18
SAFE FAST DURABLE AFFORDABLE Installation and Operation Manual 2016 Edition for The LIMBSAW Company www.Limbsaw.com Copyright 2013 The LIMBSAW Company OPMAN-Limbsaw_CE-2016

SAFE FAST DURABLE AFFORDABLE
Installation and Operation Manual
2016 Edition for The LIMBSAW Company
www.Limbsaw.com
Copyright 2013 The LIMBSAW Company
OPMAN-Limbsaw_CE-2016

CUSTOMER PREPARATION CHECKLIST
□ Verify packaging for all contents.
□ Follow assembly and installation carefully, do not proceed if you have any questions.
□ Contact The LIMBSAW Company with any questions you have regarding assembly or installation.
□ Ensure that any and all fasteners are secured.
□ Operators have read all Safety & Operation sections of this manual and understand the safe and proper use of the equipment.
□ I understand that unauthorized alteration voids the warranty.
WARNINGOSHA, ASABE, SAE and ANSI standards require the use of protective guards at all times for non-agricultural use. The LIMBSAW Company strongly recommends that such guards should be used to minimize risk of property damage, serious bodily injury or
even death from object hazards or by contacting rotating parts, i.e. driveline, tires, etc.
OSHA STD 1928.57: GUARDING OF FARM FIELD EQUIPMENT. CSA Z432-04 (R2009): SAFEGUARDING OF MACHINERY. BS EN 953:1997+A1:2009: SAFETY OF MACHINERY; GUARDS. General requirements for the design and construction of fixed and movable guards
Model Number: ______________________________________________
Serial Number: ______________________________________________
Do not remove this checklist from the Operator’s Manual.It is the responsibility of the owner to complete the procedures listed above.
2
European Union Statement of Compliance
The CE mark is affixed to the Limb Saw product to confirm compliance with the following European Community Standards and Directives:
BS EN ISO 12100: SAFETY OF MACHINERY - GENERAL PRINCIPLES FOR DESIGN – 2010 ; RISK ASSESSMENT AND RISK REDUCTION .
This equipment conforms with the protection requirements of Council Directives 2006/42/EC on the approximation of the laws of the Member States relating to Safety of machinery.

Installation & Operation Manual
Table of Contents
Customer Preparation Checklist . . . . . . . . . . . . . . . . . . . . . . . . . . . . . . . . . . . . . . . . . . . . . . . . . . . 2Welcome . . . . . . . . . . . . . . . . . . . . . . . . . . . . . . . . . . . . . . . . . . . . . . . . . . . . . . . . . . . . . . . . . . 4Using This Manual . . . . . . . . . . . . . . . . . . . . . . . . . . . . . . . . . . . . . . . . . . . . . . . . . . . . . . . . . . . . 4
Owner Assistance . . . . . . . . . . . . . . . . . . . . . . . . . . . . . . . . . . . . . . . . . . . . . . . . . . . . . . . . . . . . . . . . 4 Customer Service . . . . . . . . . . . . . . . . . . . . . . . . . . . . . . . . . . . . . . . . . . . . . . . . . . . . . . . . . . . . . . . . . 4
Safety . . . . . . . . . . . . . . . . . . . . . . . . . . . . . . . . . . . . . . . . . . . . . . . . . . . . . . . . . . . . . . . . . . . . 5 Safety Alert Symbols. . . . . . . . . . . . . . . . . . . . . . . . . . . . . . . . . . . . . . . . . . . . . . . . . . . . . . . . . . . . . . . 5 Signal Words. . . . . . . . . . . . . . . . . . . . . . . . . . . . . . . . . . . . . . . . . . . . . . . . . . . . . . . . . . . . . . . . . . . . 5 High Pressure Fluids Hazard . . . . . . . . . . . . . . . . . . . . . . . . . . . . . . . . . . . . . . . . . . . . . . . . . . . . . . . . . 7 Chain Saw Safety . . . . . . . . . . . . . . . . . . . . . . . . . . . . . . . . . . . . . . . . . . . . . . . . . . . . . . . . . . . . . . . . 7 Safety Labels . . . . . . . . . . . . . . . . . . . . . . . . . . . . . . . . . . . . . . . . . . . . . . . . . . . . . . . . . . . . . . . . . . . . 8
Shipped Container Contents . . . . . . . . . . . . . . . . . . . . . . . . . . . . . . . . . . . . . . . . . . . . . . . . . . . . . 9Assembling The Saw . . . . . . . . . . . . . . . . . . . . . . . . . . . . . . . . . . . . . . . . . . . . . . . . . . . . . . . . . . 9Installing The Receiver . . . . . . . . . . . . . . . . . . . . . . . . . . . . . . . . . . . . . . . . . . . . . . . . . . . . . . . . . 10Mounting The Saw . . . . . . . . . . . . . . . . . . . . . . . . . . . . . . . . . . . . . . . . . . . . . . . . . . . . . . . . . . . . 10Operational Guidelines . . . . . . . . . . . . . . . . . . . . . . . . . . . . . . . . . . . . . . . . . . . . . . . . . . . . . . . . 11Operating Position . . . . . . . . . . . . . . . . . . . . . . . . . . . . . . . . . . . . . . . . . . . . . . . . . . . . . . . . . . . . 11Chain Tensioning . . . . . . . . . . . . . . . . . . . . . . . . . . . . . . . . . . . . . . . . . . . . . . . . . . . . . . . . . . . . . 11
Chain Tensioning Procedure. . . . . . . . . . . . . . . . . . . . . . . . . . . . . . . . . . . . . . . . . . . . . . . . . . . . . . . . . 12
Automatic Chain Oiling System . . . . . . . . . . . . . . . . . . . . . . . . . . . . . . . . . . . . . . . . . . . . . . . . . . . 12 Initial Operation. . . . . . . . . . . . . . . . . . . . . . . . . . . . . . . . . . . . . . . . . . . . . . . . . . . . . . . . . . . . . . . . . 12
Using Your LIMBSAW . . . . . . . . . . . . . . . . . . . . . . . . . . . . . . . . . . . . . . . . . . . . . . . . . . . . . . . . . . 13 Removal of LIMBSAW during Transportation . . . . . . . . . . . . . . . . . . . . . . . . . . . . . . . . . . . . . . . . . . . . . 13
Replacement Parts . . . . . . . . . . . . . . . . . . . . . . . . . . . . . . . . . . . . . . . . . . . . . . . . . . . . . . . . . . . . 14Warranty Information . . . . . . . . . . . . . . . . . . . . . . . . . . . . . . . . . . . . . . . . . . . . . . . . . . . . . . . . . . 15References . . . . . . . . . . . . . . . . . . . . . . . . . . . . . . . . . . . . . . . . . . . . . . . . . . . . . . . . . . . . . . . . . 16
This manual contains the recommended installation instructions and operational safety guidelines. Please completely familiarize yourself with these instructions and safety guidelines to minimize chances of injury and to increase
professional results regarding your LIMBSAW and its use.
WARNING:If you do not understand any part of the instructions and precautions in this manual, please contact your local LIMBSAW dealer or representative, CONTACT US thru the www.Limbsaw.com website, or call 1-580-272-3194 BEFORE beginning installation or operation.
WELCOMELIMBSAW was invented by Wendell McCracken of Pauls Valley, Oklahoma. A retiree with a Master’s degree in Electrical Engineering, Wendell and his wife Donna raised eight children on their 250 acre pecan and cattle farm where tree trimming was an ongoing family chore.
Having invented and patented items his whole life, Wendell came up with the LIMBSAW after his children moved away and left pruning to him and his wife. Far from his first invention, Wendell has worked on radar systems for the B-52 Hustler project and several other patents relating to phone systems and ”down hole” measuring devices. He has even worked on armored bullet-proof cars and, most recently, built his own airplane.
Your LIMBSAW has been designed with care and built by skilled workers using quality materials. Proper maintenance and safe operating practices outlined in this manual will help you get years of superb use and excellent results from the LIMBSAW.
REMEMBER SAFETY FIRST!
Be Alert - Eliminate unsafe habits and risky behavior, recognize hazards as they exist and read and follow
the Operator’s Manual for your LIMBSAW and your tractor!
Application
Using hand-held chainsaws, bow saws, or pole saws while standing in the bucket of a tractor or on a ladder can be an accident waiting to happen. The LIMBSAW drastically reduces the risk of injury by eliminating these common practices. Limbs fall in front of the loader while you sit in the safety of your tractor seat. In addition, the danger of chainsaw kickback is virtually eliminated. And, the ability to reverse the motor can provide needed help to back the saw out in case of a pinch.
• Mounts directly to front-end loader of your tractor, skid-loader or backhoe and is easily attached by one person.
• Quieter, safer and easier to use than a hand-held chainsaw.
• Reversible motor helps back the saw out of a pinch.
• Equipped with a self-oiling system.
• Easy-access, built-in chain tensioning system.
• Trims limbs up to 8’ higher than your loader can reach.
USING THIS MANUALThis Operation Manual is designed to help familiarize you with safety, operation and adjustments. Read this manual and follow the recommendations to help ensure safe and efficient operation.
The information contained within this manual was current at the time of printing. Your model may vary in design and configuration from those shown in this manual.
Some parts may change slightly to assure you of the best performance.
To order a new Manual or Parts contact The LIMBSAW Company.
Your LIMBSAW has an instructional video available online as well as this Operation Manual in PDF format. Both have been designed to assist you in achieving optimal results with your LIMBSAW.
The Operation Manual is a compilation of engineering data and field experience, and contains general information for adjustments and operation as every situation varies to usage, and location specifics; with experience using the LIMBSAW and this manual, you should be able to find the right procedures that is perfectly suitable to your needs.
Terminology
“Right” or “Left” as used in this manual is determined by facing forward in the direction the machine will operate while in use unless otherwise stated.
Owner Assistance
If customer service, parts or repair is required, contact The LIMBSAW Company to reach our trained personnel who will assist you with repair parts and equipment needed to service your LIMBSAW. The parts on your LIMBSAW have been specifically designed and should only be replaced with genuine LIMBSAW parts. Therefore, should your LIMBSAW require replacement parts contact our support personnel.
Customer Service
The LIMBSAW Company wants you to be satisfied with your new LIMBSAW. If for any reason you do not understand any part of this manual or are not satisfied with the service required, the following actions are suggested:
Contact our Customer Service Department. We will respond within 24 hours; usually much more quickly. You may contact our Customer Service by calling 1-580-272-3194 during our normal business hours (Monday thru Friday 8am to 5pm CST). After hours or weekend support, simply leave a voice message for a specialist. He or she will be automatically notified to call you back promptly.
For further assistance: contact us via the web: http://www.limbsaw.com/
Or you may contact us in writing at:
The LIMBSAW Company2701 36th Ave. SE
Norman, OK 73026
4
Safety Alert Symbols
The SAFETY ALERT SYMBOL indicates there is a potential hazard to personal safety involved and extra safety precaution
must be taken. When you see this symbol, be alert and carefully read the message that follows it. In addition to design and configuration of equipment, hazard control and accident prevention are dependent upon the awareness, concern, prudence and proper training of personnel involved in the operation, transport, maintenance and storage of equipment.
Owner/operator can prevent and is responsible for accidents or injuries occurring to other people, themselves, and/or property and equipment.
Thoroughly read and understand the operator’s manual, references and other material supplied with the LIMBSAW and tractor. If the operator cannot read English, it is the owner’s responsibility to explain this material to them. This publication is available as a special request in other languages.
Refer to the “Safety Label” section, read all instructions noted on them.
We strongly recommend that children are not allowed to operate machinery. Do not allow untrained people to operate or service equipment.
Operator Safety• Operator must be familiar with these instructions and functions of the
LIMBSAW and tractor before use. • Operate only with tractor, skid-loader or backhoe equipped with ROPS
and seat belts.• Operate implement from the Driver’s seat only.• Disengage the hydraulic pump, stop the engine and be sure all
equipment is stopped before dismounting from tractor. Dismounting from a moving tractor could cause serious injury or death.
Machinery Safety• Do not leave tractor and/or LIMBSAW unattended while
it is running.• Inspect both the tractor and the LIMBSAW before you operate. Be
sure hardware is tight. Repair or replace damaged, badly worn, or missing parts.
• Be sure guards and shields are in good condition and secured before operating the implement. Make any necessary adjustments before operation.
• Do not allow anyone to stand in front of the tractor or under the implement during operation.
• Make sure all persons are clear of the working area. Stop machine if anyone enters the area. Never carry passengers and keep pets, livestock and bystanders away.
• Inspect the area where the equipment is to be used and remove all objects prior to operating the LIMBSAW and tractor.
• Disengage hydraulic pump, fold and secure boom during travel, remove from vehicle when transporting vehicle or not in use.
• Only operate during daylight or with good artificial light.
DANGER: AVOID OPERATING EQUIPMENT NEAR OVERHEAD
POWER LINES! The required minimum safe distances (clearance) from overhead power lines is 10 ft. Contact with electrical connections could result in injury or death and equipment damage. Never touch downed power lines.
• Watch out for wires and other obstacles when raising implement. Have a qualified electrician de-energize powerlines within your work area prior to operation. Contact with electrical connections could result in injury or death and equipment damage.
WARNING: AVOID INJURY FROM FALLING OBJECTS! Recognize the
hazards associated with working near overhead obstructions. Your vehicle should be fitted with an overhead guard to offer protection from the impact of falling limbs and branches.
• Slow down and use care when approaching blind corners or other objects that obscure vision. Remember that the LIMBSAW extends beyond the front of the loader and requires additional clearance in front of the loader. Do not turn sharply. Use additional CAUTION when turning or operating under adverse surface conditions.
• Use care when reversing. Look behind and down before backing up to be sure of a clear path.
• If you hit an unexpected object or if abnormal vibration occurs, stop the machine and inspect it. Make repairs before resuming operation of equipment. Keep LIMBSAW properly maintained and in good working order.
Practice Safe MaintenanceUnderstand procedures before starting any work. Use proper tools, and equipment, refer to this Operation Manual for additional information.• Work in a clean dry level area.• Check all fluid levels on the tractor before operation.• If you need to refill fuel or oils wait approximately one hour for these
fluids to cool. • Lower the implement to the ground, put the tractor into park, turn off
engine and remove key before performing any maintenance.• Allow implement to cool completely.• Even with the engine turned off, hydraulic systems and mechanical
systems can fail or movement of levers can cause equipment to drop unexpectedly causing severe injury or death.
• Do not grease or oil implement while it is in operation.• Inspect all parts. Make sure parts are in good condition and installed
properly.• Remove build-up of grease, oil or debris.• Remove all tools and unused parts from implement before operation.• Never tamper with safety devices. Check their proper operation
regularly.
NOTE: Provides helpful information to the operator.
IMPORTANT: Indicates failure to observe may cause damage to equipment.
WARNING: Indicates a potentially hazardous situation which, if not avoided, could result in death or serious injury, and includes hazards that are exposed when guards are removed. It may also be used to alert against unsafe practices.1
CAUTION: Indicates an imminently hazardous situation, which, if not avoided, may result in minor or moderate injury. It may also be used to alert against unsafe practices. 1
DANGER: Indicates an imminently hazardous situation, which, if not avoided, will result in death or serious injury. This signal word is limited to the most extreme situations, typically for machine components that, for functional purposes cannot be guarded. 1
BE AWARE OF SIGNAL WORDS: A signal word designates a degree of level of hazard seriousness.
1. Sentry Insurance, FEMA, Owner’s and Operators Manuals for Farm Equipment, Sentry Insurance, Stevens Point, WI, revised Management Bulletin No. 112, 90-42; March 2007, pp S-2.
SAFETY
5
6
Emergency Preparedness
• Keep a fire extinguisher on your tractor and check the expiration date periodically!
• Keep a well stocked first aid kit on your tractor.
• Save In Case of Emergency ( I.C.E ) numbers on your cell phone (including doctors, hospital and 911 services).
• Keep I.C.E. numbers next to a home or office phone.
Keep Riders off Machinery
• Only allow the operator on the machine. Keep riders off!
• Riders may obstruct the operator’s view resulting in the tractor being operated in an unsafe manner.
• Riders on the tractor or LIMBSAW may be struck by foreign objects or thrown off the machine causing serious injury.
• Never allow children to operate equipment.
Wear Protective Equipment
• Protective clothing and equipment should be worn.
• Wear clothing and equipment appropriate for the job. Avoid loose fitting clothing to avoid entanglement with moving parts.
• Keep hands, feet, clothing, and long hair or anything worn that can be caught away from power-driven parts.
• Prolonged exposure to loud noise can cause hearing impairment or hearing loss. Wear suitable hearing protection such as earmuffs or earplugs.
• Operating equipment requires the full attention of the operator.
• Avoid wearing radio headphones, MP3 players or using cell phones while operating equipment.
Transporting & Towing Loads Safely
• Comply with state and local laws.
• Maximum Travel speed for implement is 20 mph. DO NOT EXCEED!
• Never travel at a speed which does not allow adequate control of steering and stopping.
• Sudden braking can cause a towed load to swerve and upset.
• Reduce speed if towed load is not equipped with brakes.
• IMPORTANT! Do not tow any load that is more than double the weight of the tractor.
• Stopping distance increases with speed and weight of the towed load. Travel slowly and allow extra time and distance to stop.
• Transport only with clean reflectors, SMV signage and working lights.
• Ensure that the implement components are in “up” or “Travel” position before moving. Always remove LIMBSAW from vehicle before transport.
• Lower the implement to “field position” when ready to use. This keeps the load pulling below the center of gravity.
Avoid Tipping
• Danger of tipping is increased greatly with tires are set in narrow tread setting and driving at a high rate of speed.
• LIMBSAW weight (based on model) plus 2505 pounds of water weight (8.35 x 300 gallons) must not exceed combined weight of tractor and operator. If the LIMBSAW + water exceeds this weight then refer to the tractor’s manufacturer’s recommendations for wheel weights or counterweights for added stability when operating with LIMBSAW.
Use Caution Around Hydraulic Systems
• Worn, lose or malfunctioning hydraulic hoses can cause highly pressurized oil to escape, potentially causing great harm to humans or equipment. Search for leaks with a piece of cardboard. Protect hands and body from high pressure fluids.
• Keep Hydraulic hoses out of direct sunlight and in a controlled climate during storage periods to prevent deterioration and increase hose life.
• Avoid High-Pressure Fluids. Escaping fluid under pressure can penetrate the skin causing serious injury. Avoid the hazard by relieving pressure before disconnecting hydraulic or other lines. Tighten all connections before applying pressure.
Use Safety Lights and Devices
• Slow moving tractors, self-propelled equipment, and towed implements can create a hazard when driven on public roads. They are difficult to see, especially at night.
• Flashing WARNING lights and turn signals are recommended.
• Use lights and devices provided with the machinery.
Tire & Wheel Safety
• Read and understand any manufacturer’s warning contained in literature or molded into the tire sidewall before servicing tires.
• Only use specialized tools as recommended by tire suppliers for mounting or dismounting tires.
• Explosive separation of a tire and rim parts can cause serious injury or death.
• Do not attempt to remove a tire from the rim without removing air pressure as this may cause serious injury or death.
• Check tires for low pressure, bulges (bubbles), cuts, damaged rims or missing lug bolts and nuts.
• Do not re-inflate a tire that has been operated in a run-flat or under inflated condition (80% or less than recommended pressure). Demount and inspect tire and rim parts before re-inflating.
Periodically, inspect the equipment’s tires:
• Inspect inside of tire for loose cords, cuts, penetrating objects or other casing damage.
• Inspect valve cores. Replace valve cores if damaged or leaking.
• Lubricate with only approved tire mounting lubricant or mild vegetable oil soap solution. Do not use anti-freeze, silicones or petroleum base lubricants as these will damage tires.
• Un-repairable tires should be destroyed and replaced with tire having the same rim diameter designation and suffix letters.
• Do not mount or use damaged tires or rims.
• Check wheel hardware for tightness. Loose wheel nuts may cause instability resulting in an accident that may result in serious injury. Perform this check often during the first 100 hours of operation.
• Do not attempt to mount a tire without proper equipment or experience in performing this operation.
• Always maintain proper tire pressure. Do not over inflate above the recommended pressure. Low pressure may cause loss of control during operation while on slopes or wet/slick surfaces.
SAFETY
SAFETY
Tire & Wheel Safety (cont.)
• Never attempt to weld or heat a wheel and tire assembly. Heat increases air pressure resulting in tire explosion causing serious injury or death. Welding can impair the structural integrity by weakening or deforming the wheel.
• To safely inflate tires use a clip-on chuck and extension hose long enough to allow you to stand to one side. DO NOT STAND or SIT IN FRONT OF or OVER the tire assembly.
• Never use a tire as a step as the tire may roll and cause serious injury.
• Most agricultural tire, wheel, hub and spindles have a maximum speed of 25 mph.
Avoid High Pressure Fluids Hazard
It is impossible to overemphasize the importance of implementing and adhering to safe practices when working with pressurized fluids, and components in hydraulic & pneumatic systems. A fluid system failure can result in equipment damage, production loses, personal injury, or even death.
CAUTION: Avoid injury! Escaping fluid under high pressure
can penetrate the skin and cause serious injury. A pinhole leak in any portion of the hydraulic system while pressurized can puncture clothing such as gloves, coveralls and penetrate skin from a distance of as much as four inches.
Avoid the hazard by relieving the pressure before connecting hydraulic or other lines otherwise the connectors will not lock safely.
Wear protective equipment such as gloves, long sleeves and safety glasses or goggles.
The LIMBSAW Company highly recommends that a skilled mechanic familiar with hydraulic safety should check hydraulic hoses for leaks while pressurized when leaks cannot be detected while not under pressure.
Run a piece of cardboard along the hose – NOT BODY PARTS! If the hydraulics need to be activated for any reason during the work, the mechanic should step back a safe distance, then signal the operator to start the machine.
Major areas for maintaining safe conditions and efficient operations with regard to fluid systems:
• Inspecting hoses and components before starting machinery and draining pressure from the hydraulic lines before inspecting them for leaks. Most hydraulic leaks can be detected without the need to pressurize the lines. Even if the machine has been shut off, operators need to ensure that the pressure has been relieved from the hoses.
• Replace worn hoses, any connectors or components with the recommended manufacturer’s replacement parts that meet required specifications for safe operation.
• Tighten all connectors before applying pressure. Follow proper hose assembly and routing guidelines to prevent premature failures and promote hose safety.
• Keep Hydraulic hoses out of direct sunlight and in a controlled climate during storage periods to prevent deterioration and increase hose life.
If an accident occurs seek immediate medical treatment! Any fluid injected into the skin must be surgically removed within a few hours or gangrene may result. If your Doctor is unfamiliar with this type of injury, reference a knowledgeable medical source.
Your Tractor, Skidloader, Backhoe (vehicle)
• It is important that you completely understand and follow all safety precautions listed in your tractor, skidloader, backhoe or other vehicle manual. Check with your LIMBSAW dealer to be sure that the LIMBSAW will be compatible with your vehicle. Your ability to drive and maneuver this vehicle and its front end loader in a safe, familiar, and professional manner is directly related to your safety and the professional results you will obtain with your saw.
• Cuts are made by lowering the loader and/or rotating the bucket in a skilled manner. Uneducated driving of your vehicle and use of its loader may cause serious or fatal injury to the operator and bystanders, damage your LIMBSAW beyond immediate, simple repairs, or damage your vehicle.
• Placing too much down pressure on the branch while you are making a cut could result in damage to the saw. Remember, the mechanics and the weight of your saw are what make the cut.
• Re-read and familiarize yourself with all of the safety and operation instructions in your vehicle manual before installing and operating the LIMBSAW on your loader.
IMPORTANT: Read the entire LIMBSAW Installation and Operation Manual
and review the information on the limbsaw.com website before installing and operating your unit. Also re-read both your vehicle manual and your LIMBSAW Installation and Operation Manual at the beginning of each season to maintain your knowledge of this equipment. Periodically check the website of both your vehicle manufacturer and LIMBSAW for recent updates, engineering changes, improvements on equipment, and new videos. Parts and their usage, and the operation of your equipment may change over time. Serious or fatal injury can occur without maintaining proper familiarity with all your equipment.
The Operator
To minimize the chance of injury the operator of this cutting device must be physically capable, mentally aware and not under the influence of any mind influencing substance (drugs, alcohol, etc.) which could alter operator’s vision, dexterity or judgment, this includes the influence of fatigue.
• Do not operate your vehicle or saw if you are tired. Operators that are tired or fatigued should immediately discontinue the use of this unit. Lack of concentration due to fatigue may cause loss of control of device leading to possible injury to operator and damage to equipment.
• If you think you have any condition that might impair your physical or mental ability to operate this machine please check with your doctor before beginning use.
Chain Saw Safety
• Look for nails, spikes or other metal in the tree before cutting.
• Disengage the saw when Traveling on rough or uneven terrain.
• Proper personal protective equipment must be worn when operating the saw, which includes hand, foot, leg, eye, face, hearing and head protection.
• Do not wear loose-fitting clothing.
• Be careful that the trunk or tree limbs will not bind against the saw.
• Watch for branches under tension, they may spring out when cut.
• Potential injuries can be minimized by using proper personal protective equipment and safe operating procedures.
7
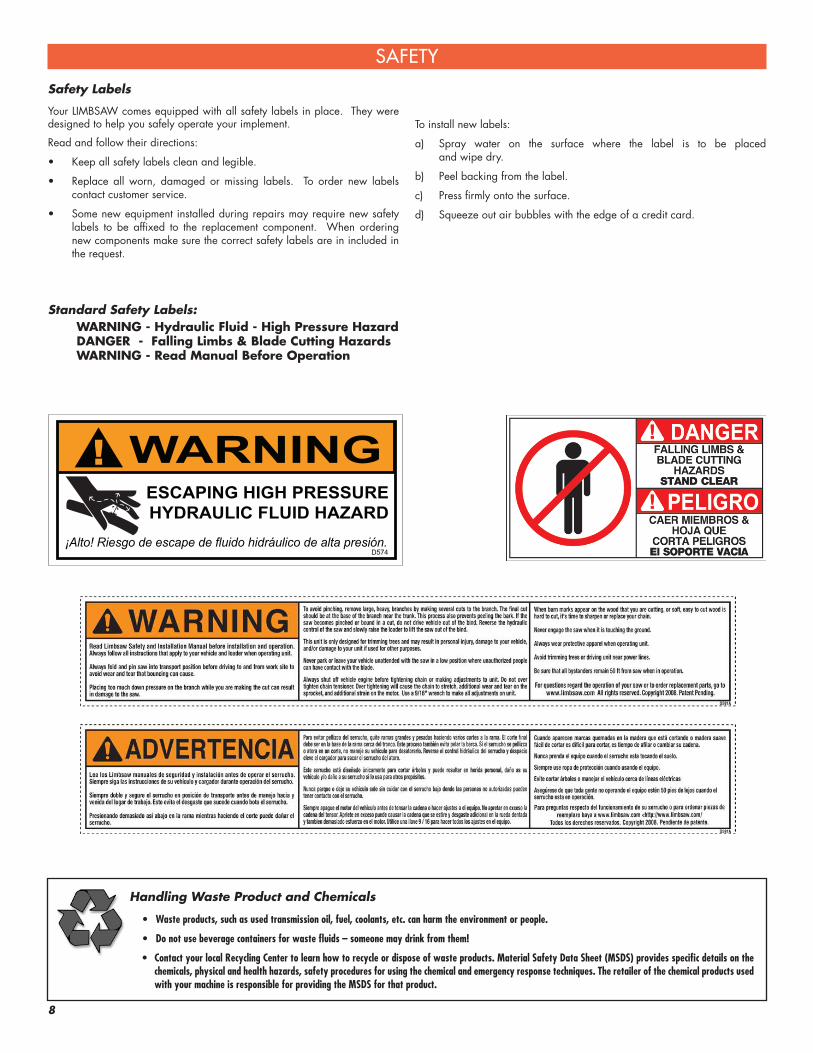
Safety Labels
Your LIMBSAW comes equipped with all safety labels in place. They were designed to help you safely operate your implement.
Read and follow their directions:
• Keep all safety labels clean and legible.
• Replace all worn, damaged or missing labels. To order new labels contact customer service.
• Some new equipment installed during repairs may require new safety labels to be affixed to the replacement component. When ordering new components make sure the correct safety labels are in included in the request.
To install new labels:
a) Spray water on the surface where the label is to be placed and wipe dry.
b) Peel backing from the label.
c) Press firmly onto the surface.
d) Squeeze out air bubbles with the edge of a credit card.
SAFETY
Standard Safety Labels:WARNING - Hydraulic Fluid - High Pressure HazardDANGER - Falling Limbs & Blade Cutting HazardsWARNING - Read Manual Before Operation
Handling Waste Product and Chemicals
• Wasteproducts,suchasusedtransmissionoil,fuel,coolants,etc.canharmtheenvironmentorpeople.
• Donotusebeveragecontainersforwastefluids–someonemaydrinkfromthem!
• ContactyourlocalRecyclingCentertolearnhowtorecycleordisposeofwasteproducts.MaterialSafetyDataSheet(MSDS)providesspecificdetailsonthechemicals,physicalandhealthhazards,safetyproceduresforusingthechemicalandemergencyresponsetechniques.TheretailerofthechemicalproductsusedwithyourmachineisresponsibleforprovidingtheMSDSforthatproduct.
8" x 4.5"RED & BLACK PRINT
ON WHITE VINYL
8
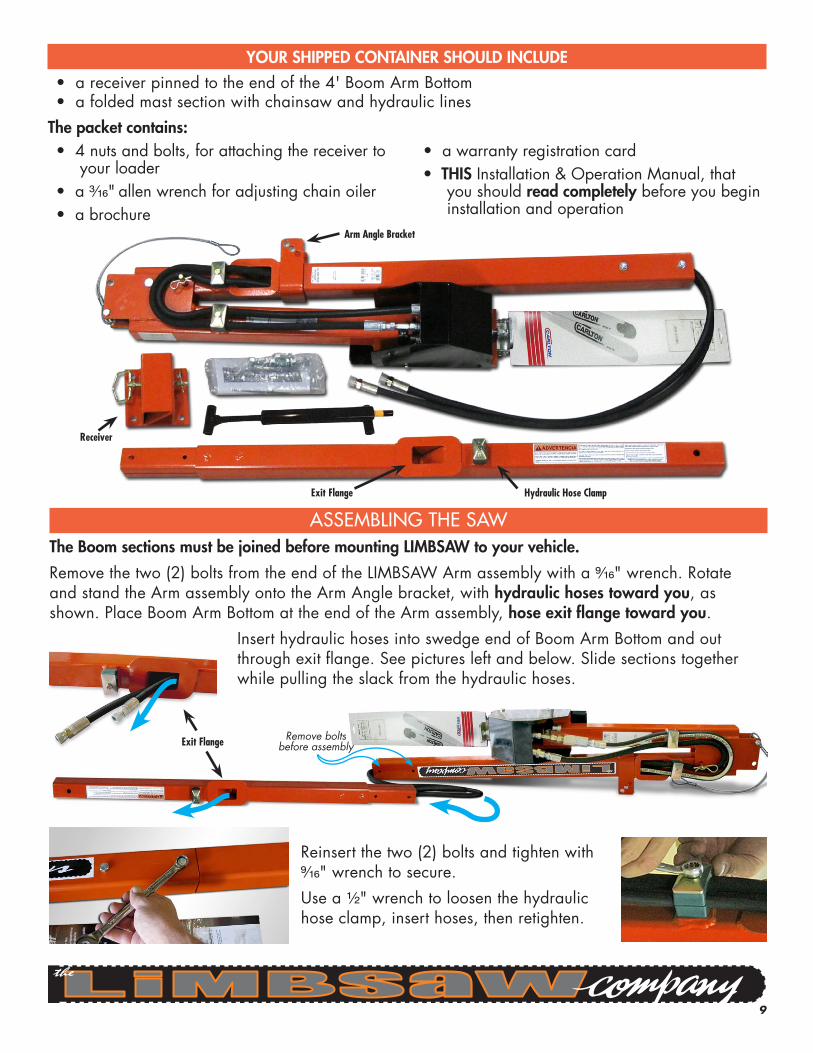
ASSEMBLING THE SAWThe Boom sections must be joined before mounting LIMBSAW to your vehicle.
Remove the two (2) bolts from the end of the LIMBSAW Arm assembly with a 9/16" wrench. Rotate and stand the Arm assembly onto the Arm Angle bracket, with hydraulic hoses toward you, as shown. Place Boom Arm Bottom at the end of the Arm assembly, hose exit flange toward you.
Insert hydraulic hoses into swedge end of Boom Arm Bottom and out through exit flange. See pictures left and below. Slide sections together while pulling the slack from the hydraulic hoses.
Reinsert the two (2) bolts and tighten with 9/16" wrench to secure.
Use a ½" wrench to loosen the hydraulic hose clamp, insert hoses, then retighten.
ExitFlange Remove bolts before assembly
9
YOUR SHIPPED CONTAINER SHOULD INCLUDE• a receiver pinned to the end of the 4' Boom Arm Bottom• a folded mast section with chainsaw and hydraulic lines
The packet contains:• 4 nuts and bolts, for attaching the receiver to
your loader• a 3/16" allen wrench for adjusting chain oiler• a brochure
• a warranty registration card• THIS Installation & Operation Manual, that
you should read completely before you begin installation and operation
ArmAngleBracket
ExitFlange
Receiver
HydraulicHoseClamp

MOUNTING THE SAWBefore mounting the LIMBSAW into the receiver, rotate your bucket so the receiver is positioned as shown. Your saw weighs about 86 lbs, making it easy to mount. Lift the saw and insert the end into the receiver until it hits the stop. Pin and clip to secure. The saw can be easily removed and stored when not in use.
Because every tractor has its hydraulic hookups in a different location, your LIMBSAW does not include the hydraulic lines that attach to the vehicle. You will need to purchase these lines with a minimum of ⅜" hydraulic hose.
Measure from the auxiliary hookups of your vehicle to the hydraulic hookups on your saw. Allow enough slack in your lines for the full rotation of your bucket.
The bottom right picture shows the saw in the Travel position. When driving to and from your work site, always keep the saw folded and pinned to protect it from the wear and tear that bouncing can cause. Always be aware of power lines and other hazards that may be hanging in your path.
Travel Position
10
INSTALLING THE RECEIVER
Install the receiver to the back of your loader, at the top, on the right side.
Positioning it at the top of the bucket, as shown in this picture, will afford you an extra two feet of reach when operating your saw.
When installing the receiver with the bolts, use a ½" drill bit. Receiver can also be welded in place. Loaders which have rolled or folded lips may require a spacer to achieve proper alignment. Check alignment before proceeding with installation.
Bolted on
Welded on Spacer

OPERATING POSITIONUnfold saw into operating position by removing pin that holds saw arm closed in Travel position. Make sure that your loader bucket is rotated enough to allow saw arm to swing and come forward without hitting the ground. Lift saw arm, then reinsert the pin through the Shock Indicator and Safety Cable into the bottom hole of the Arm Angle Bracket using the pin you just removed.
The bottom hole will be used for most of the cuts. Cutting branches close to the ground or very high will require the saw arm and mast to be straighter, use the bottom hole closest to the loader. If you are making cuts that require more angle, use the top hole closest the saw. Be sure to always pin both the shock indicator and the safety cable.
IMPORTANT: Inspect the shock indicator for damage prior to operation. Be sure it is in good condition and shows no signs of damage. Check indicator shaft to be sure it is screwed in securely. Never operate the LIMBSAW with a damaged shock indicator, OR, without the safety cable properly attached.
See additional information about using your LIMBSAW on page 13: “USING YOUR LIMBSAW”
OPERATIONAL GUIDELINES
CAUTION: Never drive your vehicle while the chain saw is in the open
position or is spinning. Always disengage the hydraulics, and fold the saw into the Travel position. Driving your vehicle with the chainsaw in the open position can result in bending the mast and pins. Always operate your LIMBSAW from the safety of your vehicle seat. Always turn off your vehicle engine, fold and pin your LIMBSAW into the Travel position, before parking your vehicle for the day. Remove LIMBSAW from vehicle when transporting the vehicle.
DANGER: Always turn off your vehicle engine before mounting or
removing unit from loader.
NOTE: If you are unsure or have concerns about installing and using your LIMBSAW, have your LIMBSAW dealer or representative demonstrate the proper installation and use before you attempt it yourself.
WARNING: Never use your LIMBSAW indoors or without all safety guards
and cables properly attached.
CAUTION: Do not use saw mast to lift or move tree limbs. Using the mast
for lifting will damage the equipment and void warranty.
NOTE: REVIEW THE INSTRUCTIONS ON THE FOLLOWING PAGE FOR CHAIN TENSIONING PROCEDURE. Correct chain tension is vital for the safety and correct operation of your LIMBSAW.
Always make sure the hexagonal nuts for the chain guard cover are tightened securely after tensioning the chain in order to secure the bar.
During operation, continually monitor the tension of the chain and tightness of the nuts as you would any other chainsaw. If the chain becomes loose while in operation, shut off vehicle engine and then tighten the chain. Allow chain to cool before attempting adjustments.
WARNING: Never make adjustments to any part of your LIMBSAW while
your vehicle engine is running. Attempting to make adjustments during operation can cause serious injury or death.
11
CAUTION: Thoroughly read and understand the operation manual, references and other material supplied with the LIMBSAW and tractor prior to
operating this equipment. Failure to do so can cause injury or death.
Reinsert Pin
Remove Pin
Lift Saw Arm

AUTOMATIC CHAIN OILING SYSTEM
The LIMBSAW is built with an automatic chain oiling system to insure the proper lubrication to the chain and chain bar. This unit has a flow regulator valve installed and is preset to flow at 7 GPM. This valve ensures manufacturer’s optimum flow rate for the Parker Motor that is used in the LIMBSAW.
FOR INITIAL OPERATION:Lightly cover the chain and chain bar of the LIMBSAW with oil to lubricate the chain. Operate the LIMBSAW for about an hour, then check the poly tubing for oil. This will allow time for the regulator to prime and begin automatic lubrication. Automatic oiling is
functioning when oil is visible in the clear poly tubing.
In the event that the preset, self-oiler needs adjustment, remove black outer motor cover to expose oiler. Push up on the blue push lock ring as shown in the photo to the left, and carefully remove clear poly oil line from oiler. Insert 3/16" allen wrench which was provided in your Manual packet,
into blue push lock as shown in photo to the right. To increase flow, turn counter clockwise. To decrease flow turn clockwise. Use extreme caution using no more than ¼ turns to make adjustment, checking flow with each adjustment. Reinsert poly tubing into blue push lock.
12
Oil Visible in Clear Poly TubingIndicates Self-Oiling
is Active
CHAIN TENSION
NOTE: SEE CHAIN TENSIONING INFORMATION ON PREVIOUS PAGE. Do not over tighten chain. Over tightening will cause chain to stretch, cause additional wear and tear on the sprocket and additional strain on the motor, and may void warranty. When replacing chain be sure the chain, guidebar and rim sprocket match each other in gauge and pitch.
Using a 9/16" wrench, loosen 2 nuts holding the black chain guard cover with white warning sticker.Loosen locking nut as shown then adjust carriage bolt. Screw bolt “out” to tighten chain, “in” to loosen. Retighten locking nut after adjustment. Chain tension should be the same as any hand held chainsaw. Re-tighten guard cover when adjustment is complete.Never operate the saw with the chain guard cover loose or off.
Correct installation and setting of chain tensioner.
Correct chain tension.
USING YOUR LIMBSAW
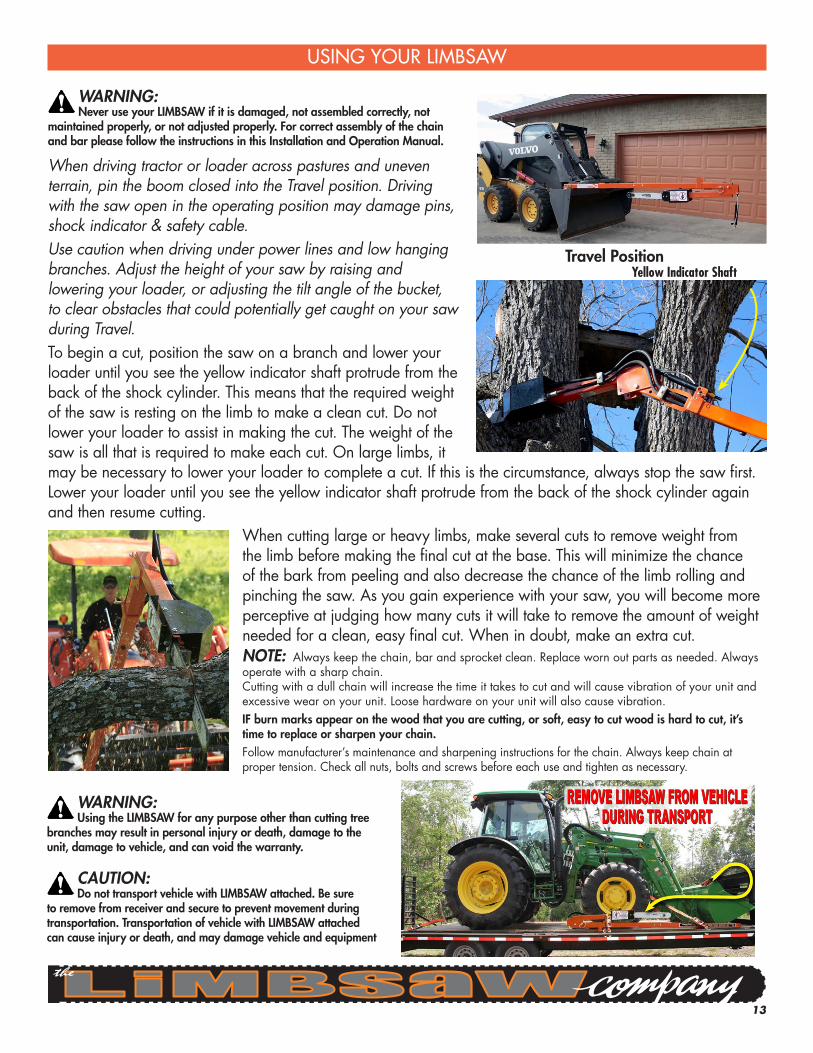
WARNING: Never use your LIMBSAW if it is damaged, not assembled correctly, not
maintained properly, or not adjusted properly. For correct assembly of the chain and bar please follow the instructions in this Installation and Operation Manual.
When driving tractor or loader across pastures and uneven terrain, pin the boom closed into the Travel position. Driving with the saw open in the operating position may damage pins, shock indicator & safety cable.Use caution when driving under power lines and low hanging branches. Adjust the height of your saw by raising and lowering your loader, or adjusting the tilt angle of the bucket, to clear obstacles that could potentially get caught on your saw during Travel.To begin a cut, position the saw on a branch and lower your loader until you see the yellow indicator shaft protrude from the back of the shock cylinder. This means that the required weight of the saw is resting on the limb to make a clean cut. Do not lower your loader to assist in making the cut. The weight of the saw is all that is required to make each cut. On large limbs, it may be necessary to lower your loader to complete a cut. If this is the circumstance, always stop the saw first. Lower your loader until you see the yellow indicator shaft protrude from the back of the shock cylinder again and then resume cutting.
When cutting large or heavy limbs, make several cuts to remove weight from the limb before making the final cut at the base. This will minimize the chance of the bark from peeling and also decrease the chance of the limb rolling and pinching the saw. As you gain experience with your saw, you will become more perceptive at judging how many cuts it will take to remove the amount of weight needed for a clean, easy final cut. When in doubt, make an extra cut.NOTE: Always keep the chain, bar and sprocket clean. Replace worn out parts as needed. Always operate with a sharp chain. Cutting with a dull chain will increase the time it takes to cut and will cause vibration of your unit and excessive wear on your unit. Loose hardware on your unit will also cause vibration. IF burn marks appear on the wood that you are cutting, or soft, easy to cut wood is hard to cut, it’s time to replace or sharpen your chain.Follow manufacturer’s maintenance and sharpening instructions for the chain. Always keep chain at proper tension. Check all nuts, bolts and screws before each use and tighten as necessary.
Travel PositionYellowIndicatorShaft
WARNING: Using the LIMBSAW for any purpose other than cutting tree
branches may result in personal injury or death, damage to the unit, damage to vehicle, and can void the warranty.
CAUTION: Do not transport vehicle with LIMBSAW attached. Be sure
to remove from receiver and secure to prevent movement during transportation. Transportation of vehicle with LIMBSAW attached can cause injury or death, and may damage vehicle and equipment
13

1. (1) D902 Decal Aluminum Limbsaw 2. (2) FM084HP Hitch Pin 1/2" X 4 - 4-1/4" 3. (1) LIMTS Limbsaw Tube Socket 4. (1) LIMA Limbsaw Arm 5. (1) LIMBABTM-P Limbsaw Boom Arm Bottom 6. (1) LIMBATOP-P Limbsaw Boom Arm Top 7. (1) LIMC Limbsaw Cover 8. (1) LIMS Limbsaw Shield 9. (1) LIMMOTOR Parker Hydraulic Motor 10. (1) LIMCHAIN Chainsaw Chain 11. (1) LIMSPROCKET Chainsaw Sprocket 12. (1) KS020200.75CR Keyway 13. (1) FM091.00SC Shaft Collar 9/16" X 1X 14. (1) LIMBAR Chainsaw Bar 15. (1) SHOCKINDR Shock Indicator 16. (1) HF6809-08-06 HYD Fit 90° 08MBoss X 06FP 17. (1) HF2602-06-06-04 HYD Fit Adaptor FEM Tee 18. (1) HF6505-06-06 HYD Fit 06MP X 06FJIC 19. (2) LIMREG Chainsaw Flow Regulator
21. (1) HF6801-06-08 HYD Fit 90° 08MBoss X 06JIC 22. (1) LIMOILER2 Chainsaw Oiler 23. (1) PTC-STR-4MP-4T RC98 PTC Fit 1/4" NPT X 1/4" 24. (1) TIUB07-BU-XXX Polyurethane Tube .25" 25. (1) HH0608MP-8MPX102 HYD Hose #6 8MP X 8MPX 26. (1) HH0608MP-6FJ-107 HYD Hose #6 8MP X 6FJX 27a. (2) HF3252-CUSHION Hose Clamp Cushions 27b. (1) HF3252-COVER Clamp Cover Plate 27c. (1) HF3252-BOLT Clamp Bolt 28. (1) S0402.50006.34-z Sheet 1/4" X 2.5" X 6-11/32" 29. (2) FM030.375SP Spring Pin 3/16" X 3/8" 30. (1) LIMBTW Limbsaw Bolt Tensioner 31. (1) LIMBGUIDE Sheet 1/4" X 1-1/2" X 3-1/2" 32. (1) S0300.47002 Sheet 3/16" X 15/32" X 2" 33. (1) 9540K61 Rubber Bumper Cone 34. (1) FB12-14x100TEKGV Bolt 12-14 X 1” TEK Galv. 35. (4) FB060.75ZPG2 Bolt 3/8" X 3/4" G2 ZP 36. (2) FB051.00BKG2FHSC Bolt 5/16" X 1" BK Flathead
37. (1) FB062.00ZPG2CB Bolt 3/8" X 2" G2ZPCB 38. (2) FB063.00ZPG5 Bolt 3/8" X 3" ZP G5 39. (1) FB063.50ZPG5 Bolt 3/8" X 3-1/2" ZP G5 40. (4) FB082.00ZPG5AT Bolt 1/2" X 2" ZP G5 41. (1) FB084.00ZPG5 Bolt 1/2" X 4" ZP G5 42. (2) FN05NYLN Nut 5/16" Nylock Insert 43. (3) FN06 Nut 3/8" ZP Hex 44. (2) FN06NYLN Nut 3/8" Nylock Insert 45. (5) FN08NYLN Nut 1/2" Nylock ZP 46. (2) FW05 Washer 5/16" ZP 47. (1) FW06LOCK Washer 3/8" ZP Locking 48. (2) FW09USS Flatwasher 9/16" ZP USS 1.5 49. (1) FW10 Arbor Shim 50. (2) FR02 Pop-Rivet 1/8" X 1/8" 51. (1) FM03AW 3/16" Allen Hex Key Wrench 52. (1) D592A Decal Limbsaw Logo 53. (1) D590 Decal Limbsaw Stand 54. (1) D591A Decal Limbsaw Warning 55. (1) LIMCABLE Safety Cable
26 25
1
2
3
9
10
4
5 6
7
8
16 17 18 19
24 2321
13 49
12 28
14
30 31 32 27b 27c 27a
33
42
44
45 48
47
46
53
52
54
15
36
41
39
38
35
34
22
11
29
LIMBSAW 2016ed. 51
40
43
50 37
REPLACEMENT PARTSAll of the components on your LIMBSAW are replaceable. Should you need a part,
please don’t hesitate to call us.
You can contact us through our website at www.limbsaw.com or by phone at (580) 272-3194.
14

Limited Warranties:The LIMBSAW Company, (LIMBSAW) 2701 36th Ave. SE, Norman, OK 73026, warrants for one (1) year from the purchase date to the original non-commercial, governmental, or municipal purchaser (“Purchaser”) and warrants for six (6) months to the original commercial or industrial purchaser (“Purchaser”) that the product purchased are free from defects in material or workmanship. LIMBSAW will replace or repair, free of charge to the original purchaser any part(s) found, upon examination at our factory, to be defective under normal use and service due to defects in material or workmanship, provided that the original purchaser:
• Notifies LIMBSAW in writing of any defect in material or workmanship within the above specified warranty period.
• Returns must be routed through an authorized LIMBSAW dealer or distributor from whom the purchase was made.
• Purchaser is responsible for cost of shipping.
In no event will LIMBSAW be held liable under this warranty unless written notice is received and failure must have occurred within the warranty period. Genuine LIMBSAW replacement parts and components will be warranted for 90 days from date of purchase, or the remainder of the original equipment warranty period, whichever is longer.
This limited warranty does not apply to any part of the product which has been subjected to improper or misintended use, negligence, alteration, modification, or accident, damaged due to lack of maintenance or use of wrong oil or lubricants, or repairs that have been made with parts other than those obtainable through LIMBSAW , or which has served its usual life. This limited warranty does not apply to any expendable item such as blades, shields, guards, or pneumatic tires, or other trade accessories since these items are warranted separately by their respective manufacturers, except as specifically noted in your Operator’s Manual.
Except as provided herein, no employee, agent, Dealer, or other person is authorized to give any warranties of any nature on behalf of LIMBSAW. Only LIMBSAW is authorized to make any representation to the purchaser concerning “normal” use and service for its product as described in the Operator’s Manual, or in authorized printed materials or stickers affixed to the product.
If after examination of the product and/or part(s) in question; LIMBSAW finds them to be defective under standard use and service due to defects in material or workmanship,
The LIMBSAW Company will:
Repair or replace the defective product or part(s); if LIMBSAW has made several reasonable number of attempts in repairing the product and/or part(s) to conform to the warranty; then
• LIMBSAW will replace part(s) or product.
• Purchaser is responsible for any labor charges exceeding a reasonable amount as determined by LIMBSAW and for returning product and/or part(s) to the Dealer, whether or not the claim is approved. Purchaser is responsible for the transportation cost for the product or part(s) from the Dealer to the factory.
• The choice of remedy shall belong to LIMBSAW. Repair or replacement are the only remedies against LIMBSAW under this limited warranty.
Limitation of Liability:
LIMBSAW disclaims any express (except as set forth herein) and implied warranties with respect to the product including, but not limited to, merchantability and fitness for a particular purpose.
LIMBSAW makes no warranty as to the design, capability, capacity, or suitability for use of the product.
This warranty shall not be interpreted to render us liable for injury or damages of any kind or nature to person or property. LIMBSAW will not be liable for any special, incidental or consequential damages based upon breach of warranty, breach of contract, negligence, strict tort liability, or any other legal theory. Such damages include but are not limited to loss of crops, loss of savings or revenue, cost of capital, loss of use of equipment, facilities or services, down time, expense or loss incurred for labor, supplies, substitute machinery, rental, and claims of third parties including customers, and injury to property.
Supplementary:
Proper venue for any lawsuits arising from or related to this limited warranty shall be only in Cleveland County, OK.
LIMBSAW may waive compliance with any of the terms of this limited warranty, but no waiver of any terms shall be deemed to be a waiver of any other term.
If any provision of this limited warranty violates any applicable law and is held unenforceable, then the invalidity of such provision shall not invalidate any other provisions.
Applicable law may provide rights and benefits to purchaser in addition to those herein.

References
1. Sentry Insurance, FEMA, Owner’s and Operators Manuals for Farm Equipment, Sentry Insurance, Stevens Point, WI, revised Management Bulletin No. 112, 90-42; March 2007, pp S-2.
2. Occupational Safety and Health Administration (OSHA), Safety for Agricultural Equipment, 29 CFR 1928.57, http://www.osha.gov/pls/oshaweb/owadisp.show_document?p_table=STANDARDS&p_id=10958.
2. Occupational Safety and Health Administration (OSHA), Chain Saw Safety, 3269-10N-05, https://www.osha.gov/Publications/3269-10N-05-english-06-27-2007.html
4. Fluid Power Safety Institute (FPSI), Avoid High-Pressure Fluids, Ref. No. SA-033, http://www.fluidpowersafety.com/fpsi_alert-33.html
Suggested References
Priefert assumes no liability for the use or misuse of information provided in the following references:
FEMA, Farm Equipment Manufacturers Association, Safety 4 Just Kids, 2008, http://www.farmequip.org/safety
Includes AG Safety Links for additional information and materials.
Farm Safety Association, Guelph, Ontario, The Safe Movement of Agricultural Equipment on the Roadway, http://www.farmsafety.ca/pages/manuals-dwnld.html
Farm Safety Association, Guelph, Ontario, Preventing Farm Incidents Caused by Moving Parts, http://www.farmsafety.ca/pages/pages/manuals-dwnld.html
Occupational Safety and Health Administration (OSHA), General Respiratory Protection, OSHA Bulletin 2011, http://www.osha.gov/dts/shib/respiratory_protection_bulletin_2011.html
Occupational Safety and Health Administration (OSHA), STD# 1926.955, Overhead lines. https://www.osha.gov/pls/oshaweb/owadisp.show_document?p_table=STANDARDS&p_id=10826
National Institute for Occupational Safety and Health (NIOSH); Occupational Safety and Health Administration (OSHA), Chainsaw Safety; https://www.osha.gov/dte/grant_materials/fy10/sh-20823-10/chainsawsafety-eng.pdf

Registration/Warranty Card
Last Name Initial First Name
Apt. Address (Number & Street)
Zip State City
Email Phone #Date of Purchase / / Place ofPurchase
Month Day Year
Serial NumberLocated on the underside of Arm assembly
Would you be interested in receiving information on special offers, discounts and new products from The LIMBSAW Company? Yes No
You can also register your LIMBSAW online at www.limbsaw.com Thank you for registering with The LIMBSAW Company.
The LIMBSAW CompanyLIMBSAW Registration2701 36th Ave. SENorman, OK 73026
Return address:Place first class
stamp here.Post Office will
not deliver without proper
postage
fold along dotted line and seal
REGISTRATION/WARRANTY CARD

Registration/Warranty Card
Last NameInitialFirst Name
Apt.Address (Number & Street)
ZipStateCity
EmailPhone #Date of Purchase / / Place of Purchase
Month Day Year
Serial NumberLocated on the underside of Arm assembly
Would you be interested in receiving information on special offers, discounts and new products from The LIMBSAW Company? Yes No
You can also register your LIMBSAW online at www.limbsaw.com Thank you for registering with The LIMBSAW Company.
The LIMBSAW CompanyLIMBSAW Registration2701 36th Ave. SENorman, OK 73026
Return address:Place first class
stamp here.Post Office will
not deliver without proper
postage
fold along dotted line and seal


