BD-ROM, DVD±R DL (DOUBLE LAYER/DUAL LAYER), DVD±R/RW, DVD-RAM, CD-R/RW DRIVE December 2008 INSTALLATION AND USERS MANUAL Model PX-B310U External USB Drive Model PX-B310SA Internal SATA Drive
Plextor and the Plextor logo are registered trademarks of Shinano Kenshi. All other licenses and trademarks are property of their respective owners.
Record Your Serial Number For future reference, record the serial number in the space provided below.
PX-B310U/ PX-B310SA Installation and Users Manual iii
FEDERAL COMMUNICATIONS COMMISSION STATEMENT This device complies with Part 15 of the FCC Rules. Operation is subject to the following two conditions: (1) This device may not cause harmful interference, and (2) this device must accept any interference received, including interference that may cause undesired operation. CAUTION: Any changes or modifications not expressly approved by the party responsible for compliance could void the user's authority to operate the equipment.
CANADIAN DEPARTMENT OF COMMUNICATIONS STATEMENT This digital apparatus does not exceed the Class B limits for radio noise emissions from digital apparatus set out in the Radio Interference Regulations of the Canadian Department of Communications. This class B digital apparatus complies with Canadian ICES-003. Cet appareil numérique de la classe B est conforme a la norme NMB-003 du Canada.
LASER INFORMATION These products have been designed and manufactured according to IEC 60825-1 on the Safety of Laser products. This product comes under “Class 1 Laser Products.” CAUTION: Use of controls or adjustments or performance of procedures other than those specified herein may result in hazardous radiation exposure. A Laser Caution Label is attached on the top of the internal drive model. The laser beam emitted from the optical pickup is visible and invisible. Accordingly: • Do not open the optical pickup housing. • Obtain service only from Plextor-authorized personnel. CAUTION: To disconnect the internal DVD/CD drive from an electrical current, pull out the computer’s power plug.
PX-B310U/ PX-B310SA Installation and Users Manual iv
Table of Contents Record Your Serial Number............................................................. iiTable of Contents.............................................................................. iv1. Getting Started............................................................................... 1
About this Manual ........................................................................... 1Meet Your Plextor DVD Rewriter................................................... 2
What the PX-B310U and PX-B310SA Do.................................. 2Features of the PX-B310U and PX-B310SA .............................. 3Minimum Configuration to Use the PX-B310U/ PX-B310SA .. 5What You Can Do with the PX-B310U or PX-B310SA............. 6
About Software................................................................................ 6Precautions....................................................................................... 8Where to Go From Here .................................................................. 9
2. Installing the PX-B310U External USB Drive .......................... 10PX-B310U Drive Features and Controls ....................................... 10
What Else Is In the PX-B310U Box .............................................. 11Save Your Box! ......................................................................... 12PX-B310U QuickStart Installation ............................................ 12
3. Installing the PX-B310SA Internal SATA Drive ...................... 15PX-B310SA Drive Features and Controls..................................... 16
Front Panel—PX-B310SA Internal Drive ................................. 16Rear Panel—PX-B310SA Internal SATA Drive....................... 17
What Else Is In the PX-B310SA Box............................................ 18Save Your Box! ......................................................................... 18
Mount the PX-B310SA Drive ....................................................... 19Record the Serial Number ......................................................... 19Mount the Drive in the Computer.............................................. 19
4. Using Your PX-B310U and PX-B310SA ................................... 24What Media to Use ........................................................................ 24
BD Media .................................................................................. 24DVD Media ............................................................................... 24DVD-RAM Media ..................................................................... 25CD-ROM Media ........................................................................ 25More About Media for Your Plextor Drive............................... 26
Table of Contents
PX-B310U/ PX-B310SA Installation and Users Manual v
Tray Loading and Operation..........................................................26Handling DVD and CD Media ..................................................27Cleaning Discs ...........................................................................27
Mounting Position..........................................................................28Playing BDs ...................................................................................28Playing DVDs ................................................................................29Writing to DVD Media ..................................................................30
Specifying +R/RW or -R/RW....................................................30Writing to CD-R and CD-RW Media ............................................30Using the Disc/Busy Indicator .......................................................30
5. Maintenance and Troubleshooting.............................................32Cleaning the your Plextor Drive ....................................................32Upgrading Firmware......................................................................33Emergency Eject ............................................................................34Troubleshooting .............................................................................35
Make Sure the Drive Is Recognized ..........................................356. Frequently Asked Questions .......................................................37Appendix A: Technical Support .....................................................39
How to Contact Plextor Technical Support ...................................40Before You E-mail or Call for Support..........................................40Returns ...........................................................................................41
Contacting Plextor’s RMA Department.....................................41Packing Your Drive ...................................................................41Shipping Your Drive to Plextor .................................................42
Appendix B: Warranty....................................................................43If You’re Outside the U.S. or Canada............................................44
vi PX-B310U/ PX-B310SA Installation and Users Manual
This page intentionally left blank.
PX-B310U/ PX-B310SA Installation and Users Manual 1
1. Getting Started Congratulations! Thank you for purchasing a Plextor® optical disc drive, a reliable, high-performance BD player and recordable DVD and CD writer, rewriter, and player. We appreciate the confidence you have shown in us. Our goal is to put you—and keep you—on the leading edge of optical disc technology.
About this Manual Please read this manual carefully and keep it handy for easy reference. Use the manual for installation, operation and troubleshooting. If your drive needs service, see your dealer or call Plextor’s Technical Support Department.
In this manual you should find all the information you need to successfully install, operate and troubleshoot your drive. If you run into a problem that doesn't seem to be covered, however, please contact us. (See “Appendix A: Technical Support” for the different ways you can reach us.) You will be connected to our friendly, helpful band of tech support engineers. What might seem like an uncooperative drive to you could very well be a 30-second fix to them. But we will never know unless you contact us.
Section 1. Getting Started
2 PX-B310U/ PX-B310SA Installation and Users Manual
Meet Your Plextor DVD Rewriter The PX-B310U External USB and the PX-B310SA are BD read and DVD ReWritable/CD ReWritable drives that provides professional quality BD reading and DVD and CD performance for writing, rewriting and reading.
What the PX-B310U and PX-B310SA Do For BDs, the PX-B310U and PX-B310SA: • Reads BD-ROM, BD-R, BD-RE, and BD-R DL media at
up to 6X speed For DVDs, the PX-B310U and PX-B310SA: • Writes DVD+R (recordable DVD, “plus” format) media at
up to 16X speed on recommended media. • Writes DVD+R DL (double layer) media at up to 8X speed. • Writes DVD-R DL (double layer) media at up to 8X speed. • Writes DVD-R (recordable DVD, “dash” format) media at
up to 16X speed on recommended media. • Writes DVD+RW (rewritable DVD, “plus” format) media
at up to 8X speed. • Writes DVD-RW (rewritable DVD, “dash” format) media
at up to 6X speed. • Writes DVD-RAM discs at up to 12X. • Reads stamped DVD discs at up to 16X. • Reads DVD-RAM discs at up to 12X.
For CDs, the PX-B310U and PX-B310SA: • Writes to CD-R (recordable CD) media at up to 48X speed. • Writes to CD-RW (rewritable CD) media at up to 32X speed. • Reads all CD-ROM and CD-R data media at a maximum of 48X
speed. • Reads CD-DA (audio) media at up to 48X speed • Reads CD-R/RW audio media at up to 40X speed.
Section 1. Getting Started
PX-B310U/ PX-B310SA Installation and Users Manual 3
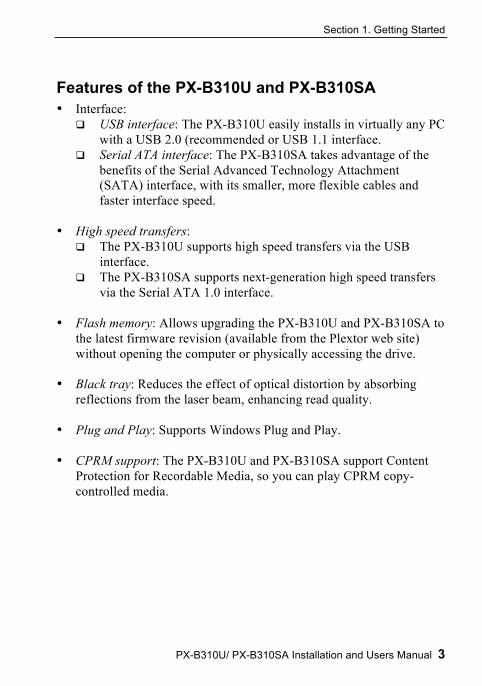
Features of the PX-B310U and PX-B310SA • Interface:
USB interface: The PX-B310U easily installs in virtually any PC with a USB 2.0 (recommended or USB 1.1 interface.
Serial ATA interface: The PX-B310SA takes advantage of the benefits of the Serial Advanced Technology Attachment (SATA) interface, with its smaller, more flexible cables and faster interface speed.
• High speed transfers:
The PX-B310U supports high speed transfers via the USB interface.
The PX-B310SA supports next-generation high speed transfers via the Serial ATA 1.0 interface.
• Flash memory: Allows upgrading the PX-B310U and PX-B310SA to
the latest firmware revision (available from the Plextor web site) without opening the computer or physically accessing the drive.
• Black tray: Reduces the effect of optical distortion by absorbing
reflections from the laser beam, enhancing read quality. • Plug and Play: Supports Windows Plug and Play. • CPRM support: The PX-B310U and PX-B310SA support Content
Protection for Recordable Media, so you can play CPRM copy-controlled media.
Section 1. Getting Started
4 PX-B310U/ PX-B310SA Installation and Users Manual
DVD Features • Lossless linking for DVD+R/RW and DVD+R DL: Allows
DVD+RW and DVD+R DL discs to be edited and still play on DVD-ROM players.
• Zero Link for DVD-R/RW, DVD-R DL: Has 0 byte gap between sessions so the discs are compatible with all players. This allows DVD-RW and DVD-R DL discs to be edited and still play on DVD-ROM players.
• Double layer and dual layer DVD discs: Reads and writes DVD+R DL (double layer) and DVD-R DL (dual layer) discs, so you can burn up to 4 hours of high quality MPEG-2/DVD video on a single 8.5-gigabyte DVD disc.
• Wide media compatibility: Compatible with a wide range of DVD-
RAM, DVD±R and DVD±RW media.
• DVD Multi Recorder: Supports the DVD Multi specification for read and write; can read and write DVD-RAM, DVD-ROM, DVD-Video, multi-border, multi-session and DVD±VR.
• Versatile recording modes for DVD+R/RW: Including disc-at-once
(DAO), multi-session, and incremental write for DVD+R DL (double layer) discs; DAO, multi-session, and incremental write for DVD+R; and DAO, incremental write, and random access write for DVD+RW.
• Recording versatility for DVD-R/RW, too: Including DAO,
incremental recording, and layer jump recording for DVD-R DL (dual-layer); DAO, incremental recording, multi-border recording for DVD-R; and DAO, multi-border recording, incremental recording, and restricted overwriting for DVD-RW.
Section 1. Getting Started
PX-B310U/ PX-B310SA Installation and Users Manual 5
CD-R and CD-RW Features • Variety of recording modes: Supports track-at-once, disc-at-once,
session-at-once, and variable and fixed packet writing. • Buffer Underrun Proof Technology: Eliminates buffer underrun
errors, so you can safely use your computer for other tasks while you’re writing to a CD-R or CD-RW disc.
• Wide compatibility: Wide CD-R and CD-RW media compatibility. • Orange Book compatibility: Compatible with Orange Book, Parts II
and III. • OPC: Optimum Power Control, which adjust the laser power for the
Minimum Configuration to Use the PX-B310U/ PX-B310SA Here’s what you’ll need in order to install and use the PX-B310U drive. • Computer: Computer CPU, Memory, and configuration are
dependent on installed application requirements. • Interface:
Model PX-B310UA requires a USB 2.0 interface. Model PX-B310SA requires a Serial ATA controller that
supports the ATAPI command set. • Hard disk size: To write to a CD in image mode (that is, to write an
image of a CD to your hard disk), you need 1 GB of free space. For a DVD, 10 GB of free space is recommended. (For more accurate guidelines, see the help files or documentation for the recording software you’re using.)
• Operating System: Model PX-B310U requires Windows XP or Windows Vista. Model PX-B310SA requires Windows XP or Windows Vista.
Section 1. Getting Started
6 PX-B310U/ PX-B310SA Installation and Users Manual
What You Can Do with the PX-B310U or PX-B310SA Just look at some of the things you can do with your PX-B310U or PX-B310SA: • Play BD media • Record slide shows or digital video onto DVD-RAM, DVD+R DL,
DVD-R DL, DVD+R, DVD-R, DVD+RW and DVD-RW discs. • Play DVD-RAM, DVD-ROM, DVD+R DL, DVD-R DL, DVD+R,
DVD+RW, DVD-R, and DVD-RW discs. • Write onto DVD-RAM discs with your set-top box and read the
discs with your Plextor drive; or write to DVD-RAM with the Plextor drive, then read those discs on your set-top box.
• Record data or audio onto writable or rewritable CD media. • Play music CDs. • Save photos and other images on rewritable or writable CDs. • Create a CD or DVD “sneakernet” to share information with
colleagues—just use software such as Cyberlink BD Suite to drag and drop files onto DVD+R, DVD+RW, CD-R or CD-RW media, then continue adding files and sharing the same disc.
• Archive images and video to DVD or CD. • Master new software programs on DVD or CD.
About Software In order to record on DVD±R DL, DVD±R/RW, and CD-R/RW discs you will need to have mastering, packet writing, or duplication software installed on your computer system. If you purchased a retail kit from Plextor, you’ll get software packages that include such software.
Cyberlink BD Suite is one software suite that lets you play Blu-ray discs and write to DVDs and CDs. The software lets you write to and share anything on CD or DVD, including music, photos, and videos; and you can easily back up your critical data to a CD or DVD. (For more information about Cyberlink BD Suite, install this application and examine the help files.)
Section 1. Getting Started
PX-B310U/ PX-B310SA Installation and Users Manual 7
Take control of several powerful features of Plextor drives. With the power of PlexUTILITIES you have now have extra support for your Plextor hardware. PlexUTILITIES allows you to view basic and advance drive information as well as offering high quality audio and multimedia capabilities. By allowing you to measure and control the burn quality of every disc, PlexUTILITIES makes coasters a thing of the past. The distinctive design in PlexUTILITIES allows ease of use for newcomers without compromising on the powerful features that experienced burners demand. PlexUTILITIES also features: - View Basic and Advanced Drive Information List the drive’s hardware, including serial number, firmware version and jumper settings, and shows the capabilities of the drive. Concurrently, you can reveal extensive information about the inserted disc— like format, sessions and tracks, manufacturer, and CD TEXT. - Permitting Drive Identification and Control allows you to control different features of your Plextor drive. - Measure Disc Burning Quality Test the quality of a written or pressed disc by counting the number of errors, measure the mechanical characteristics of blank media, show the write quality by checking the jitter rate and the beta value of written media, and measure the quality of the written DVD media by checking the pits and lands for compliance with the DVD specifications. - Automatic software and firmware updates immediately notify you of pending updates to your Plextor drive so that you always have the most current applications. For details on software that is available for writing to DVDs or CDs, please visit the web sites of the companies whose software you are interested in, refer to their user’s manuals, or look at the help option within the software.
Section 1. Getting Started
8 PX-B310U/ PX-B310SA Installation and Users Manual
Precautions Like the rest of your computer system, your PX-B310U or PX-B310SA requires reasonable care in its installation and use.
• Keep the area around your drive clean from dust, smoke, and other contaminants.
• Do not allow moisture or liquids, including water or cleaning fluids, to touch the drive. Thinner, benzene, or alcohol-based solvents can mar your drive’s surface.
• Do not drop or jolt the drive.
• Do not move, carry or transport a disc in the drive because this can cause damage.
• Do not attempt to open the drive and service it yourself. Removing
the cover may expose you to harmful electrical voltages or the laser beam. For your safety, entrust service to experienced service personnel only.
• Keep your BDs, DVDs, and CDs free of dirt or other contaminants, by storing them in jewel cases. Use only industry-standard discs. Do not insert dirty, warped, poorly balanced, or cracked discs into the drive.
• Do not clean discs using a circular motion. Instead, using a soft, dry cloth, wipe gently in a radial motion; start at the center of the disc and proceed to the outer edge.
• Do not attempt to clean your drive using solvent-based cleaners or an air compressor.
• Do not attempt to clean your drive using a CD cleaning disc. These discs can damage your drive permanently.
Section 1. Getting Started
PX-B310U/ PX-B310SA Installation and Users Manual 9
Where to Go From Here • If you have an External USB drive, see Section 2, beginning on page
10, to learn how to install your drive. • If you have an Internal drive with the Serial ATA interface, see
Section 3, beginning on page 15, to install it.
PX-B310U/ PX-B310SA Installation and Users Manual 10
2. Installing the PX-B310U External USB Drive
This section explains how to physically install your PX-B310U external USB drive in your computer.
PX-B310U Drive Features and Controls Before proceeding, become familiar with the controls and features of your Plextor drive. Match the parts of your drive to the illustrations below.
Front Panel—PX-B310U External Drive
Figure 1: Front panel of the PX-B310U external USB drive • Tray front door: Attached to tray drawer. • Emergency eject hole: If the automatic eject button does not work,
insert the emergency eject tool, paper clip, or other thin, rigid object in this hole to eject tray. Turn OFF power before using this feature.
• Disc/busy indicator: Illuminated green for disc reading or writing. • Eject button: Push once to eject tray. Push again to insert the tray
back into the PX-B310U. To prevent wear on the drive, always use the eject button to insert the tray.
Section 2. Installing the PX-B310U External USB Drive
PX-B310U/ PX-B310SA Installation and Users Manual 11
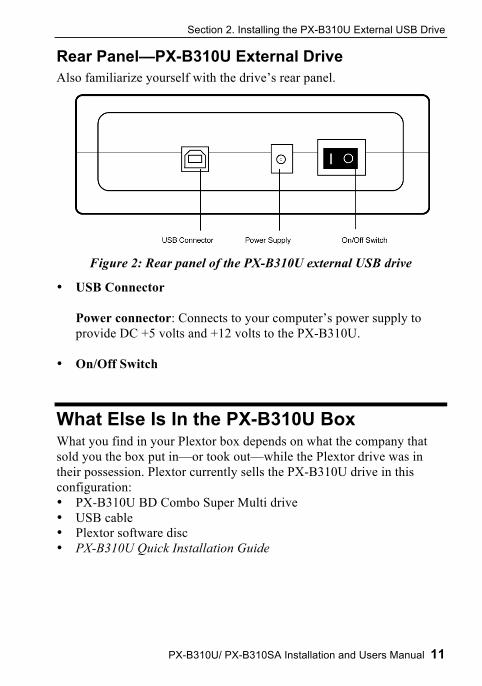
Rear Panel—PX-B310U External Drive Also familiarize yourself with the drive’s rear panel.
Figure 2: Rear panel of the PX-B310U external USB drive
• USB Connector Power connector: Connects to your computer’s power supply to provide DC +5 volts and +12 volts to the PX-B310U.
• On/Off Switch
What Else Is In the PX-B310U Box What you find in your Plextor box depends on what the company that sold you the box put in—or took out—while the Plextor drive was in their possession. Plextor currently sells the PX-B310U drive in this configuration: • PX-B310U BD Combo Super Multi drive • USB cable • Plextor software disc • PX-B310U Quick Installation Guide
Section 2. Installing the PX-B310U External USB Drive
12 PX-B310U/ PX-B310SA Installation and Users Manual
Save Your Box! Be sure to save the box after you have installed your drive. The box and its packaging material were designed and drop tested to ensure your drive can endure rough treatment and still arrive in working order. If you have to ship your drive back to Plextor, you’ll want to send it in the original box. (For more details about returning your drive to Plextor, see page 41.)
If the security sticker on top of your box is cut, there may be a good reason: for example, a dealer may have added other components or software. Carefully check the contents to ensure nothing has been removed. If something is missing, contact the party from whom you purchased the box for an explanation. NOTE: This applies to the Plextor retail box. Your drive may have been shipped in a different box with other contents, depending on whom you purchased the drive from and what they included inside the box. If your drive came pre-installed, some or all of the items above may have been installed and may not be separately available. See the Plextor web site for locations to purchase additional or replacement accessories.
PX-B310U QuickStart Installation Here’s an overview of what you’ll do to connect the drive: 1. Connect the USB cable to the External BD Combo Drive
Plug in the USB cable into the USB port on the back of your external BD drive.
2. Connect the USB cable to your PC Locate an available USB port on your PC and plug the other end of the USB cable in that port.
Note: High Speed USB (2.0) ports provide high-speed data transfer rates. You can connect the external DVD Combo drive to a USB (1.1) port, but this is not recommended because it will significantly lower the external DVD drive’s read speeds. If you are unsure about which ports are available on your PC, check your PC manual or Windows device manager.
Section 2. Installing the PX-B310U External USB Drive
PX-B310U/ PX-B310SA Installation and Users Manual 13
3. Connect the power supply to your external BD Combo drive. Plug the power supply into the back of your external BD Combo drive.
4. Connect the power supply to a wall outlet. Plug the power supply into the outlet or power strip. Then, turn on the power switch. Note: Your power plug and outlet may differ from the illustration. The power switch must be turned off before unplugging the power cord. Troubleshooting tip: You can verify that your external DVD drive has power by pressing the EJECT button on the front of the external DVD drive to open and close the tray. If the tray does not open, ensure that the cables are plugged in properly and securely.
5. Install the software Note: Please ensure your external DVD drive is detected and properly installed by the operating system before installing application software. For further troubleshooting assistance, please refer to your PC’s and Microsoft Windows help, under the “help support” section, in “adding new devices”.
Insert the Software Installation Disc into your external DVD drive. Click on Install Suite. Follow the on-screen instructions.
Section 2. Installing the PX-B310U External USB Drive
14 PX-B310U/ PX-B310SA Installation and Users Manual
This page intentionally left blank.
PX-B310U/ PX-B310SA Installation and Users Manual 15
3. Installing the PX-B310SA Internal SATA Drive
This section explains how to physically install your PX-B310SA internal Serial ATA drive in your computer. The steps are as follows: 1. Turn OFF your computer system. 2. Mount the drive into an available drive bay inside the computer
system. 3. Make the cabling connections: Serial ATA cable and power cable. 4. Turn your computer system ON. The following pages give more details for this procedure. NOTE: Your computer’s SATA connection must support the ATAPI command set. Some computer motherboards have SATA RAID (Redundant Array of Independent Discs) chipsets that do not support the ATAPI command set used by optical disc drives, or that do not have BIOS settings to enable IDE/ATAPI functions. If you are unsure, consult your motherboard manual or vendor web site for compatibility, BIOS versions, and BIOS settings. And check the Plextor PX-B310SA motherboard compatibility listing at http://www.plextor.com/english/support/support_compatability.html
Section 3. Installing the PX-B310SA Internal SATA Drive
16 PX-B310U/ PX-B310SA Installation and Users Manual
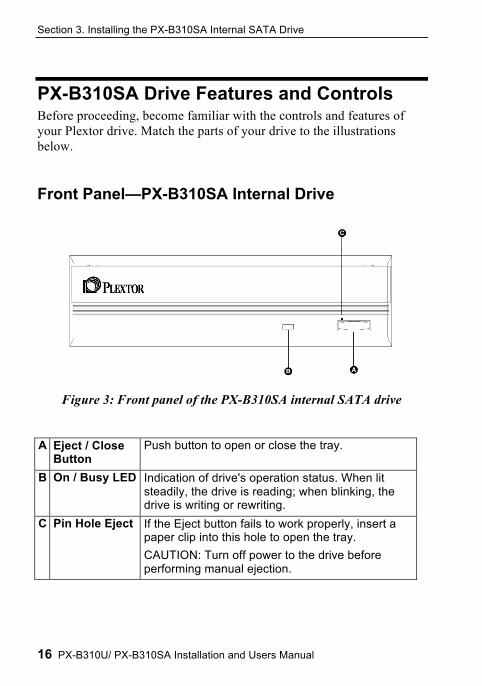
PX-B310SA Drive Features and Controls Before proceeding, become familiar with the controls and features of your Plextor drive. Match the parts of your drive to the illustrations below.
Front Panel—PX-B310SA Internal Drive
Figure 3: Front panel of the PX-B310SA internal SATA drive A Eject / Close
Button Push button to open or close the tray.
B On / Busy LED Indication of drive's operation status. When lit steadily, the drive is reading; when blinking, the drive is writing or rewriting.
C Pin Hole Eject If the Eject button fails to work properly, insert a paper clip into this hole to open the tray. CAUTION: Turn off power to the drive before performing manual ejection.
Section 3. Installing the PX-B310SA Internal SATA Drive
PX-B310U/ PX-B310SA Installation and Users Manual 17
Rear Panel—PX-B310SA Internal SATA Drive Also familiarize yourself with the drive’s rear panel.
Figure 4: Rear panel of the PX-B310SA internal SATA drive • SATA cable connector: Connects to your computer’s SATA
interface using a 7-pin SATA interface cable. • Power connector: Connects to your computer’s 15-pin SATA power
cable to provide DC +5 volts and +12 volts to the PX-B310SA.
NOTE: If your computer has only 4-pin power connectors, use the SATA power cable adapter to connect to the 15-pin power connector on the PX-B310SA.
Section 3. Installing the PX-B310SA Internal SATA Drive
18 PX-B310U/ PX-B310SA Installation and Users Manual
What Else Is In the PX-B310SA Box What you find in your Plextor box depends on what the company that sold you the box put in—or took out—while the Plextor drive was in their possession. Plextor currently sells the PX-B310SA drive in this configuration: • PX-B310SA Combo Super Multi drive • 7-pin SATA interface cable • 4 mounting screws • Plextor software disc • PX-B310SA Quick Reference Guide
Save Your Box! Be sure to save the box after you have installed your drive. The box and its packaging material were designed and drop tested to ensure your drive can endure rough treatment and still arrive in working order. If you have to ship your drive back to Plextor, you’ll want to send it in the original box. (For more details about returning your drive to Plextor, see page 41.)
If the security sticker on top of your box is cut, there may be a good reason: for example, a dealer may have added other components or software. Carefully check the contents to ensure nothing has been removed. If something is missing, contact the party from whom you purchased the box for an explanation. NOTE: This applies to the Plextor retail box. Your drive may have been shipped in a different box with other contents, depending on whom you purchased the drive from and what they included inside the box.
If your drive came pre-installed, some or all of the items above may have been installed and may not be separately available. See the Plextor web site for locations to purchase additional or replacement accessories.
Section 3. Installing the PX-B310SA Internal SATA Drive
PX-B310U/ PX-B310SA Installation and Users Manual 19
Mount the PX-B310SA Drive Before proceeding to install the PX-B310SA drive in your personal computer, make sure you have all the cables you’ll need.
Record the Serial Number Note the serial number of your drive on the inside front cover of this manual.
Mount the Drive in the Computer You can mount your internal drive in any available bay. You must remove the small panel that covers the bay that you want to use. NOTE: The drive can be mounted horizontally or vertically If you don’t have an empty bay, remove the existing DVD-ROM or CD-ROM drive and install the PX-B310SA. You must make two cable connections to your PX-B310SA. The two cable connections that you must make are: • SATA cable • Power cable To mount the PX-B310SA drive: 1. Before proceeding, make sure the power to your computer and any
external peripherals is OFF and your computer is UNPLUGGED from its power source.
2. Remove your computer’s cover, following the directions provided by
your computer’s manufacturer. Typically, this involves loosening or removing several screws on the back panel of your computer and sliding off the cover. See the illustration below for an example.
Section 3. Installing the PX-B310SA Internal SATA Drive
20 PX-B310U/ PX-B310SA Installation and Users Manual
Figure 5: Removing a typical computer's cover
3. Remove the cover panel from the bay that will hold the drive. To remove the cover panel, pop it out by pressing outward lightly. (In some older computers, you may have to remove screws that hold the panel in place.)
Figure 6: Removing the cover panel from a bay
Section 3. Installing the PX-B310SA Internal SATA Drive
PX-B310U/ PX-B310SA Installation and Users Manual 21
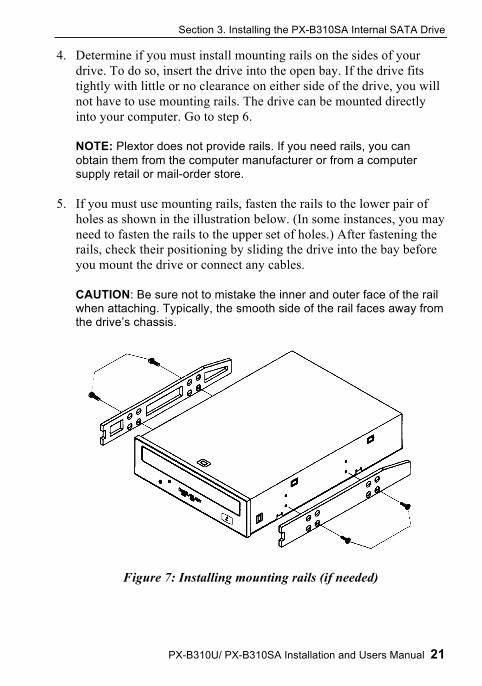
4. Determine if you must install mounting rails on the sides of your drive. To do so, insert the drive into the open bay. If the drive fits tightly with little or no clearance on either side of the drive, you will not have to use mounting rails. The drive can be mounted directly into your computer. Go to step 6.
NOTE: Plextor does not provide rails. If you need rails, you can obtain them from the computer manufacturer or from a computer supply retail or mail-order store.
5. If you must use mounting rails, fasten the rails to the lower pair of
holes as shown in the illustration below. (In some instances, you may need to fasten the rails to the upper set of holes.) After fastening the rails, check their positioning by sliding the drive into the bay before you mount the drive or connect any cables.
CAUTION: Be sure not to mistake the inner and outer face of the rail when attaching. Typically, the smooth side of the rail faces away from the drive’s chassis.
Figure 7: Installing mounting rails (if needed)
Section 3. Installing the PX-B310SA Internal SATA Drive
22 PX-B310U/ PX-B310SA Installation and Users Manual
6. Plug one connector of the 7-pin SATA interface cable into the SATA connector (the right-hand connector) on the rear panel of the drive before you insert the drive into your computer. Then thread the cable through the front of the open bay and back toward the motherboard. The drive should slide smoothly into the bay. If it does not, check for obstructions in the bay and ensure the side rails are attached properly.
Figure 8: Cable connections for an internal SATA drive
NOTE: Your computer’s SATA connection must support the ATAPI command set. Some computer motherboards have SATA RAID (Redundant Array of Independent Discs) chipsets that do not support the command set used by optical disc drives, or that do not have BIOS settings to enable IDE/ATAPI functions. If you are unsure, consult your motherboard manual or vendor web site for compatibility, BIOS versions, and BIOS settings.
7. If not already connected, attach the other end of the 7-pin SATA interface cable to the Serial ATA connector on the computer motherboard (or on a PCI board, if that is how the Serial ATA interface is provided in your computer). When connecting the Serial ATA cable, note that cable connectors are keyed, and will fit only one way. For example, the initials “SATA” on the cable connector should be up.
Section 3. Installing the PX-B310SA Internal SATA Drive
PX-B310U/ PX-B310SA Installation and Users Manual 23
8. Connect a power cable from the computer to the power connector of
the drive. In most computers, you will find free power connectors that are ready for your use. If your computer is equipped with 15-pin SATA power cables,
you can connect a power cable directly to the PX-B310SA drive. If your computer’s power cables have only 4-pin power
connectors, use the 4-pin SATA power cable adapter that came with your PX-B310SA drive.
CAUTION: The power connector on the cable and the receptacle on the drive are keyed. Do not force the power connector into the drive, or the drive and/or the computer could be damaged.
9. Mount the PX-B310SA drive in the computer using the four screws
that were supplied with your drive. Use only these screws.
CAUTION: Do not mount your drive in your computer using screws other than those supplied by Plextor. You may damage the drive if you insert screws that are too long or the wrong thread type.
This completes the installation procedure. Go on to the next section to see how to use your PX-B310SA drive.
PX-B310U/ PX-B310SA Installation and Users Manual 24
4. Using Your PX-B310U and PX-B310SA This section explains how to use your Plextor drive and how to load, handle and care for your BDs, DVDs, and CDs.
What Media to Use Use the right media! Your Plextor drive's capabilities change depending on which type of compact disc you use.
BD Media Blu-ray media is available in different formats: • BD-ROM, BD-R, BD-RE, and BD-R DL (double layer)
Figure 9: The logo identifies the type of BD media
Your PX-B310U and PX-B310SA can read these media formats, in single layer or double layer media.
DVD Media DVD recordable media is available in two different, non-compatible formats: • DVD+R, DVD+R DL (double layer) and DVD+RW • DVD-R, DVD-R DL (dual layer) and DVD-RW Your PX-B310U and PX-B310SA can read and write either media format, in single layer or double layer media. It supports all these types of DVD media: • Digital Video Discs: You can immediately play pre-recorded DVD
discs, including movies and other DVDs. • DVD+R DL, DVD-R DL, DVD+R, DVD-R: Recordable DVD.
You can record on these discs, but only once. You can also read them.
Section 4. Using Your PX-B310U or PX-B310SA
PX-B310U/ PX-B310SA Installation and Users Manual 25
• DVD+RW, DVD-RW: ReWritable DVD. You can record and re-record (up to 1,000 times) on these discs. You can also read them.
Figure 10: The logo identifies the type of DVD media With double layer media, you don’t need to turn the disc over to record on side 2.
DVD-RAM Media Unlike standard DVD media, you do not need special DVD burning software to write or read DVD-RAM discs on a computer. You can access these discs like a floppy disk or hard drive. You can even write a DVD-RAM disc with a set-top box, then read it on the PX-B310U or PX-B310SA drive. The PX-B310U and PX-B310SA supports reading and writing with 4.7-GB (version 2) DVD-RAM discs.
CD-ROM Media You can use these types of CD media: • CD-ROM: You can immediately play or read prerecorded compact
discs, such as audio CDs and data discs. • CD-R: Recordable CD. You can record on these discs, but only
once. You can also read them. • CD-RW: Normal Speed, High Speed, Ultra Speed and Ultra Speed
Plus ReWritable CD. These discs support recording and re-recording (up to 1,000 times). You can also read them.
To achieve a certain writing speed, you must use the appropriate media. To achieve 48X CD-R writing speed you must use certified 48X (or higher) media; and to achieve 32X CD-RW writing speed you must use Ultra Speed Plus CD-RW media.
Section 4. Using Your PX-B310U or PX-B310SA
26 PX-B310U/ PX-B310SA Installation and Users Manual
Remember: • Using Normal Speed CD-RW discs (that is, NS-RW media) you can
rewrite at 4X. • Using High Speed CD-RW discs (HS-RW media), you can rewrite at
10X. • Using Ultra Speed CD-RW discs (US-RW media) in this drive, you
can rewrite at up to 24X. • Using Ultra Speed Plus CD-RW discs (US+) in this drive, you can
rewrite at up to 32X. You can write to Ultra Speed CD-RW discs only on drives that support this media. Drives that are capable of writing to Ultra Speed ReWritable media, such as the Plextor PX-B310U or PX-B310SA, are identified by a “Compact Disc ReWritable Ultra Speed” logo.
Figure 11: The logo also identifies the type of CD-RW media
More About Media for Your Plextor Drive See the Plextor web site at www.plextor.com for a list of Plextor-approved media for your drive
Tray Loading and Operation To load and unload the tray: 1. While the drive is powered up, push the eject button on the front
panel. The tray drawer slides out in 3–4 seconds.
Figure 12: Loading the tray
Section 4. Using Your PX-B310U or PX-B310SA
PX-B310U/ PX-B310SA Installation and Users Manual 27
2. Lay a CD or DVD disc in the depression in the tray, label side up. 3. Press the eject button again and the tray will slide shut within
seconds. NOTE: Always use the eject button to close the tray in a smooth and secure manner. Closing the tray by pressing the front of the drawer using your hand is not recommended and risks damage or premature wearing of the mechanism.
Handling DVD and CD Media Take care when handling blank CD and DVD media. Dust, scratches, and fingerprints on either side of the disc can cause write errors during recording. When picking up or holding blank media you can either place your fingers along the outer edge of the disc, or place one finger through the center hole and one finger on the outer edge. Once you have finished creating a disc, label it by writing on the top using permanent ink. CAUTION: We recommend using a “non-toxic” marker, such as a Sharpie® pen, that conforms to the ASTM D-4236 standard. Some permanent markers will damage the media. Also, do not press too hard when writing on the disc. NOTE: We do not recommend placing self-sticking CD-R labels on the disc. The weight of the label may unbalance the disc and cause write errors during recording or read errors during reading. Also, attempting to remove the label may permanently damage the disc.
Cleaning Discs For proper read and write performance, your discs must be clean. Trying to record on a dirty disc may result in a failed session and ruin the disc. To clean the disc, wipe the disc using a clean, soft cotton cloth to remove surface dirt such as fingerprints. Use a straight-line motion, wiping from the center out. Do not wipe the disc in a circular motion.
Section 4. Using Your PX-B310U or PX-B310SA
28 PX-B310U/ PX-B310SA Installation and Users Manual
Figure 13: Wipe the disc from the center outward HINT: Keep your frequently used discs in jewel cases at all times to prevent them from becoming dirty or damaged.
Mounting Position You can operate your PX-B310U or PX-B310SA drive in either a horizontal or a vertical position.
Playing BDs To play a Blu-ray video disc, insert the DVD as you would any other disc. The drive plays both single layer and double layer discs. The first time: A code on each BD allows it to be played only on players designed for a certain regional area, such as North America, Europe, etc. When the drive ships from the factory there is no region code set. The first time a BD that has a region setting is inserted into the drive, the drive is automatically set to that region code by the player application.
Section 4. Using Your PX-B310U or PX-B310SA
PX-B310U/ PX-B310SA Installation and Users Manual 29
If you later insert a BD with a different region code, you are prompted to either accept changing the new region code or not. If you don’t accept the change, then that BD will not play. If you do accept the change, then the region code setting is changed. But remember: you can change the drive’s region code only 5 times. After that, you can’t change it any more.
Playing DVDs To play a digital video disc, insert the DVD as you would any other disc. The drive plays both single layer and double layer discs. The first time: A code on each DVD allows it to be played only on players designed for a certain regional area, such as North America, Europe, etc. When the drive ships from the factory there is no region code set. The first time a DVD that has a region setting is inserted into the drive, the drive is automatically set to that region code by the player application. If you later insert a DVD with a different region code, you are prompted to either accept changing the new region code or not. If you don’t accept the change, then that DVD will not play. If you do accept the change, then the region code setting is changed. But remember: you can change the drive’s region code only 5 times. After that, you can’t change it any more.
Section 4. Using Your PX-B310U or PX-B310SA
30 PX-B310U/ PX-B310SA Installation and Users Manual
Writing to DVD Media You need special software that supports writing to DVD+R, DVD+R DL, and DVD+RW discs; or to DVD-R DL, DVD-R and DVD-RW discs. Roxio Creator (on the DVD that accompanies your Plextor drive) contains this software. You don’t need special software to write to DVD-RAM media.
Specifying +R/RW or -R/RW You don’t need to specify whether to write to +R/RW or -R/RW. The selection is automatically made for you, based on the media you insert in the drive.
Writing to CD-R and CD-RW Media In conjunction with your drive, mastering and packet writing software such as Roxio Creator allows you to write audio, video, data, or other information to writable (CD-R) or rewritable (CD-RW) media. The PX-B310U and PX-B310SA writes to all types of CD-RW media.
Using the Disc/Busy Indicator The color of the front-panel disc/busy indicator gives you information about the drive’s operation.
Operation
LED Color
On/Off
No disc OFF Loading Green ON Disc loaded and ready OFF Read or verify activity Green ON CD/DVD write Green ON
Section 4. Using Your PX-B310U or PX-B310SA
PX-B310U/ PX-B310SA Installation and Users Manual 31
This page intentionally left blank.
PX-B310U/ PX-B310SA Installation and Users Manual 32
5. Maintenance and Troubleshooting This section explains maintenance and troubleshooting procedures for your Plextor drive. With proper maintenance, you can prevent problems. If trouble arises, you can often solve many simple problems on your own, rather than wait for assistance from a Plextor representative.
Cleaning the your Plextor Drive Plextor drives are sealed against external contamination, so in a normal computer environment and with normal use, your drive should not require internal cleaning. However, if your drive has been in use for some time and has just recently started to exhibit read/write problems, it is possible that dust has accumulated on the laser lens. In this case: • If your drive is still in warranty and you are experiencing problems,
send the drive to Plextor. (See “Returns” on page 41.) • If your drive is out of warranty, before returning the drive for repair
you may want to try a short blast of canned air aimed at the center of the drive. Use only electronics-grade canned air: sterile, filtered, and moisture-free. If you notice no improvements after this step, you will need to return the drive for repair.
CAUTION: Do not attempt to clean your drive using any solvent-based cleaners. Also, do not use an air compressor, because the high-pressure blast can damage the drive. ANOTHER CAUTION: Do not use a CD cleaning disc. Cleaning discs that use a felt pad can scratch the laser lens surface and render the drive inoperable. Cleaning discs with brushes may also scratch the lens. Moreover, these cleaning discs are often out of balance, making their operation very noisy.
Section 6. Maintenance and Troubleshooting
PX-B310U/ PX-B310SA Installation and Users Manual 33
Upgrading Firmware Plextor creates firmware revisions to meet the particular needs of large computer manufacturers. It is rare that these revisions will impact the performance or operation of your drive. However, we advise that you always update your drive with the latest available firmware. Among other benefits, updating firmware ensures that your drive has the latest media catalog. Before troubleshooting a possible problem with your Plextor drive please visit our web site at www.plextor.com to check if you have the latest firmware. With the installation of PlexUTILITIES, firmware upgrades are automated. When a new firmware is available, PlexUTILITIES will automatically download and install the latest firmware. To obtain new firmware for your drive: 1. Go to the Plextor web site at www.plextor.com. 2. Look for firmware upgrades in the Support area, on the Downloads
page. There is a description of the latest firmware revision and its intended use.
3. Download the firmware to your computer. To upgrade firmware in your drive’s flash memory: 1. Run the executable file that you downloaded from Plextor’s web site. 2. Accept all defaults by continuing to click on the Next button until
you see the message: Firmware update has completed.
3. Restart your system.
Section 5. Maintenance and Troubleshooting
34 PX-B310U/ PX-B310SA Installation and Users Manual
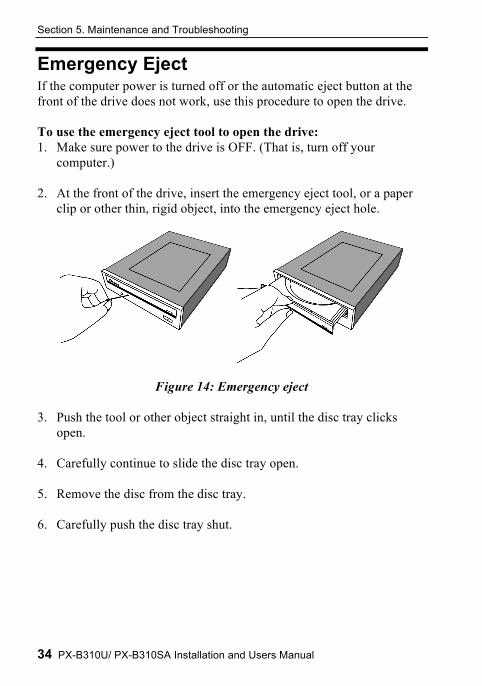
Emergency Eject If the computer power is turned off or the automatic eject button at the front of the drive does not work, use this procedure to open the drive. To use the emergency eject tool to open the drive: 1. Make sure power to the drive is OFF. (That is, turn off your
computer.) 2. At the front of the drive, insert the emergency eject tool, or a paper
clip or other thin, rigid object, into the emergency eject hole.
Figure 14: Emergency eject 3. Push the tool or other object straight in, until the disc tray clicks
open. 4. Carefully continue to slide the disc tray open. 5. Remove the disc from the disc tray. 6. Carefully push the disc tray shut.
Section 6. Maintenance and Troubleshooting
PX-B310U/ PX-B310SA Installation and Users Manual 35
Troubleshooting If you have problems during or right after installation of your drive, first make sure the drive is recognized. If you still have problems, visit the Plextor web site for tips and troubleshooting help.
Make Sure the Drive Is Recognized If you’re having trouble after installation, make sure the PX-B310U or PX-B310SA drive is recognized by your computer. To check whether the drive is recognized:
To see if the drive is recognized in Windows: 1. Turn the computer ON. After the computer boots up, you should see
the Windows display.
2. Open Windows Explorer or My Computer and ensure there is an icon for the Plextor drive, the hard disk, and another DVD or CD-ROM drive, if present. The Plextor icon may be D: or E: or another designator.
3. If the PX-B310U or PX-B310SA drive is not recognized in Windows, reboot the computer and use your computer’s setup program to program the BIOS to recognize it.
NOTE: Refer to the computer’s documentation for information on how to run the motherboard BIOS setup program.
For the PX-B310U, verify the USB connection and
compatibility.
For the PX-B310SA, verify the SATA chipset supports the ATAPI Command set. Use your computer’s motherboard BIOS setup program to enable SATA/IDE/ATAPI as needed for your configuration.
Note that if your computer’s SATA chipset is dedicated for SATA RAID, the connection may not support optical disc drives like the PX-B310SA. Consult your motherboard manual or vendor website for assistance in configuration or for questions of compatibility.
Section 5. Maintenance and Troubleshooting
36 PX-B310U/ PX-B310SA Installation and Users Manual
4. Save and exit your CMOS setup to restart your computer with the
new settings. 5. In Windows Vista or XP, right-click on the My Computer icon and
select Properties. Click on the Hardware tab, then click on the Device Manager button. Click the + sign next to the DVD/CD-ROM drives heading and look for the “PLEXTOR BD PX-B310U” or “PLEXTOR BD PX-B310SA” entry underneath.
If you do not see this drive listed as one of the devices, or if it has a yellow diamond with an exclamation point (!), contact Plextor Technical Support. (See “Appendix A: Technical Support” for the different ways you can contact us.)
PX-B310U/ PX-B310SA Installation and Users Manual 37
6. Frequently Asked Questions
Q: What is Blu-ray? Blu-ray, also known as Blu-ray Disc (BD), is the name of a next-generation optical disc format jointly developed by the Blu-ray Disc Association (BDA), a group of the world's leading consumer electronics, personal computer and media manufacturers. Q: Is the PX-B310U and PX-B310SA a DVD Multi Recorder? Yes. The DVD Multi specification requires that DVD Multi Recorders read and write DVD-ROM (prerecorded), DVD-R (General), DVD-RW and DVD-RAM discs. Because your Plextor drive conforms to the DVD Multi specification, it can read and write the formats used by today’s computers and consumer electronic (CE) DVD devices. (Note that DVD Multi does not prescribe that devices should accommodate DVD-RAM cartridges or 8-cm discs.) Q: Which is better, DVD+R and DVD+RW? Or DVD-R and DVD-RW? A: Neither is “better” or “worse.” They’re just different standards, like English versus metric measurement.
Different manufacturers support different standards. The DVD+R and DVD+RW formats are supported by Plextor, Philips, Sony, Hewlett-Packard, Dell, Ricoh, Yamaha and other manufacturers. DVD-R, DVD-RW and DVD-RAM are also supported by Plextor, as well as Panasonic, Toshiba, Apple Computer, Hitachi, NEC, Pioneer, Samsung and Sharp.
No matter which format a DVD disc is recorded in, it can be read by most commercial DVD-ROM players.
Appendix A: PX-B310U and PX-B310SA Specifications
38 PX-B310U/ PX-B310SA Installation and Users Manual
Q: What's the difference between "double layer" and "dual layer"? A: Nothing, really. It's simply a difference of opinion within the industry about how to label media and drive capabilities. DVD+R DL (as named by the DVD+RW Alliance) stands for DVD+R Double Layer. DVD-R DL (from the DVD Forum) stands for DVD-R Dual Layer. Whether your DL media is labeled "double layer" or "dual layer," the PX-B310U and PX-B310SA can handle it.
PX-B310U/ PX-B310SA Installation and Users Manual 39
Appendix A: Technical Support Store Plextor’s e-mail, web site, phone, and fax numbers in a convenient location. Keep your drive’s serial number and a copy of your sales receipt handy as well. If you experience a problem while installing or operating your drive, please refer first to the relevant sections of this manual regarding setup and installation (Sections 1–3). If you do not uncover the solution there, please refer next to the maintenance and troubleshooting section that begins on page 32. You may also wish to refer to the Frequently Asked Questions (FAQ) section of our web site to assist you in troubleshooting the problem on your own. NOTE: We encourage you to go the Plextor web site (www.plextor.com) before attempting to contact Technical Support. The answers to the most common questions callers ask can be found quickly in the support area. Select PlexHelper for online troubleshooting or FAQs for answers to common questions. If you have not been successful in your quest, our Technical Support Department will help you solve problems that relate specifically to your Plextor drive. In many cases, a problem that appears to be caused by your Plextor drive actually originates in another part of your computer. In such instances, our technical support staff will try to help you identify the part at fault and will refer you to the manufacturer of that part for further assistance.
Appendix A: Technical Support
40 PX-B310U/ PX-B310SA Installation and Users Manual
How to Contact Plextor Technical Support There are several ways for you to contact Plextor’s Technical Support Department: • Visit our web site (www.plextor.com) for answers to Frequently
telephone number and the hours during which you can be reached. Be as detailed as possible in describing your problem. Please include system configuration, hardware and software, as well as versions of drivers used.
• Call 1-800-204-0332 or 1-510-824-9693 and select the tech support
option.
Before You E-mail or Call for Support Please gather as much of the following information as possible before contacting us. • The serial number of your Plextor drive. Your serial number appears
on the drive label. • The latest version of firmware you loaded onto the drive, if
applicable.
• The version of the Windows operating system you are using.
• The brand name and model number of your computer (e.g., Dell 466/NP, Hewlett-Packard Pavilion 752n, etc.).
• The type of VGA, Super VGA, or other graphics board you use.
• Brand name and model number of any other peripherals you have installed or connected to your computer (e.g., CD-ROM, scanner, fax board, network board).
Appendix A: Technical Support
PX-B310U/ PX-B310SA Installation and Users Manual 41
Returns In the unlikely event that you need to return a drive to Plextor, you need an RMA (Returned Materials Authorization) number. You will need this number before any Plextor drive can be returned for replacement. Here’s how you get an RMA number and return your drive: 1. Contact Plextor Technical Support. You will receive assistance in
troubleshooting your system. If the drive is determined to be defective, you will receive an RMA number.
2. Plextor will e-mail you with the RMA number and shipping
information. 3. When you receive the RMA number, pack the Plextor drive securely
in a box, and include the RMA number with the drive. 4. Write the RMA number in large bold numbers on the outside of the
box, and ship it to Plextor.
Contacting Plextor’s RMA Department You can contact our RMA Department and request an RMA number at: • [email protected] • Or by calling us at 1-800-204-0332 or 1-510-824-9693.
Packing Your Drive Check the drive to make sure there is no disc inside, and if possible, pack your drive in the original box. Some of our customers have not held on to their boxes and have had to resort to less-than-secure methods to get drives back to us. CAUTION: Never ship the drive with a CD or DVD disc inside it. If you did not receive a box (for example, your drive came pre-installed in a computer), we recommend you pay a packaging store (such as The UPS Store) to ship your drive. If you don’t have a packaging store in your area, ask for packaging pointers when you contact us to get an RMA number before returning any drive.
Appendix A: Technical Support
42 PX-B310U/ PX-B310SA Installation and Users Manual
Shipping Your Drive to Plextor Be sure to write the RMA number on the outside of the shipping box. Any drive sent to Plextor without an RMA number will not be accepted. NOTE: The RMA number must be clearly visible on the outside of the shipping box. Drives must be sent postage prepaid. We recommend that you insure your shipment, as Plextor cannot be held responsible for any damage that may occur during shipment.
PX-B310U/ PX-B310SA Installation and Users Manual 43
Appendix B: Warranty PLEXTOR warrants your Plextor drive against any defect in material and workmanship, under normal use, for a period of one year following its date of purchase. In the event this product is found to be defective within the warranty period, PLEXTOR will replace the defective unit. This warranty is void: a) if the unit is operated or stored under abnormal use and/or conditions; b) if the unit is repaired, modified or altered, unless such repair, modification or alteration is expressly authorized in writing by PLEXTOR; c) if the unit is subjected to abuse, neglect, lightning strike, electrical fault, improper packaging, or accident; d) if the unit is installed improperly; or e) if the serial number of the unit is defaced or missing. PLEXTOR will not, under any circumstances, be liable for direct, special, or consequential damages such as, but not limited to, damage or loss of property or equipment, loss of profits or revenues, cost of replacement goods, or expense or inconvenience caused by service interruptions. Under no circumstances will any person be entitled to any sum greater than the purchase price paid for the unit. To obtain warranty service, you must contact PLEXTOR’s Technical Support Department by e-mail ([email protected]) or by calling 1-800-204-0332 or 510-824-9693. The Technical Support Department will attempt to diagnose and correct your problem. If the unit does not function properly, they will provide you with a Return Material Authorization (RMA) number. You may be asked to furnish proof of purchase to confirm that the unit is still under warranty. All product returns must be authorized in advance by PLEXTOR. Authorization is confirmed by issuance of the RMA number, which must be written prominently on the outside of the box in which the defective unit is returned to PLEXTOR.
Appendix B: Warranty
44 PX-B310U/ PX-B310SA Installation and Users Manual
All drives returned to PLEXTOR must be securely packaged and shipped postage prepaid. The drive will be returned to the customer at Plextor’s expense when originating within the United States. For a drive originating outside of the United States, the customer is responsible for shipping costs in both directions. NOTE: Warranty validity is limited to that applicable in the location where the drive was originally purchased.
If You’re Outside the U.S. or Canada Note that the warranty and RMA policy only apply to the United States and Canada. If you are in South America, contact your dealer or reseller for all warranty and RMA claims.
PX-B310U/ PX-B310SA Installation and Users Manual 45
Index
46 PX-B310U/ PX-B310SA Installation and Users Manual
Index background format, DVD, 2 bay cover panel, 20 BD
OPC. See optimum power control operating system, 5 optimum power control, 5 orange book, 5 packing for shipment, 41 PIO support, 3 playing DVD, 28, 29 Plextor software disc, 11, 18 PlexUtilities, 7 plug and play, support for, 3 position, mounting, 19, 28 power