112
Oracle® Fusion Middleware Installation Guide for Oracle Portal, Forms, Reports and Discoverer 11g Release 1 (11.1.1.6.0) E10421-07 November 2011
Oracle® Fusion MiddlewareInstallation Guide for Oracle Portal, Forms, Reports and Discoverer
11g Release 1 (11.1.1.6.0)
E10421-07
November 2011

Oracle Fusion Middleware Installation Guide for Oracle Portal, Forms, Reports and Discoverer, 11g Release 1 (11.1.1.6.0)
E10421-07
Copyright © 2011, Oracle and/or its affiliates. All rights reserved.
Primary Author: Kevin Hwang
This software and related documentation are provided under a license agreement containing restrictions on use and disclosure and are protected by intellectual property laws. Except as expressly permitted in your license agreement or allowed by law, you may not use, copy, reproduce, translate, broadcast, modify, license, transmit, distribute, exhibit, perform, publish, or display any part, in any form, or by any means. Reverse engineering, disassembly, or decompilation of this software, unless required by law for interoperability, is prohibited.
The information contained herein is subject to change without notice and is not warranted to be error-free. If you find any errors, please report them to us in writing.
If this is software or related documentation that is delivered to the U.S. Government or anyone licensing it on behalf of the U.S. Government, the following notice is applicable:
U.S. GOVERNMENT RIGHTS Programs, software, databases, and related documentation and technical data delivered to U.S. Government customers are "commercial computer software" or "commercial technical data" pursuant to the applicable Federal Acquisition Regulation and agency-specific supplemental regulations. As such, the use, duplication, disclosure, modification, and adaptation shall be subject to the restrictions and license terms set forth in the applicable Government contract, and, to the extent applicable by the terms of the Government contract, the additional rights set forth in FAR 52.227-19, Commercial Computer Software License (December 2007). Oracle America, Inc., 500 Oracle Parkway, Redwood City, CA 94065.
This software or hardware is developed for general use in a variety of information management applications. It is not developed or intended for use in any inherently dangerous applications, including applications that may create a risk of personal injury. If you use this software or hardware in dangerous applications, then you shall be responsible to take all appropriate fail-safe, backup, redundancy, and other measures to ensure its safe use. Oracle Corporation and its affiliates disclaim any liability for any damages caused by use of this software or hardware in dangerous applications.
Oracle and Java are registered trademarks of Oracle and/or its affiliates. Other names may be trademarks of their respective owners.
Intel and Intel Xeon are trademarks or registered trademarks of Intel Corporation. All SPARC trademarks are used under license and are trademarks or registered trademarks of SPARC International, Inc. AMD, Opteron, the AMD logo, and the AMD Opteron logo are trademarks or registered trademarks of Advanced Micro Devices. UNIX is a registered trademark of The Open Group.
This software or hardware and documentation may provide access to or information on content, products, and services from third parties. Oracle Corporation and its affiliates are not responsible for and expressly disclaim all warranties of any kind with respect to third-party content, products, and services. Oracle Corporation and its affiliates will not be responsible for any loss, costs, or damages incurred due to your access to or use of third-party content, products, or services.
iii
Contents
Preface ................................................................................................................................................................ vii
Intended Audience..................................................................................................................................... viiDocumentation Accessibility .................................................................................................................... viiRelated Documents .................................................................................................................................... viiConventions ............................................................................................................................................... viii
1 Installation Overview
1.1 Oracle Portal, Forms, Reports and Discoverer Components................................................ 1-11.1.1 Oracle Portal ......................................................................................................................... 1-11.1.2 Oracle Forms ........................................................................................................................ 1-11.1.3 Oracle Reports ...................................................................................................................... 1-21.1.4 Oracle Discoverer................................................................................................................. 1-21.2 Understanding the Oracle Portal, Forms, Reports and Discoverer Installation Types .... 1-31.3 Securing Oracle Portal, Forms, Reports and Discoverer with Oracle Identity Management..
1-31.4 Installation and Configuration Roadmap for Oracle Portal, Forms, Reports and Discoverer
1-41.5 Topology Summary for Oracle Portal, Forms, Reports and Discoverer............................. 1-6
2 Installing Oracle Portal, Forms, Reports and Discoverer
2.1 Preparing to Install ..................................................................................................................... 2-12.1.1 Verifying Your System and Network Environment ....................................................... 2-12.1.2 Running the rootpre.sh Script on IBM AIX Operating Systems ................................... 2-22.1.3 Upgrading Oracle Web Agent (OWA) for Oracle Portal ............................................... 2-22.1.4 Installing Oracle Forms and Oracle Reports on Separate Servers ................................ 2-32.1.5 Installing in a New Middleware Home............................................................................ 2-32.2 Securing Your Installation with Identity Management......................................................... 2-32.3 Obtaining the Software .............................................................................................................. 2-42.4 Installing and Configuring a Database and Database Schemas........................................... 2-42.5 Installing Oracle WebLogic Server ........................................................................................... 2-42.5.1 Planning Your Middleware Home Location for Oracle Reports (Windows Only) ... 2-52.5.2 Finding Oracle WebLogic Server Installation Instructions ........................................... 2-52.5.3 Stopping Node Manager Before Installing Oracle Portal, Forms, Reports and
Discoverer (Windows Only) 2-52.6 Installing Oracle Portal, Forms, Reports and Discoverer...................................................... 2-6

iv
2.6.1 Starting the Installer ............................................................................................................ 2-62.6.1.1 Start the Installer........................................................................................................... 2-62.6.1.2 Installation Log Files .................................................................................................... 2-62.6.2 Configuring Your Oracle Inventory (UNIX Only).......................................................... 2-62.6.3 Following the Installation Screens and Instructions....................................................... 2-72.7 Patching Oracle Portal, Forms, Reports and Discoverer....................................................... 2-82.8 Configuring Oracle Portal, Forms, Reports and Discoverer................................................. 2-82.8.1 Manual Configuration for Oracle Discoverer (Windows Only) ................................ 2-102.9 Verifying the Installation ........................................................................................................ 2-112.9.1 Verifying the Installation Logs ....................................................................................... 2-112.9.2 Verifying the Domain Server Logs................................................................................. 2-112.9.3 Verifying OPMN Status ................................................................................................... 2-112.9.4 Checking Browser URLs.................................................................................................. 2-12
3 Installing Oracle Discoverer Desktop
3.1 Verifying Your System and Network Environment .............................................................. 3-13.2 Installation Instructions ............................................................................................................. 3-23.2.1 Starting the Installer ............................................................................................................ 3-23.2.2 Finding the Installation Log Files ...................................................................................... 3-23.2.3 Following the Installation Screens and Instructions....................................................... 3-23.3 Starting Your Products ............................................................................................................... 3-3
4 Deinstalling Oracle Portal, Forms, Reports and Discoverer
4.1 Understanding the Deinstallation ............................................................................................ 4-14.2 Deinstalling the Software........................................................................................................... 4-44.2.1 Removing the Oracle Portal and Oracle Discoverer Schemas ...................................... 4-44.2.2 Removing Oracle Portal, Forms, Reports and Discoverer ............................................. 4-44.2.2.1 Starting the Deinstaller ................................................................................................ 4-44.2.2.2 Removing Your Managed Oracle Portal, Forms, Reports and Discoverer Instances.
4-54.2.2.3 Stopping Oracle Fusion Middleware......................................................................... 4-54.2.2.4 Removing Your Oracle Portal, Forms, Reports and Discoverer Oracle Home ... 4-64.2.2.5 Removing your Oracle Common Home ................................................................... 4-64.2.2.6 Removing the Oracle Home Directory Manually.................................................... 4-74.2.3 Removing Oracle WebLogic Server and WebLogic Server Domains .......................... 4-74.2.4 Removing Oracle JDeveloper............................................................................................. 4-84.3 Post-Deinstallation Tasks for Windows Operating Systems................................................ 4-84.3.1 Removing the Program Groups......................................................................................... 4-84.3.2 Rebooting Your System ...................................................................................................... 4-84.4 Reinstalling the Software ........................................................................................................... 4-8
5 Deinstalling Oracle Discoverer Desktop
5.1 Removing Your Oracle Discoverer Desktop Software-......................................................... 5-15.2 Removing the Oracle Home Directory Manually+................................................................ 5-2

v
A Oracle Portal, Forms, Reports and Discoverer Installation and Configuration Screens
A.1 Flowchart of Oracle Portal, Forms, Reports and Discoverer Installation Screens - Install Only Option A-1
A.2 Flowchart of the Oracle Portal, Forms, Reports and Discoverer Configuration Screens A-2A.3 Descriptions of the Oracle Portal, Forms, Reports and Discoverer Installation and
Configuration Screens A-4A.3.1 Specify Inventory Directory .............................................................................................. A-5A.3.2 Inventory Location Confirmation .................................................................................... A-5A.3.3 Welcome............................................................................................................................... A-6A.3.4 Configuration Tool Welcome............................................................................................ A-7A.3.5 Select Installation Type ...................................................................................................... A-8A.3.6 Prerequisite Checks ............................................................................................................ A-9A.3.7 Select Domain.................................................................................................................... A-10A.3.7.1 Create Domain ........................................................................................................... A-10A.3.7.2 Extend Domain .......................................................................................................... A-11A.3.7.3 Expand Cluster .......................................................................................................... A-11A.3.8 Specify Security Updates ................................................................................................. A-12A.3.9 Specify Installation Location ........................................................................................... A-13A.3.9.1 Install and Configure Option................................................................................... A-13A.3.9.2 Install Only - Do Not Configure Option ................................................................ A-14A.3.9.3 Configuration Tool Option....................................................................................... A-15A.3.10 Configure Components.................................................................................................... A-15A.3.11 Configure Ports ................................................................................................................. A-16A.3.12 Specify Proxy Details........................................................................................................ A-17A.3.13 Specify Schema.................................................................................................................. A-18A.3.14 Specify Portlet Schema..................................................................................................... A-19A.3.15 Specify Application OID.................................................................................................. A-20A.3.16 Installation Summary ....................................................................................................... A-21A.3.17 Installation Summary (Install Only Option)................................................................. A-22A.3.18 Installation Progress ......................................................................................................... A-23A.3.19 Configuration Progress .................................................................................................... A-24A.3.20 Installation Complete ....................................................................................................... A-25
B Oracle Discoverer Desktop Installation Screens
B.1 Welcome ...................................................................................................................................... B-2B.2 Prerequisite Checks ................................................................................................................... B-3B.3 Specify Installation Location .................................................................................................... B-4B.4 Select Components..................................................................................................................... B-5B.5 Installation Summary ................................................................................................................ B-6B.6 Installation Progress .................................................................................................................. B-7B.7 Installation Completed.............................................................................................................. B-8
C Oracle Portal, Forms, Reports and Discoverer Deinstallation Screens
C.1 Welcome ...................................................................................................................................... C-2C.2 Select Deinstallation Type ........................................................................................................ C-3
vi
C.3 Deinstall Oracle Home .............................................................................................................. C-4C.4 Specify WebLogic Domain Detail............................................................................................ C-5C.5 Select Managed Instance ........................................................................................................... C-6C.6 Specify Instance Location ......................................................................................................... C-7C.7 Deinstallation Summary (Managed Instance) ....................................................................... C-8C.8 Deinstallation Summary (Unmanaged Instance) .................................................................. C-9C.9 Deinstallation Progress ........................................................................................................... C-10C.10 Deinstallation Complete ......................................................................................................... C-11
D Oracle Discoverer Desktop Deinstallation Screens
D.1 Welcome ...................................................................................................................................... D-2D.2 Deinstall Oracle Home .............................................................................................................. D-3D.3 Deinstallation Progress ............................................................................................................. D-4D.4 Deinstallation Complete ........................................................................................................... D-5
E Silent Installation and Deinstallation
E.1 About Silent Installation and Deinstallation.......................................................................... E-1E.2 Oracle Portal, Forms, Reports and Discoverer Response Files ........................................... E-1E.2.1 Silent Installation Response Files ..................................................................................... E-1E.2.1.1 Contents of the configure_only.rsp File ......................................................... E-2E.2.1.2 Contents of the install_only.rsp File .............................................................. E-6E.2.1.3 Contents of the install_and_configure.rsp File......................................... E-7E.2.2 Patch Set Installer Response Files................................................................................... E-11E.2.3 Silent Deinstallation Response Files............................................................................... E-12E.2.3.1 Contents of the deinstall_managed_instances.rsp File ........................ E-13E.2.3.2 Contents of the deinstall_unmanaged_instances.rsp File ................... E-13E.2.3.3 Contents of the deinstall_oh.rsp File ............................................................ E-14
F Troubleshooting
F.1 General Troubleshooting Tips ................................................................................................. F-1F.2 Installation and Configuration Log Files................................................................................ F-2F.2.1 Installation Log Files .......................................................................................................... F-2F.2.2 Configuration Log Files ..................................................................................................... F-3F.3 Verifying Environment Variable Lengths for Oracle Reports (Windows Only) .............. F-3F.4 Granting Access to rwbuilder .................................................................................................. F-3F.5 Errors Accessing the Discoverer Plus and Discoverer Viewer URLs................................. F-4F.6 Need More Help?....................................................................................................................... F-4
Index
vii
Preface
The Oracle Fusion Middleware Installation Guide for Oracle Portal, Forms, Reports and Discoverer covers requirements, instructions, and troubleshooting tips for installing and configuring Oracle Portal, Forms, Reports and Discoverer.
Intended AudienceThis guide is intended for users who are installing Oracle Fusion Middleware for the first time and are comfortable running some system administration operations, such as creating users and groups, adding users to groups, and installing operating system patches on the computer where you products will be installed. Users in UNIX systems who are installing need root access to run some scripts.
Documentation AccessibilityFor information about Oracle's commitment to accessibility, visit the Oracle Accessibility Program website at http://www.oracle.com/pls/topic/lookup?ctx=acc&id=docacc.
Access to Oracle SupportOracle customers have access to electronic support through My Oracle Support. For information, visit http://www.oracle.com/pls/topic/lookup?ctx=acc&id=info or visit http://www.oracle.com/pls/topic/lookup?ctx=acc&id=trs if you are hearing impaired.
Related DocumentsFor additional information, see the following manuals:
■ Oracle Fusion Middleware Installation Planning Guide. This book contains useful information you should read before installing any Oracle Fusion Middleware product.
■ Oracle Fusion Middleware Concepts. This book introduces the common terms and concepts in an Oracle Fusion Middleware environment.
■ Oracle Fusion Middleware Administrator's Guide. This book contains information for managing your Oracle Fusion Middleware environment after installation and configuration is complete.
■ Oracle Fusion Middleware Installation Guide for Oracle Identity Management. This book contains information about installing and configuring Oracle Identity and Access
viii
Management, which can be used with this release of Oracle Forms and Reports to create a more secure environment.
ConventionsThe following text conventions are used in this document:
Convention Meaning
boldface Boldface type indicates graphical user interface elements associated with an action, or terms defined in text or the glossary.
italic Italic type indicates book titles, emphasis, or placeholder variables for which you supply particular values.
monospace Monospace type indicates commands within a paragraph, URLs, code in examples, text that appears on the screen, or text that you enter.

1
Installation Overview 1-1
1Installation Overview
The Oracle Portal, Forms, Reports, and Discoverer installer will install all of these products by default. After installation, you will have the option to configure the products you want to use.
The chapter includes the following sections:
■ Section 1.1, "Oracle Portal, Forms, Reports and Discoverer Components"
■ Section 1.2, "Understanding the Oracle Portal, Forms, Reports and Discoverer Installation Types"
■ Section 1.3, "Securing Oracle Portal, Forms, Reports and Discoverer with Oracle Identity Management"
■ Section 1.4, "Installation and Configuration Roadmap for Oracle Portal, Forms, Reports and Discoverer"
■ Section 1.5, "Topology Summary for Oracle Portal, Forms, Reports and Discoverer"
1.1 Oracle Portal, Forms, Reports and Discoverer ComponentsOracle Portal, Forms, Reports and Discoverer contains the following components:
■ Oracle Portal
■ Oracle Forms
■ Oracle Reports
■ Oracle Discoverer
1.1.1 Oracle PortalOracle Portal allows you to view content from multiple sources on a single page.
It is recommended that you install Oracle Portal from this installer only if you are an existing Oracle Portal 10g customer. If this is the first time you are installing any Oracle Portal product, it is recommended that you install Oracle WebCenter Portal. Instructions are located in Oracle Fusion Middleware Installation Guide for Oracle WebCenter.
1.1.2 Oracle FormsOracle Forms is a component of Oracle Fusion Middleware used to develop and deploy Forms applications. The Forms applications provide a user interface to access Oracle Database in an efficient and tightly-coupled way. The applications can be
Understanding the Oracle Portal, Forms, Reports and Discoverer Installation Types
1-2 Oracle Fusion Middleware Installation Guide for Oracle Portal, Forms, Reports and Discoverer
integrated with Java and web services to take advantage of service oriented architectures (SOA).
Oracle Forms consists of the following:
■ Oracle Forms Builder, used to develop and compile Forms applications.
■ Oracle Forms Server, a server component used to deploy the applications.
During the installation, you will have the option to install only Oracle Forms Server or both Oracle Forms Server and Oracle Forms Builder (Oracle Forms Builder cannot be installed without Oracle Forms Server).
Oracle recommends installing Oracle Forms and Reports 11g Release 2 (11.1.2), which offers more advanced Identity Management (Oracle Internet Directory with Oracle Access Manager) and configuration options. For more information, refer to the Oracle Forms and Reports Download, Installation, and Configuration ReadMe for 11g Release 2 (11.1.2).
1.1.3 Oracle ReportsOracle Reports enables businesses to give immediate access to information to all levels within and outside of the organization in a scalable and secure environment. Using Oracle Reports, you can rapidly develop and deploy sophisticated Web and paper reports against any data source (including an Oracle database, JDBC, XML, and text files). Leveraging J2EE technologies such as JSP and XML, you can publish your reports in a variety of formats (including HTML, XML, PDF, spreadsheet, delimited text, PostScript, and RTF) to any destination (including e-mail, Web browser, Oracle Portal, and file system) in a scalable, efficient manner.
Oracle Reports consists of the following:
■ Oracle Reports Builder, used to develop and compile your applications.
■ Oracle Reports Server, a server component used to deploy the applications.
During the installation, you will have the option to install only Oracle Reports Server or both Oracle Reports Server and Oracle Reports Builder (Oracle Reports Builder cannot be installed without Oracle Reports Server).
Oracle recommends installing Oracle Forms and Reports 11g Release 2 (11.1.2), which offers more advanced Identity Management (Oracle Internet Directory with Oracle Access Manager) and configuration options. For more information, refer to the Oracle Forms and Reports Download, Installation, and Configuration ReadMe for 11g Release 2 (11.1.2).
1.1.4 Oracle DiscovererOracle Discoverer is an intuitive ad-hoc query, reporting, analysis, and Web publishing set of tools that gives business users immediate access to information in databases.
If you are only installing only Oracle Discoverer, Oracle recommends that you install Oracle Discoverer and then configure Oracle Access Manager 11g afterwards. For more information, refer to the Oracle Business Intelligence Discoverer Configuration Guide.
1.2 Understanding the Oracle Portal, Forms, Reports and Discoverer Installation Types
Before you begin, you must decide which installation type you want to use to install and configure Oracle Portal, Forms, Reports and Discoverer.

Securing Oracle Portal, Forms, Reports and Discoverer with Oracle Identity Management
Installation Overview 1-3
The installer provides the following installation options:
■ Install and Configure
This option installs the product binaries in an Oracle home directory and creates and configures a working instance in an Oracle instance directory. The common product binaries are also copied to the oracle_common directory.
If you choose to install and configure Oracle Enterprise Manager during the installation and configuration process, you should be able to begin managing your products using the Administration Console or Enterprise Manager after the installation and configuration are completed.
■ Install Software - Do Not Configure
This option only installs the software binaries in an Oracle home directory and the common product binaries in the oracle_common directory. You must then manually run the Configuration Tool from the bin directory inside your Oracle home to configure your components before you can use them. This option is commonly used to quickly create multiple instances of the software that share a common disk, or to install the software and immediately apply a patch set to the installation before the software is configured.
For more information about the screens you may see and information you may be asked to provide for each installation type, see Appendix A, "Oracle Portal, Forms, Reports and Discoverer Installation and Configuration Screens".
1.3 Securing Oracle Portal, Forms, Reports and Discoverer with Oracle Identity Management
Your Oracle Portal, Forms, Reports and Discoverer installation can be secured with Identity Management by using Oracle Internet Directory with an existing Oracle Single Sign-On 10g environment.
New installations of Oracle Portal 11g require Oracle Single Sign-On 10g during the installation process. Your existing Oracle Single Sign-On 10g installation can be used for this purpose.
Oracle Forms, Reports and Discoverer can also be secured with your existing Oracle Internet Directory with Oracle Single Sign-On 10g during the installation process; you will be given the option to do so on the Specify Application OID screen.
Note: To install the latest Oracle Portal, Forms, Reports and Discoverer software, you must choose the Install Software - Do Not Configure installation type, as described in Section 1.4, "Installation and Configuration Roadmap for Oracle Portal, Forms, Reports and Discoverer". The installer for the latest release is designed only to patch an existing Oracle Portal, Forms, Reports and Discoverer installation.
Note: If you choose this installation type on a Windows operating system, there are manual configuration steps required for Oracle Discoverer. For more information, see Section 2.8.1, "Manual Configuration for Oracle Discoverer (Windows Only)".

Installation and Configuration Roadmap for Oracle Portal, Forms, Reports and Discoverer
1-4 Oracle Fusion Middleware Installation Guide for Oracle Portal, Forms, Reports and Discoverer
Important information about Oracle Single Sign-On 10g is provided in the "Evaluating Single Sign-On Installations" section in Oracle Fusion Middleware Installation Guide for Oracle Identity Management. It is highly recommended that you read this before you continue with your Oracle Portal, Forms, Reports and Discoverer installation.
1.4 Installation and Configuration Roadmap for Oracle Portal, Forms, Reports and Discoverer
Figure 1–1 shows the flow of a typical Oracle Portal, Forms, Reports and Discoverer installation and configuration.
Figure 1–1 Installation and Configuration Roadmap
Table 1–1 provides additional information and links to specific documentation for each task in the flowchart.
Topology Summary for Oracle Portal, Forms, Reports and Discoverer
Installation Overview 1-5
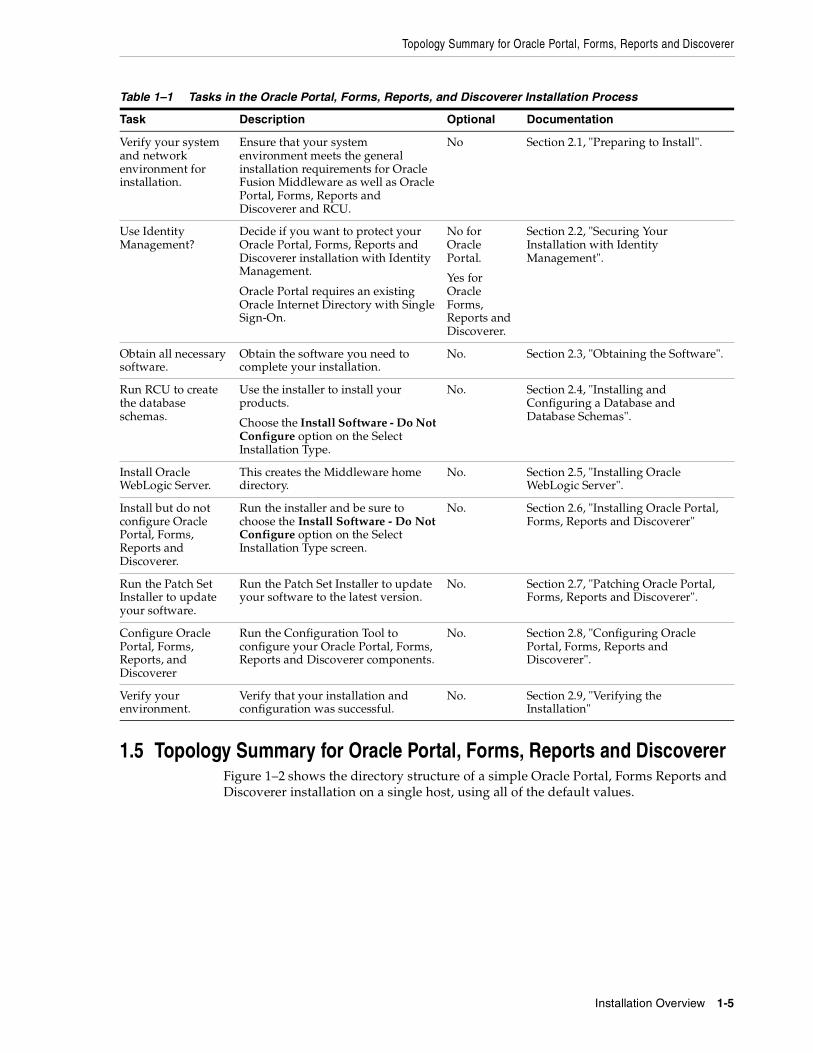
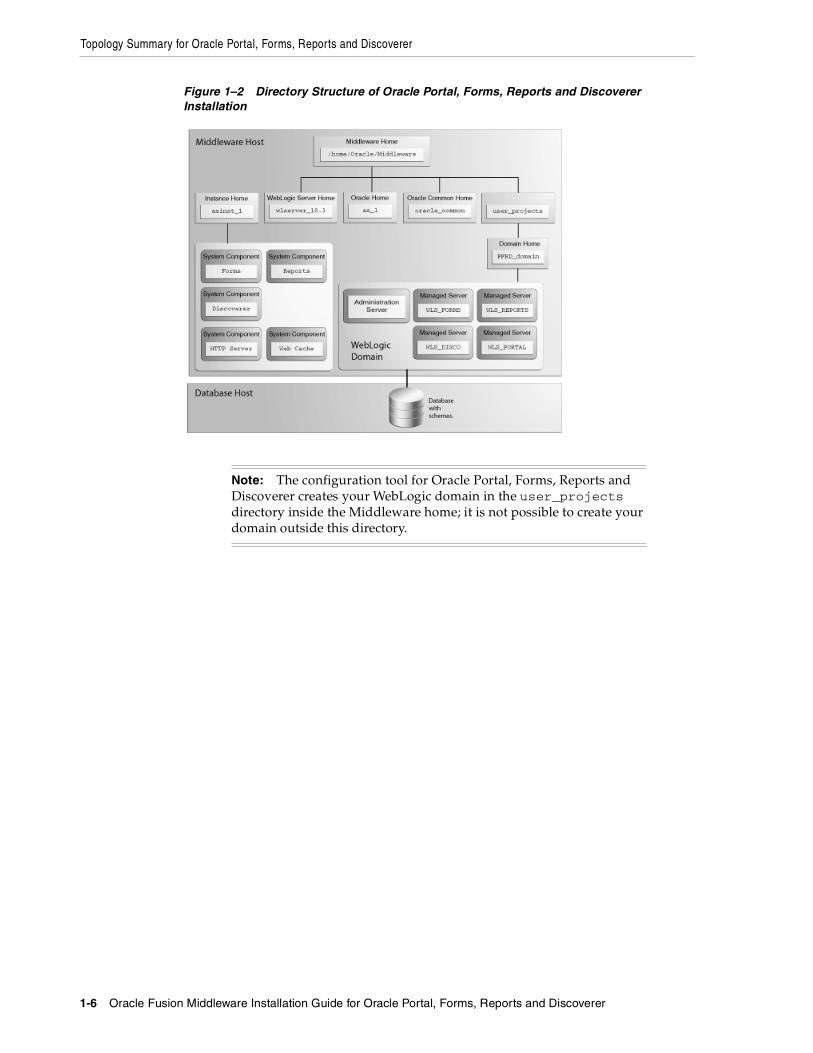
1.5 Topology Summary for Oracle Portal, Forms, Reports and DiscovererFigure 1–2 shows the directory structure of a simple Oracle Portal, Forms Reports and Discoverer installation on a single host, using all of the default values.
Table 1–1 Tasks in the Oracle Portal, Forms, Reports, and Discoverer Installation Process
Task Description Optional Documentation
Verify your system and network environment for installation.
Ensure that your system environment meets the general installation requirements for Oracle Fusion Middleware as well as Oracle Portal, Forms, Reports and Discoverer and RCU.
No Section 2.1, "Preparing to Install".
Use Identity Management?
Decide if you want to protect your Oracle Portal, Forms, Reports and Discoverer installation with Identity Management.
Oracle Portal requires an existing Oracle Internet Directory with Single Sign-On.
No for Oracle Portal.
Yes for Oracle Forms, Reports and Discoverer.
Section 2.2, "Securing Your Installation with Identity Management".
Obtain all necessary software.
Obtain the software you need to complete your installation.
No. Section 2.3, "Obtaining the Software".
Run RCU to create the database schemas.
Use the installer to install your products.
Choose the Install Software - Do Not Configure option on the Select Installation Type.
No. Section 2.4, "Installing and Configuring a Database and Database Schemas".
Install Oracle WebLogic Server.
This creates the Middleware home directory.
No. Section 2.5, "Installing Oracle WebLogic Server".
Install but do not configure Oracle Portal, Forms, Reports and Discoverer.
Run the installer and be sure to choose the Install Software - Do Not Configure option on the Select Installation Type screen.
No. Section 2.6, "Installing Oracle Portal, Forms, Reports and Discoverer"
Run the Patch Set Installer to update your software.
Run the Patch Set Installer to update your software to the latest version.
No. Section 2.7, "Patching Oracle Portal, Forms, Reports and Discoverer".
Configure Oracle Portal, Forms, Reports, and Discoverer
Run the Configuration Tool to configure your Oracle Portal, Forms, Reports and Discoverer components.
No. Section 2.8, "Configuring Oracle Portal, Forms, Reports and Discoverer".
Verify your environment.
Verify that your installation and configuration was successful.
No. Section 2.9, "Verifying the Installation"
Topology Summary for Oracle Portal, Forms, Reports and Discoverer
1-6 Oracle Fusion Middleware Installation Guide for Oracle Portal, Forms, Reports and Discoverer
Figure 1–2 Directory Structure of Oracle Portal, Forms, Reports and Discoverer Installation
Note: The configuration tool for Oracle Portal, Forms, Reports and Discoverer creates your WebLogic domain in the user_projects directory inside the Middleware home; it is not possible to create your domain outside this directory.
Installing Oracle Portal, Forms, Reports and Discoverer 2-1
2Installing Oracle Portal, Forms, Reports and
Discoverer
This chapter describes how to install and configure Oracle Portal, Forms, Reports and Discoverer.
The following topics are covered:
■ Section 2.1, "Preparing to Install"
■ Section 2.2, "Securing Your Installation with Identity Management"
■ Section 2.3, "Obtaining the Software"
■ Section 2.4, "Installing and Configuring a Database and Database Schemas"
■ Section 2.5, "Installing Oracle WebLogic Server"
■ Section 2.6, "Installing Oracle Portal, Forms, Reports and Discoverer"
■ Section 2.7, "Patching Oracle Portal, Forms, Reports and Discoverer"
■ Section 2.8, "Configuring Oracle Portal, Forms, Reports and Discoverer"
■ Section 2.9, "Verifying the Installation"
2.1 Preparing to InstallMake sure you have read and, if necessary, performed the tasks in this section before you install Oracle Portal, Forms, Reports and Discoverer:
■ Section 2.1.1, "Verifying Your System and Network Environment"
■ Section 2.2, "Securing Your Installation with Identity Management"
■ Section 2.1.2, "Running the rootpre.sh Script on IBM AIX Operating Systems"
■ Section 2.1.3, "Upgrading Oracle Web Agent (OWA) for Oracle Portal"
■ Section 2.1.4, "Installing Oracle Forms and Oracle Reports on Separate Servers"
■ Section 2.1.5, "Installing in a New Middleware Home"
2.1.1 Verifying Your System and Network EnvironmentTo verify that your system environment meets the minimum requirements for installation, refer to the following documents, available on Oracle Technology Network (OTN):
■ Oracle Fusion Middleware System Requirements and Specifications

Preparing to Install
2-2 Oracle Fusion Middleware Installation Guide for Oracle Portal, Forms, Reports and Discoverer
This document contains information related to hardware and software requirements, minimum disk space and memory requirements, database schema requirements, and required system libraries, packages, or patches.
If you are installing on a DHCP server, non-networked computer, or multihomed computer, there are additional configuration steps that are required. These steps are also available in the system requirements document in the "Oracle Fusion Middleware System Configuration Requirements" section.
If you are installing on a Windows operating system and want to install and configure Java Access Bridge for Section 508 Accessibility, read the "Installing and Configuring Java Access Bridge" section in this document.
■ Oracle Fusion Middleware Supported System Configurations
This page contains various certification documents for current and previous product releases. The System Requirements and Supported Platforms for Oracle Fusion Middleware 11gR1 document contains certification information related to supported 32-bit and 64-bit operating systems, databases, web servers, LDAP servers, adapters, IPv6, JDKs, and third-party products.
■ Oracle Fusion Middleware Interoperability and Compatibility Guide
This document covers the compatibility and interoperability issues that may arise when installing or upgrading Oracle Fusion Middleware 11g products.
2.1.2 Running the rootpre.sh Script on IBM AIX Operating SystemsIf you are installing on an IBM AIX operating system, you must run the rootpre.sh script as the root user from the Disk1 directory before you start the installer. The rootpre.sh script should be run only once on a system, to load the right kernel extensions required for Oracle Database or Oracle Fusion Middleware.
Once the installer is started on IBM AIX, the following message appears:
Answer 'y' if root has run 'rootpre.sh' so you can proceed with Oracle installation. Answer 'n' to abort installation and then ask root to run 'rootpre.sh'. Has 'rootpre.sh' been run by root? [y/n] (n) Answer 'y', if root has run 'rootpre.sh' so that you can proceed with Oracle installation. Answer 'n', to abort installation and then ask root to run 'rootpre.sh'.
To skip this message on systems where rootpre.sh has run before, set the SKIP_ROOTPRE environment variable to TRUE.
2.1.3 Upgrading Oracle Web Agent (OWA) for Oracle PortalOracle Fusion Middleware 11g Release 1 (11.1.1) includes a new version of the Oracle Web Agent (OWA) packages. Existing packages will be updated to the new version the first time either an Oracle Portal 11g repository is installed or when an existing Oracle Portal repository is upgraded to 11g. When the OWA update takes place, packages from existing Oracle Portal schemas that reside in the same database will become invalid. The OWA update ends with an attempt to revalidate all invalid packages in all Oracle Portal schemas in the existing database instance.
For more information about upgrading OWA, refer to "Updating the Oracle Web Agent (OWA) Packages During an Oracle Portal Upgrade" in Oracle Fusion Middleware Upgrade Guide for Oracle Portal, Forms, Reports, and Discoverer.
Obtaining the Software
Installing Oracle Portal, Forms, Reports and Discoverer 2-3
2.1.4 Installing Oracle Forms and Oracle Reports on Separate ServersIf you choose to install Oracle Forms and Oracle Reports on different servers, you must perform some manual configuration in order for these two products to be able to communicate properly with each other.
The instructions for doing so are available in "Communication Between Reports and Forms When Installed on Different Instances" in Oracle Fusion Middleware Publishing Reports to the Web with Oracle Reports Services.
2.1.5 Installing in a New Middleware HomeOracle Portal, Forms, Reports and Discoverer must be installed inside a Middleware home directory, which is created when Oracle WebLogic Server is installed.
Oracle recommends that Oracle Portal, Forms, Reports and Discoverer be installed in its own Middleware home directory that it does not share with any other Oracle Fusion Middleware products. This recommendation is because Oracle recommends the contents of Middleware home consist of products that are compatible as described in "Domain Extension Interoperability" in Oracle Fusion Middleware Interoperability and Compatibility Guide.
If necessary, Oracle Portal, Forms, Reports and Discoverer can be installed in the same Middleware home as another Oracle Fusion Middleware product provided that it does not share a domain with any other product, and also provided that all products in the Middleware home are the same version.
For more information, see the Oracle Fusion Middleware Interoperability and Compatibility Guide.
2.2 Securing Your Installation with Identity ManagementOracle Portal requires an existing Oracle Internet Directory (OID) with Oracle Single Sign-On (SSO) 10g. If you are also installing Oracle Forms, Reports or Discoverer, you will have the option to configure these products with your existing Oracle Single Sign-On, but it is not mandatory.
Important information about Oracle Single Sign-On 10g is provided in the "Evaluating Single Sign-On Installations" section in Oracle Fusion Middleware Installation Guide for Oracle Identity Management. It is highly recommended that you read this before you continue with your Oracle Portal, Forms, Reports and Discoverer installation.
After your Oracle Portal instance is configured, it is automatically integrated with your Oracle Internet Directory and Oracle Single Sign-On. Oracle Forms and Oracle Reports are not automatically configured. For more information, see:
■ "Using Forms Services with Oracle Single Sign-On" in Oracle Fusion Middleware Forms Services Deployment Guide.
■ "Configuring and Administering OracleAS Single Sign-On" in Oracle Fusion Middleware Publishing Reports to the Web with Oracle Reports Services.
2.3 Obtaining the SoftwareDepending on your specific needs, there are multiple places where you can obtain Oracle Fusion Middleware software. For details, refer to the Oracle Fusion Middleware Download, Installation, and Configuration ReadMe Files page, where you can find the ReadMe file for your specific release.

Installing and Configuring a Database and Database Schemas
2-4 Oracle Fusion Middleware Installation Guide for Oracle Portal, Forms, Reports and Discoverer
To install Oracle Portal, Forms, Reports and Discoverer, you will need to obtain the following:
■ If you want to protect your Oracle Portal, Forms, Reports and Discoverer installation with Oracle Identity Management, obtain Oracle Identity Management.
Note that Oracle Portal requires an existing Oracle Internet Directory with Single Sign-On on your system.
■ The latest version of Repository Creation Utility for creating the database schemas. You must also have a database that is supported for use with RCU.
■ The latest version of Oracle WebLogic Server for creating the Middleware home.
■ Oracle Portal, Forms, Reports and Discoverer 11g Release 1 (11.1.1.2.0).
■ Patch Set Installer for Oracle Portal, Forms, Reports and Discoverer 11g Release 1 (11.1.1.6.0).
Select one of the download locations and download the required software. Each download will be saved to your system as a .zip archive file.
After you download the archive file, unpack the archive file into a directory of your choice on the machine where you will be performing the installation.
2.4 Installing and Configuring a Database and Database SchemasOracle Portal and Oracle Discoverer require database schemas on an Oracle database. These schemas can be created by using the Repository Creation Utility (RCU).
■ The System Requirements and Supported Platforms for Oracle Fusion Middleware 11gR1 document lists the databases that are certified for use with RCU and Oracle Fusion Middleware. This document is located on the Oracle Fusion Middleware Supported System Configurations page.
■ To ensure that your Oracle database is configured properly, see "RCU Requirements for Oracle Databases" in the Oracle Fusion Middleware System Requirements and Specifications document.
After your database is installed and configured, run RCU to create the schemas for Oracle Portal and Oracle Discoverer. For instructions, see "Creating Schemas" in Oracle Fusion Middleware Repository Creation Utility User's Guide.
2.5 Installing Oracle WebLogic ServerOracle Portal, Forms, Reports and Discoverer requires Oracle WebLogic Server, which creates the Middleware home directory during installation. For more information, see "Oracle Fusion Middleware Directory Structure" in Oracle Fusion Middleware Installation Planning Guide.
This section contains the following topics:
■ Section 2.5.1, "Planning Your Middleware Home Location for Oracle Reports (Windows Only)"
■ Section 2.5.2, "Finding Oracle WebLogic Server Installation Instructions"
■ Section 2.5.3, "Stopping Node Manager Before Installing Oracle Portal, Forms, Reports and Discoverer (Windows Only)"
Installing Oracle WebLogic Server
Installing Oracle Portal, Forms, Reports and Discoverer 2-5
2.5.1 Planning Your Middleware Home Location for Oracle Reports (Windows Only)If you are going to install Oracle Reports on a Windows operating system, make sure the path to your Middleware home directory is not too long. For more information, see Section F.3, "Verifying Environment Variable Lengths for Oracle Reports (Windows Only)".
2.5.2 Finding Oracle WebLogic Server Installation InstructionsFor Oracle WebLogic Server installation instructions, see "Running the Installation Program in Graphical Mode" in Oracle WebLogic Server Installation Guide. The WebLogic Server installation must be completed so that a Middleware home directory is created; you do not have to create a WebLogic Server domain as the Oracle Forms and Reports installer will allow you to do this for your Oracle Forms and Reports products.
If you are installing on a Windows operating system, be sure to read Section 2.5.3, "Stopping Node Manager Before Installing Oracle Portal, Forms, Reports and Discoverer (Windows Only)" after your Oracle WebLogic Server installation is complete.
2.5.3 Stopping Node Manager Before Installing Oracle Portal, Forms, Reports and Discoverer (Windows Only)
If you are installing Oracle Portal, Forms, Reports and Discoverer on a Microsoft Windows operating system, you must make sure that the Node Manager utility that was installed with Oracle WebLogic Server is stopped before you install your Oracle Portal, Forms, Reports and Discoverer software:
1. Verify the Oracle WebLogic Server Node Manager utility is stopped. If it is running, kill the process.
2. Determine if the nodemanager.properties file is present in the WebLogic_Home\common\nodemanager directory.
a. If the nodemanager.properties file is not present, continue installing Oracle Portal, Forms, Reports and Discoverer.
b. If the nodemanager.properties file does exist, open it and verify that the ListenPort parameter is included and that it is set. If the ListenPort parameter is not included or set, edit the nodemanager.properties file so that it is similar to the following, where NODE_MANAGER_LISTEN_PORT represents the port the Node Manager listens on, such as 5556:
ListenPort=NODE_MANAGER_LISTEN_PORT
Note: If you choose to install WebLogic Server using the Custom installation type on the "Choose Install Type" screen, you must make sure that the following components are installed in order for Oracle Discoverer to work properly:
■ UDDI and Xquery Support
■ WebLogic JDBC Drivers
■ Third Party JDBC Drivers

Installing Oracle Portal, Forms, Reports and Discoverer
2-6 Oracle Fusion Middleware Installation Guide for Oracle Portal, Forms, Reports and Discoverer
2.6 Installing Oracle Portal, Forms, Reports and DiscovererThis section contains information and instructions for installing the latest Oracle Portal, Forms, Reports and Discoverer software. The following topics are covered:
■ Section 2.6.1, "Starting the Installer"
■ Section 2.6.2, "Configuring Your Oracle Inventory (UNIX Only)"
■ Section 2.6.3, "Following the Installation Screens and Instructions"
2.6.1 Starting the InstallerTo start the installer, go to the directory where you unpacked the archive file and switch to the Disk1 directory.
2.6.1.1 Start the InstallerOn UNIX operating systems:
cd unpacked_archive_directory/Disk1./runInstaller
On Windows operating systems:
cd unpacked_archive_directory\Disk1setup.exe
If you are installing on an HP-UX system with a PA-RISC processor, you must specify the location of a JRE on your system as follows:
./runInstaller -jreLoc JRE_LOCATION
Refer to the Oracle Fusion Middleware Certification document to see the JDKs supported for your system:
http://www.oracle.com/technology/software/products/ias/files/fusion_certification.html
2.6.1.2 Installation Log FilesThe installer writes logs files to the Oracle_Inventory_Location/log (on UNIX operating systems) or Oracle_Inventory_Location\logs (on Windows operating systems) directory. Refer to Section F.2.1, "Installation Log Files" for more information about the log files and their contents.
2.6.2 Configuring Your Oracle Inventory (UNIX Only)If you are installing on a UNIX operating system, and if this is the first time any Oracle product is being installed on your system with the Oracle Universal Installer, you will be asked to provide the location of an inventory directory. This is where the installer will set up subdirectories and maintain inventory data for each Oracle product that is installed on this system.
Follow the instructions in Table 2–1 to configure the inventory directory information. For more help, select the screen name in the table below, or click the Help button in the GUI.

Installing Oracle Portal, Forms, Reports and Discoverer
Installing Oracle Portal, Forms, Reports and Discoverer 2-7
If you do not wish to use the Oracle central inventory, you can create a file called oraInst.loc and in this file, include the full path of the inventory directory of your choice in the oraInst.loc file. Then, you can start the installer and point to the oraInst.loc file. For example, on UNIX operating systems:
./runInstaller -invPtrLoc location_of_oraInst.loc_file
On Windows operating systems:
setup.exe -invPtrLoc location_of_oraInst.loc_file
2.6.3 Following the Installation Screens and InstructionsFollow the instructions in Table 2–2 to install Oracle Portal, Forms, Reports and Discoverer.
If you need additional help with any of the installation screens, refer to Appendix A, "Oracle Portal, Forms, Reports and Discoverer Installation and Configuration Screens" or click Help to access the online help.
Table 2–1 Inventory Directory and Group Screens
Screen Description and Action Required
Specify Inventory Directory Specify the Oracle inventory directory and group permissions for that directory. The group must have write permissions to the Oracle inventory directory.
Inventory Location Confirmation Run the createCentralInventory.sh script as root.
Table 2–2 Installation Flow for Install Only Option
Screen Description
Welcome This page introduces you to the Oracle Fusion Middleware installer.
Select Installation Type Select Install Software - Do Not Configure.
Prerequisite Checks Verify that your system meets all necessary prerequisites.
Specify Installation Location Specify the following installation directories:
■ Middleware home
■ Oracle home
Specify Security Updates Select the method in which you want to receive the latest product information and security updates.
Installation Summary (Install Only Option)
Verify the information on this screen, then click Install to begin the installation.
Installation Progress This screen shows the progress of the installation.
If you are installing on a UNIX operating system, you may be asked to run the ORACLE_HOME/oracleRoot.sh script to set up the proper file and directory permissions.
Installation Complete Click Save to save your configuration information to a file. This information includes port numbers, installation directories, URLs, and component names which you may need to access at a later time.
After saving your configuration information, click Finish to dismiss the installer.
Patching Oracle Portal, Forms, Reports and Discoverer
2-8 Oracle Fusion Middleware Installation Guide for Oracle Portal, Forms, Reports and Discoverer
2.7 Patching Oracle Portal, Forms, Reports and DiscovererAfter the installation is complete, you must run the Patch Set Installer for Oracle Portal, Forms, Reports and Discoverer to update your software to the latest version.
For instructions, go to "Applying the Latest Oracle Fusion Middleware Patch Set" in Oracle Fusion Middleware Patching Guide.
2.8 Configuring Oracle Portal, Forms, Reports and DiscovererAfter you have patched your software to the latest version (Section 2.7, "Patching Oracle Portal, Forms, Reports and Discoverer"), you are ready to configure your components.
Run the Configuration Tool to create your WebLogic Domain and configure your components.
On UNIX systems:
ORACLE_HOME/bin/config.sh
On Windows systems:
ORACLE_HOME\bin\config.bat
Follow the instructions in Table 2–3 to configure Oracle Portal, Forms, Reports and Discoverer.
If you need additional help with any of the installation screens, refer to Appendix A, "Oracle Portal, Forms, Reports and Discoverer Installation and Configuration Screens" or click Help to access the online help.
Note: Make sure the Oracle Portal, Forms, Reports and Discoverer installer is not running; running the installer and Configuration Tool concurrently is not supported.
Configuring Oracle Portal, Forms, Reports and Discoverer
Installing Oracle Portal, Forms, Reports and Discoverer 2-9
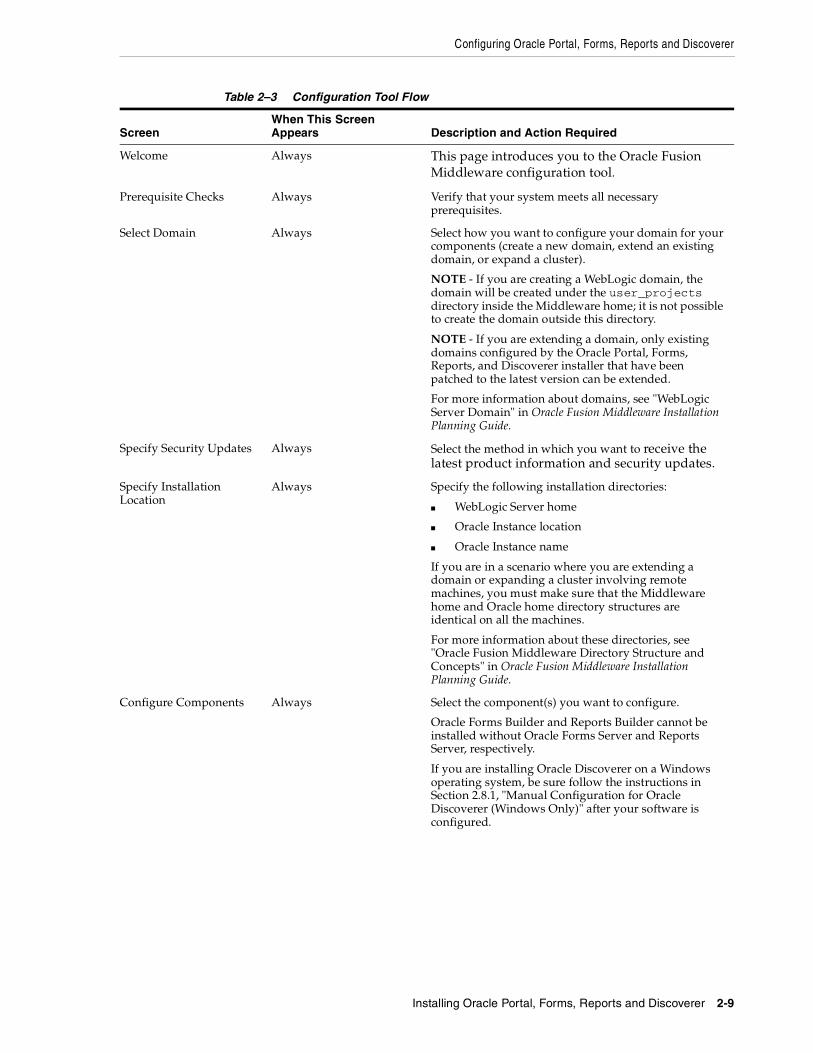
Table 2–3 Configuration Tool Flow
ScreenWhen This Screen Appears Description and Action Required
Welcome Always This page introduces you to the Oracle Fusion Middleware configuration tool.
Prerequisite Checks Always Verify that your system meets all necessary prerequisites.
Select Domain Always Select how you want to configure your domain for your components (create a new domain, extend an existing domain, or expand a cluster).
NOTE - If you are creating a WebLogic domain, the domain will be created under the user_projects directory inside the Middleware home; it is not possible to create the domain outside this directory.
NOTE - If you are extending a domain, only existing domains configured by the Oracle Portal, Forms, Reports, and Discoverer installer that have been patched to the latest version can be extended.
For more information about domains, see "WebLogic Server Domain" in Oracle Fusion Middleware Installation Planning Guide.
Specify Security Updates Always Select the method in which you want to receive the latest product information and security updates.
Specify Installation Location
Always Specify the following installation directories:
■ WebLogic Server home
■ Oracle Instance location
■ Oracle Instance name
If you are in a scenario where you are extending a domain or expanding a cluster involving remote machines, you must make sure that the Middleware home and Oracle home directory structures are identical on all the machines.
For more information about these directories, see "Oracle Fusion Middleware Directory Structure and Concepts" in Oracle Fusion Middleware Installation Planning Guide.
Configure Components Always Select the component(s) you want to configure.
Oracle Forms Builder and Reports Builder cannot be installed without Oracle Forms Server and Reports Server, respectively.
If you are installing Oracle Discoverer on a Windows operating system, be sure follow the instructions in Section 2.8.1, "Manual Configuration for Oracle Discoverer (Windows Only)" after your software is configured.
Configuring Oracle Portal, Forms, Reports and Discoverer
2-10 Oracle Fusion Middleware Installation Guide for Oracle Portal, Forms, Reports and Discoverer
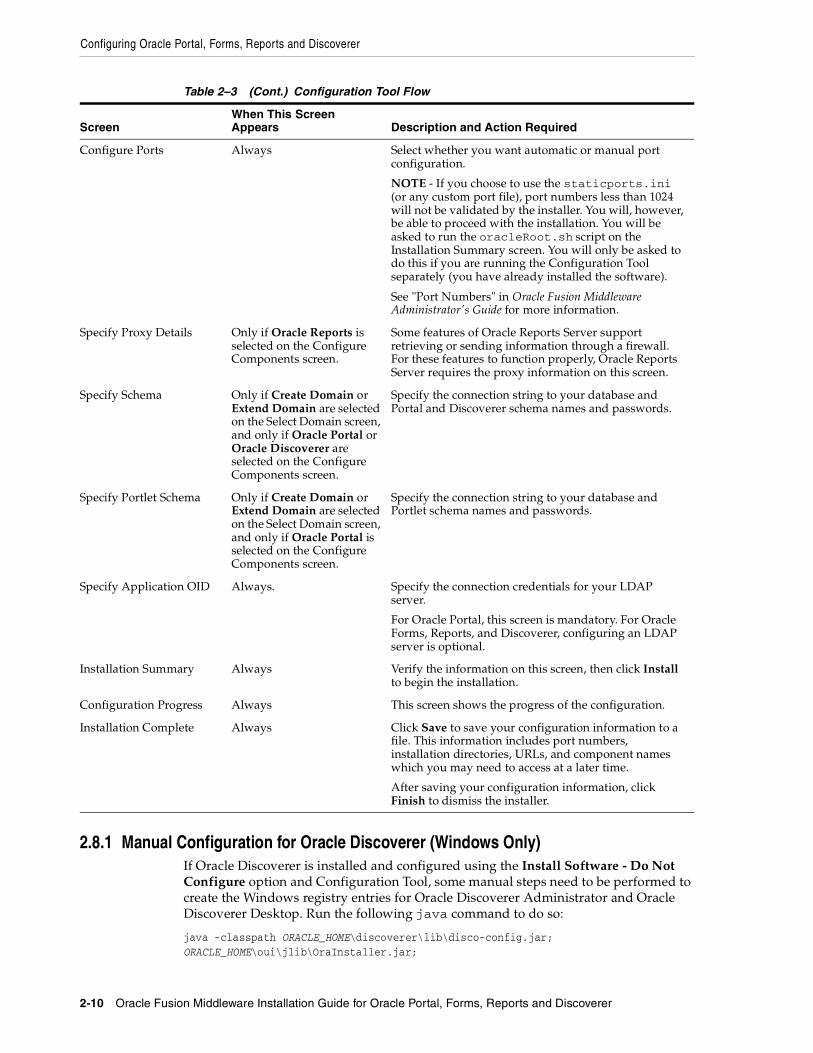
2.8.1 Manual Configuration for Oracle Discoverer (Windows Only)If Oracle Discoverer is installed and configured using the Install Software - Do Not Configure option and Configuration Tool, some manual steps need to be performed to create the Windows registry entries for Oracle Discoverer Administrator and Oracle Discoverer Desktop. Run the following java command to do so:
java -classpath ORACLE_HOME\discoverer\lib\disco-config.jar;ORACLE_HOME\oui\jlib\OraInstaller.jar;
Configure Ports Always Select whether you want automatic or manual port configuration.
NOTE - If you choose to use the staticports.ini (or any custom port file), port numbers less than 1024 will not be validated by the installer. You will, however, be able to proceed with the installation. You will be asked to run the oracleRoot.sh script on the Installation Summary screen. You will only be asked to do this if you are running the Configuration Tool separately (you have already installed the software).
See "Port Numbers" in Oracle Fusion Middleware Administrator's Guide for more information.
Specify Proxy Details Only if Oracle Reports is selected on the Configure Components screen.
Some features of Oracle Reports Server support retrieving or sending information through a firewall. For these features to function properly, Oracle Reports Server requires the proxy information on this screen.
Specify Schema Only if Create Domain or Extend Domain are selected on the Select Domain screen, and only if Oracle Portal or Oracle Discoverer are selected on the Configure Components screen.
Specify the connection string to your database and Portal and Discoverer schema names and passwords.
Specify Portlet Schema Only if Create Domain or Extend Domain are selected on the Select Domain screen, and only if Oracle Portal is selected on the Configure Components screen.
Specify the connection string to your database and Portlet schema names and passwords.
Specify Application OID Always. Specify the connection credentials for your LDAP server.
For Oracle Portal, this screen is mandatory. For Oracle Forms, Reports, and Discoverer, configuring an LDAP server is optional.
Installation Summary Always Verify the information on this screen, then click Install to begin the installation.
Configuration Progress Always This screen shows the progress of the configuration.
Installation Complete Always Click Save to save your configuration information to a file. This information includes port numbers, installation directories, URLs, and component names which you may need to access at a later time.
After saving your configuration information, click Finish to dismiss the installer.
Table 2–3 (Cont.) Configuration Tool Flow
ScreenWhen This Screen Appears Description and Action Required

Verifying the Installation
Installing Oracle Portal, Forms, Reports and Discoverer 2-11
ORACLE_HOME\opmn\lib\iasprovision.jar -Djava.library.path=ORACLE_HOME\oui\lib\win32 oracle.disco.install.config.DiscoUtil -oraclehome ORACLE_HOME -tnsadmin TNS_ADMIN_DIR
■ Replace ORACLE_HOME with the full path to your Oracle Portal, Forms, Reports and Discoverer Oracle home directory.
■ Replace TNS_ADMIN_DIR with the path to the directory where the tnsnames.ora file is located. If this file does not already exist, create it and supply the directory in place of the TNS_ADMIN_DIR variable.
■ The Java class path must be set properly with the -classpath parameter.
■ The java.library.path must be set to the directory containing OraInstaller.dll.
2.9 Verifying the InstallationAfter you have successfully run the installer and configuration wizard, you can verify the status of your installation by performing any combination of the following:
■ Verifying the Installation Logs
■ Verifying the Domain Server Logs
■ Verifying OPMN Status
■ Checking Browser URLs
2.9.1 Verifying the Installation LogsCheck for the presence of installation log files in logs directory inside your Oracle Inventory directory. On UNIX systems, if you do not know the location of your Oracle Inventory directory, you can find it in the ORACLE_HOME/oraInst.loc file. On Windows systems, the default location for the inventory directory is C:\Program Files\Oracle\Inventory\logs.
For more information about the installation log files, refer to Section F.2.1, "Installation Log Files".
2.9.2 Verifying the Domain Server LogsCheck the domain server logs, which are located in the servers directory inside the domain home directory. For example, on UNIX systems:
MW_HOME/user_projects/domains/domain_name/servers/server_name
On Windows systems:
MW_HOME\user_projects\domains\domain_name\servers\server_name
2.9.3 Verifying OPMN StatusRun the opmnctl status command from the INSTANCE_HOME/bin (on UNIX operating systems) or INSTANCE_HOME\bin (on Windows operating systems) directory in your instance home location. The example below shows the output on a UNIX system:
> ./opmnctl status
Processes in Instance: asinst_1

Verifying the Installation
2-12 Oracle Fusion Middleware Installation Guide for Oracle Portal, Forms, Reports and Discoverer
---------------------------------+--------------------+---------+---------ias-component | process-type | pid | status ---------------------------------+--------------------+---------+---------emagent_asinst_1 | EMAGENT | 11849 | Alive wc1 | WebCache-admin | 11333 | Alive wc1 | WebCache | 11332 | Alive ohs1 | OHS | 11207 | Alive
This information shows the components configured for this installation. The status "Alive" means the component is up and running.
You can also run the opmnctl status -l command to obtain a list of ports used by the components. The example below shows the output on a UNIX system:
> ./opmnctl status -l
Processes in Instance: asinst_1---------------------------------+--------------------+---------+----------+------------+----------+-----------+------ias-component | process-type | pid | status | uid | memused | uptime | ports---------------------------------+--------------------+---------+----------+------------+----------+-----------+------emagent_asinst_1 | EMAGENT | 11849 | Alive | 1133259606 | 4204 | 0:09:38 | N/Awc1 | WebCache-admin | 11333 | Alive | 1133259605 | 43736 | 0:15:35 | http_admin:8091wc1 | WebCache | 11332 | Alive | 1133259604 | 63940 | 0:15:35 | http_stat:8092,http_invalidation:8093,https_listen:8094,http_listen:8090ohs1 | OHS | 11207 | Alive | 1133259603 | 50744 | 0:15:43 | https:8889,https:8890,http:8888
2.9.4 Checking Browser URLsThe Installation Complete contains URLs that can be used to access your installed and configured products, as shown in Table 2–4:
Table 2–4 Oracle Portal, Forms, Reports, and Discoverer Product URLs
Product or Component URL
Administration Server Console http://host:port/console
Enterprise Manager Console http://host:port/em
Enterprise Manager Agent http://host:port/emd/main
Oracle Portal http://host:port/portal/pls/portal
Oracle Forms http://host:port/forms/frmservlet
Oracle Reports http://host:port/reports/rwservlet
Oracle Discoverer Viewer http://host:port/discoverer/viewer
Installing Oracle Discoverer Desktop 3-1
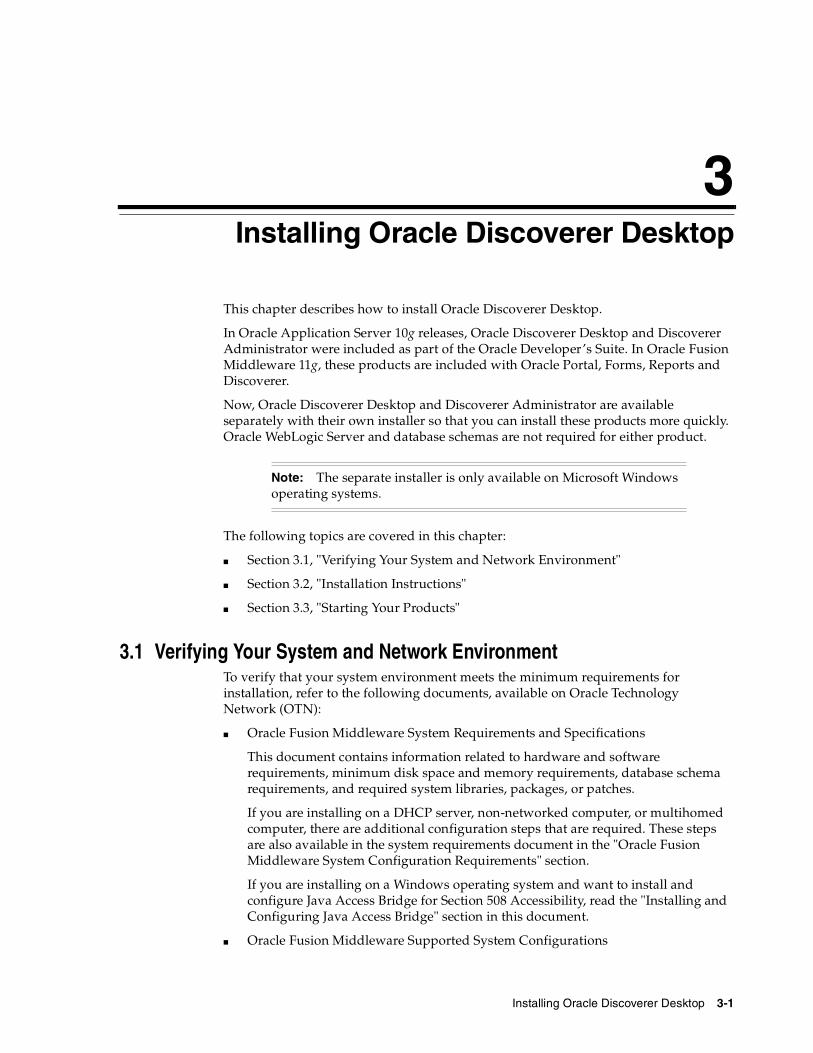
3Installing Oracle Discoverer Desktop
This chapter describes how to install Oracle Discoverer Desktop.
In Oracle Application Server 10g releases, Oracle Discoverer Desktop and Discoverer Administrator were included as part of the Oracle Developer’s Suite. In Oracle Fusion Middleware 11g, these products are included with Oracle Portal, Forms, Reports and Discoverer.
Now, Oracle Discoverer Desktop and Discoverer Administrator are available separately with their own installer so that you can install these products more quickly. Oracle WebLogic Server and database schemas are not required for either product.
The following topics are covered in this chapter:
■ Section 3.1, "Verifying Your System and Network Environment"
■ Section 3.2, "Installation Instructions"
■ Section 3.3, "Starting Your Products"
3.1 Verifying Your System and Network EnvironmentTo verify that your system environment meets the minimum requirements for installation, refer to the following documents, available on Oracle Technology Network (OTN):
■ Oracle Fusion Middleware System Requirements and Specifications
This document contains information related to hardware and software requirements, minimum disk space and memory requirements, database schema requirements, and required system libraries, packages, or patches.
If you are installing on a DHCP server, non-networked computer, or multihomed computer, there are additional configuration steps that are required. These steps are also available in the system requirements document in the "Oracle Fusion Middleware System Configuration Requirements" section.
If you are installing on a Windows operating system and want to install and configure Java Access Bridge for Section 508 Accessibility, read the "Installing and Configuring Java Access Bridge" section in this document.
■ Oracle Fusion Middleware Supported System Configurations
Note: The separate installer is only available on Microsoft Windows operating systems.

Installation Instructions
3-2 Oracle Fusion Middleware Installation Guide for Oracle Portal, Forms, Reports and Discoverer
This page contains various certification documents for current and previous product releases. The System Requirements and Supported Platforms for Oracle Fusion Middleware 11gR1 document contains certification information related to supported 32-bit and 64-bit operating systems, databases, web servers, LDAP servers, adapters, IPv6, JDKs, and third-party products.
■ Oracle Fusion Middleware Interoperability and Compatibility Guide
This document covers the compatibility and interoperability issues that may arise when installing or upgrading Oracle Fusion Middleware 11g products.
3.2 Installation InstructionsWhen you run the installer, Application Developer is installed onto your system. After the product is installed, you must run the Configuration Wizard to configure Application Developer.
This section contains the following topics:
■ Section 3.2.1, "Starting the Installer"
■ Section 3.2.2, "Finding the Installation Log Files"
■ Section 3.2.3, "Following the Installation Screens and Instructions"
3.2.1 Starting the InstallerTo start the installer, insert the product CD-ROM. If your system is not configured for autorun, find and execute the setup.exe file.
3.2.2 Finding the Installation Log FilesThe installer writes logs files to the Oracle_Inventory_Location\logs directory. Refer to Section F.2.1, "Installation Log Files" for more information about the log files and their contents.
3.2.3 Following the Installation Screens and InstructionsFollow the instructions in Table 3–1 to install Oracle Discoverer Desktop and Discoverer Administrator.
If you need additional help with any of the installation screens, refer to Appendix B, "Oracle Discoverer Desktop Installation Screens" or click Help to access the online help.
Table 3–1 Installation Screens
Screen Description and Action Required
Welcome This page introduces you to the Oracle Fusion Middleware installer.
Prerequisite Checks Verify that your system meets all necessary prerequisites.
Specify Installation Location Specify the directory where you want to install the software. This directory is your Oracle home directory:
■ If you specify an existing directory, make sure the directory is empty.
■ If you specify a new directory, the installer will create the directory for you.
Starting Your Products
Installing Oracle Discoverer Desktop 3-3
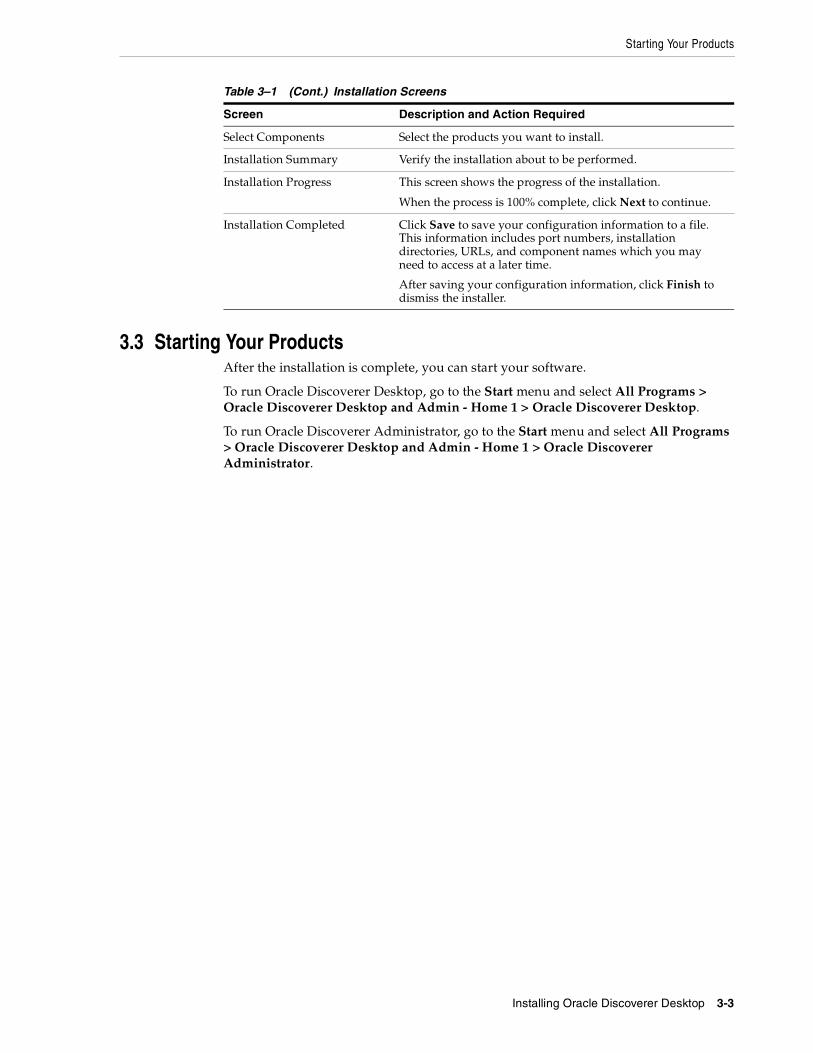
3.3 Starting Your ProductsAfter the installation is complete, you can start your software.
To run Oracle Discoverer Desktop, go to the Start menu and select All Programs > Oracle Discoverer Desktop and Admin - Home 1 > Oracle Discoverer Desktop.
To run Oracle Discoverer Administrator, go to the Start menu and select All Programs > Oracle Discoverer Desktop and Admin - Home 1 > Oracle Discoverer Administrator.
Select Components Select the products you want to install.
Installation Summary Verify the installation about to be performed.
Installation Progress This screen shows the progress of the installation.
When the process is 100% complete, click Next to continue.
Installation Completed Click Save to save your configuration information to a file. This information includes port numbers, installation directories, URLs, and component names which you may need to access at a later time.
After saving your configuration information, click Finish to dismiss the installer.
Table 3–1 (Cont.) Installation Screens
Screen Description and Action Required

Starting Your Products
3-4 Oracle Fusion Middleware Installation Guide for Oracle Portal, Forms, Reports and Discoverer
Deinstalling Oracle Portal, Forms, Reports and Discoverer 4-1
4Deinstalling Oracle Portal, Forms, Reports
and Discoverer
This chapter describes how to remove Oracle Portal, Forms, Reports and Discoverer from your system.
You should always use the instructions provided in this chapter for removing the software. If you try to remove the software manually, you may experience problems when you try to reinstall the software again at a later time. Following the procedures in this chapter will ensure that the software is properly removed. See Section 4.4, "Reinstalling the Software" for more information.
The following topics are covered:
■ Section 4.1, "Understanding the Deinstallation"
■ Section 4.2, "Deinstalling the Software"
■ Section 4.4, "Reinstalling the Software"
4.1 Understanding the DeinstallationThe Oracle Portal, Forms, Reports and Discoverer deinstaller gives you the following software removal options, which should be performed in the order shown:
■ Deinstall Unmanaged ASInstances
This option removes instances of your system components not associated with a WebLogic domain.
■ Deinstall ASInstances managed by WebLogic Domain
This option removes instances of your system components that are managed by a WebLogic domain. The Administration Server must be up and running in order to
Note: If you need to remove a particular product component, you must remove the entire domain containing the component. It is not possible to remove a single product from a domain containing multiple products.
Note: This option is not applicable to Oracle Portal, Forms, Reports and Discoverer since all components must be associated with a WebLogic Server domain.

Understanding the Deinstallation
4-2 Oracle Fusion Middleware Installation Guide for Oracle Portal, Forms, Reports and Discoverer
remove managed instances; you will need to specify the credentials to access your WebLogic domain.
You should choose this option if you have configured any Oracle Forms and Reports components, either by using the installer or the configuration tool.
■ Deinstall Oracle Home
This option removes everything under the Oracle home from which the deinstaller is started and also gives you the option to remove the Oracle home directory. Be sure that you have removed all unmanaged and managed instances of your system components and also stopped all the servers before you remove the Oracle home. The deinstaller only removes the Oracle home directory from where it was started and does not remove any associated managed instances.
You should choose this option:
– If you have configured any Oracle Portal, Forms, Reports and Discoverer components, have already removed all managed instances of those components, have stopped all the servers, and are ready to remove the software in the Oracle home.
– If you have performed a software-only installation and want to remove the installed software. For this scenario, since you did not configure any Oracle Forms and Reports components, you do not need to select the Deinstall ASInstances managed by WebLogic Domain option; you can start the deinstaller and go directly to the Deinstall Oracle Home option.
There are two Oracle home directories that need to be removed: the Oracle Portal, Forms, Reports and Discoverer Oracle home and also the Oracle Common home. Each Oracle home contains its own deinstaller; you must start the deinstaller separately for each Oracle home as the deinstaller only removes the Oracle home from where it is started.
If you want to also remove Oracle WebLogic Server from your system, you must run the Oracle WebLogic Server uninstaller to do so. Refer to the instructions in Section 4.2.3, "Removing Oracle WebLogic Server and WebLogic Server Domains".
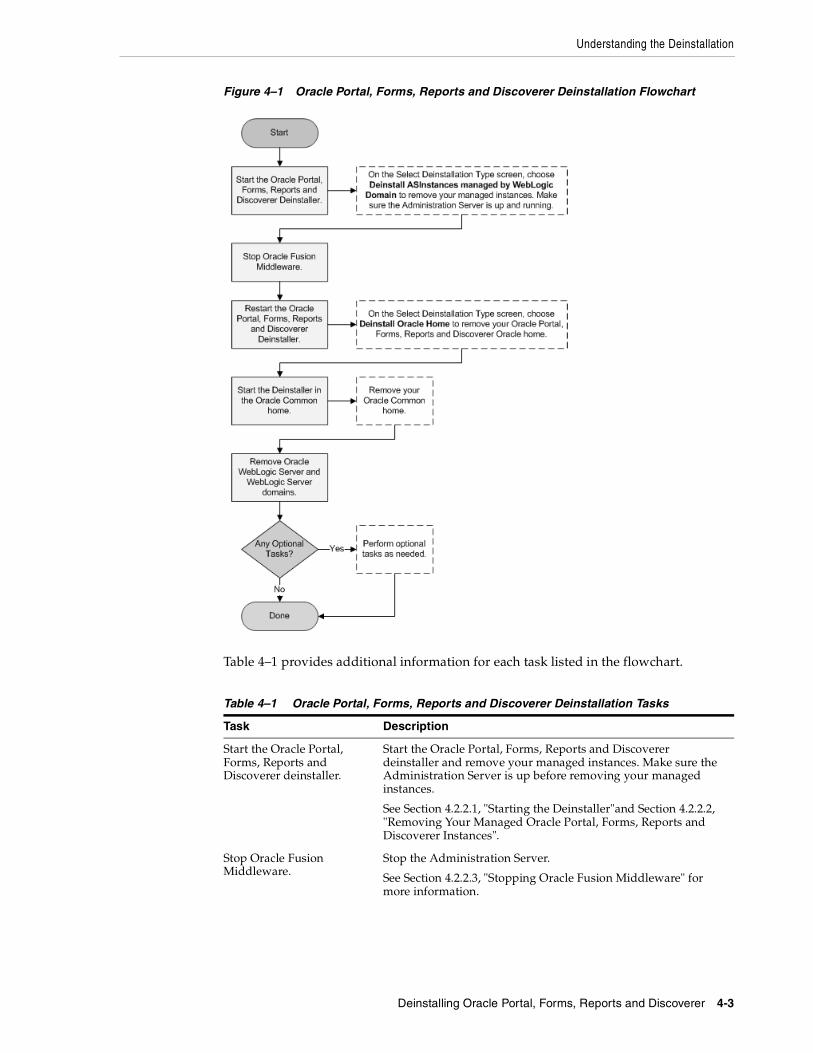
Figure 4–1 illustrates the order in which these deinstallation options, along with other related tasks, should be performed (assuming that managed instances were configured on your system):
Understanding the Deinstallation
Deinstalling Oracle Portal, Forms, Reports and Discoverer 4-3
Figure 4–1 Oracle Portal, Forms, Reports and Discoverer Deinstallation Flowchart
Table 4–1 provides additional information for each task listed in the flowchart.
Table 4–1 Oracle Portal, Forms, Reports and Discoverer Deinstallation Tasks
Task Description
Start the Oracle Portal, Forms, Reports and Discoverer deinstaller.
Start the Oracle Portal, Forms, Reports and Discoverer deinstaller and remove your managed instances. Make sure the Administration Server is up before removing your managed instances.
See Section 4.2.2.1, "Starting the Deinstaller"and Section 4.2.2.2, "Removing Your Managed Oracle Portal, Forms, Reports and Discoverer Instances".
Stop Oracle Fusion Middleware.
Stop the Administration Server.
See Section 4.2.2.3, "Stopping Oracle Fusion Middleware" for more information.
Deinstalling the Software
4-4 Oracle Fusion Middleware Installation Guide for Oracle Portal, Forms, Reports and Discoverer
4.2 Deinstalling the SoftwareThis section contains information and instructions for removing Oracle Portal, Forms, Reports and Discoverer. This procedure involves the following:
■ Section 4.2.1, "Removing the Oracle Portal and Oracle Discoverer Schemas"
■ Section 4.2.2, "Removing Oracle Portal, Forms, Reports and Discoverer"
■ Section 4.2.3, "Removing Oracle WebLogic Server and WebLogic Server Domains"
■ Section 4.2.4, "Removing Oracle JDeveloper"
■ Section 4.3.1, "Removing the Program Groups"
■ Section 4.3.2, "Rebooting Your System"
4.2.1 Removing the Oracle Portal and Oracle Discoverer SchemasRun the Repository Creation Utility (RCU) to drop the Oracle Portal and Oracle Discoverer schemas from your database.
See "Dropping Schemas" in Oracle Fusion Middleware Repository Creation Utility User's Guide for instructions.
4.2.2 Removing Oracle Portal, Forms, Reports and DiscovererFollow the instructions in this section to deinstall Oracle Portal, Forms, Reports and Discoverer.
4.2.2.1 Starting the DeinstallerGo to the ORACLE_HOME/oui/bin (on UNIX operating systems) or ORACLE_HOME\oui\bin (on Windows operating systems) directory and start the deinstaller.
On UNIX operating systems:
./runInstaller.sh -deinstall
Restart the Oracle Portal, Forms, Reports and Discoverer deinstaller.
Start the Oracle Portal, Forms, Reports and Discoverer deinstaller again and remove your product Oracle home directory.
See Section 4.2.2.1, "Starting the Deinstaller" and Section 4.2.2.4, "Removing Your Oracle Portal, Forms, Reports and Discoverer Oracle Home".
Start the deinstaller in the Oracle Common home.
Start the deinstaller in the Oracle Common home directory to remove the Oracle Common home.
See Section 4.2.2.5, "Removing your Oracle Common Home".
Remove Oracle WebLogic Server and WebLogic Server domains.
See Section 4.2.3, "Removing Oracle WebLogic Server and WebLogic Server Domains".
Perform Optional Tasks? Read the following to see if they are applicable to your environment:
■ Section 4.3.1, "Removing the Program Groups"
■ Section 4.3.2, "Rebooting Your System"
Table 4–1 (Cont.) Oracle Portal, Forms, Reports and Discoverer Deinstallation Tasks
Task Description
Deinstalling the Software
Deinstalling Oracle Portal, Forms, Reports and Discoverer 4-5
On Windows operating systems:
setup.exe -deinstall
On Windows systems, you can also start the deinstaller from the Start menu by selecting Programs > Oracle Home - Home1 > Uninstall.
4.2.2.2 Removing Your Managed Oracle Portal, Forms, Reports and Discoverer InstancesAll managed Oracle Instances must be removed from the system before you remove the Oracle home. Follow the instructions in Table 4–2 to remove your managed Oracle Instances (these are instances that are associated with a WebLogic Domain):
4.2.2.3 Stopping Oracle Fusion MiddlewareBefore deinstalling Oracle Fusion Middleware software components, you should stop all servers and processes.
For more information about starting and stopping Oracle Fusion Middleware, refer to "Starting and Stopping Oracle Fusion Middleware" in Oracle Fusion Middleware Administrator's Guide.
Note: To remove a managed instance, the Administration Server must be up and running.
Note: If you want to remove an Oracle instance which is registered with a WebLogic domain, make sure to launch the deinstaller from Oracle home directory that is associated with the Oracle instance you are removing.
The deinstaller will list all instances associated with same WebLogic domain; make sure you choose to remove the instances that are associated with the Oracle home from where you launched the deinstaller only.
Table 4–2 Removing Managed Oracle Instances
Screen Description
Welcome The installer displays this screen when you are about to deinstall one or more Oracle Fusion Middleware software components.
Select Deinstallation Type Select the type of deinstallation you want to perform. In this case, select Deinstall ASInstances managed by WebLogic Domain.
Specify WebLogic Domain Detail
Specify the credentials to connect to your WebLogic Domain.
Select Managed Instance Select the managed Oracle instance you want to deinstall.
Deinstallation Summary (Managed Instance)
Verify the Oracle Instance that is about to be removed.
Deinstallation Progress This screen shows the progress and status of the deinstallation.
Deinstallation Complete This screen summarizes the deinstallation that was just completed.
Click Finish to dismiss the screen.
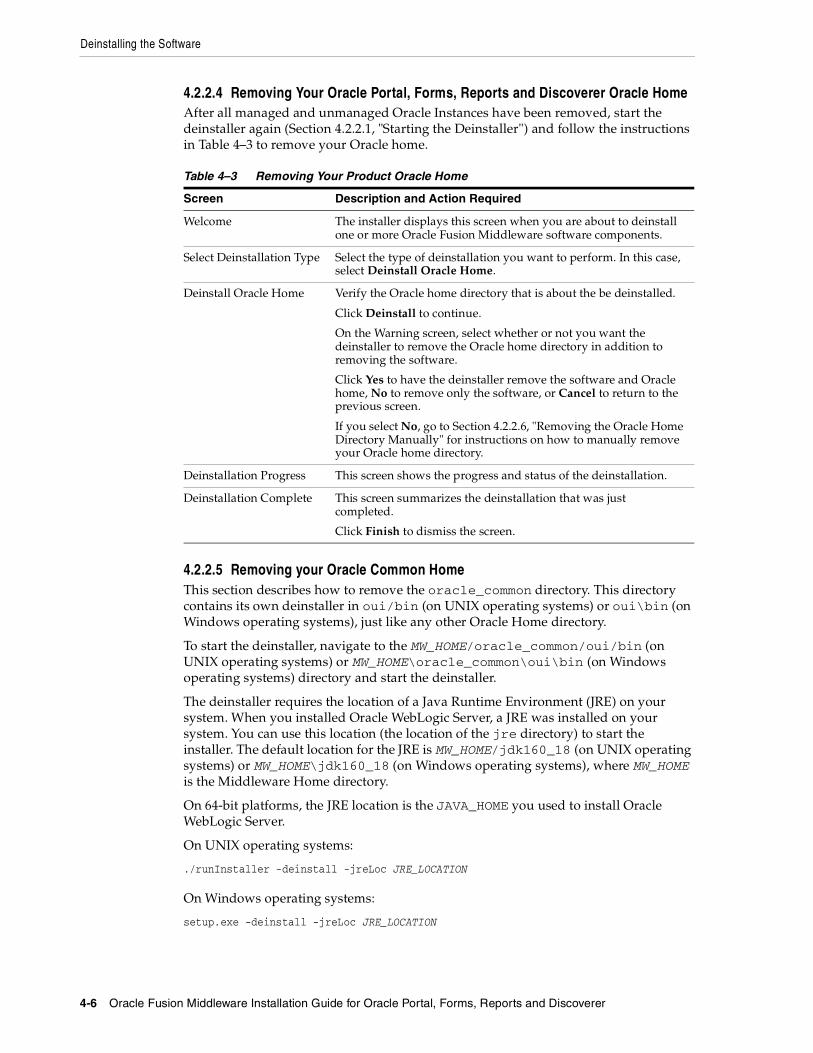
Deinstalling the Software
4-6 Oracle Fusion Middleware Installation Guide for Oracle Portal, Forms, Reports and Discoverer
4.2.2.4 Removing Your Oracle Portal, Forms, Reports and Discoverer Oracle HomeAfter all managed and unmanaged Oracle Instances have been removed, start the deinstaller again (Section 4.2.2.1, "Starting the Deinstaller") and follow the instructions in Table 4–3 to remove your Oracle home.
4.2.2.5 Removing your Oracle Common HomeThis section describes how to remove the oracle_common directory. This directory contains its own deinstaller in oui/bin (on UNIX operating systems) or oui\bin (on Windows operating systems), just like any other Oracle Home directory.
To start the deinstaller, navigate to the MW_HOME/oracle_common/oui/bin (on UNIX operating systems) or MW_HOME\oracle_common\oui\bin (on Windows operating systems) directory and start the deinstaller.
The deinstaller requires the location of a Java Runtime Environment (JRE) on your system. When you installed Oracle WebLogic Server, a JRE was installed on your system. You can use this location (the location of the jre directory) to start the installer. The default location for the JRE is MW_HOME/jdk160_18 (on UNIX operating systems) or MW_HOME\jdk160_18 (on Windows operating systems), where MW_HOME is the Middleware Home directory.
On 64-bit platforms, the JRE location is the JAVA_HOME you used to install Oracle WebLogic Server.
On UNIX operating systems:
./runInstaller -deinstall -jreLoc JRE_LOCATION
On Windows operating systems:
setup.exe -deinstall -jreLoc JRE_LOCATION
Table 4–3 Removing Your Product Oracle Home
Screen Description and Action Required
Welcome The installer displays this screen when you are about to deinstall one or more Oracle Fusion Middleware software components.
Select Deinstallation Type Select the type of deinstallation you want to perform. In this case, select Deinstall Oracle Home.
Deinstall Oracle Home Verify the Oracle home directory that is about the be deinstalled.
Click Deinstall to continue.
On the Warning screen, select whether or not you want the deinstaller to remove the Oracle home directory in addition to removing the software.
Click Yes to have the deinstaller remove the software and Oracle home, No to remove only the software, or Cancel to return to the previous screen.
If you select No, go to Section 4.2.2.6, "Removing the Oracle Home Directory Manually" for instructions on how to manually remove your Oracle home directory.
Deinstallation Progress This screen shows the progress and status of the deinstallation.
Deinstallation Complete This screen summarizes the deinstallation that was just completed.
Click Finish to dismiss the screen.
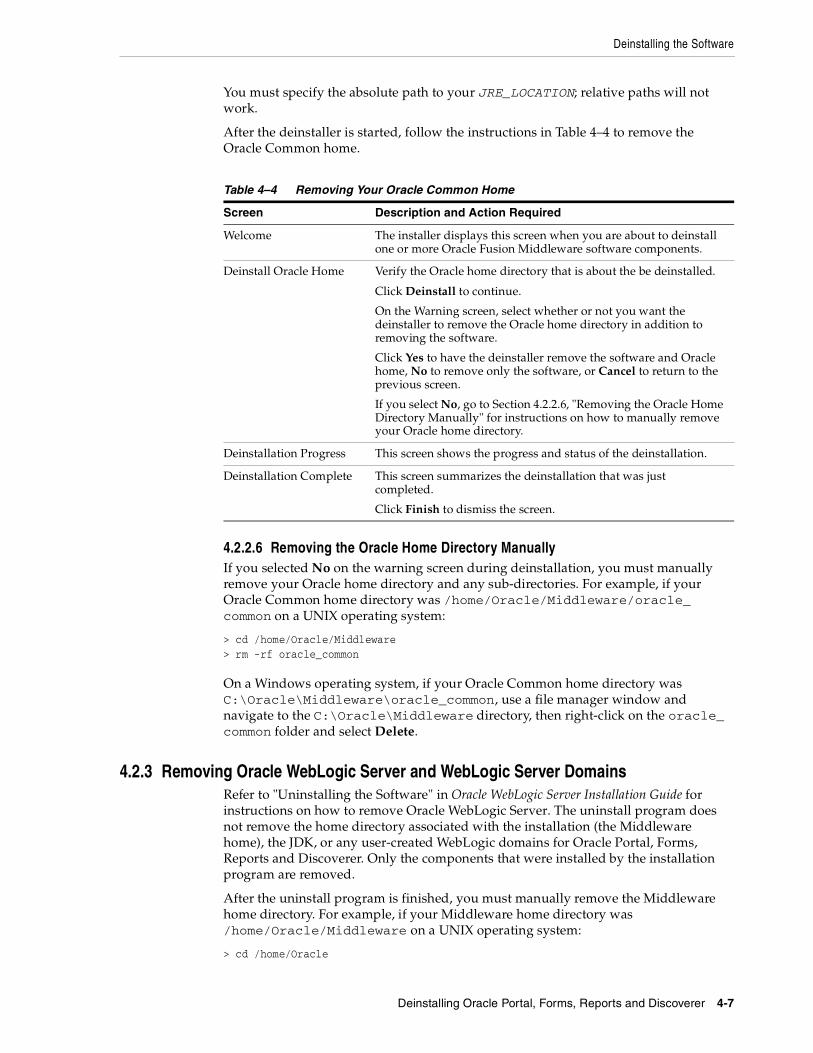
Deinstalling the Software
Deinstalling Oracle Portal, Forms, Reports and Discoverer 4-7
You must specify the absolute path to your JRE_LOCATION; relative paths will not work.
After the deinstaller is started, follow the instructions in Table 4–4 to remove the Oracle Common home.
4.2.2.6 Removing the Oracle Home Directory ManuallyIf you selected No on the warning screen during deinstallation, you must manually remove your Oracle home directory and any sub-directories. For example, if your Oracle Common home directory was /home/Oracle/Middleware/oracle_common on a UNIX operating system:
> cd /home/Oracle/Middleware> rm -rf oracle_common
On a Windows operating system, if your Oracle Common home directory was C:\Oracle\Middleware\oracle_common, use a file manager window and navigate to the C:\Oracle\Middleware directory, then right-click on the oracle_common folder and select Delete.
4.2.3 Removing Oracle WebLogic Server and WebLogic Server DomainsRefer to "Uninstalling the Software" in Oracle WebLogic Server Installation Guide for instructions on how to remove Oracle WebLogic Server. The uninstall program does not remove the home directory associated with the installation (the Middleware home), the JDK, or any user-created WebLogic domains for Oracle Portal, Forms, Reports and Discoverer. Only the components that were installed by the installation program are removed.
After the uninstall program is finished, you must manually remove the Middleware home directory. For example, if your Middleware home directory was /home/Oracle/Middleware on a UNIX operating system:
> cd /home/Oracle
Table 4–4 Removing Your Oracle Common Home
Screen Description and Action Required
Welcome The installer displays this screen when you are about to deinstall one or more Oracle Fusion Middleware software components.
Deinstall Oracle Home Verify the Oracle home directory that is about the be deinstalled.
Click Deinstall to continue.
On the Warning screen, select whether or not you want the deinstaller to remove the Oracle home directory in addition to removing the software.
Click Yes to have the deinstaller remove the software and Oracle home, No to remove only the software, or Cancel to return to the previous screen.
If you select No, go to Section 4.2.2.6, "Removing the Oracle Home Directory Manually" for instructions on how to manually remove your Oracle home directory.
Deinstallation Progress This screen shows the progress and status of the deinstallation.
Deinstallation Complete This screen summarizes the deinstallation that was just completed.
Click Finish to dismiss the screen.

Post-Deinstallation Tasks for Windows Operating Systems
4-8 Oracle Fusion Middleware Installation Guide for Oracle Portal, Forms, Reports and Discoverer
> rm -rf Middleware
On a Windows operating system, if your Middleware home directory was C:\Oracle\Middleware, use a file manager window and navigate to the C:\Oracle directory, then right-click on the Middleware folder and select Delete.
Since the Oracle Portal, Forms, Reports and Discoverer installer automatically creates your domains in the user_projects directory inside the Middleware home, removing the Middleware home will also remove your domains.
4.2.4 Removing Oracle JDeveloperIf you have installed Oracle JDeveloper on your system, refer to Oracle Fusion Middleware Installation Guide for Oracle JDeveloper for instructions on how to remove this software from your system.
4.3 Post-Deinstallation Tasks for Windows Operating SystemsIf you are using a Microsoft Windows operating system, there are additional post-deinstallation tasks that you need to perform:
■ Section 4.3.1, "Removing the Program Groups"
■ Section 4.3.2, "Rebooting Your System"
4.3.1 Removing the Program GroupsOn Windows operating systems, you must also manually remove the program groups from the Start Menu\Programs folder. As an example (the folder names and program group names on your system may be different), you might remove the following from C:\Documents and Settings\All Users\Start Menu\Programs:
■ Oracle Fusion Middleware 11.1.1.6.0
■ Oracle Classic 11g - Home1
■ Oracle WebLogic
4.3.2 Rebooting Your SystemOn Windows operating systems, you should reboot your computer after you have finished removing all your programs to ensure proper cleanup.
4.4 Reinstalling the SoftwareThe installer does not allow reinstallation of Oracle Portal, Forms, Reports and Discoverer in a directory that already contains an Oracle instance. To reinstall Oracle Portal, Forms, Reports and Discoverer in the same directory as before, you must:
1. Follow the instructions in Section 4.2.2.2, "Removing Your Managed Oracle Portal, Forms, Reports and Discoverer Instances"to remove all Oracle instances from the directory.
2. Follow the instructions in Chapter 2, "Installing Oracle Portal, Forms, Reports and Discoverer" to reinstall the software.

5
Deinstalling Oracle Discoverer Desktop 5-1
5 Deinstalling Oracle Discoverer Desktop
This chapter describes how to remove Oracle Discoverer Desktop.
You should always use the instructions provided in this chapter for removing the software. If you try to remove the software manually, you may experience problems when you try to reinstall the software again at a later time. Following the procedures in this chapter will ensure that the software is properly removed.
5.1 Removing Your Oracle Discoverer Desktop Software-To remove Oracle Discoverer Desktop from your system, start the deinstaller by going to the Start menu and selecting All Programs > Oracle Discoverer Desktop and Admin - Home 1 > Uninstall Oracle Discoverer Desktop and Admin.
Follow the instructions in Table 5–1 to remove Oracle Discoverer Desktop and Discoverer Administrator.
If you need additional help with any of the deinstallation screens, refer to Appendix D, "Oracle Discoverer Desktop Deinstallation Screens" or click Help to access the online help.
Table 5–1 Oracle Discoverer Desktop Deinstallation Screens
Screen Description
Welcome The installer displays this screen when you are about to deinstall one or more Oracle Fusion Middleware software components.
Deinstall Oracle Home Verify the Oracle home directory that is about the be deinstalled.
Click Deinstall to continue.
On the Warning screen, select whether or not you want the deinstaller to remove the Oracle home directory in addition to removing the software.
Click Yes to have the deinstaller remove the software and Oracle home, No to remove only the software, or Cancel to return to the previous screen.
If you select No, go to Section 5.2, "Removing the Oracle Home Directory Manually+" for instructions on how to manually remove your Oracle home directory.
Deinstallation Progress This screen shows the progress and status of the deinstallation.
Deinstallation Complete This screen summarizes the deinstallation that was just completed.
Click Finish to dismiss the screen.
Removing the Oracle Home Directory Manually+
5-2 Oracle Fusion Middleware Installation Guide for Oracle Portal, Forms, Reports and Discoverer
5.2 Removing the Oracle Home Directory Manually+If you selected No on the warning screen during deinstallation, you must manually remove your Oracle home directory and any sub-directories.
For example, if your Oracle home directory was C:\Oracle\Middleware\as_1, use a file manager window and navigate to the C:\Oracle\Middleware directory, then right-click on the as_1 folder and select Delete.
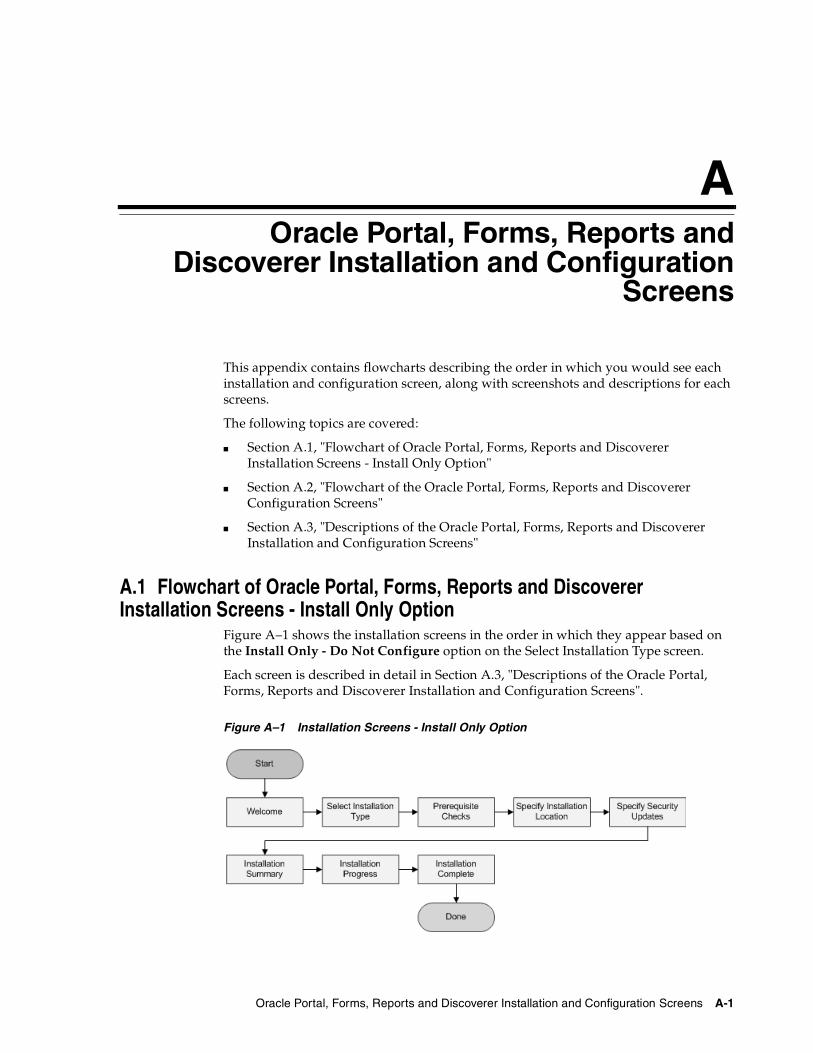
Oracle Portal, Forms, Reports and Discoverer Installation and Configuration Screens A-1
AOracle Portal, Forms, Reports and
Discoverer Installation and Configuration Screens
This appendix contains flowcharts describing the order in which you would see each installation and configuration screen, along with screenshots and descriptions for each screens.
The following topics are covered:
■ Section A.1, "Flowchart of Oracle Portal, Forms, Reports and Discoverer Installation Screens - Install Only Option"
■ Section A.2, "Flowchart of the Oracle Portal, Forms, Reports and Discoverer Configuration Screens"
■ Section A.3, "Descriptions of the Oracle Portal, Forms, Reports and Discoverer Installation and Configuration Screens"
A.1 Flowchart of Oracle Portal, Forms, Reports and Discoverer Installation Screens - Install Only Option
Figure A–1 shows the installation screens in the order in which they appear based on the Install Only - Do Not Configure option on the Select Installation Type screen.
Each screen is described in detail in Section A.3, "Descriptions of the Oracle Portal, Forms, Reports and Discoverer Installation and Configuration Screens".
Figure A–1 Installation Screens - Install Only Option

Flowchart of the Oracle Portal, Forms, Reports and Discoverer Configuration Screens
A-2 Oracle Fusion Middleware Installation Guide for Oracle Portal, Forms, Reports and Discoverer
A.2 Flowchart of the Oracle Portal, Forms, Reports and Discoverer Configuration Screens
Figure A–2 shows the screens you will see in the configuration tool based on the options you select.
Each screen is described in detail in Section A.3, "Descriptions of the Oracle Portal, Forms, Reports and Discoverer Installation and Configuration Screens".

Flowchart of the Oracle Portal, Forms, Reports and Discoverer Configuration Screens
Oracle Portal, Forms, Reports and Discoverer Installation and Configuration Screens A-3
Figure A–2 Configuration Screens
Descriptions of the Oracle Portal, Forms, Reports and Discoverer Installation and Configuration Screens
A-4 Oracle Fusion Middleware Installation Guide for Oracle Portal, Forms, Reports and Discoverer
A.3 Descriptions of the Oracle Portal, Forms, Reports and Discoverer Installation and Configuration Screens
This section contains screenshots and descriptions for all of the Oracle Portal, Forms, Reports and Discoverer installation and configuration screens:
■ Specify Inventory Directory
■ Inventory Location Confirmation
■ Welcome
■ Configuration Tool Welcome
■ Select Installation Type
■ Prerequisite Checks
■ Select Domain
■ Specify Security Updates
■ Specify Installation Location
■ Configure Components
■ Configure Ports
■ Specify Proxy Details
■ Specify Schema
■ Specify Portlet Schema
■ Specify Application OID
■ Installation Summary
■ Installation Summary (Install Only Option)
■ Installation Progress
■ Configuration Progress
■ Installation Complete
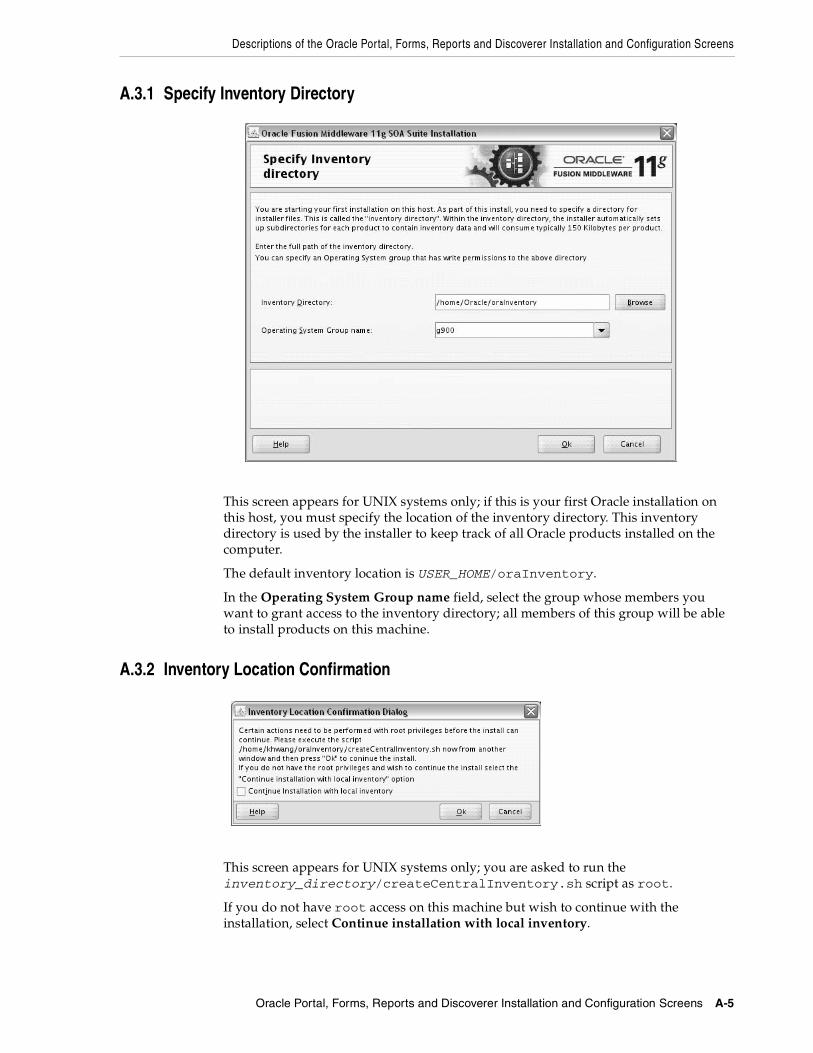
Descriptions of the Oracle Portal, Forms, Reports and Discoverer Installation and Configuration Screens
Oracle Portal, Forms, Reports and Discoverer Installation and Configuration Screens A-5
A.3.1 Specify Inventory Directory
This screen appears for UNIX systems only; if this is your first Oracle installation on this host, you must specify the location of the inventory directory. This inventory directory is used by the installer to keep track of all Oracle products installed on the computer.
The default inventory location is USER_HOME/oraInventory.
In the Operating System Group name field, select the group whose members you want to grant access to the inventory directory; all members of this group will be able to install products on this machine.
A.3.2 Inventory Location Confirmation
This screen appears for UNIX systems only; you are asked to run the inventory_directory/createCentralInventory.sh script as root.
If you do not have root access on this machine but wish to continue with the installation, select Continue installation with local inventory.
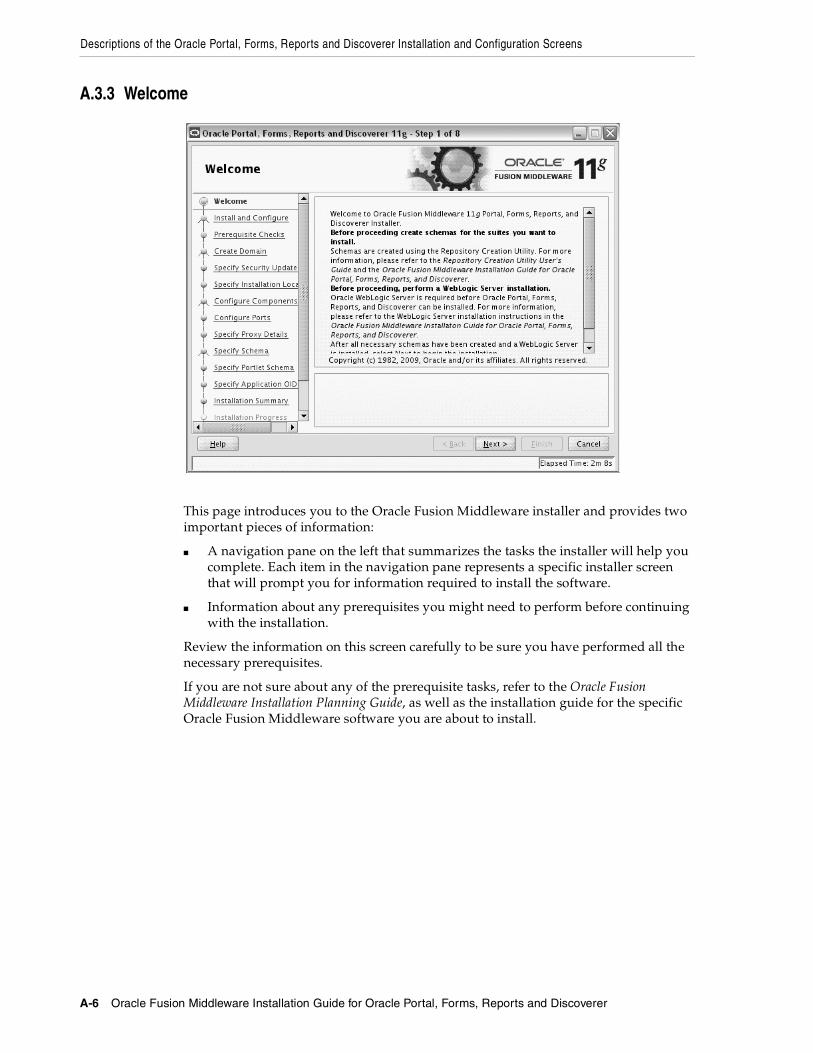
Descriptions of the Oracle Portal, Forms, Reports and Discoverer Installation and Configuration Screens
A-6 Oracle Fusion Middleware Installation Guide for Oracle Portal, Forms, Reports and Discoverer
A.3.3 Welcome
This page introduces you to the Oracle Fusion Middleware installer and provides two important pieces of information:
■ A navigation pane on the left that summarizes the tasks the installer will help you complete. Each item in the navigation pane represents a specific installer screen that will prompt you for information required to install the software.
■ Information about any prerequisites you might need to perform before continuing with the installation.
Review the information on this screen carefully to be sure you have performed all the necessary prerequisites.
If you are not sure about any of the prerequisite tasks, refer to the Oracle Fusion Middleware Installation Planning Guide, as well as the installation guide for the specific Oracle Fusion Middleware software you are about to install.

Descriptions of the Oracle Portal, Forms, Reports and Discoverer Installation and Configuration Screens
Oracle Portal, Forms, Reports and Discoverer Installation and Configuration Screens A-7
A.3.4 Configuration Tool Welcome
This page introduces you to the Oracle Fusion Middleware configuration tool and provides two important pieces of information:
■ A navigation pane on the left that summarizes the tasks the configuration tool will help you complete. Each item in the navigation pane represents a specific screen that will prompt you for information required to configure the software.
■ Information about any prerequisites you might need to perform before continuing with the configuration.
Review the information on this screen carefully to be sure you have performed all the necessary prerequisites.
If you are not sure about any of the prerequisite tasks, refer to the Oracle Fusion Middleware Installation Planning Guide, as well as the installation guide for the specific Oracle Fusion Middleware software you are about to install.
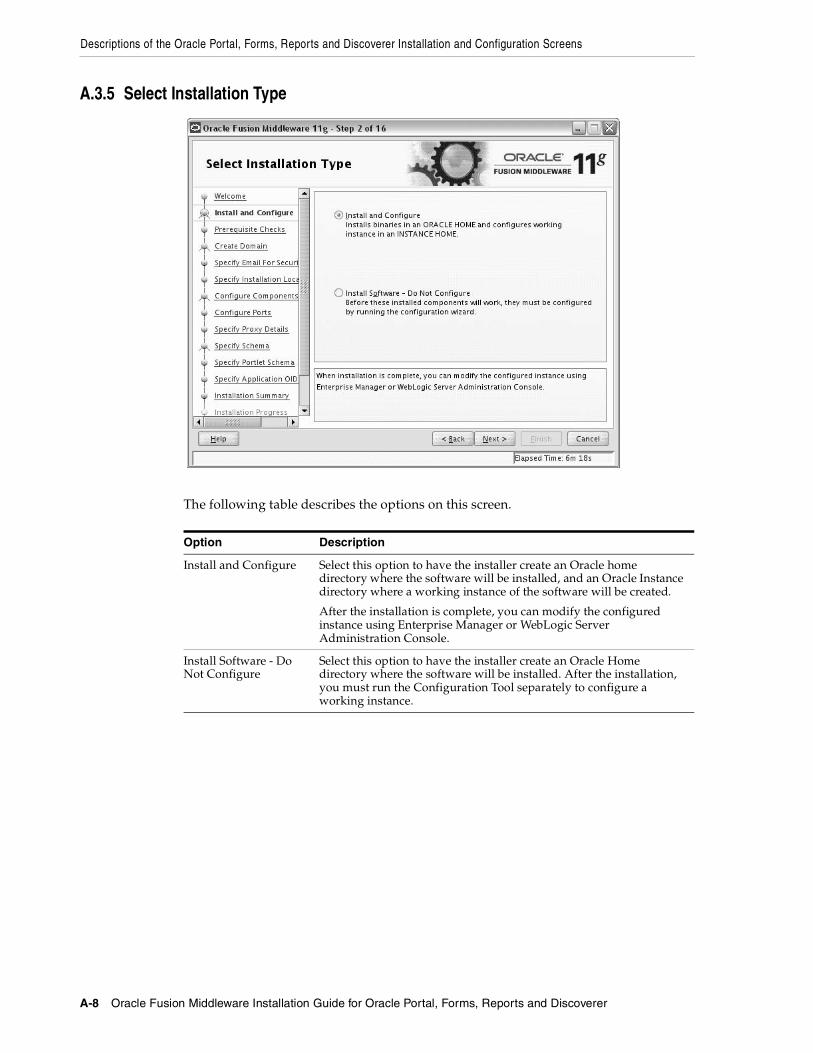
Descriptions of the Oracle Portal, Forms, Reports and Discoverer Installation and Configuration Screens
A-8 Oracle Fusion Middleware Installation Guide for Oracle Portal, Forms, Reports and Discoverer
A.3.5 Select Installation Type
The following table describes the options on this screen.
Option Description
Install and Configure Select this option to have the installer create an Oracle home directory where the software will be installed, and an Oracle Instance directory where a working instance of the software will be created.
After the installation is complete, you can modify the configured instance using Enterprise Manager or WebLogic Server Administration Console.
Install Software - Do Not Configure
Select this option to have the installer create an Oracle Home directory where the software will be installed. After the installation, you must run the Configuration Tool separately to configure a working instance.
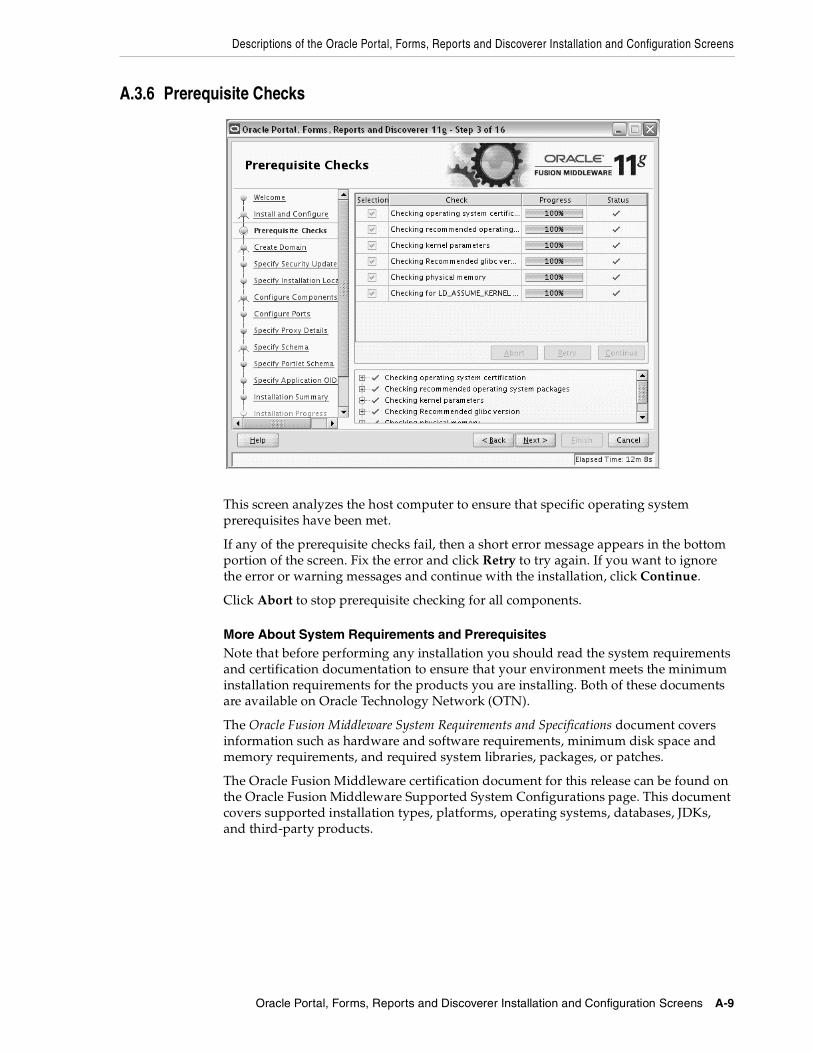
Descriptions of the Oracle Portal, Forms, Reports and Discoverer Installation and Configuration Screens
Oracle Portal, Forms, Reports and Discoverer Installation and Configuration Screens A-9
A.3.6 Prerequisite Checks
This screen analyzes the host computer to ensure that specific operating system prerequisites have been met.
If any of the prerequisite checks fail, then a short error message appears in the bottom portion of the screen. Fix the error and click Retry to try again. If you want to ignore the error or warning messages and continue with the installation, click Continue.
Click Abort to stop prerequisite checking for all components.
More About System Requirements and PrerequisitesNote that before performing any installation you should read the system requirements and certification documentation to ensure that your environment meets the minimum installation requirements for the products you are installing. Both of these documents are available on Oracle Technology Network (OTN).
The Oracle Fusion Middleware System Requirements and Specifications document covers information such as hardware and software requirements, minimum disk space and memory requirements, and required system libraries, packages, or patches.
The Oracle Fusion Middleware certification document for this release can be found on the Oracle Fusion Middleware Supported System Configurations page. This document covers supported installation types, platforms, operating systems, databases, JDKs, and third-party products.
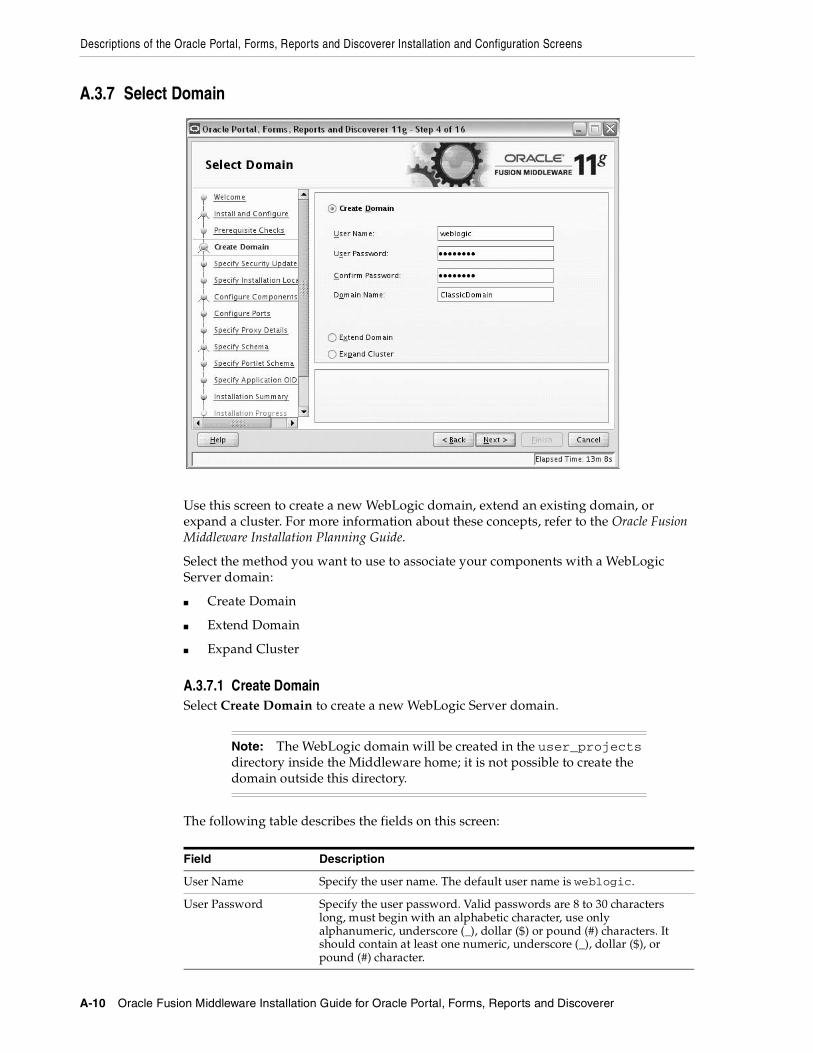
Descriptions of the Oracle Portal, Forms, Reports and Discoverer Installation and Configuration Screens
A-10 Oracle Fusion Middleware Installation Guide for Oracle Portal, Forms, Reports and Discoverer
A.3.7 Select Domain
Use this screen to create a new WebLogic domain, extend an existing domain, or expand a cluster. For more information about these concepts, refer to the Oracle Fusion Middleware Installation Planning Guide.
Select the method you want to use to associate your components with a WebLogic Server domain:
■ Create Domain
■ Extend Domain
■ Expand Cluster
A.3.7.1 Create DomainSelect Create Domain to create a new WebLogic Server domain.
The following table describes the fields on this screen:
Note: The WebLogic domain will be created in the user_projects directory inside the Middleware home; it is not possible to create the domain outside this directory.
Field Description
User Name Specify the user name. The default user name is weblogic.
User Password Specify the user password. Valid passwords are 8 to 30 characters long, must begin with an alphabetic character, use only alphanumeric, underscore (_), dollar ($) or pound (#) characters. It should contain at least one numeric, underscore (_), dollar ($), or pound (#) character.
Descriptions of the Oracle Portal, Forms, Reports and Discoverer Installation and Configuration Screens
Oracle Portal, Forms, Reports and Discoverer Installation and Configuration Screens A-11
A.3.7.2 Extend DomainIf an existing domain is detected, you will have the option of extending the existing domain to add the products and services you are installing.
The following table describes the fields on this screen:
A.3.7.3 Expand ClusterYou can also choose Expand Cluster to add Managed Servers for high availability and replication.
The following table describes the fields on this screen:
Confirm Password Re-enter the user password.
Domain Name Specify the name of the domain you want to create. Domain names may only contain alphanumeric characters, or the underscore (_) or hyphen (-) characters.
Note: Only existing domains configured by the Oracle Portal, Forms, Reports, and Discoverer installer that have been patched to the latest version can be extended.
Field Description
Host Name Specify the name of the system where the domain is located.
Port Specify the port number on the host where the domain can be accessed.
User Name Specify the user name. The default user name is weblogic.
User Password Specify the password for the user.
Field Description
Host Name Specify the name of the system where the cluster is located.
Port Specify the port number on the host where the cluster can be accessed.
User Name Specify the user name. The default user name is weblogic.
User Password Specify the password for the user.
Field Description

Descriptions of the Oracle Portal, Forms, Reports and Discoverer Installation and Configuration Screens
A-12 Oracle Fusion Middleware Installation Guide for Oracle Portal, Forms, Reports and Discoverer
A.3.8 Specify Security Updates
Use this screen to enter your My Oracle Support account information so you can receive the latest product information and security updates via your My Oracle Support account.
Enter your E-mail address if you want to receive the latest product information and security updates. If you have a My Oracle account and wish to receive updates via this mechanism, select I wish to receive security updates via My Oracle Support, then enter your account password.
If you do not wish to register for Oracle Configuration Manager, uncheck the I wish to receive security updates via My Oracle Support box and leave all the fields on this screen blank. You will be prompted to confirm your selection with the following screen:
Click Yes to confirm that you do not want to register for security updates.
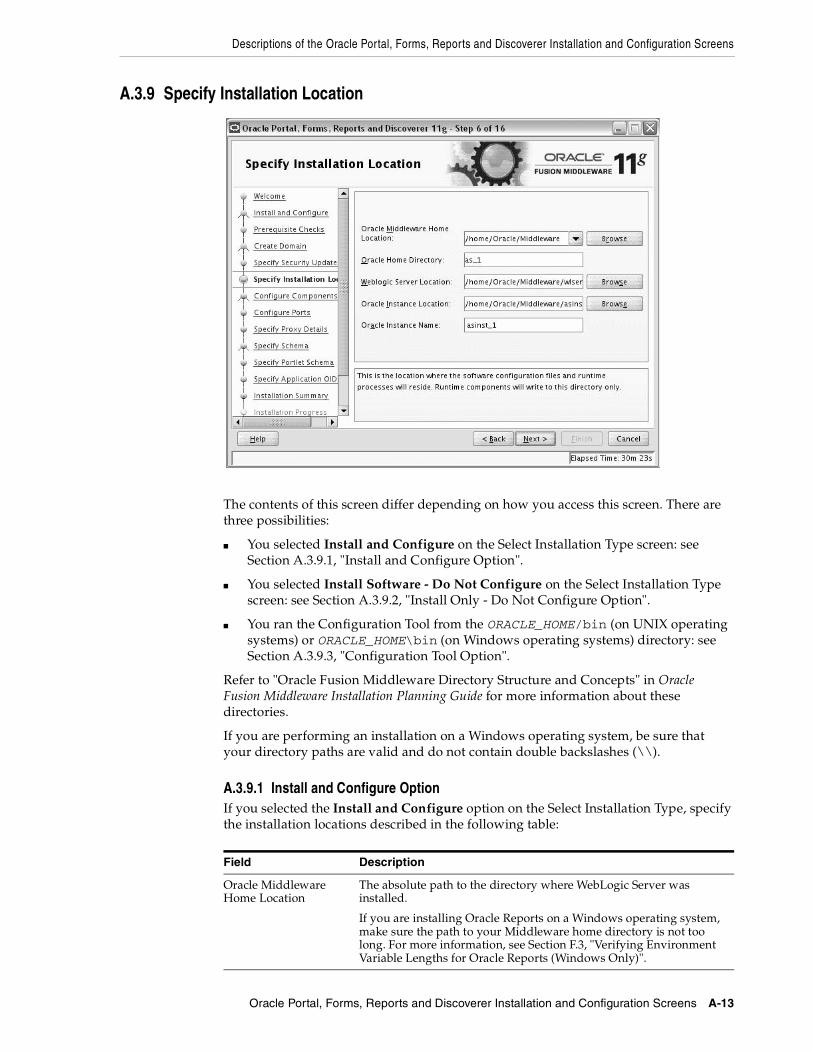
Descriptions of the Oracle Portal, Forms, Reports and Discoverer Installation and Configuration Screens
Oracle Portal, Forms, Reports and Discoverer Installation and Configuration Screens A-13
A.3.9 Specify Installation Location
The contents of this screen differ depending on how you access this screen. There are three possibilities:
■ You selected Install and Configure on the Select Installation Type screen: see Section A.3.9.1, "Install and Configure Option".
■ You selected Install Software - Do Not Configure on the Select Installation Type screen: see Section A.3.9.2, "Install Only - Do Not Configure Option".
■ You ran the Configuration Tool from the ORACLE_HOME/bin (on UNIX operating systems) or ORACLE_HOME\bin (on Windows operating systems) directory: see Section A.3.9.3, "Configuration Tool Option".
Refer to "Oracle Fusion Middleware Directory Structure and Concepts" in Oracle Fusion Middleware Installation Planning Guide for more information about these directories.
If you are performing an installation on a Windows operating system, be sure that your directory paths are valid and do not contain double backslashes (\\).
A.3.9.1 Install and Configure OptionIf you selected the Install and Configure option on the Select Installation Type, specify the installation locations described in the following table:
Field Description
Oracle Middleware Home Location
The absolute path to the directory where WebLogic Server was installed.
If you are installing Oracle Reports on a Windows operating system, make sure the path to your Middleware home directory is not too long. For more information, see Section F.3, "Verifying Environment Variable Lengths for Oracle Reports (Windows Only)".

Descriptions of the Oracle Portal, Forms, Reports and Discoverer Installation and Configuration Screens
A-14 Oracle Fusion Middleware Installation Guide for Oracle Portal, Forms, Reports and Discoverer
A.3.9.2 Install Only - Do Not Configure OptionIf you selected the Install Software - Do Not Configure option on the Select Installation Type, you specify the installation locations described in the following table:
Oracle Home Directory The directory name for your Oracle home:
■ You can specify a directory that already exists; this must be an empty directory inside the Oracle Middleware home (for example, you have created an empty directory inside the Middleware home in advance of this installation and should specify this directory here).
■ You can specify the name of a new directory that will be created for you inside the Middleware home.
Your Oracle home directory where your products will be installed. All software binaries will reside in this directory, and no runtime process can write to this directory.
WebLogic Server Location
The directory name for your WebLogic Server home. This directory will automatically be created inside the Middleware home. The default name for this directory is wlserver_10.3.
Oracle Instance Location
The absolute path to the directory where your Oracle Instance will reside. This is where application configuration files reside and where the application process runs from. Runtime components write only to this location.
By default, this directory will be created inside the Middleware home but you can choose any location on your system.
Oracle Instance Name Specify the unique name of your Oracle Instance. The Oracle Instance name may only contain alphanumeric and underscore (_) characters, it must begin with an alphabetic (a-z or A-Z) character, and must be 4 to 30 characters in length.
Field Description
Oracle Middleware Home
The absolute path to the directory where WebLogic Server was installed.
If you are installing Oracle Reports on a Windows operating system, make sure the path to your Middleware home directory is not too long. For more information, see Section F.3, "Verifying Environment Variable Lengths for Oracle Reports (Windows Only)".
Oracle Home Directory The directory name for your Oracle home:
■ You can specify a directory that already exists; this must be an empty directory inside the Oracle Middleware home (for example, you have created an empty directory inside the Middleware home in advance of this installation and should specify this directory here).
■ You can specify the name of a new directory that will be created for you inside the Middleware home.
Your Oracle home directory where your products will be installed. All software binaries will reside in this directory, and no runtime process can write to this directory.
Field Description
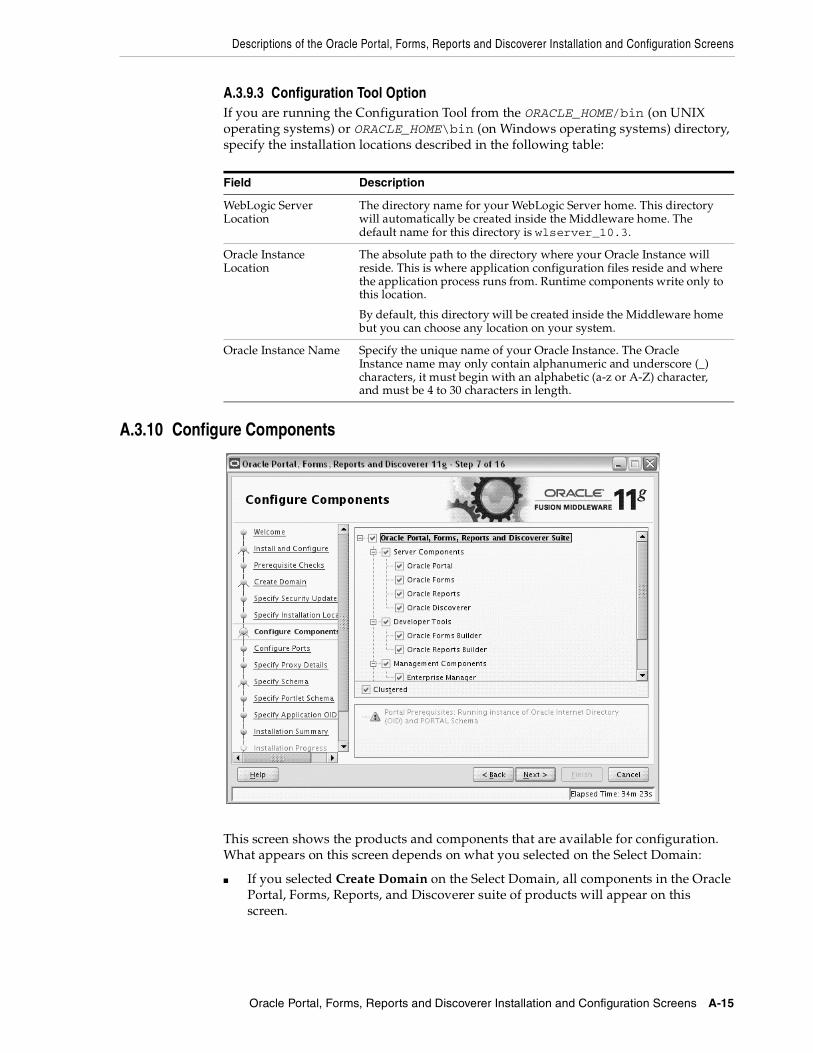
Descriptions of the Oracle Portal, Forms, Reports and Discoverer Installation and Configuration Screens
Oracle Portal, Forms, Reports and Discoverer Installation and Configuration Screens A-15
A.3.9.3 Configuration Tool OptionIf you are running the Configuration Tool from the ORACLE_HOME/bin (on UNIX operating systems) or ORACLE_HOME\bin (on Windows operating systems) directory, specify the installation locations described in the following table:
A.3.10 Configure Components
This screen shows the products and components that are available for configuration. What appears on this screen depends on what you selected on the Select Domain:
■ If you selected Create Domain on the Select Domain, all components in the Oracle Portal, Forms, Reports, and Discoverer suite of products will appear on this screen.
Field Description
WebLogic Server Location
The directory name for your WebLogic Server home. This directory will automatically be created inside the Middleware home. The default name for this directory is wlserver_10.3.
Oracle Instance Location
The absolute path to the directory where your Oracle Instance will reside. This is where application configuration files reside and where the application process runs from. Runtime components write only to this location.
By default, this directory will be created inside the Middleware home but you can choose any location on your system.
Oracle Instance Name Specify the unique name of your Oracle Instance. The Oracle Instance name may only contain alphanumeric and underscore (_) characters, it must begin with an alphabetic (a-z or A-Z) character, and must be 4 to 30 characters in length.

Descriptions of the Oracle Portal, Forms, Reports and Discoverer Installation and Configuration Screens
A-16 Oracle Fusion Middleware Installation Guide for Oracle Portal, Forms, Reports and Discoverer
■ If you selected Extend Domain on the Select Domain, only those components that do not already exist in the domain will be available on this screen, in order for you to add functionality and services to your existing domain.
■ If you selected Expand Cluster on the Select Domain, only those components that already exist in the domain will be available on this screen, in order for you to perform your replication for high availability.
Select the component(s) you want to configure. Notice in the bottom pane that there is prerequisite information depending on which component(s) you select. Be sure you read this information carefully before you continue.
Oracle recommends selecting Clustered for all installations; if you do not and the installation is completed, you will not be able to expand your domain. Any servers created in an un-clustered environment will not have the ability to be managed from Oracle Enterprise Manager.
A.3.11 Configure Ports
Select Auto Port Configuration if you want the installer to automatically assign the default ports to the components. For a list of default port numbers, refer to Oracle Fusion Middleware Administrator's Guide.
Select Specify Ports Using Configuration File if you have already created a port configuration file that specifies the port numbers that you want to use for each component. Enter the full part and filename of this file in the Filename field, or click Browse to locate an existing file on your system.
A default file called staticports.ini is provided in the Disk1/stage/Response directory on the CD-ROM. You can use this file as a template to create your own custom ports file.

Descriptions of the Oracle Portal, Forms, Reports and Discoverer Installation and Configuration Screens
Oracle Portal, Forms, Reports and Discoverer Installation and Configuration Screens A-17
After providing the location and name of a valid file, click View/Edit File to view or edit the contents of the file.
A.3.12 Specify Proxy Details
This screen is only visible if Oracle Reports was selected on the Configure Components screen.
If your computer is located behind a firewall you may need to route outgoing HTTP connections through a proxy server. If you have a direct connection to the Internet or if you do not wish to configure a proxy server at this time, select Do Not Use Proxy Settings.
If you are configuring a proxy server, select Enable Proxy and provide the information described in the following table:
Note: If you choose to use the staticports.ini file provided in the Disk1 directory, all of the port values are commented out with a hash sign (#). You must uncomment (remove the hash sign) for any port values you want to use in the file.
Note: If you choose to use the staticports.ini (or any custom port file), port numbers less than 1024 will not be validated by the installer. You will, however, be able to proceed with the installation.
See "Port Numbers" in Oracle Fusion Middleware Administrator's Guide for more information.
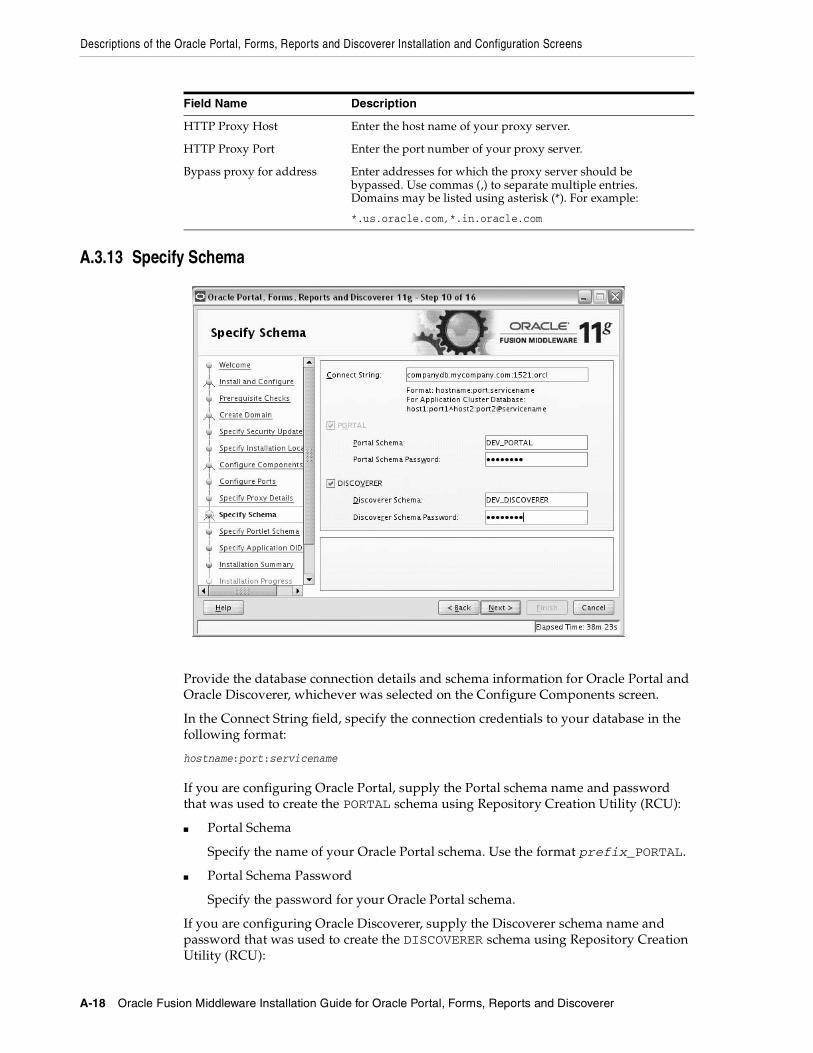
Descriptions of the Oracle Portal, Forms, Reports and Discoverer Installation and Configuration Screens
A-18 Oracle Fusion Middleware Installation Guide for Oracle Portal, Forms, Reports and Discoverer
A.3.13 Specify Schema
Provide the database connection details and schema information for Oracle Portal and Oracle Discoverer, whichever was selected on the Configure Components screen.
In the Connect String field, specify the connection credentials to your database in the following format:
hostname:port:servicename
If you are configuring Oracle Portal, supply the Portal schema name and password that was used to create the PORTAL schema using Repository Creation Utility (RCU):
■ Portal Schema
Specify the name of your Oracle Portal schema. Use the format prefix_PORTAL.
■ Portal Schema Password
Specify the password for your Oracle Portal schema.
If you are configuring Oracle Discoverer, supply the Discoverer schema name and password that was used to create the DISCOVERER schema using Repository Creation Utility (RCU):
Field Name Description
HTTP Proxy Host Enter the host name of your proxy server.
HTTP Proxy Port Enter the port number of your proxy server.
Bypass proxy for address Enter addresses for which the proxy server should be bypassed. Use commas (,) to separate multiple entries. Domains may be listed using asterisk (*). For example:
*.us.oracle.com,*.in.oracle.com
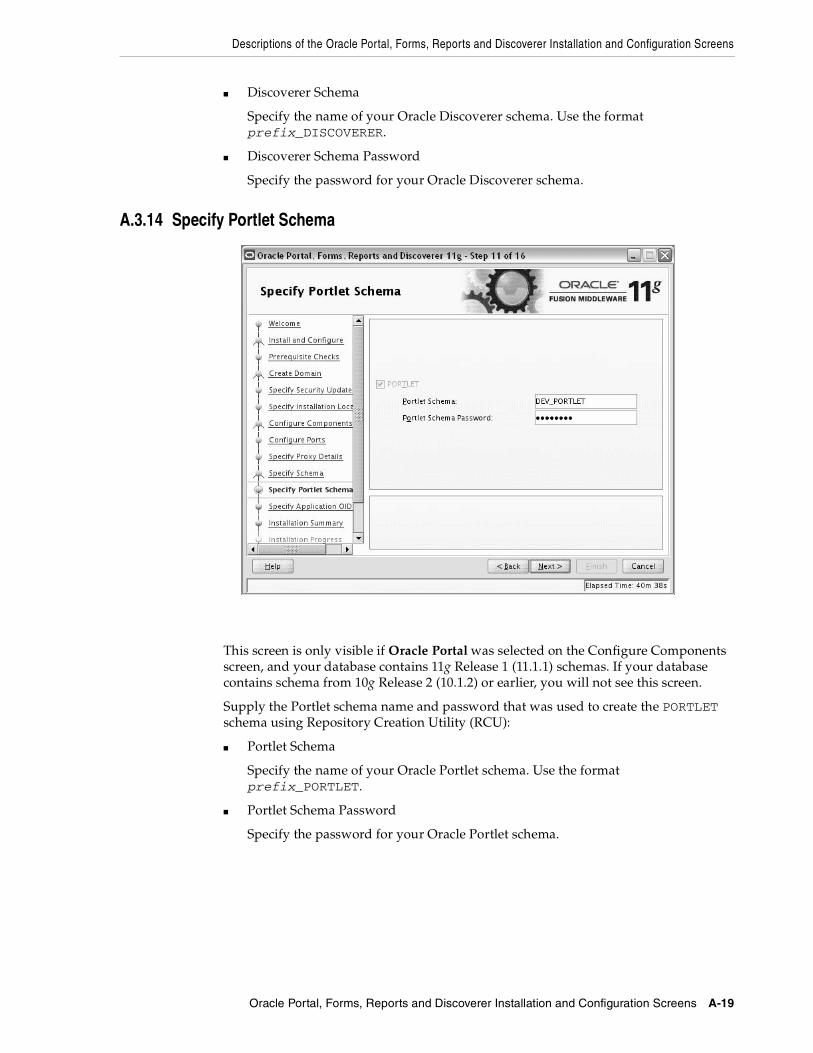
Descriptions of the Oracle Portal, Forms, Reports and Discoverer Installation and Configuration Screens
Oracle Portal, Forms, Reports and Discoverer Installation and Configuration Screens A-19
■ Discoverer Schema
Specify the name of your Oracle Discoverer schema. Use the format prefix_DISCOVERER.
■ Discoverer Schema Password
Specify the password for your Oracle Discoverer schema.
A.3.14 Specify Portlet Schema
This screen is only visible if Oracle Portal was selected on the Configure Components screen, and your database contains 11g Release 1 (11.1.1) schemas. If your database contains schema from 10g Release 2 (10.1.2) or earlier, you will not see this screen.
Supply the Portlet schema name and password that was used to create the PORTLET schema using Repository Creation Utility (RCU):
■ Portlet Schema
Specify the name of your Oracle Portlet schema. Use the format prefix_PORTLET.
■ Portlet Schema Password
Specify the password for your Oracle Portlet schema.
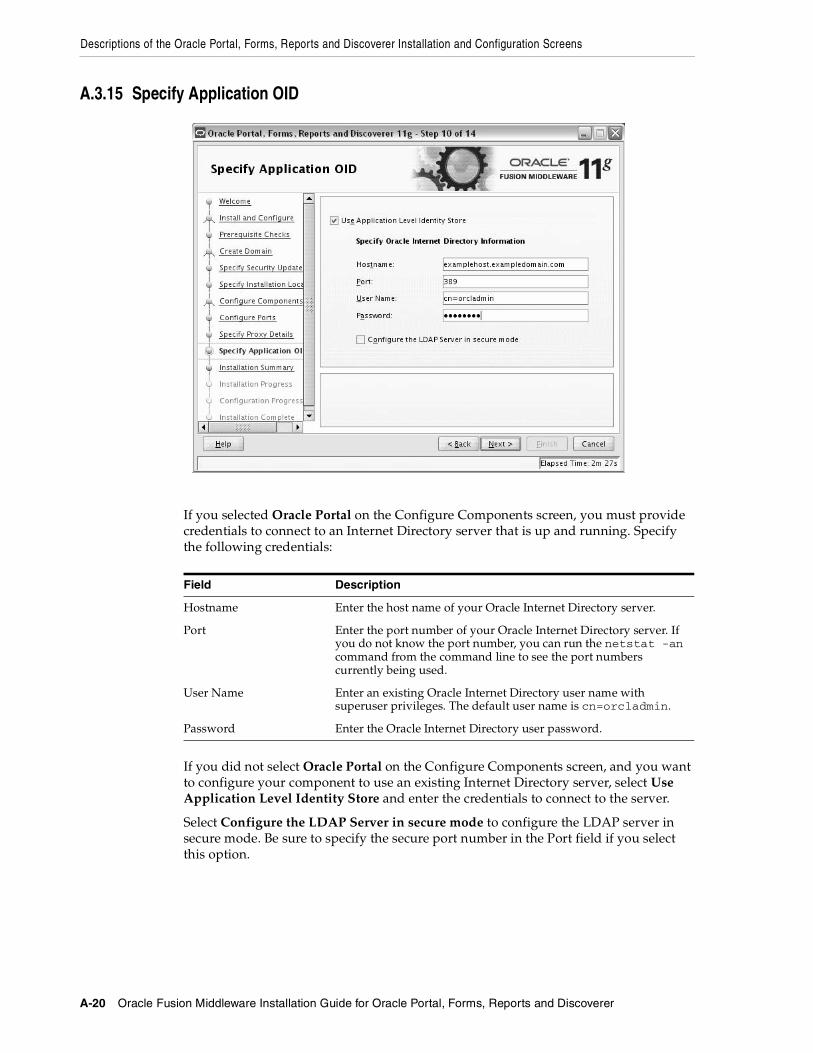
Descriptions of the Oracle Portal, Forms, Reports and Discoverer Installation and Configuration Screens
A-20 Oracle Fusion Middleware Installation Guide for Oracle Portal, Forms, Reports and Discoverer
A.3.15 Specify Application OID
If you selected Oracle Portal on the Configure Components screen, you must provide credentials to connect to an Internet Directory server that is up and running. Specify the following credentials:
If you did not select Oracle Portal on the Configure Components screen, and you want to configure your component to use an existing Internet Directory server, select Use Application Level Identity Store and enter the credentials to connect to the server.
Select Configure the LDAP Server in secure mode to configure the LDAP server in secure mode. Be sure to specify the secure port number in the Port field if you select this option.
Field Description
Hostname Enter the host name of your Oracle Internet Directory server.
Port Enter the port number of your Oracle Internet Directory server. If you do not know the port number, you can run the netstat -an command from the command line to see the port numbers currently being used.
User Name Enter an existing Oracle Internet Directory user name with superuser privileges. The default user name is cn=orcladmin.
Password Enter the Oracle Internet Directory user password.
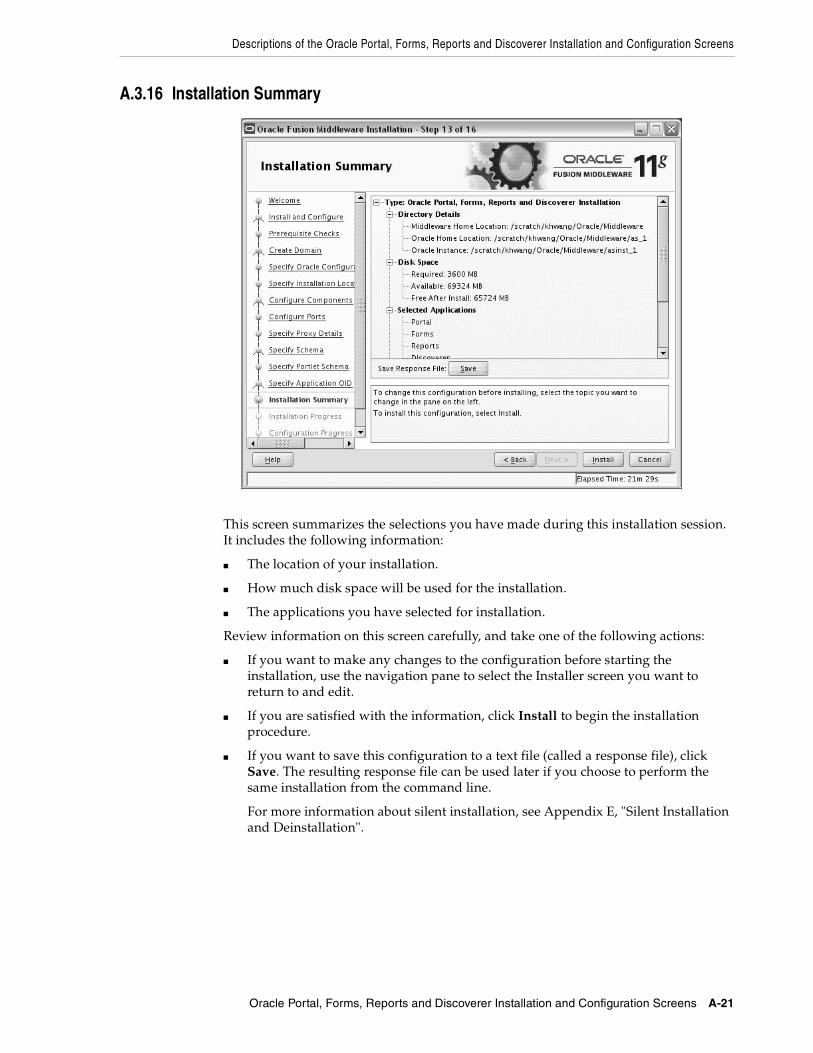
Descriptions of the Oracle Portal, Forms, Reports and Discoverer Installation and Configuration Screens
Oracle Portal, Forms, Reports and Discoverer Installation and Configuration Screens A-21
A.3.16 Installation Summary
This screen summarizes the selections you have made during this installation session. It includes the following information:
■ The location of your installation.
■ How much disk space will be used for the installation.
■ The applications you have selected for installation.
Review information on this screen carefully, and take one of the following actions:
■ If you want to make any changes to the configuration before starting the installation, use the navigation pane to select the Installer screen you want to return to and edit.
■ If you are satisfied with the information, click Install to begin the installation procedure.
■ If you want to save this configuration to a text file (called a response file), click Save. The resulting response file can be used later if you choose to perform the same installation from the command line.
For more information about silent installation, see Appendix E, "Silent Installation and Deinstallation".
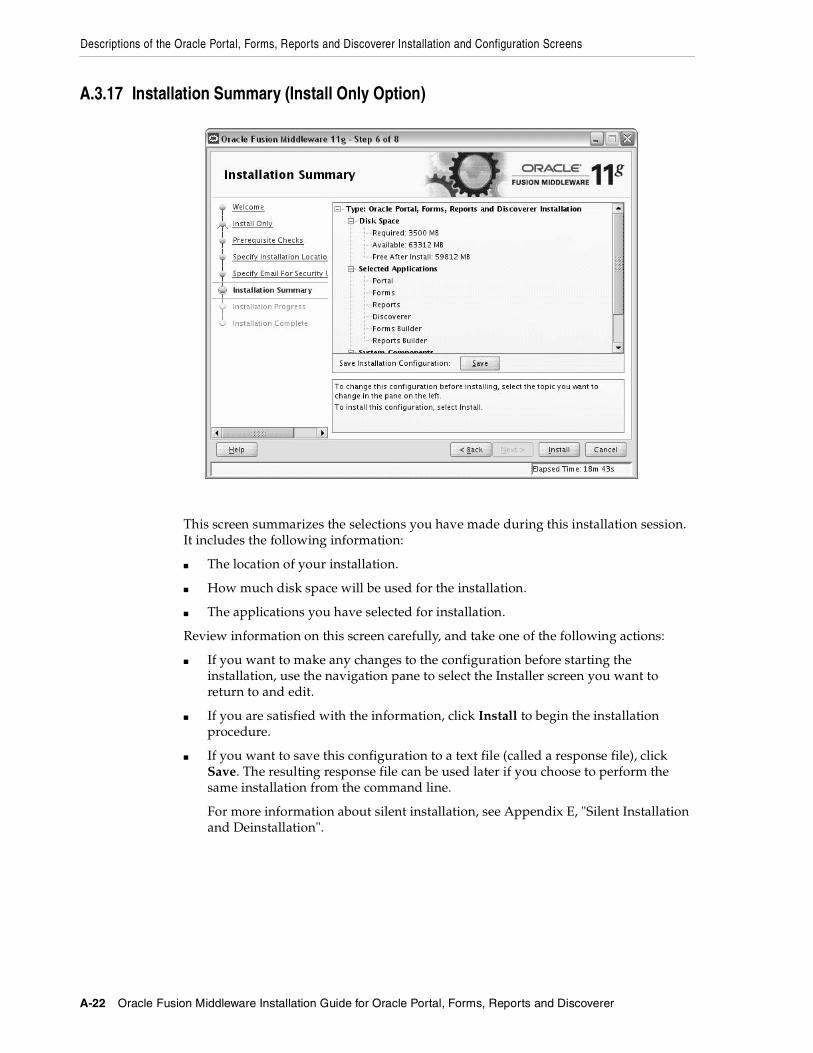
Descriptions of the Oracle Portal, Forms, Reports and Discoverer Installation and Configuration Screens
A-22 Oracle Fusion Middleware Installation Guide for Oracle Portal, Forms, Reports and Discoverer
A.3.17 Installation Summary (Install Only Option)
This screen summarizes the selections you have made during this installation session. It includes the following information:
■ The location of your installation.
■ How much disk space will be used for the installation.
■ The applications you have selected for installation.
Review information on this screen carefully, and take one of the following actions:
■ If you want to make any changes to the configuration before starting the installation, use the navigation pane to select the Installer screen you want to return to and edit.
■ If you are satisfied with the information, click Install to begin the installation procedure.
■ If you want to save this configuration to a text file (called a response file), click Save. The resulting response file can be used later if you choose to perform the same installation from the command line.
For more information about silent installation, see Appendix E, "Silent Installation and Deinstallation".
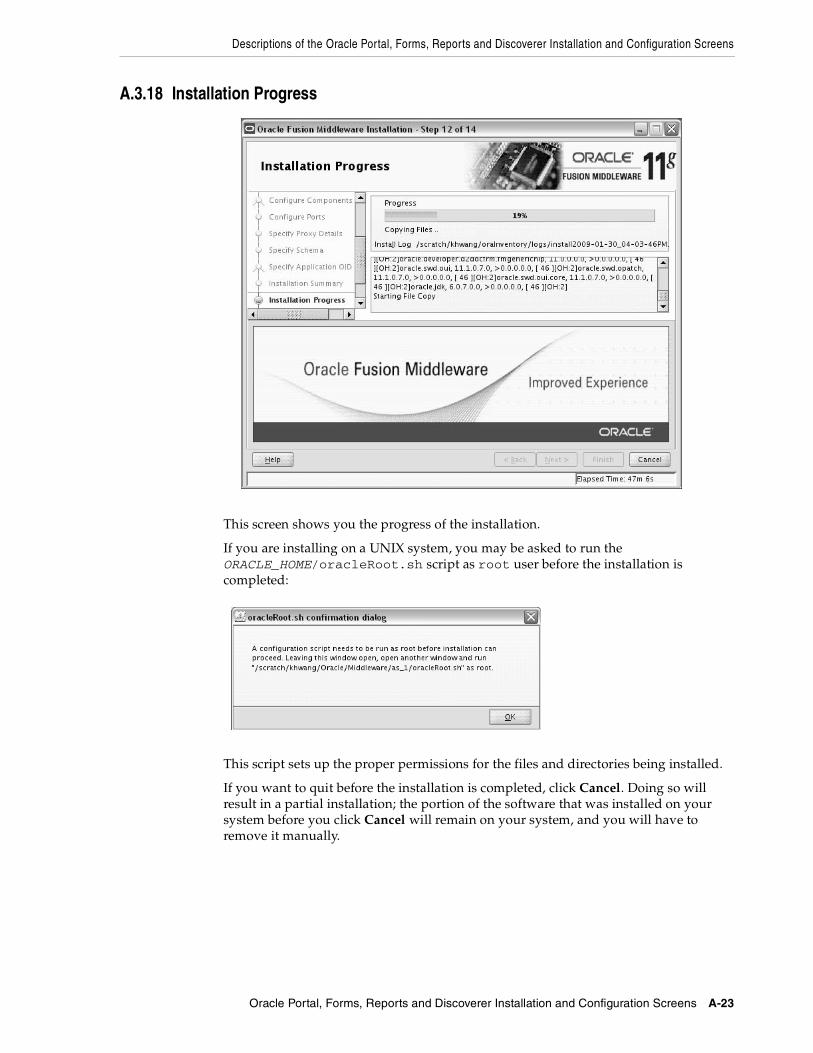
Descriptions of the Oracle Portal, Forms, Reports and Discoverer Installation and Configuration Screens
Oracle Portal, Forms, Reports and Discoverer Installation and Configuration Screens A-23
A.3.18 Installation Progress
This screen shows you the progress of the installation.
If you are installing on a UNIX system, you may be asked to run the ORACLE_HOME/oracleRoot.sh script as root user before the installation is completed:
This script sets up the proper permissions for the files and directories being installed.
If you want to quit before the installation is completed, click Cancel. Doing so will result in a partial installation; the portion of the software that was installed on your system before you click Cancel will remain on your system, and you will have to remove it manually.
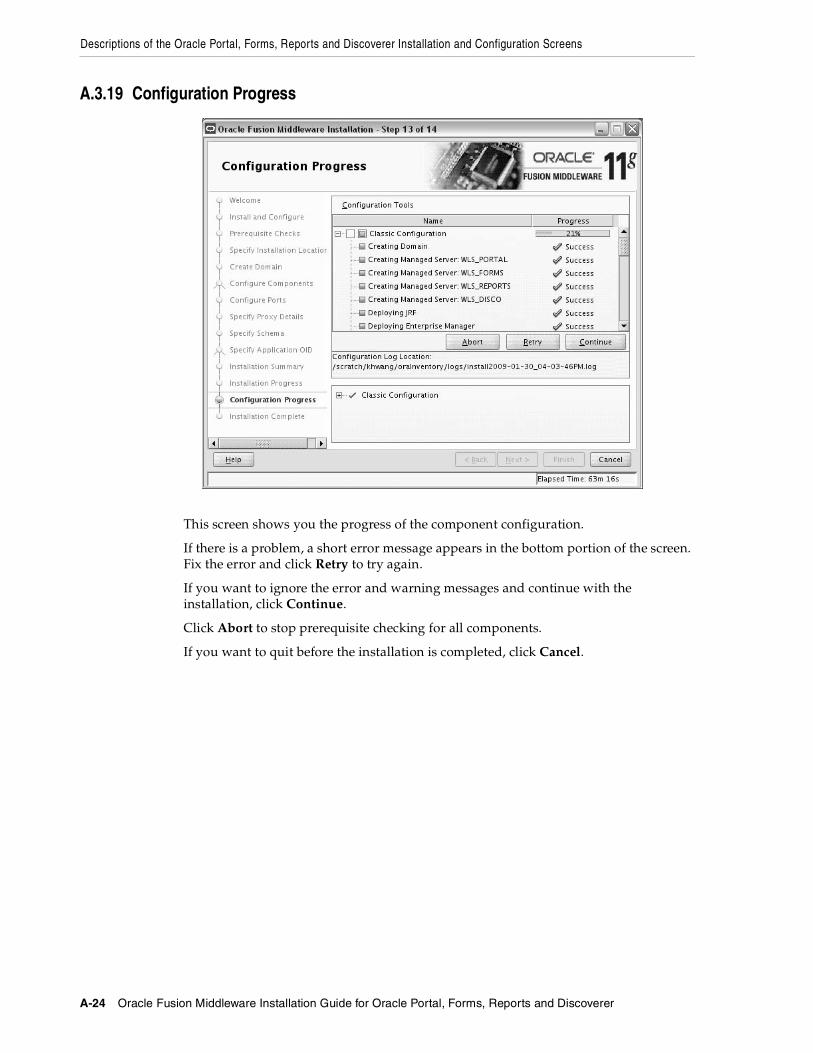
Descriptions of the Oracle Portal, Forms, Reports and Discoverer Installation and Configuration Screens
A-24 Oracle Fusion Middleware Installation Guide for Oracle Portal, Forms, Reports and Discoverer
A.3.19 Configuration Progress
This screen shows you the progress of the component configuration.
If there is a problem, a short error message appears in the bottom portion of the screen. Fix the error and click Retry to try again.
If you want to ignore the error and warning messages and continue with the installation, click Continue.
Click Abort to stop prerequisite checking for all components.
If you want to quit before the installation is completed, click Cancel.

Descriptions of the Oracle Portal, Forms, Reports and Discoverer Installation and Configuration Screens
Oracle Portal, Forms, Reports and Discoverer Installation and Configuration Screens A-25
A.3.20 Installation Complete
This screen summarizes the installation that was just completed.
The end of the summary information on this screen contains the various URLs to access the Administration Console as well as your installed products. You should write these URLs down so you can access your products later.
Or, you can click Save to save your configuration information to a file. This information includes port numbers, installation directories, disk space usage, URLs, and component names which you may need at a later time.
Click Finish to dismiss the screen.
Note: This summary information does not appear on the Installation Complete screen if you chose Install Software - Do Not Configure on the Select Installation Type screen.
Descriptions of the Oracle Portal, Forms, Reports and Discoverer Installation and Configuration Screens
A-26 Oracle Fusion Middleware Installation Guide for Oracle Portal, Forms, Reports and Discoverer

Oracle Discoverer Desktop Installation Screens B-1
BOracle Discoverer Desktop Installation
Screens
This appendix contains screenshots and descriptions for all of the Oracle Discoverer Desktop installation screens:
■ Welcome
■ Prerequisite Checks
■ Specify Installation Location
■ Select Components
■ Installation Summary
■ Installation Progress
■ Installation Completed

Welcome
B-2 Oracle Fusion Middleware Installation Guide for Oracle Portal, Forms, Reports and Discoverer
B.1 Welcome
This page introduces you to the Oracle Fusion Middleware installer and provides two important pieces of information:
■ A navigation pane on the left that summarizes the tasks the installer will help you complete. Each item in the navigation pane represents a specific installer screen that will prompt you for information required to install the software.
■ Information about any prerequisites you might need to perform before continuing with the installation.
Review the information on this screen carefully to be sure you have performed all the necessary prerequisites.
If you are not sure about any of the prerequisite tasks, refer to the Oracle Fusion Middleware Installation Planning Guide, as well as the installation guide for the specific Oracle Fusion Middleware software you are about to install.

Prerequisite Checks
Oracle Discoverer Desktop Installation Screens B-3
B.2 Prerequisite Checks
This screen analyzes the host computer to ensure that specific operating system prerequisites have been met.
If any of the prerequisite checks fail, then a short error message appears in the bottom portion of the screen. Fix the error and click Retry to try again. If you want to ignore the error or warning messages and continue with the installation, click Continue.
Click Abort to stop prerequisite checking for all components.
More About System Requirements and PrerequisitesNote that before performing any installation you should read the system requirements and certification documentation to ensure that your environment meets the minimum installation requirements for the products you are installing. Both of these documents are available on Oracle Technology Network (OTN).
The Oracle Fusion Middleware System Requirements and Specifications document covers information such as hardware and software requirements, minimum disk space and memory requirements, and required system libraries, packages, or patches.
The Oracle Fusion Middleware certification document for this release can be found on the Oracle Fusion Middleware Supported System Configurations page. This document covers supported installation types, platforms, operating systems, databases, JDKs, and third-party products.
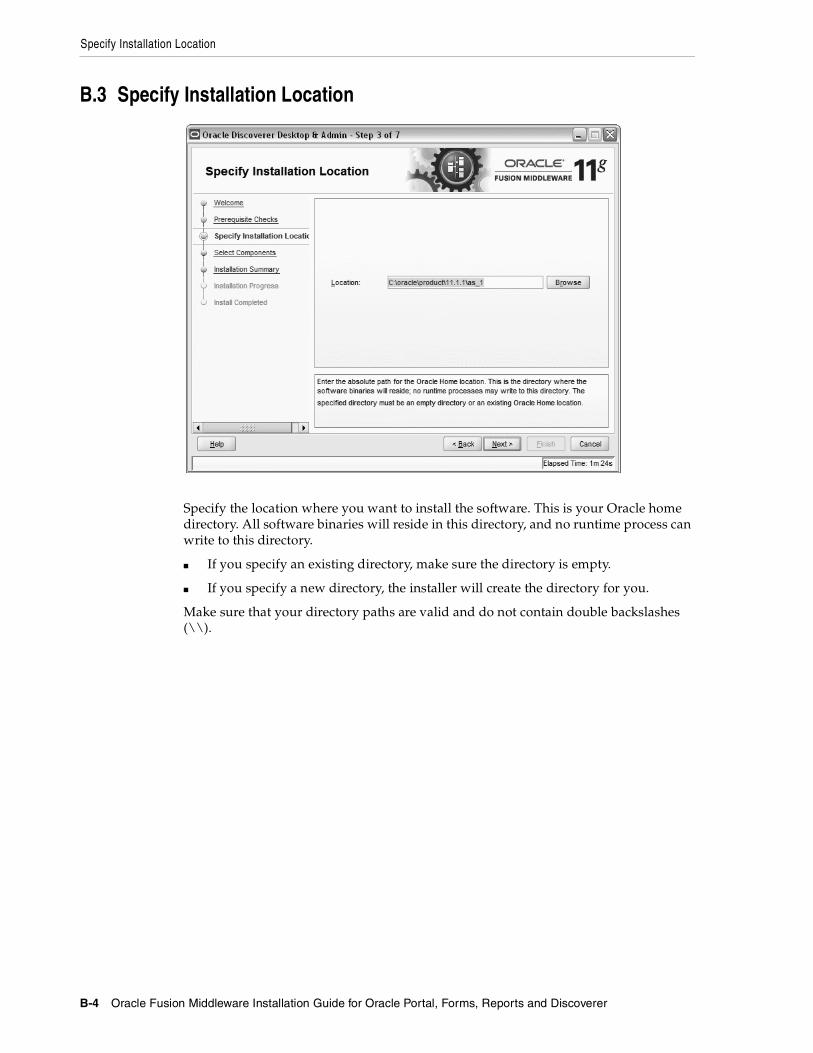
Specify Installation Location
B-4 Oracle Fusion Middleware Installation Guide for Oracle Portal, Forms, Reports and Discoverer
B.3 Specify Installation Location
Specify the location where you want to install the software. This is your Oracle home directory. All software binaries will reside in this directory, and no runtime process can write to this directory.
■ If you specify an existing directory, make sure the directory is empty.
■ If you specify a new directory, the installer will create the directory for you.
Make sure that your directory paths are valid and do not contain double backslashes (\\).
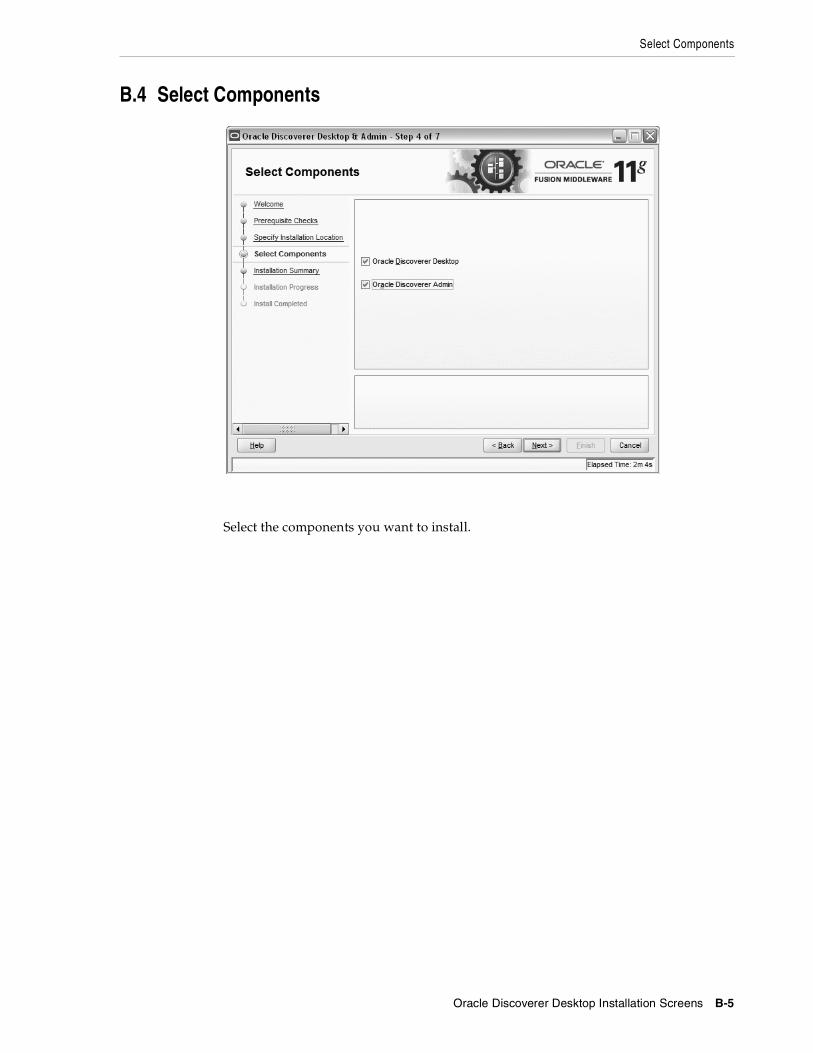
Select Components
Oracle Discoverer Desktop Installation Screens B-5
B.4 Select Components
Select the components you want to install.

Installation Summary
B-6 Oracle Fusion Middleware Installation Guide for Oracle Portal, Forms, Reports and Discoverer
B.5 Installation Summary
Review the information on this screen, and click Install to begin the installation. The operations summarized on this page will be performed when you click Install.
If you want to make any changes to the configuration before starting the installation, use the navigation pane and select the topic you want to edit.
If you want to save this configuration to a text file, click Save. This file can be used later if you choose to perform the same installation from the command line. See Appendix E, "Silent Installation and Deinstallation" for more information.
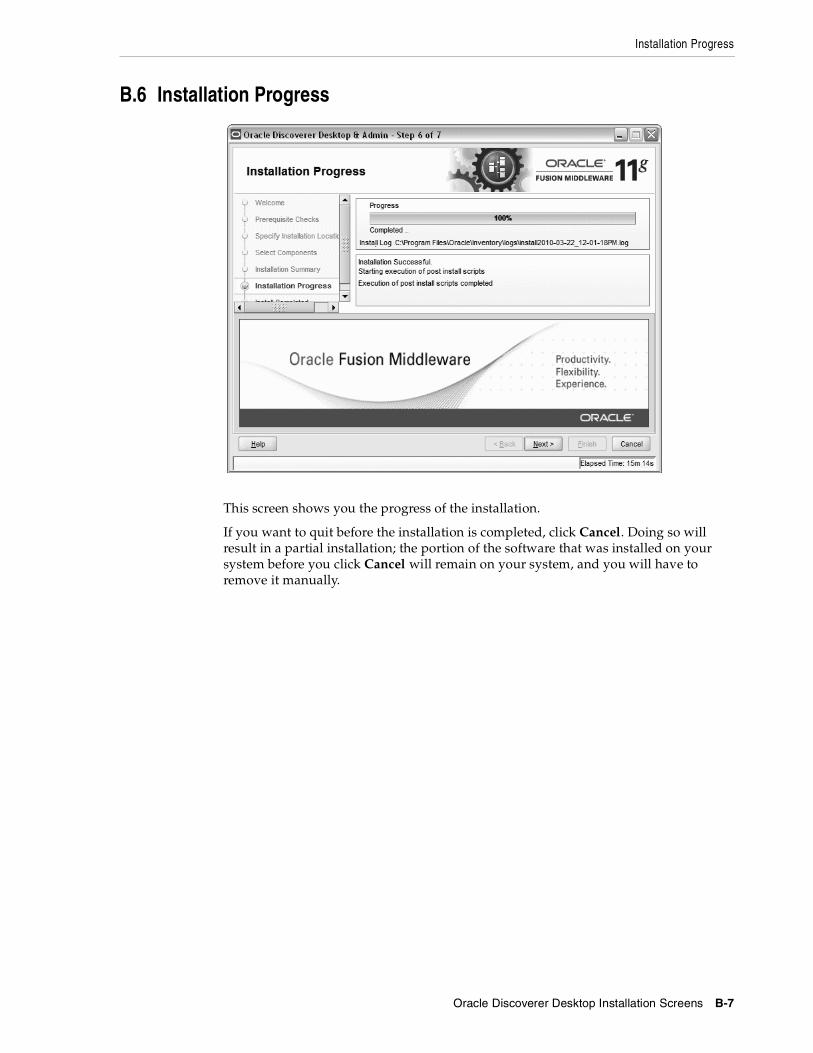
Installation Progress
Oracle Discoverer Desktop Installation Screens B-7
B.6 Installation Progress
This screen shows you the progress of the installation.
If you want to quit before the installation is completed, click Cancel. Doing so will result in a partial installation; the portion of the software that was installed on your system before you click Cancel will remain on your system, and you will have to remove it manually.
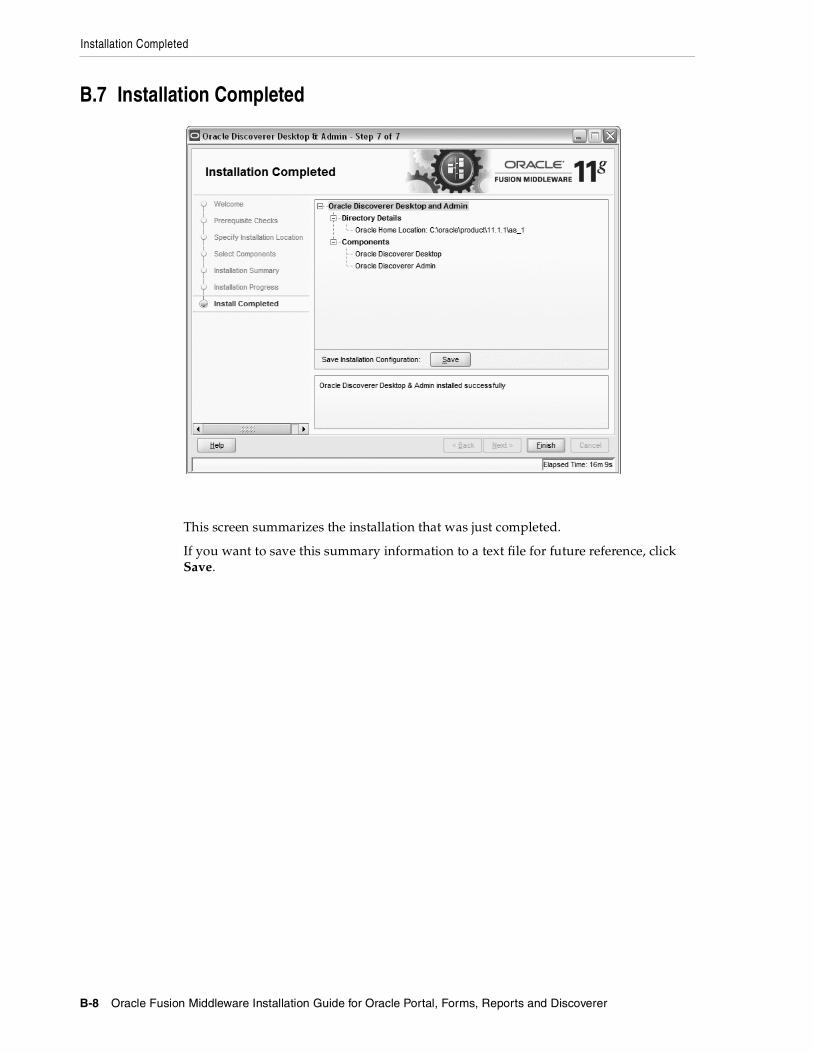
Installation Completed
B-8 Oracle Fusion Middleware Installation Guide for Oracle Portal, Forms, Reports and Discoverer
B.7 Installation Completed
This screen summarizes the installation that was just completed.
If you want to save this summary information to a text file for future reference, click Save.
Oracle Portal, Forms, Reports and Discoverer Deinstallation Screens C-1
COracle Portal, Forms, Reports and Discoverer Deinstallation Screens
This appendix contains screenshots and descriptions for all of the Oracle Portal, Forms, Reports and Discoverer deinstallation screens:
■ Welcome
■ Select Deinstallation Type
■ Deinstall Oracle Home
■ Specify WebLogic Domain Detail
■ Select Managed Instance
■ Specify Instance Location
■ Deinstallation Summary (Managed Instance)
■ Deinstallation Summary (Unmanaged Instance)
■ Deinstallation Progress
■ Deinstallation Complete

Welcome
C-2 Oracle Fusion Middleware Installation Guide for Oracle Portal, Forms, Reports and Discoverer
C.1 Welcome
The installer displays this screen when you are about to deinstall one or more Oracle Fusion Middleware software components.
When you use the installer to deinstall your Oracle Fusion Middleware software, the installer removes the software files in the selected Oracle home from disk, updates the Oracle inventory, and performs other operating-specific tasks to remove the components.
Like the Welcome screen that appears when you are about to install a product, the deinstallation Welcome screen contains a navigation pane on the left that summarizes the tasks the installer will help you complete.
Each item in the navigation pane represents a specific installer screen that will prompt you for information required to install the software.
For complete information about deinstalling your Oracle Fusion Middleware software, refer to the deinstallation information in the Installation guide for your software suite.

Select Deinstallation Type
Oracle Portal, Forms, Reports and Discoverer Deinstallation Screens C-3
C.2 Select Deinstallation Type
Use this screen to select the type of deinstallation you want to perform.
The following table describes the options on this screen:
Option Description
Deinstall Oracle Home Select this option to deinstall all binaries in the specified Oracle Home directory (the directory from which you started the deinstaller).
Deinstall ASInstances managed by WebLogic Domain
Select this option to deinstall a specific Oracle Instance and its system components that are registered to a WebLogic Domain.
Deinstall Unmanaged ASInstances
Select this option to deinstall all unmanaged Oracle Instances and their system components.

Deinstall Oracle Home
C-4 Oracle Fusion Middleware Installation Guide for Oracle Portal, Forms, Reports and Discoverer
C.3 Deinstall Oracle Home
Use this screen to verify that you have selected the Oracle home that you want to deinstall.
When you click Deinstall, then the installer will begin the process of deinstalling the Oracle home shown on this screen, and the following screen will appear:
Click Yes to remove the software and the Oracle home directory from which the deinstaller was started. Click No to remove the software but do not remove the Oracle home directory. Click Cancel to return to the previous screen.
If you want to save this configuration to a text file (called a response file), click Save. The resulting response file can be used later if you choose to perform the same deinstallation procedure from the command line.
See Appendix E, "Silent Installation and Deinstallation"for more information.
Note: Before you click Deinstall, ensure that all processes associated with the selected Oracle home have been stopped.

Specify WebLogic Domain Detail
Oracle Portal, Forms, Reports and Discoverer Deinstallation Screens C-5
C.4 Specify WebLogic Domain Detail
Use this screen to specify the WebLogic Domain credentials for your managed instances, as described in the following table:
Field Description
Domain Host Name Specify the name of the system on which your WebLogic domain resides.
Domain Port No Specify the Administration Server port number. The default port number is 7001.
User Name Specify the Administration Server user name.
Password Specify the password for the user.

Select Managed Instance
C-6 Oracle Fusion Middleware Installation Guide for Oracle Portal, Forms, Reports and Discoverer
C.5 Select Managed Instance
Use this screen to select the managed instance you want to deinstall. Select LocalHost if you have multiple managed instances on your system and you want to select all instances.
Note: Your instances must be up and running before they can be deinstalled.
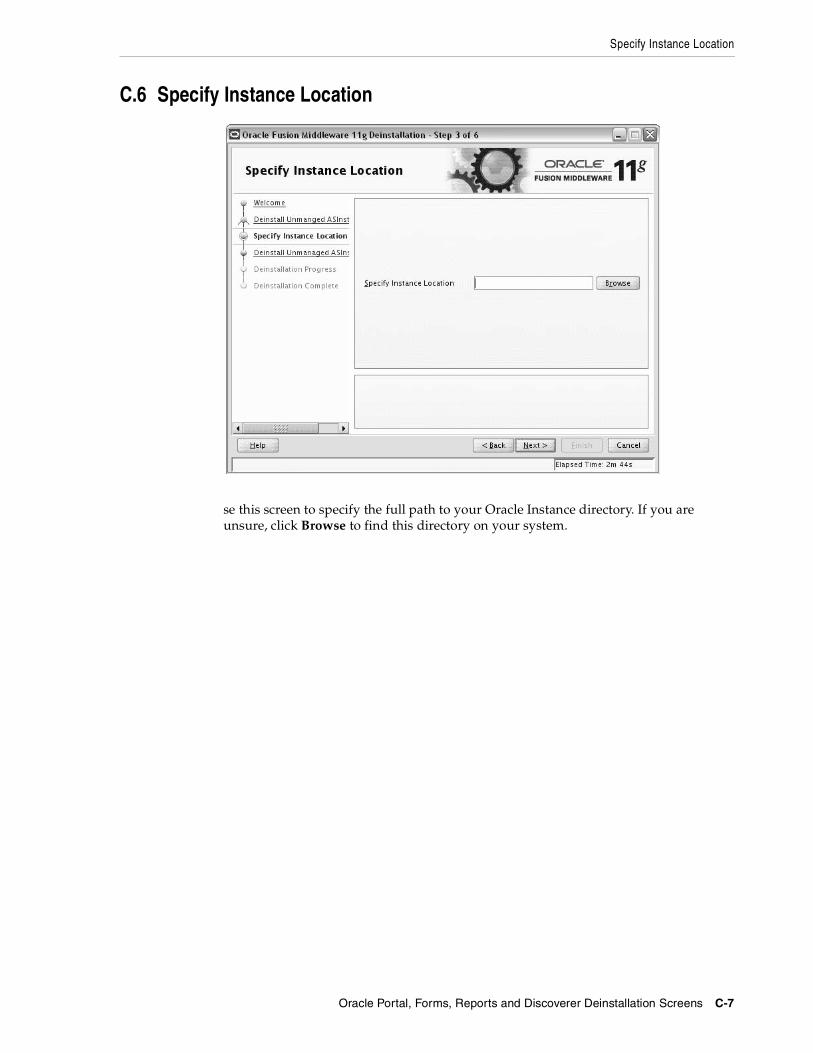
Specify Instance Location
Oracle Portal, Forms, Reports and Discoverer Deinstallation Screens C-7
C.6 Specify Instance Location
se this screen to specify the full path to your Oracle Instance directory. If you are unsure, click Browse to find this directory on your system.

Deinstallation Summary (Managed Instance)
C-8 Oracle Fusion Middleware Installation Guide for Oracle Portal, Forms, Reports and Discoverer
C.7 Deinstallation Summary (Managed Instance)
This screen shows you the instance(s) you are about to deinstall.
If you want to save this configuration to a text file (called a response file), click Save. The resulting response file can be used later if you choose to perform the same deinstallation procedure from the command line.
See Appendix E, "Silent Installation and Deinstallation" for more information.
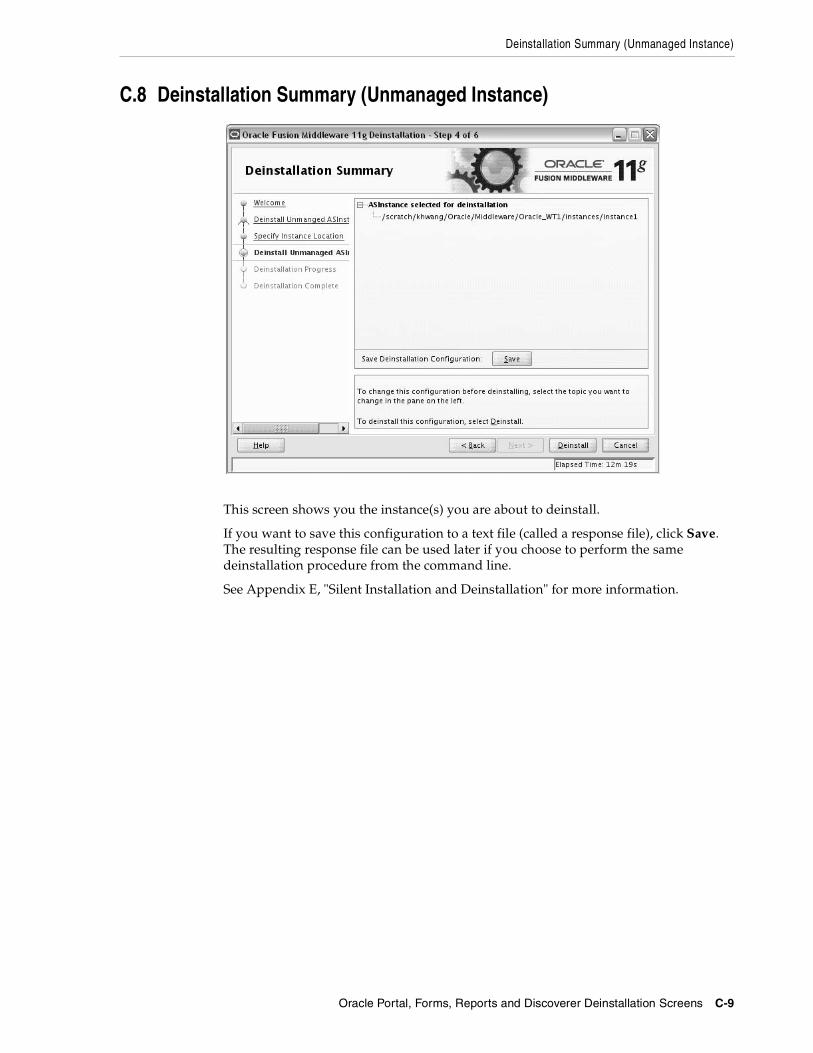
Deinstallation Summary (Unmanaged Instance)
Oracle Portal, Forms, Reports and Discoverer Deinstallation Screens C-9
C.8 Deinstallation Summary (Unmanaged Instance)
This screen shows you the instance(s) you are about to deinstall.
If you want to save this configuration to a text file (called a response file), click Save. The resulting response file can be used later if you choose to perform the same deinstallation procedure from the command line.
See Appendix E, "Silent Installation and Deinstallation" for more information.

Deinstallation Progress
C-10 Oracle Fusion Middleware Installation Guide for Oracle Portal, Forms, Reports and Discoverer
C.9 Deinstallation Progress
Use this screen to monitor the progress of the deinstallation process.
Click Cancel to stop the desinstallation process.

Deinstallation Complete
Oracle Portal, Forms, Reports and Discoverer Deinstallation Screens C-11
C.10 Deinstallation Complete
This screen summarizes the deinstallation that was just completed. When this screen appears, it indicates that the deinstallation is complete and the selected components have been cleared from the Oracle Inventory.

Deinstallation Complete
C-12 Oracle Fusion Middleware Installation Guide for Oracle Portal, Forms, Reports and Discoverer
D
Oracle Discoverer Desktop Deinstallation Screens D-1
D Oracle Discoverer Desktop Deinstallation Screens
This appendix contains screenshots and descriptions for all of the Oracle Discoverer Desktop deinstallation screens:
■ Welcome
■ Deinstall Oracle Home
■ Deinstallation Progress
■ Deinstallation Complete

Welcome
D-2 Oracle Fusion Middleware Installation Guide for Oracle Portal, Forms, Reports and Discoverer
D.1 Welcome
The installer displays this screen when you are about to deinstall one or more Oracle Fusion Middleware software components.
When you use the installer to deinstall your Oracle Fusion Middleware software, the installer removes the software files in the selected Oracle home from disk, updates the Oracle inventory, and performs other operating-specific tasks to remove the components.
Like the Welcome screen that appears when you are about to install a product, the deinstallation Welcome screen contains a navigation pane on the left that summarizes the tasks the installer will help you complete.
Each item in the navigation pane represents a specific installer screen that will prompt you for information required to install the software.
For complete information about deinstalling your Oracle Fusion Middleware software, refer to the deinstallation information in the Installation guide for your software suite.

Deinstall Oracle Home
Oracle Discoverer Desktop Deinstallation Screens D-3
D.2 Deinstall Oracle Home
Use this screen to verify that you have selected the Oracle home that you want to deinstall.
When you click Deinstall, then the installer will begin the process of deinstalling the Oracle home shown on this screen, and the following screen will appear:
Click Yes to remove the software and the Oracle home directory from which the deinstaller was started. Click No to remove the software but do not remove the Oracle home directory. Click Cancel to return to the previous screen.
If you want to save this configuration to a text file (called a response file), click Save. The resulting response file can be used later if you choose to perform the same deinstallation procedure from the command line.
See Appendix E, "Silent Installation and Deinstallation"for more information.
Note: Before you click Deinstall, ensure that all processes associated with the selected Oracle home have been stopped.

Deinstallation Progress
D-4 Oracle Fusion Middleware Installation Guide for Oracle Portal, Forms, Reports and Discoverer
D.3 Deinstallation Progress
Use this screen to monitor the progress of the deinstallation process.
Click Cancel to stop the desinstallation process.

Deinstallation Complete
Oracle Discoverer Desktop Deinstallation Screens D-5
D.4 Deinstallation Complete
This screen summarizes the deinstallation that was just completed. When this screen appears, it indicates that the deinstallation is complete and the selected components have been cleared from the Oracle Inventory.

Deinstallation Complete
D-6 Oracle Fusion Middleware Installation Guide for Oracle Portal, Forms, Reports and Discoverer
Silent Installation and Deinstallation E-1
ESilent Installation and Deinstallation
This appendix describes how to install and deinstall Oracle Portal, Forms, Reports and Discoverer from the command line in silent mode. This appendix contains the following topics:
■ Section E.1, "About Silent Installation and Deinstallation"
■ Section E.2, "Oracle Portal, Forms, Reports and Discoverer Response Files"
E.1 About Silent Installation and DeinstallationFor information about silent installation and deinstallation, refer to "Silent Installation and Deinstallation" in Oracle Fusion Middleware Installation Planning Guide.
E.2 Oracle Portal, Forms, Reports and Discoverer Response FilesBefore doing a silent installation, you must provide information specific to your installation in a response file. The installer will fail if you attempt an installation using a response file that is not configured correctly. Response files are text files that you can create or edit in a text editor
Oracle recommends creating your response file by first running the install GUI, then clicking Save on the Installation Summary. You will be prompted for a name and location where you want to create this response file. After it is created, you can use it exactly as-is to replicate the installation on other systems, or modify it as needed.
This section contains the following:
■ Silent Installation Response Files
■ Patch Set Installer Response Files
■ Silent Deinstallation Response Files
E.2.1 Silent Installation Response FilesTable E–1 lists the installation response files provided in the Disk1/stage/Response (on UNIX operating systems) or Disk1\stage\Response (on Windows operating systems) directory on the installation CD-ROM:

Oracle Portal, Forms, Reports and Discoverer Response Files
E-2 Oracle Fusion Middleware Installation Guide for Oracle Portal, Forms, Reports and Discoverer
E.2.1.1 Contents of the configure_only.rsp FileThis section shows the contents of the Disk1/stage/Response/configure_only.rsp response file on a UNIX operating system:
[ENGINE] #DO NOT CHANGE THIS.Response File Version=1.0.0.0.0 [GENERIC] #Set this to true if you want to create a new domain, all other required variables need to be provided. If this is set to true then variables "EXTEND_DOMAIN" and "EXPAND_CLUSTER" must be set to false, since the variables are mutually exclusive.CREATE_DOMAIN=true #Set this to true if you want to extend an already existing domain, all other required variables need to be provided. If this is set to true then variables "CREATE_DOMAIN" and "EXPAND_CLUSTER" must be set to false, since the variables are mutually exclusive.EXTEND_DOMAIN=false #Set this to true if you want to expand a cluster in an already existing domain, all other required variables need to be provided. If this is set to true then variables "CREATE_DOMAIN" and "EXTEND_DOMAIN" must be set to false, since the variables are mutually exclusive.EXPAND_CLUSTER=false #Write the name of the domain you want to create. Domain name may only contain alphanumeric characters, or the underscore (_) or hyphen (-) characters.
Table E–1 Oracle Portal, Forms, Reports and Discoverer Installation and Configuration Response File Templates
Template Description
configure_only.rsp This is the template response file that should be used if you have already installed the software on your system, and now need to configure the products to either create or extend a domain.
The equivalent using the GUI would be to run the config.sh (on UNIX operating systems) or config.bat (on Windows operating systems) script from the ORACLE_HOME/bin (on UNIX operating systems) or ORACLE_HOME\bin (on Windows operating systems) directory.
See Section E.2.1.1, "Contents of the configure_only.rsp File" to view the contents of this file.
install_only.rsp This is the template response file that should be used if you only want to install the software on your system.
The equivalent using the GUI would be selecting Install Software - Do Not Configure option on the Select Installation Type.
See Section E.2.1.2, "Contents of the install_only.rsp File" to view the contents of this file.
install_and_configure.rsp This is the template response file that should be used if you want to install and configure the software on your system.
The equivalent using the GUI would be selecting Install and Configure option on the Select Installation Type.
See Section E.2.1.3, "Contents of the install_and_configure.rsp File" to view the contents of this file.

Oracle Portal, Forms, Reports and Discoverer Response Files
Silent Installation and Deinstallation E-3
DOMAIN_NAME= #Write the name of the host to which you want to connect. It should have an already existing domain configured.DOMAIN_HOSTNAME= #Give the port number at which the host should be connected.DOMAIN_PORT= #Give an administrator user name for the domain if you are creating a new one otherwise give the administrator user name for the domain configured at the host.ADMIN_USER_NAME=weblogic #Give an administrator password for the domain if you are creating a new one otherwise give the administrator password for the domain configured at the host.ADMIN_PASSWORD= #Write the administrator password again to confirm.ADMIN_CONFIRM_PASSWORD= #Provide the My Oracle Support Username. If you wish to ignore Oracle Configuration Manager configuration provide empty string for user name.MYORACLESUPPORT_USERNAME= #Provide the My Oracle Support PasswordMYORACLESUPPORT_PASSWORD= #Set this to true if you wish to decline the security updates. Setting this to true and providing empty string for My Oracle Support username will ignore the Oracle Configuration Manager configurationDECLINE_SECURITY_UPDATES=false #Set this to true if My Oracle Support Password is specifiedSECURITY_UPDATES_VIA_MYORACLESUPPORT=true#Provide the Proxy HostPROXY_HOST= #Provide the Proxy PortPROXY_PORT= #Provide the Proxy UsernamePROXY_USER= #Provide the Proxy PasswordPROXY_PWD= #Give the complete path to a valid Middleware Home with WebLogic Server installed.MW_HOME= #Give the complete path to a valid WebLogic Server Home for the corresponding Middleware Home entered.WL_HOME= #Give the complete path for an Oracle Home to be created. The Oracle Home directory name may only contain alphanumeric , hyphen (-) , dot (.) and underscore (_) characters, and it must begin with an alphanumeric character.ORACLE_HOME= #Give the complete path for an Oracle Instance directory to be created. This is the location where the software configuration files and runtime processes will

Oracle Portal, Forms, Reports and Discoverer Response Files
E-4 Oracle Fusion Middleware Installation Guide for Oracle Portal, Forms, Reports and Discoverer
reside.INSTANCE_HOME= #Give a name for Oracle Instance corresponding to the Instance Home. The Oracle Instance name may only contain alphanumeric and underscore (_) characters, it must begin with an alphabetic (a-z or A-Z) character, and must be from 4 to 30 characters in length.INSTANCE_NAME=asinst_1 #Set this to true if you want the configuration wizard to assign the ports automatically.AUTOMATIC_PORT_DETECT=true #Give the location for the file containing the list of static ports if you manually want to assign ports.STATICPORT INI FILE LOCATION= #Set this to true if you do not want to use proxy.DO NOT USE PROXY SETTINGS=true #Set this to true if you do want to use proxy.ENABLE PROXY=false #Give the host name for proxy settings.PROXY HOST NAME= #Give the port for proxy settings.PROXY PORT NO= #Give the bypass addresses for proxy settings.PROXY BY PASS ADDRESS=#Give the connection string to establish a connection to a database.DATABASE_CONNECTION_STRING= #Set this to true if you want to register Discoverer Schema, schema name and password details need to be provided.REGISTER_DISCOVERER_SCHEMA=true #Give the Discoverer Schema Name.DISCOVERER_SCHEMA_NAME= #Give the Portal Schema Name.PORTAL_SCHEMA_NAME= #Give the Discoverer Schema Password.DISCOVERER_SCHEMA_PASSWORD= #Give the Portal Schema Password.PORTAL_SCHEMA_PASSWORD= #Set this to true if you want to register Portlet Schema, schema name and password details need to be provided.REGISTER_PORTLET_SCHEMA=true #Give the Portlet Schema Name.PORTLET_SCHEMA_NAME= #Give the Portlet Schema Password.PORTLET_SCHEMA_PASSWORD=
Oracle Portal, Forms, Reports and Discoverer Response Files
Silent Installation and Deinstallation E-5
#Set this to true if you want to use Application OID. It has to be true you are configuring Oracle Portal.USE_OID=true #Give the Application OID hostname.OID_HOST= #Give the Application OID port.OID_PORT= #Give the Application OID user name.OID_USERNAME=cn=orcladmin #Give the Application OID password.OID_PASSWORD= #Set this to true if you want to use Application OID in SSL mode.OID_USE_SSL=false [SYSTEM] [APPLICATIONS] [RELATIONSHIPS]#Set this to true if you want to configure Oracle Portal. "CONFIGURE_WEBCACHE" and "CONFIGURE_OHS" must also be set to true then as Oracle Portal Configuration is dependent on them.CONFIGURE_PORTAL=true #Set this to true if you want to configure Oracle FormsCONFIGURE_FORMS=true #Set this to true if you want to configure Oracle ReportsCONFIGURE_REPORTS=true #Set this to true if you want to configure Oracle Discoverer. "CONFIGURE_OHS" must also be set to true then as Oracle Discoverer Configuration is dependent on it.CONFIGURE_DISCO=true #Set this to true if you want to configure Oracle Forms Builder. "CONFIGURE_FORMS" must also be set to true then as Oracle Forms Builder Configuration is dependent on it.CONFIGURE_FORMS_BUILDER=false #Set this to true if you want to configure Oracle Reports Builder. "CONFIGURE_REPORTS" must also be set to true then as Oracle Reports Builder Configuration is dependent on it.CONFIGURE_REPORTS_BUILDER=false #Set this to true if you want to configure Oracle HTTP Server.CONFIGURE_OHS=true #Set this to true if you want to configure Oracle Webcache. "CONFIGURE_OHS" must also be set to true then as Oracle Webcahce Configuration is dependent on it.CONFIGURE_WEBCACHE=true #Set this to true if you want to configure Oracle Enterprise Manager.
Oracle Portal, Forms, Reports and Discoverer Response Files
E-6 Oracle Fusion Middleware Installation Guide for Oracle Portal, Forms, Reports and Discoverer
ENTERPRISE_MANAGEMENT=true #Set this to true if you want to create a cluster for the selected applicationsCREATE_CLUSTERED=true
E.2.1.2 Contents of the install_only.rsp FileThis section shows the contents of the Disk1/stage/Response/install_only.rsp response file on a UNIX operating system:
[ENGINE] #DO NOT CHANGE THIS.Response File Version=1.0.0.0.0 [GENERIC] #Set this to true if installation and configuration need to be done, all other required variables need to be provided. Variable "INSTALL AND CONFIGURE LATER TYPE" must be set to false if this is set to true as the variables are mutually exclusiveINSTALL AND CONFIGURE TYPE=false #Set this to true if only Software only installation need to be done. If this is set to true then variable "INSTALL AND CONFIGURE TYPE" must be set to false, since the variables are mutually exclusive.INSTALL AND CONFIGURE LATER TYPE=true #Give the complete path for an Oracle Home to be created. The Oracle Home directory name may only contain alphanumeric , hyphen (-) , dot (.) and underscore (_) characters, and it must begin with an alphanumeric character.ORACLE_HOME= #Write the complete path to a valid Middleware Home.MW_HOME= #Provide the My Oracle Support Username. If you wish to ignore Oracle Configuration Manager configuration provide empty string for user name.MYORACLESUPPORT_USERNAME= #Provide the My Oracle Support PasswordMYORACLESUPPORT_PASSWORD= #Set this to true if you wish to decline the security updates. Setting this to true and providing empty string for My Oracle Support username will ignore the Oracle Configuration Manager configurationDECLINE_SECURITY_UPDATES=false #Set this to true if My Oracle Support Password is specifiedSECURITY_UPDATES_VIA_MYORACLESUPPORT=true #Provide the Proxy HostPROXY_HOST= #Provide the Proxy PortPROXY_PORT= #Provide the Proxy UsernamePROXY_USER= #Provide the Proxy Password

Oracle Portal, Forms, Reports and Discoverer Response Files
Silent Installation and Deinstallation E-7
PROXY_PWD= [SYSTEM] [APPLICATIONS] [RELATIONSHIPS]
E.2.1.3 Contents of the install_and_configure.rsp FileThis section shows the contents of the Disk1/stage/Response/install_and_configure.rsp response file on a UNIX operating system:
[ENGINE] #DO NOT CHANGE THIS.Response File Version=1.0.0.0.0 [GENERIC] #Set this to true if installation and configuration need to be done, all other required variables need to be provided. Variable "INSTALL AND CONFIGURE LATER TYPE" must be set to false if this is set to true as the variables are mutually exclusiveINSTALL AND CONFIGURE TYPE=true #Set this to true if only Software only installation need to be done. If this is set to true then variable "INSTALL AND CONFIGURE TYPE" must be set to false, since the variables are mutually exclusive.INSTALL AND CONFIGURE LATER TYPE=false #Set this to true if you want to create a new domain, all other required variables need to be provided. If this is set to true then variables "EXTEND_DOMAIN" and "EXPAND_CLUSTER" must be set to false, since the variables are mutually exclusive.CREATE_DOMAIN=true #Set this to true if you want to extend an already existing domain, all other required variables need to be provided. If this is set to true then variables "CREATE_DOMAIN" and "EXPAND_CLUSTER" must be set to false, since the variables are mutually exclusive.EXTEND_DOMAIN=false #Set this to true if you want to expand a cluster in an already existing domain, all other required variables need to be provided. If this is set to true then variables "CREATE_DOMAIN" and "EXTEND_DOMAIN" must be set to false, since the variables are mutually exclusive.EXPAND_CLUSTER=false #Write the name of the domain you want to create. Domain name may only contain alphanumeric characters, or the underscore (_) or hyphen (-) characters.DOMAIN_NAME= #Write the name of the host to which you want to connect. It should have an already existing domain configured.DOMAIN_HOSTNAME= #Give the port number at which the host should be connected.DOMAIN_PORT=
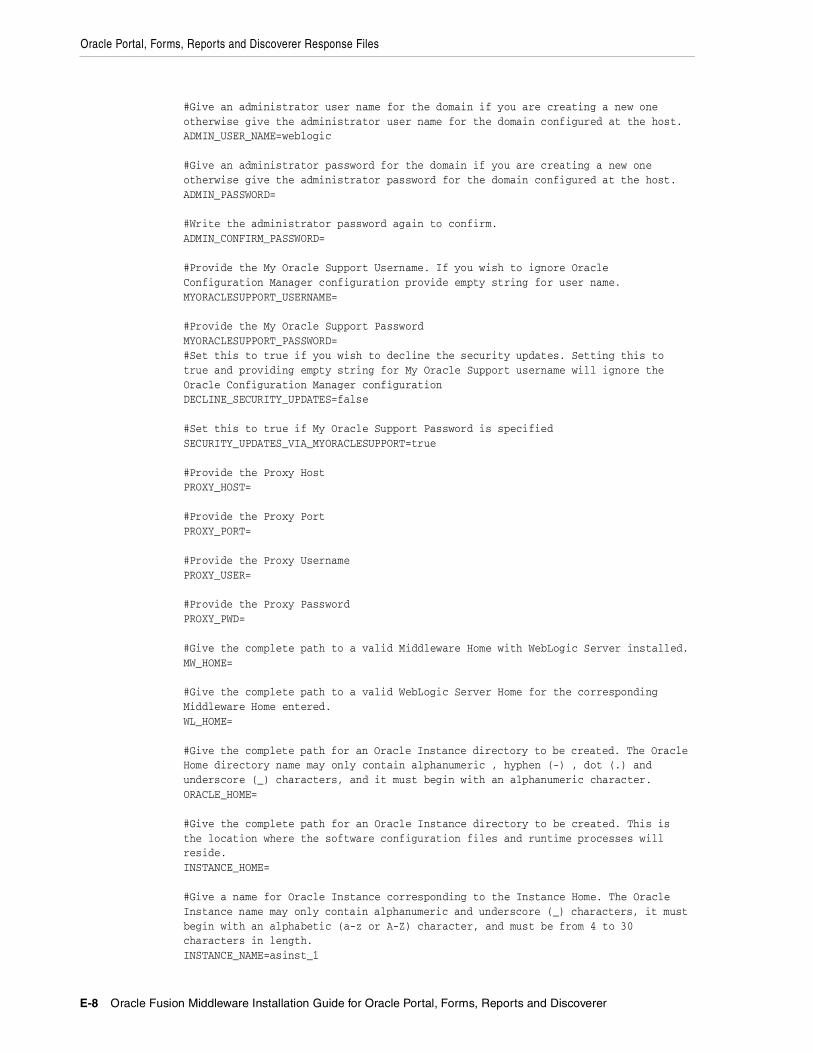
Oracle Portal, Forms, Reports and Discoverer Response Files
E-8 Oracle Fusion Middleware Installation Guide for Oracle Portal, Forms, Reports and Discoverer
#Give an administrator user name for the domain if you are creating a new one otherwise give the administrator user name for the domain configured at the host.ADMIN_USER_NAME=weblogic #Give an administrator password for the domain if you are creating a new one otherwise give the administrator password for the domain configured at the host.ADMIN_PASSWORD= #Write the administrator password again to confirm.ADMIN_CONFIRM_PASSWORD= #Provide the My Oracle Support Username. If you wish to ignore Oracle Configuration Manager configuration provide empty string for user name.MYORACLESUPPORT_USERNAME= #Provide the My Oracle Support PasswordMYORACLESUPPORT_PASSWORD=#Set this to true if you wish to decline the security updates. Setting this to true and providing empty string for My Oracle Support username will ignore the Oracle Configuration Manager configurationDECLINE_SECURITY_UPDATES=false #Set this to true if My Oracle Support Password is specifiedSECURITY_UPDATES_VIA_MYORACLESUPPORT=true #Provide the Proxy HostPROXY_HOST= #Provide the Proxy PortPROXY_PORT= #Provide the Proxy UsernamePROXY_USER= #Provide the Proxy PasswordPROXY_PWD= #Give the complete path to a valid Middleware Home with WebLogic Server installed.MW_HOME= #Give the complete path to a valid WebLogic Server Home for the corresponding Middleware Home entered.WL_HOME= #Give the complete path for an Oracle Instance directory to be created. The Oracle Home directory name may only contain alphanumeric , hyphen (-) , dot (.) and underscore (_) characters, and it must begin with an alphanumeric character.ORACLE_HOME= #Give the complete path for an Oracle Instance directory to be created. This is the location where the software configuration files and runtime processes will reside.INSTANCE_HOME= #Give a name for Oracle Instance corresponding to the Instance Home. The Oracle Instance name may only contain alphanumeric and underscore (_) characters, it must begin with an alphabetic (a-z or A-Z) character, and must be from 4 to 30 characters in length.INSTANCE_NAME=asinst_1

Oracle Portal, Forms, Reports and Discoverer Response Files
Silent Installation and Deinstallation E-9
#Set this to true if you want the configuration wizard to assign the ports automatically.AUTOMATIC_PORT_DETECT=true #Give the location for the file containing the list of static ports if you manually want to assign ports.STATICPORT INI FILE LOCATION= #Set this to true if you do not want to use proxy.DO NOT USE PROXY SETTINGS=true #Set this to true if you do want to use proxy.ENABLE PROXY=false #Give the host name for proxy settings.PROXY HOST NAME= #Give the port for proxy settings.PROXY PORT NO=#Give the bypass addresses for proxy settings.PROXY BY PASS ADDRESS= #Give the connection string to establish a connection to a database.DATABASE_CONNECTION_STRING= #Set this to true if you want to register Discoverer Schema, schema name and password details need to be provided.REGISTER_DISCOVERER_SCHEMA=true #Give the Discoverer Schema Name.DISCOVERER_SCHEMA_NAME= #Give the Portal Schema Name.PORTAL_SCHEMA_NAME= #Give the Discoverer Schema Password.DISCOVERER_SCHEMA_PASSWORD= #Give the Portal Schema Password.PORTAL_SCHEMA_PASSWORD= #Set this to true if you want to register Portlet Schema, schema name and password details need to be provided.REGISTER_PORTLET_SCHEMA=true #Give the Portlet Schema Name.PORTLET_SCHEMA_NAME= #Give the Portlet Schema Password.PORTLET_SCHEMA_PASSWORD= #Set this to true if you want to use Application OID. It has to be true you are configuring Oracle Portal.USE_OID=true #Give the Application OID hostname.OID_HOST= #Give the Application OID port.

Oracle Portal, Forms, Reports and Discoverer Response Files
E-10 Oracle Fusion Middleware Installation Guide for Oracle Portal, Forms, Reports and Discoverer
OID_PORT= #Give the Application OID user name.OID_USERNAME=cn=orcladmin #Give the Application OID password.OID_PASSWORD= #Set this to true if you want to use Application OID in SSL mode.OID_USE_SSL=false [SYSTEM] [APPLICATIONS] [RELATIONSHIPS]#Set this to true if you want to configure Oracle Portal. "CONFIGURE_WEBCACHE" and "CONFIGURE_OHS" must also be set to true then as Oracle Portal Configuration is dependent on them.CONFIGURE_PORTAL=true #Set this to true if you want to configure Oracle FormsCONFIGURE_FORMS=true #Set this to true if you want to configure Oracle ReportsCONFIGURE_REPORTS=true #Set this to true if you want to configure Oracle Discoverer. "CONFIGURE_OHS" must also be set to true then as Oracle Discoverer Configuration is dependent on it.CONFIGURE_DISCO=true #Set this to true if you want to configure Oracle Forms Builder. "CONFIGURE_FORMS" must also be set to true then as Oracle Forms Builder Configuration is dependent on it.CONFIGURE_FORMS_BUILDER=false #Set this to true if you want to configure Oracle Reports Builder. "CONFIGURE_REPORTS" must also be set to true then as Oracle Reports Builder Configuration is dependent on it.CONFIGURE_REPORTS_BUILDER=false #Set this to true if you want to configure Oracle HTTP Server.CONFIGURE_OHS=true #Set this to true if you want to configure Oracle Webcache. "CONFIGURE_OHS" must also be set to true then as Oracle Webcahce Configuration is dependent on it.CONFIGURE_WEBCACHE=true #Set this to true if you want to configure Oracle Enterprise Manager.ENTERPRISE_MANAGEMENT=true #Set this to true if you want to create a cluster for the selected applicationsCREATE_CLUSTERED=true
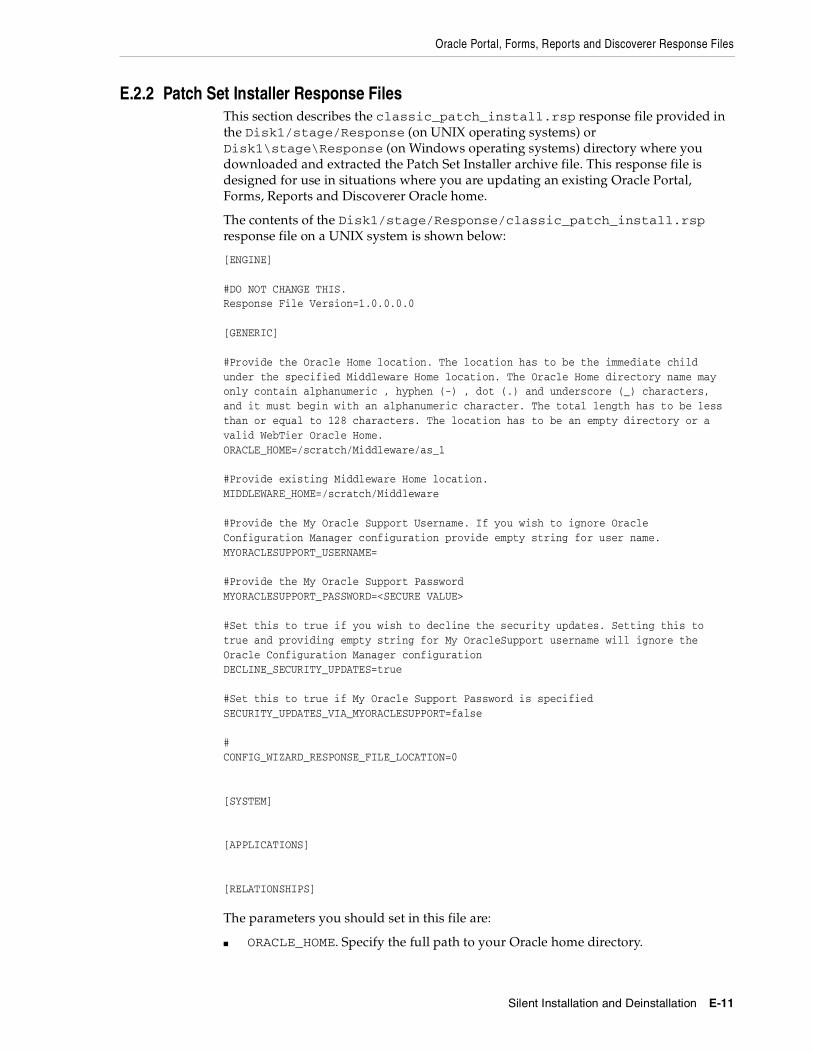
Oracle Portal, Forms, Reports and Discoverer Response Files
Silent Installation and Deinstallation E-11
E.2.2 Patch Set Installer Response FilesThis section describes the classic_patch_install.rsp response file provided in the Disk1/stage/Response (on UNIX operating systems) or Disk1\stage\Response (on Windows operating systems) directory where you downloaded and extracted the Patch Set Installer archive file. This response file is designed for use in situations where you are updating an existing Oracle Portal, Forms, Reports and Discoverer Oracle home.
The contents of the Disk1/stage/Response/classic_patch_install.rsp response file on a UNIX system is shown below:
[ENGINE] #DO NOT CHANGE THIS.Response File Version=1.0.0.0.0 [GENERIC] #Provide the Oracle Home location. The location has to be the immediate child under the specified Middleware Home location. The Oracle Home directory name may only contain alphanumeric , hyphen (-) , dot (.) and underscore (_) characters, and it must begin with an alphanumeric character. The total length has to be less than or equal to 128 characters. The location has to be an empty directory or a valid WebTier Oracle Home.ORACLE_HOME=/scratch/Middleware/as_1 #Provide existing Middleware Home location.MIDDLEWARE_HOME=/scratch/Middleware #Provide the My Oracle Support Username. If you wish to ignore Oracle Configuration Manager configuration provide empty string for user name.MYORACLESUPPORT_USERNAME= #Provide the My Oracle Support PasswordMYORACLESUPPORT_PASSWORD=<SECURE VALUE> #Set this to true if you wish to decline the security updates. Setting this to true and providing empty string for My OracleSupport username will ignore the Oracle Configuration Manager configurationDECLINE_SECURITY_UPDATES=true #Set this to true if My Oracle Support Password is specifiedSECURITY_UPDATES_VIA_MYORACLESUPPORT=false #CONFIG_WIZARD_RESPONSE_FILE_LOCATION=0 [SYSTEM] [APPLICATIONS] [RELATIONSHIPS]
The parameters you should set in this file are:
■ ORACLE_HOME. Specify the full path to your Oracle home directory.
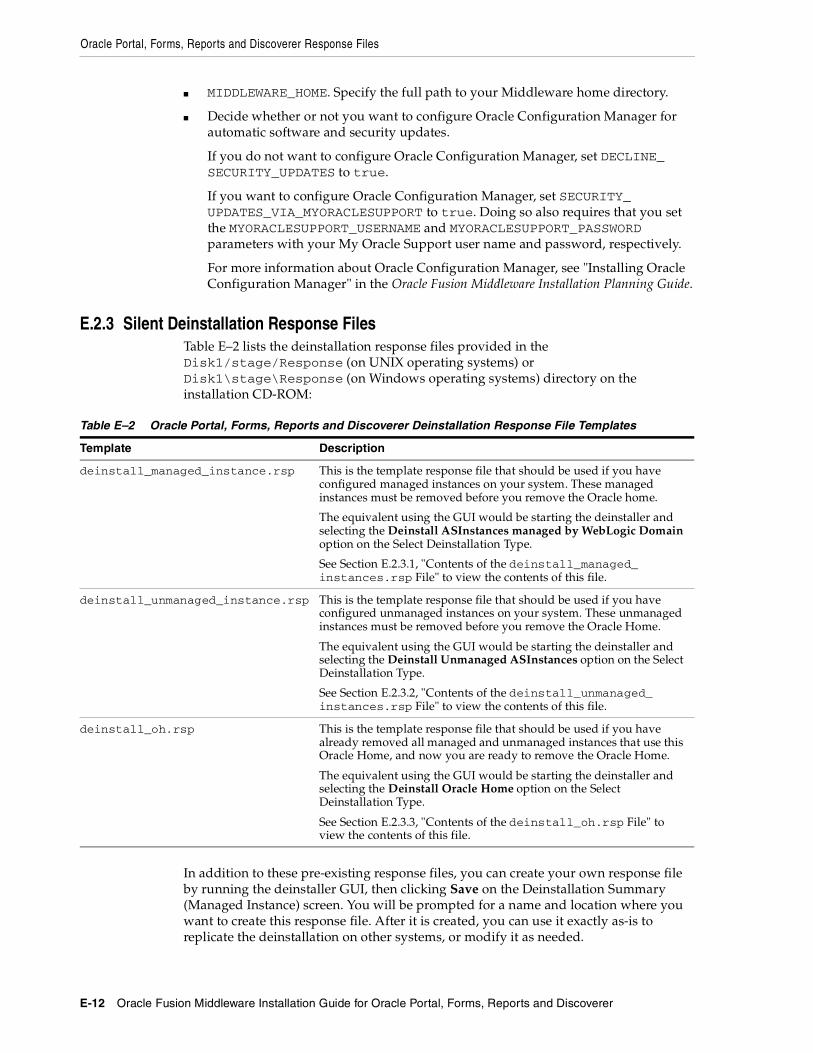
Oracle Portal, Forms, Reports and Discoverer Response Files
E-12 Oracle Fusion Middleware Installation Guide for Oracle Portal, Forms, Reports and Discoverer
■ MIDDLEWARE_HOME. Specify the full path to your Middleware home directory.
■ Decide whether or not you want to configure Oracle Configuration Manager for automatic software and security updates.
If you do not want to configure Oracle Configuration Manager, set DECLINE_SECURITY_UPDATES to true.
If you want to configure Oracle Configuration Manager, set SECURITY_UPDATES_VIA_MYORACLESUPPORT to true. Doing so also requires that you set the MYORACLESUPPORT_USERNAME and MYORACLESUPPORT_PASSWORD parameters with your My Oracle Support user name and password, respectively.
For more information about Oracle Configuration Manager, see "Installing Oracle Configuration Manager" in the Oracle Fusion Middleware Installation Planning Guide.
E.2.3 Silent Deinstallation Response FilesTable E–2 lists the deinstallation response files provided in the Disk1/stage/Response (on UNIX operating systems) or Disk1\stage\Response (on Windows operating systems) directory on the installation CD-ROM:
In addition to these pre-existing response files, you can create your own response file by running the deinstaller GUI, then clicking Save on the Deinstallation Summary (Managed Instance) screen. You will be prompted for a name and location where you want to create this response file. After it is created, you can use it exactly as-is to replicate the deinstallation on other systems, or modify it as needed.
Table E–2 Oracle Portal, Forms, Reports and Discoverer Deinstallation Response File Templates
Template Description
deinstall_managed_instance.rsp This is the template response file that should be used if you have configured managed instances on your system. These managed instances must be removed before you remove the Oracle home.
The equivalent using the GUI would be starting the deinstaller and selecting the Deinstall ASInstances managed by WebLogic Domain option on the Select Deinstallation Type.
See Section E.2.3.1, "Contents of the deinstall_managed_instances.rsp File" to view the contents of this file.
deinstall_unmanaged_instance.rsp This is the template response file that should be used if you have configured unmanaged instances on your system. These unmanaged instances must be removed before you remove the Oracle Home.
The equivalent using the GUI would be starting the deinstaller and selecting the Deinstall Unmanaged ASInstances option on the Select Deinstallation Type.
See Section E.2.3.2, "Contents of the deinstall_unmanaged_instances.rsp File" to view the contents of this file.
deinstall_oh.rsp This is the template response file that should be used if you have already removed all managed and unmanaged instances that use this Oracle Home, and now you are ready to remove the Oracle Home.
The equivalent using the GUI would be starting the deinstaller and selecting the Deinstall Oracle Home option on the Select Deinstallation Type.
See Section E.2.3.3, "Contents of the deinstall_oh.rsp File" to view the contents of this file.
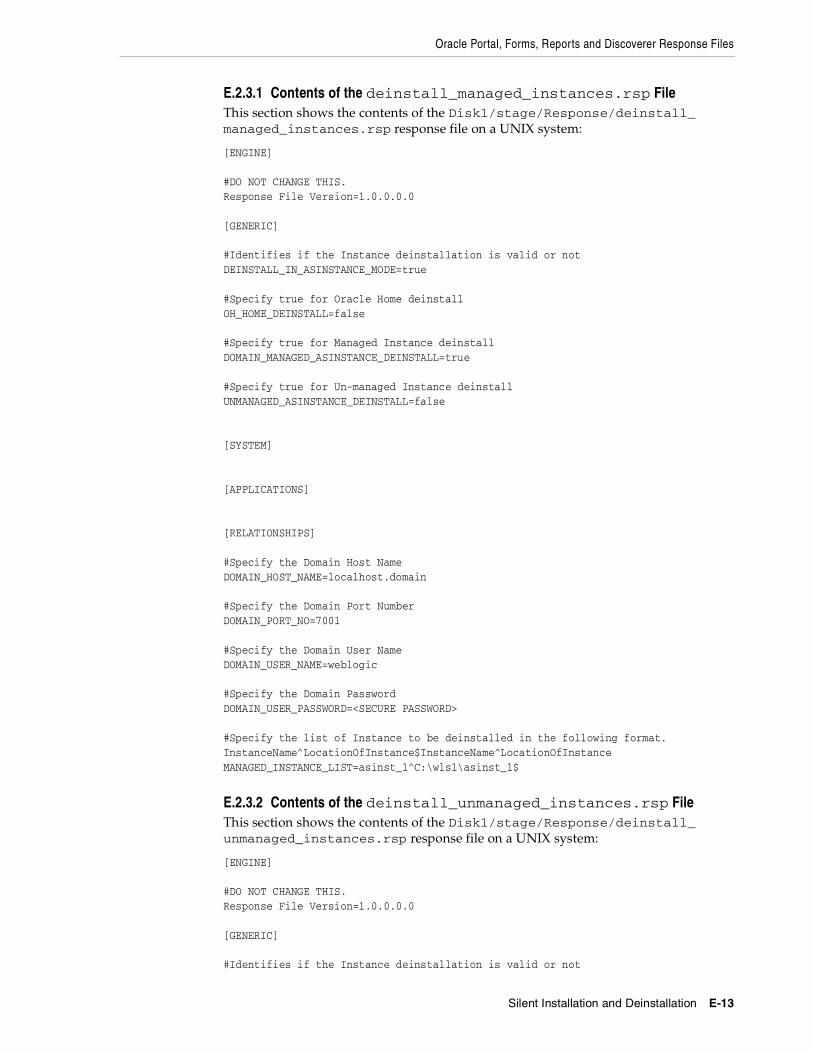
Oracle Portal, Forms, Reports and Discoverer Response Files
Silent Installation and Deinstallation E-13
E.2.3.1 Contents of the deinstall_managed_instances.rsp FileThis section shows the contents of the Disk1/stage/Response/deinstall_managed_instances.rsp response file on a UNIX system:
[ENGINE] #DO NOT CHANGE THIS.Response File Version=1.0.0.0.0 [GENERIC] #Identifies if the Instance deinstallation is valid or notDEINSTALL_IN_ASINSTANCE_MODE=true #Specify true for Oracle Home deinstallOH_HOME_DEINSTALL=false #Specify true for Managed Instance deinstallDOMAIN_MANAGED_ASINSTANCE_DEINSTALL=true #Specify true for Un-managed Instance deinstallUNMANAGED_ASINSTANCE_DEINSTALL=false [SYSTEM] [APPLICATIONS] [RELATIONSHIPS] #Specify the Domain Host NameDOMAIN_HOST_NAME=localhost.domain #Specify the Domain Port NumberDOMAIN_PORT_NO=7001 #Specify the Domain User NameDOMAIN_USER_NAME=weblogic #Specify the Domain PasswordDOMAIN_USER_PASSWORD=<SECURE PASSWORD> #Specify the list of Instance to be deinstalled in the following format. InstanceName^LocationOfInstance$InstanceName^LocationOfInstanceMANAGED_INSTANCE_LIST=asinst_1^C:\wls1\asinst_1$
E.2.3.2 Contents of the deinstall_unmanaged_instances.rsp FileThis section shows the contents of the Disk1/stage/Response/deinstall_unmanaged_instances.rsp response file on a UNIX system:
[ENGINE] #DO NOT CHANGE THIS.Response File Version=1.0.0.0.0 [GENERIC] #Identifies if the Instance deinstallation is valid or not

Oracle Portal, Forms, Reports and Discoverer Response Files
E-14 Oracle Fusion Middleware Installation Guide for Oracle Portal, Forms, Reports and Discoverer
DEINSTALL_IN_ASINSTANCE_MODE=true #Specify true for Oracle Home deinstallOH_HOME_DEINSTALL=false #Specify true for Managed Instance deinstallDOMAIN_MANAGED_ASINSTANCE_DEINSTALL=false #Specify true for Un-managed Instance deinstallUNMANAGED_ASINSTANCE_DEINSTALL=true #Specify the path of the Un-managed InstanceASINSTANCE_LOCATION_TEXTFIELD=c:\Oracle\Middleware\asinst_1 [SYSTEM] [APPLICATIONS] [RELATIONSHIPS]
E.2.3.3 Contents of the deinstall_oh.rsp FileThis section shows the contents of the Disk1/stage/Response/deinstall_oh.rsp response file on a UNIX system:
[ENGINE] #DO NOT CHANGE THIS.Response File Version=1.0.0.0.0 [GENERIC] #Identifies if the Instance deinstallation is valid or notDEINSTALL_IN_ASINSTANCE_MODE=true #Specify true for Oracle Home deinstallOH_HOME_DEINSTALL=true #Specify true for Managed Instance deinstallDOMAIN_MANAGED_ASINSTANCE_DEINSTALL=false #Specify true for Un-managed Instance deinstallUNMANAGED_ASINSTANCE_DEINSTALL=false [SYSTEM] [APPLICATIONS] [RELATIONSHIPS]

Troubleshooting F-1
FTroubleshooting
This appendix describes solutions to common problems that you might encounter when installing Oracle Portal, Forms, Reports and Discoverer. It contains the following sections:
■ Section F.1, "General Troubleshooting Tips"
■ Section F.2, "Installation and Configuration Log Files"
■ Section F.3, "Verifying Environment Variable Lengths for Oracle Reports (Windows Only)"
■ Section F.4, "Granting Access to rwbuilder"
■ Section F.5, "Errors Accessing the Discoverer Plus and Discoverer Viewer URLs"
■ Section F.6, "Need More Help?"
F.1 General Troubleshooting TipsIf you encounter an error during installation:
■ Read the Oracle Fusion Middleware Release Notes for the latest updates. The most current version of the release notes is available on Oracle Technology Network (http://www.oracle.com/technology/documentation).
■ Verify your system and configuration is certified. Refer to the Fusion Middleware Certification document:
http://www.oracle.com/technology/software/products/ias/files/fusion_certification.html
■ Verify your system meets the minimum system requirements. Refer to the System Requirements and Specifications document:
http://www.oracle.com/technology/software/products/ias/files/fusion_requirements.htm
■ If you entered incorrect information on one of the installation screens, return to that screen by clicking Back until you see the screen.
■ If an error occurred while the installer is copying or linking files:
1. Note the error and review the installation log files.
2. Remove the failed installation by following the steps in Chapter 4, "Deinstalling Oracle Portal, Forms, Reports and Discoverer".
3. Correct the issue that caused the error.
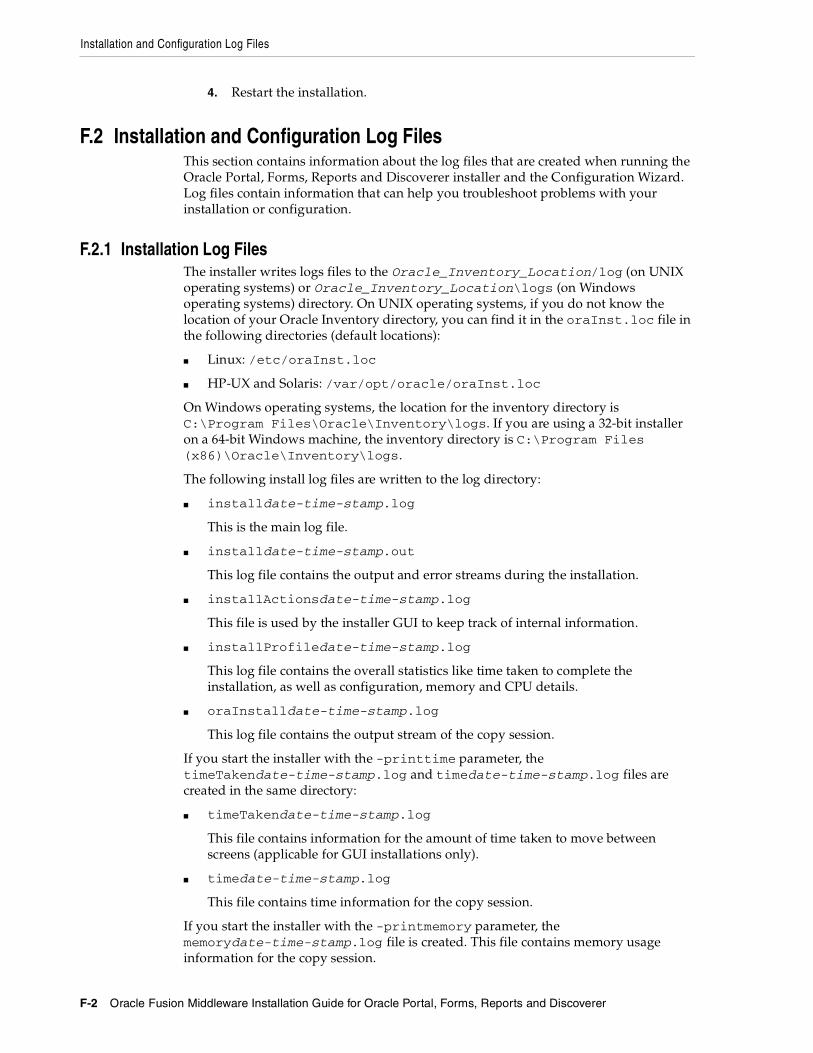
Installation and Configuration Log Files
F-2 Oracle Fusion Middleware Installation Guide for Oracle Portal, Forms, Reports and Discoverer
4. Restart the installation.
F.2 Installation and Configuration Log FilesThis section contains information about the log files that are created when running the Oracle Portal, Forms, Reports and Discoverer installer and the Configuration Wizard. Log files contain information that can help you troubleshoot problems with your installation or configuration.
F.2.1 Installation Log FilesThe installer writes logs files to the Oracle_Inventory_Location/log (on UNIX operating systems) or Oracle_Inventory_Location\logs (on Windows operating systems) directory. On UNIX operating systems, if you do not know the location of your Oracle Inventory directory, you can find it in the oraInst.loc file in the following directories (default locations):
■ Linux: /etc/oraInst.loc
■ HP-UX and Solaris: /var/opt/oracle/oraInst.loc
On Windows operating systems, the location for the inventory directory is C:\Program Files\Oracle\Inventory\logs. If you are using a 32-bit installer on a 64-bit Windows machine, the inventory directory is C:\Program Files (x86)\Oracle\Inventory\logs.
The following install log files are written to the log directory:
■ installdate-time-stamp.log
This is the main log file.
■ installdate-time-stamp.out
This log file contains the output and error streams during the installation.
■ installActionsdate-time-stamp.log
This file is used by the installer GUI to keep track of internal information.
■ installProfiledate-time-stamp.log
This log file contains the overall statistics like time taken to complete the installation, as well as configuration, memory and CPU details.
■ oraInstalldate-time-stamp.log
This log file contains the output stream of the copy session.
If you start the installer with the -printtime parameter, the timeTakendate-time-stamp.log and timedate-time-stamp.log files are created in the same directory:
■ timeTakendate-time-stamp.log
This file contains information for the amount of time taken to move between screens (applicable for GUI installations only).
■ timedate-time-stamp.log
This file contains time information for the copy session.
If you start the installer with the -printmemory parameter, the memorydate-time-stamp.log file is created. This file contains memory usage information for the copy session.

Granting Access to rwbuilder
Troubleshooting F-3
F.2.2 Configuration Log FilesTo create a log file of your configuration session, start the Configuration Wizard with the -log option, as shown below:
On UNIX operating systems:
% ./config.sh -log=log_filename
On Windows operating systems:
G:\ config.cmd -log=log_filename
If you specify an absolute path with your log_filename then your log file will be created there. If you only specify a file name with no path, then the log files are created in the ORACLE_HOME/common/bin (on UNIX operating systems) or ORACLE_HOME\common\bin (on Windows operating systems) directory.
F.3 Verifying Environment Variable Lengths for Oracle Reports (Windows Only)
If an environment variable used by startManagedWebLogic.cmd (for example, PATH or CLASSPATH) contains too many characters, Oracle Reports will generate errors when you try to start its Managed Server.
To work around this issue, you can try to convert all directory names longer than eight characters to the Windows short name format. For example, C:\Oracle11g\Middleware can be converted to C:\Oracle~1\Middle~1 wherever you define your environment variables that use this path.
You can also reinstall Oracle WebLogic Server to a location where the directory path is shorter than its current location.
For more information about the character limits of the environment variables on your Windows system, refer Article 830473 on the Microsoft Support website (http://support.microsoft.com/kb/830473), or refer to your operating system documentation.
F.4 Granting Access to rwbuilderA user who installed the Oracle Reports components can access them, by default. If you want to allow other users to run rwbuilder:
1. Change the permissions of the following files.
On Linux x86 operating systems:
chmod 750 ORACLE_HOME/binchmod 750 ORACLE_HOME/bin/rwbuilderchmod 750 COMMON_COMPONENTS_HOME/modules/oracle.dms_11.1.1/*.jarchmod 750 COMMON_COMPONENTS_HOME/modules/oracle.odl_11.1.1/*.jarchmod 750 ORACLE_INSTANCEchmod 750 ORACLE_INSTANCE/binchmod 750 ORACLE_INSTANCE/configchmod 750 ORACLE_INSTANCE/config/reportschmod 750 ORACLE_INSTANCE/config/reports/binchmod 750 ORACLE_INSTANCE/config/reports/bin/*chmod 750 ORACLE_INSTANCE/config/FRComponentchmod 750 ORACLE_INSTANCE/config/ReportsToolsComponentchmod 750 ORACLE_INSTANCE/config/ReportsToolsComponent/ReportsToolschmod 750 ORACLE_INSTANCE/config/ReportsToolsComponent/ReportsTools/*

Errors Accessing the Discoverer Plus and Discoverer Viewer URLs
F-4 Oracle Fusion Middleware Installation Guide for Oracle Portal, Forms, Reports and Discoverer
chmod 770 ORACLE_INSTANCE/config/ReportsToolsComponent/ReportsTools/rwbuilder.confchmod 750 ORACLE_INSTANCE/reportschmod 750 ORACLE_INSTANCE/reports/reports_install.propertieschmod 750 DOMAIN_HOME/servers/WLS_REPORTS/tmp/_WL_user/chmod 770 DOMAIN_HOME/servers/WLS_REPORTS/tmp/_WL_user/reports_version/chmod 770 DOMAIN_HOME/servers/WLS_REPORTS/tmp/_WL_user/reports_version/<random_name>/warchmod 750 directory_mentioned_in_REPORTS_TMP
On Windows operating systems, right-click on the folder, select Properties, then modify the security settings as necessary.
2. Change the location of the log files so that users will have both read and write access. Modify the PATH property of the runtime_trace_handler and zrcclient_trace_handler parameters in the ORACLE_INSTANCE/config/ReportsToolsComponent/ReportsTools/logging.xml (on Linux x86 operating systems) or ORACLE_INSTANCE\config\ReportsToolsComponent\ReportsTools\logging.xml (on Windows operating systems) file.
F.5 Errors Accessing the Discoverer Plus and Discoverer Viewer URLsDuring the configuration process, if the database that contains the prefix_DISCOVERER schema is shut down between the "Create ASInstance" and "Deploy Discoverer" steps, the configuration process will be completed successfully despite the database being down. However, you will not be able to access the Discoverer Plus and Discoverer Viewer URLs.
The following errors can be found in the log file:
connection error. - error while creating the session, check for other errors.- oracle.discoiv.connections.ConnectionStoreException:@ weblogic.common.resourcepool.ResourceDisabledException: Pool@ examplehost.exampledomain.com_SPS3NT_DISCOVERER_PS is disabled,cannot allocate resources to applications..
In this situation, you should do the following:
1. Start the database.
2. Restart the Oracle Discoverer instance.
3. Restart the WLS_DISCO Managed Server.
4. Restart the Administration Server.
F.6 Need More Help?If this appendix does not solve the problem you encountered, try looking for a solution on My Oracle Support (formerly OracleMetaLink):
https://support.oracle.com/
If you are unable to find a solution for your problem, open a service request.
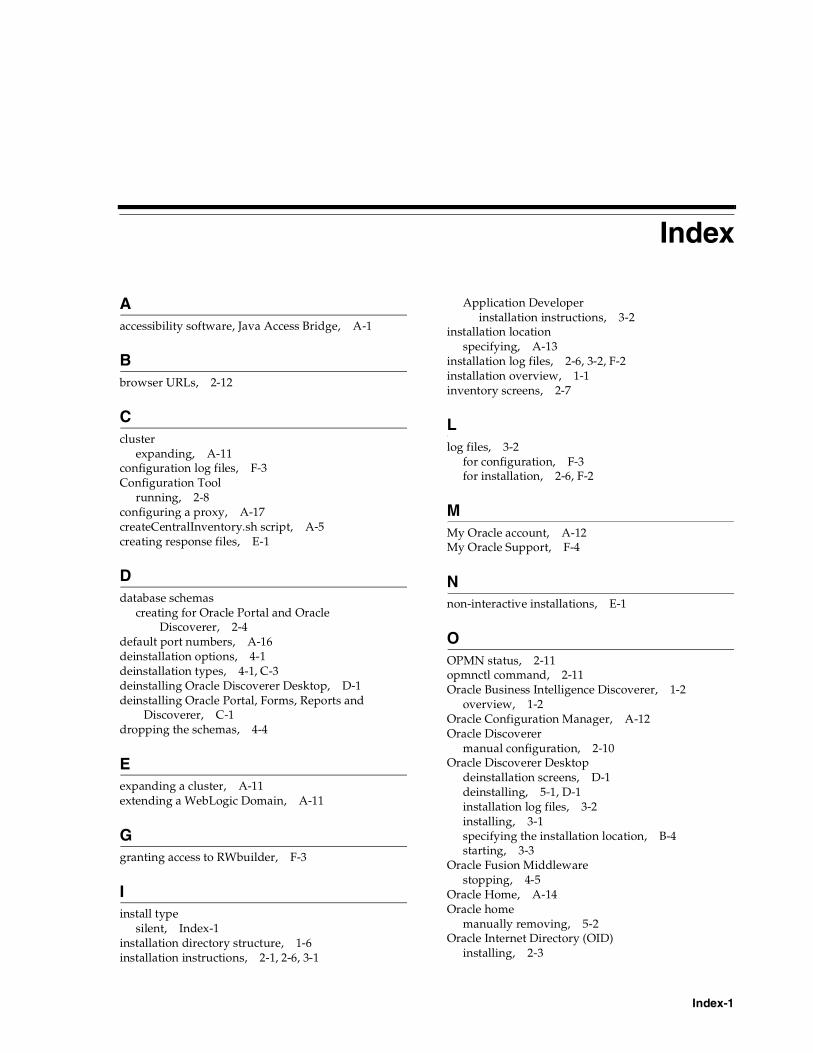
Index-1
Index
Aaccessibility software, Java Access Bridge, A-1
Bbrowser URLs, 2-12
Ccluster
expanding, A-11configuration log files, F-3Configuration Tool
running, 2-8configuring a proxy, A-17createCentralInventory.sh script, A-5creating response files, E-1
Ddatabase schemas
creating for Oracle Portal and Oracle Discoverer, 2-4
default port numbers, A-16deinstallation options, 4-1deinstallation types, 4-1, C-3deinstalling Oracle Discoverer Desktop, D-1deinstalling Oracle Portal, Forms, Reports and
Discoverer, C-1dropping the schemas, 4-4
Eexpanding a cluster, A-11extending a WebLogic Domain, A-11
Ggranting access to RWbuilder, F-3
Iinstall type
silent, Index-1installation directory structure, 1-6installation instructions, 2-1, 2-6, 3-1
Application Developerinstallation instructions, 3-2
installation locationspecifying, A-13
installation log files, 2-6, 3-2, F-2installation overview, 1-1inventory screens, 2-7
Llog files, 3-2
for configuration, F-3for installation, 2-6, F-2
MMy Oracle account, A-12My Oracle Support, F-4
Nnon-interactive installations, E-1
OOPMN status, 2-11opmnctl command, 2-11Oracle Business Intelligence Discoverer, 1-2
overview, 1-2Oracle Configuration Manager, A-12Oracle Discoverer
manual configuration, 2-10Oracle Discoverer Desktop
deinstallation screens, D-1deinstalling, 5-1, D-1installation log files, 3-2installing, 3-1specifying the installation location, B-4starting, 3-3
Oracle Fusion Middlewarestopping, 4-5
Oracle Home, A-14Oracle home
manually removing, 5-2Oracle Internet Directory (OID)
installing, 2-3

Index-2
Oracle Inventory, 2-6custom inventory location, 2-7
Oracle Inventory location, A-5Oracle JDeveloper
removing, 4-8Oracle Portal, 1-1
overview, 1-1Oracle Portal, Forms, Reports and Discoverer
deinstallation screens, C-1deinstalling, 4-1, C-1directory structure, 1-6installation instructions, 2-6installation overview, 1-1installing on separate servers, 2-3products overview, 1-1reinstalling, 4-8silent installation, E-1verifying the installation, 2-11
Oracle Single Sign-On (SSO)installing, 2-3
Oracle Web Agent (OWA)upgrading for Oracle Portal, 2-2
Oracle WebLogic Serverinstalling, 2-4removing, 4-7
oracleRoot.sh script, 2-10oraInst.loc file, 2-7, F-2oraInventory directory, A-5overview of installation, 1-1
PPatch Set Installer, 2-8port configuration, A-16proxy
configuring, A-17
Rreceiving security updates, A-12reinstalling Oracle Portal, Forms, Reports and
Discoverer, 4-8removing Oracle JDeveloper, 4-8removing Oracle WebLogic Server, 4-7response file
creating, E-1RWbuilder
granting access to, F-3
Sschema
specifying, A-18schemas
dropping, 4-4security updates
signing up for, A-12silent installation, E-1specifying schema, A-18starting the deinstaller, 4-5
on Windows systems, 4-5
staticports.ini file, A-16stopping Oracle Fusion Middleware, 4-5
Ttroubleshooting, F-1types of deinstallation, 4-1, C-3
Uupgrading Oracle Web Agent (OWA) for Oracle
Portal, 2-2URLs to help verify installation, 2-12
Vverifying the installation, 2-11
WWebLogic Domain
extending, A-11


