Update [Customer Name] in Doc Properties [Type Subject Here] Prepared for Update [Customer Name] in Doc Properties 3-Mar-22 Version 1.1 Draft Prepared by Author Add Author Position to Doc Properties Add Author Email to Doc Properties Contributors Add Contributors to Doc Properties i Installation Guide for System Center 2012 Operations Manager, [Type Subject Here], Version 1.1 Draft Prepared by Author “Installation Guide" last modified on 6 Jun. 14, Rev 3 Installation Guide for System Center 2012 Operations Manager
Transcript
Update [Customer Name] in Doc Properties
[Type Subject Here]
Prepared for
Update [Customer Name] in Doc Properties5-May-23Version 1.1 Draft
Prepared by
AuthorAdd Author Position to Doc PropertiesAdd Author Email to Doc Properties
ContributorsAdd Contributors to Doc Properties
Table of Contents
iInstallation Guide for System Center 2012 Operations Manager, [Type Subject Here],
Version .1 DraftPrepared by Author“Installation Guide" last modified on 8 Jun. 14, Rev 3
Installation Guide for System Center 2012 Operations Manager
Installation Guide for System Center 2012 Operations Manager
Installation Guide for System Center 2012 Operations Manager
Installation Guide for System Center 2012 Operations Manager
Installation Guide for System Center 2012 Operations Manager
Installation Guide for System Center 2012 Operations Manager
5.1 Prepare Accounts and Groups in Active Directory...................................................125.2 Service Principal Names..........................................................................................165.3 Antivirus Software...................................................................................................165.4 Web Console Security..............................................................................................17
5.4.1 Using FIPS Compliant Algorithms.................................................................185.5 Certificates..............................................................................................................18
6 Software Prerequisites.............................................................................196.1 Management Servers..............................................................................................196.2 SQL Server..............................................................................................................196.3 Web Console...........................................................................................................20
7 New Installation of Operations Manager 2012.........................................217.1 Before Installing Operations Manager on A SQL 2012 AlwaysOn Availability Group 217.2 Install the First Management Server in the Management Group..............................227.3 Complete Configuration of SQL 2012 AlwaysOn Availability Group After Installing the First Management Server.............................................................................................257.4 How to Install Additional Management Servers.......................................................287.5 How to Install the Operations Manager Reporting Server........................................30
7.5.1 To Verify SQL Server Reporting Services is Configured Correctly...........307.5.2 Install Operations Manager Reporting........................................................317.5.3 Confirm the Health of Operations Manager Reporting..............................317.5.4 How to Setup an SSL Certificate with Report Server.................................327.5.5 How to configure the Operations Console to use SSL...............................32
7.6 How to Install the Web Console...............................................................................337.6.1 Web Console Security Configuration...........................................................34
8 Upgrading from Operations Manager 2007 R2........................................368.1 SQL Server Prerequisites.........................................................................................37
iiInstallation Guide for System Center 2012 Operations Manager, [Type Subject Here],
Version .1 DraftPrepared by Author“Installation Guide" last modified on 8 Jun. 14, Rev 3
Update [Customer Name] in Doc Properties
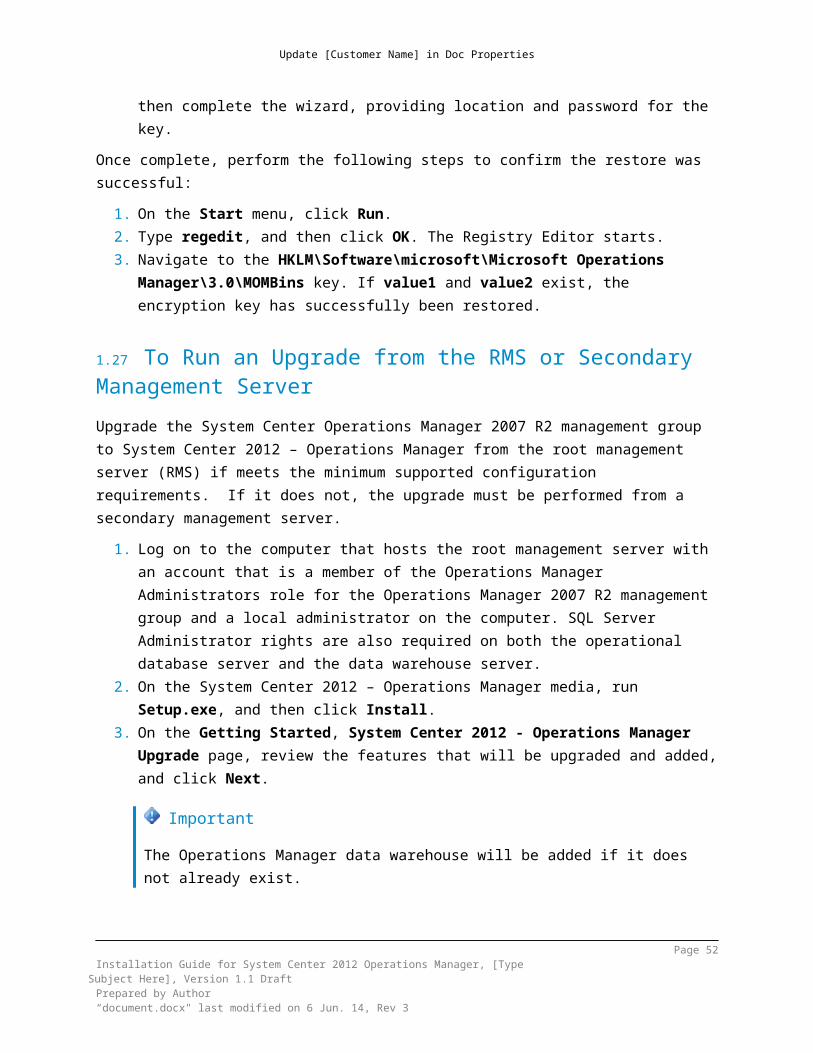
8.2 Import the Upgrade Helper Management Pack........................................................378.3 Move Agents to Secondary Management Server.....................................................378.4 Remove Pending Agents..........................................................................................388.5 Back up the RMS Encryption Key.............................................................................388.6 Upgrade Manually Installed Agents.........................................................................398.7 Upgrade Secondary Management Servers...............................................................408.8 Upgrading Gateway Servers....................................................................................418.9 Check the Operations Manager 2007 R2 RMS for Active Connected Consoles.........428.10 Disable the Notification Subscriptions.....................................................................428.11 Restore the RMS Encryption Key on Secondary Management Server......................428.12 To Run an Upgrade from the RMS or Secondary Management Server.....................438.13 Upgrade Web Console.............................................................................................448.14 Upgrade Reporting Server.......................................................................................45
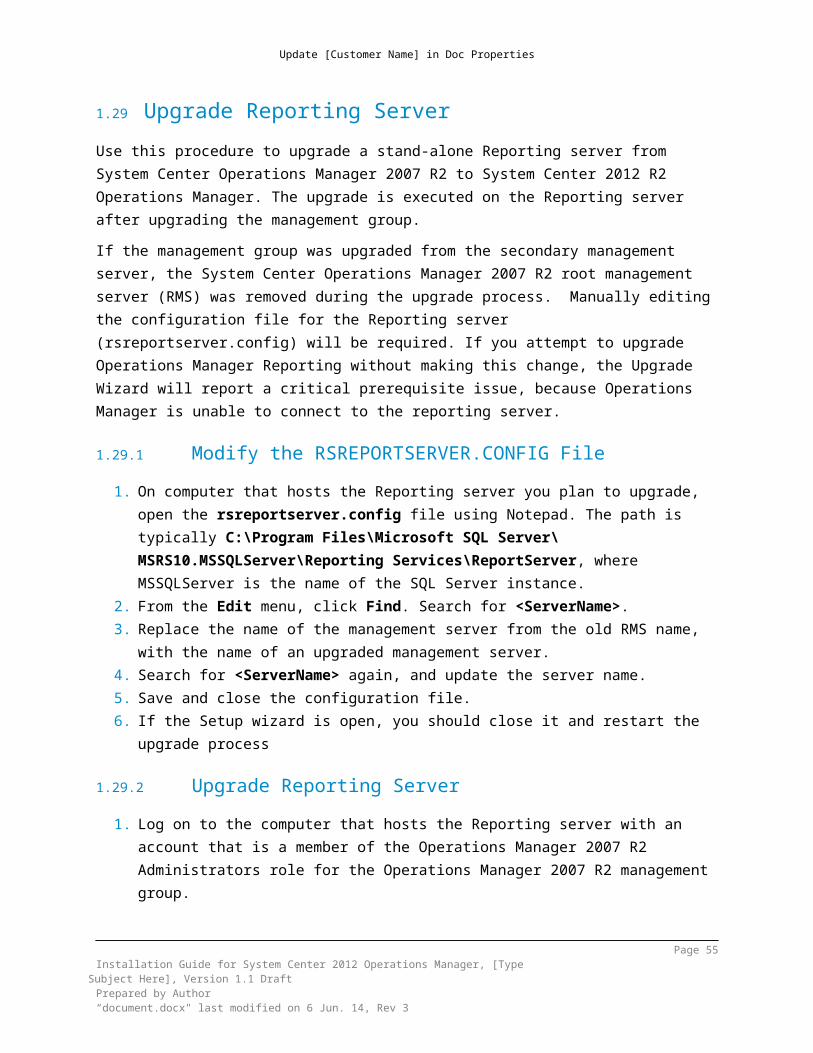
8.14.1 Modify the RSREPORTSERVER.CONFIG File.................................................468.14.2 Upgrade Reporting Server............................................................................46
9 Post-Upgrade Tasks.................................................................................479.1 Re-enable Notification Subscriptions.......................................................................479.2 Verify the Upgrade Was Successful.........................................................................489.3 Run SQL Query on each Management Group...........................................................48
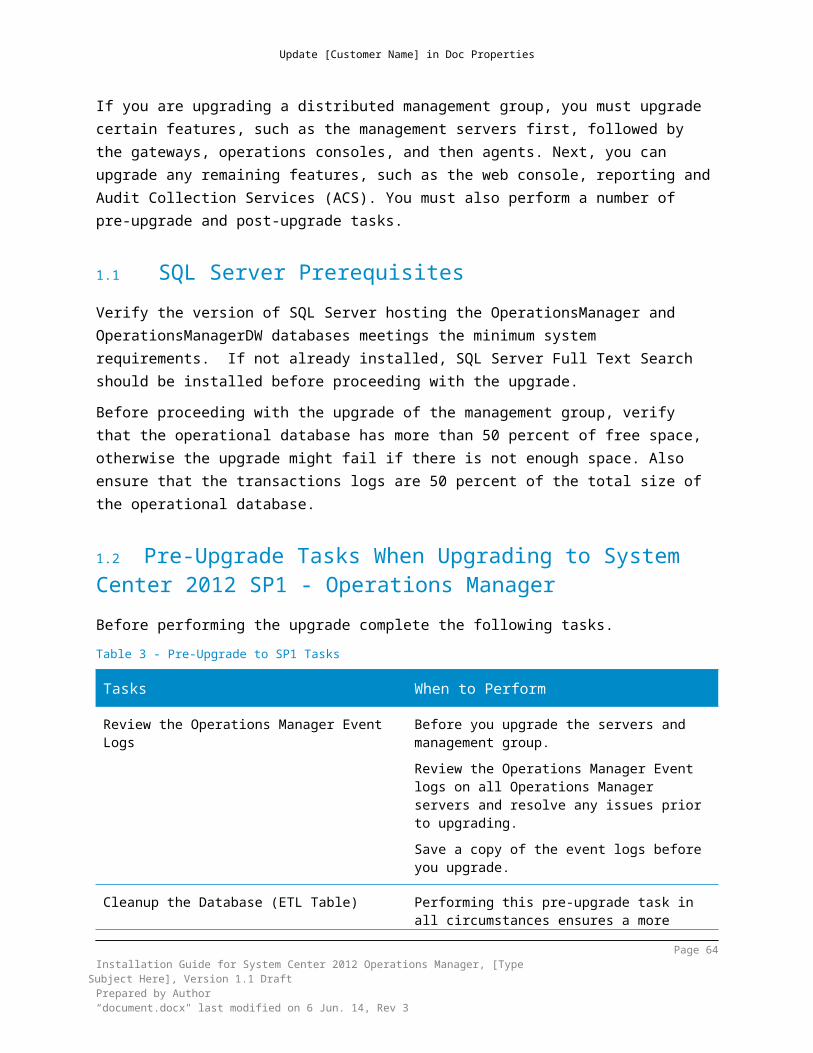
10 Upgrading from System Center 2012 Operations Manager.....................5110.1 SQL Server Prerequisites.........................................................................................5210.2 Pre-Upgrade Tasks When Upgrading to System Center 2012 SP1 - Operations Manager.............................................................................................................................52
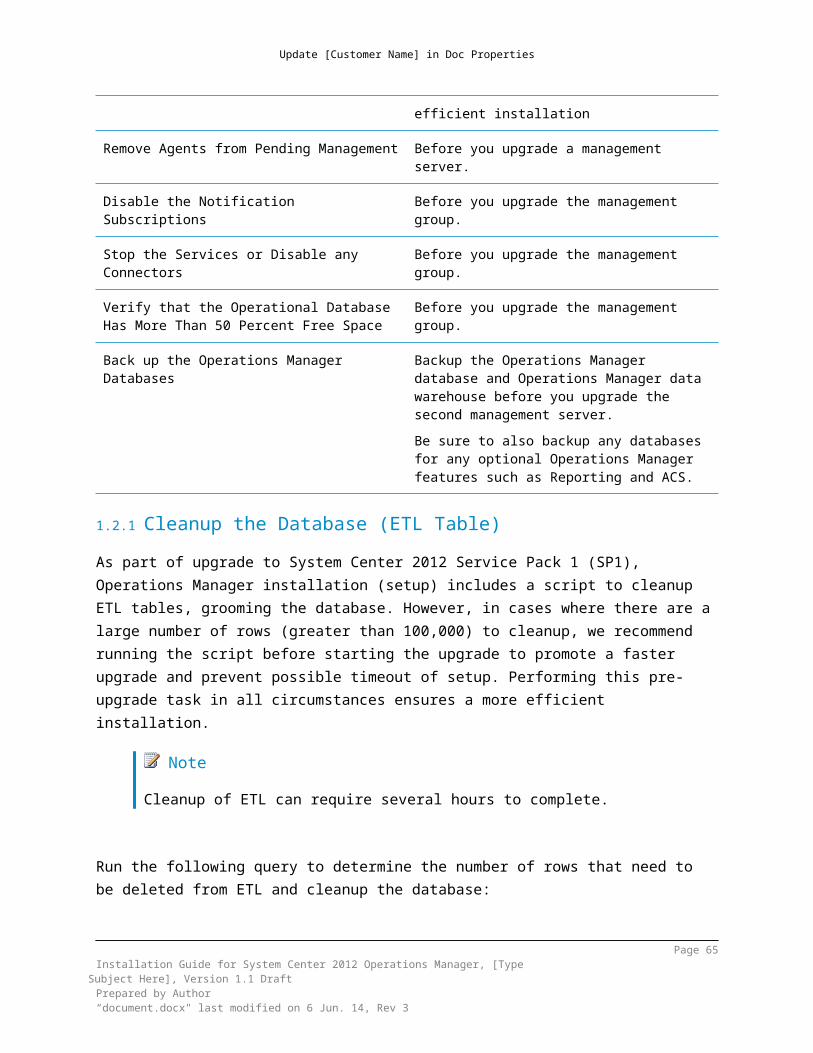
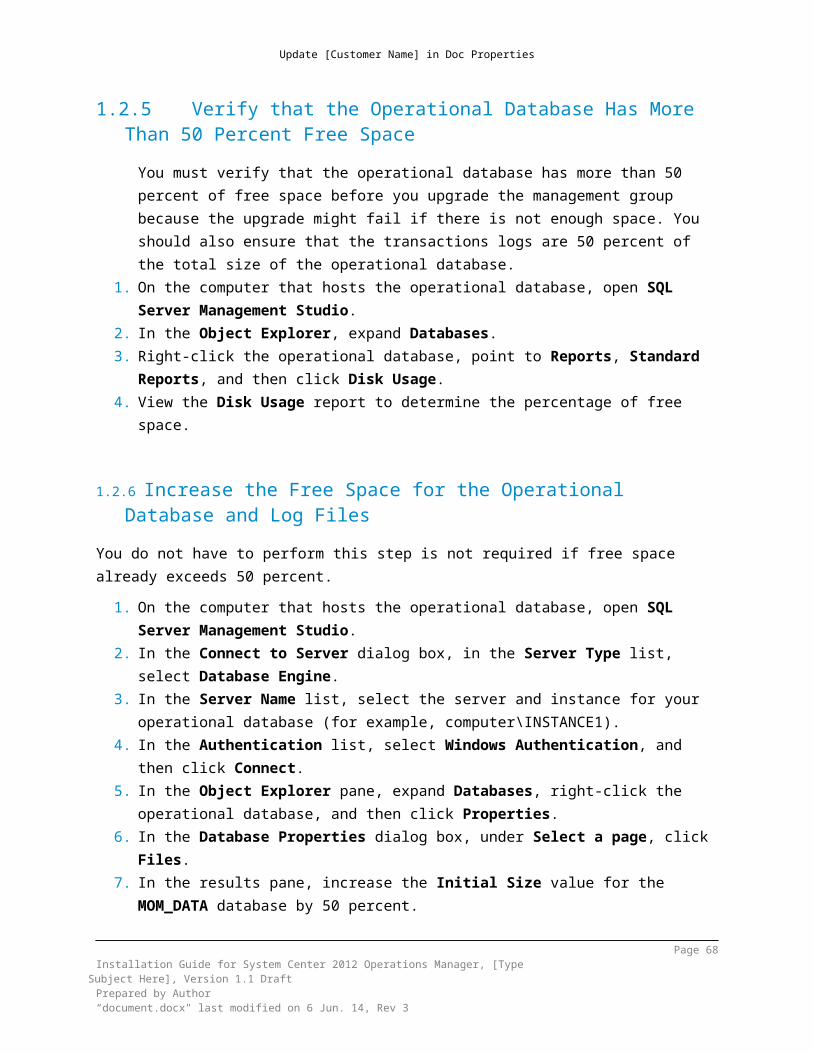
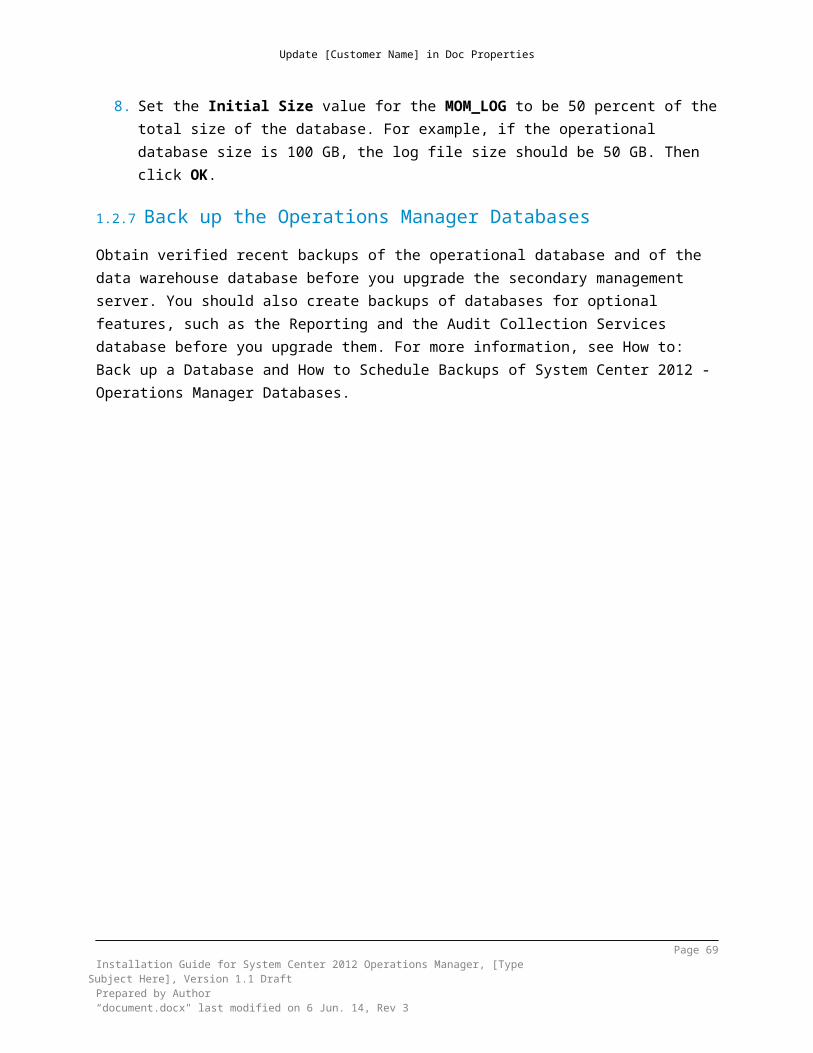
10.2.1 Cleanup the Database (ETL Table)..............................................................5310.2.2 Remove Agents from Pending Management...............................................5410.2.3 Disable the Notification Subscriptions........................................................5510.2.4 Stop the Services or Disable any Connectors............................................5510.2.5 Verify that the Operational Database Has More Than 50 Percent Free Space 5510.2.6 Increase the Free Space for the Operational Database and Log Files....5610.2.7 Back up the Operations Manager Databases.............................................56
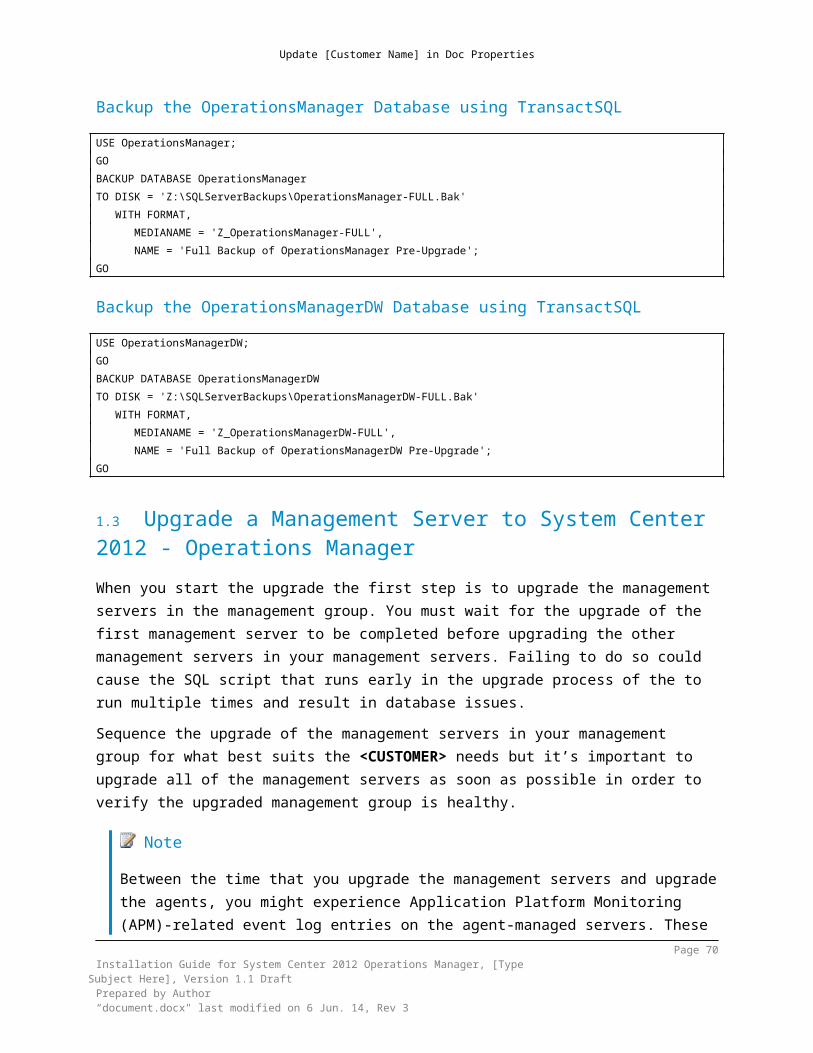
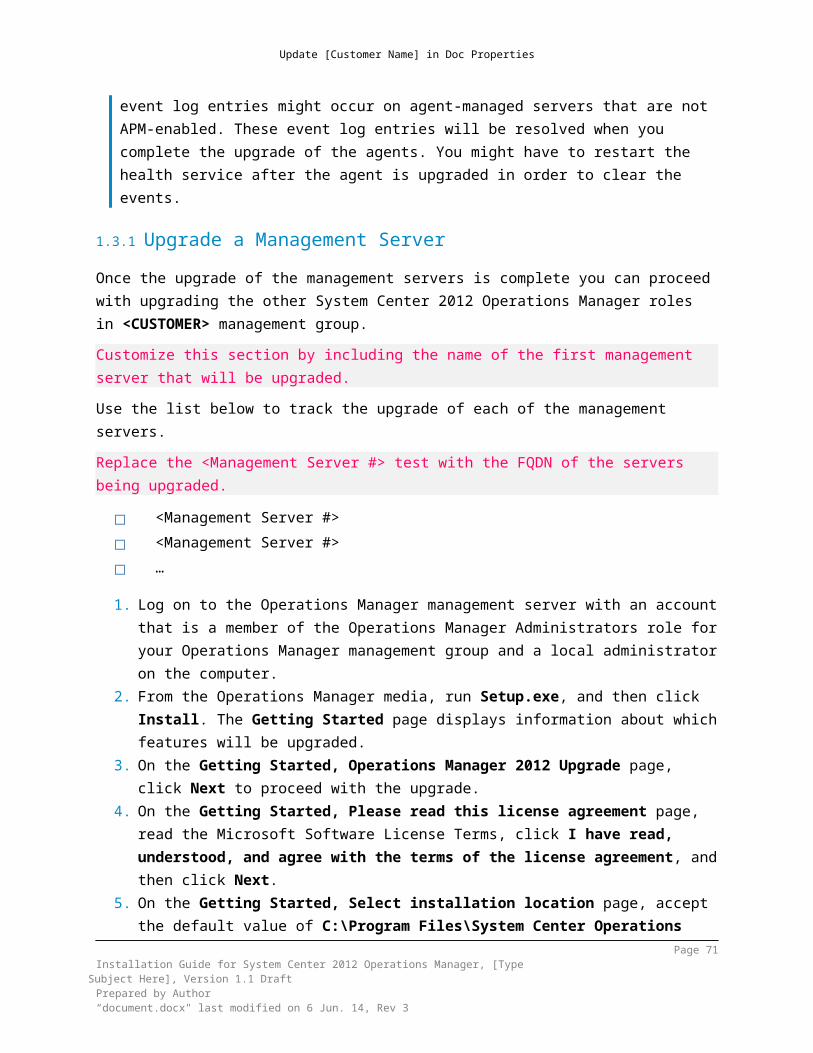
10.3 Upgrade a Management Server to System Center 2012 - Operations Manager.......5710.3.1 Upgrade a Management Server...................................................................58
iiiInstallation Guide for System Center 2012 Operations Manager, [Type Subject Here],
Version .1 DraftPrepared by Author“Installation Guide" last modified on 8 Jun. 14, Rev 3
Update [Customer Name] in Doc Properties
10.4 Upgrade a Gateway Server to System Center 2012 SP1 - Operations Manager.......5910.5 Upgrade an Operations Console to System Center 2012 SP1 - Operations Manager
6010.6 Upgrade an Agent to System Center 2012 SP1 - Operations Manager....................61
10.6.1 Upgrading Manually Installed Agents..........................................................6310.7 Upgrade a Web Console to System Center 2012 - Operations Manager..................6410.8 Upgrade Reporting to System Center 2012 - Operations Manager..........................6610.9 Post-Upgrade Tasks When Upgrading to System Center 2012 SP1 - Operations Manager.............................................................................................................................66
10.9.1 Re-enable the Notification Subscriptions....................................................6710.9.2 Re-Enable Audit Collection Services...........................................................67
10.10 Upgrade OM2007 R2 Agents to OM2012 SP1 - Parallel Environments.....................6810.11 Upgrading OM 2007 R2 Agents to OM2012 SP1 using Parallel Environments..........68
11 Upgrading from System Center Operations Manager SP1 to R2..............6811.1 High Level View of System Center 2012 R2 Operations Manager Upgrade Steps – Upgrading a Distributed Management Group.....................................................................6911.2 High Level View of System Center 2012 R2 Operations Manager Upgrade Steps – Upgrading 2012 SP1 Agents to 2012 R2 and Running Two Environments.........................7011.3 Pre-Upgrade Tasks When Upgrading to System Center 2012 R2 Operations Manager
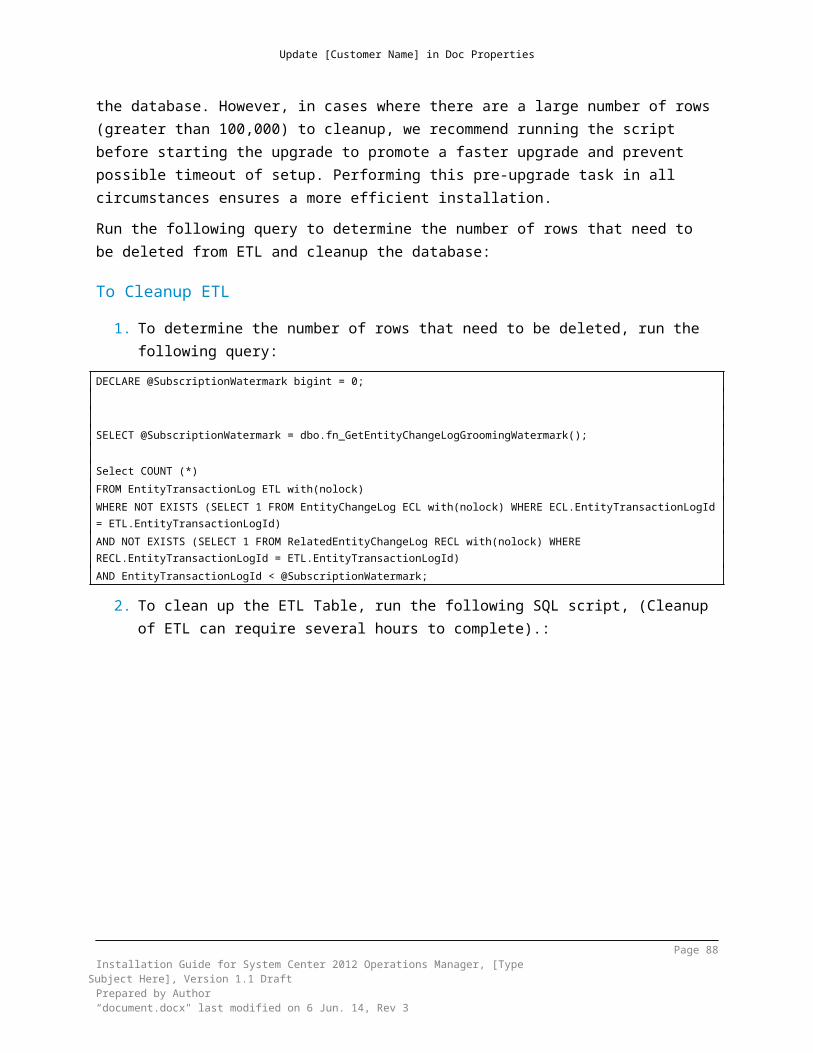
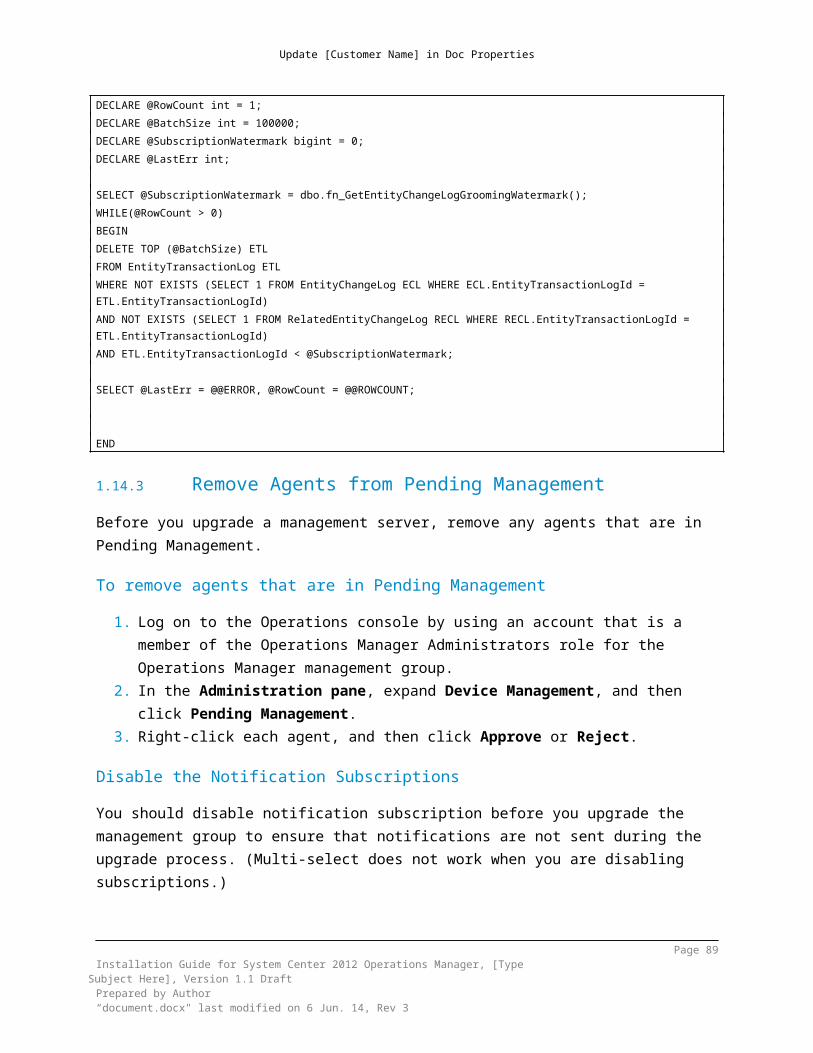
7111.3.1 Review the Operations Manager Event Logs..............................................7111.3.2 Cleanup the Database (ETL Table)..............................................................7111.3.3 Remove Agents from Pending Management...............................................7211.3.4 Stop the Services or Disable any Connectors............................................7311.3.5 Verify that the Operational Database Has More Than 50 Percent Free Space 7311.3.6 Back up the Operations Manager Databases.............................................74
11.4 Upgrade a Management Server to System Center 2012 - Operations Manager R2. 7511.4.1 To upgrade a management server..............................................................77
11.5 Upgrade an ACS Collector to System Center 2012 R2 Operations Manager............7711.5.1 To upgrade an ACS Collector.......................................................................78
11.6 Upgrade a Gateway Server to System Center 2012 R2 Operations Manager..........7911.6.1 To upgrade a gateway server......................................................................7911.6.2 To verify the gateway server upgrade........................................................80
11.7 Upgrade an Operations Console to System Center 2012 R2 Operations Manager...80iv
Installation Guide for System Center 2012 Operations Manager, [Type Subject Here], Version .1 Draft
Prepared by Author“Installation Guide" last modified on 8 Jun. 14, Rev 3
Update [Customer Name] in Doc Properties
11.7.1 To upgrade a stand-alone Operations console...........................................8011.7.2 To verify the Operations console upgrade.................................................81
11.8 Upgrade an Agent to System Center 2012 R2 Operations Manager........................8111.8.1 Upgrading Push-Installed Agents.................................................................8211.8.2 Upgrading Manually Installed Agents..........................................................83
11.9 Upgrade a Web Console to System Center 2012 R2 Operations Manager...............8511.9.1 To Set the Registry to Enable or Disable SSL on the Web Console.........8511.9.2 To upgrade the web console server............................................................86
11.10 Upgrade Reporting to System Center 2012 R2 - Operations Manager....................8611.11 Upgrade the Reporting Server.................................................................................8611.12 Post-Upgrade Tasks When Upgrading to System Center 2012 R2 Operations Manager.............................................................................................................................87
11.12.1 Re-enable the Notification Subscriptions................................................8711.12.2 Restart or Re-enable the Connector Services.........................................8811.12.3 Re-Enable Audit Collection Services........................................................88
11.13 Upgrade OM2012 SP1 Agents to OM2012 R2 Parallel Environments.......................8911.13.1 Upgrading OM2012 SP1 Agents to OM2012 R2 using Parallel Environments...............................................................................................................89
12 Registering Product Key...........................................................................8913 References...............................................................................................90Appendix A –Updating System Center 2012 R2 Operations Manager............91Appendix B – Command-Line Installation......................................................92Appendix C – Upgrade Sequencing for System Center SP1/R2......................94
vInstallation Guide for System Center 2012 Operations Manager, [Type Subject Here],
Version .1 DraftPrepared by Author“Installation Guide" last modified on 8 Jun. 14, Rev 3
Update [Customer Name] in Doc Properties
Spell/grammar check is turned ON within this Word templates - Remember to turn off spell/grammar check before sending out the document if you want to avoid showing spelling and grammar red mark-ups. To turn this feature off, do the following:
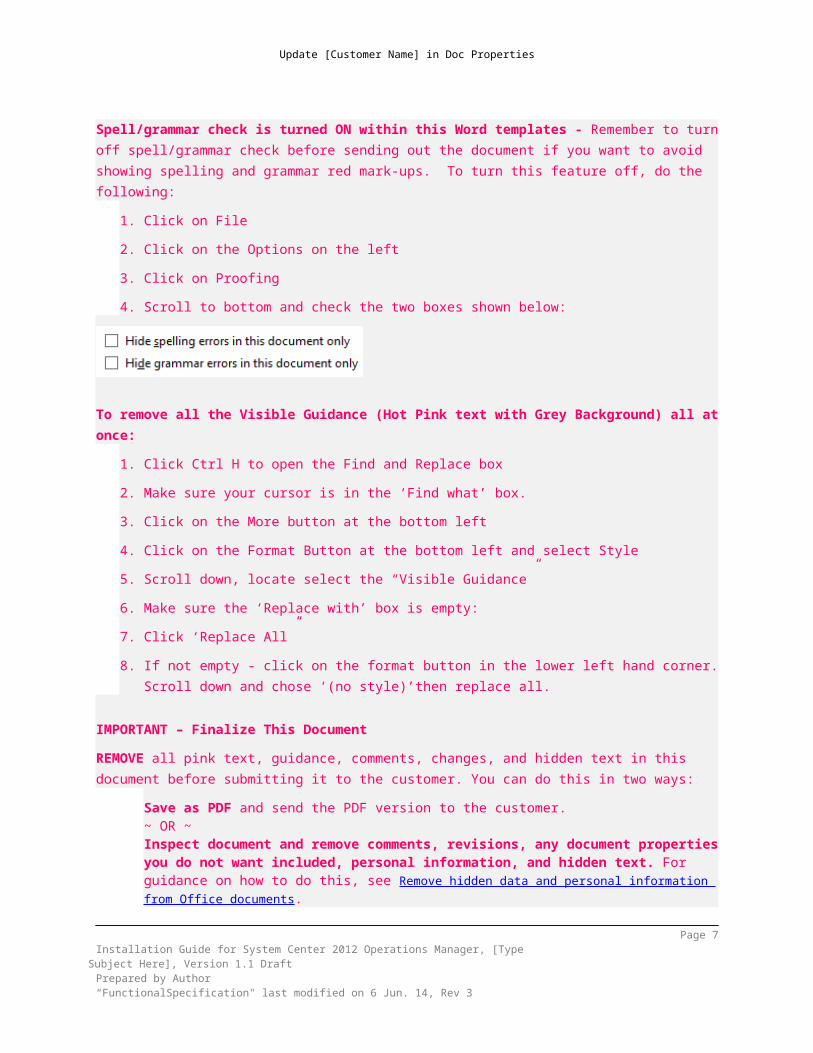
1. Click on File2. Click on the Options on the left3. Click on Proofing4. Scroll to bottom and check the two boxes shown below:
To remove all the Visible Guidance (Hot Pink text with Grey Background) all at once:
1. Click Ctrl H to open the Find and Replace box2. Make sure your cursor is in the ‘Find what’ box.3. Click on the More button at the bottom left4. Click on the Format Button at the bottom left and select Style5. Scroll down, locate select the “Visible Guidance”6. Make sure the ‘Replace with’ box is empty:7. Click ‘Replace All”8. If not empty - click on the format button in the lower left hand corner. Scroll down
and chose ‘(no style)’then replace all.
IMPORTANT – Finalize This Document REMOVE all pink text, guidance, comments, changes, and hidden text in this document before submitting it to the customer. You can do this in two ways:
Save as PDF and send the PDF version to the customer. ~ OR ~ Inspect document and remove comments, revisions, any document properties you do not want included, personal information, and hidden text. For guidance on how to do this, see Remove hidden data and personal information from Office documents.
Template GuidanceDescription: The Functional Specification is the repository for a set of deep, technical drill-down documents that details every element of the solution deliverables, explaining in exact and specific terms what the team is building and deploying. The Functional Specification is the final technical document against
Page 6Installation Guide for System Center 2012 Operations Manager, [Type Subject Here],
Version .1 DraftPrepared by Author“FunctionalSpecification" last modified on 8 Jun. 14, Rev 3
which every development team member will build. The Functional Specification is built on the foundation of eight separate foundation documents. You may choose to provide customers with all documents (four requirements document, one Usage Scenarios document, three design documents, plus the parent Functional Specification document), or you may simply choose to combine the requirements documents, usage scenarios and design documents into a single Functional Specification with sub-topics. The eight foundational documents are:
Usage Scenarios
User Requirements
Business Requirements
Operations Requirements
System Requirements
Conceptual Design
Logical Design
Physical Design
Templates provided for all foundation documents.Justification: The Functional Specification is in essence a contract between the customer and the team, describing from a technical view what the customer expects. The quality of the Functional Specification (completeness and correctness) has a significant impact on the quality of the development activities and all follow on phases.Team Role Primary: Program Management is responsible for ensuring that the Functional Specification is completed by its estimated completion date. Program Management must also ensure that the design elements of the Functional Specification are consistent with the Vision/Scope document and all relevant plans from the Master Project Plan and Operational Plan. Development will have the primary responsibility for creating the content of the design documents within the Functional Specification. Release Management will participate with Development in both content creation and review to ensure operational, deployment, migration, interoperability and support needs are addressed within the designs. Team Role Secondary: Product Management will review and understand the design documents within the Functional Specification in order to convey solution design to parties external to the team and to ensure that product features are represented in the design according to initial project sponsor requirements. Test will review the Functional Specification to ensure test plans are in place to validate the designs.
Page 7Installation Guide for System Center 2012 Operations Manager, [Type Subject Here],
Version .1 DraftPrepared by Author“document.docx" last modified on 8 Jun. 14, Rev 3
Update [Customer Name] in Doc Properties
User Experience must review the design documents to ensure user requirements are met.
1 Executive SummaryUse this section to provide a strategic statement of the contents of the Functional Specification. This section should identify which foundational documents (requirements, usage scenarios and designs) comprise the Functional Specification and provide a brief statement about the content of each. Justification: This information provides the reader a guideline of the structure of this document and the strategic context for reading its detail.This document is designed to provide detailed information on how to successfully deploy Microsoft® System Center 2012 R2 Operations Manager solution into <CUSTOMERNAME> production environment. It also serves as a reference for the management and support tasks necessary to keep the solution running correctly. This document is based on the <CUSTOMERNAME> Vision Scope document, and the <CUSTOMERNAME> Infrastructure Architecture and Design document that were completed previously and which were signed-off as a record of <CUSTOMERNAME> requirements.
2 AudienceProvide an overview of who this document is intended for and set the expectation of the technical knowledge required to use this document successfully.This document is for use by the <PROJECTNAME> project manager(s), project sponsors, technical decision makers, <Partner Name> technical specialists and <CUSTOMERNAME> IT teams to determine if the proposed System Center 2012 R2 Operations Manager functionality, design, development and testing all meet the requirements of the business as well as the requirements of the <PROJECTNAME> stakeholders. This document should also be made available for review to any program team members, affected service owners, infrastructure owners/managers, Information Assurance and any other teams that are identified.
Page 8Installation Guide for System Center 2012 Operations Manager, [Type Subject Here],
Version .1 DraftPrepared by Author“document.docx" last modified on 8 Jun. 14, Rev 3
Update [Customer Name] in Doc Properties
The reader should have a good level of understanding in the following technical areas:
Microsoft Active Directory design and implementation Microsoft SQL Server Infrastructure design and implementation Networking and communication implementations Microsoft System Center 2012 R2 Operations Manager infrastructure design Microsoft System Center 2012 R2 Operations Manager operations and tuning
guidance
3 ScopeEdit the list and adjust the in scope description as required. List the components that will be installed as part of the solution. A detailed description does not need to be provided. List the number of servers for each role.This document includes the implementation requirements to support the design of System Center 2012 R2 Operations Manager for <CUSTOMERNAME> including:
The design options documented in the Infrastructure Architecture and Design. The requirements documented in the Vision Scope.
3.1 Out of ScopeSummarize the design options/ roles that will not be installed as part of the solution.Example:
Items not explicitly listed in the In Scope section. Creation or management of certificates. Implementation of Gateway Servers Implementation of Audit Collection Services Implementation of Application Performance Monitoring –formerly known as
AVIcode Integration with any third-party systems using custom connectors or System
Center 2012 - Orchestrator Creation of custom dashboards using Visio or third-party solutions Integration with SharePoint 2010 Creation of custom reports or custom management packs Installation and management of UNIX/Linux systems
Page 9Installation Guide for System Center 2012 Operations Manager, [Type Subject Here],
Version .1 DraftPrepared by Author“document.docx" last modified on 8 Jun. 14, Rev 3
Update [Customer Name] in Doc Properties
The following roles/features will not be implemented as part of the design of System Center 2012 R2 Operations Manager for <CUSTOMERNAME> including:
The design options documented in the Infrastructure Architecture and Design. Items not explicitly listed in the In Scope section.
4 Implementation OverviewAdjust this section as required for either a multi-server management group upgrade or a fresh installation.This Infrastructure Implementation Guide is based upon the <CUSTOMERNAME> Vision Scope and the <CUSTOMERNAME> Infrastructure Architecture and Design documents that were produced by <Partner Name>. This document is structured in the following manner:
Implementation Overview– an overview of implementation aspects of the System Center 2012 R2 Operations Manager options for the <CUSTOMERNAME> environment.
Security Prerequisites – details the security requirements that need to be implemented before System Center 2012 R2 Operations Manager is installed.
Software Prerequisites – details the software components that need to be installed for each role before Operations Manager is installed.
New Installation of Operations Manager 2012 R2 – details the steps for performing a new installation of Operations Manager.
Upgrading Operations Manager 2007 R2 Management Group (Distributed Deployment) – details the steps required to upgrade the agents, management servers, gateway servers to Operations Manager 2012 R2
Upgrading Operations Manager 2012 or 2012 SP1 Management Group (Distributed Deployment) – details the steps required to upgrade the agents, management servers, gateway servers to Operations Manager 2012 R2.
Page 10Installation Guide for System Center 2012 Operations Manager, [Type Subject Here],
Version .1 DraftPrepared by Author“document.docx" last modified on 8 Jun. 14, Rev 3
Update [Customer Name] in Doc Properties
5 Security PrerequisitesUse this section to identify the security prerequisites required to implement System Center 2012 R2 Operations ManagerSystem Center 2012 R2 Operations Manager. Before you start, prepare accounts and groups as described in the following procedures.At the time of deployment, you need to have the following service accounts ready. If you use domain accounts and your domain Group Policy object (GPO) has the default password expiration policy set as required, you will either have to change the passwords on the service accounts according to the schedule, use low maintenance system accounts, or configure the accounts so that the passwords never expire.
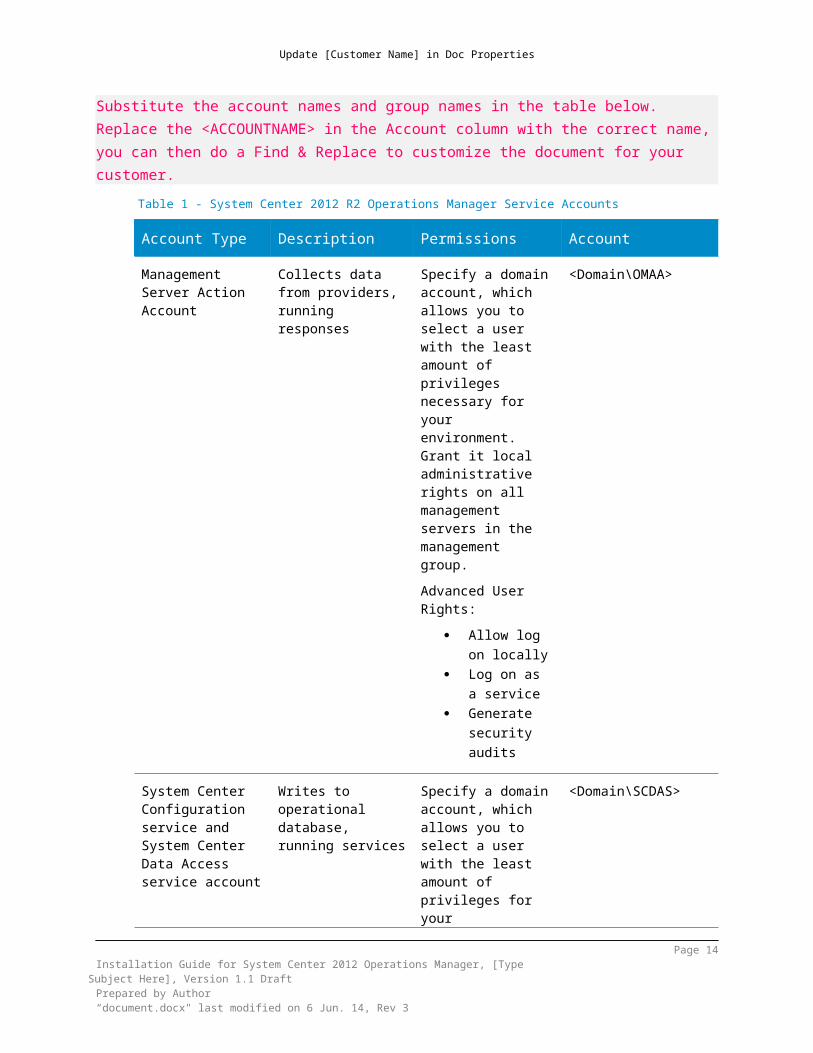
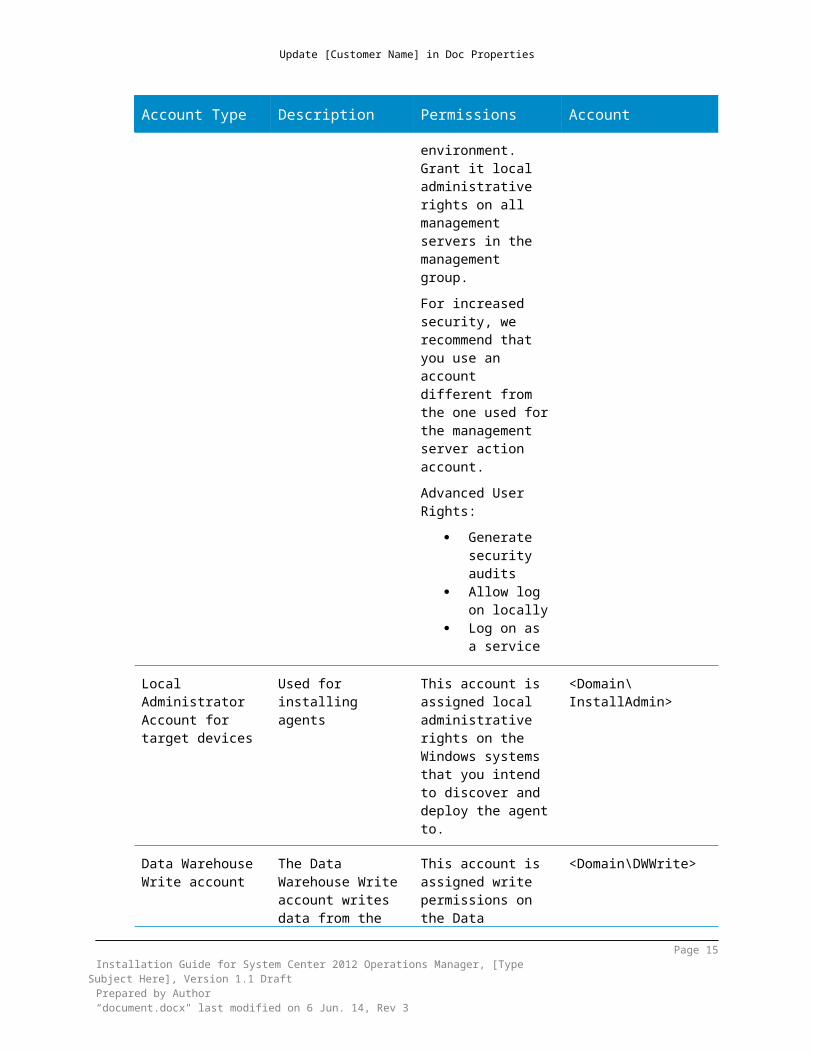
5.1 Prepare Accounts and Groups in Active DirectoryIn Active Directory, create the following accounts: Management Server Action account, System Center Configuration Service and System Center Data Access service account, Data Reader account, Data Warehouse Write Action account, and an Operations Manager Administrator account (for example, OMAdmin). These can all be domain user accounts. No special privileges are required at the domain level.Use the following table for a description, permissions and the actual account names defined.Substitute the account names and group names in the table below. Replace the <ACCOUNTNAME> in the Account column with the correct name, you can then do a Find & Replace to customize the document for your customer.
Table 1 - System Center 2012 R2 Operations Manager Service Accounts
Account Type Description Permissions Account
Management Server Action Account
Collects data from providers, running responses
Specify a domain account, which allows you to select a user with the least amount of privileges necessary for your environment. Grant it local administrative rights on all management servers in the management
<Domain\OMAA>
Page 11Installation Guide for System Center 2012 Operations Manager, [Type Subject Here],
Version .1 DraftPrepared by Author“document.docx" last modified on 8 Jun. 14, Rev 3
Update [Customer Name] in Doc Properties
Account Type Description Permissions Account
group.Advanced User Rights:
Allow log on locally
Log on as a service
Generate security audits
System Center Configuration service and System Center Data Access service account
Writes to operational database, running services
Specify a domain account, which allows you to select a user with the least amount of privileges for your environment. Grant it local administrative rights on all management servers in the management group.For increased security, we recommend that you use an account different from the one used for the management server action account.Advanced User Rights:
Generate security audits
Allow log on locally
Log on as a service
<Domain\SCDAS>
Local Administrator Account for target devices
Used for installing agents
This account is assigned local administrative rights on the Windows systems
<Domain\InstallAdmin>
Page 12Installation Guide for System Center 2012 Operations Manager, [Type Subject Here],
Version .1 DraftPrepared by Author“document.docx" last modified on 8 Jun. 14, Rev 3
Update [Customer Name] in Doc Properties
Account Type Description Permissions Account
that you intend to discover and deploy the agent to.
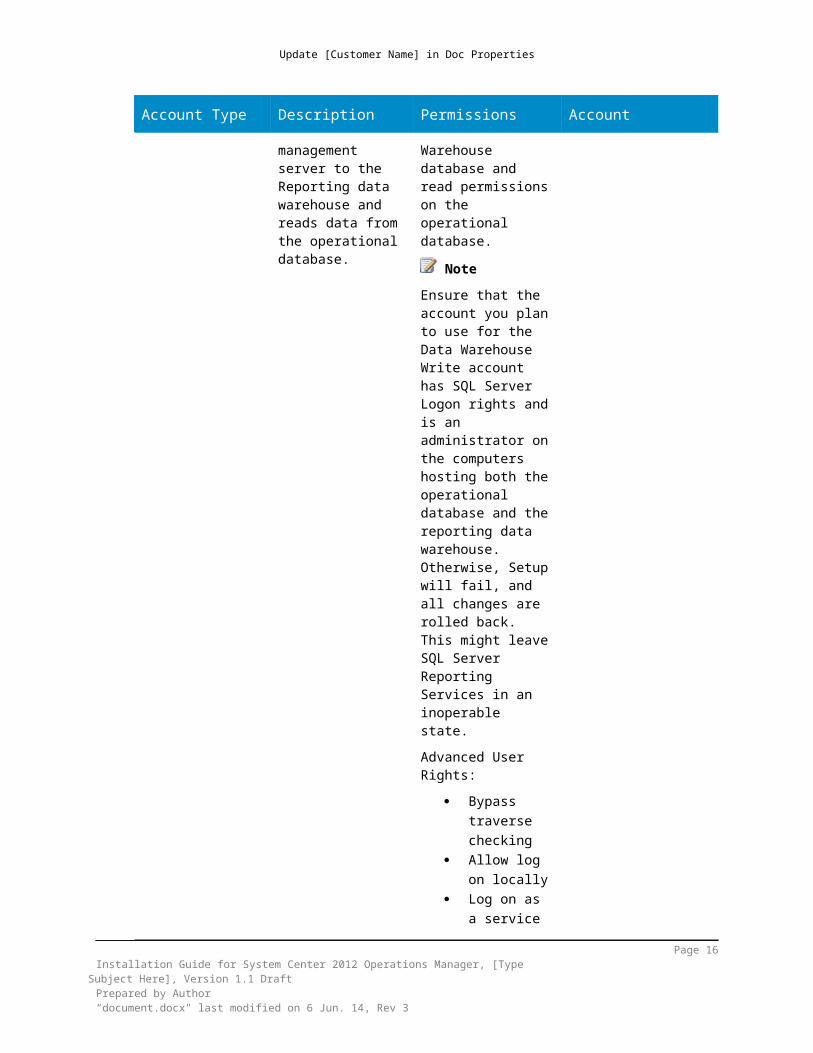
Data Warehouse Write account
The Data Warehouse Write account writes data from the management server to the Reporting data warehouse and reads data from the operational database.
This account is assigned write permissions on the Data Warehouse database and read permissions on the operational database.
Note
Ensure that the account you plan to use for the Data Warehouse Write account has SQL Server Logon rights and is an administrator on the computers hosting both the operational database and the reporting data warehouse. Otherwise, Setup will fail, and all changes are rolled back. This might leave SQL Server Reporting Services in an inoperable state.Advanced User Rights:
Bypass traverse checking
Allow log on locally
Log on as a service
Replace a process level token
<Domain\DWWrite>
Page 13Installation Guide for System Center 2012 Operations Manager, [Type Subject Here],
Version .1 DraftPrepared by Author“document.docx" last modified on 8 Jun. 14, Rev 3
Update [Customer Name] in Doc Properties
Account Type Description Permissions Account
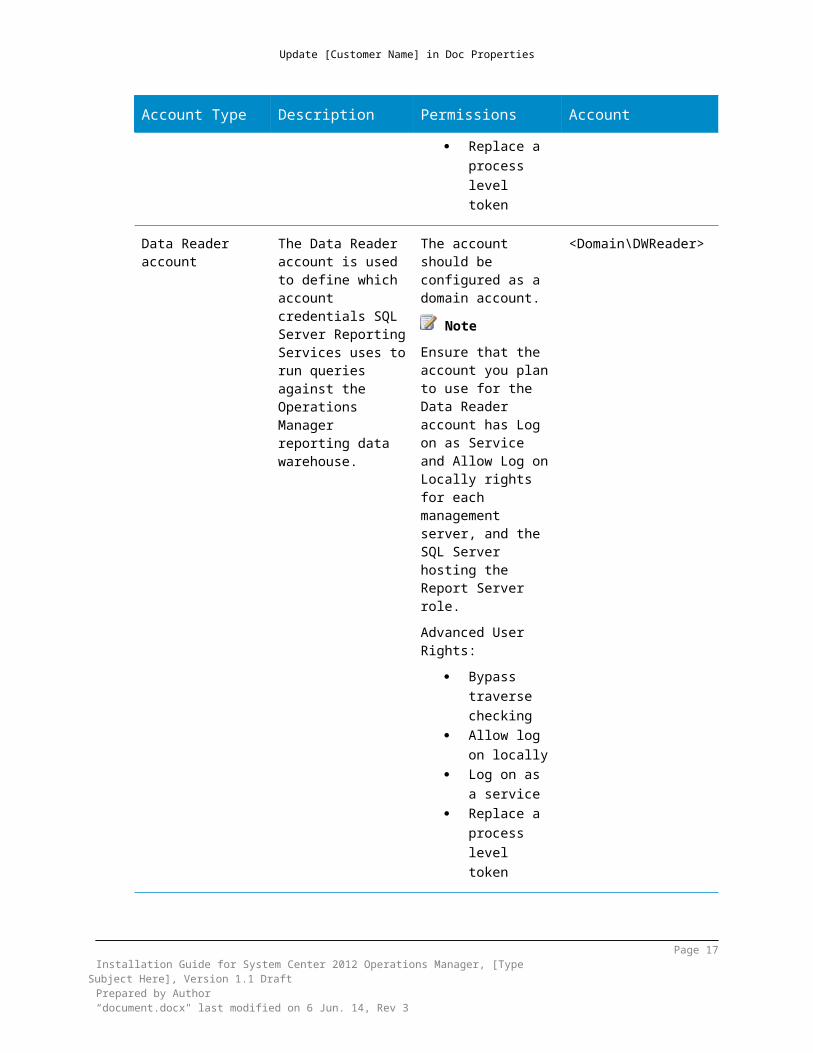
Data Reader account
The Data Reader account is used to define which account credentials SQL Server Reporting Services uses to run queries against the Operations Manager reporting data warehouse.
The account should be configured as a domain account.
Note
Ensure that the account you plan to use for the Data Reader account has Log on as Service and Allow Log on Locally rights for each management server, and the SQL Server hosting the Report Server role. Advanced User Rights:
Bypass traverse checking
Allow log on locally
Log on as a service
Replace a process level token
<Domain\DWReader>
In Active Directory Domain Services, create a Global Security group for the Operations Manager Administrators. Add the Operations Manager Administrator account to the Operations Manager Administrators Global Security group.
5.2 Service Principal NamesReplace the <netbios name> and the <fqdn> with the netbios and fqdn of the management servers. List all of the SPNs that are required for the System Center 2012 R2 Operations ManagerSystem Center 2012 R2 Operations Manager solution.When you deploy Operations Manager, you will need to register a Service Principal Name (SPN). SPNs are used by Kerberos authentication for the client to mutually authenticate with the server. When you install Operations Manager, you select an account for the System Center Configuration service and System Center Data Access service, and you must register an SPN for each management server. Use the SETSPN command line tool
Page 14Installation Guide for System Center 2012 Operations Manager, [Type Subject Here],
Version .1 DraftPrepared by Author“document.docx" last modified on 8 Jun. 14, Rev 3
Update [Customer Name] in Doc Properties
and register both the NetBIOS name and fully qualified domain name of the management server, using the following syntax:setspn –a MSOMSdkSvc/<netbios name> <Domain\SCDAS>
setspn –a MSOMSdkSvc/<fqdn> <Domain\SCDAS>
Tip You can list the SPNs registered to user account or computer with the following syntax:
setspn –l <Domain\SCDAS>
setspn –l <fqdn>
If you are using Network Load Balancing or using a hardware load balancer, the System Center Data Access service must run under a domain account. In addition to the setup already described, you must also register the load balanced name, using the following syntax:setspn –a MSOMSdkSvc/<load balanced name> <Domain\SCDAS>
Note All of the System Center Data Access services running behind the load balancer must be running with the same domain account.
5.3 Antivirus SoftwareBe sure to reference http://support.microsoft.com/kb/975931Most organizations run antivirus software on their servers and workstations to detect and fix computer viruses. However, running antivirus software on server software systems such as Operations Manager can cause data corruption and have a detrimental effect on performance.There are particular files and folders that should be excluded from antivirus scanning. Directories to exclude are those for:
SQL Server database servers that host the database files used by Operations Manager components and also for the System, Master, and Tempdb database files. To exclude these by directory, exclude the directory for the .LDF and .MDF files, for example: <Path>:\Program Files\Microsoft SQL Server\MSSQL.1\MSSQL\Data
Page 15Installation Guide for System Center 2012 Operations Manager, [Type Subject Here],
Version .1 DraftPrepared by Author“document.docx" last modified on 8 Jun. 14, Rev 3
Update [Customer Name] in Doc Properties
<Path>:\SQLData\MSSQL.1\MSSQL\Data Operations Manager management servers and agents
<Path>:\Program Files\ System Center 2012\Operations Manager\Server\Health Service State\Health Service Store
Real-time, scheduled scanner and local scanner file-extension-specific exclusions for Operations Manager include: SQL Database Servers that host the database files used by Operations
Manager components and also the System, Master, and Tempdb database files that have the extension .MDF or .LDF
Operations Manager management servers and agents that include the queue and log files with the extension .EDB, .CHK, or .LOG
Rules and monitors in Operations Manager management packs will execute such script engines as JavaScript, VBScript, and PowerShell. If your antivirus software is configured to alert and react to the execution of these script engines, this can prevent the management pack from monitoring specific aspects of the component or subsystem of the IT service within your environment. In addition to file and folder exclusion, it is important that TCP Port 25 for SMTP mail flow is not blocked on management servers which are members of the Notifications Resource Pool; otherwise, e-mail notifications will not occur.
5.4 Web Console SecurityRemove or alter this sections if SSL will not be used.When you install the web console, you must specify a web site for use with the web console. The default port for accessing the web console from a browser using Windows-based authentication is the same port as the web site that is selected when the web console was installed. If the web site chosen has been configured to use Secure Sockets Layer (SSL), then you must also select Enable SSL. You must also select an authentication mode for use with the web console. Use mixed authentication for intranet scenarios and network authentication for extranet scenarios.The web console uses two encryption algorithms:
SHA256 HMACSHA256
These algorithms may not be sufficient to meet compliance standards. For instance, they do not meet the Federal Information Processing Standard (FIPS). In order to meet a compliance standard, you need to map these names, in the appropriate configuration files, to appropriate encryption algorithms.
Page 16Installation Guide for System Center 2012 Operations Manager, [Type Subject Here],
Version .1 DraftPrepared by Author“document.docx" last modified on 8 Jun. 14, Rev 3
Update [Customer Name] in Doc Properties
5.4.1Using FIPS Compliant AlgorithmsSystem Center 2012 – Operations Manager can use Federal Information Processing Standard (FIPS) compliant algorithms. A FIPS compliant algorithm is included on your installation media. After you install it, you need to manually edit several configuration files.FIPS Compliance must be enabled in the environment where System Center 2012 R2 Operations ManagerSystem Center 2012 R2 Operations Manager is going to be deployed and should be tested prior to be deployed into an production environment.
5.5 CertificatesRemove or alter this sections if certificates will not be used. You can configure the Operations Manager web console and report server report server to use Secure Sockets Layer (SSL) connections to ensure that both incoming requests and outbound responses are encrypted prior to transmission. Separate certificates will need to be requested and generated before you can proceed with configuring SSL connections for either role. One unique certificate for the SQL server hosting reporting services and the other for the server hosting the web console.Certificates are also used to ensure mutual authentication and encryption of agent or gateway communications with a management server.
6 Software PrerequisitesAdd the software prerequisites for the System Center 2012 R2 Operations Manager SP/R2 features that are going to be installed for your customer’s deployment, below are the most common.
6.1 Management ServersIn System Center 2012 R2 Operations Manager, the first feature that is installed is the management server. The operational database and data warehouse database are created during this setup. This procedure assumes that you have already installed Microsoft SQL Server 2012 on a separate server or cluster. You must ensure that your servers meets the minimum supported configurations for System Center 2012 R2 Operations Manager.
Page 17Installation Guide for System Center 2012 Operations Manager, [Type Subject Here],
Version .1 DraftPrepared by Author“document.docx" last modified on 8 Jun. 14, Rev 3
Update [Customer Name] in Doc Properties
Server Operating System: must be Windows Server 2008 R2 SP1, Windows Server 2012, Windows Server 2012 Core Installation, or Windows Server® 2012 R2
Processor Architecture must be x64. Windows PowerShell version: Windows PowerShell version 2.0, Windows
PowerShell version 3.0, or Windows PowerShell version 4.0. Windows Remote Management must be enabled for the management server. Microsoft Core XML Services (MSXML) 6.0 is required for the management
server. .NET Framework 4 or .NET Framework 4.5 is required.
6.2 SQL Server Operating System: Windows Server 2008 R2 SP1, Windows Server 2012,
Windows Server 2012 Core Installation or Windows Server® 2012 R2. Microsoft SQL Server: SQL Server 2008 R2 SP1, SQL Server 2008 R2 SP2, SQL
Server 2012, SQL Server 2012 SP1 Standard or Enterprise Edition. Operations Manager does not support hosting its databases or SQL Server
Reporting Services on a 32-bit edition of SQL Server. Using a different version of SQL Server for different Operations Manager
features is not supported. The same version should be used for all features. SQL Server collation settings for all databases must be one of the following:
SQL_Latin1_General_CP1_CI_AS, French_CI_AS, Cyrillic_General_CI_AS, Chinese_PRC_CI_AS, Japanese_CI_AS, Traditional_Spanish_CI_AS, or Latin1_General_CI_AS. No other collation settings are supported.
The Operations Manager data warehouse installer will always install the data warehouse with SQL_Latin1_General_CP1_CI_AS regardless of the SQL Server collation. Until this issue is resolved, always install the Operations Manager data warehouse on a SQL Server with the SQL_Latin1_General_CP1_CI_AS collation. There are some compatibility issues when the Temp database on the data warehouse SQL Server instance is anything other than SQL_Latin1_General_CP1_CI_AS and the data warehouse database is SQL_Latin1_General_CP1_CI_AS.
The SQL Server Agent service must be started, and the startup type must be set to automatic.
SQL Server Full Text Search is required. Side-by-side installation of System Center Operations Manager 2007 R2
reporting and System Center 2012 Service Pack 1 (SP1) or R2, Operations Manager reporting on the same server is not supported.
The db_owner role for the operational database must be a domain account. If you set the SQL Server Authentication to Mixed mode, and then try to add a
Page 18Installation Guide for System Center 2012 Operations Manager, [Type Subject Here],
Version .1 DraftPrepared by Author“document.docx" last modified on 8 Jun. 14, Rev 3
Update [Customer Name] in Doc Properties
local SQL Server login on the operational database, the Data Access service will not be able to start.
6.3 Web Console .NET Framework 4 is required. Web browsers: Internet Explorer 8, Internet Explorer 10, Internet Explorer 11,
Silverlight 5.0 Installing the web console on a computer that has Microsoft SharePoint
installed is not supported. Execution of the SilverlightClientConfig.exe program in order to configure the
Silverlight client component and create a self-signed certificate in the client’s certificate store under Trusted Certificates that is referenced by Silverlight client. In a secure environment, this may need to be pre-deployed on client systems who will be accessing the web console by using System Center Configuration Manager 2012 or other configuration management tool.
Internet Information Services (IIS) 7.5 and later versions, with the IIS Management Console and the following role services installed: Static Content Default Document Directory Browsing HTTP Errors HTTP Logging Request Monitor Request Filtering Static Content Compression Web Server (IIS) Support IIS 6 Metabase Compatibility ASP.NET (both the 2.0 and 4.0 versions of ASP.Net are required.) Windows Authentication
Installation of the web console requires that ISAPI and CGI Restrictions in IIS are enabled for ASP.NET 4. To enable this, select the web server in IIS Manager, and then double-click ISAPI and CGI Restrictions. Select ASP.NET v4.0.30319, and then click Allow.
7 New Installation of Operations Manager 2012Add or remove sections based on the solution to be deployed, the sections below cover the most common deployment types, customize this to suit your customer.
Page 19Installation Guide for System Center 2012 Operations Manager, [Type Subject Here],
Version .1 DraftPrepared by Author“document.docx" last modified on 8 Jun. 14, Rev 3
Update [Customer Name] in Doc Properties
7.1 Before Installing Operations Manager on A SQL 2012 AlwaysOn Availability GroupThe assumption here is that SQL 2012 AlwaysOn Availability Group or Groups will be used. This section does not cover the installation of SQL Server 2012. If SQL Server 2012 Always On is not going to be used remove this section.Use the following series of tasks if you will be installing a new management group with a SQL 2012 AlwaysOn Availability Group. Otherwise, please proceed with the section entitled Install the First Management server in the Management Group
1. Make sure to use the Group listener Name and port when installing Operations Manager for the databases that are going to be added to the availability databases.
2. The first management server will use the Group listener to get the primary SQL instance, and will install the databases on that instance.
3. Complete the configuration by following the steps outlined in the section entitled Complete Configuration of SQL 2012 AlwaysOn Availability Group After Installing the First Management Server.
7.2 Install the First Management Server in the Management Group
1. Log on to the server by using an account that has local administrative credentials.
2. On the Operations Manager installation media, run Setup.exe, and then click Install.
3. On the Getting Started, Select features to install page, select the Management server feature and then click Next.
4. On the Getting Started, Select installation location page, type <Path>:\Program Files\System Center 2012\Operations Manager as the value for the location , and then click Next.
5. On the Prerequisites page, review and resolve any warnings or errors, and then click Verify Prerequisites Again to recheck the system.
Important You might receive a message that indicates that ASP.NET 4 is not registered with Internet Information Services (IIS). To resolve this problem, open a Command Prompt window, select Run as administrator, and then run the following command:
Page 20Installation Guide for System Center 2012 Operations Manager, [Type Subject Here],
Version .1 DraftPrepared by Author“document.docx" last modified on 8 Jun. 14, Rev 3
1. If the Prerequisites checker does not return any warnings or errors, the Prerequisites, Proceed with Setup page appears. Click Next.
2. On the Configuration, Specify an installation option page, select Create the first Management server in a new management group, type <ManagementGroupName> as the name for your management group, and then click Next.
3. On the Configuration, Please read the license terms page, review the Microsoft Software License Terms, select I have read, understood and agree with the license terms, and then click Next.
4. When the Configuration, Configure the operational database page opens, in the Server name and instance name box, type the name of the server and the name of the SQL Server instance for the database server that will host the operational database. If you changed the default SQL Server port, you must type the new port number in the SQL Server port box.
As you type the values for the SQL Server and instance names, you see a red circle with a white X in it appear to the left of the Server name and instance name and SQL Server port boxes. The white X indicates that the values have not yet been validated, and the black text indicates that you have not entered any illegal characters. If you enter illegal characters, the text itself turns red.The white X appears under the following circumstances:
You entered an instance of SQL Server or a SQL Server port value that is not valid or that does not exist.
The instance of SQL Server that you specified does not have the required configuration or features.
You entered a value that is out-of-range (for example, port 999999). You entered an illegal character for that box (for example, server\instance%)
You can hover the cursor over the Server name and instance name text box to view additional information about the error.
1. After you type the correct value for the SQL Server database server name, click the SQL Server port box so that Setup will attempt to validate the values you typed for the SQL Server name and for the port number.
2. In the Database size (MB) box, type <EstimatedSizeofDB> (meaning XX GB), and for the Database name, Data file folder, and Log file folder boxes, type <EstimatedSizeofLogFile> (meaning XX GB). Click Next.
Note These paths do not change if you connect to a different instance of SQL Server.
Page 21Installation Guide for System Center 2012 Operations Manager, [Type Subject Here],
Version .1 DraftPrepared by Author“document.docx" last modified on 8 Jun. 14, Rev 3
Update [Customer Name] in Doc Properties
Important You might receive a message about having the wrong version of SQL Server, or you might encounter a problem with the SQL Server Windows Management Instrumentation (WMI) provider. To resolve this problem, open a Command Prompt window, select Run as administrator, and then run the following command. In the command, replace the <path> placeholder with the location of SQL Server.mofcomp.exe “<path>\Microsoft SQL Server\100\Shared\sqlmgmproviderxpsp2up.mof”
Note The SQL Server model database size must not be greater than 100 MB. If it is, you might encounter an error in Setup regarding the inability to create a database on SQL due to user permissions. To resolve the issue, you must reduce the size of the model database.
3. When the Configuration, Configure the data warehouse database page opens, in the Server name and instance name box, type the server name and the name of the instance of SQL Server for the database server that will host the data warehouse database.
4. Because this is the first management server installation, accept the default value of Create a new data warehouse database.
5. In the Database name, Database size (MB), Data file folder, and Log file folder boxes, accept the default values. Click Next.
Important You might receive a message about having the wrong version of SQL Server, or you might encounter a problem with the SQL Server Windows Management Instrumentation (WMI) provider. To resolve this problem, open a Command Prompt window, select Run as administrator, and then run the following command. In the command, replace the <path> placeholder with the location of SQL Server.mofcomp.exe “<path>\Microsoft SQL Server\100\Shared\sqlmgmproviderxpsp2up.mof”
Note These paths do not change if you connect to a different instance of SQL Server.
Page 22Installation Guide for System Center 2012 Operations Manager, [Type Subject Here],
Version .1 DraftPrepared by Author“document.docx" last modified on 8 Jun. 14, Rev 3
Update [Customer Name] in Doc Properties
6. On the Configuration, Configure Operations Manager accounts page, enter in the format of DOMAIN\Account the specific domain account and password for the Management server action account, the System Center Configuration service and System Center Data Access service account, the Data Reader account, and the Data Writer account by selecting the Domain Account option for each account. Refer to Table 1 for the account names. Click Next.
7. On the Configuration, Help improve System Center 2012 - Operations Manager page, select the option No, I am not willing to participate for Customer Improvement Experience Program and Error Reporting, and then click Next.
8. If Windows Update is not enabled on the computer, the Configuration, Microsoft Update page appears. Select the option Off , and then click Next.
9. Review the options on the Configuration, Installation Summary page, and then click Install. Setup continues.
10.When Setup is finished, the Setup is complete page appears. Click Close.11.Open the Event Viewer and navigate to Applications and Services Logs
and Operations Manager. In the Operations Manager event log, search for Event ID’s 26331, 2002, 26361, 7019, 29194 to verify the management server is functioning normally.
7.3 Complete Configuration of SQL 2012 AlwaysOn Availability Group After Installing the First Management Server
1. Ensure that the recovery model of the database is full: open SQL Server Management Studio and connect to the instance where the database(s) are installed. Right click on the targeted database, and select its properties and select Options. If the recovery model is not listed as “Full”, select Full from the drop down list.
2. Make a full back up the databases.3. Use SQL Server Management Studio to add the databases to the availability
databases. Notice that when adding the databases to the availability databases under Select Data Synchronization, three choice are possible: Full, Join only and Skip initial data synchronization. Choose the option that is most appropriate for you. We recommend selecting Full and allowing the Add Database wizard create a full backup and restore of the databases on the secondary replicas. More steps might or might not be needed depending on which choice you made. See Manually Prepare a Secondary Database for an Availability Group (SQL Server) for more information.
4. On the new server hosting the operational database, expand Security, then expand Logins, and add the data writer account name.
5. Under Logins, add the management server action account.Page 23
Installation Guide for System Center 2012 Operations Manager, [Type Subject Here], Version .1 Draft
Prepared by Author“document.docx" last modified on 8 Jun. 14, Rev 3
6. Under Logins, add the Data Access Service (DAS) computer account, using the form “domain\computername$”.
7. For the DAS computer account, add the following user mappings: ConfigService db_accessadmin db_datareader db_datawriter db_ddladmin db_securityadmin sdk_users sql_dependency_subscriber
8. On the new server hosting the data warehouse database, expand Security, then expand Logins, and then add the data writer account.
9. Under Logins, add the data reader account.10.Under Logins, add the Data Access Service computer account, using the form
“domain\computername$”.11.For the DAS computer account, add the following user mappings: db_datareader OpsMgrReader apm_datareader
12.Run the following command on the database of the all SQL instances hosting the Operations Manager databases:sp_configure 'show advanced options', 1;GORECONFIGURE;GOsp_configure 'clr enabled', 1;GORECONFIGURE;GO
13.On each management server run regedit from an elevated Command Prompt, then edit: HKEY_LOCAL_MACHINE\SOFTWARE\Microsoft\System Center\2010\
Page 24Installation Guide for System Center 2012 Operations Manager, [Type Subject Here],
Version .1 DraftPrepared by Author“document.docx" last modified on 8 Jun. 14, Rev 3
Update [Customer Name] in Doc Properties
Change the DatabaseServerName to <AvailabilityGroupListnerName,portNumber>
Change the DataWarehouseDBServerName to <AvailabilityGroupListnerName,portNumber>
14.On the SQL Server hosting Operations Manager Reporting Server, run regedit from an elevated Command Prompt, then edit: HKEY_LOCAL_MACHINE\SOFTWARE\Microsoft\Microsoft Operation
Manager\3.0\Reporting Change the DWDBInstance to
<AvalabilityGroupListnerName,portNumber>15.On reporting server, change the connection strings.
a. Open a browser and go to the reporting webpage, http://localhost/reports_instancename. If there is no named instance, go to http://localhost/reports.
b. Click Show Details and then click Data Warehouse Main. Change the Connection String to contain the new data warehouse server name, and then click Apply.
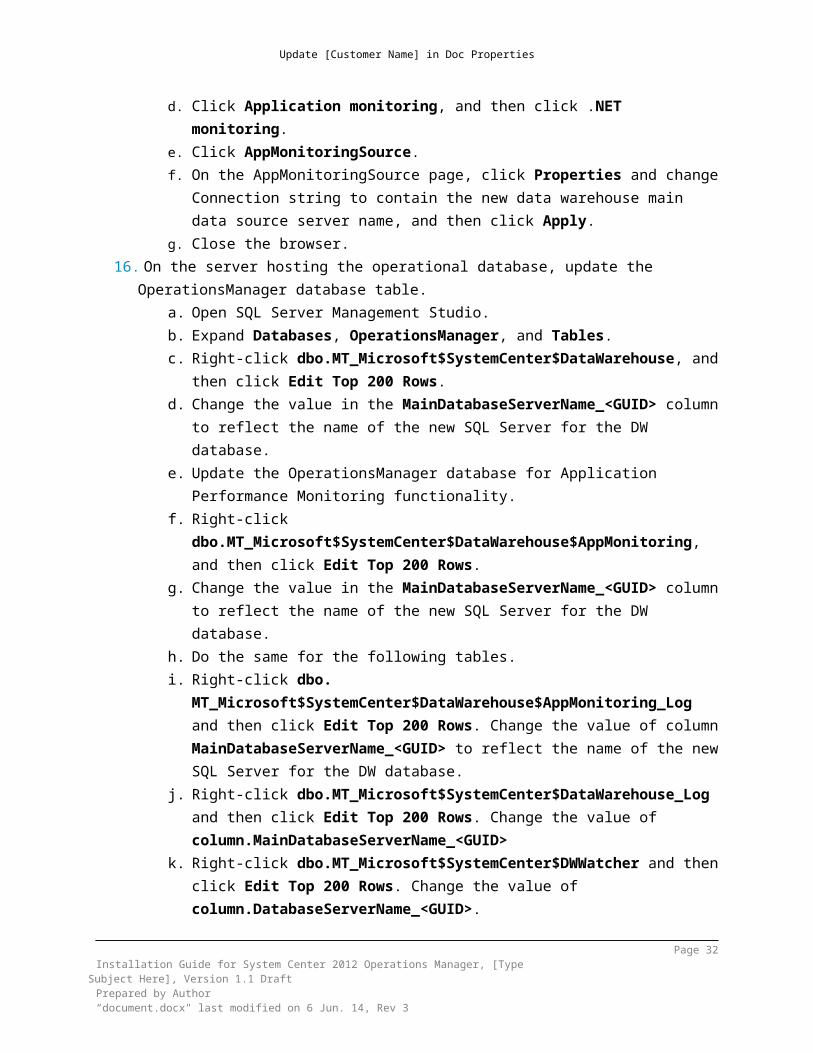
c. Change the connection string for AppMonitoringSource.d. Click Application monitoring, and then click .NET monitoring.e. Click AppMonitoringSource.f. On the AppMonitoringSource page, click Properties and change
Connection string to contain the new data warehouse main data source server name, and then click Apply.
g. Close the browser.16.On the server hosting the operational database, update the
OperationsManager database table.a. Open SQL Server Management Studio.b. Expand Databases, OperationsManager, and Tables.c. Right-click dbo.MT_Microsoft$SystemCenter$DataWarehouse,
and then click Edit Top 200 Rows.d. Change the value in the MainDatabaseServerName_<GUID>
column to reflect the name of the new SQL Server for the DW database.
e. Update the OperationsManager database for Application Performance Monitoring functionality.
f. Right-click dbo.MT_Microsoft$SystemCenter$DataWarehouse$AppMonitoring, and then click Edit Top 200 Rows.
g. Change the value in the MainDatabaseServerName_<GUID> column to reflect the name of the new SQL Server for the DW database.
h. Do the same for the following tables.
Page 25Installation Guide for System Center 2012 Operations Manager, [Type Subject Here],
Version .1 DraftPrepared by Author“document.docx" last modified on 8 Jun. 14, Rev 3
Update [Customer Name] in Doc Properties
i. Right-click dbo. MT_Microsoft$SystemCenter$DataWarehouse$AppMonitoring_Log and then click Edit Top 200 Rows. Change the value of column MainDatabaseServerName_<GUID> to reflect the name of the new SQL Server for the DW database.
j. Right-click dbo.MT_Microsoft$SystemCenter$DataWarehouse_Log and then click Edit Top 200 Rows. Change the value of column.MainDatabaseServerName_<GUID>
k. Right-click dbo.MT_Microsoft$SystemCenter$DWWatcher and then click Edit Top 200 Rows. Change the value of column.DatabaseServerName_<GUID>.
l. Right-click dbo.MT_Microsoft$SystemCenter$DBWatcher and then click Edit Top 200 Rows. Change the value of column.DatabaseServerName_<GUID>.
m. Right-click dbo.MT_Microsoft$SystemCenter$ManagementGroup and then click Edit Top 200 Rows. Change the value of column.SQLServerName_<GUID>.
n. Right-click dbo.MT_Microsoft$SystemCenter$OpsMgrDB$AppMonitoring and then click Edit Top 200 Rows. Change the value of column.MainDatabaseServerName_<GUID>.
o. Close SQL Server Management Studio.17.On the server hosting the data warehouse database, update the
OperationsManagerDW database table.a. Open SQL Server Management Studio.b. Expand Databases, OperationsManagerDW, and Tables.c. Right-click dbo.MemberDatabase, and then click Edit Top 200
Rows. Change the value of column.ServerName.
7.4 How to Install Additional Management ServersAfter you have installed System Center 2012 R2 Operations Manager, you can add additional management servers and join them to your existing management group.
1. Log on to the server with an account that has local administrative credentials.2. On the Operations Manager installation media, run Setup.exe, and then click
Install.3. On the Getting Started, Select features to install page, select
Management server and then click Next.4. On the Getting Started, Select installation location page, type <Path>:\
Program Files\System Center 2012\Operations Manager as the value for the location , and then click Next.
Page 26Installation Guide for System Center 2012 Operations Manager, [Type Subject Here],
Version .1 DraftPrepared by Author“document.docx" last modified on 8 Jun. 14, Rev 3
Update [Customer Name] in Doc Properties
5. On the Prerequisites page, review and address any warnings or errors that the Prerequisites checker returns, and then click Verify Prerequisites Again to recheck the system.
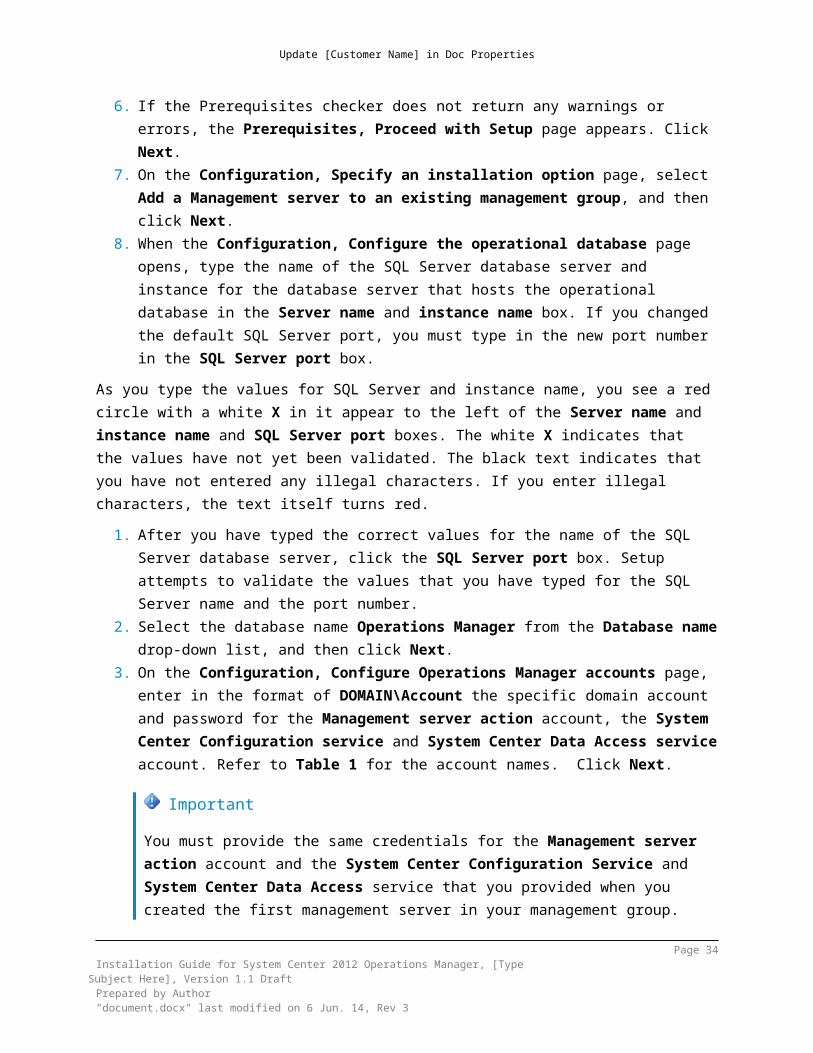
6. If the Prerequisites checker does not return any warnings or errors, the Prerequisites, Proceed with Setup page appears. Click Next.
7. On the Configuration, Specify an installation option page, select Add a Management server to an existing management group, and then click Next.
8. When the Configuration, Configure the operational database page opens, type the name of the SQL Server database server and instance for the database server that hosts the operational database in the Server name and instance name box. If you changed the default SQL Server port, you must type in the new port number in the SQL Server port box.
As you type the values for SQL Server and instance name, you see a red circle with a white X in it appear to the left of the Server name and instance name and SQL Server port boxes. The white X indicates that the values have not yet been validated. The black text indicates that you have not entered any illegal characters. If you enter illegal characters, the text itself turns red.
1. After you have typed the correct values for the name of the SQL Server database server, click the SQL Server port box. Setup attempts to validate the values that you have typed for the SQL Server name and the port number.
2. Select the database name Operations Manager from the Database name drop-down list, and then click Next.
3. On the Configuration, Configure Operations Manager accounts page, enter in the format of DOMAIN\Account the specific domain account and password for the Management server action account, the System Center Configuration service and System Center Data Access service account. Refer to Table 1 for the account names. Click Next.
Important You must provide the same credentials for the Management server action account and the System Center Configuration Service and System Center Data Access service that you provided when you created the first management server in your management group.
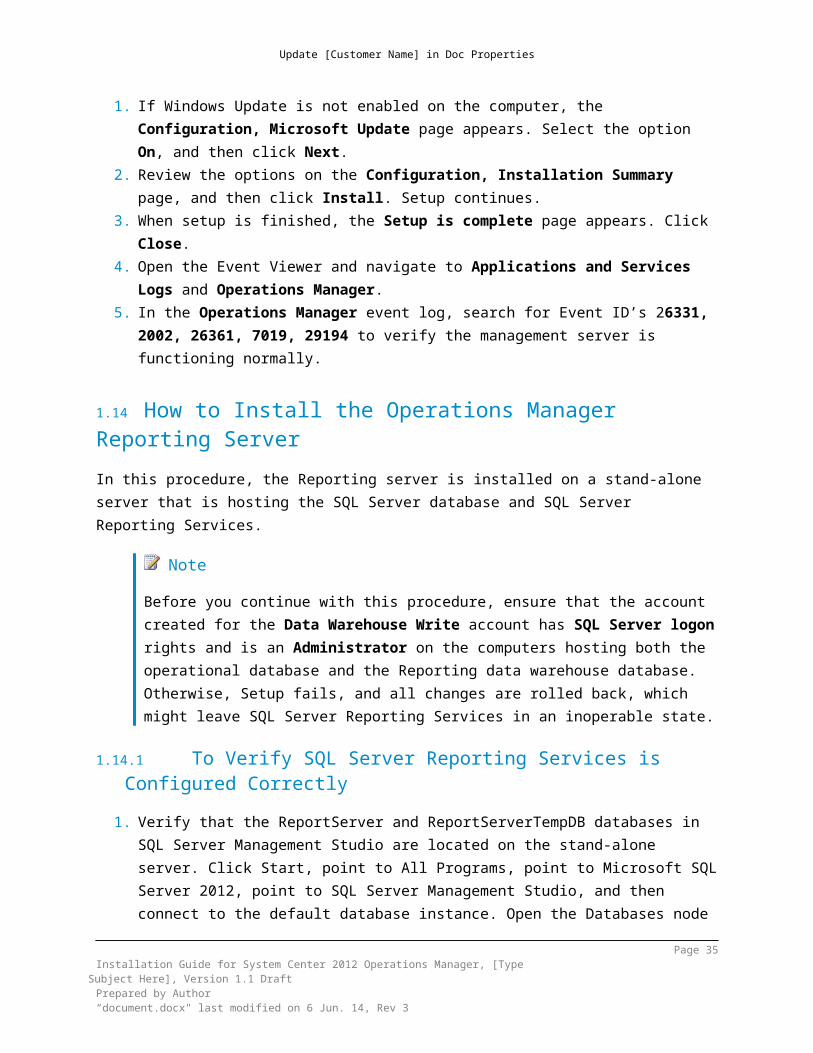
1. If Windows Update is not enabled on the computer, the Configuration, Microsoft Update page appears. Select the option On, and then click Next.
2. Review the options on the Configuration, Installation Summary page, and then click Install. Setup continues.
3. When setup is finished, the Setup is complete page appears. Click Close.4. Open the Event Viewer and navigate to Applications and Services Logs
and Operations Manager.
Page 27Installation Guide for System Center 2012 Operations Manager, [Type Subject Here],
Version .1 DraftPrepared by Author“document.docx" last modified on 8 Jun. 14, Rev 3
Update [Customer Name] in Doc Properties
5. In the Operations Manager event log, search for Event ID’s 26331, 2002, 26361, 7019, 29194 to verify the management server is functioning normally.
7.5 How to Install the Operations Manager Reporting ServerIn this procedure, the Reporting server is installed on a stand-alone server that is hosting the SQL Server database and SQL Server Reporting Services.
Note Before you continue with this procedure, ensure that the account created for the Data Warehouse Write account has SQL Server logon rights and is an Administrator on the computers hosting both the operational database and the Reporting data warehouse database. Otherwise, Setup fails, and all changes are rolled back, which might leave SQL Server Reporting Services in an inoperable state.
7.5.1To Verify SQL Server Reporting Services is Configured Correctly
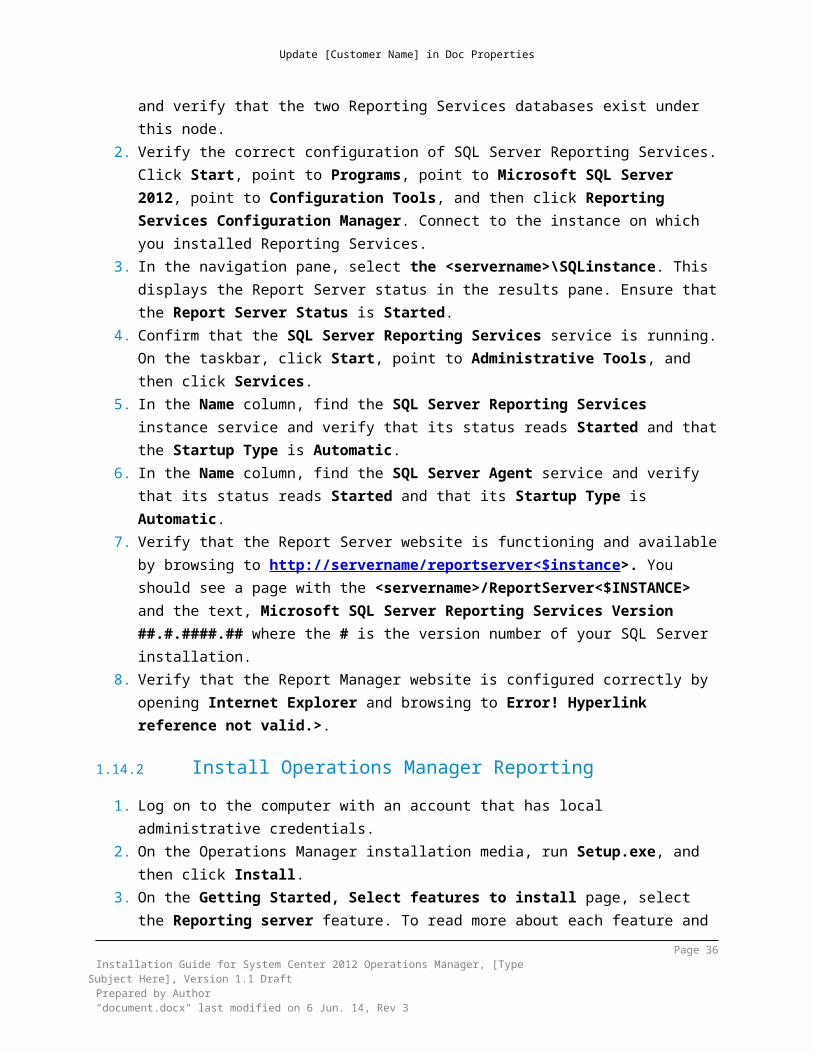
1. Verify that the ReportServer and ReportServerTempDB databases in SQL Server Management Studio are located on the stand-alone server. Click Start, point to All Programs, point to Microsoft SQL Server 2012, point to SQL Server Management Studio, and then connect to the default database instance. Open the Databases node and verify that the two Reporting Services databases exist under this node.
2. Verify the correct configuration of SQL Server Reporting Services. Click Start, point to Programs, point to Microsoft SQL Server 2012, point to Configuration Tools, and then click Reporting Services Configuration Manager. Connect to the instance on which you installed Reporting Services.
3. In the navigation pane, select the <servername>\SQLinstance. This displays the Report Server status in the results pane. Ensure that the Report Server Status is Started.
4. Confirm that the SQL Server Reporting Services service is running. On the taskbar, click Start, point to Administrative Tools, and then click Services.
5. In the Name column, find the SQL Server Reporting Services instance service and verify that its status reads Started and that the Startup Type is Automatic.
6. In the Name column, find the SQL Server Agent service and verify that its status reads Started and that its Startup Type is Automatic.
Page 28Installation Guide for System Center 2012 Operations Manager, [Type Subject Here],
Version .1 DraftPrepared by Author“document.docx" last modified on 8 Jun. 14, Rev 3
Update [Customer Name] in Doc Properties
7. Verify that the Report Server website is functioning and available by browsing to http://servername/reportserver<$instance>. You should see a page with the <servername>/ReportServer<$INSTANCE> and the text, Microsoft SQL Server Reporting Services Version ##.#.####.## where the # is the version number of your SQL Server installation.
8. Verify that the Report Manager website is configured correctly by opening Internet Explorer and browsing to Error! Hyperlink reference not valid.>.
7.5.2Install Operations Manager Reporting1. Log on to the computer with an account that has local administrative
credentials.2. On the Operations Manager installation media, run Setup.exe, and then click
Install.3. On the Getting Started, Select features to install page, select the
Reporting server feature. To read more about each feature and its requirements, click Expand all, or expand the buttons next to each feature, and then click Next.
4. On the Getting Started, Select installation location page, type <Path>:\Program Files\System Center 2012\Operations Manager as the value for the location, and then click Next.
5. On the Prerequisites page, review and resolve any warnings or errors, and then click Verify Prerequisites Again to recheck the system.
6. If the Prerequisites checker does not return any warnings or errors, continue to the Prerequisites, Proceed with Setup page. Click Next.
7. On the Configuration, Specify a Management server page, enter <provide actual name of server> the name of a management server that is used by the Reporting features only. Then click Next.
8. On the Configuration, SQL Server instance for reporting services page, select the instance of SQL Server that hosts SQL Server Reporting Services, and then click Next.
9. On the Configuration, Configure Operations Manager accounts page, enter the credentials for the Data Reader account, and then click Next.
10.On the Configuration, Help improve System Center 2012 - Operations Manager page, select the option No, I am not willing to participate for Customer Improvement Experience Program and Error Reporting, and then click Next.
11.If Windows Update is not enabled on the computer, the Configuration, Microsoft Update page appears. Select the option On, and then click Next.
12.Review the options on the Configuration, Installation Summary page, and then click Install. Setup continues.
13.When Setup is finished, the Setup is complete page appears. Click Close.
Page 29Installation Guide for System Center 2012 Operations Manager, [Type Subject Here],
Version .1 DraftPrepared by Author“document.docx" last modified on 8 Jun. 14, Rev 3
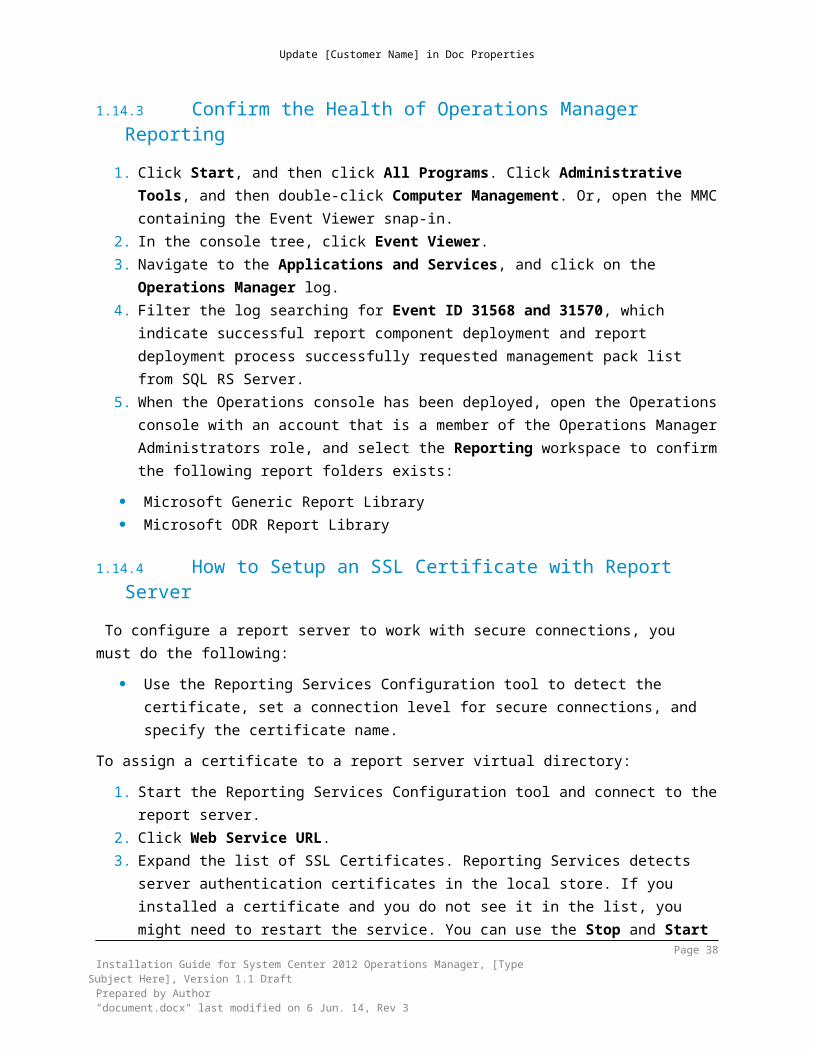
7.5.3Confirm the Health of Operations Manager Reporting1. Click Start, and then click All Programs. Click Administrative Tools, and
then double-click Computer Management. Or, open the MMC containing the Event Viewer snap-in.
2. In the console tree, click Event Viewer. 3. Navigate to the Applications and Services, and click on the Operations
Manager log. 4. Filter the log searching for Event ID 31568 and 31570, which indicate
successful report component deployment and report deployment process successfully requested management pack list from SQL RS Server.
5. When the Operations console has been deployed, open the Operations console with an account that is a member of the Operations Manager Administrators role, and select the Reporting workspace to confirm the following report folders exists:
Microsoft Generic Report Library Microsoft ODR Report Library
7.5.4How to Setup an SSL Certificate with Report Server To configure a report server to work with secure connections, you must do the following:
Use the Reporting Services Configuration tool to detect the certificate, set a connection level for secure connections, and specify the certificate name.
To assign a certificate to a report server virtual directory:1. Start the Reporting Services Configuration tool and connect to the report
server.2. Click Web Service URL.3. Expand the list of SSL Certificates. Reporting Services detects server
authentication certificates in the local store. If you installed a certificate and you do not see it in the list, you might need to restart the service. You can use the Stop and Start buttons on the Report Server Status page in the Reporting Services Configuration tool to restart the service.
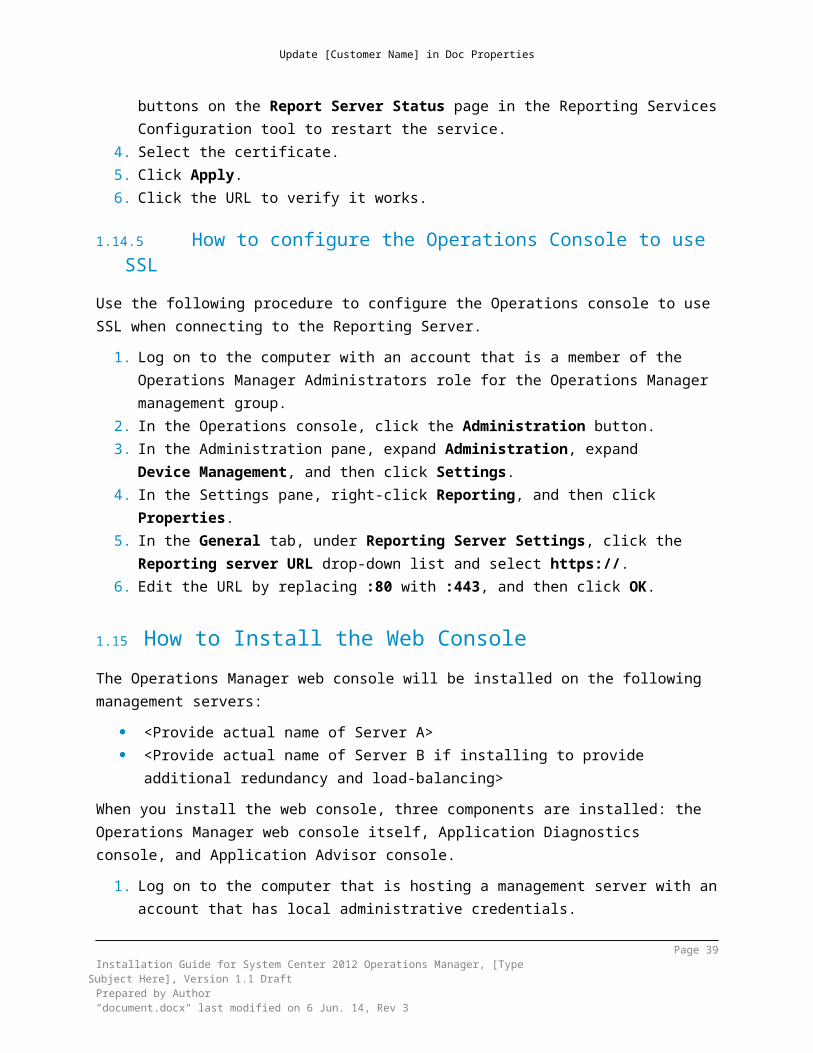
4. Select the certificate.5. Click Apply.6. Click the URL to verify it works.
7.5.5How to configure the Operations Console to use SSLUse the following procedure to configure the Operations console to use SSL when connecting to the Reporting Server.
Page 30Installation Guide for System Center 2012 Operations Manager, [Type Subject Here],
Version .1 DraftPrepared by Author“document.docx" last modified on 8 Jun. 14, Rev 3
Update [Customer Name] in Doc Properties
1. Log on to the computer with an account that is a member of the Operations Manager Administrators role for the Operations Manager management group.
2. In the Operations console, click the Administration button.3. In the Administration pane, expand Administration, expand
Device Management, and then click Settings.4. In the Settings pane, right-click Reporting, and then click Properties.5. In the General tab, under Reporting Server Settings, click the Reporting
server URL drop-down list and select https://.6. Edit the URL by replacing :80 with :443, and then click OK.
7.6 How to Install the Web ConsoleThe Operations Manager web console will be installed on the following management servers:
<Provide actual name of Server A> <Provide actual name of Server B if installing to provide additional
redundancy and load-balancing>When you install the web console, three components are installed: the Operations Manager web console itself, Application Diagnostics console, and Application Advisor console.
1. Log on to the computer that is hosting a management server with an account that has local administrative credentials.
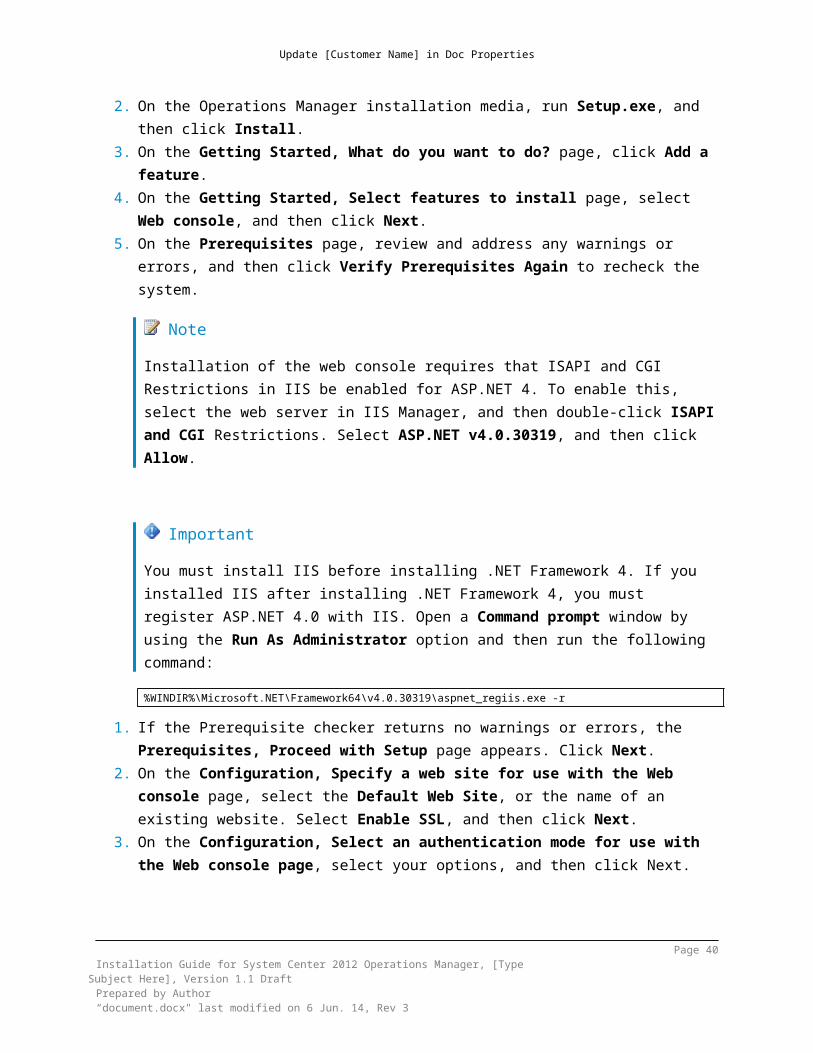
2. On the Operations Manager installation media, run Setup.exe, and then click Install.
3. On the Getting Started, What do you want to do? page, click Add a feature.
4. On the Getting Started, Select features to install page, select Web console, and then click Next.
5. On the Prerequisites page, review and address any warnings or errors, and then click Verify Prerequisites Again to recheck the system.
Note Installation of the web console requires that ISAPI and CGI Restrictions in IIS be enabled for ASP.NET 4. To enable this, select the web server in IIS Manager, and then double-click ISAPI and CGI Restrictions. Select ASP.NET v4.0.30319, and then click Allow.
Page 31Installation Guide for System Center 2012 Operations Manager, [Type Subject Here],
Version .1 DraftPrepared by Author“document.docx" last modified on 8 Jun. 14, Rev 3
Update [Customer Name] in Doc Properties
Important You must install IIS before installing .NET Framework 4. If you installed IIS after installing .NET Framework 4, you must register ASP.NET 4.0 with IIS. Open a Command prompt window by using the Run As Administrator option and then run the following command:%WINDIR%\Microsoft.NET\Framework64\v4.0.30319\aspnet_regiis.exe -r
1. If the Prerequisite checker returns no warnings or errors, the Prerequisites, Proceed with Setup page appears. Click Next.
2. On the Configuration, Specify a web site for use with the Web console page, select the Default Web Site, or the name of an existing website. Select Enable SSL, and then click Next.
3. On the Configuration, Select an authentication mode for use with the Web console page, select your options, and then click Next.
4. If Windows Update is not activated on the computer, the Configuration, Microsoft Update page appears. Select your options, and then click Next.
5. Review your selections on the Configuration, Installation Summary page, and click Install. Setup continues.
6. On the Setup is complete page, click Close.
7.6.1Web Console Security ConfigurationIn order to use algorithms that are FIPS compliant, follow these steps for all Operations Manager server components. Enabling FIPS compliance for System Center 2012 R2 Operations Manager requires that the underlying infrastructure used (Server OS, Active Directory etc.), also be FIPS compliant.
Install Microsoft.EnterpriseManagement.Cryptography.dll. Edit several instances of the machine.config file.
For systems that host a web console, also do the following steps. Edit the WebHost\web.config file. Edit the MonitoringView\web.config file.
You need the Global Assembly Cache Tool, gacutil.exe. This utility is part of the Windows SDK. For more information, see Gacutil.exe (Global Assembly Cache Tool).
To Install the Cryptography DLL1. On the system hosting the web console, use the Run as Administrator option
to open a Command Prompt window.2. Change directories to the SupportTools directory of your installation media,
and then change directory to AMD64. 3. Run the following gacutil command:
Page 32Installation Guide for System Center 2012 Operations Manager, [Type Subject Here],
Version .1 DraftPrepared by Author“document.docx" last modified on 8 Jun. 14, Rev 3
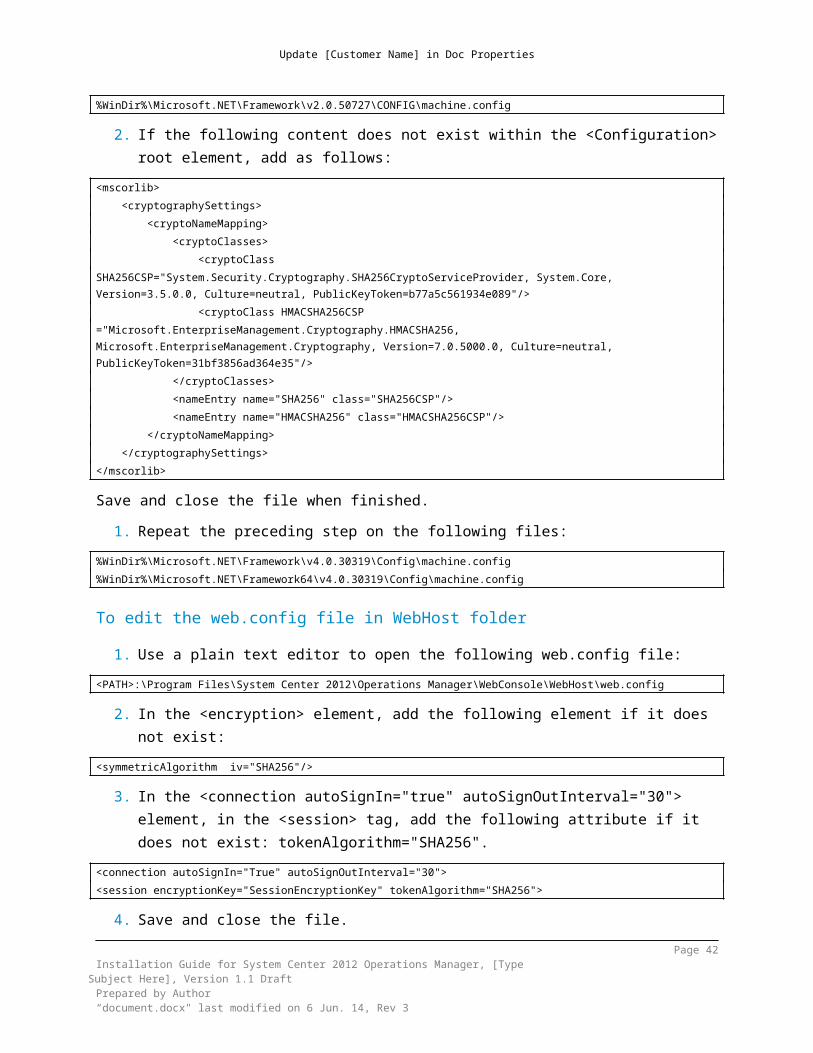
To edit the web.config file in WebHost folder1. Use a plain text editor to open the following web.config file:
<PATH>:\Program Files\System Center 2012\Operations Manager\WebConsole\WebHost\web.config
2. In the <encryption> element, add the following element if it does not exist:<symmetricAlgorithm iv="SHA256"/>
3. In the <connection autoSignIn="true" autoSignOutInterval="30"> element, in the <session> tag, add the following attribute if it does not exist: tokenAlgorithm="SHA256".
Page 33Installation Guide for System Center 2012 Operations Manager, [Type Subject Here],
Version .1 DraftPrepared by Author“document.docx" last modified on 8 Jun. 14, Rev 3
Update [Customer Name] in Doc Properties
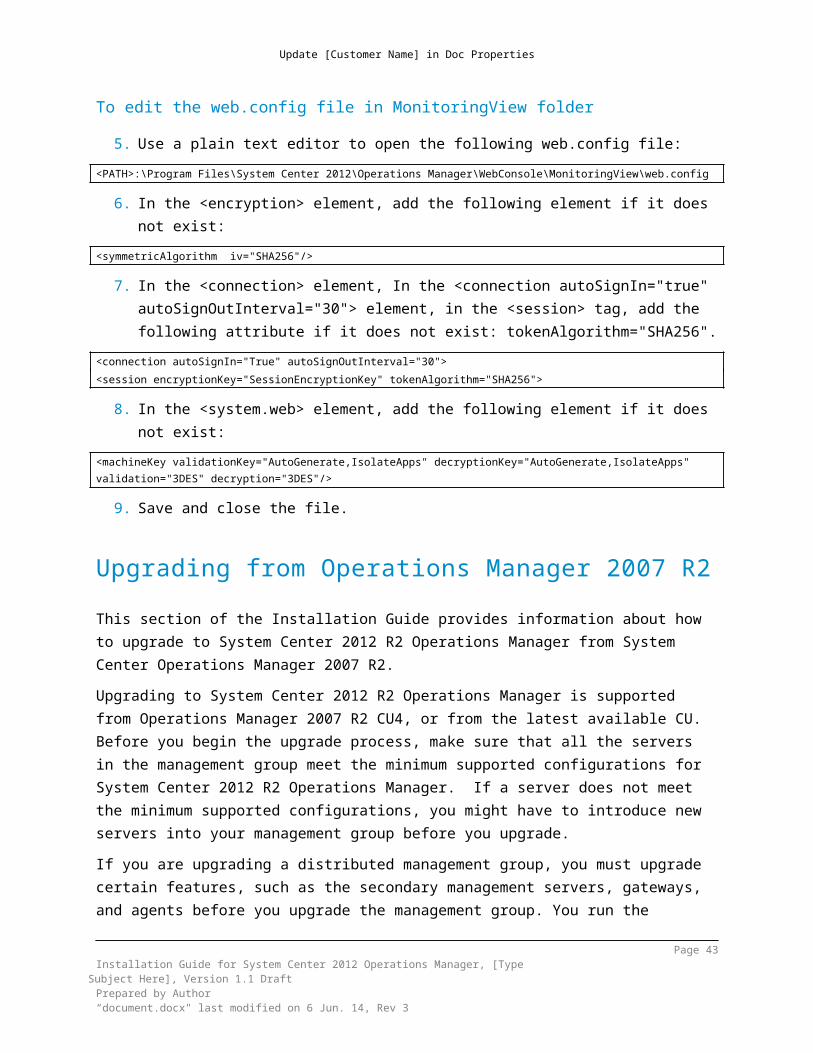
To edit the web.config file in MonitoringView folder5. Use a plain text editor to open the following web.config file:
<PATH>:\Program Files\System Center 2012\Operations Manager\WebConsole\MonitoringView\web.config
6. In the <encryption> element, add the following element if it does not exist:<symmetricAlgorithm iv="SHA256"/>
7. In the <connection> element, In the <connection autoSignIn="true" autoSignOutInterval="30"> element, in the <session> tag, add the following attribute if it does not exist: tokenAlgorithm="SHA256".
8. In the <system.web> element, add the following element if it does not exist:<machineKey validationKey="AutoGenerate,IsolateApps" decryptionKey="AutoGenerate,IsolateApps" validation="3DES" decryption="3DES"/>
9. Save and close the file.
8 Upgrading from Operations Manager 2007 R2This section of the Installation Guide provides information about how to upgrade to System Center 2012 R2 Operations Manager from System Center Operations Manager 2007 R2.Upgrading to System Center 2012 R2 Operations Manager is supported from Operations Manager 2007 R2 CU4, or from the latest available CU. Before you begin the upgrade process, make sure that all the servers in the management group meet the minimum supported configurations for System Center 2012 R2 Operations Manager. If a server does not meet the minimum supported configurations, you might have to introduce new servers into your management group before you upgrade.If you are upgrading a distributed management group, you must upgrade certain features, such as the secondary management servers, gateways, and agents before you upgrade the management group. You run the management group upgrade from the server that hosts the RMS, unless it does not meet the minimum supported configurations for System Center 2012 R2 Operations Manager. For example, if the RMS is installed on a 32-bit operating system or if it is a clustered RMS, you cannot run upgrade from the RMS. Instead, you must upgrade the management group from a secondary management server. If you follow this
Page 34Installation Guide for System Center 2012 Operations Manager, [Type Subject Here],
Version .1 DraftPrepared by Author“document.docx" last modified on 8 Jun. 14, Rev 3
Update [Customer Name] in Doc Properties
upgrade path, this secondary management server is marked as the RMS emulator, and the unsupported RMS is removed from the management group.
8.1 SQL Server PrerequisitesVerify the version of SQL Server hosting the OperationsManager and OperationsManagerDW databases meetings the minimum system requirements. If not already installed, SQL Server Full Text Search should be installed before proceeding with the upgrade.Before proceeding with the upgrade of the management group, verify that the operational database has more than 50 percent of free space, otherwise the upgrade might fail if there is not enough space. Also ensure that the transactions logs are 50 percent of the total size of the operational database.
8.2 Import the Upgrade Helper Management PackThe Upgrade Helper management pack provides guidance during the upgrade process from System Center Operations Manager 2007 R2 to System Center 2012 R2 Operations Manager for a distributed topology.
1. Log on to the computer with an account that is a member of the Operations Manager Administrators role for the Operations Manager 2007 R2 management group.
2. In the Operations console, click Administration.3. Right-click the Management Packs node, and then click Import
Management Packs. 4. In the Import Management Packs wizard, click Add, and then click Add from
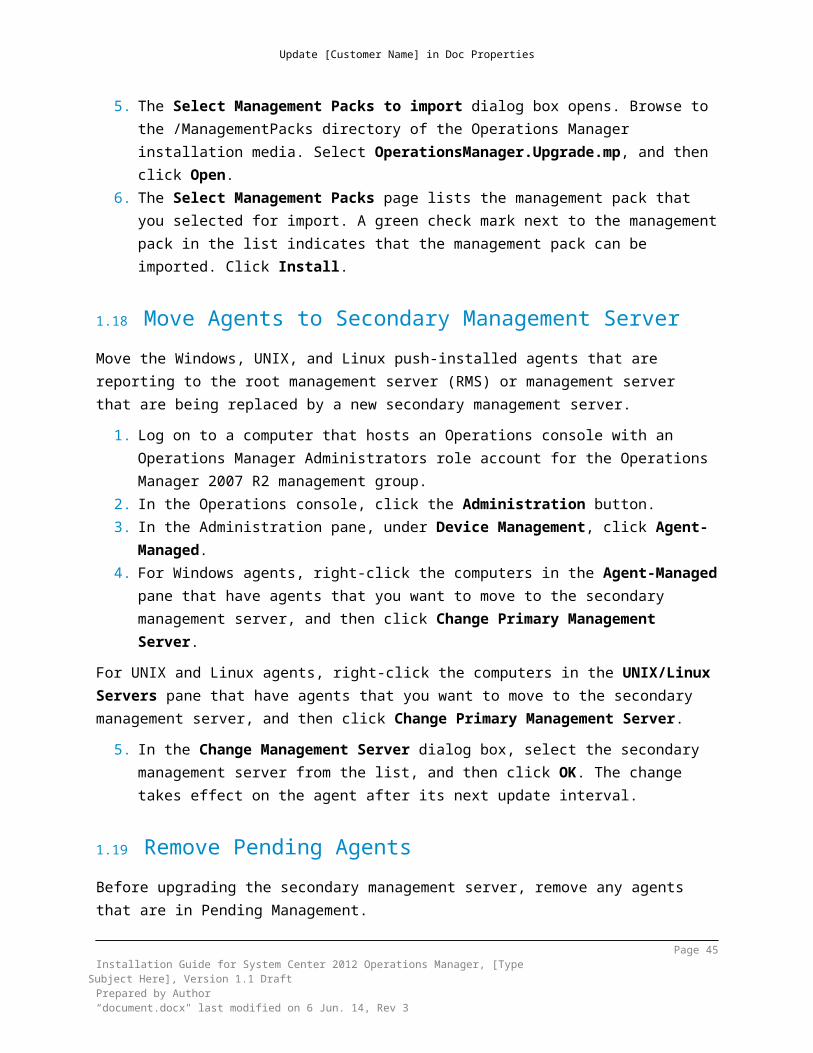
disk. 5. The Select Management Packs to import dialog box opens. Browse to
the /ManagementPacks directory of the Operations Manager installation media. Select OperationsManager.Upgrade.mp, and then click Open.
6. The Select Management Packs page lists the management pack that you selected for import. A green check mark next to the management pack in the list indicates that the management pack can be imported. Click Install.
8.3 Move Agents to Secondary Management ServerMove the Windows, UNIX, and Linux push-installed agents that are reporting to the root management server (RMS) or management server that are being replaced by a new secondary management server.
Page 35Installation Guide for System Center 2012 Operations Manager, [Type Subject Here],
Version .1 DraftPrepared by Author“document.docx" last modified on 8 Jun. 14, Rev 3
Update [Customer Name] in Doc Properties
1. Log on to a computer that hosts an Operations console with an Operations Manager Administrators role account for the Operations Manager 2007 R2 management group.
2. In the Operations console, click the Administration button.3. In the Administration pane, under Device Management, click Agent-
Managed.4. For Windows agents, right-click the computers in the Agent-Managed pane
that have agents that you want to move to the secondary management server, and then click Change Primary Management Server.
For UNIX and Linux agents, right-click the computers in the UNIX/Linux Servers pane that have agents that you want to move to the secondary management server, and then click Change Primary Management Server.
5. In the Change Management Server dialog box, select the secondary management server from the list, and then click OK. The change takes effect on the agent after its next update interval.
8.4 Remove Pending AgentsBefore upgrading the secondary management server, remove any agents that are in Pending Management.
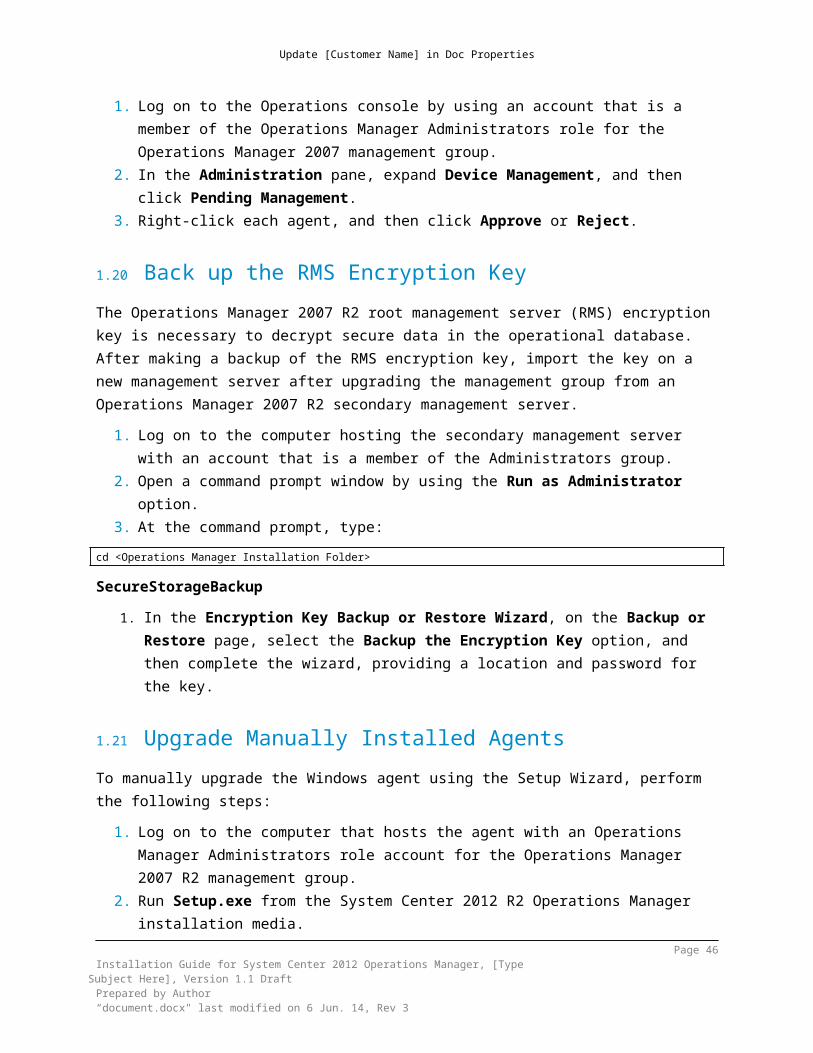
1. Log on to the Operations console by using an account that is a member of the Operations Manager Administrators role for the Operations Manager 2007 management group.
2. In the Administration pane, expand Device Management, and then click Pending Management.
3. Right-click each agent, and then click Approve or Reject.
8.5 Back up the RMS Encryption KeyThe Operations Manager 2007 R2 root management server (RMS) encryption key is necessary to decrypt secure data in the operational database. After making a backup of the RMS encryption key, import the key on a new management server after upgrading the management group from an Operations Manager 2007 R2 secondary management server.
1. Log on to the computer hosting the secondary management server with an account that is a member of the Administrators group.
2. Open a command prompt window by using the Run as Administrator option.3. At the command prompt, type:
cd <Operations Manager Installation Folder>
SecureStorageBackup
Page 36Installation Guide for System Center 2012 Operations Manager, [Type Subject Here],
Version .1 DraftPrepared by Author“document.docx" last modified on 8 Jun. 14, Rev 3
Update [Customer Name] in Doc Properties
1. In the Encryption Key Backup or Restore Wizard, on the Backup or Restore page, select the Backup the Encryption Key option, and then complete the wizard, providing a location and password for the key.
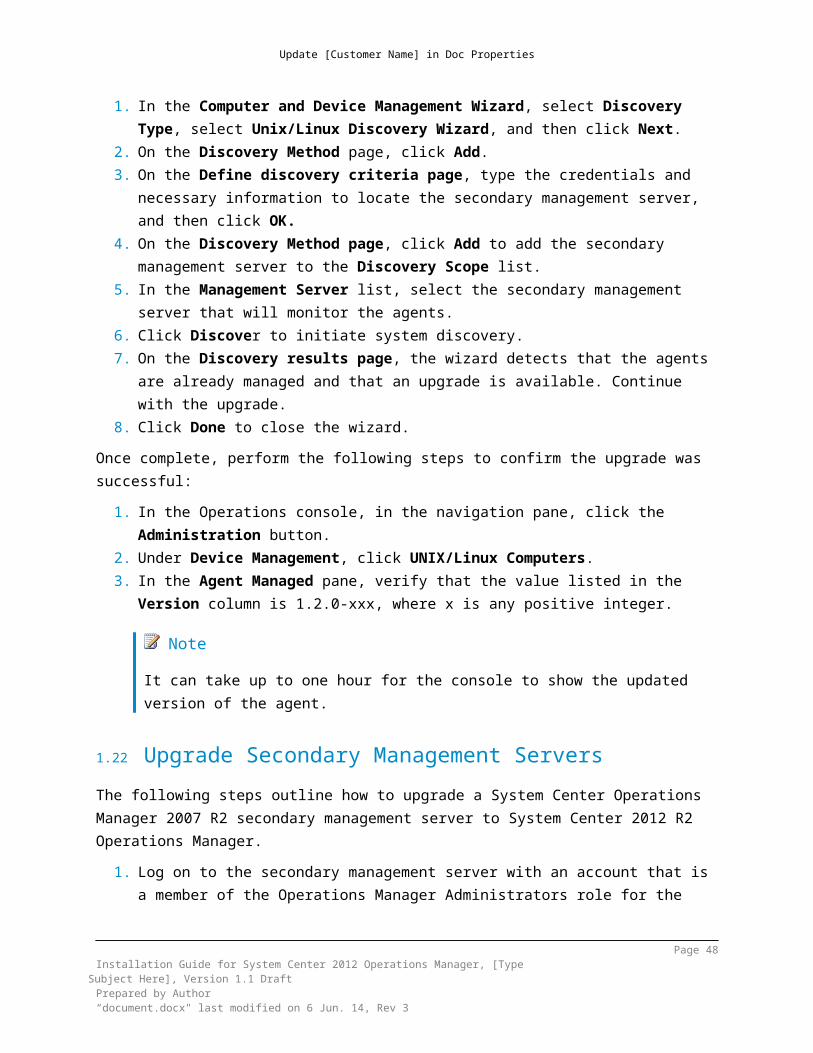
8.6 Upgrade Manually Installed AgentsTo manually upgrade the Windows agent using the Setup Wizard, perform the following steps:
1. Log on to the computer that hosts the agent with an Operations Manager Administrators role account for the Operations Manager 2007 R2 management group.
2. Run Setup.exe from the System Center 2012 R2 Operations Manager installation media.
3. On the first page of the Setup Wizard, click Local agent. When the Welcome to the System Center 2012 - Operations Manager Agent Upgrade Wizard page opens, click Next.
4. In the System Center 2012 - Operations Manager Agent Setup dialog box, click Upgrade. The status page displays the progress of the upgrade.
5. When the Completing the System Center 2012 - Operations Manager Agent Setup wizard page appears, click Finish.
To manually upgrade the Windows agent from the Command Prompt, perform the following steps:
1. Log on to the computer hosting the agent with an Operations Manager Administrators role account for the Operations Manager 2007 R2 management group.
2. Open a Command Prompt window by using the Run as Administrator option.
3. Change directory to agent, and then change directory again to AMD64, i386, or ia64, as appropriate for the current system.
4. Run the following command, where D:\ is the location for the upgrade log file. msiexec /i MOMAgent.msi /qn /l*v D:\logs\AgentUpgrade.log
To upgrade UNIX and Linux agents in a distributed management group, perform the following steps:
1. Log on to the root management server hosting the Operations Manager 2007 R2 Operations console with an account that is a member of the Operations Manager Administrators role for the Operations Manager 2007 R2 management group.
2. In the Operations console, click Administration.3. At the bottom of the navigation pane, select the Discovery Wizard link.
Page 37Installation Guide for System Center 2012 Operations Manager, [Type Subject Here],
Version .1 DraftPrepared by Author“document.docx" last modified on 8 Jun. 14, Rev 3
Update [Customer Name] in Doc Properties
Initiate the upgrade by running the Discovery Wizard in Operations Manager 2007 R2 on agents that have been moved to a secondary management server that has been upgraded to Operations Manager. There is no Pending Management feature for UNIX and Linux agents in either version.
1. In the Computer and Device Management Wizard, select Discovery Type, select Unix/Linux Discovery Wizard, and then click Next.
2. On the Discovery Method page, click Add.3. On the Define discovery criteria page, type the credentials and necessary
information to locate the secondary management server, and then click OK.4. On the Discovery Method page, click Add to add the secondary
management server to the Discovery Scope list. 5. In the Management Server list, select the secondary management server
that will monitor the agents. 6. Click Discover to initiate system discovery.7. On the Discovery results page, the wizard detects that the agents are
already managed and that an upgrade is available. Continue with the upgrade.
8. Click Done to close the wizard.Once complete, perform the following steps to confirm the upgrade was successful:
1. In the Operations console, in the navigation pane, click the Administration button.
2. Under Device Management, click UNIX/Linux Computers.3. In the Agent Managed pane, verify that the value listed in the Version
column is 1.2.0-xxx, where x is any positive integer.
Note It can take up to one hour for the console to show the updated version of the agent.
8.7 Upgrade Secondary Management ServersThe following steps outline how to upgrade a System Center Operations Manager 2007 R2 secondary management server to System Center 2012 R2 Operations Manager.
1. Log on to the secondary management server with an account that is a member of the Operations Manager Administrators role for the Operations Manager 2007 R2 management group and a local administrator on the computer.
2. From the System Center 2012 – Operations Manager media, run Setup.exe, and then click Install. The Getting Started page displays information about which features will be upgraded.
Page 38Installation Guide for System Center 2012 Operations Manager, [Type Subject Here],
Version .1 DraftPrepared by Author“document.docx" last modified on 8 Jun. 14, Rev 3
Update [Customer Name] in Doc Properties
3. On the Getting Started, System Center 2012 - Operations Manager Upgrade page, click Next to proceed with the upgrade.
4. On the Getting Started, Select installation location page, accept the default value of C:\Program Files\System Center 2012\Operations Manager, or type in a new location, or browse to one. Then click Next.
5. On the Prerequisites page, review and address any warnings or errors that the Prerequisites checker returns, and then click Verify Prerequisites Again to recheck the system.
6. If the Prerequisites checker does not return any warnings or errors, the Prerequisites, Proceed with Setup page appears. Click Next.
7. On the Configuration, Configure Operations Manager accounts page, we recommend that you use the Domain Account option for the System Center Configuration service and System Center Data Access service accounts.
8. Enter the credentials for a domain account, and then click Next.9. Review the options on the Configuration, Ready To Upgrade page, and
then click Upgrade. The upgrade proceeds and displays the upgrade progress.
10.When the upgrade is finished, the Upgrade complete page appears. Click Close.
Upgrading a secondary management server is just one phase of the distributed upgrade process. Upgrade is not completed until all of the other features in the management group have been upgraded, and have run upgrade on the management group itself.
8.8 Upgrading Gateway ServersAfter upgrading the secondary management server, upgrade any gateway servers. The following steps outline how to upgrade a gateway server from System Center Operations Manager 2007 R2 to System Center 2012 R2 Operations Manager performed locally on the gateway server. Upon completion, verify whether the upgrade is successful.
1. Log on to a computer that hosts the gateway server with an Operations Manager Administrators role account for the Operations Manager 2007 R2 management group.
2. On the System Center 2012 – Operations Manager media, run Setup.exe.3. In the Optional Installations area, click Gateway management server.4. On the Welcome to the System Center 2012 - Operations Manager
Gateway Upgrade Wizard page, click Next.5. On the The wizard is ready to begin gateway upgrade page, click
Upgrade.
Page 39Installation Guide for System Center 2012 Operations Manager, [Type Subject Here],
Version .1 DraftPrepared by Author“document.docx" last modified on 8 Jun. 14, Rev 3
Update [Customer Name] in Doc Properties
6. On the Completing the System Center 2012 - Operations Manager Gateway Setup wizard page, click Finish.
Once complete, perform the following steps to confirm the upgrade was successful:1. In the Operations console, in the navigation pane, click the Administration
button.2. Under Device Management, click Management Servers.3. In the Management Servers pane, verify that the value listed in the
Version column is 7.0.85xx.x, where x is any positive integer.
8.9 Check the Operations Manager 2007 R2 RMS for Active Connected ConsolesConsoles that are connected to the Operations Manager 2007 R2 RMS might lose connectivity during the upgrade of the management group. Before performing the upgrade of the management group, notify anyone who has a connected console to close the connection.
8.10Disable the Notification SubscriptionsDisable notification subscription before upgrading the management group to ensure that notifications are not sent during the upgrade process.
1. Log on to the Operations console account that is a member of the Operations Manager Administrators role for the Operations Manager management group.
2. In the Operations console, select the Administration view.3. In the navigation pane, expand Administration, expand the Notifications
container, and then click Subscriptions.4. Select each subscription, and then click Disable in the Actions pane.
NoteMulti-select does not work when you are disabling subscriptions.
8.11Restore the RMS Encryption Key on Secondary Management ServerIf the management group cannot be upgraded from the RMS because it does not meet the minimum supported configurations for System Center 2012 R2 Operations Manager, the encryption key must be restored on the Operations Manager 2007 R2 secondary manager server from which the management group upgrade will be run from.
Page 40Installation Guide for System Center 2012 Operations Manager, [Type Subject Here],
Version .1 DraftPrepared by Author“document.docx" last modified on 8 Jun. 14, Rev 3
Update [Customer Name] in Doc Properties
1. Log on to the computer hosting the secondary management server with an account that is a member of the Administrators group.
2. Open a command prompt window by using the Run as Administrator option.3. At the command prompt, type:
cd <Operations Manager Installation Folder> SecureStorageBackup
4. In the Encryption Key Backup or Restore Wizard, on the Backup or Restore? page, select the Restore the Encryption Key option and then complete the wizard, providing location and password for the key.
Once complete, perform the following steps to confirm the restore was successful:1. On the Start menu, click Run.2. Type regedit, and then click OK. The Registry Editor starts.3. Navigate to the HKLM\Software\microsoft\Microsoft Operations
Manager\3.0\MOMBins key. If value1 and value2 exist, the encryption key has successfully been restored.
8.12To Run an Upgrade from the RMS or Secondary Management ServerUpgrade the System Center Operations Manager 2007 R2 management group to System Center 2012 – Operations Manager from the root management server (RMS) if meets the minimum supported configuration requirements. If it does not, the upgrade must be performed from a secondary management server.
1. Log on to the computer that hosts the root management server with an account that is a member of the Operations Manager Administrators role for the Operations Manager 2007 R2 management group and a local administrator on the computer. SQL Server Administrator rights are also required on both the operational database server and the data warehouse server.
2. On the System Center 2012 – Operations Manager media, run Setup.exe, and then click Install.
3. On the Getting Started, System Center 2012 - Operations Manager Upgrade page, review the features that will be upgraded and added, and click Next.
Important The Operations Manager data warehouse will be added if it does not already exist.
Page 41Installation Guide for System Center 2012 Operations Manager, [Type Subject Here],
Version .1 DraftPrepared by Author“document.docx" last modified on 8 Jun. 14, Rev 3
Update [Customer Name] in Doc Properties
1. On the Getting Started, Please read the license terms page, review the license terms and select the option I have read, understood, and agree with the license terms, and then click Next.
2. On the Select installation location page, accept the default value of C:\Program Files\System Center 2012\Operations Manager, or type in a new location or browse to one. Then click Next.
3. On the Prerequisites page, review and address any warnings or errors that the Prerequisites checker returns, and then click Verify Prerequisites Again to recheck the system.
4. If the Prerequisites checker does not return any warnings or errors, the Prerequisites, Proceed with Setup page appears. Click Next.
5. If a data warehouse was not already installed, it is created, and you must configure it as follows:
a. In the Configuration, Configure the data warehouse database page, type the name and instance of the SQL Server database server for the database server that will host the System Center 2012 – Operations Manager data warehouse database in the Server name and instance name box.
b. Accept the default value of Create a new data warehouse database or select an existing data warehouse.
c. In the Database name, Database size (MB) Data file folder, and Log file folder boxes, we recommend that you accept the default values. Click Next.
6. On the Configuration, Configure Operations Manager accounts page, we recommend that you use the Domain Account option for the System Center Configuration service and System Center Data Access service accounts. Before the account is validated, an error icon appears to the left of the Domain\Username box.
7. Enter the credentials for a domain account in each box. The error icons disappear after account validation. Click Next.
8. On the Configuration, Ready To Upgrade page, click Upgrade.9. When the upgrade is finished, the Upgrade complete page appears. Click
Close.
8.13Upgrade Web Console A stand-alone System Center Operations Manager 2007 R2 web console server can be upgraded to System Center 2012 R2 Operations Manager. If the web console server was on the same computer as a secondary management server that was upgraded, it must be re-installed.
Page 42Installation Guide for System Center 2012 Operations Manager, [Type Subject Here],
Version .1 DraftPrepared by Author“document.docx" last modified on 8 Jun. 14, Rev 3
Update [Customer Name] in Doc Properties
1. Log on to the computer that hosts the web console server with an Operations Manager Administrators role account for the Operations Manager 2007 R2 management group.
2. On the System Center 2012 – Operations Manager source media, run Setup.exe, and then click Install.
3. On the Getting Started, System Center 2012 - Operations Manager Upgrade page, review the features that will be upgraded, and then click Next.
4. On the Select installation location page, accept the default value of C:\Program Files\System Center 2012\Operations Manager, or type in a new location or browse to one. Then click Next.
5. On the Prerequisites page, review and address any warnings or errors that the Prerequisites checker returns, and then click Verify Prerequisites Again to recheck the system.
6. If the Prerequisites checker does not return any warnings or errors, the Prerequisites, Proceed with Setup page appears. Click Next.
7. If the root management server has not been upgraded or is unavailable, the Configuration, Specify a management server page appears. Enter the name of a System Center 2012 – Operations Manager management server that is to be used by the web console, and then click Next.
8. On the Configuration, Specify a web site for use with the Web console page, select the Default Web Site, or the name of an existing website. Select Enable SSL only if the website has been configured to use Secure Sockets Layer (SSL), and then click Next.
9. On the Configuration, Select an authentication mode for use with the Web console page, select your options, and then click Next.
10.When the Ready to Upgrade page appears, review the upgrade summary, and then click Upgrade.
8.14Upgrade Reporting ServerUse this procedure to upgrade a stand-alone Reporting server from System Center Operations Manager 2007 R2 to System Center 2012 R2 Operations Manager. The upgrade is executed on the Reporting server after upgrading the management group.If the management group was upgraded from the secondary management server, the System Center Operations Manager 2007 R2 root management server (RMS) was removed during the upgrade process. Manually editing the configuration file for the Reporting server (rsreportserver.config) will be required. If you attempt to upgrade Operations Manager Reporting without making this change, the Upgrade Wizard will report a critical prerequisite issue, because Operations Manager is unable to connect to the reporting server.
Page 43Installation Guide for System Center 2012 Operations Manager, [Type Subject Here],
Version .1 DraftPrepared by Author“document.docx" last modified on 8 Jun. 14, Rev 3
Update [Customer Name] in Doc Properties
8.14.1 Modify the RSREPORTSERVER.CONFIG File1. On computer that hosts the Reporting server you plan to upgrade, open the
rsreportserver.config file using Notepad. The path is typically C:\Program Files\Microsoft SQL Server\MSRS10.MSSQLServer\Reporting Services\ReportServer, where MSSQLServer is the name of the SQL Server instance.
2. From the Edit menu, click Find. Search for <ServerName>.3. Replace the name of the management server from the old RMS name, with
the name of an upgraded management server.4. Search for <ServerName> again, and update the server name.5. Save and close the configuration file.6. If the Setup wizard is open, you should close it and restart the upgrade
process
8.14.2 Upgrade Reporting Server1. Log on to the computer that hosts the Reporting server with an account that is
a member of the Operations Manager 2007 R2 Administrators role for the Operations Manager 2007 R2 management group.
2. On the System Center 2012 – Operations Manager source media, run Setup.exe, and then click Install.
3. On the Getting Started, System Center 2012 - Operations Manager Upgrade page, review the features that will be upgraded. In this case, it is Operations Manager 2007 R2 Reporting. Click Next.
4. On the Select installation location page, accept the default value of C:\Program Files\System Center 2012\Operations Manager, or type in a new location or browse to one. Then click Next.
5. On the Prerequisites page, review and address any warnings or errors that the Prerequisites checker returns, and then click Verify Prerequisites Again to recheck the system.
6. If the Prerequisites checker does not return any warnings or errors, the Prerequisites, Proceed with Setup page appears. Click Next.
7. If the root management server has not been upgraded or is unavailable, the Configuration, Specify a management server page appears. Enter the name of a System Center 2012 – Operations Manager management server that is to be used by the Reporting server, and then click Next.
8. On the Ready to Upgrade page, review the options, and then click Upgrade.
9. When upgrade is finished, the Upgrade complete page appears. Click Close.
Page 44Installation Guide for System Center 2012 Operations Manager, [Type Subject Here],
Version .1 DraftPrepared by Author“document.docx" last modified on 8 Jun. 14, Rev 3
Update [Customer Name] in Doc Properties
9 Post-Upgrade TasksAfter completing the upgrade process for System Center 2012 R2 Operations Manager, a number of post-upgrade tasks must be performed. The following table highlights those tasks.Table 2 Post-Upgrade Tasks
Task When to Perform
Re-enable the Notification Subscriptions. After completing the last step in the upgrade process.
Restart or Re-enable the Connector Services
After completing the last step in the upgrade process, and only if the connector services are installed.
Uninstall the Old RMS Only if the upgrade of the management group was performed on the secondary management server.
Update Overrides After upgrading the management group
Verify the Upgrade was Successful After completing the last step in the upgrade process.
Run SQL Query on each Management Group Run SQL query on each management group to clean up the Localizedtext table and the Publishmessage table.
Assign UNIX/Linux Agents to a Resource Pool
After completing the last step in the upgrade process.
9.1 Re-enable Notification Subscriptions1. Open the Operations console by using an account that is a member of the
Operations Manager Administrators role for the System Center 2012 R2 Operations Manager management group.
NoteWhen you run the Operations console on a computer that is not a management server, the Connect To Server dialog box appears. In the Server name text box, type the name of the System Center 2012 R2 Operations Manager management server to which you want to connect.
Page 45Installation Guide for System Center 2012 Operations Manager, [Type Subject Here],
Version .1 DraftPrepared by Author“document.docx" last modified on 8 Jun. 14, Rev 3
Update [Customer Name] in Doc Properties
2. In the Operations console, in the navigation pane, click the Administration button.
3. In the Administration pane, under Notifications, click Subscriptions.4. In the Actions pane, click Enable for each subscription listed.
9.2 Verify the Upgrade Was SuccessfulPerform the following tasks to verify that the upgrade was successful.
Check the health state of the management servers and agents in the Health Service Watcher state view. In the Administration workspace of the Operations console, ensure that the management servers and agents are healthy. In the Monitoring workspace, check if there are any alerts related to the management group health.
Review the event logs of all the management servers for new errors. Sort alerts by the last-modified column to review the new alerts. Check the CPU utilization and disk I/O on your database servers to ensure
that they are functioning normally. If the Reporting feature is installed, click Reporting, and then run a generic
performance report to ensure that Reporting is functioning correctly. Re-deploy any agents that were uninstalled during the upgrade process.
9.3 Run SQL Query on each Management GroupRun the following SQL query on the Operational database in each management group to clean up the Localizedtext table and the Publishmessage table.
Page 46Installation Guide for System Center 2012 Operations Manager, [Type Subject Here],
Version .1 DraftPrepared by Author“document.docx" last modified on 8 Jun. 14, Rev 3
Update [Customer Name] in Doc Properties
-- Create a temporary table to quickly find a PublisherId when you know the MessageId.BEGIN TRYCREATE TABLE #PublisherMessageReverseIndex(MessageStringId UNIQUEIDENTIFIER, MessageId INT)CREATE CLUSTERED INDEX #PublisherMessageReverseIndex_CI ON #PublisherMessageReverseIndex(MessageStringId)INSERT INTO #PublisherMessageReverseIndex (MessageStringId, MessageId)SELECT MessageStringId, MessageIdFROM dbo.PublisherMessages
-- Create a temporary table of message lengths, message IDs, and message hashes with the-- MessageStringId to quickly determine whether a message is duplicated. Index the table.
CREATE TABLE #LTHashStrings (MessageStringId UNIQUEIDENTIFIER, LTValueLen INT, LTValueHash VARBINARY(32), MessageId INT NULL)CREATE CLUSTERED INDEX #LTHashStrings_CI ON #LTHashStrings(MessageStringId)CREATE NONCLUSTERED INDEX #LTHashStrings_NCI1 ON #LTHashStrings(LTValueLen, MessageId, LTValueHash)
-- Create a temporary table for the orphaned PublisherStrings that you find. Orphaned PublisherStrings -- are rows in PublisherMessages whose corresponding events have already been groomed. They still-- have corresponding rows in LocalizedText. Do not add rows for PublisherMessages; they are not-- for duplicated messages.
CREATE TABLE #OrphanedPublisherStrings (PublisherId UNIQUEIDENTIFIER, MessageStringId UNIQUEIDENTIFIER)CREATE CLUSTERED INDEX #OrphanedPublisherStrings_CI ON #OrphanedPublisherStrings(MessageStringId)
-- Create a temporary table so that you can determine whether a PublisherMessages row still-- has a corresponding event. These events do not have an index on the PublisherId, so do -- not query the EventAllView. If a PublisherId occurs multiple times in the event tables,-- it is only needed one time in the temp table; therefore, the unique clustered index-- must contain IGNORE_DUP_KEY. This keeps the temporary table relatively small and saves-- time when you want to see the orphaned PublisherMessages.
CREATE TABLE #EventAllPublishers (PublisherId UNIQUEIDENTIFIER)CREATE UNIQUE CLUSTERED INDEX #EventAllPublishers_CI ON #EventAllPublishers (PublisherId)WITH (IGNORE_DUP_KEY = ON)
-- Populate the temporary table by scanning EventAllView one time.INSERT INTO #EventAllPublishers(PublisherId) SELECT PublisherId FROM EventAllView
-- Populate the first temporary table to determine which messages are duplicated.INSERT INTO #LTHashStrings (MessageStringId, LTValueLen, LTValueHash, MessageId)SELECT LTStringId, len(LTValue), HashBytes('SHA1', LTValue), MessageIdFROM dbo.LocalizedText LT JOIN #PublisherMessageReverseIndex PM ON PM.MessageStringId = LTStringId
-- Create the second table to determine which messages are duplicated. CREATE TABLE #LTCountByMessage( LTValueLen INT, MessageId INT,
Page 47Installation Guide for System Center 2012 Operations Manager, [Type Subject Here],
Version .1 DraftPrepared by Author“document.docx" last modified on 8 Jun. 14, Rev 3
Update [Customer Name] in Doc Properties
LTValueHash VARBINARY(32), MsgCount INT)CREATE CLUSTERED INDEX #LTCountByMessage_CI ON #LTCountByMessage(LTValueLen, MessageId, LTValueHash)
-- Populate second message for duplicate message detection by scanning the INDEX of-- the first one and by doing a grouped count.INSERT INTO #LTCountByMessage (LTValueLen, MessageId, LTValueHash, MsgCount)SELECT LTValueLen, MessageId, LTValueHash, COUNT(1) FROM #LTHashStringsGROUP BY LTValueLen, MessageId, LTValueHash
-- You are now set up to detect both orphaned PublisherStrings and duplicated messages-- by joining to our relatively small (and correctly indexed) temporary tables.-- Determine the OrphanedPublisherStrings that have duplicate messages.INSERT INTO #OrphanedPublisherStrings (PublisherId, MessageStringId)SELECT PM.PublisherId, PM.MessageStringId FROM dbo.PublisherMessages PM JOIN #LTHashStrings LTS ON (LTS.MessageStringId = PM.MessageStringId AND LTS.MessageId = PM.MessageId)JOIN #LTCountByMessage LTC ON (LTC.LTValueLen = LTS.LTValueLen ANDLTC.MessageId = LTS.MessageId AND LTC.LTValueHash = LTS.LTValueHash)WHERE PM.PublisherId NOT IN (SELECT PublisherId FROM #EventAllPublishers) ANDLTC.MsgCount > 1
-- Deleting all the OrphanedPublisherStrings and all the corresponding LocalizedText rows-- at one time may be too large for the transaction log to handle. Create a numbered-- or ordered table so that you can delete them in relatively small batches and not-- overtax the transaction log.CREATE TABLE #NumberOrphanPublisherStrings(OrphanNum INT IDENTITY, PublisherId UNIQUEIDENTIFIER, MessageStringId UNIQUEIDENTIFIER)CREATE CLUSTERED INDEX #NumberOrphanPublisherStrings_CI on #NumberOrphanPublisherStrings(OrphanNum)
-- Populate the numbered table.INSERT INTO #NumberOrphanPublisherStrings (PublisherId, MessageStringId)SELECT PublisherId, MessageStringId FROM #OrphanedPublisherStringsEND TRYBEGIN CATCHGOTO ErrorEND CATCH
-- Set up variables so that you can delete the orphaned rows.-- If the transaction log fills up, try to reduce the @OrphanIncrement value,-- which controls the number of rows that are delete at the same time.DECLARE @OrphanNum INTDECLARE @OrphanIncrement INTDECLARE @OrphanLimit INTSET @OrphanNum = 0SET @OrphanIncrement = 10000SELECT @OrphanLimit = MAX(OrphanNum) FROM #NumberOrphanPublisherStringsBEGIN TRYWHILE @OrphanNum < @OrphanLimitBEGINDELETE dbo.LocalizedText FROM
Page 48Installation Guide for System Center 2012 Operations Manager, [Type Subject Here],
Version .1 DraftPrepared by Author“document.docx" last modified on 8 Jun. 14, Rev 3
Error:IF @@ERROR <> 0 SELECT ERROR_NUMBER() AS ErrorNumber, ERROR_MESSAGE() AS ErrorMessage;
-- Try to drop all the temporary tablesBEGIN TRYIF EXISTS (SELECT 1 FROM tempdb.INFORMATION_SCHEMA.TABLES WHERE TABLE_NAME LIKE '#PublisherMessage%')DROP TABLE #PublisherMessageReverseIndexIF EXISTS (SELECT 1 FROM tempdb.INFORMATION_SCHEMA.TABLES WHERE TABLE_NAME LIKE '#OrphanedPublisherStrings%')DROP TABLE #OrphanedPublisherStringsIF EXISTS (SELECT 1 FROM tempdb.INFORMATION_SCHEMA.TABLES WHERE TABLE_NAME LIKE '#LTHashStrings%')DROP TABLE #LTHashStringsIF EXISTS (SELECT 1 FROM tempdb.INFORMATION_SCHEMA.TABLES WHERE TABLE_NAME LIKE '#EventAllPublishers%')DROP TABLE #EventAllPublishersIF EXISTS (SELECT 1 FROM tempdb.INFORMATION_SCHEMA.TABLES WHERE TABLE_NAME LIKE '#LTCountByMessage%')DROP TABLE #LTCountByMessageIF EXISTS (SELECT 1 FROM tempdb.INFORMATION_SCHEMA.TABLES WHERE TABLE_NAME LIKE '#NumberOrphanPublisherStrings%')DROP TABLE #NumberOrphanPublisherStringsEND TRYBEGIN CATCH SELECT ERROR_NUMBER() AS ErrorNumber, ERROR_MESSAGE() AS ErrorMessage;END CATCH
10 Upgrading from System Center 2012 Operations Manager
Page 49Installation Guide for System Center 2012 Operations Manager, [Type Subject Here],
Version .1 DraftPrepared by Author“document.docx" last modified on 8 Jun. 14, Rev 3
Update [Customer Name] in Doc Properties
This section of the Installation Guide provides information about how to upgrade from System Center 2012 Operations Manager to System Center 2012 Operations Manager or SP1.The supported upgrade path from System Center 2012 Operations Manager to System Center 2012 R2 Operations Manager is, System Center 2012 Operations Manager to System Center 2012 Operations Manager SP1 to System Center 2012 R2 Operations Manager.
System Center 2012 Operations Manager System Center 2012 Operations Manager SP1 System Center 2012 R2 Operations Manager
Before you begin the upgrade process, make sure that all the servers in the management group meet the minimum supported configurations for System Center 2012 Operations Manager SP1. If a server does not meet the minimum supported configurations, you might have to introduce new servers into your management group before you upgrade.If you are upgrading a distributed management group, you must upgrade certain features, such as the management servers first, followed by the gateways, operations consoles, and then agents. Next, you can upgrade any remaining features, such as the web console, reporting and Audit Collection Services (ACS). You must also perform a number of pre-upgrade and post-upgrade tasks.
10.1 SQL Server PrerequisitesVerify the version of SQL Server hosting the OperationsManager and OperationsManagerDW databases meetings the minimum system requirements. If not already installed, SQL Server Full Text Search should be installed before proceeding with the upgrade.Before proceeding with the upgrade of the management group, verify that the operational database has more than 50 percent of free space, otherwise the upgrade might fail if there is not enough space. Also ensure that the transactions logs are 50 percent of the total size of the operational database.
10.2Pre-Upgrade Tasks When Upgrading to System Center 2012 SP1 - Operations ManagerBefore performing the upgrade complete the following tasks.Table 3 - Pre-Upgrade to SP1 Tasks
Tasks When to Perform
Review the Operations Manager Event Logs Before you upgrade the servers and Page 50
Installation Guide for System Center 2012 Operations Manager, [Type Subject Here], Version .1 Draft
Prepared by Author“document.docx" last modified on 8 Jun. 14, Rev 3
Update [Customer Name] in Doc Properties
management group.Review the Operations Manager Event logs on all Operations Manager servers and resolve any issues prior to upgrading.Save a copy of the event logs before you upgrade.
Cleanup the Database (ETL Table) Performing this pre-upgrade task in all circumstances ensures a more efficient installation
Remove Agents from Pending Management Before you upgrade a management server.
Disable the Notification Subscriptions Before you upgrade the management group.
Stop the Services or Disable any Connectors Before you upgrade the management group.
Verify that the Operational Database Has More Than 50 Percent Free Space
Before you upgrade the management group.
Back up the Operations Manager Databases Backup the Operations Manager database and Operations Manager data warehouse before you upgrade the second management server.Be sure to also backup any databases for any optional Operations Manager features such as Reporting and ACS.
10.2.1 Cleanup the Database (ETL Table)As part of upgrade to System Center 2012 Service Pack 1 (SP1), Operations Manager installation (setup) includes a script to cleanup ETL tables, grooming the database. However, in cases where there are a large number of rows (greater than 100,000) to cleanup, we recommend running the script before starting the upgrade to promote a faster upgrade and prevent possible timeout of setup. Performing this pre-upgrade task in all circumstances ensures a more efficient installation.
NoteCleanup of ETL can require several hours to complete.
Run the following query to determine the number of rows that need to be deleted from ETL and cleanup the database:
Page 51Installation Guide for System Center 2012 Operations Manager, [Type Subject Here],
Version .1 DraftPrepared by Author“document.docx" last modified on 8 Jun. 14, Rev 3
Update [Customer Name] in Doc Properties
To Cleanup ETL1. To determine the number of rows that need to be deleted, run the following
query:DECLARE @SubscriptionWatermark bigint = 0; SELECT @SubscriptionWatermark = dbo.fn_GetEntityChangeLogGroomingWatermark(); Select COUNT (*)FROM EntityTransactionLog ETL with(nolock)WHERE NOT EXISTS (SELECT 1 FROM EntityChangeLog ECL with(nolock) WHERE ECL.EntityTransactionLogId = ETL.EntityTransactionLogId)AND NOT EXISTS (SELECT 1 FROM RelatedEntityChangeLog RECL with(nolock) WHERE RECL.EntityTransactionLogId = ETL.EntityTransactionLogId)AND EntityTransactionLogId < @SubscriptionWatermark;
2. To clean up the ETL Table, run the following SQL script:DECLARE @RowCount int = 1;DECLARE @BatchSize int = 100000;DECLARE @SubscriptionWatermark bigint = 0;DECLARE @LastErr int;
SELECT @SubscriptionWatermark = dbo.fn_GetEntityChangeLogGroomingWatermark();WHILE(@RowCount > 0)BEGIN DELETE TOP (@BatchSize) ETLFROM EntityTransactionLog ETLWHERE NOT EXISTS (SELECT 1 FROM EntityChangeLog ECL WHERE ECL.EntityTransactionLogId = ETL.EntityTransactionLogId)AND NOT EXISTS (SELECT 1 FROM RelatedEntityChangeLog RECL WHERE RECL.EntityTransactionLogId = ETL.EntityTransactionLogId)AND ETL.EntityTransactionLogId < @SubscriptionWatermark;
10.2.2 Remove Agents from Pending ManagementBefore you upgrade a management server, remove any agents that are in Pending Management.
1. Log on to the Operations console by using an account that is a member of the Operations Manager Administrators role for the Operations Manager management group.
2. In the Administration pane, expand Device Management, and then click Pending Management.
Page 52Installation Guide for System Center 2012 Operations Manager, [Type Subject Here],
Version .1 DraftPrepared by Author“document.docx" last modified on 8 Jun. 14, Rev 3
Update [Customer Name] in Doc Properties
3. Right-click each agent, and then click Approve or Reject.
10.2.3 Disable the Notification SubscriptionsYou should disable notification subscription before you upgrade the management group to ensure that notifications are not sent during the upgrade process.
1. Log on to the Operations console account that is a member of the Operations Manager Administrators role for the Operations Manager management group.
2. In the Operations console, select the Administration view.3. In the navigation pane, expand Administration, expand the Notifications
container, and then click Subscriptions.4. Select each subscription, and then click Disable in the Actions pane.
10.2.4 Stop the Services or Disable any ConnectorsRefer to the non-Microsoft connector documentation for any installed Connectors to determine the services used for each Connector.
1. On the Start menu, point to Administrative Tools, and then click Services.2. In the Name column, right-click the Connector that you want to control, and
then click Stop.
10.2.5 Verify that the Operational Database Has More Than 50 Percent Free Space
You must verify that the operational database has more than 50 percent of free space before you upgrade the management group because the upgrade might fail if there is not enough space. You should also ensure that the transactions logs are 50 percent of the total size of the operational database.
1. On the computer that hosts the operational database, open SQL Server Management Studio.
2. In the Object Explorer, expand Databases.3. Right-click the operational database, point to Reports, Standard Reports,
and then click Disk Usage.4. View the Disk Usage report to determine the percentage of free space.
10.2.6 Increase the Free Space for the Operational Database and Log Files
You do not have to perform this step is not required if free space already exceeds 50 percent.
Page 53Installation Guide for System Center 2012 Operations Manager, [Type Subject Here],
Version .1 DraftPrepared by Author“document.docx" last modified on 8 Jun. 14, Rev 3
Update [Customer Name] in Doc Properties
1. On the computer that hosts the operational database, open SQL Server Management Studio.
2. In the Connect to Server dialog box, in the Server Type list, select Database Engine.
3. In the Server Name list, select the server and instance for your operational database (for example, computer\INSTANCE1).
4. In the Authentication list, select Windows Authentication, and then click Connect.
5. In the Object Explorer pane, expand Databases, right-click the operational database, and then click Properties.
6. In the Database Properties dialog box, under Select a page, click Files.7. In the results pane, increase the Initial Size value for the MOM_DATA
database by 50 percent.8. Set the Initial Size value for the MOM_LOG to be 50 percent of the total size
of the database. For example, if the operational database size is 100 GB, the log file size should be 50 GB. Then click OK.
10.2.7 Back up the Operations Manager DatabasesObtain verified recent backups of the operational database and of the data warehouse database before you upgrade the secondary management server. You should also create backups of databases for optional features, such as the Reporting and the Audit Collection Services database before you upgrade them. For more information, see How to: Back up a Database and How to Schedule Backups of System Center 2012 - Operations Manager Databases.
Page 54Installation Guide for System Center 2012 Operations Manager, [Type Subject Here],
Version .1 DraftPrepared by Author“document.docx" last modified on 8 Jun. 14, Rev 3
Update [Customer Name] in Doc Properties
Backup the OperationsManager Database using TransactSQLUSE OperationsManager;GOBACKUP DATABASE OperationsManagerTO DISK = 'Z:\SQLServerBackups\OperationsManager-FULL.Bak' WITH FORMAT, MEDIANAME = 'Z_OperationsManager-FULL', NAME = 'Full Backup of OperationsManager Pre-Upgrade';GO
Backup the OperationsManagerDW Database using TransactSQLUSE OperationsManagerDW;GOBACKUP DATABASE OperationsManagerDWTO DISK = 'Z:\SQLServerBackups\OperationsManagerDW-FULL.Bak' WITH FORMAT, MEDIANAME = 'Z_OperationsManagerDW-FULL', NAME = 'Full Backup of OperationsManagerDW Pre-Upgrade';GO
10.3Upgrade a Management Server to System Center 2012 - Operations ManagerWhen you start the upgrade the first step is to upgrade the management servers in the management group. You must wait for the upgrade of the first management server to be completed before upgrading the other management servers in your management servers. Failing to do so could cause the SQL script that runs early in the upgrade process of the to run multiple times and result in database issues.Sequence the upgrade of the management servers in your management group for what best suits the <CUSTOMER> needs but it’s important to upgrade all of the management servers as soon as possible in order to verify the upgraded management group is healthy.
NoteBetween the time that you upgrade the management servers and upgrade the agents, you might experience Application Platform Monitoring (APM)-related event log entries on the agent-managed servers. These event log entries might occur on agent-managed servers that are not APM-enabled. These event log entries will be resolved when you complete the upgrade of the agents. You might have to restart the health service after the agent is upgraded in order to clear the events.
Page 55Installation Guide for System Center 2012 Operations Manager, [Type Subject Here],
Version .1 DraftPrepared by Author“document.docx" last modified on 8 Jun. 14, Rev 3
Update [Customer Name] in Doc Properties
10.3.1 Upgrade a Management ServerOnce the upgrade of the management servers is complete you can proceed with upgrading the other System Center 2012 Operations Manager roles in <CUSTOMER> management group.Customize this section by including the name of the first management server that will be upgraded.Use the list below to track the upgrade of each of the management servers.Replace the <Management Server #> test with the FQDN of the servers being upgraded.
<Management Server #> <Management Server #> …
1. Log on to the Operations Manager management server with an account that is a member of the Operations Manager Administrators role for your Operations Manager management group and a local administrator on the computer.
2. From the Operations Manager media, run Setup.exe, and then click Install. The Getting Started page displays information about which features will be upgraded.
3. On the Getting Started, Operations Manager 2012 Upgrade page, click Next to proceed with the upgrade.
4. On the Getting Started, Please read this license agreement page, read the Microsoft Software License Terms, click I have read, understood, and agree with the terms of the license agreement, and then click Next.
5. On the Getting Started, Select installation location page, accept the default value of C:\Program Files\System Center Operations Manager 2012, or type in a new location, or browse to one. Then click Next.
6. On the Prerequisites page, review and address any warnings or errors that the Prerequisites checker returns, and then click Verify prerequisites again to recheck the system.
7. If the Prerequisites checker does not return any warnings or errors, the Prerequisites, Proceed with Setup page appears. Click Next.
8. On the Configuration, Configure Operations Manager accounts page, enter the credentials for a domain account, and then click Next
9. Review the Configuration, Ready To Upgrade page, and then click Upgrade. The upgrade proceeds and displays the upgrade progress.
10.When the upgrade is finished, the Upgrade complete page appears. Click Close.
Page 56Installation Guide for System Center 2012 Operations Manager, [Type Subject Here],
Version .1 DraftPrepared by Author“document.docx" last modified on 8 Jun. 14, Rev 3
Update [Customer Name] in Doc Properties
10.4Upgrade a Gateway Server to System Center 2012 SP1 - Operations ManagerThis section can be removed if your customer does not make use of the gateway role.This section only needs to be completed if <CUSTOMER> has deployed the System Center 2012 Operations Manager Gateway role.With the upgrade of the management servers complete, you can now procedd with upgrading the gateway servers. The procedure to upgrade a gateway server to System Center 2012 Service Pack 1 (SP1), Operations Manager is performed locally on the gateway server. You can then verify whether the upgrade is successful.
NoteBefore you begin the upgrade process, make sure that your gateway server meets the minimum supported configurations. For more information, see System Requirements: System Center 2012 SP1 - Operations Manager.
1. Log on to a computer that hosts the gateway server with an Operations Manager Administrators role account for your Operations Manager management group.
2. On the System Center 2012 – Operations Manager media, run Setup.exe.3. In the Optional Installations area, click Gateway management server.4. On the Welcome to the System Center 2012 - Operations Manager
Gateway Upgrade Wizard page, click Next.5. On the The wizard is ready to begin gateway upgrade page, click
Upgrade.6. On the Completing the System Center 2012 - Operations Manager
Gateway Setup wizard page, click Finish.To verify the upgrade of the gateway servers perform the following steps:
1. In the Operations console, in the navigation pane, click the Administration button.
2. Under Device Management, click Management Servers.3. In the Management Servers pane, verify that the value listed in the
Version column is 8925 (89xx), where x is any positive integer.
Page 57Installation Guide for System Center 2012 Operations Manager, [Type Subject Here],
Version .1 DraftPrepared by Author“document.docx" last modified on 8 Jun. 14, Rev 3
10.5Upgrade an Operations Console to System Center 2012 SP1 - Operations ManagerPay special attention to any System Center 2012 components such as System Center 2012 Orchestrator that have a dependency on the System Center 2012 Operations Manager Operations Console, these are classified as standalone consoles and should be upgraded.This procedure upgrades a stand-alone Operations console to System Center 2012 Service Pack 1 (SP1), Operations Manager. Perform this procedure locally on the computer that has a stand-alone Operations console installed. You do not have to perform this procedure to upgrade Operations consoles that are installed locally on a management server.System Center 2012 components and possibly 3rdParty components that use the Operations Console software to access the Data Access Service (DAS) should be upgraded at this point, otherwise integration may not work post-upgrade.Before you begin the upgrade process, make sure that your server meets the minimum supported configurations. For more information, see System Requirements: System Center 2012 SP1 - Operations Manager.
1. Log on to the computer that hosts the Operations console with an Operations Manager Administrators role account for your Operations Manager management group.
2. On the Operations Manager source media, run Setup.exe, and then click Install.
3. On the Getting Started, System Center 2012 - Operations Manager Upgrade page, click Next.
4. On the Getting Started, Select installation location page, accept the default value of C:\Program Files\System Center 2012\Operations Manager, or type in a new location or browse to one. Then click Next.
5. On the Prerequisites page, review and address any warnings or errors that are returned by the Prerequisites checker, and then click Verify Prerequisites Again to recheck the system.
6. If the Prerequisites checker does not return any warnings or errors, the Prerequisites, Proceed with Setup page appears. Click Next.
7. On the Configuration, Ready To Upgrade page, click Upgrade.8. When the upgrade is finished, the Upgrade complete page appears. Click
Close.To verify the Operations console upgrade.
1. On the Windows desktop, click Start, and then click Run.2. Type regedit, and then click OK. The Registry Editor starts.
Page 58Installation Guide for System Center 2012 Operations Manager, [Type Subject Here],
Version .1 DraftPrepared by Author“document.docx" last modified on 8 Jun. 14, Rev 3
CautionIncorrectly editing the registry can severely damage your system. Before you make changes to the registry, you should back up any valued data that is on the computer.
3. Browse to the HKey_Local_Machine\Software\Microsoft\Microsoft Operations Manager\3.0\Setup key. If the value of the UIVersion entry is 8925 (89xx), where x is any positive integer, the Operations console was upgraded successfully.
10.6Upgrade an Agent to System Center 2012 SP1 - Operations ManagerUse the following procedures to upgrade to System Center 2012 Service Pack 1 (SP1), Operations Manager agents. You should first verify that the agents meet minimum supported configurations. For more information, see System Requirements: System Center 2012 SP1 - Operations Manager. If UAC is enabled the installation must run from an elevated command prompt.If before upgrade an agent was installed using the push install method, after the server the agent will be put into a pending update state and can be upgraded through the Console. Otherwise the agent should be upgraded manually.When you upgrade an agent, the Operations Manager installer service runs and is not removed until after the completion of the upgrade. If the agent upgrade fails, you might have to re-install the agent because the installer service was not properly removed. If you attempt to upgrade the agent again and it fails, you should re-install the agent after you have completed upgrading all features of Operations Manager.
NoteIf you have Audit Collection Services (ACS) enabled for an agent prior to this upgrade, it is disabled as part of the agent upgrade process. ACS must be re-enabled after upgrade completes.
If you are upgrading agents that are deployed to a computer that has other System Center 2012 Service Pack 1 (SP1), Operations Manager features installed, you must do the following:
If the agent is installed on a computer that has System Center 2012 Service Pack 1 (SP1), Operations Manager Operations console or web console installed, you must first uninstall the consoles before you upgrade the agents. You can do this by uninstalling System Center 2012 Service Pack 1 (SP1),
Page 59Installation Guide for System Center 2012 Operations Manager, [Type Subject Here],
Version .1 DraftPrepared by Author“document.docx" last modified on 8 Jun. 14, Rev 3
Operations Managerin Programs and Features. You can reinstall these consoles after upgrade is completed.
NoteInformation about upgraded agents might not appear in the Operations console for up to 60 minutes after performing the upgrade.
Push-installed agents are agents that were installed by using the Computer and Device Management Wizard. Use the following procedures to upgrade these agents.To upgrade push-installed Windows agents by using the Operations console
1. Log on to the computer hosting the Operations Manager Operations console. Use an account that is a member of the Operations Manager Administrators role for the Operations Manager management group.
2. In the Operations console, click Administration.
NoteWhen you run the Operations console on a computer that is not a management server, the Connect To Server dialog box appears. In the Server name box, type the name of the management server to which you want to connect.
3. In the Administration workspace, in the navigation pane under Device Management, click Pending Management.
4. In the Pending Management pane, under Type: Agent Requires Update, right-click each agent-managed computer listed, and then click Approve.
NoteYou should not approve more than 200 agents at one time.
5. In the Update Agents dialog box, enter the administrator account credentials, and then click Update. The upgrade status is displayed in the Agent Management Task Status dialog box.
6. When the upgrade is completed, click Close.
Page 60Installation Guide for System Center 2012 Operations Manager, [Type Subject Here],
Version .1 DraftPrepared by Author“document.docx" last modified on 8 Jun. 14, Rev 3
Update [Customer Name] in Doc Properties
10.6.1 Upgrading Manually Installed AgentsManually-installed agents are agents that were installed manually, either by using the Command Prompt window, or by using the MOMAgent.msi Setup Wizard. Use the following procedure to upgrade these agents.1. Log on to the computer that hosts the agent with an Operations Manager
Administrators role account for your Operations Manager management group.2. Run Setup.exe from the Operations Manager installation media.3. On the first page of the Setup Wizard, click Local agent. When the Welcome
to the System Center Operations Manager 2012 Agent Upgrade Wizard page opens, click Next.
4. In the System Center Operations Manager 2012 Agent Setup dialog box, click Upgrade. The status page displays the progress of the upgrade.
5. When the Completing the System Center Operations Manager 2012 Agent Setup Wizard page appears, click Finish.
To upgrade a manually installed Windows agent by using the Command Prompt window. The command can also be used when programs such as SCCM2012 is used for software deployment and patching.
1. Log on to the computer that hosts the agent with an Operations Manager Administrators role account for your Operations Manager management group.
2. Open a Command Prompt window by using the Run as Administrator option.
3. Run the following command, where D:\ is the location for the upgrade log file.msiexec /i MOMAgent.msi /qn /l*v D:\logs\AgentUpgrade.log AcceptEndUserLicenseAgreement=1
Verifying Windows Agent Upgrade1. In the Operations console, in the navigation pane, click the Administration
button.2. Under Device Management, click Agent Managed.3. In the Agent Managed pane, verify that the value listed in the Version column
is 8925 (89xx), where x is any positive integer.
Upgrading UNIX and Linux AgentsIn the Operations console, in the Administration pane, run the UNIX/Linux Upgrade Wizard.
Any existing Run As profiles and Run As accounts continue to have valid configurations. For information about changes to Run As profiles and accounts for
Page 61Installation Guide for System Center 2012 Operations Manager, [Type Subject Here],
Version .1 DraftPrepared by Author“document.docx" last modified on 8 Jun. 14, Rev 3
Update [Customer Name] in Doc Properties
UNIX and Linux monitoring in System Center 2012 Service Pack 1 (SP1), Operations Manager, see Accessing UNIX and Linux Computers in Operations Manager
1. Log on to Linux/Unix machines and copy the target agent to machines.2. Run the commands below on different Systems to upgrade the agents: Suse/Redhat/CentOS/Oracle Linux: rpm -U <package> Ubuntu/Debian: -i <package file> HP-UX: swinstall -s <full path to depot> <package name> Aix: /usr/sbin/install –X –F –d <package file> scx.rte/ Solaris:
Remove the installed package with: pkgrm MSFTscx Install the new package version with: pkgadd
To verify the UNIX or Linux agent upgrade1. In the Operations console, in the navigation pane, click the Administration
button.2. Under Device Management, click UNIX/Linux Computers.3. Verify that the value listed in the Agent Version column is 1.4.0-xxx, where x
is any positive integer.
10.7Upgrade a Web Console to System Center 2012 - Operations ManagerIf you have a stand-alone System Center 2012 – Operations Manager web console server, you can upgrade it to System Center 2012 Service Pack 1 (SP1), Operations Manager. Before you begin the upgrade process, make sure that your server meets the minimum supported configurations. For more information, see System Requirements: System Center 2012 SP1 - Operations Manager.
NoteWhen you upgrade the web console, any customizations that were made to the web.config file after the web console was installed will be reset.
If you made changes after you set up your web console to either enable or disable Secure Sockets Layer (SSL), the SSL settings will be reset during upgrade. To resolve the issue, you must make changes to the registry key before you upgrade the web console, as follows:
Page 62Installation Guide for System Center 2012 Operations Manager, [Type Subject Here],
Version .1 DraftPrepared by Author“document.docx" last modified on 8 Jun. 14, Rev 3
Update [Customer Name] in Doc Properties
To set the registry to enable or disable SSL on the web console1. Logon on to the web console with an account that has local administrator
rights, and on the desktop, click Start, and then click Run.2. Type regedit, and then click OK. The Registry Editor starts.
CautionIncorrectly editing the registry can severely damage your system. Before you make changes to the registry, you should back up any valued data that is on the computer.
3. Navigate to the HKey_Local_Machine\Software\Microsoft\System Center Operations Manager\12\Setup\WebConsole\ key.
4. To enable SSL, set the following:HTTP_GET_ENABLED=0BINDING_CONFIGURATION=DefaultHttpsBinding
5. To disable SSL, set the following:HTTP_GET_ENABLED=1BINDING_CONFIGURATION=DefaultHttpBinding
Upgrade the web console server1. Log on to the computer that hosts the web console server with an Operations
Manager Administrators role account for your Operations Manager management group.
2. On the Operations Manager source media, run Setup.exe, and then click Install.
3. On the Getting Started, System Center 2012 - Operations Manager Upgrade page, review the features that will be upgraded, and then click Next.
4. On the Select installation location page, accept the default value of C:\Program Files\System Center Operations Manager 2012, or type in a new location or browse to one. Then click Next.
5. On the Prerequisites page, review and address any warnings or errors that the Prerequisites checker returns, and then click Verify Prerequisites Again to recheck the system.
6. If the Prerequisites checker does not return any warnings or errors, the Prerequisites, Proceed with Setup page appears. Click Next.
7. When the Ready to Upgrade page appears, review the upgrade summary, and then click Upgrade.
Page 63Installation Guide for System Center 2012 Operations Manager, [Type Subject Here],
Version .1 DraftPrepared by Author“document.docx" last modified on 8 Jun. 14, Rev 3
Update [Customer Name] in Doc Properties
10.8Upgrade Reporting to System Center 2012 - Operations ManagerUse this procedure to upgrade a stand-alone Reporting server to System Center 2012 Service Pack 1 (SP1), Operations Manager. You should not run upgrade on the Reporting server until after you have upgraded the management servers, gateways, operation consoles, and agents.Before you begin the upgrade process, make sure that your server meets the minimum supported configurations. For more information, see System Requirements: System Center 2012 SP1 - Operations Manager.
1. Log on to the computer that hosts the Reporting server with an account that is a member of the Operations Manager Administrators role for your Operations Manager management group.
2. On the Operations Manager source media, run Setup.exe, and then click Install.
3. On the Getting Started, System Center 2012 - Operations Manager Upgrade page, review the features that will be upgraded. In this case, it is Operations Manager Reporting. Click Next.
4. On the Select installation location page, accept the default value of C:\Program Files\System Center Operations Manager 2012, or type in a new location or browse to one. Then click Next.
5. On the Prerequisites page, review and address any warnings or errors that the Prerequisites checker returns, and then click Verify Prerequisites Again to recheck the system.
6. If the Prerequisites checker does not return any warnings or errors, the Prerequisites, Proceed with Setup page appears. Click Next.
7. On the Ready to Upgrade page, review the options, and then click Upgrade.
8. When upgrade is finished, the Upgrade complete page appears. Click Close.
10.9Post-Upgrade Tasks When Upgrading to System Center 2012 SP1 - Operations ManagerAfter you have completed the upgrade process to System Center 2012 Service Pack 1 (SP1), Operations Manager, you must perform a number of post-upgrade tasks.Perform the following tasks when you have completed the upgrade process.
1. Re-enable the Notification Subscriptions.2. Restart or Re-enable the Connector Services (if needed)3. Re-enable Audit Collection Services (ACS) on agents that were upgraded4. Verify That the Upgrade Was Successful
Page 64Installation Guide for System Center 2012 Operations Manager, [Type Subject Here],
Version .1 DraftPrepared by Author“document.docx" last modified on 8 Jun. 14, Rev 3
Update [Customer Name] in Doc Properties
10.9.1 Re-enable the Notification SubscriptionsAfter the upgrade has finished, use the following procedure to re-enable subscriptions.
1. Open the Operations console by using an account that is a member of the Operations Manager Administrators role for the Operations Manager management group.
2. In the Operations console, in the navigation pane, click the Administration button.
3. In the Administration pane, under Notifications, click Subscriptions.4. In the Actions pane, click Enable for each subscription listed.
10.9.2 Re-Enable Audit Collection ServicesIf you had Audit Collection Services (ACS) enabled for an agent prior to upgrade, it was disabled as part of the agent upgrade process. Re-enable ACS as appropriate.Perform the following tasks to verify that the upgrade was successful.
Check the health state of the management servers and agents in the Health Service Watcher state view. In the Administration workspace of the Operations console, ensure that the management servers and agents are healthy. In the Monitoring workspace, check if there are any alerts related to the management group health.
Review the event logs of all the management servers for new errors. Sort alerts by the last-modified column to review the new alerts. Check the CPU utilization and disk I/O on your database servers to ensure
that they are functioning normally. If the Reporting feature is installed, click Reporting, and then run a generic
performance report to ensure that Reporting is functioning correctly. Re-deploy any agents that you uninstalled during the upgrade process.
10.10 Upgrade OM2007 R2 Agents to OM2012 SP1 - Parallel EnvironmentsThis section can be removed if this upgrade method is not going to be used by your customer.This upgrade path contains an Operations Manager scenario with parallel environments, sharing agents, so that the original Operations Manager 2007 R2 environment is left intact. After the upgrade, the agents have been upgraded to System Center 2012 Service Pack 1 (SP1), Operations Manager and are fully capable of working with native System Center 2012 Service Pack 1 (SP1)
Page 65Installation Guide for System Center 2012 Operations Manager, [Type Subject Here],
Version .1 DraftPrepared by Author“document.docx" last modified on 8 Jun. 14, Rev 3
Update [Customer Name] in Doc Properties
functionality. The SP1 agents are also able to “talk” to the Operations Manager 2007 R2 management server.The supported upgrade of Operations Manager 2007 R2 agents is with the latest cumulative update (CU6).
10.11 Upgrading OM 2007 R2 Agents to OM2012 SP1 using Parallel EnvironmentsIf you want to maintain your Operations Manager 2007 R2 environment you can install System Center 2012 Service Pack 1 (SP1), Operations Manager in parallel and just upgrade your agents using the following process.
1. Retain the original Operations Manager 2007 R2 environment.2. Set up an additional, new System Center 2012 Service Pack 1 (SP1),
Operations Manager environment with management servers, gateway, Operations Manager Database, Operations Manager Data Warehouse, console, web console, and reporting server. See Deploying System Center 2012 - Operations Manager for more information.
3. Upgrade the Operations Manager 2007 R2 Agents to 2012 SP1 using Push-Install or Command Line options as appropriate. See How to Upgrade an Agent to System Center 2012 SP1 - Operations Manager for more information.
11 Upgrading from System Center Operations Manager SP1 to R2This section covers only a distributed upgrade of System Center 2012 Operations Manager SP1.Optionally, using the “Sample Upgrade Helper for SP1 to R2” (SUHMP2012R2) can be imported before any of the upgrade activities start to help your customer visualize the upgrade progress. It is available at: http://blogs.msdn.com/b/wei_out_there_with_system_center/archive/2013/10/22/opsmgr-sample-upgrade-helper-mp-for-2012-sp1-to-2012-r2-suhmp2012r2.aspxIt does not track the upgrade status of Cross-platform agents or the Operations Manager Reporting Server.It is NOT required to use this MP and using it is on an as-is basis and should be used at your customers risk.This Upgrade Guide provides information about how to upgrade from System Center 2012 Service Pack 1 (SP1), Operations Manager to System Center 2012 R2 Operations Manager.
Page 66Installation Guide for System Center 2012 Operations Manager, [Type Subject Here],
Version .1 DraftPrepared by Author“document.docx" last modified on 8 Jun. 14, Rev 3
The only supported upgrade path to System Center 2012 R2 Operations Manager is from System Center 2012 Operations Manager SP1.
NoteBefore you upgrade to System Center 2012 R2 Operations Manager, you must first determine whether all servers in your Operations Manager management group meet the minimum supported configurations. For more information, see System Requirements: System Center 2012 R2 Operations Manager
1. If you are upgrading a distributed management group, you must upgrade certain features before others. For example, you upgrade the management servers first, followed by the gateways, operations consoles, and then agents. Next, you can upgrade any remaining features, such as the web console, reporting and Audit Collection Services (ACS). You must also perform a number of pre-upgrade and post-upgrade tasks.
2. If you want to maintain your Operations Manager 2007 R2 environment you can install System Center 2012 Service Pack 1 (SP1), Operations Manager in parallel and just upgrade your agents.
11.1High Level View of System Center 2012 R2 Operations Manager Upgrade Steps – Upgrading a Distributed Management GroupThe following steps outline the process for upgrading a distributed management group:
Accomplish Pre-Upgrade Tasks Upgrade the initial management server and then additional management
servers (each management server must be upgraded) Upgrade ACS (because the ACS server must be on same machine as a
management server, we recommend you perform this step along with the upgrade of the management server on which ACS resides.)
*Upgrade Gateway(s) Upgrade Console Push Install to Agent(s) / Upgrading Manually Installed Agents Upgrade Web Console Upgrade Reporting Server Accomplish Post-Upgrade Tasks
* Steps 4 to 8 after Management Server Upgrade can occur in parallel.Page 67
Installation Guide for System Center 2012 Operations Manager, [Type Subject Here], Version .1 Draft
Prepared by Author“document.docx" last modified on 8 Jun. 14, Rev 3
11.2High Level View of System Center 2012 R2 Operations Manager Upgrade Steps – Upgrading 2012 SP1 Agents to 2012 R2 and Running Two EnvironmentsThe following upgrade path supports customers in an Operations Manager scenario with parallel environments, sharing agents, so that the original System Center 2012 Service Pack 1 (SP1), Operations Manager environment is left intact. After the upgrade, the agents have been upgraded to System Center 2012 R2 Operations Manager and are fully capable of working with native System Center 2012 R2 Operations Manager functionality. The R2 agents are also able to “talk” to the System Center 2012 Service Pack 1 (SP1), Operations Manager management server.
NoteIn this parallel environment scenario, we support upgrade of System Center 2012 Service Pack 1 (SP1), Operations Manager agents with the latest cumulative update (UR4).
1. Retain the original System Center 2012 Service Pack 1 (SP1), Operations Manager environment.
2. Set up an additional, new System Center 2012 R2 Operations Manager environment with management servers, gateway, Operations Manager Database, Operations Manager Data Warehouse, console, web console, and reporting server. (If you are manually upgrading, step 2 is not needed.)
3. Upgrade the System Center 2012 Service Pack 1 (SP1), Operations Manager Agents to 2012 R2.
a. Push-Install optionb. Manual / Command Line option
11.3Pre-Upgrade Tasks When Upgrading to System Center 2012 R2 Operations ManagerPerform the following pre-upgrade tasks in the order presented before you begin the upgrade process.
Review the Operations Manager Event Logs Cleanup the Database (ETL Table) Remove Agents from Pending Management Disable the Notification Subscriptions Stop the Services or Disable any Connectors Verify that the Operational Database Has More Than 50 Percent Free Space Back up the Operations Manager Databases
Page 68Installation Guide for System Center 2012 Operations Manager, [Type Subject Here],
Version .1 DraftPrepared by Author“document.docx" last modified on 8 Jun. 14, Rev 3
Update [Customer Name] in Doc Properties
11.3.1 Review the Operations Manager Event LogsReview the event logs for Operations Manager on the management servers to look for recurring warning or critical events. Address them and save a copy of the event logs before you perform your upgrade.
11.3.2 Cleanup the Database (ETL Table)As part of upgrade to System Center 2012 R2 Operations Manager installation (setup) includes a script to cleanup ETL tables, grooming the database. However, in cases where there are a large number of rows (greater than 100,000) to cleanup, we recommend running the script before starting the upgrade to promote a faster upgrade and prevent possible timeout of setup. Performing this pre-upgrade task in all circumstances ensures a more efficient installation.Run the following query to determine the number of rows that need to be deleted from ETL and cleanup the database:
To Cleanup ETL1. To determine the number of rows that need to be deleted, run the following
query:DECLARE @SubscriptionWatermark bigint = 0; SELECT @SubscriptionWatermark = dbo.fn_GetEntityChangeLogGroomingWatermark(); Select COUNT (*)FROM EntityTransactionLog ETL with(nolock)WHERE NOT EXISTS (SELECT 1 FROM EntityChangeLog ECL with(nolock) WHERE ECL.EntityTransactionLogId = ETL.EntityTransactionLogId)AND NOT EXISTS (SELECT 1 FROM RelatedEntityChangeLog RECL with(nolock) WHERE RECL.EntityTransactionLogId = ETL.EntityTransactionLogId)AND EntityTransactionLogId < @SubscriptionWatermark;
2. To clean up the ETL Table, run the following SQL script, (Cleanup of ETL can require several hours to complete).:
Page 69Installation Guide for System Center 2012 Operations Manager, [Type Subject Here],
Version .1 DraftPrepared by Author“document.docx" last modified on 8 Jun. 14, Rev 3
Update [Customer Name] in Doc Properties
DECLARE @RowCount int = 1;DECLARE @BatchSize int = 100000;DECLARE @SubscriptionWatermark bigint = 0;DECLARE @LastErr int;
SELECT @SubscriptionWatermark = dbo.fn_GetEntityChangeLogGroomingWatermark();WHILE(@RowCount > 0)BEGIN DELETE TOP (@BatchSize) ETLFROM EntityTransactionLog ETLWHERE NOT EXISTS (SELECT 1 FROM EntityChangeLog ECL WHERE ECL.EntityTransactionLogId = ETL.EntityTransactionLogId)AND NOT EXISTS (SELECT 1 FROM RelatedEntityChangeLog RECL WHERE RECL.EntityTransactionLogId = ETL.EntityTransactionLogId)AND ETL.EntityTransactionLogId < @SubscriptionWatermark;
11.3.3 Remove Agents from Pending ManagementBefore you upgrade a management server, remove any agents that are in Pending Management.
To remove agents that are in Pending Management1. Log on to the Operations console by using an account that is a member of the
Operations Manager Administrators role for the Operations Manager management group.
2. In the Administration pane, expand Device Management, and then click Pending Management.
3. Right-click each agent, and then click Approve or Reject.
Disable the Notification SubscriptionsYou should disable notification subscription before you upgrade the management group to ensure that notifications are not sent during the upgrade process. (Multi-select does not work when you are disabling subscriptions.)
To disable subscriptions1. Log on to the Operations console account that is a member of the Operations
Manager Administrators role for the Operations Manager management group.2. In the Operations console, select the Administration view.3. In the navigation pane, expand Administration, expand the Notifications
container, and then click Subscriptions.4. Select each subscription, and then click Disable in the Actions pane.
Page 70Installation Guide for System Center 2012 Operations Manager, [Type Subject Here],
Version .1 DraftPrepared by Author“document.docx" last modified on 8 Jun. 14, Rev 3
Update [Customer Name] in Doc Properties
11.3.4 Stop the Services or Disable any ConnectorsRefer to the non-Microsoft connector documentation for any installed Connectors to determine the services used for each Connector.
To stop a service for Connectors1. On the Start menu, point to Administrative Tools, and then click Services.2. In the Name column, right-click the Connector that you want to control, and
then click Stop.
11.3.5 Verify that the Operational Database Has More Than 50 Percent Free Space
You must verify that the operational database has more than 50 percent of free space before you upgrade the management group because the upgrade might fail if there is not enough space. You should also ensure that the transactions logs are 50 percent of the total size of the operational database.
Verify how much free space the Operational Database has1. On the computer that hosts the operational database, open SQL Server
Management Studio.2. In the Object Explorer, expand Databases.3. Right-click the operational database, point to Reports, Standard Reports,
and then click Disk Usage.4. View the Disk Usage report to determine the percentage of free space.
To increase the free space for the operational database and log files1. On the computer that hosts the operational database, open SQL Server
Management Studio.2. In the Connect to Server dialog box, in the Server Type list, select
Database Engine.3. In the Server Name list, select the server and instance for your operational
database (for example, computer\INSTANCE1).4. In the Authentication list, select Windows Authentication, and then click
Connect.5. In the Object Explorer pane, expand Databases, right-click the operational
database, and then click Properties.6. In the Database Properties dialog box, under Select a page, click Files.7. In the results pane, increase the Initial Size value for the MOM_DATA
database by 50 percent. (This step is not required if free space already exceeds 50 percent.)
Page 71Installation Guide for System Center 2012 Operations Manager, [Type Subject Here],
Version .1 DraftPrepared by Author“document.docx" last modified on 8 Jun. 14, Rev 3
Update [Customer Name] in Doc Properties
8. Set the Initial Size value for the MOM_LOG to be 50 percent of the total size of the database. For example, if the operational database size is 100 GB, the log file size should be 50 GB. Then click OK.
11.3.6 Back up the Operations Manager DatabasesObtain verified recent backups of the operational database and of the data warehouse database before you upgrade the secondary management server. You should also create backups of databases for optional features, such as the Reporting and the Audit Collection Services database before you upgrade them. For more information, see How to: Back up a Database and How to Schedule Backups of System Center 2012 - Operations Manager Databases.
Backup the OperationsManager Database using TransactSQLUSE OperationsManager;GOBACKUP DATABASE OperationsManagerTO DISK = 'Z:\SQLServerBackups\OperationsManager-FULL.Bak' WITH FORMAT, MEDIANAME = 'Z_OperationsManager-FULL', NAME = 'Full Backup of OperationsManager Pre-Upgrade';GO
Backup the OperationsManagerDW Database using TransactSQLUSE OperationsManagerDW;GOBACKUP DATABASE OperationsManagerDWTO DISK = 'Z:\SQLServerBackups\OperationsManagerDW-FULL.Bak' WITH FORMAT, MEDIANAME = 'Z_OperationsManagerDW-FULL', NAME = 'Full Backup of OperationsManagerDW Pre-Upgrade';GO
11.4Upgrade a Management Server to System Center 2012 - Operations Manager R2When you upgrade a distributed management group to System Center 2012 R2 Operations Manager, you start by upgrading each of the management servers in your management group. There are a number of pre-upgrade tasks that you must perform first. For more information, see Section 11.3.Customize this section by including the name of the first management server that will be upgraded.Use the list below to track the upgrade of each of the management servers.
Page 72Installation Guide for System Center 2012 Operations Manager, [Type Subject Here],
Version .1 DraftPrepared by Author“document.docx" last modified on 8 Jun. 14, Rev 3
Replace the <Management Server #> test with the FQDN of the servers being upgraded.
<Management Server #> <Management Server #> …
Important
Between the time that you upgrade the management servers and upgrade the agents, you might experience Application Platform Monitoring (APM)-related event log entries on the agent-managed servers. These event log entries might occur on agent-managed servers that are not APM-enabled. These event log entries will be resolved when you complete the upgrade of the agents. You might have to restart the health service after the agent is upgraded in order to clear the events.
NoteBecause the ACS server must be on same machine as a management server, we recommend you perform the steps described in How to Upgrade an ACS Collector to System Center 2012 R2 Operations Manager along with the upgrade of the management server on which ACS resides.
ImportantWhen upgrading multiple management servers in a distributed management group, you must wait to start upgrade of additional management servers until after setup on the first management server completes. Failing to do so can cause a SQL update script that runs early in the set up process to run on multiple management servers and result in database issues. This SQL update script only needs to run on the initial management server being upgraded.
Page 73Installation Guide for System Center 2012 Operations Manager, [Type Subject Here],
Version .1 DraftPrepared by Author“document.docx" last modified on 8 Jun. 14, Rev 3
NoteWhen upgrading multiple management servers in a distributed management group, sequence the upgrades in a manner that best suits your business needs. Upgrade all management servers in the distributed management group as soon as possible after the initial management server is upgraded to verify that your upgraded environment is healthy.
11.4.1 To upgrade a management serverAfter you have upgraded all of the management servers in your management group, you should upgrade any gateways, and then upgrade any stand-alone operations consoles.
1. Log on to the Operations Manager management server with an account that is a member of the Operations Manager Administrators role for your Operations Manager management group and a local administrator on the computer.
2. From the Operations Manager media, run Setup.exe, and then click Install. The Getting Started page displays information about which features will be upgraded.
3. On the Getting Started, System Center 2012 R2 Operations Manager Upgrade page, click Next to proceed with the upgrade.
4. On the Getting Started, Please read the license terms page, read the Microsoft Software License Terms, click I have read, understood, and agree with the terms of the license agreement, and then click Next.
5. On the Getting Started, Select installation location page, accept the default value of C:\Program Files\Microsoft System Center 2012 R2\Operations Manager, or type in a new location, or browse to one. Then click Next.
6. On the Prerequisites page, review and address any warnings or errors that the Prerequisites checker returns, and then click Verify prerequisites again to recheck the system.
7. If the Prerequisites checker does not return any warnings or errors, the Prerequisites, Proceed with Setup page appears. Click Next.
8. On the Configuration, Configure Operations Manager accounts page, enter the credentials for a domain account, and then click Next
9. Review the Configuration, Ready To Upgrade page, and then click Upgrade. The upgrade proceeds and displays the upgrade progress.
10.When the upgrade is finished, the Upgrade complete page appears. Click Close.
Page 74Installation Guide for System Center 2012 Operations Manager, [Type Subject Here],
Version .1 DraftPrepared by Author“document.docx" last modified on 8 Jun. 14, Rev 3
Update [Customer Name] in Doc Properties
11.5Upgrade an ACS Collector to System Center 2012 R2 Operations ManagerPerform this procedure to upgrade the Audit Collection Services (ACS) Collector to System Center 2012 R2 Operations Manager locally on the ACS Collector. During this procedure, the ACS database is also upgraded without any additional steps.Verify that the server meets the minimum supported configurations. For more information, see System Requirements: System Center 2012 R2 Operations Manager
ImportantA computer that hosts an ACS Collector must also be an Operations Manager management server or gateway server.
11.5.1 To upgrade an ACS Collector1. Log on to the computer that hosts the ACS Collector with an Operations
Manager Administrators role account for your Operations Manager management group.
2. On the Operations Manager media, run Setup.exe.3. In the Install section, click Audit Collection Services. The Audit Collection
Services Setup wizard starts.4. On the Welcome to the Audit Collection Services Collector Setup
Wizard page, click Next.5. On the Database Installation Options page, select Use an existing
database, and then click Next.6. On the Data Source page, type the name that you used as the Open
Database Connectivity data source name for your ACS database in the Data source name box. By default, this name is OpsMgrAC. Click Next.
7. On the Database page, if the database is on a separate server than the ACS Collector, click Remote Database Server, and then type the computer name of the database server that will host the database for this installation of ACS. Otherwise, click Database server running locally, and then click Next.
8. On the Database Authentication page, select one authentication method. If the ACS Collector and the ACS database are members of the same domain, you can select Windows authentication; otherwise, select SQL authentication, and then click Next.
Page 75Installation Guide for System Center 2012 Operations Manager, [Type Subject Here],
Version .1 DraftPrepared by Author“document.docx" last modified on 8 Jun. 14, Rev 3
NoteIf you select SQL authentication and click Next, the Database Credentials page appears. Enter the name of the user account that has access to the SQL Server in the SQL login name box and the password for that account in the SQL password password box, and then click Next.
9. The Summary page displays a list of actions that the installation program will perform to upgrade ACS. Review the list, and then click Next to begin the installation.
NoteIf a SQL Server Login dialog box appears and the database authentication is set to Windows Authentication, select the correct database, and then verify that the Use Trusted Connection check box is selected. Otherwise, clear it, enter the SQL Server login name and password, and then click OK.
10.When the upgrade is finished, click Finish.
11.6Upgrade a Gateway Server to System Center 2012 R2 Operations ManagerThis section can be removed if your customer does not make use of the gateway role.This section only needs to be completed if <CUSTOMER> has deployed the System Center 2012 Operations Manager Gateway role.After you upgrade the management servers in your management group, you upgrade any gateway servers. The procedure to upgrade a gateway server to System Center 2012 R2 Operations Manager is performed locally on the gateway server. You can then verify whether the upgrade is successful. Before you begin the upgrade process, make sure that your gateway server meets the minimum supported configurations. For more information, see System Requirements: System Center 2012 R2 Operations Manager
11.6.1 To upgrade a gateway serverAfter you have upgraded all of the gateways in your management group, you can upgrade the stand-alone operations consoles. See section 11.7 for more information.
Page 76Installation Guide for System Center 2012 Operations Manager, [Type Subject Here],
Version .1 DraftPrepared by Author“document.docx" last modified on 8 Jun. 14, Rev 3
1. Log on to a computer that hosts the gateway server with an Operations Manager Administrators role account for your Operations Manager management group.
2. On the Operations Manager media, run Setup.exe.3. In the Optional Installations area, click Gateway management server.4. On the Welcome to the System Center 2012 R2 Operations Manager
Gateway Upgrade Wizard page, click Next.5. On the The wizard is ready to begin gateway upgrade page, click
Upgrade.6. On the Completing the System Center 2012 - Operations Manager
Gateway Setup wizard page, click Finish.
11.6.2 To verify the gateway server upgrade1. In the Operations console, in the navigation pane, click the Administration
button.2. Under Device Management, click Management Servers.3. In the Management Servers pane, verify that the value listed in the
Version column is System Center 2012 R2 Operations Manager 10139 (10xxx), where x is any positive integer.
11.7Upgrade an Operations Console to System Center 2012 R2 Operations ManagerThis procedure upgrades a stand-alone Operations console to System Center 2012 R2 Operations Manager. Perform this procedure locally on the computer that has a stand-alone Operations console installed. You do not have to perform this procedure to upgrade Operations consoles that are installed locally on a management server.Before you begin the upgrade process, make sure that your server meets the minimum supported configurations. For more information, see System Requirements: System Center 2012 R2 Operations Manager
11.7.1 To upgrade a stand-alone Operations console1. Log on to the computer that hosts the Operations console with an Operations
Manager Administrators role account for your Operations Manager management group.
2. On the Operations Manager source media, run Setup.exe, and then click Install.
3. On the Getting Started, System Center 2012 R2 Operations Manager Upgrade page, click Next.
Page 77Installation Guide for System Center 2012 Operations Manager, [Type Subject Here],
Version .1 DraftPrepared by Author“document.docx" last modified on 8 Jun. 14, Rev 3
4. On the Getting Started, Select installation location page, accept the default value of C:\Program Files\Microsoft System Center 2012 R2\Operations Manager, or type in a new location or browse to one. Then click Next.
5. On the Prerequisites page, review and address any warnings or errors that are returned by the Prerequisites checker, and then click Verify Prerequisites Again to recheck the system.
6. If the Prerequisites checker does not return any warnings or errors, the Prerequisites, Proceed with Setup page appears. Click Next.
7. On the Configuration, Ready To Upgrade page, click Upgrade.8. When the upgrade is finished, the Upgrade complete page appears. Click
Close.
11.7.2 To verify the Operations console upgradeAfter you have upgraded all of the stand-alone operations consoles in your management group, you can upgrade the agents. See How to Upgrade an Agent to System Center 2012 R2 Operations Manager for more information.Incorrectly editing the registry can severely damage your system. Before you make changes to the registry, you should back up any valued data that is on the computer.
1. On the Windows desktop, click Start, and then click Run.2. Type regedit, and then click OK. The Registry Editor starts.3. Browse to the HKey_Local_Machine\Software\Microsoft\Microsoft
Operations Manager\3.0\Setup key. If the value of the UIVersion entry is 10226 (10xxx), where x is any positive integer, the Operations console was upgraded successfully.
11.8Upgrade an Agent to System Center 2012 R2 Operations ManagerUse the following procedures to upgrade to System Center 2012 R2 Operations Manager agents. You should first verify that the agents meet minimum supported configurations. For more information, see System Requirements: System Center 2012 R2 Operations Manager.Information about upgraded agents might not appear in the Operations console for up to 60 minutes after performing the upgrade.
NoteIf before upgrade an agent was installed using the push install method, after upgrade the server the agent will be put into a pending update state and can
Page 78Installation Guide for System Center 2012 Operations Manager, [Type Subject Here],
Version .1 DraftPrepared by Author“document.docx" last modified on 8 Jun. 14, Rev 3
be upgraded through the Console. Otherwise the agent should be upgraded manually.
ImportantWhen you upgrade an agent, the Operations Manager installer service runs and is not removed until after the completion of the upgrade. If the agent upgrade fails, you might have to re-install the agent because the installer service was not properly removed. If you attempt to upgrade the agent again and it fails, you should re-install the agent after you have completed upgrading all features of Operations Manager.
NoteIf you have Audit Collection Services (ACS) enabled for an agent prior to this upgrade, it is disabled as part of the agent upgrade process. ACS must be re-enabled after upgrade completes.
ImportantIf you are upgrading agents that are deployed to a computer that has other System Center 2012 R2 Operations Manager features installed, you must do the following:
If the agent is installed on a computer that has System Center 2012 R2 Operations Manager Operations console or web console installed, you must first uninstall the consoles before you upgrade the agents. You can do this by uninstalling System Center 2012 R2 Operations Managerin Programs and Features. You can reinstall these consoles after upgrade is completed.
NoteIf UAC is enabled, you must run the agent upgrade from an elevated command prompt.
Page 79Installation Guide for System Center 2012 Operations Manager, [Type Subject Here],
Version .1 DraftPrepared by Author“document.docx" last modified on 8 Jun. 14, Rev 3
Update [Customer Name] in Doc Properties
11.8.1 Upgrading Push-Installed AgentsPush-installed agents are agents that were installed by using the Computer and Device Management Wizard. Use the following procedures to upgrade these agents.To upgrade push-installed Windows agents by using the Operations console
1. Log on to the computer hosting the Operations Manager Operations console. Use an account that is a member of the Operations Manager Administrators role for the Operations Manager management group.
2. In the Operations console, click Administration.
Note
When you run the Operations console on a computer that is not a management server, the Connect To Server dialog box appears. In the Server name box, type the name of the management server to which you want to connect.
3. In the Administration workspace, in the navigation pane under Device Management, click Pending Management.
4. In the Pending Management pane, under Type: Agent Requires Update, right-click each agent-managed computer listed, and then click Approve.
ImportantYou should not approve more than 200 agents at one time.
5. In the Update Agents dialog box, enter the administrator account credentials or use a selected Management Server Action Account, and then click Update. The upgrade status is displayed in the Agent Management Task Status dialog box.
6. When the upgrade is completed, click Close.
11.8.2 Upgrading Manually Installed AgentsManually-installed agents are agents that were installed manually, either by using the Command Prompt window, or by using the MOMAgent.msi Setup Wizard. Use the following procedure to upgrade these agents.
1. Log on to the computer that hosts the agent with an Operations Manager Administrators role account for your Operations Manager management group.
2. Run Setup.exe from the Operations Manager installation media.
Page 80Installation Guide for System Center 2012 Operations Manager, [Type Subject Here],
Version .1 DraftPrepared by Author“document.docx" last modified on 8 Jun. 14, Rev 3
Update [Customer Name] in Doc Properties
3. On the first page of the Setup Wizard, click Local agent. When the Welcome to the Microsoft Monitoring Agent Upgrade Wizard page opens, click Next.
4. In the Microsoft Monitoring Agent Setup dialog box, click Upgrade. The status page displays the progress of the upgrade.
5. When the Completing the Microsoft Monitoring Agent Setup Wizard page appears, click Finish.
Verifying Windows Agent Upgrade1. In the Operations console, in the navigation pane, click the Administration
button.2. Under Device Management, click Agent Managed.3. In the Agent Managed pane, verify that the value listed in the Version column
is 10184 (10xxx), where x is any positive integer.
Upgrading UNIX and Linux AgentsIn the Operations console, in the Administration pane, run the UNIX/Linux Upgrade Wizard.Any existing Run As profiles and Run As accounts continue to have valid configurations. For information about changes to Run As profiles and accounts for UNIX and Linux monitoring in Operations Manager, see Accessing UNIX and Linux Computers in Operations Manager.It can take up to one hour for the console to show the updated version of the agent.
1. Log on to Linux/Unix machines and copy the target agent to machines.2. Run the commands below on different Systems to upgrade the agents: Suse/Redhat/CentOS/Oracle Linux: rpm -U <package> Ubuntu/Debian: -i <package file> HP-UX: swinstall -s <full path to depot> <package name> AIX: /usr/sbin/install –X –F –d <package file> scx.rte/ Solaris:
Remove the installed package with: pkgrm MSFTscx Install the new package version with: pkgadd
Verify the UNIX or Linux agent upgrade1. In the Operations console, in the navigation pane, click Administration.2. Under Device Management, click UNIX/Linux Computers.3. Verify that the value listed in the Agent Version column is 1.54.0-xxx, where
x is any positive integer.Page 81
Installation Guide for System Center 2012 Operations Manager, [Type Subject Here], Version .1 Draft
Prepared by Author“document.docx" last modified on 8 Jun. 14, Rev 3
11.9Upgrade a Web Console to System Center 2012 R2 Operations ManagerIf you have a stand-alone System Center 2012 Service Pack 1 (SP1), Operations Manager web console server, you can upgrade it to System Center 2012 R2 Operations Manager. Before you begin the upgrade process, make sure that your server meets the minimum supported configurations. For more information, see System Requirements: System Center 2012 R2 Operations Manager.
ImportantWhen you upgrade the web console, any customizations that were made to the web.config file after the web console was installed will be reset.
If you made changes after you set up your web console to either enable or disable Secure Sockets Layer (SSL), the SSL settings will be reset during upgrade. To resolve the issue, you must make changes to the registry key before you upgrade the web console, as follows:
11.9.1 To Set the Registry to Enable or Disable SSL on the Web Console
Incorrectly editing the registry can severely damage your system. Before you make changes to the registry, you should back up any valued data that is on the computer.
1. Logon on to the web console with an account that has local administrator rights, and on the desktop, click Start, and then click Run.
2. Type regedit, and then click OK. The Registry Editor starts.3. Navigate to the HKey_Local_Machine\Software\Microsoft\System Center
Operations Manager\12\Setup\WebConsole\ key.4. To enable SSL, set the following:
11.9.2 To upgrade the web console server1. Log on to the computer that hosts the web console server with an Operations
Manager Administrators role account for your Operations Manager management group.
2. On the Operations Manager source media, run Setup.exe, and then click Install.
3. On the Getting Started, System Center 2012 R2 Operations Manager Upgrade page, review the features that will be upgraded, and then click Next.
4. On the Select installation location page, accept the default value of C:\Program Files\Microsoft System Center 2012 R2\Operations Manager, or type in a new location or browse to one. Then click Next.
5. On the Prerequisites page, review and address any warnings or errors that the Prerequisites checker returns, and then click Verify Prerequisites Again to recheck the system.
6. If the Prerequisites checker does not return any warnings or errors, the Prerequisites, Proceed with Setup page appears. Click Next.
7. When the Ready to Upgrade page appears, review the upgrade summary, and then click Upgrade.
11.10 Upgrade Reporting to System Center 2012 R2 - Operations Manager
Use this procedure to upgrade a stand-alone Reporting server to System Center 2012 R2 Operations Manager. You should not run upgrade on the Reporting server until after you have upgraded the management servers, gateways, operation consoles, and agents.Before you begin the upgrade process, make sure that your server meets the minimum supported configurations. For more information, see System Requirements: System Center 2012 R2 Operations Manager
11.11 Upgrade the Reporting Server1. Log on to the computer that hosts the Reporting server with an account that is
a member of the Operations Manager Administrators role for your Operations Manager management group.
2. On the Operations Manager source media, run Setup.exe, and then click Install.
3. On the Getting Started, System Center 2012 R2 Operations Manager Upgrade page, review the features that will be upgraded. In this case, it is Operations Manager Reporting. Click Next.
Page 83Installation Guide for System Center 2012 Operations Manager, [Type Subject Here],
Version .1 DraftPrepared by Author“document.docx" last modified on 8 Jun. 14, Rev 3
4. On the Select installation location page, accept the default value of C:\Program Files\ Microsoft System Center 2012 R2\Operations Manager, or type in a new location or browse to one. Then click Next.
5. On the Prerequisites page, review and address any warnings or errors that the Prerequisites checker returns, and then click Verify Prerequisites Again to recheck the system.
6. If the Prerequisites checker does not return any warnings or errors, the Prerequisites, Proceed with Setup page appears. Click Next.
7. On the Ready to Upgrade page, review the options, and then click Upgrade.
8. When upgrade is finished, the Upgrade complete page appears. Click Close.
11.12 Post-Upgrade Tasks When Upgrading to System Center 2012 R2 Operations ManagerAfter you have completed the upgrade process to System Center 2012 R2 Operations Manager, you must perform a number of post-upgrade tasks.Perform the following tasks when you have completed the upgrade process.
Re-enable the Notification Subscriptions. Restart or Re-enable the Connector Services (if needed) Re-enable Audit Collection Services (ACS) on agents that were upgraded Verify That the Upgrade Was Successful
11.12.1 Re-enable the Notification SubscriptionsAfter the upgrade has finished, use the following procedure to re-enable subscriptions.
1. Open the Operations console by using an account that is a member of the Operations Manager Administrators role for the Operations Manager management group.
2. In the Operations console, in the navigation pane, click the Administration button.
NoteWhen you run the Operations console on a computer that is not a management server, the Connect To Server dialog box appears. In the Server name text box, type the name of the Operations Manager management server to which you want to connect.
Page 84Installation Guide for System Center 2012 Operations Manager, [Type Subject Here],
Version .1 DraftPrepared by Author“document.docx" last modified on 8 Jun. 14, Rev 3
Update [Customer Name] in Doc Properties
3. In the Administration pane, under Notifications, click Subscriptions.4. In the Actions pane, click Enable for each subscription listed.
11.12.2 Restart or Re-enable the Connector ServicesRefer to the third-party documentation for any installed connectors to determine if the connectors are supported for System Center 2012 R2 Operations Manager. If you stopped a connector for any reason during upgrade, restart the service.
1. On the taskbar, click Start, click Administrative Tools, and then click Services.
2. In the Name column, right-click the connector that you want to restart, and then click Start.
11.12.3 Re-Enable Audit Collection ServicesIf you had Audit Collection Services (ACS) enabled for an agent prior to upgrade, it was disabled as part of the agent upgrade process. Re-enable ACS as appropriate.Perform the following tasks to verify that the upgrade was successful.
Check the health state of the management servers and agents in the Health Service Watcher state view. In the Administration workspace of the Operations console, ensure that the management servers and agents are healthy. In the Monitoring workspace, check if there are any alerts related to the management group health.
Review the event logs of all the management servers for new errors. Sort alerts by the last-modified column to review the new alerts. Check the CPU utilization and disk I/O on your database servers to ensure
that they are functioning normally. If the Reporting feature is installed, click Reporting, and then run a generic
performance report to ensure that Reporting is functioning correctly. Re-deploy any agents that you uninstalled during the upgrade process.
11.13 Upgrade OM2012 SP1 Agents to OM2012 R2 Parallel EnvironmentsThis upgrade path contains an Operations Manager scenario with parallel environments, sharing agents, so that the original System Center 2012 Service Pack 1 (SP1), Operations Manager environment is left intact. After the upgrade, the agents have been upgraded to System Center 2012 R2 Operations Manager and are fully capable of working with native System Center 2012 R2 Operations Manager functionality. The System Center 2012 R2 Operations Manager agents are also able to “talk” to the System Center 2012 Service Pack 1 (SP1), Operations Manager management server.
Page 85Installation Guide for System Center 2012 Operations Manager, [Type Subject Here],
Version .1 DraftPrepared by Author“document.docx" last modified on 8 Jun. 14, Rev 3
Update [Customer Name] in Doc Properties
11.13.1 Upgrading OM2012 SP1 Agents to OM2012 R2 using Parallel Environments
If you want to maintain your System Center 2012 Service Pack 1 (SP1), Operations Manager environment you can install System Center 2012 R2 Operations Manager in parallel and just upgrade your agents using the following process.
1. Retain the original System Center 2012 Service Pack 1 (SP1), Operations Manager environment.
2. Set up an additional, new System Center 2012 R2 Operations Manager environment with management servers, gateway, Operations Manager Database, Operations Manager Data Warehouse, console, web console, and reporting server. See Deploying System Center 2012 - Operations Manager for more information.
3. Upgrade the System Center 2012 Service Pack 1 (SP1), Operations Manager Agents to 2012 R2 using Push-Install or Command Line options as appropriate. See How to Upgrade an Agent to System Center 2012 R2 Operations Manager for more information.
12 Registering Product KeyBy default Operations Manager 2012 is installed as an evaluation version and you are required to manually register a valid product key. The following describes how to add a Product Key to the Eval edition of System Center 2012 R2 Operations Manager.
1. To set the product key, use the Set-SCOMLicense cmdlet in PowerShell. To use the Set-SCOMLicense cmdlet you need to use elevated permissions. (Run as Administrator) and the account must be a member of the Operations Manager Administrators user role and SA rights on the SQL Server hosting the Operations Manager database.
2. Open PowerShell as an Administrator and type the following commands:3. import-module operationsmanager 4. new-scommanagementgroupconnection 5. Set-SCOMLicense -ProductId XXXXX-XXXX-XXXXX-XXXXX-XXXXX 6. When prompted, enter Y to confirm the action, and once completed you are
returned to a PS> prompt.7. Restart the Operations Manager services on all management servers in the
management group.
Page 86Installation Guide for System Center 2012 Operations Manager, [Type Subject Here],
Version .1 DraftPrepared by Author“document.docx" last modified on 8 Jun. 14, Rev 3
8. To check if changes were executed run Get-SCOMManagementGroup | ft skuforlicense, version, timeofexpiration –a from the elevated PowerShell session. The response should display “Retail” and not “Eval”.
13 ReferencesUse this section to identify any internal or external resources that would provide supplementary information to the Installation Guide.
Page 87Installation Guide for System Center 2012 Operations Manager, [Type Subject Here],
Version .1 DraftPrepared by Author“document.docx" last modified on 8 Jun. 14, Rev 3
Update [Customer Name] in Doc Properties
Appendix A –Updating System Center 2012 R2 Operations Manager Update this section with the UR that was deployed at the time of deployment.
This section outlines the guidance to update System Center 2012 R2 Operations Manager from RTM to the latest Update Rollup (UR).A complete list of URs is available at: http://support.microsoft.com/kb/2906925/en-usUR updates are cumulative and if the System Center 2012 R2 Operations Manager.General guidelines:
Do not install the update rollup package immediately after you install the System Center 2012 R2 server. Otherwise, the Health Service state may not be initialized.
Recommended Update order: Management server(s) Gateway servers ACS Web console server role computers Operations console role computers Manually import the management packs. Apply the agent update to manually installed agents, or push the installation
from the Pending view in the Operations console
NoteInstall the update rollup package on agents either before or after you install the update rollup package on the server infrastructure.
If the Connected MG/Tiering feature is enabled, first update the top tier of the Connected MG/Tiering feature.
Verify the version of the Update Rollup files.
Page 88Installation Guide for System Center 2012 Operations Manager, [Type Subject Here],
Version .1 DraftPrepared by Author“document.docx" last modified on 8 Jun. 14, Rev 3
Appendix B – Command-Line InstallationThis section lists the commands that can be used to install the Operations Manager roles via the command-line.
Install First Management Server Via Command-LineThe following steps detail how to install the first management server via command-line. There is no on screen feedback of the installation progress or errors, monitoring of the installation log is the only way.
NoteAll Prerequisite software must be installed before proceeding.
Verify that there is a directory called OperationsManager in the data drive for the SQL Server database instance where the Operations Manager database will be created. This is a workaround to an existing command-line installation issue.
Verify that there is a directory called OperationsManagerDW in the data drive for the SQL Server database instance where the Operations Manager data warehouse database will be created. This is a workaround to an existing command-line installation issue.
Install an Additional Management Server via Command-LineAll Prerequisite software must be installed before proceeding.Verify that there is a directory called OperationsManager in the data drive for the SQL Server database instance where the Operations Manager database will be created. This is a workaround to an existing command-line installation issue.Verify that there is a directory called OperationsManagerDW in the data drive for the SQL Server database instance where the Operations Manager data warehouse database will be created. This is a workaround to an existing command-line installation issue.
Page 89Installation Guide for System Center 2012 Operations Manager, [Type Subject Here],
Version .1 DraftPrepared by Author“document.docx" last modified on 8 Jun. 14, Rev 3
Install The Management Server and Web Console Via Command-LineThe following steps detail how to install a Management Server and Web Console server via command-line. There is no on screen feedback of the installation progress or errors, monitoring of the installation log is the only way.All Prerequisite software must be installed before proceeding.From an elevated Command Prompt type:setup.exe /silent /install /components:OMServer,OMWebConsole,OMConsole /SqlServerInstance: <OperationalDatabaseServer\instance> /DatabaseName: <OperationalDatabaseName> /ActionAccountUser: <Domain\OMAA> /ActionAccountPassword: <domain\OMAApassword> /DASAccountUser: <Domain\SCDAS> /SCDASAccountPassword: <SCDASpassword> /WebSiteName:"Default Web Site" /WebConsoleUseSSL /WebConsoleAuthorizationMode:Mixed /AcceptEndUserLicenseAgreement:1 /SendODRReports:1 /EnableErrorReporting:Never /SendCEIPReports:0 /UseMicrosoftUpdate:0
Install Reporting via Command-LineThe following steps detail how to install the Reporting Server server via command-line. There is no on screen feedback of the installation progress or errors, monitoring of the installation log is the only way.All Prerequisite software must be installed before proceeding.setup.exe /silent /install /components:OMReporting /ManagementServer:<ManagementServerName> /SRSInstance: <SRServer\Instance> /DataReaderUser: <domain\DRuser> /DataReaderPassword: <DRPassword> /AcceptEndUserLicenseAgreement:1 /SendODRReports:1 /EnableErrorReporting:Never /SendCEIPReports:0 /UseMicrosoftUpdate:0
Installing the Gateway Server Via Command-LineLog on to the gateway server with Administrator rights.Open the Command Prompt window by using the Run as Administrator option.%WinDir%\System32\msiexec.exe /i E:\gateway\amd64\MOMGateway.msi /qn /l*v %temp%\GatewayInstall.log ADDLOCAL=MOMGateway MANAGEMENT_GROUP="<ManagementGroupName>" IS_ROOT_HEALTH_SERVER=0 ROOT_MANAGEMENT_SERVER_AD=<MGMTSVR.FQDN> ROOT_MANAGEMENT_SERVER_DNS=<MGMTSVR.FQDN> ACTIONS_USE_COMPUTER_ACCOUNT=0 ACTIONSDOMAIN=adp1.cibc.pte ACTIONSUSER=<ActionAccountName> ACTIONSPASSWORD=<Password> ROOT_MANAGEMENT_SERVER_PORT=5723 [INSTALLDIR=<C:\%Program Files%\System Center Operations Manager\Gateway]
Page 90Installation Guide for System Center 2012 Operations Manager, [Type Subject Here],
Version .1 DraftPrepared by Author“document.docx" last modified on 8 Jun. 14, Rev 3
Update [Customer Name] in Doc Properties
Appendix C – Upgrade Sequencing for System Center SP1/R2If you are planning to upgrade two or more System Center components, it is imperative that you first consult the guide Upgrade Sequencing for System Center 2012 SP1 or Upgrade Sequencing for System Center 2012 R2. The order in which you perform component upgrades is important. Failure to follow the correct upgrade sequence might result in component failure for which no recovery options exist. The affected System Center components are: