46
SSL Install Guide 1 Galileo SSL Installation Guide Galileo SSL Client v01.00.0014
SSL Install Guide 1
Galileo SSL Installation Guide
Galileo SSL Client v01.00.0014

SSL Install Guide 2
Copyright
© Copyright 1999-2010. All rights reserved.
Trademarks
All Travelport logos and marks as well as all other proprietary materials depicted herein are the property of Travelport and/or its subsidiaries.
SSL Install Guide 3
Table of Contents
Introduction .............................................................................................................................. 5
Supported Products ................................................................................................................ 5
Minimum Software Requirements.......................................................................................... 5
Installing Galileo SSL .............................................................................................................. 7
Before Installing Galileo SSL .............................................................................................. 7
Standard Galileo SSL Installation ....................................................................................... 8
Silent Installation ............................................................................................................... 11
Installation Environments for Galileo SSL .......................................................................... 12
Typical Agency Workstation .............................................................................................. 12
Environment Diagram ................................................................................................. 12
Installing Galileo SSL ................................................................................................. 13
Gateway Mode for a Citrix Load-Balanced (Cluster) or MTS Environment ...................... 14
Environment Diagram ................................................................................................. 14
Installing Galileo SSL ................................................................................................. 15
Stand-Alone Citrix or MTS ................................................................................................ 16
Environment Diagram ................................................................................................. 16
Installing Galileo SSL ................................................................................................. 17
Agency Gateway Mode for Legacy OS Environments ...................................................... 18
Environment Diagram ................................................................................................. 18
Installing Galileo SSL ................................................................................................. 19
Configuring Galileo SSL for Supported Products .............................................................. 20
Configuring Galileo SSL for Galileo Desktop and Galileo Print Manager (GPM) ............. 20
Configuring Galileo Desktop and GPM in a Typical Agency Workstation Environment .................................................................................................................................... 20
Configuring Galileo Desktop in Gateway Mode for a Citrix Load-Balanced (Cluster) or MTS Environment ....................................................................................................... 25
Configuring Galileo Desktop in a Stand-Alone Citrix or MTS Environment ............... 26
Configuring Viewpoint 3.0/Focalpoint 3.5 and Galileo Print Manager for Galileo SSL ..... 27
Configuring Viewpoint 3.0/Focalpoint 3.5 and Galileo Print Manager in a Typical Workstation Environment ........................................................................................... 27
Configuring Viewpoint 3.0/Focalpoint 3.5 in a Stand-Alone Citrix or MTS Environment .................................................................................................................................... 31
Configuring Viewpoint 3.0/Focalpoint 3.5 in Gateway Mode for a Citrix Load-Balanced (Cluster) or MTS Environment .................................................................................... 32
Configuring GIDS for Galileo SSL ..................................................................................... 33
Multiple Clients ........................................................................................................... 33
Configuring a TN3270 Emulator for Galileo SSL .............................................................. 35
Configuring XML Select for Galileo SSL ........................................................................... 36
Configuring Customer Proxy Servers for Galileo SSL ...................................................... 38
SSL Connection
4 SSL Install Guide
Uninstalling Galileo SSL ....................................................................................................... 39
Silent Uninstall .................................................................................................................. 40
Appendix A: SSL Client Configuration Parameters ........................................................... 41
Appendix B: DNS/VIP Addresses......................................................................................... 43
Copy System Access ........................................................................................................ 43
Add-ons Workaround ........................................................................................................ 44
Transient DNS Changes ................................................................................................... 44
Appendix C: Troubleshooting .............................................................................................. 45
64-BIT OS Support ............................................................................................................ 45
Installation ................................................................................................................... 45
ODBC Support ............................................................................................................ 45
Double-NIC ....................................................................................................................... 45
Telnet ................................................................................................................................ 46
SSL Install Guide 5
Introduction
SSL (Secure Sockets Layer) is a commonly used protocol for managing the security of a message transmission on the Internet. Galileo SSL enables agencies to use their existing computers and print servers to access the Apollo
® and Galileo
® Computer Reservation
Systems (CRS) over the public Internet via an encrypted, secured connection.
Supported Products
SSL is implemented for agencies running these products:
� Viewpoint 3.0/Focalpoint™ 3.5 and later.
� Galileo Desktop 1.01 and later.
� Galileo Print ManagerTM
(GPM) 4.0 and later. Note: Earlier versions of GPM do not have the option to Always Connect on Startup, which is required for Galileo SSL.
� Galileo Integrated Data Source (GIDS)
� PM Browser.
� XML SelectTM
� Products that use a TN3270 emulator for connectivity.
� Products that use a proxy server for connectivity.
No changes for SSL will be made for current internet-dependent products and services, such as:
� Galileo Web Services (GWS)™
� Galileo Flight Integrator (GFI)™
� Galileo Desktop Internet Access (GDIA)
Minimum Software Requirements
The following requirements are needed for the SSL installation:
� A supported product.
� Internet access.
– Allow SSL service on port 443 through Firewall or other customer infrastructure.
– Set idle timeouts on port 443 connections at 3600 seconds or higher.
– If using an HTTP proxy, ensure the proxy idle timeout on port 443 is set to 3600 seconds or higher.
� Windows 2000 Professional®, Windows XP® (all versions) or Windows Vista® (all versions). Note: It is possible to support a Legacy OS in Gateway Mode.
� Microsoft .NET Framework® version 2.0 (x86) or later needs to be installed. If .NET Framework is not present, the installation process automatically downloads this software from Microsoft and completes this portion of the installation.
� Microsoft Installer 3.1 v2 (KB893803) If Microsoft XP is installed, Microsoft Installer 3.1 v2 or later must be installed.
SSL Connection
6 SSL Install Guide
Notes:
� The installer must have Administrative rights.
� Install SSL connection under the supervision of someone with a working knowledge of your office hardware.
� ISP must provide minimum bandwidth as legacy leased-line providers. Ensure you monitor ISP connection utilization and increase the bandwidth when utilization grows close to saturation. Most agencies discover that the bandwidth to support GDS access is extremely low.
� As a precaution all Client IDs should be captured before installing a new version of the SSL Client. See the SSL Versioning Guide view instructions on how to determine the Client ID.
� For Gateway Mode installation questions, contact your local support personnel or contact the GSO.
SSL Connection
SSL Install Guide 7
Installing Galileo SSL
The instructions for installing and configuring Galileo SSL can vary not only by supported product, but also by the type of environment. Therefore, the following steps should be followed before installing Galileo SSL and configuring your supported products.
1. Review this section for installation pre-requisites and the Basic Installation information.
2. Review the Installation Environments for Galileo SSL section on page 12 and install Galileo SSL based on the selected environment.
3. Go to Configuring Galileo SSL for Supported Products on page 20 for instructions on configuring the supported products that will use the Galileo SSL connection.
Note: Configuration requirements for supported products may vary depending on the environment in which they are installed. Be sure to confirm the appropriate environment before proceeding with the configuration instructions.
Before Installing Galileo SSL
Before installing the Galileo SSL Client:
� Ensure that one of the supported products is installed. See page Supported Products on page 5 for a list of products that use Galileo SSL.
� Close any supported applications before installation.
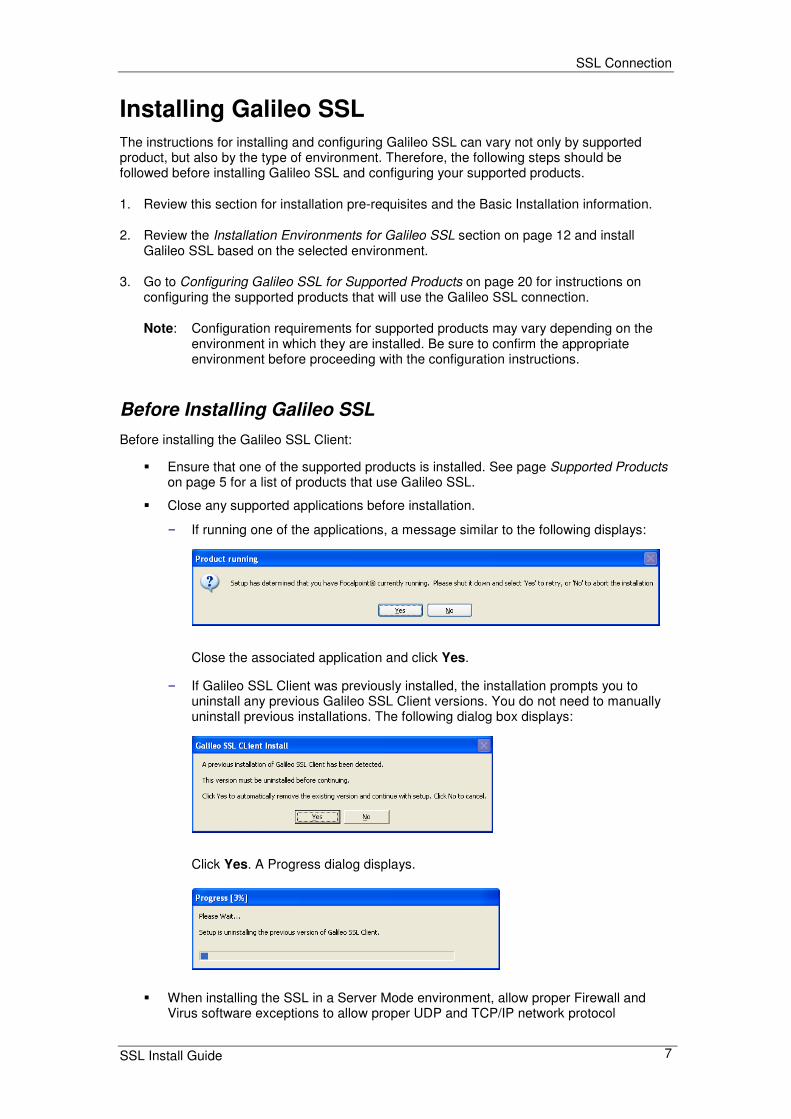
– If running one of the applications, a message similar to the following displays:
Close the associated application and click Yes.
– If Galileo SSL Client was previously installed, the installation prompts you to uninstall any previous Galileo SSL Client versions. You do not need to manually uninstall previous installations. The following dialog box displays:
Click Yes. A Progress dialog displays.
� When installing the SSL in a Server Mode environment, allow proper Firewall and Virus software exceptions to allow proper UDP and TCP/IP network protocol

SSL Connection
8 SSL Install Guide
exceptions required for applicable applications. This applies to Firewall and Virus software running on the SSL server and down-stream workstations connecting through the server.
Please see the Firewall Specifications documentation for specific application.
Note: If you install the SSL client, create new connection profiles, then uninstall or upgrade the SSL client, you will lose the connection profiles.
To maintain your connection profiles, manually add the connection profiles, and then install the SSL Client.
Standard Galileo SSL Installation
The standard Galileo SSL installation applies to installations for all supported products, unless otherwise noted.
Note: Be sure to review the Installation Environments for Galileo SSL on page 12 BEFORE installing Galileo SSL. This section provides details for installing Galileo SSL on single machines or various types of networked environments.
Note: For Silent Installation options see the Silent Installation section below these instructions.
1. Close any supported products.
2. Launch the Galileo SSL installation. The method of delivery for this installation may vary by region; the installation location and other details are provided by your Galileo representative. However, the main method of delivery is: http://support.travelport.com/SGC/APS/softlib/GalileoDesktopSSL.htm. Complete the associated form and click Submit.
Note: The installation checks for the presence of Microsoft.NET version 2.0. If the correct version is already installed, the installation will continue. If Microsoft.NET version 2.0 is not found the download starts automatically. The download is approx 23 MB. If installing Microsoft .NET 2.0:
a. After the Microsoft .NET 2.0 download, if you are prompted with a security message to run or not run, click Run.
b. Follow the Microsoft.NET install prompts to install. After the install the SSL software installation automatically continues.
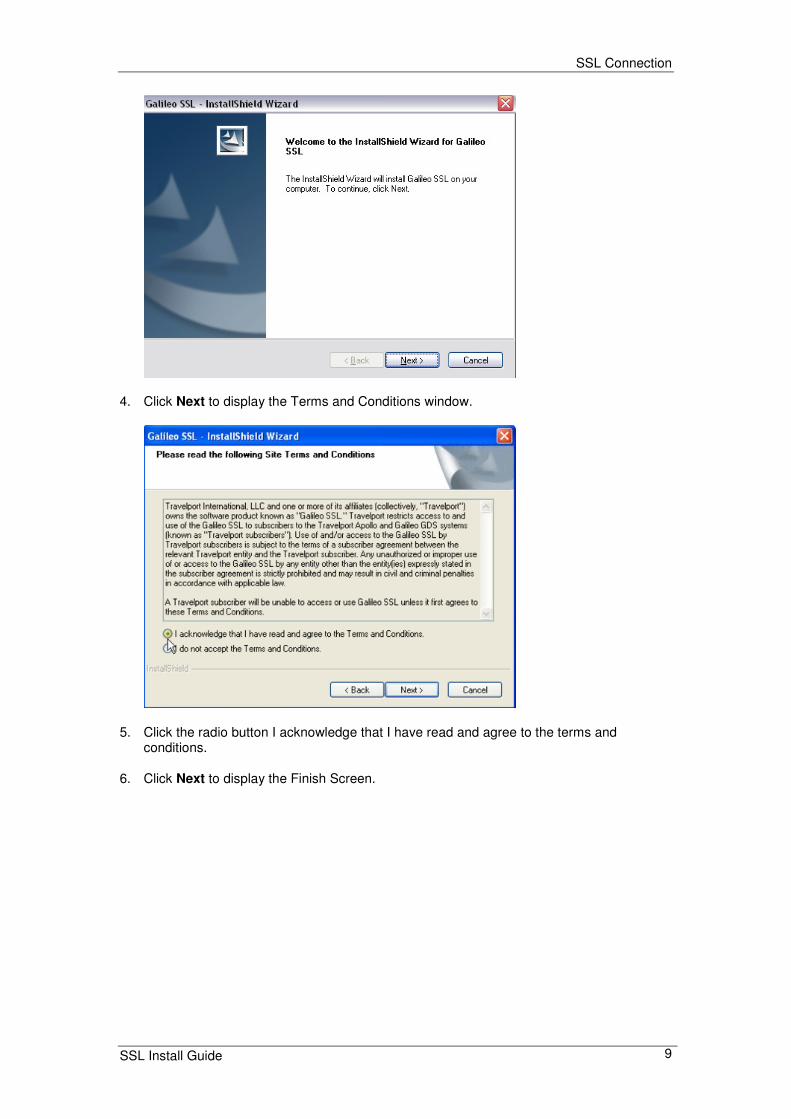
3. The Welcome window displays.
SSL Connection
SSL Install Guide 9
4. Click Next to display the Terms and Conditions window.
5. Click the radio button I acknowledge that I have read and agree to the terms and conditions.
6. Click Next to display the Finish Screen.
SSL Connection
10 SSL Install Guide
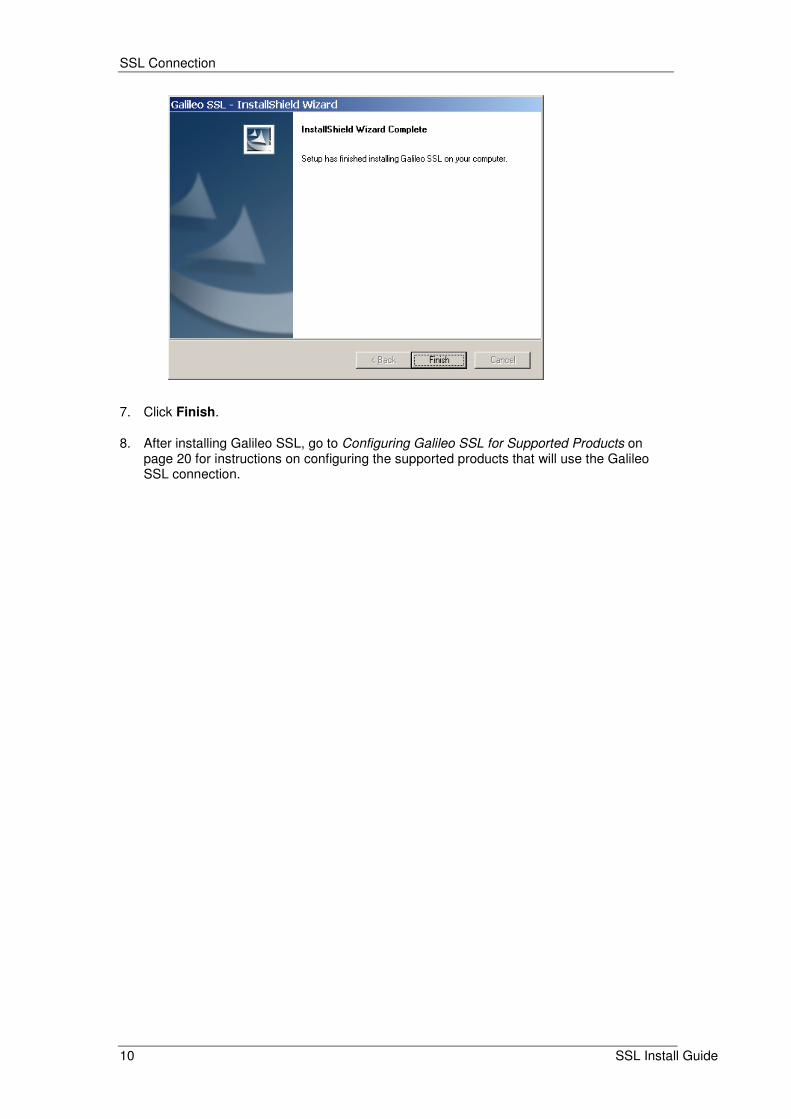
7. Click Finish.
8. After installing Galileo SSL, go to Configuring Galileo SSL for Supported Products on page 20 for instructions on configuring the supported products that will use the Galileo SSL connection.
SSL Connection
SSL Install Guide 11
Silent Installation
If the installation package is an accessible .exe file, an option exists for “silent” install, and no further installation procedures are required. To set the application for Silent Install:
1. Close any supported products.
2. Open a command window and navigate to the SSL installation file (.exe) location.
3. Type the name of the install executable followed by the parameters –s –a –s.. For example, GalileoSSLClient_v01.00.0014.exe -s -a -s
� The first parameter ‘s’ specifies that the package for the web extraction is silent.
� The second parameter ‘a’ specifies to start setup.exe.
� The third parameter ‘s’ specifies the type of install the setup should run: 's' is silent install.
SSL Connection
12 SSL Install Guide
Installation Environments for Galileo SSL
SSL can be installed in a variety of environments. The installation type for your agency depends on the way the network is configured, and the specific environment setup. The four most common environments are:
� Typical Agency Workstation
� Gateway Mode for Citrix Load Balanced (Cluster) or MTS
� Stand Alone Citrix or MTS
� Agency Gateway Mode for Legacy OS environments
Each environment is described in the related section. After installing Galileo SSL, see Configuring Galileo SSL for Supported Products on page 20 to configure your associated supported products.
Typical Agency Workstation
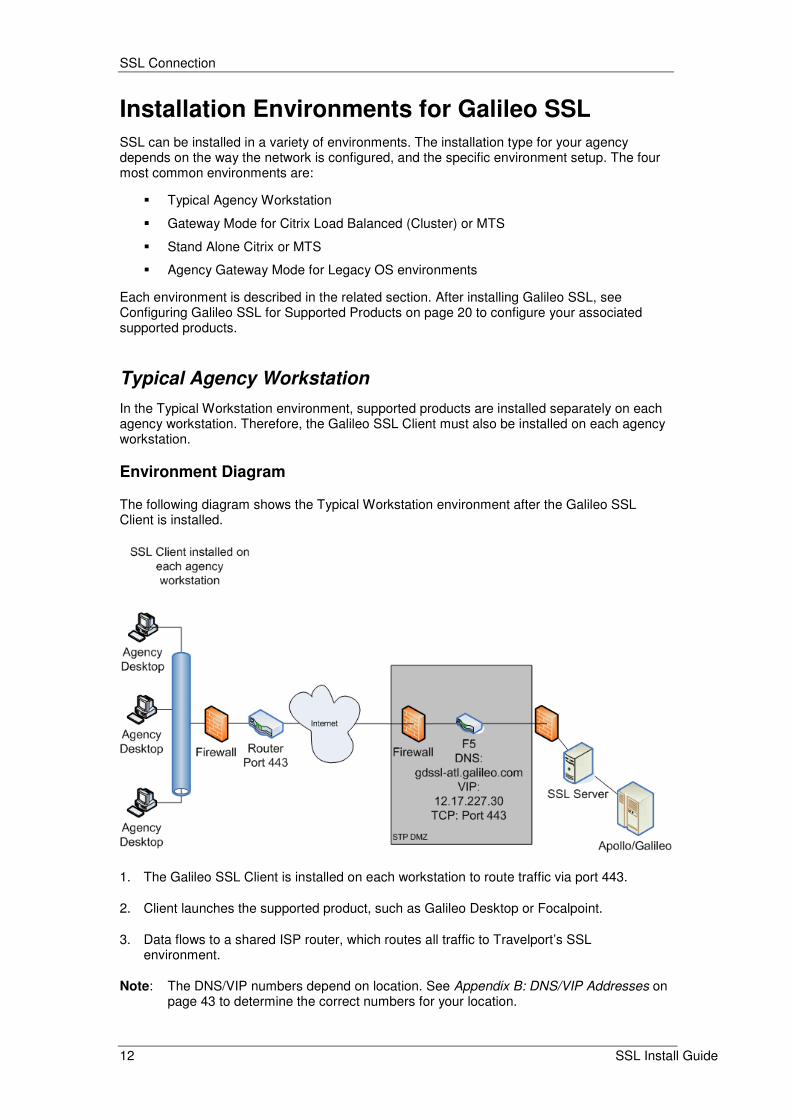
In the Typical Workstation environment, supported products are installed separately on each agency workstation. Therefore, the Galileo SSL Client must also be installed on each agency workstation.
Environment Diagram
The following diagram shows the Typical Workstation environment after the Galileo SSL Client is installed.
1. The Galileo SSL Client is installed on each workstation to route traffic via port 443.
2. Client launches the supported product, such as Galileo Desktop or Focalpoint.
3. Data flows to a shared ISP router, which routes all traffic to Travelport’s SSL environment.
Note: The DNS/VIP numbers depend on location. See Appendix B: DNS/VIP Addresses on page 43 to determine the correct numbers for your location.
SSL Connection
SSL Install Guide 13
Installing Galileo SSL
To install SSL in a Typical Agency Workstation environment:
1. Use the Standard Galileo SSL Installation on page 8. Galileo SSL must be installed separately on each workstation.
2. Verify that Galileo SSL is installed on the workstation.
a. From the Start menu, select the Control Panel.
b. Double-click Add or Remove Programs to display the Add or Remove Programs dialog box.
c. If Galileo SSL has installed successfully, the currently installed programs list displays Galileo SSL.
3. After installation, refer to Configuring Galileo SSL for Supported Products on page 20 to determine additional configuration requirements for your supported products.
SSL Connection
14 SSL Install Guide
Gateway Mode for a Citrix Load-Balanced (Cluster) or MTS Environment
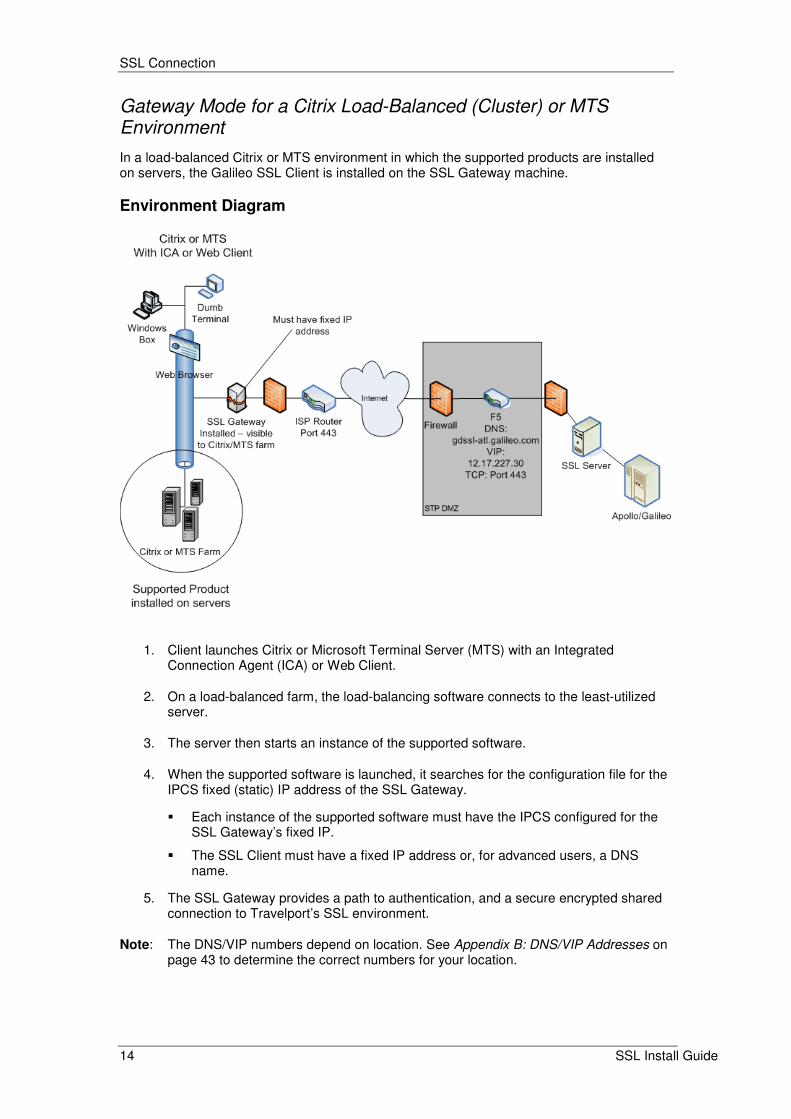
In a load-balanced Citrix or MTS environment in which the supported products are installed on servers, the Galileo SSL Client is installed on the SSL Gateway machine.
Environment Diagram
1. Client launches Citrix or Microsoft Terminal Server (MTS) with an Integrated Connection Agent (ICA) or Web Client.
2. On a load-balanced farm, the load-balancing software connects to the least-utilized server.
3. The server then starts an instance of the supported software.
4. When the supported software is launched, it searches for the configuration file for the IPCS fixed (static) IP address of the SSL Gateway.
� Each instance of the supported software must have the IPCS configured for the SSL Gateway’s fixed IP.
� The SSL Client must have a fixed IP address or, for advanced users, a DNS name.
5. The SSL Gateway provides a path to authentication, and a secure encrypted shared connection to Travelport’s SSL environment.
Note: The DNS/VIP numbers depend on location. See Appendix B: DNS/VIP Addresses on page 43 to determine the correct numbers for your location.
SSL Connection
SSL Install Guide 15
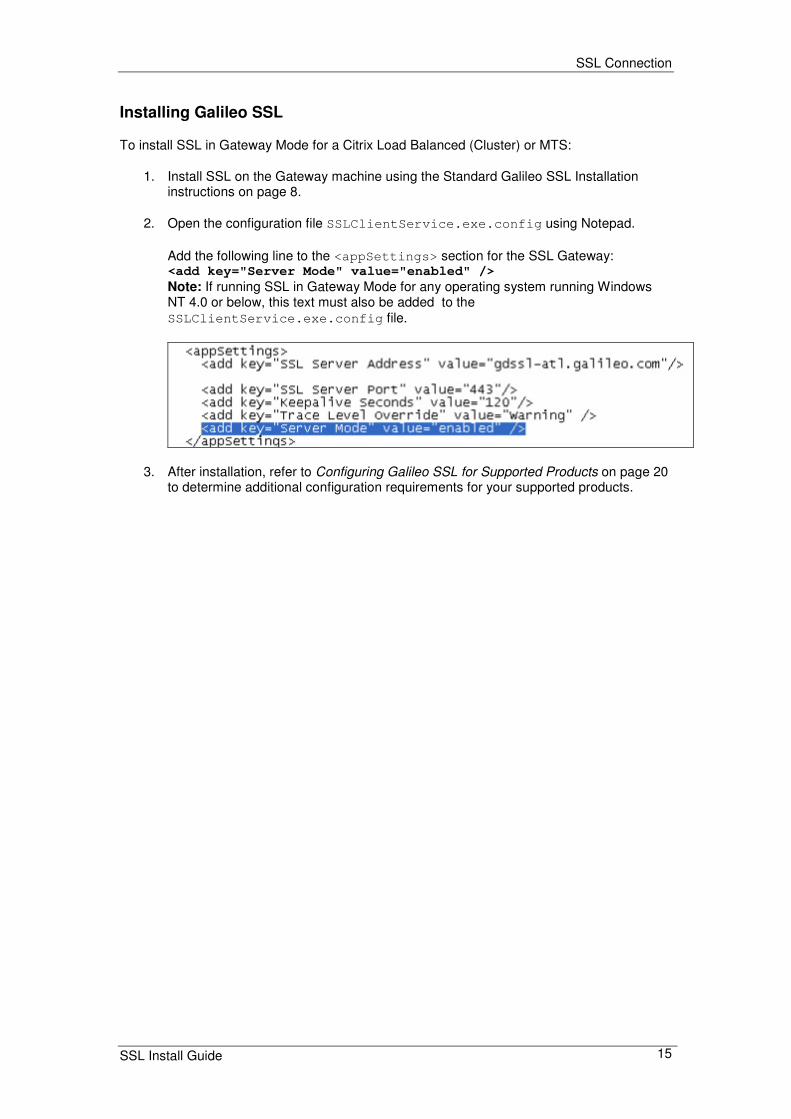
Installing Galileo SSL
To install SSL in Gateway Mode for a Citrix Load Balanced (Cluster) or MTS:
1. Install SSL on the Gateway machine using the Standard Galileo SSL Installation instructions on page 8.
2. Open the configuration file SSLClientService.exe.config using Notepad.
Add the following line to the <appSettings> section for the SSL Gateway: <add key="Server Mode" value="enabled" />
Note: If running SSL in Gateway Mode for any operating system running Windows NT 4.0 or below, this text must also be added to the SSLClientService.exe.config file.
3. After installation, refer to Configuring Galileo SSL for Supported Products on page 20 to determine additional configuration requirements for your supported products.
SSL Connection
16 SSL Install Guide
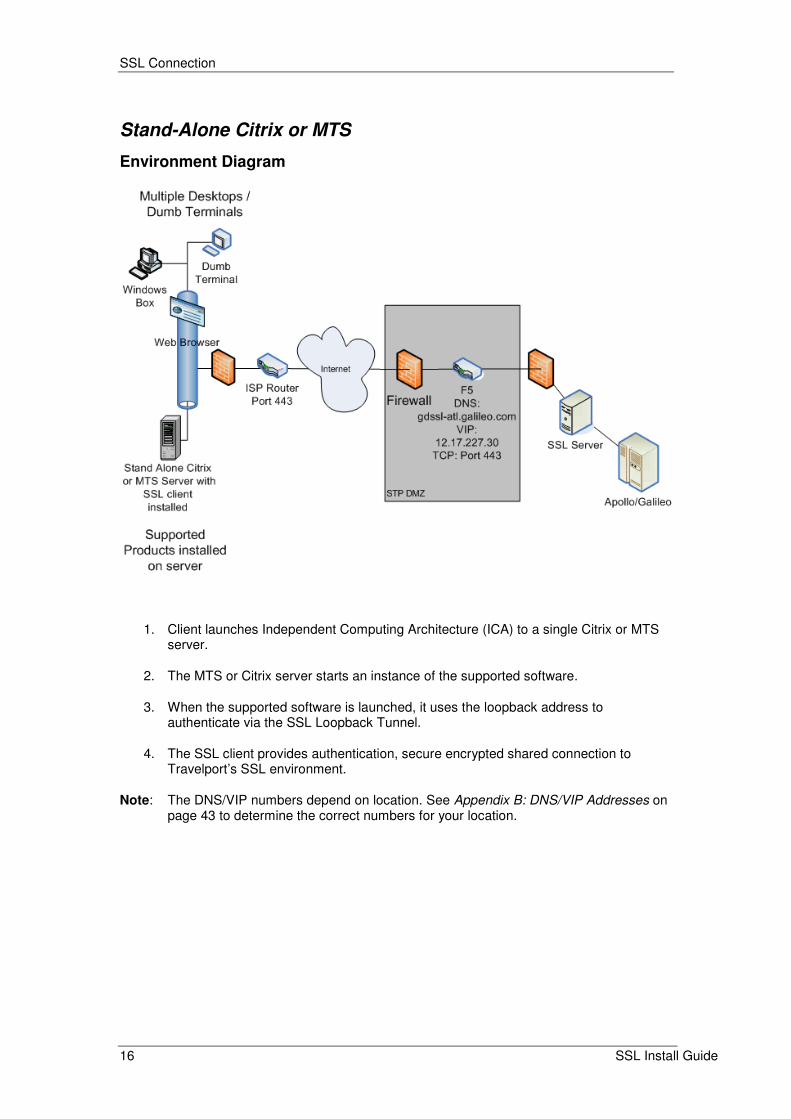
Stand-Alone Citrix or MTS
Environment Diagram
1. Client launches Independent Computing Architecture (ICA) to a single Citrix or MTS server.
2. The MTS or Citrix server starts an instance of the supported software.
3. When the supported software is launched, it uses the loopback address to authenticate via the SSL Loopback Tunnel.
4. The SSL client provides authentication, secure encrypted shared connection to Travelport’s SSL environment.
Note: The DNS/VIP numbers depend on location. See Appendix B: DNS/VIP Addresses on page 43 to determine the correct numbers for your location.
SSL Connection
SSL Install Guide 17
Installing Galileo SSL
To install SSL in a stand-alone Citrix or Microsoft Terminal Server setup:
1. Install SSL on the stand-alone or MTS server using the Standard Galileo SSL Installation instructions on page 8.
2. Verify that SSL is installed and running by initiating the Task Manager and finding the entry SSLClientService.exe
3. After installation, refer to Configuring Galileo SSL for Supported Products on page 20 to determine additional configuration requirements for your supported products.
SSL Connection
18 SSL Install Guide
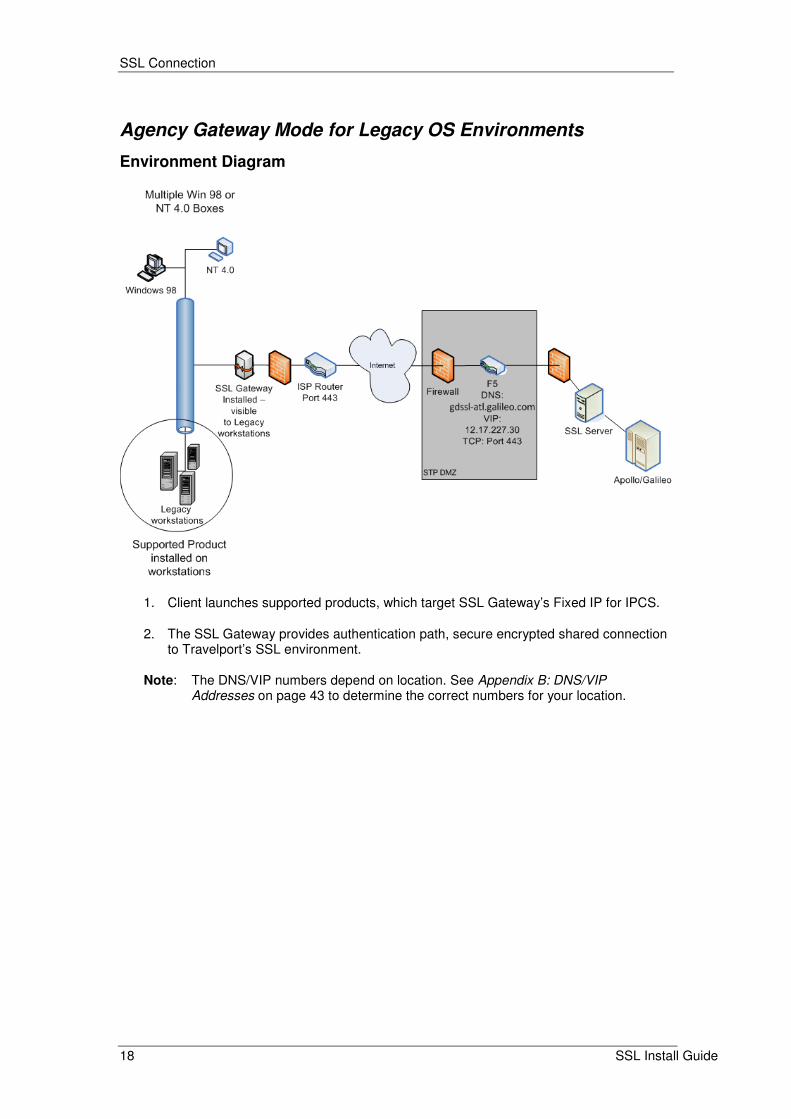
Agency Gateway Mode for Legacy OS Environments
Environment Diagram
1. Client launches supported products, which target SSL Gateway’s Fixed IP for IPCS.
2. The SSL Gateway provides authentication path, secure encrypted shared connection to Travelport’s SSL environment.
Note: The DNS/VIP numbers depend on location. See Appendix B: DNS/VIP Addresses on page 43 to determine the correct numbers for your location.
SSL Connection
SSL Install Guide 19
Installing Galileo SSL
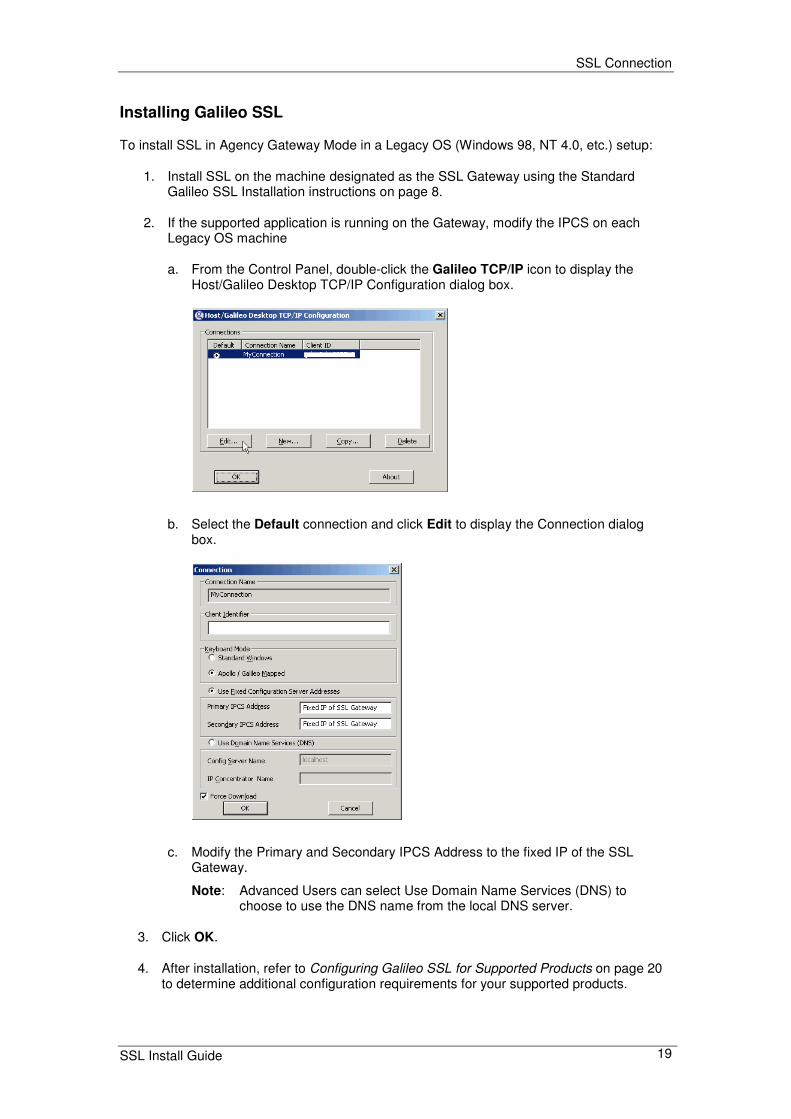
To install SSL in Agency Gateway Mode in a Legacy OS (Windows 98, NT 4.0, etc.) setup:
1. Install SSL on the machine designated as the SSL Gateway using the Standard Galileo SSL Installation instructions on page 8.
2. If the supported application is running on the Gateway, modify the IPCS on each Legacy OS machine
a. From the Control Panel, double-click the Galileo TCP/IP icon to display the Host/Galileo Desktop TCP/IP Configuration dialog box.
b. Select the Default connection and click Edit to display the Connection dialog box.
c. Modify the Primary and Secondary IPCS Address to the fixed IP of the SSL Gateway.
Note: Advanced Users can select Use Domain Name Services (DNS) to choose to use the DNS name from the local DNS server.
3. Click OK.
4. After installation, refer to Configuring Galileo SSL for Supported Products on page 20 to determine additional configuration requirements for your supported products.
SSL Connection
20 SSL Install Guide
Configuring Galileo SSL for Supported Products
After you have installed Galileo SSL for the appropriate installation environment, you must configure your supported products to use the Galileo SSL connection.
Important!: Configuration requirements for a supported product may vary depending on the environment in which it is installed. Be sure to confirm the appropriate environment before proceeding with the configuration instructions.
Configuring Galileo SSL for Galileo Desktop and Galileo Print Manager (GPM)
The configuration instructions for Galileo Desktop vary by environment; follow the instructions for your environment.
Use of Galileo Print Manager (GPM) is optional; however, please note that configuration instructions can vary depending on whether GPM is installed.
Configuring Galileo Desktop and GPM in a Typical Agency Workstation Environment
These instructions support configuring SSL on Galileo Desktop 1.01 and (optionally) Galileo Print Manager 4.0 or later.
Note: The configuration instructions are different depending on whether Galileo Print Manager is installed.
Configuring Galileo Desktop for Galileo SSL in a Typical Agency Workstation Environment
After the Galileo SSL installation is completed, the installation automatically changes the Primary and Secondary IPCS Addresses for all Client IDs to use 127.0.0.1 for Galileo SSL
access. At the time of the installation, all present Client IDs are updated.
Note: If you use multiple Client IDs and traditional land-line access, the addresses must be
manually configured back to the original addresses. For example: 57.8.81.13 and
57.8.81.113.
To configure Galileo Desktop for Galileo SSL:
1. Close Galileo Desktop.
2. From the Start menu, select the Control Panel.
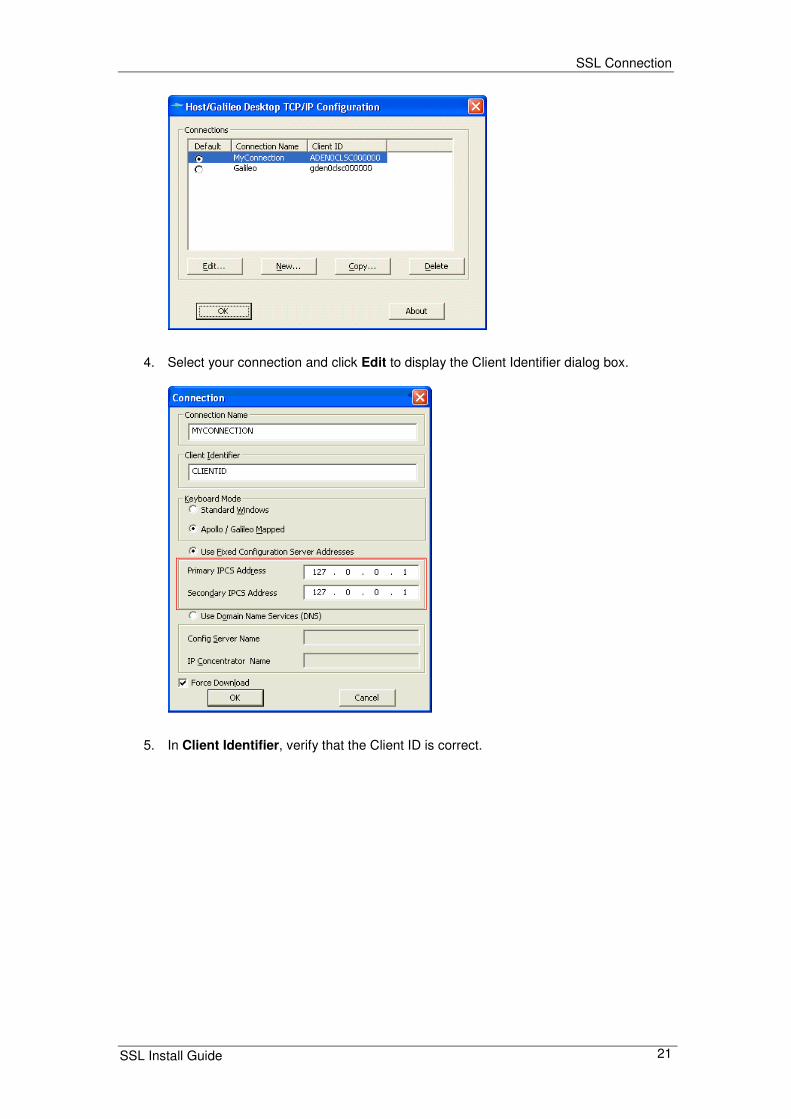
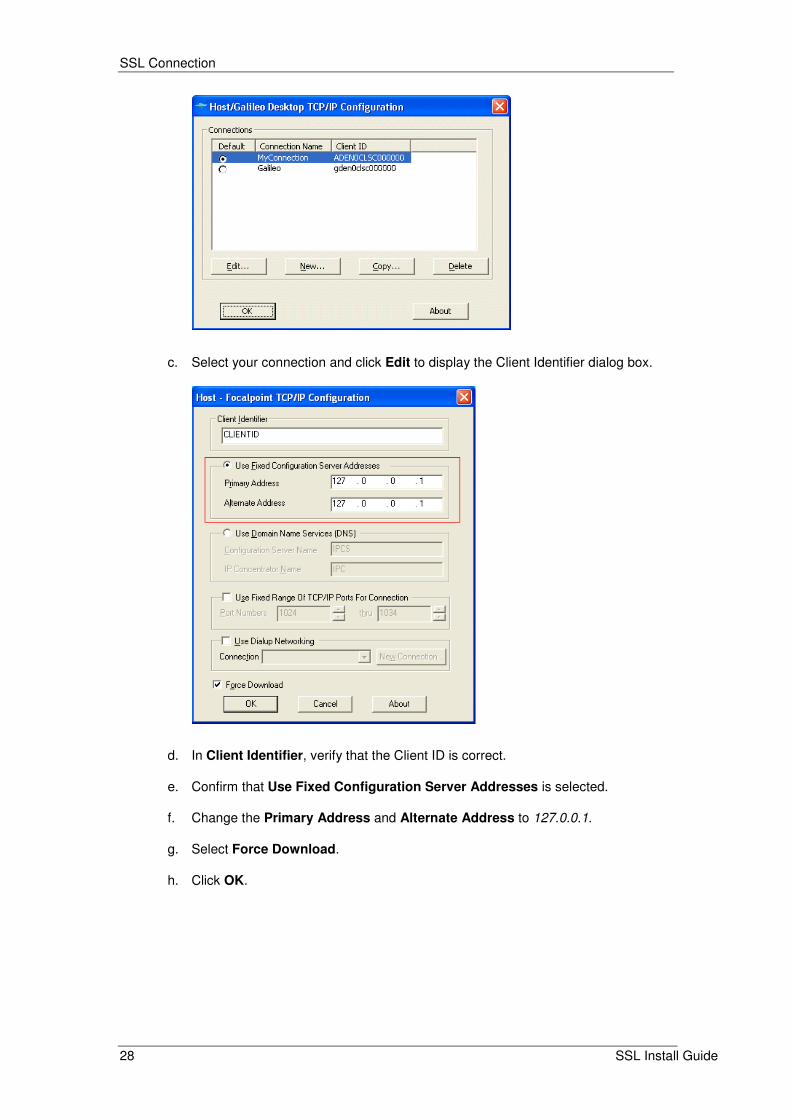
3. Double-click the Galileo TCP/IP icon to display the Host – Focalpoint TCP/IP Configuration dialog box.
SSL Connection
SSL Install Guide 21
4. Select your connection and click Edit to display the Client Identifier dialog box.
5. In Client Identifier, verify that the Client ID is correct.
SSL Connection
22 SSL Install Guide
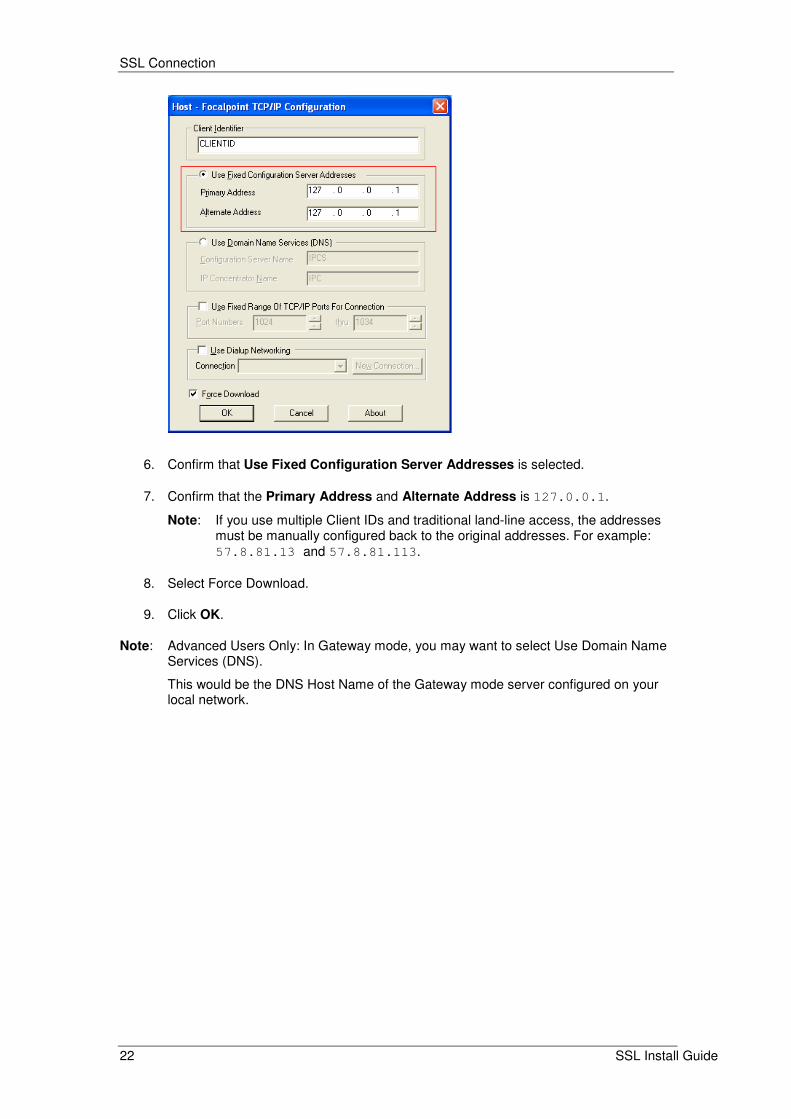
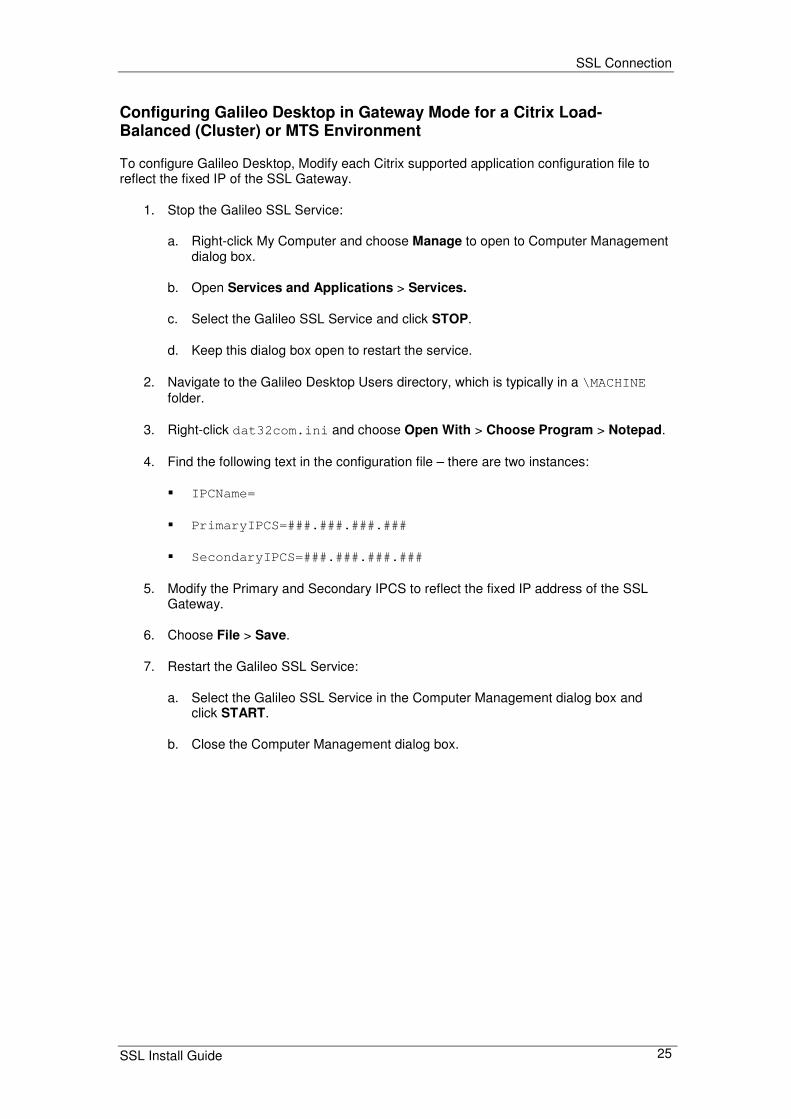
6. Confirm that Use Fixed Configuration Server Addresses is selected.
7. Confirm that the Primary Address and Alternate Address is 127.0.0.1.
Note: If you use multiple Client IDs and traditional land-line access, the addresses must be manually configured back to the original addresses. For example: 57.8.81.13 and 57.8.81.113.
8. Select Force Download.
9. Click OK.
Note: Advanced Users Only: In Gateway mode, you may want to select Use Domain Name Services (DNS).
This would be the DNS Host Name of the Gateway mode server configured on your local network.

SSL Connection
SSL Install Guide 23
Configuring Galileo Print Manager (GPM) for Galileo SSL in a Typical Agency Workstation Environment.
If Galileo Print Manager is installed on the workstation, the configuration address that was updated for Galileo Desktop in the previous section is also updated automatically.
To configure GPM for Galileo SSL:
1. From the Windows Start menu, select Programs > Galileo Print Manager > Print Manager to display the Galileo Print Manager dialog box.
2. Click the Configuration Server tab.
3. In Client Identifier, verify that the Client ID is correct.
4. Confirm that Use Fixed Configuration Server Addresses is selected.
5. Confirm that the Primary Address and Alternate Address is 127.0.0.1.
Note: If you use multiple Client IDs and traditional land-line access, the addresses must be manually configured back to the original addresses. For example: 57.8.81.13 and 57.8.81.113.
6. Click Apply.
7. From the File, select Save.
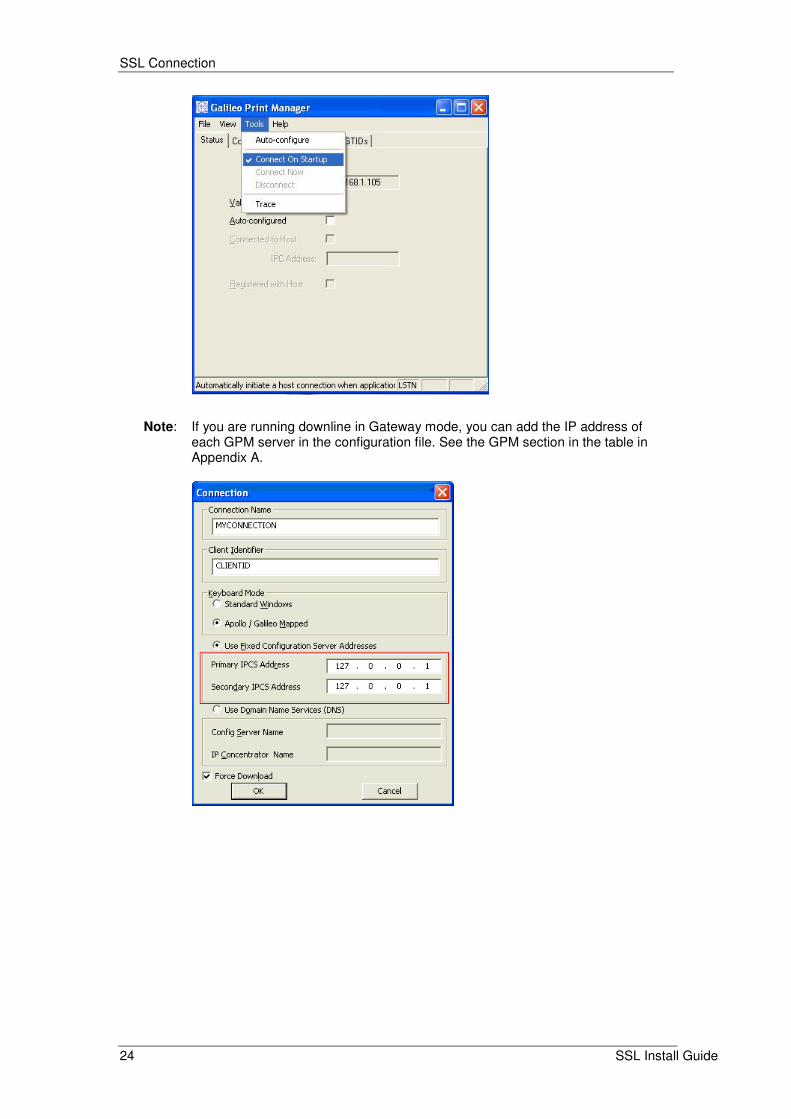
8. GPM automatically wakes up because it is configured to Connect on Startup. After GPM connected, it always stays connected. To manually set this option, from the Tools menu, select Connect On Startup.
SSL Connection
24 SSL Install Guide
Note: If you are running downline in Gateway mode, you can add the IP address of each GPM server in the configuration file. See the GPM section in the table in Appendix A.
SSL Connection
SSL Install Guide 25
Configuring Galileo Desktop in Gateway Mode for a Citrix Load-Balanced (Cluster) or MTS Environment
To configure Galileo Desktop, Modify each Citrix supported application configuration file to reflect the fixed IP of the SSL Gateway.
1. Stop the Galileo SSL Service:
a. Right-click My Computer and choose Manage to open to Computer Management dialog box.
b. Open Services and Applications > Services.
c. Select the Galileo SSL Service and click STOP.
d. Keep this dialog box open to restart the service.
2. Navigate to the Galileo Desktop Users directory, which is typically in a \MACHINE
folder.
3. Right-click dat32com.ini and choose Open With > Choose Program > Notepad.
4. Find the following text in the configuration file – there are two instances:
� IPCName=
� PrimaryIPCS=###.###.###.###
� SecondaryIPCS=###.###.###.###
5. Modify the Primary and Secondary IPCS to reflect the fixed IP address of the SSL Gateway.
6. Choose File > Save.
7. Restart the Galileo SSL Service:
a. Select the Galileo SSL Service in the Computer Management dialog box and click START.
b. Close the Computer Management dialog box.
SSL Connection
26 SSL Install Guide
Configuring Galileo Desktop in a Stand-Alone Citrix or MTS Environment
To configure Galileo Desktop in a Stand-Alone Citrix or Microsoft Terminal Server environment:
1. Stop the Galileo SSL Service:
a. Right-click My Computer and choose Manage to open to Computer Management dialog box.
b. Open Services and Applications > Services.
c. Select the Galileo SSL Service and click STOP.
d. Keep this dialog box open to restart the service.
2. Navigate to each \(Users)\(Remote Users Home Directory).
3. Right-click dat32com.ini and choose Open With > Choose Program > Notepad.
4. Find the following text in the configuration file – there are two instances:
� IPCName=
� PrimaryIPCS=###.###.###.###
� SecondaryIPCS=###.###.###.###
5. Modify the Primary and Secondary address to reflect the loopback IP address 127.0.0.1
6. Choose File > Save.
7. Restart the Galileo SSL Service:
a. Select the Galileo SSL Service in the Computer Management dialog box and click START.
b. Close the Computer Management dialog box.
SSL Connection
SSL Install Guide 27
Configuring Viewpoint 3.0/Focalpoint 3.5 and Galileo Print Manager for Galileo SSL
The configuration instructions for Viewpoint/Focalpoint vary by environment; follow the instructions for your environment.
Use of Galileo Print Manager (GPM) is optional; however, please note that configuration instructions can vary depending on whether GPM is installed.
Configuring Viewpoint 3.0/Focalpoint 3.5 and Galileo Print Manager in a Typical Workstation Environment
These instructions support installing SSL on a Viewpoint 3.0/Focalpoint 3.5 Workstation and (optionally) configuring Galileo Print Manager 4.0 or later. Please note that the configuration instructions are different depending on whether Galileo Print Manager is installed.
Installing Galileo SSL on a Viewpoint 3.0/Focalpoint 3.5 Workstation
To configure Viewpoint 3.0/Focalpoint 3.5 after Galileo SSL is installed:
1. Verify that Galileo SSL is installed.
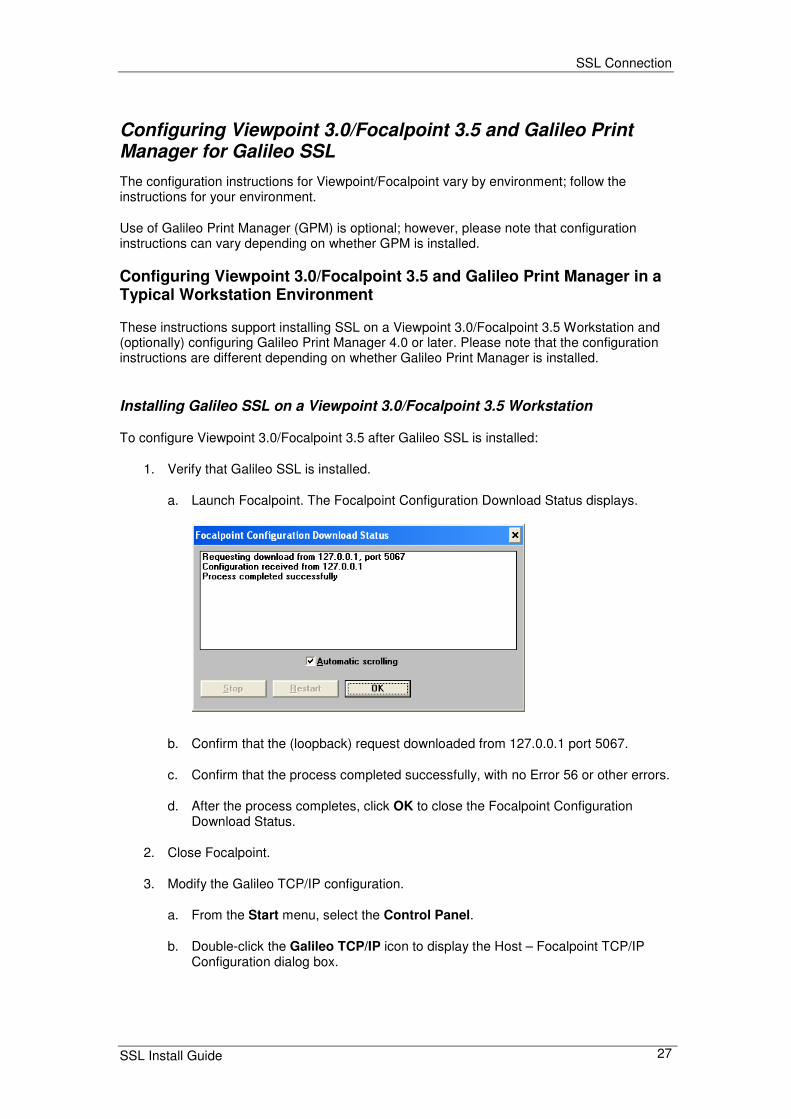
a. Launch Focalpoint. The Focalpoint Configuration Download Status displays.
b. Confirm that the (loopback) request downloaded from 127.0.0.1 port 5067.
c. Confirm that the process completed successfully, with no Error 56 or other errors.
d. After the process completes, click OK to close the Focalpoint Configuration Download Status.
2. Close Focalpoint.
3. Modify the Galileo TCP/IP configuration.
a. From the Start menu, select the Control Panel.
b. Double-click the Galileo TCP/IP icon to display the Host – Focalpoint TCP/IP Configuration dialog box.
SSL Connection
28 SSL Install Guide
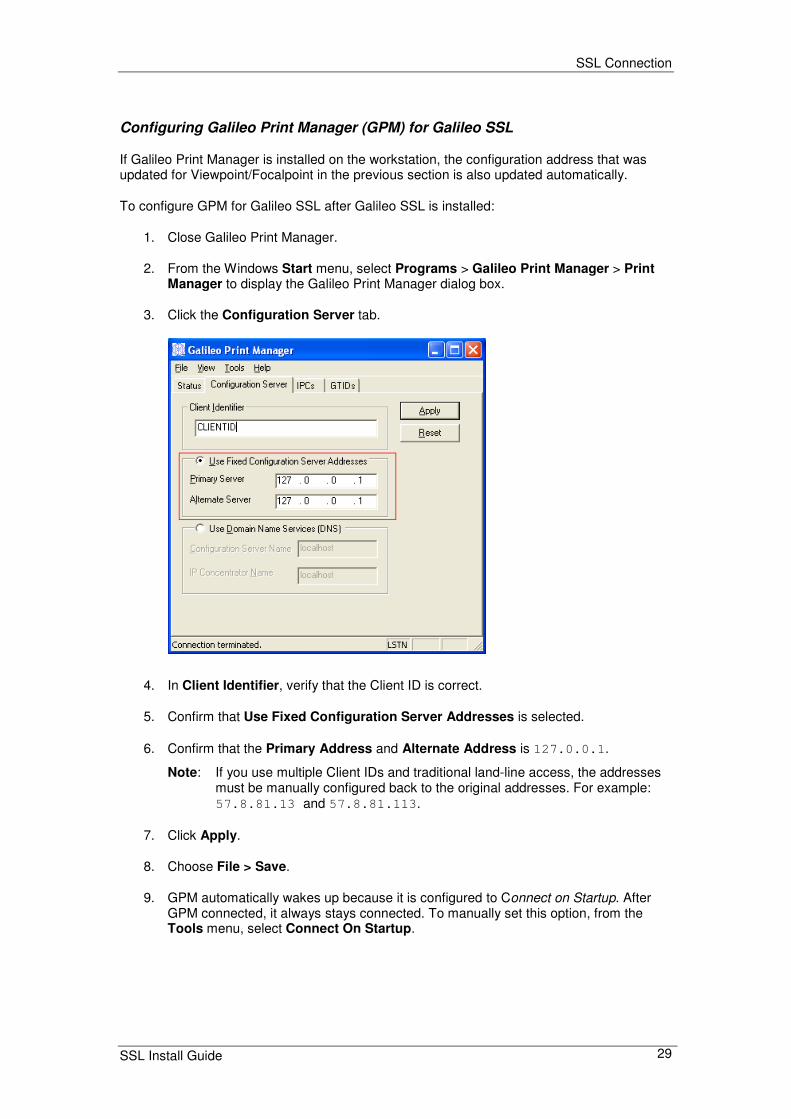
c. Select your connection and click Edit to display the Client Identifier dialog box.
d. In Client Identifier, verify that the Client ID is correct.
e. Confirm that Use Fixed Configuration Server Addresses is selected.
f. Change the Primary Address and Alternate Address to 127.0.0.1.
g. Select Force Download.
h. Click OK.
SSL Connection
SSL Install Guide 29
Configuring Galileo Print Manager (GPM) for Galileo SSL
If Galileo Print Manager is installed on the workstation, the configuration address that was updated for Viewpoint/Focalpoint in the previous section is also updated automatically.
To configure GPM for Galileo SSL after Galileo SSL is installed:
1. Close Galileo Print Manager.
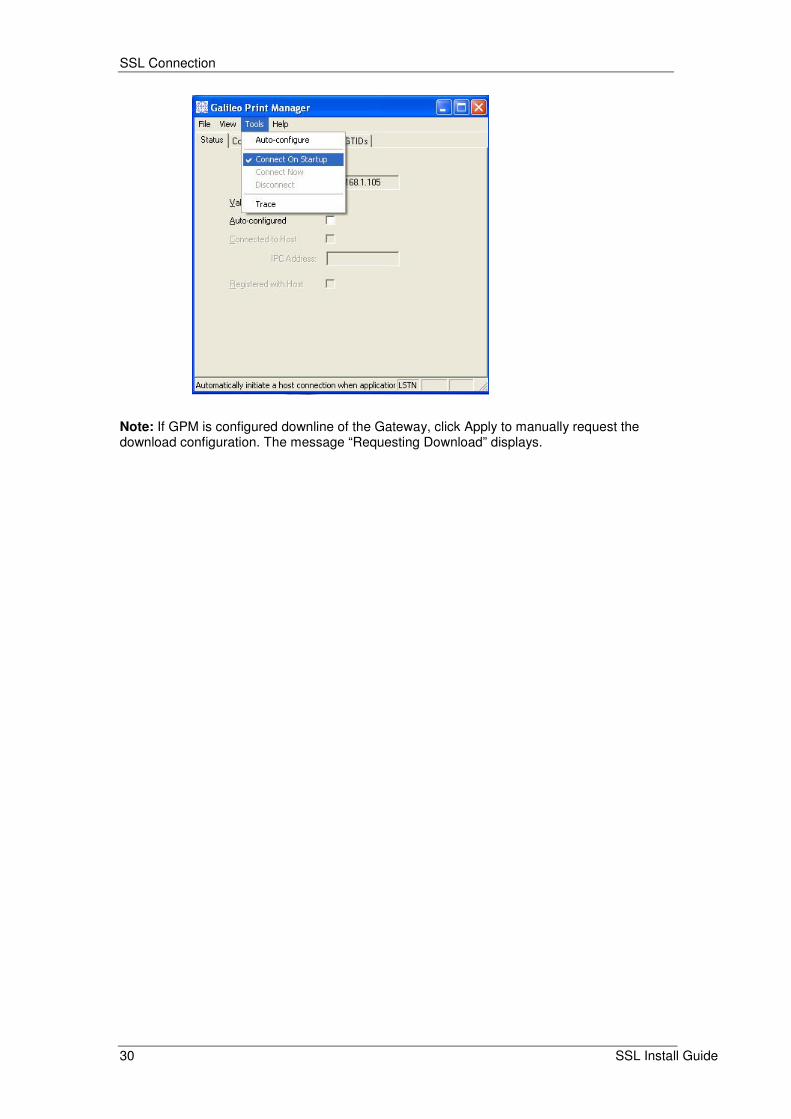
2. From the Windows Start menu, select Programs > Galileo Print Manager > Print Manager to display the Galileo Print Manager dialog box.
3. Click the Configuration Server tab.
4. In Client Identifier, verify that the Client ID is correct.
5. Confirm that Use Fixed Configuration Server Addresses is selected.
6. Confirm that the Primary Address and Alternate Address is 127.0.0.1.
Note: If you use multiple Client IDs and traditional land-line access, the addresses must be manually configured back to the original addresses. For example: 57.8.81.13 and 57.8.81.113.
7. Click Apply.
8. Choose File > Save.
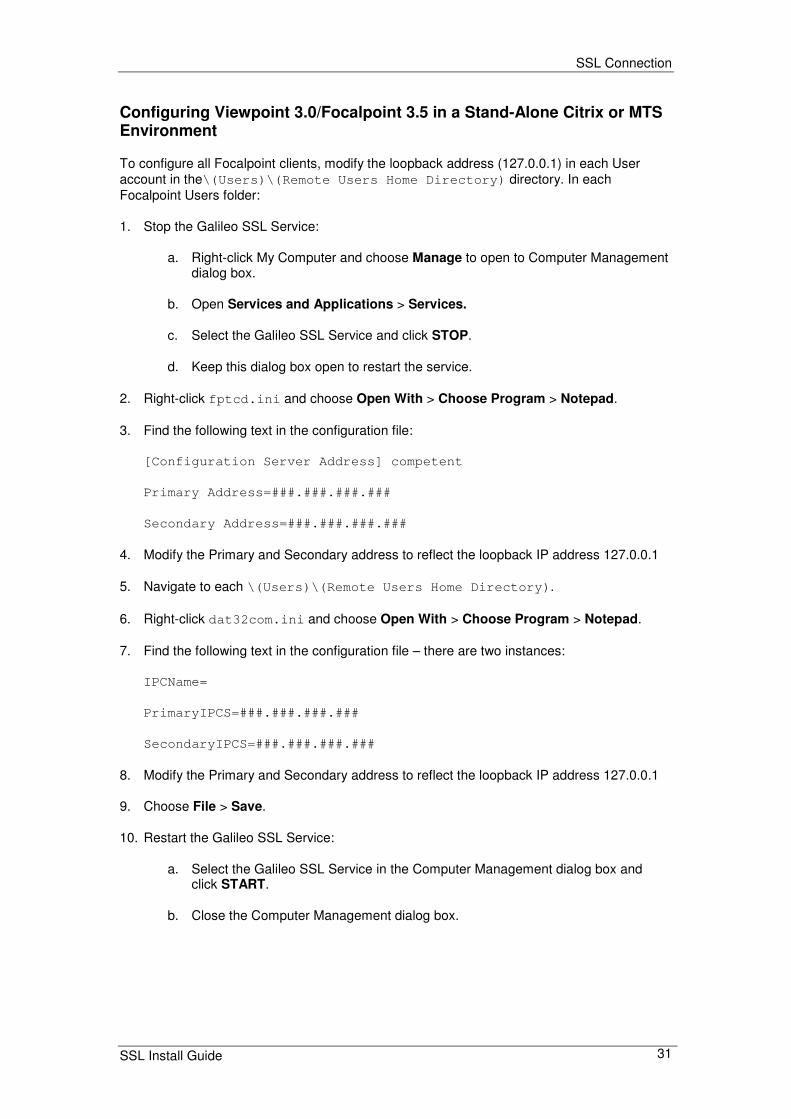
9. GPM automatically wakes up because it is configured to Connect on Startup. After GPM connected, it always stays connected. To manually set this option, from the Tools menu, select Connect On Startup.
SSL Connection
30 SSL Install Guide
Note: If GPM is configured downline of the Gateway, click Apply to manually request the download configuration. The message “Requesting Download” displays.
SSL Connection
SSL Install Guide 31
Configuring Viewpoint 3.0/Focalpoint 3.5 in a Stand-Alone Citrix or MTS Environment
To configure all Focalpoint clients, modify the loopback address (127.0.0.1) in each User account in the\(Users)\(Remote Users Home Directory) directory. In each
Focalpoint Users folder:
1. Stop the Galileo SSL Service:
a. Right-click My Computer and choose Manage to open to Computer Management dialog box.
b. Open Services and Applications > Services.
c. Select the Galileo SSL Service and click STOP.
d. Keep this dialog box open to restart the service.
2. Right-click fptcd.ini and choose Open With > Choose Program > Notepad.
3. Find the following text in the configuration file:
[Configuration Server Address] competent
Primary Address=###.###.###.###
Secondary Address=###.###.###.###
4. Modify the Primary and Secondary address to reflect the loopback IP address 127.0.0.1
5. Navigate to each \(Users)\(Remote Users Home Directory).
6. Right-click dat32com.ini and choose Open With > Choose Program > Notepad.
7. Find the following text in the configuration file – there are two instances:
IPCName=
PrimaryIPCS=###.###.###.###
SecondaryIPCS=###.###.###.###
8. Modify the Primary and Secondary address to reflect the loopback IP address 127.0.0.1
9. Choose File > Save.
10. Restart the Galileo SSL Service:
a. Select the Galileo SSL Service in the Computer Management dialog box and click START.
b. Close the Computer Management dialog box.
SSL Connection
32 SSL Install Guide
Configuring Viewpoint 3.0/Focalpoint 3.5 in Gateway Mode for a Citrix Load-Balanced (Cluster) or MTS Environment
To configure Viewpoint 3.0/Focalpoint 3.5, or later, in Gateway Mode for a Citrix Load-Balanced (Cluster) or MTS Environment, modify each Citrix-supported application configuration file to reflect the fixed IP of the SSL Gateway:
1. Stop the Galileo SSL Service:
a. Right-click My Computer and choose Manage.
b. Open Services and Applications > Services.
c. Select the Galileo SSL Service and click STOP.
2. Navigate to the Focalpoint Users directory, which is typically in the \MACHINE folder.
3. Right-click fptcd.ini and select Open With > Choose Program > Notepad.
4. Find the following text in the configuration file:
[Configuration Server Address]
Primary Address=###.###.###.###
Secondary Address=###.###.###.###
5. Modify the Primary and Secondary address to reflect the fixed IP address of the SSL Gateway.
6. Choose File > Save.
7. Restart the Galileo SSL Service:
a. Select the Galileo SSL Service in the Computer Management dialog box and click START.
b. Close the Computer Management dialog box.
SSL Connection
SSL Install Guide 33
Configuring GIDS for Galileo SSL
These configuration instructions apply to GIDS implementations in all environments.
Note: If your GIDS implementation uses more than one queue, contact your Galileo support person.
To configure GIDS for Galileo SSL:
1. Stop the Galileo SSL Service:
a. Right-click My Computer and choose Manage.
b. Open Services and Applications > Services.
c. Select the Galileo SSL Service and click STOP.
2. Install Galileo SSL on the machine that runs the GIDS Client Adapter.
3. Modify the SSLClientService.exe.config file.
a. Navigate to the Galileo SSL installation folder. For example: c:\Program Files\Galileo\SSL.
b. Right-click the SSLClientService.exe.config file and select Open With.
c. Select Notepad to display SSLClientService.exe.config in Notepad.
d. Add the following lines with the GIDS information, under the <appSettings> section if you are installing GIDS after previously installing the SSL Client:
<add key="GIDS Queuename Override" value="7G561G3381" />
e. Save and close SSLClientService.exe.config.
f. If running more than one client against the same GIDS queuename, see the following Multiple Clients section.
4. Open the Galileo IDS Configuration adapter utility.
5. In the GIDS Application Properties dialog box, change the MQ Host Name destination to 127.0.0.1.
6. Click Apply.
7. Restart the Galileo SSL Service:
a. Select the Galileo SSL Service in the Computer Management dialog box and click START.
b. Close the Computer Management dialog box.
Multiple Clients
If running more than one client against the same GIDS queuename, you must have a unique ID for each client. The help desk can assist in getting these added to the SSL database. The Unique ID can be an underscore for each queuename.
SSL Connection
34 SSL Install Guide
For example:
Before:
<add key="GIDS Queuename Override" value="7G561G3381" />
After: (server 1)
<add key="GIDS Queuename Override" value="7G561G3381_1" />
After: (server 2)
<add key="GIDS Queuename Override" value="7G561G3381_2" />
After: (server 3)
<add key="GIDS Queuename Override" value="7G561G3381_3" />
SSL Connection
SSL Install Guide 35
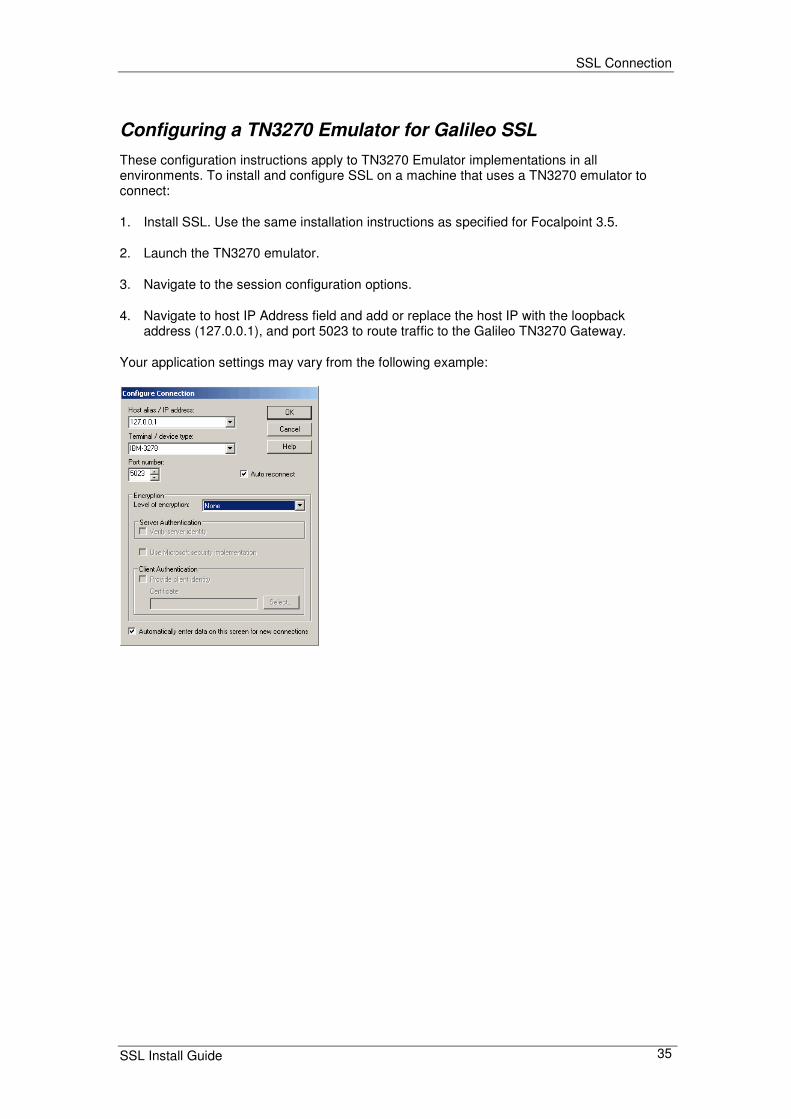
Configuring a TN3270 Emulator for Galileo SSL
These configuration instructions apply to TN3270 Emulator implementations in all environments. To install and configure SSL on a machine that uses a TN3270 emulator to connect:
1. Install SSL. Use the same installation instructions as specified for Focalpoint 3.5.
2. Launch the TN3270 emulator.
3. Navigate to the session configuration options.
4. Navigate to host IP Address field and add or replace the host IP with the loopback address (127.0.0.1), and port 5023 to route traffic to the Galileo TN3270 Gateway.
Your application settings may vary from the following example:
SSL Connection
36 SSL Install Guide
Configuring XML Select for Galileo SSL
These configuration instructions apply to XML Select implementations in all environments. When installing the Galileo SSL Client in an XML Select environment, the HCM Manager is automatically configured with the loopback settings.
To install Galileo SSL in an XML Select environment:
1. Launch the installation.
2. The installation checks for the presence of Microsoft.NET version 2.0. If already installed, the SSL installation continues.
a. If Microsoft.NET version 2.0 is not found the download starts automatically. The download is approx 23 MB.
b. After the download if prompted with a security message to run or not run, click Run.
c. Follow the Microsoft.NET install prompts to install.
d. After the .NET install, the SSL software installation automatically continues.
3. The Welcome Screen displays.
4. Click Next.
5. The Terms and Conditions Screen displays.
6. Click Yes to accept.
7. The Finish Screen displays.
8. Click Finish.
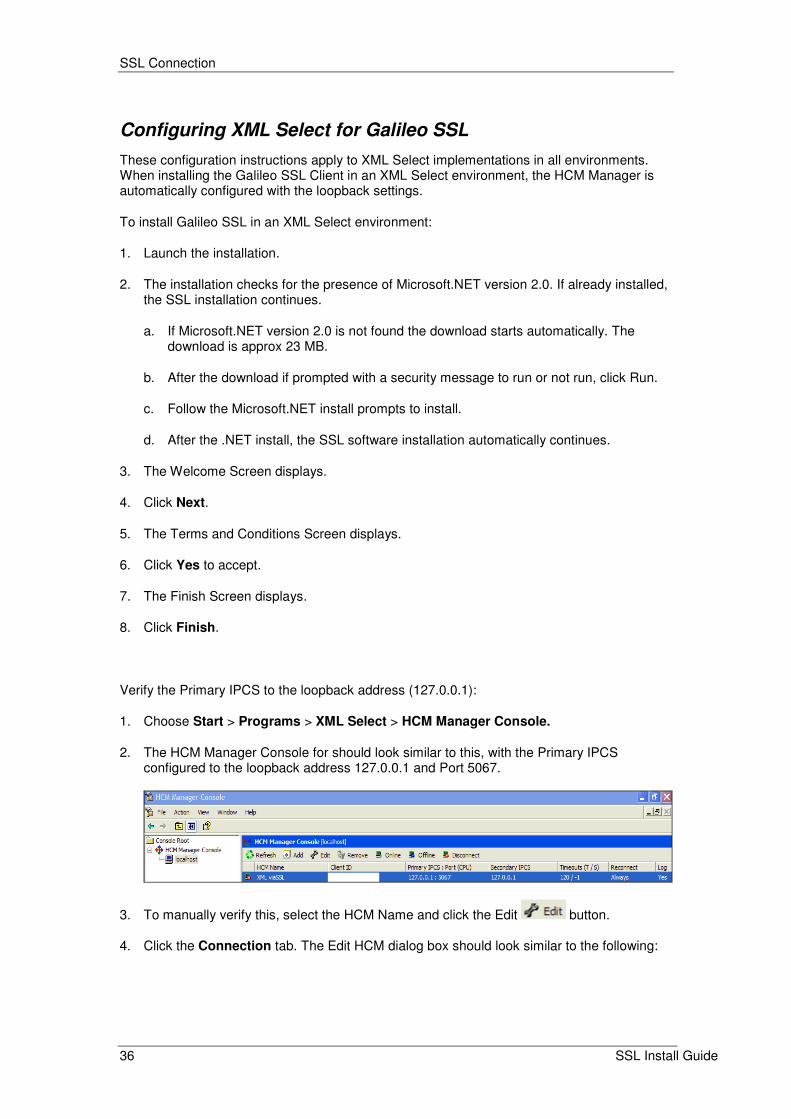
Verify the Primary IPCS to the loopback address (127.0.0.1):
1. Choose Start > Programs > XML Select > HCM Manager Console.
2. The HCM Manager Console for should look similar to this, with the Primary IPCS configured to the loopback address 127.0.0.1 and Port 5067.
3. To manually verify this, select the HCM Name and click the Edit button.
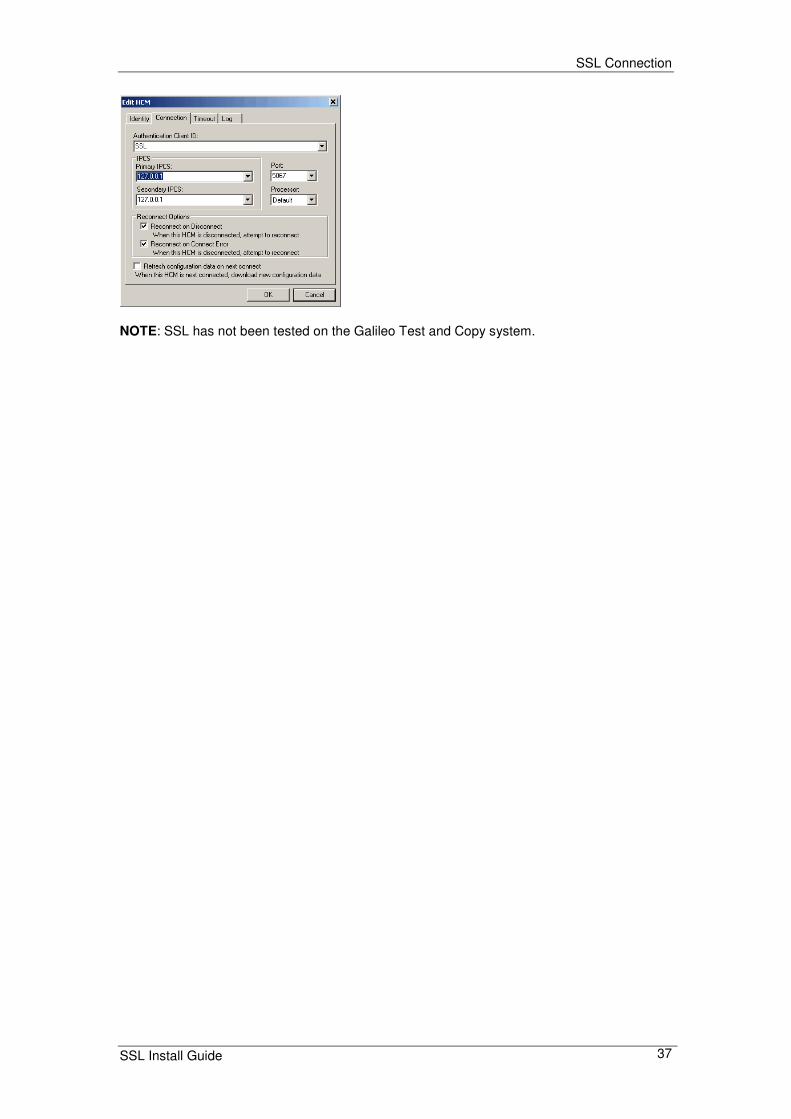
4. Click the Connection tab. The Edit HCM dialog box should look similar to the following:
SSL Connection
SSL Install Guide 37
NOTE: SSL has not been tested on the Galileo Test and Copy system.
SSL Connection
38 SSL Install Guide
Configuring Customer Proxy Servers for Galileo SSL
These configuration instructions apply to Customer proxy servers in a Typical Agency Workstation environment only.
This section describes installing SSL to support customer proxy servers. Customer proxy servers service the requests of its clients by forwarding requests to other servers. To install SSL to support customer proxy servers:
1. Install SSL on the Gateway machine. Use the same installation instructions as specified for Focalpoint 3.5.
2. Stop the Galileo SSL Service:
a. Right-click My Computer and choose Manage.
b. Open Services and Applications > Services.
c. Select the Galileo SSL Service and click STOP.
3. Enable proxy server support by adding the IP Address or DNS name of the proxy server in the SSLClientService.exe.config file.
4. Navigate to the default install folder. For example, C:\Program Files\Galileo\SSL
5. Right-click the file and choose Open With.
6. Select Notepad.
7. Add the following lines in the <AppSettings> section with the information for the
customer:
<add key="Proxy Server Address" value="customer proxy"/>
<add key="Proxy Server Port" value="customer proxy port"/>
8. Choose File > Save.
9. Restart the Galileo SSL Service:
a. Select the Galileo SSL Service in the Computer Management dialog box and click START.
b. Close the Computer Management dialog box.
Note: When using an HTTP proxy, please assure that the proxy idle timeout on port 443 is set to 3600 seconds or higher.

SSL Install Guide 39
Uninstalling Galileo SSL
Every time a new SSL package is installed, the previous version is uninstalled. The option exists, however, to completely remove the SSL package. Following are instructions to completely uninstall Galileo SSL from a computer:
Note: For a Silent Uninstall, see the Silent Uninstall section below these instructions.
1. Navigate to the Control Panel (typically from the Start menu, select Start > Settings > Control Panel. Review the help system for the OS to determine the correct procedure to display the Control Panel).
2. Double-click Add or Remove Programs.
3. Select Galileo SSL.
4. Click Change/Remove.
5. The following dialog box displays. Click Yes.
6. The Uninstall Complete dialog box displays. Click Finish.
SSL Connection
40 SSL Install Guide
Silent Uninstall
An option exists for “silent” uninstall, and no further uninstall procedures are required. This applies to all applications except XML Select. XML Select users must use the previous manual uninstall instructions. To set the application for Silent Uninstall:
1. Close any supported products.
2. Open a command window and navigate to the SSL installation file (.exe) location.
3. Type in the name of the install executable followed by the parameters –s –a –us. For example, GalileoSSLClient_v01.00.0012.exe -s -a -us
o The first parameter ‘s’ specifies that the package extraction is silent.
o The second parameter ‘a’ specifies to start setup.exe.
o The third parameter ‘us’ specifies the type of uninstall the setup should run: 'us' is uninstall silent.
o The third parameter can also be just ‘u’ to specify a standard uninstall procedure (not silent).
SSL Connection
SSL Install Guide 41
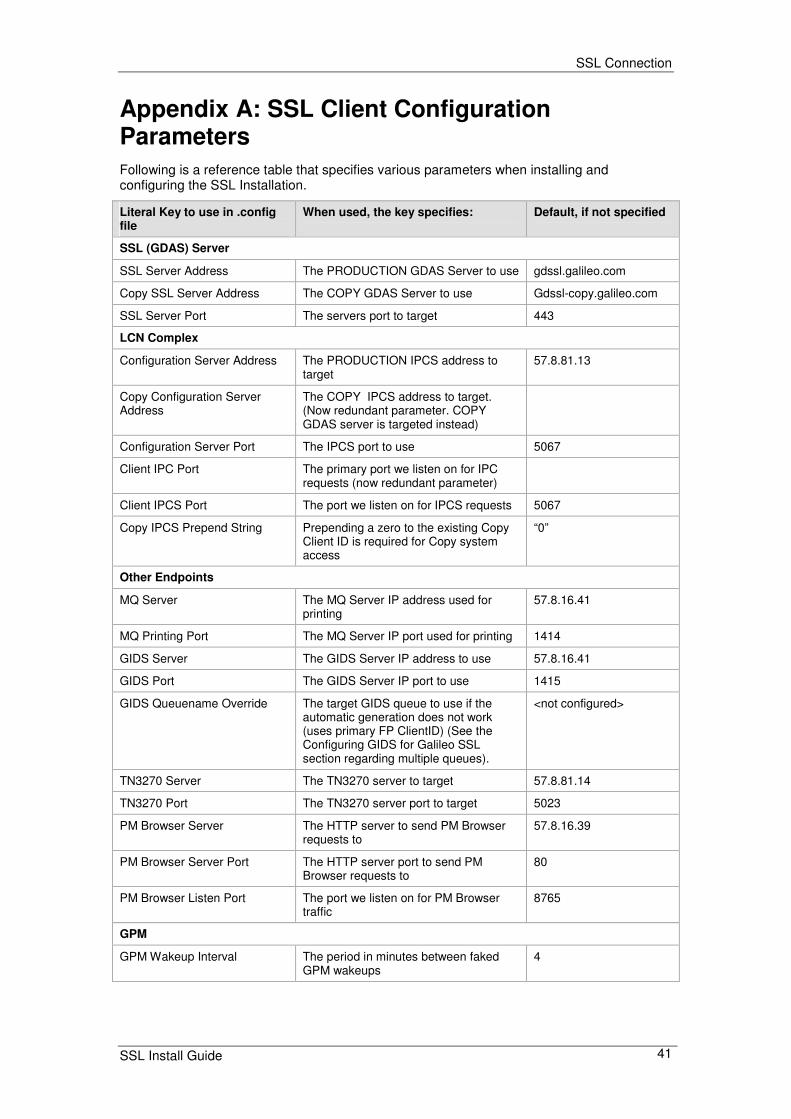
Appendix A: SSL Client Configuration Parameters
Following is a reference table that specifies various parameters when installing and configuring the SSL Installation.
Literal Key to use in .config file
When used, the key specifies: Default, if not specified
SSL (GDAS) Server
SSL Server Address The PRODUCTION GDAS Server to use gdssl.galileo.com
Copy SSL Server Address The COPY GDAS Server to use Gdssl-copy.galileo.com
SSL Server Port The servers port to target 443
LCN Complex
Configuration Server Address The PRODUCTION IPCS address to target
57.8.81.13
Copy Configuration Server Address
The COPY IPCS address to target. (Now redundant parameter. COPY GDAS server is targeted instead)
Configuration Server Port The IPCS port to use 5067
Client IPC Port The primary port we listen on for IPC requests (now redundant parameter)
Client IPCS Port The port we listen on for IPCS requests 5067
Copy IPCS Prepend String Prepending a zero to the existing Copy Client ID is required for Copy system access
“0”
Other Endpoints
MQ Server The MQ Server IP address used for printing
57.8.16.41
MQ Printing Port The MQ Server IP port used for printing 1414
GIDS Server The GIDS Server IP address to use 57.8.16.41
GIDS Port The GIDS Server IP port to use 1415
GIDS Queuename Override The target GIDS queue to use if the automatic generation does not work (uses primary FP ClientID) (See the Configuring GIDS for Galileo SSL section regarding multiple queues).
<not configured>
TN3270 Server The TN3270 server to target 57.8.81.14
TN3270 Port The TN3270 server port to target 5023
PM Browser Server The HTTP server to send PM Browser requests to
57.8.16.39
PM Browser Server Port The HTTP server port to send PM Browser requests to
80
PM Browser Listen Port The port we listen on for PM Browser traffic
8765
GPM
GPM Wakeup Interval The period in minutes between faked GPM wakeups
4

SSL Connection
42 SSL Install Guide
Literal Key to use in .config file
When used, the key specifies: Default, if not specified
Server Mode GPM machine IP Addresses
The IP addresses of known GPM machines to send wakeups to ONLY when using SSL Client Server Mode
<not configured>
Server Mode Local IP Address Use to override the detected local IP address of the machine ONLY when using SSL Client Server Mode
<not configured>
Proxy Server Configuration
Proxy Server Address The IP address/dns name of a proxy server to use if required
<not configured>
Proxy Server Port The IP port of a proxy server to use if required
<not configured>
General Configuration
Server Mode Enables SSL Client Server Mode. Traffic from local network machines will be accepted. To enable, set to “Enabled”.
<not configured>
Spoof Version 3 Test config parameter. Do not use. False
Disable Redirects Prevents automatic redirection to preferred GDAS SSL servers. To enable, set to “True”.
False
Keepalive Seconds The period in seconds between TCP/IP low level keepalives. May be tuned to avoid networking issues regarding lost connections.
120
Trace Level Override Changes the tracing level of the SSL Client. Values may be Critical, Error, Warning, Information, Verbose or All
Warning
SSL Connection
SSL Install Guide 43
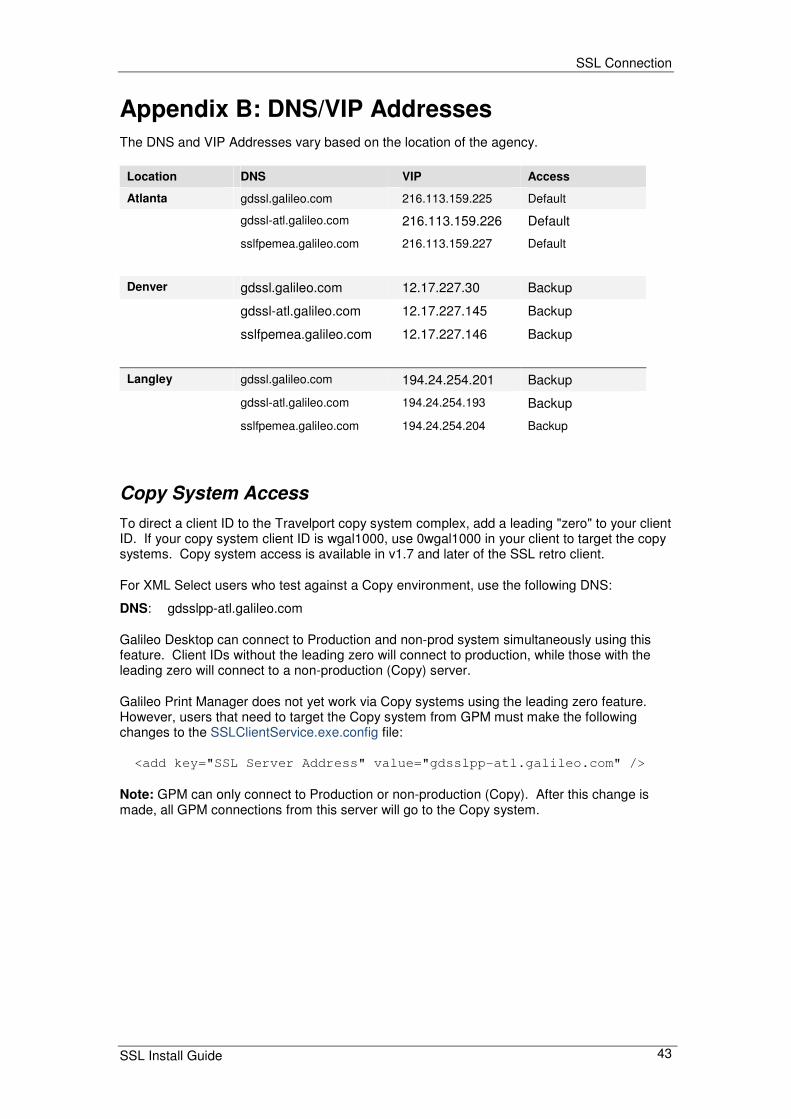
Appendix B: DNS/VIP Addresses
The DNS and VIP Addresses vary based on the location of the agency.
Location DNS VIP Access
Atlanta gdssl.galileo.com 216.113.159.225 Default
gdssl-atl.galileo.com 216.113.159.226 Default
sslfpemea.galileo.com 216.113.159.227 Default
Denver gdssl.galileo.com 12.17.227.30 Backup
gdssl-atl.galileo.com 12.17.227.145 Backup
sslfpemea.galileo.com 12.17.227.146 Backup
Langley gdssl.galileo.com 194.24.254.201 Backup
gdssl-atl.galileo.com 194.24.254.193 Backup
sslfpemea.galileo.com 194.24.254.204 Backup
Copy System Access
To direct a client ID to the Travelport copy system complex, add a leading "zero" to your client ID. If your copy system client ID is wgal1000, use 0wgal1000 in your client to target the copy systems. Copy system access is available in v1.7 and later of the SSL retro client.
For XML Select users who test against a Copy environment, use the following DNS:
DNS: gdsslpp-atl.galileo.com
Galileo Desktop can connect to Production and non-prod system simultaneously using this feature. Client IDs without the leading zero will connect to production, while those with the leading zero will connect to a non-production (Copy) server.
Galileo Print Manager does not yet work via Copy systems using the leading zero feature. However, users that need to target the Copy system from GPM must make the following changes to the SSLClientService.exe.config file:
<add key="SSL Server Address" value="gdsslpp-atl.galileo.com" />
Note: GPM can only connect to Production or non-production (Copy). After this change is made, all GPM connections from this server will go to the Copy system.

SSL Connection
44 SSL Install Guide
Add-ons Workaround
A Focalpoint/Desktop add-on is a feature, like Relay, Rapid Reprice, WebFares, Point and Click, ARNE, AutoServiceFee. These check the “Host=” statement in the WIN.INI file to validate what host is configured. Focalpoint/Desktop treats all Client IDs that start with “G” as Galileo and all others as Apollo, and sets this host= statement accordingly.
The new SSL copy access requires that you prepend a zero in front of the Client ID so a Galileo Copy Client ID triggers the application to set the win.ini as host=Apollo. The workaround for copy applies to a Galileo Copy Client ID. You need to configure with the zero, then change the host in win.ini back to host=Galileo.
To begin, open the win.ini file, and make the following change:
Before:
[Focalpoint]
SWDIR=C:\fp\swdir\
DATADIR=C:\fp\datadir\
MACHINEDIR=C:\fp\machine\
Host=Apollo
After:
[Focalpoint]
SWDIR=C:\fp\swdir\
DATADIR=C:\fp\datadir\
MACHINEDIR=C:\fp\machine\
Host=Galileo
Transient DNS Changes
The DNS to which you are assigned will remain the same (see the Default labels in the Access column in the DNS/VIP table), unless a problem arises and all users on that DNS are moved to another DNS. This migration is transparent, except that if you ping or trace your assigned DNS, the VIP will display the new system to which traffic is going. Upon completion of the fix, you will be switched back to your original VIP.
SSL Connection
SSL Install Guide 45
Appendix C: Troubleshooting
64-BIT OS Support
64-bit operating systems are now supported in SSL Client version 1.7 and above. However, there are several installation modifications required in order for it to work properly:
Installation
When installing the SSL Client, the install directory is \Program Files. After installation,
1. Navigate to C:\Program Files directory (or the default program files directory on your 64-bit machine).
2. Copy the Galileo International folder.
3. Navigate to C:\Program Files (x86).
4. Paste the Galileo International folder into the C:\Program Files (x86) directory.
ODBC Support
In the Windows 64-Bit OS, when creating an ODBC connection to the GIDS database, the default 64 Bit ODBC does not work. To add GIDS database configuration, set your ODBC configuration to access C:\Windows\SYSWOW64\odbcad32.exe.
Double-NIC
Double-NICs are supported in both 32-bit and 64-bit operating systems.
SSL Connection
46 SSL Install Guide
Telnet
Being able to telnet from your OS is a pre-requisite as a download from the SSL server. To test whether you can telnet from your OS, you must be able to launch a telnet application. In Windows XP, you can perform this from a DOS prompt. In Windows Vista, a 3
rd-party
application is required. To test via telnet whether you can connect to the SSL VIP:
1. Launch your telnet application.
2. Enter the following commands (below). If you can connect, you will receive a blank screen. Press the Enter key to drop the connection.
• telnet gdssl-atl.galileo.com 443
Note: You may receive the note:
Could not open connection to the host, on port 443: Connect failed.
This note indicates there is a connectivity issue between the workstation and the Galileo SSL farm. This should be investigated by the agency network personnel, and is likely a firewall rule issue. See the instructions on firewall rules and configuration for your installation type.


