52
B1WS-1261-01ENZ0(00) January 2016 FUJITSU Software Enterprise Service Catalog Manager V16.0 Installation Guide (GlassFish)
B1WS-1261-01ENZ0(00)January 2016
FUJITSU SoftwareEnterprise ServiceCatalog Manager V16.0
Installation Guide(GlassFish)
Trademarks LINUX is a registered trademark of Linus Torvalds.Microsoft and Windows are either registered trademarksor trademarks of Microsoft Corporation in the UnitedStates and/or other countries.Open Service Catalog Manager is a registered trademarkof FUJITSU LIMITED.Oracle, GlassFish, Java, and all Java-based trademarksand logos are trademarks or registered trademarks ofOracle Corporation and/or its affiliates.Apache Ant, Ant, and Apache are trademarks of TheApache Software Foundation.UNIX is a registered trademark of the Open Group in theUnited States and in other countries.Other company names and product names aretrademarks or registered trademarks of their respectiveowners.
Copyright FUJITSULIMITED 2016
All rights reserved, including those of translation into otherlanguages. No part of this manual may be reproducedin any form whatsoever without the written permission ofFUJITSU LIMITED.
High Risk Activity
The Customer acknowledges and agrees that the Product is designed, developedand manufactured as contemplated for general use, including without limitation,general office use, personal use, household use, and ordinary industrial use, but is notdesigned, developed and manufactured as contemplated for use accompanying fatalrisks or dangers that, unless extremely high safety is secured, could lead directly todeath, personal injury, severe physical damage or other loss (hereinafter "High SafetyRequired Use"), including without limitation, nuclear reaction control in nuclear facility,aircraft flight control, air traffic control, mass transport control, medical life supportsystem, missile launch control in weapon system. The Customer shall not use theProduct without securing the sufficient safety required for the High Safety Required Use.In addition, FUJITSU (or other affiliate's name) shall not be liable against the Customerand/or any third party for any claims or damages arising in connection with the HighSafety Required Use of the Product.
Export Restrictions
Exportation/release of this document may require necessary procedures in accordancewith the regulations of your resident country and/or US export control laws.
Contents
Installation Guide 3
ContentsAbout this Manual........................................................................... 5
1 Introduction...................................................................................... 8
1.1 CT-MG Architecture............................................................................................... 8
1.2 Distribution Media..................................................................................................9
2 Prerequisites and Preparation......................................................11
2.1 Hardware and Operating Systems.....................................................................11
2.2 Java and Ant........................................................................................................ 11
2.3 Application Server............................................................................................... 11
2.4 Relational Databases...........................................................................................12
2.5 Mail Server............................................................................................................13
2.6 Web Browsers...................................................................................................... 13
2.7 Authentication Mode........................................................................................... 13
3 Installation...................................................................................... 15
3.1 Preparing the Software and Setup Utilities...................................................... 15
3.2 Configuring CT-MG..............................................................................................16
3.3 Setting up the Databases................................................................................... 18
3.4 Setting up the Application Server Resources.................................................. 19
3.5 Next Steps............................................................................................................ 22
3.6 Configuration Steps Required for IdP Communication................................... 23
4 Update Installation.........................................................................25
5 Uninstallation..................................................................................30
Appendix A Application Server Resources......................................................31
A.1 CT-MG Domain.....................................................................................................31
A.2 Search Indexer Application Domain..................................................................33
Appendix B Configuration Settings.................................................................. 34
Contents
Installation Guide 4
B.1 GlassFish Configuration Settings for the Search Indexer ApplicationDomain.................................................................................................................. 34
B.2 GlassFish Configuration Settings for the CT-MG Domain.............................. 35
B.3 GlassFish JMS Configuration Settings............................................................. 38
B.4 Database Configuration Settings.......................................................................38
B.5 CT-MG Configuration Settings........................................................................... 39
B.6 SAML_SP Configuration Setting........................................................................ 51
About this Manual
Installation Guide 5
About this ManualThis manual describes how to install and uninstall FUJITSU Software Enterprise Service CatalogManager - hereafter referred to as Catalog Manager (CT-MG).The manual is structured as follows:
Chapter Description
Introduction on page 8 Provides an overview of CT-MG, its architecture, and thedistribution media.
Prerequisites and Preparation onpage 11
Describes the prerequisites that must be fulfilled and thepreparations you need to take before installing and deployingCT-MG.
Installation on page 15 Describes how to install CT-MG with the help of the utilitieswhich are shipped with the software.
Update Installation onpage 25
Describes how to update CT-MG.
Uninstallation on page 30 Describes how to uninstall CT-MG.
Application Server Resources onpage 31
Describes the resources required for CT-MG on theapplication server.
Configuration Settings onpage 34
Describes the CT-MG configuration settings.
Readers of this ManualThis manual is directed to operators who install and maintain CT-MG in their environment.It assumes that you are familiar with the following:• Administration of the operating systems in use, including the adaption and execution of batch
files or shell scripts.• Java EE technology, particularly as to the deployment on application servers.• Relational databases and their administration, in particular, the PostgreSQL database.• CT-MG concepts as explained in the Overview manual.• Installation and administration of Web servers.• Installation and administration of the GlassFish application server.
Notational ConventionsThis manual uses the following notational conventions:
Add The names of graphical user interface elements like menu options are shownin boldface.
init System names, for example command names and text that is entered fromthe keyboard, are shown in Courier font.
<variable> Variables for which values must be entered are enclosed in angle brackets.

About this Manual
Installation Guide 6
[option] Optional items, for example optional command parameters, are enclosed insquare brackets.
one | two Alternative entries are separated by a vertical bar.
{one | two} Mandatory entries with alternatives are enclosed in curly brackets.
AbbreviationsThis manual uses the following abbreviations:
API Application Programming Interface
CT-MG Catalog Manager
DBMS Database Management System
EJB Enterprise JavaBeans
IdP SAML Identity Provider
JMS Java Message Service
LDAP Lightweight Directory Access Protocol
PaaS Platform as a Service
PSP Payment Service Provider
SaaS Software as a Service
SAML Security Assertion Markup Language
SOAP Simple Object Access Protocol
STS Security Token Service
WSDL Web Services Description Language
WSIT Web Services Interoperability Technologies
The term "Windows" is used to denote the different Microsoft Windows operating systemssupported by CT-MG. "UNIX" stands for the supported UNIX operating systems, "Linux" for thesupported Linux systems.
Available DocumentationThe following documentation on CT-MG is available:• Overview: A PDF manual introducing CT-MG. It is written for everybody interested in CT-MG
and does not require any special knowledge.• Online Help: Online help pages describing how to work with the administration portal
of CT-MG. The online help is intended for and available to everybody working with theadministration portal.
• Installation Guide (GlassFish): A PDF manual describing how to install and uninstall CT-MG. Itis intended for operators who set up and maintain CT-MG in their environment.
• Operator's Guide: A PDF manual for operators describing how to administrate and maintainCT-MG.
About this Manual
Installation Guide 7
• Technology Provider's Guide: A PDF manual for technology providers describing how toprepare applications for usage in a SaaS model and how to integrate them with CT-MG.
• Supplier's Guide: A PDF manual for suppliers describing how to define and manage serviceofferings for applications that have been integrated with CT-MG.
• Reseller's Guide: A PDF manual for resellers describing how to prepare, offer, and sell servicesdefined by suppliers.
• Broker's Guide: A PDF manual for brokers describing how to support suppliers in establishingrelationships to customers by offering their services on a marketplace.
• Marketplace Owner's Guide: A PDF manual for marketplace owners describing how toadministrate and customize marketplaces in CT-MG.
• Developer's Guide: A PDF manual for application developers describing the public Web serviceinterface of CT-MG and how to integrate applications and external systems with CT-MG.
• ServerView Resource Orchestrator Integration (GlassFish): A PDF manual for operatorsdescribing how to offer and use virtual platforms and servers controlled by FUJITSUServerView Resource Orchestrator through services in CT-MG.
• Amazon Web Services Integration (GlassFish): A PDF manual for operators describing howto offer and use virtual servers controlled by the Amazon Elastic Compute Cloud Web servicethrough services in CT-MG.
• OpenStack Integration (GlassFish): A PDF manual for operators describing how to offer anduse virtual systems controlled by OpenStack through services in CT-MG.
• Trusted Public S5 Integration (GlassFish): A PDF manual for operators describing how to offerand use virtual systems controlled by FUJITSU Cloud IaaS Trusted Public S5 through servicesin CT-MG.
• Systemwalker Runbook Automation Integration Guide: A PDF manual for operators describinghow to offer and use automated operation processes of Systemwalker Runbook Automationthrough services in CT-MG.
• IaaS Integration Guide: A PDF manual for operators describing how to offer and use virtualsystems on different platforms through services in CT-MG.
• Javadoc documentation for the public Web service interface of CT-MG and additionalresources and utilities for application developers.
1: Introduction
Installation Guide 8
1 IntroductionCatalog Manager (CT-MG) is a set of services which provide all business-related functions andfeatures required for turning on-premise software applications into Software as a Service (SaaS)offerings and using them in the Cloud. This includes ready-to-use account and subscriptionmanagement, online service provisioning, billing and payment services, and reporting facilities.With its components, CT-MG covers all the business-related aspects of a Platform as a Service(PaaS) or Cloud platform. It supports software vendors as well as their customers in leveragingthe advantages of Cloud Computing.CT-MG is typically operated in data centers on servers providing for optimum performance,scalability, and non-stop operation. The applications integrated with CT-MG and their data may behosted in the same data centers as CT-MG or in different locations.
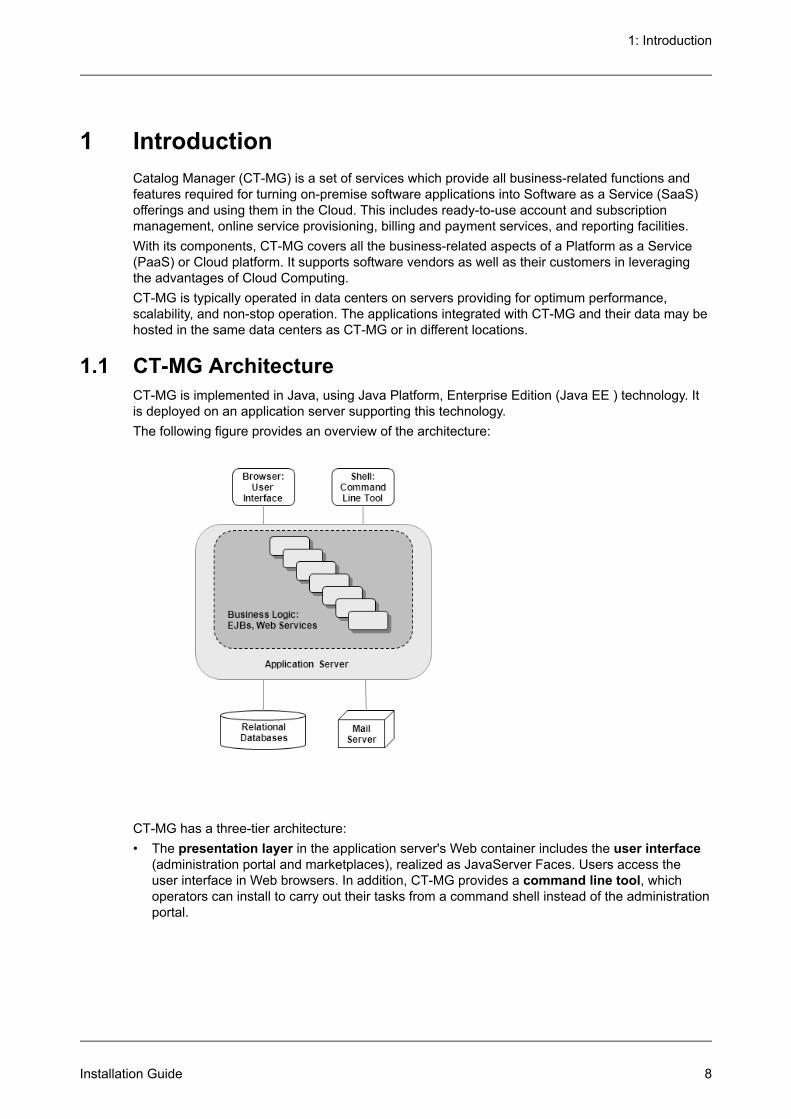
1.1 CT-MG ArchitectureCT-MG is implemented in Java, using Java Platform, Enterprise Edition (Java EE ) technology. Itis deployed on an application server supporting this technology.The following figure provides an overview of the architecture:
CT-MG has a three-tier architecture:• The presentation layer in the application server's Web container includes the user interface
(administration portal and marketplaces), realized as JavaServer Faces. Users access theuser interface in Web browsers. In addition, CT-MG provides a command line tool, whichoperators can install to carry out their tasks from a command shell instead of the administrationportal.
1: Introduction
Installation Guide 9
• The business logic is implemented in Enterprise JavaBeans (EJB). Both the EnterpriseJavaBeans and the public Web service interface are available in the application server'sEJB container. The public Web service interface is mainly used for integrating applicationsand external systems with CT-MG. However, it can also be employed for accessing CT-MGfunctionality from a Web service client. HTTPS must be used for communication with the publicWeb service interface.
• CT-MG persists its data through the Java Persistence API in relational databases.
For informing users about relevant issues (e.g. their registration or assignment to a subscription),CT-MG must have access to a mail server.
1.2 Distribution MediaCT-MG is distributed in the following packages:• Installation Package, oscm-install-pack.zip:
Contains the CT-MG software and documentation for installation and deployment in a datacenter. The package includes:• databases/bes_db subdirectory:
Configuration files for setting up the databases used by CT-MG.
• doc subdirectory:PDF manuals providing installation and operation instructions, an overview of CT-MG, andinformation on new features and compatibility issues when upgrading a CT-MG installation.
• domains/bes_domain subdirectory:Configuration files for setting up the application server resources for the domain to whichCT-MG is to be deployed, as well as the archive files that make up CT-MG.
• domains/indexer_domain subdirectory:Configuration files for setting up the application server resources for the domain to whichthe search indexer application is to be deployed, as well as the archive file that makes upthe search indexer application.
• install subdirectory:XML files that support you in setting up the databases and application server resources forCT-MG.
• licences subdirectory:License files of third-party software used by CT-MG.
• oscm-operatorclient.zip: The command line tool.
The subsequent chapters of this manual describe the installation and deployment in detail.
• Integration Package, oscm-integration-pack.zip:Contains the public Web service interface of CT-MG, its documentation as well as additionalresources, templates, samples, and utilities. Developers and technology providers can use thispackage for integrating applications and external systems with CT-MG. This is described indetail in the Technology Provider's Guide and the Developer's Guide.
• Payment Service Provider Integration Package, oscm-integration-psp-pack.zip:Contains the public Web service interface as well as additional resources and documentationfor integrating a payment service provider (PSP) with CT-MG.
1: Introduction
Installation Guide 10
• Integration Package for Asynchronous Provisioning, oscm-integration-app-pack.zip:Contains the asynchronous provisioning platform (APP) as well as samples anddocumentation. APP is a framework which provides a provisioning service, an operationservice, as well as functions, data persistence, and notification features which are alwaysrequired for integrating applications with CT-MG in asynchronous mode.
• ROR Integration Package, oscm-ror-install-pack.zip:Contains all the components required for integrating FUJITSU ServerView ResourceOrchestrator (ROR) with CT-MG as well as the related documentation.
• AWS Integration Package, oscm-aws-install-pack.zip:Contains all the components required for integrating the Amazon Elastic Compute Cloud Webservice with CT-MG as well as the related documentation.
• OpenStack Integration Package, oscm-openstack-install-pack.zip:Contains all the components required for integrating OpenStack services with CT-MG as wellas the related documentation.
• TPS5 Integration Package, oscm-tps5-install-pack.zip:Contains all the components required for integrating FUJITSU Trusted Public S5 with CT-MGas well as the related documentation.
2: Prerequisites and Preparation
Installation Guide 11
2 Prerequisites and PreparationThe following sections describe the prerequisites that must be fulfilled and the preparations youneed to take before installing and deploying CT-MG.
2.1 Hardware and Operating SystemsCT-MG as a Java application does not rely on specific hardware or operating systems. It can bedeployed on any platform supported by the application server and the database managementsystem.CT-MG without any data requires about 150 MB of disk space.Apart from this, CT-MG does not have specific requirements as to the power, performance,capacity, or configuration of CPUs, memory, and disks. CT-MG is usually deployed as part of aCloud platform for which the most powerful and efficient hardware is used anyway.
2.2 Java and AntCT-MG requires a Java Development Kit (JDK), version 7, 64 bit. Deployment with JDK 7, Update45 has been tested and is recommended.Due to a CORBA library change which is incompatible with Oracle GlassFish Server version3.1.2.2, deployment with JDK 7, Update 55 and higher is not supported.In order to be able to execute the installation scripts, you need to install the Apache Ant 1.8 (orhigher) open source software. In the subsequent sections, <ANT_HOME> is the installation directoryof Apache Ant.
2.3 Application ServerCT-MG must be deployed on an application server compatible with Java EE version 6. Thefollowing application server is supported:Oracle GlassFish Server, version 3.1.2.2.
Note: Before installing GlassFish, make sure that the JAVA_HOME environment variable points toa Java Development Kit (JDK), version 7, 64 bit.
Proceed as follows:1. Install the application server as described in its documentation, and configure it as required by
your environment.
Note: Make sure that the path of the GlassFish installation directory does not contain blanks.
2. After you have configured GlassFish, make a backup copy of the GlassFish installation.
3. Make sure that GlassFish is running in a JDK 7 environment. Also, make sure that no otherapplications (e.g. Tomcat) are running on your GlassFish ports.
CT-MG requires two domains in the application server:• One for the actual CT-MG application (bes-domain).• One for the search indexer application (master-indexer-domain). CT-MG applies a master/
slave search architecture: Every slave node delegates its index-related work to the master
2: Prerequisites and Preparation
Installation Guide 12
node. The slave node is where the CT-MG application runs; the master node is where thesearch indexer application runs.
Both domains can be created by running the CT-MG installation scripts.In the subsequent sections, <GLASSFISH_HOME> is the installation directory of GlassFish.
Note: CT-MG can be operated in a multi-node environment: You can install several CT-MGdomains communicating with one search indexer application domain. In this case, a loadbalancer must be configured for handling and distributing the load on the various nodes.In case you want to set up a multi-node environment, refer to the relevant documentation(application server, load balancer), or contact your Fujitsu support organization.
2.4 Relational DatabasesCT-MG stores its data in relational databases. The following database management system(DBMS) is supported:PostgreSQL, version 9.1.12.Install the DBMS as described in its documentation.It is recommended that you use a separate machine for the CT-MG databases.
Setup and ConfigurationEdit the file<postgres_dir>/data/postgresql.conf
as follows (<postgres_dir> is the PostgreSQL installation directory):1. Set the max_prepared_transactions property value to 50.2. Set the max_connections property value to 210.
This property determines the maximum number of concurrent connections to the databaseserver.Note the following: This setting is used in combination with the JDBC pool size settings forthe domains on your application server. If you change the JDBC pool size, you might need toadapt the max_connections setting. Refer to the CT-MG Operator's Guide, section TuningPerformance, for details.
3. Set the listen_addresses property value:Specify the IP addresses of all application servers on which the database server is to listenfor connections from client applications. If you use the entry '*', which corresponds to allavailable IP addresses, you must be aware of possible security holes.
4. Save the file.
If you use a server name in all configuration files instead of localhost during installation, edit thefile<postgres_dir>/data/pg_hba.conf
as follows (<postgres_dir> is the PostgreSQL installation directory):1. Add the IP address of the application server that is to host the CT-MG application.
For example:
host all all 123.123.12.1/32 md5
2: Prerequisites and Preparation
Installation Guide 13
Also add the application server's IPv6 address.For example:
host all all fe80::cdfb:b6ed:9b38:cf17/128 md5
There are authentication methods other than md5. For details, refer to the PostgreSQLdocumentation.
2. Save the file.
Restart your PostgreSQL server for the changes to take effect.
2.5 Mail ServerTo inform users about relevant issues (e.g. their registration or assignment to a subscription),CT-MG requires a mail server in its environment. You can use any mail server that supportsSMTP.The settings for addressing the mail server are defined in the glassfish.properties file for thebes-domain domain of CT-MG. Refer to GlassFish Configuration Settings for the CT-MG Domainon page 35 for details.
2.6 Web BrowsersThe CT-MG user interface supports the following Web browsers:• Google Chrome 42.0, 43.0• Microsoft Internet Explorer 9.0, 10.0, or 11.0• Mozilla Firefox 31.0 - 38.0
Note: Using the administration portal of CT-MG as well as marketplaces requires to havecookies enabled.
2.7 Authentication ModeBefore starting to install CT-MG, you must decide on how users and Web services are to beauthenticated.The following sections explain the supported scenarios.
INTERNAL Authentication ModeCT-MG is installed as a platform for public access from anywhere in the Internet. Users areauthenticated with CT-MG and can be managed in CT-MG or an existing LDAP system of anorganization. Web service calls are formatted as SOAP messages and are authenticated inCT-MG either by providing a user ID and password in their header, or by certificates.This authentication mode is referred to as INTERNAL.It is recommended to use the INTERNAL authentication mode if Web browser single sign-on is notrequired, and if your customers are to be able to register themselves.
SAML_SP Authentication ModeCT-MG is installed as a SAML 2.0 service provider. SAML (Security Assertion Markup Language)is an XML-based protocol that uses SAML assertions to pass information about a user between
2: Prerequisites and Preparation
Installation Guide 14
a SAML IdP and a SAML service provider (CT-MG). With SAML 2.0, Web browser single sign-onwithin a company is provided.All users and Web service calls are authenticated against the authentication system underlyingthe IdP, for example, OpenAM, Cloudminder, or Active Directory. The IdP provides a Web browsersingle sign-on profile (SSO profile) and a Security Token Service (STS). This is a Web service thatissues security tokens as defined in the WS-Security/WS-Trust specification. A connection to theIdP is always established by the client (Web browser or Web service application), not by CT-MG.The client sends a request for a SAML assertion. The IdP returns an assertion authenticating thecalling user.The user data is managed in the IdP. Additionally, all users who are to work with CT-MG must beregistered explicitly in CT-MG.This authentication mode is referred to as SAML_SP.It is recommended to use the SAML_SP authentication mode if you want to operate CT-MG ina company network and use existing authentication mechanisms that support the SAML 2.0standard. Customer self-registration is not supported in this case, and should thus be disabled.Required Information From the IdPWhen using CT-MG in SAML_SP mode, additional configuration settings in CT-MG are necessary.For this, you require the following:• A contractual relationship with the IdP operator so that the IdP can allow for Web browser SSO
and secure of Web service calls using a Security Token Service (STS).• Information on three service endpoints. Ask the IdP operator for the following information:
• For Web browser SSO: SAML Redirect URL for the IdP service endpoint.• For STS communication: STS service endpoint URL as well as the URL pointing to the MEX
address (Issuer Metadata Exchange) of the STS.
• Length of the encryption key used by the IdP.• Information on whether the IdP can process GET or POST authentication requests.• For Web browser SSO: the public key certificate from the IdP. Request this certificate from the
IdP operator.
3: Installation
Installation Guide 15
3 InstallationThe installation of CT-MG consists of the following main steps:1. Preparing the CT-MG software and setup utilities. Refer to Preparing the Software and Setup
Utilities on page 15.2. Adapting configuration files. Refer to Configuring CT-MG on page 16.3. Setting up the databases. Refer to Setting up the Databases on page 17.4. Setting up the resources in the application server and deploying the CT-MG archives. Refer to
Setting up the Application Server Resources on page 18.5. Logging in to CT-MG, creating users, and checking the configuration of CT-MG. Refer to Next
Steps on page 22.6. When installing CT-MG in SAML_SP authentication mode, additional steps are required. Refer
to Configuration Steps Required for IdP Communication on page 23.
The descriptions in the subsequent sections assume that you are using the CT-MG setup utilitiesfor setting up the databases and the application server resources. This is the easiest way andsuitable for most environments, particularly when you are using a database management systemand application server installation solely for CT-MG.In specific situations, however, you may have to set up some or all of the resources manually. Thisis the case, for example, if you want to integrate the CT-MG resources in an existing environmenton an application server.The resources required by CT-MG on the application server are described in detail in ApplicationServer Resources on page 31. Details of how to set up the resources properly can best beobtained from the XML files which are provided for the automated installation and described in thesections below.
3.1 Preparing the Software and Setup UtilitiesThe CT-MG software and setup utilities are provided in the CT-MG installation package,oscm-install-pack.zip. The contents of the installation package need to be made available inyour environment as follows:Extract the contents of the CT-MG installation package, oscm-install-pack.zip, to a separatetemporary directory on the system from where you want to install and deploy CT-MG.In the following sections, this directory is referred to as <install_pack_dir>.After extraction, the following directories are available:• databases/bes_db
Configuration files for setting up the databases used by CT-MG.
• doc
PDF manuals providing installation and operation instructions, an overview of CT-MG, andinformation on new features and compatibility issues when upgrading a CT-MG installation.
• domains/bes_domain
Configuration files for setting up the application server resources for the domain to whichCT-MG is to be deployed. The domains/bes_domain/applications subdirectory contains thearchive files that make up CT-MG:• oscm.ear: The CT-MG platform.
• oscm-portal.war: The CT-MG administration portal and marketplace.
3: Installation
Installation Guide 16
• eclipse-birt-runtime.war: The report engine.
• oscm-portal-help.war. The online help for the administration portal and the marketplaces.
• domains/indexer_domain
Configuration files for setting up the application server resources for the domain to whichthe search indexer application (oscm-search.ear) is to be deployed. The domains/indexer_domain/applications subdirectory contains the oscm-search.ear file.
• install
XML files that support you in setting up the databases and application server resources forCT-MG.
• licenses
License files of third-party software used by CT-MG.
• oscm-operatorclient.zip: The command line tool.
Note: The <install_pack_dir>/install directory contains a properties file,parallel-execution.properties. Do not change the content of this file!
3.2 Configuring CT-MGThe CT-MG software and setup utilities require a number of settings. These settings are providedin the following subdirectories and files of <install_pack_dir>:• databases/bes_db
• db.properties: Settings for the database setup and access.• configsettings.properties: Configuration settings for the CT-MG services.
The initial installation stores these settings in the bss database, where you can changethem later, if required. An update installation only adds new settings to the database butdoes not overwrite existing ones.
• sso.properties: Configuration setting for creating the first platform operator in CT-MG(ADMIN_USER_ID). Only required when installing CT-MG in SAML_SP authentication mode.
• domains/bes_domain
The configuration settings for setting up the application server domain to which the CT-MGapplications will be deployed are provided in the following files:• glassfish.properties: Configuration settings for the application server.• glassfishJMSBroker.properties: Configuration settings for the Java Message Service
(JMS) in the application server.
• domains/indexer_domain
The configuration settings for setting up the application server domain to which the searchindexer application will be deployed are provided in the following files:• glassfish.properties: Configuration settings for the application server.• glassfishJMSBroker.properties: Configuration settings for the Java Message Service
(JMS) in the application server.
Additional configuration files contained in other subdirectories are used internally and must not bechanged.
3: Installation
Installation Guide 17
You need to adapt the settings in the files above to your environment. In particular, server names,ports, paths, user IDs, and passwords require adaptation. If installed in SAML_SP authenticationmode, additional settings are required.Proceed as follows to view and adjust the configuration settings:1. Open each of the configuration files listed above with an editor.2. Check the settings in each file and adapt them to your environment.
For details on the individual settings, refer to Configuration Settings on page 34.
3. Save the files to their original location in <install_pack_dir>/<subdirectory>. For futurereference, it is a good idea to create a backup of the files.
Observe the following configuration issues:• The specified ports are suggestions and work with the default settings used in the files.• If you install everything on the local system, use either the server name or localhost in all
configuration files for all URLs that need to be resolved by CT-MG.Do not mix the specification of server names and localhost.The BASE_URL_HTTPS setting, and, if specified, the BASE_URL setting in theconfigsettings.properties file must be resolved by clients. They always require thespecification of the server name.Specify the settings as follows:
BASE_URL_HTTPS=https://<host>:<port>/oscm-portalBASE_URL_HTTP=http://<host>:<port>/oscm-portal
• On Windows, in the glassfish.properties files, double-escape thecolon in the drive specification of the path to the search indexer application(hibernate.search.shared.sourceBase). Otherwise the search indexer application maynot work properly. The directory you specify for the search indexer application is createdautomatically.Example:
hibernate.search.shared.sourceBase=C\\:/glassfish/masterSourceBase
• The following settings in the configsettings.properties file are mandatory when installingCT-MG in SAML_SP authentication mode:• AUTH_MODE
• SSO_ISSUER_ID
• SSO_IDP_URL
• SSO_IDP_AUTHENTICATION_REQUEST_HTTP_METHOD
• SSO_STS_URL
• SSO_STS_METADATA_URL
• SSO_STS_ENCKEY_LEN
• SSO_IDP_TRUSTSTORE
• SSO_IDP_TRUSTSTORE_PASSWORD
3: Installation
Installation Guide 18
3.3 Setting up the DatabasesCT-MG requires and stores its data in the following PostgreSQL databases:• The CT-MG database (bss). This database is used for the actual business data, as well as for
resources and configuration settings, for example, timer data.
• The JMS database (bssjms). This database is used for storing JMS data.
The databases are created by executing installation scripts. They need to be initialized with theappropriate schema and settings.Proceed as follows:1. Make sure that the database server is running.2. Open the command prompt (Windows) or a terminal session (UNIX/Linux).3. Set the following environment variable for your current session:
DB_INTERPRETER: The absolute path and name of the psql executable of PostgreSQL. Theexecutable is usually located in the bin subdirectory of the PostgreSQL installation directory.Example (Unix/Linux):
export DB_INTERPRETER="/opt/PostgreSQL/9.1/bin/psql"
Example (Windows):
set DB_INTERPRETER="C:\Program Files\PostgreSQL\9.1\bin\psql"
4. Create the CT-MG databases by executing the build-db.xml file in <install_pack_dir>/install as follows:
<ANT_HOME>/bin/ant -f build-db.xml initDB
If you set a password other than postgres for the PostgreSQL user account (postgres) wheninstalling the database management system, you have to specify the password with the call tothe build-db.xml file as follows:
<ANT_HOME>/bin/ant -f build-db.xml initDB -Ddb.admin.pwd=<password>
Note: It may be required to enclose the -Ddb.admin.pwd=<password> command in double orsingle quotes depending on the operating system.
If the setup of the databases fails with errors, proceed as follows:1. Check and correct the configuration files.2. Execute the build-db.xml file in <install_pack_dir>/install as follows:
<ANT_HOME>/bin/ant -f build-db.xml DROP.dbsAndUsers
3. Repeat the setup.
3: Installation
Installation Guide 19
3.4 Setting up the Application Server ResourcesCT-MG requires specific settings and resources in the application server, such as a data sourceand JMS queues. For details on the resources, refer to Application Server Resources onpage 31.Before starting to install CT-MG, make sure that the application server ports you want to use areavailable. The GlassFish domain creation reserves some ports using the following rules based onthe port base principle. For example, when using port base 8000:Portbase + 48: admin port: 8048Portbase + 80: HTTP listener: 8080Portbase + 81: HTTP listener: 8081Portbase + 86: JMX port: 8086Portbase + 76: JMS broker port: 8076Portbase + 37: IIOP listener: 8037Portbase + 38: IIOP listener: 8038Portbase + 39: IIOP listener: 8039By default, the CT-MG installation assumes the following ports:8048: admin port of the CT-MG domain.8448: admin port of the search indexer application domain.You can specify the port numbers in the glassfish.properties configuration files.Proceed as follows to create the resources and make the required settings in the applicationserver:1. Open the command prompt (Windows) or a terminal session (UNIX/Linux).2. Execute the build-glassfish.xml file in <install_pack_dir>/install as follows:
<ANT_HOME>/bin/ant -f build-glassfish.xml SETUP
Note: The <install_pack_dir>/domains directory contains a properties file,InstallationOrder.properties. Do not change the content of this file! The searchindexer application domain must always be installed before the CT-MG domain.
Results of the Build Script ExecutionThe execution of the SETUP target defined in the build-glassfish.xml file has the followingresults:1. Domains and resources:
• The master-indexer-domain domain is created and started.• The search indexer application (oscm-search.ear) is deployed to the
master-indexer-domain domain.• The bes-domain domain is created and started.• The following applications are deployed to the bes-domain domain:
oscm.ear
oscm-portal.war
eclipse-birt-runtime.war
oscm-portal-help.war
3: Installation
Installation Guide 20
• The oscm-security.jar, the postgresql-9.1-903.jdbc4.jar, and thecommons-codec-1.7.jar files are copied from the directory to which you extracted theCT-MG installation package (<install_pack_dir>/domains/bes_domain/lib) to the libdirectory of the bes-domain domain.
• The javax.faces.jar file is copied from the directory to which you extracted the CT-MGinstallation package (<install_pack_dir>/install/lib) to the <GLASSFISH_HOME>/modules directory.
• The required resources, email settings, JMS queues, data sources are created in theapplication server. Refer to Application Server Resources on page 31 for details.
• The directory traversal is disabled for both domains, bes-domain andmaster-indexer-domain: The directory listing parameter is set to false in thedefault-web.xml file in the domain directories you are using for CT-MG.
2. JVM options set for the master-indexer-domain domain during the installation:
-Dfile.encoding=UTF8-Duser.language=en-Dorg.glassfish.jms.EagerStartup=true-XX:MaxPermSize=512m-Dhibernate.search.default.directory_provider= org.hibernate.search.store.impl.FSMasterDirectoryProvider-Dhibernate.search.default.indexBase=${com.sun.aas.instanceRoot}/ masterIndexBase-Dhibernate.search.default.sourceBase=${hibernate.search.shared.sourceBase}-Dhibernate.search.default.refresh=${hibernate.search.default.refresh}-Dorg.apache.catalina.loader.WebappClassLoader. ENABLE_CLEAR_REFERENCES=false
3. JVM options set for the bes-domain domain during the installation:
-Dfile.encoding=UTF8-XX:MaxPermSize=512m-Dsun.java2d.print.polling=false-Dsun.net.inetaddr.ttl=3600-Duser.language=en-Dhibernate.search.default.directory_provider= org.hibernate.search.store.impl.FSSlaveDirectoryProvider-Dhibernate.search.indexing_strategy=manual-Dhibernate.search.default.indexBase=${com.sun.aas.instanceRoot}/ slaveIndexBase-Dhibernate.search.default.sourceBase=${hibernate.search.shared.sourceBase}-Dhibernate.search.default.refresh=${hibernate.search.default.refresh}-Dorg.apache.catalina.loader.WebappClassLoader. ENABLE_CLEAR_REFERENCES=false
After a successful deployment, you have two domains with the following setup:
3: Installation
Installation Guide 21
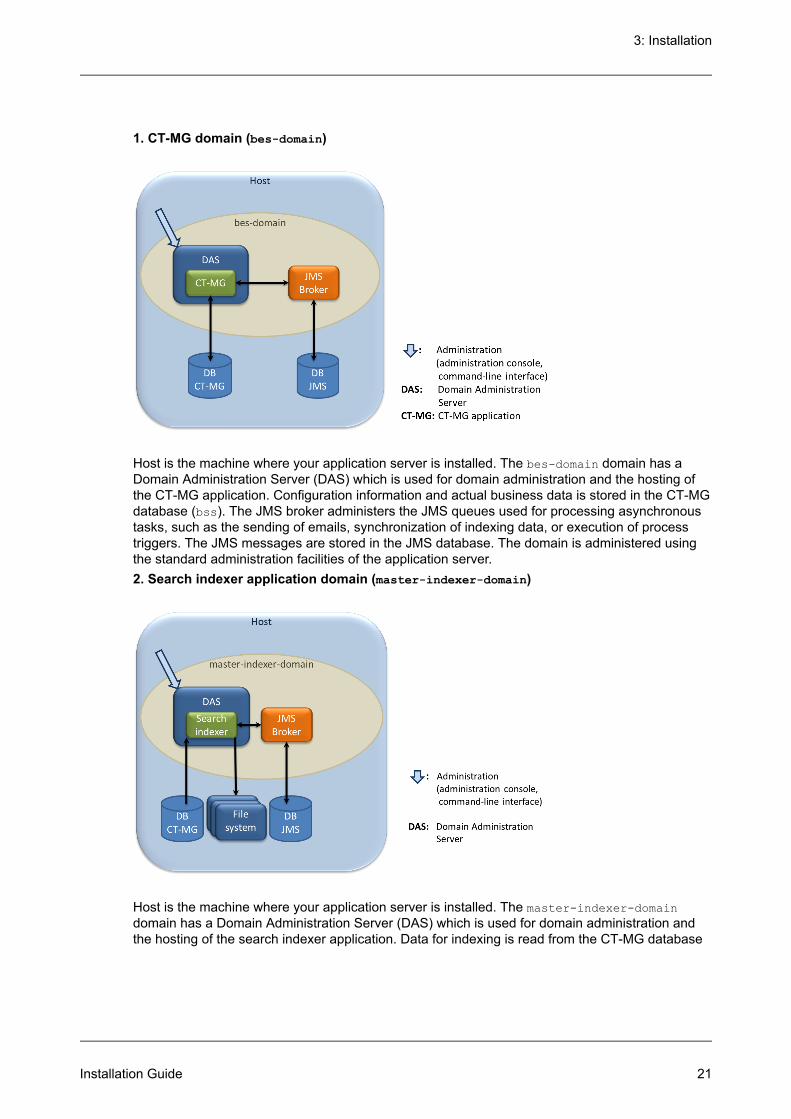
1. CT-MG domain (bes-domain)
Host is the machine where your application server is installed. The bes-domain domain has aDomain Administration Server (DAS) which is used for domain administration and the hosting ofthe CT-MG application. Configuration information and actual business data is stored in the CT-MGdatabase (bss). The JMS broker administers the JMS queues used for processing asynchronoustasks, such as the sending of emails, synchronization of indexing data, or execution of processtriggers. The JMS messages are stored in the JMS database. The domain is administered usingthe standard administration facilities of the application server.2. Search indexer application domain (master-indexer-domain)
Host is the machine where your application server is installed. The master-indexer-domaindomain has a Domain Administration Server (DAS) which is used for domain administration andthe hosting of the search indexer application. Data for indexing is read from the CT-MG database
3: Installation
Installation Guide 22
(bss) and written to a shared directory on the file system. This directory hosts the search indexfor the master indexer node. It is specified by the hibernate.search.shared.sourceBaseconfiguration setting in the glassfish.properties files of both domains. The JMS brokeradministers the JMS queue used for processing indexing jobs. The JMS messages are stored inthe JMS database. The domain is administered using the standard administration facilities of theapplication server.If the setup of the application server resources fails with errors, proceed as follows:1. Stop the application server domains related to CT-MG.2. Delete the bes-domain domain.3. Delete the master-indexer-domain domain.4. Delete the shared directory for the master search index.5. Repeat the setup.
If you want to set up a single domain:Add a parameter indicating which domain you want to set up, and execute thebuild-glassfish.xml file in <install_pack_dir>/install as follows:For setting up the search indexer application domain:
<ANT_HOME>/bin/ant -Ddomain.setup=indexer_domain -f build-glassfish.xml SETUP
For setting up the CT-MG domain:
<ANT_HOME>/bin/ant -Ddomain.setup=bes_domain -f build-glassfish.xml SETUP
Note: It may be required to enclose the -Ddomain.setup=<domain> command in double orsingle quotes depending on the operating system.
3.5 Next StepsAfter you have successfully completed the installation of CT-MG, you can optionally change theURL to be used for accessing the CT-MG administration portal and the marketplaces. You canthen start to set up the CT-MG organizations using the CT-MG administration portal.
Setting the Context RootBy default, i.e. if you used the CT-MG installation scripts, the context root of the URL used foraccessing the CT-MG administration portal and the marketplaces is oscm-portal. You canchange this setting in the application server administration console. In addition, you need to adaptthe BASE_URL_HTTPS configuration setting, and, if specified, the BASE_URL configuration setting, inCT-MG.1. In the application server administration console:
1. Go to Applications -> oscm-portal -> Edit and set the Context Root as required.2. Go to Applications -> oscm-portal-help -> Edit and set the Context Root analogously to
the one for oscm-portal.Example: If you set the context root for oscm-portal to MyPortal, set it to MyPortal-helpfor oscm-portal-help.
3: Installation
Installation Guide 23
2. In the CT-MG administration portal, go to Operation -> Update Configuration Settings andchange the BASE_URL_HTTPS configuration key, and, if specified, the BASE_URL configurationkey, accordingly. See below for details on accessing CT-MG.
Accessing CT-MGYou can access the CT-MG administration portal in a Web browser using an URL in the followingformat:https://<server>:<port>/<context-root> orhttp://<server>:<port>/<context-root>
<server> is the host of the application server where CT-MG has been deployed. <port> is theport to address the application server (default: 8080 for HTTP, 8081 for HTTPS). <context-root>is the context root of CT-MG (default: oscm-portal).You are prompted for a user ID and password.Depending on the authentication mode, the initial credentials are the following:• INTERNAL:
User ID: administratorPassword: admin123It is recommended that you change the initial password in the CT-MG administration portal(Change Password page in the Account menu).
• SAML_SP:User ID: The ID you specified in the ADMIN_USER_ID configuration key in the sso.propertiesconfiguration file.Password: Password as known in the IdP for the above user.
Creating an Additional Operator AccountThe creation of an additional operator account for your organization is useful, for example, to beable to delegate operational tasks or to unlock other operator accounts in case the password hasbeen forgotten. Proceed as follows:In the CT-MG administration portal, choose Register new users in the Account menu. Enter therelevant user data and assign at least the Operator role.
Changing the CT-MG ConfigurationRefer to the Operator's Guide in case you need to change the configuration of your CT-MGinstallation.
3.6 Configuration Steps Required for IdP CommunicationAfter having successfully deployed CT-MG in SAML_SP authentication mode, the following stepsmust be performed in the IdP and in CT-MG:1. The IdP operator must ensure that the correct endpoints for the Web UI SSO and STS
connections are activated.2. For STS, the IdP operator must create the relying party for CT-MG in the IdP, and all CT-MG
users must be allowed to access this relying party. The URL of the relying party is usually theURL for accessing the CT-MG administration portal.
3: Installation
Installation Guide 24
3. For Web browser SSO, an SSO federation with the IdP must be established in a way thatCT-MG acts as the relying party.
4. CT-MG must be registered with the IdP. One way to achieve this is to use CT-MG metadata.The minimum data required are a name or ID of CT-MG as a service provider (as specified inthe SSO_ISSUER_ID configuration key) and the URL to which the IdP is to send its responses(as specified in the BASE_URL or BASE_URL_HTTPS configuration key).The IdP operator requires a URL in the following format:http://<host>:<port>/<context-root>/saml2/metadata.jsp
where <host>, <port>, and <context-root> point to the CT-MG installation.
5. For Web browser SSO: Import the IdP certificate into the application server truststore whereCT-MG is deployed, and set the SSO_IDP_TRUSTSTORE and SSO_IDP_TRUSTSTORE_PASSWORDconfiguration keys accordingly. Refer to the Operator's Guide for details on certificate handling.
6. For using the STS for authenticating Web service calls, the IdP operator requires the CT-MGdomain certificate. He has to import this certificate into the truststore of the application serverwhere the STS is deployed. Refer to the Operator's Guide for details on certificate handling.
7. For Web browser SSO and for STS, the assertions returned to CT-MG must contain user IDs.This is required for CT-MG to map the users to the CT-MG user roles (such as administrator,service manager, marketplace manager).To achieve this, the IdP must be configured such that its assertions contain an<AttributeStatement> element. Its <Attribute> subelement must contain a Name="userid"property, and the <AttributeValue> subelement must specify the user ID that matches the IDof the calling user in CT-MG .Example:
<saml:Assertion ...> ... <saml:AttributeStatement> <saml:Attribute Name="userid"> <saml:AttributeValue>administrator</saml:AttributeValue> </saml:Attribute> </saml:AttributeStatement> </saml:Assertion>
4: Update Installation
Installation Guide 25
4 Update InstallationBefore updating your installation of CT-MG, read the Release Notes of the new release. Theycontain information on compatibility issues, changes and enhancements, and known restrictions.
Note: An update installation cannot change the authentication mode (INTERNAL or SAML_SP).You can only upgrade from an installation in INTERNAL mode to an installation inINTERNAL mode, or an installation in SAML_SP mode to an installation in SAML_SPmode.
Preparing the UpdateBefore you start with the update installation, carry out the following steps:1. In the bes-domain and the master-indexer-domain domains, check whether all JMS
messages have been processed. They are stored in the bssjms database. For example, checkthe JMS broker as follows:For the bes-domain domain:
<GLASSFISH_HOME>/mq/bin/imqcmd.exe -b localhost:8076 -u admin query bkr
For the master-indexer-domain domain:
<GLASSFISH_HOME>/mq/bin/imqcmd.exe -b localhost:8476 -u admin query bkr
where 8076 or 8476 is the port where the JMS broker is running.When executing the above command, you need to specify a password. The default passwordadmin is defined in the password.sample file in the <GLASSFISH_HOME>/mq/etc directory. Itis set automatically after the installation of GlassFish. You can also call the above commandtogether with this password file, for example for the bes-domain domain:
<GLASSFISH_HOME>/mq/bin/imqcmd.exe -b localhost:8076 -u admin query bkr -passfile ../etc/passfile.sample
2. Set the following environment variable for your current session:DB_INTERPRETER: The absolute path and name of the psql executable of PostgreSQL. Theexecutable is usually located in the bin subdirectory of the PostgreSQL installation directory.Example:
export DB_INTERPRETER="/opt/PostgreSQL/9.1/bin/psql"
3. If you are running CT-MG in SAML_SP mode and want to update or change STS-relatedconfiguration settings:In the configsettings.properties file located in <install_pack_dir>/databases/bes_db,change the values for the following configuration parameters as required:SSO_STS_ENCKEY_LEN
SSO_STS_METADATA_URL
SSO_STS_URL

4: Update Installation
Installation Guide 26
4. Proceed with updating your installation in the following sequence:1. Update the database.2. Update the master-indexer-domain domain.3. Update the bes-domain domain.4. Restart both domains.See below for details.
Updating the DatabaseProceed with updating the database as follows:1. Check whether the file
postgresql-9.1-903.jdbc4.jar
is contained in the following directories of the application server:• lib directory of the bes-domain domain• <GLASSFISH_HOME>/mq/lib/ext
If this is not the case, copy the file from the <install_pack_dir>/install/lib directory tothe location where it is missing.
2. Create a backup of the bss database using the standard PostgreSQL commands. Thedatabase backup must be compatible with PostgreSQL 9.1.12. Make sure to also have abackup of any customizations to marketplaces.
Note: Creating a backup of search index data is not required. The index will be automaticallyrebuilt when CT-MG is operational again.
3. Update the following configuration files so that the settings match your current installation:• db.properties located in <install_pack_dir>/databases/bes_db• configsettings.properties located in <install_pack_dir>/databases/bes_db
4. Update the schema and configuration settings of the bss database by executing thebuild-db.xml file in <install_pack_dir>/install as follows:
<ANT_HOME>/bin/ant -f build-db.xml updateDatabase
Note: Make sure that Ant runs in a Java 7 runtime environment when calling the build-db.xmlfile.
Updating the master-indexer-domain Domain1. Undeploy the search indexer application, oscm-search. If you are upgrading from a release
prior to V15.4 Fix 5, undeploy fujitsu-bss-search.2. Set the following setting in the JVM Options of the application server to false:
-Dorg.apache.catalina.loader.WebappClassLoader.ENABLE_CLEAR_REFERENCES=false
3. Stop the master-indexer-domain domain.4. Check for .glassfishStaleFiles files. If there are any, delete them. The files are located in
<domain>/applications/<application name>/.glassfishStaleFiles
For example:
4: Update Installation
Installation Guide 27
master-indexer-domain/applications/oscm-search/.glassfishStaleFiles
or, when upgrading from a release prior to V15.4 Fix 5:master-indexer-domain/applications/fujitsu-bss-search/.glassfishStaleFiles
5. Delete the index directory of the master-indexer-domain domain.For example:master-indexer-domain/masterIndexBase/org.oscm.domobjects.Product
or, when upgrading from a release prior to V15.4 Fix 5:master-indexer-domain/masterIndexBase/com.fujitsu.adm.um.domobjects.Product
6. Start the master-indexer-domain domain.7. Deploy the search indexer application (oscm-search located in <install_pack_dir>/
domains/indexer_domain/applications).
Updating the bes-domain Domain1. Undeploy the following applications:
• eclipse-birt-runtime
• oscm, or fujitsu-bss if you are upgrading from a release prior to V15.4 Fix 5.• oscm-portal, or fujitsu-bss-portal if you are upgrading from a release prior to V15.4
Fix 5.• oscm-portal-help, or fujitsu-bss-portal-help if you are upgrading from a release
prior to V15.4 Fix 5.• Optionally: Your own branding package .war file, if you have customized the layout of the
marketplaces and created your own branding package.
2. Set the following setting in the JVM Options of the application server to false:-Dorg.apache.catalina.loader.WebappClassLoader.ENABLE_CLEAR_REFERENCES=false
3. Stop the bes-domain domain.4. Check for .glassfishStaleFiles files. If there are any, delete them. The files are located in
<domain>/applications/<application name>/.glassfishStaleFiles
For example:bes-domain/applications/oscm/.glassfishStaleFiles
or, when upgrading from a release prior to V15.4 Fix 5:bes-domain/applications/fujitsu-bss/.glassfishStaleFiles
5. Delete the index directory of the bes-domain domain.For example:bes-domain/slaveIndexBase/org.oscm.domobjects.Product
or, when upgrading from a release prior to V15.4 Fix 5:bes-domain/slaveIndexBase/com.fujitsu.adm.um.domobjects.Product
6. When upgrading from a release prior to V15.4 Fix 5,delete the file fujitsu-bss-security.jar from the<GLASSFISH_HOME>/glassfish/domains/bes-domain/lib directory.
7. Copy the javax.faces.jar file from the <install_pack_dir>/install/lib directory to the<GLASSFISH_HOME>/modules directory.
4: Update Installation
Installation Guide 28
8. Copy the oscm-security.jar and commons-codec-1.7.jar files from the<install_pack_dir>/domains/bes_domain/lib directory to the lib directory of thebes-domain domain.
9. Start the bes-domain domain.10.Deploy the CT-MG applications located in <install_pack_dir>/domains/bes_domain/
applications in the following sequence:1. eclipse-birt-runtime
This archive contains the properties files for the labels and texts used in reports. Be awarethat with a new release or fix, new keys may have been added to the system, others mayhave been changed or deleted.Existing texts in English, German, and Japanese are overwritten by an upgrade. If you havecustomized these texts, merge your customizations into the properties files before deployingthe eclipse-birt-runtime archive. Otherwise they will no longer be available after theupgrade. Refer to the Operator's Guide for details.
2. oscm
If you are running CT-MG in SAML_SP mode, you need to update the WSIT files containedin the oscm.ear archive. If you want to update or change STS-related configuration settings,you must change the respective settings in the configsettings.properties located in<install_pack_dir>/databases/bes_db file first.Execute the build-glassfish.xml file in <install_pack_dir>/install as follows:
<ANT_HOME>/bin/ant -DpatchProps.path=../domains/bes_domain/installer -f build-glassfish.xml patchApplication
Note: It may be required to enclose the -DpatchProps.path=<path> command in double orsingle quotes depending on the operating system.
The configuration setting values are read from the configsettings.properties fileand written to the WSIT files contained in the oscm.ear archive. During the execution ofthe above command, a tmp subdirectory is created in <install_pack_dir>/domains/bes_domain to which the updated oscm.ear archive is saved. Proceed with manuallydeploying the tmp/oscm.ear archive to the bes-domain domain.
3. oscm-portal
This archive contains the properties files for the user interface resources (user interface andemail texts, platform objects). Be aware that with a new release or fix, new keys may havebeen added to the system, others may have been changed or deleted.If you have not customized the texts, existing texts in English, German, and Japanese areoverwritten by an upgrade. If you have customized these texts, they are not overwritten.Make sure to have a backup of your changes. After having deployed the oscm-portal,check whether existing texts, for example, mail messages have changed as compared tothe previous release. You may need to customize the texts again.If you are running CT-MG in SAML_SP mode and upgrading from a release prior to V15.4Fix 5, the following change is necessary in the IdP: The IdP operator must adapt the URL ofthe relying party for CT-MG to reflect the renaming from fujitsu-bss to oscm.
4. oscm-portal-help
This archive contains the online help and FAQ files in English, German, and Japanese.You can customize these resources. When upgrading the system with a fix for this release,
4: Update Installation
Installation Guide 29
make sure to have a backup of any such customizations. Merge the customized files intothe oscm-portal-help archive, before deploying it again. Otherwise they will no longer beavailable after the upgrade.If you added additional languages to the system, also include the corresponding help andFAQ file structures into the oscm-portal-help archive before deploying it again. Refer tothe Operator's Guide for details.
5. Optionally: Your own branding package .war file
11. If you are upgrading from a CT-MG release prior to V15.4 Fix 5change the implementation of the login module for the bssRealm in<GLASSFISH_HOME>/glassfish/domains/bes-domain/config/login.conf from:
bssRealm {com.fujitsu.adm.um.security.ADMLoginModule required;};
to
bssRealm {org.oscm.security.ADMLoginModule required;};
12.If you are upgrading from a CT-MG release prior to V15.4Fix 5 change the implementation class of the bss-realm in<GLASSFISH_HOME>/glassfish/domains/bes-domain/config/domain.xml from:
<auth-realm name="bss-realm" classname="com.fujitsu.adm.um.security.ADMRealm">
to
<auth-realm name="bss-realm" classname="org.oscm.security.ADMRealm">
Updating the Command Line ToolThe current version of the command line tool is provided in the CT-MG installation package,oscm-install-pack.zip, as oscm-operatorclient.zip. If you want to use the command linetool with your updated installation, delete and install it again when finished with the update. Fordetails on how to set up the tool, refer to the Operator's Guide.
5: Uninstallation
Installation Guide 30
5 UninstallationThe uninstallation of CT-MG consists of the following steps:1. Stop the application server domains related to CT-MG.2. Delete the bes-domain domain.3. Delete the master-indexer-domain domain.4. Delete the shared directory for the master search index.5. Delete the databases, bss and bssjms, and uninstall the database management system and
the application server, if you no longer need them for other purposes.
For details on how to proceed, refer to the documentation of the database management systemand the application server.
Appendix A: Application Server Resources
Installation Guide 31
Appendix A: Application Server ResourcesThe following sections provide an overview of the resources which must be provided to CT-MG onthe application server.For details and hints on how to create these resources, refer to the build-glassfish.xml filelocated in the <install_pack_dir>/install directory.
A.1 CT-MG DomainThe following sections give an overview of the resources which must be provided for the CT-MGdomain (bes-domain) on the application server.
Data SourceA JDBC data source with a corresponding connection pool is required for the relational databaseswhere CT-MG stores its data.
Name BSSDS
Class name org.postgresql.xa.PGXADataSource
Resource type javax.sql.XADataSource
Database schema As distributed with CT-MG.
JMS QueuesThe following JMS queues and corresponding connection factories are required for asynchronousprocessing:1. Trigger queue:
Queue name: jms/bss/triggerQueueConnection factory name: jms/bss/triggerQueueFactory
2. Task queue:Queue name: jms/bss/taskQueueConnection factory name: jms/bss/taskQueueFactory
3. Indexer queue:Queue name: jms/bss/indexerQueueConnection factory name: jms/bss/indexerQueueFactory
4. Master indexer queue:Queue name: jms/bss/masterIndexerQueueConnection factory name: jms/bss/masterIndexerQueueFactory
All queues and connection factories mentioned above use the following settings:
Initial and minimum pool size 1 connection
Maximum pool size 250 connections
Pool resize quantity 2 connections
Appendix A: Application Server Resources
Installation Guide 32
Idle timeout 600 seconds
Max wait time 60000 milliseconds
On any failure Close all connections
Transaction support XATransaction
Connection validation Required
UserName jmsuser
Password jmsuser
The master indexer queue / connection factory requires the following additional setting:
AddressList <master-indexer-host-name>:<port>,where port is the port number of the searchindexer application domain.Default: 8476
Java Mail SessionA Java Mail Session is required for the application server to automatically send emails in case ofspecific user actions.
JNDI Name mail/BSSMail
Store Protocol imap
Transport Protocol smtp
mail-smtp-auth false
mail-user saas
mail-smtp-port 25
mail-smtp-password password
The settings are retrieved from the glassfish.properties file located in <install_pack_dir>/domains/bes_domain when running the installation scripts. The JNDI Name, Store Protocol, andTransport Protocol are mandatory and must not be changed.
RealmCT-MG comes with a custom realm implementation in the oscm-security.jar archive (located in<install_pack_dir>/domains/bes_domain/lib), which is included in the installation package.The realm must be configured as follows:
Name bss-realm
JAAS context bssRealm
Implementation class org.oscm.security.ADMRealm

Appendix A: Application Server Resources
Installation Guide 33
Certificate RealmThe certificate realm of the application server must be assigned the role CLIENTCERT.
Default File EncodingEnsure that the default file encoding of the application server's Java virtual machine is UTF-8. Thiscan be achieved by setting the file.encoding system property to UTF8.
A.2 Search Indexer Application DomainThe following sections provide an overview of the resources which must be provided for thesearch indexer application domain (master-indexer-domain) on the application server.
Data SourceA JDBC data source with a corresponding connection pool is required for the relational databaseswhere CT-MG stores its data.
Name BSSDS
Class name org.postgresql.xa.PGXADataSource
Resource type javax.sql.XADataSource
Database schema As distributed with CT-MG.
JMS QueueA JMS queue and a corresponding connection factory are required for asynchronous processing.
Queue name jms/bss/masterIndexerQueue
Connection factory name jms/bss/masterIndexerQueueFactory
Initial and minimum pool size 1 connection
Maximum pool size 250 connections
Pool resize quantity 2 connections
Idle timeout 600 seconds
Max wait time 60000 milliseconds
On any failure Close all connections
Transaction support XATransaction
Connection validation Required
UserName jmsuser
Password jmsuser
Default File EncodingEnsure that the default file encoding of the application server's Java virtual machine is UTF-8. Thiscan be achieved by setting the file.encoding system property to UTF8.
Appendix B: Configuration Settings
Installation Guide 34
Appendix B: Configuration SettingsThe configuration settings for CT-MG are provided in the following files in subdirectories of thedirectory to which you extracted the oscm-install-pack.zip file (<install_pack_dir>):• domains/indexer_domain/glassfish.properties
• domains/bes_domain/glassfish.properties
• domains/indexer_domain/glassfishJMSBroker.properties
• domains/bes_domain/glassfishJMSBroker.properties
• databases/bes_db/db.properties
• databases/bes_db/configsettings.properties
• databases/bes_db/sso.properties
This appendix describes the settings in detail.
B.1 GlassFish Configuration Settings for the Search IndexerApplication DomainThe glassfish.properties file located in <install_pack_dir>/domains/indexer_domaincontains the configuration settings for the GlassFish application server. The settings are requiredfor configuring the domain where the search indexer application is deployed.Below you find a detailed description of the settings.
GLASSFISH_HOMEThe absolute path and name of the GlassFish installation directory.
JDBC_DRIVER_JAR_NAMEThe name of the PostgreSQL JDBC driver jar file as available after installation.Example: postgresql-9.1-903.jdbc4.jar
glassfish.domain.portbaseMandatory. The base number for all ports used by the domain of the search indexer application.Make sure that the port base setting differs from the glassfish.domain.portbase setting for thebes_domain domain by at least 200.Example: 8400
glassfish.domain.jms.portMandatory. The port of the JMS broker used by the domain of the search indexer application.Example: 8476
glassfish.domain.portadminMandatory. The administration port of the search indexer domain.Example: 8448
Appendix B: Configuration Settings
Installation Guide 35
glassfish.domain.nameMandatory. The name of the domain for the search indexer application.Default: master-indexer-domain
glassfish.domain.admin.userMandatory. The user name of the search indexer application domain administrator.Default: admin
glassfish.domain.admin.pwdMandatory. The password of the search indexer application domain administrator.Default: adminadmin
glassfish.domain.admin.master.pwdMandatory. The master password required for accessing the keystore and truststore files of theapplication server domain.Default: changeit
hibernate.search.shared.sourceBaseMandatory. The shared directory hosting the search index for the master indexer node and theslave nodes, if any. From this directory, the master search index is replicated to the slave nodes, ifany.On Windows, double-escape the colon in the drive specification of the path to the shared directory.Example: C\\:/glassfish/masterSourceBase
hibernate.search.default.refreshMandatory. The interval in seconds between refresh operations. At this interval, the search indexis replicated and copied to the shared directory hosting the search index for the master indexernode.Default: 300
glassfish.domain.stop.waitSecondsMandatory. The time in seconds the application server waits until a stop domain operation isexecuted.Default: 60
glassfish.domain.start.maxWaitSecondsMandatory. The maximum time in seconds the application server waits until it checks whether adomain is started.Default: 600
B.2 GlassFish Configuration Settings for the CT-MG DomainThe glassfish.properties file located in <install_pack_dir>/domains/bes_domain containsthe configuration settings for the GlassFish application server. The settings are required forconfiguring the domain where the CT-MG application is deployed.
Appendix B: Configuration Settings
Installation Guide 36
Below you find a detailed description of the settings.
GLASSFISH_HOMEThe absolute path and name of the GlassFish installation directory.
JDBC_DRIVER_JAR_NAMEThe name of the PostgreSQL JDBC driver jar file as available after installation.Example: postgresql-9.1-903.jdbc4.jar
MAIL_HOSTThe host name or IP address of your mail server.
MAIL_RESPONSE_ADDRESSThe email address used by the server as the sender of emails.Example: [email protected]
MAIL_PORTThe port of your mail server.Default: 25
MAIL_USE_AUTHENTICATIONOptional. Defines whether mails can be sent only to users authenticated against the SMTP mailsystem.Allowed values: true, falseDefault: false
MAIL_USERMandatory if MAIL_USE_AUTHENTICATION=true. Specifies the name of the user to be used forauthentication against the SMTP mail system.
MAIL_PWDMandatory if MAIL_USE_AUTHENTICATION=true. Specifies the password of the user to be used forauthentication against the SMTP mail system.
MAIL_TIMEOUTOptional. The time interval in milliseconds for sending email messages, i.e. until a socket I/Otimeout occurs.Allowed values: Any value between 0 and 4924967296Default: 30000
MAIL_CONNECTIONTIMEOUTOptional. The time interval in milliseconds for establishing the SMTP connection, i.e. until a socketconnection timeout occurs.Allowed values: Any value between 0 and 4924967296
Appendix B: Configuration Settings
Installation Guide 37
Default: 30000
glassfish.domain.portbaseMandatory. The base number for all ports used by the domain of the CT-MG application. Makesure that the port base setting differs from the glassfish.domain.portbase setting for themaster_indexer_domain domain by at least 200.Example: 8800
glassfish.domain.portadminThe administration port of the domain used for CT-MG.Example: 8848
glassfish.domain.nameThe name of the domain where CT-MG is deployed.Example: bes-domain
glassfish.domain.admin.userThe user name of the CT-MG domain administrator.Default: admin
glassfish.domain.admin.pwdThe password of the CT-MG domain administrator.Default: adminadmin
glassfish.domain.remote.jms.hostMandatory. The host name or IP address of the server where the domain for the search indexerapplication is deployed.Example: MyHibernateMasterIndexerHostName
glassfish.domain.remote.jms.portMandatory. The port of the JMS broker used by the domain of the search indexer application.Example: 8476
glassfish.domain.admin.master.pwdMandatory. The master password required for accessing the keystore and truststore files of theapplication server domain.Default: changeit
glassfish.domain.WS_PORTThe port used for an HTTP listener for Web service connections of the application server.Example: 8082
Appendix B: Configuration Settings
Installation Guide 38
hibernate.search.default.refreshMandatory. The interval in seconds between index data refresh operations. At this interval, thesearch index is read from the shared directory hosting the search index for the master indexernode and written to the index directory on the slave node.Example: 300
hibernate.search.shared.sourceBaseMandatory. The shared directory hosting the search index for the master indexer node and theslave nodes, if any. From this directory, the master search index is replicated to the slave nodes, ifany.On Windows, double-escape the colon in the drive specification of the path to the shared directory.Example: C\\:/glassfish/masterSourceBase
glassfish.domain.stop.waitSecondsMandatory. The time in seconds the application server waits until a stop domain operation isexecuted.Default: 60
glassfish.domain.start.maxWaitSecondsMandatory. The maximum time in seconds the application server waits until it checks whether adomain is started.Default: 600
B.3 GlassFish JMS Configuration SettingsThe glassfishJMSBroker.properties file contains the configuration settings for theJava Message Service (JMS) in the application server. It is required for both domains,master-indexer-domain and bes-domain, and thus available in the following directories:<install_pack_dir>/domains/indexer_domain
<install_pack_dir>/domains/bes_domain
Note: If you are using CT-MG in a multi-node installation, make sure to change the defaultsetting imq.brokerid=broker1 to a value that is unique for every node.
For details, refer to the Sun GlassFish Message Queue 4.4 Administration Guide.
B.4 Database Configuration SettingsThe db.properties file located in <install_pack_dir>/databases/bes_db contains theconfiguration settings for database access. This configuration is used for the initial setup andschema updates.
db.driver.classThe Java class of the JDBC driver.Default: org.postgresql.Driver
Appendix B: Configuration Settings
Installation Guide 39
db.hostThe database host.Default: localhost
db.portThe database port.Default: 5432
db.nameThe name of the database.Default: bss
db.userThe name of the user to connect to the database.Default: bssuser
db.pwdThe password of the user to connect to the database.Default: bssuser
db.typeThe type of the database.Default: postgresql
B.5 CT-MG Configuration SettingsThe configsettings.properties file located in <install_pack_dir>/databases/bes_dbcontains the configuration settings for the CT-MG services.
AUDIT_LOG_ENABLEDOptional. Specifies whether user operations related to subscriptions, marketable services, andprice models are logged and stored in the database. If set to true, the operator can export auditlog data to retrieve information on the user operations.Allowed values: true, falseDefault: false
AUDIT_LOG_MAX_ENTRIES_RETRIEVEDOptional. Specifies how many log entries are retrieved in one export of audit log data. If thisnumber is exceeded, a warning is displayed asking the operator to change his filter criteriaand start the export again. This setting is required to keep the number of SQL requests to thedatabase low when audit log data is exported. Too many requests may lead to a decrease insystem performance.Allowed values: Any value between 1 and 1000Default: 100
Appendix B: Configuration Settings
Installation Guide 40
AUTH_MODEMandatory. Specifies whether CT-MG is used for user authentication or whether it acts as a SAMLservice provider. This configuration setting is evaluated at the first startup of CT-MG and can nolonger be changed after CT-MG has been started for the first time. It cannot be changed by anupgrade installation either.Allowed values: INTERNAL (CT-MG user authentication is used) or SAML_SP (CT-MG shall act asSAML service provider).Default: INTERNAL
BASE_URLOptional. The base URL is used to access the CT-MG home page if CT-MG does not requireHTTPS for communication. If left empty, the BASE_URL_HTTPS setting is used.Syntax: http://<host>:<port>/<context-root>The default for <context-root> is oscm-portal.
Note: If the SSL/HTTPS port was changed, then this setting must also be updated.
BASE_URL_HTTPSMandatory. The base URL is used to access the CT-MG home page and to create the URL foraccessing services via HTTPS.Syntax: https://<host>:<port>/<context-root>The default for <context-root> is oscm-portal.
Note: If the SSL/HTTPS port was changed, then this setting must also be updated.
CUSTOMER_SELF_REGISTRATION_ENABLEDOptional. Specifies whether customer organizations can register on a marketplace. If set to false,the operator needs to create an organization for the customer who wants to register, or a seller(supplier, broker, reseller) needs to register the customer.Allowed values: true, falseDefault: true
DECIMAL_PLACESOptional. Specifies the number of decimal places in which usage charges are calculated. Thissetting is needed only when migrating from CT-MG V14.1 to a higher version.Allowed values: 2, 3, 4, 5, 6Default: 2
HIDDEN_UI_ELEMENTSOptional. Specifies user interface elements to be hidden from the CT-MG administration portaland the marketplaces operated on your platform. You can use this setting to hide user interfaceelements both from the administration portal and the marketplaces.Marketplaces
Appendix B: Configuration Settings
Installation Guide 41
If you want to hide a menu option from the Account menu of the marketplaces operated on yourplatform, enter one of the following values:• marketplace.navigation.Profile: Profile menu• marketplace.navigation.Payment: Payment menu• marketplace.navigation.Subscriptions: Subscriptions menu• marketplace.navigation.Users: Users & Units menu• marketplace.navigation.Reports: Reports menu• marketplace.navigation.Processes: Processes menu• marketplace.navigation.Operations: Operations menu
To hide several options from the Account menu, separate the options by a comma.Administration PortalIf you want to hide a specific page from the CT-MG administration portal, you can find out whichvalue needs to be specified here as follows:1. Open the respective page at the administration portal.2. Display the online help for this page.3. Have a look at the name of the online help HTML page.4. Omit the file extension .htm and replace the underscore by a dot.
Example:You want to hide the Manage VAT rates page. The online help HTML page name isorganization_manageVats.htm. Thus, the respective administration portal page isorganization.manageVats. You need to set the configuration key as follows:HIDDEN_UI_ELEMENTS=organization.manageVats
To hide several pages from the administration portal, separate the entries by a comma.Below, you find some more examples of values that can be used to hide a specific page. The list isnot complete.• organization.edit: Edit profile page• shop.editSkin: Customize layout page• techService.edit: Update service definition page
To hide a complete menu from the administration portal, enter one of the following values:• navigation.myAccount: Account menu• navigation.customer: Customer menu• navigation.operator: Operation menu• navigation.techService: Technical service menu• navigation.service: Marketable service menu• navigation.priceModel: Price model menu• navigation.marketplace: Marketplace menu
Billing AdapterBy default, the element HIDDEN_UI_ELEMENTS= has been commented out, so that the values:• operator.manageBillingAdapters: Managing billing systems menu• techService.viewBillingAdapters: Viewing billing system details menu
Appendix B: Configuration Settings
Installation Guide 42
are visible. To hide them from the menu, you have to comment the elementHIDDEN_UI_ELEMENTS= back in.
Note: The Update configuration settings page in the Operation menu is the default page theoperator is directed to when logging in. If you hide the page from the menu or hide thecomplete menu, you are still directed to the Update configuration settings page whereyou can make changes, if required.
HTTP_PROXYOptional. The proxy to be used for PSP-related HTTP connections, if any.Example: proxy.domain or the proxy server IP address.
HTTP_PROXY_PORTOptional. The proxy port to be used for PSP-related HTTP connections, if any.Allowed values: Any value between 1 and 65535Default: 1080
IDP_ASSERTION_EXPIRATIONMandatory if a technical service is defined with the user access type and uses CT-MG as aSAML 1.1 IdP. For details on access types, refer to the Technology Provider's Guide.This setting represents the number of milliseconds an assertion generated by the SAML IdP isvalid. It is the difference between the NotAfterOrOn and IssueInstant attributes of the assertion.Allowed values: Any value between 1 and 9223372036854775807Default: 1800000 milliseconds (30 minutes)
IDP_ASSERTION_VALIDITY_TOLERANCEMandatory if a technical service is defined with the user access type and uses CT-MG as aSAML 1.1 IdP. For details on access types, refer to the Technology Provider's Guide.This setting represents the number of milliseconds an assertion generated by the SAML IdP wasvalid in the past. It is used to avoid synchronization problems between servers. The number is thedifference between the IssueInstant and NotBefore attributes of the assertion.Allowed values: Any value between 1 and 9223372036854775807Default: 600000 milliseconds (10 minutes)
IDP_PRIVATE_KEY_FILE_PATHMandatory if a technical service is defined with the user access type and uses CT-MG as aSAML 1.1 IdP. For details on access types, refer to the Technology Provider's Guide.This setting represents the URL to the private key in Distinguished Encoding Rules (DER) format(.der file). This URL is used by the IdP to sign SAML messages.Example: /opt/glassfish-3.1.2.2/glassfish/domains/bes-domain/config/cakey.derIf you change this setting, you need to restart CT-MG.
IDP_PUBLIC_CERTIFICATE_FILE_PATHMandatory if a technical service is defined with the user access type and uses CT-MG as aSAML 1.1 IdP. For details on access types, refer to the Technology Provider's Guide.
Appendix B: Configuration Settings
Installation Guide 43
This setting represents the URL to the public certificate in Distinguished Encoding Rules (DER)format (.der file). This URL is added to the signature of SAML messages by the IdP, so that theapplication can validate the signature.Example: /opt/glassfish-3.1.2.2/glassfish/domains/bes-domain/config/cacert.derIf you change this setting, you need to restart CT-MG.
LDAP_SEARCH_LIMITOptional. The maximum number of entries that will be returned by an LDAP query in case anorganization uses an external LDAP system for user management.Allowed values: Any value between 1 and 9223372036854775807Default: 100
LOG_CONFIG_FILEOptional. The path to the log4j configuration file of CT-MG.Default:./log4j.properties in the <GLASSFISH_HOME>/glassfish/domains/bes-domain/configdirectory
LOG_FILE_PATHMandatory. The path to the CT-MG log files.Default:../logs, which is the <GLASSFISH_HOME>/glassfish/domains/bes-domain/logs directoryIf you change this setting, you need to restart CT-MG.
LOG_LEVELOptional. The log level for CT-MG. This setting applies to all logging classes if it is not overriddenby the content of the log4j.properties file.Allowed values: ERROR, WARN, INFO, DEBUGDefault: INFOIf you change this setting, you need to restart CT-MG.
MAIL_JA_CHARSETOptional. Special character encoding for emails sent in Japanese.Default: UTF-8
MAX_NUMBER_ALLOWED_USERSMandatory. The maximum number of users that can be registered within the CT-MG installation.Allowed values: Any value between 1 and 9223372036854775807Default: 10
MAX_NUMBER_LOGIN_ATTEMPTSOptional. The maximum number of allowed login attempts to CT-MG. If a user does not log insuccessfully with this number of attempts, his account is locked.Allowed values: Any value between 1 and 9223372036854775807
Appendix B: Configuration Settings
Installation Guide 44
Default: 3
MP_ERROR_REDIRECT_HTTPOptional. The URL of a Web page that is to be displayed in case a visitor tries to access amarketplace without a valid marketplace ID by HTTP. This Web page will be shown instead of thedefault error message.Syntax: http://<your Web page>Make sure to specify a valid URL that does not exceed a maximum of 255 characters.
MP_ERROR_REDIRECT_HTTPSOptional. The URL of a Web page that is to be displayed in case a visitor tries to access amarketplace without a valid marketplace ID by HTTPS. This Web page will be shown instead ofthe default error message.Syntax: https://<your Web page>Make sure to specify a valid URL that does not exceed a maximum of 255 characters.
PERMITTED_PERIOD_INACTIVE_ON_BEHALF_USERSOptional. The time in milliseconds after which a user who logged in on behalf of a customer andwas inactive will be removed from the system.Allowed values: Any value between 1 and 9223372036854775807Default: 604800000, i.e. 7 days
PERMITTED_PERIOD_UNCONFIRMED_ORGANIZATIONSOptional. The maximum time in milliseconds until an organization's initial administrative accountmust be confirmed. When this time has passed, the account is removed.Allowed values: Any value between 1 and 9223372036854775807Default: 604800000, i.e. 7 days
PSP_USAGE_ENABLEDMandatory. Specifies whether PSP integration is used for the current environment.Allowed values: true, falseDefault: falseIf you change this setting, you need to restart CT-MG.
REPORT_ENGINEURLMandatory if you want to use the CT-MG reports. The URL template of the report engine. If youdo not specify a correct URL template, CT-MG will not be able to generate any reports, since theReport Web service cannot be called correctly.If your installation is configured to use HTTP access, the required value is:
http://<host IP address>:<port>/eclipse-birt-runtime/frameset?__report=$ {reportname}.rptdesign&SessionId=$ {sessionid}&__locale=$ {locale}&WSDLURL=$ {wsdlurl}&SOAPEndPoint=${soapendpoint}&wsname=Report&wsport=ReportPort
Appendix B: Configuration Settings
Installation Guide 45
If your installation is configured to use HTTPS access, the required value is:
https://<host IP address>:<port>/eclipse-birt-runtime/frameset?__report=$ {reportname}.rptdesign&SessionId=$ {sessionid}&__locale=$ {locale}&WSDLURL=$ {wsdlurl}&SOAPEndPoint=${soapendpoint}&wsname=ReportSecure&wsport=ReportSecurePort
Note: The above value must be used as indicated. Do not change this value.If the SSL/HTTPS port was changed and the BIRT report engine is running on the samedomain as CT-MG, then this setting must also be updated.
REPORT_SOAP_ENDPOINTMandatory if you want to use the CT-MG reports. The SOAP end point of the Report Web service.All report data is retrieved via a call to the Report Web service. If you do not specify a correctvalue, CT-MG will not be able to generate any reports, since the Report Web service cannot becalled correctly.If your installation is configured to use HTTP access, the required value is:http://<host IP address>:<port>/Report/ReportingServiceBean
If your installation is configured to use HTTPS access, the required value is:https://<host IP address>:<port>/ReportSecure/ReportingServiceSecureBean
Note: The above value must be used as indicated. Do not change this value.If the SSL/HTTPS port was changed and the BIRT report engine is running on the samedomain as CT-MG, then this setting must also be updated.
REPORT_WSDLURLMandatory if you want to use the CT-MG reports. The URL of the WSDL file of the Report Webservice. All report data is retrieved via a call to the Report Web service. If you do not specify acorrect value, CT-MG will not be able to generate any reports, since the Report Web servicecannot be called correctly.If your installation is configured to use HTTP access, the required value is:http://<host IP address>:<port>/Report/ReportingServiceBean?wsdl
If your installation is configured to use HTTPS access, the required value is:https://<host IP address>:<port>/ReportSecure/ReportingServiceSecureBean?wsdl
Note: The above value must be used as indicated. Do not change this value.If the SSL/HTTPS port was changed and the BIRT report engine is running on the samedomain as CT-MG, then this setting must also be updated.
SEARCH_INDEX_MASTER_FACTORY_NAMEMandatory. The name of the search indexer application's JMS connection factory. Stay with theentry jms/bss/masterIndexerQueueFactory and do not change it.
Appendix B: Configuration Settings
Installation Guide 46
SEARCH_INDEX_MASTER_QUEUE_NAMEMandatory. The name of the search indexer application's JMS queue. Stay with the entry jms/bss/masterIndexerQueue and do not change it.
SSO_IDP_AUTHENTICATION_REQUEST_HTTP_METHODMandatory if you install CT-MG in SAML_SP authentication mode. The method used for HTTPauthentication requests. Depending on the IdP, GET or POST requests can be used.Required for Web browser SSO.Default: POSTIf you change this setting, you need to restart CT-MG.
SSO_IDP_TRUSTSTOREMandatory if you install CT-MG in SAML_SP authentication mode. The path and file name of theapplication server truststore file holding the public key certificate of the IdP.Required for Web browser SSO.Default: <path>/cacerts.jksAs soon as another IdP system, for example, OpenAM, Cloudminder, or Active Directory isinstalled and used, this setting might need to be changed. In this case, you need to restartCT-MG.
SSO_IDP_TRUSTSTORE_PASSWORDMandatory if you install CT-MG in SAML_SP authentication mode. The password of theapplication server truststore holding the public key certificate of the IdP.Required for Web browser SSO.GlassFish default password: changeitThe spelling of the password is case-sensitive and must be identical to the output of the IdP.If you change this setting, you need to restart CT-MG.
SSO_IDP_URLMandatory if you install CT-MG in SAML_SP authentication mode. The SAML Redirect URL forthe IdP service endpoint.Required for Web browser SSO.For security and confidentiality reasons, it is recommended to use the HTTPS protocol.Syntax: https://<host>:<port>/<RedirectServiceEndpoint>If you change this setting, you need to restart CT-MG.
SSO_ISSUER_IDMandatory if you install CT-MG in SAML_SP authentication mode. A unique identifier for CT-MG.The IdP uses this ID for identifying incoming SAML authentication requests from CT-MG.Required for Web browser SSO.If you need to change this setting after the first exchange of data between CT-MG and the IdP, youmust change it both in CT-MG and the IdP system. It may be required to send a new metadataexchange file to the IdP operator.Default: CT_MG
Appendix B: Configuration Settings
Installation Guide 47
If you change this setting, you need to restart CT-MG.
SSO_STS_ENCKEY_LENMandatory if you install CT-MG in SAML_SP authentication mode. The length of the encryptionkey as used by the IdP.Required for STS communication.Default: 128This setting is an installation property and cannot be changed in the administration portal. If youneed to change the encryption key length, proceed as follows:1. Stop the bes-domain domain.2. Edit the configsettings.properties file and change the value for SSO_STS_ENCKEY_LEN as
required.3. Execute the build-glassfish.xml file in <install_pack_dir>/install as follows:
<ANT_HOME>/bin/ant -DpatchProps.path=../domains/bes_domain/installer -f build-glassfish.xml patchAndRedeployApplication
<ANT_HOME> is the installation directory of Apache Ant.
Note: It may be required to enclose the -DpatchProps.path=<path> command in double orsingle quotes depending on the operating system.
The modified configuration parameter value is read from the configsettings.propertiesfile and written to the WSIT files contained in the oscm.ear archive. The updated archive isredeployed to the bes-domain domain.During the execution of the above command, a tmp subdirectory is created in<install_pack_dir>/domains/bes_domain to which the updated oscm.ear archive is saved.
4. Redeploy the oscm-portal.war file to the bes-domain domain.5. Restart the bes-domain domain.
SSO_STS_METADATA_URLMandatory if you install CT-MG in SAML_SP authentication mode. The URL of the MEX address(Issuer Metadata Exchange) of the STS.Required for STS communication.For security and confidentiality reasons, it is recommended to use the HTTPS protocol.Syntax: https://<host>:<port>/<MEXAddress>This setting is an installation property and cannot be changed in the administration portal. If youneed to change the URL, proceed as follows:1. Stop the bes-domain domain.2. Edit the configsettings.properties file and change the value for SSO_STS_METADATA_URL
as required.3. Execute the build-glassfish.xml file in <install_pack_dir>/install as follows:
<ANT_HOME>/bin/ant -DpatchProps.path=../domains/bes_domain/installer -f build-glassfish.xml patchAndRedeployApplication
Appendix B: Configuration Settings
Installation Guide 48
<ANT_HOME> is the installation directory of Apache Ant.
Note: It may be required to enclose the -DpatchProps.path=<path> command in double orsingle quotes depending on the operating system.
The modified configuration parameter value is read from the configsettings.propertiesfile and written to the WSIT files contained in the oscm.ear archive. The updated archive isredeployed to the bes-domain domain.During the execution of the above command, a tmp subdirectory is created in<install_pack_dir>/domains/bes_domain to which the updated oscm.ear archive is saved.
4. Redeploy the oscm-portal.war file to the bes-domain domain.5. Restart the bes-domain domain.
SSO_STS_URLMandatory if you install CT-MG in SAML_SP authentication mode. The URL of the STS endpoint.Required for STS communication.For security and confidentiality reasons, it is recommended to use the HTTPS protocol.Syntax: https://<host>:<port>/<ServiceEndpoint>This setting is an installation property and cannot be changed in the administration portal. If youneed to change the URL, proceed as follows:1. Stop the bes-domain domain.2. Edit the configsettings.properties file and change the value for SSO_STS_URL as required.3. Execute the build-glassfish.xml file in <install_pack_dir>/install as follows:
<ANT_HOME>/bin/ant -DpatchProps.path=../domains/bes_domain/installer -f build-glassfish.xml patchAndRedeployApplication
<ANT_HOME> is the installation directory of Apache Ant.
Note: It may be required to enclose the -DpatchProps.path=<path> command in double orsingle quotes depending on the operating system.
The modified configuration parameter value is read from the configsettings.propertiesfile and written to the WSIT files contained in the oscm.ear archive. The updated archive isredeployed to the bes-domain domain.During the execution of the above command, a tmp subdirectory is created in<install_pack_dir>/domains/bes_domain to which the updated oscm.ear archive is saved.
4. Redeploy the oscm-portal.war file to the bes-domain domain.5. Restart the bes-domain domain.
SUPPLIER_SETS_INVOICE_AS_DEFAULTOptional. Specifies whether invoice is to be used as the default payment type for all customers.Allowed values: true, falseDefault: false
Appendix B: Configuration Settings
Installation Guide 49
TAGGING_MAX_TAGSMandatory. The maximum number of tags composing the tag cloud.The tag cloud is the area of a marketplace containing defined search terms (tags). The more oftena tag is used in services, the bigger the characters of the tag are displayed. Customers can usethe tags to search for services, provided that the tag cloud is enabled for the marketplace by themarketplace owner.Allowed values: Any value between 0 and 2147483647Default: 20
TAGGING_MIN_SCOREMandatory. The minimum number of times a tag must be used in services to be shown in the tagcloud.The tag cloud is the area of a marketplace containing defined search terms (tags). The more oftena tag is used in services, the bigger the characters of the tag are displayed. Customers can usethe tags to search for services, provided that the tag cloud is enabled for the marketplace by themarketplace owner.Allowed values: Any value between 1 and 2147483647Default: 1, i.e. a tag must have been used at least once so that it is shown in the tag cloud.
TIME_ZONE_IDOptional. The time zone to be used for display.Allowed values: All time zones supported by Java. This can be an abbreviation such as PST, a fullname such as America/Los_Angeles, or a custom ID such as GMT-8:00. For a list of IDs, refer tojava.util.TimeZone.Default: GMT
TIMER_INTERVAL_BILLING_OFFSETOptional. The offset in milliseconds for the timer for billing runs calculating subscription usagecosts (customer billing data) or revenue share data. The interval for this timer is one day andcannot be changed. If no offset is defined, the default offset of 4 days is applied.Customer billing data is calculated for a period of one month (billing period). Suppliers andresellers can define individual start days for their billing periods. Revenue share data is alwayscalculated for the past month on the first day of a month.The offset for the billing run timer defines the following:• Number of days after which the billing run calculating the customer billing data or the revenue
share data is executed.• Time the timer for the daily billing runs expires on the current day.
Example:A supplier defines the 10th of a month as the billing period start date. The offset is set to 4 daysand 4 hours. The billing run that calculates the customer billing data for the past billing period ofthis supplier is started on the 14th of the following month at 04:00:00.000. The revenue share datais calculated on the 5th of the following month at 04:00:00.000. The daily check whether a billingperiod of any supplier has ended is started at 04:00:00.000 every day.Allowed values: Any value between 0 and 2419200000 (28 days)Default: 345600000, i.e. 4 days.
Appendix B: Configuration Settings
Installation Guide 50
TIMER_INTERVAL_DISCOUNT_END_NOTIFICATION_OFFSETOptional. The offset in milliseconds for the timer for terminating the discounts for all organizations.The timer interval is one day and cannot be changed.Allowed values: Any value between 0 and 9223372036854775807Default: 0
TIMER_INTERVAL_INACTIVE_ON_BEHALF_USERSOptional. The time interval in milliseconds at which a check for non-existing users acting on behalfof another organization is executed. A value of 0 indicates that this timer is disabled.A technical service definition may contain a flag (allowingOnBehalfActing) to indicate that anorganization can act in the name of another organization. The organization must be a customerof the other organization, which must have both the technology provider and supplier role.Additionally, the customer organization must have allowed the other organization to log inon its behalf. This is achieved via a subscription whose underlying technical service has theallowingOnBehalfActing flag set to true.When an organization acts in the name of another organization, an artificial user ID is generated.Cleaning up the CT-MG database from time to time to remove such users who no longer existmight be required since it cannot be ensured that a technical service always removes such usersitself.Allowed values: 0 and any value between 10000 (10 seconds) and 9223372036854775807Default: 0
TIMER_INTERVAL_INACTIVE_ON_BEHALF_USERS_OFFSETOptional. The offset in milliseconds for the timer for removing inactive "on behalf" users.Allowed values: Any value between 0 and 9223372036854775807Default: 0
TIMER_INTERVAL_ORGANIZATIONOptional. The time interval in milliseconds at which tasks related to organizations are executed. Avalue of 0 indicates that this timer is disabled.Allowed values: 0 and any value between 10000 (10 seconds) and 9223372036854775807Default: 0
TIMER_INTERVAL_ORGANIZATION_OFFSETOptional. The offset in milliseconds for the timer for organization-related tasks.Allowed values: Any value between 0 and 9223372036854775807Default: 0
TIMER_INTERVAL_SUBSCRIPTION_EXPIRATIONOptional. The time interval in milliseconds at which a check for expired subscriptions is executed.This timer cannot be disabled, i.e. it cannot be set to 0.Allowed values: Any value between 10000 (10 seconds) and 9223372036854775807Default: 86400000, i.e. 1 day
Appendix B: Configuration Settings
Installation Guide 51
TIMER_INTERVAL_SUBSCRIPTION_EXPIRATION_OFFSETOptional. The offset in milliseconds for the timer for subscription expiration checks.Allowed values: Any value between 0 and 9223372036854775807Default: 0
TIMER_INTERVAL_TENANT_PROVISIONING_TIMEOUTOptional. The time interval in milliseconds at which a check for timed-out subscriptions isexecuted. A value of 0 indicates that this timer is disabled.Allowed values: 0 and any value between 10000 (10 seconds) and 9223372036854775807Default: 0
TIMER_INTERVAL_TENANT_PROVISIONING_TIMEOUT_OFFSETOptional. The offset in milliseconds for the timer for pending subscription checks.Allowed values: Any value between 0 and 9223372036854775807Default: 0
TIMER_INTERVAL_USER_COUNTMandatory. The time interval in milliseconds at which the amount of users registered with theplatform is checked. This timer cannot be disabled, i.e. it cannot be set to 0.Allowed values: Any value between 1 and 9223372036854775807Default: 43200000, i.e. 12 hours
WS_TIMEOUTMandatory. The timeout for outgoing Web service calls in milliseconds. After this time has passed,a timeout exception is thrown by the JAX-WS framework.An outgoing Web service call is a call initiated by CT-MG. A typical example is the invocation ofthe createUsers method of the ProvisioningService interface, which is implemented by anapplication. If the timeout is reached before the Web service call returns, the operation is abortedand an exception is thrown.Allowed values: Any value between 1 and 9223372036854775807Default: 30000, i.e. 30 seconds
Note: Make sure that timeouts set in the GlassFish application server, e.g. request timeouts, donot conflict with or overrule the timeouts defined in the CT-MG configuration settings.
B.6 SAML_SP Configuration SettingThe sso.properties file located in <install_pack_dir>/databases/bes_db contains theconfiguration setting for creating the first platform operator in CT-MG when installing CT-MG inSAML_SP authentication mode.
ADMIN_USER_IDMandatory if you install CT-MG in SAML_SP authentication mode. The ID of the user who is tobecome the first CT-MG operator. This user must relate to an existing user in the IdP.User IDs are restricted to 100 characters and must not contain any of the following characters:
Appendix B: Configuration Settings
Installation Guide 52
! " # $ % & ' * + , / : ; < = > ? \ ^ `


