INSTALLATION GUIDE NI 8260 This guide includes installation information for the NI 8260. For more information about configuring, using, and maintaining the NI 8260, refer to ni.com. Contents Related Documentation ............................................................................................................ 1 Unpacking................................................................................................................................. 2 What You Need to Get Started ................................................................................................. 2 Key Features ............................................................................................................................. 2 Mainboard Features .......................................................................................................... 2 SATA Chipset........................................................................................................... 2 HDD.......................................................................................................................... 2 Front Panel LEDs ..................................................................................................... 2 NI 8260 Overview .................................................................................................................... 2 Hardware Installation ............................................................................................................... 3 Software/Driver Installation ..................................................................................................... 4 RAID Creation.......................................................................................................................... 7 Moving the NI 8260 to a Different System .............................................................................. 15 Specifications............................................................................................................................ 17 Mainboard......................................................................................................................... 17 Hard Disk Drive................................................................................................................ 17 Physical ............................................................................................................................. 17 Environment ..................................................................................................................... 17 Operating Environment .................................................................................................... 18 Storage Environment ........................................................................................................ 18 Shock and Vibration ......................................................................................................... 18 Electromagnetic Compatibility ......................................................................................... 19 CE Compliance ................................................................................................................. 19 Online Product Certification............................................................................................. 19 Environmental Management............................................................................................. 19 Worldwide Support and Services ............................................................................................. 20 Related Documentation The following documents contain information that you may find helpful as you read this manual: • CompactPCI Specification PICMG 2.0 R 3.0 • PXI Hardware Specification, Revision 2.1 • PXI Software Specification, Revision 2.1 • ANSI/IEEE Standard 1014-1987, IEEE Standard for a Versatile Backplane Bus: VMEbus • ANSI/VITA 1-1994, VME64 • Read Me First: Safety and Electromagnetic Compatibility , National Instruments
Transcript
INSTALLATION GUIDE
NI 8260This guide includes installation information for the NI 8260. For more information about configuring, using, and maintaining the NI 8260, refer to ni.com.
ContentsRelated Documentation ............................................................................................................ 1Unpacking................................................................................................................................. 2What You Need to Get Started ................................................................................................. 2Key Features ............................................................................................................................. 2
NI 8260 Overview .................................................................................................................... 2Hardware Installation ............................................................................................................... 3Software/Driver Installation ..................................................................................................... 4RAID Creation.......................................................................................................................... 7Moving the NI 8260 to a Different System .............................................................................. 15Specifications............................................................................................................................ 17
Worldwide Support and Services ............................................................................................. 20
Related DocumentationThe following documents contain information that you may find helpful as you read this manual:
• CompactPCI Specification PICMG 2.0 R 3.0• PXI Hardware Specification, Revision 2.1• PXI Software Specification, Revision 2.1• ANSI/IEEE Standard 1014-1987, IEEE Standard for a Versatile Backplane Bus: VMEbus• ANSI/VITA 1-1994, VME64• Read Me First: Safety and Electromagnetic Compatibility, National Instruments
2 | ni.com | NI 8260 Installation Guide
UnpackingCarefully inspect the shipping container and the NI 8260 for damage. Check for visible damage to the metal work. Check to make sure all hardware and switches are undamaged. If damage appears to have been caused during shipment, file a claim with the carrier. Retain the packing material for possible inspection and/or reshipment.
What You Need to Get StartedThe NI 8260 kit contains the following items:
NI 8260 module
NI 8260 User Guide
Driver media
Key FeaturesThe NI 8260, using software RAID or JBOD mode, provides a compact storage solution in a 3U PXI Express platform.
Mainboard Features
SATA Chipset• Marvel 88SX7042
HDD• 4 × 250 GB (or greater) SATA (platter) hard drives
or
• 4 × 64 GB (or greater) SATA solid state hard drives
Front Panel LEDs• Power
• HDD activity
NI 8260 OverviewThe NI 8260 PXI Express/cPCI Express Storage Module supports a software-based stripped/simple/spanned RAID array. The NI 8260 is a three-slot wide hard drive storage device that holds up to four 2.5 in. solid-state or mechanical laptop hard drives. The module has a x4 PXI Express high bandwidth connector to the chassis backplane.
The following table lists the optimal NI 8260 usability options.
Note If you require the highest streaming performance with the NI 8260 3 TB and SSD version, Windows XP is not recommended. This is due to the 4 KB sector size incorporated in newer, higher density drives, as opposed to 512 bytes in older, lower density drives. Only operating systems such as Windows 7/Vista, which are 4 KB compatible, can properly format these drives. Using these drives under Windows XP results in reduced performance and is not recommended.
Hardware InstallationThe following are general instructions for installing the NI 8260 in a PXI Express chassis.
1. Power off your PXI Express or CompactPCI Express chassis, but leave it plugged in while installing the NI 8260. The power cord grounds the chassis and protects it from electrical damage while you install the module.
2. Locate an available PXI Express or CompactPCI Express slot in the chassis. Do not install the NI 8260 in the controller slot (slot 1 in a PXI Express chassis).
Note The NI 8260 requires three open slots.
Caution To protect both yourself and the chassis from electrical hazards, leave the chassis off until you finish installing the NI 8260.
3. Remove or open any doors or covers blocking access to the slot in which you intend to install the NI 8260.
4. Touch the metal part of the case to discharge any static electricity that might be on your clothes or body.
5. Make sure the injector/ejector handle is in its downward position. Be sure to remove all connector packaging and protective caps from retaining screws on the module. Align the NI 8260 with the card guides on the top and bottom of the system controller slot.
Caution Do not raise the injector/ejector handle as you insert the NI 8260. It will not insert properly unless the handle is in its downward position so that it does not interfere with the injector/ejector rail on the chassis.
6. Hold the handle as you slowly slide the module into the chassis until the handle catches on the injector/ejector rail.
NI 8260 NI 8260 1 TB NI 8260 3 TB NI 8260 SSD
Windows XP — —
Windows Vista
Windows 7
4 | ni.com | NI 8260 Installation Guide
7. Raise the injector/ejector handle until the module firmly seats into the backplane receptacle connectors. The front panel of the NI 8260 should be even with the front panel of the chassis.
8. Tighten the bracket-retaining screws on the top and bottom of the front panel to secure the NI 8260 to the chassis.
9. Replace or close any doors or covers to the chassis.
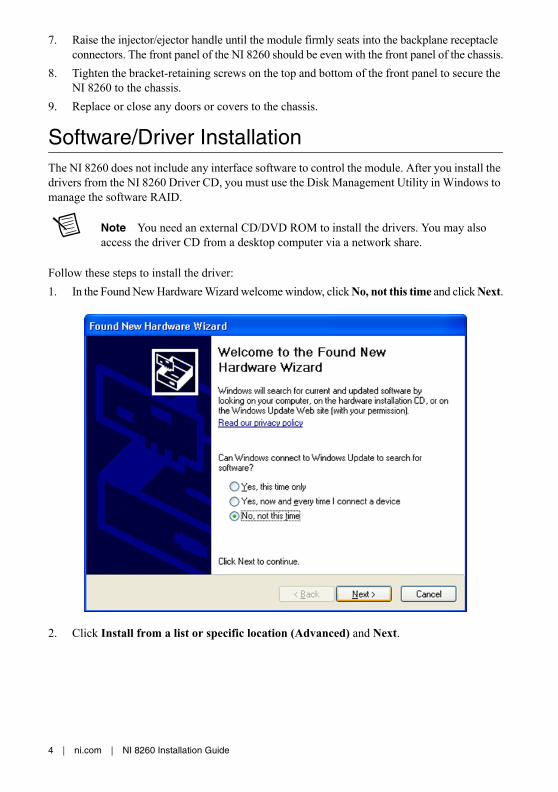
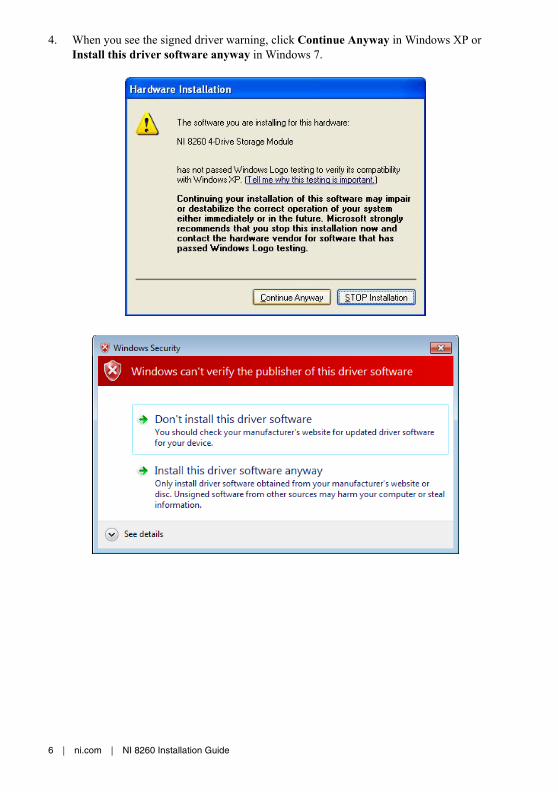
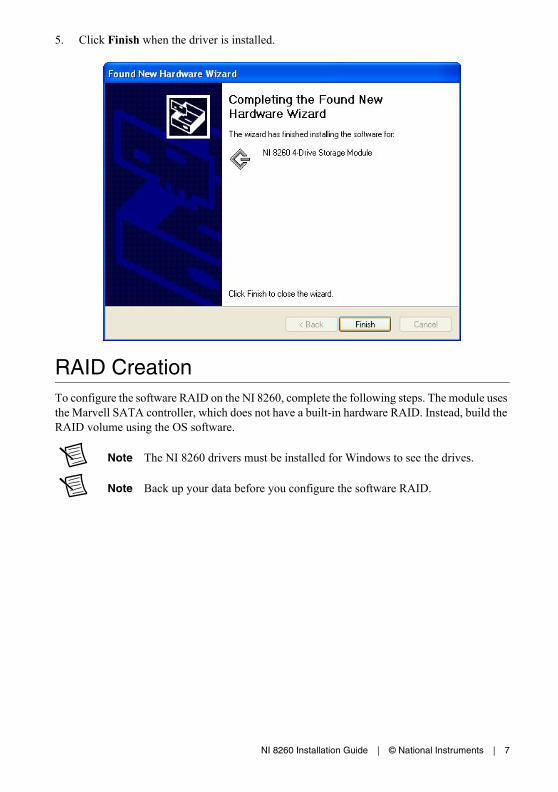
Software/Driver InstallationThe NI 8260 does not include any interface software to control the module. After you install the drivers from the NI 8260 Driver CD, you must use the Disk Management Utility in Windows to manage the software RAID.
Note You need an external CD/DVD ROM to install the drivers. You may also access the driver CD from a desktop computer via a network share.
Follow these steps to install the driver:
1. In the Found New Hardware Wizard welcome window, click No, not this time and click Next.
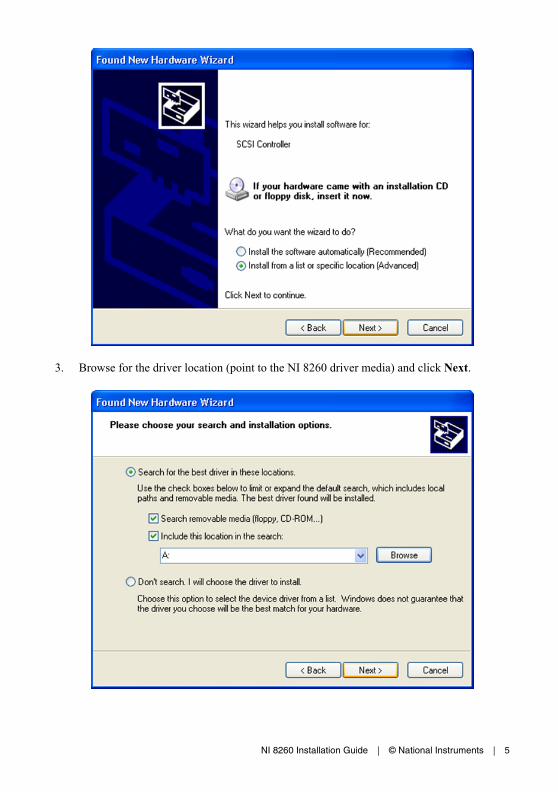
2. Click Install from a list or specific location (Advanced) and Next.
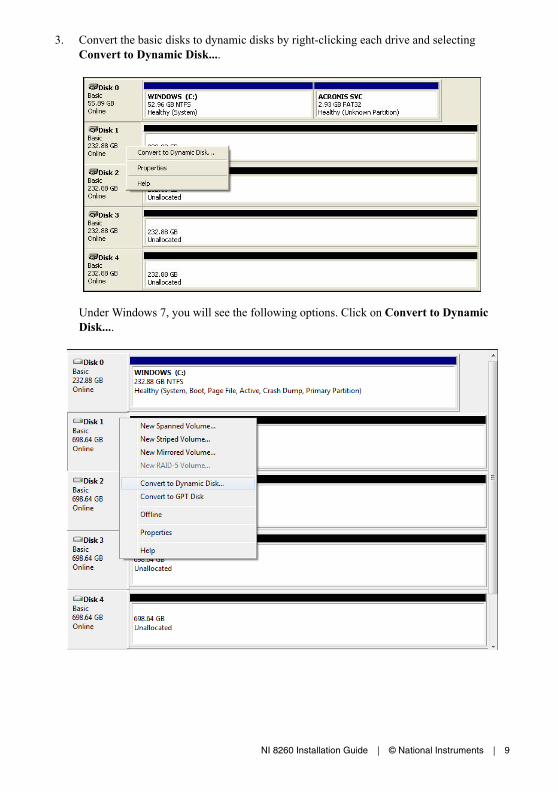
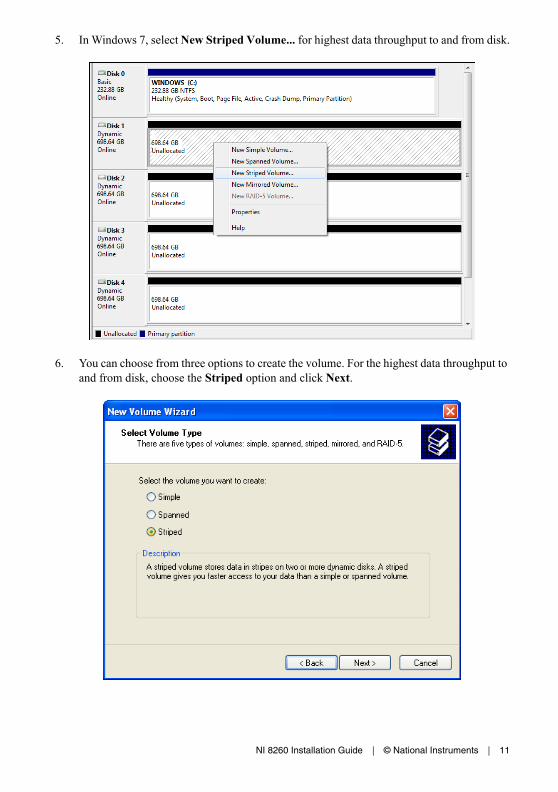
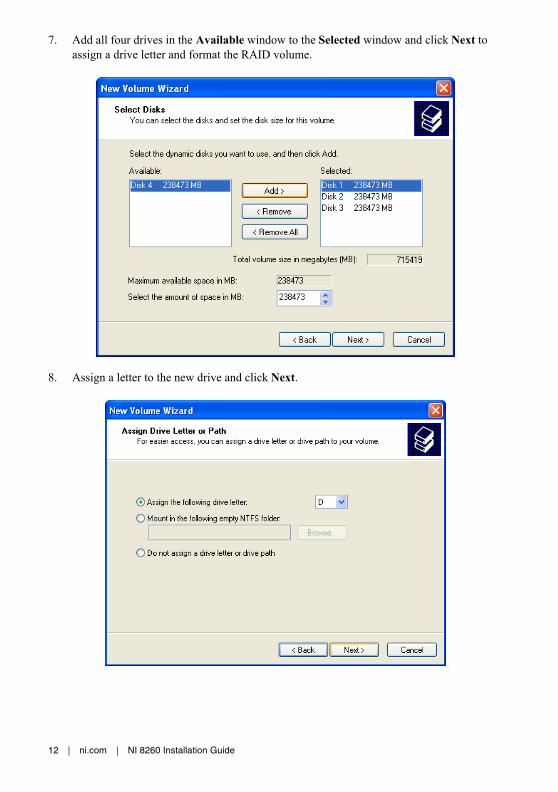
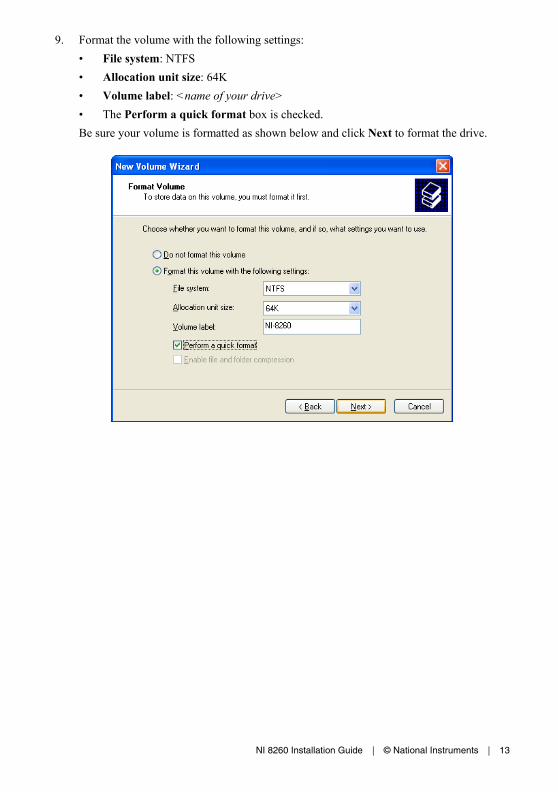
RAID CreationTo configure the software RAID on the NI 8260, complete the following steps. The module uses the Marvell SATA controller, which does not have a built-in hardware RAID. Instead, build the RAID volume using the OS software.
Note The NI 8260 drivers must be installed for Windows to see the drives.
Note Back up your data before you configure the software RAID.
8 | ni.com | NI 8260 Installation Guide
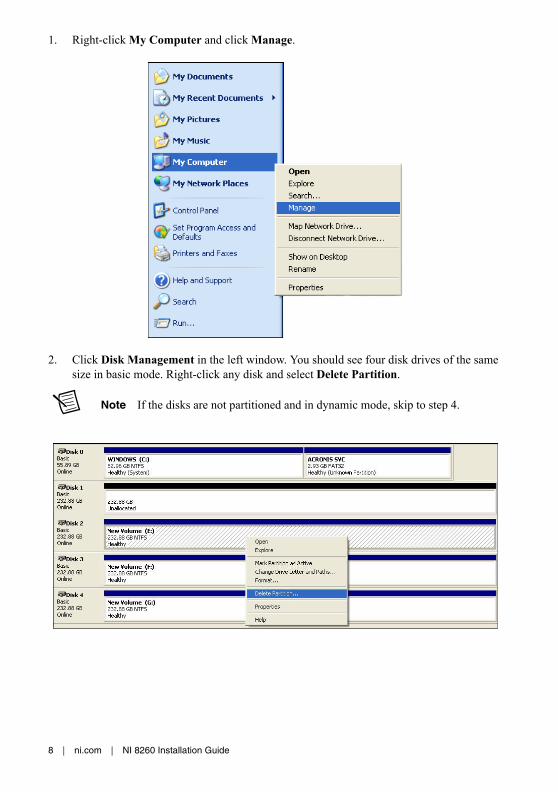
1. Right-click My Computer and click Manage.
2. Click Disk Management in the left window. You should see four disk drives of the same size in basic mode. Right-click any disk and select Delete Partition.
Note If the disks are not partitioned and in dynamic mode, skip to step 4.
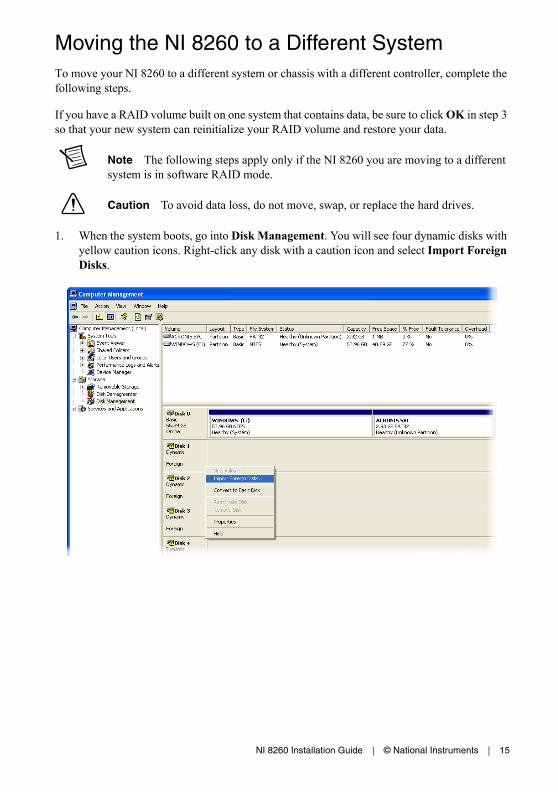
Moving the NI 8260 to a Different SystemTo move your NI 8260 to a different system or chassis with a different controller, complete the following steps.
If you have a RAID volume built on one system that contains data, be sure to click OK in step 3 so that your new system can reinitialize your RAID volume and restore your data.
Note The following steps apply only if the NI 8260 you are moving to a different system is in software RAID mode.
Caution To avoid data loss, do not move, swap, or replace the hard drives.
1. When the system boots, go into Disk Management. You will see four dynamic disks with yellow caution icons. Right-click any disk with a caution icon and select Import Foreign Disks.
16 | ni.com | NI 8260 Installation Guide
2. Be sure the box for the foreign disk group (four of four disks) is checked and click OK.
3. You may see the following dialog box if a RAID volume was present on the NI 8260 before you moved it to the new system. Click OK to allow the new system to reinitialize the RAID volume.
Rotating media (HDD)..............................5 to 50 °C (tested in accordance with IEC-60068-2-1 and IEC-60068-2-2; meets MIL-PRF-28800F Class 3 high temperature limit)
Solid state media (SSD)............................0 to 55 °C(tested in accordance with IEC-60068-2-1 and IEC-60068-2-2; meets MIL-PRF-28800F Class 3 low-temperature limit and MIL-PRF-28800F Class 2 high-temperature limit)
Relative humidity range............................10 to 90% noncondensing (tested in accordance with IEC-60068-2-56)
Storage EnvironmentAmbient temperature range ..............................-40 to 71 °C
(tested in accordance with IEC-60068-2-1 and IEC-60068-2-2; meets MIL-PRF-28800F Class 3 limits)
Relative humidity range....................................5 to 95% noncondensing(tested in accordance with IEC-60068-2-56)
Shock and VibrationOperational shock .............................................30 g peak, half-sine, 11 ms pulse
(tested in accordance with IEC-60068-2-27; test profile developed in accordance with MIL-PRF-28800F)
Random vibration
Operating ..................................................5 to 500 Hz, 0.3 grms(with solid state hard drive)
Nonoperating ............................................5 to 500 Hz, 2.4 grms (tested in accordance with IEC-60068-2-64; nonoperating test profile exceeds the requirements of MIL-PRF-28800F, Class 3)
Note Specifications are subject to change without notice.
1 For chassis that are not available in the online catalog at ni.com, contact National Instruments for supported operating temperatures.
Electromagnetic CompatibilityThis product meets the requirements of the following EMC standards for electrical equipment for measurement, control, and laboratory use:
• EN 61326 (IEC 61326): Class A emissions; Basic immunity
• EN 55011 (CISPR 11): Group 1, Class A emissions
• AS/NZS CISPR 11: Group 1, Class A emissions
• FCC 47 CFR Part 15B: Class A emissions
• ICES-001: Class A emissions
Note For the standards applied to assess the EMC of this product, refer to the Online Product Certification section.
CE ComplianceThis product meets the essential requirements of applicable European Directives as follows:
Online Product CertificationRefer to the product Declaration of Conformity (DoC) for additional regulatory compliance information. To obtain product certifications and the DoC for this product, visit ni.com/certification, search by model number or product line, and click the appropriate link in the Certification column.
Environmental ManagementNI is committed to designing and manufacturing products in an environmentally responsible manner. NI recognizes that eliminating certain hazardous substances from our products is beneficial to the environment and to NI customers.
For additional environmental information, refer to the Minimize Our Environmental Impact web page at ni.com/environment. This page contains the environmental regulations and directives with which NI complies, as well as other environmental information not included in this document.
Refer to the NI Trademarks and Logo Guidelines at ni.com/trademarks for more information on National Instruments trademarks. Other product and company names mentioned herein are trademarks or trade names of their respective companies. For patents covering National Instruments products/technology, refer to the appropriate location: Help»Patents in your software, the patents.txt file on your media, or the National Instruments Patents Notice at ni.com/patents. You can find information about end-user license agreements (EULAs) and third-party legal notices in the readme file for your NI product. Refer to the Export Compliance Information at ni.com/legal/export-compliance for the National Instruments global trade compliance policy and how to obtain relevant HTS codes, ECCNs, and other import/export data.
Waste Electrical and Electronic Equipment (WEEE)EU Customers At the end of the product life cycle, all products must be sent to a WEEE recycling center. For more information about WEEE recycling centers, National Instruments WEEE initiatives, and compliance with WEEE Directive 2002/96/EC on Waste and Electronic Equipment, visit ni.com/environment/weee.
Worldwide Support and ServicesThe National Instruments website is your complete resource for technical support. At ni.com/support you have access to everything from troubleshooting and application development self-help resources to email and phone assistance from NI Application Engineers.
Visit ni.com/services for NI Factory Installation Services, repairs, extended warranty, and other services.
Visit ni.com/register to register your National Instruments product. Product registration facilitates technical support and ensures that you receive important information updates from NI.
A Declaration of Conformity (DoC) is our claim of compliance with the Council of the European Communities using the manufacturer’s declaration of conformity. This system affords the user protection for electromagnetic compatibility (EMC) and product safety. You can obtain the DoC for your product by visiting ni.com/certification. If your product supports calibration, you can obtain the calibration certificate for your product at ni.com/calibration.
National Instruments corporate headquarters is located at 11500 North Mopac Expressway, Austin, Texas, 78759-3504. National Instruments also has offices located around the world. For telephone support in the United States, create your service request at ni.com/support or dial 512 795 8248. For telephone support outside the United States, visit the Worldwide Offices section of ni.com/niglobal to access the branch office websites, which provide up-to-date contact information, support phone numbers, email addresses, and current events.
RoHSNational Instruments
(RoHS) National Instruments RoHS ni.com/environment/rohs_china (For information about China RoHS compliance, go to ni.com/environment/rohs_china.)