TP-02118 Revised 10-05 Installation Guide R955320 and R955321 Meritor WABCO 2S/2M and 4S/2M Enhanced Easy-Stop ™ Trailer ABS for Easy-Stop ™ Replacement Kits for ECU/Modulator Valve Assembly Part Number 472 500 012 0 Hazard Alert Messages Read and observe all Warning and Caution hazard alert messages in this publication. They provide information that can help prevent serious personal injury, damage to components, or both. How to Obtain Additional Maintenance and Service Information Refer to Maintenance Manual MM-0180, Enhanced Easy-Stop™ Trailer ABS with PLC. This publication is available on our website, meritorwabco.com, or contact the ArvinMeritor Customer Service Center, 800-535-5560, to obtain a copy. Replacement Kit Information Enhanced Easy-Stop™ Trailer ABS ECU/dual modulator valve assembly, Part Number 400 500 103 0, has replaced ECU/modulator valve assembly, Part Number 472 500 012 0. This replacement assembly meets the March 1, 2001 FMVSS 121 in-cab trailer indicator lamp mandate. The Easy-Stop™ ECU/modulator valve assembly may have been used in a 2S/1M, 2S/2M or 4S/2M configuration. Installation instructions for the replacement assembly, which may be used as a 2S/2M, 4S/2M or 4S/3M system, will differ, depending on the configuration. If the 472 500 103 0 replacement assembly is for a 4S/3M installation, you will need Installation Guide TP-0378 and Replacement Kit R955346 or R955347. Sensor and air line locations depend on the mounting orientation of the replacement assembly and are explained in detail in the instructions. Differences Between Easy-Stop TM and Enhanced Easy-Stop TM There are some changes to Enhanced Easy-Stop™ that you need to be aware of before you begin the installation. Enhanced Easy-Stop™ includes the Power Line Carrier (PLC) communication function. The ECU/dual modulator valve assembly must be mounted as one unit. The LED on top of the ECU has been eliminated. The blink code tool LED does not operate simultaneously with the ABS lamp on the trailer. The valve portion of the ECU/dual modulator valve assembly contains two separate modulator valves that share common control and exhaust ports. If the system you are replacing used two SEPARATE valves, you must remove the old ECU/valve assembly AND the external ABS modulator valve, air lines and associated cabling. Because BOTH modulator valves are now included in one valve package, all air tubing and hoses must be routed to the new ECU/dual modulator valve assembly. Some air delivery hoses may need to be rerouted or reworked in order to reach the delivery ports of the new assembly. Each valve has its own delivery ports, three each. Therefore, the mounting orientation — whether the valve is facing the front or the rear of the trailer — determines sensor hookup. If this assembly is mounted facing forward — toward the front of the trailer — the YE sensor connections go to the curbside and the BU sensor connections go to the roadside. If this assembly is mounted facing the rear, the YE sensor connections go to the roadside, and the BU sensor connections go to the curbside. Figure 1. Figure 1 The ECU/dual modulator assembly cannot be used as a 2S/1M system. POWER ADAPTER CABLE POWER/DIAGNOSTICS ADAPTER “Y” CABLE ECU/DUAL MODULATOR VALVE ASSEMBLY Enhanced Easy-Stop TM Replacement Parts Easy-Stop TM Parts POWER CABLE ECU/MODULATOR VALVE ASSEMBLY DIAGNOSTICS CABLE 4000664c
Transcript
TP-02118Revised 10-05
Installation Guide
R955320 and R955321 Meritor WABCO 2S/2M and 4S/2M Enhanced Easy-Stop™ Trailer ABSfor Easy-Stop™ Replacement Kits for ECU/Modulator Valve Assembly
Part Number 472 500 012 0TP-02118Revised 10-051 Installation Guide
Hazard Alert MessagesRead and observe all Warning and Caution hazard alert messages in this publication. They provide information that can help prevent serious personal injury, damage to components, or both.
How to Obtain Additional Maintenance and Service InformationRefer to Maintenance Manual MM-0180, Enhanced Easy-Stop™ Trailer ABS with PLC. This publication is available on our website, meritorwabco.com, or contact the ArvinMeritor Customer Service Center, 800-535-5560, to obtain a copy.
Replacement Kit InformationEnhanced Easy-Stop™ Trailer ABS ECU/dual modulator valve assembly, Part Number 400 500 103 0, has replaced ECU/modulator valve assembly, Part Number 472 500 012 0. This replacement assembly meets the March 1, 2001 FMVSS 121 in-cab trailer indicator lamp mandate.
The Easy-Stop™ ECU/modulator valve assembly may have been used in a 2S/1M, 2S/2M or 4S/2M configuration. Installation instructionsfor the replacement assembly, which may be used as a 2S/2M, 4S/2M or 4S/3M system, will differ, depending on the configuration.
If the 472 500 103 0 replacement assembly is for a 4S/3M installation, you will need Installation Guide TP-0378 and Replacement Kit R955346 or R955347.
� Sensor and air line locations depend on the mounting orientation of the replacement assembly and are explained in detail in the instructions.
Differences Between Easy-StopTM and Enhanced Easy-StopTM
There are some changes to Enhanced Easy-Stop™ that you needto be aware of before you begin the installation.
� Enhanced Easy-Stop™ includes the Power Line Carrier (PLC) communication function.
� The ECU/dual modulator valve assembly must be mounted as one unit.
� The LED on top of the ECU has been eliminated.
� The blink code tool LED does not operate simultaneously with the ABS lamp on the trailer.
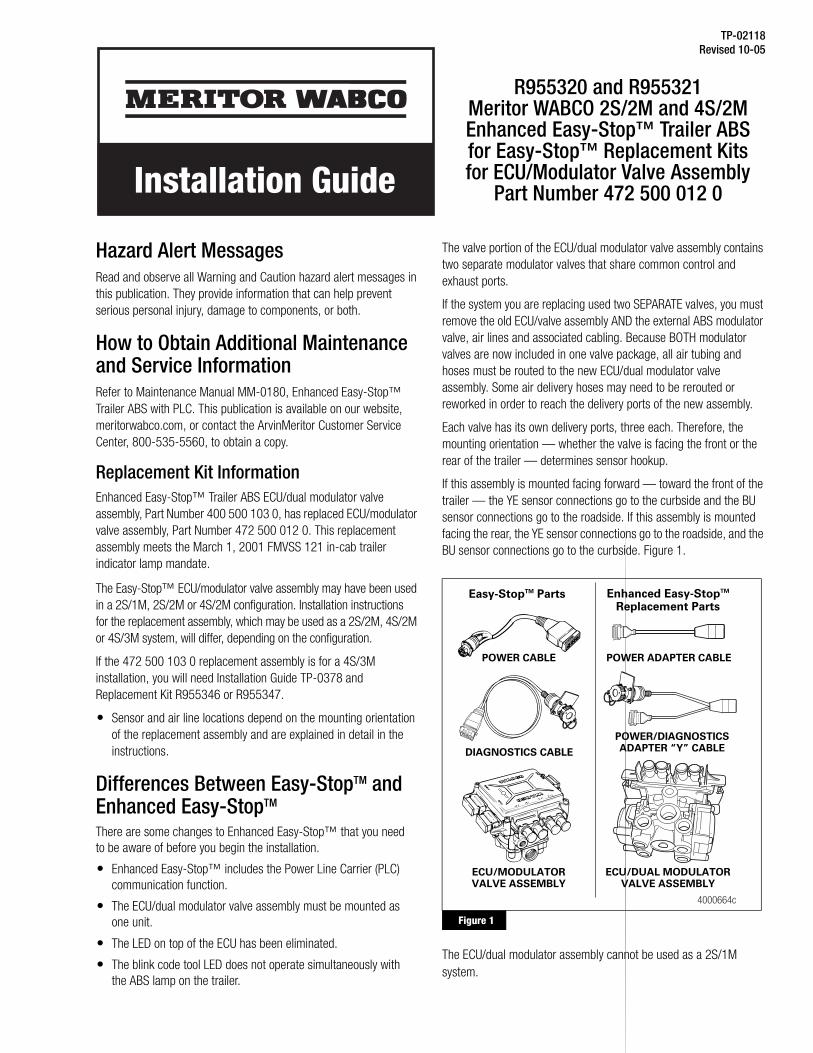
The valve portion of the ECU/dual modulator valve assembly contains two separate modulator valves that share common control and exhaust ports.
If the system you are replacing used two SEPARATE valves, you must remove the old ECU/valve assembly AND the external ABS modulator valve, air lines and associated cabling. Because BOTH modulator valves are now included in one valve package, all air tubing and hoses must be routed to the new ECU/dual modulator valve assembly. Some air delivery hoses may need to be rerouted or reworked in order to reach the delivery ports of the new assembly.
Each valve has its own delivery ports, three each. Therefore, the mounting orientation — whether the valve is facing the front or the rear of the trailer — determines sensor hookup.
If this assembly is mounted facing forward — toward the front of the trailer — the YE sensor connections go to the curbside and the BU sensor connections go to the roadside. If this assembly is mounted facing the rear, the YE sensor connections go to the roadside, and the BU sensor connections go to the curbside. Figure 1.
Figure 1
The ECU/dual modulator assembly cannot be used as a 2S/1M system.
Figure 1
POWER ADAPTER CABLE
POWER/DIAGNOSTICSADAPTER “Y” CABLE
ECU/DUAL MODULATORVALVE ASSEMBLY
Enhanced Easy-StopTM
Replacement PartsEasy-StopTM Parts
POWER CABLE
ECU/MODULATORVALVE ASSEMBLY
DIAGNOSTICS CABLE
4000664c
TP-02118Revised 10-05 (16579/22882)Page 2 Copyright ArvinMeritor, Inc., 2005 Printed in USA
Replacement KitsThe new assemblies are packaged as a kit so that you will have all of the necessary components to complete an installation. Replacement kits contain the following.
2S/2M and 4S/2M Premium ECU/Dual Modulator Valve Assembly with Power Adapter Cable, Replacement Kit R955320� Installation Guide, TP-02118
� 12-volt integrated ECU/dual modulator valve assembly, Part Number 400 500 103 0
� Power adapter cable, Part Number 894 607 312 0
2S/2M and 4S/2M Premium ECU/Dual Modulator Valve Assembly with Power/Diagnostics Adapter Cable, Replacement Kit R955321� Installation Guide, TP-02118
� 12-volt integrated ECU/dual modulator valve assembly, Part Number 400 500 103 0
� Power/Diagnostics adapter cable with mounting bracket, Part Number 894 607 313 0
Enhanced Easy-Stop™ replacement parts, as well as the Easy-Stop™ components, are shown in Figure 1.
Removal
Remove the Easy-Stop™ ECU/Modulator Valve Assembly
WARNINGTo prevent serious eye injury, always wear safe eye protection when you perform vehicle maintenance or service.
The Anti-lock Braking System (ABS) is an electrical system. When you work on the ABS, take the same precautions that you must take with any electrical system to avoid serious personal injury. As with any electrical system, the danger of electrical shock or sparks exists that can ignite flammable substances. You must always disconnect the battery ground cable before working on the electrical system.
Park the vehicle on a level surface. Block the wheels to prevent the vehicle from moving. Support the vehicle with safety stands. Do not work under a vehicle supported only by jacks. Jacks can slip and fall over. Serious personal injury and damage to components can result.
1. Wear safe eye protection.
2. Park the vehicle on a level surface. Block the wheels to prevent the vehicle from moving.
3. Discharge all pressure from the air system.
4. Attach labels to identify all air lines before they are disconnected.
5. Disconnect and remove the air lines from the ECU/modulator valve assembly and from the external ABS modulator valve.
6. Disconnect the Easy-Stop™ power cable.
� For Replacement Kit R955320: Disconnect the Easy-Stop™ power cable from the ECU/modulator valve assembly. Do not remove the cable from the trailer. Disconnect and remove the external ABS modulator valve cable.
� For Replacement Kit R955321: Disconnect the Easy-Stop™ power and diagnostic cables from theECU/modulator valve assembly. Remove the diagnostic cable from the trailer. Do not remove the power cable from the trailer. Disconnect and remove the external ABS modulator valve cable.
7. Disconnect the sensor cables from the ECU/modulator valve assembly. Do not remove the sensor cables from the trailer.
8. Remove the ECU/modulator valve assembly from its mounting location, either on the air tank or on the frame of the vehicle.
9. For existing 2M systems, remove the external ABS modulator valve.
Installation
Install the New Enhanced ECU/Dual Modulator Valve AssemblyAttach the replacement ECU/dual modulator valve assembly to a cross member of the trailer or to the air tank. Contact our Customer Service Center at 1-800-535-5560 for additional assistance.
Air Tank-Mounted
WARNINGYou must use a Schedule 80 hex nipple (3/4-inch NPTF) to mount the ECU/dual modulator valve assembly securely to the air tank to avoid possible serious personal injury and damage to the component.
1. Use a 3/4-inch NPTF Schedule 80 hex nipple to attach the ECU/dual modulator valve assembly to a reinforced air tank. Do not overtighten.
Meritor WABCO does not recommend the use of a vise when installing the hex nipple. Use of a vise may cause overclamping which may damage the internal components of the assembly.
TP-02118(16579/22882) Revised 10-05Printed in USA Copyright ArvinMeritor, Inc., 2005 Page 3
2. Use a 3/4-inch NPTF pipe plug to plug the unused supply port.
Apply SAE-standard, DOT-approved Teflon tape or paste-type thread sealant to all pipe threads beyond the first two threads. Pipes with pre-applied thread sealant may also be used.
3. Rotate and tighten the ECU/dual modulator valve assembly until the exhaust port faces DOWN and the connection is secure. Use a torque wrench or ratchet with an extension at the 3/4-inch pipe plug installed on the front supply port. Figure 2.
Figure 2
Cross Member-Mounted
If you are attaching the replacement assembly to the vehicle cross member, it will be necessary to drill new mounting holes.
1. Install a 3/4-inch NPTF fitting in the supply port.
2. Use a 3/4-inch NPTF pipe plug to plug the unused supply port.
Apply SAE-standard, DOT-approved Teflon tape or paste-type thread sealant to all pipe threads beyond the first two threads. Pipes with pre-applied thread sealant may also be used.
3. Mark the location of the two mounting holes on the vehicle cross member. Drill two 3/8-inch holes into the vehicle cross member.
The recommended mounting location is midway between the side rails, close to the brake chambers the valve serves.
4. Attach the replacement assembly to the vehicle.
5. Use two 3/8-inch Grade 8 bolts with prevailing torque nuts and washers to attach the assembly to the vehicle cross member. Tighten the bolts to 18 lb-ft (24 N�m). Figure 3. @
Figure 3
Connect the Air LinesBefore connecting the air lines, check to ensure the spring brake relay or emergency brake relay is plumbed into the system as required.
� If you are mounting the assembly on a bracket, connect the air supply line from the supply tank to supply Port 1. Plug the unused port.
� Use 5/8-inch O.D. min. nylon tubing or heavy-walled Schedule 80 pipe nipple (3/4-inch NPTF) if you are mounting the assembly directly to the supply tank.
Figure 2
PLUG UNUSEDPORT
Exhaust portmust face DOWN.
CURBSIDEYE2
CURBSIDEYE1
ROADSIDEBU1
ROADSIDEBU2
CURBSIDEBU2
CURBSIDEBU1
ROADSIDEYE1
ROADSIDEYE2
4003548b
ECU/DUAL MODULATOR VALVE MOUNTED TOTHE AIR TANK WITH SENSORS FACING FRONT
OF TRAILER
ECU/DUAL MODULATOR VALVE MOUNTED TOTHE AIR TANK WITH SENSORS FACING
REAR OF TRAILER
Figure 3
FRONT OFTRAILER
Exhaust portmust face DOWN.
FRONT OFTRAILER
Exhaust portmust face DOWN.
ECU/DUAL MODULATOR VALVE MOUNTED TO A VEHICLE CROSS MEMBER WITHSENSORS FACING REAR OF TRAILER
PLUG ALLUNUSED PORTS
PLUG ALLUNUSED PORTS
ROADSIDEYE1
CURBSIDEBU2CURBSIDE
BU1
ROADSIDEYE2
ROADSIDEBU1
CURBSIDEYE2
ROADSIDEBU2
CURBSIDEYE1
ECU/DUAL MODULATOR VALVE MOUNTED TO A VEHICLE CROSS MEMBER WITHSENSORS FACING FRONT OF TRAILER
4003549b
TP-02118Revised 10-05 (16579/22882)Page 4 Copyright ArvinMeritor, Inc., 2005 Printed in USA
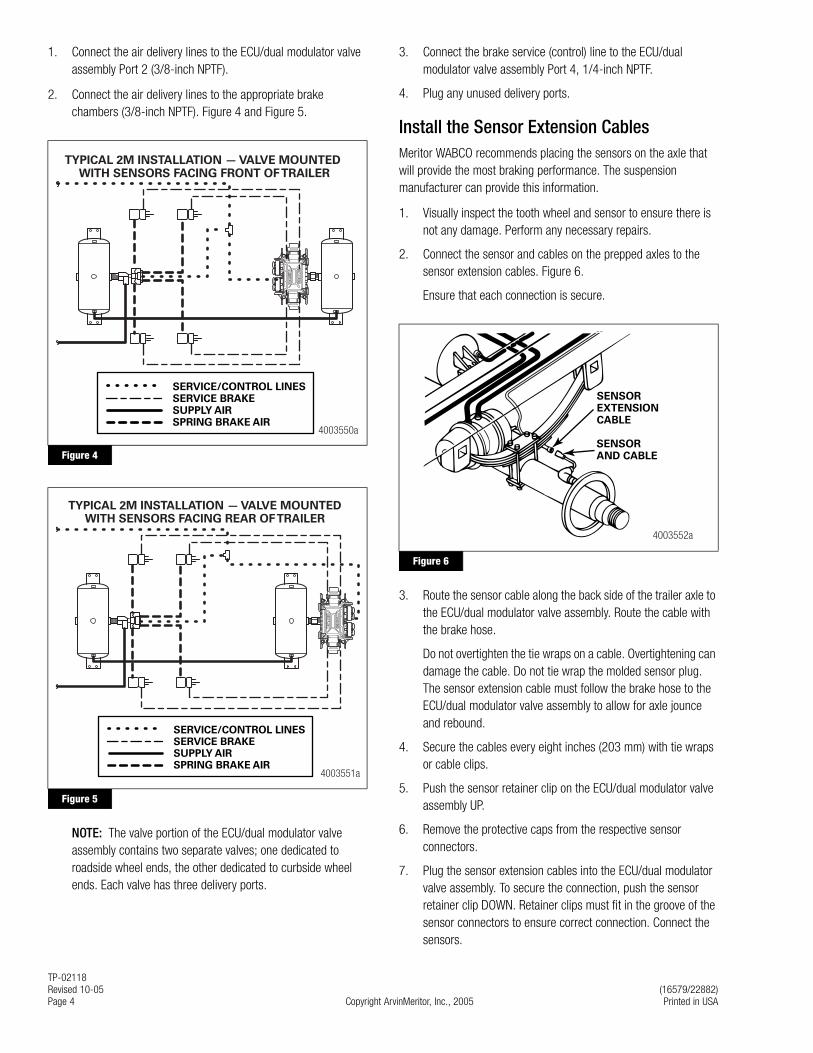
1. Connect the air delivery lines to the ECU/dual modulator valve assembly Port 2 (3/8-inch NPTF).
2. Connect the air delivery lines to the appropriate brake chambers (3/8-inch NPTF). Figure 4 and Figure 5.
Figure 4
Figure 5
NOTE: The valve portion of the ECU/dual modulator valve assembly contains two separate valves; one dedicated to roadside wheel ends, the other dedicated to curbside wheel ends. Each valve has three delivery ports.
3. Connect the brake service (control) line to the ECU/dual modulator valve assembly Port 4, 1/4-inch NPTF.
4. Plug any unused delivery ports.
Install the Sensor Extension CablesMeritor WABCO recommends placing the sensors on the axle that will provide the most braking performance. The suspension manufacturer can provide this information.
1. Visually inspect the tooth wheel and sensor to ensure there is not any damage. Perform any necessary repairs.
2. Connect the sensor and cables on the prepped axles to the sensor extension cables. Figure 6.
Ensure that each connection is secure.
Figure 6
3. Route the sensor cable along the back side of the trailer axle to the ECU/dual modulator valve assembly. Route the cable with the brake hose.
Do not overtighten the tie wraps on a cable. Overtightening can damage the cable. Do not tie wrap the molded sensor plug. The sensor extension cable must follow the brake hose to the ECU/dual modulator valve assembly to allow for axle jounce and rebound.
4. Secure the cables every eight inches (203 mm) with tie wraps or cable clips.
5. Push the sensor retainer clip on the ECU/dual modulator valve assembly UP.
6. Remove the protective caps from the respective sensor connectors.
7. Plug the sensor extension cables into the ECU/dual modulator valve assembly. To secure the connection, push the sensor retainer clip DOWN. Retainer clips must fit in the groove of the sensor connectors to ensure correct connection. Connect the sensors.
Figure 4
Figure 5
SERVICE/CONTROL LINESSERVICE BRAKESUPPLY AIRSPRING BRAKE AIR
TYPICAL 2M INSTALLATION — VALVE MOUNTED WITH SENSORS FACING FRONT OF TRAILER
4003550a
SERVICE/CONTROL LINESSERVICE BRAKESUPPLY AIRSPRING BRAKE AIR
TP-02118(16579/22882) Revised 10-05Printed in USA Copyright ArvinMeritor, Inc., 2005 Page 5
* If the lift axle is sensed in 4S/2M installations: Sensors YE2 and BU2 must always be used on the lift axle to avoid an unwanted ABS indicator lamp illumination.
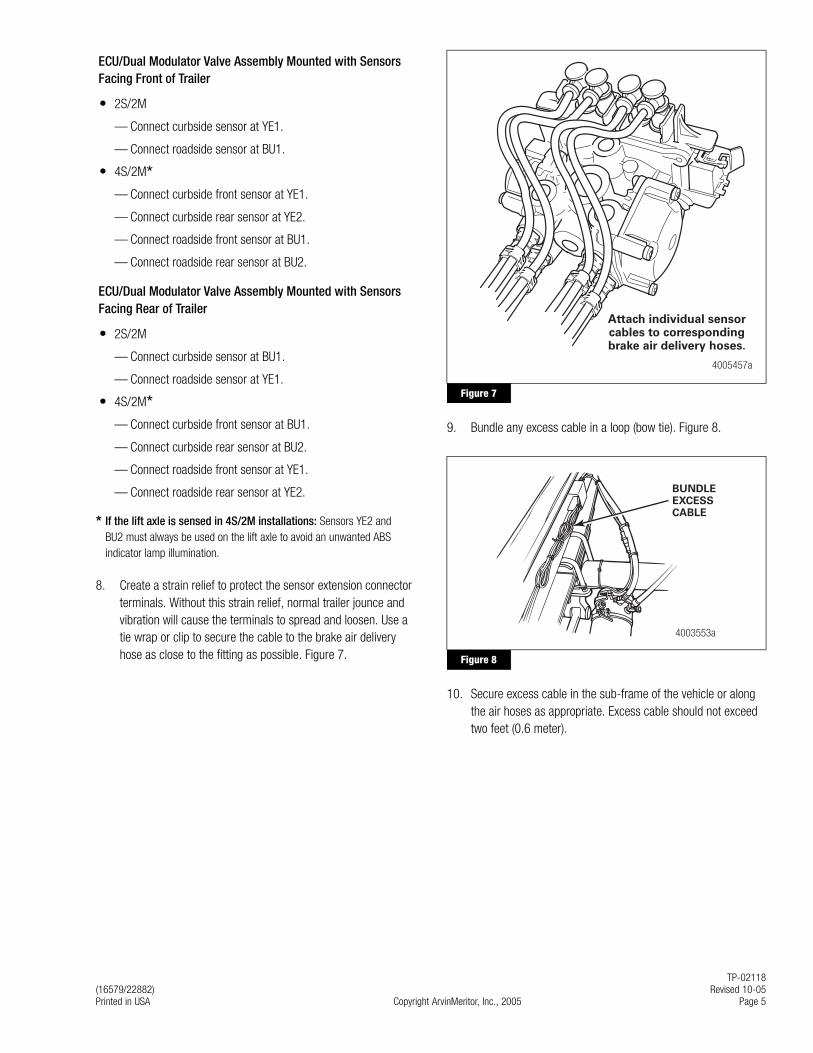
8. Create a strain relief to protect the sensor extension connector terminals. Without this strain relief, normal trailer jounce and vibration will cause the terminals to spread and loosen. Use a tie wrap or clip to secure the cable to the brake air delivery hose as close to the fitting as possible. Figure 7.
Figure 7
9. Bundle any excess cable in a loop (bow tie). Figure 8.
Figure 8
10. Secure excess cable in the sub-frame of the vehicle or along the air hoses as appropriate. Excess cable should not exceed two feet (0.6 meter).
ECU/Dual Modulator Valve Assembly Mounted with Sensors Facing Front of Trailer
� 2S/2M
— Connect curbside sensor at YE1.
— Connect roadside sensor at BU1.
� 4S/2M*— Connect curbside front sensor at YE1.
— Connect curbside rear sensor at YE2.
— Connect roadside front sensor at BU1.
— Connect roadside rear sensor at BU2.
ECU/Dual Modulator Valve Assembly Mounted with Sensors Facing Rear of Trailer
� 2S/2M
— Connect curbside sensor at BU1.
— Connect roadside sensor at YE1.
� 4S/2M*— Connect curbside front sensor at BU1.
— Connect curbside rear sensor at BU2.
— Connect roadside front sensor at YE1.
— Connect roadside rear sensor at YE2.
Figure 7
Figure 8
Attach individual sensorcables to correspondingbrake air delivery hoses.
4005457a
BUNDLEEXCESSCABLE
4003553a
TP-02118Revised 10-05 (16579/22882)Page 6 Copyright ArvinMeritor, Inc., 2005 Printed in USA
Install the Power Adapter or Power/Diagnostics Adapter CableReplacement Kit R955320: Power Adapter Cable
To install the power or power/diagnostics adapter cable:
1. Push the hinged power connector retaining clip UP and remove the protective cap from the ECU/modulator valve assembly. Plug the 8-pin connector on the power or power/diagnostics adapter cable into the ECU/dual modulator valve assembly. WABCO identification (lettering on the 8-pin cable connection) must face DOWN. Pull the hinged power connector retainer clip on the ECU/dual modulator valve assembly DOWN to secure the connection. Figure 9.
Figure 9
2. If you are installing the power cable only, go to Step 3.
If you are installing the power/diagnostics cable: Install the diagnostic cable bracket so that the diagnostic plug is accessible. The normal location is on the right front corner of the sub-frame, but will vary depending on the type of trailer.
3. Connect the 5-pin power adapter cable to the existing Easy-Stop™ power cable.
When connecting the power adapter cable to the existing Easy-Stop™ power cable, the lettering on both connectors must face the same direction, usually UP. Figure 10.
Figure 10
� Both the straight and “Y” replacement power adapter cables have a WABCO power connector on one end and a mating Easy-Stop™ power adapter connector on the other end. The Easy-Stop™ power adapter connector eliminates the need to replace the existing Easy-Stop™ power cable. The WABCO power connector is different from the connector on the old cable. Therefore, the replacement cable MUST be used with the replacement ECU/dual modulator valve assembly.
� The power portion of the power/diagnostics adapter cable is 1.6 feet (0.5 meter). The diagnostic portion of the adapter cable is 10 feet (3 meters).
Figure 9
KEYED CABLECONNECTOR
MATINGTRAILER
HARNESSCONNECTOR
CAP
4003569a
Figure 10
MERITOR WABCO
MERITOR WABCO
4000692a
TP-02118(16579/22882) Revised 10-05Printed in USA Copyright ArvinMeritor, Inc., 2005 Page 7
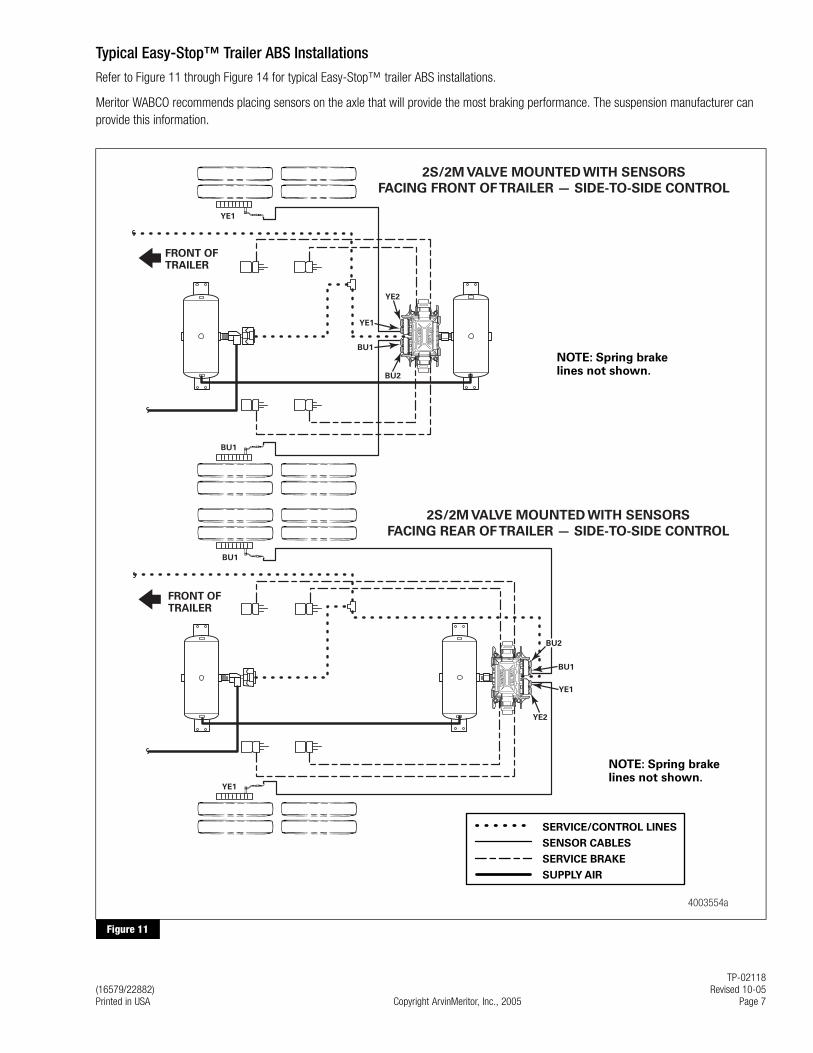
Typical Easy-Stop™ Trailer ABS Installations
Refer to Figure 11 through Figure 14 for typical Easy-Stop™ trailer ABS installations.
Meritor WABCO recommends placing sensors on the axle that will provide the most braking performance. The suspension manufacturer can provide this information.
Figure 11
Figure 11
NOTE: Spring brakelines not shown.
SERVICE/CONTROL LINES
SENSOR CABLES
SERVICE BRAKE
SUPPLY AIR
NOTE: Spring brakelines not shown.
4003554a
YE1
BU1
2S/2M VALVE MOUNTED WITH SENSORS
FACING FRONT OF TRAILER — SIDE-TO-SIDE CONTROL
FRONT OFTRAILER
BU1
YE1
2S/2M VALVE MOUNTED WITH SENSORS
FACING REAR OF TRAILER — SIDE-TO-SIDE CONTROL
FRONT OFTRAILER
BU1
YE1
YE2
BU2
YE1
BU1
YE2
BU2
TP-02118Revised 10-05 (16579/22882)Page 8 Copyright ArvinMeritor, Inc., 2005 Printed in USA
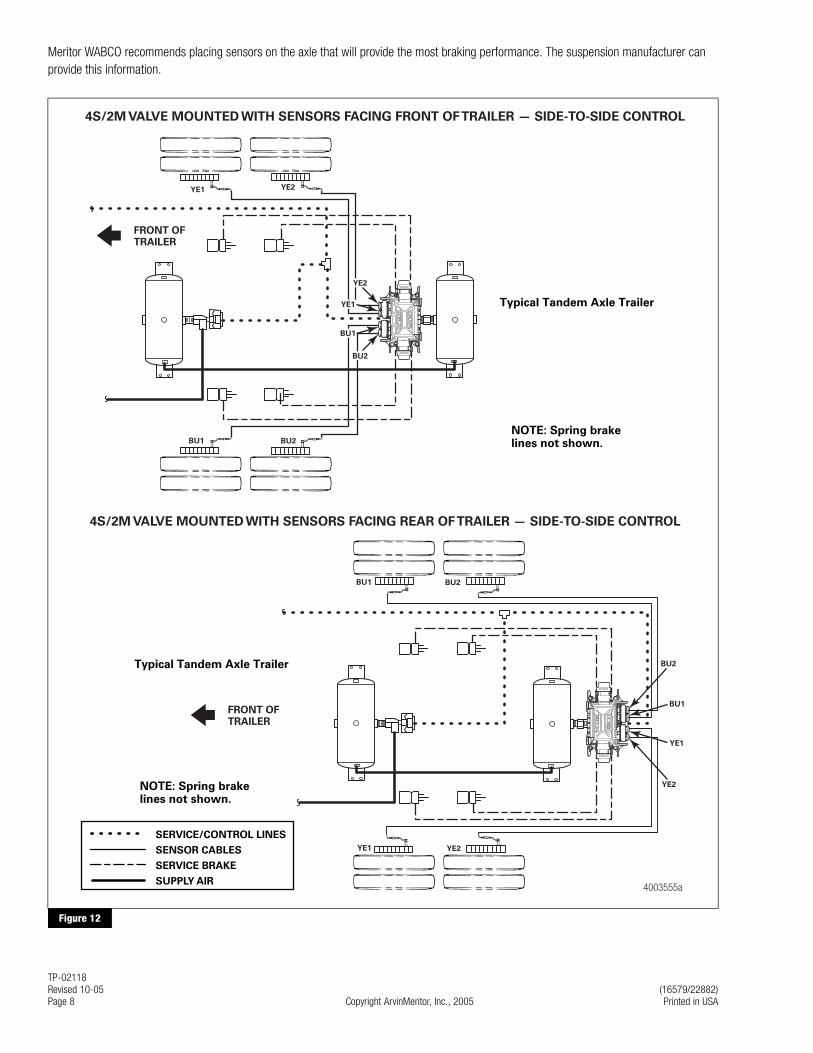
Meritor WABCO recommends placing sensors on the axle that will provide the most braking performance. The suspension manufacturer can provide this information.
Figure 12
Figure 12
Typical Tandem Axle Trailer
YE1
BU1
BU2
YE1
YE2
BU2
BU1
YE2
Typical Tandem Axle Trailer
NOTE: Spring brakelines not shown.
SERVICE/CONTROL LINES
SENSOR CABLES
SERVICE BRAKE
SUPPLY AIR
NOTE: Spring brakelines not shown.
4S/2M VALVE MOUNTED WITH SENSORS FACING FRONT OF TRAILER — SIDE-TO-SIDE CONTROL
FRONT OFTRAILER
FRONT OFTRAILER
4S/2M VALVE MOUNTED WITH SENSORS FACING REAR OF TRAILER — SIDE-TO-SIDE CONTROL
BU1
YE1
YE2
BU2
YE1
BU1
BU2
YE2
4003555a
TP-02118(16579/22882) Revised 10-05Printed in USA Copyright ArvinMeritor, Inc., 2005 Page 9
Meritor WABCO recommends placing sensors on the axle that will provide the most braking performance. The suspension manufacturer can provide this information.
Figure 13
Figure 13
YE1
BU1
YE2
BU2
4S/2M TYPICAL TRI-AXLE — VALVE MOUNTED WITH SENSORS
FACING FRONT OF TRAILER — SIDE-TO-SIDE CONTROL
FRONT OFTRAILER
BU1
YE1
BU2
YE2
4S/2M TYPICAL TRI-AXLE — VALVE MOUNTED WITH SENSORS
FACING REAR OF TRAILER — SIDE-TO-SIDE CONTROL
FRONT OFTRAILER
BU1
YE1
YE2
BU2
YE1
BU1
BU2
YE2
NOTE: Spring brakelines not shown.
SERVICE/CONTROL LINES
SENSOR CABLES
SERVICE BRAKE
SUPPLY AIR
NOTE: Spring brakelines not shown.
4003556a
TP-02118Revised 10-05 (16579/22882)Page 10 Copyright ArvinMeritor, Inc., 2005 Printed in USA
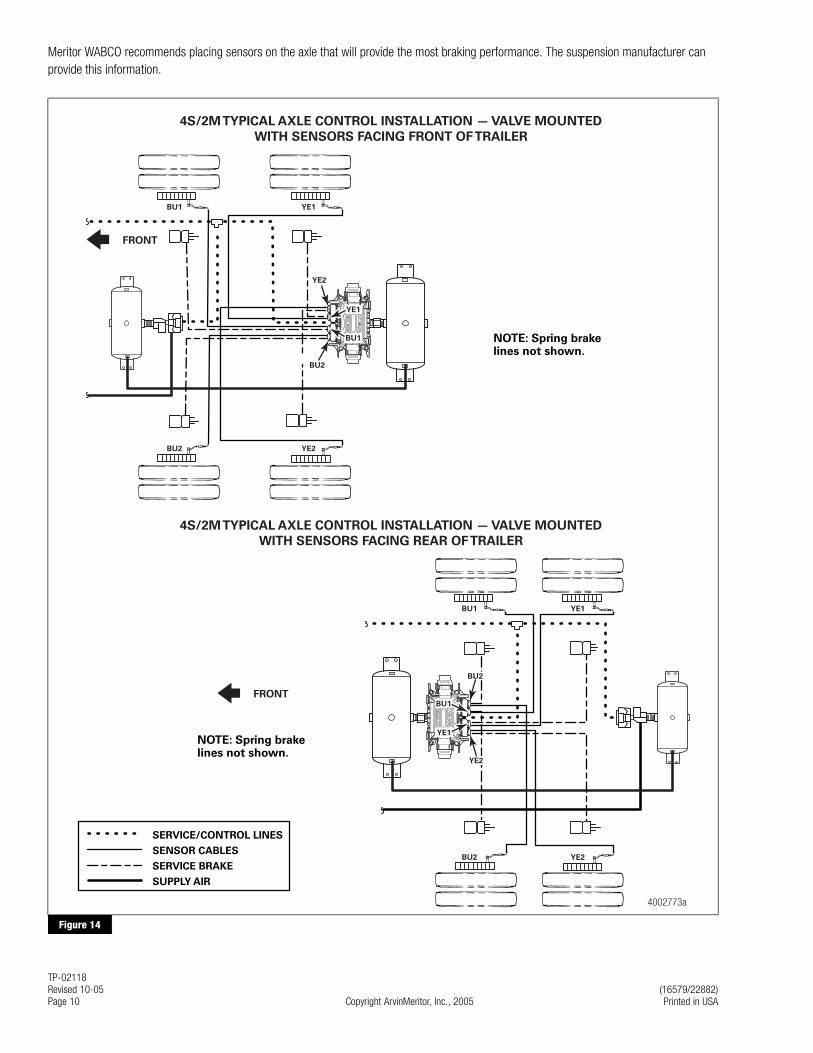
Meritor WABCO recommends placing sensors on the axle that will provide the most braking performance. The suspension manufacturer can provide this information.
Figure 14
Figure 14
4S/2M TYPICAL AXLE CONTROL INSTALLATION — VALVE MOUNTED
WITH SENSORS FACING FRONT OF TRAILER
BU1 YE1
BU2 YE2
FRONT
FRONT
BU1 YE1
BU2 YE2
4S/2M TYPICAL AXLE CONTROL INSTALLATION — VALVE MOUNTED
WITH SENSORS FACING REAR OF TRAILER
YE2
BU2
NOTE: Spring brakelines not shown.
SERVICE/CONTROL LINES
SENSOR CABLES
SERVICE BRAKE
SUPPLY AIR
NOTE: Spring brakelines not shown.
4002773a
BU1
YE1
BU1
YE1
BU2
YE2
TP-02118(16579/22882) Revised 10-05Printed in USA Copyright ArvinMeritor, Inc., 2005 Page 11
End of Line TestingEnd of line testing is required on all Enhanced Easy-Stop™ installations. To run these tests, Meritor WABCO recommends you use TOOLBOX™ Software.
TOOLBOX™ Software and general test procedures are included in this bulletin. If you are using a Pro-Link, refer to the operating manual for test instructions.
Enhanced Easy-Stop™ 2S/2M and 4S/2M Premium Installation — End of Line Testing Procedure with TOOLBOX™ SoftwareIf you are testing an installation that has a power only cable, temporarily install a Meritor WABCO combination power/diagnostics adapter “Y” style cable.
1. Connect the diagnostic connector on the cable to the PC serial port/SAE diagnostic interface (J1587/J1708 to RS232 interface).
Refer to the Software Owner’s Manual, TP-99102, for instructions for running TOOLBOX™ Software. For additional information about TOOLBOX™ setup (e.g. devices), contact us at 1-800-535-5560.
2. Display the Trailer ABS Main Screen.
3. Verify the power supply.
� Apply 12 volts DC to the blue wire (constant). Check the screen for correct voltage (9.5 to 14 volts). Constant power voltage is displayed in the Primary field. Figure 15.
� Apply 12 volts DC to the red wire (stoplight power). Check the screen for correct voltage (9.5 to 14 volts). Stoplight power voltage is displayed in the Secondary field. Figure 15.
The Internal field is not applicable to this test.
Figure 15
4. Check the Faults field on the Main Screen.
NONE = No faults present, proceed with end of line test.
YES = Faults present, double-click on “YES” to bring up the fault information screen.
Use the information in the Repair Instructions field to perform the necessary repairs. Figure 16.
Figure 16
Figure 15
Figure 16
4003560a
4003561a
TP-02118Revised 10-05 (16579/22882)Page 12 Copyright ArvinMeritor, Inc., 2005 Printed in USA
End of Line Test with TOOLBOX™ Software
Verify Correct Valve and Lamp Installation
To verify valve and lamp installations with TOOLBOX™ Software:
1. Apply 12 volts DC to the ABS.
2. Apply air to the emergency line to fill the air tanks and release the spring brakes.
3. Apply air to the control line.
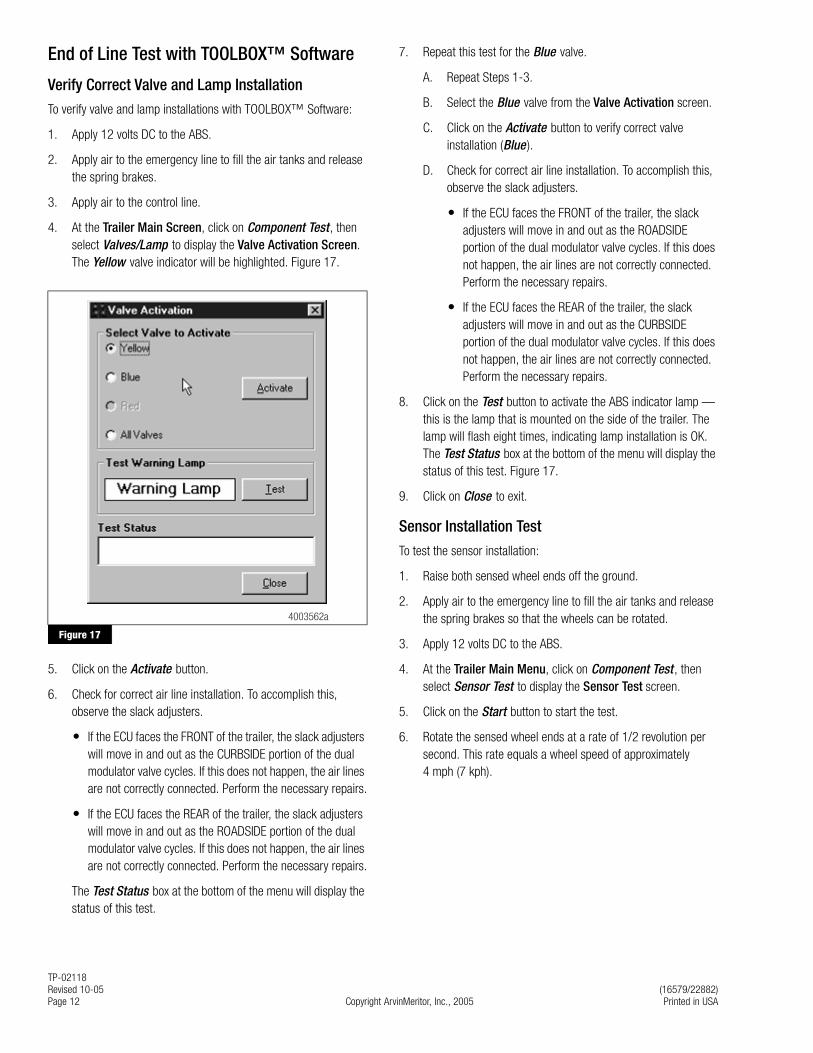
4. At the Trailer Main Screen, click on Component Test, then select Valves/Lamp to display the Valve Activation Screen. The Yellow valve indicator will be highlighted. Figure 17.
Figure 17
5. Click on the Activate button.
6. Check for correct air line installation. To accomplish this, observe the slack adjusters.
� If the ECU faces the FRONT of the trailer, the slack adjusters will move in and out as the CURBSIDE portion of the dual modulator valve cycles. If this does not happen, the air lines are not correctly connected. Perform the necessary repairs.
� If the ECU faces the REAR of the trailer, the slack adjusters will move in and out as the ROADSIDE portion of the dual modulator valve cycles. If this does not happen, the air lines are not correctly connected. Perform the necessary repairs.
The Test Status box at the bottom of the menu will display the status of this test.
7. Repeat this test for the Blue valve.
A. Repeat Steps 1-3.
B. Select the Blue valve from the Valve Activation screen.
C. Click on the Activate button to verify correct valve installation (Blue ).
D. Check for correct air line installation. To accomplish this, observe the slack adjusters.
� If the ECU faces the FRONT of the trailer, the slack adjusters will move in and out as the ROADSIDE portion of the dual modulator valve cycles. If this does not happen, the air lines are not correctly connected. Perform the necessary repairs.
� If the ECU faces the REAR of the trailer, the slack adjusters will move in and out as the CURBSIDE portion of the dual modulator valve cycles. If this does not happen, the air lines are not correctly connected. Perform the necessary repairs.
8. Click on the Test button to activate the ABS indicator lamp — this is the lamp that is mounted on the side of the trailer. The lamp will flash eight times, indicating lamp installation is OK. The Test Status box at the bottom of the menu will display the status of this test. Figure 17.
9. Click on Close to exit.
Sensor Installation Test
To test the sensor installation:
1. Raise both sensed wheel ends off the ground.
2. Apply air to the emergency line to fill the air tanks and release the spring brakes so that the wheels can be rotated.
3. Apply 12 volts DC to the ABS.
4. At the Trailer Main Menu, click on Component Test , then select Sensor Test to display the Sensor Test screen.
5. Click on the Start button to start the test.
6. Rotate the sensed wheel ends at a rate of 1/2 revolution per second. This rate equals a wheel speed of approximately4 mph (7 kph).
Figure 17
4003562a
TP-02118(16579/22882) Revised 10-05Printed in USA Copyright ArvinMeritor, Inc., 2005 Page 13
7. Check the screen for sensor output. Figure 18.
� Verify there is sensor output. If sensor output is displayed, the sensor test is complete.
� If there is no sensor output, verify that a tone ring has been installed and that the sensor is pushed all the way in against the tone ring. Perform the necessary repairs and repeat the sensor test. If the problem persists, contact Meritor WABCO (800-535-5560).
The 2S/2M installations use YE1 and BU1 locations.
Figure 18
8. Check the Order fields to verify the sensors were installed in the right location based on the orientation of the valves. Figure 18.
End of Line Testing without TOOLBOX™ Software
Inspect the Sensor and Air Line Installation
Sensor Installation
1. Look at the sensor connectors on the ECU/dual modulatorvalve assembly. Ensure the connectors are routed to the correct wheel-end location.
* If the lift axle is sensed in 4S/2M installations: Sensors YE2 andBU2 must always be used on the lift axle to avoid an unwanted ABS indicator lamp illumination.
2. If the sensors are not correctly installed, perform the necessary repairs.
Air Line Installation
1. Ensure that all unused air ports are plugged and that the exhaust port is facing DOWN.
2. Look at the air line installation to verify that all air lines are correctly installed.
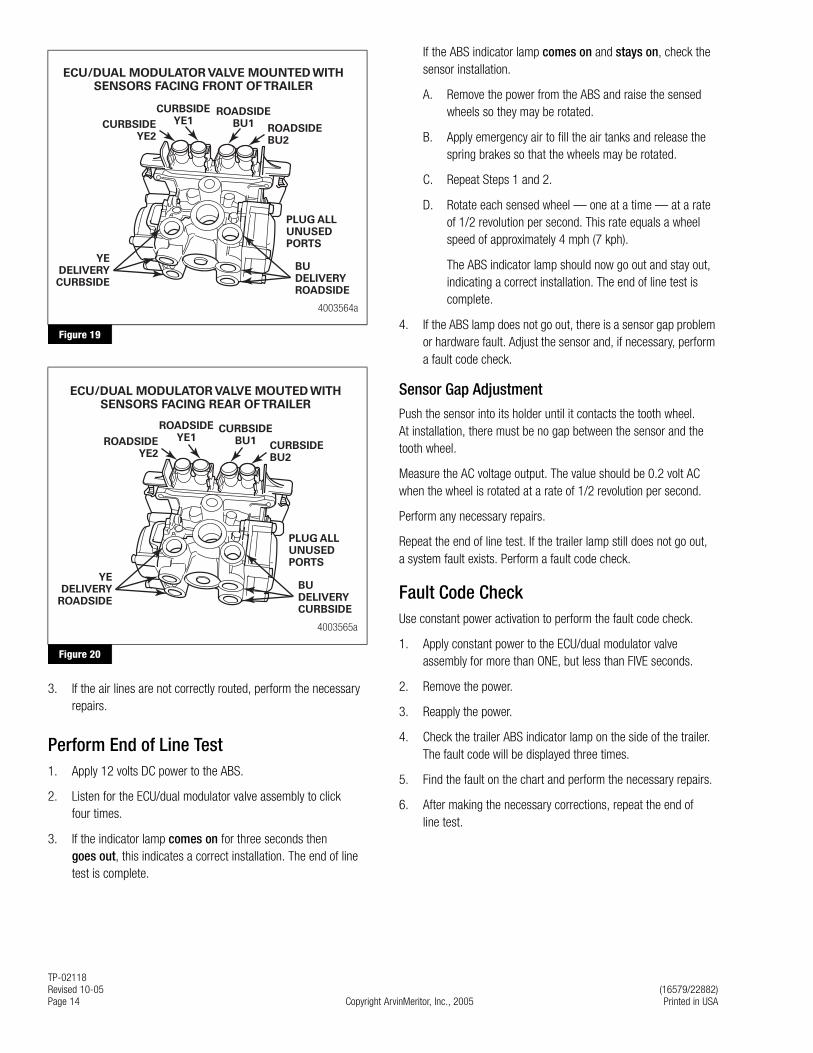
� If the ECU/dual modulator valve assembly is mounted with the sensors facing the FRONT of the trailer, the air lines for the three delivery ports located under the YE sensor connectors must be routed to CURBSIDE; the air lines for the three delivery ports on the opposite side of the valve must be routed to ROADSIDE. Figure 19.
� If the ECU/dual modulator valve assembly is mounted with the sensors facing the REAR of the trailer, the air lines for the three delivery ports located under the YE sensor connectors must be routed to ROADSIDE; the air lines for the three delivery ports on the opposite side of the valve must be routed to CURBSIDE. Figure 20.
Figure 18
4003563a
ECU/Dual Modulator Valve Assembly Mounted with Sensors Facing Front of Trailer
� 2S/2M
— Connect curbside sensor at YE1.
— Connect roadside sensor at BU1.
� 4S/2M*— Connect curbside front sensor at YE1.
— Connect curbside rear sensor at YE2.
— Connect roadside front sensor at BU1.
— Connect roadside rear sensor at BU2.
ECU/Dual Modulator Valve Assembly Mounted with Sensors Facing Rear of Trailer
� 2S/2M
— Connect curbside sensor at BU1.
— Connect roadside sensor at YE1.
� 4S/2M*— Connect curbside front sensor at BU1.
— Connect curbside rear sensor at BU2.
— Connect roadside front sensor at YE1.
— Connect roadside rear sensor at YE2.
TP-02118Revised 10-05 (16579/22882)Page 14 Copyright ArvinMeritor, Inc., 2005 Printed in USA
Figure 19
Figure 20
3. If the air lines are not correctly routed, perform the necessary repairs.
Perform End of Line Test1. Apply 12 volts DC power to the ABS.
2. Listen for the ECU/dual modulator valve assembly to clickfour times.
3. If the indicator lamp comes on for three seconds then goes out, this indicates a correct installation. The end of line test is complete.
If the ABS indicator lamp comes on and stays on, check the sensor installation.
A. Remove the power from the ABS and raise the sensed wheels so they may be rotated.
B. Apply emergency air to fill the air tanks and release the spring brakes so that the wheels may be rotated.
C. Repeat Steps 1 and 2.
D. Rotate each sensed wheel — one at a time — at a rate of 1/2 revolution per second. This rate equals a wheel speed of approximately 4 mph (7 kph).
The ABS indicator lamp should now go out and stay out, indicating a correct installation. The end of line test is complete.
4. If the ABS lamp does not go out, there is a sensor gap problem or hardware fault. Adjust the sensor and, if necessary, perform a fault code check.
Sensor Gap Adjustment
Push the sensor into its holder until it contacts the tooth wheel. At installation, there must be no gap between the sensor and the tooth wheel.
Measure the AC voltage output. The value should be 0.2 volt AC when the wheel is rotated at a rate of 1/2 revolution per second.
Perform any necessary repairs.
Repeat the end of line test. If the trailer lamp still does not go out,a system fault exists. Perform a fault code check.
Fault Code CheckUse constant power activation to perform the fault code check.
1. Apply constant power to the ECU/dual modulator valve assembly for more than ONE, but less than FIVE seconds.
2. Remove the power.
3. Reapply the power.
4. Check the trailer ABS indicator lamp on the side of the trailer. The fault code will be displayed three times.
5. Find the fault on the chart and perform the necessary repairs.
6. After making the necessary corrections, repeat the end ofline test.
Figure 19
Figure 20
BUDELIVERYROADSIDE
YEDELIVERYCURBSIDE
PLUG ALLUNUSEDPORTS
ECU/DUAL MODULATOR VALVE MOUNTED WITHSENSORS FACING FRONT OF TRAILER
CURBSIDEYE2
CURBSIDEYE1
ROADSIDEBU2
ROADSIDEBU1
4003564a
BUDELIVERYCURBSIDE
YEDELIVERY
ROADSIDE
ECU/DUAL MODULATOR VALVE MOUTED WITHSENSORS FACING REAR OF TRAILER
PLUG ALLUNUSEDPORTS
ROADSIDEYE2
ROADSIDEYE1
CURBSIDEBU2
CURBSIDEBU1
4003565a
TP-02118(16579/22882) Revised 10-05Printed in USA Copyright ArvinMeritor, Inc., 2005 Page 15
Table A: Blink Code Chart Trailer Identification
After ensuring the Enhanced Easy-Stop™ trailer ABS has been correctly installed, attach the ABS indicator label included with the ECU/dual modulator valve assembly to the trailer. Generally, this will be applied near the ABS trailer indicator lamp. Figure 21. Refer to the vehicle specification sheet for the correct location.
Figure 21
If this label is not included with the assembly, let your supervisor know. Labels are available from Meritor WABCO. Ask for part number TP-95172.
For additional assistance, contact Meritor WABCO at 800-535-5560.
Blink Code Problem Area Action
3 Sensor BU1 Determine sensor location.
Check sensor installation.
Perform necessary repairs.
4 Sensor YE1 Determine sensor location.
Check sensor installation.
Perform necessary repairs.
5 Sensor BU2 Determine sensor location.
Check sensor installation.
Perform necessary repairs.
6 Sensor YE2 Determine sensor location.
Check sensor installation.
Perform necessary repairs.
7 External ABS modulator valve
Verify correct electrical installation.
Check power supply.
Perform necessary corrections.
9 Internal modulator failure, inlet valve #2
Verify correct installation. If code continues, contact Meritor WABCO for assistance.
10 Internal modulator failure, inlet valve #1
Verify correct installation. If code continues, contact Meritor WABCO for assistance.
11 Internal modulator failure, outlet valve
Verify correct installation. If code continues, contact Meritor WABCO for assistance.
14 Power Supply Verify correct electrical installation.
Check power supply.
Perform necessary corrections.
15 ECU Failure Verify correct installation. If code continues, contact Meritor WABCO for assistance.
16 SAE J1708 Failure
Internal failure, contact Meritor WABCO.
17 SAE J2497 Failure
Internal failure, contact Meritor WABCO.
18 Generic I/O Failure
Verify correct electrical installation.
Check power supply.
Perform necessary corrections.
Figure 21
4005501a
If the ABS indicator lampcomes on and stays on when you
apply the brakes to a moving vehicle,the trailer ABS is not working properly.
The ABS must be serviced as soon aspossible upon completion of your trip toensure full anti-lock braking capability.
TP-95172 Rev. 4/98
NOTICE:
Information contained in this publication was in effect at the time the publication was approved for printing and is subject to change without notice or liability. Meritor WABCO reserves the right to revise the information presented or to discontinue the production of parts described at any time.
Copyright TP-02118ArvinMeritor, Inc. Revised 10-05All Rights Reserved Printed in USA
Appendix
Installing Sensors on Non-ABS-Prepped AxlesSensor locations vary due to suspension type. Meritor WABCO recommends placing the sensor on the axle that will provide the most braking performance. Contact your suspension manufacturer for further information.
1. Apply a mineral oil-based grease that contains molydisulfideto the sensor spring clip, the body of the sensor and the boreof the sensor block. The grease must be anti-corrosive and contain adhesive properties that will continuously endure temperatures from −40° to 300°F (−40° to 150°C).
2. Push the spring clip into the sensor holder from the inboard side, until the spring clip tabs are against the sensor holder. Push the sensor into the spring clip as far as possible.
Use Meritor WABCO spring clips to ensure a correct fit.
3. Push the spring clip into the sensor holder from the inboard side until the spring clip tabs are against the sensor holder. Push the sensor into the spring clip as far as possible.Figure A-1.
Figure A-1
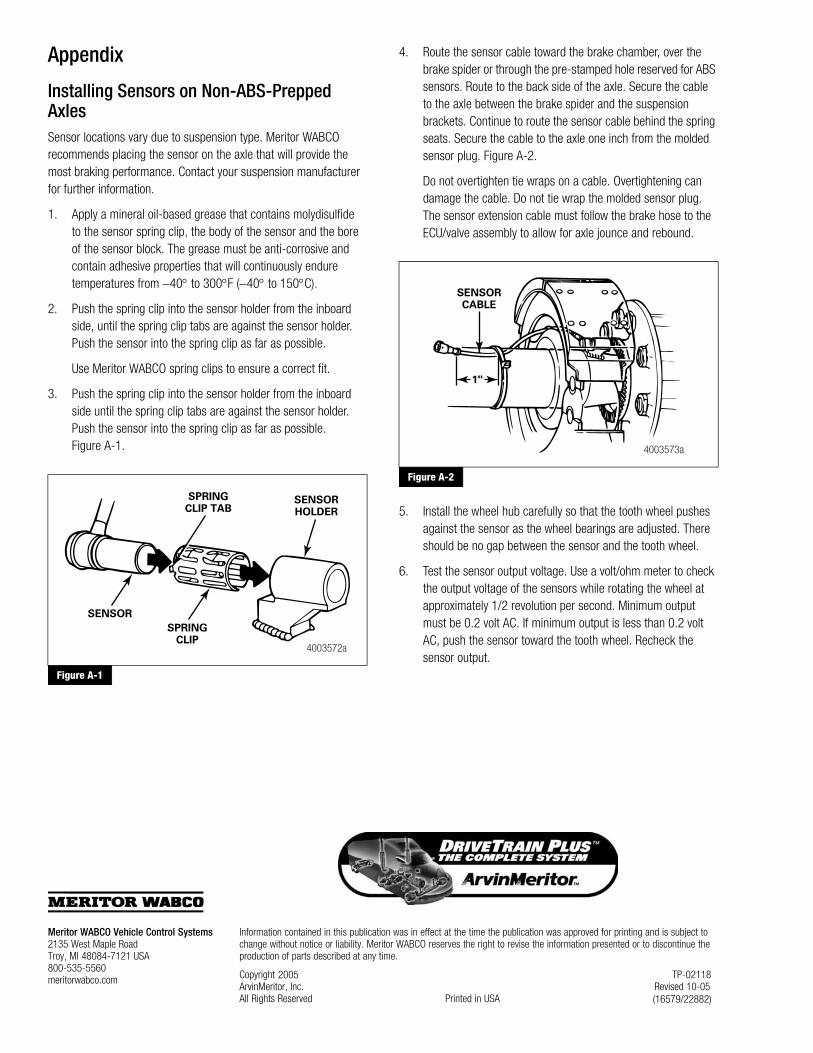
4. Route the sensor cable toward the brake chamber, over the brake spider or through the pre-stamped hole reserved for ABS sensors. Route to the back side of the axle. Secure the cable to the axle between the brake spider and the suspension brackets. Continue to route the sensor cable behind the spring seats. Secure the cable to the axle one inch from the molded sensor plug. Figure A-2.
Do not overtighten tie wraps on a cable. Overtightening can damage the cable. Do not tie wrap the molded sensor plug. The sensor extension cable must follow the brake hose to the ECU/valve assembly to allow for axle jounce and rebound.
Figure A-2
5. Install the wheel hub carefully so that the tooth wheel pushes against the sensor as the wheel bearings are adjusted. There should be no gap between the sensor and the tooth wheel.
6. Test the sensor output voltage. Use a volt/ohm meter to check the output voltage of the sensors while rotating the wheel at approximately 1/2 revolution per second. Minimum output must be 0.2 volt AC. If minimum output is less than 0.2 volt AC, push the sensor toward the tooth wheel. Recheck the sensor output.
Figure A-1
SPRINGCLIP TAB
SENSOR
SPRINGCLIP
SENSORHOLDER
4003572a
Figure A-2
SENSORCABLE
1"
4003573a
Meritor WABCO Vehicle Control Systems2135 West Maple RoadTroy, MI 48084-7121 USA800-535-5560meritorwabco.com 2005