2
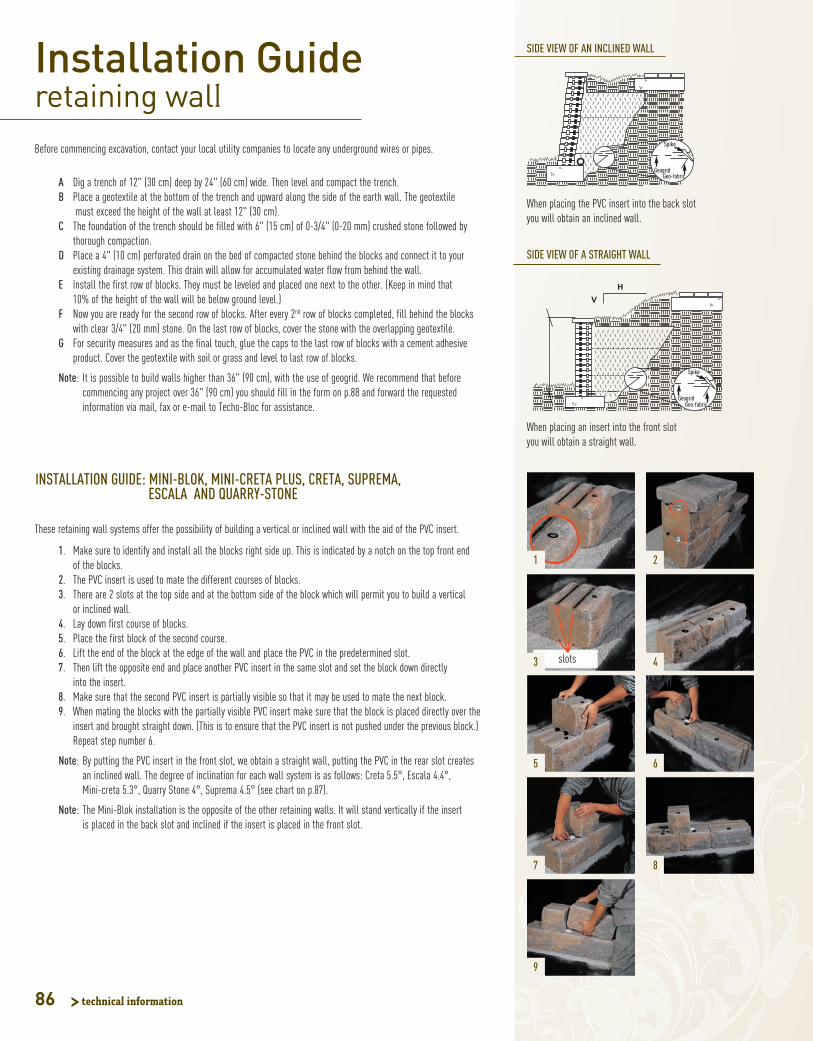
When placing the PVC insert into the back slot you will obtain an inclined wall. When placing an insert into the front slot you will obtain a straight wall. SIDE VIEW OF AN INCLINED WALL SIDE VIEW OF A STRAIGHT WALL 1 3 5 7 9 2 4 6 8 slots > technical information Before commencing excavation, contact your local utility companies to locate any underground wires or pipes. Installation Guide retaining wall A Dig a trench of 12" (30 cm) deep by 24" (60 cm) wide. Then level and compact the trench. B Place a geotextile at the bottom of the trench and upward along the side of the earth wall. The geotextile must exceed the height of the wall at least 12" (30 cm). C The foundation of the trench should be filled with 6" (15 cm) of 0-3/4" (0-20 mm) crushed stone followed by thorough compaction. D Place a 4" (10 cm) perforated drain on the bed of compacted stone behind the blocks and connect it to your existing drainage system. This drain will allow for accumulated water flow from behind the wall. E Install the first row of blocks. They must be leveled and placed one next to the other. (Keep in mind that 10% of the height of the wall will be below ground level.) F Now you are ready for the second row of blocks. After every 2 nd row of blocks completed, fill behind the blocks with clear 3/4" (20 mm) stone. On the last row of blocks, cover the stone with the overlapping geotextile. G For security measures and as the final touch, glue the caps to the last row of blocks with a cement adhesive product. Cover the geotextile with soil or grass and level to last row of blocks. Note: It is possible to build walls higher than 36" (90 cm), with the use of geogrid. We recommend that before commencing any project over 36" (90 cm) you should fill in the form on p.88 and forward the requested information via mail, fax or e-mail to Techo-Bloc for assistance. These retaining wall systems offer the possibility of building a vertical or inclined wall with the aid of the PVC insert. 1. Make sure to identify and install all the blocks right side up. This is indicated by a notch on the top front end of the blocks. 2. The PVC insert is used to mate the different courses of blocks. 3. There are 2 slots at the top side and at the bottom side of the block which will permit you to build a vertical or inclined wall. 4. Lay down first course of blocks. 5. Place the first block of the second course. 6. Lift the end of the block at the edge of the wall and place the PVC in the predetermined slot. 7. Then lift the opposite end and place another PVC insert in the same slot and set the block down directly into the insert. 8. Make sure that the second PVC insert is partially visible so that it may be used to mate the next block. 9. When mating the blocks with the partially visible PVC insert make sure that the block is placed directly over the insert and brought straight down. (This is to ensure that the PVC insert is not pushed under the previous block.) Repeat step number 6. Note: By putting the PVC insert in the front slot, we obtain a straight wall, putting the PVC in the rear slot creates an inclined wall. The degree of inclination for each wall system is as follows: Creta 5.5°, Escala 4.4°, Mini-creta 5.3°, Quarry Stone 4°, Suprema 4.5° (see chart on p.87). Note: The Mini-Blok installation is the opposite of the other retaining walls. It will stand vertically if the insert is placed in the back slot and inclined if the insert is placed in the front slot. INSTALLATION GUIDE: MINI-BLOK, MINI-CRETA PLUS, CRETA, SUPREMA, ESCALA AND QUARRY-STONE 86