14
1 INSTALLATION INSTRUCTION New Luxury Slider Door 8mm C0382-A00-02 If you need further help please contact your local depot www.ctb.co.uk

1
INSTALLATION INSTRUCTION
New Luxury Slider Door 8mm
C0382-A00-02
If you need further help please contact your local depot www.ctb.co.uk

2
Parts Identification
1
2
3
4
5
6
7
8
9
10
11
18
12
14
15
17
16
13
18
If you need further help please contact your local depot www.ctb.co.uk

N0. Drawing DescriptionQty
1
Components List
Bottom Rail1
No8x 1" Pozi Pan Screw
Wall Plug
Wall Profile A
8
8
2
Profile Cover Strip
2
No8x1 3/4" Pozi Pan Screw
8
1
Cover Strip Clip
6
Door Glass
1
Wall Profile LH Cap
1
Top rail1
1
Fixed Panel Glass
1
No8x 3/8" Pozi Pan Screw6
Fixed Panel Seal (1815mm)
1
Profile Cap
2
Closing Profile
Door Seal (1891mm)
1
Glass Clip Cover2
2
3
4
5
6
7
8
9
10
11
12
13
14
15
16
17
18
Wall Profile RH Cap
If you need further help please contact your local depot www.ctb.co.uk
3

4
Recess Installation Pack-Supplied separately
3
N0. Drawing DescriptionQty
3
6
16
19
20
21
22
Components List
Wall plug4
No8x1 3/4" Pozi Pan Screw
4
No8x 3/8" Pozi Pan Screw
3
1
1
Recess Profile1
1
16
9
1920
Left Profile Cap
Right Profile Cap
Profile Cover Strip
21
22
6
Cover Strip Clip6
9
If you need further help please contact your local depot www.ctb.co.uk
Recess Profile

*Check that the wet floor / tray has been installed correctly and that it is level, tiled
down onto and sealed to the manufacturer’guidelines.
*check
*Ensure the product is fitted to a non-porous surface ie. tiled
and that the shower area is water proof. Check that the wall
surface is flat.
*Unpack and check the product is complete and
undamaged.
*Please check you are happy with the product before
installing it.
*Fixings are supplied for solid walls only. Ensure that the
correct fixings are used for the wall type.
–if in doubt seek professional advice
*Ensure the area is clean, dry and dust free.
*Read the instructions in full.
*Have the correct tools available, see "Tools Required"
*Plese dispose of all packaging with due regard to the
environment.
5
Things to check before you start
Pencil
Drill Bits
Measuring Tape
3mm dia.
HSS
SiliconeAllen Key
MASONRY DRILL
BIT Ø8mm
Screw DriverMallet
Drill Level
Knife
GogglesGlove Sealant
Tools required
If you need further help please contact your local depot www.ctb.co.uk

*For domestic use only.
*Handle all glass with care - support on cardboard to avoid
risk of breakage.
*When drilling walls check first for hidden pipes and electric cables.
*All glass is toughened –it cannot be reworked or replaced
by ordinary glass.
*Use safety eyewear when drilling the wall.
*Use safety eyewear when handling glass.
*DO NOT drill through glass.
*Keep all small parts away from children.
*Plastic bags are dangerous. To avoid danger of suffocation
or choking all plastic bags should be kept away from babies
and children, and disposed of correctly after use.
*Care and Maintenance
Use clean cloth or wiper blade to remove water droplets after use
Use only soapy water and a clean damp cloth to clean the surface of the product, wipe dry
after with clean dry cloth
NEVER USE solvents, scourers, abrasive solutions, bleach, acidic solutions, strong detergents,
aggressive chemical cleaners or solvent type cleaning solutions on this products.
*Technical Specification
This product uses toughened glass that conforms to EN12150
*Guarantee
Products that have not been stored, assembled, fitted correctly or not maintained in line with
'Care and Maintenance', we will not accept responsibility under the Guarantee.
If product is damaged or becomes defective due to modification, neglect, misuse we will not
accept responsibility under the Guarantee.
Product damaged accidently, willfully or due to an act of God , we will not accept responsibility
under the Guarantee
Products not installed in accordance to this instruction leaflet.
Product installed with known fault that was evident prior to installation.
*Fitting Tips
When drilling into tiles use masking tape to avoid drill slipping.
If you need further help please contact your local depot www.ctb.co.uk
6

Wall
tray
Tape
1. Check shower tray is level and flat .
2. Check walls are vertical and within shower enclosure tolerance, 20mm/side.
3. Check shower tray and walls water tight .
If you need further help please contact your local depot www.ctb.co.uk
7

Tip:
When inserting screws, apply a small
amount of oil to the screw thread to
allow easier fixing.
12X1
2X2
2X2
2X2
2X2
8X1
1X1
18X1
Installation Recess Fit
8
If you need further help please contact your local depot www.ctb.co.uk
Loosen screws on top and bottom rails , fit fixed panel on the
same side as dampers. After assembly of frame retighten
screws on rails taking care not to over tighten
18X1
Fixed panel side
6 7 8
9
12
1
1
2
3
4
5

Installation Recess Fit
Wall Profile
Recess Profile
!
Note: Do not fit recess profile towall at this point
Opening Side
All doors are reversible
and can be fitted right
hand or left hand
opening
If you need further help please contact your local depot www.ctb.co.uk
9
Fixed panel side
1
Φ8mm
6X4
3 X4
4 X1
2
3 4
*After this stage for fitting in conjunction with
Side Panel go to Side Panel instructions.
4
3 X4
Inside View
Pencil
21
21X1
Φ8mm
2 3
1

1
Door opening left side
viewed from inside
shower enclosure
7X1
Installation Recess Fit
Put the door glass inside
tray on cardboard before
fitting frame
If you need further help please contact your local depot www.ctb.co.uk
10
Door opening right
side viewed from
inside shower
enclosure

6 7
6 X4
21
9 X3
Φ=3mm
Drill Bit
3
16X3
4
11
Note:
Two different Seal lengths supplied.
Use Shorter lengths for fixed panel.
Installation Recess Fit
Fixed Side
8
9
Φ=3mm
Drill Bit
9 X3
11
10
5
If you need further help please contact your local depot www.ctb.co.uk
Opening Side
5
22
12
16 X3

Tip:
Locate bearing wheels
on the top rail first.
Inside View
1Outside view
2
Bottom bearings are sprung loaded
push them down so they fit into the
bottom rail.
12
Installation Recess Fit
If you need further help please contact your local depot www.ctb.co.uk
Inside View

When door is correctly located, Door
position can be levelled using the
adjustment screws in the top rollers.
please ensure doors
run freely after adjustment
Outside View Under Top Bearings
13
2
17X1
17
Installation Recess Fit
Adjustable Screw
If you need further help please contact your local depot www.ctb.co.uk
1
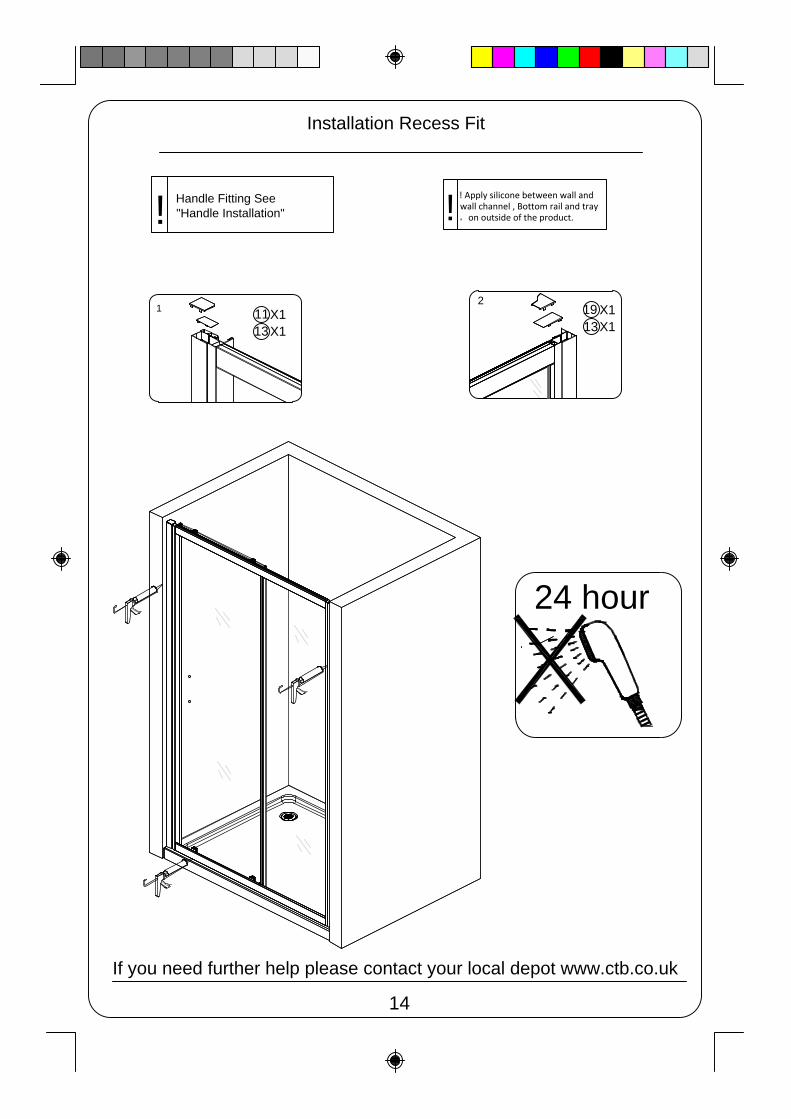
1
11X1
13X1
19 X1
13X1
!
! Apply silicone between wall andwall channel , Bottom rail and tray,on outside of the product.
24 hour
Installation Recess Fit
!
Handle Fitting See
"Handle Installation"
2
If you need further help please contact your local depot www.ctb.co.uk
14


