16
Installation Instructions Advantium ® 240V Built-In SpeedCook Ovens PSB2200 PSB2201 ZSC2200 ZSC2201 ZSC2202 49-40574 MFL06213302 12-07 JR
InstallationInstructions
Advantium® 240VBuilt-In SpeedCookOvensPSB2200PSB2201ZSC2200ZSC2201ZSC2202
49-40574MFL0621330212-07 JR

Safety Information
2
CONTENTSDesign InformationModels Available ......................................................................2Product Dimensions and Clearances ............................3Tools and Parts Required ....................................................3Parts Supplied ..........................................................................3Electrical Tools and Parts Required ................................3Advance Planning ..................................................................3
Installation PreparationElectrical Requirements........................................................4Install Junction Box ................................................................4Preparing the Opening (Installation without
an accessory storage drawer)..................................5-6Preparing the Opening (Installation with
an accessory storage drawer)..................................7-8
Installation InstructionsStep 1, Remove Packaging and Parts ..........................9Step 2, Route Conduit ........................................................10Step 3, Install Bottom Trim ..............................................11Step 4, Install Mounting Screws ....................................11Step 5, Finalize Installation ..............................................11
BEFORE YOU BEGINRead these instructions completely and carefully.
IMPORTANT — Save these instructions forlocal inspector’s use.
IMPORTANT — Observe all governing codesand ordinances.
• Note to Installer — Be sure to leave theseinstructions with the Consumer.
• Note to Consumer — Keep these instructions with your Owner’s Manual for future reference.
• Skill Level — Installation of this appliancerequires basic mechanical and electrical skills.
• Completion Time — 1 Hour.• Proper installation is the responsibility of the
installer. Product failure due to improperinstallation is not covered under the warranty.See Owner’s Manual for warranty information.
IMPORTANT — Use this oven only for its intended purpose. Never use the oven forwarming or heating a room. Prolonged use of theoven without proper ventilation can be hazardous.
CAUTION:For personal safety, remove house fuse or ovencircuit breaker before beginning installation toavoid severe or fatal shock injury.
CAUTION:For personal safety, the mounting surface must be capable of supporting the cabinet load, inaddition to the added weight of the 80-pound ovenand 30-pound drawer, plus additional oven loads ofup to 50 pounds or a total weight of up to 160pounds.
CAUTION:For personal safety, this product cannot beinstalled in cabinet arrangements such as an island, a peninsula or below a countertop.
MODELS AVAILABLEProfile Models:PSB2200NWW–WhitePSB2200NBB–BlackPSB2201NSS–Stainless Steel
Monogram Models:ZSC2200NWW–White ZSC2200NBB–BlackZSC2201NSS–Stainless Steel
Monogram Pro Range Models:ZSC2202NSS–Stainless SteelNOTE: This unit cannot be installed with anaccessory storage drawer.

Design Information
3
PRODUCT DIMENSIONS AND CLEARANCES NOTE: Appearance will vary by model.
13”13/16”
21 1/2”
19 1/32”
29 3/4”
TOOLS AND PARTS REQUIRED (NOT SUPPLIED)
#2 Phillips screwdriverHand held drillHigh speed drill bit, 1/8″ diameter3/8″ slot head screwdriverLevelSaw2x4 or 2x2 lumber for installing runners or 3/8″ plywood for floor (if required)Wood screws or other hardware for installingrunner or shelf to support oven (if required)Safety glasses or goggles
PARTS SUPPLIED 6 brass screws (3 required, 3 extra)5 color matched screws (4 required, 1 extra)Bottom trim
ELECTRICAL TOOLS AND PARTSREQUIRED (NOT SUPPLIED)
Junction boxElectrical cable (3-conductor or 4-conductor wireas required by local codes)UL-listed conduit connectorsWire cutters and wire strippers
ADVANCE PLANNING• These ovens may be installed directly into a 30” wide
oven cabinet.• Cutout dimensions are NOT the same for installation
with or without an accessory storage drawer. Makesure to use the correct cutout when preparing theopening.NOTE: Model ZSC2202 CANNOT be installed with anaccessory storage drawer. See InstallationPreparation Without an Accessory Storage Drawer for this model.
IMPORTANT — This oven is not approved foruse above another built-in Advantium Speedcookoven, a side by side installation or below acountertop.• For personal safety, this oven cannot be installed
in a cabinet arrangement such as an island orpeninsula.
• The oven must be installed at least 36-3/4" abovethe floor.
• Allow for clearance to adjacent corners, walls,drawers, etc.
• Cabinets installed adjacent to wall ovens musthave an adhesion spec of at least 194ºFtemperature rating.
The oven must be securely installed in a cabinetthat is firmly attached to the house structure.Weight on the oven door could cause the oven to tip and result in injury. Never allow anyone toclimb, sit, stand or hang on the oven door.If installing the drawer accessory, the drawer mustbe assembled to the oven prior to installation intothe cabinet. See the Accessory Storage DrawerAssembly Instructions.
21-1/2”
1”13”
19”
29-3/4”
Installation Preparation
4
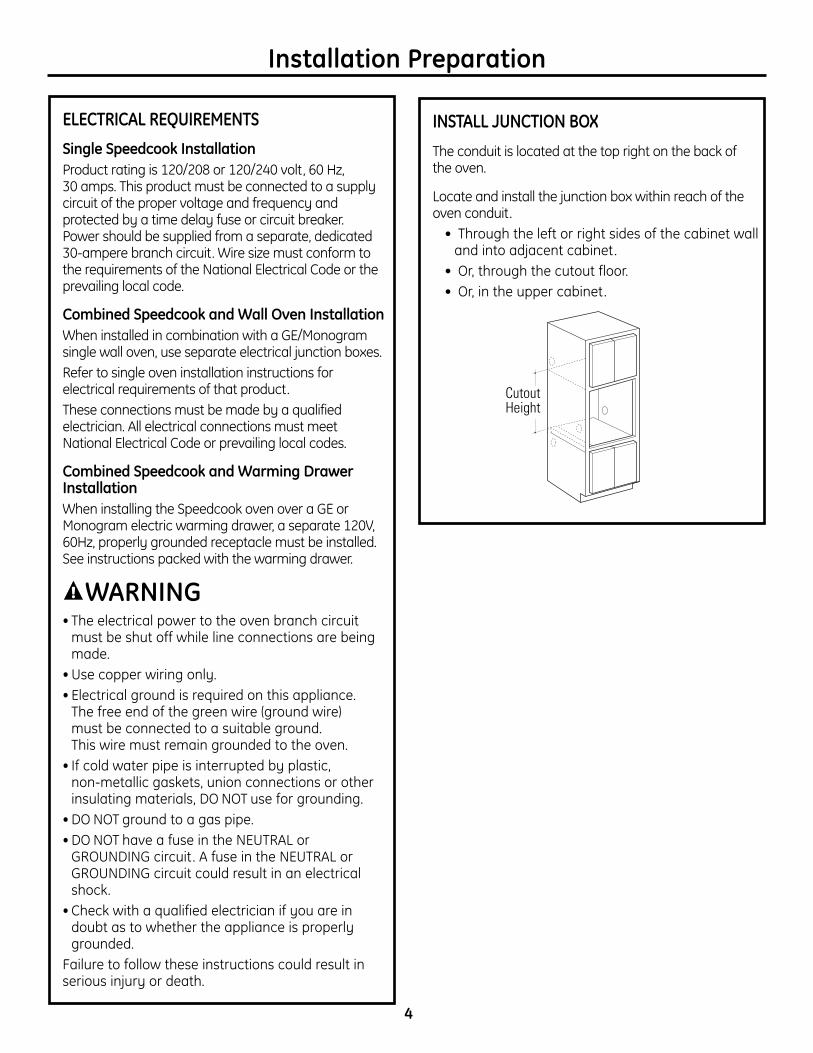
ELECTRICAL REQUIREMENTSSingle Speedcook InstallationProduct rating is 120/208 or 120/240 volt, 60 Hz, 30 amps. This product must be connected to a supplycircuit of the proper voltage and frequency andprotected by a time delay fuse or circuit breaker. Power should be supplied from a separate, dedicated30-ampere branch circuit. Wire size must conform tothe requirements of the National Electrical Code or theprevailing local code.
Combined Speedcook and Wall Oven InstallationWhen installed in combination with a GE/Monogramsingle wall oven, use separate electrical junction boxes.Refer to single oven installation instructions forelectrical requirements of that product.These connections must be made by a qualifiedelectrician. All electrical connections must meetNational Electrical Code or prevailing local codes.
Combined Speedcook and Warming DrawerInstallationWhen installing the Speedcook oven over a GE orMonogram electric warming drawer, a separate 120V,60Hz, properly grounded receptacle must be installed.See instructions packed with the warming drawer.
WARNING• The electrical power to the oven branch circuit
must be shut off while line connections are beingmade.
• Use copper wiring only.• Electrical ground is required on this appliance.
The free end of the green wire (ground wire) must be connected to a suitable ground. This wire must remain grounded to the oven.
• If cold water pipe is interrupted by plastic, non-metallic gaskets, union connections or otherinsulating materials, DO NOT use for grounding.
• DO NOT ground to a gas pipe.• DO NOT have a fuse in the NEUTRAL or
GROUNDING circuit. A fuse in the NEUTRAL orGROUNDING circuit could result in an electricalshock.
• Check with a qualified electrician if you are indoubt as to whether the appliance is properlygrounded.
Failure to follow these instructions could result inserious injury or death.
INSTALL JUNCTION BOXThe conduit is located at the top right on the back of the oven.
Locate and install the junction box within reach of theoven conduit.
• Through the left or right sides of the cabinet walland into adjacent cabinet.
• Or, through the cutout floor.• Or, in the upper cabinet.
CutoutHeight

5
Installation Preparation
Preparation WITHOUT an Accessory Storage Drawer
PREPARE THE OPENING (CONT.)
Installation over a GE/Monogram Warming Drawer:
NOTE: Additional clearances between the cutoutsmay be required. Check to be sure the oven supportsabove the Warming Drawer location do not obstructthe required interior depth and height. See WarmingDrawer installation instructions for details.
30” 23-1/2”
25-1/4”
17-1/2”
36-3/4”Min.
2” Min. (3” recommended)
Per warmingdrawerrequirement
Construct Solid Bottom Min. 3/8”PlywoodSupported by 2x4 or 2x2Runners all Four Sides
PREPARE THE OPENINGThe Advantium 240V can be installed incombination with other GE/Monogram appliances.Always follow each product’s InstallationInstructions to complete the installation.
Single Advantium 240V Installation:Order a 30” wide single oven cabinet or cut theopening in a wall to the dimensions shown.
• Always maintain 36-3/4” minimum height fromthe floor to the cutout in any single or combinedinstallation.
• Allow 2-1/8” case trim overlap on the sides and7/8” overlap on the bottom of the opening for allmodels. Allow 1-1/4” case trim overlap on the topfor models PSB2200 and PSB2201 and 3/4”overlap on the top for models ZSC2200, ZSC2201and ZSC2202.
• Oven overlaps will conceal cut edges on all sidesof the opening.
When installed over a single oven or a warmingdrawer, allow at least 2” between the two openings.This separation will provide clearance for bottomoverlap of the Advantium 240V and the otherappliance overlaps.
Construct a solid oven floor of 3/8” min. thick plywoodsupported by 2 x 4 or 2 x 2 runners on all sides.• The support must be level and rigidly mounted,
flush with the bottom edge of the cutout.
30” 23-1/2”
25-1/4”
17-1/2”
Construct Base Min. 3/8”PlywoodSupported by 2x4 or 2x2Runners allFour Sides
36-3/4”Min.

Installation Preparation
6
Preparation WITHOUT an Accessory Storage Drawer
PREPARE THE OPENING (CONT.)
Installation over a GE/Monogram Oven andWarming Drawer:
NOTE: Additional clearances between the cutoutsmay be required. Check to be sure the ovensupports above the Warming Drawer location donot obstruct the required interior depth and height.See Warming Drawer installation instructions fordetails.
CAUTION: For personal safety, the mountingsurface must be capable of supporting the cabinet load, in addition to the added weight ofthis approximate 80-pound oven, plus additionaloven loads of up to 50 pounds or a total weight of 130 pounds.
Construct SolidBottom Min.3/8” PlywoodSupported by 2x4 or 2x2Runners all Four Sides
30” 23-1/2”
25-1/4”
17-1/2”
2” Min.
Per OvenRequirement
45-1/4”Min.
Per warming drawer requirement
2” Min. (3” recommended)
PREPARE THE OPENING (CONT.)
Installation over a GE/Monogram Oven:
• If you are replacing a GE/Monogram electricdouble oven with the combined installation of an Advantium 240V and a single oven, use thedimensions shown. The middle rail separating the two openings may need to be larger than the 2” minimum shown.
30” 23-1/2”
25-1/4”
17-1/2” 2” Min. (3” recommended)
45-1/4”Min.
Construct SolidBottom Min.3/8” PlywoodSupported by 2x4 or 2x2Runners all Four Sides
Per OvenRequirement

7
Installation Preparation
Preparation WITH an Accessory Storage DrawerNOTE: MODEL ZSC2202 CANNOT BE INSTALLED WITH AN ACCESSORY STORAGE DRAWER. SEE INSTALLATION PREPARATIONWITHOUT AN ACCESSORY STORAGE DRAWER FOR THIS MODEL.
Installation over a GE/Monogram Warming Drawer:
* For existing cutouts, a maximum width of 28-1/2” is acceptable. If the opening is slightly wider, secure a furring strip on each side of the cutout for securing the oven.
NOTE: Additional clearances between the cutoutsmay be required. Check to be sure the ovensupports above the Warming Drawer location donot obstruct the required interior depth and height.See Warming Drawer installation instructions fordetails.
30” 23-1/2”
25-1/4”Min.*
21”
36-3/4”Min.
2” Min. (3” recommended)
Per warmingdrawerrequirement
Construct Solid Bottom Min. 3/8”PlywoodSupported by 2x4 or 2x2Runners all Four Sides
PREPARE THE OPENINGThe Advantium 240V can be installed incombination with other GE/Monogram appliances.Always follow each product’s InstallationInstructions to complete the installation.
Single Advantium 240V Installation:Order a 30” wide single oven cabinet or cut theopening in a wall to the dimensions shown.
* For existing cutouts, a maximum width of 28-1/2”is acceptable. If the opening is slightly wider,secure a furring strip on each side of the cutoutfor securing the oven.
• Always maintain 36-3/4” minimum height fromthe floor to the cutout in any single or combinedinstallation.
• Allow 3/4” to 2-1/8” case trim overlap on the sidesand 7/8” overlap on the bottom of the opening forall models. The amount of overlap on the sidesdepends on the actual cutout width. Allow 1-1/4”case trim overlap on the top for models PSB2200and PSB2201 and 3/4” overlap on the top formodels ZSC2200, ZSC2201 and ZSC2202.
• Oven overlaps will conceal cut edges on all sidesof the opening.
30” 23-1/2”
25-1/4”Min.*
21”
Construct Base Min. 3/8”PlywoodSupported by 2x4 or 2x2Runners allFour Sides
36-3/4”Min.
PREPARE THE OPENING (CONT.)
Single Advantium 240V Installation (cont.)When installed over a single oven or a warmingdrawer, allow at least 2” between the two openings.This separation will provide clearance for bottomoverlap of the Advantium 240V and the otherappliance overlaps.
Construct a solid oven floor of 3/8” min. thick plywoodsupported by 2 x 4 or 2 x 2 runners on all sides.• The support must be level and rigidly mounted,
flush with the bottom edge of the cutout.

8
Installation Preparation
Preparation WITH an Accessory Storage DrawerNOTE: MODEL ZSC2202 CANNOT BE INSTALLED WITH AN ACCESSORY STORAGE DRAWER. SEE INSTALLATION PREPARATIONWITHOUT AN ACCESSORY STORAGE DRAWER FOR THIS MODEL.
PREPARE THE OPENING (CONT.)
Installation over a GE/Monogram Oven andWarming Drawer:
* For existing cutouts, a maximum width of 28-1/2”is acceptable. If the opening is slightly wider,secure a furring strip on each side of the cutoutfor securing the oven.
NOTE: Additional clearances between the cutoutsmay be required. Check to be sure the ovensupports above the Warming Drawer location donot obstruct the required interior depth and height.See Warming Drawer installation instructions fordetails.
CAUTION: For personal safety, the mountingsurface must be capable of supporting the cabinetload, in addition to the added weight of thisapproximate 80-pound oven and 30-pounddrawer, plus additional oven loads of up to 50pounds or a total weight of 160 pounds.
Construct SolidBottom Min.3/8” PlywoodSupported by 2x4 or 2x2Runners all Four Sides
30” 23-1/2”
21”
2” Min.
Per OvenRequirement
45-1/4”Min. Per warming drawer requirement
2” Min. (3” recommended)
PREPARE THE OPENING (CONT.)
Installation over a GE/Monogram Oven:
* For existing cutouts, a maximum width of 28-1/2”is acceptable. If the opening is slightly wider,secure a furring strip on each side of the cutoutfor securing the oven.
• If you are replacing a GE/Monogram electricdouble oven with the combined installation of an Advantium 240V and a single oven, use thedimensions shown. The middle rail separating the two openings may need to be larger than the 2” minimum shown.
30” 23-1/2”
25-1/4”Min.*
21” 2” Min. (3” recommended)
45-1/4”Min.
Construct SolidBottom Min.3/8” PlywoodSupported by 2x4 or 2x2Runners all Four Sides
Per OvenRequirement
25-1/4”Min.*

9
Installation Instructions
• Remove all packing material and tape.• Locate parts package containing mounting screws.• Remove the oven from the carton. Do not lift unit by
handle or conduit. Two people are required to liftthis oven.
• Open the door and remove any packaging in oven.
REMOVE THE PACKAGING AND PARTS1
Owner’s Manual
Owner’s Manual InstallationInstructions
Glass Tray
Metal Grill TrayMetal Trays (2)
Turntable Ring
Bottom Trim
Rack
6 Brass Screws(3 required, 3 extra)
IMPORTANT: If installing the Advantium 240V Oven with an accessory storage drawer, read the storagedrawer assembly instructions to assemble theproducts together before proceeding to Step 2.
Cook Book
5 Color Matched Screws(4 required, 1 extra)Cooking Guide
CookingGuide

Installation Instructions
10
ROUTE CONDUIT THROUGHCUTOUT (CONT.)
When connecting to a 3-conductor branchcircuit:• Connect oven red lead to branch circuit red lead.• Connect oven black lead to branch circuit black
lead.• Connect oven green ground lead and white lead
to branch circuit neutral (white or gray).
When connecting to a 4-conductor branchcircuit:• Connect oven red lead to branch circuit red lead.• Connect oven black lead to branch circuit black
lead.• Break connection between oven white lead and
oven green ground lead.• Connect oven white lead to branch circuit neutral
lead (white or gray).• Connect oven green ground lead to branch circuit
ground lead (green or bare copper).
2ROUTE CONDUIT THROUGHCUTOUT
CAUTION: Two people are required to liftthe oven into the opening. Grasp the bottom atfront and rear. Discard foam base. DO NOT USEHANDLE OR CONDUIT TO LIFT THE OVEN. DAMAGEWILL OCCUR.With oven in front of the cabinet opening:• Insert conduit into cabinet opening. Connect oven
wiring and branch circuit.• Lift the oven into the opening while continuing to feed
the conduit in the direction of the installed junctionbox. Be sure the conduit does not get pinchedbetween the back of the oven and the cabinet wall.
• Leave oven a few inches forward of the cabinetfront frame. Do not push the unit all of the wayinto the cutout.
WARNING• Disconnect power to the junction box before
making the electrical connection.• Electrical ground is required on this appliance. • Do not connect the electrical supply until
appliance is permanently grounded.
GROUNDING INSTRUCTIONSThis appliance must be connected to a grounded,metallic, permanent wiring system, or an equipmentgrounding connector should be run with the circuitconductors and connected to the equipmentgrounding terminal or lead on the appliance.Failure to follow these instructions could result in fire, personal injury or electrical shock.
2
(Oven shown withoutaccessory storage drawer.)
11
Installation Instructions
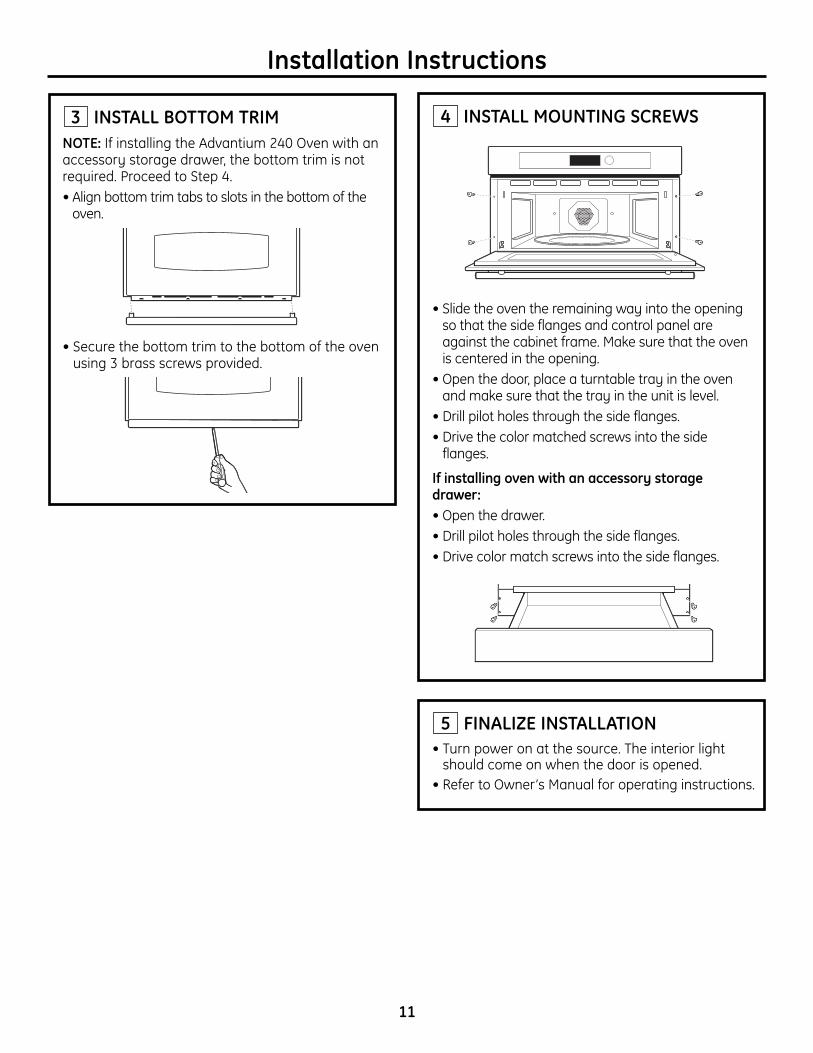
INSTALL BOTTOM TRIMNOTE: If installing the Advantium 240 Oven with anaccessory storage drawer, the bottom trim is notrequired. Proceed to Step 4.• Align bottom trim tabs to slots in the bottom of the
oven.
• Secure the bottom trim to the bottom of the ovenusing 3 brass screws provided.
3 INSTALL MOUNTING SCREWS
• Slide the oven the remaining way into the openingso that the side flanges and control panel areagainst the cabinet frame. Make sure that the ovenis centered in the opening.
• Open the door, place a turntable tray in the ovenand make sure that the tray in the unit is level.
• Drill pilot holes through the side flanges.• Drive the color matched screws into the side
flanges.
If installing oven with an accessory storagedrawer:• Open the drawer.• Drill pilot holes through the side flanges.• Drive color match screws into the side flanges.
4
FINALIZE INSTALLATION• Turn power on at the source. The interior light
should come on when the door is opened.• Refer to Owner’s Manual for operating instructions.
5

NOTE: Appearance will vary by model.
Assembly InstructionsAdvantium® 240V Built-In Accessory Storage DrawerJX2200, JX2201, ZX2201
BEFORE YOU BEGINRead these instructions completely and carefully. Readthe Installation Instructions for the Advantium 240V ovencompletely and carefully for cutout dimensions and step-by-step instructions.
IMPORTANT — Save these instructions forlocal inspector’s use.
IMPORTANT — Observe all governing codesand ordinances.• NOTE TO INSTALLER: Be sure to leave these
instructions with the Consumer.• NOTE TO CONSUMER: Keep these instructions with
your Advantium 240V Oven Owner’s Manual forfuture reference.
• SKILL LEVEL: Installation of this appliance requiresbasic mechanical skills.
• COMPLETION TIME: One hour with the installationof an Advantium 240V oven.
• Proper installation is the responsibility of the installer.
• Product failure due to improper installation is not covered under the Warranty. See the Advantium240V Oven Owner’s Manual for warranty information.
TOOLS REQUIRED• #2 Phillips screwdriver
PARTS SUPPLIED• 2 Side Supports • Screws• Screws (color matched)
MODELS AVAILABLEProfile Models:JX2200BB–BlackJX2201SS–Stainless Steel
Monogram Models:ZX2201SS–Stainless Steel
NOTE: Advantium 240V Built-In SpeedCook Ovenmodel ZSC2202SS CANNOT be installed with an accessory storage drawer. See InstallationPreparation Without an Accessory Storage Drawer inthe Advantium 240V Built-In SpeedCook OvenInstallation Instructions for this model.
PRODUCT DIMENSIONS AND CLEARANCES
Allow 15” clearance when fully open
5”
12
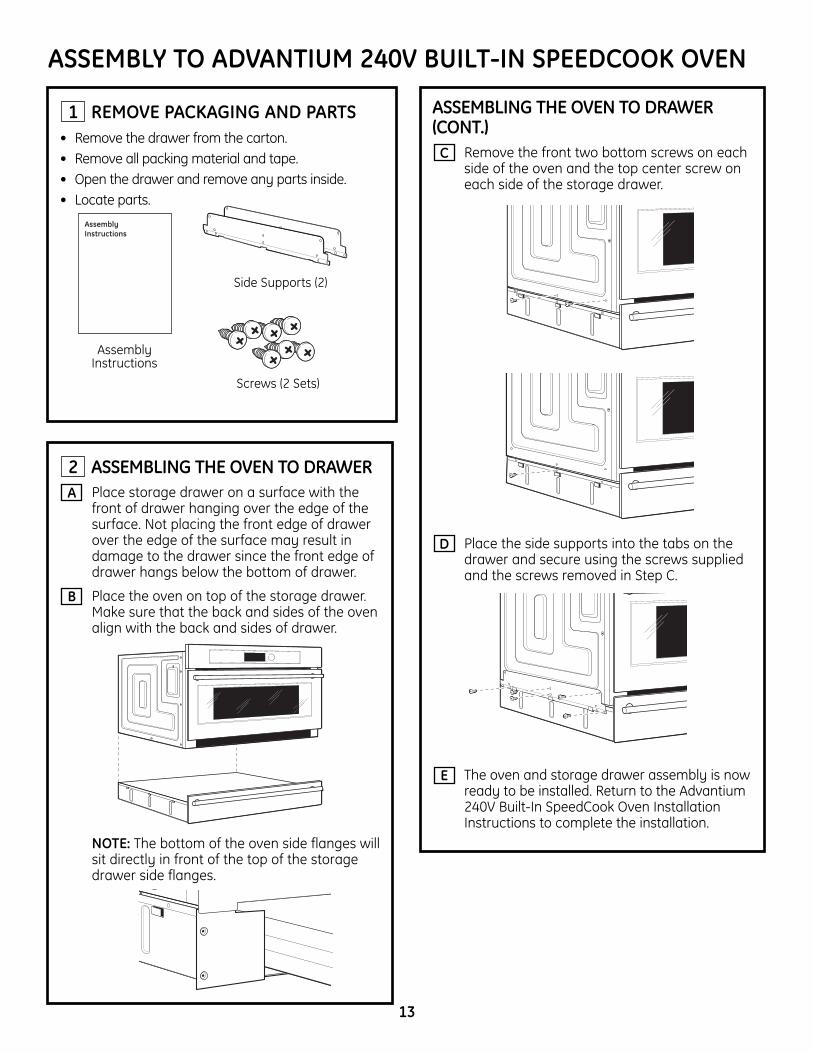
REMOVE PACKAGING AND PARTS• Remove the drawer from the carton.• Remove all packing material and tape.• Open the drawer and remove any parts inside.• Locate parts.
1
ASSEMBLY TO ADVANTIUM 240V BUILT-IN SPEEDCOOK OVEN
AssemblyInstructions
Side Supports (2)
Screws (2 Sets)
ASSEMBLING THE OVEN TO DRAWER(CONT.)
Remove the front two bottom screws on eachside of the oven and the top center screw oneach side of the storage drawer.
Place the side supports into the tabs on thedrawer and secure using the screws suppliedand the screws removed in Step C.
The oven and storage drawer assembly is nowready to be installed. Return to the Advantium240V Built-In SpeedCook Oven InstallationInstructions to complete the installation.
E
D
C
ASSEMBLING THE OVEN TO DRAWERPlace storage drawer on a surface with thefront of drawer hanging over the edge of thesurface. Not placing the front edge of drawerover the edge of the surface may result indamage to the drawer since the front edge ofdrawer hangs below the bottom of drawer.
Place the oven on top of the storage drawer.Make sure that the back and sides of the ovenalign with the back and sides of drawer.
NOTE: The bottom of the oven side flanges willsit directly in front of the top of the storagedrawer side flanges.
B
A
2
13

14

15

Printed in Korea
NOTE: While performing installations described in this book,safety glasses or goggles should be worn.
NOTE: Product improvement is a continuing endeavor atGeneral Electric. Therefore, materials, appearance andspecifications are subject to change without notice.
GE Consumer & IndustrialAppliances General Electric Company Louisville, KY 40225ge.com


