These instructions are written for qualified and experienced personnel. Please study them carefully before starting any work. Any liability or responsibility for the results of improper or unsafe installation practices is disclaimed. Please respect valid environmental regulations for assembly and waste disposal.Studieren Sie bitte sorgfältig vor Beginn der Montage diese Anleitung, die für geschultes und qualifiziertes Personal erstellt ist. Bei unsachgemäßer Montage ist eine Haftung bzw. Gewährleistung ausgeschlossen. Bitte beachten Sie bei Montage und Entsorgung die geltenden Umweltschutzbestimmungen.Ces instructions sont écrites pour des personnes qualifiées et expérimentées. Il est nécessaire de bien les lire avant de commencer l‘installation. Notre responsabilité ne pourra être engagée si l‘installation n‘a pas été faite en conformité avec nos instructions. Prière de respecter les règles d‘environnement en application pour le montage.Estas instrucciones estan dirijídas a personal calificado y con la debida experiencia. Por favor léalas cuidadosamente antes de iniciar su trabajo. No asumimos ninguna responsabilidad derivada de instalaciones impropias ó sin las adecuadas medidas de seguridad. Por favor respete las regulaciones para proteccion ambiental y desecho de desperdicios.Estas instruções são dirigidas ao pessoal qualificado e com a devida experiência. Por favor leia-as atentamente antes de começar a tarefa. Não assumimos nenhuma responsabilidade devido a execução da instalação de maneira imprópria ou sem as adequadas medidas de segurança. Por favor respeite os regulamentos válidos de meio ambiente para a montagem e remoção de resíduos.本安装说明为合格及有经验的操作人员所写. 请在安装之前仔细阅读. 任何不恰当或不安全的安装所引起的责任, 都将不予受理. 并请遵守关于装配件及废物弃置的有效环保条例.
产品在正常使用条件下, 其环保使用期限才在此标识有效期内. / The environmental protection use period is valid if the product is used as intended.
部件名称/Component Name
有毒有害物质或元素/Toxic or Hazardous Substances and Elements铅/Pb 汞/Hg 镉/Cd 六价铬/Cr 6+ 多溴联f/PBB 多溴二f醚/PBDE
金属零件/metal parts X O O O O O
M36
288d
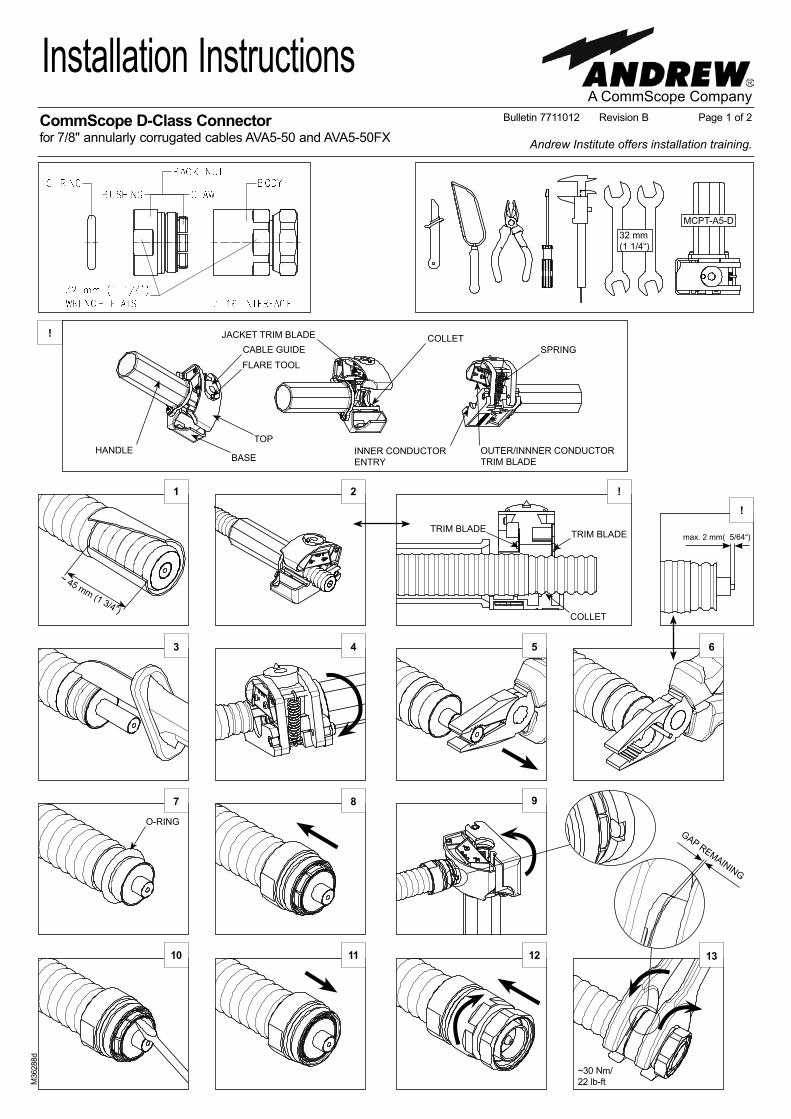
For cable preparation use the accessory Trimming Tool in addition to the use of standard hand tools.
1. Remove cable jacket with knife.2. Position collet guide of Trimming Tool in the first corrugation nearest to the trimmed
cable jacket - then rotate Trimming Tool around the cable until the top stops at the cable jacket.
Do not use any additional force greater than the preset Trimming Tool spring tension.
Remove loose cable outer conductor and foam. Ensure that no foam remains on the inner conductor!
3. Trim away the jacket with knife along the pre-scored mark. 4. Position cable inner conductor in the intended entry of the Trimming Tool - then rotate
trimming tool until the top stops at the base. Press together top and base slightly during rotation.5. Remove loose cable inner conductor. 6. Cut off inner conductor core. 7. Slide O-ring onto cable.8. Push and twist the back nut over the cable end and over the O-ring until the back nut
has completely snapped over the cable end. Push the back nut back as far as possible.9. Insert cable inner conductor into cable guide of the Trimming Tool. Turn Trimming Tool
to flare cable outer conductor.10. Check to confirm the foam is fully separated and evenly spaced from the cable outer
conductor.11. Push the back nut forward until stop. 12. Thread the connector head to the back nut until the thread only just grips.13. Tighten the back nut and the connector head using an open wrench.
Recommended: To ensure the durability of the built in sealing it is recommended to protect the sealing
(O-ring) with additional arrangements against aggressive and extreme environmental impacts.
Für die Kabelvorbereitung als Zubehör das Absetzwerkzeug zusätzlich zum Gebrauch von Standard-Werkzeugen verwenden.
1. Kabelmantel mit Messer entfernen.2. Führungsschulter des Absetzwerkzeuges im ersten Wellental nach dem abgesetzten
Kabelmantel positionieren. Dann das Absetzwerkzeug um das Kabel drehen, bis das Werkzeugoberteil auf dem Kabelmantel aufliegt.
Keine zusätzliche Kraft anwenden, die größer ist als die voreingestellte Federspannung des Absetzwerkzeuges.
Abgeschnittenen Außenleiter und Kabeldielektrikum entfernen. Schaumreste vollständig vom Kabelinnenleiter entfernen!3. Den Kabelmantel bis zur eingeschnittenen Stelle entfernen. 4. Kabelinnenleiter in der vorgesehenen Aufnahme im Absetzwerkzeug positionieren.
Dann das Absetzwerkzeug drehen bis es geschlossen ist. Werkzeugober- und unterteil währed des Drehens mit mäßiger Kraft
zusammendrücken.5. Den abgeschnittenen Kabelinnenleiter entfernen.6. Kern des Kabelinnenleiters abschneiden.7. O-Ring auf dem Kabel positionieren.8. Abfangung auf das Kabelende und über den O-Ring schieben, bis die Abfangung
vollständig über das Kabelende geschnappt ist. Abfangung soweit wie möglich nach hinten schieben.
9. Kabelinnenleiter in die Führung des Absetzwerkzeugs stecken. Das Werkzeug unter leichtem Druck drehen um den Außenleiter aufzuweiten.
10. Schaumdielektrikum vollständig vom Kabelaußenleiter trennen. Das Schaumdielektrikum muss ausreichend Abstand zum Kabelaußenleiter haben.
11. Abfanghülse bis zum Anschlag nach vorne schieben.12. Steckerkopf nur soweit auf die Abfangung aufschrauben bis das Gewinde greift.13. Abfangung und Steckerkopf mit Gabelschlüssel festziehen. Empfohlen: Um die Lebensdauer der eingebauten Dichtung dauerhaft zu gewährleisten, wird
empfohlen geeignete Maßnahmen zu treffen, welche die Dichtstelle (O-Ring) vor aggressiven und extremen Umwelteinflüssen schützt.