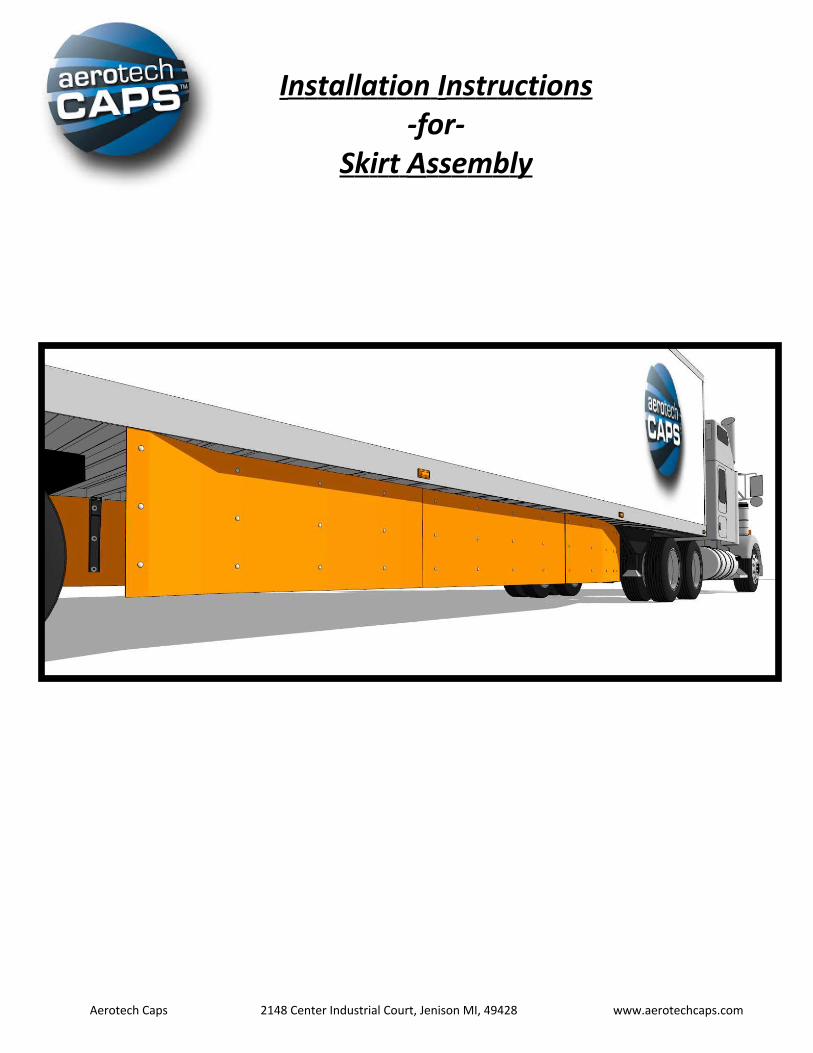
Aerotech Caps 2148 Center Industrial Court, Jenison MI, 49428 www.aerotechcaps.com I n s t a l l a t i o n I n s t r u c t i o n s -for- S k i r t A s s e m b l y
Transcript
Aerotech Caps 2148 Center Industrial Court, Jenison MI, 49428 www.aerotechcaps.com
Installation Instructions-for-
Skirt Assembly
Aerotech Caps 2148 Center Industrial Court, Jenison MI, 49428 www.aerotechcaps.com
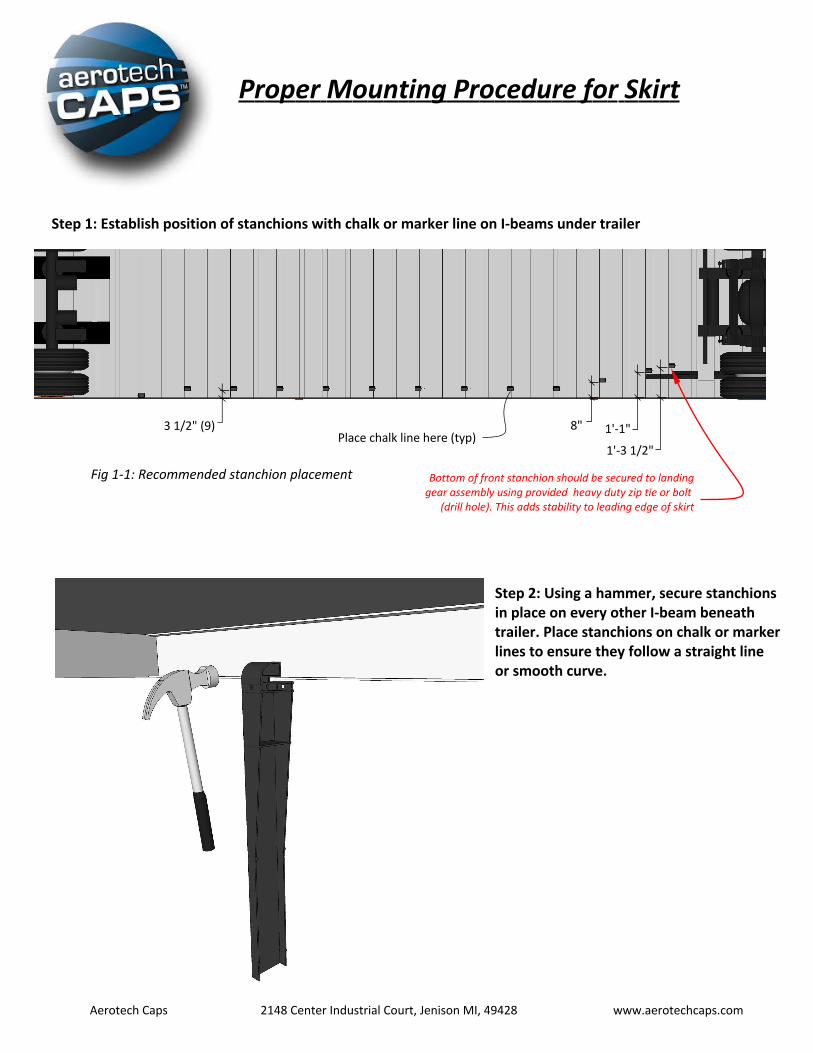
3 1/2" (9) 8" 1'-1"
1'-3 1/2"Place chalk line here (typ)
Step 1: Establish position of stanchions with chalk or marker line on I-beams under trailer
Fig 1-1: Recommended stanchion placement
Step 2: Using a hammer, secure stanchionsin place on every other I-beam beneathtrailer. Place stanchions on chalk or markerlines to ensure they follow a straight lineor smooth curve.
Proper Mounting Procedure for Skirt
Bottom of front stanchion should be secured to landinggear assembly using provided heavy duty zip tie or bolt
(drill hole). This adds stability to leading edge of skirt
Aerotech Caps 2148 Center Industrial Court, Jenison MI, 49428 www.aerotechcaps.com
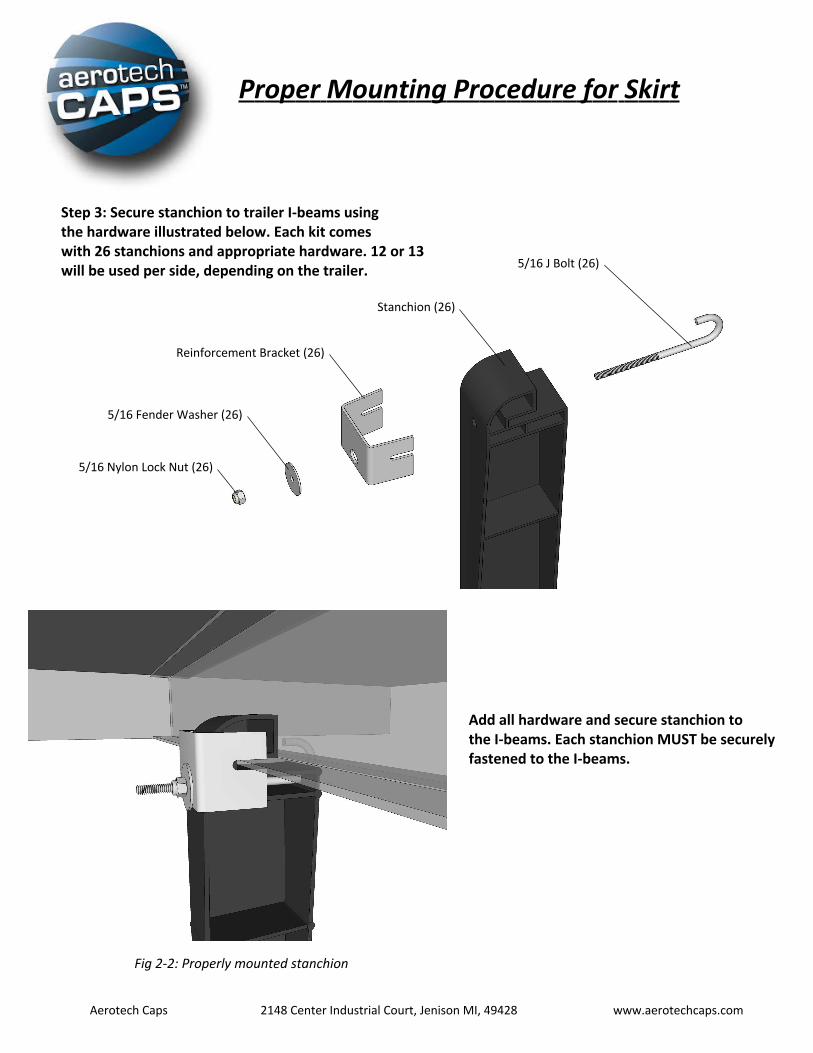
5/16 J Bolt (26)
Stanchion (26)
Reinforcement Bracket (26)
5/16 Fender Washer (26)
5/16 Nylon Lock Nut (26)
Step 3: Secure stanchion to trailer I-beams usingthe hardware illustrated below. Each kit comeswith 26 stanchions and appropriate hardware. 12 or 13will be used per side, depending on the trailer.
Fig 2-2: Properly mounted stanchion
Add all hardware and secure stanchion tothe I-beams. Each stanchion MUST be securelyfastened to the I-beams.
Proper Mounting Procedure for Skirt
Aerotech Caps 2148 Center Industrial Court, Jenison MI, 49428 www.aerotechcaps.com
Panels should overlap as illustrated below. Trailer not show for clarity.
1"
Step 4: Begin affixing the panels to the stanchions. There are (3) panels per side. Starting at the back of the trailer attach the panels to the stanchions using the provided 5/16" self tapping screws. Drill the self tapping screws into the panels. This step allows you to place the panels onto the stanchions and make any adjustments before the panels are permanently secured with the carriage bolts.
Proper Mounting Procedure for Skirt
Aerotech Caps 2148 Center Industrial Court, Jenison MI, 49428 www.aerotechcaps.com
Front panel should overlap as illustrated below. Trailer not show for clarity.
1"
Proper Mounting Procedure for Skirt
Aerotech Caps 2148 Center Industrial Court, Jenison MI, 49428 www.aerotechcaps.com
Step 5: Drill (3) holes through each stanchion and panel using a hand power drill with a 5/16"drill bit. The holes should be in the center of the stanchion. The bottom two holes should bealigned with the ejector pins on the stanchion and the top hole should be in the middle of the top stanchion pocket
Ejector Pins
Ejector Pins
Top Stanchion Pocket
Proper Mounting Procedure for Skirt
Aerotech Caps 2148 Center Industrial Court, Jenison MI, 49428 www.aerotechcaps.com
Step 6: Utilize the hardware illustrated below to affix the panels to the stanchions, working from the rear of the trailer moving forward. Seams created by the back edgeof the panel that land directly on stanchion should be secured with a fourth carriagebolt placed 1" above the bottom edge of the panel. Seams may also occur where theedge of a panel may not directly be on a stanchion. Secure any seam with four carriagebolts as previously described.
Carriage Bolt (90)
1/4 Fender Washer
1/4 Split Lock Nut
1/4 Hex Nut
Proper Mounting Procedure for Skirt
Aerotech Caps 2148 Center Industrial Court, Jenison MI, 49428 www.aerotechcaps.com
Thank you for being an Aerotech Caps customer!
Visit out our website for more fuel saving options!
www.aerotechcaps.com
Proper Mounting Procedure for Skirt
Should any questions arise about this or any other Aerotech Caps product, please feel free to contact us at: