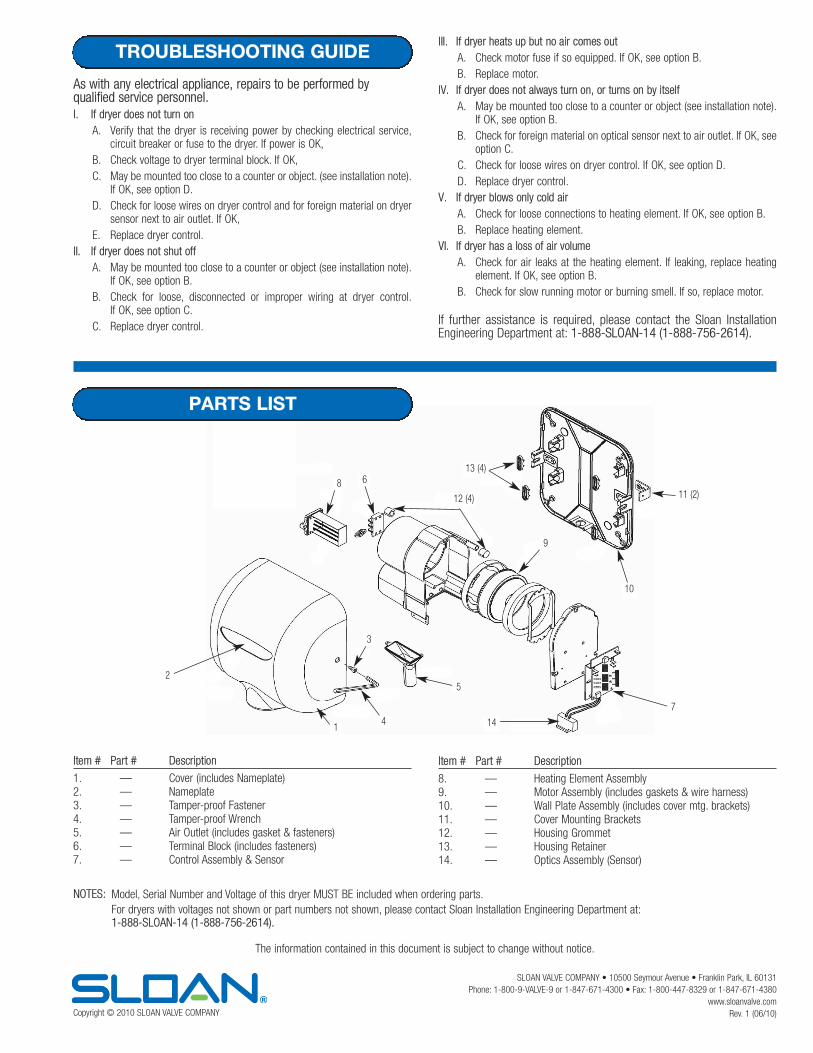
+ All Categories
Home > Documents > Installation Instructions for XLERATOR Hand Dryer...Code No. 0816786 Rev. 1 (06/10) INSTALLATION...

Installation Instructions for XLERATOR Hand Dryer...Code No. 0816786 Rev. 1 (06/10) INSTALLATION...

Date post: 16-Mar-2020
Category:
Upload: others
View: 9 times
Download: 0 times
Share this document with a friend
3
Code No. 0816786 Rev. 1 (06/10) INSTALLATION INSTRUCTIONS FOR XLERATOR ® HAND DRYER Prior to installing the Sloan OPTIMA XLerator ® Electronic Hand Dryer, determine the location where the dryer will be installed. Read the following section entitled “Installation Precautions” and then refer to Table 1 for recommended mounting heights. Installation Precautions Mounting surface should be smooth and flat. Mount dryer at least 24 inches (610 mm) away from basins. Mount dryer at least 20 inches (508 mm) away from corners. Mount multiple hand dryers a minimum of 20 inches (508 mm) apart, center to center. Avoid installing hand dryers in narrow hallways and behind swinging doors. Important: INSTALL ALL ELECTRICAL WIRING IN ACCORDANCE WITH NATIONAL/LOCAL CODES AND REGULATIONS. Table 1 — Recommended Mounting Heights Users Height Men 45 Inches (1143 mm) Women 43 Inches (1092 mm) Teenagers 41 Inches (1041 mm) Small Children 35 Inches (889 mm) Handicapped 37 Inches (940 mm) Important: When Mounting over a countertop, distance between counter and dryer MUST BE 15” (381 mm) MINIMUM . Refer to Table 2 for recommended fasteners. LIMITED WARRANTY Sloan Valve Company warrants its XLerator ® Hand Dryer to be made of first class materials, free from defects of material or workmanship under normal use and to perform the service for which it is intended in a thoroughly reliable and efficient manner when properly installed and serviced, for a period of five years (1 year for special finishes) from date of purchase. During this period, Sloan Valve Company will, at its option, repair or replace any part or parts which prove to be thus defective if returned to Sloan Valve Company, at customer’s cost, and this shall be the sole remedy available under this warranty. No claims will be allowed for labor, transportation or other incidental costs. This warranty extends only to persons or organizations who purchase Sloan Valve Company’s products directly from Sloan Valve Company for purpose of resale. THERE ARE NO WARRANTIES WHICH EXTEND BEYOND THE DESCRIPTION ON THE FACE HEREOF. IN NO EVENT IS SLOAN VALVE COMPANY RESPONSIBLE FOR ANY CONSEQUENTIAL DAMAGES OF ANY MEASURE WHATSOEVER. Step 1 — Remove Cover Using wrench provided, remove two tamper-proof fasteners from sides of dryer cover. Remove cover from dryer. Step 2 — Attach Wall Plate to Wall Attach wall plate to wall using the recommended fasteners shown in Table 2. Install a fastener at each corner of the wall plate. In locations where vandalism is a concern, install two additional mounting fasteners at the locations shown in the rough-in on page 2. Remove control assembly to access the right side mounting hole. Step 3 — Connect Electrical Wiring Connect a 110/120V dryer to a 15 Amp. branch circuit using at least #12 GA copper wire. (Do not exceed a 20 Amp. branch circuit). Connect a 220/240V dryer to no more than a 15 Amp. branch circuit using at least a #14 GA copper wire. Attach lines to terminals as indicated by the schematic inside dryer cover. Be sure that an equipment ground wire is securely fastened to green ground screw on base plate. For runs over 50 feet or for multiple installations, increase the size of the wire used. Dryers located in shower rooms or other wet locations should be installed with circuits protected by ground fault interrupter(s) or as local codes require. Step 4 — Replace Cover For multiple installations, before replacing cover, check the Serial Number marked inside the dryer to be sure it matches the Serial Number marked on the label at the bottom of cover. DO NOT SWITCH COVERS. Install Cover using the two tamper-proof fasteners. Leave the special TAMPER PROOF WRENCH with the owner. NOTE: If the dryer will not turn on, stays on or stops working, it may be mounted too close to a counter or object. Turn off power to dryer for 10 seconds and then reapply power. If dryer starts, then turn off again, relocate the object or remount dryer. If this is not possible, adjust the range of the sensor by turning the potentiometer on the control board clockwise to decrease sensor range. Please contact the Sloan Installation Engineering Department at 1-888-SLOAN-14 (1-888-756-2614) and one of our trained technicians will be happy to assist you. (Continued on Page 2) PRIOR TO INSTALLATION Table 2 — Recommended Fasteners Wall Type Recommended Fastener Masonry Wall 1/2” expansion sleeve with 1/4” lag bolt Hollow Wall 1/4” wing type through bolt Wooden Wall 1/4” lag screw with washer INSTALLATION INSTRUCTIONS
Transcript

Code No. 0816786Rev. 1 (06/10)

INSTALLATION INSTRUCTIONSFOR XLERATOR® HAND DRYER

Prior to installing the Sloan OPTIMA XLerator® Electronic Hand Dryer,determine the location where the dryer will be installed. Read thefollowing section entitled “Installation Precautions” and then refer toTable 1 for recommended mounting heights.

Installation Precautions• Mounting surface should be smooth and flat.• Mount dryer at least 24 inches (610 mm) away from basins.• Mount dryer at least 20 inches (508 mm) away from corners.• Mount multiple hand dryers a minimum of 20 inches (508 mm)apart, center to center.

• Avoid installing hand dryers in narrow hallways and behind swingingdoors.

Important:• INSTALL ALL ELECTRICAL WIRING IN ACCORDANCE WITHNATIONAL/LOCAL CODES AND REGULATIONS.

Table 1 — Recommended Mounting HeightsUsers Height

Men 45 Inches (1143 mm)Women 43 Inches (1092 mm)Teenagers 41 Inches (1041 mm)Small Children 35 Inches (889 mm)Handicapped 37 Inches (940 mm)

Important: When Mounting over a countertop, distance betweencounter and dryer MUST BE 15” (381 mm) MINIMUM.Refer to Table 2 for recommended fasteners.

LIMITED WARRANTYSloan Valve Company warrants its XLerator® Hand Dryer to be made of first class materials, free from defects of material or workmanship under normal use and toperform the service for which it is intended in a thoroughly reliable and efficient manner when properly installed and serviced, for a period of five years (1 year forspecial finishes) from date of purchase. During this period, Sloan Valve Company will, at its option, repair or replace any part or parts which prove to be thus defectiveif returned to Sloan Valve Company, at customer’s cost, and this shall be the sole remedy available under this warranty. No claims will be allowed for labor,transportation or other incidental costs. This warranty extends only to persons or organizations who purchase Sloan Valve Company’s products directly from SloanValve Company for purpose of resale.

THERE ARE NO WARRANTIES WHICH EXTEND BEYOND THE DESCRIPTION ON THE FACE HEREOF. IN NO EVENT IS SLOAN VALVE COMPANY RESPONSIBLE FORANY CONSEQUENTIAL DAMAGES OF ANY MEASURE WHATSOEVER.

Step 1 — Remove CoverUsing wrench provided, remove two tamper-proof fasteners from sidesof dryer cover. Remove cover from dryer.

Step 2 — Attach Wall Plate to WallAttach wall plate to wall using the recommended fasteners shown inTable 2. Install a fastener at each corner of the wall plate. In locationswhere vandalism is a concern, install two additional mounting fastenersat the locations shown in the rough-in on page 2. Remove controlassembly to access the right side mounting hole.

Step 3 — Connect Electrical WiringConnect a 110/120V dryer to a 15 Amp. branch circuit using at least#12 GA copper wire. (Do not exceed a 20 Amp. branch circuit).Connect a 220/240V dryer to no more than a 15 Amp. branch circuitusing at least a #14 GA copper wire. Attach lines to terminals asindicated by the schematic inside dryer cover. Be sure that anequipment ground wire is securely fastened to green ground screw onbase plate. For runs over 50 feet or for multiple installations, increasethe size of the wire used. Dryers located in shower rooms or other wetlocations should be installed with circuits protected by ground faultinterrupter(s) or as local codes require.

Step 4 — Replace CoverFor multiple installations, before replacing cover, check the SerialNumber marked inside the dryer to be sure it matches the SerialNumber marked on the label at the bottom of cover. DO NOT SWITCHCOVERS. Install Cover using the two tamper-proof fasteners.

Leave the special TAMPER PROOF WRENCH with the owner.NOTE: If the dryer will not turn on, stays on or stops working, it may be mounted

too close to a counter or object. Turn off power to dryer for 10 secondsand then reapply power. If dryer starts, then turn off again, relocate theobject or remount dryer. If this is not possible, adjust the range of thesensor by turning the potentiometer on the control board clockwise todecrease sensor range. Please contact the Sloan Installation EngineeringDepartment at 1-888-SLOAN-14 (1-888-756-2614) and one of ourtrained technicians will be happy to assist you.

(Continued on Page 2)

PRIOR TO INSTALLATION

Table 2 — Recommended FastenersWall Type Recommended Fastener

Masonry Wall 1/2” expansion sleeve with 1/4” lag boltHollow Wall 1/4” wing type through boltWooden Wall 1/4” lag screw with washer

INSTALLATION INSTRUCTIONS

WIRING DIAGRAM — 110/120 and 220/240 VAC

2

CLEANING INSTRUCTIONS

Important: DISCONNECT ELECTRICAL SUPPLY TO DRYER PRIOR TO SERVICING.

OutsideGently wash cover (including air Inlet holes) using a soft cloth orsponge and a mild soap or detergent with lukewarm water toloosen dirt and grime.

InsideCLEANING SHOULD BE PERFORMED BY QUALIFIED SERVICEPERSONNELWith normal use, dryer will require cleaning once a year. Heavier usagerequires more frequent cleaning. Lint on the air inlet or other internalparts of dryer will reduce efficiency and shorten the life of the workingparts. To clean, remove cover by unscrewing the tamper-prooffasteners from cover with the special wrench provided with each dryer.Use a small, soft brush to gently clean all parts.

• When the Infrared Sensor detects hands beneaththe exhaust port, it activates the XLerator® HandDryer. Water droplets are first blown from handswith a strong controlled air blast. Residualmoisture is then evaporated with a warm streamof air up to 135° F/57° C.

• After hands are withdrawn from the Sensor’sdetection zone, or after a maximum of thirty-five(35) seconds of continuous operation, the HandDryer automatically stops. It is then ready for thenext user.

OPERATION

MOUNTINGHEIGHT

(SEE TABLE 1ON PAGE 1)

LIVE TEXTMOUNTING

HEIGHT(SEE TABLE 1ON PAGE 1)

LIVE TEXT

ROUGH-IN NOTE: Upon completing installation and checking for proper operation, it ishighly recommended that a bead of silicone sealant be placed aroundthe outside of the cover at the wall to protect dryer from internalcorrosion caused by wash water and cleaning solutions.

If further assistance is required, contact your nearest SloanRepresentative office or the Sloan Installation Engineering Departmentat: 1-888-SLOAN-14 (1-888-756-2614).

SLOAN VALVE COMPANY • 10500 Seymour Avenue • Franklin Park, IL 60131Phone: 1-800-9-VALVE-9 or 1-847-671-4300 • Fax: 1-800-447-8329 or 1-847-671-4380

www.sloanvalve.comRev. 1 (06/10)Copyright © 2010 SLOAN VALVE COMPANY

Item # Part # Description

1. — Cover (includes Nameplate)2. — Nameplate3. — Tamper-proof Fastener4. — Tamper-proof Wrench5. — Air Outlet (includes gasket & fasteners)6. — Terminal Block (includes fasteners)7. — Control Assembly & Sensor

TROUBLESHOOTING GUIDE

As with any electrical appliance, repairs to be performed byqualified service personnel.I. If dryer does not turn on

A. Verify that the dryer is receiving power by checking electrical service,circuit breaker or fuse to the dryer. If power is OK,

B. Check voltage to dryer terminal block. If OK,C. May be mounted too close to a counter or object. (see installation note).

If OK, see option D.D. Check for loose wires on dryer control and for foreign material on dryer

sensor next to air outlet. If OK,E. Replace dryer control.

II. If dryer does not shut offA. May be mounted too close to a counter or object (see installation note).

If OK, see option B.B. Check for loose, disconnected or improper wiring at dryer control.

If OK, see option C.C. Replace dryer control.

III. If dryer heats up but no air comes outA. Check motor fuse if so equipped. If OK, see option B.B. Replace motor.

IV. If dryer does not always turn on, or turns on by itselfA. May be mounted too close to a counter or object (see installation note).

If OK, see option B.B. Check for foreign material on optical sensor next to air outlet. If OK, see

option C.C. Check for loose wires on dryer control. If OK, see option D.D. Replace dryer control.

V. If dryer blows only cold airA. Check for loose connections to heating element. If OK, see option B.B. Replace heating element.

VI. If dryer has a loss of air volumeA. Check for air leaks at the heating element. If leaking, replace heating

element. If OK, see option B.B. Check for slow running motor or burning smell. If so, replace motor.

If further assistance is required, please contact the Sloan InstallationEngineering Department at: 1-888-SLOAN-14 (1-888-756-2614).

Item # Part # Description

8. –– Heating Element Assembly9. –– Motor Assembly (includes gaskets & wire harness)10. — Wall Plate Assembly (includes cover mtg. brackets)11. — Cover Mounting Brackets12. — Housing Grommet13. — Housing Retainer14. — Optics Assembly (Sensor)

5

6

7

8

4

9

1

2

3

10

14

13 (4)

12 (4) 11 (2)

NOTES: Model, Serial Number and Voltage of this dryer MUST BE included when ordering parts.For dryers with voltages not shown or part numbers not shown, please contact Sloan Installation Engineering Department at: 1-888-SLOAN-14 (1-888-756-2614).

The information contained in this document is subject to change without notice.

PARTS LIST


Recommended