This B&M Precision Sport Shifter has been designed to work on most 2002+ Acura RSX/Honda Integra (including 6-spd Type-S) and 2001+ Honda Civic models equipped with a manual transmission. It has been engineered to greatlyreduce shift throw and improve shifter feel. Check the parts and tools lists at the beginning of these instructions for thesupplied parts and the tools required to install your B&M Precision Sport Shifter. Installation of the B&M PrecisionSport Shifter can be accomplished by anyone with minimal mechanical experience.
INTRODUCTION
The B&M Precision Sport Shifter can be installed in less than an hour by carefully following the instructions. Read allinstructions first to familiarize yourself with the parts, tools, and procedures. This kit contains all the parts necessary toinstall the shifter.
PARTS
9500789-00Printed in the U.S.A.
B&M Precison A
Sport Shifter
Solid Bushings
(x4)
M6 Shoulder
Bolt
GreaseCable Arm Retainer
M8 Shoulder
Bolt
Clamp B C
D E
F G H
DISASSEMBLY STEP 1. Un-snap boot from knob, un-screw, and remove
shift knob.
TOOLS
Extension Socket
(8,12mm)
Ratchet
Needle Pliers &/or
Channel locks
Wrench
(8mm)
Screwdriver
(flat head x 2)
Screwdriver
(Phillips)
Hex Wrench
(2.5, 3, 4 mm)
Hammer
Razor
Nut Adhesive J K
Cotter Pin L
Screws x4 I
STEP 2*. Lift up and remove shift boot/center console.
STEP 3*. Remove the 2 middle console screws.
TOOL: Screwdriver (Phillips)
STEP 4*. Remove the upper center console piece andunplug the electrical connector.
STEP *5. Remove the (2) center console screws.
TOOL: Screwdriver (Phillips)
GO TO STEP 9
*STEPS 2-5 ACURA RSX/HONDA INTEGRA ONLY
STEP 9. Remove the (2) rear console screws located behindthe front seats.
TOOL: Screwdriver (Phillips)
STEP 8**. Pry out (2) screw covers and remove the (2)screws.
STEP 7**. Remove the (2) center console screws.
STEP 6**. Pull-up and remove center console tray.
**STEPS 6-8 HONDA CIVIC ONLY
TOOL: Screwdriver (Phillips)
TOOL: Screwdriver (Phillips)
STEP 10. Pull up center console to access shift boot retainer.
STEP 11. Cut off tie-strap to remove the shift boot from theshifter stick and remove entire console.
TOOL: Razor
STEP 12. Detach both cables by removing the (2) cotter pinswith needle nose pliers. Keep all components andbushings as they will be re-used.
TOOL: Needle nose pliers
STEP 13. Pull up and remove shifter cable clip.
TOOLS:Screwdriver (Flat-head)Pliers
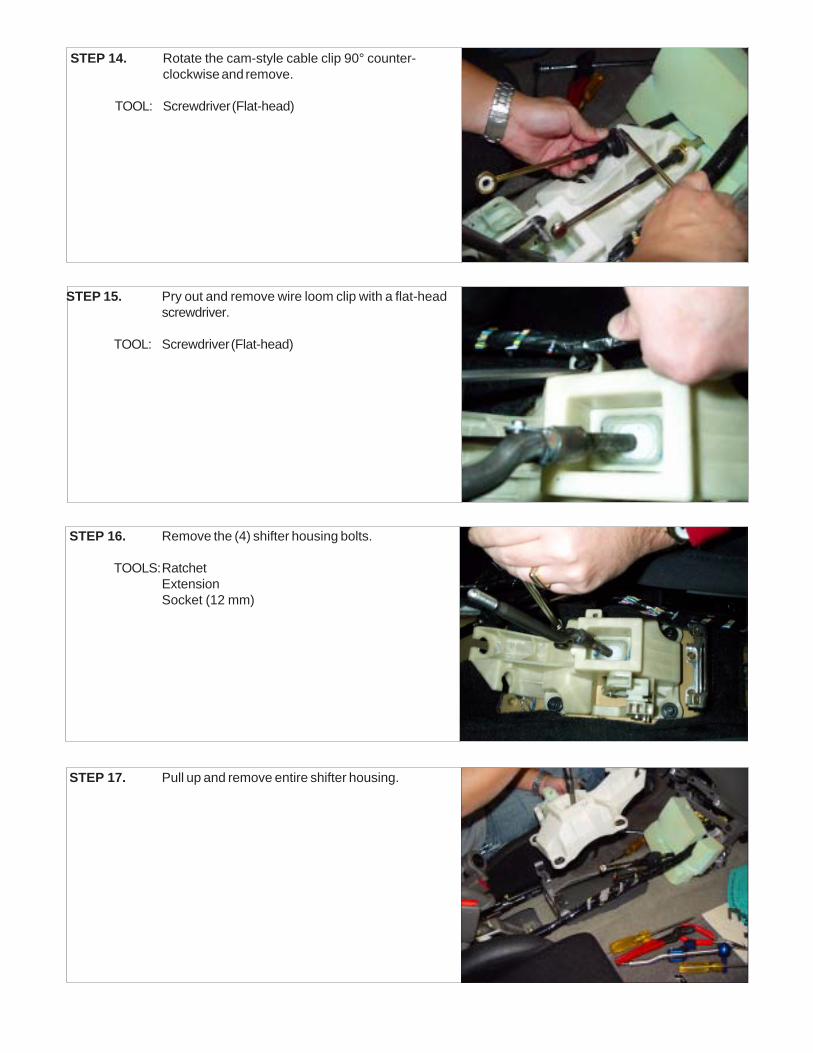
STEP 14. Rotate the cam-style cable clip 90° counter-clockwise and remove.
TOOL: Screwdriver (Flat-head)
STEP 15. Pry out and remove wire loom clip with a flat-headscrewdriver.
TOOL: Screwdriver (Flat-head)
STEP 17. Pull up and remove entire shifter housing.
STEP 16. Remove the (4) shifter housing bolts.
TOOLS:RatchetExtensionSocket (12 mm)
STEP 21. Remove entire shifter stick assembly from theshifter base.
STEP 18. Carefully pry out shifter pin without breaking theplastic shifter housing.
TOOL: Flat head screwdriver
STEP 19. Insert and twist out plastic retainer with a flatheadscrewdriver.
TOOL: Flat head screwdriver
STEP 20. Insert another flathead screwdriver from theunderside of the shifter to ease removal.
TOOLS:Flat head screwdriver (x2)
STEP 25. Grease all moving parts and install the B&Mshifter stick assembly A .
A
STEP 22. Split the white spherical ball with a flat-headscrewdriver and separate into 2 pieces.
TOOL: Flat head screwdriver
STEP 23. Remove and KEEP the plastic pivot block w/rubbergasket as it will be re-used.
STEP 24. Remove the (4) metal and (4) rubber shifter housingbushings.
TOOL: Flat head screwdriver
ASSEMBLY
STEP 26. Insert the original plastic pivot block w/rubbergasket.
STEP 29. Re-install the original shoulder pin into the shifterassembly.
STEP 28. Secure the chamfered edge of the retainer byhammering in the remaining two tabs with a screwdriver and a hammer.
TOOLS:HammerScrewdriver (flat-head)
STEP 27. Insert the B&M retainer G on top of the stockplastic pivot. Seat the two flat retainer tabs intostock shifter housing first.
G
Flat-end
1st
STEP 33. Tighten and secure the shifter housing with the (4)stock bolts and (4) B&M solid shifter bushings.
TOOLS:RatchetExtensionSocket (12mm)
STEP 30. Re-install the shifter assembly and the (4) B&Mshifter bushings C . Re-install wiring harnessback into the shifter housing tab.
STEP 31. Re-install and secure the shifter cable clip.
STEP 32. Re-install and secure the cam-style shifter clip.
C
TOP
STEP 35. Insert the M8 shoulder bolt D through the cableand screw it into the B&M cable arm F . Be surethe cable is secured into the cable groove.
TOOL: Hex wrench (4 mm)
STEP 34. Re-attach the side-to-side cable by inserting thestock pin and new cotter pin L .
STEP 36. Attach B&M clamp B to the B&M cable arm Fand tighten the (4) screws I down tightly.
TOOL: Hex wrench (2.5 mm)
L
D
F
F
B
I
J
A
F E
STEP 37. Choose either the high or low shift reduction hole.Insert the shoulder bolt E through eachcorresponding high/low hole of the B&M cable arm F and B&M shifter stick A assembly. Applyadhesive J to the threads.
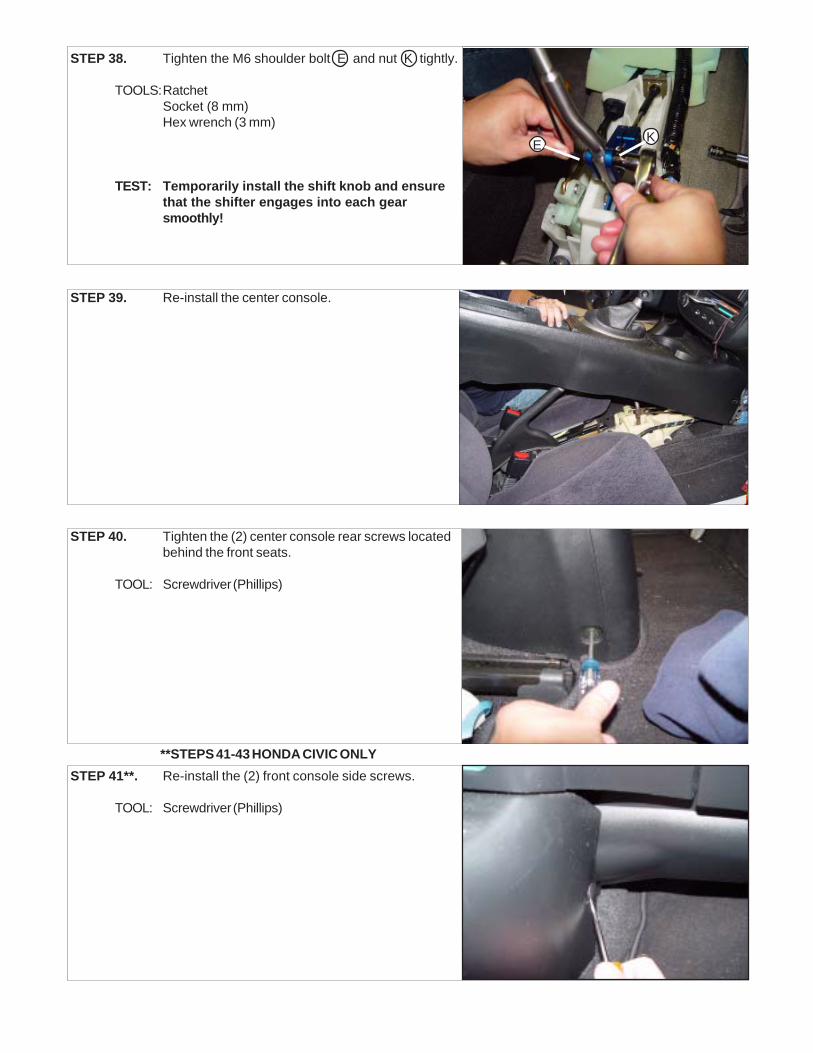
STEP 38. Tighten the M6 shoulder bolt E and nut K tightly.
TOOLS:RatchetSocket (8 mm)Hex wrench (3 mm)
TEST: Temporarily install the shift knob and ensurethat the shifter engages into each gearsmoothly!
STEP 39. Re-install the center console.
STEP 41**. Re-install the (2) front console side screws.
TOOL: Screwdriver (Phillips)
STEP 40. Tighten the (2) center console rear screws locatedbehind the front seats.
TOOL: Screwdriver (Phillips)
**STEPS 41-43 HONDA CIVIC ONLY
E K
STEP 42**. Re-install the (2) front center console screws.
TOOL: Screwdriver (Phillips)
STEP 43**. Re-install the E-brake console.
GO TO STEP 48.
STEP 45*. Plug the electrical outlet back together andre-install the plastic cover.
STEP 44*. Re-install the (2) front console screws.
TOOL: Screwdriver (Phillips)
*STEPS 44-47 ACURA RSX/HONDA INTEGRA ONLY
STEP 46*. Re-install the center console, kick panels, andplug the wire connectors back together.
TOOL: Screwdriver (Phillips)
STEP 49. Enjoy!
STEP 47*. Re-install the shift boot and cover.
STEP 48. Re-install the shift knob. Test the movementthrough each gear to make sure shifter engagessafely into each gear.
ManualShift Knobs
Racing & PerformanceProducts
B&M's Manual Shift Knobs are perfect when style and performancematter. Ergonomically correct andmade from the highest grade materials, these sturdy knobs incorporate the latest styling as well as distinctive design. Eachknob is designed to fit most vehicles equipped with a floormounted manual gearbox stick.B&M knobs are mounted andtightly secured via an innovativestick locating/locking method that keeps the mounting method invisible. Fit up to 9/16” or 14mm thread diameter (except where noted).
These Hi-tech Button Knobs can be used to control any12-volt function in your vehicle. They feature a momentaryswitch in a billet aluminum anodized knob. Suitable fornitrous or line lock systems. Fits metric thread sizes:M16x1.5, M12x1.75, M12x1.25, M10x1.5 and M10x1.25shifter sticks. Knob measures 3.75” in height.
Synthetic Trick Shift™
& SyntheticStick Shift™
Racing & PerformanceProducts
B&M’s Synthetic Trick Shift was formulated asa Performance Automatic Transmission Fluid, butit can be used in manual transmissions that callfor the use of ATF as a lubricant. Synthetic TrickShift is ideal for street use and high performanceapplications including racing, off-road, towing andheavy duty fleet use.
A synthetic formula engineered for racing and performance applications, B&M SyntheticStick Shift allows you to get the best performance out of your manual transmission,transaxle or differential. Extensive testing showsB&M Stick Shift provides total lubrication protection for street and heavy-duty applications.It gives outstanding oxidation stability, extremepressure protection, anti-shear agents and foaminhibitors that exhibit a tenacious capability tokeep on lubricating under extreme conditions. It provides excellent cold weather properties and high temperature stability not found in mostgear oils. SAE 75W90 fluid allows quicker shifts,improved fuel economy and is compatible withother automotive gear oils. Stick Shift’s goldencolor offers easy detection of even the slightestcontamination.