Congratulations!With your purchase of this Premium Entrance Set, you’re among a groupof discerning individuals who know the intrinsic value of selecting thefinest—Baldwin.
Our step-by-step installation instructions will help guide you through yourproject quickly and easily.
Before you begin your installation, read and understand the installationinstructions and marking templates. If you have any questions, please do not hesitate to contact our Baldwin Consumer Help Line at 1-800-566-1986. We’re here to help! We thank you for your purchase and wish you the fullest enjoyment of your Baldwin product.
Care and MaintenanceWARNING: Do not attempt to clean your hardware with any type of abra-sive cleaners, solvents, or chemicals. These types of cleaning agents maymar the finish. A damp cloth is all that is necessary to wipe clean. Note: Finish Number 102, Oil-Rubbed Bronze, can be cleaned with lightmachine oil and wiped with a dry cloth.
Remember BaldwinWith the completion of your project, remember that Baldwin quality hard-ware and giftware products are available for all your decorating andremodeling needs. Matching entrance sets for exterior doors, beautifulbath accessories, and a complete selection of cabinet and door-enhancinghardware are all available from your Baldwin retailer.
To request a product brochure or the name of a retailer near you, call 1-800-566-1986.
Baldwin offers a vast array of exceptional solid brass products to elegantlyenhance all areas of the home. Each collection features a wide variety ofbeautiful, high-fashion finishes. From locking products to lighting andbath accessories, Baldwin provides the discriminating decorator withnumerous options to accent and complement the home’s ambience withdistinction, taste, and fine detail.
Complimentary BaldwinSecurity Test and Rebate OfferBe assured that your home is safe and secure with Baldwin’s Security Test.To get yours free, download it at www.baldwinhard-ware.com/security and receive a special onlinerebate offer. Or write to Baldwin HardwareCorporation, P.O. Box 15048, Reading, PA19612.
Consumer Help Line 1-800-566-1986
Hours: 6 a.m. to Midnight C.S.T.—7 days a weekIf you have trouble installing your Baldwin product, feel free to call ourtoll-free Consumer Help Line.
www.baldwinstyleguide.com
www.baldwinhardware.com
Premium Entrance SetEMERGENCY EXIT FUNCTION
5360
BlakelyTM
5350
Manchester®
PK.EGENTR
PK.EGENTR8/20/02
5355
Stonegate®
1.
ProtectiveEyewear
PhillipsScrewdriver
TapeMeasure
Flat HeadScrewdriver
21⁄8" Dia. FaceBore Hole Saw
ElectricDrill
1⁄2" WoodChisel
1⁄8" WoodDrill Bit
5⁄16" Wood Drill Bit
5⁄32" Wood Drill Bit
PencilChalk, Grease Pencil, or
Lipstick
Utility Knife
Masking Tape 24" Level Hammer
Helpful Tools
Wood Filler Beeswaxor Soap
Required Tools
1" Spade Bit or1" Hole Saw
(Recommended)
If you have any trouble installing your Baldwin product, feel free to call our toll-free consumer help line at 1-800-566-1986. Hours: 6 a.m. – midnight (east coast standard), 7 days a week. 2.
Before You Begin1• Remove and discard all materials and screw(s) used for packing your
Premium Entrance Set. Verify that you have all parts pictured onexploded view section of instructions.
• Check the thickness of the door. This lockset works on doors 13⁄4" thick only. For doors greater than 13⁄4" up to 21⁄4" thick, contact ourConsumer Help Line at 1-800-566-1986. The conversion kit partnumber for this item is 5399.XXX.C; please specify the finish of your product.
• Follow the step-by-step sequence to ensure proper opera-tion of your Baldwin lockset.
• If your door is pre-drilled, see handleset installation step 1. If it is not pre-drilled, see door preparation step 1.
• Important! If you are removing an old lock and replacing it with thisBaldwin lockset, you must install the Baldwin strikeplate provided onthe doorframe. Failure to do so could void your warranty. You may needto plug existing holes left by the old strikeplate screws with wood dowelsand re-drill the pilot holes for the new strikeplate.
• We recommend spreading cardboard over floor to prevent scratching partsand marring floor.
• Always wear protective eyewear.
Note: The illustrations in these instructions depict the outside handlebeing installed on the right of the door. For installation of the outsidehandle on the left of the door, proceed as if all illustrations were reversed.
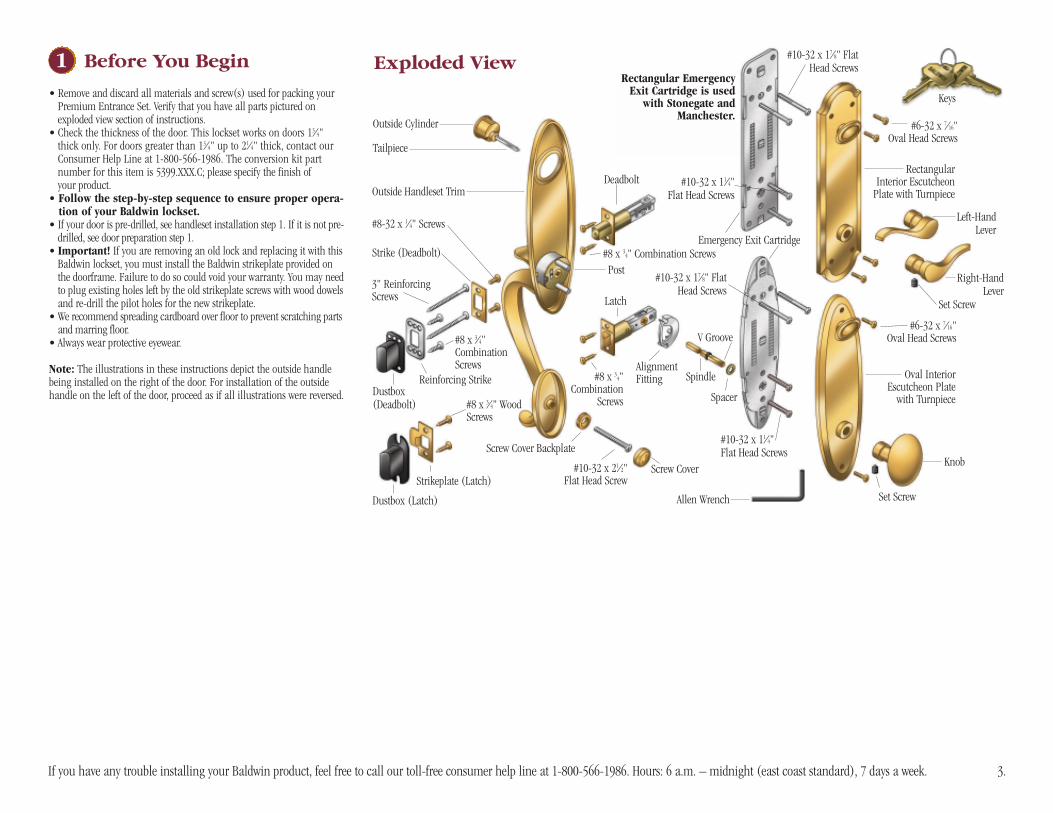
Exploded View
Outside Cylinder
Tailpiece
Allen Wrench
Strikeplate (Latch)
Dustbox (Latch) Set Screw
Latch
#6-32 x 7⁄16" Oval Head Screws
#10-32 x 17⁄8" FlatHead Screws
Emergency Exit Cartridge
RectangularInterior Escutcheon
Plate with Turnpiece
Knob
#10-32 x 11⁄4"Flat Head Screws
Spacer
Spindle AlignmentFitting
V Groove
Deadbolt
Dustbox(Deadbolt)
#10-32 x 21⁄2" Flat Head Screw
Reinforcing Strike
Strike (Deadbolt)
#8 x 34"
CombinationScrews
#8 x 34" Combination Screws
Outside Handleset Trim
#8-32 x 1⁄4" Screws
3" ReinforcingScrews
#8 x 3⁄4"CombinationScrews
#8 x 3⁄4" WoodScrews
Post
Keys
Oval InteriorEscutcheon Plate
with Turnpiece
#6-32 x 7⁄16" Oval Head Screws
Right-HandLever
Left-HandLever
#10-32 x 11⁄4"Flat Head Screws
#10-32 x 17⁄8" FlatHead Screws
Screw Cover Backplate
Rectangular EmergencyExit Cartridge is used
with Stonegate andManchester.
Screw Cover
Set Screw
If you have any trouble installing your Baldwin product, feel free to call our toll-free consumer help line at 1-800-566-1986. Hours: 6 a.m. – midnight (east coast standard), 7 days a week. 3.
(2) #8-32 x 1⁄4" Screws(2 or 4) #6-32 x 7⁄16"
Oval Head Screws
(2) #8 x 3⁄4" Wood Screws
(2) #8 x 3⁄4" Combination
Screws
(2) 3" Reinforcing
Screws
Set Screw
(2) #10-32 x 17⁄8" Flat Head
Screws
(2) #10-32 x 11⁄4" Flat Head Screws
(4) #8 x 3⁄4" Combination
Screws
(1) #10-32 x 21⁄2" Flat Head
Screw
Handleset InstallationFasteners
Strikeplate InstallationFasteners
If you have any trouble installing your Baldwin product, feel free to call our toll-free consumer help line at 1-800-566-1986. Hours: 6 a.m. – midnight (east coast standard), 7 days a week. 4.
Door Frame TemplateDoor Hole Template
If you have any trouble installing your Baldwin product, feel free to call our toll-free consumer help line at 1-800-566-1986. Hours: 6 a.m. – midnight (east coast standard), 7 days a week. 5.
3 Fold hole template alongdoor edge with center of bot-tom hole (A), the 21⁄8" dia.hole, 38" from floor. Tape tem-plate to door.
4Determine backset, whichis the distance from the edge ofdoor to center of hole. Usehole template to mark thebackset center point for yourinstallation. Locate and markpositions for (A, B, C, D, andE) on template. The mostcommon backset is 23⁄8".
5 Very carefully drill (A, B)21⁄8" holes into one side of doorface until drill bit starts toprotrude on opposite side. Important: Drill perpendicu-larly (at a 90º angle) to door.
1Pull door toward you tocheck if it’s level. Observe con-tact of door to jam and makesure it’s level. Adjust if neces-sary.
Door Preparation (If Needed)2
hole template
low side of bevel
door stopB
A
top of door
2 (Aerial View) To ensureproper alignment, only usehole template on side facingdoorstop. Helpful Hint: Some doorshave a beveled edge with bevelfacing doorstop.
If you have any trouble installing your Baldwin product, feel free to call our toll-free consumer help line at 1-800-566-1986. Hours: 6 a.m. – midnight (east coast standard), 7 days a week. 6.
Door Preparation (If Needed) cont.2
6Complete drilling holes (A,B) from opposite side of door.
7 Very carefully drill (C, D)holes into door edge exactly atpencil marks.31⁄2" deep for a 23⁄8" backset37⁄8" deep for a 23⁄4" backsetHelpful Hint: Mark edge depthof drilling with masking tape.
8 Very carefully drill (E) 5⁄16"hole into door exactly at pen-cil mark.
9 Insert latch into hole (D).Use utility knife to score chis-el guides into door edge.Make sure score guides areparallel to door. Repeat fordeadbolt hole (C).
10Chisel faceplate cavity5⁄32" deep. Helpful Hint: Chisel towardinside edge of score lines,removing only a small bit toavoid wood damage.
B
A
C
D ED
C31⁄2"or 37⁄8"
1"Masking tape
If you have any trouble installing your Baldwin product, feel free to call our toll-free consumer help line at 1-800-566-1986. Hours: 6 a.m. – midnight (east coast standard), 7 days a week. 7.
Handleset Installation3
1Determine your backset,which is the distance fromthe edge of door to center ofhole. Your lockset is shippedwith a 23⁄8" backset (mostcommon). Adjust for a 23⁄4"backset door only.
3 Insert latch with angled side ofbolt facing outside. Drill 1⁄8" pilotholes. Secure with two #8 x 3⁄4"combination screws so latch isflush with door. Repeat for dead-bolt.Helpful Hint: When installingwood screws it is recommended toput beeswax or soap on screwthreads to improve installation.
2 For a 23⁄4" backset, graspbody and twist faceplate 180ºuntil it stops. Angled side ofbolt should face outside.Follow same procedure fordeadbolt. Note: See deadbolt orientationduring installation step 4.
4Note orientation of dead-bolt. Insert deadbolt. Drill 1⁄8"pilot holes. Secure with #8 x 3⁄4" combination screws solatch is flush with door.
inside inside
5Extend deadbolt usingflat head screw driver.
inside
Top
If you have any trouble installing your Baldwin product, feel free to call our toll-free consumer help line at 1-800-566-1986. Hours: 6 a.m. – midnight (east coast standard), 7 days a week. 8.
Handleset Installation (cont.)3
If you have any trouble installing your Baldwin product, feel free to call our toll-free consumer help line at 1-800-566-1986. Hours: 6 a.m. – midnight (east coast standard), 7 days a week.
6 Attach handle by insertingthe #10-32 x 21⁄2" flat headscrew on inside of doorthrough screw cover backplateand the lower hole (E). Leavescrew loose for adjustment.Note: Go to door preparation if you do not have a lowerhole (E).
7 From inside of door, slidealignment fitting between postand around latch.
8Measure the thickness ofyour door. If door is less than13⁄4" thick, do not use thespacer provided. If your doormeasures 13⁄4", slide the spaceronto spindle.
9 From inside of door, insertshort end of spindle throughalignment bracket and latch,with V groove on the long endangled down and toward hinges.Position outside handle assemblyso spindle slides into square holeon thumbpiece cartridge. Makecertain spindle is insertedthrough the latch to stops.
10 Slide emergency exitcartridge onto spindle. Attachlower cartridge with two #10-32 x 11⁄4" flat head screws, butDO NOT TIGHTEN SCREWSAT THIS TIME.
inside inside inside inside inside
V groove on bottom
towardhinges
Spindle
E
9.
Handleset Installation (cont.)3
11Rotate deadbolt camtoward door edge using a flathead screwdriver. This will coverthe mounting screw hole that isclosest to door edge.
14With turn knob in verticalposition, align the slot in back ofturn knob with tailpiece andplace interior escutcheon plateagainst door. Fasten with two(four for rectangular interiorescutcheon plate) #6-32 x 7⁄16"oval head screws.
15Pull spindle out as far aspossible and depress thumbpiece.Slide knob/lever onto spindle andtighten set screw firmly into Vgroove with Allen wrench. Tighten#10-32 x 21⁄2" flat head screw.Attach bottom screw cover.
The lever version of this prod-uct comes with both left-handand right-hand levers. You willonly use one in the installa-tion. To determine which leverto use, make sure that the han-dle portion of the lever extendstoward the hinges of the doorand the hole for the set screwfaces down.
Lever Version
13 From inside of door, rotatetailpiece to retract deadbolt anduncover blocked mounting hole attop of cartridge. Attach cylinderwith two #10-32 x 17⁄8" flat headscrews. Tighten all four screwsmaking certain assembly isaligned properly. Check operationof tailpiece and spindle.
inside inside inside inside inside
Tailpiecevertical
Door edge
Mounting screwhole is covered
If you have any trouble installing your Baldwin product, feel free to call our toll-free consumer help line at 1-800-566-1986. Hours: 6 a.m. – midnight (east coast standard), 7 days a week. 10.
Strikeplate InstallationIMPORTANT! You must install Baldwin strikeplate or your warranty is void.
1 If weather stripping isnot installed, you mustinstall weather strippingprior to strikeplateinstallation. Mark center ofdeadbolt with chalk, greasepencil, or lipstick. Shut doorand lock deadbolt to markcenter point on doorframe.
4
2On doorframe, align strikehole template with centerpoint. Mark holes for center oflatch bolt and outer corners ofboth strikes with pencil.
3For Deadbolt andLatch Strikeplates: Markdrill points 5⁄16" above andbelow center points. Bore two1" holes 11⁄4" deep for deadboltdustbox and two 1" holes 1"deep for latch dustbox. Scorechisel guide into doorframewith utility knife.
4For Deadbolt and LatchStrikeplates: Chisel out holesfor dustboxes. Chisel out cavityso deadbolt strikeplate and latchstrikeplate fit flush with door-frame. For deadbolt strikeplate, cavity is 7⁄32" deep. For latch strikeplate,cavity is 3⁄32" deep.
5For DeadboltStrikeplate: Using reinforc-ing strikeplate as a template,drill two 5⁄32" pilot holes for 3"long screws (outside holes)and two 1⁄8" pilot holes for #8x 3⁄4" screws (inside holes).
inside inside 1/8"
5/32"
If you have any trouble installing your Baldwin product, feel free to call our toll-free consumer help line at 1-800-566-1986. Hours: 6 a.m. – midnight (east coast standard), 7 days a week. 11.
Strikeplate Installation (cont.)IMPORTANT! You must install Baldwin strikeplate or your warranty is void.
4
8For Latch Strikeplate:Using latch as a template, drilltwo 1⁄8" pilot holes for the #8 x 3⁄4" screws.
6For DeadboltStrikeplate: Insert dustboxinto hole, add reinforcing strike,and secure with 3" reinforcingscrews (outside holes) and #8 x3⁄4" combination screws (insideholes).Helpful Hint: When installingwood screws it is recommendedto put beeswax or soap on screwthreads to improve installation.
7For DeadboltStrikeplate: Add strikeplateand secure with #8-32 x 1⁄4"screws.
insideinsideinside
9For Latch Strikeplate:Insert dustbox into hole, addstrikeplate, and secure by insert-ing #8 x 3⁄4" wood screws intopilot holes.Helpful Hint: when installingwood screws it is recommendedto put beeswax or soap on screwthreads to improve installation.
insideinside
outside
If you have any trouble installing your Baldwin product, feel free to call our toll-free consumer help line at 1-800-566-1986. Hours: 6 a.m. – midnight (east coast standard), 7 days a week. 12.
ProblemCan’t extend deadbolt unless key is in cylinder. Can’t remove key with deadbolt in extended posi-tion.
Screws are all tight but the hardware is not firmly attached to the door.
Knob or lever keeps coming off the spindle.
Door is difficult to latch or will not stay closed unless deadbolt is extended.
Can’t extend deadbolt from inside with turn knob or outside with key when door is closed.
Door is already prepared with round hole for latch.
Deadbolt will only retract fully when retracted forcefully and quickly. Will not retract fully whenretracted slowly.
Deadbolt works easily with turn knob on inside but is difficult to turn and has grinding soundwhen turned with key on outside.
Deadbolt retracts when thumbpiece on outside is pushed.
Troubleshooting GuideIf parts are missing do not return product. Please call Baldwin's Consumer Help Line at 1-800-566-1986 and we will quickly send the parts to you.
SolutionCylinder is not installed with correct tailpiece orientation. Remove turn knob assembly and cylinder. Extend deadbolt with screwdriverand re-install hardware. Refer to handleset installation steps 11 and 12.
Check door thickness. Door must be 13⁄4" thick. Hardware will not install on doors less than 13⁄4" thick.
Ensure that set screw on knob or lever is installed in V groove on spindle and securely tightened with Allen wrench provided. Refer tohandleset installation step 15.
Strikeplate is not aligned with latchbolt. Remove, plug holes with wooden dowels and glue. Adjust and re-install. Condition can alsobe caused by weather stripping being installed after hardware is installed. Re-install strike as described at left. Refer to strikeplateinstallation step 1.
Open door and try to extend deadbolt. If deadbolt extends easily with door open, deadbolt strike is not aligned with deadbolt. Removestrike and relocate as necessary. Refer to strikeplate installation step 1.
Replace door or return lockset to place of purchase. Baldwin does not manufacture a round (drive-in) latch at this time.
Wrong deadbolt may have been supplied. Call our Consumer Help Line at 1-800-566-1986 for assistance.
Improper alignment of cylinder and turnpiece or improper door thickness. Use a block of wood to tap cylinder collar so it will notmove more than 1⁄16" in any direction. If this does not correct problem, check deadbolt hole preparation for accuracy. Ensure thatdoor is 13⁄4" thick. Refer to door preparation step 12.
Spindle is installed backwards. Long side on spindle must be toward the inside of the house. Remove and re-install correctly. Refer tohandleset installation steps 8 and 9.
If you have any trouble installing your Baldwin product, feel free to call our toll-free consumer help line at 1-800-566-1986. Hours: 6 a.m. – midnight (east coast standard), 7 days a week. 13.