1.1 Installation of ESX Server (Scripted) The VMware ESXi Server hosts are to be built using VMware best practices, using one common configuration for all VMware ESXi Server hosts in the environment. This provides a stable and easily maintained environment. The following section presents the scripted installation for creating each VMware ESXi Server host in the environment. This serves as both an informational document for reference of the current hosts as well as guide for building additional hosts that will be joined to the data centre. Keeping a standard build process will scale the virtualization environment effectively. # The following steps will walk through the scripted installation. IMPORTANT NOTE: Ensure that any fibre channel cables are disconnected during the install process. 1.1.1 ESXi Scripted Installation Step 1 Options Visual Discussion ESXi Installation Step 1 –Scripted Installer 1. Insert the NHS-On-A-Stick (FOAS) in the machines USB port 2. Power on the machine and boot from the USB devise 3. Select the SOAS scripted install and press enter. (esx-primary or esx-secondary Note: The automated Scripted installer will execute
Transcript
1.1 Installation of ESX Server (Scripted) The VMware ESXi Server hosts are to be built using VMware best practices, using one common configuration for all VMware ESXi Server hosts in the environment. This provides a stable and easily maintained environment. The following section presents the scripted installation for creating each VMware ESXi Server host in the environment. This serves as both an informational document for reference of the current hosts as well as guide for building additional hosts that will be joined to the data centre. Keeping a standard build process will scale the virtualization environment effectively. # The following steps will walk through the scripted installation.
IMPORTANT NOTE: Ensure that any fibre channel cables are disconnected during the install process.
1.1.1 ESXi Scripted Installation Step 1
Options Visual Discussion
ESXi Installation Step 1 –Scripted Installer1. Insert the NHS-On-A-Stick (FOAS) in the machines USB
port2. Power on the machine and boot from the USB devise3. Select the SOAS scripted install and press enter. (esx-
primary or esx-secondary
Note: The automated Scripted installer will execute
1.1.2 ESXi Scripted Installation Step 2
Options Visual Discussion
ESXi Installation
Step 2 - Scripted Installer
1. The system will boot and perform a complete ESXi installation and Scripted Installation configuration to build the complete production ready Hypervisor. Go to 1.15.1
The ESXi 5.0 Scripted installation is a one composite process. The indicial ESXi host installation is manually initiated then an automated scripted is run against the machine. The following section details to configuration and caveats. The script is written and saved as a ks.cfg forming a completed power-on to Production ready state in a single process.
1.1.4 ESXi USB Delivery Configuration
Options Visual Discussion
ESXi Installation
Step 1 - Create the USB Boot Device
1. Download and install ‘Live Linux USB Creator’ (LinuxLive USB Creator 2.8.11.exe)
2. Step1: Select your USB device3. Step2: Select the ESXi ISO (VMware-ESXi-5.0.0-
Update1-623860-HP-5.20.43.iso)4. Step4: Make sure the USB is formatted as FAT165. Click to Create the USB
Step 2 - Customisation1. Copy your customised ks.cfg files to the root of the
USB drive (overwriting the original) 2. Copy your Customised syslinux.cfg file to the root
directory 3. Optional: Create a Directory at the root of the USB
device (/VM) and copy any vm*.tar files into that directory (this is to auto import VM’s from the USB device during install)
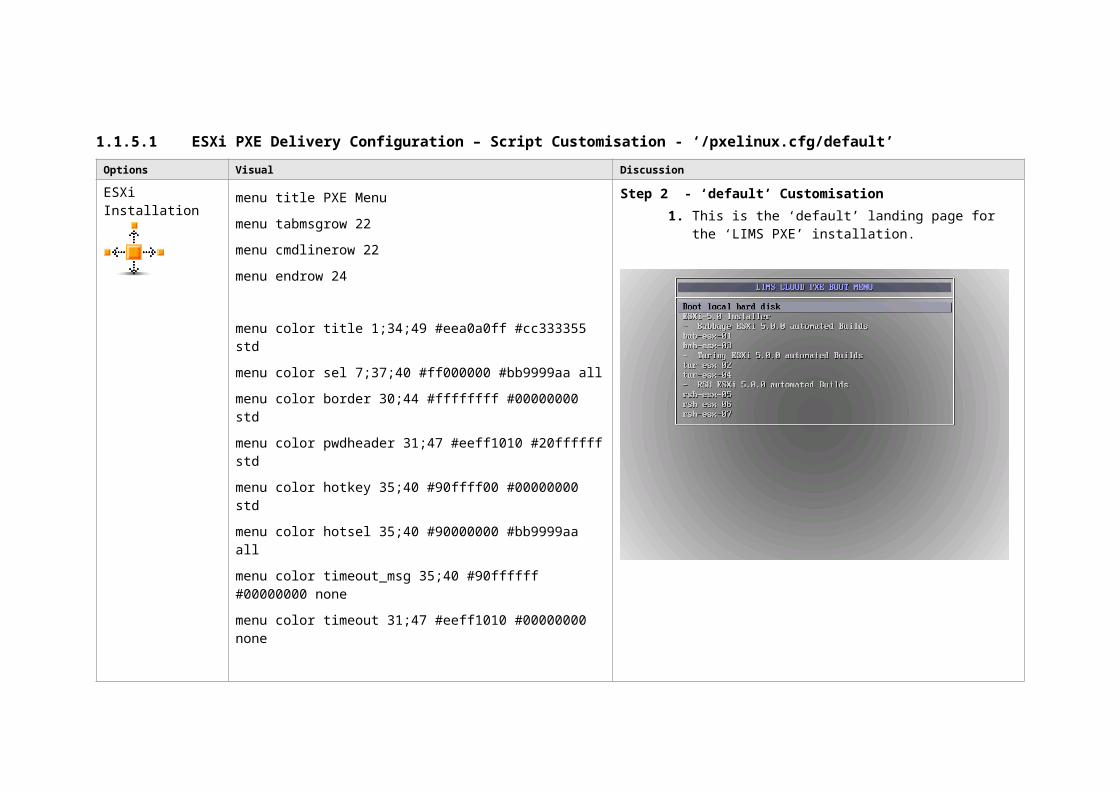
ESXi Installation menu title PXE Menumenu tabmsgrow 22menu cmdlinerow 22menu endrow 24
menu color title 1;34;49 #eea0a0ff #cc333355 stdmenu color sel 7;37;40 #ff000000 #bb9999aa allmenu color border 30;44 #ffffffff #00000000 stdmenu color pwdheader 31;47 #eeff1010 #20ffffff stdmenu color hotkey 35;40 #90ffff00 #00000000 stdmenu color hotsel 35;40 #90000000 #bb9999aa allmenu color timeout_msg 35;40 #90ffffff #00000000 nonemenu color timeout 31;47 #eeff1010 #00000000 none
2. You will receive the PXE landing page, then select the machine description of the ESXi host you are building.
1.1.6 ESXi DVD Delivery Configuration – ISO Creation
Options Directions Notes
ESXi Installation
Step 1 - Create the DVD ISO1. Download and install ‘WinISO v5.3.exe/UltraISO.exe (License required)2. Download and install ‘VMware-vSphere-CLI-5.0.0-422456.exe’3. Download your VMware Offline Bundles (i.e: update-from-esxi5.0-5.0_update01.zip or hp-esxi5.0uX-
bundle-1.1.2-4.zip)4. Open VMware CLI (provides: PowerCLI C:\Program Files (x86)\VMware\Infrastructure\vSphere
Step 2 - File Customisation1. Open winISO/ or UltaISO2. Open the ISO that you created with Vmware CLI 5. ("NHS_V2_DVD” )3. Copy your customised ks.cfg files (ks.cfg) to the Kickstart (create it) folder on the root of the DVD ISO
drive (overwriting the original) goto – 1.14.54. Copy your Customised isolinux.cfg file to the DVD root directory (goto 1.14.4.1)
Optional: Create a Directory at the root of the DVD ISO (/VM) and copy any vm*.tar files into that directory (this is to auto import VM’s from the DVD device during install) (see next step 1.14.5.1)
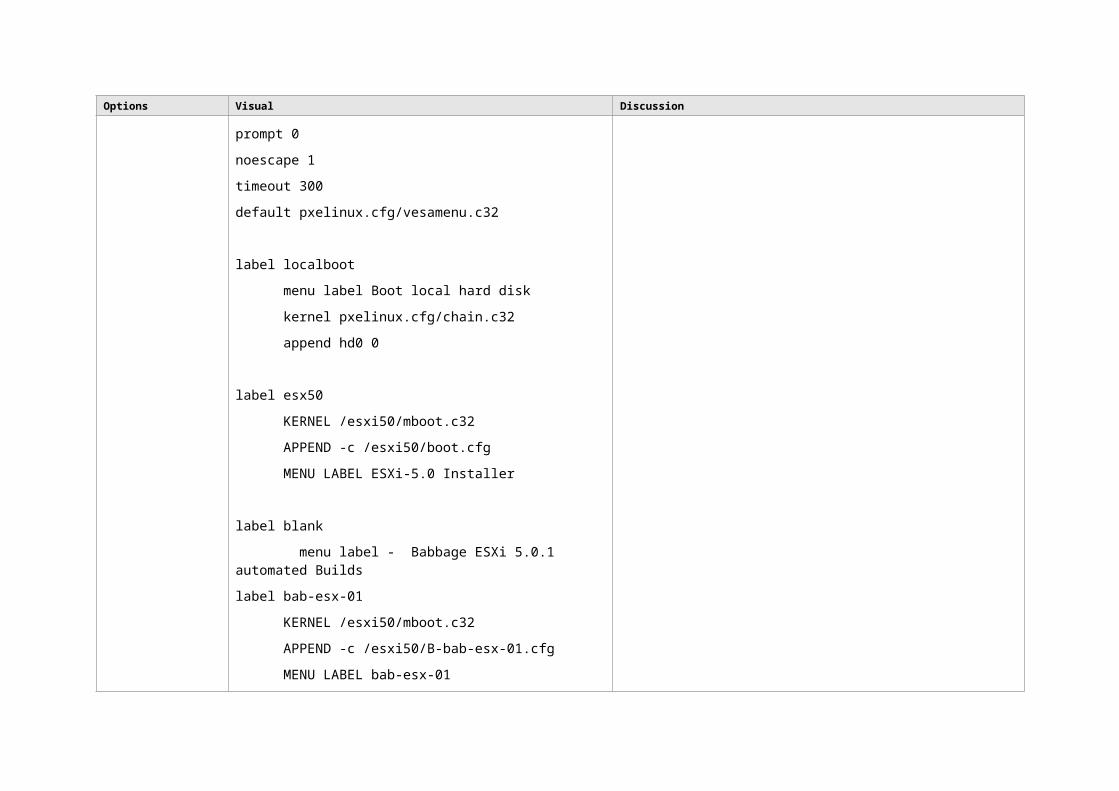
label - menu label ^Customer Installs: menu disable
label bab-esx-01 menu label ^Install bab-esx-01 (Auto-Script) menu indent 1 kernel mboot.c32 APPEND -c boot.cfg ks=cdrom:/KICKSTART/BAB-ESX-01-COIN.CFG
Isolinux.cfg is the same structure as syslinux.cfg for the USB, with some additional variables.
Note: The Append line defines the following ks.cfg files in Capital letter as this is required: APPEND -c boot.cfg ks=cdrom:/KICKSTART/BAB-ESX-01-COIN.CFG
This is the menu screen that the isolinux.cfg generates:
Options Visual Discussion
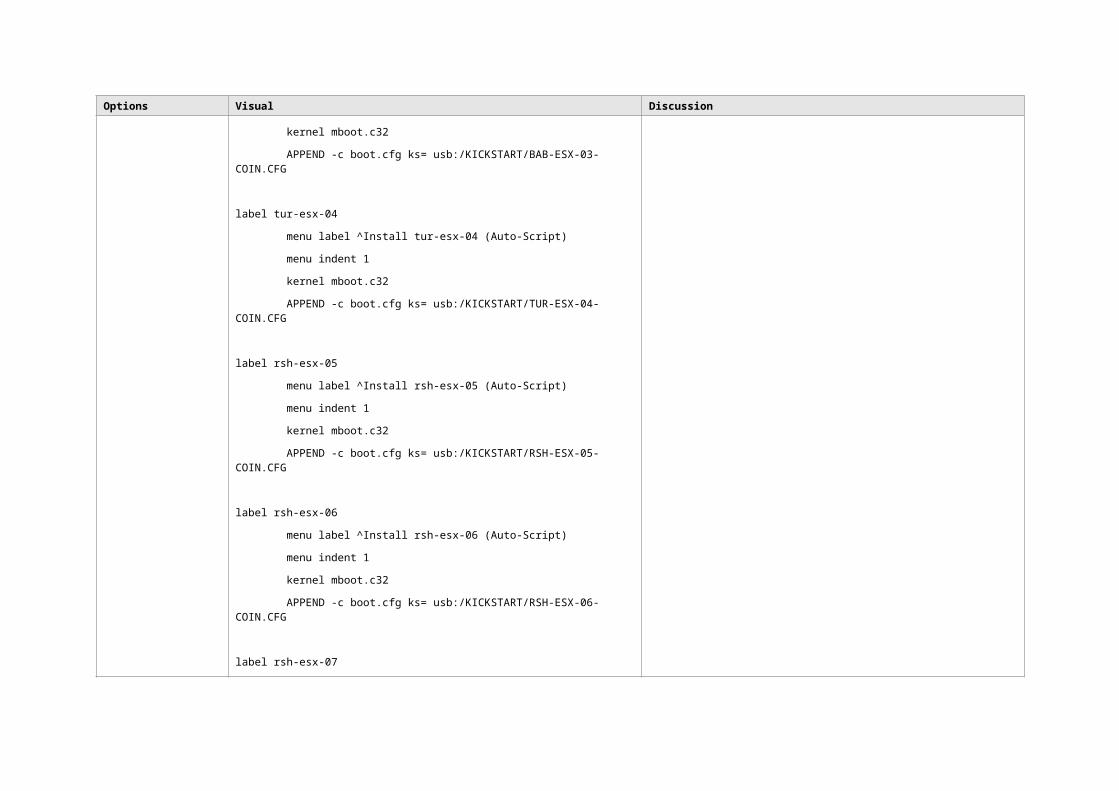
label tur-esx-02 menu label ^Install tur-esx-02 (Auto-Script) menu indent 1 kernel mboot.c32 APPEND -c boot.cfg ks=cdrom:/KICKSTART/TUR-ESX-02-COIN.CFG
label bab-esx-03 menu label ^Install bab-esx-03 (Auto-Script) menu indent 1 kernel mboot.c32 APPEND -c boot.cfg ks=cdrom:/KICKSTART/BAB-ESX-03-COIN.CFG
label tur-esx-04 menu label ^Install tur-esx-04 (Auto-Script) menu indent 1 kernel mboot.c32 APPEND -c boot.cfg ks=cdrom:/KICKSTART/TUR-ESX-04-COIN.CFG
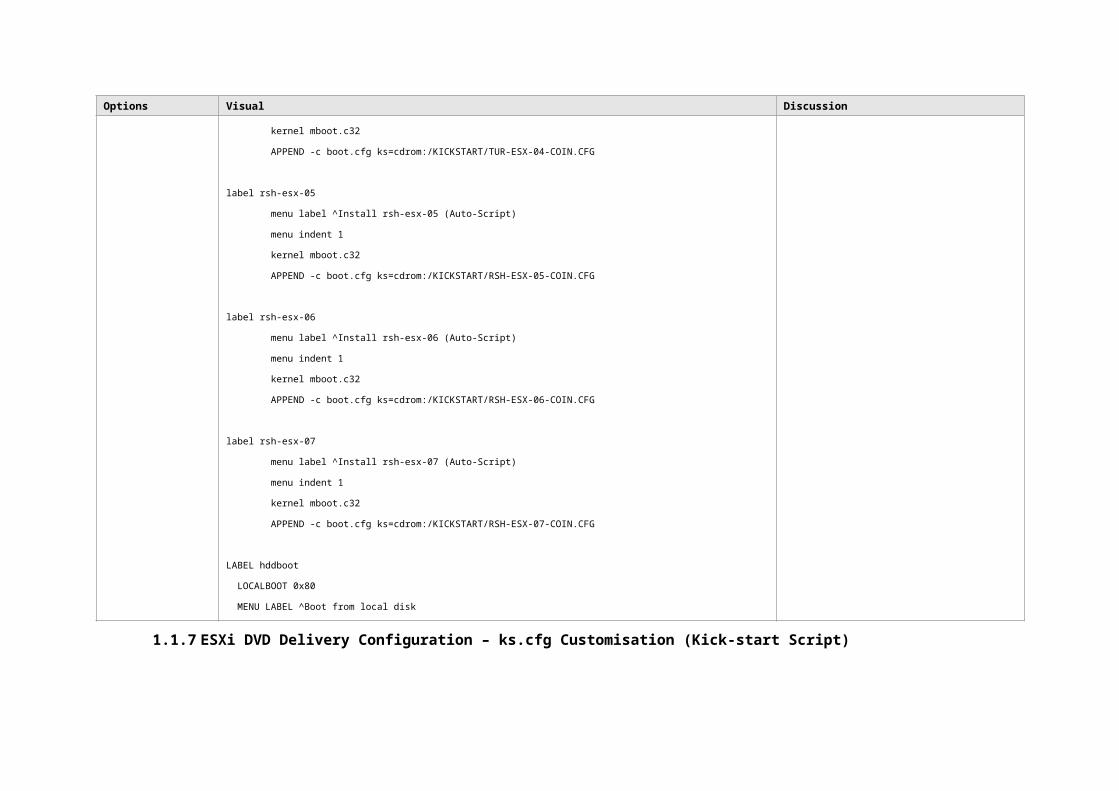
label rsh-esx-05 menu label ^Install rsh-esx-05 (Auto-Script) menu indent 1 kernel mboot.c32 APPEND -c boot.cfg ks=cdrom:/KICKSTART/RSH-ESX-05-COIN.CFG
label rsh-esx-06 menu label ^Install rsh-esx-06 (Auto-Script) menu indent 1 kernel mboot.c32 APPEND -c boot.cfg ks=cdrom:/KICKSTART/RSH-ESX-06-COIN.CFG
Options Visual Discussion
label rsh-esx-07 menu label ^Install rsh-esx-07 (Auto-Script) menu indent 1 kernel mboot.c32 APPEND -c boot.cfg ks=cdrom:/KICKSTART/RSH-ESX-07-COIN.CFG
LABEL hddboot LOCALBOOT 0x80 MENU LABEL ^Boot from local disk
1.1.7 ESXi DVD Delivery Configuration – ks.cfg Customisation (Kick-start Script)
1. Make fundamental changed to the default configuration:
a. VMware EULA b. Configure Partitioning c. Installation media location d. Root password and Authentication e. Reboot after installationf. %include Sectiong. Specifies %pre scripth. Set default Management Interface and IPV4 addressing (Static)i. Specifies script to run after ESXi is installed and before the reboot (%post)j. Save the firewall configuration on the post?k. Specifies script to run after ESXi installation (%firstboot)l. Set Script Variable for use in scriptm. Rename local datastore to something more meaningfuln. Assign VMware licenseo. Global vSwitch configurationp. Enable management interfaceq. Syslog Configurationr. Change the individual syslog rotation counts. NTP Configurationt. FIREWALL Configurationu. Security Hardeningv. Create SSH Bannerw. VM Autostart Rules #configure virtual machine autostart rules (Auto-poweron feature broken with free license)x. Update ESXi Host
Scripted Installation Configuration parametersy. Backup ESXi configuration to persist changesz. Copy %first boot script logs to persisted Datastoreaa. VM Import Utility (to be completed)bb. Reboot
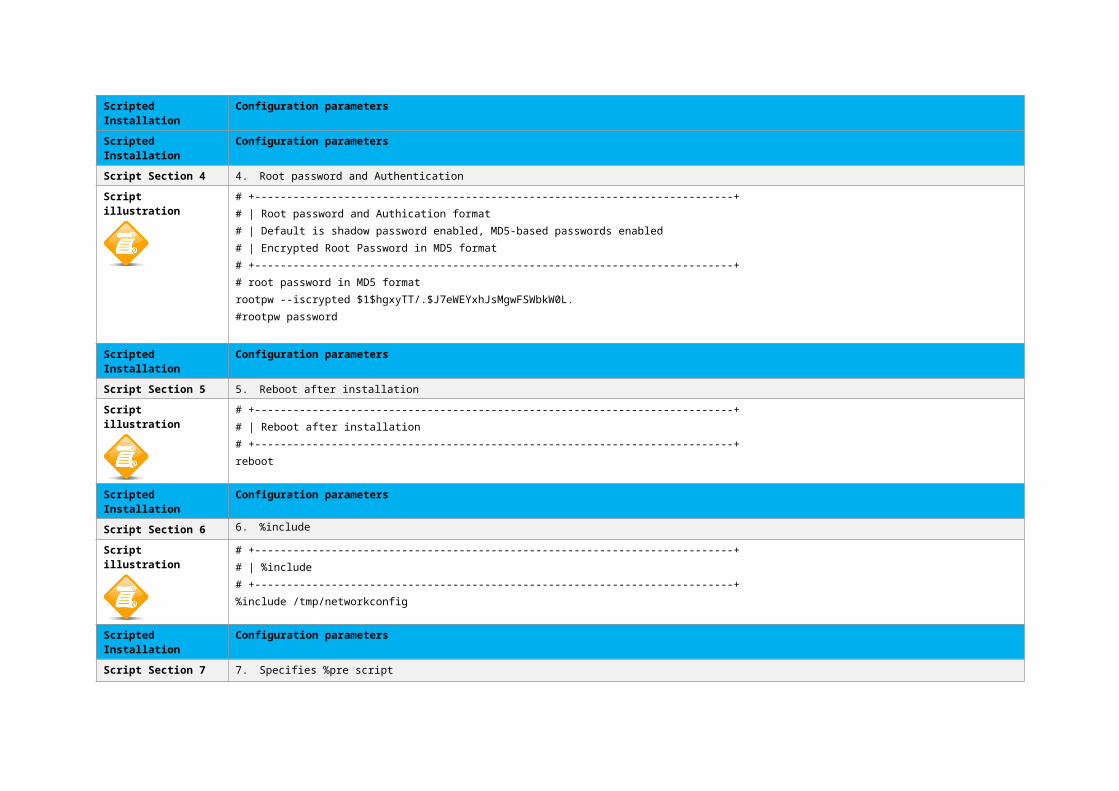
Script illustration # +---------------------------------------------------------------------------+# | Disk Partitioning# | Clear all partitions in first detected disk and overwrite any VMFS # | partitions on the specified drives.# +---------------------------------------------------------------------------+clearpart --firstdisk –overwritevmfs
Scripted Installation Configuration parametersScript Section 3 3. Installation media location
Script illustration # +---------------------------------------------------------------------------+# | Installation media location# +---------------------------------------------------------------------------+# Fresh installation on first disk and overwrite an existing VMFS datastore
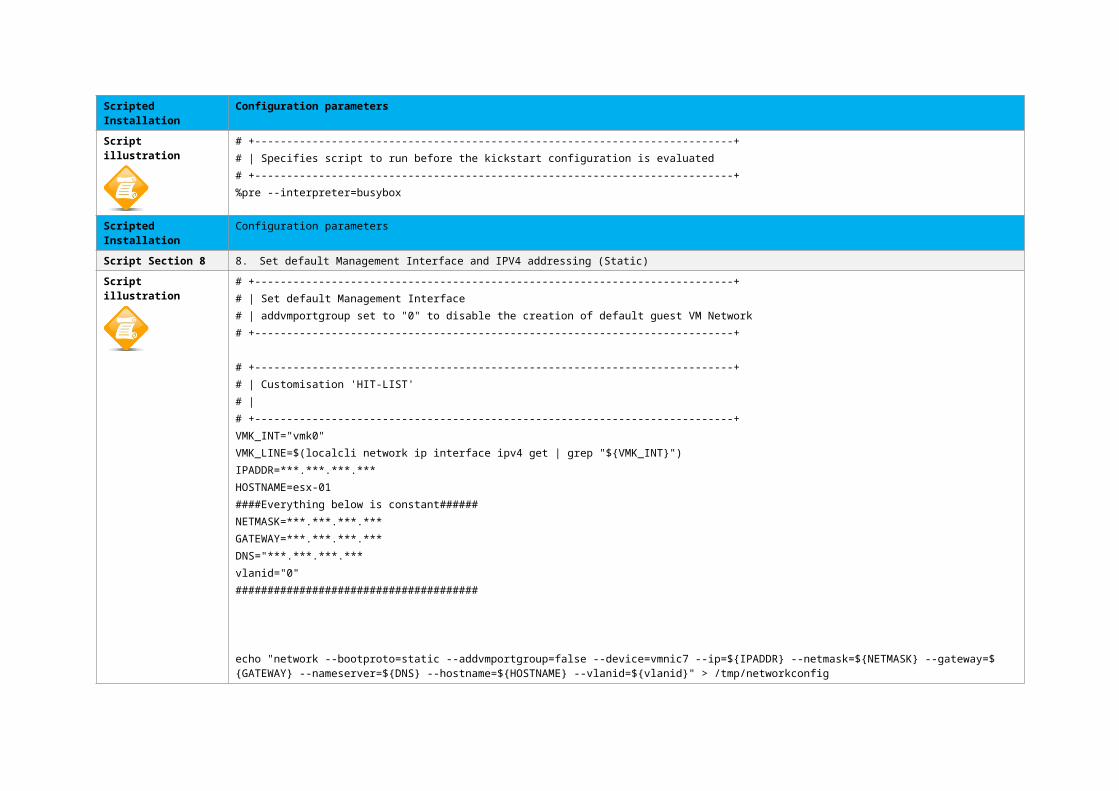
Script illustration # +---------------------------------------------------------------------------+# | Specifies script to run before the kickstart configuration is evaluated# +---------------------------------------------------------------------------+%pre --interpreter=busybox
Scripted Installation Configuration parameters
Scripted Installation Configuration parametersScript Section 8 8. Set default Management Interface and IPV4 addressing (Static)
Script illustration # +---------------------------------------------------------------------------+# | Set default Management Interface# | addvmportgroup set to "0" to disable the creation of default guest VM Network# +---------------------------------------------------------------------------+
# +---------------------------------------------------------------------------+# | Customisation 'HIT-LIST'# | # +---------------------------------------------------------------------------+VMK_INT="vmk0"VMK_LINE=$(localcli network ip interface ipv4 get | grep "${VMK_INT}")IPADDR=***.***.***.***HOSTNAME=esx-01####Everything below is constant######NETMASK=***.***.***.***GATEWAY=***.***.***.***DNS="***.***.***.***vlanid="0"######################################
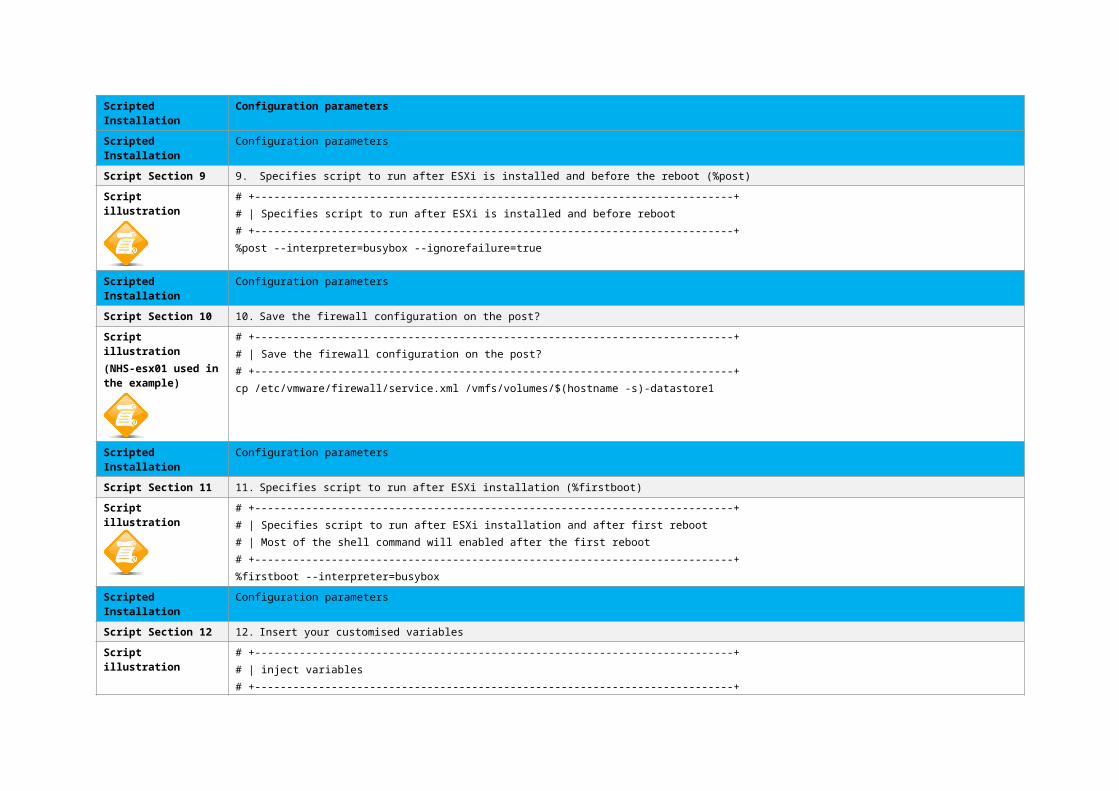
Script Section 9 9. Specifies script to run after ESXi is installed and before the reboot (%post)
Script illustration # +---------------------------------------------------------------------------+# | Specifies script to run after ESXi is installed and before reboot# +---------------------------------------------------------------------------+%post --interpreter=busybox --ignorefailure=true
Scripted Installation Configuration parameters
Script Section 10 10. Save the firewall configuration on the post?
Script illustration(NHS-esx01 used in the example)
# +---------------------------------------------------------------------------+# | Save the firewall configuration on the post?# +---------------------------------------------------------------------------+
Script Section 11 11. Specifies script to run after ESXi installation (%firstboot)
Script illustration # +---------------------------------------------------------------------------+# | Specifies script to run after ESXi installation and after first reboot# | Most of the shell command will enabled after the first reboot# +---------------------------------------------------------------------------+%firstboot --interpreter=busybox
Scripted Installation Configuration parameters
Script Section 12 12. Insert your customised variables
Script illustration # +---------------------------------------------------------------------------+# | inject variables# +---------------------------------------------------------------------------+####Section to be edited for each server#####IPADDR-MGMT2="***.***.***.***"VMK1_IPADDR="***.***.***.***"VMK2_IPADDR="***.***.***.***"VMK3_IPADDR="***.***.***.***"#####Everything below stays constant#############################NETMASK-MGMT2="255.255.255.0"DNS-SERVER-1="***.***.***.***"DNS-SERVER-2="***.***.***.***"DNS-SERVER-3="***.***.***.***"DNS-SERVER-4="***.***.***.***"
Script Section 13,14 13. Set Script Variable for use in script14. rename local datastore to something more meaningful
Script illustration # +---------------------------------------------------------------------------+# | Set Script Variable for use in script# | Variable can only be define after the first reboot and when the full bshell# | is in place# +---------------------------------------------------------------------------+
# +---------------------------------------------------------------------------+# | rename local datastore to something more meaningful# +---------------------------------------------------------------------------+vim-cmd hostsvc/datastore/rename datastore1 "$(hostname -s)-datastore1"
# +---------------------------------------------------------------------------+# | attach vmnic1,3,5 to vSwitch0# +---------------------------------------------------------------------------+esxcli network vswitch standard uplink add --uplink-name vmnic1 --vswitch-name vSwitch0esxcli network vswitch standard uplink add --uplink-name vmnic3 --vswitch-name vSwitch0esxcli network vswitch standard uplink add --uplink-name vmnic5 --vswitch-name vSwitch0
# +---------------------------------------------------------------------------+# | remove default VM Network port group if required ?# +---------------------------------------------------------------------------+esxcli network vswitch standard portgroup remove --portgroup-name="VM Network" --vswitch-name vSwitch2
# +---------------------------------------------------------------------------+# | configure mtu + cdp# +---------------------------------------------------------------------------+esxcli network vswitch standard set --mtu 1500 --cdp-status both --vswitch-name vSwitch0
Scripted Installation Configuration parameters# +---------------------------------------------------------------------------+# | edited - configure active and standby uplinks for vSwitch0# +---------------------------------------------------------------------------+ esxcli network vswitch standard policy failover set --active-uplinks vmnic1,vmnic3,vmnic5,vmnic7 --vswitch-name vSwitch0
# +---------------------------------------------------------------------------+# | edited configure failure detection + load balancing (could have appended to previous line)# +---------------------------------------------------------------------------+ esxcli network vswitch standard policy failover set --failback yes --failure-detection link --load-balancing iphash --notify-switches yes --vswitch-name vSwitch0
# +---------------------------------------------------------------------------+# | configure portgroup (on vSwitch0) VM-Network# +---------------------------------------------------------------------------+esxcli network vswitch standard portgroup add --portgroup-name VM-Network --vswitch-name vSwitch0
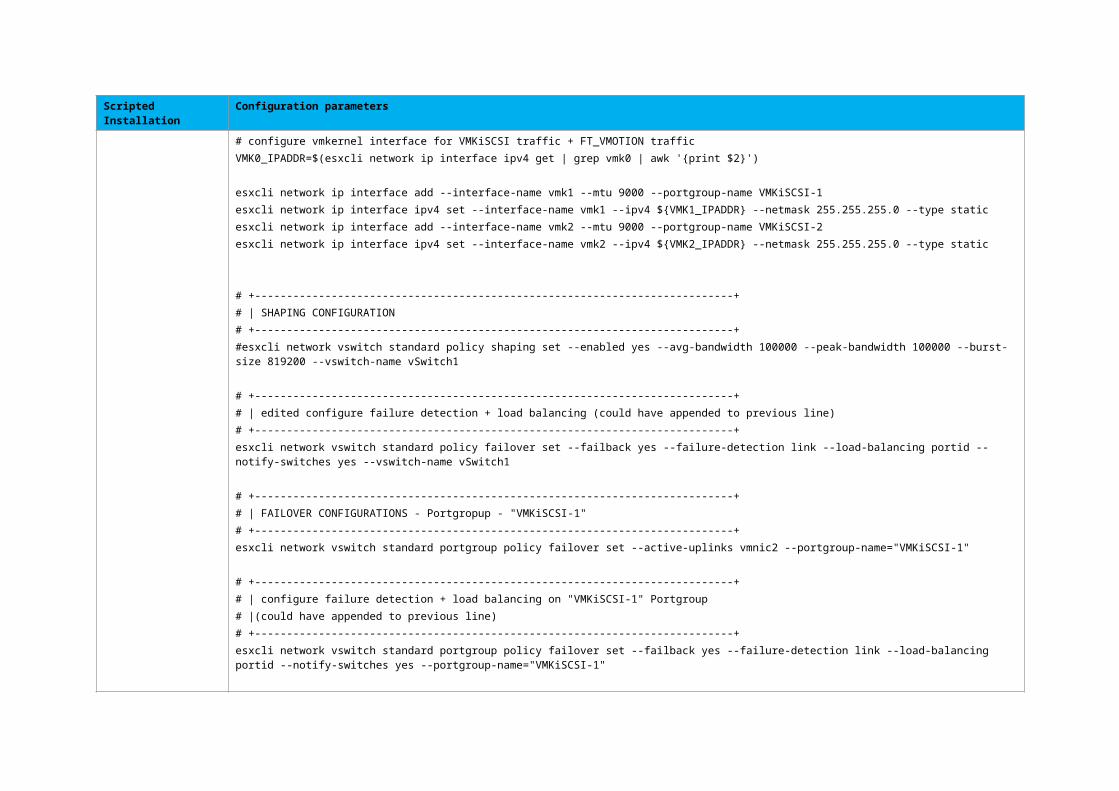
# +---------------------------------------------------------------------------+# | SECURITY CONFIGURATION# +---------------------------------------------------------------------------+esxcli network vswitch standard policy security set --allow-forged-transmits no --allow-mac-change no --allow-promiscuous no --vswitch-name vSwitch0
# +---------------------------------------------------------------------------+# | attach vmnic4 to vSwitch1# +---------------------------------------------------------------------------+esxcli network vswitch standard uplink add --uplink-name vmnic2 --vswitch-name vSwitch1 esxcli network vswitch standard uplink add --uplink-name vmnic6 --vswitch-name vSwitch1
# +---------------------------------------------------------------------------+# | configure mtu + cdp# +---------------------------------------------------------------------------+esxcli network vswitch standard set --mtu 9000 --cdp-status both --vswitch-name vSwitch1
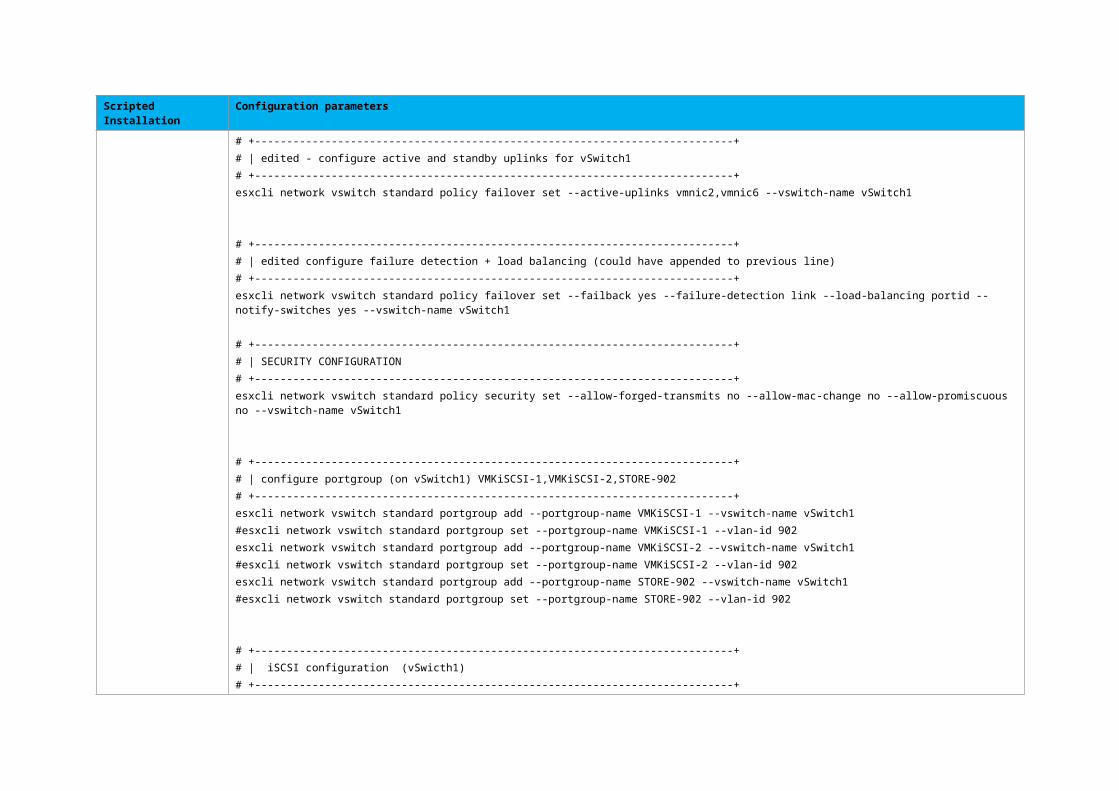
# +---------------------------------------------------------------------------+# | edited - configure active and standby uplinks for vSwitch1# +---------------------------------------------------------------------------+ esxcli network vswitch standard policy failover set --active-uplinks vmnic2,vmnic6 --vswitch-name vSwitch1
# +---------------------------------------------------------------------------+# | edited configure failure detection + load balancing (could have appended to previous line)# +---------------------------------------------------------------------------+ esxcli network vswitch standard policy failover set --failback yes --failure-detection link --load-balancing portid --notify-switches yes --vswitch-name vSwitch1
# +---------------------------------------------------------------------------+# | SECURITY CONFIGURATION# +---------------------------------------------------------------------------+esxcli network vswitch standard policy security set --allow-forged-transmits no --allow-mac-change no --allow-promiscuous no --vswitch-name vSwitch1
# +---------------------------------------------------------------------------+# | configure portgroup (on vSwitch1) VMKiSCSI-1,VMKiSCSI-2,STORE-902# +---------------------------------------------------------------------------+esxcli network vswitch standard portgroup add --portgroup-name VMKiSCSI-1 --vswitch-name vSwitch1#esxcli network vswitch standard portgroup set --portgroup-name VMKiSCSI-1 --vlan-id 902esxcli network vswitch standard portgroup add --portgroup-name VMKiSCSI-2 --vswitch-name vSwitch1
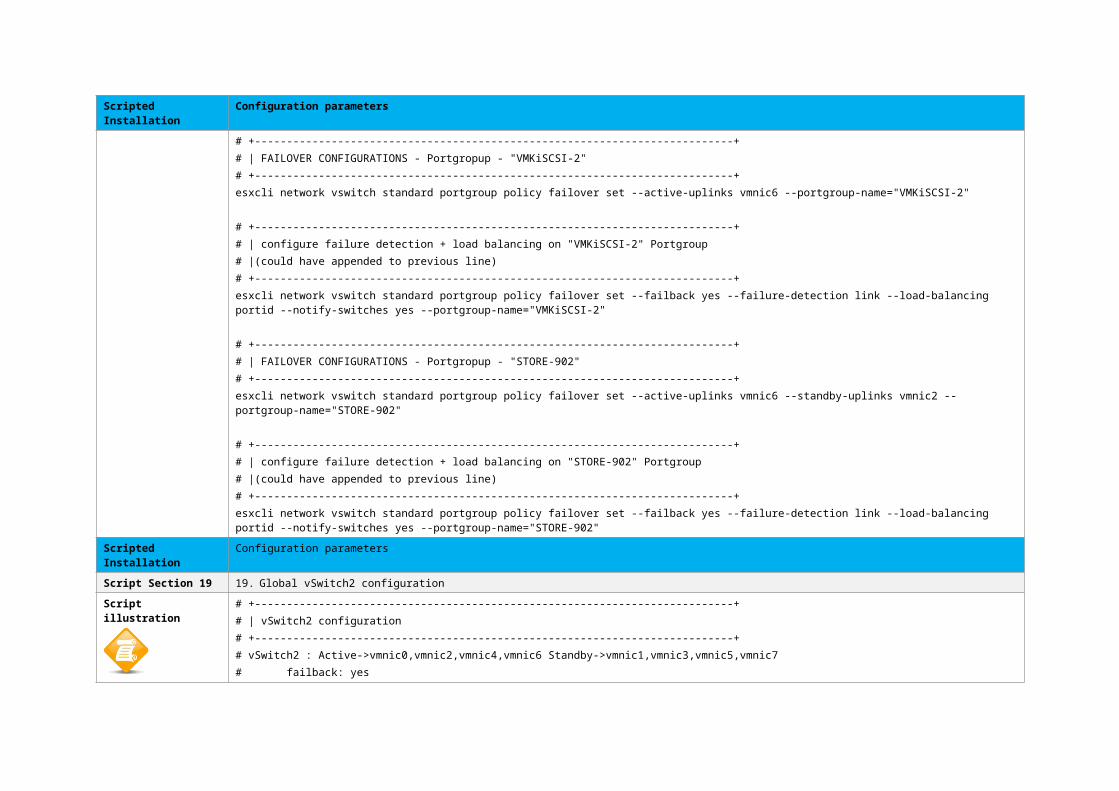
Scripted Installation Configuration parameters#esxcli network vswitch standard portgroup set --portgroup-name VMKiSCSI-2 --vlan-id 902esxcli network vswitch standard portgroup add --portgroup-name STORE-902 --vswitch-name vSwitch1#esxcli network vswitch standard portgroup set --portgroup-name STORE-902 --vlan-id 902
# +---------------------------------------------------------------------------+# | iSCSI configuration (vSwicth1)# +---------------------------------------------------------------------------+# configure vmkernel interface for VMKiSCSI traffic + FT_VMOTION trafficVMK0_IPADDR=$(esxcli network ip interface ipv4 get | grep vmk0 | awk '{print $2}')
esxcli network ip interface add --interface-name vmk1 --mtu 9000 --portgroup-name VMKiSCSI-1esxcli network ip interface ipv4 set --interface-name vmk1 --ipv4 ${VMK1_IPADDR} --netmask 255.255.255.0 --type staticesxcli network ip interface add --interface-name vmk2 --mtu 9000 --portgroup-name VMKiSCSI-2esxcli network ip interface ipv4 set --interface-name vmk2 --ipv4 ${VMK2_IPADDR} --netmask 255.255.255.0 --type static
# +---------------------------------------------------------------------------+# | attach vmnic0/4 to vSwitch2# +---------------------------------------------------------------------------+esxcli network vswitch standard uplink add --uplink-name vmnic0 --vswitch-name vSwitch2esxcli network vswitch standard uplink add --uplink-name vmnic4 --vswitch-name vSwitch2
# +---------------------------------------------------------------------------+# | configure mtu + cdp# +---------------------------------------------------------------------------+esxcli network vswitch standard set --mtu 9000 --cdp-status both --vswitch-name vSwitch2
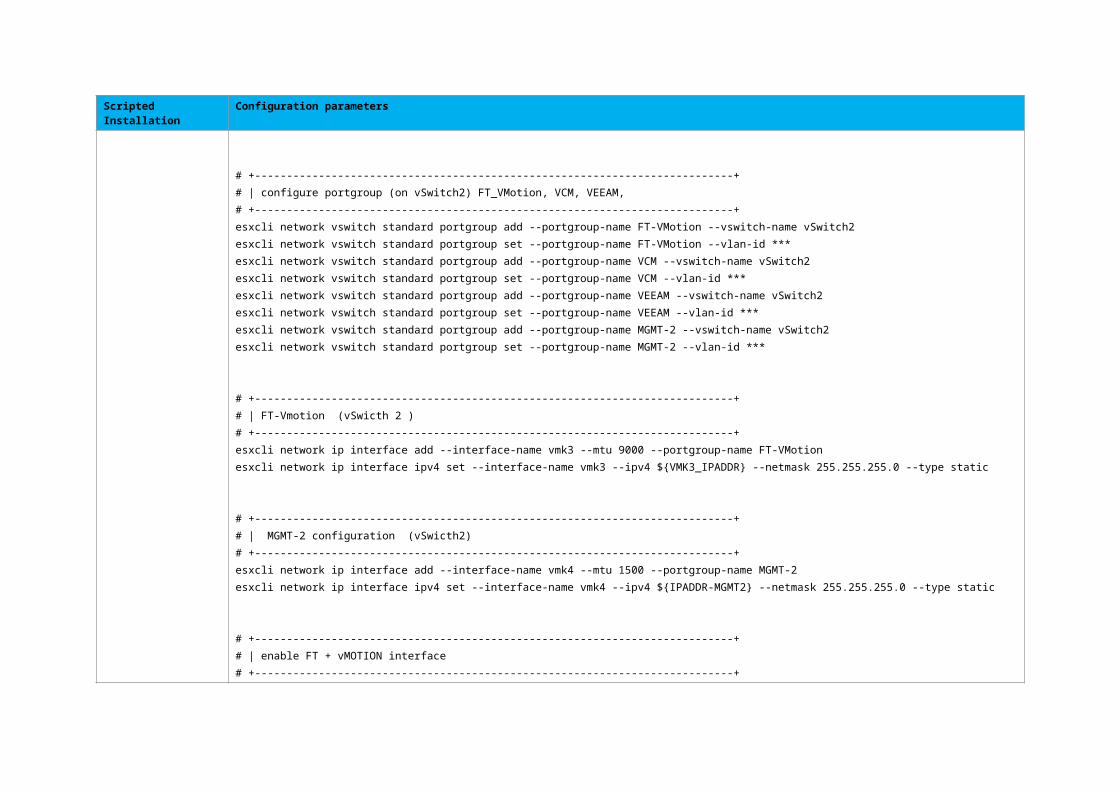
# +---------------------------------------------------------------------------+# | configure portgroup (on vSwitch2) FT_VMotion, VCM, VEEAM,# +---------------------------------------------------------------------------+esxcli network vswitch standard portgroup add --portgroup-name FT-VMotion --vswitch-name vSwitch2esxcli network vswitch standard portgroup set --portgroup-name FT-VMotion --vlan-id ***esxcli network vswitch standard portgroup add --portgroup-name VCM --vswitch-name vSwitch2esxcli network vswitch standard portgroup set --portgroup-name VCM --vlan-id ***esxcli network vswitch standard portgroup add --portgroup-name VEEAM --vswitch-name vSwitch2esxcli network vswitch standard portgroup set --portgroup-name VEEAM --vlan-id ***esxcli network vswitch standard portgroup add --portgroup-name MGMT-2 --vswitch-name vSwitch2esxcli network vswitch standard portgroup set --portgroup-name MGMT-2 --vlan-id ***
# +---------------------------------------------------------------------------+# | edited - configure active and standby uplinks for vSwitch2# +---------------------------------------------------------------------------+ esxcli network vswitch standard policy failover set --active-uplinks vmnic0,vmnic4 --vswitch-name vSwitch2
# +---------------------------------------------------------------------------+# | edited configure failure detection + load balancing (could have appended to previous line)# +---------------------------------------------------------------------------+ esxcli network vswitch standard policy failover set --failback yes --failure-detection link --load-balancing portid --notify-switches yes --vswitch-name vSwitch2
# +---------------------------------------------------------------------------+# | SECURITY CONFIGURATION vSwitch2# +---------------------------------------------------------------------------+esxcli network vswitch standard policy security set --allow-forged-transmits no --allow-mac-change no --allow-promiscuous no --vswitch-name vSwitch2
# +---------------------------------------------------------------------------+# | configure failure detection + load balancing on "MGMT-2" Portgroup # |(could have appended to previous line)# +---------------------------------------------------------------------------+esxcli network vswitch standard portgroup policy failover set --failback yes --failure-detection link --load-balancing portid --notify-switches yes --portgroup-name="MGMT-2"
Scripted Installation Configuration parameters
Script Section 20 20. ISCSI storage Configuration
Script illustration ##-------------------------------------------------------------------------- ## Setup iSCSI Storage ##-------------------------------------------------------------------------- esxcli iscsi software set --enabled=true# search for hba card number after enabling of software iscsiISCSI_ADT=$(esxcli iscsi adapter list | grep -i Software | cut -d ' ' -f 1)
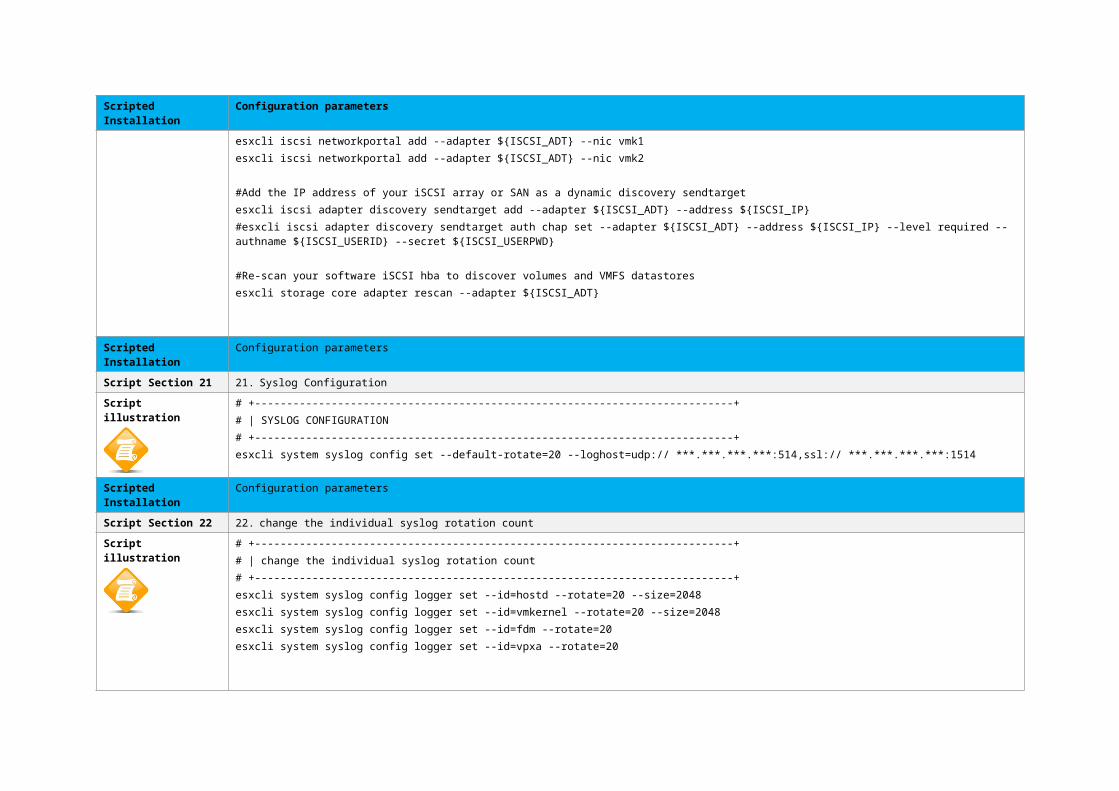
#Bond each of the VMkernel NICs to the software iSCSI HBAesxcli iscsi networkportal add --adapter ${ISCSI_ADT} --nic vmk1esxcli iscsi networkportal add --adapter ${ISCSI_ADT} --nic vmk2
#Add the IP address of your iSCSI array or SAN as a dynamic discovery sendtargetesxcli iscsi adapter discovery sendtarget add --adapter ${ISCSI_ADT} --address ${ISCSI_IP}#esxcli iscsi adapter discovery sendtarget auth chap set --adapter ${ISCSI_ADT} --address ${ISCSI_IP} --level required --authname ${ISCSI_USERID} --secret $
#Re-scan your software iSCSI hba to discover volumes and VMFS datastoresesxcli storage core adapter rescan --adapter ${ISCSI_ADT}
Scripted Installation Configuration parameters
Script Section 21 21. Syslog Configuration
Script illustration # +---------------------------------------------------------------------------+# | SYSLOG CONFIGURATION# +---------------------------------------------------------------------------+esxcli system syslog config set --default-rotate=20 --loghost=udp:// ***.***.***.***:514,ssl:// ***.***.***.***:1514
Scripted Installation Configuration parameters
Script Section 22 22. change the individual syslog rotation count
Script illustration # +---------------------------------------------------------------------------+# | change the individual syslog rotation count# +---------------------------------------------------------------------------+esxcli system syslog config logger set --id=hostd --rotate=20 --size=2048esxcli system syslog config logger set --id=vmkernel --rotate=20 --size=2048esxcli system syslog config logger set --id=fdm --rotate=20esxcli system syslog config logger set --id=vpxa --rotate=20
Script Section 26 26. Create scratch disk for SSD ESXi
Script illustration # +---------------------------------------------------------------------------+# | Create /scratch directory for ESXi hosts# +---------------------------------------------------------------------------+# Generate a new scratch directory for this host on a Datastorescratchdirectory=/vmfs/volumes/Datastore_08_2TB_THIN/Scratch/.locker-$(hostname 2> /dev/null)-$(esxcfg-info -b 2> /dev/null)#### for ESX hosts in RSH######scratchdirectory=/vmfs/volumes/Datastore_RECO1_1TB/Scratch/.locker-$(hostname 2> /dev/null)-$(esxcfg-info -b 2> /dev/null)
# Create the scratch directorymkdir -p $scratchdirectory
# Change the advanced configuration optionvim-cmd hostsvc/advopt/update ScratchConfig.ConfiguredScratchLocation string $scratchdirectory
Scripted Installation Configuration parameters
Script Section 27 27. Hardware Virtualization to run nested 64bit Guests + Hyper-V VM
Script illustration # +---------------------------------------------------------------------------+# | # edited - supress ESXi Shell shell warning - Thanks to Duncan (http://www.yellow-bricks.com/2011/07/21/esxi-5-suppressing-the-localremote-shell-warning/)# +---------------------------------------------------------------------------+esxcli system settings advanced set -o /UserVars/SuppressShellWarning -i 1
Scripted Installation Configuration parameters
Script Section 29 29. Create SSH Banner
Script illustration # +---------------------------------------------------------------------------+# | Create SSH Banner# +---------------------------------------------------------------------------+/bin/cat > /etc/banner.new <<SSHEOF${INDENTATION:-}======================================================${INDENTATION:-}= NHS HOSPITAL =${INDENTATION:-}======================================================${INDENTATION:-}${INDENTATION:-}======================================================${INDENTATION:-}= WARNING: UNAUTHORIZED USE IS PROHIBITED =${INDENTATION:-}= ----------------------------------------- =${INDENTATION:-}= Property of NHS Hospital , and should only =${INDENTATION:-}= be accessed by authorized NHS employees. =${INDENTATION:-}= Do not attempt to login unless you are an =${INDENTATION:-}= authorized user. =${INDENTATION:-}= =${INDENTATION:-}= Any authorized or unauthorized access and use, =${INDENTATION:-}= will be monitored and anyone using this system =${INDENTATION:-}= expressly consents to such monitoring. If such =${INDENTATION:-}= monitoring reveals possible envidence of criminal=
${INDENTATION:-}= activity, such evidence will be provided to law =${INDENTATION:-}= enforcement personnel and can result in criminal =${INDENTATION:-}= or civil prosecution under applicable law of =${INDENTATION:-}= the United Kingdom (UK). =${INDENTATION:-}======================================================SSHEOF# copy new banner file to overwrite /etc/issue (esxi 5 store it's banner file here)cp /etc/banner.new /etc/issue
Script illustration # +---------------------------------------------------------------------------+# |DNS Configuration# +---------------------------------------------------------------------------+esxcli network ip dns server add --server=${DNS-SERVER-1}esxcli network ip dns server add --server=${DNS-SERVER-2}
Scripted Installation Configuration parameters
Script Section 32 32. add ESXi Host to the AD-Domin
Script illustration # +---------------------------------------------------------------------------+# |add ESXi Host to the AD-Doamin# +---------------------------------------------------------------------------+vicfg-authconfig --server=${DNS-SERVER-1} --username=${ADMIN-USER}--password=${ADMIN-USER-PW} --authscheme AD --joindomain ${AD-DOMAIN} --adusername=${NHS-TR-AD-USER} --adpassword=${NHS-TR-AD-USER-PW}
##-------------------------------------------------------------------------- ## End of kickstart Script##--------------------------------------------------------------------------