+ All Categories
Home > Documents > Installing and Configuring Insight Dynamics – VSE 4.1 …h41379. · BL860c, BL870c and HPVM...

Installing and Configuring Insight Dynamics – VSE 4.1 …h41379. · BL860c, BL870c and HPVM...

Date post: 06-Sep-2018
Category:
Upload: haliem
View: 218 times
Download: 0 times
Share this document with a friend
35
Table of Contents Introduction ......................................................................................................................................... 2 ID–VSE Features Available for OpenVMS ............................................................................................... 2 Windows CMS Requirements ................................................................................................................ 2 Managed Node Requirements............................................................................................................... 3 Assumptions ........................................................................................................................................ 4 Additional Software Setup on Windows CMS ......................................................................................... 4 Downloading ID–VSE 4.1 for Windows CMS ......................................................................................... 4 Mounting Insight Software DVDs in Virtual DVD drives ............................................................................. 5 Launching the HP Insight Software Welcome Screen ................................................................................ 9 Verifying your Environment with Insight Software Advisor ....................................................................... 10 Performing ID–VSE 4.1 Installation with the Integrated Installer ................................................................ 12 Installing VSE 4.1 Update 1 Patch ....................................................................................................... 24 ID–VSE Licensing for Integrity Managed Nodes ..................................................................................... 24 Setting up WBEM on the OpenVMS System.......................................................................................... 24 Verifying WBEM on the HP-UX VM Host ............................................................................................... 27 Setting up gWLM Agent on the OpenVMS System................................................................................. 28 Updating SSH Configuration on OpenVMS systems ............................................................................... 29 Discovering an HP-UX VM Host and its OpenVMS guests on HP SIM ....................................................... 30 Updating HP SIM System Properties for OpenVMS Systems .................................................................... 32 Launching the ID–VSE Virtualization Manager ....................................................................................... 34 For More Information ......................................................................................................................... 35 Installing and Configuring Insight Dynamics VSE 4.1 on a Windows CMS for OpenVMS Integrity managed nodes
Transcript

Table of Contents

Introduction......................................................................................................................................... 2

ID–VSE Features Available for OpenVMS ............................................................................................... 2

Windows CMS Requirements................................................................................................................ 2

Managed Node Requirements............................................................................................................... 3

Assumptions........................................................................................................................................ 4

Additional Software Setup on Windows CMS......................................................................................... 4

Downloading ID–VSE 4.1 for Windows CMS ......................................................................................... 4

Mounting Insight Software DVDs in Virtual DVD drives ............................................................................. 5

Launching the HP Insight Software Welcome Screen ................................................................................ 9

Verifying your Environment with Insight Software Advisor ....................................................................... 10

Performing ID–VSE 4.1 Installation with the Integrated Installer................................................................ 12

Installing VSE 4.1 Update 1 Patch ....................................................................................................... 24

ID–VSE Licensing for Integrity Managed Nodes..................................................................................... 24

Setting up WBEM on the OpenVMS System.......................................................................................... 24

Verifying WBEM on the HP-UX VM Host............................................................................................... 27

Setting up gWLM Agent on the OpenVMS System................................................................................. 28

Updating SSH Configuration on OpenVMS systems............................................................................... 29

Discovering an HP-UX VM Host and its OpenVMS guests on HP SIM ....................................................... 30

Updating HP SIM System Properties for OpenVMS Systems .................................................................... 32

Launching the ID–VSE Virtualization Manager....................................................................................... 34

For More Information ......................................................................................................................... 35

Installing and Configuring Insight Dynamics – VSE 4.1

on a Windows CMS for OpenVMS Integrity managed

nodes

2

Introduction

This cookbook is intended to help a user to download, install and configure Insight Dynamics – VSE

(ID–VSE) 4.1 on a Windows Server 2003/2008 (32-bit) CMS (Central Management Station) for

managing OpenVMS V8.3-1H1 and V8.4 Integrity servers.

Note: This document is released specifically for OpenVMS Version 8.4 field test purposes.

ID–VSE Features Available for OpenVMS

The following features of ID–VSE are currently available for OpenVMS:

Capacity Advisor (whole-OS workloads only)

Virtualization Manager

Global Workload Manager (gWLM)

NOTE: ID–VSE 4.1 includes gWLM CMS 4.1. The current version of gWLM agent on OpenVMS is

4.0. The gWLM CMS 4.1 application is backward compatible with gWLM agent 4.0. However,

product features that are new to gWLM CMS 4.1 are not supported with OpenVMS gWLM agent

4.0.

Windows CMS Requirements

The Windows Central Management Station (CMS) to HP SIM and ID–VSE has the following

requirements:

Server: HP ProLiant BladeSystem c-Class or p-Class server blades, or HP ProLiant ML or DL

300, 500, and 700 G3 or higher recommended

Processors: 2 or more processor cores; at least 1.6 GHz. (recommended 2.0 GHz or

higher)

RAM: At least 2 GB RAM; (recommended 4 - 6 GB)

Operating System: One of the following 32-bit Windows operating systems with the

specified service pack level:

o Windows Server 2008 Standard (English, Japanese)

o Windows Server 2008 Enterprise (English, Japanese)

o Windows Server 2003 Standard SP2 (English, French, Italian, German, Spanish,

Japanese)

o Windows Server 2003 Enterprise SP2 (English, French, Italian, German, Spanish,

Japanese)

o Windows Server 2003 R2 Standard SP2

o Windows Server 2003 R2 Enterprise SP2

Virtualization Platforms: VMware ESX 3.0.1, 3.0.2 Update 1, 3.0.3, or ESX 3.5

Update 1 (or later) guest running a supported Windows CMS operating system

Free Disk Space: At least 20 GB free disk space with NTFS file system

NOTE: Ensure that NTFS compression and encryption is turned off on the target installation disk and

system disk.

Additional Software Requirements for ID–VSE: The following are additional

software requirements to be satisfied on the Windows CMS for ID–VSE 4.1:

o Microsoft .NET Framework 2.0

o SNMP Service and SNMP Trap Service

3

o Microsoft iSCSI Initiator 2.05, 2.06 or 2.07 (for Windows Server 2003 only)

o TCP/IP with DNS installed so that system names must resolve to an IP address. It is

necessary that IP addresses must resolve to system names

CMS Database: Microsoft SQL Server 2008, Microsoft SQL Server 2005 SP2, or

Microsoft SQL Server 2005 Express Edition SP2

Browsers: The following web browsers can be used to connect to ID–VSE 4.1 running on

the Windows CMS:

o Microsoft Internet Explorer 6.0 SP2

o Microsoft Internet Explorer 7.0

o Mozilla Firefox 2.0

o Mozilla Firefox 3.0

Managed Node Requirements

The following are the OpenVMS managed-node requirements for using ID–VSE:

Operating Systems:

o OpenVMS V8.3-1H1 or V8.4 running on HP Integrity servers

o OpenVMS V8.4 running as a guest on HP Integrity VM

WBEM Services and Providers:

o OpenVMS V8.3-1H1: WBEM Services 2.9-1 and WBEM Providers 1.7-16

o OpenVMS V8.4: WBEM Services 2.9-2 and WBEM Providers 2.0-0

NOTE: Capacity Advisor and Virtualization Manager collect management and utilization data

from WBEM Providers running on the managed node. WBEM Providers for OpenVMS is

supported on the following HP Integrity systems:

o WBEM Providers 1.7-16 for OpenVMS V8.3-1H1 is supported on rx3600,

rx6600, BL860c, and BL870c.

o WBEM Providers 2.0-0 for OpenVMS V8.4 is supported on rx1620, rx2600,

rx3600, rx4640, rx6600, rx7620, rx7640, rx8620, rx8640, Superdome,

BL860c, BL870c and HPVM guest.

gWLM Agent: For use with HP Global Workload Manager

o gWLM agent 4.0

The below table shows the installation requirements for the gWLM agent on OpenVMS

Integrity servers.

System Functionality Dependencies

for OpenVMS

V8.4

Dependencies for OpenVMS

V8.3-1H1

Cell-

based

Pset, FSS,

nPar, iCAP,

and TiCAP

WBEM

Services, iCAP

9.0

WBEM Services, iCAP 8.0 (current

shipping version) with latest iCAP

patch.

Non-cell

based

Pset and FSS None None

4

Assumptions

This cookbook makes the following assumptions:

For an OpenVMS managed node, it is assumed that:

OpenVMS OS is installed on the target Integrity system

HP TCP/IP is configured on the managed node

WBEM Services and WBEM Providers are installed

SSL is installed

Timezone is configured correctly

For an OpenVMS V8.4 as a guest operating system on HP Integrity Virtual Machines (Integrity VM), it

is assumed that:

HP-UX VM Host is setup

OpenVMS V8.4 is installed as a guest operating system

HP TCP/IP is configured on the VM Host and on the OpenVMS guest

WBEM Services and WBEM Providers are installed on the VM Host and on the OpenVMS

guest

SSL is installed on the OpenVMS guest

Timezone is configured correctly on the HP-UX VM Host and the OpenVMS guest.

The example installation of ID–VSE 4.1 used in this cookbook was performed on a Windows Server

2008 SP1 (32-bit) system. This system was not part of a Windows domain. Also, the example uses

the Microsoft SQL Server 2005 Express (the default database that comes with Insight Software 3.10)

as the CMS database.

Additional Software Setup on Windows CMS

This section provides information on additional software setup to be done on the Windows CMS for

ID–VSE 4.1.

Microsoft .NET Framework 2.0: For Windows Server 2008, this comes included with

the OS. For Windows Server 2003, download and install this software from:

http://www.microsoft.com/downloads/details.aspx?FamilyID=0856EACB-4362-4B0D-

8EDD-AAB15C5E04F5&displaylang=en.

SNMP Service and SNMP Trap Service: Ensure that SNMP Service and SNMP Trap

Service are installed and started on the CMS. Define READ/WRITE or READ/CREATE

community string for the SNMP service.

Microsoft iSCSI Initiator: For Windows Server 2008, this comes included with the OS.

For Windows Server 2003, download and install Microsoft iSCSI Initiator 2.07 (Initiator-

2.07-build3640-x86fre.exe) from:

http://www.microsoft.com/downloads/details.aspx?familyid=7A133E76-5524-4362-BAD7-

81FE6968BBA4&displaylang=en.

Downloading ID–VSE 4.1 for Windows CMS

ID–VSE 4.1 is available as part of Insight Software 3.10 DVDs. Insight Software consists of two DVD

images. You can download these DVD images onto the Windows CMS as below:

1. Visit the following website to download the DVD images:

https://h20293.www2.hp.com/portal/swdepot/try.do?productNumber=ISDVD

2. Under Product Specifications -> Software Specification list box, select the following DVD images:

5

IS 3.10 DVD1 ISO Double Layer – Apr 2009

IS 3.10 DVD2 ISO Single Layer – Apr 2009

3. Fill out the rest of the form fields on this page.

4. Read and accept the software license and warranty terms and click Next.

5. Follow the instructions provided to download the two DVD images, and copy them to the

Windows CMS.

IMPORTANT: Use HP Download Manager to download the two DVD images.

In addition, you must install the ID–VSE 4.1 Update 1 patch. To download this patch to Windows

CMS, follow these instructions:

1. Visit the following website to download the ID–VSE 4.1 Update 1 patch:

http://h18000.www1.hp.com/products/servers/management/fpdownload.html

2. At the bottom of the page, click the “VSE 4.1 Update 1” link.

3. Follow the on-screen instructions to download the patch (setupvseupdate_4_1_1.exe), and then

copy it to the Windows CMS.

Mounting Insight Software DVDs in Virtual DVD drives

You can mount and access the contents of the Insight Software DVD ISO images (without having to

burn them to DVDs) through virtual DVD drive emulation software on your Windows CMS, as below:

1. Login into the Windows CMS with the Administrator local account.

IMPORTANT: If you are connecting to the Windows CMS through Remote Desktop client, always

connect to the console session by using the “/console” option, as shown in the example below.C:\>mstsc /v:<cms-network-address> /console

2. Visit the following website to download the Microsoft Virtual CD/DVD emulation tool:

http://download.microsoft.com/download/7/b/6/7b6abd84-78414978-96f5-

bd58df02efa2/winxpvirtualcdcontrolpanel_21.exe

3. Run the above self-extractor executable and extract its contents into a temporary folder, for

example, C:\temp.

4. Open Windows Explorer, navigate to C:\temp and double-click on VCdControlTool.exe. You will

see the following application window:

6

5. Click on Driver Control… to view the Virtual CD-ROM driver Control window:

6. Click Install Driver…. On the next window select vcdrom.sys, and click Open.

7

7. The driver control window shows the virtual CD-ROM driver is installed. Click Start to start the

driver, and click OK to go back to the main window.

8. In the main window, click Add Drive to add a new drive letter for the virtual CD/DVD drive. The

below figure shows the main window after Add Drive is clicked. Here, X: is the drive letter

assigned to the virtual CD/DVD drive.

9. Select the drive letter, and click Mount to mount IS 3.10 DVD1 ISO image. You will see a file

dialog window as shown, select the ISO image to mount and click Open.

8

10. On the next Special Mount Options dialog box, click OK.

11. After the IS 3.10 DVD1 ISO image has been mounted into the virtual CD/DVD drive X:, the main

window displays the full path to the ISO image.

9

Similarly, mount IS 3.10 DVD2 ISO image into another the virtual CD/DVD drive (for example W:) by

following steps 8 to 11given above.

Launching the HP Insight Software Welcome Screen

1. Open Windows Explorer, navigate to drive X: and double-click autorun.exe.

2. You will see the software license agreement. Accept the license agreement by clicking Agree.

3. The next page displays the HP Insight Software Welcome screen.

10

Verifying your Environment with Insight Software Advisor

This section describes the steps to test and verify your environment to ensure that it meets the ID–VSE

4.1 installation pre-requisites.

1. On the HP Insight Software Welcome screen, click Run Insight Software Advisor…. to

display the Insight Software Advisor main window.

2. Click Filter…. to display the Filter Selection pop-up window. Select Filter by: Suite radio

button. Select HP Systems Insight Manager, HP Insight Dynamics suites, and Include Pre-Install

Tests. Click OK.

11

3. On the main window, Click Run Now. Insight Software Advisor may take a few minutes to

perform the selected tests. After the tests are completed, the result of each test is displayed against

each test.

12

4. If a test fails, click the particular test name (in the Test column) to view more details about the test,

possible causes for the failure, and recommendations to resolve the issue. Clicking the test result (in

the Result column) shows up the test log.

Specifically, verify that the following tests do not fail:

Minimum Processor Speed test

Minimum Memory test

Minimum Disk Space tests (for the target disk where you plan to install ID–VSE 4.1)

Microsoft .NET Framework 2.0 test

Microsoft iSCSI Initiator tests

User Access Control test

Local Administrator Privileges test

DNS and reverse-DNS tests

Supported Operating System test

SIM-related tests

SNMP-related tests

Web-browser version test

TCP/IP configuration test

Windows Firewall Configuration test

5. In case of test failures, resolve the reported issue and re-run the tests by clicking Run Now.

6. After the tests are successful, close Insight Software Advisor by clicking Close.

Performing ID–VSE 4.1 Installation with the Integrated

Installer

1. On the HP Insight Software Welcome screen, click Run Integrated Installer…. to view the

installer window. Select Customized Product List option and click Next.

13

2. On the next page, uncheck all products by selecting the Check/uncheck all check box. Then,

select the HP Virtual Server Environment Management Software check box.

3. All HP Virtual Server Environment Management Software and its dependencies get selected. The

installer will display the following message in this regard. Click OK. Click Next on the installer

window.

4. On the next page, specify the location of IS 3.10 DVD2 to the installer. In this example, IS 3.10

DVD2 is mounted at W:\. Click Next.

14

5. On the next page, the installer displays the pre-requisites for the installation. Click Next.

6. The installer verifies that the pre-requisites have been met. This may take a few minutes. After

verification is successful, the default installation directory selection is displayed on the next page.

Click Next.

15

7. If the installation directory does not exist, the installer asks for confirmation to create the directory.

Click Yes.

8. The next page requests for the service account credentials for Insight Software services. If you have

HP SIM already installed, provide the credentials used previously during HP SIM installation.

This example uses the local system Administrator account for this purpose. Specify the user account

password and click Next.

16

9. The next page displays the database configuration, with the default settings selected. If you

already have HP SIM installed, Insight Software uses the existing database; in this case, provide

the database configuration details. Click Next.

NOTE: For a new installation, the default settings will install Microsoft SQL 2005 Express on the

local system.

10. The installer sets up and configures Microsoft SQL Server 2005 Express on the local system. This

may take a few minutes.

17

11. On the next page, the automatic logon configuration for the installer is displayed. Provide the

user account password (if necessary). Click Next.

12. The next page displays proxy configuration details. Click Next without making any changes on

this screen.

18

13. The next page displays the global credentials to be used by HP SIM for discovery of managed

nodes. Provide the WBEM user account credentials of the managed nodes. Click Next.

In the below example, two user account credentials are specified – one for OpenVMS managed

nodes (native Integrity and Integrity VM guest) and one for HP-UX managed nodes hosting

OpenVMS Integrity VM guests.

14. The next page shows HP SIM discovery settings for managed node discovery. Click Next without

making any changes in this screen.

NOTE: This screen is not shown if you already have HP SIM installed.

19

15. The next page shows the location for the VSE management software data storage. Click Next

without making any changes.

The installer may prompt you for a confirmation to create a directory. Click Yes.

16. The installation summary screen shows the list of products/features that will be installed. Click

Install to begin the installation.

20

17. An installation confirmation dialog box is shown. Click Yes.

18. The installation progress is shown on the next screen.

21

19. During the HP SIM installation, the installer will request a reboot of the Windows CMS. After

reboot, the installer will automatically login into the system with the Administrator account.

If you were connected to the Windows CMS through Remote Desktop client, you will have to

reconnect to the console session after the system has rebooted, as shown in the example below:

C:\>mstsc /v:<cms-network-address> /console

20. After logging into the Windows CMS, the installer displays an error message in a dialog box,

indicating that it cannot access IS 3.10 DVD #1 through the X: drive. Do not click OK on this

dialog box until requested to do so below.

21. Use the procedure given in Mounting Insight Software DVDs in Virtual DVD drives to mount the

two Insight Software 3.10 DVD images. It is important to use the same drive letters to mount these

two DVD images, which were used in the previous boot.

In this example, X: and W: were used to mount DVD #1 and DVD #2 respectively.

22. Now click OK on the installer error message dialog box (shown in step 20 above). The

installation continues as shown below.

22

23. After all the products/features have been installed and configured, the completion is reported.

Click Next.

24. The next page reports the installation completion and also provides the location of the installation

log. Click Close. This completes the installation of VSE Management Software and its

dependencies.

23

24

Installing VSE 4.1 Update 1 Patch

After installing ID–VSE 4.1 is completed, run setupvseupdate_4_1_1.exe and follow on-screen

instructions to complete the installation.

ID–VSE Licensing for Integrity Managed Nodes

VSE 4.1 comes with a 90-day trial license out-of-the-box for all Integrity managed nodes. Hence, there

is no need to install a separate license during this period.

Setting up WBEM on the OpenVMS System

This section provides information on how to setup the WBEM on your OpenVMS system. WBEM

Services and WBEM Providers need to be configured and running on the OpenVMS system to be

able to discover the system in HP-SIM and ID–VSE. Follow these steps to configure WBEM on the

OpenVMS managed node:

1. For OpenVMS V8.4 systems, WBEM Services 2.9-2 and WBEM Providers 2.0-0 are automatically

installed with the fresh-install of the OS.

For OpenVMS V8.3-1H1, WBEM Services 2.9-1 and WBEM Providers 1.7-16 can be

downloaded and installed from here:http://h71000.www7.hp.com/openvms/products/wbem/wbem_survey.html

2. Login to the OpenVMS system with an account in the system group (UIC group 1) with full

privileges.

3. To configure and start WBEM Services, run the following command as shown in the example:

(select the default answer for all queries during this process)

$ Run SYS$SYSROOT:[WBEM_Services]WBEM_Services$Config.exeWBEM Services for OpenVMS Configuration Utility 2.90.42Copyright 2007-2008, Hewlett-Packard Company.

This utility initializes the environment requiredto run HP WBEM Services for OpenVMS (WBEMCIM) on this system.

The CIMServer process will use the following UIC: [SYSTEM].

Do you want to change this (Yes/No) [No]? [Enter]

The configuration files and repository will be placed in the followinglocation:

SYS$SPECIFIC:[WBEM_Services].

Do you want to change this location (Yes/No) [No]? [Enter]

All configuration questions have been answered.

Do you want to continue (Yes/No) [Yes]? [Enter]

%WBEMCONFIG-I-CREREPBEGIN, Create Repository Begins...%WBEMCONFIG-I-CREREPCOMPLETE, Create Repository Complete.This utility creates:

SYS$STARTUP:WBEM_Services$Startup.comwhich should be added to SYS$STARTUP:SYSTARTUP_VMS.COM.

This utility creates:SYS$STARTUP:WBEM_Services$Shutdown.com

which should be added to SYS$STARTUP:SYSHUTDWN.COM.

25

This utility creates:SYS$SYSROOT:[wbem_services]WBEM_Services$Define_Commands.com

which users who use this product can add to their login.com.

Do you want to start the CIMServer now (Yes/No) [Yes]? [Enter]%RUN-S-PROC_ID, identification of created process is 0000407C%WBEMCIM-I-SERVERWAIT, Waiting for CIMServer to start. 180 seconds

remaining...%WBEMCIM-S-STARTSTOP, CIMServer successfully started.OperatingSystem Information

Host: mgtbl4Name: OpenVMSVersion: E8.4UserLicense: Unlimited user licenseNumber of Users: 1 usersNumber of Processes: 19 processesOSCapability: 64 bitLastBootTime: Oct 22, 2009 23:10:47 (-0400)LocalDateTime: Nov 8, 2009 23:54:11 (-0400)SystemUpTime: 1471404 seconds = 17 days, 0 hrs, 43 mins, 24 secs

%RUN-S-PROC_ID, identification of created process is 00004083

4. You can start WBEM services as part of the configuration process above. Otherwise, WBEM

Services can be manually started with the below DCL command:

$ @SYS$STARTUP:WBEM_SERVICES$STARTUP.COM

5. To define the WBEM Services logicals and commands, enter the following command:

$ @SYS$COMMON:[WBEM_SERVICES]WBEM_SERVICES$DEFINE_COMMANDS.COM

6. Ensure that the CIM Server is running and verify the list of Providers installed by entering the

following command:

$ CIMPROVIDER -L -SMODULE STATUSOperatingSystemModule OKComputerSystemModule OKProcessModule OKIPProviderModule OK

7. To configure the WBEM Providers software, enter the following command:

$ @SYS$COMMON:[WBEMPROVIDERS]WBEMPROVIDERS$CONFIGURE.COM

Enter the "Primary Owner name" and "Primary owner contact" when prompted. The configuration

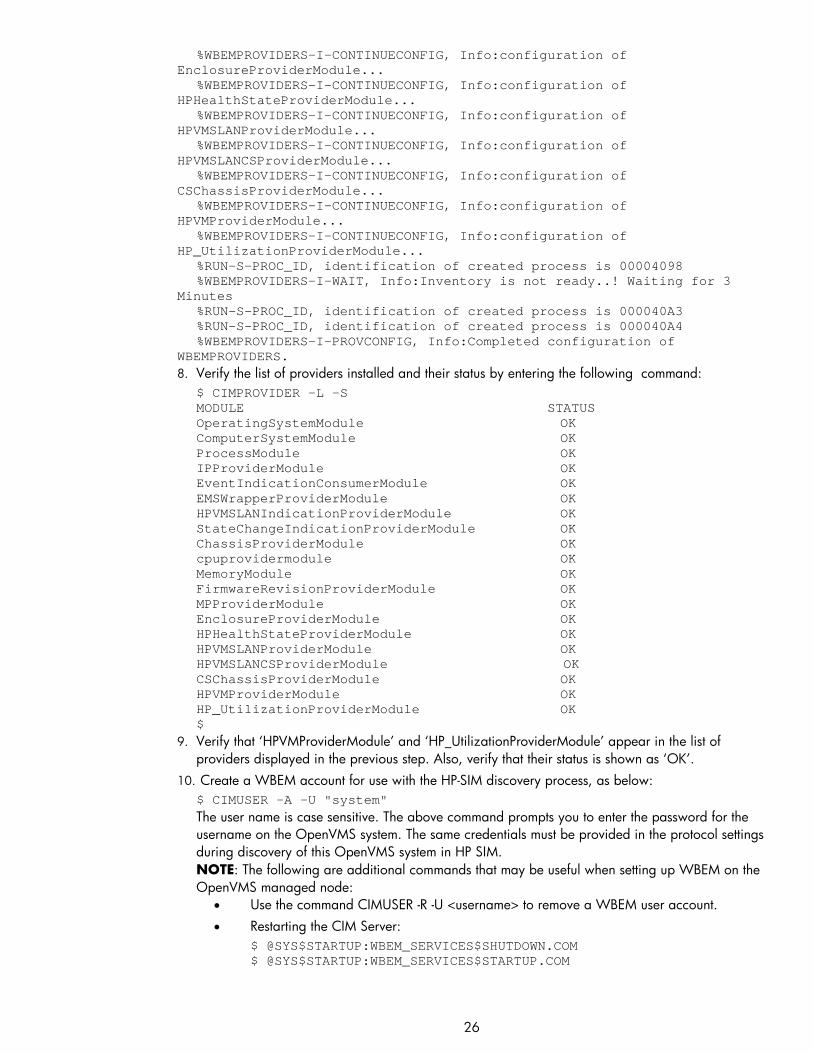
process takes a few minutes to complete. An output similar to the following is displayed:$ @SYS$COMMON:[WBEMPROVIDERS]WBEMPROVIDERS$CONFIGURE.COM%WBEMPROVIDERS-I-STARTING, Info:Starting WBEMPROVIDERS Configuration.Enter Primary Owner name of the system: systemEnter Primary owner contact information: 25166230%WBEMPROVIDERS-I-CONTINUECONFIG, Info:configuration of

EventIndicationConsumerModule...%WBEMPROVIDERS-I-CONTINUECONFIG, Info:configuration of

EMSWrapperProviderModule...%WBEMPROVIDERS-I-CONTINUECONFIG, Info:configuration of

HPVMSLANIndicationProviderModule...%WBEMPROVIDERS-I-CONTINUECONFIG, Info:configuration of

StateChangeIndicationProviderModule...%WBEMPROVIDERS-I-CONTINUECONFIG, Info:configuration of

ChassisProviderModule...%WBEMPROVIDERS-I-CONTINUECONFIG, Info:configuration of

cpuprovidermodule...%WBEMPROVIDERS-I-CONTINUECONFIG, Info:configuration of MemoryModule...%WBEMPROVIDERS-I-CONTINUECONFIG, Info:configuration of

FirmwareRevisionProviderModule...%WBEMPROVIDERS-I-CONTINUECONFIG, Info:configuration of

MPProviderModule...

26

%WBEMPROVIDERS-I-CONTINUECONFIG, Info:configuration ofEnclosureProviderModule...

%WBEMPROVIDERS-I-CONTINUECONFIG, Info:configuration ofHPHealthStateProviderModule...

%WBEMPROVIDERS-I-CONTINUECONFIG, Info:configuration ofHPVMSLANProviderModule...

%WBEMPROVIDERS-I-CONTINUECONFIG, Info:configuration ofHPVMSLANCSProviderModule...

%WBEMPROVIDERS-I-CONTINUECONFIG, Info:configuration ofCSChassisProviderModule...

%WBEMPROVIDERS-I-CONTINUECONFIG, Info:configuration ofHPVMProviderModule...

%WBEMPROVIDERS-I-CONTINUECONFIG, Info:configuration ofHP_UtilizationProviderModule...

%RUN-S-PROC_ID, identification of created process is 00004098%WBEMPROVIDERS-I-WAIT, Info:Inventory is not ready..! Waiting for 3

Minutes%RUN-S-PROC_ID, identification of created process is 000040A3%RUN-S-PROC_ID, identification of created process is 000040A4%WBEMPROVIDERS-I-PROVCONFIG, Info:Completed configuration of

WBEMPROVIDERS.

8. Verify the list of providers installed and their status by entering the following command:

$ CIMPROVIDER -L -SMODULE STATUSOperatingSystemModule OKComputerSystemModule OKProcessModule OKIPProviderModule OKEventIndicationConsumerModule OKEMSWrapperProviderModule OKHPVMSLANIndicationProviderModule OKStateChangeIndicationProviderModule OKChassisProviderModule OKcpuprovidermodule OKMemoryModule OKFirmwareRevisionProviderModule OKMPProviderModule OKEnclosureProviderModule OKHPHealthStateProviderModule OKHPVMSLANProviderModule OKHPVMSLANCSProviderModule OKCSChassisProviderModule OKHPVMProviderModule OKHP_UtilizationProviderModule OK$

9. Verify that ‘HPVMProviderModule’ and ‘HP_UtilizationProviderModule’ appear in the list of

providers displayed in the previous step. Also, verify that their status is shown as ‘OK’.

10. Create a WBEM account for use with the HP-SIM discovery process, as below:

$ CIMUSER -A -U "system"

The user name is case sensitive. The above command prompts you to enter the password for the

username on the OpenVMS system. The same credentials must be provided in the protocol settings

during discovery of this OpenVMS system in HP SIM.

NOTE: The following are additional commands that may be useful when setting up WBEM on the

OpenVMS managed node:

Use the command CIMUSER -R -U <username> to remove a WBEM user account.

Restarting the CIM Server:

$ @SYS$STARTUP:WBEM_SERVICES$SHUTDOWN.COM$ @SYS$STARTUP:WBEM_SERVICES$STARTUP.COM

27

Verifying WBEM on the HP-UX VM Host

This section applies if OpenVMS V8.4 is running as a guest OS on HP Integrity VM. In this case,

WBEM must be running on the HP-UX VM Host. Follow the steps below to verify/start WBEM on the

VM Host:

1. Logon to the HP-UX VM Host with the root account.

2. Ensure that the CIM Server is running and verify the list of Providers installed by entering the

following command:

# cimprovider -lsMODULE STATUSOperatingSystemModule OKComputerSystemModule OKProcessModule OKIPProviderModule OKDNSProviderModule OKNTPProviderModule OKNISProviderModule OKSDProviderModule OKIOTreeModule OKHPUXLVMProviderModule OKAmgrAgentProviderModule OKSGProvidersModule OKEMSHAProviderModule OKHPUX_ProviderModule OKHP_NParProviderModule OKHP_ResParProviderModule OKHewlett-Packard:CDM-ProvidersModule OKHPUXRAIDSAProviderModule OKHPUXRAIDSACSProviderModule OKHPUXRAIDSAIndicationProviderModule OKHPUXSASProviderModule OKHPUXSASCSProviderModule OKHPUXSASIndicationProviderModule OKHPUXSCSIProviderModule OKHPUXSCSICSProviderModule OKSFMProviderModule OKHP_VParProviderModule OKHPUXFCProviderModule OKHPUXFCCSProviderModule OKHPUXFCIndicationProviderModule OKFSProviderModule OKHPUXIOTreeIndicationProviderModule OKHPUXIOTreeCSProviderModule OKHPUXLANProviderModule OKHPUXLANCSProviderModule OKHPUXLANIndicationProviderModule OKHPUXStorageIndicationProviderModule OKHPUXStorageProviderModule OKHP_iCODProviderModule OKHP_iCAPProviderModule OKHP_GiCAPProviderModule OKHP_OLOSProviderModule OKHP_UtilizationProviderModule OKHPVMProviderModule OK#

3. If the above command indicates that CIM server is not running, use the following command to start

CIM server:

# cimserver

4. Verify that the cimserver process is running by entering the following command:

# ps –ef | grep cimserver

28

root 22493 1 0 Nov 9 ? 0:37/opt/wbem/lbin/cimserver

cimsrvr 22494 22493 0 Nov 9 ? 7:09 cimservermain --executor-socket 4

root 2477 1 0 Oct 15 ? 0:18/opt/wbem/lbin/cimserverd

root 8922 8895 0 22:04:55 pts/ta 0:00 grep cimserver

#

5. Verify that ‘HPVMProviderModule’ and ‘HP_UtilizationProviderModule’ appear in the list of

providers displayed by the cimprovider –ls command. Also, verify that their status is shown as

‘OK’.

6. If the HPVMProviderModule is not listed in the cimprovider –ls list , install the provider on HP UX

system by entering the following command:

# swinstall -x autoreboot=true -s /var/depots/HPVM_4.1_OVMS_FT_2T2801AA vmProvider

NOTE: To stop and re-start the CIM Server on the VM Host, use the following sequence of

commands:# cimserver –s# cimserver

Setting up gWLM Agent on the OpenVMS System

This section provides information on how to setup the gWLM agent 4.0 on your OpenVMS system.

You can install the gWLM agent for OpenVMS on systems whose workloads you want to manage.

1. Download the gWLM agent version 4.0 on to the OpenVMS system from the following link:

http://h71000.www7.hp.com/openvms/integrity/integrity_gwlm.html

2. If needed, download unzip.exe OpenVMS freeware application to the OpenVMS system from the

following link: http://h71000.www7.hp.com/freeware/ia-64_images/unzip.exe

3. Define the symbol ‘unzip’, as shown in this example:

$ unzip :== $SYS$SYSDEVICE:[GWLM40KIT]unzip.exe

4. Extract the downloaded ZIP file (HP-I64VMS-GWLM-V0400-8-1.ZIP) using unzip.exe.

$ set def SYS$SYSDEVICE:[GWLM40KIT]$$ unzip HP-I64VMS-GWLM-V0400-8-1.ZIPArchive: SYS$SYSDEVICE:[GWLM40KIT]HP-I64VMS-GWLM-V0400-8-1.ZIP;1

inflating: HP-I64VMS-GWLM-V0400-8-1.PCSI$COMPRESSED_ESWinflating: HP-I64VMS-GWLM-V0400-8-1.PCSI$COMPRESSED

$

5. Install the gWLM Agent as below:

$ product install gwlm/source=SYS$SYSDEVICE:[GWLM40KIT]

The gWLM agent gets installed on OpenVMS in the sys$sysroot:[gwlm] directory.

6. Start the gWLM Agent as below:

$ @sys$startup:gwlm$startup

7. To use gWLM foreign commands (gwlmsslconfig, gwlmimportkey, gwlmexportkey, gwlmplace,

gwlmsend, gwlmstatus) on the OpenVMS managed node, execute the following command:

$ @sys$sysroot:[gwlm.bin]gwlm$env get_commands

To use gWLM foreign commands in sys$sysroot:[gwlm] directory, users must have read and write

access to the files.

8. The discovery process would encounter an error if there is a variation in the host name

configuration between the CMS and the managed hosts, see the following example:

C:\> gwlm discover test.zko.dec.comThe IP address 1.1.1.1 resolves to two different fully qualified domain

names.The fully qualified domain name on the managed node is test; the CMS

has the managed node’s fully qualified domain name as test.zko.dec.com.

29

Please correct and retry. Please re-enter the systems.

The following example deals with the problem on the managed node byproviding the managed node with a fully qualified domain name definition:

TCPIP> show host testLOCAL databaseHost address Host name1.1.1.1 test, TESTTCPIP> set nohost "test"TCPIP> set host "test.zko.dec.com"/address=1.1.1.1/alias=("test",test)TCPIP> show host testLOCAL databaseHost address Host name1.1.1.1 test.zko.dec.com, test, TEST

9. The following are the guidelines for composing application workload definitions:

You can compose an application workload definition using UNIX-style application

pathnames. For example:

/sys$common/java$142/bin/java$java.exe/sys$system/vms*.exe/RED$DKA0/SYS0/SYSCOMMON/JAVA$142/BIN/JAVA$JAVA.EXE

You can use the wildcard characters, ‘‘%’’ and ‘‘*’’. ‘‘Application Alternate Names’’ are

not necessary on OpenVMS; do not specify them.

You can use OpenVMS-style pathnames for individual, non-wildcarded executable. For

example:

RED$DKA0:[SYS0.SYSCOMMON.JAVA$142.BIN]JAVA$JAVA.EXESYS$SYSTEM:VMSHELP.EXESYS$COMMON:[SYSEXE]VMSHELP.EXE

In addition, the pathname must start with a ‘‘/’’ character; for example:/RED$DKA0:[SYS0.SYSCOMMON.JAVA$142.BIN]JAVA$JAVA.EXE/SYS$SYSTEM:VMSHELP.EXE/SYS$COMMON:[SYSEXE]VMSHELP.EXE

You can use OpenVMS user account names. For example:

o System

o Guest

Updating SSH Configuration on OpenVMS systems

This section applies only if the SSH Server service is configured and running on OpenVMS systems

that are to be managed through ID–VSE. The procedure in this section provides a workaround to a

known issue with the discovery of OpenVMS systems (running SSH server service) in HP SIM.

Follow the steps below on each OpenVMS system (native Integrity and HPVM guest) that has the SSH

server service running:

1. Determine the list of usernames from the global and system-specific credentials used for discovery

purposes in the HP SIM server.

In this example, there are two global credentials (system and root – which were specified during

the HP Insight Software installation), and no system-specific credentials.

2. For each username determined in step 1 above, modify the SSH configuration file

(SYS$SYSDEVICE:[TCPIP$SSH.SSH2]SSHD2_CONFIG) to prevent the SSH login of the username

from the HP SIM server. To do this, add a line with the following syntax to this file:

DenyUsers username_to_deny@ip_address_of_SIM_server

In this example, the following two lines are added to the SSH configuration file:DenyUsers [email protected] [email protected]

30

These lines prevent the usernames system and root from performing an SSH login into the

OpenVMS system, from an HP SIM server address of 2.2.2.2.

Discovering an HP-UX VM Host and its OpenVMS guests on

HP SIM

This section describes how to discover a HP-UX VM Host and its OpenVMS V8.4 guests on HP SIM.

NOTE: In the example below, HP SIM already has global credentials for WBEM discovery of the HP-

UX VM Host and its OpenVMS V8.4 guests.

1. Access HP SIM on the Windows CMS via the following website:

http://<cms-network-address>:280/

Login with the Administrator local account credentials.

2. In HP SIM, select Options menu ->Discovery.

3. On the next page, click New…. Under the resulting New Discovery section, select ‘Discovery a

single system’. Enter a discovery task name in the ‘Name:’ text box, and the network address of

the HP-UX VM Host system to be discovered. Under Schedule, uncheck the ‘Automatically execute

discovery’ check box. Click Save.

31

4. After the discovery task has been saved, select the newly created discovery task on the Discovery

page and click Run Now. HP SIM will now attempt to discover the OpenVMS system. Click

View Task Results… to see the progress of the discovery.

5. After the HP-UX VM Host discovery has been completed successfully, HP SIM automatically

performs discovery of the OpenVMS V8.4 guests running on the VM Host. This may take some

minutes.

Click ‘All Systems’. This shows the HP-UX VM Host (mgtbl2), and its OpenVMS V8.4 Integrity

VM guests (guest2 and guest3).

32

Updating HP SIM System Properties for OpenVMS Systems

The steps in this section must be performed for all OpenVMS systems (native Integrity and Integrity VM

guest) that are discovered in HP SIM. It must be performed before attempting to use ID–VSE features

with OpenVMS systems.

1. Click the OpenVMS system in the ‘All Systems’ table.

2. The detailed view of the selected system is displayed. Click the Tools & Links tab.

33

3. Click Edit System Properties under HP System Insight Manager pages.

4. On the Edit System Properties page, set the value for the parameter Operating system for tool

filtering to HP OpenVMS. Click OK to save the parameter change.

34

Launching the ID–VSE Virtualization Manager

To launch ID–VSE Virtualization Manager from HP SIM, use one of the following ways:

Select Tools menu -> VSE Management….

Select All VSE Resources in Systems and Event Collections.

35

For More Information

ID–VSE 4.1 Support Matrix:http://docs.hp.com/en/T8671-90069/T8671-90069.pdf

HP Insight Dynamics - VSE for ProLiant Installation and Configuration Guide:http://h20000.www2.hp.com/bc/docs/support/SupportManual/c01658940/c01658940.pdf

© Copyright 2010 Hewlett-Packard Development Company, L.P. The informationcontained herein is subject to change without notice. The only warranties for HPproducts and services are set forth in the express warranty statementsaccompanying such products and services. Nothing herein should be construed asconstituting an additional warranty. HP shall not be liable for technical or editorialerrors or omissions contained herein.

Microsoft and Windows are U.S. registered trademarks of Microsoft Corporation.

February 2010


Recommended