21
Installing and Configuring the osCommerce Plug-in A reference guide for merchants who are integrating Checkout by Amazon™ with osCommerce.

Installing and Configuring the osCommerce Plug-in
A reference guide for merchants who are integrating Checkout by Amazon™ with osCommerce.

Installing and Configuring the osCommerce Plug-in
ii
Table of Contents 1 Overview of the osCommerce Plug-in v2.0 ........................................................................................ 1
1.1 Your Tasks When Using the osCommerce Plug-in v2.0 ...............................................................1 1.2 Other Documentation.................................................................................................................. 2 1.3 Further Support ........................................................................................................................... 2 1.4 What’s New in This Document .................................................................................................... 2
2 Requirements for Using the Checkout by Amazon - osCommerce Plug-in v2.0 ............................. 4 2.1 osCommerce Plug-in v2.0 ............................................................................................................ 4 2.2 Permissions .................................................................................................................................. 4 2.3 Enabling Callbacks for Use with the Callback API ...................................................................... 5 2.4 Enabling Order Management ...................................................................................................... 5 2.5 Compatible Top osCommerce Contributions ............................................................................. 5
3 Installing the osCommerce Plug-in v2.0 ............................................................................................ 7 4 Configuring the osCommerce Plug-in v2.0 ........................................................................................ 8
4.1 General Options ........................................................................................................................... 8 4.2 Signing Options .......................................................................................................................... 10 4.3 Order Management Options ..................................................................................................... 10 4.4 Callback Options ......................................................................................................................... 11 4.5 Shipping Speed Options ............................................................................................................. 12 4.6 Modifying the Shipping Carrier or Shipping Override Configurations ..................................... 13
5 Testing the osCommerce Plug-in v2.0 .............................................................................................. 15 5.1 Callbacks ...................................................................................................................................... 15 5.2 Order Management .................................................................................................................... 15
6 Examples ............................................................................................................................................ 16 6.1 Callbacks ..................................................................................................................................... 16 6.2 Order Management .................................................................................................................... 17
7 Frequently Asked Questions About the osCommerce Plug-in v2.0 ............................................... 19 7.1 What happens if I change the order status? ............................................................................. 19 7.2 What are upper and lower limits for the tax rates I set for callbacks? ................................... 19

© 2009-10 Amazon.com, Inc. or its Affiliates
1
1 Overview of the osCommerce Plug-in v2.0 The osCommerce Plug-in v2.0 for Checkout by Amazon allows merchants to conveniently manage their business across multiple sale channels within their ecommerce platform. Instead of using Amazon Payments’ sales management website, http://sellercentral.amazon.com, merchants can directly view and process their orders in osCommerce, which can reduce operational costs and order management overhead.
The osCommerce Plug-in v2.0 adds two major features to the existing osCommerce plug-in:
1. Order management – Merchants can now directly manage submitted orders in their osCommerce admin UI
2. Callback API support – New seamless integration functionality allows merchants to dynamically calculate their own shipping, taxes and promotions using osCommerce settings. Shipping calculations can be calculated using existing carriers accounts, such as Fedex, UPS or USPS.
Notes
This plug-in is not designed for merchants who sell digital products. Please check out Amazon Simple Pay Standard (https://payments.amazon.com/sdui/sdui/business?sn=paynow/pn). We plan to provide support for Amazon Simple Pay in the next release of the osCommerce Plug-in.
These additional features are optional. You can use one or both as you work with your osCommerce application.
Callback support is offered through the Callback API.
1.1 Your Tasks When Using the osCommerce Plug-in v2.0 You have three mandatory tasks to accomplish when using the osCommerce Plug-in v2.0:
1. Install the plug-in by following the instructions in the INSTALLATION_GUIDE.txt (located in the zip file).
2. Install the required software (see the Requirements section, below). 3. Update your osCommerce installation and your MySQL tables (see the Permissions section,
below).
You have two optional tasks to accomplish when using the osCommerce Plug-in v2.0:
1. To enable order management, you must set the operating environment to “Production” and enable XML feeds on your account (see the Order Management section, below).
2. To enable callbacks in Production, you must enable HTTPS and open port 443 on your webserver (see the Callbacks Options section, below).

Installing and Configuring the osCommerce Plug-in
2
The rest of this document discusses how to accomplish these tasks.
1.2 Other Documentation You can read our downloadable files (PDF) to understand more about Checkout by Amazon.
Resource Audience, Purpose, and Goals Getting Started Guide (PDF) For merchants who want to use a simple, step-by-step approach in setting up
Checkout by Amazon on their websites, from start to finish. The Getting Started Guide walks merchants through the process, from gathering the required information for signing up for an account setting up a button on their websites.
Implementation Guide Using the Create Checkout Button Feature (PDF)
For merchants who want detailed information about integrating their website with Checkout by Amazon using the Create Checkout Button feature in Seller Central. Designed for a simple copy-and-paste HTML solution for your webpages.
Implementation Guide Using HTML-based Button Code and Shopping Carts (PDF)
For merchants and developers who want detailed information about integrating their website with Checkout by Amazon using HTML-based buttons and shopping carts. Designed for HTML-based integration.
Implementation Guide Using XML-based Button Code and Shopping Carts (PDF)
For merchants and developers who want detailed information about integrating their website with Checkout by Amazon using XML-based buttons and shopping carts. Designed for XML-based integration.
Best Practices Guide (PDF) Contains the best tips for merchants who want to set up their websites to use Amazon Payments, with advice for planning, setting up, and day-to-day operations.
Launch Checklist (PDF) For merchants and developers planning to set up and use Checkout by Amazon on their site.
Callback API Guide (PDF) For developers who want to build their own applications to calculate shipping and tax rates as well as promotional discounts and then send these results to Checkout by Amazon.
Instant Order Processing Notifications API Guide (PDF)
For developers who want to automate order notifications with Amazon Payments.
Using Custom Data Fields (PDF)
For merchants and developers who want to include custom data fields in their carts.
Open-Source Shopping Cart Solutions (PDF)
For developers interested in open-source carts that support Checkout by Amazon (currently osCommerce 1.x and Zen Cart).
1.3 Further Support You can view our partners page on the Amazon Payments website:
https://payments.amazon.com/sdui/sdui/business?sn=fpspartners/o
Or, contact us and let us know your questions:
https://payments.amazon.com/sdui/sdui/contactus
1.4 What’s New in This Document Ver Date Changes 2.1 2014-06-03 Updated references to a menu option “Access Key” to “MWS Access Key”. Updated, or
removed out dated, links. 1.1 2014-03-21 Update to clarify access and secret access keys
© 2009-10 Amazon.com, Inc. or its Affiliates
3
Ver Date Changes 1.0 2009-03-04 Initial release

Installing and Configuring the osCommerce Plug-in
4
2 Requirements for Using the Checkout by Amazon - osCommerce Plug-in v2.0
2.1 osCommerce Plug-in v2.0 To use this plug-in, you must have pre-installed the following software and account:
1. osCommerce 2.2 MS2 or osCommerce 2.2RC2a Other versions are not tested.
2. PHP 5.2.3 or greater 3. MySQL 4.x or greater 4. Checkout by Amazon account (available at amazonservices.com/payments)
If you want to use callbacks for merchant-calculated shipping and tax, you must have one of the following modules installed:
Carrier Download install UPS http://www.oscommerce.com/community/contributions,1323 UPS XML 1.3.5
shipping module USPS http://www.oscommerce.com/community/contributions,487 USPS Methods 3.0
shipping module FedEx http://www.oscommerce.com/community/contributions,1462 FedEx Real Time
Quotes 2.07 shipping module
Checkout by Amazon also supports the following shipping modules that are part of the standard osCommerce installation:
• Flat Rate • Per-Item • Table Rate • Zone Rates
If you not sure which version of software you are using, please ask your web-hosting provider for more information.
If you do not have a Checkout by Amazon seller account, you can register for one on the Amazon Services website. Click Add Amazon Payments, and then click the Sign Up for Checkout by Amazon button.
2.2 Permissions You must have permissions to update your default osCommerce installation on your web server, because the osCommerce Plug-in v2.0 plug-in requires updates to specific osCommerce PHP files.

© 2009-10 Amazon.com, Inc. or its Affiliates
5
You also must have permissions to create and alter MySQL tables for the database account you used to set up osCommerce. The osCommerce Plug-in v2.0 requires you to update the MySQL tables to store additional Amazon-specific order information.
If you are not sure what permissions you have on your database account, please ask your webhosting provider for more information.
2.3 Enabling Callbacks for Use with the Callback API To enable callbacks for osCommerce in your Checkout by Amazon Production account, you must enable HTTPS on your webserver using the secure port 443. If you are using the Checkout by Amazon Sandbox, you can using the standard HTTP port 80 or HTTPS over port 443.
You also must set up your callback functionality following the information provided in the Callback API Guide.
2.4 Enabling Order Management To enable order management for osCommerce in your Checkout by Amazon Production account, you must set the Operating Environment to “Production” in the osCommerce Admin UI.
You also must change your Order Report settings to use XML feeds.
1. Log in to Seller Central (https://sellercentral.amazon.com/). 2. Click Settings > Checkout Pipeline Settings. 3. Under Order Report Settings, click Edit. 4. Next to Order Report Type, click XML. 5. Click Submit.
Note
Once you decide to enable XML feeds for your account, most integration tasks will require XML feeds instead of flat-file feeds.
2.5 Compatible Top osCommerce Contributions The osCommerce Plug-in v2.0 is tested with the following top contributions from osCommerce:
• Simple Template System: http://addons.oscommerce.com/info/1524 • osC Affiliate: http://addons.oscommerce.com/info/158 • Quantity Price Breaks Per Product: http://addons.oscommerce.com/info/1242 • QTpro v1.0 – Quantity Tracking Professional: http://addons.oscommerce.com/info/888 • Credit Class & Gift Voucher: http://addons.oscommerce.com/info/282 (Compatible, but not
supported as a functionality) • Discount Coupon Codes: http://addons.oscommerce.com/info/4269 (Compatible, but not
supported as a functionality)

Installing and Configuring the osCommerce Plug-in
6
Note
Please see the INSTALLATION_GUIDE.txt (included in the .ZIP file) to determine which third-party contributions versions are supported.

© 2009-10 Amazon.com, Inc. or its Affiliates
7
3 Installing the osCommerce Plug-in v2.0 To install the osCommerce Plug-in v2.0, you can simply copy over the set of PHP files provided in the zip file on top of the existing osCommerce installation. For information about installing the plug-in, please see the INSTALLATION_GUIDE.txt provided in the plug-in zip file.
You should take precautions to be sure that you can roll back changes if the installation fails or the website availability is disrupted.
Note
These installation steps assume you are using a new installation of osCommerce. Existing osCommerce sites that are already integrated with PayPal or Google Checkout might need to perform different steps to fully integrate with the osCommerce Plug-in v2.0.

Installing and Configuring the osCommerce Plug-in
8
4 Configuring the osCommerce Plug-in v2.0 After installation, you can configure the Checkout by Amazon module in the osCommerce UI by navigating to Administration > Modules > Payments > Checkout by Amazon.
The illustration below shows the configuration options available with the plug-in:
Note
This illustration is for version 2.2 MS2. Version 2.2RC2a is similar, but with some slight wording changes.
4.1 General Options Enable Checkout by Amazon Module: Set this to “true” to use Checkout by Amazon as an option on your website

© 2009-10 Amazon.com, Inc. or its Affiliates
9
Checkout by Amazon Merchant ID: Enter your Merchant ID to enable Checkout by Amazon on your website. You can find your Merchant ID in Seller Central by clicking Settings > Checkout Pipeline Settings. Your Merchant ID is similar to “AEIOU1234AEIOU”.
Operating Environment: Select your operating environment, Sandbox (testing) or Production (live orders).
• Sandbox is the testing environment. You can use the Sandbox to test whether customers can successfully complete the order. No charges are processed for Sandbox orders. When in the Sandbox mode, a warning appears below the Checkout by Amazon icon on the shopping cart page.
• Production is the live mode where you can accept orders and your customers’ payment methods are charged.
Checkout Button Size: Set the button size you want to use, either large (151 x 27 px) or medium (126 x 24 px).
Button Style: Select the color of the button you want to place on your website.
Color Large Medium
Orange
Tan
Sort Order Display: Select the order you want to display Amazon Payments relative to your other payment options, from lowest value (first position) to higher values (secondary positions).
Cart Expiration Time: (Optional) Set the time interval before a customer’s cart expires and is reset. If you do not set this value, the cart will not expire.
Cancellation Return Page: The page you want to send customers to when they cancel an order within the checkout pipeline (before they click the “Place Your Order” button). The default setting returns your customers to the catalog index page without clearing the shopping cart.
Success Return Page: The page you want to send customers to when they successfully complete an order within the checkout pipeline (that is, they click the “Place Your Order” button). The default setting returns your customers to the catalog index page in your osCommerce store.

Installing and Configuring the osCommerce Plug-in
10
Notes
Enabling this option requires you to build an index.php file as listed in the INSTALLATION_GUIDE.txt file (included with the zipped file containing the osCommerce installation files). Redirecting to the osCommerce page checkout_success.php will not work, as osCommerce requires customers to be logged in to your site, and the Checkout by Amazon process does not log customers in to your site.
If you create your own Success Return Page and you use the pop-up order summary feature provided by Checkout by Amazon, you must include the necessary scripts.
Enable Diagnostic Logging: If set to true, enables logging for debugging. The debugging log is located in your catalog directory, and is named checkout_by_amazon_callback.log. Both Order management and callback debugging information are appended to this log.
4.2 Signing Options Enable Order Signing: Select whether you want to accept signed orders (secure) or unsigned (insecure). As unsigned orders are vulnerable for fraud, we recommend you enable signed orders.
Note
If you have set Order Signing as required in Seller Central, you must enable this option.
Access Key ID: Enter your Seller Central Access Key ID. This key, paired with your Seller Central Secret Key, is required for signed orders. You can get your Seller Central Access Key in Seller Central by clicking Integration > MWS Access Key.
Note
Be sure to use the Access Key ID you get in Seller Central.
Secret Key: Enter your Seller Central Secret Access Key. This key, paired with your Seller Central Access Key ID, is required for signed orders. Treat your secret key like a password. You can get your Seller Central Access Key in Seller Central by clicking Integration > MWS Access Key and then clicking +Show.
Note
Be sure to use the Secret Access Key you get in Seller Central.
4.3 Order Management Options Enable Order Management: Enable this feature to view and manage (ship, refund, or cancel) Checkout by Amazon orders within the osCommerce Admin Order UI without logging in to Seller Central. Before you enable this feature, you must enable programmatic XML feeds as described earlier.

© 2009-10 Amazon.com, Inc. or its Affiliates
11
Notes
Please set the Operating Environment to Production to enable this functionality, because the Sandbox mode does not support order management. (Sandbox orders do not complete the order process, as they are test orders that are not charged to a payment method.)
When testing this feature in Production, create low-value orders (for a few cents, for example) to reduce your processing fees. You can ship and refund your orders so that the fees are reversed.
Orders appear in the osCommerce Admin Order UI about 15-30 minutes after buyers place them.
Checkout by Amazon Merchant Login ID: Enter your login ID (the e-mail address you use to log in to your Checkout by Amazon merchant account on Seller Central).
Checkout by Amazon Merchant Password: Enter your password (the password you use to log in to your Checkout by Amazon merchant account on Seller Central).
Checkout by Amazon Merchant Token: Enter your Merchant Token. You can get your Merchant Token in Seller Central by clicking Settings > Account Info and scrolling down to the Your Merchant Token section.
Checkout by Amazon Merchant Name: Enter your Merchant Business Display Name. You can get your Merchant Business Display Name in Seller Central by clicking Settings > Account Info and scrolling down to the Your Business Information section.
4.4 Callback Options Enable Callbacks: You can use the Callback API to dynamically specify shipping (using USPS, FedEx, or UPS) or taxes as calculated by your osCommerce site when customers are in the checkout pipeline.
Callback Page: Enter the URL on your osCommerce site where Amazon sends the callback request for dynamic rate calculations. The URL should contain the host and port, and should be set to the path catalog/checkout_by_amazon_callback_processor.php. For example, https://mydomain.com/catalog/checkout_by_amazon_callback_processor.php.
Notes
When you enable callbacks in the Production mode, your URL must use https:// and port 443 for secure communications. If you enable callbacks in the Sandbox mode, your URL can be set to http:// and port 80 or https:// and port 443.
Enable Shipping Calculations: Enable dynamic shipping rate calculations (callbacks) from FedEx, UPS, or USPS. You can enable only one of these carriers. For shipping rate calculations to work

Installing and Configuring the osCommerce Plug-in
12
correctly, you must first install and configure the FedEx, UPS, or USPS shipping module in osCommerce.
Enable Tax Calculations: Enable dynamic tax rate calculations (callbacks). Before you enable this feature, apply the correct tax classes and tax rates to your inventory items in osCommerce.
Is Shipping and Handling Taxed: Select to specify whether to apply the tax rate to the shipping costs as part of the callback.
Shipping Carrier: Select the shipping carrier you use. This shipping carrier must match the carrier you select in Enable Shipping Calculations. Before you enable this feature, install and enable the selected carrier in the osCommerce Admin Modules Shipping page.
Note
If you set this option to “None” and callbacks are enabled, you must select a valid value for “CBA Standard Shipping Override,” below.
CBA Standard Shipping Override: Select whether you want to override the shipping carrier (selected above in the “Shipping Carrier” section) for the CBA Standard Shipping method with “Flat Rate,” “Per Item,” “Table Rate,” or “Zone Rates” that come as part of standard osCommerce installation. You must first install and enable the selected module on the Administration > Modules > Shipping page in the osCommerce UI. This override configuration is used to calculate shipping only for domestic shipments and is mapped to the Standard shipping method within the Amazon pipeline.
Note
Please be sure to configure the Zones properly for the selected override. For instance, if you select “Table Rate” as “CBA Standard Shipping Override,” but do NOT want to use “Table Rate” for shipments to Puerto Rico, you must configure Zones in the “Table Rate” module appropriately.
4.5 Shipping Speed Options The following section lists the shipping speed options.
Notes
You must install the corresponding shipping module before you can configure the settings in this section.
If you do not select a value for “Shipping Carrier,” you can click the Update button and continue to the section Testing the osCommerce Plug-in v2.0, below.
Domestic and International Carrier Shipping Mapping: Maps the carrier-supported shipping speeds to the shipping speeds supported by Checkout by Amazon. You can map the shipping method

© 2009-10 Amazon.com, Inc. or its Affiliates
13
supported by your carrier (selected in the “Shipping Carrier” section, above) to the Checkout by Amazon-supported shipping methods by navigating to the Administration > Modules > Shipping > Checkout by Amazon 2.0 Shipping Mapping page in the osCommerce UI.
Note
For each carrier (USPS, FedEx, or UPS) and shipping speed, the mapping you choose sets the service level rate returned from the carrier and maps the carrier service level to the service level supported by Checkout by Amazon, including Standard, Expedited, One Day, or Two Day. The shipping service level, including speed and rate, appears to the buyer in the checkout pipeline. For example, if you map the USPS service level “Parcel Post” to “Standard Shipping,” then when your buyer chooses Standard Shipping, the service level in the checkout pipeline appears as “Standard Shipping” with the rates and speeds supported by USPS Parcel Post.
After you complete selecting the options, click the Update button at the bottom of the page and then review your site.
4.6 Modifying the Shipping Carrier or Shipping Override Configurations If you modify the “Shipping Carrier” or the “CBA Standard Shipping Override” configuration entries on the Modules > Payment > Checkout by Amazon 2.0 for 22ms2 page, you must remove and re-install the Checkout by Amazon 2.0 Shipping Mapping module before continuing. (The Checkout by

Installing and Configuring the osCommerce Plug-in
14
Amazon 2.0 Shipping Mapping module is on the Module > Shipping > Checkout by Amazon 2.0 Shipping Mapping page.)
For example, suppose you set FedEx as your Shipping Carrier and the Flat Rate method is set to CBA Shipping Override. (You do so on the Module > Shipping> Checkout by Amazon 2.0 Shipping Mapping page.)
Now you decide to switch to using UPS for your shipping carrier and remove the CBA Shipping Override.
To enable this scenario, you must remove and reinstall the Modules > Shipping > Checkout by Amazon 2.0 Shipping Mapping before you start mapping the UPS shipping methods to Amazon shipping speeds.

© 2009-10 Amazon.com, Inc. or its Affiliates
15
5 Testing the osCommerce Plug-in v2.0 We strongly encourage you to test a few orders in the Sandbox environment before enabling the Production environment. The following section lists the testing scenarios you should try on your website.
5.1 Callbacks On the order review page, check to be sure that the shipping, promotion, and tax rates reflect what you have configured within osCommerce. You can verify this by performing the order calculations manually.
5.2 Order Management You can test whether order management is working by fulfilling an order placed using your Production account; that is, confirming that the order appears in Seller Central in the “Ready to Ship” state, and then confirming that the order appears in the osCommerce Admin UI a few minutes later. To test your order management setup, enable the plug-in and then place small orders (for example, for $0.50) with your Checkout by Amazon Production account. (You can place orders in the Sandbox, but the orders won’t appear in your Admin UI.)
After you place the orders and verify that the plug-in was set up correctly, you can refund the orders.
When you test order management, be sure to test shipping, cancelling, and refunding orders so that you become familiar with the functionality and workflow of Amazon systems.
If an order status update fails, always be sure to check the order’s status in Seller Central, as Seller Central contains the latest order information. You can search for the order using the Checkout by Amazon Order Number ID provided in the first order status history’s Comment field:

Installing and Configuring the osCommerce Plug-in
16
6 Examples
6.1 Callbacks The Callback API (a separate API) allows merchants to calculate shipping rates, taxes, and promotional discounts using their own systems, rather than letting Checkout by Amazon calculate these values.
For example, by using the Callback API, the merchant can enable dynamic shipping rate calculations for the carrier of their choice (UPS, Fedex, USPS, and so on). This functionality allows merchants to more accurately calculate the shipping charges they charge based on the buyer’s address:
When using the Callback API for an order and the merchant’s shipping account and the osCommerce Plug-in v2.0 are set up, all merchant orders placed through the Checkout by Amazon order pipeline will call back to the osCommerce system to request the dynamic rates. osCommerce will calculate the shipping charges using the information you enter in the Shipping Module and then return the information to the Amazon systems. However, if the callback fails (for example, due to a delay in the response), then you can specify in your cart XML whether to fall back to default Seller Central settings or to reject the order.
The same scenarios apply for tax calculations. That is, if you set up the Callback API to allow for you to calculate taxes, then when an order is placed, the Callback API will call back to the osCommerce system to request the dynamically calculated taxes; if the callback fails, then the settings specified in the cart XML determine whether the Seller Central settings taxes are used or the order is rejected.
© 2009-10 Amazon.com, Inc. or its Affiliates
17
For more information on using callbacks with Checkout by Amazon, please see the Callback API Guide.
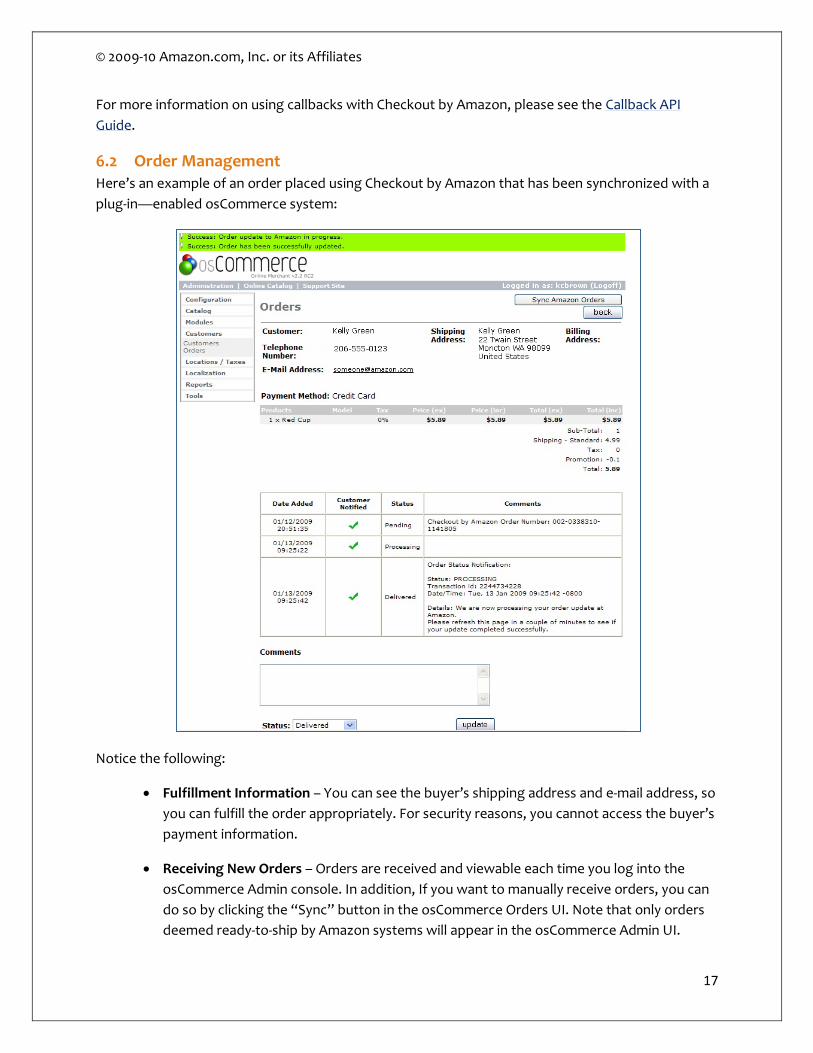
6.2 Order Management Here’s an example of an order placed using Checkout by Amazon that has been synchronized with a plug-in—enabled osCommerce system:
Notice the following:
• Fulfillment Information – You can see the buyer’s shipping address and e-mail address, so you can fulfill the order appropriately. For security reasons, you cannot access the buyer’s payment information.
• Receiving New Orders – Orders are received and viewable each time you log into the osCommerce Admin console. In addition, If you want to manually receive orders, you can do so by clicking the “Sync” button in the osCommerce Orders UI. Note that only orders deemed ready-to-ship by Amazon systems will appear in the osCommerce Admin UI.

Installing and Configuring the osCommerce Plug-in
18
There can be a 15 - 30 minute delay between the time the buyer has placed the order and the time the order is ready to ship and becomes viewable in the osCommerce Admin UI.
• Order Status - Details of the order status appear in the order status Comments field. As an order status changes from Pending to Shipped, Refunded, or Canceled, information on that progress appears in the Comments field.
• Buyer Account – For security reasons, buyers view their Checkout by Amazon orders in https://payments.amazon.com. Buyers do not login to view their Checkout by Amazon orders in the osCommerce system.
As an order progresses to its next state, the osCommerce system sends a request to Amazon to change the order state. A status of Success or Failed indicates the success of the order status change request.
• Changing Order Status – To change an order status (for example, to mark an order as Shipped), the merchant updates the status. Note that notifying the buyer is disabled, as Amazon already notifies the customer of order state changes:
Also note that changing the order status might require additional information from the merchant. For example, when changing the state of the order to Delivered, the merchant must provide the carrier that the order shipped with (UPS, Fedex, USPS, and so on).

© 2009-10 Amazon.com, Inc. or its Affiliates
19
7 Frequently Asked Questions About the osCommerce Plug-in v2.0
7.1 What happens if I change the order status? When changing order status, the status update might fail. For example, if the merchant attempts to mark an order as Delivered that was already canceled by Amazon due to a failure to ship within 30 days, then the order status is updated to System Error:
For delayed orders, mark the order as shipped and then ship the order.
7.2 What are upper and lower limits for the tax rates I set for callbacks? The osCommerce Plug-in v2.0 supports a tax rate between 0.0% and 15.0%, specified as a value between 0.0000 and 0.1500.


![[1]Oracle® Fusion Middleware Installing and Configuring ... · Installing and Configuring Oracle Enterprise Data Quality 12c ... Oracle Fusion Middleware Installing and Configuring](https://static.documents.pub/doc/80x56/5b8396637f8b9a47588d872b/1oracle-fusion-middleware-installing-and-configuring-installing-and.jpg)


