10
INSTALLING EDGE SINKS INTO SOLID SURFACE COUNTERTOPS OCTOBER 2014

INSTALLING EDGE SINKS INTOSOLID SURFACE COUNTERTOPS
OCTOBER 2014

STEP 1
�ŌĞƌ�ƌĞŵŽǀ ŝŶŐ�ƚŚĞ�ƐŝŶŬ�ĨƌŽŵ�ŝƚƐ�ďŽdž͕�ŝŶƐƉĞĐƚ�ŝƚ�ĨŽƌ�ĚĂŵĂŐĞ͘��ŚĞĐŬ�
the integrity of the rim as well as the bowls for any signs of shipping
damage. If the sink is damaged or flawed, call your Karran Sinks
distributor immediately.
STEP 2
On the back side of the solid surface material, measure and mark
where the sink needs to be installed.
Mark the sink center line.
Next mark a setback from the front edge of the countertop. The
recommended amount is about 2” to 2-1/2” but always take into
ĐŽŶƐŝĚĞƌĂƟŽŶ�ƚŚĞ�ƐƉĞĐŝĮ Đ�ĐŝƌĐƵŵƐƚĂŶĐĞƐ�ŽĨ�ĞĂĐŚ�ŝŶƐƚĂůůĂƟŽŶ�ƌĞůĂƟŶŐ�
to cabinet and plumbing placement.
STEP 3
Place the sink upside down on the back of the solid surface in the
ŝŶĚŝĐĂƚĞĚ�ƉŽƐŝƟŽŶ͘ �D ĂŬĞ�ƐƵƌĞ�ƚŚĞ�ƐŝŶŬ�ŝƐ�ĐĞŶƚĞƌĞĚ�ŽŶ�ƚŚĞ�ƐŝŶŬ�ĐĞŶƚĞƌ�
line and the front edge of the rim is on the setback line.
STEP 4
STEP 5
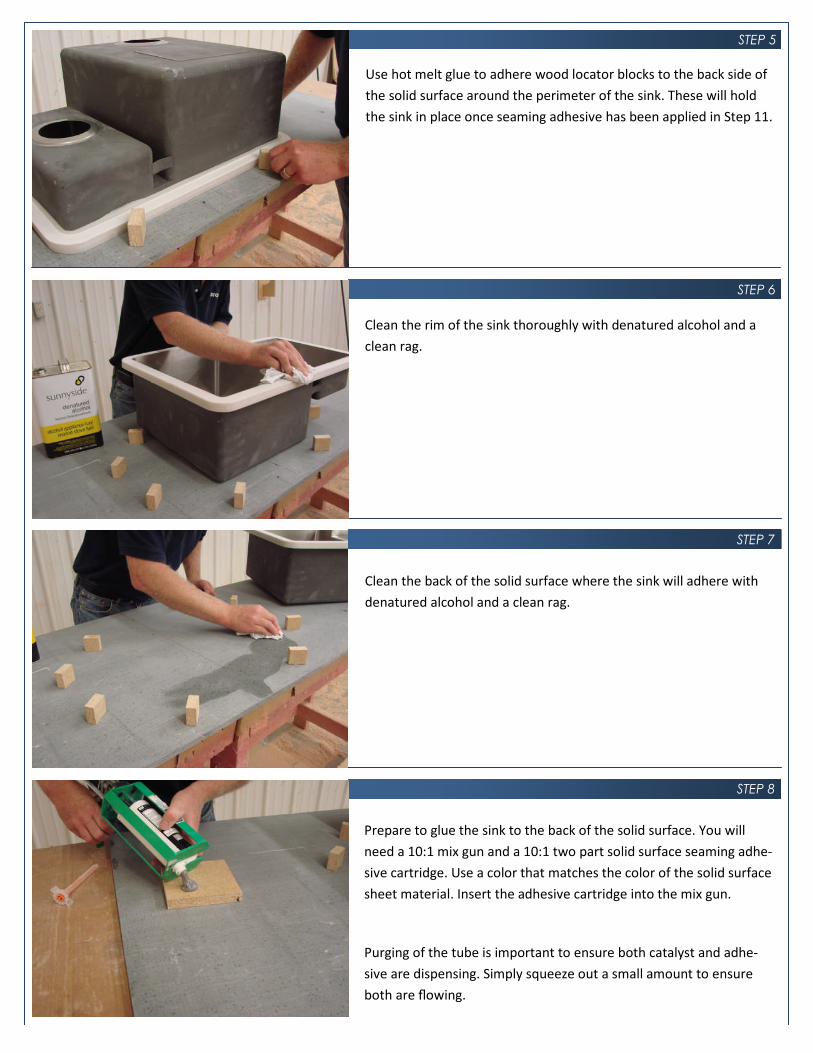
Use hot melt glue to adhere wood locator blocks to the back side of
the solid surface around the perimeter of the sink. These will hold
the sink in place once seaming adhesive has been applied in Step 11.
STEP 6
Clean the rim of the sink thoroughly with denatured alcohol and a
clean rag.
Clean the back of the solid surface where the sink will adhere with
denatured alcohol and a clean rag.
STEP 7
Prepare to glue the sink to the back of the solid surface. You will
need a 10:1 mix gun and a 10:1 two part solid surface seaming adhe-
sive cartridge. Use a color that matches the color of the solid surface
sheet material. Insert the adhesive cartridge into the mix gun.
Purging of the tube is important to ensure both catalyst and adhe-
sive are dispensing. Simply squeeze out a small amount to ensure
both are flowing.
STEP 8
STEP 5
STEP 6
STEP 7
STEP 8

STEP 9
dǁ ŝƐƚ�ŽŶ�ƚŚĞ�ƐƚĂƟĐ�ŵŝdžŝŶŐ�ƟƉ�ĂŶĚ�ůŽĐŬ�ŝŶƚŽ�ƉůĂĐĞ͘ �̂ ƋƵĞĞnjĞ�Ă��ϲ ͟ �ďĞĂĚ�
of solid surface seaming adhesive out of the gun onto a scrap
surface to ensure the adhesive and catalyst are fully mixed.
STEP 10
Apply a generous, even bead of solid surface seaming adhesive
around the perimeter of the sink.
WůĂĐĞ�ƚŚĞ�ƐŝŶŬ�ŝŶƚŽ�ƚŚĞ�ŵĂƌŬĞĚ�ƉŽƐŝƟŽŶ�ĂƐ�ŝŶĚŝĐĂƚĞĚ�ďLJ�ƚŚĞ�ǁ ŽŽĚ�
locator blocks.
STEP 11
Use your preferred clamping method to clamp the sink in place
while solid surface seaming adhesive cures for 30 to 45 minutes.
STEP 12
STEP 9
STEP 10
STEP 11
STEP 12

STEP 13
Leave the sink untouched while the solid surface seaming adhesive is
curing for 30 to 45 minutes.
STEP 14
Once cured flip the countertop over. You will now need to drill a pi-
lot hole through the solid surface. You can use a plunge bit in a rout-
er (shown here), a hole saw or a wide drill bit.
WŝůŽƚ�ŚŽůĞ�ĂŌĞƌ�ƌŽƵƚĞƌŝŶŐ�ǁ ŝƚŚ�ƉůƵŶŐĞ�ďŝƚ͘ ��ůǁ ĂLJƐ�ŵĂŬĞ�ƚŚŝƐ�ƉŝůŽƚ�ŚŽůĞ�
in the center of the sink, away from the bowl divider and bowl walls.
STEP 15
EĞdžƚ�ƵƐĞ�ĂŶ�Žǀ ĞƌŚĂŶŐ�ƚƌŝŵ�ďŝƚ�ƚŽ�ĚŽ�LJŽƵƌ�ŝŶŝƟĂů�
trimming of the solid surface.
STEP 16
STEP 13
STEP 14
STEP 15
STEP 16

STEP 17
Run the router with the overhang trim bit around the perimeter of
ƚŚĞ�ƐŝŶŬ͕�ůĞƫ ŶŐ�ƚŚĞ�ŶLJůŽŶ�ďĞĂƌŝŶŐ�ŐƵŝĚĞ�ĂůŽŶŐ�ƚŚĞ�ďŽǁ ů�ǁ ĂůůƐ͘ �D ĂŬĞ�
ƐƵƌĞ�ƚŽ�ǁ ĞĂƌ�ƚŚĞ�ĂƉƉƌŽƉƌŝĂƚĞ�ĞLJĞ�ĂŶĚ�ƌĞƐƉŝƌĂƚŽƌLJ�ƉƌŽƚĞĐƟŽŶ͘ �
STEP 18
dŚĞ�ƐŝŶŬ�ĂŌĞƌ�ŝŶŝƟĂů�ƌŽƵƚĞƌŝŶŐ�ǁ ŝƚŚ�Žǀ ĞƌŚĂŶŐ�ƚƌŝŵ�ďŝƚ�ŚĂƐ�ďĞĞŶ����
completed.
�ůŽƐĞ�ƵƉ�ŽĨ�ƚŚĞ�ƐŝŶŬ�ǁ Ăůů�ĂŌĞƌ�ŝŶŝƟĂů�ƌŽƵƚĞƌŝŶŐ�ǁ ŝƚŚ�ƚŚĞ�Žǀ ĞƌŚĂŶŐ�
trim bit has been completed.
STEP 19
Final trimming of the solid surface will be accom-
plished with a bevel bit. This bevel bit has a 10°
ĐƵƫ ŶŐ�ĂŶŐůĞ�ĂŶĚ�Ă�ϭͬ ϴ͟ �Žǀ ĞƌƐŝnjĞĚ�ŶLJůŽŶ�ďĞĂƌŝŶŐ͘�
This custom router bit may be obtained from your
Karran Sinks distributor.
Place the bit in an adjustable depth plunge router.
STEP 20
STEP 17
STEP 18
STEP 19
STEP 20

STEP 21
Set the depth of the bit so that the bearing is running just below the
ďŽƩ Žŵ�ŽĨ�ƚŚĞ�ƐŽůŝĚ�ƐƵƌĨĂĐĞ�ŵĂƚĞƌŝĂů�ĂŶĚ�ƚŚĞ�ƐŽůŝĚ�ƐƵƌĨĂĐĞ�ƐĞĂŵ����
adhesive that has oozed out.
STEP 22
D ĂŬĞ�Ă�ƉĂƐƐ�ĂƌŽƵŶĚ�ƚŚĞ�ƉĞƌŝŵĞƚĞƌ�ŽĨ�ƚŚĞ�ƐŝŶŬ͕�ůĞƫ ŶŐ�ƚŚĞ�ďĞĂƌŝŶŐ�
guide along the sink wall.
�ĂƌĞĨƵůůLJ�ĞdžĂŵŝŶĞ�ƚŚĞ�ĂŵŽƵŶƚ�ŽĨ�Žǀ ĞƌŚĂŶŐ�ƌĞŵĂŝŶŝŶŐ�ĂŌĞƌ�ƚŚĞ�ŝŶŝƟĂů�
pass.
The goal is to trim the solid surface material as close to the stainless
steel wall as possible without touching the wall with the router bit.
STEP 23
Adjust the depth of the router bit slightly lower so as to achieve a
closer cut of the solid surface material to the sink bowl wall.
STEP 24
STEP 21
STEP 22
STEP 23
STEP 24

STEP 21
Make a second pass. Carefully examine the amount of overhang
ƌĞŵĂŝŶŝŶŐ�ĂŌĞƌ�ƚŚĞ�ƐĞĐŽŶĚ�ƉĂƐƐ͘ �/Ĩ�LJŽƵ�ĨĞĞů�LJŽƵ�ĐĂŶ�ĐƵƚ�Ğǀ ĞŶ�ĐůŽƐĞƌ͕�
adjust the depth of the router bit slightly lower and make a third
ƉĂƐƐ͘ �ZĞƉĞĂƚ�ƚŚŝƐ�ƉƌŽĐĞƐƐ�ĂƐ�ŶĞĞĚĞĚ�ƵŶƟů�LJŽƵ�ĨĞĞů�LJŽƵ�ĂƌĞ�ĐƵƫ ŶŐ�ĂƐ�
close to the sink wall as possible without touching it.
STEP 22
��ǁ Ğůů�ƌŽƵƚĞƌĞĚ�ŝŶƐƚĂůůĂƟŽŶ�ǁ ŝůů�ůĞĂǀ Ğ�ŵŝŶŝŵĂů�ƐŽůŝĚ�ƐƵƌĨĂĐĞ�ĂŶĚ����
ĂĚŚĞƐŝǀ Ğ�ƌĞŵĂŝŶŝŶŐ͘�t ŚĞŶ�ƐƚĂƌƟŶŐ�ƚŽ�ƌŽƵƚĞƌ͕�ŝƚ�ŝƐ�Ăůǁ ĂLJƐ�Ă�ŐŽŽĚ�ŝĚĞĂ�
to start on the front edge of the sink. This is the least visible area to
the homeowner should any repair work be needed. Should the rout-
er bit scuff the stainless steel wall, use a coarse grit sandpaper to
hand sand the area parallel to the grain on the sink wall. Then move
ƚŽ�ƐƵĐĐĞƐƐŝǀ ĞůLJ�Į ŶĞƌ�ŐƌŝƚƐ�ŽĨ�ƐĂŶĚƉĂƉĞƌ�ƵŶƟů�LJŽƵ�ŚĂǀ Ğ�ŵĂƚĐŚĞĚ�ƚŚĞ�
finish of the stainless steel.
Use a palm or orbital sander to sand the edge of the solid surface.
Make sure to keep the sander at the same angle as the beveled rout-
er cut so as not to sand on the bowl wall.
STEP 23
Sand the edge of the solid surface to the point that the stainless
steel wall starts to show through the glue line.
STEP 24
STEP 25
STEP 26
STEP 27
STEP 28

STEP 21
Remaining adhesive on the bowl wall will simply peel off.
STEP 22
Some final hand sanding with a fine grit sandpaper will be needed to
completely smooth and blend the solid surface and stainless steel
sink wall.
Use a fine grit flap wheel (180 grit) in a drill to restore horizontal
ŐƌĂŝŶ�ůŝŶĞƐ�ŝŶ�ƐŝŶŬ�ǁ Ăůů�ŝĨ�ŶĞĞĚĞĚ�ĂŌĞƌ�ƐĂŶĚŝŶŐ͘�D ĂŬĞ�ƐƵƌĞ�ƚŽ�ŬĞĞƉ�
the drill horizontal and do not move it up and down.
Once blended, wipe the sink and countertop clean. To give the fin-
ished sink a lustrous glow, wipe the sink down with WD-40.
STEP 23
STEP 24
STEP 29
STEP 30
STEP 31
FINISHED INSTALLATION

STEP 21
STEP 22
^Ğƚ�ƚŚĞ�ĚĞƉƚŚ�ŽĨ�ƚŚĞ�ďŝƚ�ƐŽ�ƚŚĂƚ�ƚŚĞ�ĐƵƫ ŶŐ�ĨĂĐĞ�ŝƐ�ĐƵƫ ŶŐ�ũƵƐƚ�ĂďŽǀ Ğ�
the top of the stainless steel wall. Run the router around the sink.
The beauty of this profile is that when palm sanding the solid surface
ĞĚŐĞ͕�ƚŚĞ�ƐĂŶĚĞƌ�ŝƐ�ŽƉĞƌĂƟŶŐ�Ăƚ�Ă�ϰϱΣ�ĂŶŐůĞ�ƚŽ�ƚŚĞ�ƐŝŶŬ�ǁ Ăůů͘�dŚŝƐ�ƉƌĞͲ
vents any scratching of the bowl wall surface. It can significantly
ƌĞĚƵĐĞ�Žǀ ĞƌĂůů�ƐĂŶĚŝŶŐ�ĂŶĚ�Į ŶŝƐŚ�ƟŵĞ͘��
STEP 23
STEP 24
�Ɛ�ĂŶ�ĂůƚĞƌŶĂƟǀ Ğ�ƚŽ�ƚŚĞ�ϭϬ° bevel bit, you
may also use a 45° bevel bit shown here.
Optional Profiling
FINISHED INSTALLATION
Optional Profiling
Optional Profiling


