Page 1 of 46 Installing MythTV 0.20 on Ubuntu Gutsy 7.10 Document Purpose The purpose of this document is to guide the reader through the installati on of MythTV 0.20 on Ubuntu Gutsy 7.10. After completing this guide t he reader will have a fully functional MythTV Linux box that is capable of recording and playing digital television as well as hosting your DVD and music collection, or streaming those media collections to other MythTV front-end machines elsewhere around your house and wider networks, even allowing access to your recordings via the web from outside of your home if desired. Requirements The following requirements are prerequisites for using this installation guide. 1.Ubuntu Gutsy 7.10 desktop CD (a vailable from www.ubuntu.net) 2.Hardware that is identical or comparable to that specified below Example Hardware I used the hardware specified below. If you use the exact same hardware then yourinstallation will work perfectly provided that you follow the instructions here accurately. However, if you use different hardware (such as a different model of TV tuner or graphics card) then you should do some research first to check that the hardware you have chosen is compatible with Ubuntu Gutsy 7.10 and that it is it compatible with MythTV. The safest option for a stressful install is to use the hardware I’ve written this guide around. Processor : AMD Athlon 64 X2 dual core processorMotherboard : nFORCE 4M-A ATX Memory : 2GB DDR2 RAM chip Graphics Card : nVidia GeForce 7200 Series Media Drives : LG DVD/CD re-writer internal drive Tuner Card : Hauppauge WinTV Nova T-500 dual tunerNetwork : Devolo Highspeed Ethernet Starter Kit (better than using Wireless) Remotes : iPhone/iTouch, or use the remote that accompanied the TunerI wanted to point out a couple of things regarding my hardware setup. You will notice that I’ve got video built into the motherboard, yet I also opted to install a separate graphics card as well. The reason is that the separate graphics card will provide DVI output and has a higher specification that the built-in one, which is important given that I need the graphics card to deliver a clean crisp video image to the accompanying television. Secondly, rather than installing a Wireless card I opted to use the built-in Ethernet port and connect it to a Devolo Ethernet adaptor that plugs into a power socket in the wall. These adaptors allow an 85mbps network connection to be e stablished across the powercircuit in your home. One adapter connects the network from the router to the mains circuit and the other adaptor connects the mains circuit to your MythTV computer. This is especially useful because Linux still has problems natively supporting many wireless cards and this approach will give you a consistent fast network connection that will betterfacilitate streaming your media to other MythTV front-end PCs around your home. One final point - get a lot of memory (1GB per TV channel you wish to be able to record in parallel) and a large hard-disk. I fitted a 500GB hard-disk and was surprised how quickly it filled up when I loaded on my DVD collection and started recording TV. You can never have enough memory and never have enough hard-disk space available to you!
Transcript
8/14/2019 Installing MythTV 0.20 on Ubuntu Gutsy 7.10
The purpose of this document is to guide the reader through the installation of MythTV0.20 on Ubuntu Gutsy 7.10. After completing this guide the reader will have a fullyfunctional MythTV Linux box that is capable of recording and playing digital television
as well as hosting your DVD and music collection, or streaming those media collectionsto other MythTV front-end machines elsewhere around your house and wider networks,even allowing access to your recordings via the web from outside of your home if desired.
Requirements
The following requirements are prerequisites for using this installation guide.
1. Ubuntu Gutsy 7.10 desktop CD (available from www.ubuntu.net)2. Hardware that is identical or comparable to that specified below
Example HardwareI used the hardware specified below. If you use the exact same hardware then your installation will work perfectly provided that you follow the instructions here accurately.However, if you use different hardware (such as a different model of TV tuner or graphicscard) then you should do some research first to check that the hardware you have chosenis compatible with Ubuntu Gutsy 7.10 and that it is it compatible with MythTV. Thesafest option for a stressful install is to use the hardware I’ve written this guide around.
Tuner Card : Hauppauge WinTV Nova T-500 dual tuner
Network : Devolo Highspeed Ethernet Starter Kit (better than using Wireless)
Remotes : iPhone/iTouch, or use the remote that accompanied the Tuner
I wanted to point out a couple of things regarding my hardware setup. You will notice thatI’ve got video built into the motherboard, yet I also opted to install a separate graphicscard as well. The reason is that the separate graphics card will provide DVI output andhas a higher specification that the built-in one, which is important given that I need thegraphics card to deliver a clean crisp video image to the accompanying television.
Secondly, rather than installing a Wireless card I opted to use the built-in Ethernet portand connect it to a Devolo Ethernet adaptor that plugs into a power socket in the wall.These adaptors allow an 85mbps network connection to be established across the power circuit in your home. One adapter connects the network from the router to the mainscircuit and the other adaptor connects the mains circuit to your MythTV computer. This isespecially useful because Linux still has problems natively supporting many wirelesscards and this approach will give you a consistent fast network connection that will better facilitate streaming your media to other MythTV front-end PCs around your home.
One final point - get a lot of memory (1GB per TV channel you wish to be able to recordin parallel) and a large hard-disk. I fitted a 500GB hard-disk and was surprised how
quickly it filled up when I loaded on my DVD collection and started recording TV. Youcan never have enough memory and never have enough hard-disk space available to you!
8/14/2019 Installing MythTV 0.20 on Ubuntu Gutsy 7.10
In order to help you identify the hardware I used, please find below the details and boxes.All these hardware products are compatible with Ubuntu Linux 7.10 and with MythTV.
MotherboardnFORCE 4M-A ATX
(purchased in PC World)
Tuner Card
Hauppauge WinTV Nova T-500 dual tuner (purchased in PC World)
etwork
Devolo Highspeed Ethernet Starter Kit
(purchased in PC World)
Processor
AMD Athlon 64 X2 dual core processor
(purchased in PC World)
Graphics Card
nVidia GeForce 7200 Series
(purchased in Maplins)
8/14/2019 Installing MythTV 0.20 on Ubuntu Gutsy 7.10
DOCUMET PURPOSE 1 R EQUIREMETS 1 EXAMPLE HARDWARE 1 TABLE OF COTETS 3
ISTALLIG THE BASE SYSTEM 5
ISTALLIG UBUTU 5 EABLIG THE R OOT USER 6 COFIGURIG THE ETWORK 7 UPDATIG APTITUDE 8 ISTALLIG A SSH SERVER 9
ISTALLIG THE GEERIC SERVICES AD TOOLS 9 ISTALLIG A ETWORK TIME PROTOCOL SERVER 9
ISTALLIG THE FILE SERVER COMPOETS 10
CREATIG USER ACCOUTS 10 ISTALLIG SAMBA FILE SHARIG DAEMO 10
COFIGURIG THE VIDEO HARDWARE 11
ISTALLIG THE
VIDIA G
RAPHICSD
RIVERS11 ISTALLIG FIRMWARE FOR THE HAUPPAUGE WITV OVA-T 500 12
TESTIG THE HAUPPAUGE WITV OVA-T 500 13
ISTALLIG MYTHTV 15
ISTALLIG MYTHTV SERVER 15 COFIGURIG MYTHTV BACKED 15 COFIGURIG MYTHTV FROTED 21 ISTALLIG MYTHTV PLUGIS 25 COPYIG OVER YOUR MEDIA FILES TO MYTHTV 26
COFIGURE THE HAUPPAUGE R EMOTE COTROL 27
ADDIG THE FIISHIG TOUCHES 28
COFIGURIG THE DESKTOP USER ITERFACE 28 COFIGURIG AUTOMATIC LOGI AD START UP OF MYTHTV FROT-ED 29 ADDIG SUPPORT FOR DVD PLAYBACK AD R ESTRICTED FORMATS 30 SECURE APACHE2 WITH SSL 30 ISTALLIG FFMPEG WITH FULL MP4 SUPPORT 33 ISTALLIG HADBRAKE 34 ISTALLIG FS 34
ISTALLIG PHPMYADMI 35 SCRIPTS FOR ECODIG R ECORDIGS TO IPHOE/ITOUCH FORMAT 36
8/14/2019 Installing MythTV 0.20 on Ubuntu Gutsy 7.10
1. Install the hardware, insert the Ubuntu Gutsy CD into the DVD-drive and boot the PC
2. Highlight “Start or Install Ubuntu” and press F6 (Other Options)
3. Add “noapic” to the Boot Options. This is required to work around an issue withAMD 64 X2 processors hanging the OS. You may not need to include this step if youare using an alternative processor. If you are unsure you should add this option.
4. Run the Install program from the Ubuntu Desktop and follow the pictures below.
5. Select the language and region options for the installation
6. The partitioner will start up. When asked how you would like to partition your disk you should select manual . I created a 40GB partition for my root filesystem, a 10GB
swap partition, an optional 50GB partition for my network share and all the rest of myspace for my /var/ partition. The /var/ partition needs to be big because this is whereMythTV stores your media files by default. I installed a 500GB hard disk, so after losing 100GB for my root, swap and share partitions I had 400GB left for /var/.
8/14/2019 Installing MythTV 0.20 on Ubuntu Gutsy 7.10
When creating the /var/ partition I used a JFS file system. This is a journalled filesystem and is also very efficient at handling large data files, such as media content.
7. Next provide your name and password details for the main account. We will besetting up a mythtv account later on, so for now just create an account in your own
name. You should also provide a name for your computer; I used mythtv as the name.
8. The installation of the core Ubuntu operating system will then commence. Go andgrab yourself a cup of tea and after a while you will be prompted to reboot your PC.
Enabling the Root User
1. First we need to enable the root user account. This is the account that we will be usingto install all the core services under. Root is considered to be a specially privilegedaccount, so be careful when issuing the commands in this installation guide.
sudo passwd root[sudo] password for username: [enter password ]Enter new UNIX password: [enter password ]Retype new UNIX password: [enter password again]passwd: password updated successfully
suPassword: [enter the password you selected above]
8/14/2019 Installing MythTV 0.20 on Ubuntu Gutsy 7.10
1. You should now be logged in as the root user and therefore have the required privileges to change the system settings and install services and programs.
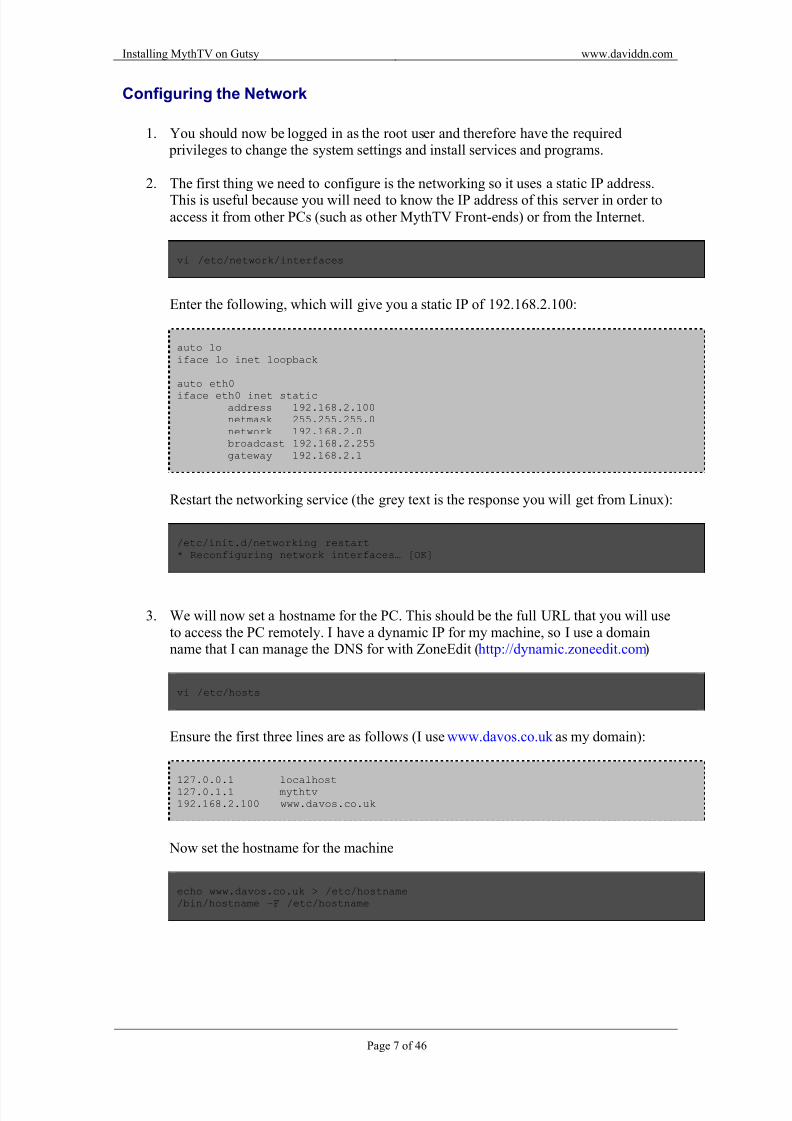
2. The first thing we need to configure is the networking so it uses a static IP address.
This is useful because you will need to know the IP address of this server in order toaccess it from other PCs (such as other MythTV Front-ends) or from the Internet.
vi /etc/network/interfaces
Enter the following, which will give you a static IP of 192.168.2.100:
3. We will now set a hostname for the PC. This should be the full URL that you will useto access the PC remotely. I have a dynamic IP for my machine, so I use a domainname that I can manage the DNS for with ZoneEdit (http://dynamic.zoneedit.com)
vi /etc/hosts
Ensure the first three lines are as follows (I use www.davos.co.uk as my domain):
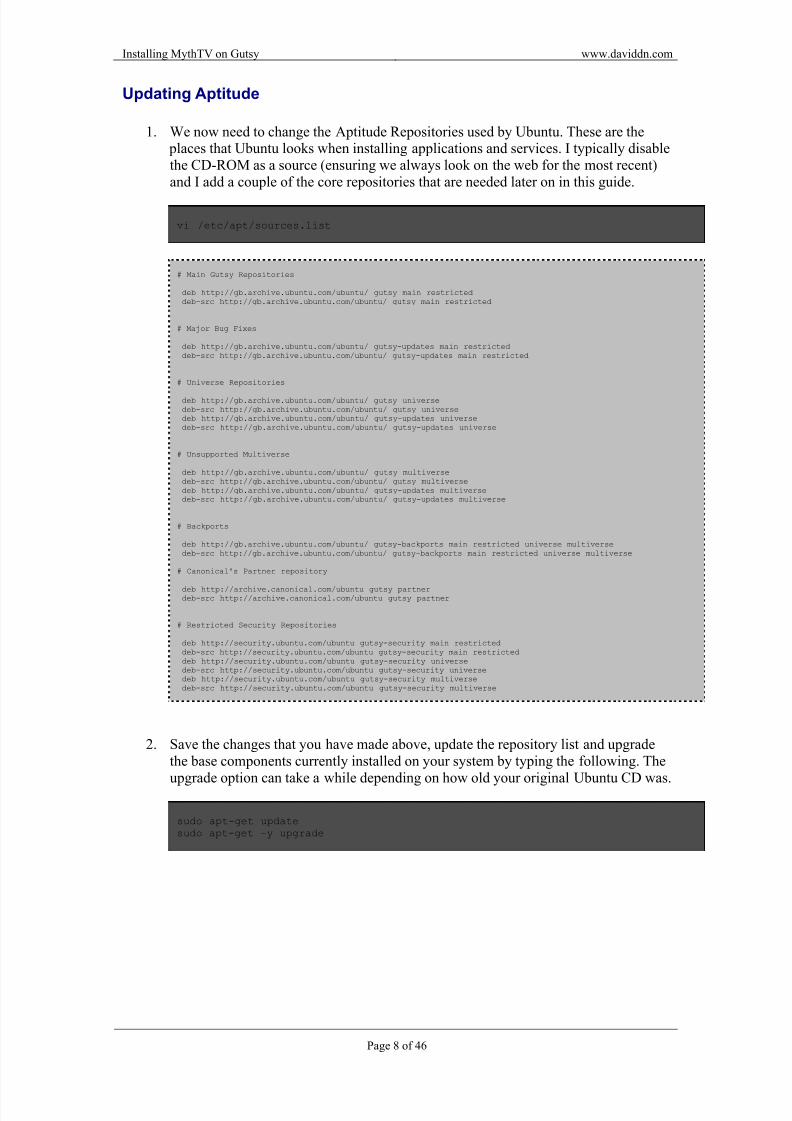
1. We now need to change the Aptitude Repositories used by Ubuntu. These are the places that Ubuntu looks when installing applications and services. I typically disablethe CD-ROM as a source (ensuring we always look on the web for the most recent)and I add a couple of the core repositories that are needed later on in this guide.
vi /etc/apt/sources.list
# Main Gutsy Repositories
deb http://gb.archive.ubuntu.com/ubuntu/ gutsy main restricteddeb-src http://gb.archive.ubuntu.com/ubuntu/ gutsy main restricted
# Major Bug Fixes
deb http://gb.archive.ubuntu.com/ubuntu/ gutsy-updates main restricteddeb-src http://gb.archive.ubuntu.com/ubuntu/ gutsy-updates main restricted
deb http://gb.archive.ubuntu.com/ubuntu/ gutsy-backports main restricted universe multiversedeb-src http://gb.archive.ubuntu.com/ubuntu/ gutsy-backports main restricted universe multiverse
# Canonical's Partner repository
deb http://archive.canonical.com/ubuntu gutsy partnerdeb-src http://archive.canonical.com/ubuntu gutsy partner
# Restricted Security Repositories
deb http://security.ubuntu.com/ubuntu gutsy-security main restricteddeb-src http://security.ubuntu.com/ubuntu gutsy-security main restricteddeb http://security.ubuntu.com/ubuntu gutsy-security universedeb-src http://security.ubuntu.com/ubuntu gutsy-security universedeb http://security.ubuntu.com/ubuntu gutsy-security multiversedeb-src http://security.ubuntu.com/ubuntu gutsy-security multiverse
2. Save the changes that you have made above, update the repository list and upgradethe base components currently installed on your system by typing the following. Theupgrade option can take a while depending on how old your original Ubuntu CD was.
sudo apt-get updatesudo apt-get –y upgrade
8/14/2019 Installing MythTV 0.20 on Ubuntu Gutsy 7.10
1. Install an SSH server so that you can use a SSH client to access the PC:
sudo apt-get –y install ssh
Installing the Generic Services and Tools
1. Install additional generic software that will be required during this installation bytyping the command line below into your terminal. The applications being added hereinclude useful programs for compressing and uncompressing data (unzip and zip), for fetching data from web pages (curl) or mail servers (fetchmail), for compiling code(gcc and make) and for converting DOS files into UNIX files (apt-file and sysutils).
sudo apt-get –y install unzip zip curl fetchmail libarchive-zip-perl zlib1g-dev
1. Install ntpdate to enable your clock to be automatically synchronised with an InternetTime server using NTP (Network Time Protocol). It is important for your clock to becorrect for timed recordings, otherwise you may miss programs you want to record.
As well as using the PC as a MythTV back-end, I also use the PC as a network fileserver too. Therefore, it may be useful to have additional user accounts set up on the
machine. We already have one account setup for the main user, but you can add anadditional one by following the following steps (repeat as many times as necessary):
adduser [username]
Installing Samba File Sharing Daemon
1. Samba allows you to create shares on your Ubuntu server that are visible fromWindows PCs on your network. We plan to install Samba for two reasons; (1) so that
the recordings made by MythTV can be made easily available across the network toWindows PCs that are not running a MythTV Front-end, and (2) so that we can usethe server as a standard file server for holding work files. Below I show how to installSamba and create accounts for two users that I intend giving access to. The passwordsthat are created are for the Samba accounts only, and do not need to be the same
passwords that are used on the accounts for accessing the Ubuntu machine.
New SMB password: [enter password]Retype new SMB password: [re-enter password]
smbpasswd -a niamhNew SMB password: [enter password]Retype new SMB password: [re-enter password]
vi /etc/samba/smb.conf
Under the Share Definitions section, add the following definition. This will create awritable share under the path /shared/ on your Ubuntu server. We will need to createthis directory and set the permissions so that users can read and write appropriately.
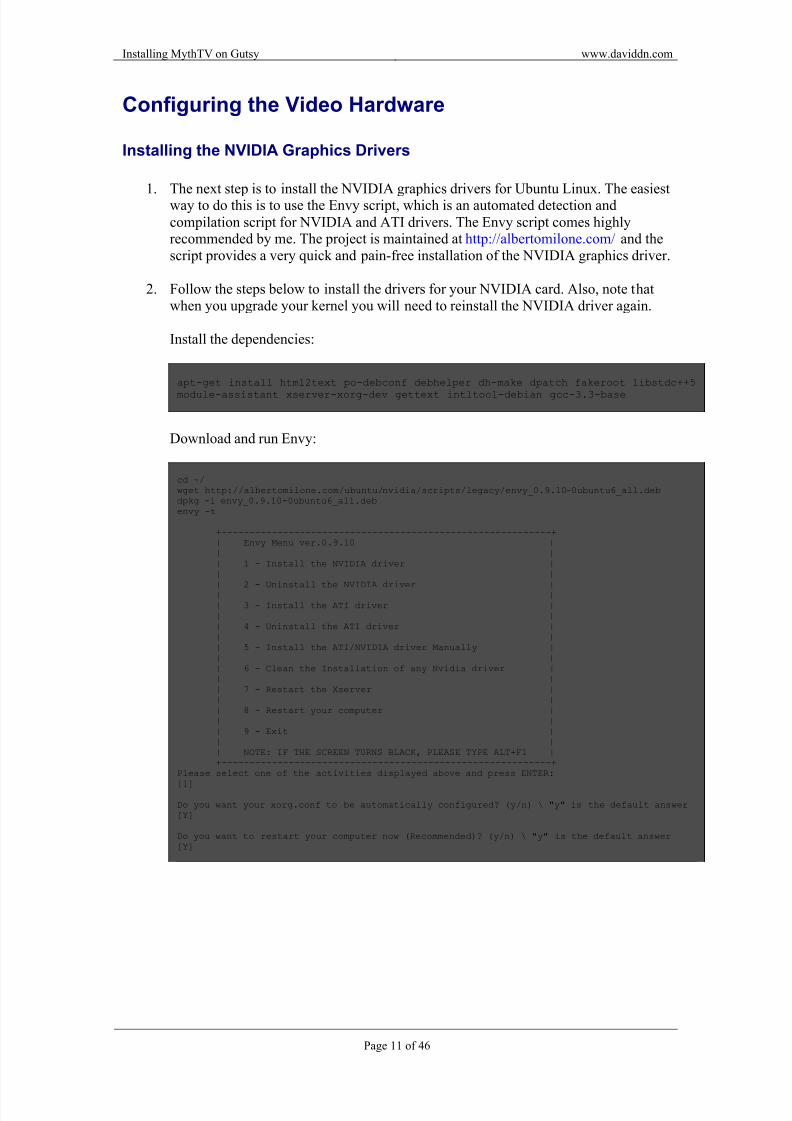
The next step is to install the NVIDIA graphics drivers for Ubuntu Linux. The easiestway to do this is to use the Envy script, which is an automated detection and
compilation script for NVIDIA and ATI drivers. The Envy script comes highlyrecommended by me. The project is maintained at http://albertomilone.com/ and thescript provides a very quick and pain-free installation of the NVIDIA graphics driver.
2. Follow the steps below to install the drivers for your NVIDIA card. Also, note thatwhen you upgrade your kernel you will need to reinstall the NVIDIA driver again.
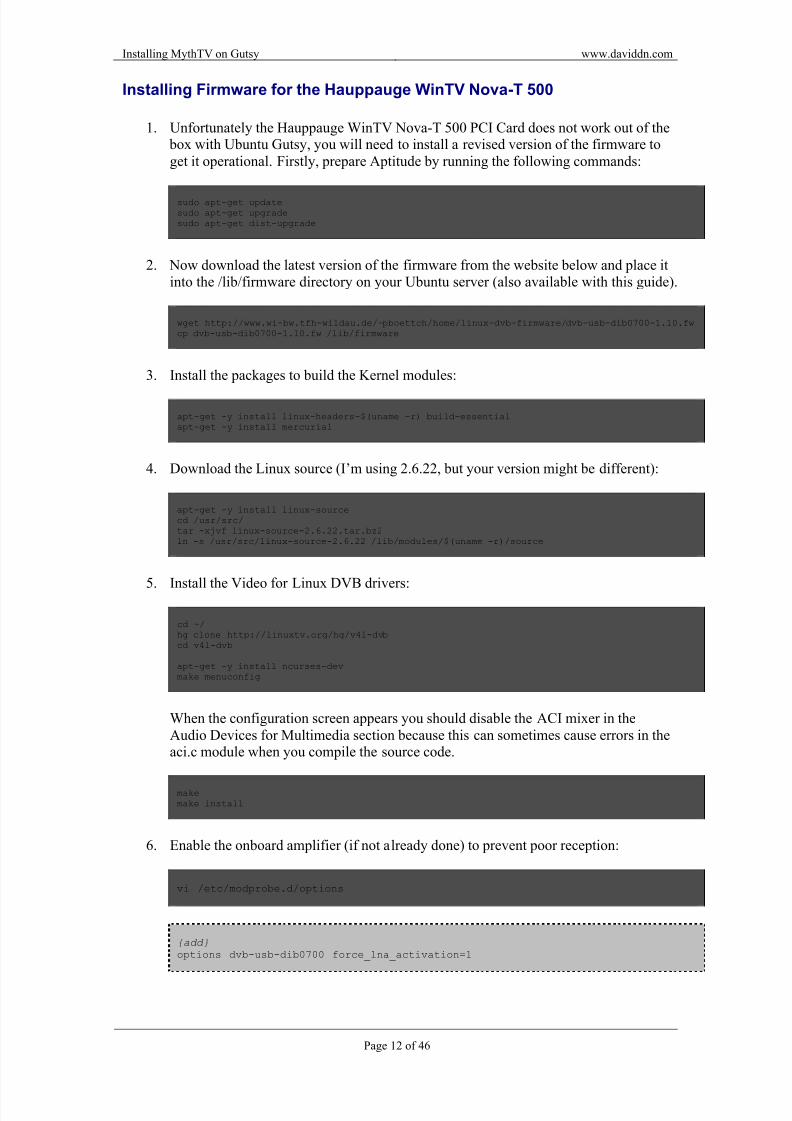
Installing Firmware for the Hauppauge WinTV Nova-T 500
1. Unfortunately the Hauppauge WinTV Nova-T 500 PCI Card does not work out of the box with Ubuntu Gutsy, you will need to install a revised version of the firmware to
get it operational. Firstly, prepare Aptitude by running the following commands:
2. Now download the latest version of the firmware from the website below and place itinto the /lib/firmware directory on your Ubuntu server (also available with this guide).
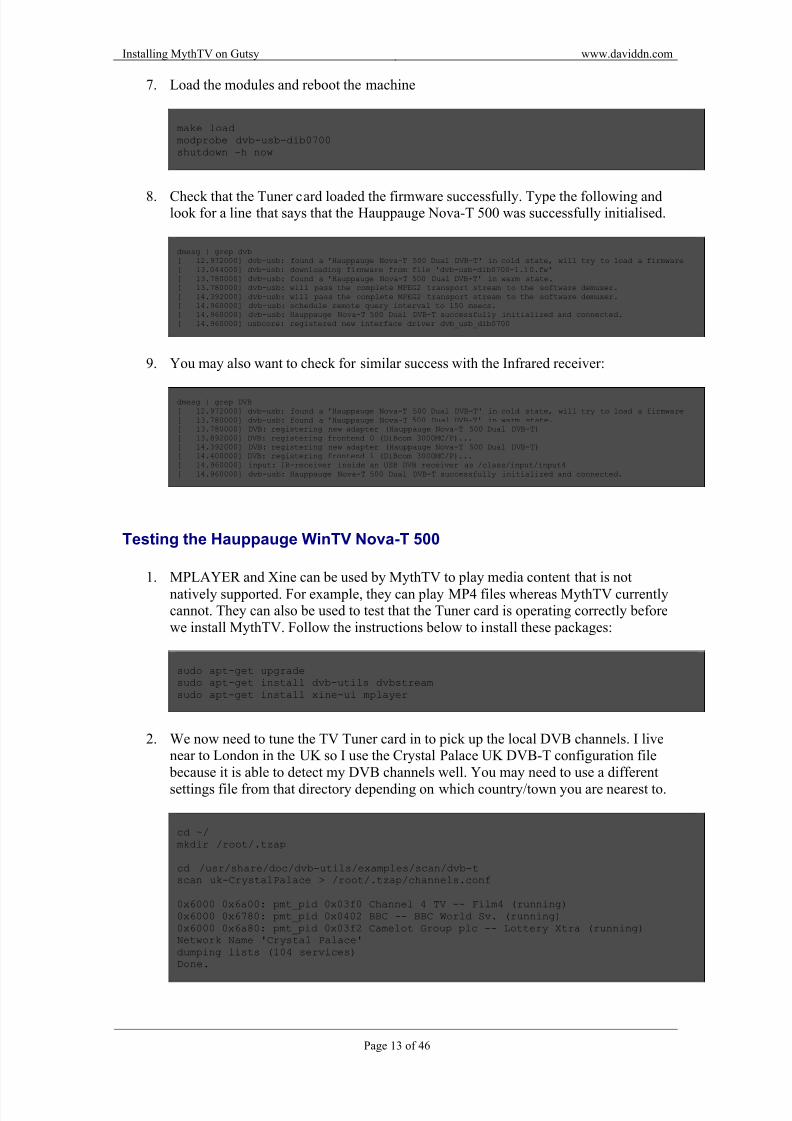
8. Check that the Tuner card loaded the firmware successfully. Type the following andlook for a line that says that the Hauppauge Nova-T 500 was successfully initialised.
dmesg | grep dvb[ 12.972000] dvb-usb: found a 'Hauppauge Nova-T 500 Dual DVB-T' in cold state, will try to load a firmware[ 13.044000] dvb-usb: downloading firmware from file 'dvb-usb-dib0700-1.10.fw'[ 13.780000] dvb-usb: found a 'Hauppauge Nova-T 500 Dual DVB-T' in warm state.[ 13.780000] dvb-usb: will pass the complete MPEG2 transport stream to the software demuxer.[ 14.392000] dvb-usb: will pass the complete MPEG2 transport stream to the software demuxer.[ 14.960000] dvb-usb: schedule remote query interval to 150 msecs.[ 14.960000] dvb-usb: Hauppauge Nova-T 500 Dual DVB-T successfully initialized and connected.[ 14.960000] usbcore: registered new interface driver dvb_usb_dib0700
9. You may also want to check for similar success with the Infrared receiver:
dmesg | grep DVB[ 12.972000] dvb-usb: found a 'Hauppauge Nova-T 500 Dual DVB-T' in cold state, will try to load a firmware[ 13.780000] dvb-usb: found a 'Hauppauge Nova-T 500 Dual DVB-T' in warm state.[ 13.780000] DVB: registering new adapter (Hauppauge Nova-T 500 Dual DVB-T)[ 13.892000] DVB: registering frontend 0 (DiBcom 3000MC/P)...[ 14.392000] DVB: registering new adapter (Hauppauge Nova-T 500 Dual DVB-T)[ 14.400000] DVB: registering frontend 1 (DiBcom 3000MC/P)...[ 14.960000] input: IR-receiver inside an USB DVB receiver as /class/input/input4[ 14.960000] dvb-usb: Hauppauge Nova-T 500 Dual DVB-T successfully initialized and connected.
Testing the Hauppauge WinTV Nova-T 500
1. MPLAYER and Xine can be used by MythTV to play media content that is not
natively supported. For example, they can play MP4 files whereas MythTV currentlycannot. They can also be used to test that the Tuner card is operating correctly beforewe install MythTV. Follow the instructions below to install these packages:
2. We now need to tune the TV Tuner card in to pick up the local DVB channels. I livenear to London in the UK so I use the Crystal Palace UK DVB-T configuration file because it is able to detect my DVB channels well. You may need to use a different
settings file from that directory depending on which country/town you are nearest to.
cd ~/mkdir /root/.tzap
cd /usr/share/doc/dvb-utils/examples/scan/dvb-tscan uk-CrystalPalace > /root/.tzap/channels.conf
0x6000 0x6a00: pmt_pid 0x03f0 Channel 4 TV -- Film4 (running)0x6000 0x6780: pmt_pid 0x0402 BBC -- BBC World Sv. (running)0x6000 0x6a80: pmt_pid 0x03f2 Camelot Group plc -- Lottery Xtra (running)Network Name 'Crystal Palace'dumping lists (104 services)Done.
8/14/2019 Installing MythTV 0.20 on Ubuntu Gutsy 7.10
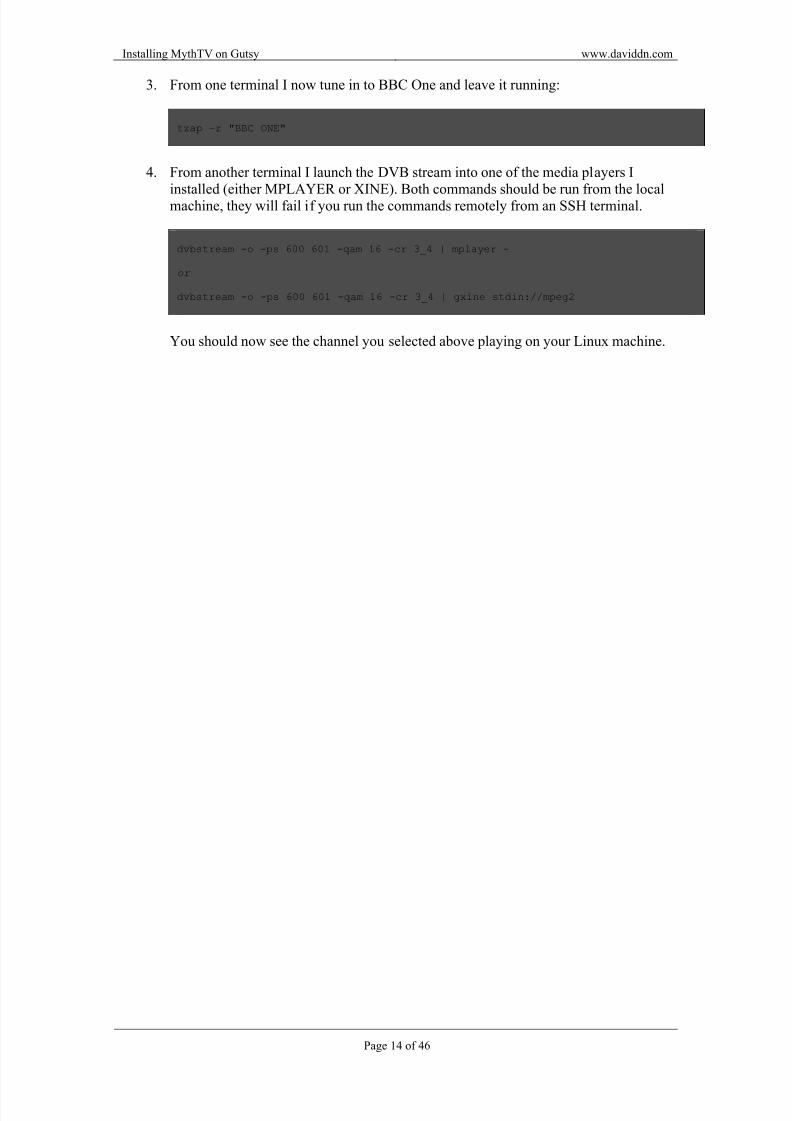
3. From one terminal I now tune in to BBC One and leave it running:
tzap –r "BBC ONE"
4. From another terminal I launch the DVB stream into one of the media players I
installed (either MPLAYER or XINE). Both commands should be run from the localmachine, they will fail if you run the commands remotely from an SSH terminal.
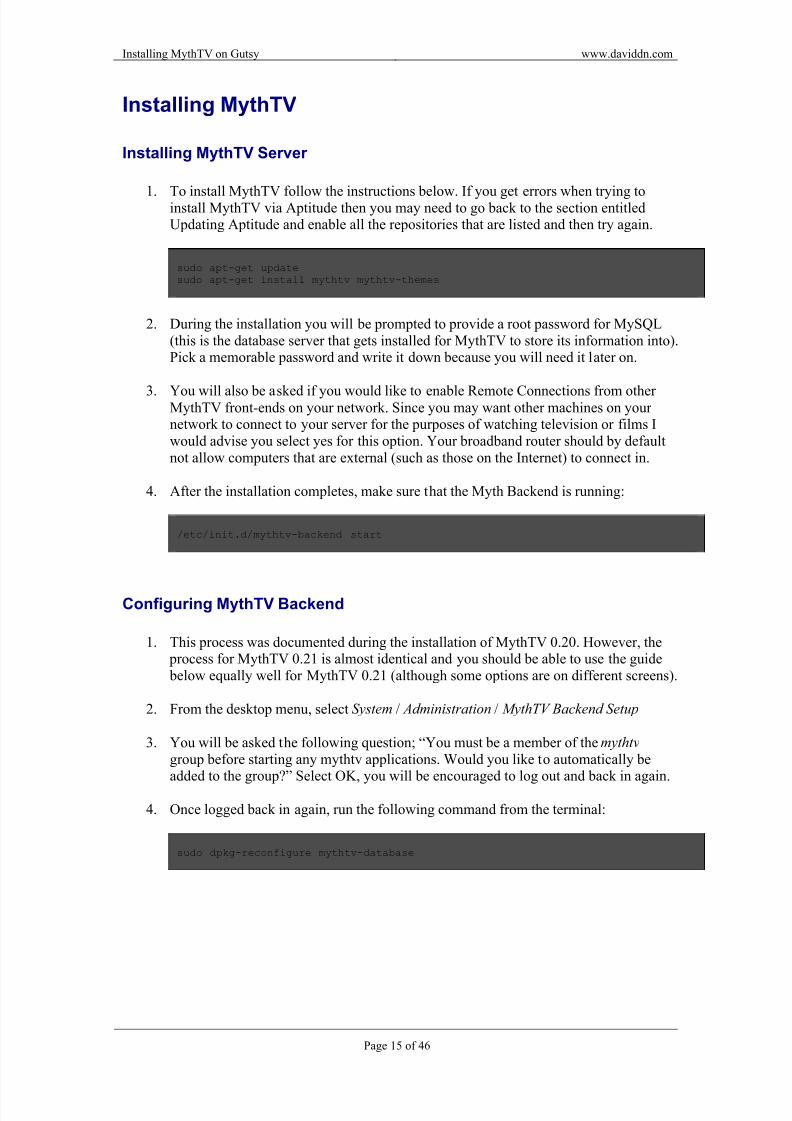
To install MythTV follow the instructions below. If you get errors when trying toinstall MythTV via Aptitude then you may need to go back to the section entitledUpdating Aptitude and enable all the repositories that are listed and then try again.
2. During the installation you will be prompted to provide a root password for MySQL(this is the database server that gets installed for MythTV to store its information into).Pick a memorable password and write it down because you will need it later on.
3. You will also be asked if you would like to enable Remote Connections from other MythTV front-ends on your network. Since you may want other machines on your network to connect to your server for the purposes of watching television or films Iwould advise you select yes for this option. Your broadband router should by defaultnot allow computers that are external (such as those on the Internet) to connect in.
4. After the installation completes, make sure that the Myth Backend is running:
/etc/init.d/mythtv-backend start
Configuring MythTV Backend
1. This process was documented during the installation of MythTV 0.20. However, the process for MythTV 0.21 is almost identical and you should be able to use the guide below equally well for MythTV 0.21 (although some options are on different screens).
2. From the desktop menu, select System / Administration / MythTV Backend Setup
3. You will be asked the following question; “You must be a member of the mythtv group before starting any mythtv applications. Would you like to automatically beadded to the group?” Select OK, you will be encouraged to log out and back in again.
4. Once logged back in again, run the following command from the terminal:
sudo dpkg-reconfigure mythtv-database
8/14/2019 Installing MythTV 0.20 on Ubuntu Gutsy 7.10
5. Enter the following responses for the questions below:
Question Response
MySQL Server localhost
MySQL Administration Account root
Will you be using other computers running MythTV? Yes
6. Next run the following command from the terminal:
sudo dpkg-reconfigure mythtv-common
7. Enter the following responses for the questions below:
Question Response
What database should be used to hold MythTV data? mythconverg
What username should MythTV use? mythtv
What password should MythTV use? [use password in /etc/mythtv/mysql.txt]
On what host does the MySQL server reside? localhost
8. From the desktop menu, select System / Administration / MythTV Backend Setup.You will be told that Mythbackend must be closed before continuing. You should
select OK and then the MythTV Language Configuration screen will appear:
Question Response
Select your preferred language English (British)
9. The next screen allows you to configure the Database. Fill in the details as below:
Question Response
Host name localhost
Database mythconverg
User: mythtv
Password: [use password in /etc/mythtv/mysql.txt]
Database Type MySQL
8/14/2019 Installing MythTV 0.20 on Ubuntu Gutsy 7.10
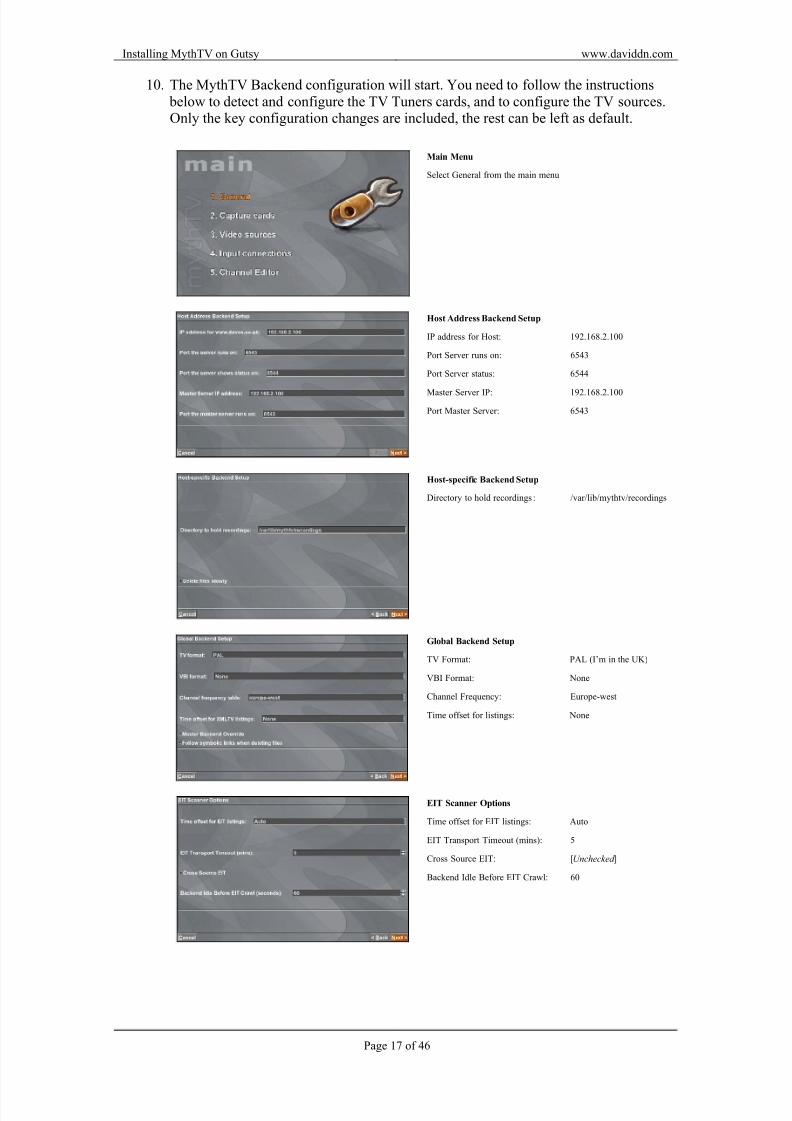
10. The MythTV Backend configuration will start. You need to follow the instructions below to detect and configure the TV Tuners cards, and to configure the TV sources.Only the key configuration changes are included, the rest can be left as default.
Main Menu
Select General from the main menu
Host Address Backend Setup
IP address for Host: 192.168.2.100
Port Server runs on: 6543
Port Server status: 6544
Master Server IP: 192.168.2.100
Port Master Server: 6543
Host-specific Backend Setup
Directory to hold recordings : /var/lib/mythtv/recordings
Global Backend Setup
TV Format: PAL (I’m in the UK)
VBI Format: None
Channel Frequency: Europe-west
Time offset for listings: None
EIT Scanner Options
Time offset for EIT listings: Auto
EIT Transport Timeout (mins): 5
Cross Source EIT: [Unchecked ]
Backend Idle Before EIT Crawl: 60
8/14/2019 Installing MythTV 0.20 on Ubuntu Gutsy 7.10
Wait patiently whilst the scan takes place, this can take up to 5
minutes on some systems depending on your computer
performance and on the strength of your TV signal.
Input Connections
When complete you should have assigned both your DVB
capture cards to the TV video source (see image on the left)
11. After finishing with the settings you will be prompted if you would like to runmythfilldatabase. You should select OK to this option and let the database be updated.You may be asked for your root password during this process also.
Configuring MythTV Frontend
1. From a terminal enter the following to reset the mythtv account password:
sudo passwd mythtvEnter new UNIX password: [enter a password ]Retype new UNIX password: [enter a password ]passwd: password updated successfully
2. Edit /etc/group and add mythtv to the following groups:
admadmin
powerdev
3. Log out and then log in as the mythtv user to complete the following steps
4. From the desktop menu select Applications / Sound & Video / MythTV Frontend
5. The MythTV Frontend configuration will start. You now need to follow theinstructions below to configure the various components in order to watch TV. Again,only the key configuration changes are shown below, the others can be left as default.
8/14/2019 Installing MythTV 0.20 on Ubuntu Gutsy 7.10
1. Install the MythTV plugins package by following the instructions below. As part of the installation you will be prompted whether or not you wish to password-protectMythWeb. I would recommend that you do (we will also look at SSL security later).
sudo apt-get -y install mythplugins
2. Restart your web server for the changes to be picked up in MythWeb:
/etc/init.d/apache2 restart
3. Test the MythWeb installation by navigating to http://192.168.2.100/mythweb/
4. Place an empty index.html file into /var/www/ to prevent browsing your web-root:
touch /var/www/index.html
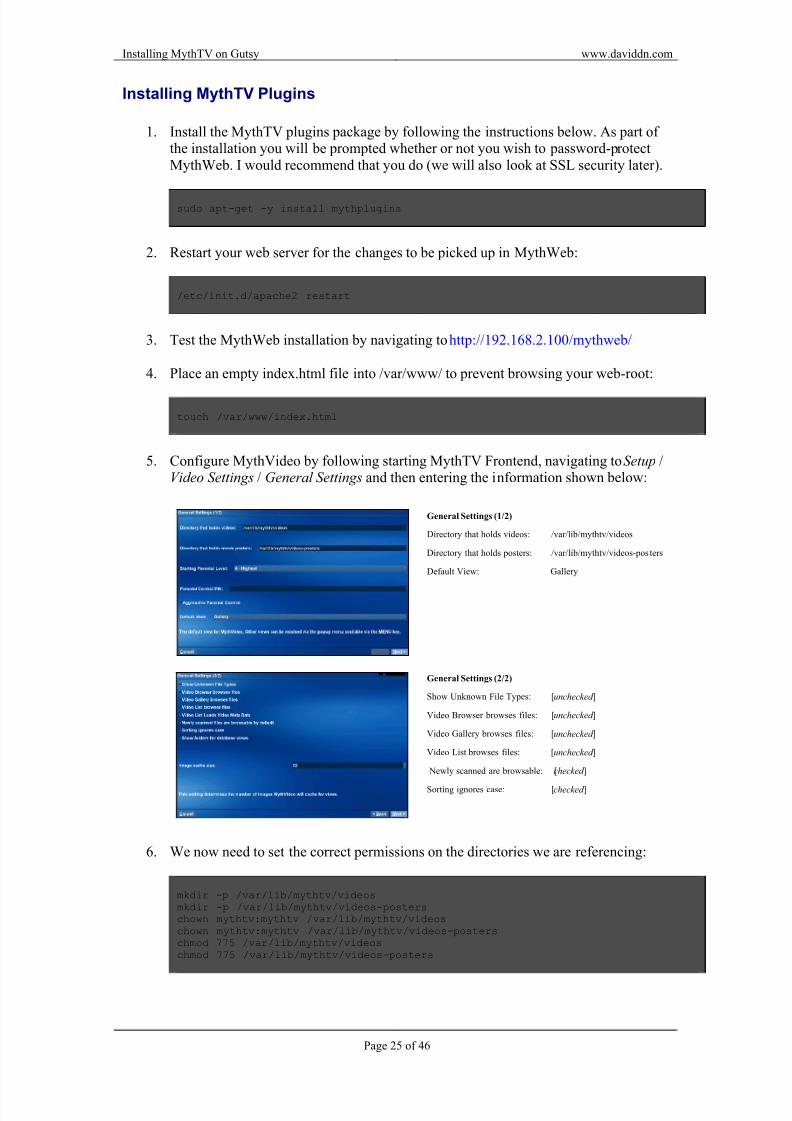
5. Configure MythVideo by following starting MythTV Frontend, navigating to Setup /Video Settings / General Settings and then entering the information shown below:
General Settings (1/2)
Directory that holds videos: /var/lib/mythtv/videos
Directory that holds posters: /var/lib/mythtv/videos-posters
Default View: Gallery
General Settings (2/2)
Show Unknown File Types: [unchecked ]
Video Browser browses files: [unchecked ]
Video Gallery browses files: [unchecked ]
Video List browses files: [unchecked ]
Newly scanned are browsable: [checked ]
Sorting ignores case: [checked ]
6. We now need to set the correct permissions on the directories we are referencing:
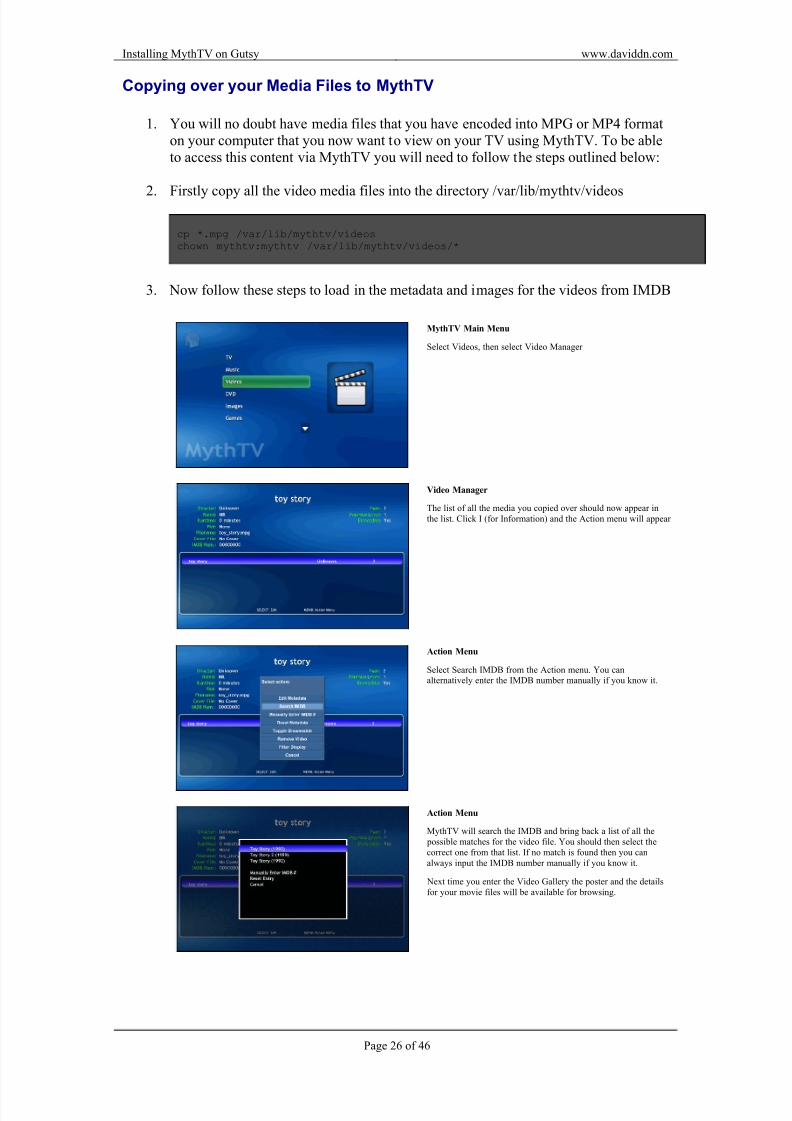
1. You will no doubt have media files that you have encoded into MPG or MP4 formaton your computer that you now want to view on your TV using MythTV. To be ableto access this content via MythTV you will need to follow the steps outlined below:
2.
Firstly copy all the video media files into the directory /var/lib/mythtv/videos
1. To use the Hauppauge Remote Control that came with your tuner card you shouldfollow the steps below. Make sure that the remote receiver is plugged into the back of your computer and that the remote control is within line-of-sight of the receiver.
cat /proc/bus/input/devices
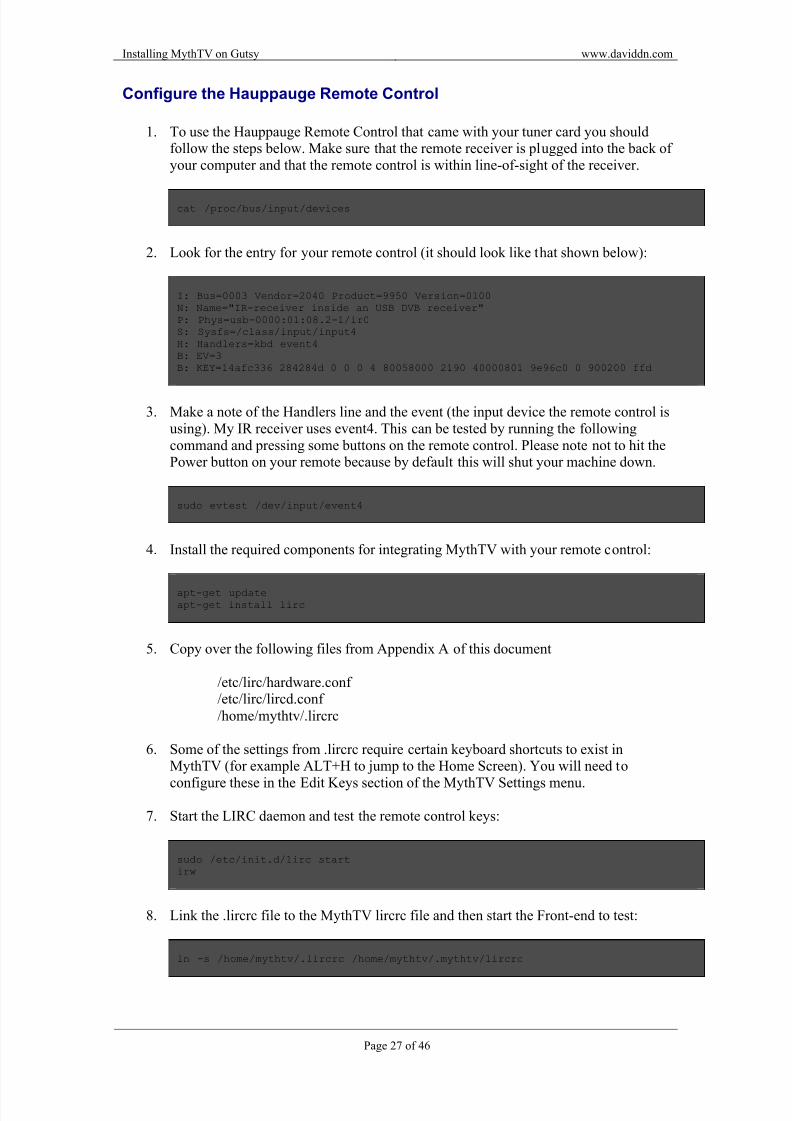
2. Look for the entry for your remote control (it should look like that shown below):
3. Make a note of the Handlers line and the event (the input device the remote control isusing). My IR receiver uses event4. This can be tested by running the followingcommand and pressing some buttons on the remote control. Please note not to hit thePower button on your remote because by default this will shut your machine down.
sudo evtest /dev/input/event4
4. Install the required components for integrating MythTV with your remote control:
apt-get updateapt-get install lirc
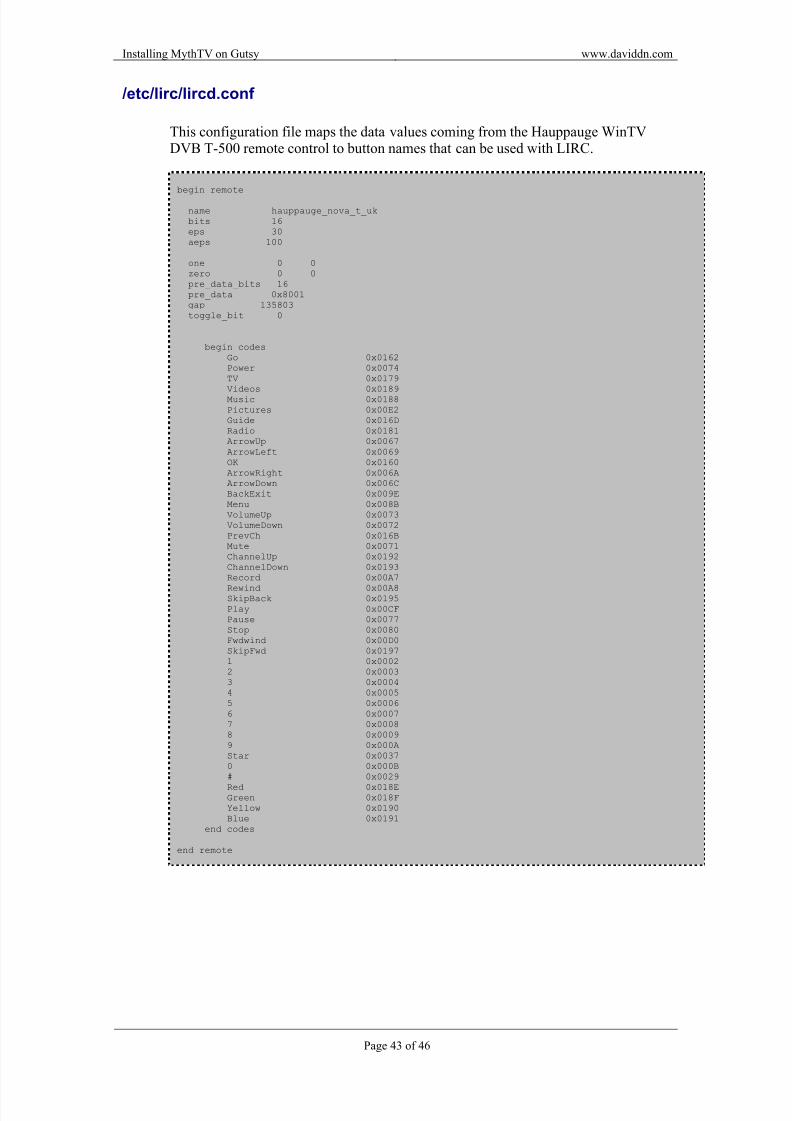
5. Copy over the following files from Appendix A of this document
/etc/lirc/hardware.conf /etc/lirc/lircd.conf
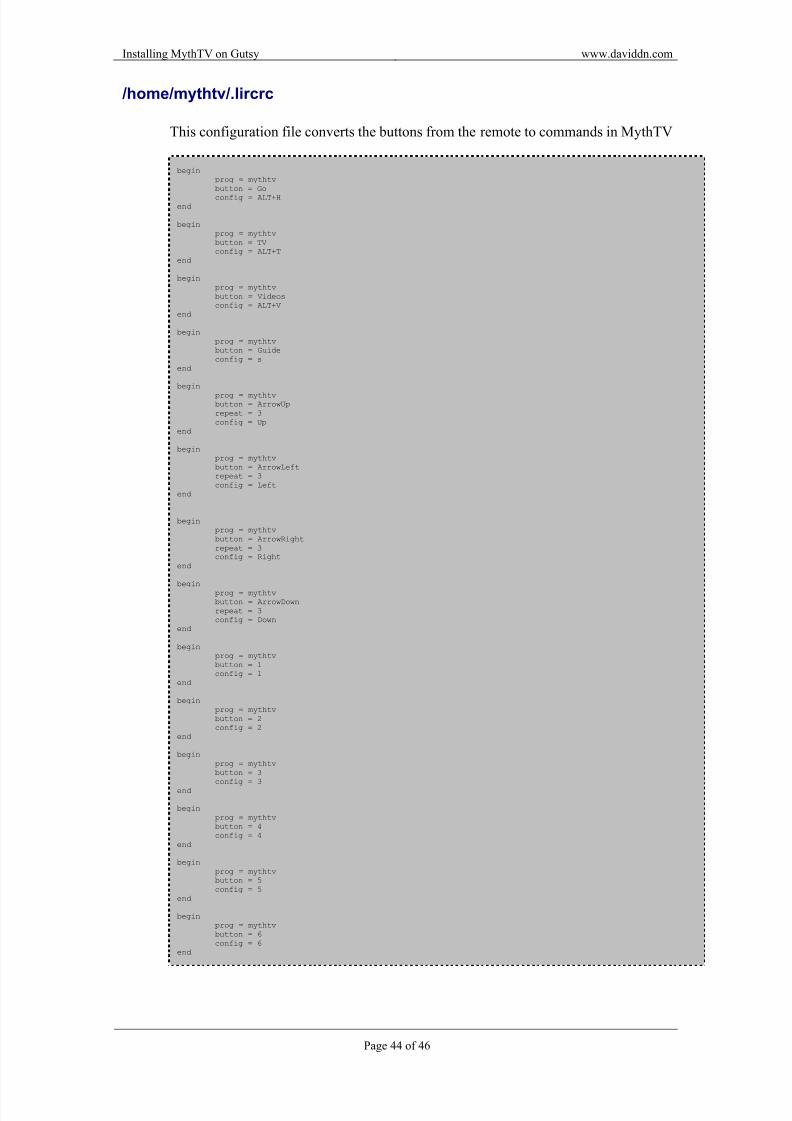
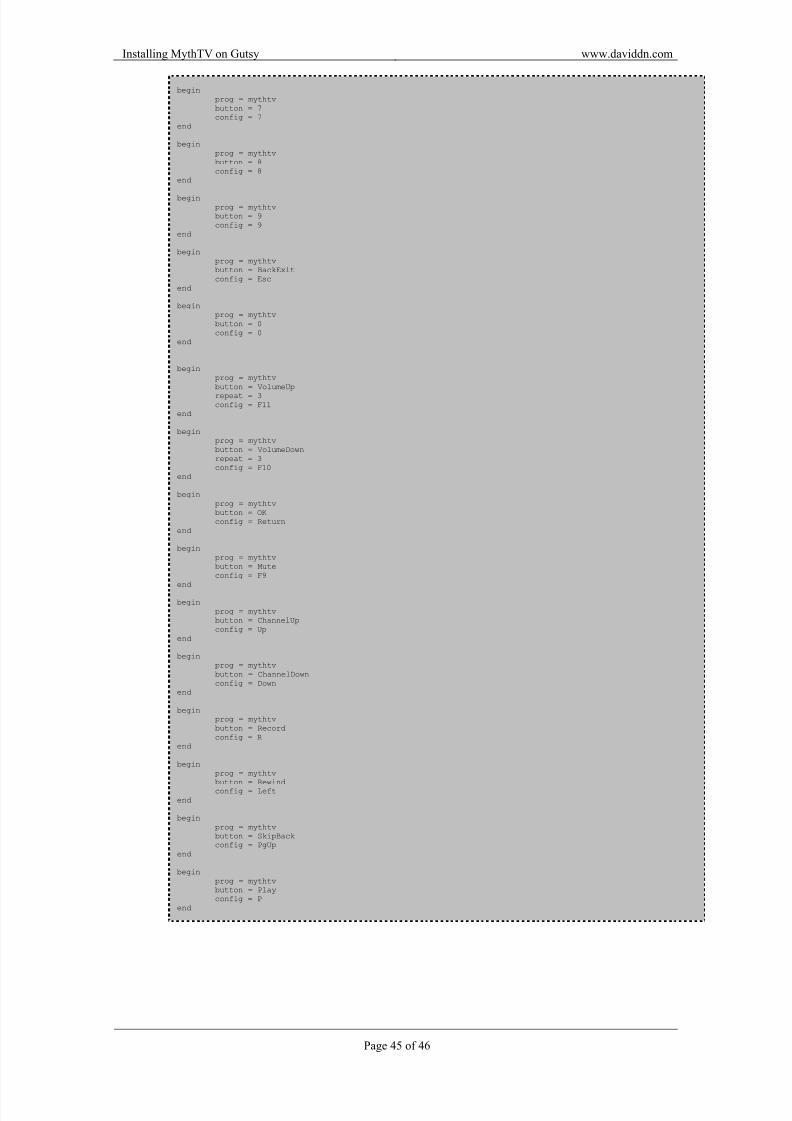
/home/mythtv/.lircrc
6. Some of the settings from .lircrc require certain keyboard shortcuts to exist inMythTV (for example ALT+H to jump to the Home Screen). You will need to
configure these in the Edit Keys section of the MythTV Settings menu.
7. Start the LIRC daemon and test the remote control keys:
sudo /etc/init.d/lirc startirw
8. Link the .lircrc file to the MythTV lircrc file and then start the Front-end to test:
1. The purpose of this section is to configure the MythTV server so that it allows you to play back video and TV without being interrupted by system sounds, screen savers
and other alerts commonplace on a computer that could spoil your viewing pleasure.These steps should all be completed whilst logged in as the mythtv user.
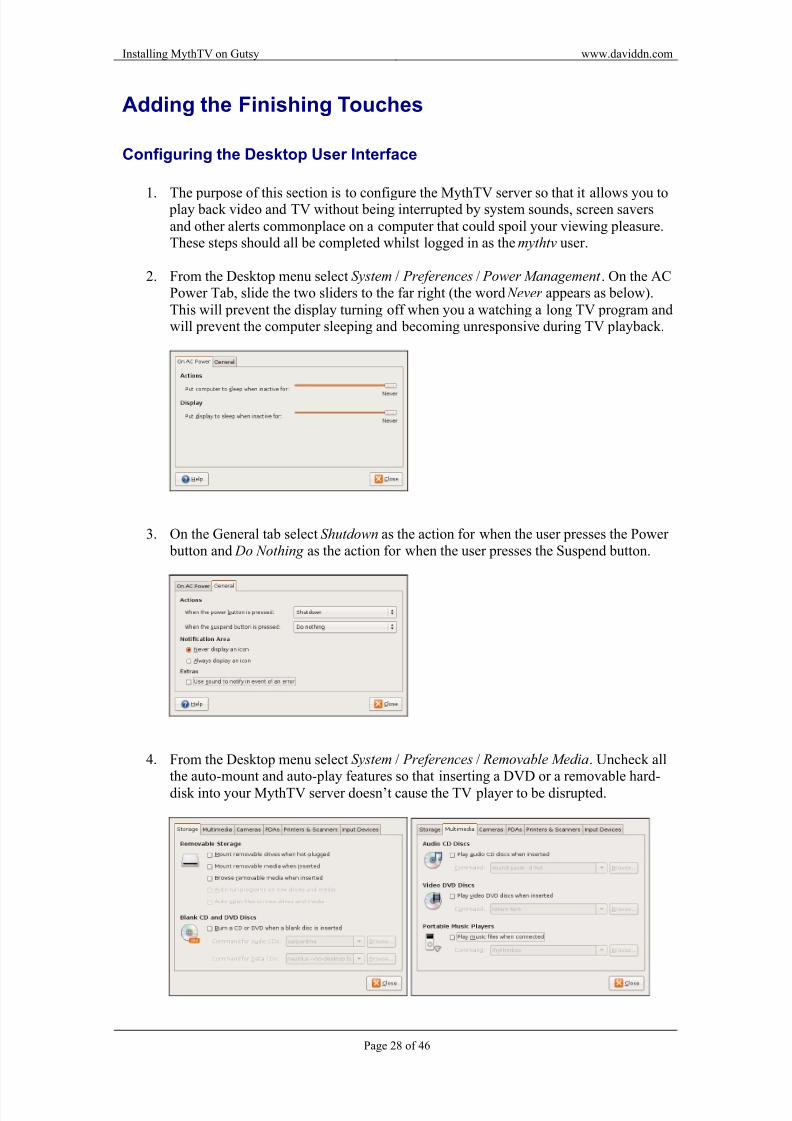
2. From the Desktop menu select System / Preferences / Power Management . On the ACPower Tab, slide the two sliders to the far right (the word ever appears as below).
This will prevent the display turning off when you a watching a long TV program andwill prevent the computer sleeping and becoming unresponsive during TV playback.
3. On the General tab select Shutdown as the action for when the user presses the Power button and Do othing as the action for when the user presses the Suspend button.
4. From the Desktop menu select System / Preferences / Removable Media. Uncheck allthe auto-mount and auto-play features so that inserting a DVD or a removable hard-
disk into your MythTV server doesn’t cause the TV player to be disrupted.
8/14/2019 Installing MythTV 0.20 on Ubuntu Gutsy 7.10
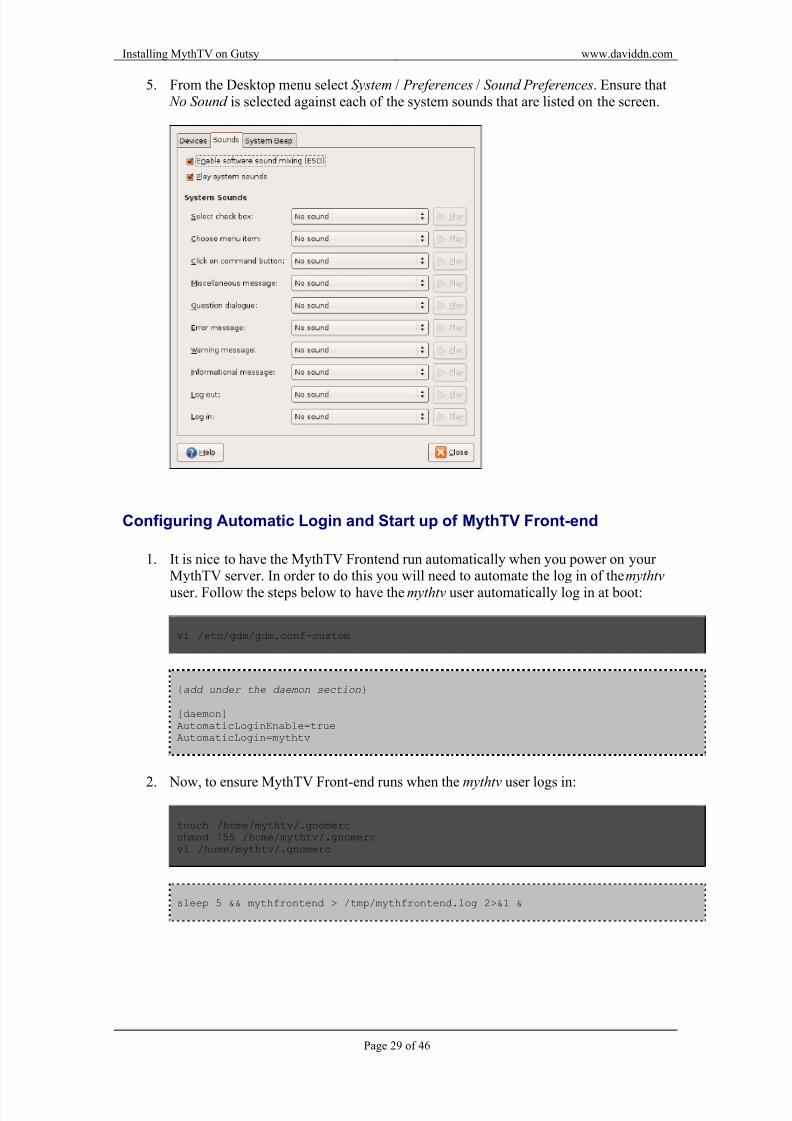
5. From the Desktop menu select System / Preferences / Sound Preferences. Ensure that o Sound is selected against each of the system sounds that are listed on the screen.
Configuring Automatic Login and Start up of MythTV Front-end
1. It is nice to have the MythTV Frontend run automatically when you power on your MythTV server. In order to do this you will need to automate the log in of the mythtv
user. Follow the steps below to have the mythtv user automatically log in at boot:
Adding Support for DVD Playback and Restricted Formats
1. Some of your media may be in formats that are not natively supported under Linux.Follow these steps to include support for CSS encrypted DVDs and Windows codecs.First add the Medibuntu sources to Aptitude by issuing the following commands:
1. You may wish to secure some of the URLs on your web server with SSL encryption
so that information passed over the internet between your client PC and the MythTVserver (such as passwords) cannot be read or intercepted. This would be particularly
useful to help secure MythWeb. Follow the steps below to install and configure SSL.
AllowOverride NoneOptions +ExecCGI -MultiViews +SymLinksIfOwnerMatchOrder allow,denyAllow from all
</Directory>
ErrorLog /var/log/apache2/error.log
LogLevel warn
CustomLog /var/log/apache2/access.log combinedServerSignature On
Alias /doc/ "/usr/share/doc/"<Directory "/usr/share/doc/">
Options Indexes MultiViews FollowSymLinksAllowOverride NoneOrder deny,allowDeny from allAllow from 127.0.0.0/255.0.0.0 ::1/128
</Directory>
</VirtualHost>
7. Finally, reload Apache. You should be able to test the above configuration by
navigating to MythWeb on your MythTV server. A certificate will be displayed andyou will be redirected to use an HTTPS (SSL) connection instead of standard HTTP.
sudo /etc/init.d/apache2 force-reload
8/14/2019 Installing MythTV 0.20 on Ubuntu Gutsy 7.10
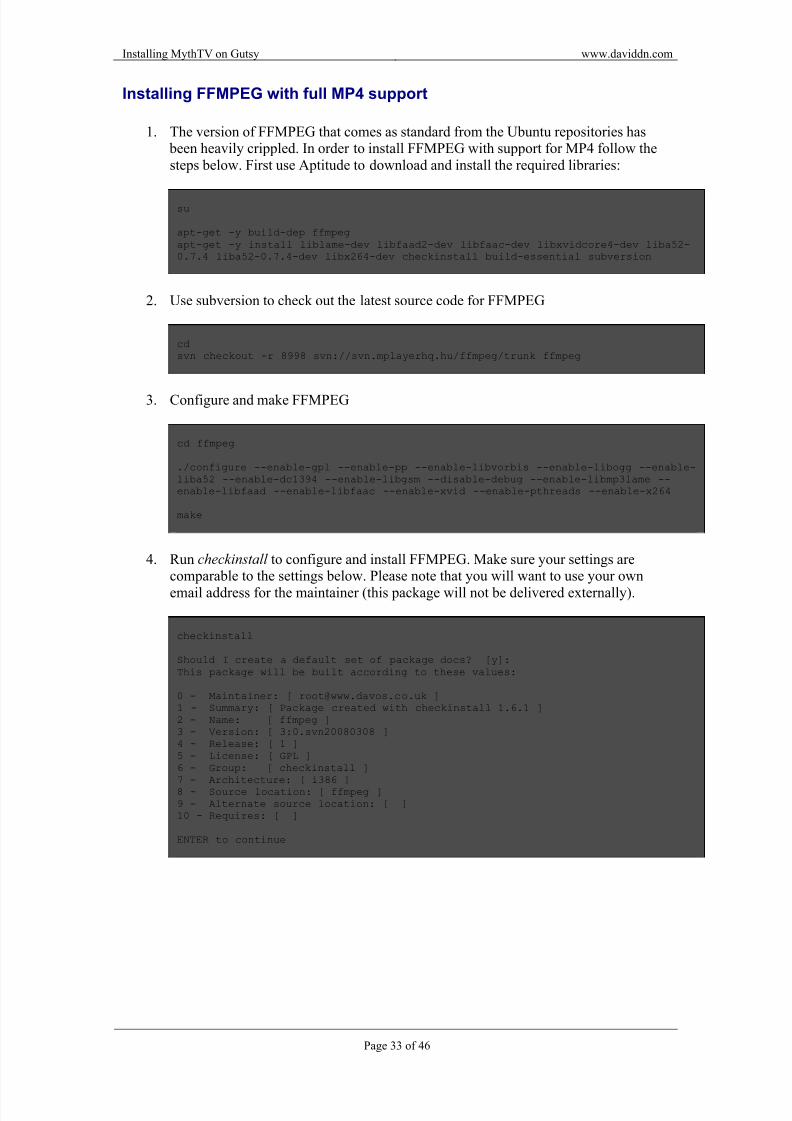
1. The version of FFMPEG that comes as standard from the Ubuntu repositories has been heavily crippled. In order to install FFMPEG with support for MP4 follow thesteps below. First use Aptitude to download and install the required libraries:
4. Run checkinstall to configure and install FFMPEG. Make sure your settings arecomparable to the settings below. Please note that you will want to use your own
email address for the maintainer (this package will not be delivered externally).
checkinstall
Should I create a default set of package docs? [y]:This package will be built according to these values:
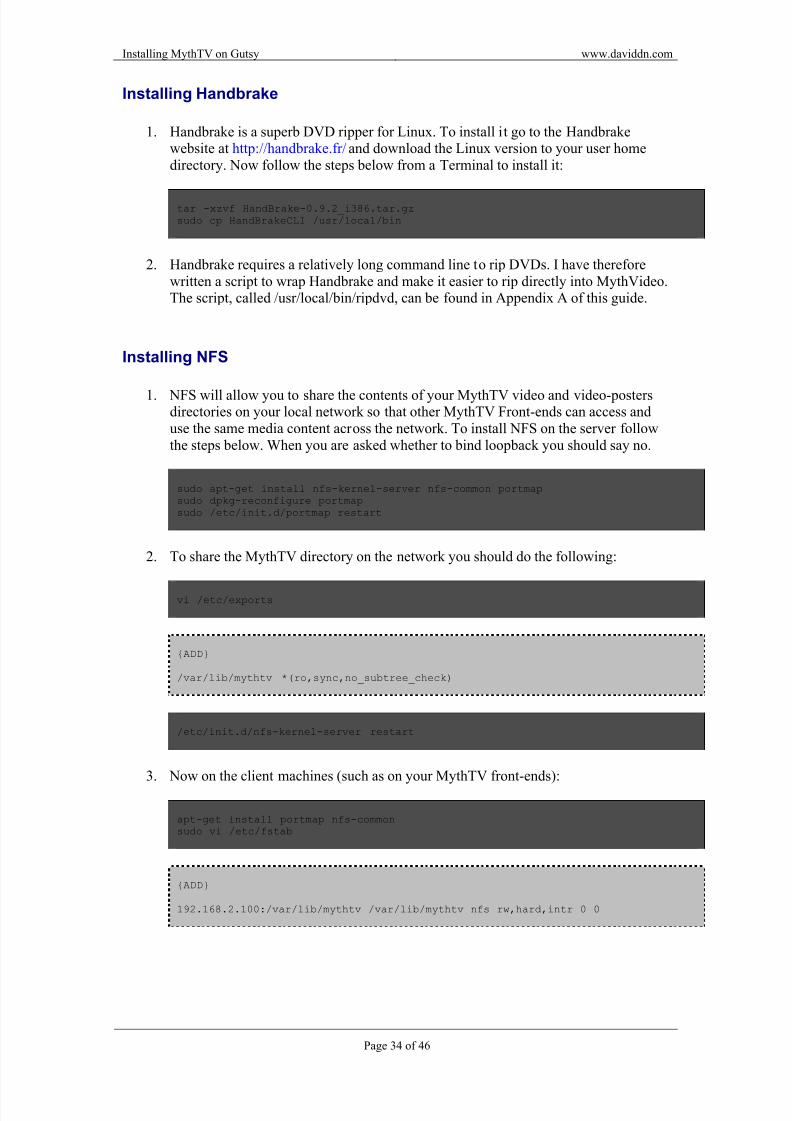
1. Handbrake is a superb DVD ripper for Linux. To install it go to the Handbrakewebsite at http://handbrake.fr/ and download the Linux version to your user homedirectory. Now follow the steps below from a Terminal to install it:
tar -xzvf HandBrake-0.9.2_i386.tar.gzsudo cp HandBrakeCLI /usr/local/bin
2. Handbrake requires a relatively long command line to rip DVDs. I have thereforewritten a script to wrap Handbrake and make it easier to rip directly into MythVideo.The script, called /usr/local/bin/ripdvd, can be found in Appendix A of this guide.
Installing NFS
1. NFS will allow you to share the contents of your MythTV video and video-postersdirectories on your local network so that other MythTV Front-ends can access anduse the same media content across the network. To install NFS on the server followthe steps below. When you are asked whether to bind loopback you should say no.
1. PHPMyAdmin will allow you to configure and manage MythTV directly from thedatabase. To install PHPMyAdmin you will need to visit the PHPMyAdmin websiteat http://www.phpmyadmin.net/ and download the latest all-languages.zip file.
2. Place all-languages.zip into /var/www/ and run the following from a terminal:
cd /var/wwwunzip phpMyAdmin-*-all-languages.zipmv phpMyAdmin-*-all-languages phpmyadminrm phpMyAdmin-*-all-languages.zip
3. Change the PHPMyAdmin configuration file by adding the blowfish secret:
cd /var/www/phpmyadminmv config.sample.inc.php config.inc.php
vi config.inc.php
{CHANGE }
$cfg['blowfish_secret'] = 'hello';
4. You should now be able to log into PHPMyAdmin by entering your MythTV
database username and password into the site http://192.168.2.100/phpmyadmin
8/14/2019 Installing MythTV 0.20 on Ubuntu Gutsy 7.10
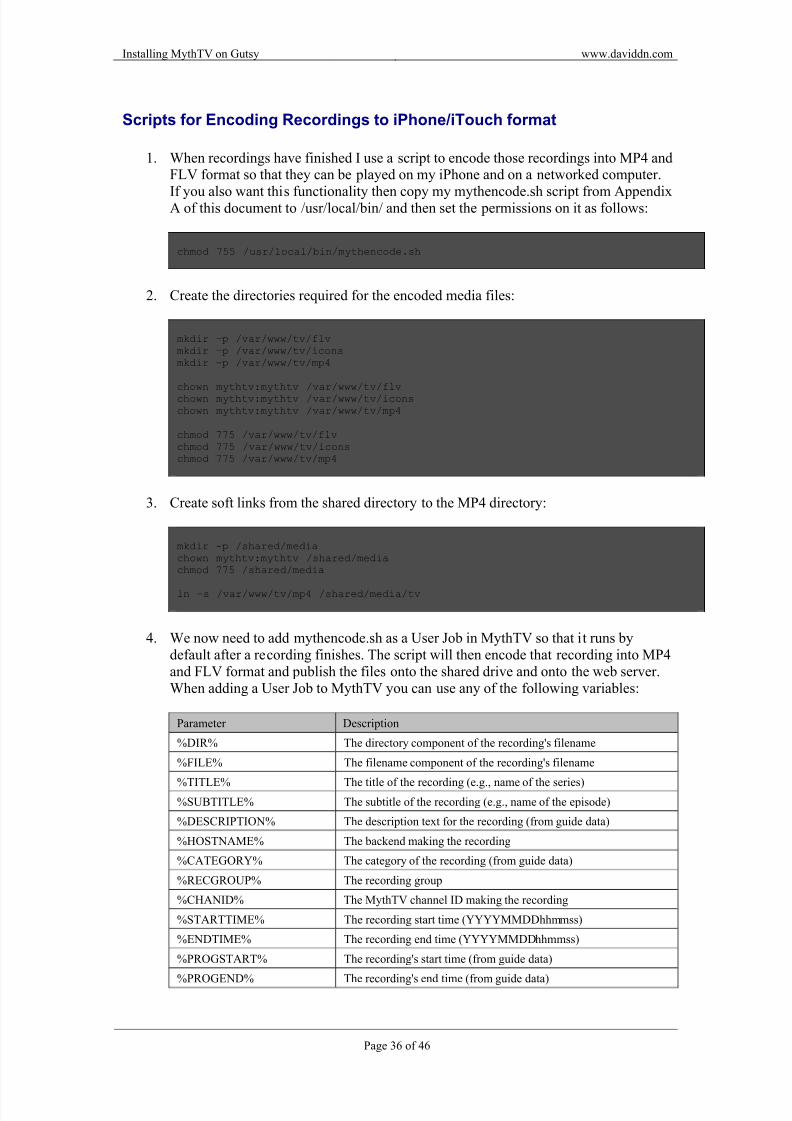
Scripts for Encoding Recordings to iPhone/iTouch format
1. When recordings have finished I use a script to encode those recordings into MP4 andFLV format so that they can be played on my iPhone and on a networked computer.
If you also want this functionality then copy my mythencode.sh script from AppendixA of this document to /usr/local/bin/ and then set the permissions on it as follows:
chmod 755 /usr/local/bin/mythencode.sh
2. Create the directories required for the encoded media files:
4. We now need to add mythencode.sh as a User Job in MythTV so that it runs bydefault after a recording finishes. The script will then encode that recording into MP4and FLV format and publish the files onto the shared drive and onto the web server.When adding a User Job to MythTV you can use any of the following variables:
Parameter Description
%DIR% The directory component of the recording's filename
%FILE% The filename component of the recording's filename
%TITLE% The title of the recording (e.g., name of the series)%SUBTITLE% The subtitle of the recording (e.g., name of the episode)
%DESCRIPTION% The description text for the recording (from guide data)
%HOSTNAME% The backend making the recording
%CATEGORY% The category of the recording (from guide data)
%RECGROUP% The recording group
%CHANID% The MythTV channel ID making the recording
%STARTTIME% The recording start time (YYYYMMDDhhmmss)
%ENDTIME% The recording end time (YYYYMMDDhhmmss)
%PROGSTART% The recording's start time (from guide data)
%PROGEND% The recording's end time (from guide data)
8/14/2019 Installing MythTV 0.20 on Ubuntu Gutsy 7.10
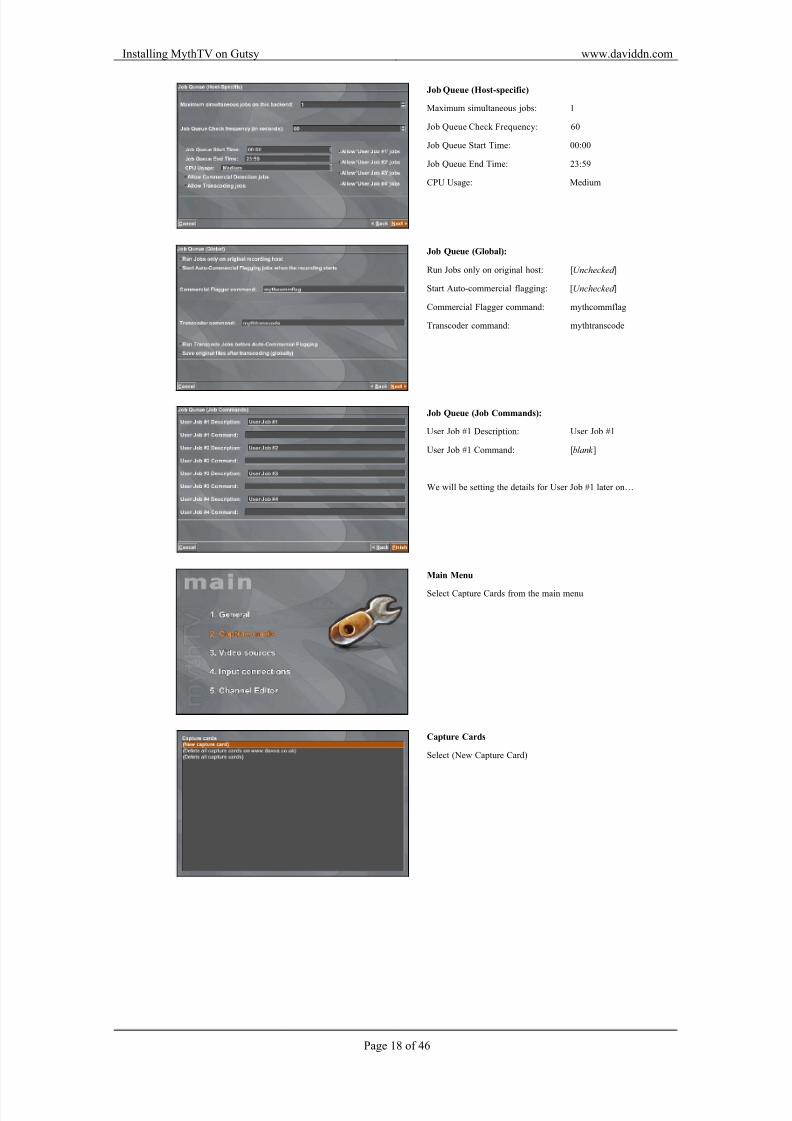
5. Run MythTV-Backend and select General, then on the Job Queue (Host-specific)settings screen check the box that says Allow User #1 Jobs. Click ext two times andthen enter the following in the User Job #1 Description and Command boxes:
6. Go to MythWeb (http://192.168.2.100/mythweb/), then go to the Setting page andclick MythTV Settings Table. Now enter the following information into the table:
Setting Value
AutoCommercialFlag 0
AutoExpireDefault 1
AutoExpireExtraSpace 1
AutoExpireLiveTVMaxAge 1
AutoRunUserJob1 1
AutoTranscode 0
7. Now save your settings and close MythWeb.
8. The standard MythTV recordings will auto-delete themselves when disk space isrequired, however the MP4 and FLV encoded versions will not. Therefore you willneed to use a script to delete old media to ensure that these files don’t fill up your filesystem. The mythclean script in Appendix A is written by me for this purpose. Copy
it over to /usr/local/bin/ and then use the cron to schedule it to run every 24 hours.
chmod 755 /usr/local/bin/mythclean
8/14/2019 Installing MythTV 0.20 on Ubuntu Gutsy 7.10
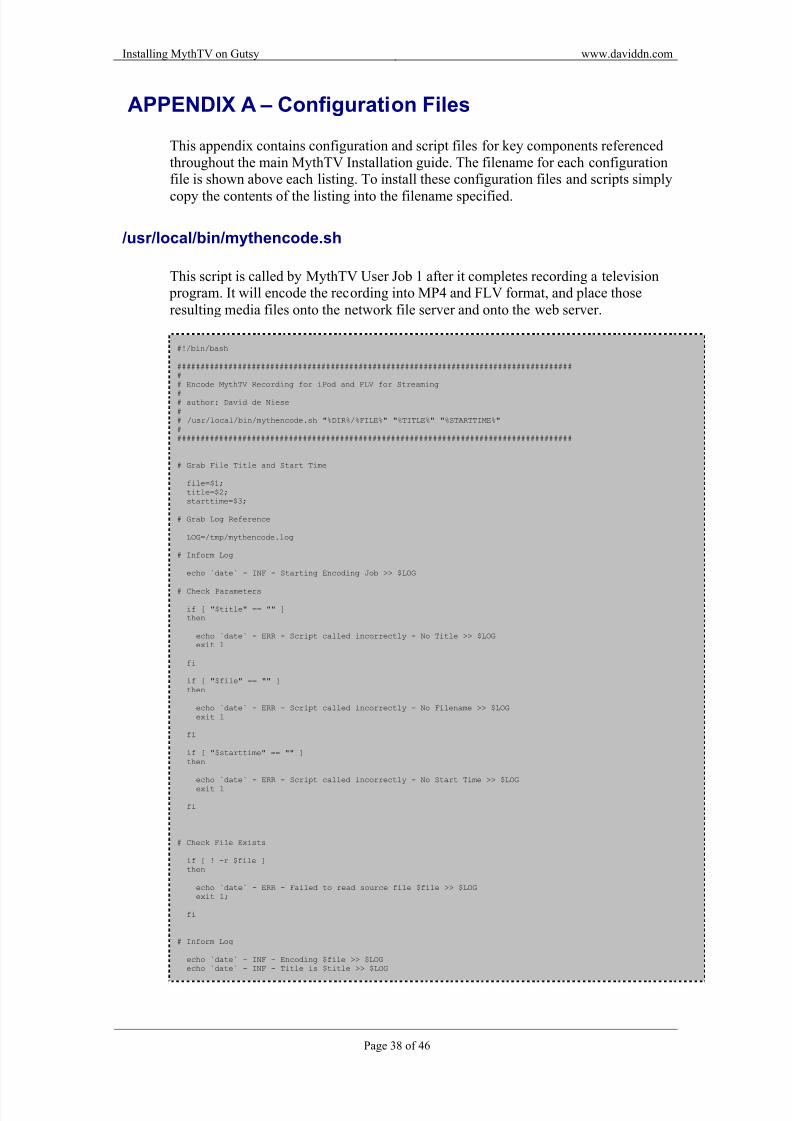
This appendix contains configuration and script files for key components referencedthroughout the main MythTV Installation guide. The filename for each configurationfile is shown above each listing. To install these configuration files and scripts simply
copy the contents of the listing into the filename specified.
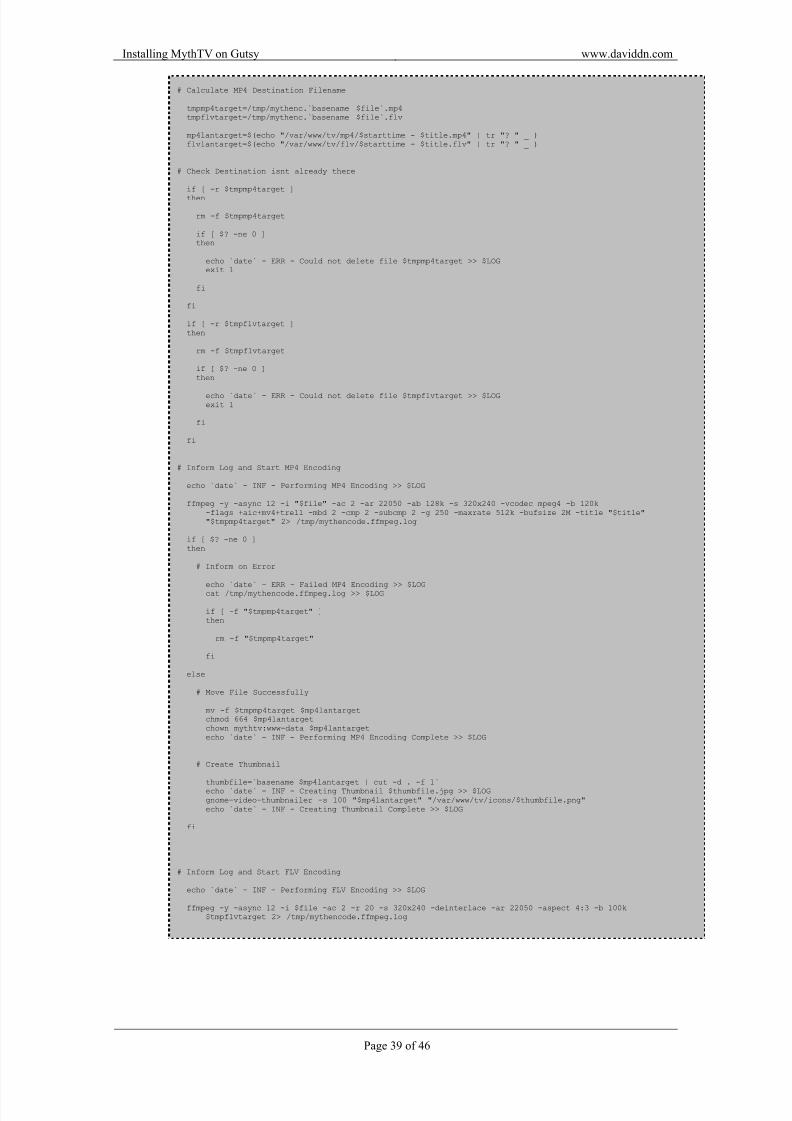
/usr/local/bin/mythencode.sh
This script is called by MythTV User Job 1 after it completes recording a television program. It will encode the recording into MP4 and FLV format, and place those
resulting media files onto the network file server and onto the web server.
#!/bin/bash
####################################################################################### Encode MythTV Recording for iPod and FLV for Streaming
## author: David de Niese## /usr/local/bin/mythencode.sh "%DIR%/%FILE%" "%TITLE%" "%STARTTIME%"######################################################################################
# Grab File Title and Start Time
file=$1;title=$2;starttime=$3;
# Grab Log Reference
LOG=/tmp/mythencode.log
# Inform Log
echo `date` - INF - Starting Encoding Job >> $LOG
# Check Parameters
if [ "$title" == "" ]then
echo `date` - ERR - Script called incorrectly - No Title >> $LOGexit 1
fi
if [ "$file" == "" ]then
echo `date` - ERR - Script called incorrectly - No Filename >> $LOGexit 1
fi
if [ "$starttime" == "" ]then
echo `date` - ERR - Script called incorrectly - No Start Time >> $LOGexit 1
This script is called daily by cron and will delete the files created by mythencode (see
above) after they become more than 7 days old. The FLV and MP4 files are encodedversions of the original recordings, and the PNG files are the video thumbnails.
#!/bin/bash
####################################################################################### Clean MythTV Recordings for iPod and FLV## author: David de Niese
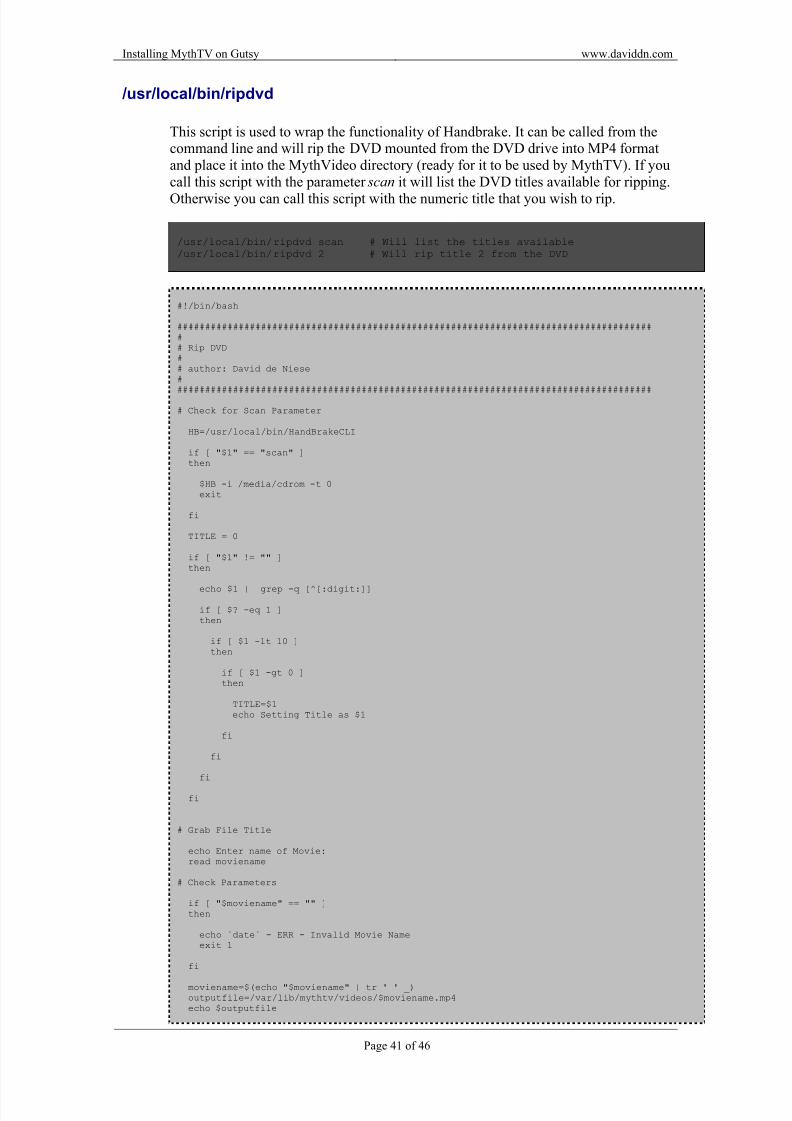
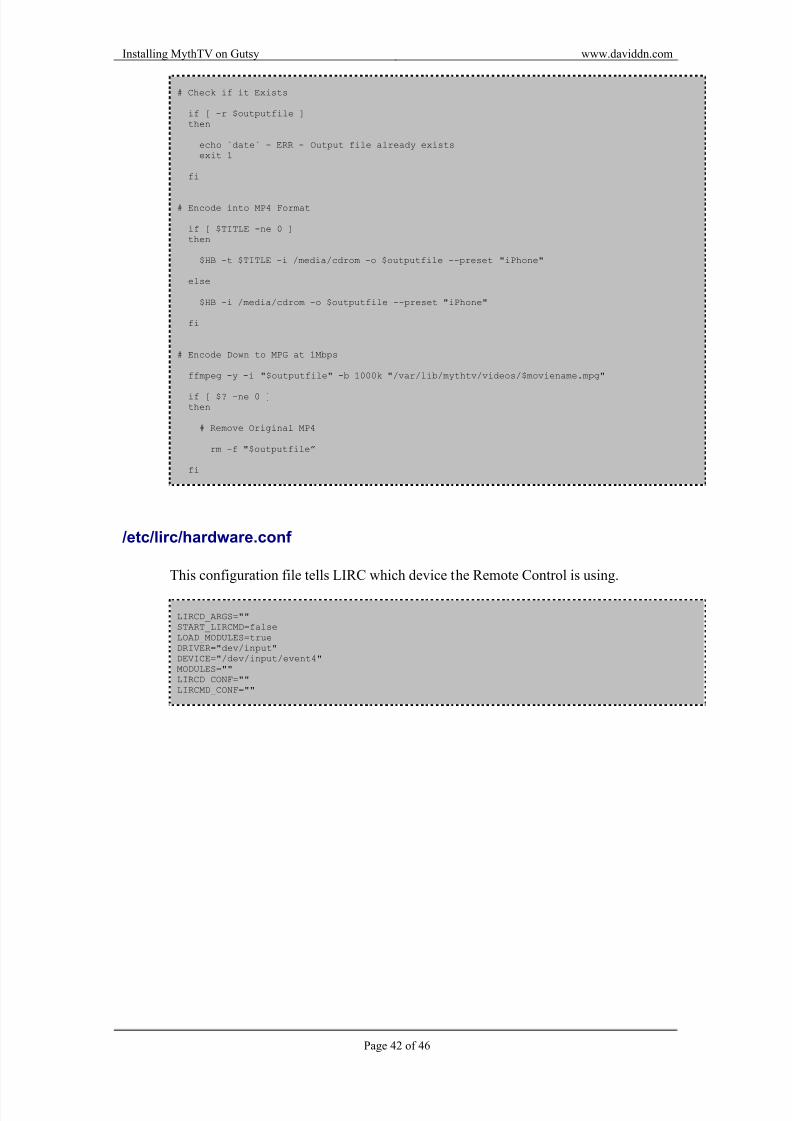
This script is used to wrap the functionality of Handbrake. It can be called from thecommand line and will rip the DVD mounted from the DVD drive into MP4 formatand place it into the MythVideo directory (ready for it to be used by MythTV). If youcall this script with the parameter scan it will list the DVD titles available for ripping.
Otherwise you can call this script with the numeric title that you wish to rip.
/usr/local/bin/ripdvd scan # Will list the titles available/usr/local/bin/ripdvd 2 # Will rip title 2 from the DVD
#!/bin/bash
####################################################################################### Rip DVD## author: David de Niese#


![A Gutsy Girl - Sarah Kay Hoffman · A Gutsy Girl Sarah Kay Hoffman @SarahKayHoffman [A GUTSY GIRL PRESENTS A COLLECTION OF HOLIDAY GLUTEN-FREE RECIPES] ... ½ Scharffen …](https://static.documents.pub/doc/80x56/5b8a8dba7f8b9a287e8ee0fa/a-gutsy-girl-sarah-kay-a-gutsy-girl-sarah-kay-hoffman-sarahkayhoffman-a.jpg)


