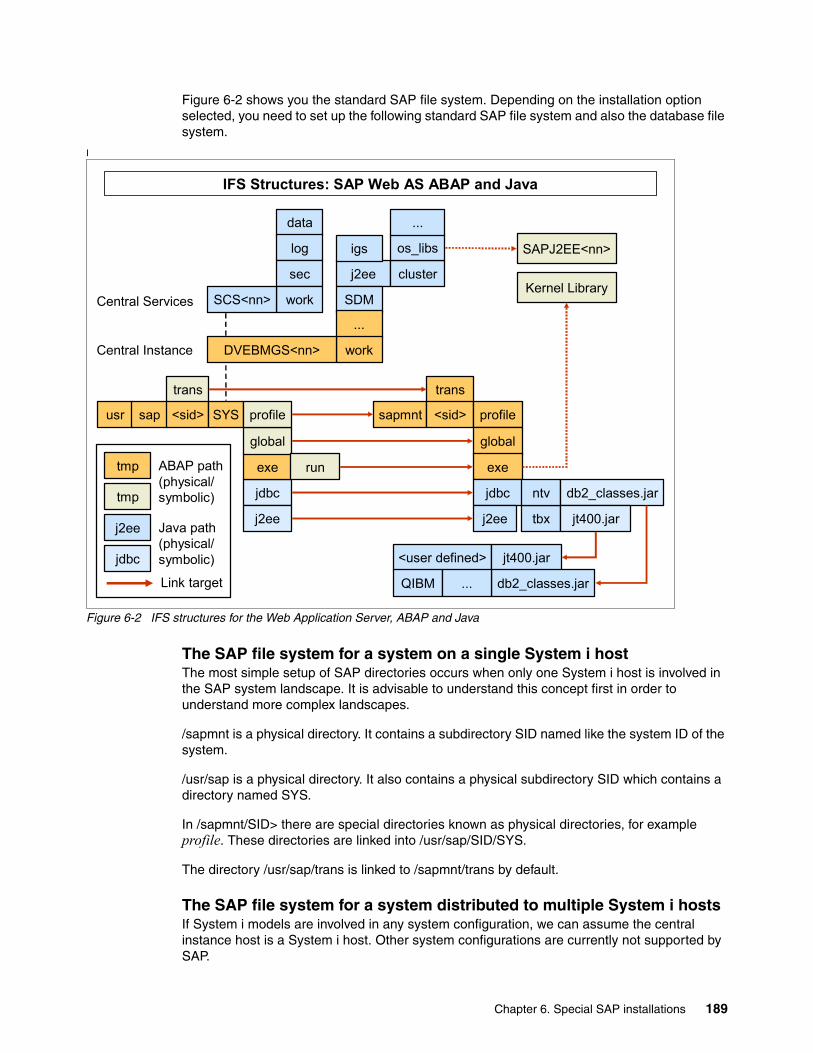
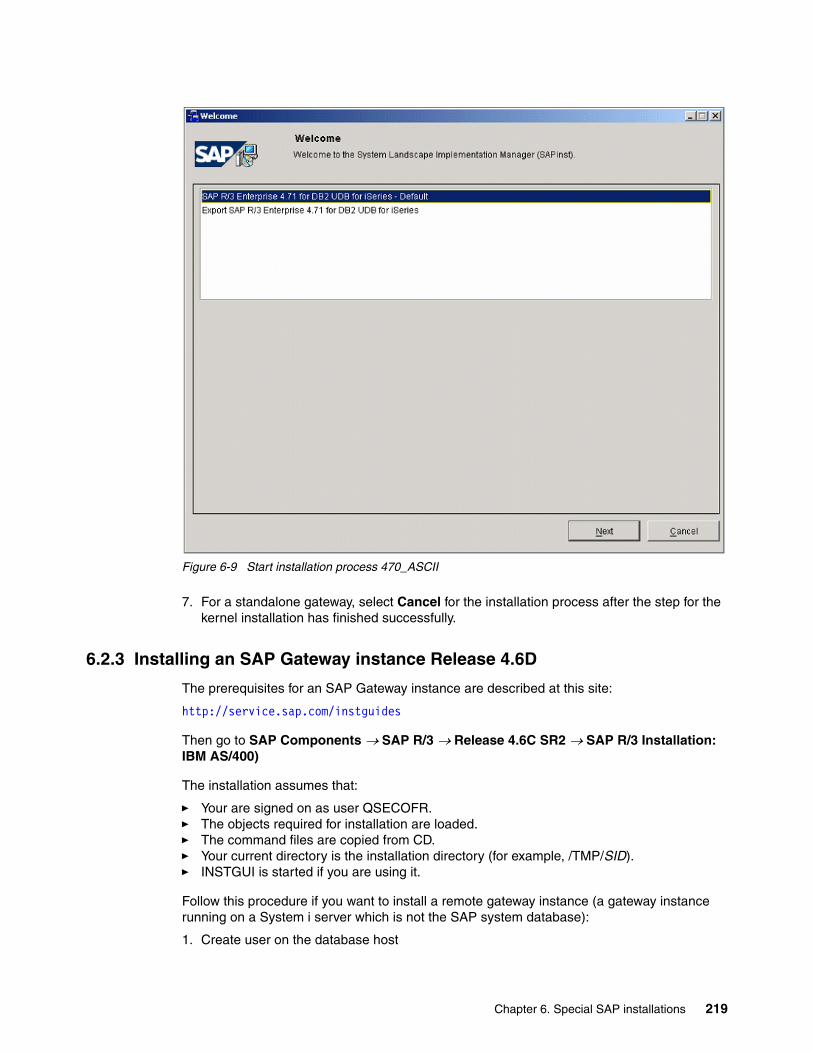
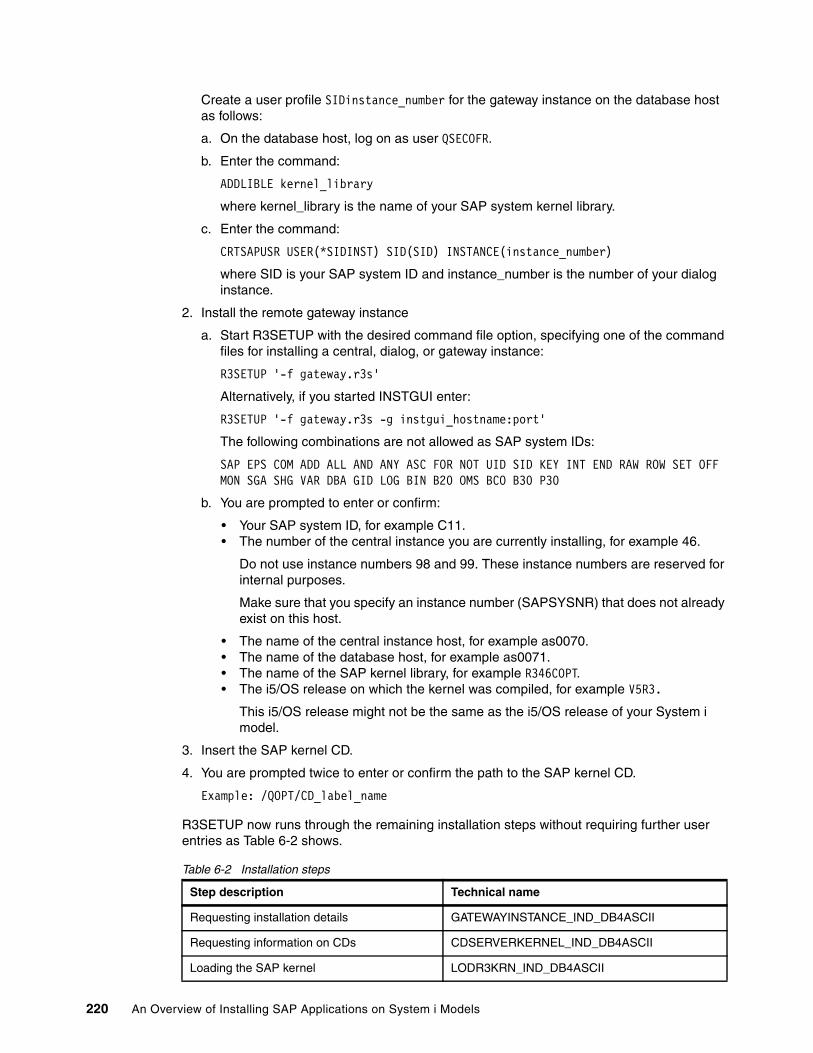
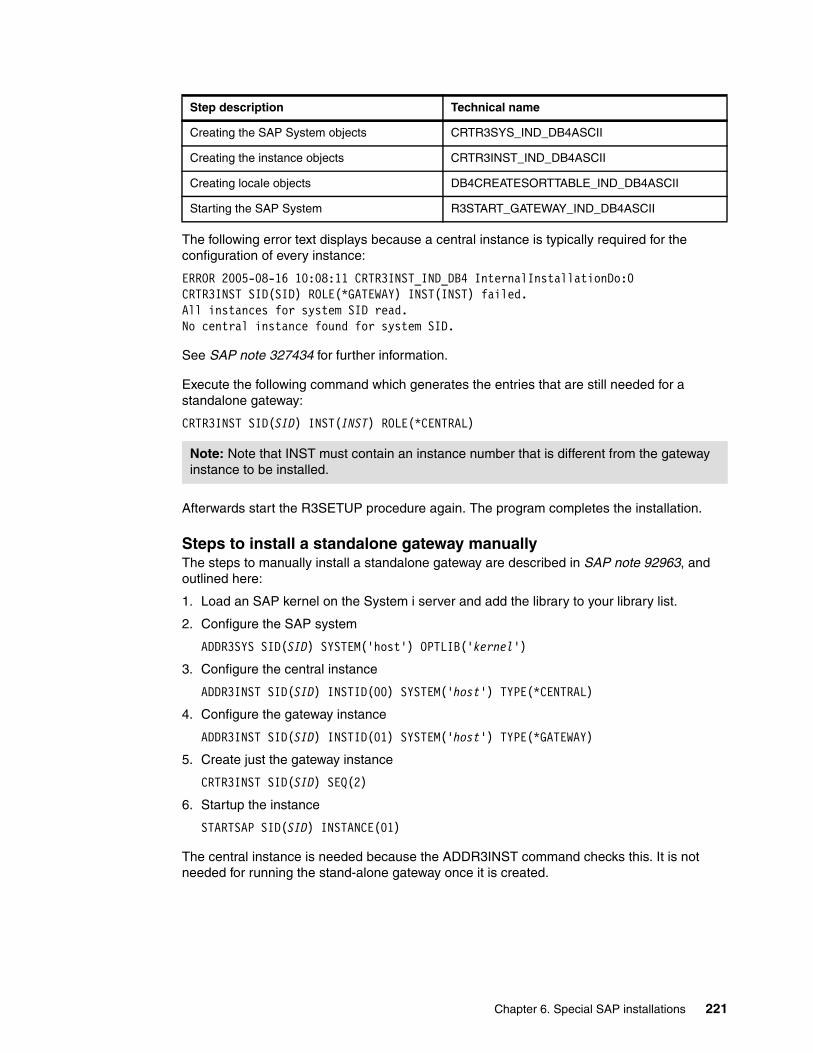
ibm.com/redbooks Redpaper Front cover An Overview of Installing SAP Applications on System i Models Dieter Huber Susan Powers Preparations for installing SAP applications with IBM i5/OS Comprehensive checklist of installation tasks Understanding special installation scenarios
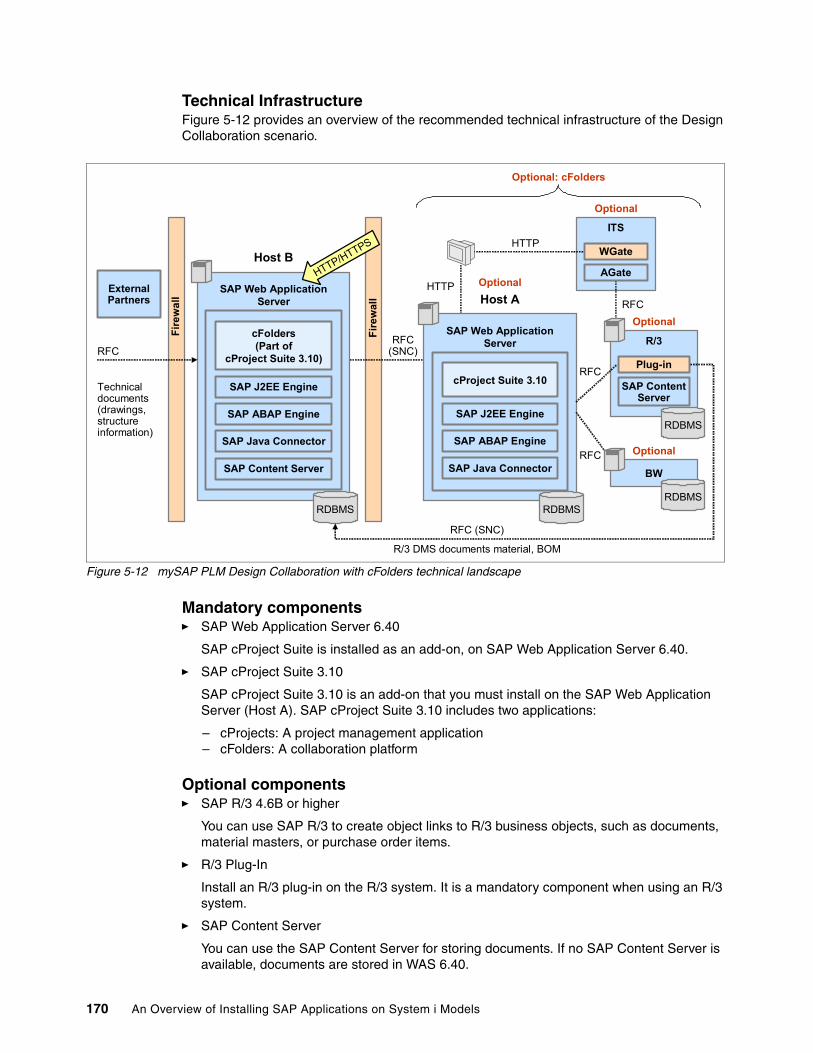
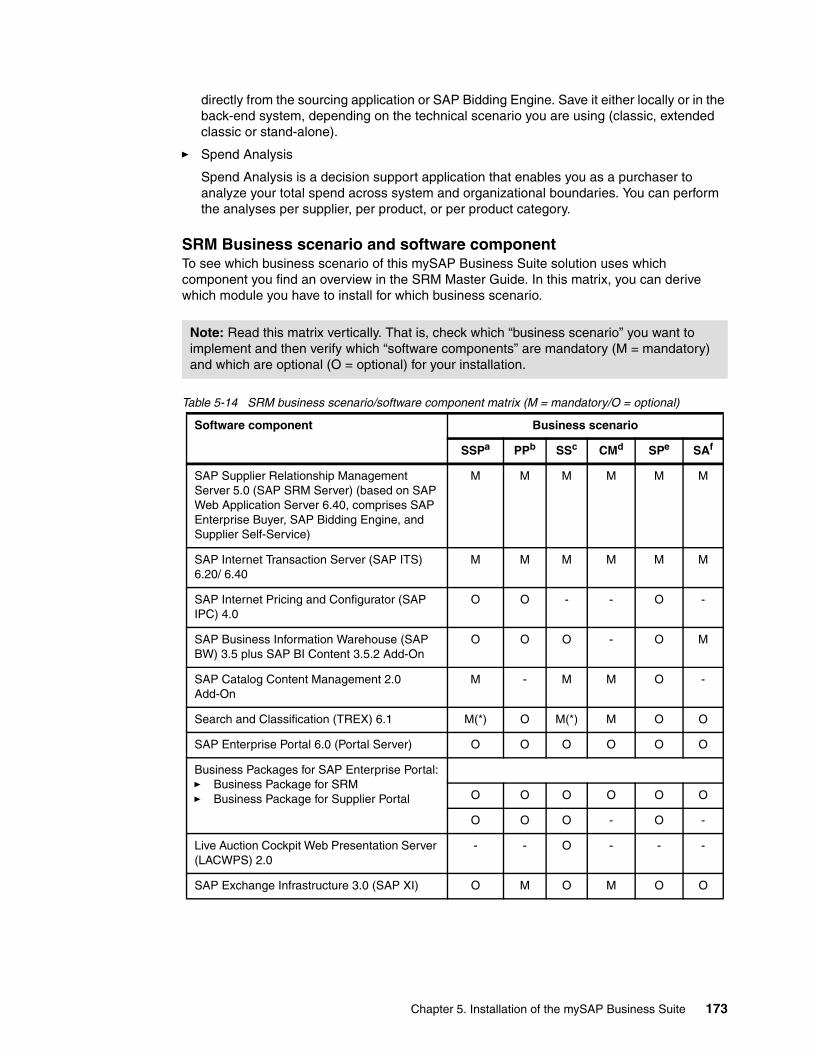
Transcript
ibm.com/redbooks Redpaper
Front cover
An Overview of Installing SAP Applications on System i Models
Dieter HuberSusan Powers
Preparations for installing SAP applications with IBM i5/OS
This edition applies to Version 5, Release 4, and Release 3, Modification 5 of i5/OS (product number 5722-SS1) and SAP ERP 640 ECC 5.0 based on NetWeaver ´04.
Note: Before using this information and the product it supports, read the information in “Notices” on page vii.
vi An Overview of Installing SAP Applications on System i Models
Notices
This information was developed for products and services offered in the U.S.A.
IBM may not offer the products, services, or features discussed in this document in other countries. Consult your local IBM representative for information on the products and services currently available in your area. Any reference to an IBM product, program, or service is not intended to state or imply that only that IBM product, program, or service may be used. Any functionally equivalent product, program, or service that does not infringe any IBM intellectual property right may be used instead. However, it is the user's responsibility to evaluate and verify the operation of any non-IBM product, program, or service.
IBM may have patents or pending patent applications covering subject matter described in this document. The furnishing of this document does not give you any license to these patents. You can send license inquiries, in writing, to: IBM Director of Licensing, IBM Corporation, North Castle Drive, Armonk, NY 10504-1785 U.S.A.
The following paragraph does not apply to the United Kingdom or any other country where such provisions are inconsistent with local law: INTERNATIONAL BUSINESS MACHINES CORPORATION PROVIDES THIS PUBLICATION "AS IS" WITHOUT WARRANTY OF ANY KIND, EITHER EXPRESS OR IMPLIED, INCLUDING, BUT NOT LIMITED TO, THE IMPLIED WARRANTIES OF NON-INFRINGEMENT, MERCHANTABILITY OR FITNESS FOR A PARTICULAR PURPOSE. Some states do not allow disclaimer of express or implied warranties in certain transactions, therefore, this statement may not apply to you.
This information could include technical inaccuracies or typographical errors. Changes are periodically made to the information herein; these changes will be incorporated in new editions of the publication. IBM may make improvements and/or changes in the product(s) and/or the program(s) described in this publication at any time without notice.
Any references in this information to non-IBM Web sites are provided for convenience only and do not in any manner serve as an endorsement of those Web sites. The materials at those Web sites are not part of the materials for this IBM product and use of those Web sites is at your own risk.
IBM may use or distribute any of the information you supply in any way it believes appropriate without incurring any obligation to you.
Information concerning non-IBM products was obtained from the suppliers of those products, their published announcements or other publicly available sources. IBM has not tested those products and cannot confirm the accuracy of performance, compatibility or any other claims related to non-IBM products. Questions on the capabilities of non-IBM products should be addressed to the suppliers of those products.
This information contains examples of data and reports used in daily business operations. To illustrate them as completely as possible, the examples include the names of individuals, companies, brands, and products. All of these names are fictitious and any similarity to the names and addresses used by an actual business enterprise is entirely coincidental.
COPYRIGHT LICENSE:
This information contains sample application programs in source language, which illustrate programming techniques on various operating platforms. You may copy, modify, and distribute these sample programs in any form without payment to IBM, for the purposes of developing, using, marketing or distributing application programs conforming to the application programming interface for the operating platform for which the sample programs are written. These examples have not been thoroughly tested under all conditions. IBM, therefore, cannot guarantee or imply reliability, serviceability, or function of these programs.
The following terms are trademarks of other companies:
Java, JDBC, JDK, JSP, JVM, J2EE, J2SE, Sun, and all Java-based trademarks are trademarks of Sun Microsystems, Inc. in the United States, other countries, or both.
Microsoft, Visual Basic, Windows server, Windows, and the Windows logo are trademarks of Microsoft Corporation in the United States, other countries, or both.
UNIX is a registered trademark of The Open Group in the United States and other countries.
Linux is a trademark of Linus Torvalds in the United States, other countries, or both.
Other company, product, or service names may be trademarks or service marks of others.
viii An Overview of Installing SAP Applications on System i Models
Preface
Systems, Applications, and Products in Data Processing (SAP) offers software applications for business, including a comprehensive set of business applications that are supported on the IBM® System i™ family of products and the IBM i5/OS® integrated DB2® Universal Database™ (UDB) for the IBM eServer™ iSeries™ database.
The following are some of the more than 50 SAP business applications available for System i models:
� Business Applications and Solutions, for example:
• mySAP Enterprise Portal (EP)• mySAP Business Information Warehouse (BW)• mySAP Exchange Infrastructure (XI)• mySAP Mobile Infrastructure (MI)• mySAP Knowledge Warehouse (KW)
� Solutions for small and midsize enterprises:
– mySAP All-in-One– SAP Business One
All of the SAP applications are based on a common infrastructure layer called SAP NetWeaver.
This IBM Redpaper focuses on the SAP business applications based on mySAP NetWeaver 2004 and outlines the activities involved when installing an SAP system which are specific to the System i customer. Use this Redpaper as an installation checklist.
Chapter 2, “Introduction to an SAP installation” on page 5 through Chapter 5, “Installation of the mySAP Business Suite” on page 107 discuss the concepts, preparation and installation of SAP applications. Chapter 6, “Special SAP installations” on page 183 focuses on the techniques about how to use and how to perform special installation scenarios within an SAP system.
For more detailed information about planning and installation steps and other considerations when installing an SAP application, refer to the formal SAP documentation. The SAP planning and installation manuals and configuration guides are found in the SAP Service Marketplace at:
http://service.sap.com/instguides
The SAP Service Marketplace Web sites require you to use the user ID and password supplied to you by SAP.
Note: This Redpaper is not a single documentation source for guidelines for an SAP installation. Information in this paper may or may not be relevant for releases after NetWeaver 2004. Always refer to the official SAP installation guides and the SAP notes for the SAP component you are installing to obtain the most current information.
Refer to Implementing SAP Applications with System i and i5/OS, SG24-7166, for information about the activities involved in maintaining and operating an SAP system, such as:
� Configuration options � Setting up two or three tier installation� Installing and upgrading the kernel� Housekeeping activities � Options and tools available to optimize the performance of an SAP system� Determining the availability options for your SAP installation
The team that wrote this RedpaperThis Redpaper was produced by a team of specialists from around the world working with the International Technical Support Organization, Poughkeepsie Center.
Dieter Huber is an SAP/IBM Solution Architect and Senior IT Consultant from basycs GmbH, Germany. He started his company as CEO in 2002 with the intention to increase the “SAP on System i” market. His areas of expertise include 11 years development, implementation and consultancy with SAP on iSeries, and also on UNIX® and Windows® with different databases. Dieter holds a degree of Computer Science and Economics from the University of Karlsruhe in Germany and combines theoretical knowledge with practical experience.
Susan Powers is a Consulting IT Specialist at the ITSO, Rochester Center. Prior to joining the ITSO in 1997, she was an AS/400® Technical Advocate in the IBM Support Center with a variety of communications, performance, and work management assignments. Her IBM career began as a Program Support Representative and Systems Engineer in Des Moines, Iowa. She holds a degree in Mathematics, with an emphasis in Education, from St. Mary’s College of Notre Dame. She is the Project Manager for the iSeries Handbook and System Builder suite of IBM Redbooks™.
Thanks to the following people for their contributions to this project:
Barbara RothIBM Germany
Thomas ObermeierSAP
Jürgen Zehbasycs GmbH, Germany
Erica WazewskiLinda RobinsonIBM ITSO
A special thank you to the following people for their thorough review and continual support of this ITSO residency, people, project, and Redpaper:
Christian BartelsGert RulandIBM Germany
x An Overview of Installing SAP Applications on System i Models
Dorothea LinkSAP, Germany
Volker Gueldenpfennigconsolut.gmbh
Become a published authorJoin us for a two- to six-week residency program! Help write an IBM Redbook dealing with specific products or solutions, while getting hands-on experience with leading-edge technologies. You'll team with IBM technical professionals, Business Partners and/or customers.
Your efforts will help increase product acceptance and customer satisfaction. As a bonus, you'll develop a network of contacts in IBM development labs, and increase your productivity and marketability.
Find out more about the residency program, browse the residency index, and apply online at:
ibm.com/redbooks/residencies.html
Comments welcomeYour comments are important to us!
We want our papers to be as helpful as possible. Send us your comments about this Redpaper or other Redbooks in one of the following ways:
� Use the online Contact us review redbook form found at:
xii An Overview of Installing SAP Applications on System i Models
Chapter 1. Overview of SAP solutions, applications, components, and tools
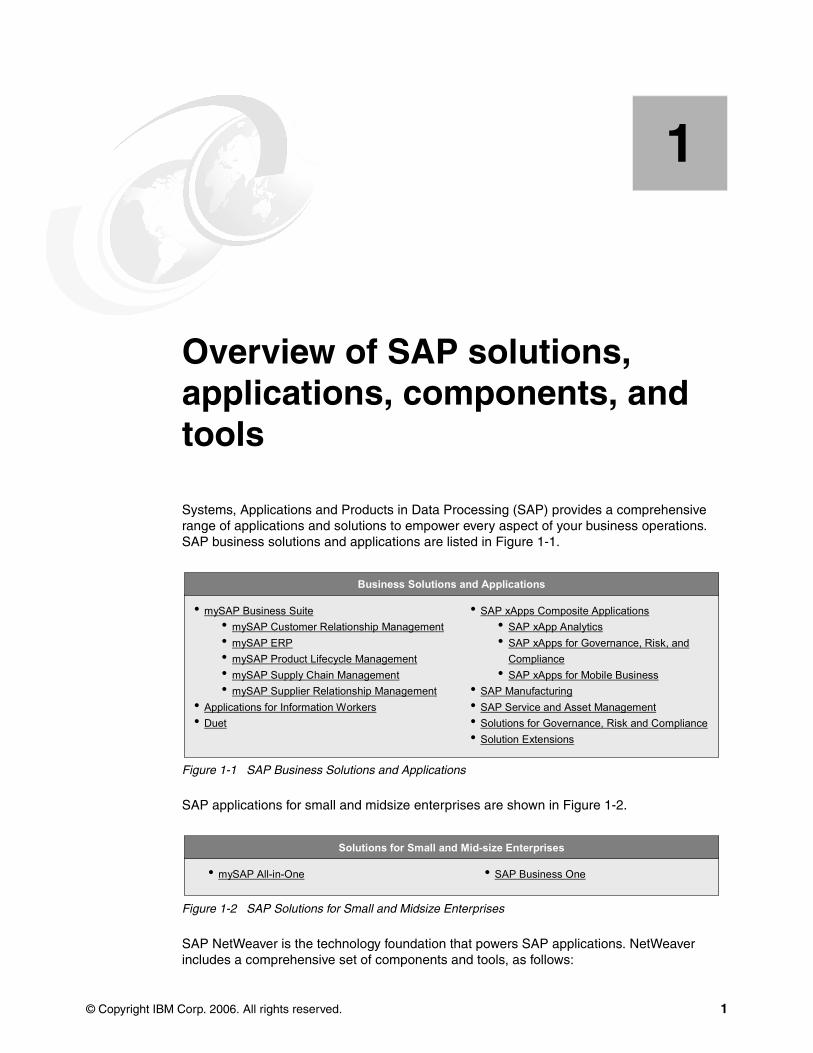
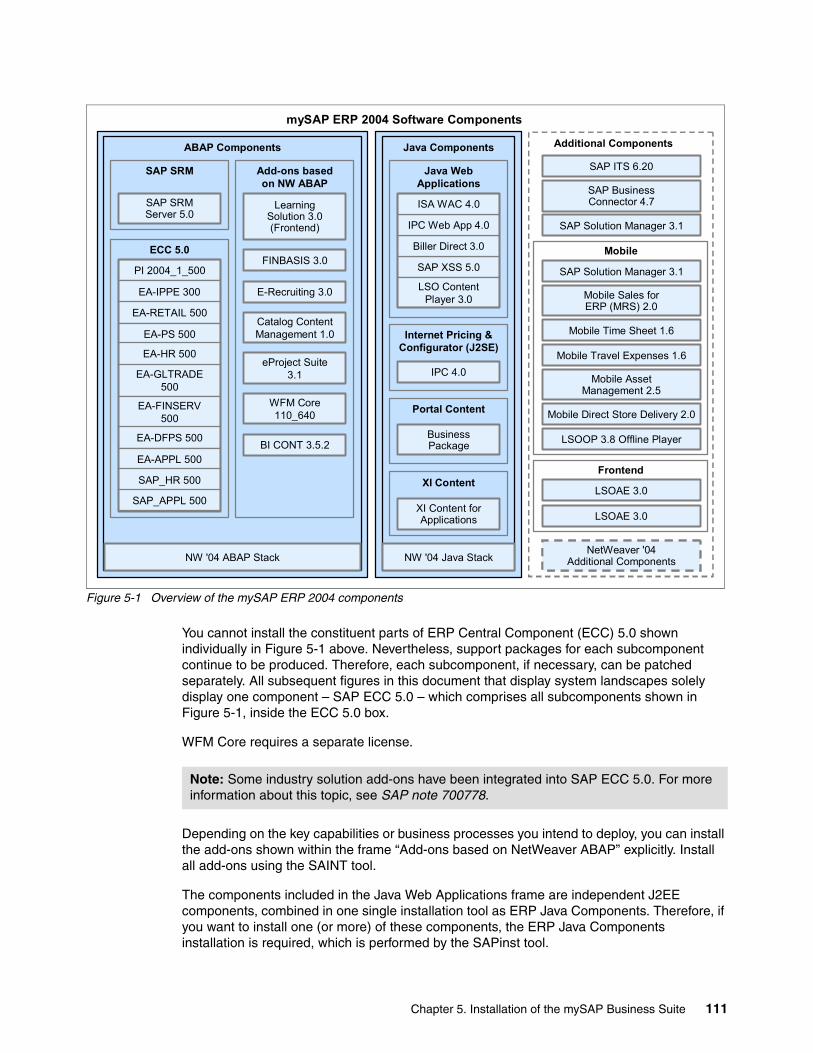
Systems, Applications and Products in Data Processing (SAP) provides a comprehensive range of applications and solutions to empower every aspect of your business operations. SAP business solutions and applications are listed in Figure 1-1.
Figure 1-1 SAP Business Solutions and Applications
SAP applications for small and midsize enterprises are shown in Figure 1-2.
Figure 1-2 SAP Solutions for Small and Midsize Enterprises
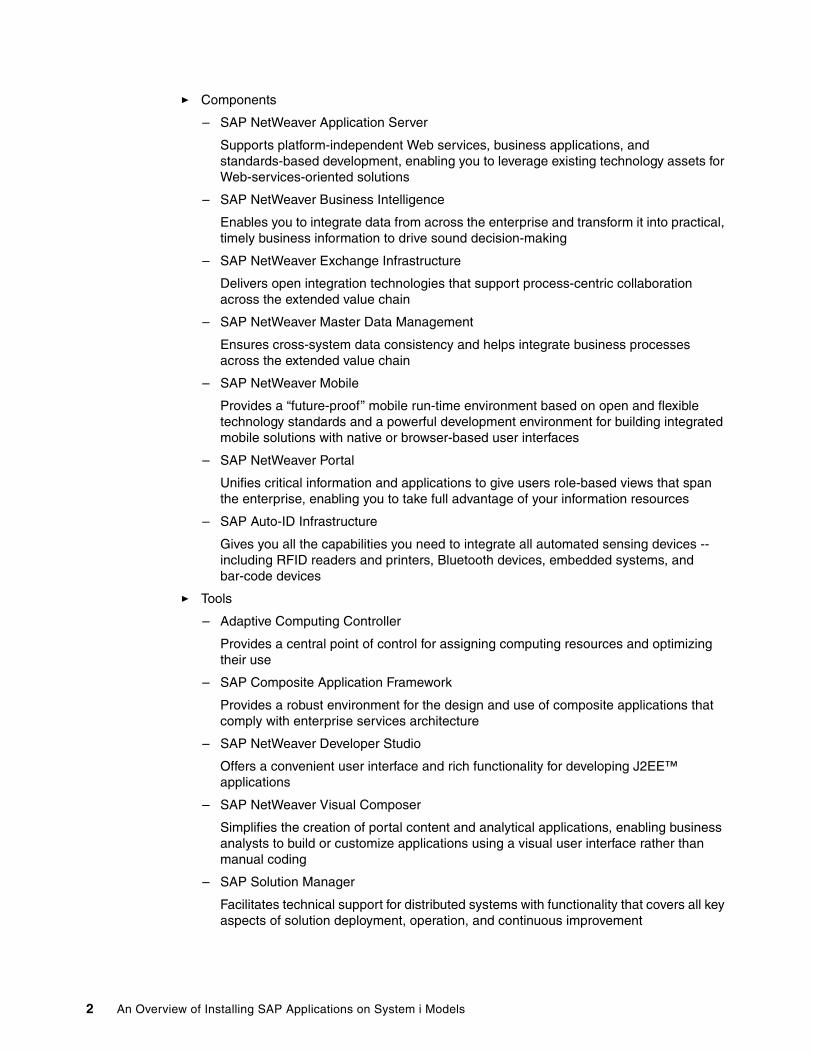
SAP NetWeaver is the technology foundation that powers SAP applications. NetWeaver includes a comprehensive set of components and tools, as follows:
Supports platform-independent Web services, business applications, and standards-based development, enabling you to leverage existing technology assets for Web-services-oriented solutions
– SAP NetWeaver Business Intelligence
Enables you to integrate data from across the enterprise and transform it into practical, timely business information to drive sound decision-making
– SAP NetWeaver Exchange Infrastructure
Delivers open integration technologies that support process-centric collaboration across the extended value chain
– SAP NetWeaver Master Data Management
Ensures cross-system data consistency and helps integrate business processes across the extended value chain
– SAP NetWeaver Mobile
Provides a “future-proof” mobile run-time environment based on open and flexible technology standards and a powerful development environment for building integrated mobile solutions with native or browser-based user interfaces
– SAP NetWeaver Portal
Unifies critical information and applications to give users role-based views that span the enterprise, enabling you to take full advantage of your information resources
– SAP Auto-ID Infrastructure
Gives you all the capabilities you need to integrate all automated sensing devices -- including RFID readers and printers, Bluetooth devices, embedded systems, and bar-code devices
� Tools
– Adaptive Computing Controller
Provides a central point of control for assigning computing resources and optimizing their use
– SAP Composite Application Framework
Provides a robust environment for the design and use of composite applications that comply with enterprise services architecture
– SAP NetWeaver Developer Studio
Offers a convenient user interface and rich functionality for developing J2EE™ applications
– SAP NetWeaver Visual Composer
Simplifies the creation of portal content and analytical applications, enabling business analysts to build or customize applications using a visual user interface rather than manual coding
– SAP Solution Manager
Facilitates technical support for distributed systems with functionality that covers all key aspects of solution deployment, operation, and continuous improvement
2 An Overview of Installing SAP Applications on System i Models
SAP provides more than 50 applications, including industry specific solutions. SAP applications are described at:
http://www.sap.com/solutions
In this Redpaper, we focus on the business applications based on SAP NetWeaver. We show you the concepts and issues which are specific to the System i customer.
Apart from the System i specific topics, we also provide some platform independent descriptions of the SAP installations. This helps you to keep track of the installation procedure of an SAP application. This approach makes the chapter lengthy, nevertheless, you get a realistic overview of what is important and what has to be done for the installation of an SAP application.
Note: This Redpaper is not a single source for guidelines for an SAP installation. Information in this paper may or may not be relevant for releases after NetWeaver 2004. Always refer to the official SAP installation guides and the SAP notes for the SAP component you are installing to obtain the most current information.
Chapter 1. Overview of SAP solutions, applications, components, and tools 3
4 An Overview of Installing SAP Applications on System i Models
Chapter 2. Introduction to an SAP installation
This chapter includes introductory installation information about such topics as planning and preparation, requirements, 2.3, “SAP NetWeaver and SAP Web Application Server” on page 21, SAP System Landscape, Client Server, and general steps:
� Planning and preparing for an SAP installation
In this section, we demonstrate from a high level about how to plan and prepare for a general SAP installation. We also provide a list of the primary SAP documentation for installing SAP systems. This is valid for almost any SAP application, therefore, we do not differentiate between the different SAP components.
� Installation requirements
In this section, we specify the issues and check points in the preliminary stages of an SAP installation. We also provide information about the hardware and software requirements.
� SAP NetWeaver and SAP Web Application Server
The SAP NetWeaver is the infrastructure for nearly all SAP applications. The SAP Web Application Server with its Advanced Business Application Programming (ABAP), Java™ stack, or both is a component of the SAP NetWeaver. Therefore, we define the concepts and components of these main technical fundaments of nearly each SAP application.
� The SAP System Landscape Directory (SLD)
The SAP System Landscape (SLD) is the central information provider for your system landscape. We show you some exemplary SLD configurations and provide a checklist about how to setup the SLD.
� The Client Server concept for an SAP installation on System i servers
We provide a short description of the technical principles of an SAP procedure, which is done by a remote installation client with the SAP installation server named TMKSVR.
� General steps of an SAP installation
In ten points, we summarize the main steps of nearly any SAP installation.
For an SAP installation it is crucial to go through a very intensive and exact preparation phase. Plan this phase as soon and as detailed as possible. Also, be prepared to run into some difficulties which can always appear before, during, or after an SAP installation.
2.1.1 Checklist for preparing an SAP installation
A practical approach for the preparation for an SAP installation, an SAP upgrade, or an SAP system copy is the following checklist:
� SAP installation guides
Refer to the required installation guides from the SAP Service Marketplace at:
http://service.sap.com/instguides
Based on Web Application Server Release. 6.40, almost all SAP installations have guidelines that are split into:
– Part-I: Planning and Preparing – Part-II: Installation and Post-Installation
Some components such as CRM also have a master guide that points to several other guidelines.
� SAP planning and preparation guide
Most (but not all) of the new SAP guidelines have a chapter “Installation Step by Step” that helps to organize and plan the installation process.
Some guidelines help in the installation process with checklists for the required and optional components, depending on the different installation scenarios that you select for your requirements, such as the SolMan or the CRM installation guide. For example, see 2.1.2, “Example: mySAP ERP 2004 SR1 Planning and Preparation Guide” on page 9.
� SAP installation notes
Refer to the SAP installation notes that are listed in the installation guides.
This is an very important task. Errors in the installation guides are not corrected in the guide themselves but in the appropriate SAP notes. So it is essential to have all the relevant SAP notes ready before starting the installation.
Important: SAP notes can have different versions with ascending two-digit version numbers. If the content of an SAP note changes, then the SAP note number remains the same but the version number is increased by one. Therefore, ensure that you always have the most recent version of an SAP note. See Figure 2-1.
6 An Overview of Installing SAP Applications on System i Models
Figure 2-1 Version and last-updated date of an SAP note
� i5/OS operating system and other system programs
Ensure that your base System i installation with the required i5/OS version and additional licence programs and all other hardware fulfill the following requirements:
– The required i5/OS version and the required licence programs are complete and correctly installed
– All necessary CUM, PTFs, hyper and fix packs, and other patches are installed
The software prerequisite information is available in the following SAP preparation guides.
For the required IBM operating system release and relevant PTFs, see SAP on iSeries (SAP note 83292.) For example, Version: 27, Note Language: EN, Released on: 17.02.2006.
Table 2-1 IBM Informational APARs for SAP
The IBM informational APARs (Info APARs) are constantly updated by IBM and are available at the following Web site:
Check the other prerequisites for the installation, which are detailed in the different guidelines.
Another important task is also to plan the external and internal capacity you require for the installation, for example:
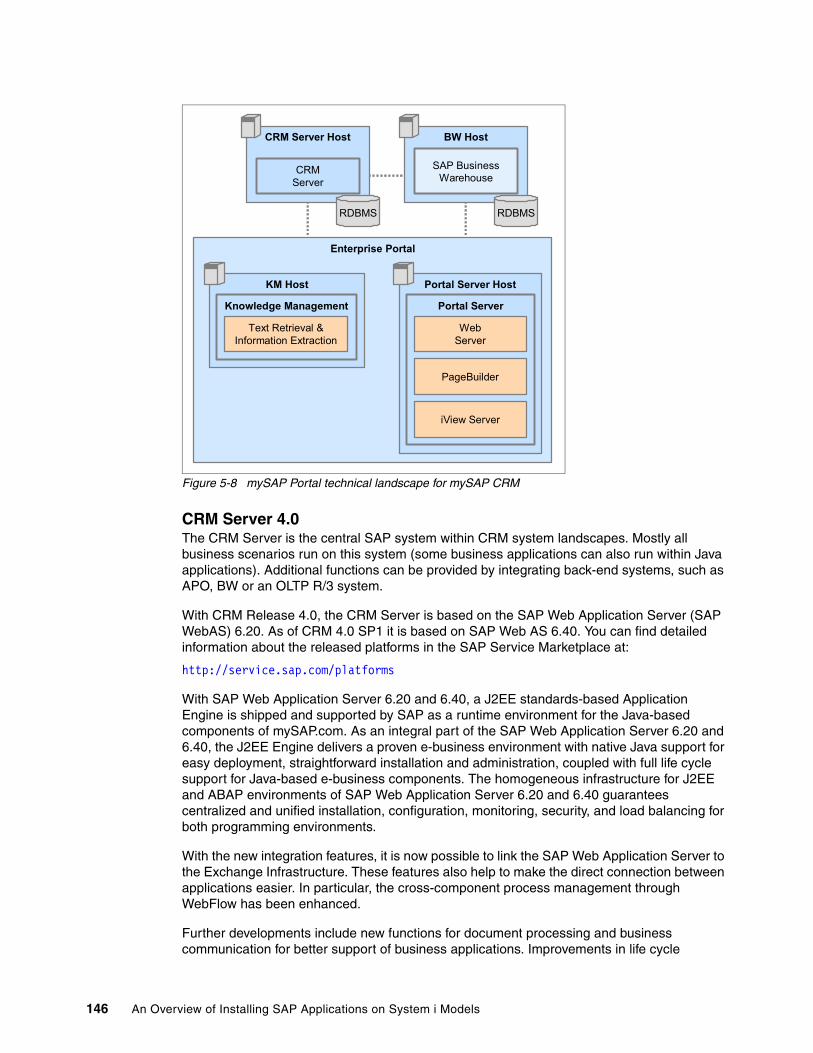
– Project management– External manpower or consultants– Internal manpower or capacity– External costs– Internal costs
� Installation software
Order the correct installation package from SAP. You can order it with your special SAP User for the SAP Service Marketplace (S-User) directly from the SAP software catalog:
http://service.sap.com/swcat
You must adapt your licence contract with SAP. After signing of the contract with SAP you (or somebody from your company) receive an S-User ID with a special password. With this S-User, you can enter the SAP Service Marketplace and order more S-User (free of charge).
You can manage your S-User and more at:
http://service.sap.com/user-admin
Order the installation pack in advance. It takes approximately three to five days to get the package from the SAP Software Logistics Center. Ensure that you have detailed the correct address to receive the installation pack. Perhaps you want it to be sent to your installation partner.
Only the customers themselves can order the SAP installation software pack with their SAP S-User based on the licence agreement with SAP. Ensure that your SAP S-User has the necessary authority to order the SAP software for the desired installation number from the SAP software catalogue.
� SAP service connection
Ensure you have a direct SAP service connection (OSS) either via Internet, via Integrated Services Digital Network (ISDN), or some other method.
For SAP customers, it is mandatory to have such a direct connection to SAP. It is not only necessary to have a physical connection, you must also have a valid S-User for the SAP Marketplace. You get this S-User with the first delivery of the SAP installation software.
This connection provides you remote support from SAP in case of installation problems. Furthermore, you can order an EARLY Watch Check from SAP to obtain a system and performance check after the installation. For production systems, we recommend that you activate the Early Watch Alert using this OSS service connection that automatically generates a system report.
Note: When you install your System i server and i5/OS correctly and complete it with the application of all required PTFs from IBM, you can save a lot of time and avoid running into problems.
Attention: For the SAP Service Marketplace there is a special authority concept for the S-User.
8 An Overview of Installing SAP Applications on System i Models
Ensure that you have a fully functional and stable connection to the SAP Marketplace at:
http://service.sap.com
You have to download patches and additional software. For performance reasons, you require a good bandwidth and we recommend a bandwidth of at least 1 Mbps capacity for download.
You need the SAP OSS connection for online connection to SAP. For example, the SAP Notes Assistant (transaction SNOTE) and the SAP EarlyWatchAlert (EWA) Service is based on this connection. Additionally, you need this connection for remote support from SAP.
For the OSS connection, you do not need this broad bandwidth. An ISDN connection (64 Kb/s) with channel bundling might be sufficient. However, setting up a virtual private network (VPN) or SNC connection to the OSS Server is more cost-effective.
The “SAProuter connections via SNC” topic in Implementing SAP Applications with System i and i5/OS, SG24-7166 provides details about how to set up a SNC connection.
� SAP support packages
Download all the necessary patches and support packages that are not already included in the installation (Service Release) or the Support Package Collection DVD that comes with the installation package.
It is very useful to have all the software patches ready even on disk when you start the installation procedure. You can get all the SAP patches from the SAP Software Distribution Center at:
http://service.sap.com/SWDC
Again, take care to download all the right patches.
To download all the SAP patches that are not available on the CDs or DVDs of the installation pack takes a lot of time, sometimes more than the SAP installation itself. You can save a lot of time if these patches are downloaded and ready at the time when you or your SAP installation partner starts the SAP installation process.
The “Copy CDs and DVDs to hard disk” topic Implementing SAP Applications with System i and i5/OS, SG24-7166 details different ways of copying CDs and DVDs to hard disk devices.
� Create your own installation roadmap
Take time to set up your own installation roadmap. Ensure that you meet all the runtime requirements of the installation procedures, which can take some hours. Consider all the things that have to be done especially for your installation. You can also contact an experienced project and basis consultant.
2.1.2 Example: mySAP ERP 2004 SR1 Planning and Preparation Guide
SAP installation guides discuss the installation preparation. Here is a typical example from mySAP ERP 2004 SR1 Planning and Preparation Guide for the IBM Eserver iSeries.
You have to complete the following preparation activities:
1. Check the general information hardware and software requirements.2. Check the hardware and software requirements.3. Check Qp2Term, Qp2Shell, and the OS/400® Portable Application Solution Environment.
Note: It is important that your hardware server provider and your SAP basis installer work together in advance of the SAP installation.
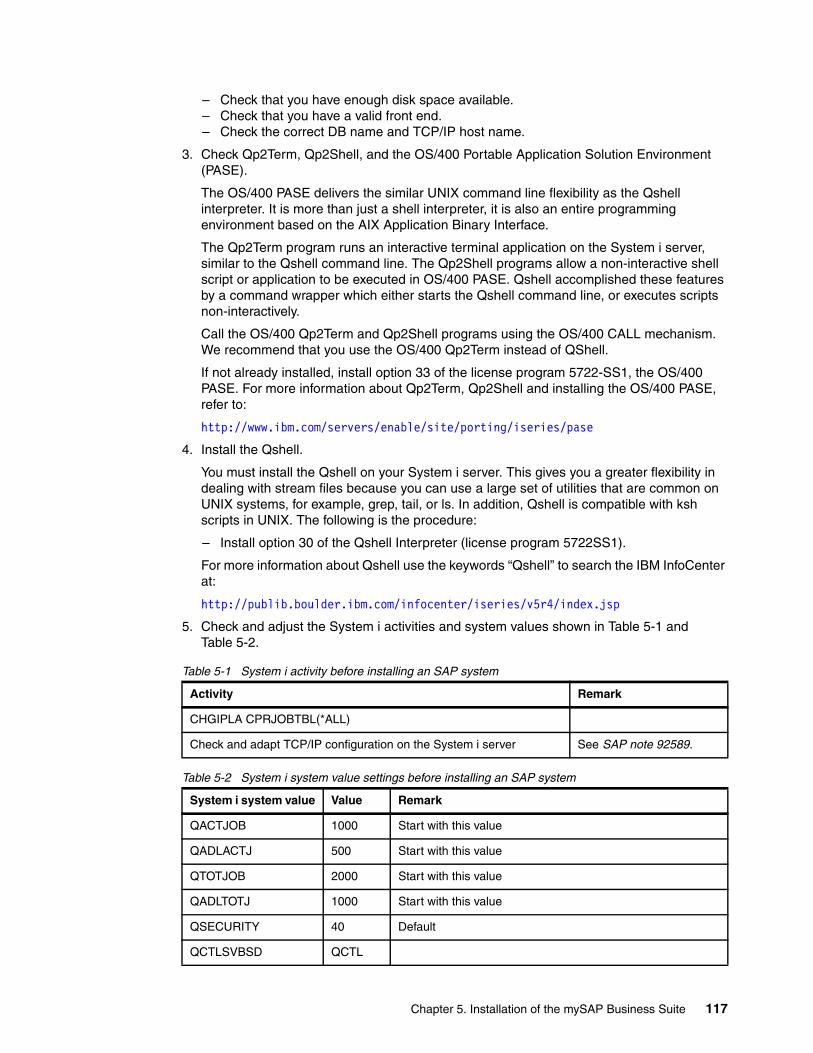
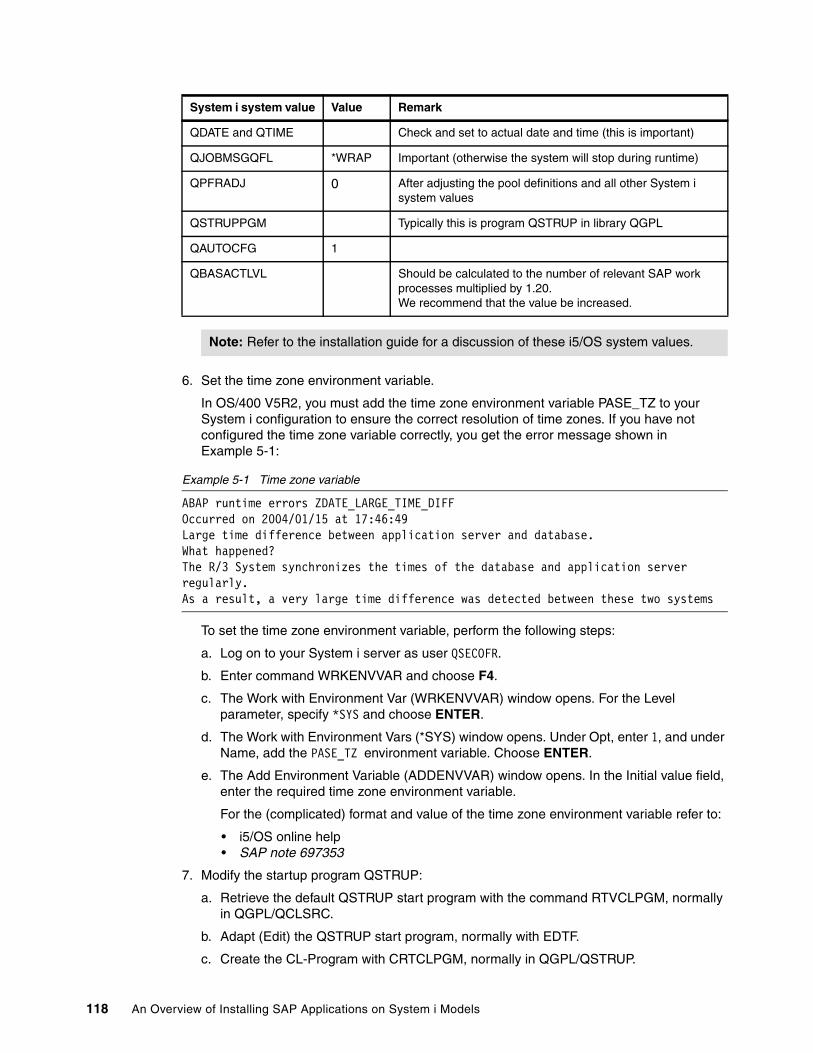
4. Install the Qshell.5. Check and adjust System i system values.6. Set the time zone environment variable.7. Adjust the startup program QSTRUP.8. Check the distribution of libraries on ASPs.9. Add a user ASP.10.Configure the Transmission Control Protocol/Internet Protocol (TCP/IP).11.Adjust the relational database name.12.Install English as a secondary language.13.Install additional languages.14.Set up the transport directory.15.Prepare a Windows user account and System i user profile.16.Install TMKSVR and create an installation share.17.Install the SAP front-end software.18.Generate the SAP Solution Manager key.19.Check the general information about preparing the system for SAPinst.20.Prepare the system for the SAPinst GUI.
These preparation activities are optional and only apply if you decided to use LDAP for SAP Logon or Microsoft® Management Console (MMC), and you have to prepare the active directory for use with the SAP system.
2.1.3 The main SAP documentation types
The first step in any installation is collecting information, from such sources as the SAP installation guides, SAP notes for installation and IBM Info APARs. See Figure 2-2.
Figure 2-2 The documentation and information necessary for an SAP installation
In the following sections, we provide a short overview of the installation steps for SAP WebAS 6.40 SR1, however, do not use this as the official reference. Use the SAP installation guides instead, which you can download at:
http://www.service.sap.com/instguides
SAP Installation: Obtain Information
SAP Installation Guide
SAP notesfor installation
IBM InfoAPAR
10 An Overview of Installing SAP Applications on System i Models
Note that you can use multiple guides. For example, if you install a complete SAP Web AS Release 6.40 SR1, you need four documents: ”Planning and Preparation” and “Installation and Post-Installation”, for both ABAP and Java. The installation guides refer to some SAP notes with last minute information, as well as the IBM Info APARs with current information about the PTFs necessary for your system. Refer to the SAP notes at:
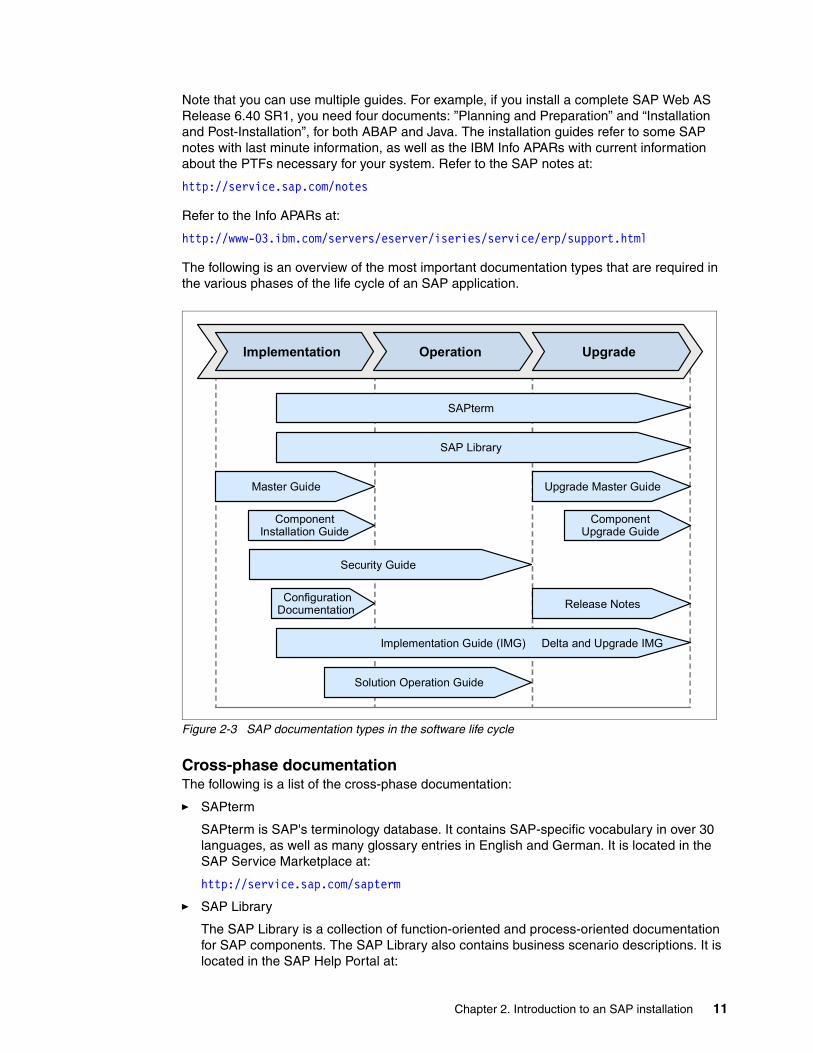
The following is an overview of the most important documentation types that are required in the various phases of the life cycle of an SAP application.
Figure 2-3 SAP documentation types in the software life cycle
Cross-phase documentationThe following is a list of the cross-phase documentation:
� SAPterm
SAPterm is SAP's terminology database. It contains SAP-specific vocabulary in over 30 languages, as well as many glossary entries in English and German. It is located in the SAP Service Marketplace at:
http://service.sap.com/sapterm
� SAP Library
The SAP Library is a collection of function-oriented and process-oriented documentation for SAP components. The SAP Library also contains business scenario descriptions. It is located in the SAP Help Portal at:
It is also available as documentation CD, located in the SAP Service Marketplace (only the business scenario descriptions) at:
http://service.sap.com/ibc
� Implementation Guide (IMG)
The IMG is a tool for configuring the SAP system to meet customer requirements. Its structure and documentation are component-oriented. You can find the IMG in the SAP menu of the SAP system under Tools → Customizing → IMG.
� SAP Security Guide
The Security Guide describes the settings for a medium security level and offers suggestions for raising the security levels. A collective security guide is available for the SAP NetWeaver technologies, such as the SAP Web Application Server. This document contains general guidelines and suggestions about the system security. Other technologies and individual applications have a security guide of their own. This guide is located in the SAP Service Marketplace at:
http://service.sap.com/securityguide
ImplementationThe following is a list of the implementation guides:
� Master Guide
The Master Guide is the starting point for implementing an SAP application. It lists the required SAP components and the third-party applications that are required for each business scenario. It provides scenario-specific descriptions of the preparation, execution, and follow-up of an implementation. It also offers references to other documents, such as component installation guides and SAP notes. This guide is located in the SAP Service Marketplace at:
http://service.sap.com/instguides
� Component Installation Guide
The Component Installation Guide describes the technical implementation of an SAP component, taking into account the combinations of operating systems and databases. It does not describe any business-related configuration. This guide is located in the SAP Service Marketplace at:
http://service.sap.com/instguides
� Configuration documentation in SAP SolMan
SAP SolMan is a tool with various functions and one of its main functions is the configuration of SAP applications and business scenarios. It contains IMG activities, transactions, and so on, as well as documentation. Instead of the configuration documentation in SAP SolMan, there can be separate business scenario configuration guides in the SAP Service Marketplace for previous shipments of the business scenarios. This guide is located in the SAP Service Marketplace at:
http://service.sap.com/ibc
Production operationThe Solution Management Guide is the starting point for operating an SAP application. The guide refers users to the tools and documentation that are necessary to perform various tasks, such as monitoring, backup or restore, master data maintenance, transports, and tests. It also refers users to other documents, for example, the SAP Library, the master guide, and the component management guides.
12 An Overview of Installing SAP Applications on System i Models
This guide is located in the SAP Service Marketplace at:
http://service.sap.com/instguides
UpgradeThe following guides for upgrades are available:
� Upgrade Master Guide
The Upgrade Master Guide is the starting point for upgrading the business scenarios of an SAP application. It provides scenario-specific descriptions of the preparation, execution, and follow-up of an upgrade. It also refers to other documents, such as the component upgrade guides and SAP notes. Instead of an upgrade master guide, there can be several business scenario upgrade guides or a solution upgrade guide for previous shipments of the business scenarios of an SAP application. This guide is located in the SAP Service Marketplace at:
http://service.sap.com/instguides
� Component Upgrade Guide
The Component Upgrade Guide describes the technical upgrade of an SAP component, taking into account the combinations of operating systems and databases. It does not describe any business-related configuration. This guide is located in the SAP Service Marketplace at:
http://service.sap.com/instguides
Additional documentationYou can also refer to the following documentation.
� SAP Release notes
Release notes are documents that contain short descriptions of new features or changes in an SAP component since the previous release. Release notes about ABAP developments enable the SAP system to generate delta and upgrade IMGs. These are located in the SAP Service Marketplace at:
http://service.sap.com/releasenotes
� Info APARs
Refer to the list of IBM Info APARs in the topic “Operating System and Database Patches” section of Implementing SAP Applications with System i and i5/OS, SG24-7166. For each i5/OS version and release there is a different Info APAR. The installation of the CUM and PTF mentioned in this Info APAR is a prerequisite for each SAP installation.
2.1.4 The SAP installation guides
The most important guides for installing the SAP components are:
� SAP Master Guide for the underlaying main components:
– SAP NetWeaver– mySAP ERP
� SAP Component Installation Guides, which are usually divided in two parts (see Figure 2-4 on page 14):
– Part I: Planning and Preparation Guide– Part II: Installation and Post-Installation Guide
Figure 2-4 The two parts of the SAP Component Installation Guides
The SAP Master Guides provide an overview of which SAP components you have to install for a particular SAP application. An SAP application is also known as key function area or as scenario.
The Component Installation Guides describe, in more detail, the exact procedure about how to install the specific component. For your planning and preparation refer to the “Planning and Preparation” guide before you start the real installation. In the “Installation and Post-Installation” guide you find the single steps you have to perform for the specific installation.
Each guide has links to special SAP notes. You have to consider these notes as additional components to the installation guides. While the installation guides are not updated when there are some optimizations or corrected errors in the installation guides, the SAP notes correct these errors. Therefore, the SAP notes are versioned documents. Take care to always use the most recent SAP note. Moreover, the SAP notes mentioned in the SAP installation guides may refer to additional SAP notes, therefore, you have to study your documents in a hierarchical way. For an example, see Table 2-2.
Table 2-2 Example about how to read the SAP installation documents
As a further explanation to Table 2-2, see Figure 2-5 on page 15 and the accompanying scenario about how to read the documentation.
Hierarchy 1 Hierarchy 2 Hierarchy 3 Hierarchy 4
Master Guide
Installation Guide
SAP noteInstallation Guide (cont’d))
SAP note SAP note
SAP noteSAP note (cont’d)
SAP noteInstallation Guide (cont’d)
Planning and PreparationGuide
Installation andPost-Installation Guide
Post-InstallationPost-
InstallationPost-Installation
Post-InstallationPost-
InstallationInstallation
Post-InstallationPost-
InstallationPreparation
Post-InstallationPost-
InstallationPlanning
14 An Overview of Installing SAP Applications on System i Models
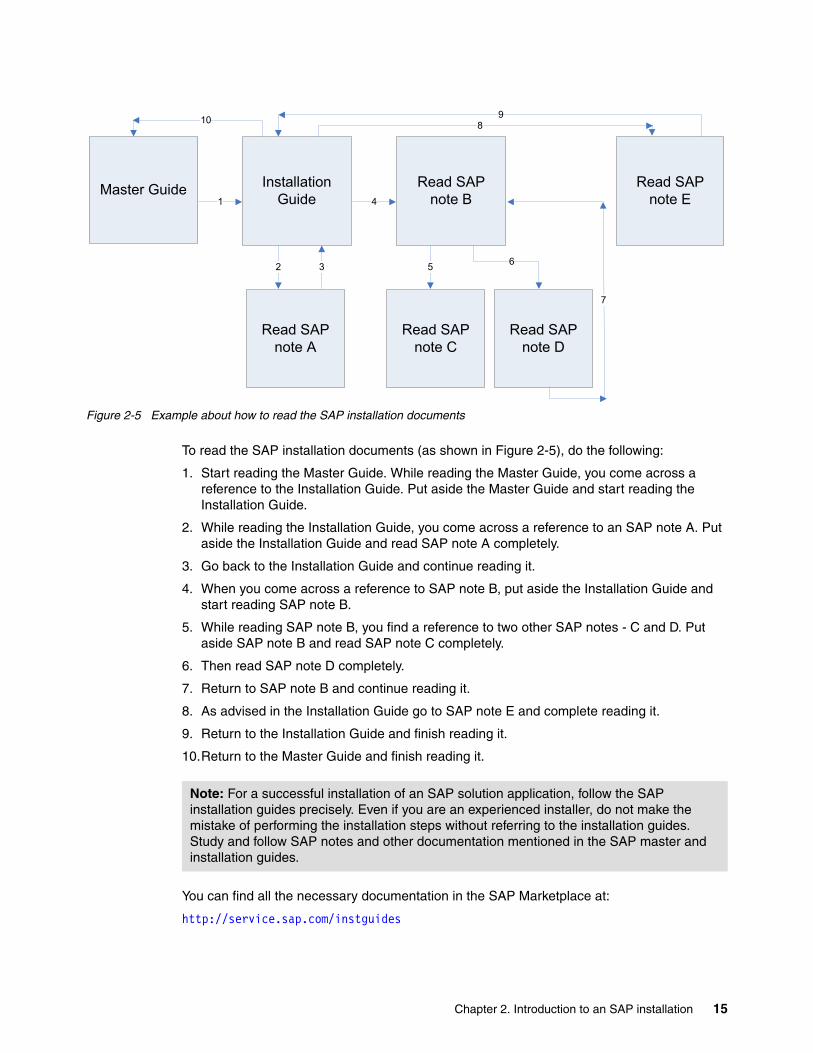
Figure 2-5 Example about how to read the SAP installation documents
To read the SAP installation documents (as shown in Figure 2-5), do the following:
1. Start reading the Master Guide. While reading the Master Guide, you come across a reference to the Installation Guide. Put aside the Master Guide and start reading the Installation Guide.
2. While reading the Installation Guide, you come across a reference to an SAP note A. Put aside the Installation Guide and read SAP note A completely.
3. Go back to the Installation Guide and continue reading it.
4. When you come across a reference to SAP note B, put aside the Installation Guide and start reading SAP note B.
5. While reading SAP note B, you find a reference to two other SAP notes - C and D. Put aside SAP note B and read SAP note C completely.
6. Then read SAP note D completely.
7. Return to SAP note B and continue reading it.
8. As advised in the Installation Guide go to SAP note E and complete reading it.
9. Return to the Installation Guide and finish reading it.
10.Return to the Master Guide and finish reading it.
You can find all the necessary documentation in the SAP Marketplace at:
http://service.sap.com/instguides
Master Guide
10
1
Installation Guide
98
2 3
Read SAP note A
Read SAP note B
Read SAP note C
Read SAP note D
Read SAP note E4
5 6
7
Note: For a successful installation of an SAP solution application, follow the SAP installation guides precisely. Even if you are an experienced installer, do not make the mistake of performing the installation steps without referring to the installation guides. Study and follow SAP notes and other documentation mentioned in the SAP master and installation guides.
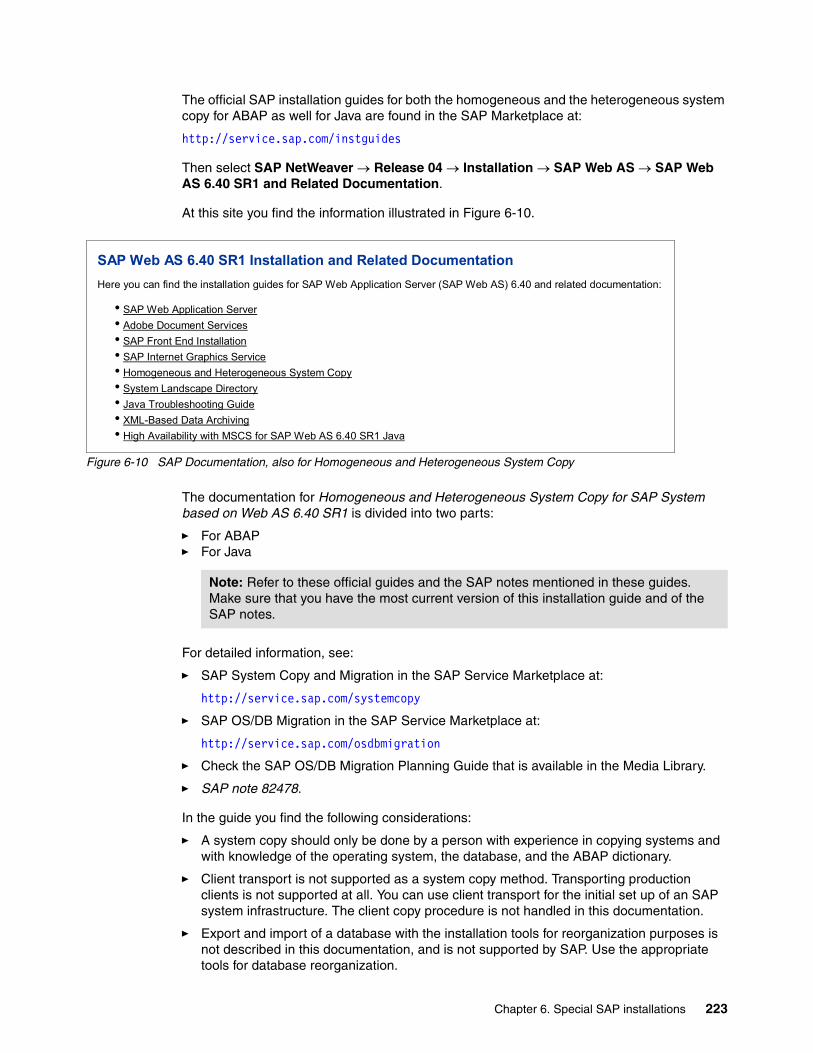
Figure 2-6 shows you the entry point to this Web page. Here you also see the SAP application areas where SAP installation guides are available, including:
� Industry Solutions� mySAP Business Suite Solutions� SAP NetWeaver� SAP Components� SAP xApps� Other documentation
Figure 2-6 SAP installation and upgrade documentation
Figure 2-7 SAP NetWeaver ´04 installation documentations
Figure 2-8 on page 17 shows the System i specific installation guides for the SAP Web Application Server 6.40 SR1.
You come to this screen by visiting the following Web site:
http://service.sap.com/nw04installation
Then choose SAP Web AS → SAP Web AS 6.40 SR1 and Related Documentation, then select IBM DB2 Universal Database for iSeries
16 An Overview of Installing SAP Applications on System i Models
Figure 2-8 SAP NetWeaver: System i specific installation guides
2.2 Installation requirements
You can check the hardware and software requirements using the requirements checklists in the installation guide.
2.2.1 Sizing requirements
The sizing requirements in the installation guides give the minimum requirements for the installations of small SAP systems and do not include customer data. Depending on the amount of data involved, the requirements may change. For a more precise sizing definition that reflects your particular system load, you can choose the following options:
� You can use the SAP Quick Sizer tool available on the SAP Service Marketplace. You enter information about your planned system and the tool calculates “some” requirements. But, very often, the result is not really based on enough data of your project. For more information, see the SAP Service Marketplace at:
service.sap.com/sizing
� Contact a hardware vendor. The vendor analyzes the load and calculates the suitable hardware sizing for you. If you have any questions, contact the person in charge of installation, your competence center, or your local IBM representative. For more information, contact the IBM International SAP IBM Competence Center (ISICC) or another competent IBM Business Partner.
� The “SAP sizing considerations” chapter in Implementing SAP Applications with System i and i5/OS, SG24-7166 provides sizing rules and rules of thumb for your configuration.
� Check the network requirements. For more information, see the documentation Network Integration of SAP Servers in the SAP Service Marketplace at:
http://service.sap.com/network
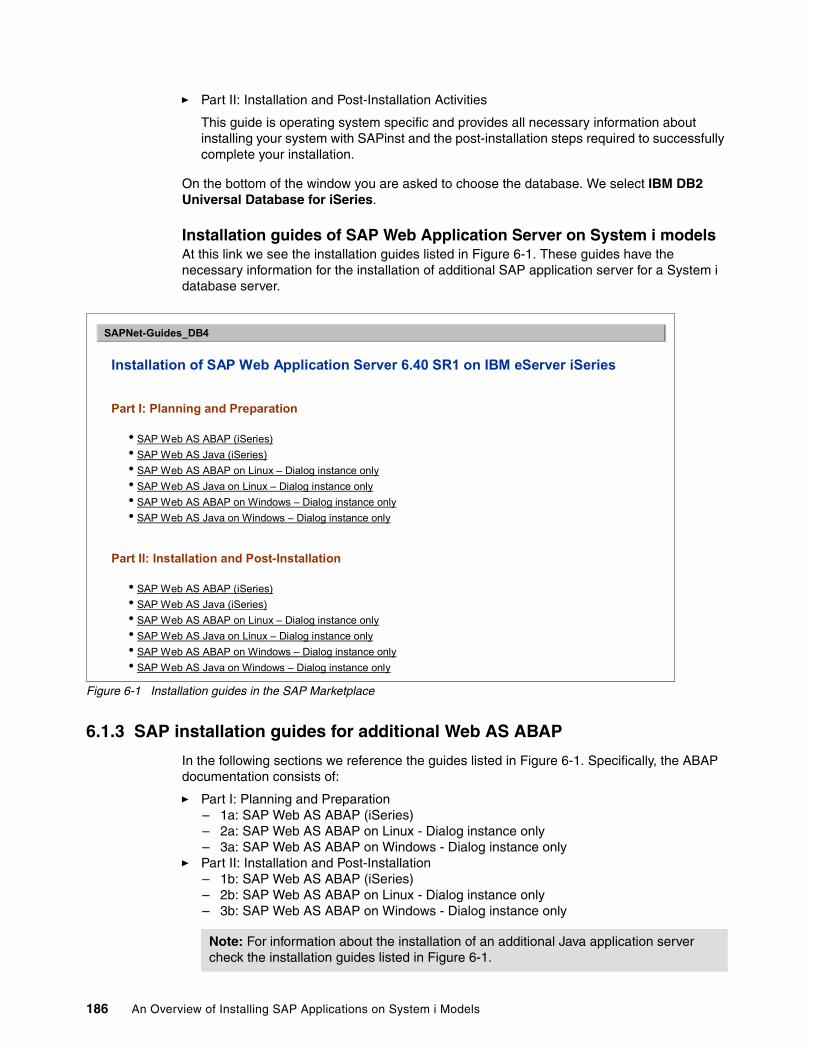
Installation of SAP Web Application Server 6.40 SR1 on IBM eServer iSeries
Part I: Planning and Preparation
• SAP Web AS ABAP (iSeries)• SAP Web AS Java (iSeries)• SAP Web AS ABAP on Linux – Dialog instance only• SAP Web AS Java on Linux – Dialog instance only• SAP Web AS ABAP on Windows – Dialog instance only• SAP Web AS Java on Windows – Dialog instance only
Part II: Installation and Post-Installation
• SAP Web AS ABAP (iSeries)• SAP Web AS Java (iSeries)• SAP Web AS ABAP on Linux – Dialog instance only• SAP Web AS Java on Linux – Dialog instance only• SAP Web AS ABAP on Windows – Dialog instance only• SAP Web AS Java on Windows – Dialog instance only
In the following sections, we list the requirements for an SAP system installation on System i configurations.
2.2.2 Hardware requirements
Do not mix the hardware requirements with the requirements for a running production system with your user data. The hardware requirements mentioned in this section are only for the pure installation procedure:
� DVD drive (on System i servers or on the Windows SAPinst GUI host).
� 4.3 GB of temporary disk space for every required installation DVD that you copy to a local hard disk. There are approximately five to ten DVDs that you have to copy to hard disk.
� Before installing an SAP system on System i configurations, you must obtain detailed sizing information from IBM or a competent IBM Business Partner. Your installation crashes if you have not efficiently or correctly configured your hardware requirements.
2.2.3 Operating system and licensed program requirements
This section provides details about the operating system requirements.
SAP Web Application Server 6.40 Service Release 1 (SR 1) is the basis for nearly all SAP applications. This Web AS 6.40 SR1 is released for OS/400 V5R2, and i5/OS V5R3 and V5R4.
For information about which i5/OS versions have been released for SAP on System i servers, see SAP note 410783. For known problems:
� i5/OS V5R4, see SAP note 853564� OS/400 V5R1 and V5R2, see SAP note 392165� i5/OS V5R3, see SAP note 743113
For each SAP installation on a System i model with an ABAP and Java stack you have to install the following IBM licensed products and options:
� 5722SS1 option *BASE Operating System/400®
� 5722SS1 option 1 OS/400: Extended Base Support
� 5722SS1 option 2 OS/400: Online Information
� 5722SS1 option 3 OS/400: Extended Base Directory Support
� 5722SS1 option 12 OS/400: Host Servers
� 5722SS1 option 13 OS/400: System Openness Includes (Unicode only)
� 5722SS1 option 39 OS/400: International Components for Unicode
� 5722AC3 option *BASE Crypto Access Provider 128-bit for AS/400 (mandatory for JDK™ 1.4)
� 5722JC1 option *BASE IBM Toolbox for Java
� 5722JV1 option *BASE IBM Developer Kit for Java 5722JV1 option 5 Java Developer Kit 1.3
18 An Overview of Installing SAP Applications on System i Models
You can find more details and related additional software products in the specific sections of this Redpaper and of course in the related official SAP installation guides.
2.2.4 Memory requirements
For an SAP system installation on a System i server, there are some golden rules for the main memory.
� Ensure an appropriate configuration of the Share Pools.
– Set the Share Pool *MACHINE to at least 10% of the main memory and not less than 600 MB. Perfect tuning is to set it to the minimum value that avoids paging. For more information, search for "QMCHPOOL" at the iSeries Information Center:
– Remove the *INTERACT pool, unless you are running non-SAP applications that generate a significant interactive workload on the System i server. Change the subsystem QINTER to use the *BASE Sharepool (using CHGSBSD). See also the SAP notes 428855 and 621793.
– Activate the Expert Cache only for the *BASE Pool. For details see also SAP note 428855.
– Set the SPOOL pool big enough to handle printers and remote output queues if you want to use connection type “C” in your SAP systems. For example, 32 MB for about 10 to 20 printers/OUTQs.
� All SAP installation workload on System i models is handled in a separate subsystem that is created during installation. The main memory for this subsystem is handled by the *BASE Share Pool. For a more detailed description, see also 2.6, “General steps of an SAP installation” on page 37.
� The rules for the estimation of the minimum main memory requirements for the installation procedure are:
– 6 GB to 8 GB per processor (better 8 GB)– An additional 4 GB for the central instance – About 4 GB for every additional application server
This means that you should not have less than 8 GB main memory. It runs with less memory, but more slowly.
2.2.5 Disk size requirements
This section provides details about the disk size requirements.
Note: Ensure that English is installed as the primary or secondary language on your System i model. This is asked by the installation procedure of Web Application Server 6.xx to get appropriate assistance from IBM, SAP, or both.
The SAP installers often miss this feature (library QSYS2924) when they start the SAP installation.
Note: You can adapt the Share Pool configurations dynamically later during the runtime of the system.
Multiple disk size requirementsWhen you start the installation, you require disk size for the following:
� Enough space for the database of the SAP system
� Additional space when the SAP system is started
� Temporary, additional disk space during the installation
� 4.3 GB of temporary disk space for every required installation DVD you have to copy to a hard disk. You have to reserve disk space for approximately five to ten DVDs.
Detailed space requirementsThe amount of space required for an SAP system on System i servers is dependent on many variables such as the following:
� Size of the database, mainly influenced by the number of SAP clients and the application data in these clients.
� Number of work processes
� Number of users
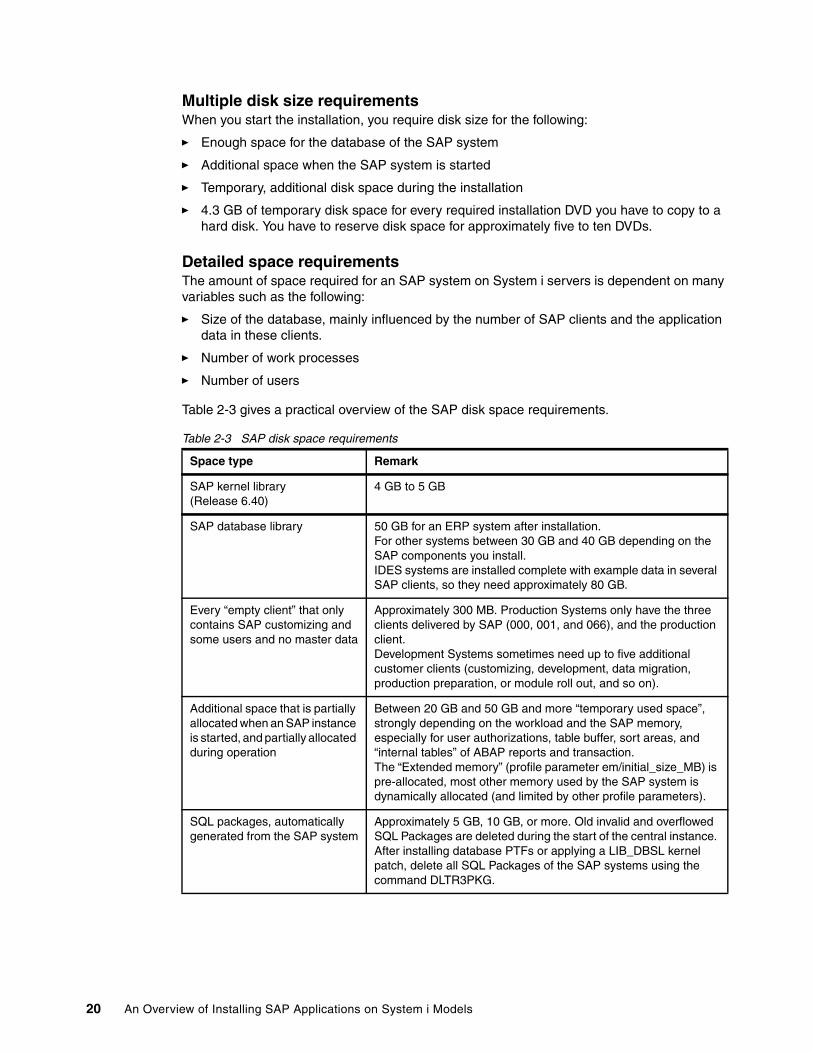
Table 2-3 gives a practical overview of the SAP disk space requirements.
Table 2-3 SAP disk space requirements
Space type Remark
SAP kernel library (Release 6.40)
4 GB to 5 GB
SAP database library 50 GB for an ERP system after installation.For other systems between 30 GB and 40 GB depending on the SAP components you install.IDES systems are installed complete with example data in several SAP clients, so they need approximately 80 GB.
Every “empty client” that only contains SAP customizing and some users and no master data
Approximately 300 MB. Production Systems only have the three clients delivered by SAP (000, 001, and 066), and the production client.Development Systems sometimes need up to five additional customer clients (customizing, development, data migration, production preparation, or module roll out, and so on).
Additional space that is partially allocated when an SAP instance is started, and partially allocated during operation
Between 20 GB and 50 GB and more “temporary used space”, strongly depending on the workload and the SAP memory, especially for user authorizations, table buffer, sort areas, and “internal tables” of ABAP reports and transaction. The “Extended memory” (profile parameter em/initial_size_MB) is pre-allocated, most other memory used by the SAP system is dynamically allocated (and limited by other profile parameters).
SQL packages, automatically generated from the SAP system
Approximately 5 GB, 10 GB, or more. Old invalid and overflowed SQL Packages are deleted during the start of the central instance. After installing database PTFs or applying a LIB_DBSL kernel patch, delete all SQL Packages of the SAP systems using the command DLTR3PKG.
20 An Overview of Installing SAP Applications on System i Models
We recommend that you do not start an installation when you have less than 80 GB DASD free space for an SAP ERP ECC Central System. For additional sizing aspects, refer to 2.2.1, “Sizing requirements” on page 17, where you find all necessary references. Further sizings must be done for additional ASPs and for iASPs, for example, for clustering (Cross-Site® Mirroring, XSM).
For your sizing considerations, take into account the net and gross requirements when you implement a disk protection such as Raid-5. There are different strategies and options to implement RAID-5. Refer to the Integrated Storage topic in Implementing SAP Applications with System i and i5/OS, SG24-7166.
Also, consider the following requirements:
� Your system ASP should not exceed 80% of the available disk space.� Your journal receiver ASP should not exceed 70% of the available disk space.
2.3 SAP NetWeaver and SAP Web Application Server
To understand the installation concepts and installation steps for an SAP system, it is important to have a look at the SAP infrastructure NetWeaver and its components. This infrastructure is the basis for nearly any SAP application. Within SAP NetWeaver, there is the SAP Web Application Server, which represents the hardware-dependent SAP application platform with the ABAP and JAVA stack.
In the following section, you see the basic system variants of the SAP NetWeaver and the distribution of the SAP instances.
2.3.1 SAP NetWeaver components
SAP NetWeaver ´04 provides mySAP ERP with a comprehensive integration platform and delivers the foundation to serve all ERP applications. SAP NetWeaver is built to extend mySAP ERP and to integrate non-SAP systems.
Space for journal receivers This depends on your strategy for the backup and cleanup of the journal receivers. We recommend that you save every journal receiver twice before deleting it. Therefore, you should plan for approximately 20 GB to 50 GB of space for production systems. Maybe much more in large installations or ASPs with more than one SAP system.
Space needed in the IFS The main part of the space necessary in the IFS from the SAP system is the DIR_GLOBAL where the joblogs for the batch jobs, optionally the SAP spool (else in database tables), and SAP Batch Input protocols of each SAP instance are stored. A big impact has the transport directory DIR_TRANS where the transport requests with their data and log files, also the data for the installation of additional languages and all the support packages are placed before they are installed. This also needs between 5 GB and 20 GB and more disk space, and, of course, a backup or cleanup concept.
Total for one central system At least 100 GB to 120 GB. Then you can start filling the system with data.
Space type Remark
Chapter 2. Introduction to an SAP installation 21
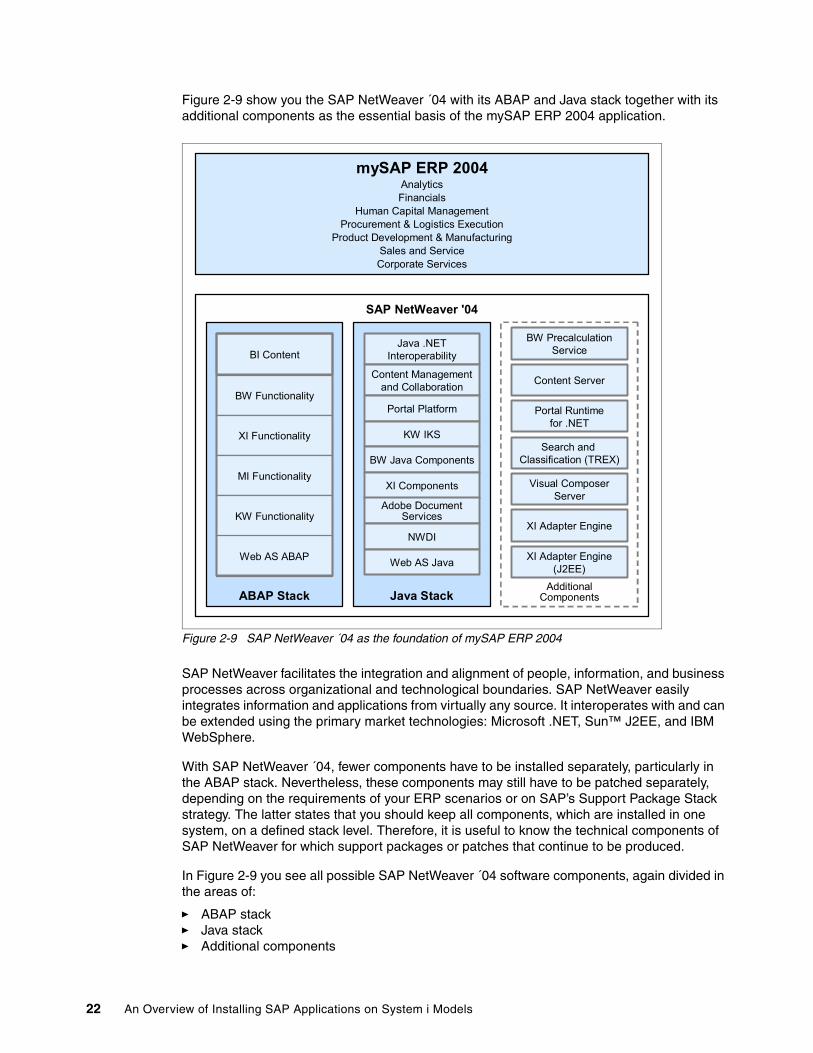
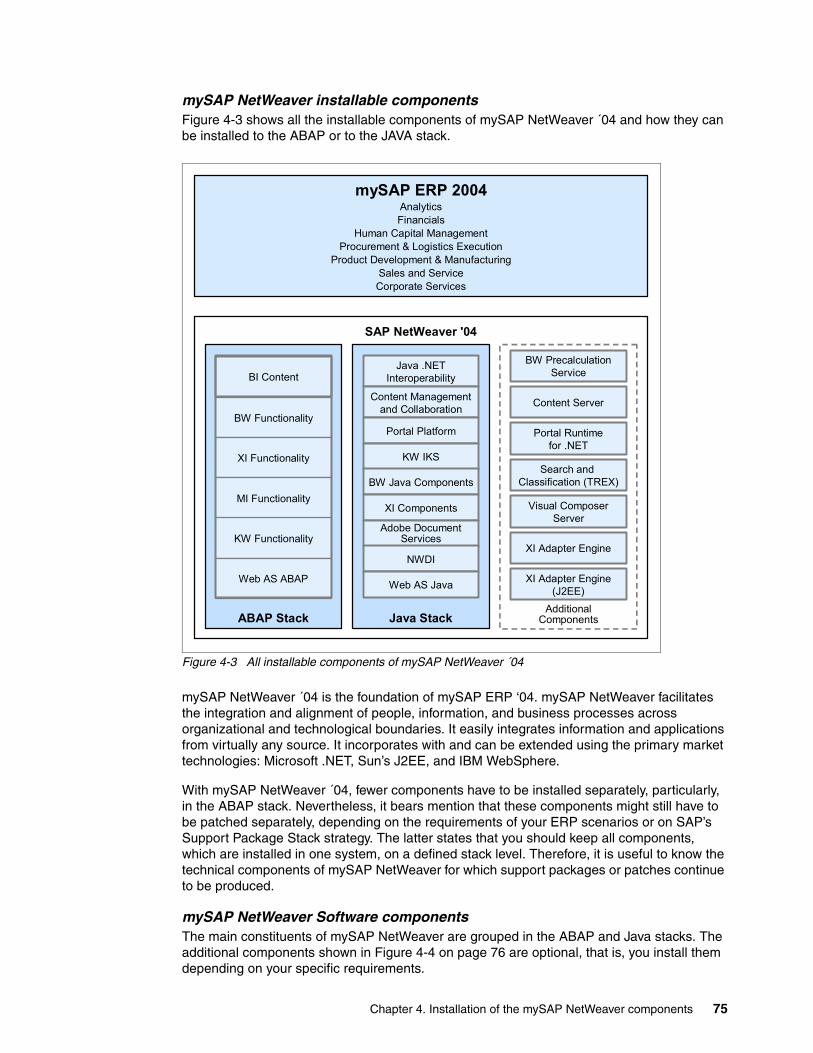
Figure 2-9 show you the SAP NetWeaver ´04 with its ABAP and Java stack together with its additional components as the essential basis of the mySAP ERP 2004 application.
Figure 2-9 SAP NetWeaver ´04 as the foundation of mySAP ERP 2004
SAP NetWeaver facilitates the integration and alignment of people, information, and business processes across organizational and technological boundaries. SAP NetWeaver easily integrates information and applications from virtually any source. It interoperates with and can be extended using the primary market technologies: Microsoft .NET, Sun™ J2EE, and IBM WebSphere.
With SAP NetWeaver ´04, fewer components have to be installed separately, particularly in the ABAP stack. Nevertheless, these components may still have to be patched separately, depending on the requirements of your ERP scenarios or on SAP’s Support Package Stack strategy. The latter states that you should keep all components, which are installed in one system, on a defined stack level. Therefore, it is useful to know the technical components of SAP NetWeaver for which support packages or patches that continue to be produced.
In Figure 2-9 you see all possible SAP NetWeaver ´04 software components, again divided in the areas of:
� ABAP stack� Java stack� Additional components
mySAP ERP 2004AnalyticsFinancials
Human Capital ManagementProcurement & Logistics Execution
Product Development & ManufacturingSales and ServiceCorporate Services
SAP NetWeaver '04
Java StackABAP Stack
BI Content
BW Functionality
XI Functionality
MI Functionality
KW Functionality
Web AS ABAP
Java .NETInteroperability
Content Managementand Collaboration
Portal Platform
KW IKS
BW Java Components
XI Components
Adobe DocumentServices
NWDI
Web AS Java
BW PrecalculationService
Content Server
Portal Runtimefor .NET
Search and Classification (TREX)
Visual ComposerServer
XI Adapter Engine
XI Adapter Engine(J2EE)
AdditionalComponents
22 An Overview of Installing SAP Applications on System i Models
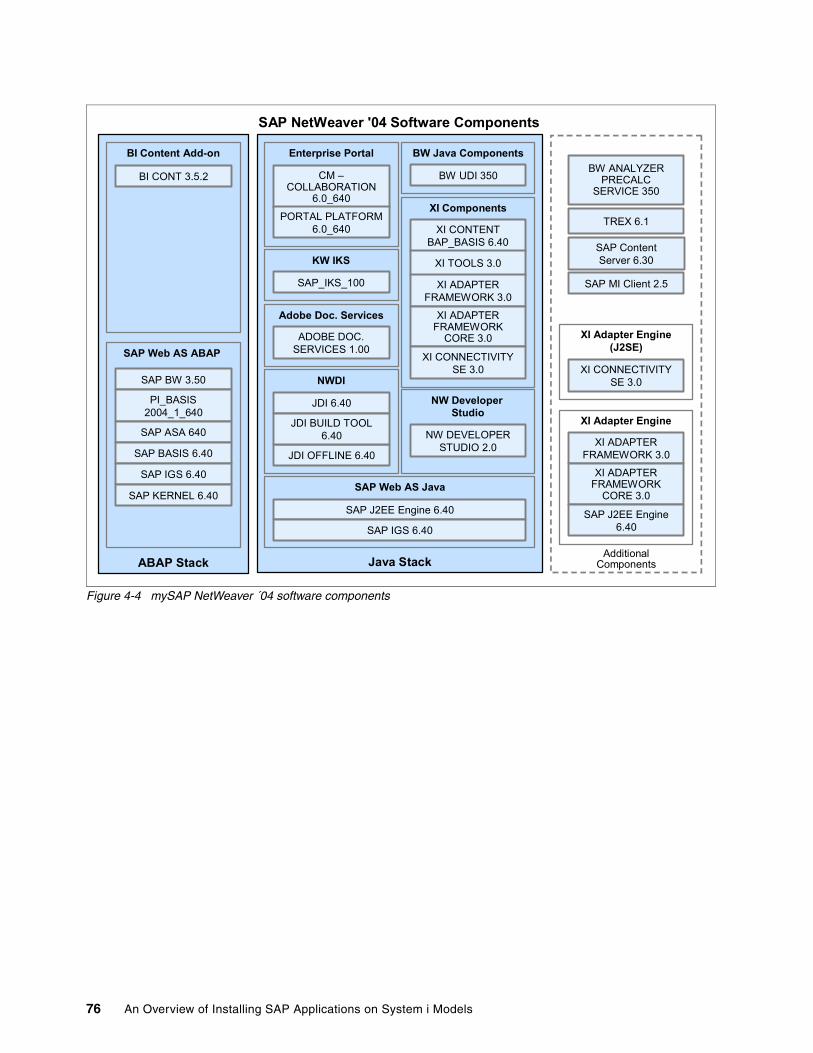
Figure 2-10 SAP NetWeaver ´04 software components
The main constituents of SAP NetWeaver are grouped in the ABAP and Java stacks. The additional components shown in Figure 2-10 are optional, that is, you only have to install them depending on your specific requirements.
2.3.2 Basic system variants of the SAP Web Application Server
SAP Web AS 6.40 is a main component of SAP NetWeaver. It can be installed in different basic system variants.
Basic system variantsThe following are the basic SAP variants:
� ABAP system
This system variant consists of the ABAP installation. There is no J2EE Engine.
� Java system
This system variant consists of the Java installation, that is the J2EE Engine and auxiliary services. There is no ABAP application server.
Java Stack
Enterprise Portal
ABAP StackAdditional
Components
SAP Web AS ABAP
SAP BW 3.50
PI_BASIS2004_1_640
SAP ASA 640
SAP BASIS 6.40
SAP IGS 6.40
SAP KERNEL 6.40
BI Content Add-on
BI CONT 3.5.2 CM –COLLABORATION
6.0_640
PORTAL PLATFORM6.0_640
KW IKS
SAP_IKS_100
Adobe Doc. Services
ADOBE DOC.SERVICES 1.00
NWDI
JDI 6.40
JDI OFFLINE 6.40
JDI BUILD TOOL6.40
BW Java Components
BW UDI 350
XI Components
XI CONTENTBAP_BASIS 6.40
XI TOOLS 3.0
XI ADAPTERFRAMEWORK 3.0
XI ADAPTERFRAMEWORK
CORE 3.0
XI CONNECTIVITYSE 3.0
NW Developer Studio
NW DEVELOPERSTUDIO 2.0
SAP Web AS Java
SAP J2EE Engine 6.40
SAP IGS 6.40
BW ANALYZERPRECALC
SERVICE 350
TREX 6.1
SAP ContentServer 6.30
SAP MI Client 2.5
XI Adapter Engine(J2SE)
XI CONNECTIVITYSE 3.0
XI Adapter Engine
XI ADAPTERFRAMEWORK 3.0
XI ADAPTERFRAMEWORK
CORE 3.0
SAP J2EE Engine6.40
SAP NetWeaver '04 Software Components
Chapter 2. Introduction to an SAP installation 23
� ABAP + Java system
This system variant consists of the ABAP installation and the installation of the Java Add-In. You can then operate both the ABAP application server and the J2EE Engine on the SAP system.
Distribution of SAP system instancesAdditionally, we show you the distribution of SAP system instances within these basic system variants, for example, for a mySAP ERP solution. You can install all mandatory SAP system components on a single host (central system) or on separate hosts (distributed system).
SAP Web AS ABAP systemThis variant shown in Figure 2-11 only consists of the ABAP Engine. There is no J2EE Engine.
Figure 2-11 One SAP Web AS ABAP system
Mandatory instances of an ABAP system are the central instance and the database instance. Optionally, you can install one or more dialog instances and gateway instances.
In Figure 2-12 on page 25 you see the possibilities about how to distribute an ABAP system between a central and other distributed systems.
JavaSchema
Database
Web AS Java
24 An Overview of Installing SAP Applications on System i Models
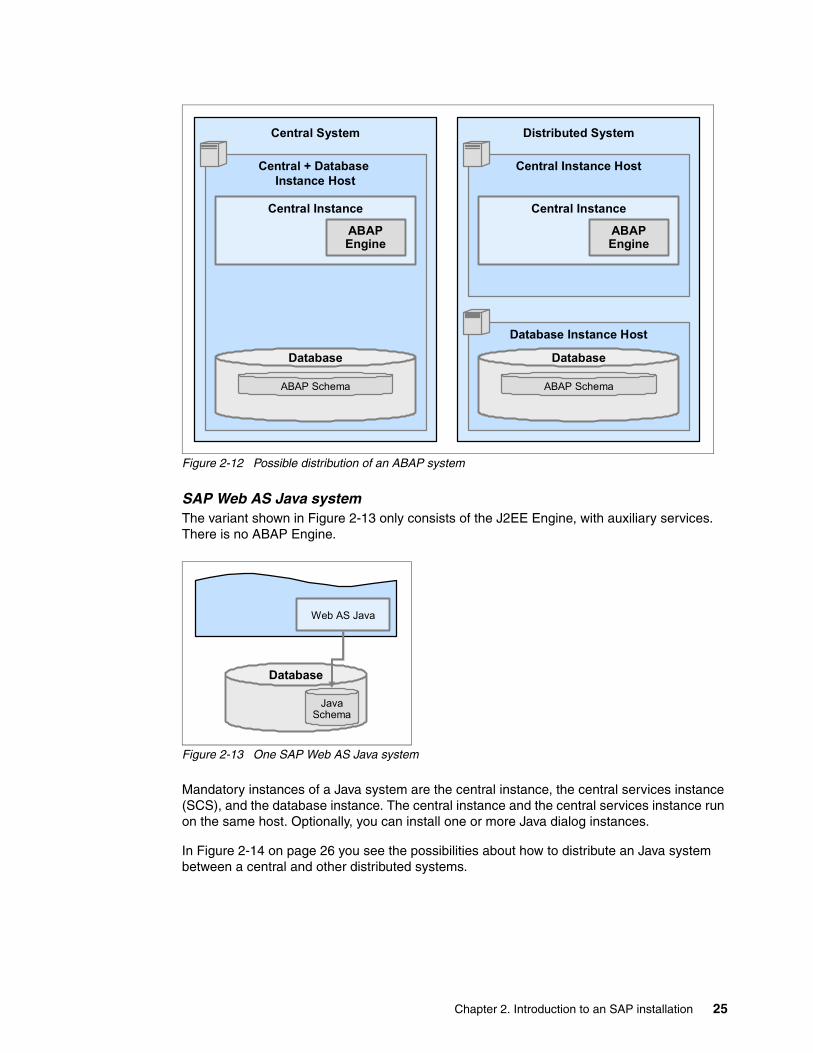
Figure 2-12 Possible distribution of an ABAP system
SAP Web AS Java systemThe variant shown in Figure 2-13 only consists of the J2EE Engine, with auxiliary services. There is no ABAP Engine.
Figure 2-13 One SAP Web AS Java system
Mandatory instances of a Java system are the central instance, the central services instance (SCS), and the database instance. The central instance and the central services instance run on the same host. Optionally, you can install one or more Java dialog instances.
In Figure 2-14 on page 26 you see the possibilities about how to distribute an Java system between a central and other distributed systems.
Distributed System
Database Instance Host
Central System
Central + Database Instance Host
Central Instance
ABAPEngine
Database
ABAP Schema
Central Instance Host
Central Instance
ABAPEngine
Database
ABAP Schema
JavaSchema
Database
Web AS Java
Chapter 2. Introduction to an SAP installation 25
Figure 2-14 Distribution of a Java system
SAP Web AS ABAP + Java system or SAP Web AS ABAP system + SAP Web AS Java system
With the variant shown in Figure 2-15 you can operate both the ABAP Engine and the J2EE Engine in one system (that is, one SAP system with one SAPSID).
Figure 2-15 SAP Web AS ABAP + Java system
With the variant shown in Figure 2-16 on page 27 you can also operate both the ABAP Engine and the J2EE Engine. But in contrast to an SAP Web AS ABAP + Java system, the two engines run separately in two systems (that is, two SAP systems, each with a different SAPSID).
Central System
Central + DatabaseInstance Host
Central Instance
J2EEEngine
Database
Central ServicesInstance
J2EE Schema
Distributed System
Database Instance Host
Central Instance Host
Central Instance
J2EEEngine
Database
J2EE Schema
Central ServicesInstance
JavaSchema
Database
Web AS JavaWeb AS ABAP
ABAPSchema
26 An Overview of Installing SAP Applications on System i Models
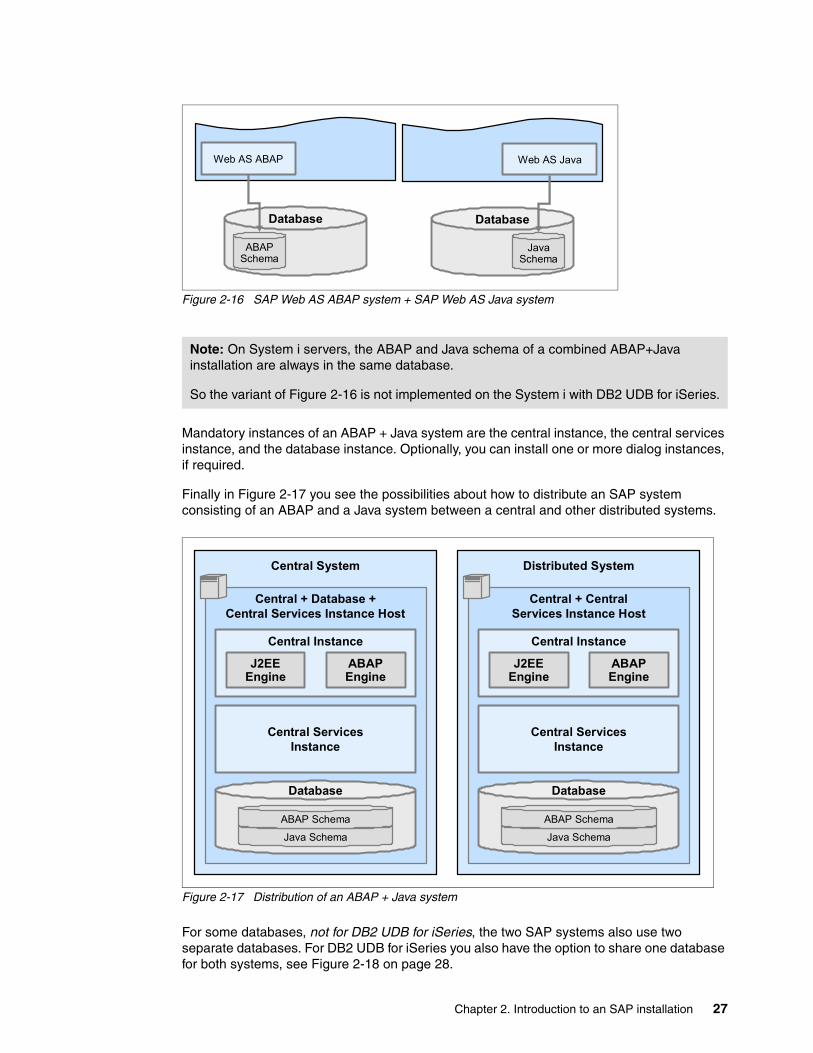
Figure 2-16 SAP Web AS ABAP system + SAP Web AS Java system
Mandatory instances of an ABAP + Java system are the central instance, the central services instance, and the database instance. Optionally, you can install one or more dialog instances, if required.
Finally in Figure 2-17 you see the possibilities about how to distribute an SAP system consisting of an ABAP and a Java system between a central and other distributed systems.
Figure 2-17 Distribution of an ABAP + Java system
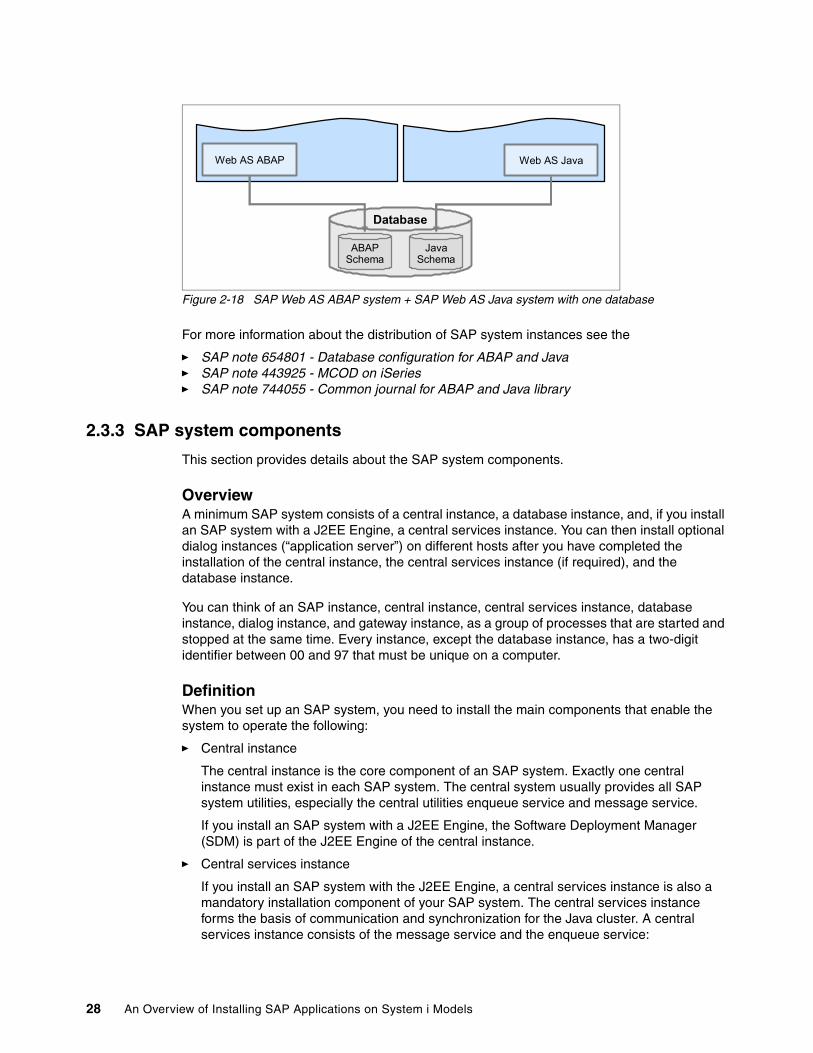
For some databases, not for DB2 UDB for iSeries, the two SAP systems also use two separate databases. For DB2 UDB for iSeries you also have the option to share one database for both systems, see Figure 2-18 on page 28.
Note: On System i servers, the ABAP and Java schema of a combined ABAP+Java installation are always in the same database.
So the variant of Figure 2-16 is not implemented on the System i with DB2 UDB for iSeries.
ABAPSchema
Database
Web AS ABAP
JavaSchema
Database
Web AS Java
Central System
Central + Database +Central Services Instance Host
Central Instance
ABAPEngine
Database
Central ServicesInstance
Java Schema
ABAP Schema
J2EEEngine
Distributed System
Central + CentralServices Instance Host
Central Instance
ABAPEngine
Database
Central ServicesInstance
Java Schema
ABAP Schema
J2EEEngine
Chapter 2. Introduction to an SAP installation 27
Figure 2-18 SAP Web AS ABAP system + SAP Web AS Java system with one database
For more information about the distribution of SAP system instances see the
� SAP note 654801 - Database configuration for ABAP and Java� SAP note 443925 - MCOD on iSeries� SAP note 744055 - Common journal for ABAP and Java library
2.3.3 SAP system components
This section provides details about the SAP system components.
OverviewA minimum SAP system consists of a central instance, a database instance, and, if you install an SAP system with a J2EE Engine, a central services instance. You can then install optional dialog instances (“application server”) on different hosts after you have completed the installation of the central instance, the central services instance (if required), and the database instance.
You can think of an SAP instance, central instance, central services instance, database instance, dialog instance, and gateway instance, as a group of processes that are started and stopped at the same time. Every instance, except the database instance, has a two-digit identifier between 00 and 97 that must be unique on a computer.
DefinitionWhen you set up an SAP system, you need to install the main components that enable the system to operate the following:
� Central instance
The central instance is the core component of an SAP system. Exactly one central instance must exist in each SAP system. The central system usually provides all SAP system utilities, especially the central utilities enqueue service and message service.
If you install an SAP system with a J2EE Engine, the Software Deployment Manager (SDM) is part of the J2EE Engine of the central instance.
� Central services instance
If you install an SAP system with the J2EE Engine, a central services instance is also a mandatory installation component of your SAP system. The central services instance forms the basis of communication and synchronization for the Java cluster. A central services instance consists of the message service and the enqueue service:
JavaSchema
Database
ABAPSchema
Web AS ABAP Web AS Java
28 An Overview of Installing SAP Applications on System i Models
– The message service keeps a list of the Java dispatchers and Java server processes of the Java cluster. It provides the infrastructure for data exchange (small data sets only) between the participating nodes. The message service also supplies information to the SAP Web Dispatcher about load balancing between multiple Java instances.
– The enqueue service manages logical database locks, which are set by the executed application program in a Java server process. The enqueue service also synchronizes data across the Java cluster.
For more information, see the following documentation in the SAP Library:
Application Platforms (SAP Web Application Server) → Java Technology in SAP Web Application Server → Architecture Manual → Java Cluster Architecture → Central Services
� Database instance
The database instance is a mandatory installation component for the installation of an SAP system. The J2EE Engine uses its own database schema. For the installation of a Java Add-In, both the ABAP and the Java database schema are installed in the same database.
� Dialog instances, if required
Dialog instances are installed on application servers. The dialog instances of a Java system are called Java dialog instances.
Dialog instances are SAP instances that include only:
– Dispatcher, IGS, and CCMS agents– Java and Java Add-In system: Java server processes– ABAP and Java Add-In system: Gateway and certain ABAP work processes (dialog,
batch, spool, or update)
� Gateway instance, if required
It is possible to install an SAP instance of an SAP system exclusively as a stand-alone gateway. This type of instance does not contain normal work process types (dialog, background, update, enqueue, or spool). Only the gateway process (gwrd) is started.
� Front ends
The installation of front ends for the SAP system is described separately in the documentation SAP Front End Installation Guide on the SAP Service Marketplace.
2.4 SAP System Landscape Directory (SLD)
This section gives you a short overview to the SAP System Landscape Directory (SLD). This is a platform independent feature so it is not explained in detail in this Redpaper.
2.4.1 Introduction to the SLD
Today’s system landscapes consist of multiple distributed software components with different platform dependencies, interfaces, and requirements placed on installation and change management. An overall concept is required that facilitates the implementation, upgrade, and maintenance of your system landscapes, including the SAP NetWeaver system landscape you are installing. This is where System Landscape Directory (SLD) comes into play.
SLD is the central directory of system landscape information relevant for the management of your software life cycle. It contains a description of your system landscape (that is, the software components that are currently installed) and a repository of software components
Chapter 2. Introduction to an SAP installation 29
that can theoretically be installed in your landscape (such as the software components available from SAP). Since this data gets updated automatically, SLD provides reliable and up-to-date system landscape information with as little effort for you as possible. In this way, SLD acts as a central information provider for SAP and third-party tools that use this data to deliver the services you need to keep your landscape up and running.
The SAP System Landscape Directory (SLD) is the central information provider for your system landscape. You can use SAP Web AS for SLD in the following ways:
� As an SLD server, which means that SAP Web AS is the system where the central SLD is located. For this, you need a Java or an ABAP + Java system. You have to configure and activate the SLD server after installation.
� As an SLD client, which means that you connect SAP Web AS to an existing SLD. An SLD client can be either an ABAP, Java, or ABAP + Java system.
2.4.2 Multiple landscape scenarios
Figure 2-19 on page 31 shows you some examples about how to set up a System Landscape Directory depending on your specific system landscapes.
The most straightforward scenario is the use of a single SLD. However, depending on organizational, operational, or security reasons, it is also possible to have more than one SLD distributed over the system landscape. Automatic message forwarding as well as sophisticated data export and import functions are provided to support the operation of multiple SLDs.
Central Organization (One Single Central SLD)The best and easiest scenario is the “central SLD”. All data is collected and maintained in a single SLD. All requests are routed to this single SLD, which contains information about the whole system landscape.
All clients must be enabled to access the central SLD. The use of DNS aliases to address SLD makes it possible to switch SLD hosts very easily. This may be necessary for maintenance (updates).
Figure 2-19 on page 31 shows you the System Landscape Directory (SLD) in a central organization.
30 An Overview of Installing SAP Applications on System i Models
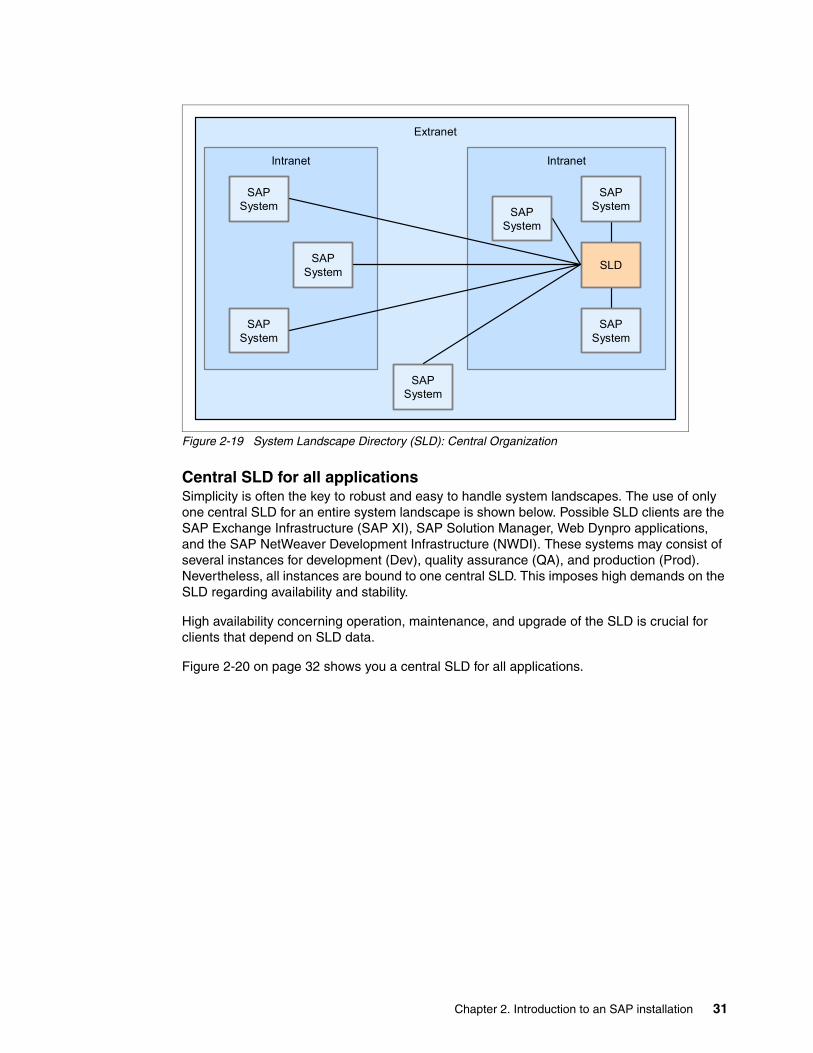
Figure 2-19 System Landscape Directory (SLD): Central Organization
Central SLD for all applicationsSimplicity is often the key to robust and easy to handle system landscapes. The use of only one central SLD for an entire system landscape is shown below. Possible SLD clients are the SAP Exchange Infrastructure (SAP XI), SAP Solution Manager, Web Dynpro applications, and the SAP NetWeaver Development Infrastructure (NWDI). These systems may consist of several instances for development (Dev), quality assurance (QA), and production (Prod). Nevertheless, all instances are bound to one central SLD. This imposes high demands on the SLD regarding availability and stability.
High availability concerning operation, maintenance, and upgrade of the SLD is crucial for clients that depend on SLD data.
Figure 2-20 on page 32 shows you a central SLD for all applications.
Extranet
Intranet
SAPSystem
SAPSystem
SAPSystem
SAPSystem
Intranet
SAPSystem
SAPSystem
SLD
SAPSystem
Chapter 2. Introduction to an SAP installation 31
Figure 2-20 Central System Landscape Directory (SLD) for all applications
Best Practise for the SAP NetWeaver LandscapeThe following points constitute the best practices for the system landscape:
� One central SLD is used.
� Administration and monitoring components are grouped together on one host.
� This central monitoring and administration system must have high availability (HA).
� SAP Solution Manager is installed on the same host as the central monitoring and administration system but in a separate SAP Web AS.
� SLD can act as a data source for landscape data for SAP Solution Manager.
Support Infrastructure and Central Administration and MonitoringThe SAP Solution Manager represents the support infrastructure and the central administration and monitoring comprises the following elements:
� SAP NetWeaver Administrator� SLD System Landscape Directory� SLM Software Lifecycle Manager� CUA® Central User Administration� CPH Central Performance History
Web DynproDev
Web DynproQA
ABAPBack End
Dev
ABAPBack End
QA
SLD HA Cluster
Web DynproProd SAP XI
Dev
SAP XI
QA
SAP XI
Prod
SAPSolutionManager
Dev
SAPSolutionManager
QA
ABAPBack End
Prod
SLD
(Central Master)
SAPSolutionManager
Prod
NWDINWDINWDI
JCO/RFC
32 An Overview of Installing SAP Applications on System i Models
Figure 2-21 Support Infrastructure and Central administration and monitoring
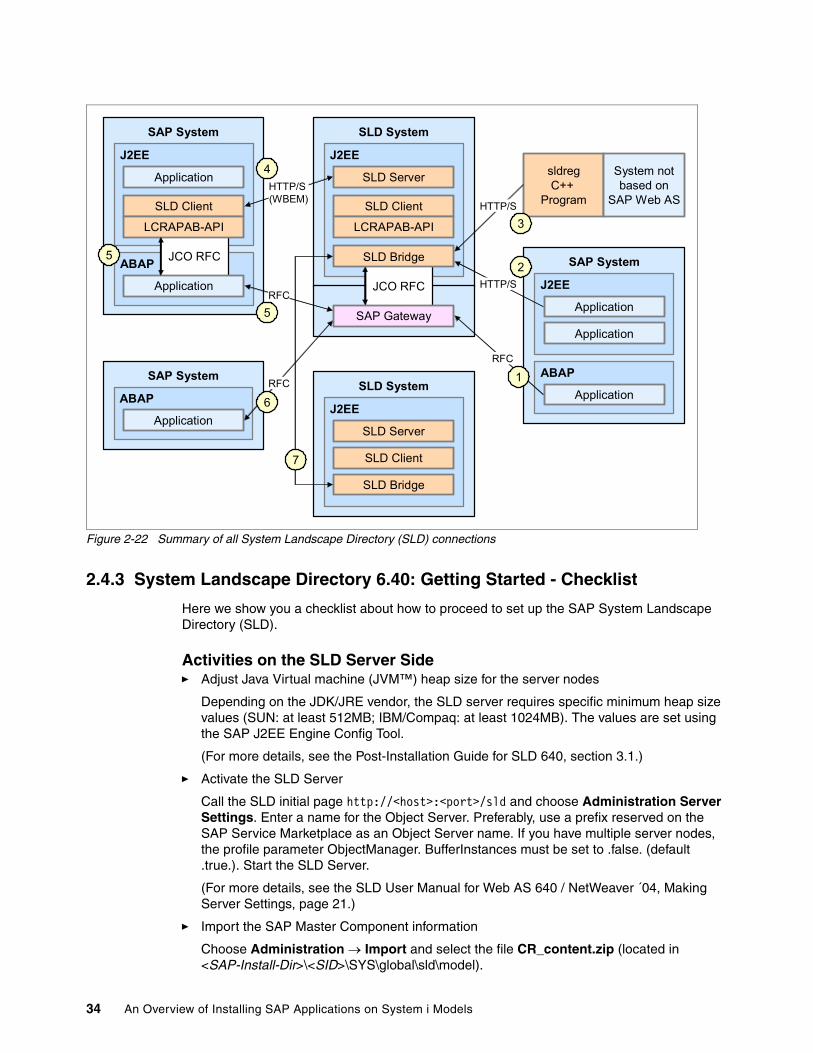
Summary of all SLD ConnectionsThe following Figure 2-22 on page 34 gives you an overview of all communication paths to and from the SLD. On the right side (bullets 1 to 3) it shows data suppliers. They simply send actual system landscape data to SLD. SLD clients on the left side are capable of interacting with the SLD. This means they can retrieve, send, and update system landscape data with SLD.
The following sections give a short explanation of all communication paths depicted below (see bullet points).
Dev
SAP Web AS
SAPSolutionManager
Support Infrastructure andCentral Administration and Monitoring
SAP Web AS
Optional enhancementsof Solution Manager
Infrastructure
CUASAP
NetWeaverAdministrator
CPH SolManDiagnosticsSLM
Refresh of SystemLandscape Information
SAP Web AS
QA
SAP Web AS
SAPSolutionManager
SLDSAP
SolutionManager
HA Cluster
SAP Web AS
ERP
SAP Web AS
CRM
SAP Web AS
SRM
Chapter 2. Introduction to an SAP installation 33
Figure 2-22 Summary of all System Landscape Directory (SLD) connections
2.4.3 System Landscape Directory 6.40: Getting Started - Checklist
Here we show you a checklist about how to proceed to set up the SAP System Landscape Directory (SLD).
Activities on the SLD Server Side� Adjust Java Virtual machine (JVM™) heap size for the server nodes
Depending on the JDK/JRE vendor, the SLD server requires specific minimum heap size values (SUN: at least 512MB; IBM/Compaq: at least 1024MB). The values are set using the SAP J2EE Engine Config Tool.
(For more details, see the Post-Installation Guide for SLD 640, section 3.1.)
� Activate the SLD Server
Call the SLD initial page http://<host>:<port>/sld and choose Administration Server Settings. Enter a name for the Object Server. Preferably, use a prefix reserved on the SAP Service Marketplace as an Object Server name. If you have multiple server nodes, the profile parameter ObjectManager. BufferInstances must be set to .false. (default .true.). Start the SLD Server.
(For more details, see the SLD User Manual for Web AS 640 / NetWeaver ´04, Making Server Settings, page 21.)
� Import the SAP Master Component information
Choose Administration → Import and select the file CR_content.zip (located in <SAP-Install-Dir>\<SID>\SYS\global\sld\model).
SAP System
sldregC++
Program
J2EE
ABAP JCO RFC
Application
SLD Client
LCRAPAB-API
Application
5
5
SAP System
ABAP
Application
SLD System
J2EE
SLD Server
SLD Client
LCRAPAB-API
JCO RFC
SLD Bridge
SAP Gateway
SLD System
J2EE
SLD Server
SLD Client
SLD Bridge
SAP System
J2EE
Application
Application
ABAP
Application
System notbased on
SAP Web AS
7
HTTP/S (WBEM)
4
6
RFC
RFC
HTTP/S
3
HTTP/S2
RFC
1
34 An Overview of Installing SAP Applications on System i Models
(For more details, see the Post-Installation Guide for SLD 640, section 3.3.3.)
� Configure the SLD Data Bridge
Choose Administration → Data Supplier and maintain the gateway server host and the name of the gateway service. If you are using the SAP Web AS Java standalone configuration, a standalone SAP gateway has to be installed from the presentation CD first.
For more details, see the SLD User Manual for Web AS 640 / NetWeaver ´04, Making Server Settings.
� Assign SLD security roles to users/user groups
Start the J2EE Engine Visual Administrator and navigate to Administration → Server → Services → SLD Data Supplier. If a Non-ABAP user store is used, five SLD user groups have to be created.
(For more details, see the Post-Installation Guide for SLD 640, section 3.2.)
Activities on the Client Side� Configure the SLD Data Supplier (in an ABAP system)
Call transaction RZ70 and maintain the gateway server host and the name of the gateway service.
(For more details, see the SLD User Manual for Web AS 640 / NetWeaver ´04, Making Server Settings, page 103; also see SAP note 584654.)
� Configure the SLD Data Supplier (in a J2EE system)
Start the J2EE Engine Visual Administrator and navigate to Administration → Server → Services → SLD Data Supplier.
(For more details, see the SLD User Manual for Web AS 640 / NetWeaver ´04, Making Server Settings, page 115; also see SAP note 673144.)
� Configure ABAP-based clients
To establish the connection between an ABAP client and the SLD server, register a J2EE Engine as an RFC server; define an RFC destination in the ABAP stack (transaction SM59); and maintain the SLD connection parameters (transaction SLDAPICUST).
(For more details, see the Post-Installation Guide for SLD 640, section 5.1.)
2.4.4 Related documentation in SAP Service Marketplace
Here are related documents that you can find in the SAP Service Marketplace:
� System Landscape Directory: http://service.sap.com/sld
� Platform and Technology Information Center: http://service.sap.com/platforms
� R/3 Security Guide: http://service.sap.com/security → Guidelines and Audits
� Sizing: http://service.sap.com/sizing
� Find information about the installation and configuration of SLD: Post-Installation Guide: SAP System Landscape Directory on SAP Web AS 6.40 on the SAP Service Marketplace, under the topics Installation → SAP Web AS, IBM DB2 Universal Database for iSeries, Installation and Post-Installation → SAP Web AS ABAP (iSeries) at: http://service.sap.com/instguidesnw04
2.5 The Client Server concept for an SAP installation on System i servers
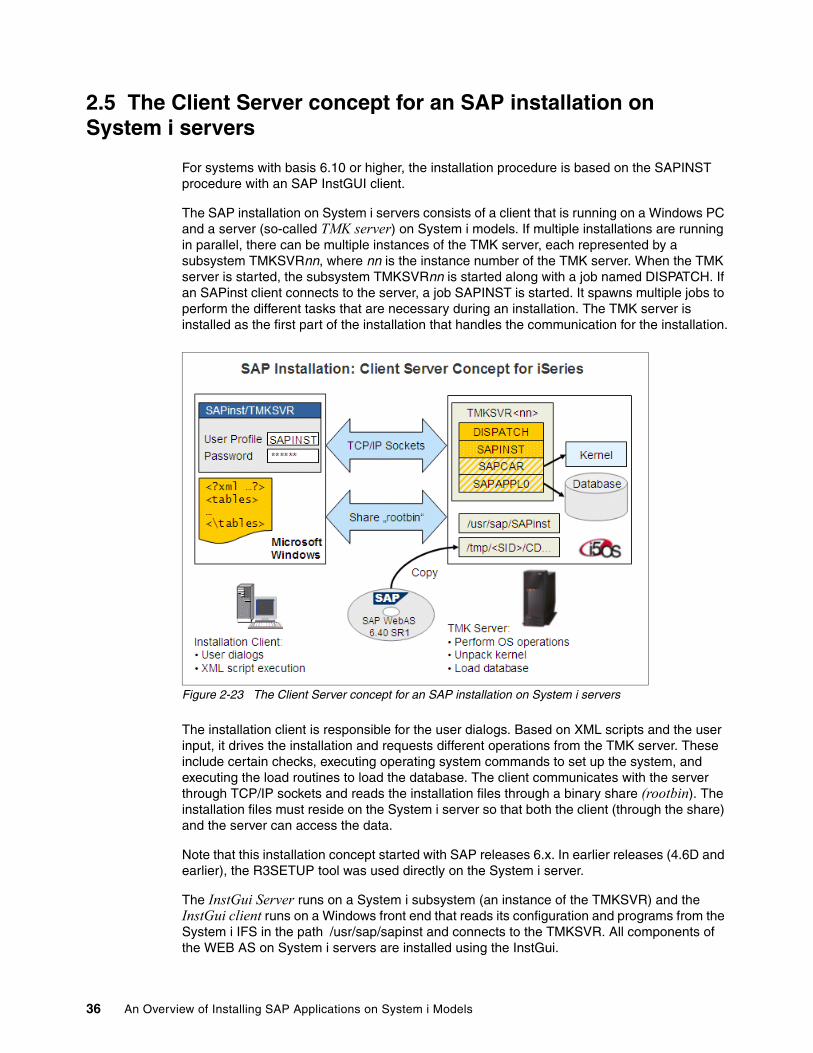
For systems with basis 6.10 or higher, the installation procedure is based on the SAPINST procedure with an SAP InstGUI client.
The SAP installation on System i servers consists of a client that is running on a Windows PC and a server (so-called TMK server) on System i models. If multiple installations are running in parallel, there can be multiple instances of the TMK server, each represented by a subsystem TMKSVRnn, where nn is the instance number of the TMK server. When the TMK server is started, the subsystem TMKSVRnn is started along with a job named DISPATCH. If an SAPinst client connects to the server, a job SAPINST is started. It spawns multiple jobs to perform the different tasks that are necessary during an installation. The TMK server is installed as the first part of the installation that handles the communication for the installation.
Figure 2-23 The Client Server concept for an SAP installation on System i servers
The installation client is responsible for the user dialogs. Based on XML scripts and the user input, it drives the installation and requests different operations from the TMK server. These include certain checks, executing operating system commands to set up the system, and executing the load routines to load the database. The client communicates with the server through TCP/IP sockets and reads the installation files through a binary share (rootbin). The installation files must reside on the System i server so that both the client (through the share) and the server can access the data.
Note that this installation concept started with SAP releases 6.x. In earlier releases (4.6D and earlier), the R3SETUP tool was used directly on the System i server.
The InstGui Server runs on a System i subsystem (an instance of the TMKSVR) and the InstGui client runs on a Windows front end that reads its configuration and programs from the System i IFS in the path /usr/sap/sapinst and connects to the TMKSVR. All components of the WEB AS on System i servers are installed using the InstGui.
36 An Overview of Installing SAP Applications on System i Models
2.6 General steps of an SAP installation
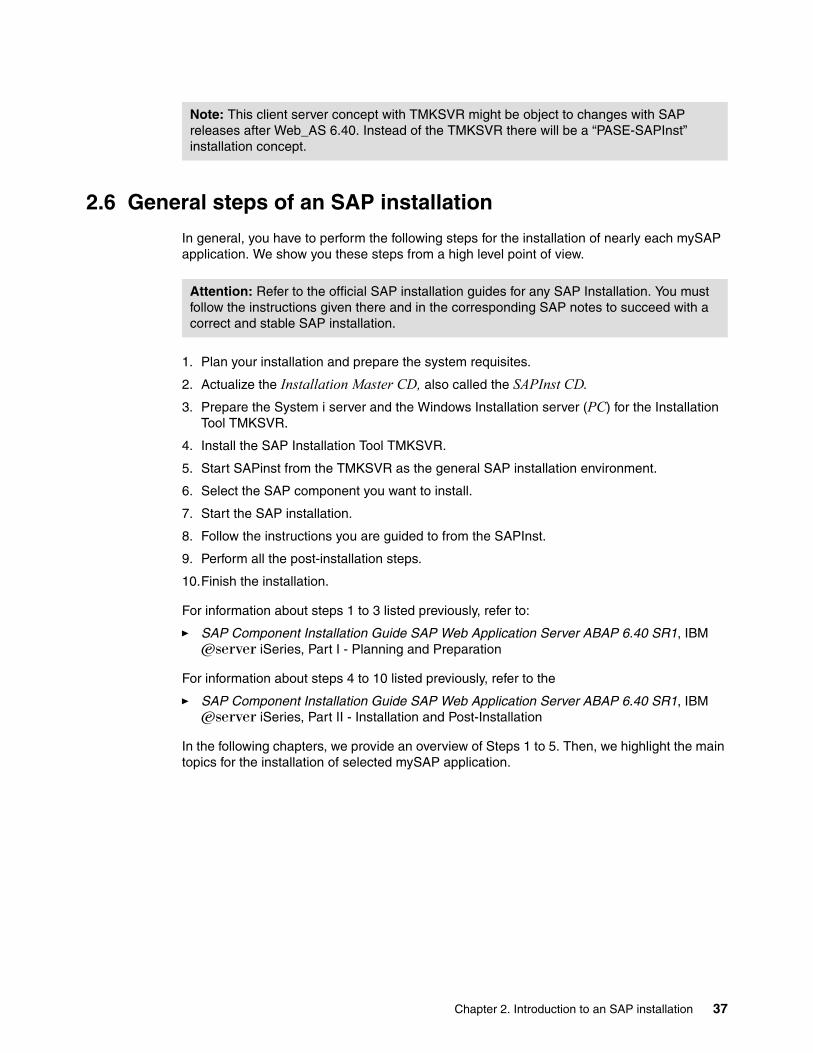
In general, you have to perform the following steps for the installation of nearly each mySAP application. We show you these steps from a high level point of view.
1. Plan your installation and prepare the system requisites.
2. Actualize the Installation Master CD, also called the SAPInst CD.
3. Prepare the System i server and the Windows Installation server (PC) for the Installation Tool TMKSVR.
4. Install the SAP Installation Tool TMKSVR.
5. Start SAPinst from the TMKSVR as the general SAP installation environment.
6. Select the SAP component you want to install.
7. Start the SAP installation.
8. Follow the instructions you are guided to from the SAPInst.
9. Perform all the post-installation steps.
10.Finish the installation.
For information about steps 1 to 3 listed previously, refer to:
� SAP Component Installation Guide SAP Web Application Server ABAP 6.40 SR1, IBM Eserver iSeries, Part I - Planning and Preparation
For information about steps 4 to 10 listed previously, refer to the
� SAP Component Installation Guide SAP Web Application Server ABAP 6.40 SR1, IBM Eserver iSeries, Part II - Installation and Post-Installation
In the following chapters, we provide an overview of Steps 1 to 5. Then, we highlight the main topics for the installation of selected mySAP application.
Note: This client server concept with TMKSVR might be object to changes with SAP releases after Web_AS 6.40. Instead of the TMKSVR there will be a “PASE-SAPInst” installation concept.
Attention: Refer to the official SAP installation guides for any SAP Installation. You must follow the instructions given there and in the corresponding SAP notes to succeed with a correct and stable SAP installation.
Chapter 2. Introduction to an SAP installation 37
38 An Overview of Installing SAP Applications on System i Models
Chapter 3. Installation of the SAP Web Application Server
This chapter describes the installation of the SAP Web Application Server, first with an overview and then the installation steps:
� Overview
As mentioned previously, the SAP Web Application Server is the basis of nearly all SAP applications. First we give you a short overview to the Web Application Server (Web AS), its functions and purposes.
� Installation steps for the SAP Web Application Server 6.40
We describe how to install the Web AS and discuss the concepts and demonstrate the single steps of the installation on the System i. We focus on the System i specific points and also provide some pictures from a real installation.
The implementation of the SAP application of the mySAP Business Suite and mySAP NetWeaver is based on the mySAP Web Application Server. Therefore, the technology and the installation of the mySAP Web Application Server is the basis for the installation of SAP applications, such as:
� mySAP NetWeaver including the SAP Solution Manager
– mySAP BW – mySAP EP – mySAP XI – mySAP MI – mySAP KW
� SAP Solution Manager (SolMan)
Figure 3-1 shows you that every SAP solution is based on the Web Application Server either with the ABAP stack or the Java stack. We understand to have an SAP solution, all applications are within the mySAP Business Suite (ERP, CRM, SCM, PLM, SRM and more) and within the SAP NetWeaver (BW, EP, XI, MI, KW and more). So you see the importance of the Web AS with its ABAP and Java technology for the SAP applications.
Figure 3-1 The SAP applications are based on the SAP Web Application Server technology
If you know the procedures and the principles about how to install the SAP Application Server, you can also derive the same knowledge about how to install the other SAP applications. Most SAP on System i specific tasks have to be done with the installation of the SAP Web Application Server with its platform-dependent tasks.
SAP Web Application Server Technology(ABAP, JAVA)
SAP Solutions are based on SAP Web Application Server
mySAP Business Suite Components(ERP, CRM, SCM, PLM, SRM, ...)
40 An Overview of Installing SAP Applications on System i Models
In the following Figure 3-2 you see an extract from an overview of the official SAP installation guides in the SAP Marketplace
http://service.sap.com/instguides
Figure 3-2 Overview from the SAP installation guides
A listing and discussion of all the installation tasks of all SAP applications beyond the scope of this book. For detailed information and the latest information about the installation of a specific SAP application, refer to the SAP-specific information, planning, and installation guides.
3.2 Installation steps for the SAP Web Application Server 6.40
Table 3-1 on page 42 shows, at a high level, the steps that you need to perform if you install SAP WebAS 6.40 SR1. For a complete description of all the steps that you need to perform, refer to the installation documentation. System i specific steps are indicated by a “*)” in the “description” column.
Note: The descriptions in Table 3-1 maintain the use of the term “iSeries” to be consistent with the installation document referenced. iSeries servers (as well as IBM Eserver i5 and AS/400e™ servers) are represented by the term “System i” in this Redpaper.
Chapter 3. Installation of the SAP Web Application Server 41
Table 3-1 Single steps for installing SAP Web Application Server 6.40 SR1
Here we show you 14 steps for the installation of a Web Application Server 6.40 SR1. This is somewhat different from the ten general steps of an SAP Installation shown in 2.6, “General steps of an SAP installation” on page 37. We make this distinction because here we want to focus more on the activities than the general aspects of an installation.
The following sections explain the steps listed in Table 3-1.
3.2.1 Preparing a Windows user account and a System i user profile
The SAP installations are done by the SAP tool SAPINST. So we call this point Preparing a Windows user account and a System i user profile, also “Create SAPINST user on PC and System i”.
For the installation, you have to create a user account on your Windows installation host and a user profile on the System i server you want to install.
The following requirements apply:
� The System i user profile and the Windows user account must have the same name and password.
� The System i user profile must have user class *SECOFR and all the special authorities that belong to user profile QSECOFR.
� The Windows user account must have administrator rights on the Windows installation host.
No Description Reference Remark Status
1 Preparing a Windows user account and a System i user profile.*
See page 42
2 Preparing the Windows PC for SAPINST.*) See page 43
3 Copy CDs/DVDs onto iSeries directories* See page 44
4 Updating the SAPINST CD* See page 45
5 Installing the TMK server* See page 46
6 Install the ABAP database See page 49
7 Install the ABAP central instance See page 56
8 Post installation steps for ABAP See page 66
9 Client copy to production client See page 66
10 Copy Toolbox JDBC™ driver* See page 66
11 Install cryptographic software and policies See page 66
12 Create users (SAPJSF, J2EE_ADM, and so on) See page 67
13 Install Java Add-in See page 67
14 Remove SAPinst installation files See page 67
* Specific System i step of the total installation procedure
42 An Overview of Installing SAP Applications on System i Models
User profile on WindowsCreate a local user SAPINST with administrator rights. To do this, perform the following steps:
1. Create a local user.2. In the User name field, enter your installation user name, for example, SAPINST.3. In the Password and Confirm password fields, enter the password notSAPINST.4. Deselect User must change password at next logon.5. Assign the new user SAPINST to group Administrators.
User profile on System i Create user SAPINST as a copy of a user profile with the same authorities as QSECOFR by executing the following command:
WRKUSRPRF and option 3
Otherwise you can create a user profile with the command
The installation of the Web AS is done by a (remote) PC that has to be connected to the System i where the Web AS should be installed. This connection can be done by an SAP tool called TMKSVR or by a rootbin share. So we call this step also “Install TMK server or create rootbin share”.
The next step is to create a rootbin share on the System i server, so that the Windows PC can access the root directory on System i models. This share must be binary so that no character conversion happens between System i servers and Windows.
Then map the rootbin share from your System i host (in this example: IBAS03) to a PC drive (in this example Y:), see Figure 3-3.
Figure 3-3 Mapping the Rootbin share to a PC drive
Chapter 3. Installation of the SAP Web Application Server 43
Instead of creating the share manually, you can also install the TMK server by loading the installation CD onto your PC and running the SETUP.EXE in subdirectory SAPINST\OS400\AS400\TMKSVR. See the next step.
You must install the Java Development Kit (JDK) on your Windows front end to perform the installation with SAPinst.
You need to prepare your PC for the SAPinst GUI.
1. If not yet done, download and install the Java Development Kit (JDK 1.4 or newer) or Java Runtime 1.4.2 or higher from:
http://java.sun.com
To check if this is on the PC, select Start → Settings → System control → Software.
2. Set the environment variable JAVA_HOME on your Windows host.
3. Include the directory %JAVA_HOME%/bin in the PATH variable.
The SAPinst installation tool uses the Java-based graphical user interface SAPinst GUI, regardless of your system variant. Therefore, you always need a Java runtime environment (JRE) on the host where SAPinst is to run. The JRE is included in the JDK.
3.2.3 Copying CDs and DVDs to System i directories
After the rootbin share is available, you must copy the CD or DVD data that is necessary for your installation to the directories on the System i server so that they can be accessed on both the PC and the System i server. We recommend that you copy the data into subdirectories under /tmp/sid where sid is the designated system ID for the system to be installed.
Figure 3-4 on page 45 shows you an example after the mySAP ECC 5.0 SR 1 Master CD is copied to the rootbin share.
Note: The path names must not contain spaces.
44 An Overview of Installing SAP Applications on System i Models
The advantage of this is that you can repeat single installation steps as often as you want. Additionally, you can perform the installation from any front end or PC.
3.2.4 Updating the SAPINST CD
The procedure needs a preparation step to update the Installation Master CD, also named SAPINST CD.
1. First copy the CD (or DVD) to a hard disk on a Windows front end, or to a mapped System i IFS directory.
If fixes are necessary for the installation tools, they are provided as ISERPACK. The installation note for your release (for example, SAP note 789188 for SAP Web AS 6.40 SR1) states if an ISERPACK is necessary, and what number (for example, ISERPACK7).
2. Install some patches. Normally, there is a cross-reference in the installation guide to the appropriate SAP note. This varies depending on the SAP component, SAP Release, Service Release, and for R/3 Enterprise the Extension Set you want to install.
Chapter 3. Installation of the SAP Web Application Server 45
For systems based on Web AS 6.20, 6.40, and higher, refer to following for information about how to install the ISERPACK, even if they are not mentioned in all installation guides:
– SAP note 701226 - SAP Web AS 6.40 on IBM Eserver iSeries or (newer)– SAP note 789188 - SAP Web AS 6.40 SR1 on IBM Eserver iSeries– SAP note 707805 - iSeries: Patches for SAPinst installation kits
Figure 3-5 shows you a screen from extracting the ISERPACK with SAPCAR
Figure 3-5 SAPCAR the ISERPACK
3.2.5 Installing the TMK server
First, install the installation tool TMKSVR that handles the communication for the Installation. After applying the ISERPACK to your local copy of the CD or DVD, you must install the TMK server, even if you have already installed it in step 2. This is necessary so that the client and server code match.
The installation server is running in an i5/OS subsystem (an instance of the TMKSVR) and the InstGui runs on a Windows front end that reads its configuration and programs from the System i IFS in the path /usr/sap/sapinst and connects to the TMKSVR.
All components of the WEB AS and all other SAP applications based on the Web AS on System i server are installed using the InstGUI.
Prerequisites for installing the TMKSVR To install and run the TMKSVR on a System i server, you require the following:
� An FTP server running on the System i server.� Administrator rights, that is, user name and password similar to QSECOFR.
Starting the installation of the TMKSVR1. Run SETUP.EXE from the TMKSVR path of the Installation Master CD.
From the SAP NetWeaver Installation Master CD the path to the TMKSVR is shown in Figure 3-6 on page 47.
Note: Do not hesitate to switch off your firewall software if it troubles you too much.
46 An Overview of Installing SAP Applications on System i Models
Figure 3-6 Path for the SETUP.EXE from the TMKSVR on the Installation Master CD
From the mySAP ECC50_SR1 Master CD the path to the TMKSVR is shown in Figure 3-7.
Figure 3-7 Path from SAP ECC 5.0 to the TMKSVR
For a detailed description, read INSTALL.PDF from the directory TMKSVR.
Call SETUP.EXE in the directory TMKSVR of the installation path for OS400:
Chapter 3. Installation of the SAP Web Application Server 47
You are presented the dialog as illustrated in Figure 3-8.
Figure 3-8 TMKSVR installation box
2. This is the first window that you get when you start installing the TMK Server. If you created an SAPINST user profile for both Windows and System i configurations, you should specify that profile and its password here.
You should also select the box to create a TMKSVR instance. The instance number of the TMK server is not related to the instance number of your SAP instance, so you can pick any number here. However, if you run multiple installations, perhaps in different SAP releases on the same system, be careful when selecting the TMKSVR instance number so that you get unique instances and ports for each installation.
Then the library TMKSVR and (if you did not change default for the TMKSVR instance number) TMKSVR00 are created on the System i server and the content filled from a *SAVF that is transferred via FTP from the Installation Master CD.
If you are this far in the installation, the TMKSVR is already installed and should run on the System i server. As a last check, the installation tries to connect to the currently running TMKSVR.
3. On an System i telnet session or the console, check whether the TMKSVR is actually running by using the following command:
WRKACTJOB SBS(TMKSVR00) or TMKSVRxx
Here xx is the instance number.
SAP Installation: SAPinst Start Dialog
Drive letter of „rootbin“ share, for example I: \\as0030\rootbin
Port numbermust matchTMK serverport (seepreviousslide)SAPINST
user profileandpassword
48 An Overview of Installing SAP Applications on System i Models
You should see a DISPATCH job running, as shown in Figure 3-9.
Figure 3-9 DISPATCH job running in the System i subsystem TMKSVR00
When the installation of the TMKSVR is successful, you get a window as shown in Figure 3-10.
Figure 3-10 Installing the TMKSVR successfully
3.2.6 Install the ABAP database
To start the SAP installation, follow these steps:
1. Call the program SAPINST.EXE in the subdirectory /SAPINST/OS400/AS400 of the Installation Master CD.
Figure 3-11 shows you the path from the SAPINST.EXE on the NetWeaver Installation Master CD.
Figure 3-11 Path for the SAPINST.EXE from the TMKSVR on the Installation Master CD
Chapter 3. Installation of the SAP Web Application Server 49
From the mySAP ECC50_SR1 Master CD the path to the SAPINST.EXE is shown in Figure 3-12.
Figure 3-12 Path from SAP ECC 5.0 to the SAPINST
2. Call SAPINST.EXE from the directory \OS400\AS400 and you see the following SAP NetWeaver installation window, as shown in Figure 3-13 on page 51.
50 An Overview of Installing SAP Applications on System i Models
Figure 3-13 Starting the SAPINST.EXE
3. When you execute the SAPINST executable, you have to connect to the TMK server first. The SAPINST procedure asks for the connection parameters to the TMKSVR.
You can use the default port, unless you changed the port number when installing the TMK server. We recommend that you create a copy SAPINST of the System i user profile QSECOFR. Use this profile for SAP installations. Map the installation drive share rootbin on the System i server to a new drive letter (for example, X:), see Figure 3-14
Figure 3-14 SAPINST start dialog
If you cannot connect to the TMK server, you can check whether the subsystem TMKSVRnn is active (where nn is the instance number of your TMK server, for example, 01), and if a job named DISPATCH is active in that subsystem.
After you have connected successfully, you see a job named SAPINST in this subsystem.
Server name for SAP installation
Drive letter of the„rootbin“ share,for exampleX: \\IBAS03\ROOTBIN
Port number –must matchTMKSVR port(see previousslide)
SAPINSTuser profileand password
Chapter 3. Installation of the SAP Web Application Server 51
Installing the ABAP database with SAPinstTo install the ABAP database with SAPinst, follow these steps:
1. Start the installation of the ABAP database by executing SAPINST.EXE in the subdirectory SAPINST\OS400\AS400.
Then the window shown in Figure 3-15 with the header “Welcome to NetWeaver Installation” comes up.
Figure 3-15 The so-called NetWeaver components
2. This opens up several windows to enter parameters for your installation, before it starts loading the database.
For loading the database, you can choose to load:
– The ABAP stack – The JAVA stack
For each stack, you can choose between:
– The Unicode version (UC)– The non-Unicode version (NUC)
Figure 3-16 on page 53 shows you the paths to these variants, especially to the Non-Unicode ABAP stack.
52 An Overview of Installing SAP Applications on System i Models
Figure 3-16 Start installing the NetWeaver ABAP stack
Figure 3-17 on page 54 shows you the paths to these variants, especially to the Java stack.
Chapter 3. Installation of the SAP Web Application Server 53
Figure 3-17 Start installing the NetWeaver Java stack
3. Provide some parameters for the installation (Input Phase), see Figure 3-18 on page 55:
– SAP System-ID (SID)
In our example: ERX
54 An Overview of Installing SAP Applications on System i Models
Figure 3-18 SAPINST: SAP System-ID installation window
– Installation type (In the following example, we perform a standard installation.)
For our example we use a standard installation. Alternative installation methods are:
• Standard System Copy/Migration (R3load-based)
• IBM UDB for System i specific: Homogeneous System Copy (SAVLIB/RSTLIB Method)
• IBM DB2 UDB for System i specific: ASCII to Unicode Code page Conversion
Figure 3-19 on page 56 shows you the Database installation window.
Chapter 3. Installation of the SAP Web Application Server 55
Figure 3-19 SAPINST: Database installation window
Most dialogs are self-explanatory. Some System i specific dialogs are explained in the following sections.
3.2.7 Install the ABAP central instance
Directly included into the installation of the database is the installation of the SAP central instance.
Installing the ABAP central instance with SAPINSTAfter installing the database, you can install the ABAP central instance, again by executing SAPINST.EXE. This also requires several entries before the installation starts, for example:
� Instance number
In our example: 00
� Instance host
In our example: IBAS03
And later, the following:
� Password for the SIDOFR
In our example: for the ERXOFR
Figure 3-20 on page 57 shows you the Central Instance installation window.
56 An Overview of Installing SAP Applications on System i Models
Figure 3-20 SAPINST: Central instance installation window
The following figures show System i specific window that are seen during the installation. The windows are mostly self-explanatory. If you do not know what to enter, read the “Additional Information” section or use the F1 key for the input fields. During the installation process, the menu of the SAPINST GUI appears, asks for the necessary input, and guides you through the installation steps.
Specifying the kernel libraryWhen specifying the kernel library, you can use an existing library or copy the kernel from the DVD or CD to a new library whose name you can define.
Even though it is possible to share kernel libraries between multiple SAP, we recommend that you do not share the libraries. Whenever you replace the kernel with a newer patch level, you have to shut down all SAP systems that use this kernel. The changes affect all the SAP systems that share the kernel.
If possible use an existing prepared kernel, including the patches of a support package stack. The installation uses R3LOAD, therefore, this should be patched before the database load takes place.
Never exchange R3OPT.SAR in a copied kernel CD. You would mess up the patch information of SAP's final assembly which comes with R3OPTC1.SAR on the CD. You can prepare a kernel beforehand with standard methods.
Chapter 3. Installation of the SAP Web Application Server 57
Figure 3-21 SAPINST: kernel installation window
In the example of Figure 3-21, we use the kernel name R3640A0102 where:
� R3: fix� 640: Web AS Release� A: For ASCII version of the kernel (another version would be “U” for Unicode)� 0102: for the patch level of the (main) kernel component “disp+work”
Now the kernel is loaded and checked, see Figure 3-22 on page 59.
Recommendation: Use a separate kernel library for each SAP system.
58 An Overview of Installing SAP Applications on System i Models
Figure 3-22 SAPINST: SAP kernel load and kernel check installation window
Figure 3-23 on page 60 shows how the kernel is loaded. This window gives you a good example about how SAPinst provides status information.
Chapter 3. Installation of the SAP Web Application Server 59
Figure 3-23 Installation progress of the SAPINST procedure
Performing the PTF level checkIn order to ensure that your system is up to date with PTFs, the installation compares the PTFs that are installed on your system with the PTFs that are listed in the IBM Informational APAR for your operating system release (for example, II13337 for OS/400 V5R2 or II13868 for i5/OS V5R3).
In Figure 3-24 on page 61 you see the PTF Level Check window.
60 An Overview of Installing SAP Applications on System i Models
On the kernel DVD, SAP ships versions of the informational APARs that were current when the SAP release shipped ran through the final verification, therefore, the installation should run successfully at this level. However, you may have to check your PTF level against a newer version that you downloaded from IBM. In this case, you have to copy the informational APAR into the directory /usr/sap/trans/config manually. The name must be INFOAPAR.vrm, where vrm is the version, release, and modification of the operating system, such as INFOAPAR.530 for i5/OS V5R3M0.
Installing the English secondary language libraryIf your System i model is installed with a primary language other than English, we recommend that you install English as a secondary language. This makes problem determination easier for the worldwide support organizations of SAP and IBM.
Objects for a secondary language are stored in libraries named QSYSxxxx, where xxxx is replaced by the language code. For English, you use QSYS2924 on an operating system with Single Byte Character Set or QSYS2984 on an operating system with Double Byte Character Set.
Figure 3-25 on page 62 shows you the SAP installation window about how to enter the English as the secondary language library.
Note: The operating system character set is completely independent from the SAP character set or code page.
Chapter 3. Installation of the SAP Web Application Server 61
Figure 3-25 SAPINST: The English secondary language library installation window
In this window, you see the SAP code page 1100 for an ASCII Code page. If you install a Unicode code page, you have the SAP code page 4102 for a Unicode Code page.
If you specify the name of a secondary language library, the installation makes sure that this library is in the first position in the library list of all SAP work processes. This ensures that messages in the joblog are all in English.
The SAP database library and SAP journal receiver library ASPsAs part of the installation preparation, configure your disk units into one or multiple Auxiliary Storage Pools (ASPs) by using the System Service Tools (SST). During the SAP installation, you must specify the ASP numbers where the database library and the journal receiver library are going to be installed, see Figure 3-26 on page 63.
Attention: If you have a secondary language installed and upgrade your operating system to a higher release level, you must also upgrade your secondary language to the same release. Otherwise, you can encounter a variety of errors when trying to start your SAP system (see SAP note 805447).
62 An Overview of Installing SAP Applications on System i Models
Figure 3-26 SAPINST: Specifying the SAP database and journal receiver ASPs
For a production system we recommend that you store the database and the journal receivers in different ASPs. For a test system, you can specify the same ASP for both.
SAP installations directly in an Independent ASP (IASP) are not supported in the standard procedure.
Software package checkThe SAPINST installation procedure checks and loads the required installation software packages on and from the DVDs or CDs, see Figure 3-27 on page 64.
Note 1: In this example, we specified “1” as the journal receiver library ASP because the installed SAP system ERX is an SAP Test System.
Refer to the “SAP storage and database considerations” topic in Implementing SAP Applications with System i and i5/OS, SG24-7166 to identify the ASP in which you should store the journal receiver.
Note 2: If you want to use an separate ASP for the journal receiver, this ASP needs to be configured through SST/DST separately prior to specifying it in the window of Figure 3-26.
So if you want to use an ASP 2 for the journal receivers, you need to configure the ASP 2 before starting the installation.
Chapter 3. Installation of the SAP Web Application Server 63
Figure 3-27 SAPINST: Checking and loading the SAP software packages
Number of parallel R3LOAD jobsSpecify the number of parallel R3LOAD jobs for loading the data. We recommend that you specify a number up to four times the number of processors.
In our example, we have one processor (CPU). The SAP BC consultant specified in Figure 3-28 on page 65 three parallel jobs, although he could configure four parallel jobs.
64 An Overview of Installing SAP Applications on System i Models
Figure 3-28 SAPINST: Number of parallel R3LOAD jobs
The installation log filesIf you choose defaults for log file generation, SAPinst writes log files into subdirectories of /usr/sap/SAPinst. The log files that are created during the database load phase are coded and tagged as EBCDIC files. Therefore, when you try to read them over your rootbin share, you only see non-meaningful information displayed.
The rootbin share is created as binary share, therefore, no text conversion is performed. In order to read the log files from your PC, use a second share that performs text conversion. Alternatively, you can use the EDTF or DSPF commands from a System i 5250 emulation session.
Figure 3-29 on page 66 shows you exemplary the SAP installation log files with and without text conversion.
Chapter 3. Installation of the SAP Web Application Server 65
Figure 3-29 SAP Web AS installation: viewing the installation log files
3.2.8 Post-installation steps for ABAP
At the end of the installation, you can execute the described post-installation steps, such as granting authority to the operating system command CHGSYSLIBL and executing several ABAP reports in case of a Unicode installation.
3.2.9 Client copy to production client
Before you continue with the Java installation, you should perform a client copy (transactions SCC4, SCCL) with profile SAP_UCSV to set up your production client. By doing this, the Java user management is set up correctly for your production ABAP system.
3.2.10 Copy Toolbox JDBC driver
If you run your Java instance with the Toolbox JDBC driver, we recommend that you do not use the driver (jt400.jar) from the default IBM directory. Use your own copy, for example, in the directory /sapmnt/jdbc/Toolbox. By doing so, you ensure that a newer version that is downloaded from the Internet is not automatically replaced by an older version that comes with a PTF package (such as cumulative PTF package).
3.2.11 Install cryptographic software and policies
To install the J2EE Engine with strong encryption, download the encryption software from the topics: SAP Software Distribution Center → Download → SAP Cryptographic Software at:
Copy the JCE policy files copied into the directory \QIBM\ProdData\Java400\jdk14\lib\security.
3.2.12 Create users (SAPJSF, J2EE_ADM)
In order to allow the J2EE server accessing the ABAP server, create several user IDs in the ABAP server, such as SAPJSF_sid, J2EE_ADM_sid, and J2EE_GST_sid.
3.2.13 Install Java Add-in
Install the Java add-in by starting SAPINST.EXE in the subdirectory SAPINST\OS400\AS400, filling in the user dialogs (mostly self-explanatory) and starting the installation.
3.2.14 Remove SAPinst installation files
After completing the installation successfully, you can delete the temporary directories that are necessary during the installation. If you use the recommended defaults, the directories are named /tmp/sid with the copies of the CDs or DVDs and /usr/sap/SAPinst with the temporary SAPinst files.
Chapter 3. Installation of the SAP Web Application Server 67
68 An Overview of Installing SAP Applications on System i Models
Chapter 4. Installation of the mySAP NetWeaver components
This chapter shows the installation concepts of the SAP NetWeaver components. General aspects of the SAP NetWeaver components are discussed, followed by a brief description of SAP NetWeaver components from the application point of view.
� General aspects of mySAP NetWeaver ´04
The general aspects and differences between SAP NetWeaver 2004 (or SAP NetWeaver ´04) and SAP NetWeaver 2004s are discussed
� mySAP NetWeaver overview
SAP NetWeaver is the technical infrastructure for SAP applications. However, the Web AS also contains some components, also called mySAP applications.
� A technical overview of the concepts and installation steps of the following components are given:
– Installation of SAP Business Information Warehouse (BW)
Overview of the SAP BW installation on System i models
– Installation of SAP Enterprise Portal
Overview of the SAP EP installation on System i models
– Installation of SAP Exchange Infrastructure (XI)
Overview of the SAP XI installation on System i models
– Installation of SAP Mobile Infrastructure
Overview of the SAP MI installation on System i models
– Installation of SAP Knowledge Warehouse
Overview of the SAP KW installation on System i models
– Installation of SAP Solution Manager
Overview of the SAP SolMan installation on System i models
We emphasize this topic more than the previous SAP applications because the SAP SolMan will be mandatory for every SAP installation.
We demonstrate the installation of the SAP SolMan as the central SAP application for watching, controlling, and managing the complete customer system landscape for the whole life cycle of the applications. The SAP SolMan also works as a single point of contact SAP to the customer landscape.
In the section describing each of these applications we give you an overview of:
� The business application� The technical system landscape� The components of the solution� The implementation steps
For more details refer to the SAP and IBM documentation available for each SAP NetWeaver component.
4.1 General aspects of mySAP NetWeaver ´04
Responding to a dramatic industry shift to a services-based, enterprise-scale, integrated business architecture, SAP has introduced Enterprise Services Architecture (ESA) and its technical foundation, mySAP NetWeaver, which has as its basis component the SAP Web Application Server.
From this point on, SAP is developing all its business solutions based on this foundation. For customers, this means that every piece of modularized functionality provided as part of an SAP application, third-party solution, or developed by a customer or partner can be made available as a Web service.
An important milestone on the way to an even tighter synchronization with the SAP integration and application platform is to provide a single installation process for all mySAP NetWeaver components followed by streamlined operations, resulting in a significant reduction in the total cost of ownership (TCO).
Because all SAP applications are consolidated on the SAP Web Application Server, any dependencies between components are resolved before customers install them. This alignment helps reduce the effort involved in setting up test and demonstration systems, while ensuring a more efficient overall implementation and allowing for a consolidation of the system landscape. In addition, SAP's SQL-to-Java database capabilities can eliminate the need to create and maintain separate databases for various solutions. In summary, all of this adds up to simplified updates, operations, and maintenance, which in turn means reduced effort, greater savings, better performance, and practically unlimited scalability.
mySAP NetWeaver 2004smySAP NetWeaver 2004s is the mySAP Business Suite edition of mySAP NetWeaver 2004. It is a minor release that delivers on specific needs of the mySAP and xApps solutions delivered by SAP in 2005. The “s” stands for mySAP Business Suite Edition.
We recommend an implementation of mySAP NetWeaver 2004s only to customers requiring it in the context of an application implementation project (for example, SAP ERP 2005). In
Note: The mySAP NetWeaver 2004 (or mySAP NetWeaver ´04) is based on SAP basis Release 6.40. The mySAP NetWeaver 2004 SR1 (SR = support release) is based on the same SAP basis Release 6.40, but starts including all support packages up to SP09. Finally the mySAP NetWeaver 2004s (see next paragraph) is based on SAP basis Release 7.00.
70 An Overview of Installing SAP Applications on System i Models
addition, some customers require mySAP NetWeaver 2004s due to specific enhancements, for example, in the following areas:
� Business intelligence: enhanced query, analysis, and reporting; integrated business planning; high performance analysis
� Enterprise portal: global, federated portal
� Development: Web Dynpro for ABAP; Switch Framework supporting multiple industry solutions
For more information about the mySAP NetWeaver 2004s release, refer to:
http://service.sap.com/netweaver
Difference between mySAP NetWeaver 2004 and mySAP NetWeaver 2004sIf mySAP Business Suite or mySAP application customers are planning the deployment of mySAP ERP 2005 or any other 2005 solution that is part of the mySAP Business Suite, you deploy mySAP NetWeaver 2004s, because it is the platform for those solutions.
For customers looking to implement mySAP NetWeaver during 2005 in the course of integration or development projects, or in the context of an ESA roadmap strategy, we recommend an implementation of mySAP NetWeaver 2004, because this is the current default release. Also, we recommend an implementation of mySAP NetWeaver 2004s only where new capabilities made available with mySAP NetWeaver 2004s are absolutely required.
There is no essential difference in handling these two releases concerning “SAP on System i models” so we focus on the mySAP NetWeaver ´04.
4.2 mySAP NetWeaver overview
The mySAP NetWeaver technology platform is a comprehensive integration and application platform that helps reduce the total cost of ownership (TCO). It facilitates the integration and alignment of people, information, and business processes across organizational and technological boundaries. mySAP NetWeaver easily integrates information and applications from virtually any source. It interoperates with and can be extended using the primary market technologies: .NET, Sun’s J2EE, and IBM WebSphere.
mySAP NetWeaver is the technical foundation for mySAP Business Suite and SAP xApps solutions and ensures maximum reliability, security, and scalability so that mission-critical business processes run smoothly. By providing pre-configured business content, it helps reduce the need for custom integration and lowers TCO.
The following reports can help you understand the total cost of ownership and value of System i implementations:
� An IDC report outlining the cost savings and enablement benefits AIX® 5L™, Linux® and Windows Integration in System i implementations:
Components of mySAP NetWeavermySAP NetWeaver consists of the following technical scenarios:
� SAP Business Information Warehouse (SAP BW)
SAP Business Information Warehouse is a robust and scalable data warehouse. The reporting and analysis tools within SAP Business Information Warehouse offer a quick and easy way to gain access to the information you need.
� Business Intelligence Information Broadcasting (BI Information Broadcasting)
Information broadcasting with SAP Business Information Warehouse (SAP BW) enables users to broadcast and schedule reports as needed. SAP Enterprise Portal serves as the single point of entry for the end user to access the complete business intelligence (BI) information portfolio.
� SAP Enterprise Portal (SAP EP)
For mySAP NetWeaver ´04, SAP Enterprise Portal 6.0 is changing its naming convention. SAP Enterprise Portal 6.0 SP3 is now called SAP Enterprise Portal 6.0 on Web AS 6.40 (SAP EP 6.0 on Web AS 6.40).
As one of the building blocks of mySAP NetWeaver, SAP Enterprise Portal 6.0 on Web AS 6.40 provides key capabilities such as Portal Infrastructure, Knowledge Management, and Collaboration, all based on open technology and standards, which make mySAP NetWeaver a powerful integration and application platform.
SAP EP Integration adds business value because it enables seamless deployment of BI Applications.
� SAP Exchange Infrastructure (SAP XI)
SAP XI Integration adds business value because SAP XI can be used as the single point to channel information exchange between various systems.
� SAP Mobile Infrastructure (SAP MI)
SAP MI is a technology solution for mySAP NetWeaver on which mySAP Mobile Business applications are based. However, with SAP MI, you can also make non-SAP based applications mobile.
� SAP Knowledge Warehouse (SAP KW)
SAP KW delivers the technical infrastructure that you require to set up and manage your own enterprise-specific knowledge base in the areas of documentation, training, and manuals. For project teams and end users, SAP KW streamlines training and business processes, helping you reduce your costs. In addition, the possibility to reuse, supplement and continually update SAP content offers great saving potential.
� mySAP NetWeaver Development Environment (NWDE)
mySAP NetWeaver Development Environment is used to develop both ABAP and Java applications. It is based on the mySAP NetWeaver component SAP Web Application Server (SAP Web AS).
� SAP Master Data Management (SAP MDM)
For information about the alignment of SAP Master Data Management with mySAP NetWeaver ´04, see the relevant master guide available on the SAP Service Marketplace, under the topics Planning → SAP MDM, at:
http://service.sap.com/instguidesnw04
72 An Overview of Installing SAP Applications on System i Models
mySAP NetWeaver information from the SAP MarketplaceFor comprehensive information about the mySAP NetWeaver, refer to the SAP Marketplace at:
http://service.sap.com/instguides
See Figure 4-1 for an illustration to the entry point of this Web page.
Figure 4-1 NetWeaver installation guides
mySAP NetWeaver components on the Installation Master CDFigure 4-2 on page 74 shows you the mySAP NetWeaver 2004 SR1 components of the Installation Master CD.
Find guidelines and recommendations on hardware requirements for your implementation.
Get an overview of the documentation structure for installation, upgrade, and implementation.
About this PageDocumentation Concept
InstallationInstallationEverything you need to plan and install SAP NetWeaver IT scenarios.
Operations
Find guides on monitoring and configuration of the SAP NetWeaversystem landscape.
Supplementary Information
Operations
SAP NotesFind the central notes related to SAP NetWeaver 2004s.
How-To GuidesFind information on how to perform specific tasks.
News and UpdatesFind out what's new or what has changed from the previous release.
UpgradeUpgradeFind all the documentation required to upgrade an SAP NetWeaver Implementation from older versions to SAP NetWeaver 2004s,including planning information and upgrade guides both forSAP NetWeaver and the standalone engines.
Maintenance
MaintenanceKeep your system up-to-date.Use the documentation, like Support Package Stack installation guides.
High AvailabilityFind guidelines and tips on how to implement high-availability solutions in your system landscape.
Sizing
Platform Availability MatrixFind technical and release planning information on SAP NetWeaver 2004s.
Best PracticesFind information on pre-packed, easy-to-use solutions for SAP NetWeaver.
Chapter 4. Installation of the mySAP NetWeaver components 73
Figure 4-2 mySAP NetWeaver 2004s components on the SAP Installation Master CD
74 An Overview of Installing SAP Applications on System i Models
mySAP NetWeaver installable componentsFigure 4-3 shows all the installable components of mySAP NetWeaver ´04 and how they can be installed to the ABAP or to the JAVA stack.
Figure 4-3 All installable components of mySAP NetWeaver ´04
mySAP NetWeaver ´04 is the foundation of mySAP ERP ‘04. mySAP NetWeaver facilitates the integration and alignment of people, information, and business processes across organizational and technological boundaries. It easily integrates information and applications from virtually any source. It incorporates with and can be extended using the primary market technologies: Microsoft .NET, Sun’s J2EE, and IBM WebSphere.
With mySAP NetWeaver ´04, fewer components have to be installed separately, particularly, in the ABAP stack. Nevertheless, it bears mention that these components might still have to be patched separately, depending on the requirements of your ERP scenarios or on SAP’s Support Package Stack strategy. The latter states that you should keep all components, which are installed in one system, on a defined stack level. Therefore, it is useful to know the technical components of mySAP NetWeaver for which support packages or patches continue to be produced.
mySAP NetWeaver Software componentsThe main constituents of mySAP NetWeaver are grouped in the ABAP and Java stacks. The additional components shown in Figure 4-4 on page 76 are optional, that is, you install them depending on your specific requirements.
mySAP ERP 2004AnalyticsFinancials
Human Capital ManagementProcurement & Logistics Execution
Product Development & ManufacturingSales and ServiceCorporate Services
SAP NetWeaver '04
Java StackABAP Stack
BI Content
BW Functionality
XI Functionality
MI Functionality
KW Functionality
Web AS ABAP
Java .NETInteroperability
Content Managementand Collaboration
Portal Platform
KW IKS
BW Java Components
XI Components
Adobe DocumentServices
NWDI
Web AS Java
BW PrecalculationService
Content Server
Portal Runtimefor .NET
Search and Classification (TREX)
Visual ComposerServer
XI Adapter Engine
XI Adapter Engine(J2EE)
AdditionalComponents
Chapter 4. Installation of the mySAP NetWeaver components 75
76 An Overview of Installing SAP Applications on System i Models
4.3 Installation of SAP Business Information Warehouse (BW)
In this section, we provide the following:
� An introduction to the SAP BW business overview.
� An overview of the technical system landscape of a full BW installation and its components.
� An overview of the installation steps necessary for multiple SAP BW scenarios.
� References to the installation guides and other information about BW.
4.3.1 SAP BW business overview
SAP Business Information Warehouse (SAP BW) provides data warehousing functionality, a business intelligence platform, and a suite of business intelligence tools that enable businesses to attain these goals.It allows you to analyze data from operative SAP applications as well as all other business applications and external data sources such as databases, online services, and the Internet.
SAP BW enables Online Analytical Processing (OLAP), which processes information from large amounts of operative and historical data. OLAP technology enables multidimensional analyses from various business perspectives. The Business Information Warehouse Server for core areas and processes, pre-configured with Business Content, ensures that you can look at information within the entire enterprise.
The Administrator Workbench is the tool for controlling, monitoring, and maintaining all of the processes connected with data staging and processing in the SAP BW system. The term Data Staging includes all data retrieval processes.
The Business Explorer is the SAP BW component that provides flexible reporting and analysis tools for strategic analyses and decision-making support within a company. These tools include query, reporting, and OLAP functions. With the Business Explorer, you can evaluate old and current data to varying degrees of detail and from different perspectives on the Web and also in Microsoft Excel. It gives a large spectrum of users access to information in SAP BW using the Enterprise Portal, the intranet (Web application design), or mobile technologies (mobile telephones with WAP or I-mode capabilities, and personal digital assistants). As an analysis and presentation tool, the Business Explorer is responsible for the whole Reporting.
As part of the mySAP NetWeaver architecture, SAP BW draws from and utilizes the capabilities of the other components for business intelligence usage. The sum of the functionality of SAP BW and the contribution of other components of mySAP NetWeaver form a platform that represents the next major step in the evolution of business intelligence.
Depending on what extra components you use and how you configure your SAP BW system, you can use SAP BW for different business purposes. In general, there are staging and reporting scenarios. For the staging scenario, you can use SAP systems or external databases as data source. The reporting scenarios are based on the staging scenario with SAP systems as data source.
4.3.2 SAP BW technical system landscape
Figure 4-5 on page 78 shows the technical system landscape of SAP BW.
Chapter 4. Installation of the mySAP NetWeaver components 77
Figure 4-5 SAP Business Information Warehouse (BW): technical system landscape
Components used for SAP BWThe following graphics show the main components of SAP BW and illustrate communication between the components.
To verify which components are obligatory and which can be installed optionally, refer to the mySAP NetWeaver ´04 master guide section “Technical Scenarios of mySAP NetWeaver 'SAP Business Information Warehouse' Installation”. This section also directs you to the relevant installation guides.
Figure 4-6 on page 79 shows you the SAP Business Information Warehouse (BW) technical system landscape but without external data source.
Front End
Web BrowserSAP GUI with BW Extensions
SAP Business Information Warehouse
Java StackABAP Stack
BI Content
BW Functionality
XI Functionality
MI Functionality
KW Functionality
Web AS ABAP
BW Java Components
Web AS Java
BW PrecalculationService
Search and Classification (TREX)
AdditionalComponents
SAP System
MI Plug-inor
PI_BASIS
ExternalData
Source
Key
Supported BasicSystem Variants:
•SAP Web ASABAP + Java
•SAP Web AS Java +SAP Web AS ABAP
•SAP Web AS ABAP
Non-SAPComponent
MandatoryComponent
OptionalComponent
Database
ABAPSchema
ABAPSchema
78 An Overview of Installing SAP Applications on System i Models
Figure 4-6 Technical system landscape of SAP BW without external data source
4.3.3 SAP BW installation steps overview
To implement SAP BW, follow these steps:
1. Preparing an SAP system as data source.
Check or install the suitable PI_BASIS Plug-in, in the underlying SAP R/3 or ERP system.
With SAP BW Java Components (see the following section), you can access non-SAP data sources by using the corresponding JDBC driver. You do not have to prepare this SAP system for SAP BW Staging with external system as data source.
For all other scenarios, you have to prepare this SAP system only if you want to use an Online Transaction Processing (OLTP) system (such as SAP R/3 or SAP R/3 Enterprise back end) as data source.
2. Installation of SAP BW
a. Install SAP Web AS ABAP, which includes SAP BW, PI_BASIS, and the SAP IGS.
SAP BW Staging with external system as data source only:
• If you want to run ABAP and Java parts as one system in one database instance, install an SAP Web AS ABAP + Java system instead of SAP Web AS ABAP.
• If you want to run the Java components in a separate system, install an SAP Web AS Java system additional to SAP Web AS ABAP.
SAP BW
Intranet/Internet
Web Browser
Frontend
SAP GUI with BW Extensions
Database
ABAPSchema
BWPrecalculation
Service(NT only)
SAP Web AS
BI Content
Search and Classification (TREX)
SAP Web AS ABAP
BW Server
BW Server
BW Server
SAP System
R/3 Plug-inor PI_BASIS
Chapter 4. Installation of the mySAP NetWeaver components 79
b. Configure the database of your SAP Web AS for SAP BW (see SAP note 567745).
c. Install SAP GUI with SAP BW Add-On, on each host from which you want to connect to an SAP BW server using an SAP GUI.
d. Install SAP BW Business Content Add-On BI_CONT on the SAP Web AS ABAP system according to SAP notes 774933 and 153967.
e. Optional: For SAP BW Staging with external system as data source, install SAP BW Java Components on the SAP Web AS Java system. SAP BW Java Components consist of:
• SAP BI Universal Data Integration• SAP BI Meta Model Repository
3. Optional: Installation of Search and Classification (TREX)
Use the following installation parameters for the Search and Classification (TREX) installation. For more information, see the documentation Installation Guide – Search and Classification (TREX).
– Perform the installation steps to set up an RFC connection.
– Automatic language recognition is not required. You can adopt the default settings for document languages during the installation of Search and Classification (TREX).
– No Python extensions are required.
– After the installation of Search and Classification (TREX), you have to create a search server relation as described in the Installation Guide – Search and Classification (TREX).
– After the installation of Search and Classification (TREX), you must run the report RSTIRIDX in your SAP BW system as stated in the Installation Guide – SAP Web Application Server ABAP on <Operating System>: <Database>.
This component is optional for SAP BW Reporting with Business Explorer Analyzer and SAP BW Reporting with SAP BW Web Applications. For these scenarios, the component is required, if documents and searching for documents are available. For all other scenarios, this component is not required.
4. Optional: Installation of SAP BW Pre-calculation Service
This is only required for SAP BW Reporting with Business Explorer Analyzer.
5. Installation of Internet Explorer or Netscape browser on each host from which you want to display SAP BW Web Applications
6. Optional: Installation of Crystal Enterprise SAP Edition Version 10, Crystal Enterprise (server component) and Crystal Reports (design tool). This is only required if you are require additional capabilities for formatted reporting. For more information, see SAP Service Marketplace under the topic FAQ at:
http://service.sap.com/businessobjects
4.3.4 SAP BW documentation reference
The following installation guides are available on the SAP Service Marketplace under the topic Installation at:
http://service.sap.com/instguidesNW04
Note: TREX is not supported on i5/OS. Install the TREX on another platform like Windows 32 bit, AIX 5.2/5.3, but not on Windows 64 bit or Linux on Power).
80 An Overview of Installing SAP Applications on System i Models
� Installation Guide – SAP Business Information Warehouse
� Installation Guide – SAP Web Application Server ABAP on <Operating System>: <Database>
� Installation Guide – SAP Web Application Server Java on <Operating System>: <Database>
� SAP Front End Installation Guide
� Installation Guide – SAP Business Information Warehouse
� Installation Guide – Search and Classification (TREX)
� Installation Guides for Crystal Enterprise SAP Edition, available on SAP Service Marketplace under the topics Documentation & Installation Guide → Crystal Enterprise Version 10 at:
� SAP Library under SAP NetWeaver → SAP NetWeaver Configuration → Technical Scenarios of SAP NetWeaver → SAP Business Information Warehouse SAP Web Application Server → SAP Web Application Server (Java) → J2EE Engine Configuration → Template Configuration Tool.
See other BW and BI guides in the SAP Marketplace.
4.4 Installation of SAP Enterprise Portal
This section provides an overview of the following topics, which are useful when installing SAP Enterprise Portal (EP):
� SAP Enterprise Portal (EP) business� SAP Enterprise Portal (EP) technical system landscape� Installation steps for SAP Enterprise Portal (EP)� References, installation guides, and other documentation for the SAP Enterprise Portal
4.4.1 SAP EP business overview
SAP Enterprise Portal consists of:
� The Portal platform
� The Knowledge Management platform, whose major functional areas are:
– Content Management– Search and Classification
� Collaboration
� Predefined content and tools for creating content
With SAP Enterprise Portal, you receive the portal Knowledge Management and Collaboration. The Portal Platform provides you with the tools to build portals for your target users, while the Knowledge Management platform makes it possible to provide access to
Chapter 4. Installation of the mySAP NetWeaver components 81
documents and multimedia objects that are stored in an organization's distributed document repositories. Collaboration enables virtual teams to work together in synchronous and asynchronous ways, directly within SAP Enterprise Portal.
You can customize the portal for the various users by creating targeted interfaces for the various roles. Dedicated interfaces help the users to complete both their general tasks as well as those specific to their professional roles. To speed up the process of customizing the portal for each user, SAP provides predefined content that is packaged, tested, and certified by SAP. This content is bundled in business packages.
In addition to these business packages, SAP provides a number of tools that customers can use to enhance and customize content, including tools for end users, for content administrators, for business users with no coding experience, and for professional programmers.
4.4.2 SAP EP technical system landscape
Figure 4-7 shows the technical system landscape of SAP Enterprise Portal (EP).
Figure 4-7 SAP Enterprise Portal (EP): technical system landscape
From a technical point of view, Search and Classification (TREX) is an optional prerequisite when using collaboration rooms in SAP Enterprise Portal. However, SAP recommends installing TREX for the following reasons:
Front End
Web Browser
SAP Enterprise Portal
Java StackABAP Stack
Content Managementand Collaboration
Portal Platform
Web AS Java
Search and Classification (TREX)
AdditionalComponents
Key
Supported BasicSystem Variants:
•SAP Web AS Java
•SAP Web AS ABAP + Java
Non-SAPComponent
MandatoryComponent
OptionalComponent
Database
JavaSchema
82 An Overview of Installing SAP Applications on System i Models
� If a large number of collaboration rooms have been created (more than 100), users can experience performance problems when displaying collaboration rooms in the Room Directory iView without TREX.
� With TREX, users can search for documents in collaboration rooms. This is known as a Room Content Search, which is part of the room templates delivered by SAP.
4.4.3 SAP EP installation steps overview
In order to obtain all of the SAP Enterprise Portal components on one or more hosts, follow these installation steps:
1. Install the SAP Web AS Java 6.40 system, Portal Platform, and, optionally, Content.
As of mySAP NetWeaver ´04 SR1, you can also optionally install the SAP Enterprise Portal components on an SAP Web AS ABAP + Java.
2. Optional: Installation of Search and Classification (TREX)
Use the following installation parameters for the Search and Classification (TREX) installation:
– Perform the installation steps to set up an HTTP connection.
– During Search and Classification (TREX) installation, select the languages you want Search and Classification (TREX) to recognize. Search and Classification (TREX) uses this information to perform the language recognition procedure, which is necessary for indexing documents.
– No Python extensions are required.
For more information, see the Installation Guide – Search and Classification (TREX)
3. Import Business Packages.
More information about how to find Business Packages, install, and use them in a Portal environment is available under the topic Portal Content Portfolio → Quick Link → New → Finding and Downloading Content → New Process at:
4. Optional: Configure a portal cluster and add dialog instances or server nodes using Java tools.
To add Portal Platform nodes, use the following topics:
– Adding/Deleting a Server Process: to add or remove a server process in a system where a dispatcher is already installed.
– Adding a Dialog Instance: to add a dispatcher and a server on a dedicated host.
You can find both topics in the SAP Library at SAP NetWeaver → SAP NetWeaver Technical Operations Manual → Management of the SAP Web Application Server (Java) → Management of the SAP Web Application Server (Java).
Configure a cluster to increase portal performance and ensure availability. To install the J2EE Engine in a cluster on several physical machines, make sure that:
– The time on the different machines is synchronized.– The language locale settings are equal on all machines.
Note: You can perform this step after step 1 at any stage.
Chapter 4. Installation of the mySAP NetWeaver components 83
The different locale settings result in severe database inconsistencies. This is because when the deployed applications store information in the database, they expect one and the same locale settings on all cluster nodes.
Both time and locale differences lead to reduced supportability of the system, as the mapping between the events on different machines is not obvious, and this increases the resolution time for any problems that can occur.
5. Optional: Move the Application Sharing Server to a dedicated host.
If you installed Collaboration in a production environment, we recommend that you install the Application Sharing Server for Collaboration on a dedicated host for better performance.
4.4.4 SAP EP documentation references
The following documentation is available for SAP EP:
� Planning guides, available on the SAP Service Marketplace under the topic Planning at:
http://service.sap.com/instguidesNW04
Technical Infrastructure of SAP Enterprise Portal
� Installation guides, available on the SAP Service Marketplace under the topic Installation at:
http://service.sap.com/instguidesNW04
– Installation Guide – SAP Web Application Server Java on <Operating System>: <Database>
– Installation Guide – SAP Enterprise Portal
– Installation Guide – Search and Classification (TREX)
– Installation, Upgrade and Configuration Guide → PDK for .NET
� Configuration guides, available in the SAP Library at:
– Portal Security Guide: Choose SAP NetWeaver → Security → SAP NetWeaver Security Guide → Security Guides for the SAP NetWeaver Products → Portal Security Guide
– Portal Platform Administration Guide: Choose SAP NetWeaver → People Integration → Portal → Administration Guide
4.5 Installation of SAP Exchange Infrastructure (XI)
SAP Exchange Infrastructure (SAP XI) is the technical solution for integrating heterogeneous software components of your system landscape or integrating the business systems of your
Note: Be aware that time synchronization on i5/OS depends on the i5/OS level. In i5/OS V5R3 you synchronize the system time on System i configurations with the system value QTIMZON and QUTCOFFSET.
For more details search the System i Information Center
business partners. Theoretically, you can integrate all kind of business systems by using SAP XI components Integration Server, Integration Builder, and Adapter Environment. In addition, business partners can connect to your business systems by using SAP Partner Connectivity Kit.
SAP Exchange Infrastructure provides multiple communication options that take into account the capability of involved business systems to exchange content amongst them. Business systems are determined by the existing system landscape that you want to integrate, taking into account both SAP business systems and non-SAP business systems.
We define the following parameters to determine a communication option:
� Type of business system
Since the communication occurs using the XML messaging service of the Integration Engine, the capability of sending or receiving XML messages is crucial for involved business systems.
� Type of messaging concept (middleware technology) to be used for exchanging content. Different messaging concepts are used, such as:
– Intermediate Documents (IDocs)– Remote Function Call (RFC)– Files from/to file system or FTP server– Java Messaging Service (JMS)– JDBC Data Access– SOAP– RNIF– Plain HTTP– Mail– SAP BC protocol– Marketplace Access– Proxy-based messaging
There are so-called main options based on the required connectivity named by option “A” to “Q”. For a detailed description of these main options, see the SAP Library under SAP NetWeaver → Process Integration → SAP Exchange Infrastructure → Overview → Connectivity.
4.5.1 SAP XI technical system landscape
To realize the communication options described in the previous section, the following specific SAP Exchange Infrastructure components are necessary:
� SAP Exchange Infrastructure� XI Adapter Engine� XI Adapter Engine (J2SE™)� SAP Partner Connectivity Kit
Chapter 4. Installation of the mySAP NetWeaver components 85
Figure 4-8 shows the underlying technical system landscape of SAP XI.
Figure 4-8 SAP Exchange Infrastructure: technical system landscape
Figure 4-9 on page 87 provides an overview of the relevant software components. Figure 4-9 on page 87 only applies to a minimum system landscape and does not represent the integration logic of the SAP Exchange Infrastructure 3.0 SR1. It only shows the components that can be installed for SAP Exchange Infrastructure 3.0 SR1.
Front End
Web BrowserSAP GUI with BW Extensions
SAP Exchange Infrastructure
Java StackABAP Stack
BW Functionality
XI Functionality
MI Functionality
KW Functionality
Web AS ABAP
XI Components
Web AS JavaXI Adapter Engine
(J2SE)Additional
Components
Key
Supported BasicSystem Variants:
•SAP Web ASABAP + Java
Non-SAPComponent
MandatoryComponent
OptionalComponent
Database
ABAPSchema
JavaSchema
BusinessSystem
BusinessSystem
XI Adapter Engine
86 An Overview of Installing SAP Applications on System i Models
Figure 4-9 Overview of the relevant XI software components
SAP Exchange Infrastructure Install the SAP Exchange Infrastructure on the central instance of a Unicode SAP Web AS ABAP + Java 6.40 SR1. It comprises the following units:
� Integration Server � Integration Builder, which includes the following components:
– Integration Directory – Integration Repository
� Runtime Workbench � Adapter Engine
Adapter Engine Install the Adapter Engine on the central instance of an SAP Web AS Java 6.40 SR1. This engine includes the Java Proxy Runtime and Java Proxy Server that enable Java application business system to exchange data using Java proxies. It comprises the following adapters:
Special considerations for the adapter environmentThe following are the installation options for the adapter environment:
� XI Adapter Engine that is to be installed on an SAP Web AS Java system
– Central installation on the SAP Exchange Infrastructure host– Non-central installation on a separate host
� XI Plain J2SE Adapter Engine that can be installed in a non-SAP Java environment
In general, use the XI Adapter Engine in any of the described installation options. It is the strategic adapter engine of SAP and is, therefore, continuously improved. The XI Adapter Engine (J2SE), including the contained adapters, is only supported for compatibility reasons and is not developed any further. Use it, therefore, only in cases where it is inevitable.
Adapter Engine versus Plain J2SE Adapter EngineThe following table Table 4-1 describes the advantages and disadvantages of using those adapters in the different flavors Adapter Engine or Plain J2SE Adapter Engine.
Table 4-1 Advantages and disadvantages of Adapter Engine and Plain J2SE Adapter Engine
Adapter Engine versus SAP Exchange InfrastructureXI Adapter Engine is also installed automatically with the SAP Exchange Infrastructure installation, but one of its components needs to be installed on the business systems in addition, others could be installed under certain circumstances on the business systems, too.
The following scenarios apply:
� Using the Java Proxy environment (server or runtime environment) always requires installing XI Adapter Engine separately on an SAP Web AS Java system.
� You can use the already installed adapters (File/JMS/JDBC/SOAP/Marketplace/RNIF/ RFC/Mail/SAP BC) on the SAP Exchange Infrastructure server, if required.
� Under certain circumstances, it may be more suitable for you to run one or more required adapters on the business systems or SAP Web AS Java. (See the table below for advantages or disadvantages). In this case you need to install XI Adapter Engine separately (this is an option and not mandatory).
Installation option Advantage Disadvantage
Adapter Engine Provides complete integration into the SAP XI environment:� Central Monitoring available� Central Configuration available
More resources needed for installing the SAP Web AS Java 6.40 SR1
Plain J2SE Adapter Engine
� Less resources needed when running in a Java environment only
� Supports non-SAP Web AS 6.40 SR1 platforms
Less integration into the SAP XI environment due to lack of central configuration and monitoring services.
88 An Overview of Installing SAP Applications on System i Models
Table 4-2 describes some considerations that may help you to decide when to install adapters on the business systems.
Table 4-2 Considerations about how to install the XI adapters
4.5.2 SAP Exchange Infrastructure installation steps overview
This section lists the sequence of steps required to implement SAP Exchange Infrastructure.
Now we mention the implementation steps to realize at least one of the communication options A - P:
1. Installation of a Unicode SAP Web AS ABAP + Java system
A Unicode SAP Web AS is a prerequisite for the core component SAP Exchange Infrastructure (Integration Server, Integration Builder, and XI Adapter Engine) that realizes the communication options A - P. You must prepare SAP Web AS as described in the documentation Installation Guide – SAP Exchange Infrastructure.
2. Installation of SAP GUI on each host from which you want to connect to SAP Web AS using an SAP GUI
3. Installation of the component SAP Exchange Infrastructure (Integration Server/Integration Builder/Runtime Workbench/XI Adapter Engine)
4. Optional: Installation of a Unicode SAP Web AS Java system
Optional: Installation of XI Adapter Engine
Perform these steps only if you need to install the XI Adapter Engine (for using one of the communication options D - F) on a separate server.
5. Optional: Installation of XI Adapter Engine (J2SE)
Installation host Advantage Disadvantage
Adapter on the SAP Exchange Infrastructure host (automatically installed)orJ2EE engine (Decentral Adapter Engine)
� No additional installation procedure required
� Suitable for development or test scenarios
� Data source (file, database, JMS provider) must be accessible using NFS, tcp-ports and so on (may be only available in homogeneous LAN environments)
� Possible performance bottleneck due to high RAM needs. The system needs three times the amount of the maximum message size as RAM, for example.
Adapter on the business system itself (Plain J2SE Adapter Engine)
� Installation possible on Non-released SAP Web AS platforms
� Only HTTP connection required between adapter and Integration server. Suitable for a more heterogeneous system landscape with mixed operating systems and authorization concepts, or for distributed WAN environments with firewalls and so on.
� Additional installation procedure required for JDK and adapter itself
Chapter 4. Installation of the mySAP NetWeaver components 89
Perform this step only if you want to use one of the communication options D - G in a non-SAP Java environment.
6. Download and install the most current System landscape directory SLD content (updated weekly) under the topics Download → Support Packages and Patches → Entry by Application Group → Additional Components → SAP MASTER DATA FOR SLD, available in the SAP Service Marketplace at:
http://service.sap.com/swdc
Here you see the implementation steps if you want your business partner to connect to your existing SAP Exchange Infrastructure environment (communication option O):
1. Ensure that SAP Exchange Infrastructure is installed in your SAP landscape.
2. Ensure that Unicode SAP Web AS Java 6.40 system is installed on the business partner system landscape.
The Unicode SAP Web AS Java system is a prerequisite for SAP Partner Connectivity Kit. You must prepare the SAP Web AS Java system as described in the documentation Installation Guide – SAP Exchange Infrastructure.
3. Install SAP Partner Connectivity Kit on the business partner system landscape.
Regarding the installation prerequisites:
� You must not use an SAP Web AS 6.40 derived from an upgrade.
� Do not use any business system (for example, SAP CRM or SAP SCM) with a Unicode SAP Web AS 6.40 basis as installation host for SAP Exchange Infrastructure.
� During the installation of the J2EE Engine, you should choose the XI specific installation option for the J2EE Engine in UME User Group management (Use SAPGUI Transaction PFCG).
4.5.3 SAP XI documentation reference
The following documentation is available for SAP Exchange Infrastructure:
� Technical Infrastructure Guide – SAP Exchange Infrastructure available on the SAP Service Marketplace under the topic Planning at:
http://service.sap.com/instguidesnw04
� Installation Guide – SAP Web Application Server ABAP on <Operating System>: <Database>
� Installation Guide – SAP Web Application Server Java on <Operating System>: <Database>
� SAP Front End Installation Guide
� Installation Guide – SAP Exchange Infrastructure
� Installation Guide – SAP Partner Connectivity Kit
� Configuration Guide – SAP Exchange Infrastructure available on the SAP Service Marketplace at:
http://service.sap.com/ibc
90 An Overview of Installing SAP Applications on System i Models
SAP Mobile Infrastructure (SAP MI) is a technical scenario on which SAP applications for mobile business are based. However, with SAP MI, you can also make non-SAP based applications mobile.
The SAP MI Client Component is installed locally on mobile devices and is equipped with a Web server, a database layer, and its own business logic. Therefore, staff working remotely can work offline and does not have to wait for a network connection to complete time-critical business applications. SAP MI offers tools for synchronization and data replication that make the data of the mobile device consistent with that of the back-end system.
SAP MI also supports the Abstract Window Toolkit (AWT) platform. AWT is part of the Java Foundation Classes (JFC) and provides Java developers with a framework and routines for graphic user interfaces.
Figure 4-10 shows the technical system landscape of SAP MI.
Figure 4-10 SAP Mobile Infrastructure: technical system landscape
The following sections describe the technical components of SAP MI.
Chapter 4. Installation of the mySAP NetWeaver components 91
4.6.1 SAP Mobile Infrastructure Client
SAP Mobile Infrastructure (MI) Client provides a mobile application with the following services:
� UI programming models
The standard programming model for mobile applications is Java Server Pages (JSP™) and Abstract Window Toolkit (AWT). However, the SAP ME 1.0 programming model micro ITS is still supported.
� Framework services
The framework services are provided to the mobile applications as Java APIs. The most important APIs are used for:
– Data synchronization
During synchronization, SAP MI Client codes the data using a 128-bit RDS (RSA Data Security) method and compresses the data.
– Data persistence– Reading and writing replicated data– Connecting peripheral devices (native drivers)– Tracing and XML parsing
4.6.2 SAP Mobile Infrastructure Server
SAP Mobile Infrastructure (MI) Server contains the following components:
� SAP MI J2EE Server
This server is an integral part of SAP Web AS Java. It is responsible for:
– Installing SAP MI Client
When a mobile device logs on initially to SAP MI J2EE Server, it determines which parts are required by SAP MI Client and installs them on the mobile device. The local device drivers that are needed on the platform are also installed.
– Administration of the mobile device
The system administrator keeps an overview of the mobile devices in the field and can make various client settings (such as modem, class path, state of the battery) and certain server settings (such as load balancing, handling of synchronization errors) centrally.
� SAP MI ABAP Server
This server is an integral part of SAP Web AS ABAP. It is responsible for:
– Queuing and acknowledgement of synchronized data containers– Calling the application logic
The application logic can be called synchronously or asynchronously, depending on the application.
– Data replication
Data replication defines data packages for individual mobile devices (data allocation), computes the data to be newly replicated on the device (delta comparison), finds and solves conflicts between the mobile device and the server application (conflict management), and provides a number of monitoring tools.
92 An Overview of Installing SAP Applications on System i Models
– Deployment of the mobile applications to the mobile devices
Mobile applications are automatically deployed to a mobile device when the mobile device is synchronized. This process is controlled centrally by the Deployment Console. It permits the system administrator to assign application versions based on users or roles and thus gives an overview of the mobile devices, error logs, and so on, in the field.
4.6.3 SAP Mobile Infrastructure installation steps overview
To install SAP MI, perform these high-level steps listed in the following list:
1. Installation of an SAP Web AS ABAP + Java system
2. Installation of SAP GUI on each host from which you want to connect to SAP Web AS using an SAP GUI
3. Installation of SAP Mobile Infrastructure Client
4.6.4 SAP Mobile Infrastructure documentation reference
Refer to the following installation guides for more information about installing SAP Mobile Infrastructure:
� Installation Guide – SAP Web Application Server ABAP on <Operating System>: <Database>
� Installation Guide – SAP Web Application Server Java on <Operating System>: <Database>
� SAP Front End Installation Guide
� Installation Guide – SAP Mobile Infrastructure
4.7 Installation of SAP Knowledge Warehouse
SAP Knowledge Warehouse (SAP KW) can be used for the following purposes:
� Documentation (DOC)� Training (TRAIN)� Quality Management Manuals (QMM)
To receive the initial shipment of documentation content (including quality manual, included in license), training content (which needs to be licensed separately), or both, go to the SAP Software Shop on the SAP Service Marketplace under the topic SAP Knowledge Warehouse and register for the first content shipment at:
http://service.sap.com/softwarecatalog
If, in addition, you want to receive the regular SAP content updates for SAP KW, the SAP Software Shop is also the location to subscribe to them. Subscription ensures that the updates are shipped to you automatically.
4.7.1 SAP Knowledge Warehouse business overview
SAP Knowledge Warehouse (KW) delivers the technical infrastructure you need to set up and manage your own enterprise-specific knowledge base in the areas of documentation, training, and manuals. For project teams and end users, SAP KW streamlines training and
Chapter 4. Installation of the mySAP NetWeaver components 93
business processes, helping you to reduce your costs. In addition, the possibility to reuse, supplement, and continually update SAP content offers great saving potential.
SAP KW provides an information repository for companies of all sizes, including global multilingual companies, with facilities to model structures according to their corporate and market structure.
Use SAP KW to create and adjust documentation, manuals, and training materials of varying media. Tailor the materials to your specific business processes using the editors and office products your employees know.
If necessary, SAP can deliver SAP KW with current SAP materials so that you can immediately begin training your project team and end users and edit the corresponding documentation. SAP KW is shipped with the following content created specifically for SAP application:
� Standard delivery
– Documentation (context-sensitive online application help)– Quality management manual template – EN ISO 9000 ff. and 14000 compliant
� Optional package
Training materials (includes course materials and instructor guides)
The scenarios offered through SAP KW benefit from key functions of the solution. SAP KW is designed to:
� Provide a user-friendly authoring environment for authors creating different types of materials.
� Allow for maximum reuse of content stored in the system.
� Deliver workflow-based translation functions for multilingual environments.
� Generate output formats in a purpose-oriented and target-group-oriented, flexible fashion.
� Provide an infrastructure for distributing the respective materials to end users.
The scenarios Documentation and Training focus on the traditional knowledge transfer topics of the creation and management of documentation and classroom training materials.
The Quality management manual scenario supports you in creating, managing, and distributing a quality management manual according to the requirements of the ISO 9000 ff. and 14000 standards.
Figure 4-11 on page 95 shows the technical system landscape of SAP KW.
94 An Overview of Installing SAP Applications on System i Models
Figure 4-11 SAP Knowledge Warehouse: technical system landscape
SAP Gateway is required if you use Search and Classification (TREX) within your scenario. It is also required if you run SAP Content Server on a separate host. In this case, SAP Gateway is used for the import of content updates and for the creation of separate transports.
If you do not use Search and Classification (TREX) and have installed SAP Content Server on the SAP Web AS host, you do not have to install SAP Gateway.
For test and demonstration purposes only, the SAP KW component (that is, SAP Web AS, SAP Gateway, the Web server, and SAP Content Server) shown in Figure 4-11 can be installed on one host.
For performance, scalability, high availability, and security reasons, we recommend that you do not use this installation on one host as your production landscape. For this single-host installation of SAP KW, you must provide a sufficiently sized server. For information about sizing, see the SAP Service Marketplace at:
http://service.sap.com/sizing
4.7.2 SAP KW installation steps overview
1. Installation of SAP Web AS 6.40
If you want to run SAP Web AS ABAP and SAP Web AS Java on different hosts:
Chapter 4. Installation of the mySAP NetWeaver components 95
– Install the SAP Web AS ABAP system on the first host.– Install the SAP Web AS Java system on the second host.
Otherwise, install an SAP Web AS ABAP + Java system.
2. Installation of SAP KW Internet Knowledge Servlet
3. Installation of SAP Content Server
4. Installation of SAP Gateway 6.40
If you do not use Search and Classification (TREX) and have installed SAP Content Server on the SAP Web AS host, you do not have to install SAP Gateway.
5. Installation of Search and Classification (TREX)
Use the following installation parameters for the Search and Classification (TREX) installation (for more information, see the documentation Installation Guide – Search and Classification (TREX)):
– Perform the installation steps to set up an RFC connection.
– Automatic language recognition is not required. You can adopt the default settings for document languages during the installation of Search and Classification (TREX).
– No Python extensions are required.
– After the installation of Search and Classification (TREX), you have to create a search server relation as described in the Installation Guide – Search and Classification (TREX).
6. Optional (only for mySAP NetWeaver Support Package Stack 12 or lower): Installation of SAP Internet Transaction Server (ITS) 6.20
SAP ITS is no longer required for SAP KW as of mySAP NetWeaver Support Package Stack 13.
For mySAP NetWeaver Support Package Stack 12 or lower, we recommend that you install SAP ITS to display properties from a Web browser.
7. Installation of SAP GUI with SAP KW Add-On
– Installation of SAP GUI– If you want to use Microsoft Office 2000 or Microsoft Office XP as an editing tool (see
the following step), register the dynamic link library htmltidy.dll on each SAP GUI client.
8. Installation of at least one of the following required editing tools:
– Microsoft Office 2000 or Microsoft Office XP– XML editors supported by SAP KW:
• Epic Editor 4.3.1 from Arbortext, Inc. For more information, refer to:
http://www.arbortext.com/
• Authentic 2004 from Altova. This editor can be downloaded from:
http://www.altova.com/download_authentic.html
The following SAP KW documentation is available:
� Installation Guide – SAP Web Application Server ABAP on <Operating System>: <Database>
� Installation Guide – SAP Web Application Server Java on <Operating System>: <Database>
� SAP Front End Installation Guide
� Installation Guide – SAP Knowledge Warehouse
96 An Overview of Installing SAP Applications on System i Models
� Installation Guide – Search and Classification (TREX)
� Installation Guide – SAP@Web available on the Server Components CD/DVD
� Configuration Guide – SAP KW Business Scenarios available on the SAP Service Marketplace at:
http://service.sap.com/ibc
4.8 Installation of SAP Solution Manager
The SAP Solution Manager (SolMan) belongs to the mySAP NetWeaver even it is no real SAP application. In the SAP installation guides the installation of the SAP Solution Manager is described as “mandatory” for upgrades and new installations based on SAP Web Application Server 6.xx.
4.8.1 Technical system infrastructure
The SAP Solution Manager runs on a separate central system, to which all other SAP systems are connected. Systems that are administered using the SAP Solution Manager are referred to as satellite systems.
Figure 4-12 on page 98 shows you the SAP Solution Manager connected via RFC to:
� Some satellite systems, for example:
– P01 - as a mySAP ERP production system– Q01 - as a mySAP ERP quality assurance system– T01 - as a mySAP ERP test or development system– BW1 - as a mySAP BW production system– AP1 - as a mySAP APO production system
� The SAPNet for handling customer messages, SAP services, or both� The SAP Marketplace via the Internet
Chapter 4. Installation of the mySAP NetWeaver components 97
Figure 4-12 Solution landscape with the central SAP Solution Manager system
4.8.2 Software and hardware requirements
In this section, we provide some hints for the software and hardware for the SAP SolMan. The information given is based on the SAP Solution Manager Release 3.2.
Software componentsSAP note 770200 (Upgrade Solution Manager 3.1 to 3.2) includes an overview of software components and support package levels that must be installed in your SAP Solution Manager system.
For information about new releases, delta upgrades, and support packages, see the SAP Software Distribution Center:
http://service.sap.com/swdc
Hardware requirementsHardware requirements, such as network bandwidth, physical memory, CPU power, and I/O capacity, are influenced by both business and technological requirements. You have to take into account the number of users using the various application components and the load balance in the network.
To determine the hardware requirements of your SAP Solution Manager system, go to the SAP Service Marketplace:
http://service.sap.com/sizing
4.8.3 Scenarios
The SAP Solution Manager supports the following scenarios:
� Service Desk
PO1
TO1
QO1
BW1
AP1
Satellite Systems
Customer Solution Landscape
RFC connections for data transfer• Solution monitoring (CCMS,
EarlyWatch Alert)• Configuration• Distribution issues (customizing,
� Implementation and Distribution� Upgrading SAP Solutions� Change Request Management� Solution Monitoring
These scenarios are described in the following sections.
Service DeskThe Service Desk allows you to create support messages, send them to SAP, and receive replies from SAP. Issue tracking provides follow-up functionality for the Service Desk. Configure the basic Service Desk scenario as a prerequisite for the Implementation and Distribution, the Change Request Management, and the Solution Monitoring scenarios.
Implementation and DistributionThe Implementation and Distribution scenario supports the implementation of customer projects, and the definition of template projects and upgrade projects. This scenario includes an implementation roadmap, an editor for creating and maintaining business blueprints, access to the implementation guides (IMG), and tools for testing, monitoring, and distributing customizing.
Upgrading SAP SolutionsTo configure SAP Solution Manager for the Upgrading SAP Solutions scenario, follow the steps to configure the Implementation and Distribution scenario.
Change Request ManagementChange Request Management enables you to manage your SAP Solution Manager projects (maintenance, implementation, template, and upgrade) projects from top to bottom: Starting with change management and project planning, through resource management and cost control, to physical transports of changes from the development environment into the production environment.
Ongoing software and configuration changes as well as large implementations are ongoing challenges for managing data consistency and secure project control. Change Request Management as part of SAP Solution Manager integrates Service Desk functionality for managing change requests, and extends project control by integrating project planning with the cProjects application into a transport workflow control.
The processes supported by Change Request Management include urgent corrections for implementing fast and direct changes in the production environment, and maintenance cycle activities such as regular releases, and implementation, upgrade, or template projects. Cross-system and cross-component changes are supported.
Change Request Management offers you the following benefits:
� Increased maintenance and project efficiency� Minimized costs for project management and IT� Reduced risk of correction and project failure� Shorter correction, implementation, and going-live phase� Efficient maintenance of customer developments and implementations
Note: The technical requirements apply only to the release of the SAP application that you are upgrading.
Chapter 4. Installation of the mySAP NetWeaver components 99
Solution MonitoringThe Solution Monitoring scenario provides support for functionalities, such as Service-Level Reporting, EarlyWatch Alert, Business Process Monitoring, System Monitoring, Central System Administration, System Landscape Reporting, as well as user-defined alerts.
The Monitoring functionality allows you to:
� Monitor multiple solution landscapes.
You can use the SAP Solution Manager to monitor the satellite systems in a landscape, as well as all the business processes running on them.
� Communicate with SAP Support Back Office.
The SAP Solution Manager has a connection to the SAPNet R/3 Front end and the SAP Service Marketplace.
� Document an entire solution landscape in one central system.
Before you begin the installation, collect and read the relevant SAP notes. They contain the latest or upgraded information regarding installation, as well as corrections to the installation documentation. You find these SAP notes in the SAP SolMan installation guides in the SAP Marketplace under the topics SAP Components → SAP Solution Manager at:
http://servce.sap.com/instguides
� SAP Solution Manager Master Guide� SAP Solution Manager Component Installation Guide, Part I - Planning and Preparation� SAP Solution Manager Component Installation Guide, Part II - Installation and
Post-Installation
4.8.4 SAP SolMan installation planning activities
1. Choose your basic system variant and decide how you want to distribute the SAP system instances.
There is only an ABAP System as a basic system variant of the SAP SolMan. There is no J2EE Engine. So you have only a ABAP installation.
You can install all mandatory SAP system components on a single host (central system) or on separate hosts (distributed system). Mandatory instances of an ABAP system are the central instance and the database instance.
Optionally, you can install one or more dialog instances and gateway instances (but nobody does it). But you can and should consider a two-system landscape for the SAP SolMan:
– Customizing system/Development system/Test system– Production system
2. Check SAP system components.
As mentioned previously, for the SAP SolMan ABAP installation you have the following:
– A central instance– A database instance– One or more dialog instances (optional, if required)
Note: The SAP Solution Manager does not connect directly to the SAP Service Marketplace, but uses Internet Explorer to display items from the SAP Service Marketplace on the user's desktop.
100 An Overview of Installing SAP Applications on System i Models
– One or more gateway instances (optional, if required)– Front ends
3. Before you install your SAP system, you have to know how to manage your user data.
This is especially important if you have an existing system landscape and you have to decide which system is your primary user management system. It makes sense to implement the Central User Administration (CUA) on the SAP SolMan, where you have one central system to manage all your SAP user in your SAP system landscape.
For more information, see the documentation Integration of User Management in your System Landscape in the SAP Library → Security → SAP NetWeaver Security Guide → User Administration and Authentication
4. Identify the basic SAP system parameters.
This is the same procedure as described in the 5.2.2, “mySAP ERP installation planning activities” on page 115.
5. Decide whether you want to use SAP System Landscape Directory.
This is the same procedure as described in the 5.2.2, “mySAP ERP installation planning activities” on page 115.
The following planning activities are optional and only apply, if you want to perform one of the following activities:
� Installation of multiple SAP systems on a single System i server� Using the Lightweight Directory Access Protocol (LDAP) for SAP Logon for the Microsoft
Management Console (MMC)
LDAP can also be used for other purposes (for example, the LDAP Connector). If you do not want to use LDAP for SAP Logon or MMC, no LDAP-specific installation steps are required now.
To refer to the considerations based on these issues, see the official SAP installation and implementation guides.
4.8.5 SAP SolMan installation preparation activities
When preparing to install SAP Solman, follow these steps:
1. Check the general information hardware and software requirements.2. Check the hardware and software requirements.3. Check Qp2Term, Qp2Shell, and the OS/400 Portable Application Solution Environment.4. Install the Qshell.5. Check and adjust the i5/OS system values.6. Set the time zone environment variable.7. Adjust the startup program QSTRUP.8. Add a user ASP.9. Configure the TCP/IP.10.Adjust the relational database name.11.Install English as a secondary language.12.Install additional languages.13.Set up the transport directory.14.Prepare a Windows user account and i5/OS user profile.15.Install TMKSVR and create an installation share.16.Install the SAP front-end software.17.Check the general information about preparing the system for SAPinst.18.Prepare the system for the SAPinst GUI.
Chapter 4. Installation of the mySAP NetWeaver components 101
Optionally you can decide to use LDAP for SAP Logon or Microsoft Management Console (MMC). Then you have to prepare the active directory for use with the SAP system.
4.8.6 SAP SolMan installation activities
1. Prepare the installation DVDs.
We recommend that you make all required DVDs available in parallel. Using Media Information for mySAP NetWeaver ´04 SR1, identify the required DVDs for your installation and keep them separate from the remaining DVDs. This avoids mistakes between DVDs with similar names, so that you use the correct DVDs for your installation.
Table 4-3 shows the required DVDs for an dialog instance installation on a Windows application server.
Table 4-3 Requested DVDs for an SAP SolMan installation
For the installation of a Unicode SAP system, the Unicode SAP kernel DVD is required. For the installation of a non-Unicode SAP system, the non-Unicode SAP kernel DVD is required. Use one of the following methods to make DVDs available in parallel.
– Before the installation:
• Have sufficient DVD drives• Copy DVDs manually to the local hard disks
Do not use network drives for your DVDs.
– During the installation: Use the SAPinst CD Browser dialog, that is, you can check the entered location and then copy the entire DVD to the path you entered in column Copy Package to.
2. Install an SAP instance using SAPinst.
In this section, we describe some of the prerequisites before starting SAPinst for all instance.
– Make sure that your operating system does not delete the temporary directory TEMP, TMP, TMPDIR or /tmp and its subdirectories when the system is rebooted.
SAPinst normally creates the installation directory sapinst_instdir directly below the temporary directory. SAPinst finds the temporary directory by checking the value of the environment variables TEMP, TMP, or TMPDIR. If no value is set for these variables, SAPinst uses /tmp as default installation directory.
The SAPinst Self-Extractor extracts the SAPinst executables to the temporary directory, TEMP, TMP, TMPDIR or /tmp. These executables are deleted again after SAPinst has stopped running.
Note: For all these SAP SolMan preparation activities points 1 through 18, see the corresponding considerations and procedures as described in the 5.2.3, “mySAP ERP installation preparation activities” on page 116.
Installation option Required DVD
Central instance SAP Solution Manager 3.2 Master DVD
Dialog instance SAP Windows kernel DVD
SAP Java DVD (includes IGS folder IGS_SOFT for the installation of IGS)
Database instance SAP Installation Master DVD
SAP Export DVD
102 An Overview of Installing SAP Applications on System i Models
– Ensure that you have at least 50 MB of free space in the installation directory for each ABAP installation service. In addition, you need 60 - 200 MB free space for the SAPinst executables. If you cannot provide 200 MB free space in the temporary directory, you can set one of the environment variables TEMP,TMP, or TMPDIR to another directory with 200 MB free space for the SAPinst executables.
Each SAP instance requires a separate installation directory.
– You must have a valid java executable in your executable search path or you must set the SAPINST_JRE_HOME environment variable for the installation user to the valid JAVA_HOME directory.
If you have more than one Java Virtual Machine (JVM) installed on your system (for example, you have two JREs with different versions installed), make sure that the SAPINST_JRE_HOME environment variable is set to the valid JAVA_HOME directory.
– If required, delete directories with the name sapinst_exe.xxxxxx.xxxx after SAPinst has finished. Sometimes these remain in the temporary directory.
We recommend that you keep all the installation directories until you are sure that the system is completely and correctly installed.
3. Check prerequisites before starting SAPinst: all instances.
See also point 2.
4. Run SAPinst to install the instances of your SAP system.
This applies analogously to the installation of all other SAP components based on Web Application Server 6.40 and the installation tool SAPINST and begins with:
a. Log on to the Windows host as the installation user. For more information, see the Preparing a Windows User Account and iSeries User Profile topic in Part I of the “Planning and Preparation” SAP installation guide for the SAP Solution Manager.
b. If you want to install a central instance, a database instance, or a dialog instance, copy the SAP Installation Master DVD to your System i host.
If you want to install, additional components, mount the mySAP NetWeaver Components DVD. In this case, replace “SAP Installation Master DVD” with “mySAP NetWeaver Components DVD” in this section.
c. Start SAPinst from the SAP Installation Master DVD in one of the following ways:
• Using the default installation directory (recommended). Start the installation with the command:
sapinst.exe
Install in the path Mapped_Drive:\Copied SAP Installation Master DVD \IMx_OS400_64\SAPINST\OS400\AS400.
• Using an alternative installation directory
Create a new installation directory and change into this directory. Enter the following command to start SAPinst from the SAP Installation Master DVD:
Mapped_Drive:\Copied SAP Installation Master DVD \IMx_OS400_64\SAPINST\OS400\AS400\sapinst.exe
SAPinst uses the port 21212 and 21213 during the installation for communication with the SAPinst GUI. If this port is already used by another service, you must add the parameter SAPINST_DIALOG_PORT=free_port_number to the relevant sapinst command listed previously.
Chapter 4. Installation of the mySAP NetWeaver components 103
For example:
Mapped_Drive:\Copied SAP Installation Master DVD \IMx_OS400_64\SAPINST\OS400\AS400\sapinst.exe SAPINST_DIALOG_PORT=free_port_number
d. The SAPinst/TMKSVR Session Parameters dialog box opens and prompts you for the target System i parameters. Enter your values.
Continue the SAP SolMan installation analogously as described in the mySAP NetWeaver or mySAP ERP installation section.
Follow exactly the guidance which is written in this guide and in the appropriate SAP notes. The installation guide tells you how to run SAPinst to install one or more SAP instances. It describes an installation where SAPinst GUI and SAPinst server are running on the same host.
Each SAP instance requires a separate installation directory. We recommend that you keep all the installation directories until the system is completely and correctly installed. If you are installing a second or subsequent SAP system into an existing database, ensure that the database is up and running before starting the installation.
5. Check using the SAPinst GUI.
The installation guide describes the buttons of the SAPINST GUI dialogs (input windows, installation progress windows, message boxes).
6. Check interrupted installation with SAPinst.
Refer to the installation guide.
7. Change the SAPinst GUI host.
You can run the SAPinst GUI in stand-alone mode. This enables you to change the monitoring host the GUI runs on during installation. The Windows host you started sapinst.exe from is called sapinst_exe_host. The Windows host where you want to run the SAPinst GUI in stand-alone mode is called sapinst_GUI_host.– Prepare the sapinst_GUI_host for the SAP system installation.
– Prepare a Windows user account on the sapinst_GUI_host as described in the “Preparing a Windows User Account and iSeries User Profile” section in the SAP Solution Manager installation guide, Part I “Planning and Preparation”.
– Both computers are in the same network and can ping each other. To test this:
• Log on to the host where you started sapinst.exe and enter the command:
ping sapinst_GUI_host
• Log on to the host where you want to run the SAPinst GUI in stand-alone mode and enter the command:
ping sapinst_exe_host.
The process flow is as follows:
i. Run SAPinst.exe on the sapinst_exe_host.ii. Log off from the SAPinst GUI by selecting the Logoff button.iii. Run startinstgui.bat on the SAPinst_GUI_host.
Note: Refer to the Installation and Post-installation Guide SAP Solution Manager 3.2: IBM Eserver iSeries, Part II - Installation and Post-Installation in the SAP Marketplace at:
http://service.sap.com/instguides
104 An Overview of Installing SAP Applications on System i Models
iv. Continue the installation using the SAPinst GUI.
8. Start SAPinst GUI on another host.
You use this procedure to run SAPinst GUI on the sapinst_GUI_host. The sapinst_GUI_host is the host from which you want to control the installation with the SAPinst GUI.
– Start the installation on the sapinst_exe_host.– During installation select the Logoff button in the SAPinst GUI.– You prepare the sapinst_GUI_host for the SAP system installation.– You prepare a Windows user account on the sapinst_GUI_host as described in the
section “Preparing a Windows User Account and iSeries User Profile” of the SAP Solution Manager installation guide, Part I “Planning and Preparation”.
The procedure is as follows:
a. Log on to the sapinst_GUI_host as a user who is a member of the local administration group.
b. Insert the SAP Installation Master DVD into your drive.
c. To start the SAPinst GUI double-click startinstgui.bat in the path Drive:\IMx_0S400_64\SAPINST\0S400\AS400.
To find the SAPinst executable in your platform-specific IMx directory, see the README.TXT file in the SAP Installation Master DVD.
The SAPinst GUI now gets started and connects automatically to the host that is waiting for a connection. The SAP Installation GUI Connection dialog opens.
d. Enter the host name of the Installation Host (sapinst_exe_host) and the same Port as SAPinst uses on this host. Choose OK.
SAPinst GUI now connects to the SAPinst server and the first dialog of the installation opens.
e. Continue the installation from the sapinst_GUI_host.
9. If you decided to use a generic LDAP directory and you did the necessary preparatory steps as described in Part I — Planning and Preparation, you have to create a user for LDAP directory access.
4.8.7 SAP SolMan post-installation activities
After installing SAP SolMan, perform the following functions:
1. Grant authorizations for operating system collector programs.
2. Start and stop the SAP system.
3. Log on to the SAP system.
4. Check that the SAP system services are present.
5. Install the SAP online documentation.
6. Install the SAP license.
7. Remove the SAPinst installation files.
8. Access a remote database.
Note: To connect the SAPinst GUI from another host, the SAPinst server must still be running on the sapinst_exe_host. If the SAPinst server is stopped, no GUI can connect to it.
Chapter 4. Installation of the mySAP NetWeaver components 105
9. Configure SAProuter for Remote Connection to SAP Support.
10.If you installed a unicode system, run unicode-specific reports.
11.Configure the transport management system (TMS).
12.Perform the basic operations.
13.Check the configured number of work processes.
14.Install additional languages.
15.Activate the integrated Internet Transaction Server (optional).
16.Apply the latest kernel patches and support packages.
17.If you install SAP Web AS as basis for an SAP component that uses the Knowledge Provider (KPRO) component (for example, SAP BW or SAP KW), schedule asynchronous indexing and de-indexing.
18.If you want to use KPRO, check for problems in IMS™ monitoring.
19.Perform the client copy.
20.Check the RFC Destination.
21.You can change the passwords of created i5/OS users.
22.Change passwords of created users.
23.Perform a full backup.
24.Prepare the SAP system for business application.
Note: Refer to the Installation and Post-installation Guide SAP Solution Manager 3.2: IBM Eserver iSeries, Part II - Installation and Post-Installation in the SAP Marketplace at:
http://service.sap.com/instguides
For these SAP SolMan post-installation activities point 1 to 24, see also the corresponding considerations and procedures as described in the 5.2.5, “mySAP ERP post-installation activities” on page 129 and the following.
106 An Overview of Installing SAP Applications on System i Models
Chapter 5. Installation of the mySAP Business Suite
This chapter provides an overview of the concepts and installation steps of the following components. First we give a general introduction and then discuss the installations of the various SAP applications.
� General aspects of the mySAP Business Suite applications
In this section, we explain that all solutions of the mySAP Business Suite are based on the SAP NetWeaver infrastructure and especially on the SAP Web Application Server. We have previously described the main concepts of the installation process for all components of the mySAP Business Solutions.
� Installation of mySAP Enterprise Resource Planning
In this section we show you some concepts and procedures about how to install the mySAP Enterprise Resource Planning (ERP) solution as the main and most popular application of the mySAP Business Suite.
As the successor of SAP R/3 and R/3 Enterprise, mySAP ERP is the main component of all SAP applications. We demonstrate the installation of mySAP ERP within the scope of the following activities:
Additionally we provide an overview of the installation concepts and installation steps of the other mySAP Business Suite solutions (mySAP CRM, mySAP PLM, mySAP SCM, mySAP SRM). This should give you a short impression of these modules. It is not meant to be an actual guideline about how to run the specific installation procedures.
Always keep in mind to use the official SAP installation guides found at the SAP Marketplace when you install any of these SAP applications. The SAP Marketplace can be found at:
� Installation of mySAP Customer Relationship Management
Here we show you an overview to the mySAP Customer Relationship Management (CRM) installation on System i models. You learn the versatile additional components necessary for different mySAP CRM business scenarios.
� Installation of the mySAP Supply Chain Management
Here we show you an overview to the mySAP Supply Chain Management (SCM) installation on System i models. The SAP APO Optimizer and the liveCache for SCM belong to this SAP application.
� Installation of mySAP Product Lifecycle Management
Here we show you an overview to the mySAP Product Lifecycle Management (PLM) installation on System i models. The cProjects and cFolders are the main components of mySAP PLM.
� Installation of mySAP Supplier Relationship Management
Here we show you an overview to the mySAP Supplier Relationship Management (SRM) installation on System i models. SRM consists of multiple business scenarios and each of these needs another installation approach.
5.1 General aspects of the mySAP Business Suite applications
The mySAP Business Suite consists of the following solutions:
Because all of these solutions are based on the SAP NetWeaver, the concepts to install each of them are similar:
� The Web Application Server (Web AS) is required with the following:
– ABAP stack (stand-alone)– JAVA stack (stand-alone)– ABAP stack and the JAVA stack together
There are different architectures and basic concepts about how to organize and how to install the Web AS with its components. We discussed these in the previous sections.
� For special business scenarios, you require some components from the SAP NetWeaver Platform, for example:
– SAP Enterprise Portal (EP)– SAP Business Information Warehouse (BW– SAP Exchange Infrastructure (EP)– SAP Mobile Infrastructure (MI)
Within these components, you have to distinguish the following:
– ABAP and JAVA aspects
Note: The mySAP Business Suite components are technically based on the mySAP NetWeaver and the SAP Web Application Server. Therefore, the installation of a mySAP Business Suite component is a logical add-on to these and does not require any additional or technical discussion.
108 An Overview of Installing SAP Applications on System i Models
– Code page aspects (ASCII, Unicode)
All of these components, whether in ABAP or in JAVA, have a database, or more precisely, a database schema. This is described in the “i5/OS” chapter of Implementing SAP Applications with System i and i5/OS, SG24-7166. On System i models, an SAP database is represented by a i5/OS library. The SAP database and, therefore, the i5/OS library has an ASCII or a Unicode Code page.
� Additionally, a mySAP Business Suite application also requires some middleware components such as:
– SAP Internet Transaction Server (ITS)– SAP Business Connector (BC)– Search and Classification (TREX)– SAP Internet Graphic Server (IGS)– SAP Internet Pricing and Configurator (IPC)– SAP Content Server– SAP Communication Station
In most cases, these middleware components run on special Windows or Linux machines. We do not to focus on these components in this section.
� Some front-end components, such as:
– SAP Graphical User Interface (GUI)– Web Browser like Internet Explorer (IE) or Netscape– Web Dynpro– Mobile User Interface (UI)
� You also require a database for the specific mySAP Business Suite solution itself, such as:
Keep in mind that in an SAP landscape for a special SAP scenario, normally you implement the following:
� A customizing environment� A quality and assurance or test environment� A production environment� Sandboxes, training environments, and more
The installation concepts and the System i specific aspects for an installation of a mySAP Business Suite solution are already described in the previous sections.
The procedure to install a mySAP Business Suite solution is also described in detail in the SAP installation guides and the corresponding SAP notes. You can find these documents in the SAP Marketplace:
� For the installation guides:
http://service.sap.com/instguides
� For the SAP notes:
http://service.sap.com/notes
Chapter 5. Installation of the mySAP Business Suite 109
5.2 Installation of mySAP Enterprise Resource Planning
SAP NetWeaver ´04 provides mySAP Enterprise Resource Planning (ERP) with a comprehensive integration platform and delivers the foundation to serve all ERP applications. SAP NetWeaver is built to extend mySAP ERP and to integrate non-SAP systems. We have described the installation of SAP NetWeaver ´04 in the previous sections.
The installation of the SAP ERP ECC5.0 itself is based on WEB AS 6.40, so you require the installation guide for ECC5.0. You should also be familiar with the installation guide of WEB AS 6.40.
The installation of the SAP R/3 Enterprise 4.7 is based on WEB AS 6.20. In this case too you should check both the installation guides to understand the concepts.
If you have an installation based on a service release (for example, SAP R/3 Enterprise 4.7 SR1) this means that SAP has been integrating a higher support package level into the delivery. This also implies that you have a different installation package, installation guides, and also different SAP notes.
For NetWeaver 2004S, the installation guides are split into separate manuals. Ensure that you have the latest version of your installation guides and installation notes from the following links:
� For installation guides:
http://service.sap.com/instguides
� For installation notes:
http://service.sap.com/notes
5.2.1 mySAP ERP components
We have already discussed SAP NetWeaver, the foundation upon which mySAP ERP is built. We now provide an overview of ERP-relevant components from an application point of view.
Figure 5-1 on page 111 shows you an overview of all mySAP ERP 2004 components, divided into:
Figure 5-1 Overview of the mySAP ERP 2004 components
You cannot install the constituent parts of ERP Central Component (ECC) 5.0 shown individually in Figure 5-1 above. Nevertheless, support packages for each subcomponent continue to be produced. Therefore, each subcomponent, if necessary, can be patched separately. All subsequent figures in this document that display system landscapes solely display one component – SAP ECC 5.0 – which comprises all subcomponents shown in Figure 5-1, inside the ECC 5.0 box.
WFM Core requires a separate license.
Depending on the key capabilities or business processes you intend to deploy, you can install the add-ons shown within the frame “Add-ons based on NetWeaver ABAP” explicitly. Install all add-ons using the SAINT tool.
The components included in the Java Web Applications frame are independent J2EE components, combined in one single installation tool as ERP Java Components. Therefore, if you want to install one (or more) of these components, the ERP Java Components installation is required, which is performed by the SAPinst tool.
ABAP Components Additional Components
ECC 5.0 Mobile
mySAP ERP 2004 Software Components
SAP SRM
SAP SRMServer 5.0
Frontend
SAP ITS 6.20
SAP BusinessConnector 4.7
SAP Solution Manager 3.1
SAP Solution Manager 3.1
Mobile Sales forERP (MRS) 2.0
Mobile Time Sheet 1.6
Mobile Travel Expenses 1.6
Mobile AssetManagement 2.5
Mobile Direct Store Delivery 2.0
LSOOP 3.8 Offline Player
LSOAE 3.0
LSOAE 3.0
NetWeaver '04Additional Components
PI 2004_1_500
EA-GLTRADE500
EA-IPPE 300
EA-RETAIL 500
EA-PS 500
EA-HR 500
EA-FINSERV500
EA-DFPS 500
EA-APPL 500
SAP_HR 500
SAP_APPL 500
Java Components
Add-ons basedon NW ABAP
LearningSolution 3.0(Frontend)
BI CONT 3.5.2
WFM Core110_640
eProject Suite3.1
Catalog ContentManagement 1.0
E-Recruiting 3.0
FINBASIS 3.0
Java WebApplications
SAP XSS 5.0
Biller Direct 3.0
IPC Web App 4.0
ISA WAC 4.0
LSO ContentPlayer 3.0
Internet Pricing &Configurator (J2SE)
IPC 4.0
Portal Content
BusinessPackage
XI Content
XI Content forApplications
NW '04 Java StackNW '04 ABAP Stack
Note: Some industry solution add-ons have been integrated into SAP ECC 5.0. For more information about this topic, see SAP note 700778.
Chapter 5. Installation of the mySAP Business Suite 111
To see what is inside the NetWeaver ´04 Additional Components box, refer to Figure 4-4 on page 76.
Integrating other SAP Business Suite components with SAP ECC 5.0You can integrate other mySAP Business Suite applications components with SAP ECC 5.0, for example, mySAP CRM, mySAP SCM, and so on, provided that you have the required license. The R/3 Plug-in enables this integration. R/3 Plug-in releases are downward compatible with all releases of the SAP components still in mainstream maintenance. Therefore, you can also integrate lower releases of these components, which means that existing business scenarios are still available after upgrading to SAP ECC 5.0.
For more information, refer to the topics Integration of SAP R/3 / Enterprise and SAP Components → SAP ERP Central Component at:
http://service.sap.com/r3-plug-in
mySAP ERP system landscapeThe mySAP ERP solution consists of ABAP and non-ABAP components. With certain constraints, you can install many of these components on a single host, provided you fulfill certain prerequisites. This section provides information about how to set up a minimal landscape, in which all of the key functional areas can be deployed.
Several possibilities exist to distribute these components among various hosts. The distribution depends on many factors such as sizing, security, hardware, and so on. In principle, you can choose almost any distribution of components to hosts between the minimal system landscape (described in this section) and a maximum distributed landscape, where every component runs on its own (or even multiple) hosts.
If you plan to implement a minimal landscape, you must know which business processes you want to run and then install the components you require for those business processes only. Therefore, it may not be necessary to install all the components described in this section.
We strongly recommend that you use a minimal system landscape for test and demonstration purposes only.To ensure performance, scalability, high availability and security, do not use a minimal system landscape as your production landscape.
For further information about setting up production system landscapes, see the SAP Service Marketplace at:
http://service.sap.com/ti
Establishing your system landscapeIn order to establish your system landscape, consider the following points:
� You must provide sufficiently sized servers. Technically speaking, with sufficiently sized hardware, it is possible to install all components on a single server. However, because of performance requirements, we recommend that you use a minimum of three servers. For information about hardware sizing, see the SAP Service Marketplace at:
http://service.sap.com/sizing
� The XI installation requires an add-in installation of SAP J2EE 6.40. In addition, the system must be Unicode.
� The components ADOBE DOCUMENT SERVICES 1.0 (ADS), Enterprise Portal 6.0, Exchange Infrastructure 3.0, and Search and Classification (TREX) 6.1 require a large amount of memory and make substantial demands on the host performance of the CPU. If
112 An Overview of Installing SAP Applications on System i Models
you want to implement ADS, EP 6.0, XI, and TREX in a minimal landscape, consider the hardware sizing recommendations provided in the previously.
� Keep yourself informed about the supported platforms for each component you want to install. Some components can feature platform restrictions. For more information, refer to the SAP Service Marketplace at:
http://service.sap.com/platforms
� Because of high performance and memory demands, we recommend that you install ADS, Enterprise Portal (EP), and TREX on separate hosts for production use.
� An add-in installation of SAP Enterprise Portal is currently supported for demonstration, training, and test systems. If you want to install SAP EP in the same system as SAP ECC for a production environment, see the following point.
� For Business Information Warehouse reporting purposes, you should reserve a dedicated back-end client. In this client, activate BI CONT as required.
Operating Business Information Warehouse and SAP ERP Central Component (SAP ECC) in the same system and in a production environment is solely supported on a project basis. If you want to implement this setup, contact SAP.
The same restriction applies for the joint installation and production operation of SAP Enterprise Portal with SAP ECC or SAP XI with SAP ECC on a shared SAP Web Application Server. If installed in a shared system, a common client for SAP BW 3.5 and SAP ECC 5.0 is not supported. SAP XI must also be set up in a dedicated client.
� In a minimal landscape setup, because a low number of users is assumed, you can manage these users by defining a User Store or User Management Engine (UME) client in the ERP Central Component system. This client makes all users known to J2EE, the Enterprise Portal, and the Exchange Infrastructure (XI). To this end, users are created in the UME client and assigned the role SAP_J2EE_GUEST.
� If you install IPC on the main server, you should install an additional database for it. This is a requirement of the Internet Sales scenario.
Figure 5-2 on page 114 shows an example of a minimal system landscape for mySAP ERP.
Chapter 5. Installation of the mySAP Business Suite 113
Figure 5-2 Example of a minimal mySAP ERP system landscape
As stated in 5.2.1, “mySAP ERP components” on page 110, you cannot install the constituent parts of SAP ECC 5.0 individually. In contrast, you can install all add-ons displayed within the frame Add-ons based on NW ABAP individually, using the SAINT tool.
The Java Web Applications shown in Figure 5-2 are essentially independent J2EE components, combined in a single installation as ERP Java Components. Install the ERP Java Components using the SAPinst tool. If you want to use any of the Java Web Applications shown in Figure 5-2, then you must use the ERP Components DVD.
All SAP NetWeaver components are part of the ERP solution shipment. The installation sequence for these components is explained in the next section.
Certain business processes described in the next sections require the use of Internet Transaction Server 6.20. For additional information, see the SAP Service Marketplace under the topic SAP note 741821 at:
http://service.sap.com/notes
For business processes that require SAP SRM Server (Supplier Relationship Management), we recommend that you use a separate server. On this server you can also install, for example, SAP Catalog Content Management, SAP Business Connector, ADS, SAP Content Server, and IPC.
EP 6.0 Host
SRM HostERP Host
ABAP Components Java Components
Java J2EEComponents
SAP XSS 5.0
Biller Direct 3.0
IPC Web App 4.0
ISA WAC 4.0
LSO ContentPlayer 3.0
XI Content
XI Content forApplications
Web AS ABAP 6.40
SAP ECC Add-ons basedon NW ABAP
LearningSolution 3.0(Frontend)
BI CONT 3.5.2
WFM Core110_640
E-Recruiting 3.0
FINBASIS 3.0
SAP ECC 5.0eProject Suite
3.1
SEM-BW 4.0
BW Components
XI Components
RDBMSTREX 6.1
IPC 4.0RDBMS
Web AS ABAP 6.40
Catalog ContentManagement 1.0
SAP SRM Server 5.0
Web AS Java 6.40
Web AS Java 6.40
Adobe DocumentServices 1.0
RDBMSSAP ITS 6.20
SAP BusinessConnector 4.7
IPC 4.0
SAP ContentServer 6.30
RDBMS
Web AS Java 6.40
Business Packagesfor Applications
Portal Platform 6.0
Web AS Java 6.40
RDBMS
114 An Overview of Installing SAP Applications on System i Models
1. Choose your basic system variant and decide how you want to distribute the SAP system instances:
– ABAP System– JAVA System– ABAP + JAVA System
2. Check the SAP system components:
– Central Instance– Central services instance– Database instance– Dialog instance– Gateway instance– Front ends
3. Before you install your SAP system, you need to know how to manage your user data.
This is especially important if you have an existing system landscape and you have to decide which system is your primary user management system. For more information, see the documentation Integration of User Management in your System Landscape in SAP Library → Security → SAP NetWeaver Security Guide → User Administration and Authentication.
4. Ensure that the SAP Solution Manager is available in your SAP system landscape.
By using SAP Solution Manager throughout the life cycle of your mySAP ERP solution, you can achieve faster implementation and more efficient operation of your system. The SAP Solution Manager provides you with all the implementation and upgrade content for commonly used standard processes. In addition, projects become more transparent because you have the up-to-date central project documentation all in one place at any time.
To make sure that this application management platform is available, you require an SAP Solution Manager system (minimum requirement 3.1 SP20) to perform any upgrade or installation of mySAP ERP 2004.
During the installation process, an SAP Solution Manager system is required to generate the SAP Solution Manager key for the installation of SAP ECC. Without this key, the installation process cannot continue. You can generate the required key with SAP Solution Manager Release 3.1 SP20 or SAP Solution Manager Release 3.2 SP4.
Ensure that an SAP Solution Manager is available for your SAP ECC system. If required, you can install the SAP Solution Manager as described in the documentation: Installation Guide → SAP Solution Manager 3.2 on OS: Database on the SAP Service Marketplace under the topics SAP Components → SAP Solution Manager → Release 3.2 at:
http://service.sap.com/instguides
5. Identify the basic SAP system parameters:
– SAP System-ID SAPSID– Database ID DBSID
On System i models the DBSID = SAPSID
– Instance Number– Instance Host– Message Port
36nn where nn is the instance number
– ABAP RFC user password
Chapter 5. Installation of the mySAP Business Suite 115
– SAP Solution Manager key– RFC user password of the System Landscape Directory (SLD), if using SLD– Gateway Host on which the gateway instance of the SLD is running, if using SLD– SAP system client in which the ABAP RFC user exists, if using SLD– ASP for the SAP database– ASP for the journal receiver of the SAP database
6. Decide whether you want to use SAP SLD.
The SAP SLD is the central information provider for your system landscape. You can use SAP Web AS for SLD in the following ways:
– As an SLD server, that is, SAP Web AS is the system where the central SLD is located. For this, you need a Java or an ABAP + Java system. You have to configure and activate the SLD server after installation.
– As an SLD client, that is, you connect SAP Web AS to an existing SLD. An SLD client can be either an ABAP, Java, or ABAP + Java system.
For more information about the installation and configuration of SLD, see the documentation Post-Installation Guide: SAP System Landscape Directory on SAP Web AS 6.40 on the SAP Service Marketplace under the topics Installation → SAP Web AS at:
http://service.sap.com/instguidesnw04
The following planning activities are optional and only apply if you want to perform one of the following:
� Installation of multiple SAP systems on a single System i server
� Use the Lightweight Directory Access Protocol (LDAP) for SAP Logon for the Microsoft Management Console (MMC).
LDAP can also be used for other purposes (for example, the LDAP Connector). If you do not want to use LDAP for SAP Logon or MMC, no LDAP-specific installation steps are required now.
Follow these steps to prepare for installing mySAP ERP:
1. Check the general information hardware and software requirements. For example:
– Check the HW sizing.– Check the i5/OS and SAP release level including patches.
For supported operating system releases, see the SAP Service Marketplace under the topic Product Availability Matrix (PAM) at:
http://service.sap.com/platforms
– Validate network requirements.
2. Check the hardware and software requirements.
Check the specific installation guide:
– Ready DVD drive and enough temporary disk space for each DVD copied to disk.– Ensure that you have installed the TMKSVR.– Check that the i5/OS release is compatible for your SAP release.– Check that you have installed the required i5/OS license programs.– Check that you have installed all PTFs from the IBM/SAP info APAR.
116 An Overview of Installing SAP Applications on System i Models
– Check that you have enough disk space available.– Check that you have a valid front end.– Check the correct DB name and TCP/IP host name.
3. Check Qp2Term, Qp2Shell, and the OS/400 Portable Application Solution Environment (PASE).
The OS/400 PASE delivers the similar UNIX command line flexibility as the Qshell interpreter. It is more than just a shell interpreter, it is also an entire programming environment based on the AIX Application Binary Interface.
The Qp2Term program runs an interactive terminal application on the System i server, similar to the Qshell command line. The Qp2Shell programs allow a non-interactive shell script or application to be executed in OS/400 PASE. Qshell accomplished these features by a command wrapper which either starts the Qshell command line, or executes scripts non-interactively.
Call the OS/400 Qp2Term and Qp2Shell programs using the OS/400 CALL mechanism. We recommend that you use the OS/400 Qp2Term instead of QShell.
If not already installed, install option 33 of the license program 5722-SS1, the OS/400 PASE. For more information about Qp2Term, Qp2Shell and installing the OS/400 PASE, refer to:
You must install the Qshell on your System i server. This gives you a greater flexibility in dealing with stream files because you can use a large set of utilities that are common on UNIX systems, for example, grep, tail, or ls. In addition, Qshell is compatible with ksh scripts in UNIX. The following is the procedure:
– Install option 30 of the Qshell Interpreter (license program 5722SS1).
For more information about Qshell use the keywords “Qshell” to search the IBM InfoCenter at:
In OS/400 V5R2, you must add the time zone environment variable PASE_TZ to your System i configuration to ensure the correct resolution of time zones. If you have not configured the time zone variable correctly, you get the error message shown in Example 5-1:
Example 5-1 Time zone variable
ABAP runtime errors ZDATE_LARGE_TIME_DIFFOccurred on 2004/01/15 at 17:46:49Large time difference between application server and database.What happened?The R/3 System synchronizes the times of the database and application server regularly.As a result, a very large time difference was detected between these two systems
To set the time zone environment variable, perform the following steps:
a. Log on to your System i server as user QSECOFR.
b. Enter command WRKENVVAR and choose F4.
c. The Work with Environment Var (WRKENVVAR) window opens. For the Level parameter, specify *SYS and choose ENTER.
d. The Work with Environment Vars (*SYS) window opens. Under Opt, enter 1, and under Name, add the PASE_TZ environment variable. Choose ENTER.
e. The Add Environment Variable (ADDENVVAR) window opens. In the Initial value field, enter the required time zone environment variable.
For the (complicated) format and value of the time zone environment variable refer to:
• i5/OS online help• SAP note 697353
7. Modify the startup program QSTRUP:
a. Retrieve the default QSTRUP start program with the command RTVCLPGM, normally in QGPL/QCLSRC.
b. Adapt (Edit) the QSTRUP start program, normally with EDTF.
c. Create the CL-Program with CRTCLPGM, normally in QGPL/QSTRUP.
QDATE and QTIME Check and set to actual date and time (this is important)
QJOBMSGQFL *WRAP Important (otherwise the system will stop during runtime)
QPFRADJ 0 After adjusting the pool definitions and all other System i system values
QSTRUPPGM Typically this is program QSTRUP in library QGPL
QAUTOCFG 1
QBASACTLVL Should be calculated to the number of relevant SAP work processes multiplied by 1.20.We recommend that the value be increased.
Note: Refer to the installation guide for a discussion of these i5/OS system values.
System i system value Value Remark
118 An Overview of Installing SAP Applications on System i Models
d. Adapt the i5/OS system value QSTRUPPGM before the next IPL.
As in SAP Web AS 6.30 there can be two libraries required to store data. For ABAP components, database objects (for example, tables, indexes, and views) are stored in library R3SIDDATA as in previous releases. For Java components, the equivalent database objects are stored in library SAPSIDDB.
Before you run SAPinst to install your SAP system, you must decide how you want to distribute the SAP system data, that is, the corresponding libraries where the data resides and their associated journal receiver libraries on ASPs. Depending on the installation type, the following libraries are found on the system after the installation:
– For ABAP systems, SAPinst asks for the ASP in which it should install the new libraries for ABAP.
• R3SIDDATA
This is the data library for ABAP. It already exists on the system.
• R3SIDJRN
This is the journal receiver library that is associated with R3SIDDATA. It already exists on the system.
– For ABAP+J2EE systems (Add-In):
• R3SIDDATA
This is the data library for ABAP. It already exists on the system.
Note: Starting with i5/OS V5R3, the time zone is controlled by system value QTIMZON, and the environment variable is set automatically by the initial program.
You can find more details about the time zone settings on System i configurations in SAP note 391658 - iSeries: Daylight saving time/standard time change.
Chapter 5. Installation of the mySAP Business Suite 119
• R3SIDJRN
This is the journal receiver library that is associated with R3SIDDATA. It already exists on the system.
• SAPSIDDB
This is the data library for Java. It is created by SAPinst.
• SAPSIDJRN
This is the journal receiver library that is associated with library SAPSIDDB. It is created by SAPinst.
If you are installing an SAP Web AS - J2EE Add-In, we recommend that you use the same ASP for the data libraries of ABAP components (R3SIDDATA) and Java components (SAPSIDDB), and the same ASP for the two associated journal receiver libraries (R3SIDJRN and SAPSIDJRN). This can be helpful for future enhancements.
Keep the libraries that contain the data objects and their associated journal receivers in different ASPs. This enables data recovery after disk failures and improves performance.
Each data library uses its own journal that is located in the respective data library. For more information, see SAP note 654801. Figure 5-3 is an example of how the libraries mentioned previously are distributed.
Figure 5-3 Example: Distribution of SAP libraries to the i5/OS ASPs
9. Add a user ASP.
SAP recommends that you keep your journal receivers in a separate user ASP.
SAP also recommend that you allow 4 GB to 72 GB (the minimum size is 4 GB) for your user ASP. If you have a very busy system, you can allow more disk units. However, SAP recommends that you select at least 2 disks and in a busy system 4 - 6 disks. You can increase the size later if you find that journal receiver switches are taking place too frequently or your user ASP is being filled up too quickly. This issue is discussed in more detail in the “Disk” chapter of Implementing SAP Applications with System i and i5/OS, SG24-7166.
Note: The statement that database library and journal receivers should be in separate ASP's is not quite accurate for development or test systems. Also, when using high availability solutions, it is not really necessary to have separate ASP's.
Having too few disk arms in the receiver ASP can result in a bottleneck, so a separate ASP for receivers should only be configured if it is required, and if sufficient disk arms can be provided.
ASP 1
R3<SID>DATA
QSQJRN *JRN
SAP<SID>DB
QSQJRN *JRN
ASP 2
R3<SID>JRN
... *JRNRCV
SAP<SID>JRN
... *JRNRCV
120 An Overview of Installing SAP Applications on System i Models
To check the status of a user ASP, perform the following steps:
a. Enter STRSST (Start System Service Tools).b. Enter option 3 (Work with disk units).c. Enter option 2 (Work with disk configuration).d. Enter option 1 (Display disk configuration).e. Enter option 2 (Display disk configuration capacity).
You can see whether a user ASP exists and, if so, make sure that it still contains enough space (see the recommended values given previously).
To add a user ASP, perform the following steps:
a. Perform a manual Initial Program Load (IPL) of your System i server.
i. Set the mode to manual on the control panel.ii. Enter the System i command:
PWRDWNSYS *IMMED RESTART(*YES)
b. Enter option 3 (Use Dedicated Service Tools (DST)) from the menu that opens.
c. Sign on by entering your DST user and password.
d. Enter option 4 (Work with disk units).
e. Enter option 1 (Work with disk configuration).
f. Enter option 3 (Work with ASP configuration).
g. Enter option 6 (Move units from one ASP to another).
h. Specify the ASP to which you want to move specific units by entering the number of the ASP next to the relevant unit in the column New ASP.
i. Choose ENTER.
j. In the next window, choose ENTER to confirm that you want to continue.
k. The Confirm Move of Units window opens. To confirm your choices, choose ENTER. Moving units take several minutes.
l. Continue the procedure and complete the IPL.
m. Switch back to normal mode.
10.Configure the TCP/IP.
Before configuring TCP/IP, ensure that you have the following information:
– The interface of your System i server to which the Local Area Network is attached.– The IP addresses of your System i server, subnet mask, and router or gateway.– The local domain name.
Note: You can encounter problems during installation if you have an existing user ASP that contains journal receivers or save files belonging to libraries that are located in another ASP. In this case, you cannot create additional libraries in this user ASP and the installation fails.
If you have sufficient disk space, we recommend that you work around this problem by adding a second user ASP (for example, ASP 3). The alternative is to leave the journal receivers in the system ASP. However, SAP does not recommend this for security and performance reasons.
For detailed information, see the IBM documentation OS/400 Backup and Recovery, SC41-5304.
Chapter 5. Installation of the mySAP Business Suite 121
– The System i host name.– Decide on your System i host name. The host name cannot be longer than eight
characters.
a. To call the TCP/IP configuration menu, enter the CFGTCP command.
Enter option 1 (Work with TCP/IP interfaces). You need at least two entries:
• One for the loopback entry • One for the IP address of your System i server
The loopback address always has the IP address 127.0.0.1, subnet mask 255.0.0.0, and line description *LOOPBACK.
To add an entry, enter option 1 (ADD) and choose ENTER. Add entries for the first three fields and accept the default values for the other fields.
b. If the route to the remote host, in this case the PC workstation, is through a gateway or if the remote host resides in a different network or subnetwork to the local host, you need to configure a route.
Enter option 2 in the Configure TCP/IP menu to work with the TCP/IP routes and add an entry containing your router’s IP address.
c. If the domain name is empty (and your System i server is not in a domain), enter your host name a second time in place of the domain name (that is, 'host_name.host_name') 'IBAS03.IBAS03'
If you have one or more remote name servers, you need to define the IP address here. Note that the Host name server priority must be set to *LOCAL.
11.You have test the TCP/IP connection. Before proceeding with the kernel installation (that is, the installation of the executable programs), check that this TCP/IP connection has been set up correctly. To test the connection, perform the following steps:
a. Enter the ping command (verify TCP/IP connection) specifying your own system as the Remote system.
b. Do this twice, once specifying only host_name, and once host_name.domain_name. For example, we assume that the host name is as0008 and the domain name wdf.sap-ag.de. In this case, your entries are as follows:
ping 'IBAS03' ping 'IBAS03.basycs.com'
Note: The TCP/IP configuration on System i configurations is case-sensitive. Do not enter your host name first in uppercase and then in lowercase. It is important that you enclose your host name entry in single quotation marks. Otherwise, System i servers read the characters as uppercase characters.
Remark: An IP address is a unique address in a TCP/IP network for a particular System i server. A subnet mask is a mask used to divide a single network address into multiple logical networks.
Note: It is important that you enclose your host name entry in single quotation marks. If you do not, the System i server reads the characters as uppercase characters.
122 An Overview of Installing SAP Applications on System i Models
c. After installing the SAP system kernel, check the TCP/IP connection again with the WRKLNK command:
'/QFileSvr.400/host_name'
Your host name is displayed under Object link, for example, IBAS03 for the host in the example given previously.
For more information about TCP/IP configuration, see the IBM documentation TCP/IP Configuration and Reference, SC41-5420.
12.Adjust the relational database name.
Perform the following steps to adjust the local relational database name (RDB name) so it is the same as the TCP/IP host name.
a. Log on to your database host as user QSECOFR.
b. To display your TCP/IP host name, enter the CHGTCPDMN command and choose F11.
c. Search for the contents of HOSTNAME. This is your TCP/IP host name.
d. Before you can adjust the local RDB name, you have to check whether the local RDB name exists. To do this, enter the WRKRDBDIRE command.
Depending on the outcome, proceed as follows:
• If an entry for RDB name exists and you want to adjust the name to the TCP/IP host name tcp_host_name, enter the following command:
On every System i configuration where English is not the primary language, you must install English as the secondary language library. This is necessary for SAP to be able to provide support.
To check if English is already installed on your System i model as a secondary language, enter WRKLIB QSYS29* on the System i command line. If one of the following secondary language libraries is displayed, you have already installed English as a secondary language library: QSYS2924, QSYS2938, QSYS2959, or QSYS2984.
If it is not installed, perform the following steps:
a. On the System i command line, enter GO LICPGM.b. Enter option 21 (Install secondary languages).c. Enter option 1 to select any of the following libraries: QSYS2924, QSYS2938,
QSYS2959, or QSYS2984.
14.You install additional languages.
This is an optional and hardware-independent task. For more details, refer to the installation guide.
Chapter 5. Installation of the mySAP Business Suite 123
15.Set up the transport directory.
This is a hardware-independent task. The normal standard directories are created by the installation procedure. For more details, refer to the installation guide.
To change the /usr/sap/trans to /sapmnt/trans of any other host, proceed as follows:
a. Log on to the System i host as a user with administrator rights similar to QSECOFR.b. To link to another host, enter the following command:
CHGR3SHLOC NEWHOST (hostname)
16.Prepare a Windows user account and System i user profile.
We have already described this task in the SAP NetWeaver installation steps, see 3.2.1, “Preparing a Windows user account and a System i user profile” on page 42.
17.Install TMKSVR and create an installation share.
We have already described this task in the SAP NetWeaver installation steps, see 3.2.2, “Preparing the Windows PC for SAPINST” on page 43.
18.Install the SAP front-end software.
For the installation, make sure that you have installed the front-end software on at least one host machine in your system environment. To simplify administration of your SAP system, we recommend that you do this on the central instance host.
With the SAP front-end installation software, SAPSetup, you can optimize the deployment of SAP GUI to thousands of clients. You can easily tailor installation packages to match your requirements, distribute patches, and set up automatic update processes for your clients.
For more information about installing the front-end software, see the documentation on the SAP Service Marketplace under the topics SAP Web AS → SAP Web AS 6.40 SR1 and Related Documentation → SAP Front End Installation at:
http://service.sap.com/nw04installation
– SAP Front End Installation Guide (English version)– SAP Frontend-Installationsleitfaden (German version)
19.Generate the SAP Solution Manager key.
You have to generate the Solution Manager key because SAPinst prompts for it during the input phase of the installation process.
a. In your SAP Solution Manager, call the System Landscape Solution Manager with the transaction SMSY.
b. Choose Other object....c. Set the indicator System.d. From the input help, choose the system on which you want to install your SAP system.e. Choose Generate Installation/Upgrade Key.f. Enter the requested information. If necessary, change the default values.g. Choose Generate Key.
The system displays the key. For more information, see also SAP note 805390.
20.Check the general information about preparing the system for SAPINST.
The Java-based SAPinst graphical user interface (GUI) called SAPinst GUI requires a Java Development Kit (Java 2 SDK, Standard Edition) with graphical capabilities (AWT, Swing). Since System i models do not provide a GUI, you must install the JDK on a Windows host to perform the installation with SAPinst.
You have to prepare your system for the SAPinst GUI. The installation tool SAPinst uses the Java-based graphical user interface SAPinst GUI, regardless of your system variant.
124 An Overview of Installing SAP Applications on System i Models
Therefore, you always need a JRE on the host where SAPinst is to run. The JRE is included in the JDK.
21.Prepare the system for the SAPinst GUI.
As part of preparing the system for SAPinst you need to prepare for the SAPinst GUI. This includes the installation of the JRE:
a. Check the JRE versions that are released for SAP systems on the SAP Service Marketplace under the topics Product Availability Matrix → SAP NetWeaver → SAP NetWeaver ´04 → JSE Platforms at:
http://service.sap.com/platforms
b. Ensure that a valid JRE version is installed on every host on which you want to install an SAP instance with the J2EE Engine, as follows:
• If JRE is not already installed
Since JRE is not part of the SAP shipment, you need to download and install it. JRE is part of JDK. For the recommended JDK versions for your platform and how to obtain them, see SAP note 709140.
• The JRE is already installed
Check the installed version of the JRE by entering:
java - version
22.Prepare the installation DVDs.
We recommend that you make all the required DVDs available in parallel. The Export DVDs must be available in parallel.
a. Identify the required DVDs for your installation as detailed in the following list and keep them separate from the remaining DVDs. This helps you to avoid mixing up DVDs during the installation.
• For the installation of a Unicode SAP system, the Unicode SAP kernel DVD is required.
• For the installation of a non-Unicode SAP system, the non-Unicode SAP kernel DVD is required.
b. Use one of the following methods to make DVDs available in parallel:
Before the installation:
• Have sufficient DVD drives.• Copy DVDs manually to local hard disks.
During the installation:
Use the SAPinst CD Browser dialog, that is, you can check the entered location and then copy the entire DVD to the path you entered in the field Copy Package to.
These preparation activities are optional and only apply, if you decided to use LDAP for SAP Logon or Microsoft Management Console (MMC), and you have to prepare the active directory for use with the SAP system.
5.2.4 mySAP ERP installation activities
The next step is to install an SAP instance using SAPinst.
Reminder: We discussed the concepts, the procedures, and the installation steps in detail in 3.2, “Installation steps for the SAP Web Application Server 6.40” on page 41.
Chapter 5. Installation of the mySAP Business Suite 125
Overall installation sequenceThe following table describes the installation steps for a sample minimal landscape. It also describes the suggested sequence of installation steps that you should perform to obtain a full-fledged system landscape.
Before you start the installation, it is imperative that you know which components are required for the business processes you plan to use. We recommend that you do not install all components as a matter of course. Only install those components that are required for the business processes you use.
For more information about the required components, review the software component matrix for each key capability.
During the installation process an SAP Solution Manager system is required to generate the SAP Solution Manager key for the installation of mySAP ERP 2004. Without this key, the installation process cannot continue.
Installation sequence: ERP Host1. Install the SAP ECC 5.0 system, which includes PI 2004.1, SAP HR, and the Enterprise
Extensions, as shown in Figure 5-2 on page 114. The installation also includes the SAP NetWeaver components SAP_BASIS 640, SAP_ABA 640, SAP_BW 350, and PI BASIS 2004_1_640.
For more information, see the SAP Service Marketplace under the topics mySAP ERP 2004 → SAP ECC 5.0 at:
http://service.sap.com/erp-inst
2. Install the ABAP Add-ons, including BI CONT 3.52 (or 3.53), FINBASIS 300, ERECRUIT 300, SEM-BW 400, LSOFE 300, CPROJECTS 310, and WFMCORE 110_640. Note that FINBASIS is a technical prerequisite for SEM-BW. WFMCORE requires a separate license.
For more information, see the SAP Service Marketplace under the topics mySAP ERP 2004 → ERP ABAP Add-On Components at:
http://service.sap.com/erp-inst
3. Install SAP Web AS Java 6.40. If required, install the J2EE in add-in mode (see the following). Set heap size to 1024 MB and PermSize to 256 MB.
If you plan to operate your SAP Exchange Infrastructure on the SAP ERP Central Component host or if you plan to install your Java Web Applications on this server, you should install SAP J2EE in the add-in mode.
(For production use, however, you should operate a separate SAP XI system, and depending on your requirements, a separate J2EE server in stand-alone mode, where your Web applications are installed.)
4. Install the BW Java components. Both components, MMR 3.50 = Metamodel Repository (MMR) 3.50 and Universal Data Integration (UDI) 3.50, are delivered together, in a single installation. The BW Java components are optional for the mySAP ERP key capabilities.
Note: A J2EE add-in installation is mandatory for the XI Java Components. For all other components (Web Applications, Enterprise Portal), we recommend that you install a stand-alone J2EE. Refer to the topics Installation → Installation Guide Web AS Java 6.40 <Platform>: <Database> at:
http://service.sap.com/nw04installation
126 An Overview of Installing SAP Applications on System i Models
For more information, see the SAP Service Marketplace under the topics Installation Guide → SAP Business Information Warehouse 3.5 at:
http://service.sap.com/nw04installation
5. Install SAP Exchange Infrastructure (XI) 3.0 Java Components and subsequently configure the local SLD. As stated previously, the XI Java Components require an add-in installation of the J2EE. If you operate a separate SAP XI system, you can elect to run a central SLD on a separate server.
For more information, see the SAP Service Marketplace under the topics Installation Guide → SAP Exchange Infrastructure 3.0 at:
http://service.sap.com/nw04installation
6. Install Search and Classification (TREX) 6.1. For performance reasons, this component is often operated on a separate server. For more information, see the SAP Service Marketplace under the topics Inst. Guide → Search and Classification (TREX) at:
http://service.sap.com/nw04installation
Alternatively, see the SAP Service Marketplace under the topic SAP note 745115 (Installing TREX 6.1 SP4) at:
http://service.sap.com/notes
7. Install Internet Pricing and Configurator (IPC) 4.0, along with a database for it. This component is used for certain Internet sales scenarios, but not for operational procurement with SAP SRM. For more information, see SAP Service Marketplace under the topics mySAP ERP 2004 → ERP Java Components → IPC 4.0 Server Installation Guide at:
http://service.sap.com/erp-inst
8. Install the following ERP Java Applications on the SAP J2EE Engine:
– FSCM Biller Direct 3.0– XSS 500– Internet Sales (ISA WAC) 4.0 for ERP– IPC Web Application 4.0– LSO Content Player 3.0 (for SAP Learning Solution)
These Java components are combined in a single installation as ERP Java components.
Refer to the installation guide for the ERP Java Components under the topics mySAP ERP 2004 → ERP Java Components at:
http://service.sap.com/erp-inst
9. Optional: Install SAP GUI 6.20 or 6.40. This component can be installed at any time, since it is installed on the clients.
Note: Important restrictions apply to a minimal setup. For example, regarding EBPP/payments, a large number of open items can cause a high consumption of memory and CPU capacity. For more information, see the SAP Service Marketplace under the topic SAP note 741821 (Release restrictions for SAP ERP 2004) at:
http://service.sap.com/notes
Chapter 5. Installation of the mySAP Business Suite 127
Installation sequence: Portal Host1. Install SAP Web AS Java 6.40. Install the J2EE in stand-alone mode (see the following).
Set heap size to 1024 MB and PermSize to 256 MB. Refer to the topics Installation → Installation Guide Web AS Java 6.40 <Platform>: <Database> at:
http://service.sap.com/nw04installation
2. Install SAP Enterprise Portal (EP) 6.0, including CMC, if required. Because EP 6.0 currently does not support an add-in installation, and because it requires a large amount of memory and makes substantial demands on the host performance of the CPU, install this as well on a separate server.
For installation information, consult the SAP Service Marketplace under the topics Installation → SAP EP at:
http://service.sap.com/nw04installation
3. Install the required business packages, which are also referred to as Portal Content. You can download them from the topics Download → Installations and Upgrades → Entry by Application Group → SAP Application Components → SAP ERP → SAP ERP 2004 → SAP Business Packages at:
http://service.sap.com/swdc
For more information about business packages, see the SAP Service Marketplace at:
http://service.sap.com/ep-content
Installation sequence: SRM HostIf you desire a minimal setup, you can install SAP SRM Server 5.0 and other technical components on a third server, that is, separate from the ERP and the Enterprise Portal hosts. This approach succeeds in minimizing the demands that are placed on the ERP host. If you choose to pursue this approach, ensure that you select a platform that is valid for all the components you plan to install.
1. Install SAP SRM Server 5.0.
This installation also includes NetWeaver components SAP_BASIS 640, SAP_ABA 640, SAP_BW 350, and PI BASIS 2004_1_640. For more information, see the SAP Service Marketplace under the topics mySAP ERP 2004 → SRM Server 5.0 → Installation Guide - SAP SRM Server 5.0 operation system at:
http://service.sap.com/erp-inst
2. Install SAP Catalog Content Management 1.0 (CCM 100) by using the SAINT tool. For more information, see SAP the Service Marketplace under the topic SAP note 705060 (CCM 100 Installation with SAINT) at:
http://service.sap.com/notes
3. Install SAP Web AS Java 6.40. If required, install the J2EE in add-in mode. You can also choose to install this J2EE in stand-alone mode. (In general, we recommend a stand-alone installation mode). To maximize performance, set heap size to 1024 MB and PermSize to 256 MB.
Note: SAP GUI is mainly required for administrators and power users. Moreover, certain mySAP ERP processes, which are not yet entirely portal-based, still require SAP GUI. The installation of front ends for the SAP system is described separately in the SAP Front End installation guide. Refer to this guide under the topics Installation and Upgrade Guides → SAP Components → SAP Front End Components at:
http://service.sap.com/instguides
128 An Overview of Installing SAP Applications on System i Models
For more information, see the SAP Service Marketplace under the topics Installation → Installation Guide Web AS Java 6.40 <Platform>: <Database> at:
http://service.sap.com/nw04installation
4. Install Adobe Document Services 1.0, and note the platform restrictions. For more information, see the SAP Service Marketplace under the topics Installation → Dev Env. → Installation Guide – Adobe Document Services at:
http://service.sap.com/nw04installation
5. Install Internet Pricing and Configurator (IPC) 4.0. This IPC is used for certain scenarios, such as procurement with SAP SRM, but not for Internet sales. An additional database is not required. In contrast, see installation step 7 of the ERP host.
For more information, see the SAP Service Marketplace under the topics mySAP ERP 2004 → ERP Java Components → IPC 4.0 Server Installation Guide at:
http://service.sap.com/erp-inst
6. Install SAP Business Connector (SAP BC) 4.7, Core Fix 3 (minimum). For more information, see the SAP Service Marketplace under the topic SAP note 571530 (Availability of SAP Business Connector) at:
http://service.sap.com/notes
7. Install SAP ITS 6.20. Normally, in a production landscape you can operate this ITS on a separate server. For more information, see the SAP Service Marketplace under the topic Downloads at:
http://service.sap.com/sap-its
8. Install SAP Content Server 6.30. Note that an SAP DB is required for this component. For more information, see SAP Service Marketplace under the topics SAP Components → SAP Content Server → Release 6.30 at:
http://service.sap.com/instguides
9. Install SAP GUI 6.20 or 6.40. You can install this component at any time, since it is installed on the clients. Note that SAP GUI is mainly required for administrators and power users. Moreover, certain mySAP ERP processes, which are not yet entirely portal-based, still require SAP GUI.
The installation of front ends for the SAP system is described separately in the SAP Front End installation guide. Refer to this guide under the topics Installation and Upgrade Guides → SAP Components → SAP Front End Components at:
http://service.sap.com/instguides
5.2.5 mySAP ERP post-installation activities
The following are the ERP post-installation activities.
1. Grant authorizations for operating system collector programs. If your primary language is not English, you must enable SAP Support to activate the newly installed secondary language. For more information, see “Installing the English secondary language library” on page 61.
b. Check that there are no active jobs for the instance that you have just installed. To do this, proceed as follows:
i. For the central services instance, the central instance, and all dialog instances, enter the following command:
WRKACTJOB SBS(R3_instance_number)
You can find the numbers of the installed instances in the directory /usr/sap/SID on every host for which you installed instances for in this system. The instances are abbreviated as follows:
- Central instance: DVEBMGSnn (ABAP), JCnn (Java)
- Central services instance: SCSnn
- Dialog instance: Dnn (ABAP), Jnn (Java)
ii. If a job is displayed, stop it with the command:
ENDSBS SBS(R3_instance_number) OPTION(*IMMED)
c. To start the SAP system, enter the STARTSAP command and choose F4.
d. Enter the SAP system ID (for example, C11) and instance number (for example, 90).
Repeat this for each instance that you want to start.
We recommend that you retain the default value *ENV for both SAP system ID. *ENV is replaced by the correct value for the SAP system ID.
Ensure that you start the instances in the correct order. First the central services instance (only exists if you installed J2EE Add-In), then the central instance, and finally all dialog instances.
e. To check whether your SAP system started successfully for every installed instance, enter the following command:
WRKACTJOB SBS(R3_nn)
Every instance runs in its own subsystem R3_nn, where nn is the instance number.
To stop the SAP system:
a. Log on your System i server as SIDOFR or SIDOPR.
b. To stop an SAP system, enter the STOPSAP command and choose F4.
c. Enter the SAP system ID (for example, C11) and instance number (for example, 90).
Repeat this for each instance that you want to stop.
We recommend that you retain the default value *ENV for the SAP system ID. *ENV is replaced by the correct value for the SAP system ID.
Make sure that you stop the instances in the correct order. First all dialog instances then the central instance, and finally the central services instance (only exists if you installed J2EE Add-In). For each stopped instance, the user you used to shut down the system receives a message from the operating system.
3. Log on to the SAP system.
You need to check that you can log on to the SAP system using the standard users. There are two standard users in the SAP system after the installation.
Table 5-3 Initial SAP user and standard passwords after a standard installation
User Initial password Client
SAP* 06071992 000, 066
130 An Overview of Installing SAP Applications on System i Models
Prerequisites: You have already started the SAP system and installed a front end.
During the installation, SAPinst prompts you to change the passwords for these standard users in client 000. If for any reason the SAP* and DDIC users still have initial passwords, you must change their passwords. Otherwise, there is a serious security risk because it is possible for anyone to log on to your SAP system using the initial passwords.
a. Start SAP logon on the central instance host:
• SAP GUI for Windows
On the machine, where you have installed the front end, choose:
Start → Programs → SAP Front EndRelease → SAPlogon
• SAP GUI for Java
Enter the guilogon command from the GUI installation directory:
The SAP logon dialog box appears.
b. Create a logon entry for the newly installed system.
Table 5-4 Logon entry fields of the SAPGUI
For more information, choose F1. When you choose OK, the SAP logon dialog box reappears and now includes an entry for the new system.
c. Double-click the new system entry. The logon window for the SAP system appears.
d. Log on as user SAP* or DDIC.
4. Set up load balancing.
This is a procedure to balance the user logon between the central instance and the application server. Refer to the official SAP documentation, for example, in the SAP Help Portal or SAP Library, where you find online documentation for all SAP application at:
http://help.sap.com
5. Check that the SAP system services are present.
You need to check that the SAP system services are correctly installed. This helps you to solve problems that you might experience when trying to log on or run the system for the first time.
a. Log on to the SAP system.
If you have trouble logging on, or subsequently experience problems trying to run the system, check the following files (“developer traces”) located in the directory \usr\sap\SAPSID\DVEBMGSno\WORK\:
• dev_ms• dev_disp• dev_w0
DDIC 19920706 000
Field Your entry
Description Give a meaningful description, for example, the host name of the central instance or the SAP system ID.
Server Specify the name of the central instance host.
System ID Specify the SAP system ID.
System number Specify the number you entered for the central instance during the installation.
User Initial password Client
Chapter 5. Installation of the mySAP Business Suite 131
The system displays a list of services available for the instance, that is, dialog, update, enqueue, batch, and spool. If you cannot see the services, you can find more information by looking at the files listed previously in the first step.
c. Call transaction SM51 to check all available instances and their services.
The system displays a list of all available instances. If the display is okay, double-click one instance to display the services available for that instance. If the display is empty, you can find more information by looking at the files listed previously in the first step.
d. Call transaction SM21 to check the system log.
6. Install the SAP online documentation.
SAP currently provides an HTML-based solution for the online documentation, the SAP Library. The library includes the application help, glossary, implementation guide (IMG), and release notes. You can display the documentation with a Java-compatible Web browser on all front-end platforms supported by SAP.
Install the SAP online documentation (SAP Library) in your SAP system as described in the README.TXT file contained in the root directory of the online documentation DVD, delivered as part of the installation package.
For other ways to access the SAP library, see the SAP library for an example located at the SAP Help Portal at:
http://help.sap.com/nw04
7. Install the SAP license.
You must install a permanent SAP license. When you install your SAP system, a temporary license is automatically installed. This temporary license allows you to use the system for only four weeks from the date of installation. Before the temporary license expires, you must apply for a permanent license key from SAP. We recommend that you apply for a permanent license key as soon as possible after having installed your system.
If you installed a Java system as a prerequisite for the SAP Enterprise Portal installation, do not install the SAP license now. The license of the SAP Web AS Java system is automatically installed as part of the SAP Enterprise Portal installation.
When you install the SAP Web AS license, a license for the J2EE Engine is installed automatically. The installation procedure of the SAP license depends on the installation that you performed:
– If you installed an SAP Web AS ABAP + Java system or an SAP system based on SAP Web AS ABAP + Java, refer to:
• Solution Life Cycle Management → SAP Licenses → SAP License Keys → SAP License in the SAP Library.
• SAP note 94998 (general)
• SAP note 767123 (especially for the licensing of SAP NetWeaver ´04)
– If you installed an SAP Web AS Java system, refer to:
Solution Life Cycle Management → SAP Licenses → SAP License Keys → Licensing of the SAP J2EE Engine in the SAP Library.
You can install multiple licenses, one for each host running a message server.
8. Remove the SAPinst installation files.
You use this procedure to gain disk space after the installation by deleting the SAPinst. On the System i host, remove the installation directory and its subdirectories, the temporarily
132 An Overview of Installing SAP Applications on System i Models
copied DVDs, the directory \usr\sap\SAPinst\SAPCAR64\ and the library TMKSVR. You can also disconnect from the installation share and remove it from the System i server.
Do not perform this procedure until you have installed all instances of the SAP system on the System i host. Do not delete the log files unless you are sure that you do not need them again. Do not delete log files other than those in the paths given in this section.
The following are the prerequisites:
– You have completed the SAP system installation.– The SAP system is up and running.
a. If you want to remove the SAPinst installation directory, enter the following commands:
del /F /S Mapped_Drive:\usr\sap\sapinst\INSTALL_DIRrmdir /F /S Mapped_Drive:\usr\sap\sapinst\INSTALL_DIR
Ensure that there is no hanging sapinst process from a former interrupted installation on Windows. A hanging sapinst process prevents the file sapinst.exe in the installation path from being deleted.
b. To disconnect the installation share, enter the following command:
net use Mapped_Drive: /DELETE
c. To remove temporary TMKSVR log files, enter the following command:
del %TEMP%\tmksvr*
d. To remove temporary SAPINST files, enter the following command:
del %TEMP%\sapinst_exe*
To check whether your environment variable TEMP is set, perform the following command:
echo %TEMP%
If TEMP is not set, check TMP and TMPDIR. You have chosen one of the three variables: TEMP, TMP, or TMPDIR for your temporary directory. If you do not know where the temporary TMKSVR and SAPINST files are located, use the Windows search tool.
Chapter 5. Installation of the mySAP Business Suite 133
9. Access a remote database.
We recommend that you use 100 MB Ethernet connections to a remote database only for small test environments or in some special circumstances. For production environments, we recommend that you use GB Ethernet or HSL for System i models. Ensure that the complete traffic from the application server to the DB server and vice versa runs by GB Ethernet or HSL, especially if you have 100 MB Ethernet installed as well.
Accessing a Remote Database via TCP/IP sockets
If you have both an SAP system with Release 6.40 and SAP systems with releases lower than 4.6A running on a single System i server, you should note the following:
– In SAP Release 6.40 the command STARTSAP *DB does not start the database server job R3RMTDB, which is required for releases prior to 4.6A. To start these SAP systems, you should continue to use the command STARTSAP *DB from the older SAP release.
– QXDAEDRSQL, the job necessary to access a remote database, is normally started automatically. It runs in subsystem QSYSWRK. If it is not running, you can start it with the System i command STARTSAP *DB.
– When a work process connects to the QXDAEDRSQL job, the job spawns a second shadow job. This shadow job is switched to run under the user profile running on the local system.
– When SID00 connects to the QXDAEDRSQL job, the job spawns another job under user profile QUSER. This new job is switched immediately to run under user profile SID00.
10.Configure SAProuter for Remote Connection to SAP Support.
SAP offers its customers access to support and to a number of remote services such as the EarlyWatch Service or the GoingLive Service. To establish the remote connection to SAP, you need the SAProuter software, which controls and monitors communication between your SAP system servers and the front-end computers. For more information, see the SAP Service Marketplace at:
http://service.sap.com/remoteconnection
11.If you installed a unicode system, run unicode-specific reports. Refer to the installation guides.
12.Configure the transport management system (TMS).
You configure the domain controller in the TMS by calling transactions SE06 and STMS.
a. In your SAP system, call transaction STMS.b. Enter the required information to configure the domain controller.
Tip: Do this later, approximately four weeks after the installation.
Attention: It is not easy to check which connection, the 100 MB Ethernet or the GB Ethernet, is taken to access the remote database.
Note: If you are not sure how to configure the domain controller, choose Save and configure the controller later or choose Information to display the TMS online documentation.
Attention: It is no trivial task to configure the TMS.
134 An Overview of Installing SAP Applications on System i Models
You need to perform some basic operations that are described in the SAP Library:
a. Open the SAP library. b. Choose the relevant section to perform the operations described in Table 5-5
Table 5-5 Basic operations after a standard installation
14.Check the configured number of work processes.
SAPinst installs SAP systems with a minimum number of work processes. This is only an initial configuration to get you started after the installation. It is not detailed enough for a production system because the optimal number of each type of work process depends on the system resources and on the number of users working in each SAP system application.
15.Install additional languages.
To install an additional language, you have to perform the following steps:
a. Classify the language.b. Schedule the language transport.c. Schedule the language supplementation.
You can also install additional languages later, but if you install any support packages in the meantime, you have to perform one of the following options:
– Install the support packages again.
– Use the report RSTLAN_IMPORT_OCS to extract the language-relevant information from each support package.
For more information about how to transport an additional language, see Language Transport, which you can find in either of the following:
– SAP Service Marketplace under the topic Operations at:
http://service.sap.com/instguidesNW04
– SAP Library by choosing Solution Life Cycle Management → Software Change Management → Change and Transport System → Language Transport
16.Activate the integrated Internet Transaction Server (optional).
The integrated Internet Transaction Server (ITS) was installed automatically with the SAP kernel. To be able to use the integrated ITS, you have to configure and activate the
Operation Navigation to the section in the SAP help library
Set up operation modes: transaction RZ04
Solution Life Cycle Management → System Management → Configuration → Operation Modes
Set up logon groups: transaction SMLG
Solution Life Cycle Management → System Management → Configuration → Dynamic Logon Load Distribution → The SAP Logon
Set up administrators Solution Life Cycle Management → System Management → Background Processing → Authorizations for Background Processing
Schedule background jobs
Solution Life Cycle Management → System Management → Background Processing
Install a printer Solution Life Cycle Management → System Management → SAP Printing Guide
Configure the system log Solution Live Cycle Management → System Management → Tools for Monitoring the System → System log → Configuring the System Log
Chapter 5. Installation of the mySAP Business Suite 135
Internet Communication Manager (ICM) and make sure that the Web GUI service is activated in the Internet Communication Framework (ICF).
For more information, see the SAP Library and choose Application Platform (SAP Web Application Server) → ABAP Technology → UI Technology → Web UI Technology → ITS/SAP@Web Studio → SAP ITS in the SAP Web Application Server.
Also refer to SAP note 798532 for enhancements to this documentation. This provides the necessary information if you do not want to use the integrated ITS.
17.Apply the latest kernel and support packages.
You use this procedure to apply the latest kernel and support packages for your SAP system from the SAP Service Marketplace.
a. Apply the latest kernel. You must always replace the installed kernel with the latest kernel from the SAP Service Marketplace. In particular, you must replace the installed kernel in the following cases:
• If you installed the kernel executables locally on every host.• If your central instance host runs on a different operating system than your dialog
instance host or your gateway instance host.
For more information about how to download a kernel, see SAP note 19466.
b. Apply the support packages.
For up-to-date information about currently recommended combinations of support packages and patches, and how to download them, see SP Stack → SAP ERP 2004 on the SAP Service Marketplace at:
http://service.sap.com/sp-stacks
See also SAP note 760874 for current support package stack release information.
Alternatively, you can download the support packages from the SAP Service Marketplace at:
http://service.sap.com/patches
Apply the support packages to your SAP system with the help of the Support Package Manager (formerly called SAP Patch Manager, transaction SPAM). For more information about the availability of support packages, see the SAP Service Marketplace at:
http://service.sap.com/ocs-schedules
The SAP note Assistant lets you load, implement, and organize individual SAP notes efficiently. It also recognizes dependencies between SAP notes, support packages, and modifications. For more information, see the SAP Service Marketplace at:
http://service.sap.com/noteassistant
18.If you install SAP Web AS as basis for an SAP component that uses the Knowledge Provider (KPRO) component (for example, SAP BW or SAP KW), you schedule asynchronous indexing and de-indexing. Refer to the installation guides.
19.If you want to use KPRO, check for problems in IMS monitoring. Refer to the installation guides.
20.Perform the client copy.
If you intend to install a Java Add-In, you must first perform the client copy for the ABAP system. You use this procedure to perform the client copy, which consists of the following steps:
a. Maintain the client with transaction SCC4.b. Copy the client with local transaction SCCL.
136 An Overview of Installing SAP Applications on System i Models
For more detailed information about how to perform the client copy, see the separate documentation in the SAP Library, under the topics Solution Life Cycle Management → Software Change Management → Change and Transport System → Client Copy and Transport.
If you intend to install the SAP Exchange Infrastructure on your SAP NetWeaver Application Server, make sure that you use the profile SAP_UCSV. Do not use the profile SAP_CUST as stated in the SAP Library documentation.
For more information see the documentation Installation Guide – SAP Exchange Infrastructure on SAP Service Marketplace under the topics SAP Components → SAP Exchange Infrastructure at:
http://service.sap.com
21.Check the RFC destination.
In a system configuration where the central and database instance run on different hosts, you have to test whether the database host has been correctly set up as a remote function call (RFC) destination. The database host is defined as an RFC destination to enable the system to access monitoring data that is collected for the database and operating system.
a. Choose Tools → Administration → Network → RFC destinations or call transaction SM59. The initial window of the transaction displays the different RFC connection types.
b. Expand TCP/IP connections and double-click SAPOSCOL_DB_hostname.
A window displaying information about the selected destination opens.
c. Choose Test Connection.
If you find that the destination has not been set up correctly, you have to maintain it. For more information, see the topics in the SAP Library:
Application Platform (SAP Web Application Server) → ABAP Technology → ABAP Programming and Runtime Environment → External Programming Interfaces → RFC Programming in ABAP → Maintaining Remote Destinations.
22.Change the passwords of created System i users.
For security reasons, you should change the passwords of the user profiles supplied with your SAP system.
Table 5-6 System i specific user profiles and their initial passwords after an SAP standard installation
In 3-tier systems, these three users must have the same password on all System i servers. Make sure that for every instance nn a user SIDnn exists on the central instance host.
To change passwords at an i5/OS level, use the command CHGPWD or CHGUSRPRF.
23.Change the passwords of created users.
You need to change the passwords of the users that SAPinst creates during the installation. Table 5-7 on page 138 lists these users. You also have to remove the contents of the installation directory and store them securely, otherwise, they might represent a security risk.
User profile Initial password
SIDOFR SAPOFR
SIDOPR SAPOPR
SIDnn SAPnnPWD (nn is the instance number)
Chapter 5. Installation of the mySAP Business Suite 137
Change the passwords of these users according to the SAP security guide. For more information, see the SAP Service Marketplace at:
http://service.sap.com/securityguide
SAP system users might exist in more SAP system clients than listed in Table 5-7 (for example, if a user was copied as part of the client copy).
We recommend that you change the initial passwords even if SAPinst prompted for a new password during the installation procedure.
Table 5-7 SAP users after an SAP standard installation
24.Perform a full backup.
You can use this procedure to perform a full backup of your SAP system. During the backup, your SAP system is unavailable to other users.
a. On the System i command line, enter GO SAVE.b. Enter option 21.
For detailed information, see the IBM documentation OS/400 Backup and Recovery, SC41-5304 or the related chapter of this Redpaper.
25.Perform follow-up activities for the SAP Solution Manager. Refer to the installation guides.
26.Prepare the SAP system for business application. Refer to the installation guides.
5.3 Installation of mySAP Customer Relationship Management
mySAP Customer Relationship Management (mySAP CRM) is a complete multichannel suite supporting all customer-facing lines of business across marketing, sales, and service, as well as customer interaction channels, such as the Interaction Center, the Internet, and mobile clients. It provides you with:
� Cross-industry and industry-specific end-to-end business processes� Flexible and process-based deployment options � An open, adaptable technology platform, powered by SAP NetWeaver
User type User Comment
SAP system user SAP* User exists at least in SAP system client 000
DDIC User exists at least in SAP system clients 000 and 066
EARLYWATCH User exists at least in SAP system client 066
SAPCPIC User exists at least in SAP system client 000
SYSTEM -
SYS -
OUTLN -
DBSNMP -
Note: Refer to the “Restoring a Backup” topic in Implementing SAP Applications with System i and i5/OS, SG24-7166.
138 An Overview of Installing SAP Applications on System i Models
mySAP CRM belongs to the family of solutions included in the mySAP Business Suite. Figure 5-4 shows the mySAP CRM release strategy and the classification of the CRM documentation.
Figure 5-4 CRM versions and documentations
5.3.1 CRM documentation and installation guides
You can find the most current information about the technical implementation of CRM 4.0 and the latest installation and configuration guides in the SAP Service Marketplace:
http://service.sap.com/crm-inst
We recommend that you use the documents that are available for download on these pages.
� SAP CRM 4.0 Installation on operating system: database
� Information about Plug-In Installation for OLTP R/3 Systems
� Language Transport 6.20 (BC-CTS-LAN) (installing the required languages)
� CRM Monitoring Installation Guide
� CRM Communication Station Guide
� Adapter Framework under the topics SAP Customer Relationship Management → SAP CRM Powered by SAP NetWeaver → Process Integration → CRM Integration Services → CRM Middleware → Adapter and Site Types → Adapter → The Adapter Framework in the SAP Help Portal:
http://help.sap.com
(Configuring the CRM Server and the OLTP R/3 System for proper communication)
� Components of eSelling and Channel Management Installation Guide
SAP CRM 3.1Post Ramp-Up SAP CRM 4.0
Ramp-Up
SAP CRM 4.0Post Ramp-Up/Edition 2004 SAP CRM 5.0
Ramp-Up
SAP CRM 5.0Post Ramp-Up
June 03 Nov 03 Oct 05 June 06
SAP CRM 3.1 SAP CRM 4.0 (incl. Edition 2004) SAP CRM 5.0
Documentation
EducationEducationEducation
Documentation Documentation• Development News
• Release Notes
• Business Scenarios
• Application Help
• Installation and Upgrade Guides
• Ramp-Up Knowledge Transfer (RKT)
• SAP Solutions Training(SAP CRM 3.0)
• SAP Solution Academy Courses(SAP CRM 3.0)
• Statement of DirectionDetailed overview of new andenhanced functionality. The book can be ordered for customersthrough their SAP account manager.
• Release Notes
• Application Help• Solution Manager
• Installation and Upgrade Guides
• Statement of Direction
• Release Notes
• Application Notes
• Application Help
• Solution Manager• Installation and Upgrade Guides
• Ramp-Up Knowledge Transfer (RKT)
• RKT Workshops
• SAP Solutions Training
• Ramp-Up Knowledge Transfer (RKT)
• SAP Solutions Training
Chapter 5. Installation of the mySAP Business Suite 139
� Installing the Internet Pricing and Configurator
� Text Retrieval & Information Extraction Installation Guide
� Broadcast Messaging Server Installation (x)
� SAP Content Server Installation Guide (x)
� Computer Telephony Integration (CTI) x
� SAP MCIS Installation Guide (x)
� SAP Mobile
� Infrastructure Installation
� Interaction Center Web Client (x)
� SAP Enterprise Portal Installation Guide
Before starting the actual implementation or upgrade, you must fulfill some prerequisites. The description of these activities is not part of the CRM Master Guide.
� Hardware sizing
You can find detailed information about sizing, calculation of hardware requirements (such as CPU, disk, and memory resource), and the Quick Sizer tool at:
http://service.sap.com/sizing
� Planning the system infrastructure: You can find comprehensive information about network integration and technical infrastructure aspects at:
http://service.sap.com/ti
Information about network and application security is available at:
http://service.sap.com/securityguide
Information about released platforms is available at:
http://service.sap.com/platforms
Also read the letter that is included in the SAP CRM installation package. It contains important information about several third-party software components. Additionally, read the latest and related SAP notes to the SAP CRM. You find the SAP notes number in the guides and the SAP notes themselves in the SAP Marketplace at:
http://service.sap.com/notes
Brief excerpt of mySAP CRM Edition 2004 (from the SAP Marketplace)Although there is no “big bang” version of mySAP CRM, a series of extensions are provided as part of the mySAP CRM Edition 2004 that can be applied on top of SAP CRM 4.0, without the cost of a release upgrade. These additions are fully upgradable to future releases of mySAP CRM and focus on key areas such as the further enhancement of industry-specific business processes, improved user experience, lower TCO, as well as adopting the latest technology innovations delivered with SAP NetWeaver ´04.
Note: We recommend that you use the documents that are available on these pages. These guides are updated and enhanced on a regular basis.
140 An Overview of Installing SAP Applications on System i Models
Focus of the CRM release in this bookIn this IBM Redpaper, we focus on the mySAP CRM Edition 2004, which is technically referred to as the SAP 4.0 SR1 release. When we refer to CRM 4.0 or only mySAP CRM, we mean this release mySAP CRM Edition 2004, otherwise, we remark on this separately.
5.3.2 Technical components of mySAP Customer Relationship Management
Figure 5-5 shows a minimal system landscape for SAP Customer Relationship Management (CRM) 4.0.
Figure 5-5 mySAP CRM minimal system landscape
5.3.3 Overall installation sequence
The following list provides information about a valid overall installation sequence for the solution mySAP CRM 4.0. The installation sequence corresponds to the numbers in Figure 5-5.
Installation sequence: CRM HostAs shown in Figure 5-5, the CRM host includes all the CRM 4.0 software components as well as the solution manager components.
CRM Host
CRM 4.0
CRM 4.0
WFMCORE 1.00
WP_IP 600_620
SAP Web AS Java 6.40Basic Java Libs
JCO
IC WFM Calc Srv
IC WFM Appl Srv
IPC WEB APPs
ISA WAC
IC Web Client
CRM BM-5
CRM SAP
CRM ICO
CRM ICS 8
MapBox
ME
TREK
ITS
JDK
MS SQL
2 3
TeaLeaf Host
15b
MS SQL
MS ExchangeServer
14b
7
7l
1
12
8
7a
7b
7g
7i
7h
7c
7d
7e
7j
Solution ManagerST 310 (Solman)
IPCJCO
CRM CAT Server
Business ConnectorRNET
CommStationDCCM Connector
CRM Designer
GroupwareConnector
Vartex
ARS
MCI
4
5
88a
9a
10
11
13a
15a
14a
9
Portal Host
Solution Manager2
3
4
6
7
1JDK
JBE
MS SQL
Web Server forE-Selling–port: 1080
WebServer Plug-in
8
Mobile ClientIPC
TeaLeaf
Portal Runtime
iView Runtime Java
CM 9.0
Connector
EP for CRM
EP Platform 8.0 5
MS SQL
SAP CRMTechnology Component
= OEM CRM Technology Component
= SAP ApplicationComponent
= Third Party Component
= Physical server (host)
= Database system
Note: The numbers beside the software components correspond to the overall installation order.
Chapter 5. Installation of the mySAP Business Suite 141
1. Install the Java Development Kit (JDK).
2. Install the SAP Solution Manager.
3. Install the SAP CRM server 4.0 with WFMCORE 1.00 and WP-PI 600_620.
4. Install the SAP Internet Pricing and Configurator (IPC).
5. Install the CRM CAT server.
6. Install Text Retrieval & Information Extraction (TREX).
7. Install SAP Web AS Java 6.40 or SAP Web AS Java 6.20 including Basic Java Libs and SAP Java Connector (JCO).
a. Start the CRM Java Components Installer.
b. Install the SAP J2EE Engine including Basic Java Libs and SAP Java Connector (JCO).
c. Deploy the following J2EE applications on the SAP J2EE Engine:
i. IPC Web Applications
ii. ISA Web Application Components (for E-Selling)
iii. CRM ICO
iv. CRM ICSS (for Internet Customer Self Service)
v. Install MapBox
vi. IC WFM Calculation Server and IC WFM Application Server (for Workforce Management)
vii. 7g: CRM ICWC (Interaction Center WebClient) for the Java Configuration of Interaction Center WebClient.*
viii.CRM SAF (Software Agent Framework) for the Java Configuration of Interaction Center WebClient.*
ix. CRM BMS (Broadcast Messaging Server) for the Java Configuration of Interaction Center WebClient.
x. ME (Mobile Engine, part of Mobile Infrastructure)
* In the release for CRM 4.0 Add-On for Service Industries, it is possible to have a non-Java configuration of Interaction Center WebClient.
8. Install the SAP Business Connector and RosettaNet.
9. Install the Communication Station (required for Mobile Sales) and the DCOM Connector.
10.Install the CRM Designer.
11.Install the Groupware Connector.
12.Install the Internet Transaction Server (ITS).
13.Install the MCI (Multichannel interface).
14.Install the ARS transport service (15a) on the CRM host and the Mobile Client Software (15b) for Field Sales on the Tealeaf host.
15.Install Vertex.
Note: We recommend that you install Tealeaf (14b) on a separate machine (see the additional box for the Tealeaf host).
142 An Overview of Installing SAP Applications on System i Models
Installation sequence: Enterprise Portal HostOn the portal host, install all the software components that are required for the implementation of SAP Enterprise Portal:
1. Install the Java Development Kit (JDK) and the JSE (Java standard edition) software.2. Install the SAP J2EE Engine (Cluster Version).3. Install the Portal Runtime.4. Install the iView Runtime Java.5. Install the Enterprise Portal Platform 6.0.6. Install CM 6.0 including the connector.7. Install the Business Package for Communication.8. Install the Web server with the related Plug-in for the E-Selling Scenario (IIS).
As an alternative, you can also install the Web server on the CRM host. (Be aware that the minimum system landscape described in this section does not reflect recommendations for production use, such as security requirements.)
5.3.4 Additional tools, technology, components, and activities
In this section, we provide a short description of some of the additional activities and components that are used in the CRM environment.
Monitoring the system landscapeAfter you have installed the components of your CRM system, we recommend that you refer to the CRM Monitoring Installation Guide for instructions about activating the monitoring features of the software components in your CRM landscape.
The monitoring features allow you to capture important version, configuration, performance, and problem data using a single monitoring system in your CRM landscape. Activating the monitoring according to the CRM Monitoring Installation Guide is a prerequisite for efficient and problem-free operation and delivery of support. Refer to the CRM Monitoring Installation Guide in the SAP Service Marketplace at:
http://service.sap.com/crm-inst
SAP Solution ManagerSAP provides you with the SAP Solution Manager as the highly recommended platform to efficiently support the implementation of your mySAP CRM solution. All information necessary to set up the scenario is delivered exclusively through the SAP Solution Manager content.
See also the installation guide for the SAP Solution Manager in the SAP Service Marketplace under the topic installation guides at:
http://service.sap.com/solutionmanager
Customizing ScoutThe Customizing Scout is part of the Solution Manager 3.1, that is, no additional installation is required. The Customizing Scout compares and updates Customizing settings as shown in Figure 5-6 on page 144.
Chapter 5. Installation of the mySAP Business Suite 143
Figure 5-6 The mySAP Solution Manager Customizing Scout within CRM
The Customizing Scout is relevant for all key capabilities and supports the following processes:
� Customizing data is loaded initially from ECC to CRM using the CRM Middleware download.
� The customizing entries can be compared between ECC and CRM and any differences visualized.
� Deltas are kept synchronized. This means that when Customizing settings are maintained in ECC, they are also updated in CRM.
� Transport of customizing settings through the test and production system landscape.
SAP Mobile InfrastructureThe SAP Mobile Infrastructure is a platform-independent framework that enables mobile devices to run applications offline (without a live connection to a server or the Web) and later synchronize the data with SAP and non-SAP components. Key features include the following:
� A wide variety of application program interfaces (APIs) for local data storage, data synchronization, and so on. This approach simplifies application development and also allows third parties to create specific solutions.
� A powerful deployment mechanism offers administration-free installation, upgrades, and removal of applications for mobile users. This ensures the availability of offline applications on mobile devices.
� The ability to generate any kind of plain standard markup language (such as HTML) to enable the use of standard browser front ends. No proprietary browser needs to be installed on the device.
� Customer modification of user interface “look and feel” using HTML templates.
The SAP Mobile Infrastructure Client is based on Java and has been tested for Windows 2000, PocketPC, EPOC32, and other environments. Certain handheld applications require optimized user interfaces and very rapid response times. They also require access to native operating system features such as printing, peripheral interfaces such as barcode scanners and smart card readers, and certain device management functions. SAP uses a modified programming model (such as Active Server Pages or Embedded Visual Basic®) that allows
CustomizingTransport
StructureConversion
ECC Dev
Customizing
CRM Dev
Customizing
CRM QA
Customizing
CRM Prod
Customizing
ECC QA
Customizing
ECC Prod
Customizing
Initial load+ Delta load
144 An Overview of Installing SAP Applications on System i Models
the SAP Mobile Infrastructure to support these features. The PocketPC platform supports this programming model.
For comprehensive information about the SAP Mobile Infrastructure, see the SAP Service Marketplace at:
http://service.sap.com/mi
Alternatively, refer to 4.6, “Installation of SAP Mobile Infrastructure” on page 91.
Figure 5-7 mySAP Mobile Infrastructure technical landscape for mySAP CRM
Portal enablementThe Enterprise Portal Solution primarily consists of the following platforms:
� Portal platform� Knowledge Management platform
The Portal platform includes the components required for building a portal and the Knowledge Management platform provides access to an organization's unstructured documents.
From CRM 4.0 onwards, the Enterprise Portal is used for people-centric CRM. Figure 5-8 on page 146 illustrates the technical infrastructure.
Ensure that you install the suitable software. Refer to the CRM Master Guide. For comprehensive information about the SAP Mobile Infrastructure, see the SAP Service Marketplace at:
http://service.sap.com/nw-ep
Alternatively, refer to 4.4, “Installation of SAP Enterprise Portal” on page 81.
SAP Web ASABAP
MI Server
RDBMS
BackendSystem
e.g., SAP R/3
RDBMS
HTTP/HTTPS
MIClient
WebServer
StandardBrowser
WebServer
StandardBrowser
mVBNativeUI
mVBNativeUI
SOAPProxy RFC
Chapter 5. Installation of the mySAP Business Suite 145
Figure 5-8 mySAP Portal technical landscape for mySAP CRM
CRM Server 4.0The CRM Server is the central SAP system within CRM system landscapes. Mostly all business scenarios run on this system (some business applications can also run within Java applications). Additional functions can be provided by integrating back-end systems, such as APO, BW or an OLTP R/3 system.
With CRM Release 4.0, the CRM Server is based on the SAP Web Application Server (SAP WebAS) 6.20. As of CRM 4.0 SP1 it is based on SAP Web AS 6.40. You can find detailed information about the released platforms in the SAP Service Marketplace at:
http://service.sap.com/platforms
With SAP Web Application Server 6.20 and 6.40, a J2EE standards-based Application Engine is shipped and supported by SAP as a runtime environment for the Java-based components of mySAP.com. As an integral part of the SAP Web Application Server 6.20 and 6.40, the J2EE Engine delivers a proven e-business environment with native Java support for easy deployment, straightforward installation and administration, coupled with full life cycle support for Java-based e-business components. The homogeneous infrastructure for J2EE and ABAP environments of SAP Web Application Server 6.20 and 6.40 guarantees centralized and unified installation, configuration, monitoring, security, and load balancing for both programming environments.
With the new integration features, it is now possible to link the SAP Web Application Server to the Exchange Infrastructure. These features also help to make the direct connection between applications easier. In particular, the cross-component process management through WebFlow has been enhanced.
Further developments include new functions for document processing and business communication for better support of business applications. Improvements in life cycle
CRM Server Host
CRMServer
RDBMS
BW Host
SAP BusinessWarehouse
RDBMS
Enterprise Portal
Portal Server Host
Portal Server
WebServer
PageBuilder
iView Server
KM Host
Knowledge Management
Text Retrieval &Information Extraction
146 An Overview of Installing SAP Applications on System i Models
management and enhanced security features reduce the complexity and cost of solution management.
Internet Pricing and Configurator (CRM IPC)Master data for pricing and configuration is either replicated from SAP SD (pricing) and SAP PLM (configuration - knowledge bases) to the CRM Server (through plug-in and CRM Middleware) or maintained in the CRM system (CRM with no R/3 back-end system).
Master data replication for the CRM Mobile Clients is managed using the CRM Middleware (consolidated database). The source is the CRM system and not R/3, even if the data is originally maintained in R/3 and replicated to the CRM system.
The most important components of the Internet Pricing and Configurator are:
� Sales Configuration Engine (SCE, also part of the mobile client installation)� Sales Pricing Engine (SPE, also part of the mobile client installation)� IPC User Interface (UI)
The UI for pricing analysis that is used in CRM Online is JSP-based.
Text Retrieval & Information Extraction (TREX)The TREX tools support flexible document searching, structuring of extensive document collections by using automatic document classification, and the extraction of interesting information from a document corpus (text mining). In the CRM environment, the following TREX components are used:
Index Management Service (IMS)The SAP Index Management Service is a tool for indexing many types of documents that can be handled in the SAP or CRM environment. Documents can subsequently be found by means of different search strategies. In order to use this service, you must install a search engine that fulfills the SAP IMS Server API specification, for example, the TREX search engine.
The IMS installation is part of the Text Retrieval & Information Extraction installation.
TREX search engineThe TREX search engine included in the Text Retrieval & Information Extraction installation offers the same functions as those of a standard text retrieval engine. It fulfills the SAP IMS Server API specification and must be used in combination with the SAP Index Management Service (SAP IMS).
The TREX search engine is used as a special purpose search engine in the R/3 and E-Commerce environment. It provides advanced features for error tolerant and similarity searching. It is optimized for indexing mass data such as in catalog scenarios or in an R/3 extended help environment. The SAP search engine is able to index (and search) plain text and HTML documents in the form of a file destination or text from memory.
Note: In CRM 4.0, the IPC data loader is not used for master data replication.
Chapter 5. Installation of the mySAP Business Suite 147
SAPconnectSAPconnect enables external communication components to be connected to the SAP system. As the standard interface for external communication, SAPconnect supports telecommunication services such as faxing, paging, the Internet, and X.400, as well as sending to printers and between multiple R/3 systems.
Use SAPconnect to create links to various types of communication components and communication systems:
� Fax servers, pagers, SMTP gateways or X.400 gateways, which support the SAPconnect interface
� The SAP Internet Gateway
� Microsoft Exchange servers and therefore:
– Microsoft Exchange users– Fax servers, SMTP connectors, or X.400 connectors installed on MS Exchange
� Other R/3 systems
� Printers
Computer Telephony Integration (SAPphone)The goal of telephony integration in R/3 is to make the telephone an integral part of business scenarios. In this case, “business process” can refer to an individual R/3 application, or an R/3 business workflow, scenario-based on the SAP Customer Interaction Center (CIC) in a call center environment.
In all of these scenarios, Computer Telephony Integration (CTI) components, such as a gateway to a call center system, communicate with R/3 components through SAPphone (an R/3 Basis Services component).
SAP Content ServerIf you want to administer a larger amount of documents in the product catalog (for example, in CRM eSelling), we recommend that you use the SAP Content Server. However, you can also administer documentation without this server. The SAP Content Server is accessed using HTTP. If you want to integrate another Content Server into the scenario, the new server must fulfill the requirements of the interface specification as defined by SAP.
If data is stored on different servers, cache servers are used to facilitate access to the documents' contents, for example, if a document is to be displayed in a Web browser. The cache server creates auxiliary copies of documents from the content server. This enables faster read access to the required documents. Network load is reduced, as no remote content servers need to be located. While cache servers fulfill a similar function to content servers, the amount of administrative work involved is small, and access protection is preserved. The central document administration function in an SAP system ensures that out-of-date documents in the cache can no longer be accessed, and that these documents are eventually deleted.
CRM mobile clientsMobile clients are usually laptops running the mobile sales or mobile service application client. They connect temporarily to the middleware of the CRM Server to exchange data. This connection is established through the CRM Communication Station, where DCOM calls from the mobile clients are transformed into RFC calls that go to the CRM Middleware.
The mobile client includes all the software necessary for offline data entry and processing, as well as separate middleware functions (transaction layer) required for data exchange and
148 An Overview of Installing SAP Applications on System i Models
communication with the CRM Server. The mobile client software includes an Internet Pricing and Configurator (IPC) and an MS SQL Server database.
A mobile client also includes the CRM IPC Sales Configuration Engine (IPC-SCE) and the CRM IPC Sales Pricing Engine (IPC-SPE) applications in a typical mobile client installation.
With the CRM Mobile Application Studio (formerly known as Workbench), you can customize your mobile client environment.
5.3.5 Communication and Development Station
These stations are data transfer tools connecting the SAP CRM Server and the Mobile Clients.
CRM Communication StationMobile Client users carry a PC application and a local database on their laptops. They connect to the CRM system from time to time either by phone or network to exchange data accumulated and stored in queues at both ends. This connection is established using a CRM Communication Station, where DCOM calls from the mobile clients are transformed into RFC calls that go to the CRM Server.
The CRM Communication Station acts primarily as a communication server. This data distribution follows a flexible set of replication rules, where business objects are assigned to mobile clients.
CRM Development StationThe Development Station includes several data exchange tools. The number of installation tools has decreased from CRM Release 2.0C to CRM 4.0, as some of these functions are now available within the CRM Server. For more information, see the section Field Sales.
5.3.6 R/3 Standalone Gateway
This is an SAP system that consists of the SAP Gateway only, and can be operated and maintained independently of other SAP systems. The SAP Gateway enables non-SAP systems to act as a communication partner for SAP systems.
There are various reasons for installing a stand-alone gateway. For example, in a system where the database instance and central instance are on different hosts, a gateway instance on the database server host enables remote function calls. Another reason for installing a gateway is to enable communication between systems network architecture (SNA) and SAP systems.
An SAP stand-alone Gateway is used in CRM E-Selling and Interaction Center, mainly for the Index Management Server and the Internet Pricing and Configurator, and also for the Computer Telephony Integration (CTI) feature.
5.3.7 CRM software component matrix
Table 5-9 on page 150 and Table 5-10 on page 152 provide an overview of the software components that are required for the implementation of a specific scenario.
Table 5-8 on page 150 lists the abbreviations that are used in Table 5-9 on page 150 and Table 5-10 on page 152.
Chapter 5. Installation of the mySAP Business Suite 149
Table 5-8 Abbreviations of the mySAP CRM key capabilities
Table 5-9 and Table 5-10 on page 152 list the technical or software component you have to install for a specific key capability (also known as business scenario).
Note: Read this matrix vertically. That is, you check which “business scenario” you want to implement and then you verify which “software components” are mandatory (M = mandatory) and which are optional (O = optional) for your installation.
Chapter 5. Installation of the mySAP Business Suite 151
152 An Overview of Installing SAP Applications on System i Models
SAP Java Connector O O M
Mapbox O O
MS Exchange Groupware Connector
O O
Lotus® Domino® Groupware Connector
O O
cProjects Add-on for CRM M
SAP WFM Add-on M
SAP CRM Intelligence Connector
O
CRM Mobile Client O O
CRM Communication Station O/M O/M
Internet Transaction Server (ITS) O O/M O/M
SAP Mobile Infrastructure O
Pocket PC for PDA O
Technical/software component
Key capability/business scenario
ICWEB EPSERV PRSERV ACMGT EPSALS MKMGT TPMGT
Note: In the mySAP CRM 4.0 SR1 Master Guide you find the scenario-specific sections and an overview of the overall implementation process, the technical infrastructure, and the installation sequence. In addition, these sections include information about related upgrade documentation, if available.
Chapter 5. Installation of the mySAP Business Suite 153
5.3.8 General mySAP CRM installation issues
mySAP CRM is based on SAP Web Application Server (SAP Web AS) 6.40 technology, which is the underlying technology of almost all solutions of mySAP Business Suite. For more information about the technology provided by SAP Web AS, see the SAP Service Marketplace at:
http://service.sap.com/netweaver
We focus on the ABAP part of the SAP CRM installation. The ABAP part is required for the installation of SAP CRM ABAP and SAP CRM ABAP + Java. If you want to install the Java part of SAP CRM, you have to install SAP Web AS 6.40 Java. This is because the technology of the Java part of SAP CRM is the same as that of SAP Web AS 6.40.
Installation of CRM Java ComponentsYou can now install the following CRM Java Components with the installation service Install CRM Non ABAP Components:
� Intelligence Connector (IC)
� Interaction Center WebClient (ICW)
� Broadcast Messaging Server (BMS)
� Software Agent Framework (SAF)
� CRM WAC (E-Selling Web Application Components) (ISA)
� Telecom Sales
� Selling Via Ebay (SVE)
� Internet Sales R/3 Edition (ISA R/3)
� IPC Web Applications (IPCW)
� Interaction Center Workforce Management Calculation Services and Application Services (IC WFM)
� MapBox (MBX)
� Internet Customer Self-Service (ICSS)
� Channel Management (CHM)
For more information, see the documentation Installation Guide - Java Components for SAP Customer Relationship Management 4.0 SR1 on the SAP Service Marketplace under the topics mySAP CRM → SAP CRM 4.0 at:
http://service.sap.com/crm-inst
Installation of the mySAP CRM ServerFor each scenario, check and follow exactly the installation checklists, which are given in the installation guide.
mySAP CRM is part of the mySAP Business Suite. Therefore, the installation is based on the SAP NetWeaver ´04 and of the Web Application Server 04. We described the concepts, the planning and preparation activities, and the single steps of the installation procedure of the SAP Web Application Server previously in this chapter.
The installation of the mySAP CRM server on the System i server itself is done by SAPINST from the CRM Master DVD. It is the same procedure as the installation of the SAP NetWeaver components or mySAP ERP discussed in detail previously in this chapter.
154 An Overview of Installing SAP Applications on System i Models
From the Table of Content of the SAP Customer Relationship Management 4.0 SR1 ABAP: IBM Eserver iSeries, we outline the considerations, planning, and preparation activities before the installation and the post-installation steps.
In this installation guide, there are also special checklists for:
� SAP CRM (Central System)� SAP CRM (Distributed System)� Dialog Instance
Implementation considerations� Basic system variants� Installation components� Distribution of installation components for:
– SAP SCM ABAP– SAP SCM ABAP + Java– SAP Web AS Java for SAP CRM
� Integration of LDAP Directory Services� System configuration� Hardware and software requirements� Multiple SAP systems on a single System i server
Installation preparations activities� Required installation CDs or DVDs:
– Preparing the installation CDs or DVDs– Using the CD browser dialog
� Command Line Shell Interpreters on the System i server
– Qp2Term, Qp2Shell and the OS/400 Portable Application Solution Environment (PASE)
– Installing the Qshell
Note: The descriptions in the following implementation steps maintain the use of the term “iSeries” to be consistent with the installation document referenced. iSeries servers (as well as IBM System i5™, IBM Eserver i5 and AS/400e servers) are represented by the term “System i” in this IBM Redpaper.
Chapter 5. Installation of the mySAP Business Suite 155
� Checking and adjusting i5/OS system values� Setting the time zone environment variable� Adjusting the startup program QSTRUP� Distribution of the libraries on ASPs� Adding a user ASP� Configuring the TCP/IP� Adjusting the relational database name� Preparing the active directory� Installing English as a secondary language� Setting Up the transport directory� Preparing the Windows host for the SAP system installation� Preparing a Windows user account and i5/OS user profile� Installing TMKSVR and creating an installation share� Choosing an SAP System ID
Installation process activities� Running SAPinst� Input for the installation
Post-installation activities� Granting authorizations for Operating System Collector Programs� Starting and stopping the SAP system� Logging on to the SAP system� Installing the SAP online documentation� Installing the SAP license� Starting the SAP Presentation GUI� Checking the SAP system services� Adjusting the menu and IMG structure� Changing passwords of created users: � SAP system users� System i users� Removing the spiniest installation files� Accessing a remote database� Configuring SAProuter and SAPNet – R/3 Front End� Configuring the Transport Management System� Performing basic operations� Configuring the number of work processes� Installing additional languages� Activating the Integrated Internet Transaction Server� Scheduling asynchronous indexing and de-indexing� Checking for problems in IMS monitoring� Performing the client copy� Performing a full backup
Note: For all these mySAP CRM concepts, planning, preparation, installation, and post-installation activities, see the corresponding considerations and procedures as described in 5.2.2, “mySAP ERP installation planning activities” on page 115 and the following.
156 An Overview of Installing SAP Applications on System i Models
5.4 Installation of the mySAP Supply Chain Management
The mySAP Supply Chain Management (mySAP SCM) solution is based on SAP Supply Chain Management server (SAP SCM server). It contains all activities for installation and configuration of mySAP SCM.
mySAP SCM consists of the following business scenarios:
Additionally, there are three other SAP SCM related scenarios concerning industrial business solutions:
� Make to Order for OEM� Maintenance and Service Planning� Multiple Output Planning
5.4.1 mySAP SCM overview
mySAP Supply Chain Management (mySAP SCM) offers a user-friendly, powerful, and competitive solution, which enables the modeling and optimization of the whole logistic chain.
In the middle of this solution, we have the SAP Supply Chain management server (SAP SCM server). One of the big pillars on which the IT architecture of most business scenarios of the mySAP SCM solution is based is the secure, scalable, and reliable SAP client-server architecture, which consists of presentation client, application server, and database server.
mySAP Supply Chain Management servermySAP Supply Chain Management server (SAP SCM server) is part of the mySAP Supply Chain Management solution suite. It is an advanced planning and scheduling tool that enables real-time decision support and collaborative network optimization across the extended supply chain. SAP SCM server helps companies synchronize supply chain activities with their partners and excel at customer service and order fulfillment.
Embedded SAP BWSAP SCM server is shipped with an embedded SAP BW 3.0B that, together with the liveCache, contributes to efficiently perform Forecasting & Replenishment tasks.
Note: You can find the most current information about the technical implementation of mySAP SCM as well as the Master Guide – SAP for Discrete Industries and SAP for Mill Products and the latest installation and configuration guides in the SAP Service Marketplace at:
http://service.sap.com/instguides
We recommend that you use the documents listed in this section. These guides are updated and enhanced on a regular basis.
Note: SAP SCM server uses the embedded SAP BW architecture for planning technical reasons (such as using information cubes), that is, do not use the SAP BW embedded in SAP SCM server for the reporting purposes of your company.
Chapter 5. Installation of the mySAP Business Suite 157
SAP has developed an innovative and flexible APS optimization application that opens SAP SCMs advanced planning and scheduling capabilities to external optimization technology: The Optimization Extension Workbench. This strategy enables mySAP SCM customers to take advantage of both the mySAP SCM existing set of optimizers and company-specific optimization software. The optimization technology integrates different planning methods in one planning system to fulfill optimization requirements:
� Optimizers, guided by global objective function based on key performance indicators. In case of highly complex planning scenarios, optimization results improve with increasing CPU time.
� User-specific optimizers, external optimizers. External optimizers can be called from the SAP SCM server, also as batch job.
You can use the SAP APO Optimizer for detailed production scheduling, supply network planning, transportation planning and vehicle scheduling, sequencing. It is an optional part of the SCM business scenarios.
SAP Event ManagerThe SAP Event Manager (SAP EM) is an integrated component of the SAP SCM system that offers the possibility to process application objects in various application systems, and thereby to track events for individual objects, processes, or parts of these throughout the entire supply chain.
The SAP Event Manager can link, update, and evaluate the event messages with the application data from the supply chain network.
It allows you to:
� Monitor, measure, and evaluate business processes.
– The SAP Event Manager automatically monitors events that occur and those that have not been reported (for example, goods issue, purchase order transfer, production end, or unreported proof of delivery).
– The SAP Event Manager can automatically transfer data to a data warehouse system that uses key performance indicators to create performance data for the quality of execution and notification.
� Employ checking processes and notify persons responsible to control events.
– The SAP Event Manager checks the Supply Chain Event Management-relevant objects as soon as they are saved in the application system.
– The SAP Event Manager can automatically inform the decision maker in critical situations that action is required (for example, automatic re-scheduling of the subsequent process step when a delay has occurred).
� Exchange and query information between partners (for example, e-mail or Internet).
liveCache for SAP SCMliveCache is based on SAP DB technology and ensures the highest mySAP SCM performance. liveCache is SAP's state-of-the-art, memory-based computing technology for real-time, high-speed processing of very large data volumes. The main capabilities of SAP's new memory-resident, object-oriented technology are the following:
� Application logic execution right where the data is stored in order to avoid network load.
158 An Overview of Installing SAP Applications on System i Models
� Aggregation of relational data structures retrieved from the database into application-specific, optimized data representations in main memory. As a result, you can perform optimization and planning tasks in minutes or seconds.
� Built-in business functionality in the form of C++ object methods.
� Semantic synchronization with the SAP database.
� Ready to exploit 64-Bit technology.
For more information concerning liveCache technology infrastructure, requirements and performance recommendations, see the SAP Service Marketplace at:
http://service.sap.com/scm
liveCache is available on Windows 2000 (or higher) and on 64-Bit UNIX (as of SAP APO 3.0A). This means liveCache can run in a Linux partition of the System i server.
mySAP SCM componentsThis section gives an overview of mySAP SCM and the components of its business scenarios (see Table 5-11).
Note that there are software requirements for each component listed in Table 5-11, which are not explicitly mentioned in this documentation. They are documented in the relevant installation guides in the SAP Marketplace at:
http://service.sap.com/instguides
See the SAP note 657465 (Master Guide mySAP SCM 4.1) for the latest component version requirements.
Forecasting & Replenishment Processor 2.4.8 M - - - -
Store User Interface 4.1 O - - - -
XI Content for SCM 4.1 - - M M M
SAP Solution Manager 3.1 with content ST-ICO 120
O O O O O
Note: Read this matrix vertically. That is, check which “business scenario” you want to implement and then verify which “software components” are mandatory (M = mandatory) and which are optional (O = optional) for your installation.
Chapter 5. Installation of the mySAP Business Suite 159
To plan the system infrastructure you have to determine the requirements that your system must fulfill. The following list can help you to identify the requirements that influence the design of the technical infrastructure most:
� Purpose of the system� Number of users � Scalability� Availability� Security� Manageability� High availability
5.4.4 Technical infrastructure of mySAP SCM (exemplary)
Figure 5-9 on page 161 shows an exemplary technical infrastructure of SAP SCM server and its sub-related components (liveCache, SAP APO Optimizer) and the communication between them. Depending on the involved scenario, liveCache or SAP APO Optimizer are not necessary or optional.
SAP system Business scenario
F&Ra
a. F and R: Forecasting and Replenishment
PMb
b. PM: Project Manufacturing
RRc
c. RR: Responsive Replenishment
RPd
d. RP: Release Processing
SMIe
e. SMI: Supplier Managed InventoryM(*) = see SAP note 669718M(**) = see SAP note 157755
SAP R/3 4.6C or higher� Refer also to the release constraints as described in SAP note
708736.
- M M(*) M(*) M(*)
SAP R/3 4.6C or higher� Refer also to the release constraints as described in SAP note
708736.
M - - - -
Plug In 2004_1_46C or higher M(**) O O O O
SAP BW 3.5 server- M - - - -
160 An Overview of Installing SAP Applications on System i Models
5.4.5 mySAP SCM Project Manufacturing overview and implementation
As an example, we show you the implementation of the Project Manufacturing overview and implementation because this business scenario uses the SAP liveCache and the SAP APO Optimizer.
mySAP SCM Project Manufacturing business overviewProject Manufacturing in SAP SCM 4.1 enables companies following the engineer-to-order manufacturing model and companies using project planning in new product development to leverage the advanced planning and scheduling capabilities of SAP APO for:
� Integrated project and production scheduling
� Constraint-based project and production scheduling
� Backlog-free scheduling resulting in feasible plans
� Interactive simulation of different planning scenarios
� Alerts for early detection of bottlenecks and missing parts
� Improved transparency for complete project and order context through dynamic matching of supply and demand (pegging)
� Interactive scheduling using the graphical planning board tool
� Reaching global project and production planning goals
Thus, using SAP APO for Project Manufacturing can help the customer to:
� Deliver on time� Reduce and control inventory levels
SAP SCM Server 4.1Central Instance
RDBMS
Message Server
Work Processes
SAP SCM Server 4.1Dialog Instance
Work Processes
liveCache Server(1 per SAP SCM System)
liveCacheMemory
liveCacheFile
System
OptimizationServer
RFC
RFC
Native SQL
SAP GUI
Diag
Chapter 5. Installation of the mySAP Business Suite 161
mySAP SCM Project Manufacturing Technical system landscapeFigure 5-10 shows an exemplary technical infrastructure of Project Manufacturing including its components and the communication between them. For the sake of simplicity and clearness, Figure 5-10 contains icons for whole SAP systems, not for single hosts. Note that every SAP system can consist of several hosts with different tasks.
mySAP SCM Project Manufacturing Implementation sequence overviewThis section lists the sequence of steps (installation, technical configuration, application configuration) required to implement the business scenario.
See the SAP note 431502 (mySAP SCM Master Guide) for the latest component version requirements.
1. Installation or integration of an R/3 OLTP:
SAP R/3 4.6C or higher. Refer to the Installation Guide - SAP R/3 Enterprise on <Operating System>: <Database>- Using SAP R/3 Enterprise Core 4.70, SAP R/3 Enterprise Extension <Release> or R/3 Installation on <Operating System>: <Database>- Release <Release> available at:
http://service.sap.com/instguides
2. Installation of SAP R/3 Plug-In 2004.1 (or higher) on the OLTP:
See SAP note 704564 (R/3 Plug-In: Installation Delta-Upgrade PI 2004.1) and the SAP Service Marketplace at:
http://service.sap.com/r3-plug-in
3. Installation of SAP SCM server 4.1
Refer to the Installation Guide - SAP SCM server 4.1 on <Operating System>: <Database> available under the topic mySAP Business Suite Solutions at:
http://service.sap.com/instguides
4. Installation of SAP liveCache 7.5 for SAP SCM.
Refer to the Installation Guide - SAP liveCache Server available under the topic mySAP Business Suite Solutions at:
http://service.sap.com/instguides
5. Optional: Installation of SAP APO Optimizer
Project ManufacturingCore System
Intranet Clients
SAP GUI
liveCacheMemory
OptimizationServer
SAP SCMSystem 4.1
RDBMS
(OPTIONAL)
BackendOLTP
SAP R/3 4.6Cor Higher
Plug-in 2004.1
RDBMS
162 An Overview of Installing SAP Applications on System i Models
Refer to the Installation Guide – SAP APO Optimizer – For SAP SCM 4.1 available under the topic mySAP Business Suite Solutions at:
http://service.sap.com/instguides
Installation of the mySAP SCM ServermySAP SCM is part of the mySAP Business Suite. Therefore, the installation is based on the SAP NetWeaver ´04 and on the SAP Web Application Server 04. We described the concepts, the planning, and preparation activities, and the single steps of the installation procedure of the SAP Web Application Server previously in this chapter. The following is the list of activities for the mySAP SCM server installation:
From the Table of Contents of the SAP NetWeaver ´04 Installation Guide SAP Supply Chain Management Server 4.1 ABAP: IBM Eserver iSeries, we show you the considerations, planning, and preparation activities before the installation and the post-installation steps.
In this guide there are also special checklists for:
� SAP SCM (Central System)� SAP SCM (Distributed System)� Dialog Instance
Implementation considerations� Basic system variants� Installation components� Distribution of installation components for:
– SAP SCM ABAP– SAP SCM ABAP+ Java– SAP Web AS Java for SAP SCM
� Setting the time zone environment variable� Adjusting startup program QSTRUP� Distribution of libraries on ASPs� Adding a user ASP� Configuring the TCP/IP� Adjusting the relational database name� Preparing the active directory� Installing English as a secondary language� Setting Up the transport directory� Preparing the Windows host for the SAP system installation� Preparing a Windows User Account and i5/OS user profile� Installing TMKSVR and creating an installation share� Choosing an SAP system ID
Installation process activities� Running SAPinst� Input for the Installation
Post-Installation activities� Granting authorizations for Operating System Collector Programs� Starting and stopping the SAP system� Logging on to the SAP system� Installing the SAP online documentation� Installing the SAP license� Starting the SAP Presentation GUI� Checking SAP system services� Adjusting the menu and IMG structure� Changing passwords of created users � SAP system users� System i users� Removing the SAPinst installation files� Accessing a remote database� Configuring SAProuter and SAPNet – R/3 Front End� Configuring the Transport Management System� Performing basic operations� Configuring the number of work processes� Installing additional languages� Activating the Integrated Internet Transaction Server� Performing the client copy� Performing a full backup
5.5 Installation of mySAP Product Lifecycle Management
mySAP Product Lifecyle Management (PLM) is part of the mySAP Business Suite. Although it is not as well-known as mySAP ERP or mySAP CRM, there are increasing demands for this application. We provide a short overview of this SAP application, what it is about, how is it handled, and how it is installed.
Note: For all these mySAP SCM concepts, planning, preparation, installation, and post-installation activities, see the corresponding considerations and procedures described in 5.2.2, “mySAP ERP installation planning activities” on page 115 and the following.
164 An Overview of Installing SAP Applications on System i Models
5.5.1 About mySAP PLM
mySAP Product Lifecycle Management (PLM) is a comprehensive end-to-end solution that covers product innovation, engineering and design, new product introduction, production ramp-up, and the management of ongoing engineering changes that are seamlessly communicated to mySAP SCM. Additionally, for plant operators, mySAP PLM provides an integrated solution to improve their asset utilization from the investment decision to maintenance management and replacement.
The key functional areas of mySAP PLM include the following:
� Life-cycle data management
Provides integrated product and process engineering capabilities for managing requirements, bills of material, routing and resource data, recipes, CAD models, and related technical documentation. It also provides sophisticated change management spanning from engineering to production to service, which ensures consistency of product knowledge.
� Life-cycle collaboration
Integrates business partners, customers, and suppliers to communicate data, such as project plans, documents, service bulletins, parts information, and product structures across virtual teams.
� Program and project management
Provides advanced capabilities to plan, manage, and control the complete development process, allowing project managers to control project structures, schedules, costs, and resources.
� Quality management
Provides integrated total quality management for all industries throughout the entire product life cycle, to provide the best quality from concept to production.
� Asset life cycle management
Manages physical assets and equipment throughout the whole life cycle of an asset to improve plant performance and equipment availability.
� Environment, health and safety (EH&S)
Provides a comprehensive answer to environmental, health, and product safety issues by helping enterprises to fully comply with government regulations and risk management.
5.5.2 About SAP cProject Suite 3.10 for mySAP PLM
SAP cProject Suite 3.10 for mySAP PLM consists of the applications cProjects 3.10 and cFolders 3.10.
Collaboration projectscProjects enables you to realize innovative ideas in development projects, simplify internal processes, implement recognized quality standards, and reduce costs incurred by errors. It is a cross-industry application that supports the entire process of your development project, from conception, through planning and quality checks, to the completion of the project. It also allows you to communicate with external partners or lead customers. cProjects incorporates internationally recognized standards (QS-9000) and is based on methods, such as Advanced Product Quality Planning (APQP), developed in the automobile industry.
Chapter 5. Installation of the mySAP Business Suite 165
Design collaboration with cFolderscFolders is an Internet-based collaboration application in mySAP PLM. This new collaboration platform enables you to collaborate with external business partners in virtual teams to optimize cross-enterprise processes. It allows you to efficiently share and exchange structured and unstructured information, such as data sheets and different kinds of documents, with internal team members, external partners, and suppliers. The application supports two different business scenarios for this purpose:
� Collaborative scenario, for example, for internal team members and external partners� Competitive scenario, for example, for use as a supplier’s bidding room
In addition, the tight integration of cFolders in Collaboration Projects (cProjects) in mySAP PLM connects in-house project management capabilities to secure external collaboration.
5.5.3 Integrated Business Content
The Integrated Business Content knowledge portal offers scenario-based access to generic descriptions, collaborative business maps, and best practices for mySAP Product Lifecycle Management. You can find comprehensive information about Integrated Business Content for mySAP Product Lifecycle Management on the SAP Service Marketplace at:
http://service.sap.com/ibc
5.5.4 mySAP PLM Software component matrix
Table 5-13 provides an overview of the software components required for the implementation of a specific scenario.
In the Master Guide for mySAP PLM - Using SAP cProject Suite 3.10, you find this matrix with details about the release versions of the components.
5.5.5 Technical implementation
The technical implementation depends on the system landscape and, in particular, on the security policy of the enterprise.
SAP supports three installation variants:
1. Installation of cFolders and cProjects within the intranet. Choose this installation when you use cProjects and cFolders applications for internal collaboration only. All participants in the collaboration must have access to the company’s internal network within the firewall.
2. Installation of cFolders and cProjects outside the intranet (usually DMZ/demilitarized zone). SAP does not recommend this installation due to security reasons. Choose this scenario if cProjects and cFolders applications should primarily be accessible to external collaboration partners.
3. Installation of cFolders outside the intranet (usually DMZ/demilitarized zone) and cProjects within the intranet. SAP recommends this scenario. Choose this installation when you use the cProjects for internal project management and cFolders for secure collaboration with external partners.
5.5.6 Installation of SAP cProjects Suite 3.10 and cFolders (part of cProjects)
SAP note 717650 provides information about installing and upgrading to cProject Suite 3.10 (CPROJECTS 310) using Transaction SAINT. It also provides prerequisites, preconditions, and the requested passwords for the installation of cProjects 3.10.
Use SAP transaction SAINT (in client 000) to install and upgrade to CPROJECTS 310.
5.5.7 Scenario: mySAP PLM Collaboration Projects
Figure 5-11 on page 168 provides an overview of the recommended technical infrastructure of the Collaboration Projects scenario.
MS Internet Explorer M O
cProject Suite WindowsFile Explorer Extension
O O
Easy Document Management O -
Business Package for Design Collaboration O -
Business Package for Projects O -
Note: You have to read this matrix vertically. That is, check which “business scenario” you want to implement and then verify which “software components” are mandatory (M = mandatory) and which are optional (O = optional) for your installation.
Software component Scenario
Collaboration projects Design collaboration with cFolders
Chapter 5. Installation of the mySAP Business Suite 167
Mandatory components� SAP Web Application Server 6.40
SAP cProject Suite is installed as an add-on, on SAP Web Application Server 6.40.
� SAP cProject Suite 3.10
SAP cProject Suite 3.10 is an add-on that you must install on the SAP Web Application Server. SAP cProject Suite 3.10 includes two applications:
– cProjects: A project management application– cFolders: A collaboration platform
Optional components� SAP BW
You can use SAP BW 3.50 with the BI Content 3.52 Add-On for additional evaluations. BI Content 3.5.2 contains predefined evaluations and reports.
� SAP R/3 4.6C SP47, 4.70 SP20, or mySAP ERP ECC 5.00 SP00
The ERP system contains additional PLM functions, financial data in case financial integration is used, and other ERP functions. You can use SAP R/3 to create object links to SAP R/3 business objects, such as documents, material masters, or purchase order items.
� R/3 Plug-In
Install an R/3 Plug-In on the R/3 system. It is a mandatory component when using an R/3 system.
Fire
wal
l
ITS
Optional
ExternalPartners
OptionalFi
rew
all
Host B
Technicaldocuments(drawings,structureinformation)
RFC
SAP Web ApplicationServer
Optional: cFolders
cFolders(Part of
cProject Suite 3.10)
SAP J2EE Engine
SAP ABAP Engine
SAP Java Connector
SAP Content Server
RFC(SNC)
Host A
SAP Web ApplicationServer
cProject Suite 3.10
SAP J2EE Engine
SAP ABAP Engine
SAP Java Connector
RDBMS
HTTP
WGate
AGate
R/3
Optional
SAP ContentServer
Plug-in
RDBMS
BW
Optional
RDBMS
RFC
RFC
RFC
HTTP
RDBMS
RFC (SNC)
R/3 DMS documents material, BOM
HTTP/HTTPS
168 An Overview of Installing SAP Applications on System i Models
� SAP Content Server
You can use the SAP Content Server for storing documents. If no SAP Content Server is available, documents are stored in WAS 6.40.
� ITS
You can use an Internet Transaction Server (ITS) to call SAP transactions directly using the HTML GUI.
� TREX
You can use TREX for full text search functions.
� WFM Core
You can install WFM Core on the cProjects system or on a separate instance. For more information about the WFM Core installation, see SAP notes 718626 and 565437.
� Business Package for Projects
You can use cProjects within the Business Package for Projects.
Installation sequenceHost A1. Install SAP Web Application Server.
Installing the required languages
2. Install Plug-In PI BASIS.3. Install SAP cProject Suite 3.10 Add-on.
Back-end systems1. Optional: SAP Business Information Warehouse
a. Install SAP BW.b. Install BI Content Add-On.c. Install R/3 Plug-In.
2. Optional: SAP R/3
a. Install SAP R/3 4.6C SP47, 4.70 SP20, or 5.00 SP00.b. Install SAP Content Server on R/3 System Host.c. Install R/3 Plug-In.
Optional: Internet Transaction Server (ITS)Optional: Host B1. Install SAP Web Application Server.
Installing the required languages
2. Install Plug-In PI BASIS.3. Install SAP cProject Suite 3.10.4. Install SAP Content Server on WebAS Host.
5.5.8 Scenario: mySAP PLM Design Collaboration with cFolders
This is the implementation scenario of PLM with cProjects and cFolders.
Note: Search functions for Knowledge Provider documents are currently not supported in Unicode environments.
Chapter 5. Installation of the mySAP Business Suite 169
Technical InfrastructureFigure 5-12 provides an overview of the recommended technical infrastructure of the Design Collaboration scenario.
Figure 5-12 mySAP PLM Design Collaboration with cFolders technical landscape
Mandatory components� SAP Web Application Server 6.40
SAP cProject Suite is installed as an add-on, on SAP Web Application Server 6.40.
� SAP cProject Suite 3.10
SAP cProject Suite 3.10 is an add-on that you must install on the SAP Web Application Server (Host A). SAP cProject Suite 3.10 includes two applications:
– cProjects: A project management application– cFolders: A collaboration platform
Optional components� SAP R/3 4.6B or higher
You can use SAP R/3 to create object links to R/3 business objects, such as documents, material masters, or purchase order items.
� R/3 Plug-In
Install an R/3 plug-in on the R/3 system. It is a mandatory component when using an R/3 system.
� SAP Content Server
You can use the SAP Content Server for storing documents. If no SAP Content Server is available, documents are stored in WAS 6.40.
Fire
wal
l
ITS
Optional
ExternalPartners
Fire
wal
l
Host B
Technicaldocuments(drawings,structureinformation)
RFC
SAP Web ApplicationServer
Optional: cFolders
cFolders(Part of
cProject Suite 3.10)
SAP J2EE Engine
SAP ABAP Engine
SAP Java Connector
SAP Content Server
RFC(SNC)
Host A
SAP Web ApplicationServer
cProject Suite 3.10
SAP J2EE Engine
SAP ABAP Engine
SAP Java Connector
RDBMS
HTTP
WGate
AGate
R/3
Optional
SAP ContentServer
Plug-in
RDBMS
BW
Optional
RDBMS
RFC
RFC
RFC
HTTP
RDBMS
RFC (SNC)
R/3 DMS documents material, BOM
HTTP/HTTPS
Optional
170 An Overview of Installing SAP Applications on System i Models
� ECL Viewer 4.0
You can use ECL Viewer 4.0 for visualizing documents within cFolders. Perform the following steps to download the new ECL Viewer 4.0 from the SAP Service Marketplace:
a. Go to:
http://service.sap.com/plm
b. Switch to Life Cycle Data Management → Integration → Visualization of Product Knowledge → Media Center.
c. Download the ECL Viewer zip file to your local hard drive (right-click document download icon).
d. Open the zip file and run the Setup.exe file. Ensure that all other applications are closed before starting the application.
� TREX 5.0
You can use TREX 5.0 for full text search functions.
� Business Package for Design Collaboration 60.1
You can use cFolders within the Business Package for Design Collaboration.
Installation sequenceHost B1. Install SAP Web Application Server.
Installing the required languages
2. Install Plug-In PI BASIS.3. Install SAP cProject Suite 3.10 Add-on.4. Optional: Install SAP Content Server for cFolders (Host B).
Host A1. Install SAP Web Application Server.
Installing the required languages
2. Install Plug-In PI BASIS.3. Install SAP cProject Suite 3.10 Add-on.
Optional back-end systems:1. SAP Business Information Warehouse
a. Install SAP BW.b. Install BI Content Add-On.c. Install R/3 Plug-In.
2. SAP R/3
a. Install SAP R/3 4.6B or higher.b. Optional: Install SAP Content Server for cProjects (on R/3 System Host).c. Install R/3 Plug-In.
Note: Search functions for Knowledge Provider documents are not currently supported in Unicode environments.
Chapter 5. Installation of the mySAP Business Suite 171
5.6 Installation of mySAP Supplier Relationship Management
mySAP Supplier Relationship Management (SRM) belongs to the mySAP Business Suite so we want to show you a short overview about its functions and installation steps.
5.6.1 SAP SRM Business overview
mySAP Supplier Relationship Management (SRM) maximizes the return on relationship with all suppliers across all categories of spend at all times. It covers the full supply cycle, from strategic sourcing to operational procurement and supplier enablement-leveraging consolidated content and master data. With mySAP SRM, you can collaborate with all suppliers for all purchased goods and services, so you can constantly optimize supplier selection, compress cycle times, and devise sourcing and procurement strategies.
To facilitate the implementation process, all information within this document is ordered by scenario. You can choose from several generic business scenarios and find all the information that is relevant for the technical implementation of a specific business scenario in this section. Each business scenario supports a number of variants. In this master guide only key variants are described in detail.
The complete mySAP SRM solution consists of the following top-level scenarios and business scenarios:
� Self-Service Procurement
Self-Service Procurement (Indirect Procurement) enables your employees to create and manage their own requirement requests. This relieves your purchasing department of a huge administrative burden, while making the procurement process both faster and more responsive.
� Plan-Driven Procurement
Plan-Driven Procurement (Direct Procurement) automates and streamlines ordering processes for regularly needed core materials. Since mySAP SRM is integrated with planning, design, and order-processing systems, you can link your procurement processes to a plan-driven strategy that gets you the materials you need for core business processes, exactly when you need them.
Plan-Driven Procurement integrates seamlessly with back-end systems such as enterprise planning and production systems. The scenario allows you to integrate operational procurement with your existing supply chain management solution.
� Service Procurement
E-procurement has produced great opportunities for saving costs in the purchasing process. However, companies generally fail to extend cost saving measures to services, even though services amount to more than 50% of annual purchasing volumes.
The Service Procurement business scenario within mySAP SRM covers a wide range of services such as temporary labor, consulting, maintenance, and facility management.
� Catalog Content Management
The Catalog Content Management business scenario provides a solution for creating, maintaining, and managing content within your e-procurement application.
� Strategic Sourcing
The sourcing application in SAP Enterprise Buyer provides professional purchasers with a wide range of actions and information to help them source their requirements. As a purchaser, you can use the interface to process the requirements and determine the best source of supply. After you have done this, you can create a purchase order or contract
172 An Overview of Installing SAP Applications on System i Models
directly from the sourcing application or SAP Bidding Engine. Save it either locally or in the back-end system, depending on the technical scenario you are using (classic, extended classic or stand-alone).
� Spend Analysis
Spend Analysis is a decision support application that enables you as a purchaser to analyze your total spend across system and organizational boundaries. You can perform the analyses per supplier, per product, or per product category.
SRM Business scenario and software componentTo see which business scenario of this mySAP Business Suite solution uses which component you find an overview in the SRM Master Guide. In this matrix, you can derive which module you have to install for which business scenario.
Note: Read this matrix vertically. That is, check which “business scenario” you want to implement and then verify which “software components” are mandatory (M = mandatory) and which are optional (O = optional) for your installation.
Software component Business scenario
SSPa PPb SSc CMd SPe SAf
SAP Supplier Relationship Management Server 5.0 (SAP SRM Server) (based on SAP Web Application Server 6.40, comprises SAP Enterprise Buyer, SAP Bidding Engine, and Supplier Self-Service)
M M M M M M
SAP Internet Transaction Server (SAP ITS) 6.20/ 6.40
M M M M M M
SAP Internet Pricing and Configurator (SAP IPC) 4.0
O O - - O -
SAP Business Information Warehouse (SAP BW) 3.5 plus SAP BI Content 3.5.2 Add-On
O O O - O M
SAP Catalog Content Management 2.0 Add-On
M - M M O -
Search and Classification (TREX) 6.1 M(*) O M(*) M O O
SAP Enterprise Portal 6.0 (Portal Server) O O O O O O
Business Packages for SAP Enterprise Portal:� Business Package for SRM� Business Package for Supplier Portal O O O O O O
O O O - O -
Live Auction Cockpit Web Presentation Server (LACWPS) 2.0
- - O - - -
SAP Exchange Infrastructure 3.0 (SAP XI) O M O M O O
Chapter 5. Installation of the mySAP Business Suite 173
The installation of the single software component is partially described here in the book. Always you find the installation guides for any of these software components in the SAP Marketplace at:
http://service.sap.com/instguides
� For your SAP software component� For your platform� For that the activities you want to perform:
– Overview (master guide)– Planning and preparation– Installation and post-installation
Overall installation sequenceFigure 5-13 on page 175 contains the overall installation sequence of mySAP SRM containing the components of all mySAP SRM business scenarios. Depending on the business scenarios of mySAP SRM that you want to implement, your installation sequence can only contain a subset of these software components.
For more information concerning the installation sequence of each business scenario, see section Business Scenario → Implementation Sequence in the SRM Master Guide.
Process integration content (XI content) for
� SAP SRM Server 5.0� SAP Catalog Content Management 2.0� SAP RosettaNet 1.0 (**)� SAP BI Content 3.5.2
O M O M O O
M - M M O -
O O - - O -
O O - - O -
SAP GUI for Windows 6.20 or higher M M M M M M
SAP R/3 OLTP as of 3.1I or SAP R/3 Enterprise 4.70 (SAP R/3 4.6C recommended)
O M O - O O
SAP R/3 Plug-In 2004.1 or higher version if one is available
O O O - O O
a. SSP: Self-Service Procurementb. PP: Plan-Driven Procurementc. SS: Strategic Sourcingd. CM: Catalog Content Managemente. SP: Service Procurementf. SA: Spend Analysis(*) = You require Search and Classification (TREX) in the following cases:
You use SAP Catalog Content Management Add-OnYou use the contract management application to efficiently search for information
(**) = With the current release, the RosettaNet standard is not generally supported. If you wantto use the RosettaNet standard, you need to implement it on a project basis.
Note: Not all of these guides are always available in the SAP Marketplace for all of the software components.
Software component Business scenario
SSPa PPb SSc CMd SPe SAf
174 An Overview of Installing SAP Applications on System i Models
You can install software components on the same level in parallel (for example, different project groups can install SAP R/3 and SAP XI in parallel). This information is especially valuable if you want to implement more than one mySAP SRM business scenario at a time.
Figure 5-13 SRM overall installation sequence
Installation of the mySAP SRM ServermySAP SRM is part of the mySAP Business Suite. Therefore, the installation is based on the SAP NetWeaver ´04 and of the Web Application Server 04. We described the concepts, the planning and preparation activities, and the single steps of the installation procedure of the SAP Web Application Server previously in this chapter. The following is the list of the activities of the mySAP SRM server installation:
mySAP SRM Installation planning activities� Choose your basic system variant and decide how you want to distribute the SAP system
instances.
� Check the SAP system components.
� Before you install your SAP system, you have to know how you are going to manage your user data.
� Identify the basic SAP system parameter.
� Decide whether you want to use the SAP System Landscape Directory.
The following planning activities are optional and only apply, if you want to perform one of the following:
Installation Sequence of mySAP SRM
SAPR/3
SAPITS6.20
SAPIPC
SAPCCM
SRMServer(SUS)
SAPBW
SAPEP
SAPServer(EBP)
LACWPS TREX
SAPXI
Plug-in
SAPIPC
Plug-in
Remark:Some of these software components maybe optional for some/all business scenariosor not part of some business scenarios atall. See the Software Component Matrix formore information.
Time
Chapter 5. Installation of the mySAP Business Suite 175
� Installation of multiple SAP systems on a single System i server� Using the Lightweight Directory Access Protocol (LDAP) for SAP Logon for the Microsoft
Management Console (MMC).
LDAP can also be used for other purposes (for example, the LDAP Connector). If you do not want to use LDAP for SAP Logon or MMC, no LDAP-specific installation steps are required now.
mySAP SRM Installation preparation activities� Check the general information hardware and software requirements.� Check the hardware and software requirements.� Check Qp2Term, Qp2Shell, and the OS/400 Portable Application Solution Environment.� Install the Qshell.� Check and adjust the System i system values.� Set the time zone environment variable.� Adjust the startup program QSTRUP.� Check the distribution of libraries on ASPs.� Add a user ASP.� Configure the TCP/IP.� Adjust the relational database name.� Install English as a secondary language.� Install additional languages.� Set up the transport directory.� Prepare a Windows user account and System i user profile.� Install TMKSVR and create an installation share.� Install the SAP front-end software.� Check the general information about preparing the system for SAPinst.� Prepare the system for the SAPinst GUI.
Optionally you have to prepare the active directory for use with the SAP system only if you decided to use LDAP for SAP Logon or Microsoft Management Console (MMC).
mySAP SRM Installation activities� Prepare the installation DVDs.� Install an SAP instance using SAPinst.� Check the prerequisites before starting SAPinst: all instances.� Run SAPinst to install the instances of your SAP system.� Check using the SAPinst GUI.� Check interrupted installation with SAPinst.� Change the SAPinst GUI host.� Start SAPinst GUI on another host.� If you decided to use a generic LDAP directory and you did the necessary preparatory
steps as described in “Part I: Planning and Preparation”, you have to create a user for LDAP directory access.
Note: For all these mySAP SRM planning activities point 1 to 5, see the corresponding considerations and procedures as described in the 5.2.2, “mySAP ERP installation planning activities” on page 115 and the following.
Note: For all these mySAP SRM preparation activities point 1 to 19, see the corresponding considerations and procedures as described in the 5.2.3, “mySAP ERP installation preparation activities” on page 116 and the following.
176 An Overview of Installing SAP Applications on System i Models
mySAP SRM Post-installation activities� Grant authorizations for operating system collector programs.
� Start and stop the SAP system.
� Log on to the SAP system.
� Set up the load balancing.
� Check that the SAP system services are present.
� Install the SAP online documentation.
� Install the SAP license.
� Remove the SAPinst installation files.
� Access a remote database.
� Configure SAProuter for Remote Connection to SAP Support.
� If you installed a unicode system, run unicode-specific reports.
� Configure the transport management system (TMS).
� Perform the basic operations.
� Check the configured number of work processes.
� Install additional languages.
� Activate the integrated Internet Transaction Server (optional).
� Apply the latest kernel and support packages.
� If you install SAP Web AS as basis for an SAP component that uses the Knowledge Provider (KPRO) component (for example, SAP BW or SAP KW), schedule asynchronous indexing and de-indexing.
� If you want to use KPRO, check for problems in IMS monitoring.
� Perform the client copy.
� Check the RFC Destination.
� You can change the passwords of created System i users.
� Change passwords of created user.
� Perform a full backup.
� Prepare the SAP system for business application.
As an example for a business scenario, we show you the installation of the mySAP CRM Self-service business scenario.
Note: For all these mySAP SRM installation activities point 1 to 9 see the corresponding considerations and procedures as described in 5.2.4, “mySAP ERP installation activities” on page 125 and the following.
Note: For all these mySAP SRM post-installation activities point 1 to 25, see the corresponding considerations and procedures as described in the 5.2.5, “mySAP ERP post-installation activities” on page 129 and the following.
Chapter 5. Installation of the mySAP Business Suite 177
mySAP CRM Self-service Procurement business overviewSelf-Service Procurement (Indirect Procurement) enables your employees to create and manage their own requirement requests. This relieves your purchasing department of a huge administrative burden, while making the procurement process both faster and more responsive. For more information about Self-Service Procurement, see the documentation Business Scenario Descriptions for mySAP SRM.
Deployment optionsThis section describes the deployment options that are supported for Self-Service Procurement. However, the open and flexible design of SAP Enterprise Buyer also allows you to combine the described deployment options:
� Classic deployment
You implement the SAP Enterprise Buyer system and one or multiple ERP systems. All Materials Management (MM) is mapped in the ERP system. Additionally, Accounting (FI) and Controlling (CO) are processed in the ERP system.
� The extended classic deployment
You implement the SAP Enterprise Buyer system and one or multiple ERP systems. The complete procurement process takes place in the SAP Enterprise Buyer system. The purchase order in the SAP Enterprise Buyer system is the leading purchase order. Goods receipts (confirmations) and invoices can be pre-entered in the SAP Enterprise Buyer system. Purchase order data is updated in the back-end system from SAP Enterprise Buyer. Goods receipt and invoice data is updated from the back-end system.
� The stand-alone deployment
In this deployment scenario, you have no Materials Management (MM) in your ERP system and are using the Materials Management functions in the SAP Enterprise Buyer system for all non-production procurement. If required, you can connect Accounting (FI) and Controlling (CO). However, this is optional.
mySAP SRM Self-service Procurement technical landscapeFigure 5-14 on page 179 shows the underlying architecture of Self-Service Procurement including existing connections.
178 An Overview of Installing SAP Applications on System i Models
mySAP SRM Self-service Procurement installation steps1. Installation of SAP Exchange Infrastructure (optional)
Refer to the Master Guide – SAP NetWeaver ´04 (section SAP Exchange Infrastructure), part of the corresponding installation package.
The use of SAP Exchange Infrastructure is optional. It is required for outbound XML-based messaging or for connection of non-SAP planning or execution systems. With the role of an Integration Server, SAP Exchange Infrastructure requires a dedicated SAP Web Application Server. This means that running applications in other clients of the same SAP Web AS is not supported.
If you installed SAP Exchange Infrastructure, import integration objects for mySAP SRM on the SAP Exchange Infrastructure.
Import the XI content for the following components:
– SRM Server 5.0– SAP Catalog Content Management 2.0– SAP BI Content 3.5.2
Download and install the latest SLD Content from the SAP Service Marketplace under the topics Download → Support Packages and Patches → Entry by Application Group → Additional Components → SAP Master Data for SLD at:
http://service.sap.com/swdc
Web AS6.40
Front End
Web Browser
Firewall
https/ https/
Enterprise Portal
CCM
Search&
Classif.
BW SRM Server
Bidding Engine
ITSBI_CONT
IGS
BW
SRM Server
PI_BasisEBP
Search&
Classif.
IPC
IPCSUS
Application Gateway
SAP Exchange Infrastructure 3.0
XML XMLXMLRFC RFC RFC RFC
Chapter 5. Installation of the mySAP Business Suite 179
2. Installation/integration of SAP R/3 or SAP R/3 Enterprise (SAP R/3 4.6C recommended)
Refer to the SAP R/3 Installation on <Platform>: <Database> part of the corresponding installation package or Installation Guide – SAP R/3 Enterprise on <Platform>: <Database> part of the corresponding installation package.
SAP R/3 and SAP R/3 Enterprise are not part of this installation and are, therefore, also not contained in the installation package. A separate SAP R/3 or SAP R/3 Enterprise installation package is, therefore, required.
Installation of SAP R/3 Plug-In:
– For the installation, see SAP notes 704564 (R/3 plug-in: PI 2004.1 installation/delta upgrade) and 708736 (Release restrictions R/3 Plug-in 2004.1).
– For more information about SAP R/3 Plug- Ins, see the SAP Service Marketplace at:
http://service.sap.com/r3-plug-in
The installation of SAP R/3 Plug- In is not required, if local PO handling is performed exclusively or if no SAP R/3 system is used as backend system.
3. Installation of SAP SRM Server comprising:
– SAP EBP 5.0– SAP Bidding Engine– Supplier Self-Service
Refer to the Installation Guide – SAP SRM Server on <Platform>: <Database>
4. Installation of SAP IPC
Refer to the Installation Guide – SAP IPC Server and Installation Guide – SAP IPC Web Applications.
This is a mandatory component for Self-Service Classic Extended and Self-Service Lean Procurement. It is an optional component for Self- Service Procurement/Classic Deployment. Nevertheless, if you operate Self-Service Procurement/Classic Deployment without SAP IPC, the following restrictions apply:
– The products are normally selected from a catalog. In addition, you are still able to select products from the product master or user defined text items.
– The product price must remain in the /1CN/CBPSAP118 master record table.
– Contracts and, in particular, discounts are not taken into account.
– You cannot use interlinkages and scales.
– Currency changes can only happen on the item level, and not on the document level.
5. Installation of SAP Internet Transaction Server (ITS)
Refer to the SAP Web Installation Guide located on the SAP Server Components CD.
You can either use the internal SAP ITS, which is integrated into the SRM Server (SAP ITS 6.40) or use the stand-alone SAP ITS (SAP ITS 6.20).
6. Installation of SAP Catalog Content Management
For information about the installation, see SAP note 835170.
7. Installation of Search and Classification (TREX)
Use the following parameters during the installation (for more information, see the documentation Installation Guide – Search and Classification (TREX)):
Note: The internal SAP ITS is not supported until SRM Server 5.0 Support Package 01.
180 An Overview of Installing SAP Applications on System i Models
– Perform the installation steps to set up an RFC connection.
– Automatic language recognition is not required. You can adopt the default settings for document languages during the installation of Search and Classification (TREX).
– No Python extensions are required.
Refer to the Installation Guide: Search and Classification (TREX) 6.1.
8. Installation of SRM Server for SAP SUS.
Refer to the Installation Guide – SRM Server on <Platform>: <Database>. You can either install a separate SRM Server for SUS or use the SRM Server that you have installed in step 3 for this purpose.
Installation of SAP IPC for SAP Supplier Self-Services (SUS).
Refer to the Installation Guide – SAP IPC Server and Installation Guide – SAP IPC Web Applications
9. Installation of SAP BW (optional):
a. Install SAP Web AS ABAP 6.40, which includes SAP BW 3.5, PI_BASIS 6.40 2004_1, and SAP IGS 6.40.
Refer to the Installation Guide – SAP Web Application Server ABAP on <Platform>: <Database>.
b. Configure the database of your SAP Web AS for SAP BW according to SAP note 567745.
c. Install SAP BW Business Content Add-On BI_CONT 3.5.2 on the SAP Web AS ABAP system according to SAP note 717812.
For a minimal system landscape, you can install SAP BW on your SAP SRM Server. Install the SAP BW Business Content Add-On on the SRM Server as described in SAP note 717812. For more information, see also the documentation Master Guide – SAP NetWeaver ´04, section SAP BW.
The use of the SAP BW is optional. See the description of this component in the section Software Components Overview to decide if it is required for your business scenario.
10.Installation of SAP Enterprise Portal (optional)
Refer to the Master Guide – SAP NetWeaver ´04 (section SAP Enterprise Portal, part of the corresponding installation package.
The use of SAP Enterprise Portal is optional. It is required for the integration of mySAP SRM into a portal.
11.Import the following Business Packages into the Enterprise Portal:
– Business Package for SRM– Business Package for Supplier Portal
Download the Business Packages from the SAP Developer Network under the topic Portal Content Portfolio at:
http://www.sdn.sap.com
Chapter 5. Installation of the mySAP Business Suite 181
182 An Overview of Installing SAP Applications on System i Models
Chapter 6. Special SAP installations
This chapter describes the concepts, preparation and installation of special SAP solutions. It focuses on the techniques about how to use and how to perform special installations on an SAP system. We discuss the following topics:
� Installation of a 3-tier landscape:
– Homogeneous System i 3-tier landscape
– Heterogeneous 3-tier landscape with:
• A Windows application server• A Linux application server
With an additional application server you run what is known as a 3-tier landscape. In this chapter we describe how to prepare and install an additional application server for both Windows and Linux.
� Standalone SAP gateway based on:
– A Web Application Server 6.xx– SAP Basis 4.6D
With a standalone gateway you can connect a remote database. This is an important consideration when exchanging data between an SAP and non-SAP system.
� Set up an SAP system by system copy
The steps to set up an identical SAP system are described for a homogeneous SAP system copy. Additionally we mention the function of a heterogeneous system copy.
� Installation of SAP systems before Web Application Server
Here we give you short note how the installation of an SAP system was done before SAP Web Application Server. This might be necessary because already there exists some SAP systems based on previous SAP releases and which could and sometimes must be connected to the current SAP systems.
For example the extended maintenance of R/3 Release 4.6C is in effect until the year 2009.
There are a lot of SAP components and applications that we cannot describe in this document, because their installation steps are beyond the scope of this book. However, we want to mention them and advise where you can find more details.
� Planning an SAP upgrade
After explaining the numerous SAP installations, we provide a short extract about how to plan an SAP upgrade.
6.1 Installation of a 3-tier landscape
In this section we explain a 3-tier SAP system landscape especially in respect to an installation on IBM System i models. Before we describe the installation aspects we give you definitions of a 3-tier system landscape and show you where you find more and detailed information and the official installation guides.
In this section we also mention the installation of a 3-tier landscape together with Windows and Linux application servers.
6.1.1 Definition of a 3-tier landscape
This section discusses how you can distribute the SAP instances for the different SAP system variants. You can install all mandatory SAP system components on either one of the following options:
� A single host (2-tier) � Separate hosts (3-tier)
In contrast to a 2-tier installation, 3-tier systems require additional tasks in order to ensure problem-free operations. Typical problems are described, along with their solutions and parameter settings. If system problems or performance bottlenecks occur, then the points listed here should be checked and, if necessary, corrections made.
This section discusses the following landscape setups:
� A 3-tier landscape in a homogeneous System i landscape. In this setup, the database and application servers are on System i configurations.
� A 3-tier landscape with a database server on a System i server and an application server on Windows.
� A 3-tier landscape with a database server on a System i server and an application server on Linux.
Setting up a 3-tier system (a distributed system) involves first installing a 2-tier system. Then by installing one or more additional application instances, you switch to a distributed system, also called a 3-tier system. The setup of a 2-tier system follows the preparation concept and installation sequence that are described in earlier chapters of this Redpaper.
6.1.2 Documentation and installation guides for 3-tier installations
SAP 3-tier installation means, besides other technical definitions, the installation of an additional SAP Web application server. So mainly you will want to find out where to find more information about the installation of an SAP Web application server.
184 An Overview of Installing SAP Applications on System i Models
The necessary documentation, including planning and installation manuals, and the following configuration guides are found in the SAP Service Marketplace:
http://service.sap.com/instguides
There is no alias or quick link to a special 3-tier area. You can find all documentation within the topic labeled instguides. In SAP NetWeaver → Release 04 you can find the general Installation & Implementation Documentation Center. Starting from here you find all available SAP documentation concerning:
� Overview documentation
� Guides for:
– Planning for installation and operation– Installations– Upgrades– Operations– Maintenance– SAP notes for NetWeaver ’04
� Supplementary information such as:
– Security Guide– High availability documentation – Sizing guidelines and recommendations– The Platform Available Matrix for technical and release planning on SAP NetWeaver– Best practice information– How-to guides for specific tasks
� Guide finder
We focus the Installation guides which you can access directly at:
http://service.sap.com/nw04installation
At this site, select the SAP Web AS → SAP Web AS 6.40 SR1 and Related Documentation.
General SAP Web Application Server DocumentationAt the entry window for SAP Web AS 6.40 SR1 Installation and Related Documentation you find documentation for:
� SAP Web Application Server � Adobe Document Services � SAP Front End Installation � SAP Internet Graphics Service � Homogeneous and Heterogeneous System Copy � System Landscape Directory � Java Troubleshooting Guide � XML-Based Data Archiving � High Availability with MSCS for SAP Web AS 6.40 SR1 Java
On this window you also find Installation Guides for the SAP Web Application Server 6.40 SR1.
The installation documentation consists of two guides:
� Part I: Planning and Preparation
This guide is specific to your operating system (OS). Therefore, you no longer require SAP Software on UNIX: OS-Dependencies.
� Part II: Installation and Post-Installation Activities
This guide is operating system specific and provides all necessary information about installing your system with SAPinst and the post-installation steps required to successfully complete your installation.
On the bottom of the window you are asked to choose the database. We select IBM DB2 Universal Database for iSeries.
Installation guides of SAP Web Application Server on System i modelsAt this link we see the installation guides listed in Figure 6-1. These guides have the necessary information for the installation of additional SAP application server for a System i database server.
Figure 6-1 Installation guides in the SAP Marketplace
6.1.3 SAP installation guides for additional Web AS ABAP
In the following sections we reference the guides listed in Figure 6-1. Specifically, the ABAP documentation consists of:
� Part I: Planning and Preparation– 1a: SAP Web AS ABAP (iSeries) – 2a: SAP Web AS ABAP on Linux - Dialog instance only – 3a: SAP Web AS ABAP on Windows - Dialog instance only
� Part II: Installation and Post-Installation – 1b: SAP Web AS ABAP (iSeries) – 2b: SAP Web AS ABAP on Linux - Dialog instance only – 3b: SAP Web AS ABAP on Windows - Dialog instance only
SAPNet-Guides_DB4
Installation of SAP Web Application Server 6.40 SR1 on IBM eServer iSeries
Part I: Planning and Preparation
• SAP Web AS ABAP (iSeries)• SAP Web AS Java (iSeries)• SAP Web AS ABAP on Linux – Dialog instance only• SAP Web AS Java on Linux – Dialog instance only• SAP Web AS ABAP on Windows – Dialog instance only• SAP Web AS Java on Windows – Dialog instance only
Part II: Installation and Post-Installation
• SAP Web AS ABAP (iSeries)• SAP Web AS Java (iSeries)• SAP Web AS ABAP on Linux – Dialog instance only• SAP Web AS Java on Linux – Dialog instance only• SAP Web AS ABAP on Windows – Dialog instance only• SAP Web AS Java on Windows – Dialog instance only
Note: For information about the installation of an additional Java application server check the installation guides listed in Figure 6-1.
186 An Overview of Installing SAP Applications on System i Models
6.1.4 Differences between 2-tier and 3-tier landscapes
The main concepts and management of 2- and 3-tier systems and what are the biggest differences between these two classes include:
� 3-tier systems invariably display higher database response times than 2-tier systems. This is due to the network overhead between the application and database servers. Nevertheless, a 3-tier system provides a significant reduction of the database server load, so that more users are able to work in parallel on the system.
� Set the following parameters in a 3-tier landscape in either the default profile or in all instance profiles:
SAP note 14754 contains detailed information about this.
� The majority of instance parameters must have the same setting in all instances. There are a few instance-specific exceptions, for example:
INSTANCE_NAMESAPSYSTEMrdisp/wp_no_xxx
Pay special attention to this point when additional instances are added to an existing system.
� In contrast to the point above, all memory parameters of the instance profiles are highly server-dependent.
� If you intend to use logon load balancing, then implement it as described in SAP note 26317.
� Ensure that host names are correctly defined everywhere, as SAP note 60252 describes (for example, upper and lower case characters).
� Make sure that the EDRSQL server is active on the database server and on all System i application servers. If required, start the EDRSQL server with the following command:
STRTCPSVR SERVER(*EDRSQL)
� The TCP/IP send and receive buffers on System i servers must be at least 1 MB (1048576 bytes) in size, as described in SAP note 92589. Restart TCP/IP afterwards in order to activate any changes.
� Make sure that the system values on all System i servers are defined in accordance with SAP note 428855.
� Because of the higher database response times, the SAP buffers have more significance in a 3-tier system than in a 2-tier system. For this reason, avoid nightly system restarts on 3-tier systems. SAP note 202593 describes how an online backup can be used to avoid stopping the system in order to take a backup.
� If TCP/IP is used on a 3-tier system, then the CHKXDA tool described in SAP note 450351 should also be installed and permanently activated on System i models. Refer to the CHKXDA SAP Tool topic in Implementing SAP Applications with System i and i5/OS, SG24-7166 for information about the CHKXDA tool.
� The database monitor causes an additional load on the database server. If you do not analyze the statistical information about SQL commands, for example, in transaction ST04, then you can switch-off the database monitor with the following profile parameter setting:
as4/dbmon/enable=0
Chapter 6. Special SAP installations 187
If the database monitor is to be activated, then ensure that all the latest PTFs are installed, for example Informational APAR II13868 for i5/OS V5R3. See SAP note 135369 and SAP note 321729 for more information.
� If the database server can be addressed via different host names, then configure the local instances in such a way that the host name matches that found with CFGTCP Option 12 (case-sensitive). Otherwise the work processes run via Unix-Domain-Sockets or TCP/IP, which is somewhat slower than a local connection.
You can spot such incorrect configurations in the developer trace. If the fields named dbjobname (mostly QXDARECVR SAP database shadow job) and wpjobname contain different values on a DB-server instance, then you have an example of the situation described above.
This is the normal situation from Release 6.10 onward if the following profile parameter has been set:
dbs/db4/allow_cancel = 1
� If, in spite of the correct implementation of the points given above, the system performance is still unsatisfactory, then check the sizing of the whole system.
The database server, in particular, can be too small if a central instance is installed on the same server. Contact your IBM account manager in order to arrange for a sizing check. Meanwhile, you can reduce the load on the database server by shifting some other processes to the application server (for example batch jobs or updates).
6.1.5 The System i file system of a 3-tier landscape
There are two important SAP directory trees in a 3-tier system landscape:
� /sapmnt � /usr/sap
The /sapmnt directory tree is a specific feature for SAP on UNIX-type operating systems including System i models. It is the location where shared file systems of other hosts that belong to the SAP system landscape should be mounted. In most UNIX cases this is accomplished by Network File System (NFS) mounts.
The i5/OS mechanism to share Integrated File System (IFS) directories between hosts is linked via /QFileSvr.400.
/usr/sap/SID is the local work directory tree of an SAP system and its instances. In some places it contains links to /sapmnt/SID.
There are four special directories in /usr/sap/SID/SYS. Two are common for any system, global and profile. For SAP systems containing Java there are two additional directories named j2ee and jdbc. On UNIX and System i models, these directories link to /sapmnt/SID.
There are also the directories named /usr/sap/SID/SYS/exe and /sapmnt/SID/exe which have no individual characteristic for 3-tier landscapes.
An important directory is /usr/sap/trans which is the SAP system transport directory. If you have more than one SAP system on more than one host, no matter which operating system is run, normally this transport directory has to be shared in order to have a working SAP transport system.
In the 6.xx releases, there is an i5/OS specific configuration directory named config in /usr/sap/trans which contains information about the system configuration.
188 An Overview of Installing SAP Applications on System i Models
Figure 6-2 shows you the standard SAP file system. Depending on the installation option selected, you need to set up the following standard SAP file system and also the database file system.
I
Figure 6-2 IFS structures for the Web Application Server, ABAP and Java
The SAP file system for a system on a single System i hostThe most simple setup of SAP directories occurs when only one System i host is involved in the SAP system landscape. It is advisable to understand this concept first in order to understand more complex landscapes.
/sapmnt is a physical directory. It contains a subdirectory SID named like the system ID of the system.
/usr/sap is a physical directory. It also contains a physical subdirectory SID which contains a directory named SYS.
In /sapmnt/SID> there are special directories known as physical directories, for example profile. These directories are linked into /usr/sap/SID/SYS.
The directory /usr/sap/trans is linked to /sapmnt/trans by default.
The SAP file system for a system distributed to multiple System i hostsIf System i models are involved in any system configuration, we can assume the central instance host is a System i host. Other system configurations are currently not supported by SAP.
transtrans
ABAP path(physical/symbolic)
tmp
tmp
j2ee
jdbc
Java path(physical/symbolic)
Link target
IFS Structures: SAP Web AS ABAP and Java
Central Services
Central Instance
SAPJ2EE<nn>
Kernel Library
data
log
sec
workSCS<nn>
j2ee
SDM
...
workDVEBMGS<nn>
igs
cluster
os_libs
...
usr sap <sid> SYS
jdbc
exe
global
profile
j2ee
run
sapmnt <sid> profile
global
exe
jdbc
j2ee tbx
ntv db2_classes.jar
jt400.jar
<user defined> jt400.jar
QIBM db2_classes.jar...
Chapter 6. Special SAP installations 189
If you set up a multi-System i environment, the special directories in /sapmnt on the non-central instance hosts are linked to the central instance host using /QFileSvr.400. For example /sapmnt/SID/profile on a non-central instance host is a link to /QFileSvr.400/central-instance-host/sapmnt/SID/profile.
Be aware that you link to a physical directory on the other host and not to a symbolic link. This can lead to confusion, since links are resolved locally.
The special directories inside /usr/sap/SID/SYS are always linked to the local /sapmnt/SID. This is true for any host.
The SAP file system for a system containing a Windows hostThe i5/OS technique where a symbolic link from /usr/sap points to the physical directory /sapmnt does not exist on Windows systems. Windows systems only have the /usr/sap/SID directory tree with /usr/sap/SID/SYS as the place for global data.
When running a Windows application server, it shares the executables, profiles, and the transport directory with the central instance or the central transport system. See Figure 6-3.
Figure 6-3 IFS structures with a Windows dialog instance (application server)
On System i configurations, there are two shares for directory /usr/sap:
� sapmnt is a binary share that does not convert data� saptext is a share that converts text data from EBCDIC to ASCII.
usr sap <sid> SYS jdbc tbx jt400.jar
D<nn> work
. . .
j2ee cluster
. . .
os_libsrun_ntexe
profile
SYS<sid>
trans
Windows Dialog
usr sap <sid> SYS profile
global
exe run
run_nt
trans
tmpSystem i DB HostABAP path
(physical/symbolic)
Binary share
saptext
tmp
trans
j2ee
jt400
trans
Java path(physical/symbolic)
Win share
Link target
Converting share
sapmnt
\\centralhost\sapmnt
\\saptranshost\sapmnt
IFS Structures: Windows Dialog Instance
190 An Overview of Installing SAP Applications on System i Models
The saptext share is not used in a default installation, but can be used when EBCDIC data needs to be accessed from the Windows server™. The shares are created during the installation by the command CRTSAPSHR (in the kernel library).
The other directories are much the same as on a System i application server, except that the kernel executables are now taken from the run_nt subdirectory.
Data from remote hosts is accessed by accessing a share sapmnt on these remote hosts, sharing their /usr/sap directory. Also, UNIX hosts that are part of such a heterogeneous system environment need to provide a share of /usr/sap by means of tools like Samba.
Be sure that the sapmnt share on the System i host points to the directory \usr\sap and not to \sapmnt as in earlier releases.
If you intend to install an application server on Windows connecting to System i servers, read SAP note 667233.
The SAP file system for a system containing a UNIX host (e.g. Linux)The setup of the SAP file system between an System i configuration and a UNIX type host looks similar to a standard distributed installation. Refer to “The SAP file system for a system distributed to multiple System i hosts” on page 189. One major difference is that NFS mounts are used instead of /QFileSvr.400.
The System i central instance exports its /sapmnt/SID directory via NFS. On the UNIX-type host, the special directories (global, profile, jdbc, j2ee) are mounted into the local /sapmnt/SID. You need the sub-directories jdbc and j2ee together with a Java Web AS.
Also, the /usr/sap/trans directory has to be set up which mostly uses the same mechanism.
Setting up the file system before starting a new installationFor installations based on 6.xx which still use the /usr/sap/trans/config directory, set up /usr/sap/trans as described in the previous sections. If you install anything on a non-central instance host, for example dialog instances, it is necessary to have /usr/sap/trans set up beforehand, even if a central instance does not yet exist.
For installations on a Windows host, read and apply the recommendations in SAP note 667233.
For installations on a Unix host it is necessary to set up the NFS mounts to the special directories global, profile, j2ee and jdbc in /sapmnt/SID before you start with the installation.
For more details refer to SAP note 667233 and SAP note 705962.
6.1.6 Homogeneous System i 3-tier landscapes
In this section we discuss:
� The set-up of a 3-tier landscape in a homogeneous System i landscape� The installation of an additional application server on a separate System i server� Starting and stopping all instances in a homogeneous System i landscape at the same
time
Setup of a 3-tier landscape in a homogeneous System i landscapeThis section discusses the setup of a 3-tier landscape in a homogeneous System i landscape. In this setup, the database and application servers are on a System i server. Consider the following:
Chapter 6. Special SAP installations 191
� Should TCP/IP or OptiConnect be used?
One GB Ethernet (TCP/IP) and OptiConnect (or OptiMover on earlier systems) are each supported for connections between database and application servers. Slower TCP/IP connections can work but, for performance reasons, they are not recommended and are not supported by SAP. Whether OptiConnect or TCP/IP is used in a 3-tier installation is controlled by the parameter dbs/db4/opticonnect. The default value for this parameter is 1 (for an OptiConnect connection). If you want to run 3-tier via TCP/IP then use the following command to set the parameter to 0 in all instance profiles:
dbs/db4/opticonnect = 0
If the database server can use several TCP/IP adapters with different transmission speeds, it is important that the communication between the database and application servers takes place over the fastest line.
� Additional SAP application server(s) on one server or partition?
In some cases the number of work processes needed is too high to be handled by a single SAP dispatcher process, but the server is powerful enough to handle the workload. Additional application instances are installed best on the database instance server. Then the access from the application instances to the database is handled locally on one server.
Installation of an additional application server on a separate System iThe installation of an additional application server on a separate System i server is described in (1a) and (1b) of the installation guides shown in 6.1.3, “SAP installation guides for additional Web AS ABAP” on page 186.
In the installation guide (1a) you see the planning and preparation activities for the installation of an Web Application ABAP server. The activities are the same if you have a single or an additional Web AS.
Planning activities for installing a System i application serverPerform the following steps when planning to install a System i application server:
1. Choose your basic system variant and decide how you want to distribute the SAP system instances.
2. Check SAP system components.
3. Understand how you are going to manage your user data before you install your SAP system.
4. Identify basic SAP system parameters.
5. Decide whether you want to use SAP System Landscape Directory.
The following planning activities are optional and only apply if you want to perform one of the following activities:
� Install multiple SAP systems on a single System i server
� Use the Lightweight Directory Access Protocol (LDAP) for SAP Logon for the Microsoft Management Console (MMC).
LDAP can also be used for other purposes (for example, the LDAP Connector). If you do not want to use LDAP for SAP Logon or MMC, no LDAP-specific installation steps are required.
Preparing to install an System i application serverWhen planning for installing a System i application server, follow these steps:
192 An Overview of Installing SAP Applications on System i Models
1. Check that you have met the hardware and software requirements.
2. Check if Qp2Term, Qp2Shell, and the OS/400 Portable Application Solution Environment is available (option 33 of the licence program 5722-SS1).
3. Install the Qshell.
4. Check and adjust i5/OS system values.
5. Set the time zone environment system variable.
6. Customize the QSTRUP startup program.
7. Check the distribution of libraries on ASPs.
8. Add a user ASP.
9. Configure TCP/IP.
10.Adjust the relational database name.
11.Install English as a secondary language.
12.Install additional languages.
13.Set up the transport directory.
14.Prepare a Windows user account and i5/OS user profile.
15.Install TMKSVR and create an installation share.
16.Install the SAP front-end software.
17.Check the general information about preparing the system for SAPinst.
18.Prepare the system for the SAPinst GUI.
Installation activities for installing a System i application serverPrepare to perform the following tasks when planning for the installation of a System i application server:
1. Prepare the installation DVDs.
2. Install an SAP instance using SAPinst.
3. Check prerequisites before starting SAPinst: All Instances.
4. Run SAPinst to install the instances of your SAP system.
5. Check using the SAPinst GUI.
The SAPinst GUI on System i models requires the installation of the Java Runtime Environment (JRE). The JRE is included in the Java Development Kit (JDK).
6. Check interrupted installation with SAPinst.
7. Change the SAPinst GUI host.
8. Start SAPinst GUI on another host.
9. If you decide to use a generic LDAP directory, perform the necessary preparatory steps as described in the installation guide (1a) shown in “SAP installation guides for additional Web AS ABAP” on page 186.
10., Create a user for LDAP directory access.
Note: If you decide to use LDAP for SAP Logon or Microsoft Management Console (MMC), you have to prepare the active directory for use with the SAP system.
Chapter 6. Special SAP installations 193
Post-installation activities for installing a System i application serverPerform the following steps after installing a System i application server:
1. Grant authorizations for operating system collector programs.
2. Start and stop the SAP system.
3. Log on to the SAP system.
4. Set up load balancing.
5. Check that the SAP system services are present.
6. Install the SAP Online documentation.
7. Install the SAP license.
8. Remove the SAPinst installation files.
9. Access a remote database.
10.Configure SAProuter for Remote Connection to SAP Support.
11.Run unicode-specific reports.
12.Configure the transport management system (TMS).
13.Perform basic operations.
14.Check the configured number of work processes.
15.Install additional languages.
16.Activate the integrated Internet Transaction Server (optional).
17.Apply the latest kernel and support packages.
18.If you install SAP Web AS as the basis for an SAP component that uses the Knowledge Provider (KPRO) component (for example, SAP BW or SAP KW), schedule asynchronous indexing and de-indexing.
19.If you want to use KPRO, check for problems in IMS monitoring.
20.Perform the client copy.
21.Check the RFC destination.
22.Change passwords of created i5/OS users.
23.Change passwords of created users.
24.Perform a full backup.
25.Prepare the SAP system for business application.
Note: If you install an SAP Web Application Server ABAP on a separate System i server, verify that:
� You have the all current installation guides from the SAP Service Marketplace for your SAP release available.
� You have the all current SAP notes mentioned in the installation guides available.
The necessary installation guides are listed in “Installation guides of SAP Web Application Server on System i models” on page 186.
SAP notes have priority over the installation guides.
194 An Overview of Installing SAP Applications on System i Models
Start and stop all instances together with a System i application serverIn order to start and stop all instances at the same time in a homogeneous 3-tier installation, the job R3RMTDB (up to Release 4.5B) or QXDAEDRSQL (as of Release 4.6A) must already be active on all System i configurations before the start-up. In addition, you must:
� Enhance the start-up profile of the central instance. In the illustrations in the following bullets, the host name of the application server is APPSRV1, the SAP System ID is PRD and the instance number is 01.
� Enter an additional startup program for each instance, that is, at the end of the start-up program:
Start_Program_06 = APPSRV1 STR_PRD_01
� Enter an additional stop program for each instance:
Stop_Program_03 = APPSRV1 STP_PRD_01
� When you start the central instance, these entries cause a job to be started on APPSRV1:
SBMJOB CMD(CALL STR_PRD_01)
� Or when stopping the job:
SBMJOB CMD(CALL STP_PRD_01)
� The library list in these jobs has already been set correctly by calling:
CALL PGM(R3PRD400/R3INLPGM)
� Thus, create the following two CL programs on the System i APPSRV1:
� Place the CL programs into a general library such as QGPL.
For details about how to start and stop all instances of an SAP system at the same time for homogeneous 3-tier installations, refer to SAP note 93316.
6.1.7 Example: Setup a 3-tier landscape in a homogeneous System i landscape
This section discusses the setup of a 3-tier landscape in a homogeneous System i landscape. In this setup, the database and application servers are on System i servers. All systems are implemented on System i systems or partitions.
Our configuration is illustrated in Figure 6-4 on page 196 where you see:
� One database server with an additional application server (central instance) on the same machine
� Two additional application servers
Chapter 6. Special SAP installations 195
TCP/IP configurationFigure 6-4 shows you a homogeneous System i landscape as the basis for the succeeding example.
Figure 6-4 Homogeneous System i landscape
The following are extracts of the host tables (Command CFGTCP → option 10) from:
� CIDB = Central Instance / database server� App1 = Application Server 1� App2 = Application Server 2
Table 6-1 has the same entries on all systems.
Table 6-1 Host tables for homogeneous 3-tier System i system landscapes
IP number IP name Description
192.3.2.1 CIDBS Database server - Server Segment Interface
192.3.2.3 APP1S Application Server 1- Server Segment Interface
192.3.2.4 APP2S Application Server 2 - Server Segment Interface
192.5.1.6 CIDB Database Server - Access Segment Interface
192.5.1.4 APP1 Application Server 1 - Access Segment Interface
192.5.1.2 APP2 Application Server 2- Access Segment Interface
192.3.2.1 CIDBS
Database Server
DBMS
Application ServerCentral Instance
CIHostname: CIDB
192.5.1.6 CIDB
192.3.2.3 APP1S
Application Server
Dialog Instance
APP1Hostname: APP1
192.5.3.4 APP1
192.3.2.4 APP2S
Application Server
Dialog Instance
APP2Hostname: APP2
192.5.4.2 APP2
Server Network
Backbone
Access Network
196 An Overview of Installing SAP Applications on System i Models
Perform the following tasks and consider the following guidelines to setup the correct TCP/IP configuration:
� Follow the instructions in the SAP Network Configuration Guide to configure TCP/IP and for a homogeneous System i 3-tier landscape.
� Select CIDBS as the database server name for the SAP system name when you install the Central Instance, APP1S when you install the first application server, and APP2S for the second application server.
� The implementation of TCP/IP in an SAP environment in the i5/OS operating system first uses the *DEFAULT routing entry, and then looks for static routes. This differs from standard TCP/IP implementations.
� The definition of a static route results only in a situation where no traffic is on the server segment. Therefore, direct routes must be defined in addition to the *DEFAULT route for the access network.
� Create the following additional routing entries on CIDBS
For more information refer to SAP note 484548 and the Prioritization of one local route over another section in the IBM knowledge base article Schowler Routes on the IBM System i at:
It is essential that you verify the correct route selection by testing the connections with the commands PING and TRACEROUTE between all the servers. Check that the correct interface is used for traffic and shows activity during the PING.
6.1.8 Heterogeneous 3-tier landscapes
SAP 3-tier System landscapes on System i configurations typically mean that the database server and central instance run on System i models and additional application instances run on other platforms.
You can use either a Windows server or a Linux server as an application server in a 3-tier system landscape. You can have multiple application servers on different platforms (System i, Windows, Linux).
We explain some procedures about how to start and stop the instances, with a Windows and Linux application server.
Start and stop all instances together with a Windows application serverTo start and stop all instances at the same time in a heterogeneous 3-tier installation, follow these steps:
1. On each Windows Server start the service iSeries Access for Windows Remote Command, then:
a. Go to Start → Run and type services.msc. This brings up a new window with the list of services available.
b. Find the service iSeries Access for Windows Remote Command.
c. Double-click it to get the property sheet. Change Startup type to Automatic.
This opens the Windows server to rexec connections from remote hosts which enables you to start your Windows application server from the System i central instance.
2. From the System i server, to start a Windows application server:
a. On the System i command prompt (central instance host) run the following command, where D: means the drive your application server is installed on your Windows server as Example 6-1 shows.
3. From the System i server, to stop a Windows application server follow the instructions given. On the System i command prompt run the following command as Example 6-3 on page 199 shows, where D: means the drive your application server is installed on, on your Windows Server.
Attention: This exposes your Windows server to the risks associated with an rexec daemon running on the server, for example, the ability for any user with password to run commands on that machine.
198 An Overview of Installing SAP Applications on System i Models
The results of this action are in the System i print spooler. Use the WRKSPLF command to display the report.
For details about how to start and stop a Windows application instance of an SAP system from the System i central host, see SAP note 682281.
Start and stop all instances together with a Linux application serverCheck that you can start and stop the SAP system after the installation using the scripts startsap and stopsap in the exe directory.
This process requires that:
� You have signed on to the SAP system host as user sapsidadm.
� If you want to use startsap or stopsap (for example, in a script) and require the fully qualified name of these SAP scripts, create a link to startsap or stopsap in the home directory of the corresponding user.
To start the SAP Instance:
1. Make sure the central instance is up and running on the System i host.
2. Enter the following to start a dialog instance:
startsap instanceID
3. To stop the SAP Instance, enter the following to stop dialog instances:
stopsap instanceID
Start-stop script with a Linux application serverThe SAP system can be started as user lnxadm with the command startsap and can be ended with the command stopsap (both are aliases). Make sure that the system shuts down correctly after a power off or a reboot of the server, otherwise data can be lost.
You can integrate the start and the stop of the SAP system into the start and the stop procedure of the whole system. Refer to Example 6-4 that shows you a script for starting and stopping an SAP system named LNX.
Example 6-4 Script to start and stop an SAP system (Linux)
#!/bin/sh## sapr3 Script to start and stop SAP system at startup or shutdown## chkconfig: 2345 98 02# description: start and stop SAP instance # Source function library.. /etc/rc.d/init.d/functions
# See how we were called.
Chapter 6. Special SAP installations 199
case "$1" in start) echo "Starting SAP system" su - lnxadm -c "/usr/sap/LNX/adm/startsap_`hostname`_17" touch /var/lock/subsys/sapr3;; stop) echo "Stopping SAP system" su - lnxadm -c "/usr/sap/LNX/adm/stopsap_`hostname`_17" rm -f /var/lock/subsys/sapr3 ;; status)# this is way overkill, but at least we have some status output... # sapinfo from the frontend-CD? ;; restart|reload) # do not do anything; this is unreasonable echo "Restarting SAP" su - lnxadm -c "/usr/sap/LNX/adm/stopsap_`hostname`_17" su - lnxadm -c "/usr/sap/LNX/adm/startsap_`hostname`_17" : ;; *) # do not advertise unreasonable commands that there is no reason # to use with this device echo "Usage: sap {start|stop|status|restart|reload}" exit 1esac exit 0
Store the script with the name of /etc/rc.d/init.d/sapr3. Then call the following command to setup the symbolic ling in the directory /etc/rc.d/rc?.d for the suitable run level:
chkconfig -add sapr3
6.1.9 Database server on a System i server and application server on Windows
This section discusses the setup of a 3-tier landscape with a database server on a System i server and an application server on Windows.
The central system of the SAP system must already be installed (normally as 2-tier system) on the System i host. Then plan and perform the installation of the additional application server on Windows.
First get the required documentation: Planning Guide, Installation Guide, and the latest version of the relevant SAP notes.
200 An Overview of Installing SAP Applications on System i Models
The Planning Guide (2a) shown in 6.1.3, “SAP installation guides for additional Web AS ABAP” on page 186 familiarizes you with the basic concepts, as mentioned above. The detailed preparation steps, as well as the hardware and software requirements of the Windows installation host are also introduced in the guide.
The installation activities in (2b) shown in 6.1.3, “SAP installation guides for additional Web AS ABAP” on page 186 explain step by step the single activities. After the installation you have to execute the post-installation activities.
In the following section we highlight these steps and explain the most important features and activities for:
� Planning activities for installing a Windows application server, see page 201� Preparation activities for installing a Windows application server, see page 203� Installation activities for installing a Windows application server, see page 206� Post- installation activities for installing a Windows application server, see page 207
The steps shown in this Redpaper are no substitute for the official SAP installation guides but they should help and illustrate you the installation process.
Planning activities for installing a Windows application serverConsider the following when planning for the installation of your Windows application server:
� Choose your basic system variant and distribution of SAP system instances.
– Plan the basic system variants:
• ABAP system• Java system• ABAP Java system
– Plan how to distribute all mandatory SAP system components:
• On a single host (central system) or• On separate hosts (distributed system)
� Check the SAP components.
When you set up an SAP system you need to install the main components that enable the system to operate. Consider in advance on what machine you want to install each of the following instances or applications.
– Central system– Central services instance
Note: If you install an SAP Web Application Server ABAP on a separate Windows server, verify that:
� You have the all current installation guides from the SAP Service Marketplace for your SAP release available
� You have the all current SAP notes mentioned in that installation guides available
Refer to the applicable installation guides in (2a) and (2b) of the 6.1.3, “SAP installation guides for additional Web AS ABAP” on page 186.
If you want to install an SAP Web Application Server Java on a separate Windows machine you can find the appropriate documentation in “Installation guides of SAP Web Application Server on System i models” on page 186.
The SAP notes have priority over the installation guides.
Chapter 6. Special SAP installations 201
– Database instance– Dialog instances– Gateway instance– Front ends
� Identify basic SAP system parameters.
Your SAP system parameters are probably already defined when you installed your central SAP system, such as the:
– SAP System ID– Instance number for each instance– Message port– Windows domain– RFC-user with passwords
� Plan your system configuration.
Plan and check with your IBM hardware service provider for:
– The distribution of the SAP components– The sizing and configuration of the single host– Whether to perform a local or a domain installation
• Local installation
You need to be Local Administrator of the system involved. In a local installation, all Windows account and user information is stored locally on one host and is not visible to any other hosts in the system.
If the SAP system is to run on a single system, you can perform a local installation.
Performing a local installation for a distributed system leads to authorization problems that have to be resolved.
• Domain installation
You need to be Domain Administrator of the domain involved, and all machines in the system must belong to the same domain. In a domain installation, the user information is stored centrally on the domain controller and is accessible to all hosts in the system.
If the system is to be distributed across more than one machine, we strongly recommend a domain installation.
If for any reason you are not granted domain administration rights, you can perform the installation as a domain user who is a member of the local administrator group. However, the domain administrator has to prepare the system appropriately for you.
� Plan your SAP System Landscape Directory.
The SAP System Landscape Directory (SLD) is the central information provider for the complete system landscape. In general, the SLD is deployed after the installation of a Java or ABAP+Java system. Nevertheless, to bring the SLD server into operation, you have to configure and activate it.
For more information about the installation and configuration of SLD, see:
SAP System Landscape Directory on SAP Web AS 6.40 on SAP Service Marketplace at the following Web site:
http://service.sap.com/instguidesnw04
Then go to Installation → SAP Web AS. Also see page 182.
202 An Overview of Installing SAP Applications on System i Models
The following gives you some background information about the SAP directories that have been created during the installation. Some definitions are:
– The global host is the machine on which the SAP central instance is running on your System i server.
– The local host is the current machine on which an SAP instance is running.
– The DB host is the machine on which the database server is running on your System i server.
The base directories required for the SAP central instance are:
– \\SAPGLOBALHOST\sapmnt, created on the central instance (of your System i server). It contains general SAP software.
– \\SAPTRANSHOST\sapmnt\trans, created on the transport host. It contains SAP software for the transport of objects between SAP systems.
– \usr\sap
The installation program creates the directory \usr\sap on the local host and shares it as saploc. On local hosts, \\SAPLOCALHOST\saploc contains only instance-specific data and copies of the SAP executables. The executables on the local host are updated from those on the global host each time the local instance is started and if it is necessary.
The SAP software is stored in directory \\SAPGLOBALHOST\sapmnt and contains global and local (instance-specific) data on a global host.
– \sapmnt\trans
In an SAP system landscape there must be a global directory for the transport of objects between SAP systems. This directory is created on one SAP instance host in the SAP system landscape (the transport host). This typically resides on the central instance of your System i server. It must be accessible for every host on which an SAP instance is installed and which belongs to this SAP system landscape. The path on every host must be:
\\SAPTRANSHOST\sapmnt\trans
SAP enables you to make a transport host known to the Domain Name Server for all Windows systems.
For more information about the file system structure on the System i central instance, see SAP note 705962.
� Check the users and groups.
On the System i server and the Windows application server, there must be appropriate users and groups. Check for their names and specifications the installation guide (2a), see 6.1.3, “SAP installation guides for additional Web AS ABAP” on page 186
Preparation activities for installing a Windows application serverFollow these steps to prepare for the installation of a Windows application server:
1. Check the requirements checklist for a dialog instance.
In the installation guide you find a detailed checklist for the following relative to a Windows application server:
– Hardware requirements– Software requirements and– Other
Chapter 6. Special SAP installations 203
2. Check for the Windows file system.
Check that you are using the Windows File System (NTFS) on hosts where you want to install the SAP system and database. NTFS supports full Windows security and long file names. Do not install the SAP directories on a FAT partition.
3. Check the Windows domain structure.
You do not need this step for a local installation.
In Windows, you can implement either of the following domain models for the SAP system:
– Extra domain
In this model, the SAP system is embedded in its own domain, which is specially defined for SAP. A second domain exists for the user accounts.
In Windows, the SAP domain and user domain must be incorporated in a domain tree. In this tree, the user accounts must form the root domain and the SAP domain must be a child domain of this.
– Single domain
In this model, the SAP system and the user accounts are included in a single domain.
You cannot create local users and groups on the host that is used as domain controller. Therefore, SAP does not support running an SAP instance (including the database instance) on the host where the DNS service is installed.
For a domain installation, we recommend that you check that all SAP system and database hosts are members of a single Windows domain. This is recommended for all SAP system setups.
4. Prepare System i users for Windows File System Access.
Use this procedure to start the NetServer™ on System i servers. Windows uses NetServer to access IFS files on the System i server where the central instance is running.
a. Log on to the System i server as a user that has authorization *IOSYSCFG, for example user QSECOFR.
b. Start the NetServer automatically by adding the following command to the startup program, as specified in the QSTRUPPGM system value (WRKSYSVAL QSTRUPPGM) as either of the following:
STRTCPSVR SERVER(*NETSRV)STRTCPSVR SERVER(*ALL)
5. Reduce the size of the file cache.
The Windows file cache directly competes with SAP programs for memory. Therefore, you should adjust the file cache as described in the planning and preparation guide.
6. Grant user rights for the installation.
Grant the required rights and privileges that authorize you to install the SAPinst tool and the SAP system.
If you attempt the installation without the required authorization, the system aborts.
For performance and security reasons, make sure that you do not run an SAP instance (including the database instance) on the host where the domain controller is running.
Never perform a local installation on a domain controller.
To grant the right user rights for the installation you have to differ if you want to install a local or a domain installation.
204 An Overview of Installing SAP Applications on System i Models
For more information about user authorities, see the Users and authorities topic in Implementing SAP Applications with System i and i5/OS, SG24-7166, the installation guide (2a), and 6.1.3, “SAP installation guides for additional Web AS ABAP” on page 186.
7. If required, perform a domain installation without being a domain administrator.
The procedure about how to perform a domain installation without being a domain administrator is described in the planning and preparation guide.
8. Configure the Windows transport system.
Some command line functions of the transport program tp.exe do not work, for example shadow buffers. You have to correct the transport profile.
When using tp.exe from the command prompt, it is necessary to modify the transport configuration profile to indicate the transport directory in NETBIOS naming convention.
The name of a computer system can be up to 15 alphanumeric characters with no blank spaces. The name must be unique on the network and can contain the following special characters:
! @ # $ % ^ & ( ) - _ ' { } . ~
The following characters are not allowed:
\ * + = | : ; " ? < > ,
Before you start to set up the Windows transport system you have to configure the domain controller in the Transport Management System (TMS) which sets up the TMS files also in the Integrated File System of the System i server.
For additional activities see the installation guide (2a), see 6.1.3, “SAP installation guides for additional Web AS ABAP” on page 186.
9. Install the SAP Front End software.
For the installation, make sure that the front-end software is installed on at least one host machine in your system environment. To simplify administration of your SAP system, we recommend you to do this on the central instance host.
With the SAP front-end installation software, SAPSetup, you can optimize the deployment of SAP GUI to thousands of clients. You can easily tailor installation packages to match your requirements, distribute patches, and set up automatic update processes for your clients.
10.Check the general information about preparing the system for SAPinst.
The Java-based SAPinst graphical user interface (GUI) called SAPinst GUI requires a Java Development Kit (Java 2 SDK, Standard Edition) with graphical capabilities (AWT, Swing). Since System i models do not provide a graphical user interface, you must install the JDK on a Windows host to perform the installation with SAPinst.
The installation tool SAPinst uses the Java-based graphical user interface, SAPinst GUI, regardless of your system variant. Therefore, you always need a Java runtime environment (JRE) on the host where SAPinst is to run. The JRE is included in the JDK.
If required, you can perform a remote installation using a standalone SAPinst GUI on a separate Windows or UNIX host. This enables you to perform the installation on a remote host while monitoring it with the SAPinst GUI from a local host. If you want to perform a remote installation, see the installation guide. In this case, prepare both the local and the remote host for the SAPinst GUI.
11.Prepare the system for the SAPinst GUI.
As part of preparing the system for SAPinst you need to prepare for the SAPinst GUI. This includes the installation of the Java Runtime Environment (JRE).
Chapter 6. Special SAP installations 205
For more information for preparing the System for SAPinst see the installation guide (2a), and 6.1.3, “SAP installation guides for additional Web AS ABAP” on page 186.
Installation activities for installing a Windows application serverFollow these steps to install a Windows application server:
1. Prepare the installation DVDs.
For information about how to prepare the installation DVDs, see the installation guide (2b), and 6.1.3, “SAP installation guides for additional Web AS ABAP” on page 186.
2. Execute SAPinst.
Installing an SAP instance using SAPinst is described in detail in the installation guide (2b). Refer to 6.1.3, “SAP installation guides for additional Web AS ABAP” on page 186.
The installation guide tells you how to run SAPinst to install one or more SAP instances. It describes an installation where SAPinst GUI and SAPinst server are running on the same host. Follow the instructions in this guide and in the appropriate SAP notes.
Each SAP instance requires a separate installation directory. Do not delete any of the installation directories until the system is completely and correctly installed.
If you install a second or subsequent SAP system into an existing database, make sure that the database is up and running before starting the installation.
3. Also consider the following:
– Check using SAPinst GUI.
In the installation guide the buttons of the SAPINST GUI dialogs (input screens, installation progress screen, message boxes) are described.
– Check interrupted installation with SAPinst.
Refer to the installation guide for re-starting an installation.
– Check for general information about the remote installation with SAPinst (optional).
Run the SAPinst GUI in standalone mode to perform a remote installation. This enables you to install an SAP system on another host (the remote host) while monitoring the installation with the SAPinst GUI on your local Windows or UNIX computer (the local host).
The procedure describing how to do this is in the installation guide.
– Start the SAPinst GUI on the Remote Host (optional).
Use this procedure to run SAPinst on the remote host when you want to run SAPinst as a remote installation. The remote host is the host where you want to install the SAP system.
The procedure describing how to do this is in the installation guide.
– Start SAPinst GUI on the local host (optional).
Use this procedure to run SAPinst GUI on the local host when you want to run SAPinst as a remote installation. The local host is the host where you want to control the installation with the SAPinst GUI.
In the installation guide, there is a detailed description about how to start the SAPinst GUI on the local host. There is a differentiation when either of the following takes place:
• Your Local Host Runs on a Windows Platform • Your Local Host Runs on a UNIX Platform
Follow each step described in the installation guide.
206 An Overview of Installing SAP Applications on System i Models
Post-installation activities for installing a Windows application serverAfter an SAP installation, follow these steps to install a Windows application server:
1. Start and stop the SAP instance as user sidadm.
Use this procedure to check that you can start and stop the SAP system after the installation. Use the Microsoft Management Console (MMC) to start and stop the SAP system.
The newly installed MMC only allows you to start or stop the SAP system locally on the host that you are logged on to. Later you can configure the MMC to enable central management of all hosts.
For more information about how to “Start and Stop the Windows SAP instance”, refer to the installation guide (2b), and the 6.1.3, “SAP installation guides for additional Web AS ABAP” on page 186.
Check that you can log on to the SAP system using the standard user profiles. There are two standard users in the SAP system after the installation.
2. Execute the following post-installation steps.
For more information about how to execute the post-installation steps, refer to the installation guide (2b), and the 6.1.3, “SAP installation guides for additional Web AS ABAP” on page 186.
a. Check the SAP system services. b. Install the SAP Online documentation. c. Configure SAProuter for remote connection to SAP support. d. Perform basic operations. e. Check the configured number of work processes. f. Activate the Integrated Internet Transaction Server (ITS) (optional). g. Apply Support Packages. h. Change the passwords of the SAP predefined standard users
Change the passwords of these users according to the SAP Security Guide. For more information, see also SAP Service Marketplace at:
http://service.sap.com/securityguide
3. Perform a backup of the dialog instance.
Perform an offline backup of your dialog instance at the end of the installation.
Stop the dialog instance and the SAP-related services (SAPSID_instance and SAPOSCOL).
Log on as user sidadm and shut down the SAP system.
a. To save the registry:
i. Select Start → Programs → Accessories → System Tools → Backup.
ii. Select Emergency Repair Disk.
The Emergency Repair Diskette dialog box appears.
iii. Select Backup the Registry to the Repair directory.
When you confirm your entry the registry is written to diskette.
b. Save the System State Data:
i. Select Start → Programs → Accessories → System Tools → Backup.
ii. Select Backup Wizard → Next.
iii. Select Only backup the System State Data and choose Next.
iv. Specify the Backup media type and the destination of the backup. Choose Next.
v. Check the information on the dialog box and then select Finish to start the backup.
c. Backup all SAP-specific and all database-related directories:
i. Select Start → Programs → Accessories → System Tools → Backup.
ii. Select Backup Wizard → Next.
iii. Select Backup selected files, drives or network data and select Next.
iv. In What to Back Up, select the Windows directory and all SAP and database-related directories, including the following:
\usr\sapHOMEDIR of sidadm\WINNT\usr\sap\trans
The directory \usr\sap\trans is only required for SAP systems that have the ABAP engine installed.
v. Select Next.
vi. In Where to Store the Backup screen, select the Backup media type and enter the Backup media or file name for the backup.
vii. Select Next.
viii.Check the information displayed and then select Finish to start the backup.
6.1.10 Database server on the System i and application server on Linux
This section discusses the setup of a 3-tier landscape with a database server on a System i server and an application server on Linux.
The central system of the SAP system must already be installed (normally as 2-tier system) on the System i host. Then plan and perform the installation of the additional application server on Linux.
First get the required documentation: Planning Guide, Installation Guide, and the latest version of the relevant SAP notes.
The planning guide (3a) familiarizes you with the basic concepts, as mentioned above. The detailed preparation steps, as well as the hardware and software requirements of the Windows installation host are also introduced in the guide.
Note: If you install an SAP Web Application Server ABAP on a separate Linux machine or partition, verify that you have:
� Current installation guides from the SAP Service Marketplace for the applicable SAP release.
� All current SAP notes mentioned in the installation guides.
Refer to the applicable installation guides in (3a) and (3b) of the 6.1.3, “SAP installation guides for additional Web AS ABAP” on page 186.
If you want to install an SAP Web Application Server Java on a separate Windows machine, refer to the appropriate documentations in “Installation guides of SAP Web Application Server on System i models” on page 186.
The SAP notes have priority over the installation guides.
208 An Overview of Installing SAP Applications on System i Models
The installation activities in (3b) outline the steps for each activity. Execute the post-installation activities after the installation.
Planning activities for installing a Linux application serverThe procedures to install a Linux application server are described in the installation guide (3a). Refer to the 6.1.3, “SAP installation guides for additional Web AS ABAP” on page 186. Refer to that guide for the planning activities.
The single steps are outlined as follows:
1. Choose your basic system variant and decide how you want to distribute the SAP system instances.
2. Check the SAP system components.
3. Identify basic SAP system parameters.
4. Decide whether you want to use SAP System Landscape Directory.
The following planning activities are optional:
� Integration of Lightweight Directory Access Protocol (LDAP) for SAP logon for the Microsoft Management Console (MMC).
� If you decide to use LDAP for SAP Logon or Microsoft Management Console (MMC), prepare the active directory for use with the SAP system.
Preparation activities for installing a Linux application serverFollow these steps when preparing to install a Linux application server:
1. Check the requirements for Linux.
Check the SAP note 785927 for updates to the documentation and other information.
For more information about an installation on Linux, see SAP note 171356.
In the installation guide (3a) you find a detailed checklist about a Linux host machine, such as the:
– Hardware requirements – Software requirements
2. Check the requirements for a dialog instance.
In the installation guide (3a) you find a detailed checklist about a Linux application server, such as the:
– Hardware requirements
Note: In the following section we highlight these steps and explain the most important features and activities for:
� Planning activities for installing a Linux application server. See page 209. � Preparation activities for installing a Linux application server. See page 209. � Installation activities for installing a Linux application server. See page 212. � Post- installation activities for installing a Linux application server. See page 213.
This is no substitute for the official SAP installation guides but this information can help and illustrate the installation process.
Note: The information given in the planning guide on Linux is not intended to replace the documentation of the Linux operating system (OS).
Chapter 6. Special SAP installations 209
– Software requirements
3. Check and modify the Linux kernel.
If you are using a Linux kernel version certified by SAP, you do not normally need to modify the Linux kernel.
To check the Linux kernel version, enter this command:
uname -a
For more information about the Linux kernel versions certified by SAP, see SAP note 171356.
4. Set up swap space for Linux.
Make sure that the UNIX kernel is already configured and the other prerequisites are met.
For more information about checking the Linux kernel, see the installation guide (3a). See 6.1.3, “SAP installation guides for additional Web AS ABAP” on page 186.
5. Check network information service (NIS).
If you use NIS, distribute users over the network.If you do not create users manually, SAPinst creates them automatically during the installation
All users must have identical environment settings. If you change the environment delivered by SAP, such as variables, paths, SAP does not assume responsibility.
SAPinst checks all required users, groups, and services on the local machine. If you manage users, groups or services network-wide in your company, SAP recommends that you create the user and group NIS entries before running SAPInst.
SAPinst checks if the required services are available on the host and creates them if necessary. See the log messages about the service entries and adapt the network-wide Network Information Service (NIS) entries accordingly.
SAPinst checks the NIS users, groups and services using NIS commands. However, SAPInst does not change NIS configurations.
For more information for checking the NIS see the installation guide (3a), in 6.1.3, “SAP installation guides for additional Web AS ABAP” on page 186.
6. Create operating system users and groups manually.
If you do not want SAPinst to create operating systems users, groups and services, you can optionally create them manually before the installation.
SAPinst checks whether the required users and groups already exist. If not, it creates new users and groups as necessary.
SAPinst chooses available user IDs and group IDs unless you are installing a dialog instance. Enter the same IDs on a dialog instance as on the central instance host.
As a general requirement, the user IDs (UID) and the group IDs (GID) must be the same on all hosts.
The UID and GID of SAP users and groups must be identical for all servers belonging to any SAP system.
This does not mean that all users and groups have to be installed on all SAP servers.
7. Check the creation of Linux groups and users.
Note: Check the kernel parameters. There can be unpredictable problems with your system during and after installation if you have a wrong kernel.
210 An Overview of Installing SAP Applications on System i Models
The users and groups created by the SAP installation procedure listed correspond to each other on the System i host and the Linux application server and therefore need to have matching UIDs and GIDs.
For more information about the Linux user and groups created by the SAP installation procedure see the installation guide (3a), refer to 6.1.3, “SAP installation guides for additional Web AS ABAP” on page 186. For more information about how to change the UIDs and GIDs of users on the System i host, see SAP note 818091.
8. Set up file systems and raw devices.
For more information about setting up the file system and raw devices see the installation guide (3a), refer to 6.1.3, “SAP installation guides for additional Web AS ABAP” on page 186.
9. Exporting and mounting directories.
Exporting and mounting directories is an essential feature on Linux systems to share directories that is often used in SAP environments, for example for the transport and management system (TMS).
For more information about exporting and mounting directories see the installation guide (3a) and refer to 6.1.3, “SAP installation guides for additional Web AS ABAP” on page 186.
10.Export Directories via NFS for System i servers.
To export directories via NFS, perform the following steps on your System i host. The following steps assume that the central instance host is the NFS server:
a. Log on as user QSECOFR to the NFS server.
b. On System i models, enter STRNFSSVR *ALL.
After an IPL of the System i host, the NFS server has to be started again to reactivate the mounted directories on the Linux application server.
c. To export a directory from a local file system make the following configuration changes:
i. Add a line to the local file /etc/exports:
#/etc/exports/sapmnt ANON=-1 ROOT=Linux hostANON=-1 ensures that no requests from unknown users are allowed.ROOT permits users from Linux host to access the exported directory on the System i host with QSECOFR rights.
ii. To activate the changes (that is, inform the NFS daemon about the changes performed in /etc/exports), enter: CHGNFSEXP ’-A’.
d. Log on as user root to the Linux host where the file system should be imported.
Note: We do not recommend using raw devices to perform the installation of an SAP system. For more information see SAP note 405827. If you want to use raw devices all the same, contact the support of your Linux distribution for information about how to set up raw devices on Linux.
Chapter 6. Special SAP installations 211
f. Mount those file systems using the following command:
mount -t nfs -o soft ci-host:/sapmnt/SID/subdirectory /sapmnt/SID/subdirectory
For example:
mount -t nfs -o soft ci-host:/sapmnt/SID/profile /sapmnt/SID/profile
11.Install the SAP front-end software,
For more information about installing the SAP front-end software, refer to the installation guide (3a), and refer to 6.1.3, “SAP installation guides for additional Web AS ABAP” on page 186.
12.Prepare the system for SAPinst
For more information about preparing the system for SAPinst, refer to the installation guide (3a), and the 6.1.3, “SAP installation guides for additional Web AS ABAP” on page 186.
13.Prepare the system for the SAPinst GUI
For more information about preparing the system for the SAPinst GUI, refer to the installation guide (3a), and 6.1.3, “SAP installation guides for additional Web AS ABAP” on page 186.
Installation activities for installing a Linux application serverThe procedure to install a Linux application server is summarized in the following steps:
For more information about the single installation activities see the installation guide (3b), see 6.1.3, “SAP installation guides for additional Web AS ABAP” on page 186.
1. Prepare the installation DVDs.
For more information about preparing the installation DVDs, see the installation guide (3b), and the 6.1.3, “SAP installation guides for additional Web AS ABAP” on page 186.
2. Mount a CD or DVD for Linux.
a. Log on as user root.
b. Create a mount point for the CD / DVD with the command:
mkdir /medium-mountdir
For example:
medium-mountdir is /sapcd.
c. Mount the first CD or DVD device with the command:
mount -t iso9660 -r device medium-mountdir
Where device is /dev/cdrom for non-SCSI CD devices and /dev/scdn for SCSI drives with the device number n.
If the file names on the mounted CD or DVD are written in lowercase letters, remount the CD or DVD with the following commands:
For more information about checking the prerequisites for all instances, refer to the installation guide (3b) shown in 6.1.3, “SAP installation guides for additional Web AS ABAP” on page 186.
212 An Overview of Installing SAP Applications on System i Models
4. Install the SAP system instances using SAPinst.
For more information about using SAPinst, refer to the installation guide (3b) in 6.1.3, “SAP installation guides for additional Web AS ABAP” on page 186. The installation guide tells you how to run SAPinst to install one or more SAP instances. It describes an installation where SAPinst GUI and SAPinst server are running on the same host. Closely follow the instructions in this guide and in the appropriate SAP notes.
Each SAP instance requires a separate installation directory. Do not delete any of the installation directories until the system is completely and correctly installed.
If you are installing a second or subsequent SAP system into an existing database, make sure that the database is up and running before starting the installation.
5. Also consider the following:
– How to use the SAPinst GUI.
In the installation guide the buttons of the SAPINST GUI dialogs (input screens, installation progress screen, message boxes) are described.
– What to do if there is an interrupted installation with SAPinst.
Refer to the installation guide for re-starting an installation.
– General information about the remote installation with SAPinst (optional).
Run the SAPinst GUI in standalone mode to perform a remote installation. This enables you to install an SAP system on another host (the remote host) while monitoring the installation with the SAPinst GUI on your local Windows or UNIX computer (the local host).
The procedure describing how to do this is in the installation guide.
– Start the SAPinst GUI on the Remote Host (optional).
Use this procedure to run SAPinst on the remote host when you want to run SAPinst as a remote installation. The remote host is the host where you want to install the SAP system.
The procedure describing how to do this is in the installation guide.
– Start SAPinst GUI on the local host (optional).
Use this procedure to run SAPinst GUI on the local host when you want to run SAPinst as a remote installation. The local host is the host where you want to control the installation with the SAPinst GUI.
In the installation guide, there is a detailed description about how to start the SAPinst GUI on the local host. There is a differentiation when:
• Your local host runs on a Windows platform, or • Your local host runs on a UNIX platform
Follow each step described in the installation guide.
– Do not delete any of the installation directories until you are sure that the system is completely and correctly installed.
– There is also a section on some aspects of troubleshooting.
Post-installation activities for installing a Linux application serverFollow these steps after installing a Linux application server:
1. For production operation, replace the installed kernel with the current version from SAP Service Marketplace. For more information, see SAP note 19466.
2. Start and stop the SAP instance.
Chapter 6. Special SAP installations 213
3. Log on to the SAP system.
4. Install the SAP online documentation.
5. Configure SAProuter and SAPNet for remote connection to SAP Support.
6. Perform basic operations like described in the installation guide (3b).
7. Check and configure the number of work processes.
8. Activate the integrated Internet Transaction Server (ITS), if necessary
9. Apply the latest kernel and Support Packages with the objective of having a Unix kernel.
10.Perform file and directory adjustments.
11.Change the permissions of the global transport directory.
12.Perform a full backup of the installation.
The following is a backup procedure of a Linux application server:
Perform a full offline backup at the end of the installation. This procedure also describes how to use the backed-up data for a restore.
If you install an SAP Web AS ABAP+Java system, you could perform the full installation backup after the installation of the J2EE Engine.
Make sure that you fully back up your database so that you can recover it later if necessary.
Back up the following directories and files� All SAP-specific directories:
– /usr/sap/SAPSID– /usr/sap/trans– sapmnt/SAPSID– Home directory of the user sapsidadm
� The root file system
This saves the structure of the system and all configuration files, such as file system size, logical volume manager configuration, and database configuration data.
This list is only valid for a standard installation.
The directory /usr/sap/trans is only required for SAP systems that have the ABAP engine installed.
Log on as user sidadm and stop the SAP dialog instance.
For more information about operating system-specific backup procedures, see the operating system documentation.
Backing up the Installation1. Log on as user root.
2. Manually create a compressed tar archive that contains all installed files:
– For saving on tape, run the following command:tar -cf - file_system | compress -c > tape_device
– For saving on file system, run the following command:tar -cf - file_system | compress -c > ARCHIVENAME.tar.Z
Restoring Your BackupCheck for modifications in the existing parameter files before you overwrite them when restoring the backup.
214 An Overview of Installing SAP Applications on System i Models
1. Log on as user root.
2. Restore the data that you previously backed up:
– Restore the data from tape:cat tape_device | compress -cd | tar -xf -
– Restore the data from the file system:cat ARCHIVENAME.tar.Z | compress -cd | tar -xf -
3. Maintain your company address for initial users.
4. Prepare the SAP system for preparing business applications.
If required, prepare the SAP system for using business applications, which includes customizing the SAP Web Application Server and the business components.
For more information, choose Solution Life Cycle Management → Customizing in the SAP Library.
6.2 Standalone SAP gateway
The SAP gateway makes the remote function call (RFC) interface between the SAP instances available, within an SAP system and beyond system boundaries. Each instance of an SAP system has a gateway. The gateway enables communication between work processes and external programs, as well as communication between work processes from different instances or SAP systems.
The SAP gateway carries out CPI-C services within the SAP world, services which are based on TCP/IP. These services enable SAP systems and external programs to communicate with one another. CPI-C services can be used either in the ABAP program or for the external programs via the interfaces.
As RFC is based on CPI-C, all RFC connections also pass through the SAP gateway. In the SAP system, an SAP gateway is started for each application server.
For certain configurations, an SAP gateway is used as a separately installed SAP instance or used outside an SAP system as follows:
� Starting external partner programs on remote systems which do not recognize any remote shells (Windows)
� Application-specific decoupling of communication (in certain cases)
Install the SAP gateway in the same way as you install all other SAP programs, that is in the executable files directory of the corresponding system tree.
The SAP Gateway is made up of various processes, including:
� Gateway read process
Gateway read (gwrd, gwrd.exe) is the main process in the gateway system. It is started by the application server (dispatcher) and checked by it periodically. The gateway reader receives and processes all CPI-C requests.
� Gateway monitor
The gateway monitor (gwmon, gwmon.exe) is used to analyze and administer the SAP Gateway. When you start it, you initially get a list of active CPI-C connections. You can call up all the other monitor functions via a menu. You can monitor the gateway from the SAP System (transaction SMGW) or from the operating system.
Chapter 6. Special SAP installations 215
It is possible to install an SAP instance of an SAP system exclusively as a standalone gateway, if required. This type of instance does not contain normal work process types (dialog, background, update, enqueue or spool).
Only the gateway process (gwrd) is started.
6.2.1 Gateway instance for 6.xx technology
You cannot install a gateway instance for SAP systems based on 6.xx technology on System i servers using SAPinst. If a standalone gateway Instance is required, you must install it manually:
Choose a SID and an instance number that are not used yet:
See SAP note 547227 titled Installation of a Gateway Instance for Basis Release 6.10 for further information.
6.2.2 Manually install a gateway instance for a Web Application Server 6.20
For Web Application Server 6.xx the INSTKIT that is delivered with the Installation Master CD does not contain the menu item for the gateway installation. Therefore, the installation is done manually. The installation normally is run with SAPINST.
Java Runtime 1.3 or higher must be installed on your local PC (Windows Installation Host) and the environment variables JAVA_HOME and PATH must be set correctly.
First you install the TMKSVR. Follow these steps to install the server:
1. Look for the TMKSVR on the SAPINST-CD, as illustrated in Figure 6-5 on page 217.
Note: Is it not necessary to install an SAP gateway in order for the SAP system to communicate via RFC with outside applications. The remote RFC-programs can attach the internal gateway with a so-called registration mode.
For more details, see the SAP Help Portal at:
http://help.sap.com
Use the keyword SAP Gateway.
See the Data Exchange Overview topic in Implementing SAP Applications with System i and i5/OS, SG24-7166 for examples of REFC programs that you can use in a registering mode.
216 An Overview of Installing SAP Applications on System i Models
Figure 6-5 TMKSVR on SAPINST-CD Release 470SR1_ASCII
2. Start the execution of the TMKSVR. A display is shown, as in Figure 6-6.
Figure 6-6 Start Execution of the TMKSVR 470SR1_ASCII
3. Create the user SAPINST if it does not yet exist:
CRTUSRPRF USRPRF(SAPINST) PASSWORD(password) USRCLS(*SECOFR) TEXT('TestUser for SAP Installation') SPCAUT(*USRCLS)
4. Create a local user SAPINST on your Windows Installation Host with ADMIN rights with the same password as on a System i server.
5. Invoke SAPINST. See Figure 6-7 on page 218 for an illustration.
Chapter 6. Special SAP installations 217
Figure 6-7 Starting SAPINST 470SR1_ASCII
6. Choose Custom specific Installation Type, as shown in Figure 6-8:
Figure 6-8 Custom specific installation type of the SAPInst
218 An Overview of Installing SAP Applications on System i Models
Figure 6-9 Start installation process 470_ASCII
7. For a standalone gateway, select Cancel for the installation process after the step for the kernel installation has finished successfully.
6.2.3 Installing an SAP Gateway instance Release 4.6D
The prerequisites for an SAP Gateway instance are described at this site:
http://service.sap.com/instguides
Then go to SAP Components → SAP R/3 → Release 4.6C SR2 → SAP R/3 Installation: IBM AS/400)
The installation assumes that:
� Your are signed on as user QSECOFR.� The objects required for installation are loaded. � The command files are copied from CD.� Your current directory is the installation directory (for example, /TMP/SID).� INSTGUI is started if you are using it.
Follow this procedure if you want to install a remote gateway instance (a gateway instance running on a System i server which is not the SAP system database):
where SID is your SAP system ID and instance_number is the number of your dialog instance.
2. Install the remote gateway instance
a. Start R3SETUP with the desired command file option, specifying one of the command files for installing a central, dialog, or gateway instance:
R3SETUP '-f gateway.r3s'
Alternatively, if you started INSTGUI enter:
R3SETUP '-f gateway.r3s -g instgui_hostname:port'
The following combinations are not allowed as SAP system IDs:
SAP EPS COM ADD ALL AND ANY ASC FOR NOT UID SID KEY INT END RAW ROW SET OFF MON SGA SHG VAR DBA GID LOG BIN B20 OMS BCO B30 P30
b. You are prompted to enter or confirm:
• Your SAP system ID, for example C11.• The number of the central instance you are currently installing, for example 46.
Do not use instance numbers 98 and 99. These instance numbers are reserved for internal purposes.
Make sure that you specify an instance number (SAPSYSNR) that does not already exist on this host.
• The name of the central instance host, for example as0070.• The name of the database host, for example as0071.• The name of the SAP kernel library, for example R346COPT.• The i5/OS release on which the kernel was compiled, for example V5R3.
This i5/OS release might not be the same as the i5/OS release of your System i model.
3. Insert the SAP kernel CD.
4. You are prompted twice to enter or confirm the path to the SAP kernel CD.
Example: /QOPT/CD_label_name
R3SETUP now runs through the remaining installation steps without requiring further user entries as Table 6-2 shows.
Requesting information on CDs CDSERVERKERNEL_IND_DB4ASCII
Loading the SAP kernel LODR3KRN_IND_DB4ASCII
220 An Overview of Installing SAP Applications on System i Models
The following error text displays because a central instance is typically required for the configuration of every instance:
ERROR 2005-08-16 10:08:11 CRTR3INST_IND_DB4 InternalInstallationDo:0 CRTR3INST SID(SID) ROLE(*GATEWAY) INST(INST) failed.All instances for system SID read.No central instance found for system SID.
See SAP note 327434 for further information.
Execute the following command which generates the entries that are still needed for a standalone gateway:
CRTR3INST SID(SID) INST(INST) ROLE(*CENTRAL)
Afterwards start the R3SETUP procedure again. The program completes the installation.
Steps to install a standalone gateway manuallyThe steps to manually install a standalone gateway are described in SAP note 92963, and outlined here:
1. Load an SAP kernel on the System i server and add the library to your library list.
Starting the SAP System R3START_GATEWAY_IND_DB4ASCII
Note: Note that INST must contain an instance number that is different from the gateway instance to be installed.
Step description Technical name
Chapter 6. Special SAP installations 221
Alternative installation of a standalone gateway without SAPINSTAn alternative installation method that does not use SAPINST is to manually install the copy of an existing kernel library, as follows:
1. Create a *SAVF on both System i servers.
2. Save the kernel library on the source server into the *SAVF.
3. Transfer the *SAVF binary with FTP.
4. Restore the library.
RSTLIB OPTION(*ALL) MBROPT(*ALL) ALWOBJDIF(*ALL).
5. Add the library to your library list (ADDLIBLE).
6. Create the users R3OWNER and R3GROUP using the commands:
CRTSAPUSR *OWNER and CRTSAPUSR *GROUP
7. Change the object owner of the kernel library CHGOBJOWN NEWOWN(R3OWNER).
8. Perform the command FIXR3OWNS for the kernel library.
Now you can create the Gateway Instance, as follows:
1. The SAP transport directory should be local for a standalone gateway, otherwise you have to ensure SAPINST and GW-SIDOFR exist on the SAPTRANSHOST.
2. CRTR3SYS SID(GW-SID) KRNLIB(kernel library)
3. CRTR3INST SID(GW-SID) INST(GW-instance-no.) ROLE(*GATEWAY) CCSID(500) /* and if your primary language is not 2924: SECLANGLIB(QSYS2924) */
4. Logon with GW-SIDOFR and start the gateway instance.
5. Now you can adapt your IPL start program, authorizations and system values, on the SAP Gateway Host, if needed.
6.3 Set up an SAP system by system copy
There are two different classes to perform an SAP system copy:
� Homogeneous system copy� Heterogeneous system copy
The SAP implementation understanding of an homogeneous system copy is the copying an SAP system, or to say it more precisely, the copying of the SAP database with a specific SAPSystem-ID to another SAP database with the following characteristics:
� The source and the target operating system is from the same type. The release and patch level of the source and the target operating system can differ.
� The source and the target database is the from the same type. The release and patch level of the source and the target database can differ.
If one or two of these two characteristics are disregarded then SAP customers refer to a Heterogeneous system copy. Migration is synonymous for a heterogeneous system copy.
The SAPSYSTEM-ID can remain the same, or be changed, when you do a homogeneous or a heterogeneous system copy.
222 An Overview of Installing SAP Applications on System i Models
The official SAP installation guides for both the homogeneous and the heterogeneous system copy for ABAP as well for Java are found in the SAP Marketplace at:
http://service.sap.com/instguides
Then select SAP NetWeaver → Release 04 → Installation → SAP Web AS → SAP Web AS 6.40 SR1 and Related Documentation.
At this site you find the information illustrated in Figure 6-10.
Figure 6-10 SAP Documentation, also for Homogeneous and Heterogeneous System Copy
The documentation for Homogeneous and Heterogeneous System Copy for SAP System based on Web AS 6.40 SR1 is divided into two parts:
� For ABAP� For Java
For detailed information, see:
� SAP System Copy and Migration in the SAP Service Marketplace at:
http://service.sap.com/systemcopy
� SAP OS/DB Migration in the SAP Service Marketplace at:
http://service.sap.com/osdbmigration
� Check the SAP OS/DB Migration Planning Guide that is available in the Media Library.
� SAP note 82478.
In the guide you find the following considerations:
� A system copy should only be done by a person with experience in copying systems and with knowledge of the operating system, the database, and the ABAP dictionary.
� Client transport is not supported as a system copy method. Transporting production clients is not supported at all. You can use client transport for the initial set up of an SAP system infrastructure. The client copy procedure is not handled in this documentation.
� Export and import of a database with the installation tools for reorganization purposes is not described in this documentation, and is not supported by SAP. Use the appropriate tools for database reorganization.
SAP Web AS 6.40 SR1 Installation and Related DocumentationHere you can find the installation guides for SAP Web Application Server (SAP Web AS) 6.40 and related documentation:
• SAP Web Application Server• Adobe Document Services• SAP Front End Installation• SAP Internet Graphics Service• Homogeneous and Heterogeneous System Copy• System Landscape Directory• Java Troubleshooting Guide• XML-Based Data Archiving• High Availability with MSCS for SAP Web AS 6.40 SR1 Java
Note: Refer to these official guides and the SAP notes mentioned in these guides. Make sure that you have the most current version of this installation guide and of the SAP notes.
� If you have made modifications in your development system, and want to copy your quality assurance or production system onto the development system, see SAP note 130906.
� If you want to convert a non-Unicode systems to a Unicode systems or perform system copy of a Unicode systems, see SAP note 548016.
For Java system copies check the official SAP installation guides mentioned above.
6.3.1 Homogeneous system copy
This section describes:
� General information about the homogeneous system copy� A short description of where and how to use the Web AS 6.40 homogeneous system copy� A detailed checklist about how to do a homogeneous system copy based on Web AS
ABAP 6.20
General information about the homogeneous system copyThe installation of a new SAP system typically takes one or two days. A lot of time can be required to actualize the SAP system after it is installed from CDs/DVDs with the outstanding patches, for example kernel patches, but especially support packages. So you can spare time if you set up a new SAP system by a system copy instead by a new installation.
Another reason to set up a Homogeneous system copy is if you want an exact copy of an SAP system. Often you want to have this when you set up or renew your Quality Assurance (QAS) or another Test System (TST) or a Sandbox for example from your Production System (PRD).
The homogeneous system copy is also the SAP implementation method to rename an SAP system ID because there is no tool for renaming an SAP system ID.
On non-System i platforms homogeneous system copies are done with the SAP tool R3LOAD, as described in the installation guides mentioned above. You can also do the homogeneous system copy on the System i server with the R3LOAD method.
Homogeneous system copies on the System i server with Web AS ABAP are system installations that use the i5/OS SAVLIB and RSTLIB commands to load the database instead of R3LOAD from installation CDs or DVDs. This method is faster than the R3LOAD method. For more information, see SAP note 585277.
For SAP systems on System i models based on the Web AS 6.40 Java you also have to use the R3LOAD method. For this environment the SAVLIB/RSTLIB method is not supported by SAP.
For systems based on Web AS, the InstKit must be patched. For systems with release 4.6D and earlier, the installation is done with R3SETUP using the script DBR3CP.R3S.
Note: An SAP system copy is made when you do a homogeneous system copy. All clients, all data, and the same repository exists afterwards in the target system than in the source system. Be aware that all data is copied from the source to the target, even data that you do not want to have in target system.
Also consider that you do not add, but instead replace the information at your target system. This means when you want to refresh your QAS system then you have to delete the QAS database in advance.
224 An Overview of Installing SAP Applications on System i Models
Checklist for a homogeneous system copy based on Web AS 6.20This section gives you a detailed checklist about the single steps.
The following checklist is for the (repeated) homogeneous System Copy is based on the Guideline for the Homogeneous System Copy of WEB Application Server (620) documentation and the following related SAP notes:
� SAP note 708864 titled iSeries: SAPinst kit for system copy 6.20� SAP note 585277 titled iSeries: Performing a homogeneous system copy� SAP note 206935 titled AS/400: Subsequent actions for homogeneous system copies
1. Be sure you have the 6.20 Kernel-CDs copied to the System i server, only for the check location phase in the SAPinst script. Later the existing 6.40 kernel is reused.
2. Get the license key from:
http://service.sap.com/licensekeys
If a license key already exists be sure you can access the internet.
3. Both System i servers (source and target server) must fulfill the operating system requirements. Use the same operating system release and PTF level if possible.
a. Check the operating system version with GO LICPGM and select Option 10 'and press function key PF11.
b. Use DSPPTF to check the PTF level according the Informational APAR:
Transfer the SAP 6.40 kernel of the source system to the target server, if it is newer:
i. Save the kernel library in a *SAVF and transfer it to the target server using FTP in binary mode, and then run LODR3KRN.
ii. Apply the new kernel library using APYR3KRN.
The prerequisites to prepare for the installation include:
1. Time schedule for the system copy is planned and all involved persons are informed. 2. Cancel the schedule for the backup on the database server of the target system.
Prepare the source SID
Follow these steps to prepare the system SOURCE-SID:
1. Check and release all open Transport requests in SOURCE-SID (Transaction SE01).
Create a list of the open transport requests (including owner information).
Discuss or mail with feedback requests to the owners of these transport requests.
There should not be open transport requests., otherwise they are removed.
2. Check, if there are open or canceled update records. Use Transactions SM13 and RSA7.
If so, create a list (including owner information), and process or delete these records after discussing with the owners of these update records.
There should not be open or canceled update records. Else they are removed.
Note: This list is the result of experiences in the field. It is not official documentation of SAP and therefore not officially supported. Use it on your own risk.
3. Save the database of the SOURCE-SID (Library R3SOURCE-SIDDATA, and if you also copy a Java Database SAPSOURCE-SIDDB). Schedule a normal daily or weekly backup.
Check the number of saved objects from the output of the DSPLOG or DSPLOGBRM command, or the Joblog of the backup procedure you use. Look for the following entries:
Number of saved objects: _______________________
Objects not saved: ________________________
If there are objects that could not be saved, repeat the backup if you are not sure the content of these tables can be omitted in the copy.
Prepare the target SID system
Follow these steps to prepare the (old) TARGET-SID-System:
1. Save all relevant information you need to rebuild after the copy.
2. Note the client list and their settings in table T000 using Transaction SCC4.
3. If there are open transport requests in the TARGET-SID, check if you need to release them or they can be discarded (Transaction SE01).
Create a list of the open transport requests (including owner information) and discuss with the owners of the transport requests. This mainly applies to copies from a production to a development system. There should be no open Transport Requests.
4. RFC Connections, including details as TRFC-Options, Gateway Options, login data (Transaction SM59).
5. Create a list of the released jobs on the TARGET-SID-System for re-scheduling after the copy (Transaction SM37).
6. Make a hardcopy of the operation modes (Transaction RZ04).
7. The TMS import queue of the TARGET-SID must be empty, so:
Import all transport requests that are in the import queue of the TARGET-SID into the system TARGET-SID (Transaction STMS). By importing them, they are added in the follow-up import queue. In most cases this is the queue of the SOURCE-SID.
8. Get a list of the users (especially if they are locked) with their authorizations and their assignment to the clients (Infosystem in the Transaction SU01).
9. Get a list of the printers in the TARGET-SID, especially check which printers are locked (Transaction SPAD).
If you want to keep them, put them in a transport request that can be re-imported after the system copy.
Prepare the target systemTo prepare the target system follow these steps on the target system named TARGET-SID:
1. Shutdown the system TARGET-SID on the evening before you want to start the copy procedure.
2. Save and then delete the database of the TARGET-SID (SQL Packages, Libraries R3TARGET-SIDDATA and R3TARGET-SIDJRN).
The system copy is done as described in the SAP Guideline for System Copy of Systems based on WEB AS 6.20.
Note: Save and delete a database in the background, not in dialog mode. Use the i5/OS command SBMJOB.
226 An Overview of Installing SAP Applications on System i Models
Special instructions for the system copy include: � Make a temporary change to the instance profile of the TARGET-SID, and set
rdisp/wp_no_btc = 0 on operating system level in the IFS. Remember the old value.
� During the system copy when SAPinst starts the system and waits for the confirmation “All Jobs on SELW or SEMW”.
� Login to the TARGET-SID SAP system and call report BTCTRNS1.
� Change back rdisp/wp_no_btc in the instance profile (on operating system level in the IFS).
Homogeneous system copy activitiesFollowing the installation, login with TARGET-SIDOFR and follow these steps:
1. Set the system to delete the journal receivers automatically:
WRKJRNA R3TARGET-SIDDATA/QSQJRN,
If delete receivers is not set to YES, then call:
CHGJRN JRN(R3TARGET-SIDDATA/QSQJRN) DLTRCV(*YES)
2. CLRPFM for R3TARGET-SIDDATA/FileName with the following FileNames:
ALCONSEGALSYSTEMCSMSEGMDBSTATHDB4DBSTAIHDB4MONIPAHIOSMONDBSNPSDBAHSDBADSDBAPSDBARTPFETTPFHTTLOCKDDLOG (see SAP note 25380)
All the objects listed above are located in the library R3TARGET-SIDDATA.
Note: With DLTRCV(*YES) you delete each journal receiver every time when a new journal receiver is attached to the journal.
Remember that a homogeneous system copy produces a large amount of journal receiver entries. If your journal receivers are located in a separate ASP, make sure that the ASPs do not overflow.
With the setting DLTRCV(*YES) and the missing journal receiver, there is no change to do a roll forward or to do a roll backward for the time period where no journal receiver exists. So do this, set DLTRCV(*YES) only if you are quite sure that you no longer need the deleted journal receiver.
Do not set DLTRCV(*YES) if there are other SAP activities at the same time when the homogeneous system copy is running.
Chapter 6. Special SAP installations 227
3. Install the permanent SAPLICENSE.
SAPLICENSE ’-install’
Cut and paste the information from the SAP Service MarketPlace from the path:
http://service.sap.com/licensekeys
4. Delete all SQL-Packages for the TARGET-SID.
5. Change the Message Queue for the journal if you need it for your backup procedures.
Post installation steps: Target system activities1. Check if the SAP license was installed correctly.
Log on to the system with a user that is not SAP* or DDIC.
2. Call the Installation Check (Transaction SICK).
3. Setup and rebuild the Correction and Transport System (with Transaction SE06). Log in with user DDIC in client.
4. Call the following SAP reports (Transaction SE38):
– SDB4GEN– RSDB4GEN– RSBTCDEL
older than “0 days",
with “forced mode” and
user name “*”
(alternatively call Report RSBTCDEL2)
– Run RSBTCPRIDEL without parameters
5. Check the TemSe Objects (SP12) and then with the menu bar TemSe_Database → Consistency_Check.
If everything is not alright, delete the corresponding entries.
6. Delete all SAP spool entries.
Call report RSPO1041, select older than 0 days. Execute the procedure in the background.
7. Check if there are still spool entries (Transaction SP01).
If so, then delete them.
8. Delete all update records in Transaction SM13.
9. Delete all BatchInput Data and Logs in Transaction SM35 (all relevant clients).
10.Assign the TARGET-SID System to the printers.
Select transaction SPAD, Utilities → For output devices → Assign server, see Figure 6-11 on page 229.
Note: You should lock most of the printers as immediate, or redirect the output by changing the printer definition to another physical printer, because otherwise test printing can produce paper output on production printers.
228 An Overview of Installing SAP Applications on System i Models
Figure 6-11 Homogeneous system copy: adapt the output devices
11.Import the profiles from the IFS into the SAP system.
a. Transaction RZ10, Tools → Import profiles → Of active servers, see Figure 6-12.
Figure 6-12 Homogeneous system copy: Import profiles
b. Transaction RZ04, Inst./Operation Modes, Settings → Based on current status → New instances → Generate, see Figure 6-13.
Figure 6-13 Homogeneous system copy: Generate instances
c. Transaction RZ12, define one RFC Logon group identical to the Central Instance, and delete the old entries.
12.Adapt the instance profile It is not normally needed for repeated system copies, but this is a good chance to compare with the changes in the profiles of the production system.
13.Check the SAP system log (Transaction SM21).
14.Perform a server check (Transaction SM51). Are all instances available with all the needed services?
15.Check, delete, or create RFC-Destinations (Transaction SM59).
Compare with the printed or saved list as outputted from the old TARGET-SID.
16.Check and process Logical Unit of Works (LUWs). Delete the entries in the transaction RFC (Transaction SM58).
17.Copy, adapt, and delete jobs in the TARGET-SID for the new system.
For example, the report variant for RSPO1041 contains a field for the system-ID. Compare with the saved or printed list from the old TARGET-SID.
Chapter 6. Special SAP installations 229
18.Handle the transport requests when a Quality Assurance System is refreshed:
By the update of the QAS system (Quality Assurance System) from the PRD-System (Production), all transport requests that have already been in the QAS system but not in the PRD system are now missing in the QAS system. Therefore, all transport requests that are in the TMS queue of the PRD system must be forwarded to the QAS system and imported, because they are not contained in the copied database of the PRD system.
In the following you find the single activities about how to handle the transport requests. In this example, TARGET-SID is the same as QAS system:
a. Check if there are transport requests in the buffer of the QAS system. Print the list and clear the buffer.
Execute the following commands on operating system level:
b. Forward all transport requests of the Import Queue of the PRD system to the QAS system from transaction STMS.
c. Import all transport requests in the buffer of the TARGET-SID.
d. Then rebuild the former buffer of the QAS system, if it wasn't empty in Step a).
DEL '/usr/sap/trans/buffer/TARGET-SID'RNM '/usr/sap/trans/buffer/TARGET-SIDdate' '/usr/sap/trans/buffer/TARGET-SID'
Check the resulting TMS Queues in transaction STMS. Push the refresh button.
19.Make the needed system change settings in SE03 (or SE06), as well as client change settings and client role in table T000 from transaction SCC4.
Do not change the logical system in SCC4.
20.Delete clients you do not want to keep in the TARGET-SID.
21.Perform the update of the logical system for all relevant customer clients.
a. Call Transaction BDLS to change the logical system of the client from the value that came from the SOURCE-SID- client to the former value of the TARGET-SID-client. Execution of the transaction should be performed in the background.
Dependent on the support package level it might be necessary to delete the entry for the target value of the logical system of the TARGET-SID-client from the view V_TBDLS. This is preferred in a local transport request and should immediate be released.
b. Check the results (Transactions SCC4, BD54, SM30, or OY25).
22.Optionally, delete all application logs. 23.Execute Transaction SLG2 (or Report SBAL_DELETE for background execution).
24.Update the table statistics from transaction DB02.
25.Clear the tables DBTABPRT and DBTABLOG in library R3TARGET-SIDDATA if they exist.
26.Reorganize the database files (only those with a high amount of deleted records) using RGZPFM on operating system level.
27.Check for update collection runs (the so called V3- update records) with report RSM13005. See also SAP note 140357.
Tip: Rename the import buffer file.
230 An Overview of Installing SAP Applications on System i Models
28.Perform the collection run(s) for the update records. See SAP note 176679: RSM13005.
29.Cleanup of IDocs (SM58) and BatchInput sessions (SM35).
30.Re-establish Central User Management (CUM) if it was activated in the old TARGET-SID.
31.Re-Activate BW Source System Connections. Note that the recommended procedures are changing sometimes. Search for SAP notes for Copies in the BW Landscapes.
32.Check and correct ALE Partner port in transaction WE21.
33.Check for archiving:
– OY25 - logical system name– OAC3 - Archive ID – ID Type: T for non-production, P, D, U for production systems)
34.Check, generate, or update SSL certificates (Transactions STRUST, PSEMAINT).
35.Perform a backup of the copied system.
36.Release the suspended batchjobs using report BTCTRNS2.
37.Reactivate the Central User Administration (CUA) if it was active before the copy or include the copied system in the Central User Administration Landscape. See also the SAP note 550718, SAP note 565697, and SAP note 801877.
6.3.2 Heterogeneous system copy
Heterogeneous System Copies for SAP systems based on WEB Application Server are SAP standard procedures and do not need a special Migration Kit. The guideline Homogeneous and Heterogeneous System Copy for SAP Systems based on SAP Web AS describes the procedure and the prerequisites in detail. As usual you should be sure to acquire the latest version of the SAP notes mentioned in this guideline. In this guide you find also a description of the R3LOAD tool mentioned below.
The export of the database of the source system within SAPinst is started from the Installation Master CD for the source platform and source database system. The database is exported with R3LOAD processes to the file system. If source and target server are in the same network (LAN), generate an empty directory in the IFS of the target System i server for the export and map it from the source system host using a binary share.
Otherwise the data exchange is normally done by tape. But you can do the data exchange also by a removable disk and also by the disk drives of a PC/Laptop. The export files are compressed to about 10 until 20 percent of the database size.
The import of the database into the target system within SAPinst is started from the Installation Master CD for System i models.
For more details see the installation guide Homogeneous and Heterogeneous System Copy for SAP System based on Web AS 6.40 SR1 at the SAP Marketplace:
http://service.sap.com/instguides
See Figure 6-10 on page 223.
6.3.3 System copy and migration procedures
Table 6-3 on page 232 lists the different procedures to perform a system copy or migration of SAP systems. Be aware of the following:
� Not all procedures are supported for all SAP components and for all releases. Also, some of the procedures are only available as pilot project for certain SAP components, SAP releases and/or databases. For more information, see SAP note 543715.
� Besides the procedures provided with SAP systems, there might also other methods to replicate existing SAP systems, for example, methods offered by hardware partners. SAP systems copied or migrated with such methods are still supported by SAP, but support cannot be provided by SAP for these non-SAP procedures. Instead, the corresponding supplier of the procedure (for example, the hardware partner) is in charge of providing support for the non-SAP procedure.
� If you want to perform the system copy of a Unicode system (that is, source and target systems are Unicode systems), the same procedures can be used as for copying non-Unicode systems.
Table 6-3 System copy and migration procedures
SAP provides an overview and more detailed information about system copies, their functions and procedures on the following Web sites:
6.4 Installation of SAP systems before Web Application Server
For systems with basis 4.6D and lower, the installation of SAP systems is done by R3SETUP with the following:
� Loading the Installation library R3SETUP from the kernel CD. � Using LODRUN. � Copying the installation script templates (using the command CPYR3S). � Calling the command R3SETUP using the appropriate setup script.
For example, CENTRDB.R3S for a central system (that is, a database instance and a central instance at once).
Procedure Description Validity
Standard system copy
Standard procedure using the tools:� R3SETUP (up to SAP Web AS 6.10)� SAPinst (as of SAP Web AS 6.20).
This procedure is valid for:� Homogeneous system copy � Heterogeneous system
copy � Unicode conversions (only
with SAPinst and R3load)
Incremental migration (IMIG)
IMIG is a special method to perform a system copy of large systems with only a minimum downtime. To achieve this, all large tables are exported during uptime and subsequent changes of these tables are logged. Later, the tables are updated in the target system using the logged information.
This procedure is valid for:� Homogeneous System
Copy � Heterogeneous System
Copy � Unicode conversions (only
with SAPinst and R3load)
Database-specific procedure
For some databases, database-specific procedures are available.
Homogeneous system copy of SAP systems
Split-mirror solution
This procedure uses storage technology to create a split-mirror image of a single system or a system landscape.
Homogeneous system copy of SAP systems and SAP system landscapes
232 An Overview of Installing SAP Applications on System i Models
We do not describe the installation procedures for SAP systems based on SAP Basis 4.6D. For more information about the detailed installation procedure, see the SAP installation guides in the SAP Marketplace under the topic SAP Components and select the desired SAP application at:
http://service.sap.com/instguides
6.5 Installation of other SAP components
There are more SAP components and solutions.
For example, we have some components that are not supported on i5/OS like:
� SAP Master Data Management (MDM)� SAP Business Connector (BC)� SAP Retrieval and Information Extraction (TREX)� SAP Content Server� SAP Visual Composer� SAP Communication Station
On the other side, we have some components that are an integrated part of SAP NetWeaver like:
� SAP Internet Transaction Server (ITS)� SAP Internet Graphics Server (IGS)� SAP System Landscape Directory (SLD)
There are much more besides these. There are also SAP components based on SAP applications, which are already in maintenance but there are already successors to them, for example, R/3 4.6C or R/3 Enterprise. Some of these solutions run on i5/OS or DB/2 UDB for iSeries and some are available only on other platforms.
On System i models you can run the LPAR method with multiple operating systems and multiple databases:
� i5/OS with its integrated database DB2 UDB for iSeries� AIX with multiple databases� Linux with multiple databases� Windows as IXS or IXA with multiple databases
Therefore, all SAP applications can be implemented on a System i system. But our focus in this book is the first point, that is, the implementing of SAP applications on i5/OS with its integrated database DB2 UDB for iSeries.
To describe the planning, preparation, installation, post-installation, and configuration steps of all these components is beyond the scope of this book.But we provide a description of the installation of the SAP Solution Manager because it is mandatory for all SAP components as of SAP applications based on Web Application Server 6.40.
6.6 Planning an SAP upgrade
The upgrade of the SAP components is described in specific SAP upgrade guides. You find the upgrade guides for each SAP component on the SAP Marketplace at
But they are in different sub-trees than the installation guides.
The upgrade of the SAP components is a rather sophisticated process. As it is beyond the scope of this Redpaper to describe the upgrade processes, we refer to the official SAP upgrade guides mentioned above.
When you plan to upgrade an existing system, you first have to check the source release of your SAP system for the following:
� Minimum support package level� SPAM-update level� Kernel patch level
You also have to check if an operating system upgrade - and a database upgrade, which is part of the i5/OS - is necessary before starting the SAP upgrade.
Before you begin the upgrade installation, plan it carefully. This planning includes requesting all the necessary SAP notes. Careful planning is a prerequisite for both a successful SAP installation and an SAP upgrade. The following information helps you to plan your upgrade so that downtime is reduced to a minimum and the upgrade runs as efficiently as possible.
TeamSAP offers the upgrade service SAP GoingLive Functional Upgrade Check. The yearly SAP licence maintenance charge includes two SAP services for free. A team of experts checks the parameter settings of your system in one session before the upgrade, and gives you detailed recommendations on the configuration. After the upgrade, the parameters and the entire system status are checked again in a second session.
For information about this and other SAP services, see the SAP Service Marketplace Service Catalog under the topics SAP Safeguarding → SAP GoingLive Functional Upgrade Check at:
http://service.sap.com/servicecat
SAP Support is your contact for ordering this service.
When you plan your upgrade, note the following information in addition to the information in the SAP upgrade installation guides.
Planning an upgrade: Step by step� All the times specified in this documentation are based on hardware with medium
performance levels.
� Do not perform any additional actions during the upgrade that could cause it to run less smoothly.
� Start planning your upgrade in good time.
� To make sure that all requirements are met, run the PREPARE program as soon as possible. The PREPARE can also run when the SAP system is up. You can reset and repeat the program as often as you necessary before you start the actual upgrade. The successful execution of PREPARE is a prerequisite for starting the upgrade.
� If you are upgrading a modified system where changes have been made to the standard system, you must start by upgrading a development or quality assurance system that has the same SAP system release (including support package level), and contains the same modifications. The adjustments you perform manually for the new standard in this system can be automatically exported to the global transport directory and are integrated into the production system upgrade from there. This procedure eliminates the need for time-consuming adjustments to the production system.
234 An Overview of Installing SAP Applications on System i Models
� Check the prerequisite for an i5/OS operating system or database upgrade for the designated SAP release you want to upgrade to.
If it is technically possible, we recommend that you upgrade the operating and database system and your SAP system at different times, unless it is otherwise specified.
� Before you start the upgrade, check the upgrade strategy of the add-on producer for the add-ons that exist for your source release. You must do this to ensure that the installed add-ons are compatible with your upgrade.
Note: Upgrades using the SCROLL mode should be submitted to batch for performance reasons as described in SAP note 86557.
Chapter 6. Special SAP installations 235
236 An Overview of Installing SAP Applications on System i Models
Related publications
The publications listed in this section are considered particularly suitable for a more detailed discussion of the topics covered in this Redpaper.
IBM RedbooksFor information on ordering these publications, see “How to get IBM Redbooks” on page 240. Note that some of the documents referenced here may be available in softcopy only.
� Implementing SAP Applications with System i and i5/OS, SG24-7166
Other publicationsThese publications are also relevant as further information sources:
� OS/400 Backup and Recovery V5R4, SC41-5304
� TCP/IP Configuration and Reference, SC41-5420
Online resourcesThese Web sites and URLs are also relevant as further information sources:
How to get IBM RedbooksYou can search for, view, or download Redbooks, Redpapers, Hints and Tips, draft publications and Additional materials, as well as order hardcopy Redbooks or CD-ROMs, at this Web site:
ibm.com/redbooks
Help from IBMIBM Support and downloads
ibm.com/support
IBM Global Services
ibm.com/services
240 An Overview of Installing SAP Applications on System i Models
Mobile Infrastructure 72, 91mySAP Business Suite 40, 108mySAP Customer Relationship Management 138mySAP Supply Chain Management 157NetWeaver ix, 40, 71NetWeaver Business Intelligence 2NetWeaver Developer Studio 2NetWeaver Development Environment 72NetWeaver Exchange Infrastructure 2NetWeaver Master Data Management 2NetWeaver Mobile 2NetWeaver Portal 2NetWeaver Visual Composer 2SAP Business Solutions and Applications 1Software Lifecycle Manager 32Transport Management System 134TREX 82WFM Core 111XSS 127
Applications for Information Workers 1ASP 62
add a user ASP 120asset life cycle management 165authentic 96Auxiliary Storage Pool (ASP) 62AWT 91
BBC 109BD54 230BDLS 230BI 72BI_CONT 80BMS 154Broadcast Messaging Server (BMS) 154Business Explorer 77Business Explorer Analyzer 80Business Information Warehouse 72, 77Business Information Warehouse (BW) 72Business Intelligence Information Broadcasting 72BW 72, 77
NetWeaver 2004 70NetWeaver Development Environment (NWDE) 72NetWeaver Development Infrastructure (NWDI) 31Network File System (NFS) 188network information service (NIS) 210NFS 188NFS mounts 191NIS 210non-Unicode version (NUC) 52NUC 52NWDE 72NWDI 31
SAP APO Optimizer 158SAP Auto-ID Infrastructure 2SAP Business Connector (BC) 109SAP Business Information Warehouse (BW) 77SAP code page 1100 62SAP code page 4102 62SAP Communication Station 109SAP Composite Application Framework 2SAP Content Server 109, 148SAP cProject Suite 165SAP cryptographic software 66SAP EarlyWatchAlert (EWA) 9SAP Enterprise Portal 81SAP ERP ECC5.0 110SAP Event Manager 158SAP Gateway 95, 215SAP GoingLive Functional Upgrade Check 234SAP Installation Guide
link to 15SAP Internet Graphic Server (IGS) 109SAP Internet Pricing and Configurator (IPC) 109SAP Internet Transaction Server (ITS) 96, 109SAP Knowledge Warehouse (KW) 93SAP KW technical system landscape 94SAP license 132SAP logon dialog box 131SAP Manufacturing 1SAP MI Client 92SAP MI Server 92SAP MI technical system landscape 91SAP Mobile Infrastructure (MI) 91SAP NetWeaver ix, 1
ABAP stack 23components 21Java stack 23
SAP NetWeaver 2004 70SAP NetWeaver Application Server 2SAP NetWeaver Business Intelligence 2SAP NetWeaver Developer Studio 2SAP NetWeaver Exchange Infrastructure 2SAP NetWeaver Master Data Management 2SAP NetWeaver Mobile 2SAP NetWeaver Portal 2SAP NetWeaver Visual Composer 2SAP note 18
SAP Notes Assistant 9SAP Partner Connectivity Kit 90SAP Quick Sizer 17SAP Security Guide 12SAP Service and Asset Management 1SAP Software Distribution Center 9SAP Solution Manager
application 2SAP Solution Manager key 115SAP Solutions for Small and Midsize Enterprises 1SAP S-User 8SAP terminology database 11SAP transaction 230
250 An Overview of Installing SAP Applications on System i Models
(0.5” spine)0.475”<
->0.873”
250 <->
459 pages
An Overview of Installing SAP Applications on System
i Models
An Overview of Installing SAP
Applications on System i M
odels
An Overview of Installing SAP
Applications on System i M
odels
An Overview of Installing SAP Applications on System
i Models
An Overview of Installing SAP
Applications on System i M
odels
An Overview of Installing SAP
Applications on System i M
odels
®
INTERNATIONAL TECHNICALSUPPORTORGANIZATION
BUILDING TECHNICAL INFORMATION BASED ON PRACTICAL EXPERIENCE
IBM Redbooks are developed by the IBM International Technical Support Organization. Experts from IBM, Customers and Partners from around the world create timely technical information based on realistic scenarios. Specific recommendations are provided to help you implement IT solutions more effectively in your environment.
For more information:ibm.com/redbooks
Redpaper
An Overview of Installing SAP Applications on System i Models
Preparations for installing SAP applications with IBM i5/OS
Comprehensive checklist of installation tasks
Understanding special installation scenarios
Systems, Applications, and Products in Data Processing (SAP) offers software applications for business. These offerings include a comprehensive set of business applications that are supported on the System i family of products and the i5/OS integrated DB2 Universal Database (UDB) for the iSeries database.
All of the SAP applications are based on a common infrastructure layer called SAP NetWeaver.
This IBM Redpaper focuses on the SAP business applications based on mySAP NetWeaver 2004 and outlines the activities involved when installing an SAP system that are specific to the System i customer. Use this Redpaper as an installation checklist.
For more detailed information about planning and installation steps and other considerations when installing an SAP application, refer to the formal SAP documentation.
Refer to Implementing SAP Applications with System i and i5/OS, SG24-7166, for information about the activities involved in maintaining and operating an SAP system.