Instructions to install the early (1978-83) Limited Slip Differential in the Late-model (1985-1995) G28 Transaxle BACKGROUND: Most 928 owners know about the improvements to the 5- speed transaxle that exists in cars from 1985 and up. Dubbed the “G28” transaxle, and sometimes referred to as the “Borg Warner” transmission, the G28 has stronger synchro rings, more certain shifting, and the ability to handle more torque without damage (an important attribute for racers and hot rod- ders). But, for all the benefits the G28 transaxle brought, the Limited Slip Differential (LSD) took a step back. The earlier transmissions had 8 friction plates in the LSD, 4 on each side for each of the rear tires. The G28, however, had only 4 friction plates total, 2 on each side, and as a result, a lower locking rate. The engineers had tried to compensate for the loss of half the clutch discs in the LSD by increasing the spring pressure on the plates, but it did not work. You just can’t beat a higher stack count of friction discs when the pedal hits the metal. EXAMPLES: Facing facts, there are a great many 928 owners that would never experience the need or want for a better limited-slip differential, and for them, this upgrade is not necessary. But, if you have ever throttled hard out of a 90-degree corner and found the inside-rear tire spinning wildly until you either lifted off the throttle or the tire finally hooked up – you have just experienced a loss through your LSD. In that real-world example, if the LSD had been more effective, more of the engine’s torque would have reached the non-spinning outer wheel and your launch out of that corner would have been quicker. Critical for racers trying to carry exit speed down the following straight. Another test: jack up one rear tire and apply a simple torque wrench to the center axle nut of the airborne rear wheel. With the other rear tire fixed on the ground, it will only take 15 ft pounds of force on the torque wrench to turn the tire against the late-model LSD, and 45 ft pounds of force to turn the tire on the early units. This simple and repeatable test demonstrates a 3-fold improvement in torque-holding ability. CONCLUSION: the late-model G28 transmission is a definite improvement in drive-ability and durability, but its differential cannot hold as much torque as the previous model. The hot setup, therefore, is the late model transaxle equipped with the early LSD. The 928 owners who benefit from this upgrade are: performance drivers, DE drivers, super- charged cars, and racers. Copyright 2008, 928 Motorsports, LLC All Rights Reserved
Transcript
Instructions to install the early (1978-83) Limited Slip Differential in the Late-model (1985-1995) G28 Transaxle
BACKGROUND: Most 928 owners know about the improvements to the 5- speed transaxle that exists in cars from 1985 and up. Dubbed the “G28” transaxle, and sometimes referred to as the “Borg Warner” transmission, the G28 has stronger synchro rings, more certain shifting, and the ability to handle more torque without damage (an important attribute for racers and hot rod-ders). But, for all the benefits the G28 transaxle brought, the Limited Slip Differential (LSD) took a step back. The earlier transmissions had 8 friction plates in the LSD, 4 on each side for each of the rear tires. The G28, however, had only 4 friction plates total, 2 on each side, and as a result, a lower locking rate. The engineers had tried to compensate for the loss of half the clutch discs in the LSD by increasing the spring pressure on the plates, but it did not work. You just can’t beat a higher stack count of friction discs when the pedal hits the metal. EXAMPLES: Facing facts, there are a great many 928 owners that would never experience the need or want for a better limited-slip differential, and for them, this upgrade is not necessary. But, if you have ever throttled hard out of a 90-degree corner and found the inside-rear tire spinning wildly until you either lifted off the throttle or the tire finally hooked up – you have just experienced a loss through your LSD. In that real-world example, if the LSD had been more effective, more of the engine’s torque would have reached the non-spinning outer wheel and your launch out of that corner would have been quicker. Critical for racers trying to carry exit speed down the following straight. Another test: jack up one rear tire and apply a simple torque wrench to the center axle nut of the airborne rear wheel. With the other rear tire fixed on the ground, it will only take 15 ft pounds of force on the torque wrench to turn the tire against the late-model LSD, and 45 ft pounds of force to turn the tire on the early units. This simple and repeatable test demonstrates a 3-fold improvement in torque-holding ability. CONCLUSION: the late-model G28 transmission is a definite improvement in drive-ability and durability, but its differential cannot hold as much torque as the previous model. The hot setup, therefore, is the late model transaxle equipped with the early LSD. The 928 owners who benefit from this upgrade are: performance drivers, DE drivers, super-charged cars, and racers.
Copyright 2008, 928 Motorsports, LLC All Rights Reserved
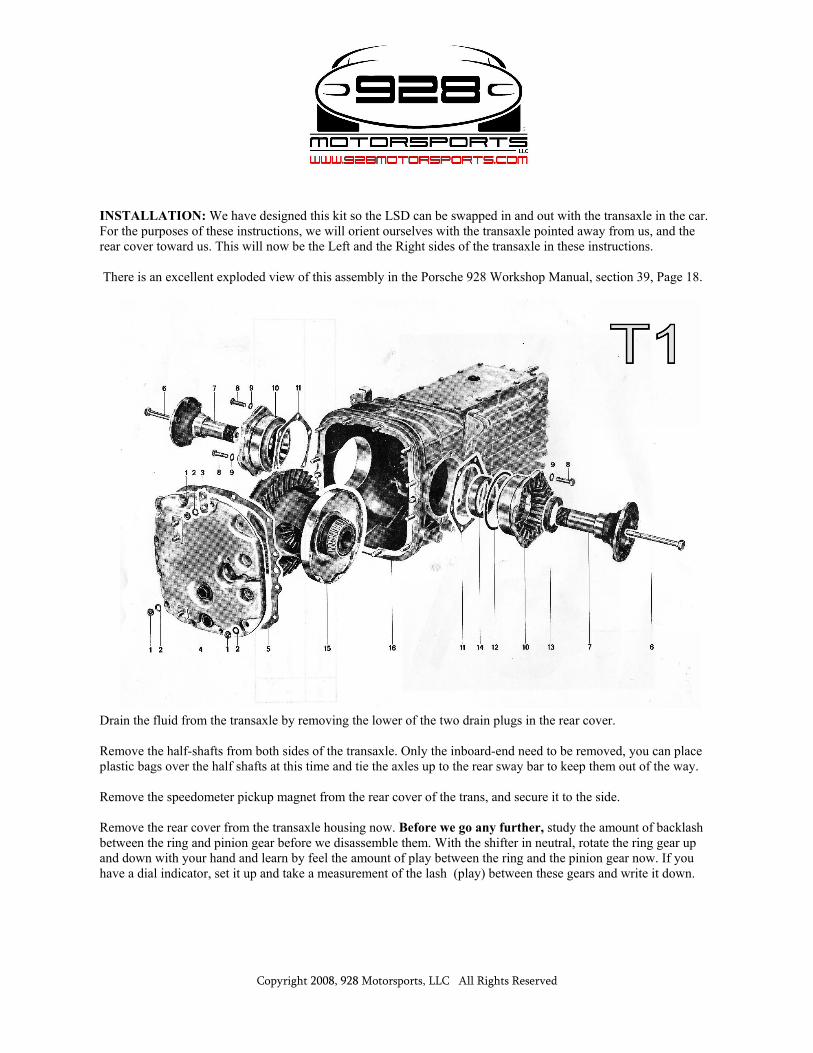
INSTALLATION: We have designed this kit so the LSD can be swapped in and out with the transaxle in the car. For the purposes of these instructions, we will orient ourselves with the transaxle pointed away from us, and the rear cover toward us. This will now be the Left and the Right sides of the transaxle in these instructions. There is an excellent exploded view of this assembly in the Porsche 928 Workshop Manual, section 39, Page 18.
Drain the fluid from the transaxle by removing the lower of the two drain plugs in the rear cover. Remove the half-shafts from both sides of the transaxle. Only the inboard-end need to be removed, you can place plastic bags over the half shafts at this time and tie the axles up to the rear sway bar to keep them out of the way. Remove the speedometer pickup magnet from the rear cover of the trans, and secure it to the side. Remove the rear cover from the transaxle housing now. Before we go any further, study the amount of backlash between the ring and pinion gear before we disassemble them. With the shifter in neutral, rotate the ring gear up and down with your hand and learn by feel the amount of play between the ring and the pinion gear now. If you have a dial indicator, set it up and take a measurement of the lash (play) between these gears and write it down.
Copyright 2008, 928 Motorsports, LLC All Rights Reserved
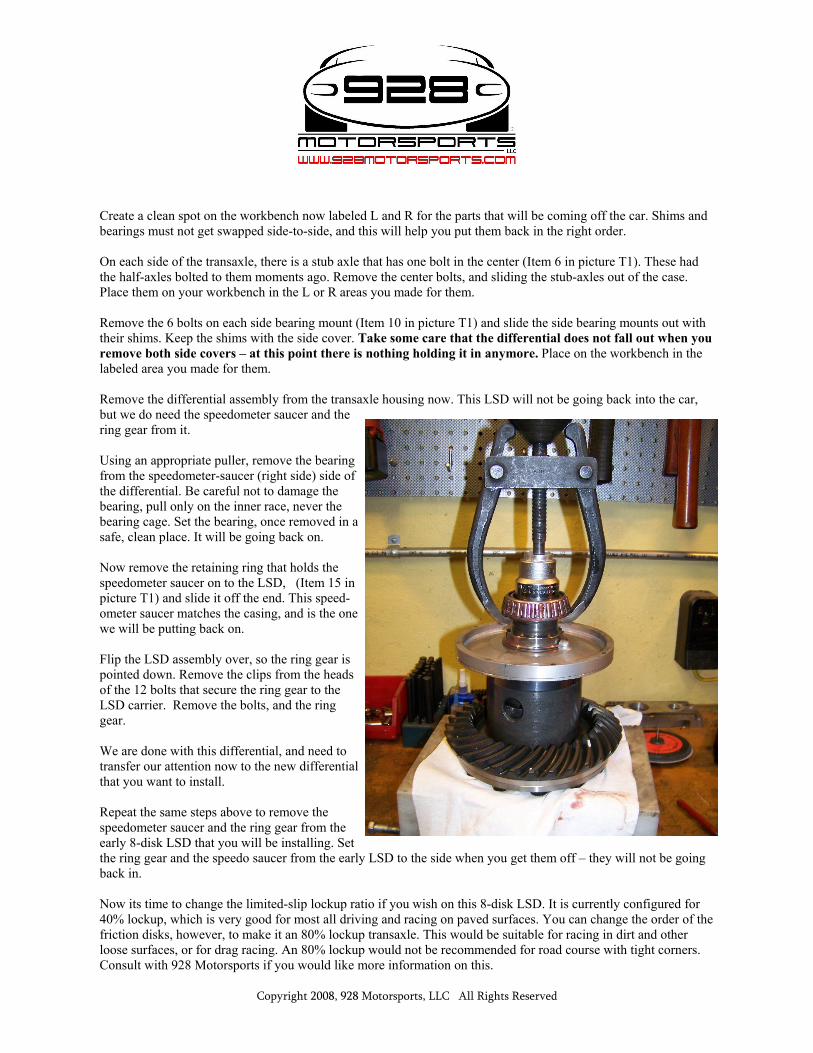
Create a clean spot on the workbench now labeled L and R for the parts that will be coming off the car. Shims and bearings must not get swapped side-to-side, and this will help you put them back in the right order. On each side of the transaxle, there is a stub axle that has one bolt in the center (Item 6 in picture T1). These had the half-axles bolted to them moments ago. Remove the center bolts, and sliding the stub-axles out of the case. Place them on your workbench in the L or R areas you made for them. Remove the 6 bolts on each side bearing mount (Item 10 in picture T1) and slide the side bearing mounts out with their shims. Keep the shims with the side cover. Take some care that the differential does not fall out when you remove both side covers – at this point there is nothing holding it in anymore. Place on the workbench in the labeled area you made for them. Remove the differential assembly from the transaxle housing now. This LSD will not be going back into the car, but we do need the speedometer saucer and the ring gear from it. Using an appropriate puller, remove the bearing from the speedometer-saucer (right side) side of the differential. Be careful not to damage the bearing, pull only on the inner race, never the bearing cage. Set the bearing, once removed in a safe, clean place. It will be going back on. Now remove the retaining ring that holds the speedometer saucer on to the LSD, (Item 15 in picture T1) and slide it off the end. This speed-ometer saucer matches the casing, and is the one we will be putting back on. Flip the LSD assembly over, so the ring gear is pointed down. Remove the clips from the heads of the 12 bolts that secure the ring gear to the LSD carrier. Remove the bolts, and the ring gear. We are done with this differential, and need to transfer our attention now to the new differential that you want to install. Repeat the same steps above to remove the speedometer saucer and the ring gear from the early 8-disk LSD that you will be installing. Set the ring gear and the speedo saucer from the early LSD to the side when you get them off – they will not be going back in. Now its time to change the limited-slip lockup ratio if you wish on this 8-disk LSD. It is currently configured for 40% lockup, which is very good for most all driving and racing on paved surfaces. You can change the order of the friction disks, however, to make it an 80% lockup transaxle. This would be suitable for racing in dirt and other loose surfaces, or for drag racing. An 80% lockup would not be recommended for road course with tight corners. Consult with 928 Motorsports if you would like more information on this.
Copyright 2008, 928 Motorsports, LLC All Rights Reserved
It is time now to install the ring gear we removed from the LSD that came out of the car onto the 8-disk LSD that will be going into the car. Bolting options: you can either put the bolts back in and re-install the safety clips onto the heads of the bolt, or your can dispense with the safety clips and use Loctite red instead. To use Loctite to secure the ring gear bolts, wash out each bolt hole and bolt hole with brake cleaner and let dry for a minute. Turn the LSD so the brake cleaner can drop out of the threaded holes to dry. Then apply Loctite red to the threads of each bolt as you install them. Torque the ring gear bolts to 165 Nm (120.4 Ft Lb). Next we install the speedometer sau-cer onto the LSD assembly. Two modifications need to be made to the speedometer saucer before it can be re-installed. First, test-fit the speed-ometer saucer onto the LSD housing. You will find that the steel locating pin is a bit too long to allow the speedo saucer to sit down where it belongs so you can get the retaining ring on it. Shorten the locating pin down with a grinder until it is the right length to both engage the hole in the LSD carrier, yet allow you to reinstall the retaining circlip. See picture T3. Second, we need to chamfer the ring-gear side edge of the speedometer saucer to provide clear-ance so it does not hit the pinion gear. We used a lathe to bevel the outer corner, but you could also use an ordinary file. A small 45-degree bevel will be enough. You can file off a small amount of the magnets with the aluminum, but take care not to break them. When completed, wash the speedometer saucer to remove all grinding debris before re-installation. Install the speedo saucer and the retaining ring.
Copyright 2008, 928 Motorsports, LLC All Rights Reserved
From your 928MS kit, slide the bearing spacer onto the LSD shaft and reinstall the bearing onto the shaft over it. A press is best for this, but it can also be done with a hammer and a drift carefully. Tap only on the inner race with the drift, never the bearing rollers or the outer race. Picture T5. Set this assembly aside for the moment.
Prepare the left side bearing mount for re-installation by re-moving the o-ring from it, then the shims, installing the large shim provide in the kit, and then reassembling it. Add back the thin shims and the o-ring. Picture T6. Set it aside for now.
Now prepare the right side bearing mount for re-installation. We need to remove the bearing race that is the right side bearing mount you removed from your transaxle so we can install it into the specially modified one from your kit. Take care when removing the outer bearing race—do not hit it or damage it. Warm the bearing mount (with a hot plate or a propane torch) to expand it, and use a punch to remove the rubber seal. Discard the seal. Set the bearing carrier up-side down (so the bearing points down) and warm it again until the bearing race drops out the bottom. Let it cool naturally, do not dunk the race in water! If you do this correctly, the bearing race will not be damaged. If you nick the bearing or turn it blue with too much heat, it will need to be re-placed. Once the bearing race has cooled enough for you to handle it, warm the new custom RS bearing mount provided, and drop the bearing race into it, making certain it is fully seated with a brass drift. Let cool. Install the new seal provided into the bearing mount as well. Add the original shims to it, and the o-ring.
Copyright 2008, 928 Motorsports, LLC All Rights Reserved
We are ready to install the “new” 8-disk LSD into your transaxle. Prepare to the transaxle housing by wiping some clean gear lubricant onto the bearings now on both sides of the LSD, and the o-rings in both the left and right bearing mounts. The lubricant on the o-ring areas will greatly help them install without cutting or excessive force. Both the L and R side bearing mounts should have all the original shims on them in their original locations at this time. Now insert your completed LSD assembly back into place into the transaxle housing, and secure it there by sliding in the left and right side bearing mounts. Install 3 bolts into each side bearing mount at this time to hold it there, make snug, but do not put a final torque on them yet. Picture T7.
Rotate the ring gear and confirm that the speedometer saucer does not hit the pinion gear. Remove the assembly and make your chamfer on the speedometer saucer larger if it does. Also check the backlash between the ring gear and the pinion. It should feel exactly like it did before, when I asked you to rotate the ring gear and study the backlash before disassembly. We put back exactly the same shims we took out, so there should be no need for any adjustment.
However, if you prefer, instructions for checking and setting the ring gear and bearing pre-load is on page 39-18 of the Workshop Manual, and 39-19 and 20 have the instructions for setting up backlash. You can also check the backlash with a dial indicator just as you did on Page 2. Set it exactly like it was be-fore we disassembled it, or to .008 if you do not know. If these two test are positive, we can finish the assem-bly.
Copyright 2008, 928 Motorsports, LLC All Rights Reserved
Install and torque all the side bearing mount bolts to 15 ft lbs. Re-check the backlash – nothing should have moved. Add a bead of sealant to the rear cover and reinstall it to the transaxle. Smear some gear lube on the stub axles and install them into the L and R sides. Secure in place with the center bolt. Torque the center bolt to 24 ft pounds. Re-attach the axles to the stub axles. This is a good time to rotate the CV joint at the end of the half axle with your hands and feel for any grit or ratcheting. Service as necessary. Re-install the drain plug into the rear cover, open the filler plug, and add 4 quarts of gear lube. We have an inex-pensive pump that makes easy work of this if you need it. We recommend a good synthetic gear lube with friction additives for limited slip differentials. 75w-90 is best for most applications, call 928 Motorsports to get the right lubricant. Enjoy your improved limited-slip differential!
Copyright 2008, 928 Motorsports, LLC All Rights Reserved


![[LSD]Remembrances of LSD Therapy Past-Betty Grover Eisner, org](https://static.documents.pub/doc/80x56/577dab601a28ab223f8c57f0/lsdremembrances-of-lsd-therapy-past-betty-grover-eisner-org.jpg)


![[LSD]LSD - Complete FBI Blotter Microgram Analysis Manual (1987)](https://static.documents.pub/doc/80x56/55cf98fa550346d0339acf6a/lsdlsd-complete-fbi-blotter-microgram-analysis-manual-1987.jpg)


