This is my own created tutorial about How To Install and Uninstall Ubuntu on Windows OS.. you can follow the same steps for the latest version of Ubuntu/Kubuntu.
Hey guys, Recently, i took Linux / Ubuntu seriously and started installing Ubuntu on my Laptop. Well i was kinda afraid in the beginning, but then thanks to the feature called “Wubi” (you can also check here ). Wubi is a small awesome application for Linux which lets you to install Ubuntu on your Windows itself like any other application you install on Windows system. Normally, when you need to install Linux / Ubuntu as ppl are aware, they need ext3 format partition. The best part of Wubi is it lets you to install the linux on the very same NTFS partition on which you’ve installed your windows and if you feel linux is not of your taste or you dont get used to its system and feel windows is more of your taste (or if you swear to support Billu), all you have to do is, login to your normal Windows a/c, go to Add/Remove programs(XP) or Programs and Features(Vista & Windows 7) and look for Ubuntu / Linux and just double click on it to uninstall. This will uninstall the whole Ubuntu / Linux just like you uninstall your any other Operating System . Trust me its such helluva lovely experience that now i’ve installed Ubuntu on proper EXT3 format on my laptop and its just SIMPLY ROCKIN’!!! Yes, i know after reading what you are thinking.. “If i install Ubuntu the way u’ve mentioned, will i get a dual boot option while booting my system?”. The answer to that question is Yes. It will act as a dual boot giving you option to select Windows or Ubuntu ….yea, i know its Pretty much kewl . Now getting on to the point “Installing Ubuntu Intrepid Ibex”. It is really gr8 to know that the 8.10 version of Ubuntu (which is Intrepid Ibex) comes integrated with Wubi). Am writing this beginner’s guide to show you how do you install Intrepid Ibex on your windows system without formatting your hdd partition, being afraid of screwing up your data, hijacking your windows , being afraid of installing this on your brand new laptop by thinking that this may void the warranty or may screw up the paritions and stuffs leading to the re-installation of the whole laptop. Trust
Transcript
Hey guys,
Recently, i took Linux / Ubuntu seriously and started installing Ubuntu on my Laptop. Well i was kinda afraid in the beginning, but then thanks to the feature called “Wubi” (you can also check here). Wubi is a small awesome application for Linux which lets you to install Ubuntu on your Windows itself like any other application you install on Windows system. Normally, when you need to install Linux / Ubuntu as ppl are aware, they need ext3 format partition. The best part of Wubi is it lets you to install the linux on the very same NTFS partition on which you’ve installed your windows and if you feel linux is not of your taste or you dont get used to its system and feel windows is more of your taste (or if you swear to support Billu), all you have to do is, login to your normal Windows a/c, go to Add/Remove programs(XP) or Programs and Features(Vista & Windows 7) and look for Ubuntu / Linux and just double click on it to uninstall. This will uninstall the whole Ubuntu / Linux just like you uninstall your any other Operating System . Trust me its such helluva lovely experience that now i’ve installed Ubuntu on proper EXT3 format on my laptop and its just SIMPLY ROCKIN’!!!
Yes, i know after reading what you are thinking.. “If i install Ubuntu the way u’ve mentioned, will i get a dual boot option while booting my system?”. The answer to that question is Yes. It will act as a dual boot giving you option to select Windows or Ubuntu ….yea, i know its Pretty much kewl .
Now getting on to the point “Installing Ubuntu Intrepid Ibex”. It is really gr8 to know that the 8.10 version of Ubuntu (which is Intrepid Ibex) comes integrated with Wubi). Am writing this beginner’s guide to show you how do you install Intrepid Ibex on your windows system without formatting your hdd partition, being afraid of screwing up your data, hijacking your windows , being afraid of installing this on your brand new laptop by thinking that this may void the warranty or may screw up the paritions and stuffs leading to the re-installation of the whole laptop. Trust me, installing this on your laptop should not be a problem for your laptop’s warranty as what you are installing is a Free Source Operating System, which you do not need to buy or there is not situation of installing its pirated.
This guide that am writing is for Installing Ubuntu on Windows Vista(SP1) or Windows XP SP2 Machines. The screenshots that i’ve used in this guide is from my own Vista machine as i did not have XP machine ready. Following are the requirements for installing Ubuntu using Wubi on Windows:
Windows Machine 6GB of HDD space (i use and suggest 10GB of HDD space) …preferably on your
Windows “C” drive.
Ubuntu Intrepid Ibex 8.10 Installation CD (Source)
Ofcourse, a CD writer / Rom (and a CD burning software to burn the ISO of ubuntu on a CD and use it for installation)
A Must & Very Important: An internet connection (higher the better) for updating the Ubuntu system after finishing the installation.
It would be also good if you install it on a Windows system with atleast 2gb of RAM, although no such high requirements and can easily be done on 1gb RAM system as well.
A graphics card in the system or your laptop would be gr8 as it’d do wonders later after you finish installing the whole thing. To use and enable the features like Compiz, etc you need to have a gfx card in ur system to have a flawless performance and smooth UI. Although an Intel OnBoard X3100 Graphics Chipset can also help with Compiz, etc but it will be a little slow or laggy (at times). No hard and fast requirement like Windows Vista.
A MAIN STEP YOU NEED TO DO IF YOU ARE PLANNING TO INSTALL THIS ON YOUR LAPTOP. The Ubuntu CD that you download and burn on the CD is a Live CD which means you can boot from it and can also use its Operating System features from the CD itself. What you need to do is before you start on with any of the installation process, just boot using the Live CD and see if your laptop hardwares are all detected and are ready to use OUT OF THE BOX. Like my wifi card, when i booted from my Live CD, wifi worked with my wireless network and i was able to surf, chat online, etc. so this indicated that its gonna be fine on my laptop and i can go ahead and install it.
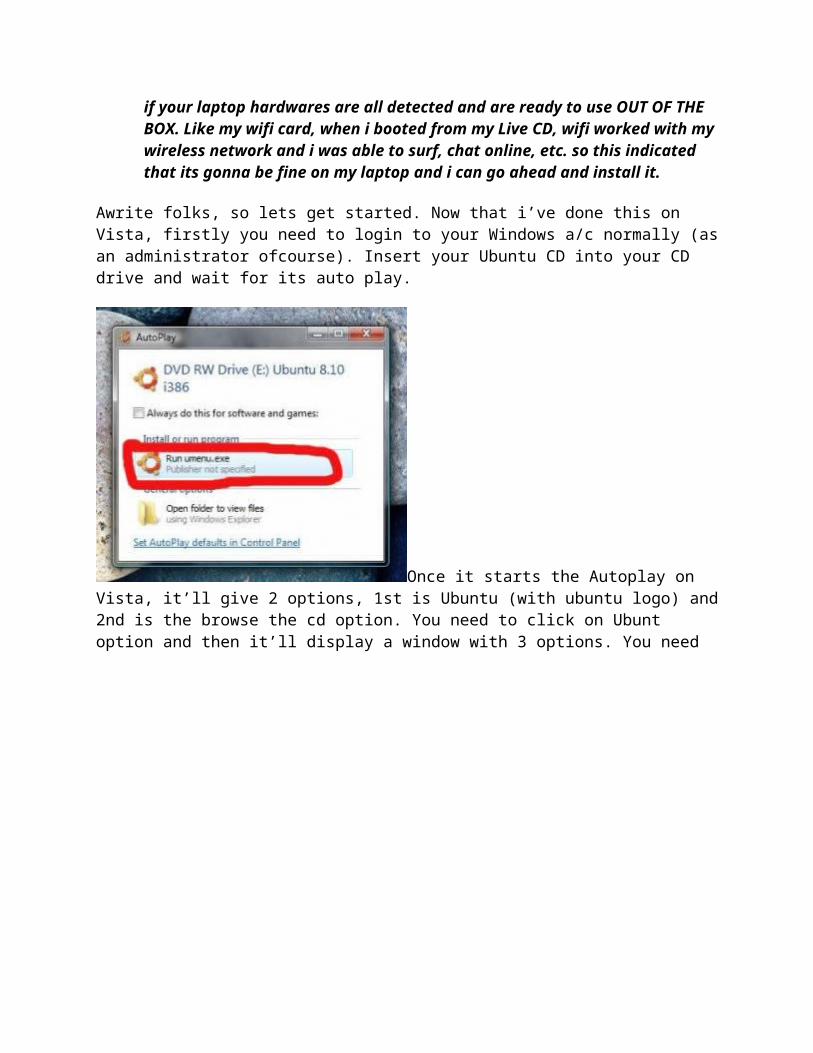
Awrite folks, so lets get started. Now that i’ve done this on Vista, firstly you need to login to your Windows a/c normally (as an administrator ofcourse). Insert your Ubuntu CD into your CD drive and wait for its auto play.
Once it starts the Autoplay on Vista, it’ll give 2 options, 1st is Ubuntu (with ubuntu logo) and 2nd is the browse the cd option. You need to click on Ubunt option and then it’ll display a window with 3 options. You need to select the middle
(second) option Install Inside Windows. Check out the pictures.
After you click on Install Inside Windows, you’ll be taken to the next window which will look like this. Keep the options exactly the way i’ve kept. Ofcourse, you can select your own Username and password . In ubuntu or linux, it wont allow you to use a username with a combination of a capital letter, like my username is “b00gieMan” but here it didnt accept
that and hence i had to use “b00gieman”. BTW, that fingerprint thing you can see on the left hand side corner of the windows, you guys may not get that if your laptop doesnt have a fingerprint reader . Its better if you select the installation drive as your C drive. Installation size, if you see in the drop down menu, it has sizes from 4gb to 15gb which is like an awesome option. I’ve used and would suggest 10gb of space (which is still alot but you can use 6gb).
After this just click on Install and it will start the installation like any other windows application. This process is very fast and will hardly consume any time of yours. Just sit back and enjoy the
Pure Moment of Awesomeness while it installs the whole OS in just a Zooooooomm speed, even less hectic and more simpler than you install Photoshop or MS Office or any such application on your windows system .
Once the installation is done, it’ll reboot the computer and it may eject the tray of your cd drive.. well if it does then just simply keep the cd there itself and again push the tray back and continue with the installation procedure.
After the system restarts it’ll again further continue with the minor installation formalities like checking swap, checking partition format, etc. which again nothing has to be done from the User’s side.. all is done automatically. After finishing this process it again may or may not reboot the computer and after that you’ll be Welcomed with the Ubuntu Human Welcome screen asking for the Username and Password. Just type in the Username and Password that you assigned wile installing Ubuntu using Wubi under windows. At this moment, just keep your speakers on so that you can hear the sound of loging in.. which is the sound of “War Drums” and vollah your set on your Ubuntu, the World of Awesomeness .
The Freshly installed Ubuntu will look very simple which some love it and some feel its sad and why so old school types… but trust me thz not the case . The desktop will look like this (this desktop isnt mine.. as i’ve completely customized my ubuntu and i was too lazy to get this look back just for taking a screenshot. This is just some random pic i took from Uncle Google ). Once you reach here, it may show up some bubble saying something about restricted drivers.. well, just ignore all that and continue with the steps mentioned below. Those bubbles are nothing but just an alert for your GFX Card / WIFI Card.
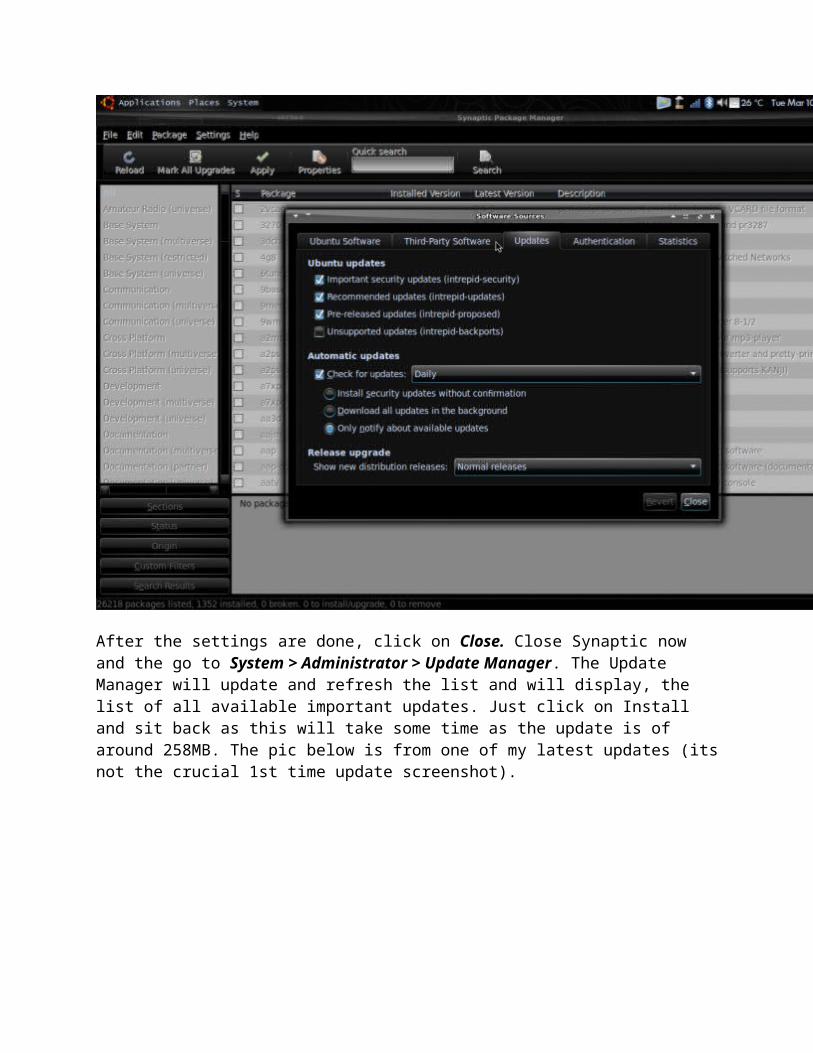
Okay, now that the installation is finished and done, comes the crucial part of updating the Ubuntu and installing Nvidia / ATI Drivers (if you have any of those cards in your system). So now after installing Ubuntu make sure you’ve got an Internet connection. Peferably a 256KBps and above connection would be really helpfull in this scenario as the crucial updates are of around 258MB. The first thing you need to do before starting the update is, go to System > Administrator > Synaptic Package Manager (click on it) and it will ask you the password.. here you need to enter your login password and hit enter. You’ll see Synaptic Package Manager window Manager. Once you get that, click on Settings > Repositories and make sure you do exactly same settings i’ve shown below. Just follow the settings shown for Downloadble from the Internet’s check boxes. Do not change anything about the servers, etc. (The screenshots looks different as i’ve done the customization for my current ubuntu laptop)
Now, click on the Update Tab and keep the settings as i’ve shown in the picture below:
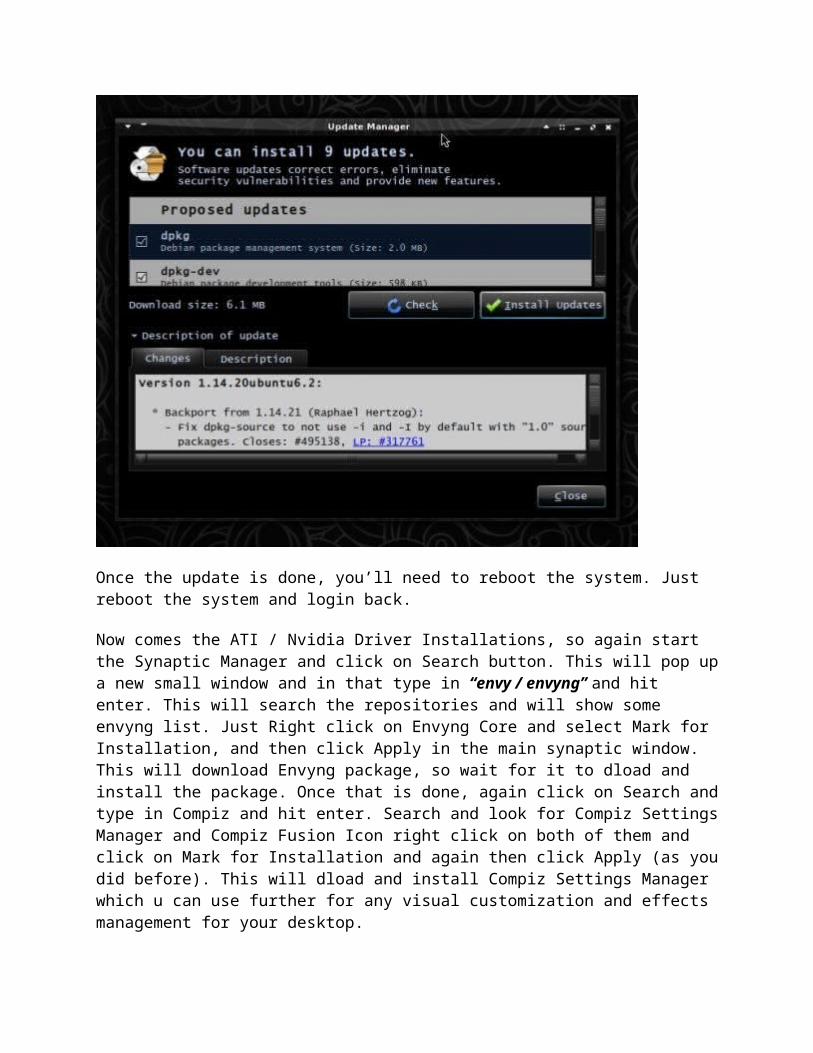
After the settings are done, click on Close. Close Synaptic now and the go to System > Administrator > Update Manager. The Update Manager will update and refresh the list and will display, the list of all available important updates. Just click on Install and sit back as this will take some time as the update is of around 258MB. The pic below is from one of my latest updates (its not the crucial 1st time update screenshot).
Once the update is done, you’ll need to reboot the system. Just reboot the system and login back.
Now comes the ATI / Nvidia Driver Installations, so again start the Synaptic Manager and click on Search button. This will pop up a new small window and in that type in “envy / envyng” and hit enter. This will search the repositories and will show some envyng list. Just Right click on Envyng Core and select Mark for Installation, and then click Apply in the main synaptic window. This will download Envyng package, so wait for it to dload and install the package. Once that is done, again click on Search and type in Compiz and hit enter. Search and look for Compiz Settings Manager and Compiz Fusion Icon right click on both of them and click on Mark for Installation and again then click Apply (as you did before). This will dload and install Compiz Settings Manager which u can use further for any visual customization and effects management for your desktop.
Once Envyng is installed (still keep your net connection active), press ctrl+alt+F1 and this should take you to the terminal, if for some reason if it doesnt, then press the same key combination again and then it’ll take you to the terminal. In terminal type in:
v1nc3@v1nc3-laptop:~$ envyng -t (after this hit enter), it will ask you for your login password and you type in your login password).
+————————————————-+|| Welcome to EnvyNG| Developed by Alberto Milone (aka tseliot)|+————————————————-+
+———————————————————–+| EnvyNG Menu|| 1 – Install the NVIDIA driver|| 2 – Uninstall the NVIDIA driver|| 3 – Install the ATI driver|| 4 – Uninstall the ATI driver|| 5 – Restart the Xserver|| 6 – Restart your computer|| 7 – Exit|| NOTE: IF THE SCREEN TURNS BLACK, PLEASE TYPE ALT+F1+———————————————————–+Please select one of the activities displayed above and press ENTER:
Here according to the card you have.. select the option accordingly eg: i Selected 3 and hit enter (as i have ati card on my laptop). This will again show you the updated drivers and the same way select the latest available driver it shows and hit enter. This will dload and install the drivers and then will as you to Reboot the system, so kindly follow it.
After rebooting the system, you’ll realise that your gfx drivers have been installed and now all you have to do is, Right click on the desktop and then select change desktop background. This will display Display Settings / Properties like you have in Windows. Click on Visual Effects and then select the option EXTRAS. This may take a few minutes but just be calm and then click on close. Just open open up your hard drive window and try to maximise and minimise it and see if the wobbly windows is enabled (it’ll get enabled by default).
Now you need to do some font settings, so again get back to CHange Deskeop Background and click on Fonts tab and then below Rendering, select Sub-Pixel and then click ok (this is mainly if you have a LCD and not a CRT).
PS: If at all you dont like Ubuntu and you want to get rid of it, just login to your windows a/c. and uninstall it from add/remove program
Important Application Summary:
For your Office usage, there is Open Office. For surfing, Firefox is default browser and is in-built. It gets updated along with the
system updates. Also you can download and install Opera by downloading it off their site.
Quite handy and Photoshop replacement and MS Paint asskicker application is “Gimp” .
If your laptop or your desktop has a webcam, then in the synaptic search and look for “Cheese”. Cheese is an application from Mac which is for Webcams which has quite good amout of effects and stuffs.
Online chat messenger is Pidgin (again its in-built). If you want something different more just for MSN, go for aMSN.
For Music, go to www.getsoundbird.com for Open Source Music Player.
For Movies, download VLCPlayer and i’d suggest to download the VLC from their site itself than getting it from Ubuntu Repositories.
Assign shortcurts to your keyboard for applicaations you need. System > Preferncs > Keyboard Shortcuts.
Screenlets (from Synaptic) if you want some widgets / screenlets like Vista.
If you want a mac like dock bar to handle your shortcuts and minimized windows, download the Avant Window Navigator (again from their site itself and not the repositories. I may cover more about Avant Window Navigator in the other guides which will cover Customizing Ubuntu). If you want some thing more light and further custimizable than Avant, then you can search and download Cairo-Dock (from synaptic).
Thats all folks.. now you’re good to go with the World of Ubuntu and enjoy pure awesomeness ..!! Hope you liked the guide and was helpful to you . A few comments would be helpfull to keep me going with more tutorials and guides.