43
Installing vRealize Network Insight VMware vRealize Network Insight 5.0

Installing vRealizeNetwork Insight
VMware vRealize Network Insight 5.0

You can find the most up-to-date technical documentation on the VMware website at:
https://docs.vmware.com/
If you have comments about this documentation, submit your feedback to
VMware, Inc.3401 Hillview Ave.Palo Alto, CA 94304www.vmware.com
Copyright © 2019 VMware, Inc. All rights reserved. Copyright and trademark information.
Installing vRealize Network Insight
VMware, Inc. 2

Contents
About vRealize Network Insight Installation Guide 5
1 Preparing for Installation 6System Recommendations and Requirements 6
Privileges 9
System Ports 10
Network Communication Ports 15
Supported Products and Versions 17
2 Installing vRealize Network Insight 21Installation Workflow 21
Deploying vRealize Network Insight Platform OVA 22
Deployment using vSphere Web Client 22
Deployment Using vSphere Windows Native Client 24
Activating the License 25
Generating Shared Secret 25
Setting up Network Insight Collector (OVA) 26
Deployment Using vSphere Web Client 26
Deployment using vSphere Windows Native Client 27
Setting up Network Insight Collector (AMI) in AWS for VMware SD-WAN 28
Deploy Additional Collector to an Existing Setup 30
3 Accessing vRealize Network Insight by using the Evaluation License 31Add vCenter Server 31
Analyze Traffic Flows 32
Generate a Report 33
4 Planning to Scale up your Deployment 34Planning to Scale up the Platform Cluster 34
Planning to Scale up the Collector 35
Increase the Brick Size of your Setup 36
5 Upgrading vRealize Network Insight 37Online Upgrade 38
Single-Click Offline Upgrade 39
Offline Upgrade 40
6 Uninstall vRealize Network Insight 42
VMware, Inc. 3

Remove Collector IP When Netflow is Enabled in vCenter 42
Remove Collector IP When Netflow is Enabled in NSX 43
Installing vRealize Network Insight
VMware, Inc. 4
About vRealize Network InsightInstallation Guide
The vRealize Network Insight Installation Guide is intended for administrators or specialists responsiblefor installing vRealize Network Insight.
Intended AudienceThis information is intended for administrators or specialists responsible for installing vRealize NetworkInsight. The information is written for experienced virtual machine administrators who are familiar withenterprise management applications and datacenter operations.
VMware, Inc. 5
Preparing for Installation 1Before you install vRealize Network Insight, prepare the deployment environment to meet the systemrequirements.
This chapter includes the following topics:
n System Recommendations and Requirements
n Supported Products and Versions
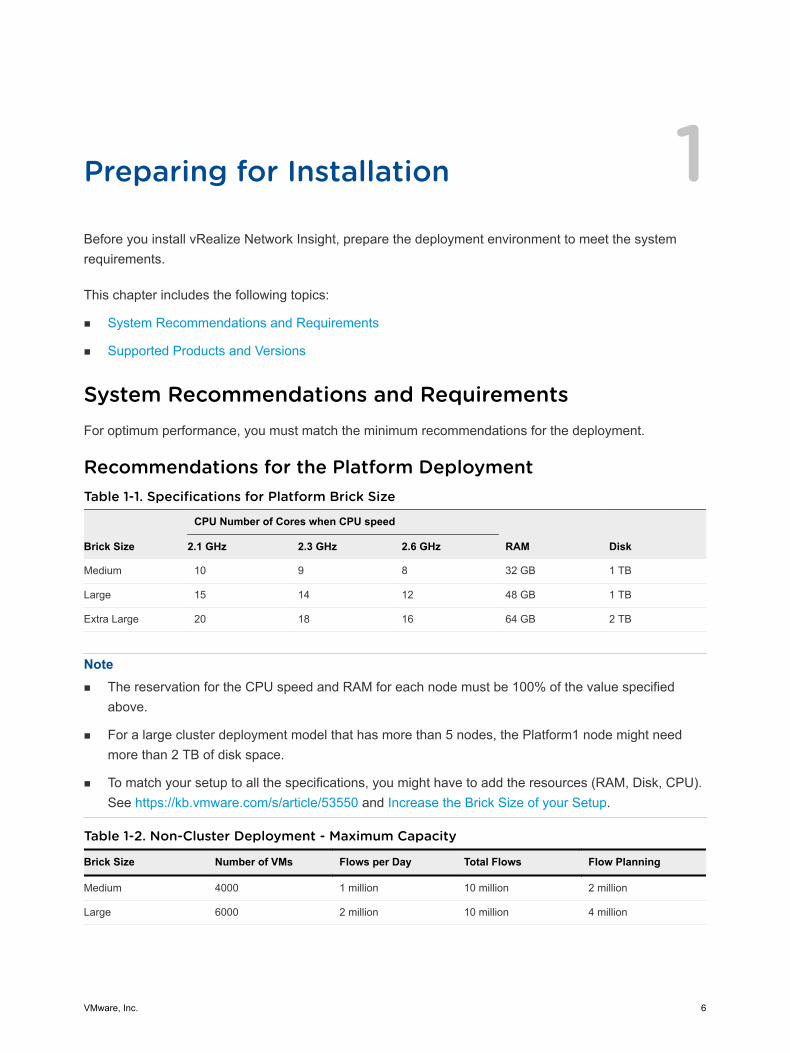
System Recommendations and RequirementsFor optimum performance, you must match the minimum recommendations for the deployment.
Recommendations for the Platform DeploymentTable 1-1. Specifications for Platform Brick Size
Brick Size
CPU Number of Cores when CPU speed
RAM Disk2.1 GHz 2.3 GHz 2.6 GHz
Medium 10 9 8 32 GB 1 TB
Large 15 14 12 48 GB 1 TB
Extra Large 20 18 16 64 GB 2 TB
Note n The reservation for the CPU speed and RAM for each node must be 100% of the value specified
above.
n For a large cluster deployment model that has more than 5 nodes, the Platform1 node might needmore than 2 TB of disk space.
n To match your setup to all the specifications, you might have to add the resources (RAM, Disk, CPU).See https://kb.vmware.com/s/article/53550 and Increase the Brick Size of your Setup.
Table 1-2. Non-Cluster Deployment - Maximum Capacity
Brick Size Number of VMs Flows per Day Total Flows Flow Planning
Medium 4000 1 million 10 million 2 million
Large 6000 2 million 10 million 4 million
VMware, Inc. 6
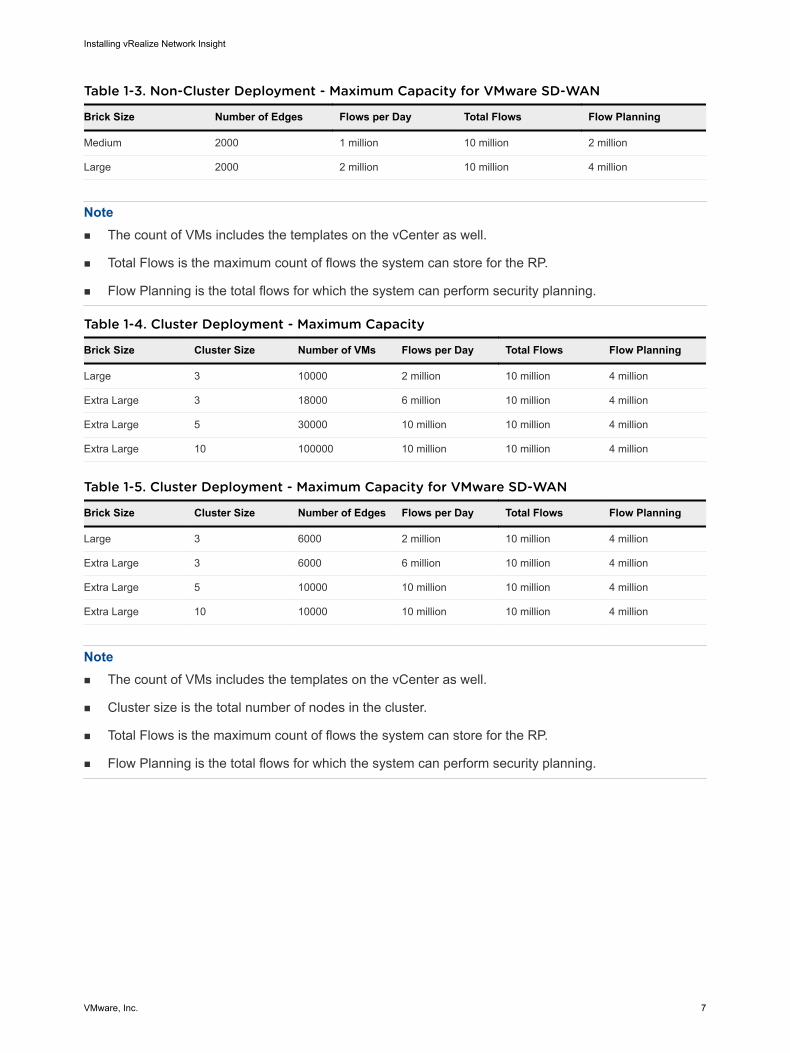
Table 1-3. Non-Cluster Deployment - Maximum Capacity for VMware SD-WAN
Brick Size Number of Edges Flows per Day Total Flows Flow Planning
Medium 2000 1 million 10 million 2 million
Large 2000 2 million 10 million 4 million
Note n The count of VMs includes the templates on the vCenter as well.
n Total Flows is the maximum count of flows the system can store for the RP.
n Flow Planning is the total flows for which the system can perform security planning.
Table 1-4. Cluster Deployment - Maximum Capacity
Brick Size Cluster Size Number of VMs Flows per Day Total Flows Flow Planning
Large 3 10000 2 million 10 million 4 million
Extra Large 3 18000 6 million 10 million 4 million
Extra Large 5 30000 10 million 10 million 4 million
Extra Large 10 100000 10 million 10 million 4 million
Table 1-5. Cluster Deployment - Maximum Capacity for VMware SD-WAN
Brick Size Cluster Size Number of Edges Flows per Day Total Flows Flow Planning
Large 3 6000 2 million 10 million 4 million
Extra Large 3 6000 6 million 10 million 4 million
Extra Large 5 10000 10 million 10 million 4 million
Extra Large 10 10000 10 million 10 million 4 million
Note n The count of VMs includes the templates on the vCenter as well.
n Cluster size is the total number of nodes in the cluster.
n Total Flows is the maximum count of flows the system can store for the RP.
n Flow Planning is the total flows for which the system can perform security planning.
Installing vRealize Network Insight
VMware, Inc. 7

Recommendation for the Collector DeploymentTable 1-6. Specifications for Collector Brick Size
Brick Size
CPU Number of Cores when CPU speed
RAM Disk2.1 GHz 2.3 GHz 2.6 GHz
Medium 5 5 4 12 GB 150 GB
Large 10 9 8 16 GB 150 GB
Extra Large 10 9 8 24 GB 200 GB
Note n The reservation for the CPU speed and RAM for each node should be 100% of the value specified
above.
Table 1-7. Collector Deployment - Maximum Capacity
Collector Size Number of VMs Flows per Day Flow count in 4 days
Medium 4000 2.5 million 3.25 million
Large 10000 5 million 6.5 million
Extra Large 10000 10 million 13 million
Table 1-8. Collector Deployment - Maximum Capacity for VMware SD-WAN
Collector Size Number of Edges Flows per Day Flow count in 4 days
Medium 4000 2.5 million 3.25 million
Large 10000 5 million 6.5 million
Extra Large 10000 10 million 13 million
Note n The count of VMs includes the templates on the vCenter as well.
n For a single deployment with more than one collector, the limitation on the total flows acrosscollectors is based on the capacity of the platform.
Other Requirements and Considerationsn The maximum time skew between the platform nodes has to be lesser than 30 seconds.
n The availability of the NTP service is critical to system operations. Ensure that you do not reboot theplatform node or the collector node when the NTP service is not available.
n vRealize Network Insight services crashes and does not recover automatically when the existingcompute resources are used up by the other processes on the platform. If the services fail to recover,reboot the platform node.
n The network latency between the platform nodes should be less than 500ms.
Installing vRealize Network Insight
VMware, Inc. 8

n The recommended disk latency for optimal performance is up to 5ms. If disk latency is above 5ms,the system performance degrades.
n The recommended disk IOPS is 7500.
Supported Web Browsern Google Chrome version 54 and later.
n Mozilla Firefox version 47 and later.
Recommendations to Support High AvailabilityYou can customize vSphere HA options to enable vSphere high availability.
n Host Failure - Restart VMs
n Host Isolation- Disabled
n Guest not heartbeating- Disabled
Privileges
Privileges Required for Data Sourcesn Privileges required to configure and use IPFIX
n vCenter Server Credentials with privileges:
• Distributed Switch: Modify
• dvPort group: Modify
n The predefined roles in the vCenter server must have the following privileges assigned at rootlevel that need to be propagated to the children roles:
• System.Anonymous
• System.Read
• System.View
• global.settings
To know more about roles in vCenter, see Using Roles to Assign Privileges section in vSphereSecurity guide.
n Privileges required for NSX Manager Data Provider
n NSX Manager Data Provider requires the Enterprise role.
n If Central CLI is enabled, then the system admin credentials are required for NSX Manager DataProvider.
Installing vRealize Network Insight
VMware, Inc. 9
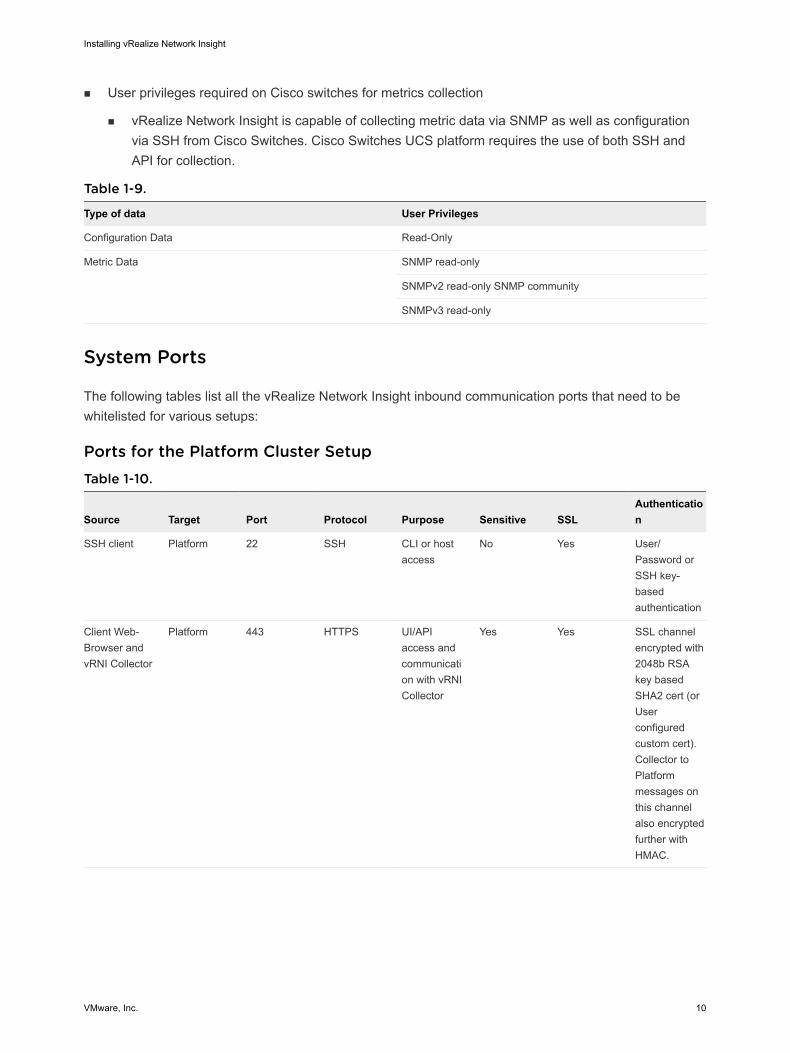
n User privileges required on Cisco switches for metrics collection
n vRealize Network Insight is capable of collecting metric data via SNMP as well as configurationvia SSH from Cisco Switches. Cisco Switches UCS platform requires the use of both SSH andAPI for collection.
Table 1-9.
Type of data User Privileges
Configuration Data Read-Only
Metric Data SNMP read-only
SNMPv2 read-only SNMP community
SNMPv3 read-only
System Ports
The following tables list all the vRealize Network Insight inbound communication ports that need to bewhitelisted for various setups:
Ports for the Platform Cluster SetupTable 1-10.
Source Target Port Protocol Purpose Sensitive SSLAuthentication
SSH client Platform 22 SSH CLI or hostaccess
No Yes User/Password orSSH key-basedauthentication
Client Web-Browser andvRNI Collector
Platform 443 HTTPS UI/APIaccess andcommunication with vRNICollector
Yes Yes SSL channelencrypted with2048b RSAkey basedSHA2 cert (orUserconfiguredcustom cert).Collector toPlatformmessages onthis channelalso encryptedfurther withHMAC.
Installing vRealize Network Insight
VMware, Inc. 10

Table 1-10. (continued)
Source Target Port Protocol Purpose Sensitive SSLAuthentication
Platform Platform 2181 HTTP Communication betweenzookeeperservers onother nodes(in case ofcluster). Andstoresmetdatainformation(znode data)
No No
Platform Platform 2888 HTTP Used toconnect tozookeeperleader
No No
Platform Platform 3000 HTTP Used foremailnotifications
Yes No
Platform Platform 3888 HTTP Used forzookeeperleaderelection
Yes No
Platform Platform 5432 jdbc Storing VMconfigurationdata andinfra metadata
Yes No
Platform Platform 8020 TCP/RPC Communicate betweenother namenode(s) anddata nodes
Yes No
Platform Platform 8025 HTTP Nodemanagersuse this portto connect toresourcemanager
No No
Platform Platform 8030 HTTP Used byresourcemanager toschedule thetasks
No No
Installing vRealize Network Insight
VMware, Inc. 11

Table 1-10. (continued)
Source Target Port Protocol Purpose Sensitive SSLAuthentication
Platform Platform 8032 HTTP The addressof theapplicationsmanagerinterface inthe RM
No No
Platform Platform 8033 HTTP The addressof the RMadmininterface
No No
Platform Platform 8042 HTTP Nodemanager webapp address
No No
Platform Platform 8080 HTTP Serves UIrequests
Yes No
Platform Platform 8088 HTTP The HTTPaddress ofthe ResourceManager webapplication
No No
Platform Platform 8480 TCP/RPC JournalNodeHTTP server
No No
Platform Platform 8485 TCP/RPC HDFS sharededits data dir
No No
Platform Platform 9090 HTTP Servesrequestsfrom collectorand sendscommands tocollector
Yes Yes(protected vianginx)
Platform Platform 9092 Binary overTCP
Port on whichother brokerscommunicate
Yes No
Platform Platform 9200-9300 HTTP Servessearchrequests. ESuses range ofports tolisten, if 9200is by it usesnext portavailable.
Yes No
Installing vRealize Network Insight
VMware, Inc. 12

Table 1-10. (continued)
Source Target Port Protocol Purpose Sensitive SSLAuthentication
Platform Platform 9300 HTTP Servessearchrequests. ESuses range ofports tolisten, if 9200is by it usesnext portavailable.
Yes No
Platform Platform 30000:65535 TCP Ephemeralports rangeused byvariousprocesses tomake theTCPconnectionwith the otherprocesses
No No
Platform Platform 60000 IPC Used forcommunication betweenother hbasemasters andregionservers
Yes No
Platform Platform 60010 HTTP Used forhbase webUI
No No
Platform Platform 60020 IPC Communication betweenhbase masterand regionserver
Yes No
Installing vRealize Network Insight
VMware, Inc. 13
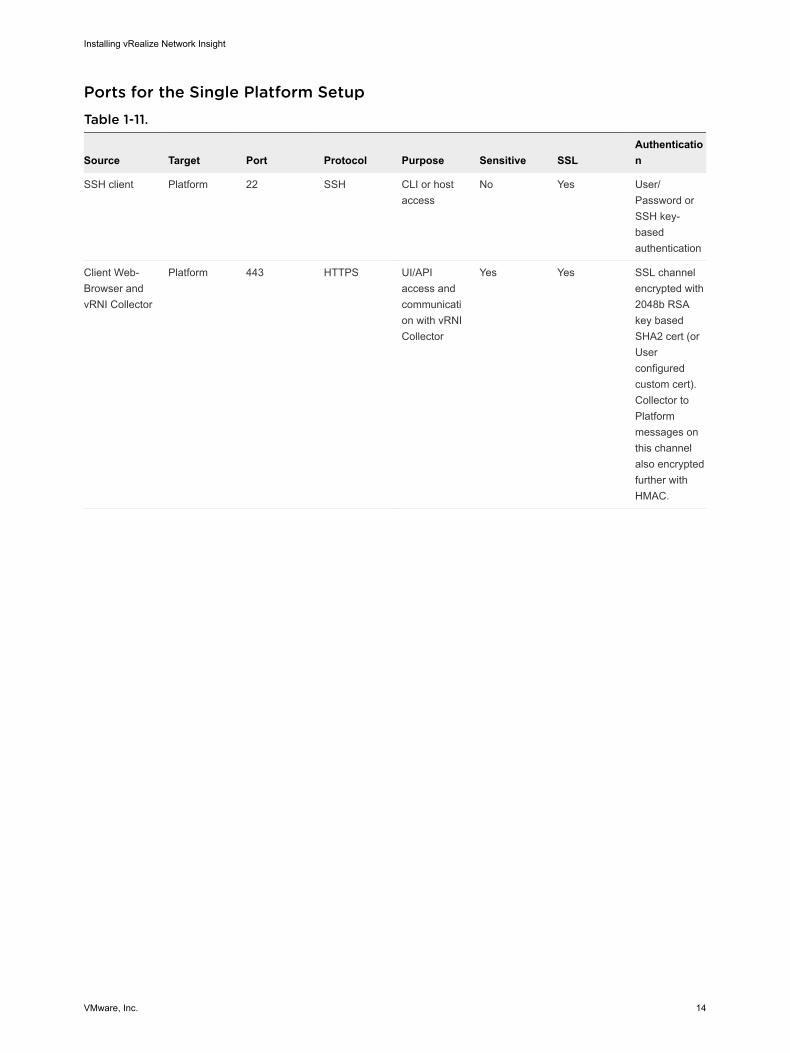
Ports for the Single Platform SetupTable 1-11.
Source Target Port Protocol Purpose Sensitive SSLAuthentication
SSH client Platform 22 SSH CLI or hostaccess
No Yes User/Password orSSH key-basedauthentication
Client Web-Browser andvRNI Collector
Platform 443 HTTPS UI/APIaccess andcommunication with vRNICollector
Yes Yes SSL channelencrypted with2048b RSAkey basedSHA2 cert (orUserconfiguredcustom cert).Collector toPlatformmessages onthis channelalso encryptedfurther withHMAC.
Installing vRealize Network Insight
VMware, Inc. 14

Ports for the Collector ServerTable 1-12.
Source Target Port Protocol Purpose Sensitive SSLAuthentication
SSH client Collector 22 SSH CLI or hostaccess
No Yes User/Password orSSH key-basedauthentication
vRNI Collector Platform 443 HTTPS Primarycommunication channelwith Platform
Yes Yes SSL channelencrypted with2048b RSAkey basedSHA2 cert (orUserconfiguredcustom cert).Collector toPlatformmessages onthis channelalso encryptedfurther withHMAC.
FlowForwarder
Collector UDP 2055 NetFlow/IPFIX
Flows fromtarget arepushed tothis port
Yes No
Network Communication PortsThe following table lists the ports and the protocols that are used for the network communication invRealize Network Insight.
You can also see the list of ports at https://ports.vmware.com/home/vRealize-Network-Insight.
Table 1-13.
Purpose From To Port Protocol
Communication betweenthe VMs of vRealizeNetwork Insight
Collector Platform
Note The port mustbe enabled for allplatforms.
443 HTTPS
Services that requireInternet access
Platform and Collector svc.ni.vmware.com 443 HTTPS
support2.ni.vmware.com
reg.ni.vmware.com
Communication formiscellaneous services
Platform LDAP server 389, 636 LDAP and LDAPS
Installing vRealize Network Insight
VMware, Inc. 15
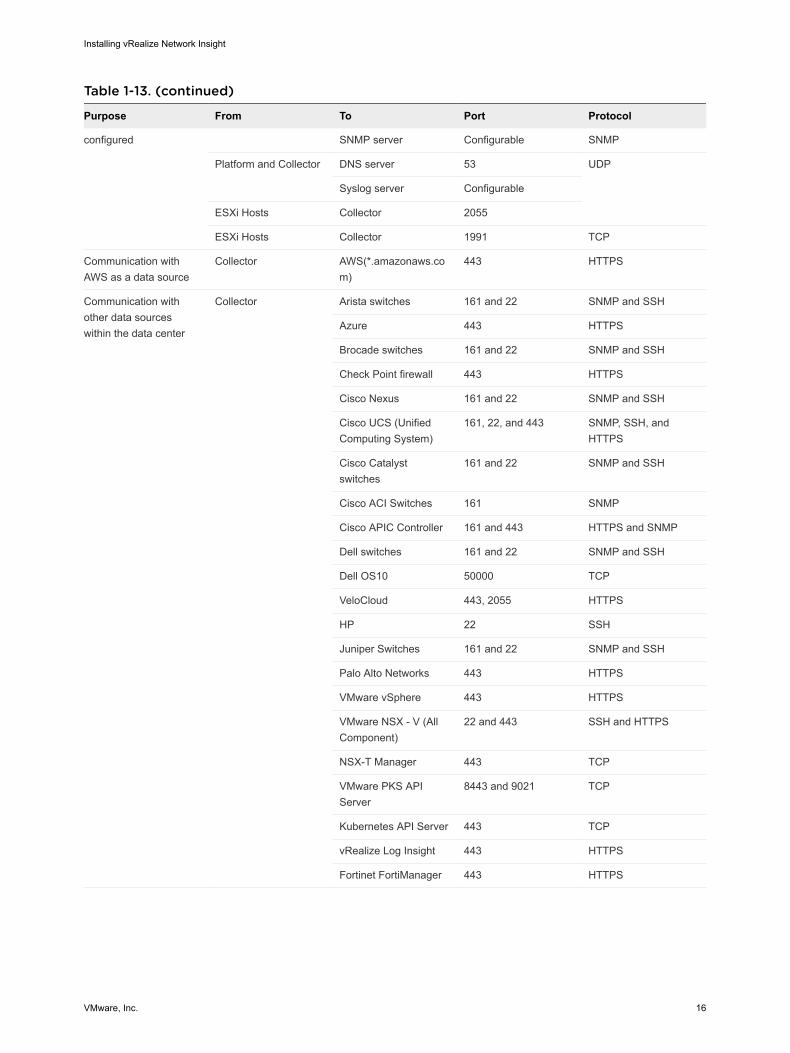
Table 1-13. (continued)
Purpose From To Port Protocol
configured SNMP server Configurable SNMP
Platform and Collector DNS server 53 UDP
Syslog server Configurable
ESXi Hosts Collector 2055
ESXi Hosts Collector 1991 TCP
Communication withAWS as a data source
Collector AWS(*.amazonaws.com)
443 HTTPS
Communication withother data sourceswithin the data center
Collector Arista switches 161 and 22 SNMP and SSH
Azure 443 HTTPS
Brocade switches 161 and 22 SNMP and SSH
Check Point firewall 443 HTTPS
Cisco Nexus 161 and 22 SNMP and SSH
Cisco UCS (UnifiedComputing System)
161, 22, and 443 SNMP, SSH, andHTTPS
Cisco Catalystswitches
161 and 22 SNMP and SSH
Cisco ACI Switches 161 SNMP
Cisco APIC Controller 161 and 443 HTTPS and SNMP
Dell switches 161 and 22 SNMP and SSH
Dell OS10 50000 TCP
VeloCloud 443, 2055 HTTPS
HP 22 SSH
Juniper Switches 161 and 22 SNMP and SSH
Palo Alto Networks 443 HTTPS
VMware vSphere 443 HTTPS
VMware NSX - V (AllComponent)
22 and 443 SSH and HTTPS
NSX-T Manager 443 TCP
VMware PKS APIServer
8443 and 9021 TCP
Kubernetes API Server 443 TCP
vRealize Log Insight 443 HTTPS
Fortinet FortiManager 443 HTTPS
Installing vRealize Network Insight
VMware, Inc. 16

Supported Products and VersionsvRealize Network Insight supports several products and versions.
Data Source Version/Model Connection Protocol Permissions/Privileges
Amazon WebServices (EnterpriseLicense Only)
Not Applicable HTTPS See the Add a Standard AWS DataSource section in the vRealizeNetwork Insight User Guide.
Arista switches 7050TX, 7250QX,7050QX-32S, 7280SE-72
SSH, SNMP Read only user
Read only SNMP user
Azure Subscription Not Applicable HTTPS You must have the followingpermission:
Microsoft.Resources/
subscriptions/read
Microsoft.Compute/
virtualMachines/read
Microsoft.Network/
virtualNetworks/read
Microsoft.Network/
networkSecurityGroups/read
Microsoft.Network/
networkInterfaces/read
Microsoft.Network/
applicationSecurityGroups/
read
Microsoft.Storage/
storageAccounts/read
Microsoft.Storage/
storageAccounts/listkeys/
action
Microsoft.Network/
networkWatchers/
queryFlowLogStatus/action
Alternatively, for ease of use you canadd the Storage Account KeyOperator Service Role, NetworkContributor, and Readerpermission.
Brocade Switches VDX 6740, VDX 6940, MLX,MLXe
SSH, SNMP Read only user
Read only SNMP user
Check Point Firewall Check Point R80 , R80.10 HTTPS, SSH See the Check Point Firewall sectionin the vRealize Network Insight UserGuide.
Cisco ACI 3.2 HTTPS (to APIC controller)
SNMP (to APIC controller and ACIswitches)
To connect to the APIC controllerREST API over HTTPS, a user withthe read-only permission havingaccess to all the tenants is required
For SNMP, the user needs the read-only permission.
Installing vRealize Network Insight
VMware, Inc. 17

Data Source Version/Model Connection Protocol Permissions/Privileges
Cisco ASA X Series with OS 9.4 SSH, SNMP The user should have rights toswitch to the enable mode. Theuser's password should be same asthe one used for the enable mode ofCisco ASA.
Cisco Catalyst 3000, 3750, 4500, 6000, 6500 SSH, SNMP Read only SNMP user with defaultprivilege level 15
Cisco Nexus 3000, 5000, 6000, 7000, 9000 SSH, SNMP Read only user
Read only SNMP user
Cisco UCS (UnifiedComputing System)
Series B blade servers,Series C rack servers,Chassis, Fabric interconnect
UCS Manager: HTTPS
UCS Fabric: SSH, SNMP
Read only user
Read only SNMP user
Dell switches FORCE10 MXL 10,FORCE10 S6000, S4048,Z9100, S4810,PowerConnect 8024, DellOS10
SSH, SNMP Read only user
Read only SNMP user
FortinetFortiManager
6.0.1 HTTPS The user must have:
n at least the Restricted User rolewith access to all ADOMs andpolicy packages.
n the rpc-permit read accessenabled from Command LineInterface (CLI).
F5 BIG - IP 12.1.2 and later HTTPS, SSH, SNMP The user must have at least theguest role. Also, TMSH must beenabled and must have access to allpartitions. F5 BIG-IP supports bothrouting and load balancing.
HP HP Virtual Connect Manager4.41, HP OneView 3.0
HP OneView 3.0: HTTPS
HP Virtual Connect Manager 4.41:SSH
Read only user
Huawei CloudEngine
6800, 7800, 8800 SSH, SNMP Read only user
Read only SNMP user
Infoblox Infoblox NIOS version 8.0,8.1, 8.2
HTTPS Read only user with API Interfaceaccess
Read-only permissions for DNSobject types as follows:
n Permission Type - DNS
n Resource - A Records, DNSZones, DNS Views
Juniper Switches EX3300, QFX 51xx Series(JunOS v12 & v15, withoutQFabric)
Netconf, SSH, SNMP Read only user
Read only SNMP user
Installing vRealize Network Insight
VMware, Inc. 18

Data Source Version/Model Connection Protocol Permissions/Privileges
Kubernetes n 1.12 on NSX-T 2.3.1
n 1.12 on NSX-T 2.3.2
n 1.13 on NSX-T 2.3.2
HTTPS User must have cluster admin rolewith read permissions.
Palo Alto Networks Panorama 7.0.x, 7.1, 8.x, 9.0 HTTPS User must have admin role with XMLAPI access. For details, see the PaloAlto Networks section in thevRealize Network Insight UserGuide.
ServiceNow London HTTPS User must have admin role
VMware SD-WAN VeloCloud Orchestrator andEdge Version 3.3.1 and later
HTTPS User must have Account Role withany of the following permission:
n Superusern Standard Adminn Customer Support
VMC on AWS -vCenter
M5P2 and above
Note Only NSX-T basedVMware Cloud on AWSSDDCs are supported.
HTTPS User must have the followingpermission:
n Cloud Administrator: To adddata source and enable IPFIX.
VMC on AWS - NSXManager
M5P2 and above
Note Only NSX-T basedVMware Cloud on AWSSDDCs are supported.
HTTPS User must have any of the followingpermission:
n Org Member.Administrator: Toadd data source and enableIPFIX.
n Org Member.Cloud Admin: Toadd data source and enableIPFIX.
n Org Member.VMware Cloud onAWS (all role): To add datasource and enable IPFIX.
n Org Member.Cloud Auditor: Toadd data source.
VMware IdentityManager
3.3 and later HTTPS User must have admin role.
VMware PKS PKS 1.3.2 on NSX-T 2.3.1
PKS 1.3.2 on NSX-T 2.3.2
User must have cluster admin rolewith read permissions.
VMware NSXManager (VMwareNSX-V)
Supported Versions SSH, HTTPS See the Edge Data Collectionsection in the vRealize NetworkInsight User Guide.
VMware NSX-TManager
2.4.
For additional supportedversion, see SupportedVersions
HTTPS Read only user
Installing vRealize Network Insight
VMware, Inc. 19
Data Source Version/Model Connection Protocol Permissions/Privileges
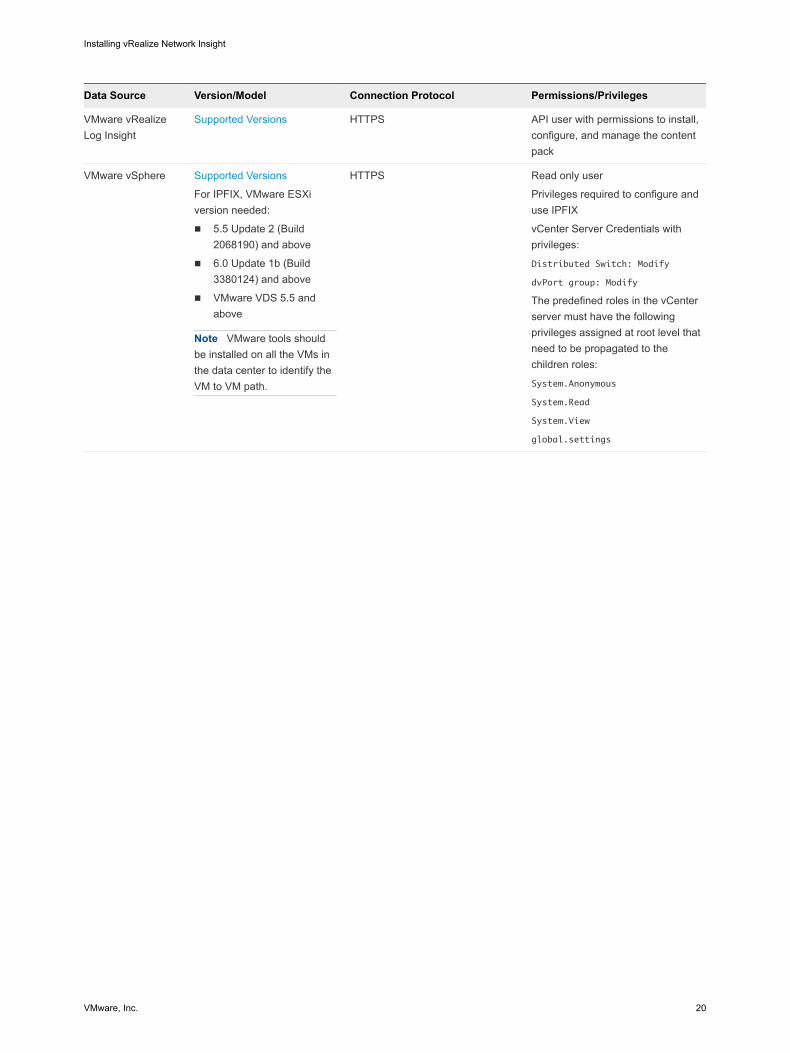
VMware vRealizeLog Insight
Supported Versions HTTPS API user with permissions to install,configure, and manage the contentpack
VMware vSphere Supported Versions
For IPFIX, VMware ESXiversion needed:
n 5.5 Update 2 (Build2068190) and above
n 6.0 Update 1b (Build3380124) and above
n VMware VDS 5.5 andabove
Note VMware tools shouldbe installed on all the VMs inthe data center to identify theVM to VM path.
HTTPS Read only user
Privileges required to configure anduse IPFIX
vCenter Server Credentials withprivileges:
Distributed Switch: Modify
dvPort group: Modify
The predefined roles in the vCenterserver must have the followingprivileges assigned at root level thatneed to be propagated to thechildren roles:
System.Anonymous
System.Read
System.View
global.settings
Installing vRealize Network Insight
VMware, Inc. 20
Installing vRealize NetworkInsight 2You can deploy vRealize Network Insight using vSphere Web client or vSphere Windows native client.
Note After you successfully deploy vRealize Network Insight Platform OVA, verify whether the givenstatic IP is set on vCenter Server.
To automate installation, configuration, upgrade, patch, configuration management, drift remediation andhealth from within a single pane of glass, you can use vRealize Suite Lifecycle Manager. If you are a newuser, click here to install vRealize Suite Lifecycle Manager. This provides the IT Managers of Cloud adminresources to focus on business-critical initiatives, while improving time to value (TTV), reliability andconsistency.
You can also install and upgradevRealize Network Insight by using vRealize Suite Lifecycle Manager. Formore information, see the vRealize Suite Lifecycle Manager Installation, Upgrade, and ManagementGuide.
This chapter includes the following topics:
n Installation Workflow
n Deploying vRealize Network Insight Platform OVA
n Activating the License
n Generating Shared Secret
n Setting up Network Insight Collector (OVA)
n Setting up Network Insight Collector (AMI) in AWS for VMware SD-WAN
n Deploy Additional Collector to an Existing Setup
Installation WorkflowTo install vRealize Network Insight, you install the platform OVA, activate the license, generate sharedsecret, and setup collector OVA.
VMware, Inc. 21

Deploying vRealize Network Insight Platform OVAYou can import the vRealize Network Insight Platform OVA to your vCenter Server.
Deployment using vSphere Web ClientYou can deploy vRealize Network Insight using vSphere Web Client.
Procedure
1 Right-click the Datacenter where you want to install the appliance and select Deploy OVF Template.
2 Enter the URL to download and install the OVA package or browse to select the source location of theOVA package.
3 Enter the OVA name. Select the destination folder for deployment.
4 Select a host or a cluster or a resource pool where you want to run the deployed template.
5 Verify the OVF template details.
6 Read the End User License Agreement and click Accept.
7 Select a deployment configuration. Click Next.
Installing vRealize Network Insight
VMware, Inc. 22

8 Select the location to store the files for the deployed template. Select Thin Provision as the VirtualDisk format. Select the datastore or the datastore clusters where you want to store the files. ClickNext.
9 Select the network that the deployed VM will use.
The selected network should allow the appliance to reach out to Internet for support and upgrade.
10 To customize the template for the deployment, you will have to manually configure the applianceusing the VM console. Click Next.
11 Verify the configuration details and click Finish.
12 Increase the Brick Size of your Setup to match the System Recommendations and Requirements.
13 Once the platform is installed, start the VM and launch the console.
14 Log in with the given console credentials. Run the setup command.
15 Create the password for the support login. Change the password for the consoleuser.
Note Your password must contain a minimum of 6 characters. A single quote (') is not allowed.
Note You must change the support and consoleuser password periodically to comply with yourorganization policy.
16 Enter the following details to configure the network:
a IPv4 Address: Second reserved static IP address
b Netmask: Subnet mask for the above static IP
c Default Gateway: Default gateway of your network
d DNS : DNS server of your environment
Note For multiple DNS servers, ensure that they are separated by space.
e Domain Search List : The domain that needs to be appended for dns lookups
f Enter y to save the configuration.
17 Enter the NTP Sever and ensure that it can reached from the VM. The services will fail to start if NTPtime is out of sync.
Note For multiple NTP servers, ensure that they are separated by commas.
18 (Optional) To configure Web Proxy, enter y.
19 All the services are verified.
20 Add additional disk space based on your setup requirement. See https://kb.vmware.com/s/article/53550.
Installing vRealize Network Insight
VMware, Inc. 23

Deployment Using vSphere Windows Native ClientYou can deploy vRealize Network Insight using vSphere Windows native client.
Procedure
1 Click File > Deploy OVF Template.
2 Enter the URL to download and install the OVA package from the internet or browse to select thesource location of the OVA package on your computer.
3 Click Next and verify the OVF template details.
4 Read the End-User License Agreement and click Accept.
5 Provide a name and specify the location for the deployed template. Click Next.
6 Select the Deployment Configuration.
7 Select a Host/Cluster where you want to run the deployed template.
8 Select the Resource Pool in which you want to deploy this template.
9 Select a destination storage for the VM files. Click Next.
10 Specify the format in which you want to store the virtual disks. Select Thin Provision as the virtualdisk format. Click Next.
11 Specify the network that the deployed template should use. Map the network from OVA to yourinventory.
12 Customize the template for the deployment. Provide the shared secret that was generated on theonboarding page. You will have to manually configure the appliance using the VM console. ClickNext.
13 Verify all the configuration data. Check Power on after deployment. Click Finish.
14 Increase the Brick Size of your Setup to match the System Recommendations and Requirements.
15 Once the Collector OVA is installed, start the VM and launch the console.
16 Log in with the given console credentials. Run the setup command.
17 Create the password for the support login. Change the password for the consoleuser.
Note Your password must contain a minimum of 6 characters. A single quote (') is not allowed.
Note You must change the support and consoleuser password periodically to comply with yourorganization policy.
18 Enter the following details to configure the network:
a IPv4 Address: Second reserved static IP address
b Netmask: Subnet mask for the above static IP
c Default Gateway: Default gateway of your network
Installing vRealize Network Insight
VMware, Inc. 24

d DNS : DNS server of your environment
Note For multiple DNS servers, ensure that they are separated by space.
e Domain Search List : The domain that needs to be appended for dns lookup.
f Enter y to save the configuration.
19 Enter the NTP Sever and ensure that it can reached from the VM. The services will fail to start if NTPtime is out of sync.
Note For multiple NTP servers, ensure that they are separated by commas.
20 (Optional) To configure Web Proxy, enter y.
21 All the services are verified.
22 Add additional disk space based on your setup requirement. See https://kb.vmware.com/s/article/53550.
Activating the License
After installing the vRealize Network Insight Platform OVA, open https://<vRealize Network InsightPlatform IP address> in the Chrome Web browser.
Procedure
1 Enter the license key received in the welcome email.
2 For UI admin (admin@local) user name, set the password.
Note Your password must be alphanumeric, with a minimum of 8 characters and a maximum of 100characters. Space between the characters is not allowed.
3 Click Activate.
4 Add the vRealize Network Insight Collector after activating the license.
Generating Shared SecretYou can generate and import the vRealize Network Insight collector virtual appliance.
Generate a shared secret and import the vRealize Network Insight collector virtual appliance:
Procedure
1 Generate a shared secret after activating the license on the Setup Proxy Virtual Appliance page.
2 Copy the shared secret.
You will require this during the deployment of vRealize Network Insight Collector OVA.
Installing vRealize Network Insight
VMware, Inc. 25
Setting up Network Insight Collector (OVA)You can set up vRealize Network Insight collector by importing OVA to your vCenter server.
Follow the steps below to import the vRealize Network Insight collector OVA to your vCenter Server.
Deployment Using vSphere Web ClientYou can import the vRealize Network Insight Collector OVA using vSphere Web Client.
Procedure
1 Right-click the Datacenter where you want to install the appliance and select Deploy OVF Template.
2 Enter the URL to download and install the OVA package from the internet or browse to select thesource location of OVA from your computer.
3 Provide a name and specify the location for the deployed template. Click Next.
4 Select a resource (host or a cluster) where you want to run the deployed template. Click Next.
5 Verify all the details of the template. Click Next.
6 Read the End-User License Agreement and click Accept. Click Next.
7 Select a deployment configuration. Click Next.
8 Select the location where you want to store the files for the deployed template. Specify the format inwhich you want to store the virtual disks. Select Thin Provision as the virtual disk format. Select theDatastore in which you want to install the files. Click Next.
9 Specify the destination network for the source network. Click Next.
10 Customize the template for the deployment. Provide the shared secret that was generated from theUI. You will have to manually configure the appliance using the VM console. Click Next.
11 Verify all the configuration data. Click Finish.
12 Once the Collector OVA is installed, start the VM and launch the console.
13 Log in with the given console credentials. Run the setup command.
14 Create the password for the support login. Change the password for the consoleuser.
15 Enter the following details to configure the network:
a IPv4 Address: Second reserved static IP address
b Netmask: Subnet mask for the above static IP
c Default Gateway: Default gateway of your network
d DNS : DNS server of your environment
Note For multiple DNS servers, ensure that they are separated by space.
Installing vRealize Network Insight
VMware, Inc. 26
e Domain Search List : The domain that needs to be appended for dns lookups
f Enter y to save the configuration.
16 Enter the NTP Sever and ensure that it can reached from the VM. The services will fail to start if NTPtime is out of sync.
Note For multiple NTP servers, ensure that they are separated by commas.
17 (Optional) To configure Web Proxy, enter y.
18 A check is made to see if the shared secret key has been configured. The collector is paired with thecorresponding platform. This may take few minutes.
19 All the services are verified.
20 Click Finish, once Proxy Detected! message is displayed on the onboarding page. It will redirect tothe Login Page.
Deployment using vSphere Windows Native ClientYou can import the vRealize Network Insight Collector OVA using vSphere Windows native client.
Procedure
1 Click File > Deploy OVF Template.
2 Enter the URL to download and install the OVA package from the internet or browse to select thesource location of the OVA package on your computer.
3 Verify the OVF template details. Click Next.
4 Read the End-User License Agreement and click Accept. Click Next.
5 Provide a name and specify the location for the deployed template. Click Next.
6 Select a Deployment Configuration. Click Next.
7 Select a Host/Cluster where you want to run the deployed template. Click Next.
8 Select the Resource Pool in which you want to deploy this template. Click Next.
9 Select a destination storage for the VM files. Click Next.
10 Specify the format in which you want to store the virtual disks. the Select Thin Provision as thevirtual disk format. Click Next.
11 Specify the network that the deployed template should use. Map the network from OVA to yourinventory.
12 Customize the template for the deployment. Provide the shared secret that was generated on theonboarding page. You will have to manually configure the appliance using the VM console. ClickNext.
13 Verify all the configuration data. Check Power on after deployment. Click Finish.
14 Once the Collector OVA is installed, start the VM and launch the console.
Installing vRealize Network Insight
VMware, Inc. 27
15 Log in with the given console credentials. Run the setup command.
16 Create the password for the support login. Change the password for the consoleuser.
17 Enter the following details to configure the network:
a IPv4 Address: Second reserved static IP address
b Netmask: Subnet mask for the above static IP
c Default Gateway: Default gateway of your network
d DNS : DNS server of your environment
Note For multiple DNS servers, ensure that they are separated by space.
e Domain Search List : The domain that needs to be appended for dns lookup.
f Enter y to save the configuration.
18 Enter the NTP Sever and ensure that it can reached from the VM. The services will fail to start if NTPtime is out of sync.
Note For multiple NTP servers, ensure that they are separated by commas.
19 (Optional) To configure Web Proxy, enter y.
20 A check is made to see if the shared secret key has been configured. The collector is paired with thecorresponding platform. This may take few minutes.
21 All the services are verified.
22 Click Finish, once Proxy Detected! message is displayed on the onboarding page. It will redirect tothe Login Page.
Setting up Network Insight Collector (AMI) in AWS forVMware SD-WANYou can set up vRealize Network Insight collector for AWS by importing Amazon Machine Image (AMI) toyour AWS environment.
If your environment does not have a vCenter server, and you want to deploy your collector in a cloudenvironment then you can deploy your collector in AWS.
Note Currently, vRealize Network Insight supports the collector deployment in AWS using AMI only forVMware SD-WAN.
The procedure and task related to EC2 instances are documented in https://docs.aws.amazon.com/efs/index.html.
Installing vRealize Network Insight
VMware, Inc. 28
Procedure
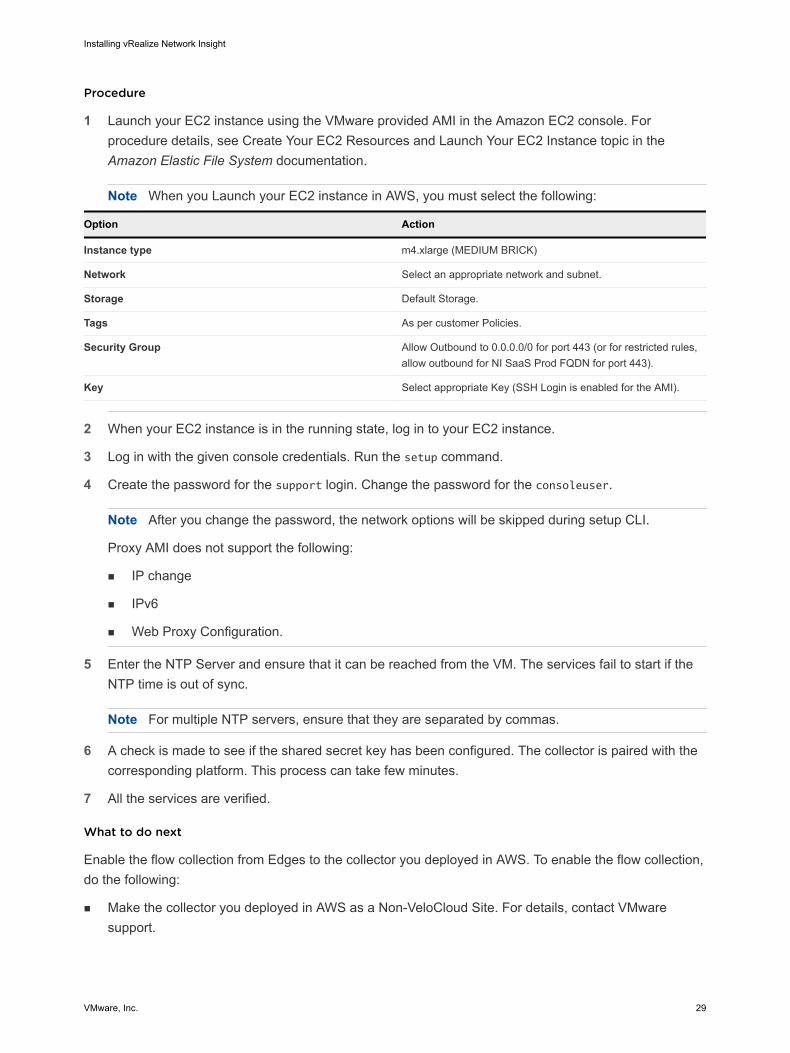
1 Launch your EC2 instance using the VMware provided AMI in the Amazon EC2 console. Forprocedure details, see Create Your EC2 Resources and Launch Your EC2 Instance topic in theAmazon Elastic File System documentation.
Note When you Launch your EC2 instance in AWS, you must select the following:
Option Action
Instance type m4.xlarge (MEDIUM BRICK)
Network Select an appropriate network and subnet.
Storage Default Storage.
Tags As per customer Policies.
Security Group Allow Outbound to 0.0.0.0/0 for port 443 (or for restricted rules,allow outbound for NI SaaS Prod FQDN for port 443).
Key Select appropriate Key (SSH Login is enabled for the AMI).
2 When your EC2 instance is in the running state, log in to your EC2 instance.
3 Log in with the given console credentials. Run the setup command.
4 Create the password for the support login. Change the password for the consoleuser.
Note After you change the password, the network options will be skipped during setup CLI.
Proxy AMI does not support the following:
n IP change
n IPv6
n Web Proxy Configuration.
5 Enter the NTP Server and ensure that it can be reached from the VM. The services fail to start if theNTP time is out of sync.
Note For multiple NTP servers, ensure that they are separated by commas.
6 A check is made to see if the shared secret key has been configured. The collector is paired with thecorresponding platform. This process can take few minutes.
7 All the services are verified.
What to do next
Enable the flow collection from Edges to the collector you deployed in AWS. To enable the flow collection,do the following:
n Make the collector you deployed in AWS as a Non-VeloCloud Site. For details, contact VMwaresupport.
Installing vRealize Network Insight
VMware, Inc. 29
Deploy Additional Collector to an Existing SetupYou can add additional vRealize Network Insight collector to an existing setup.
Procedure
1 Log into the vRealize Network Insight UI. Navigate to Settings > Install and Support.
2 Click Add Proxy VM.
3 Copy the shared secret from the dialog that is displayed.
4 Follow the steps in section Setting up Network Insight Collector (OVA) in step 3.
Installing vRealize Network Insight
VMware, Inc. 30

Accessing vRealize NetworkInsight by using the EvaluationLicense 3vRealize Network Insight starts in the NSX assessment mode when you use the evaluation license.
You can add a data source to vRealize Network Insight, analyze traffic flow, and generate reports.
Note To switch to the Full Product mode, click Switch to Full Product Evaluation located in the bottomright corner.
This chapter includes the following topics:
n Add vCenter Server
n Analyze Traffic Flows
n Generate a Report
Add vCenter ServerYou can add vCenter Servers as data source to vRealize Network Insight.
Multiple vCenter Servers can be added to vRealize Network Insight to start monitoring data.
Procedure
1 Click Add vCenter.
2 Click Add new source and customize the options.
Option Action
Source Type Select the vCenter Server system from the drop-down menu.
IP Address/FQDN Enter the IP address or fully qualified domain name of the vCenter Server.
VMware, Inc. 31

Option Action
Username Enter the user name with the following privileges:
n Distributed Switch: Modify
n dvPort group: Modify
For information about the required additional privileges, see the vCenterPrivileges section in the Install Guide.
Password Enter the password for vRealize Network Insight software to access the vCenterServer system.
3 Click Validate.
If the number of VMs discovered exceeds the capacity of the platform or a collector node or both, thevalidation fails. You will not be allowed to add a data source until you increase the brick size of theplatform or create a cluster.
The specified capacity for each brick size with and without flows is as follows:
Brick Size VMsState ofFlows
Large 6k Enabled
Large 10k Disabled
Medium 3k Enabled
Medium 6k Disabled
4 Select Enable Netflow (IPFIX) on this vCenter to enable IPFIX.
For more information on IPFIX, see the Enabling IPFIX configuration on VDS and DVPG section.
5 Add advanced data collection sources to your vCenter Server system.
6 Click Submit to add the vCenter Server system. The vCenter Server systems appear on thehomepage.
Analyze Traffic FlowsYou can use vRealize Network Insight to analyze flows in your datacenter.
Prerequisites
At least two hours of data collection must occur before starting the flow analysis.
Procedure
1 Specify the scope of the analysis. For example, if you are interested in flows of all virtual machines ina Cluster, select Cluster from the dropdown menu. You can alternately select all virtual machinesconnected to a VLAN or VXLAN.
2 Select the entity name for which you want to analyze the flows.
3 Select the duration and click Analyze.
Installing vRealize Network Insight
VMware, Inc. 32

Generate a ReportYou can generate a report of the flow assessment.
Prerequisites
Analyze traffic flows in the datacenter. For comprehensive reports, collect 24 hours of data before theanalysis.
Procedure
1 In the EVAL NSX Assessment Mode, click Generate Report in the Analyze Flows page.
2 In the Non EVAL Mode, on the Microsegmentation page, click Traffic Distribution > MoreOptions > Assesment Report.
Installing vRealize Network Insight
VMware, Inc. 33

Planning to Scale up yourDeployment 4If the VM count or the number of active flows in your setup are high or expected to grow, you canincrease the size of the platform or collector.
This chapter includes the following topics:
n Planning to Scale up the Platform Cluster
n Planning to Scale up the Collector
n Increase the Brick Size of your Setup
Planning to Scale up the Platform ClusterYou can scale up the platform cluster to meet the increasing load. Based on the load, you can either scaleup by increasing the brick size or creating or expanding a platform cluster. Three LARGE platform brickscan be connected together to form a platform cluster. If a platform is of LARGE or EXTRA LARGE brick size,then you have to scale up by creating a platform cluster.
To decide platform brick size and number of platform bricks, see System Recommendations andRequirements.
Note The platform cluster does not support the high availability configuration. All the platform nodesneed to be up and running for the cluster to work at optimal performance levels.
Scaling up Scenarios for the Platform Clustern Scenario 1 : Your platform is running 5000 VMs and 1.5 million active flows
Convert your platform MEDIUM to LARGE. See Increase the Brick Size of your Setup.
n Scenario 2 : Your platform is running a single LARGE node with 9000 VMs and 2 million active flows
Add two more LARGE brick nodes to convert into 3-node LARGE brick cluster. See Expand Clusters inthe vRealize Network Insight User Guide.
n Scenario 3 : Your platform is running a 3-node LARGE cluster with one or more colletors, 15000 VMsand 4 million active flows.
Convert your existing platform nodes from LARGE to EXTRA-LARGE. See Increase the Brick Size of yourSetup.
VMware, Inc. 34

n Scenario 4 : Your platform is running a 3-node EXTRA-LARGE cluster with one or more colletors, 25000VMs and 8 million active flows.
Add two more EXTRA-LARGE brick nodes to convert into 5-node Extra-LARGE cluster. See ExpandClusters in the vRealize Network Insight User Guide.
Planning to Scale up the CollectorThe collector capacity is based on the brick size. The datasource that you can add to a collector isdepended on the capacity of the collector (VMs and flows).
See Table 1-7. Collector Deployment - Maximum Capacity. After a collector is of LARGE brick size, youhave to add more collectors. You can scale up each collector to EXTRA-LARGE size.
You can add multiple datasources to a collector based on the supported collector capacity. However, youcannot add same datasource to multiple collectors.
Scaling up Scenarios for the Collectorsn Scenario1: 2000 VMs in a vCenter.
Install one medium collector VM. Add the vCenter to this collector. See Add vCenter Server.
n Scenario 2: 1000 VMs in vCenter1 and 2000 VMs in vCenter2 (all of them are in one data center)
Install one medium collector VM. Add both vCenters to this collector. See Add vCenter Server.
n Scenario 3: 1000 VMs in vCenter1 (data center1) and 2000 VMs in vCenter2 (data center2)
Install one medium collector VM in each data center. Add vCenter1 to a collector VM in same datacenter and Add vCenter2 to a collector VM in its data center. See Add vCenter Server.
n Scenario 4: VM count exceeds 4000, active flows exceeds 2.5 Million.
Convert your collector VM from MEDIUM to LARGE. See Increase the Brick Size of your Setup.
n Scenario 5: 9,000 VMs in vCenter1 without flows (data center1).
Install one large collector VM. Add this vCenter to the collector. See Add vCenter Server.
n Scenario 6: VM count is less than or equal to 10000, but the active flow exceeds 5 million.
Convert your collector VM from LARGE to EXTRA-LARGE. See Increase the Brick Size of your Setup.
n Scenario 8: Two vCenters, vCenter1 has 10000 VMs and 9 million active flows, and vCenter2 has10000 VMs and 4 million active flows.
Install one EXTRA-LARGE and one LARGE proxies. Add vCenter1 to EXTRA-LARGE proxy and addvCenter2 to LARGE proxy.
n Scenario 9: One vCenter that runs 10000 VMs and 9 million active flows.
Install one EXTRA-LARGE proxy and add the vCenter to the proxy.
Installing vRealize Network Insight
VMware, Inc. 35

Increase the Brick Size of your SetupTo match your requirements, you can change the brick size of your platform or the collector appliancefrom MEDIUM to LARGE or LARGE to EXTRA-LARGE.
Procedure
u Perform the setps that are relevant to your setup.
Option Description
For a single node platform or freshindependent OVA
a Log in to vCenter.
b Shutdown the platform VM.
c Increase the RAM, total vCPU and corresponding reservation of the VM to atleast match the LARGE brick size. For more information, see SystemRecommendations and Requirements.
d Restart Platfrom VM.
For a cluster platform a Log in to vCenter.
b Shutdown the platform VM in the reverse chronological order. For example:Shut down from Node 3 to Node 1.
c Increase the RAM, total vCPU and corresponding reservation. For moreinformation, see System Recommendations and Requirements.
d Restart Platfrom VMs in the chronological order. For example: Restart fromNode 1 to Node 3.
For a collector a Log in to vCenter.
b Shutdown the collector VM.
c Increase the RAM, total vCPU and corresponding reservation of the VM to atleast match the LARGE brick size. For more information, see SystemRecommendations and Requirements.
d Restart the collector VM.
Installing vRealize Network Insight
VMware, Inc. 36
Upgrading vRealize NetworkInsight 5You can upgrade your current vRealize Network Insight environment to the latest version.
vRealize Network Insight provides the following modes of upgrade:
n Online Upgrade
n Single-Click Offline Upgrade
n Offline Upgrade using Command Line Interface (CLI)
Note If issues such as upload failure or UI failure come up while performing the centralized upgrade,contact VMware support.
Note the following important points to upgarde:
n During upgrade from 4.1 to 5.0, the Operating System of vRealize Network Insight setup (Platformsand Collectors) is upgraded from Ubuntu 14.04 to Ubuntu 16.04.
n During upgrade from 4.1 to 5.0, vRealize Network Insight setup VMs are rebooted as part of theupgrade process.
n It takes around 1-2 hours to upgrade a vRealize Network Insight setup. But, if you are upgrading from4.1 to 5.0 then a single node setup takes around 1-2 hours and around 3-4 hours to upgrade acluster. The upgrade time does not depend on the number of nodes.
n After upgrade, vRealize Network Insight takes around two to three hours to reflect the latest data inUI.
n vRealize Network Insight does not support rollback or product downgrade. You must take a backupbefore you proceed to upgrade. For more information about the back up and restore process, see thehttps://kb.vmware.com/s/article/55829 KB article.
Note In a cluster environment, you must perform the upgrade operation only from Platform 1 (P1) node.
This chapter includes the following topics:
n Online Upgrade
n Single-Click Offline Upgrade
n Offline Upgrade
VMware, Inc. 37

Online UpgradeWhenever there is a new version of vRealize Network Insight available, you receive a notification.
Prerequisites
n Verify you meet the following disk space requirements for platform and collector server:
n /tmp - 6 GB
n /home - 2 GB
n Verify you meet the following disk space requirement for platform server:
n /- 6 GB (Only for the Platform1 node)
n Note The upgrade steps may fail if there is insufficient space in the /tmp directory.
n Verify you have sufficient bandwidth to download the upgrade bundle from the server. The minimumbandwidth requirement is 500 KB/s.
Note vRealize Network Insight checks for minimum download bandwidth requirement. The Installand the Support page throws an error, if the download bandwidth check fails.
Procedure
1 To enable online upgrade, you have to contact the VMware support. Verify the upgraded version fromthe product UI under Settings page to be one that is mentioned in the update.
Note n If the update notification is not available, verify that both vRealize Network Insight Platform and
Collector VMs have connectivity to svc.ni.vmware.com on port 443 and reg.ni.vmware.com onport 443 by running the show-connectivity-status command. If this connectivity requires httpproxy, configure it on each VM using the set-web-proxy command. Ensure that the outputcontains upgrade connectivity status as Passed.
n File a support ticket and provide the service tag from the product UI. The service tag is shownunder Settings > About.
n Provide a screenshot of the show-connectivity-status command output from each vRealizeNetwork Insight Platform and Collector VMs.
2 When an update is available, you see Update available message notification.
3 In the Update available message notification, click View details to view details of update.
vRealize Network Insight 5.0.0 Upgrade window appears.
4 Read the Before you proceed instruction and click Continue.
5 Wait for the pre-checks to complete, and then click Install Now.
Installing vRealize Network Insight
VMware, Inc. 38

6 Once the upgrade process begins, the vRealize Network Insight 5.0.0 Upgrade window providesthe status of the upgrade process.
Note n Ensure that all the nodes are online before beginning the upgrade. If any node is inactive before
the upgrade begins, you will not be allowed to trigger the upgrade.
n Once the upgrade begins, if a node becomes inactive, the upgrade process does not continue.The upgrade will not resume until the node becomes active again.
n The Platform1 becomes the upgrade server here. If Platform1 is offline, then no other node isupgraded.
n Once the platforms are upgraded, you can resume your normal vRealize Network Insightoperations even though the collector upgrade happens in parallel. Until the upgrade process iscompletely over, the Node Version Mismatch detected message is shown in the Install andSupport page.
Single-Click Offline UpgradevRealize Network Insight supports the single-click offline upgrade of the product from Release 3.7 andlater.
Prerequisites
n Verify you meet the following disk space requirements for platform and collector server:
n /tmp - 6 GB
n /home - 2 GB
n Verify you meet the following disk space requirement for platform server:
n /- 12 GB (Only for the Platform1 node)
Note The bundle upload and the subsequent upgrade steps may fail if there is insufficient space inthe /tmp directory.
n To avoid the UI session timeout, increase the User Session Timeout to at least 2 hours. To increasethe session timeout, go to Settings > System Configuration > User Session Timeout. After youchange the session timeout duration, you must log in again to the system.
Procedure
1 Download the required upgrade bundle file from My VMware and save the update package in yourlocal disk.
2 Check and ensure that the MD5SUM value of the downloaded bundle matches the MD5SUM valuespecified in the VMware website.
3 On the Install and Support page, under Software version, click Click here.
Installing vRealize Network Insight
VMware, Inc. 39

4 Click Browse to select the file and click Upload.
When the upload is complete, vRealize Network Insight show the Bundle Upload Completemessage notification within 2-3 minutes and the bundle processing happens in the background.
Note Do not refresh the page after bundle upload until you see the Update Available messagenotification.
5 In the Update Available message notification, click View details.
vRealize Network Insight 5.0.0 Upgrade window appears.
6 Read the Before you proceed instruction and click Continue.
7 Wait for the pre-checks to complete, and then click Install Now.
8 Once the upgrade process begins, the vRealize Network Insight 5.0.0 Upgrade window providesthe status of the upgrade process.
Note n Ensure that all the nodes are active before beginning the upgrade. If any node is inactive before
the upgrade begins, the upgrade is not triggered.
n Once the upgrade begins, if a node becomes inactive, the upgrade process does not continue.The upgrade will not resume until the node becomes active again.
n Until the upload of the package happens, the user should take care that the session is not closed.If the session ends, the user has to restart the upload process.
n The Platform 1 becomes the upgrade server here. If Platform1 is offline, then no other node isupgraded.
n Once the platforms are upgraded, you can resume your normal vRealize NetworkInsightoperations even though the collector upgrade happens in parallel. Until the upgradeprocess is completely over, the Node Version Mismatch detected message is shown in theInstall and Support page.
9 Upon the completion of upgrade process, all platforms and the collectors nodes are upgraded.
Offline UpgradeConsider the offline upgrade only if both online upgrade or single-click offline upgrade does not work. Youmust upgrade Platform VMs before Collector VMs.
In a cluster environment, you must perform the upgrade operation only from Platform 1 (P1) node and theother Platform nodes in the cluster get upgraded automatically. But you must upgrade each Collectorindividually.
Procedure
1 Download the required upgrade bundle file from My VMware.
Installing vRealize Network Insight
VMware, Inc. 40
2 Check and ensure that the MD5SUM value of the downloaded bundle matches the MD5SUM valuespecified in the VMware website.
3 Copy the upgrade bundle to vRealize Network Insight Platform 1 VM and all Collector VMs.
n To copy the file from Linux VM to vRealize Network Insight VM, run command scp<filename>.upgrade.bundle consoleuser@<IP_Address_vRNI_VM>:~/.
n To copy the file from Windows VM to vRealize Network Insight VM, run command pscp -scp<SOURCE_PATH>\<filename>.upgrade.bundle consoleuser@<IP_Address_vRNI_VM>:~/.
Note Use the pscp utility from https://the.earth.li/~sgtatham/putty/latest/w64/pscp.exe.
4 Log in to the vRealize Network Insight Platform 1 through CLI using consoleuser and run thefollowing commands:
n package-installer copy --host localhost --user consoleuser --path /home/
consoleuser/<filename>.upgrade.bundle
n package-installer upgrade --name <filename>.upgrade.bundle
Note You must perform the Platform upgrade first then start the Collector update.
5 For 4.1 to 5.0 upgrade, run the package-installer upgrade command again after the setup isrebooted as part of OS upgrade.
Important During the 4.1 to 5.0 upgrade, if you get an SSH session timeout error, you mustcheck /var/log/arkin/centralized_upgrade.log to know if the reboot has already happened. Ifthe reboot is successful, you must run the package-installer upgrade command again.
6 Log in to each Collector node through CLI and perform the upgrade using the same commands usedfor platform upgrade.
Note You can upgrade all the Collectors simultaneously.
7 Verify the upgraded version using the show-version command.
Installing vRealize Network Insight
VMware, Inc. 41
Uninstall vRealize NetworkInsight 6You must uninstall vRealize Network Insight through vSphere Web Client.
Procedure
1 If you can access the vRealize Network Insight web portal, do the following:
a Log in to the vRealize Network Insight web portal.
b Go to Settings > Accounts and Datasources.
c Turn off and delete all datasources.
Deletion of the vCenter datasource removes IPFIX settings (if configured) on VDS. Similarlydeletion of the NSX Manager datasource removes IPFIX settings from NSX Flow Monitor.
2 If you are unable to access the vRealize Network Insight web portal, do the following:
a If Netflow (IPFIX) is enabled on vCenter, remove vRealize Network Insight collector IP from VDS/DVPG IPFIX settings. See Remove Collector IP When Netflow is Enabled in vCenter.
b If IPFIX is enabled on NSX, remove vRealize Network Insight collector IP Flow Monitoringsettings. See Remove Collector IP When Netflow is Enabled in NSX.
c If Netflow is configured on physical switches to send Netflow to vRealize Network Insight NetflowCollector, modify the configuration at switches to stop sending NetFlow information.
3 If any specific firewall or routing rules are created to allow or route traffic to and from vRealizeNetwork Insight VMs, remove those firewall/routing rules.
4 For security reasons, clean up access credentials used to configure data sources in vRealize NetworkInsight.
5 Shutdown and delete all vRealize Network Insight Collectors and Platform VMs.
Remove Collector IP When Netflow is Enabled in vCenterIf Netflow (IPFIX) is enabled in vCenter, use this procedure to remove vRealize Network Insight CollectorIP from Virtual Dedicated Server (VDS)/Distributed Virtual Port Group (DVPG) IPFIX settings.
Procedure
1 Log in to vSphere Web Client.
2 Go to Home > Networking.
VMware, Inc. 42

3 In the left pane, select the VDS and click Configure > Edit.
4 In the Collector IP address field, remove vRealize Network Insight Collector IP details.
5 In the Collector Port field, remove the port details.
6 Click OK.
You must wait around two minutes before you move to the next step.
7 Select the DVPG of this VDS and click Configure > Policies > Edit.
8 In the Netflow field, select Disable from the drop-down.
9 Verify your settings and click Apply.
What to do next
Perform the steps again for each VDS and its DVPGs for which IPFIX is enabled to remove vRealizeNetwork Insight Collector IP.
Remove Collector IP When Netflow is Enabled in NSXIf Netflow (IPFIX) is enabled in NSX, use this procedure to remove vRealize Network Insight (vRealizeNetwork Insight ) Collector IP flow monitoring settings.
Procedure
1 Log in to vSphere Web Client.
2 Click Home > Networking & Security > Tools > Flow Monitoring > Configuration.
3 In the Global Flow Collection Status, click Disable.
4 To disable the flow connection, click IPFIX.
5 In the IPFIX tab, select the Collector IP and click Delete.
6 If there are no more IPs left, then click Edit and clear Enable IPFIX Configuration check-box.
7 Click Save.
Installing vRealize Network Insight
VMware, Inc. 43


