accessories, bulbs, batteries or voltage or operation of the product beyond its technical and or environmental specification.
INSTRUCTION DATAPRODUCT: FORD RANGER FASCIA PX MK2 VER: 1.1DATE: OCTOBER 2016 PART NUMBER: #CBFASCIA
Read full instructions prior to installation
To remove the original fascia from the vehicle:
1: Remove the trim from both sides of the lower central dash.
The trim is extremely tight and will need force to remove, it is extremely important that the trim be pulled directly out towards the back of the vehicle to avoid breaking any of the plastic tabs.
The left-hand trim has 6 push in retaining clips the right-hand trim has 7 push in retaining clips (refer location in below images).
2: Completely remove the two 7mm bolts, located on each side of the lower fascia (refer arrows in below images).
3: Move the gear lever fully back to allow room to remove the original fascia (for automatics you will need to insert the keys and turn to ACC).
4: The fascia can now be removed (held in by 3 retaining clips) just enough to allow for removal of both input plugs located behind the 12v accessory outlets (pull directly backwards away from the fascia).
Then manoeuvre fascia clear of centre console.
The 2 existing 12v outlets will need to be removed from the original fascia and refitted into the new fascia.
accessories, bulbs, batteries or voltage or operation of the product beyond its technical and or environmental specification.
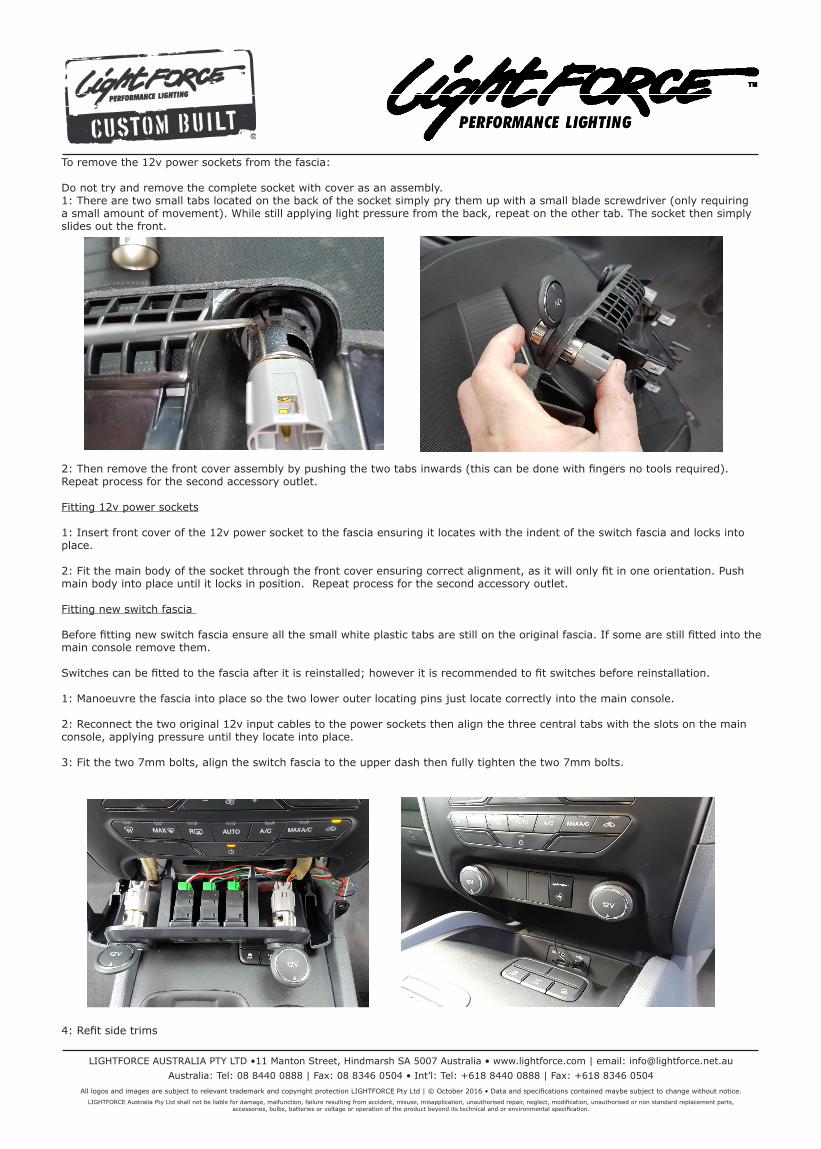
To remove the 12v power sockets from the fascia:
Do not try and remove the complete socket with cover as an assembly.1: There are two small tabs located on the back of the socket simply pry them up with a small blade screwdriver (only requiring a small amount of movement). While still applying light pressure from the back, repeat on the other tab. The socket then simply slides out the front.
2: Then remove the front cover assembly by pushing the two tabs inwards (this can be done with fingers no tools required). Repeat process for the second accessory outlet.
Fitting 12v power sockets
1: Insert front cover of the 12v power socket to the fascia ensuring it locates with the indent of the switch fascia and locks into place.
2: Fit the main body of the socket through the front cover ensuring correct alignment, as it will only fit in one orientation. Push main body into place until it locks in position. Repeat process for the second accessory outlet.
Fitting new switch fascia
Before fitting new switch fascia ensure all the small white plastic tabs are still on the original fascia. If some are still fitted into the main console remove them.
Switches can be fitted to the fascia after it is reinstalled; however it is recommended to fit switches before reinstallation.
1: Manoeuvre the fascia into place so the two lower outer locating pins just locate correctly into the main console.
2: Reconnect the two original 12v input cables to the power sockets then align the three central tabs with the slots on the main console, applying pressure until they locate into place.
3: Fit the two 7mm bolts, align the switch fascia to the upper dash then fully tighten the two 7mm bolts.
accessories, bulbs, batteries or voltage or operation of the product beyond its technical and or environmental specification.
Switch
A single on/off switch and two switch blanks are provided with the fascia; the blanks have been designed to accommodate the REDARC® Tow-Pro™ remote brake controller. On the back of the blanks are two corresponding indents to aid in drilling the two required holes, extra blanks are available (P#CBSWB).
The standard switches used are the popular and readily available late model Toyota switch (Lightforce part # CBSWTY2 & CBSWTY2H) as used in the 200 Series Landcruiser, Prado 150 and 2015 Hilux.
Switch rating @ 12 volts is 3 amps, a relay must be fitted.
Wiring: Black – To vehicles earth (negative) Red – From 12v dash light circuit Yellow – Power out (Connect to black with red stripe wire on Lightforce harness)Blue - Power in (Connect to brown wire on Lightforce harness)
For fitment of optional switches follow wiring instructions included with the switch.
Dual USB charger
The optional dual USB changer part # CBUSBTY2 can be fitted to the centre position only, position thumbs top and bottom of USB charger and push into place.
Tow-Pro™ Remote brake controller
The remote brake controller MUST be fitted before reinstallation of the fascia as it can only be fitted from the back. When fitting the remote controller to the included switch blank, first follow installation instruction included with the Tow-Pro™ remote brake controller. Fit switch blank with the holes drilled into the fascia and then fit the remote brake controller into the switch blank.
When fitting the Tow-Pro™ remote brake controller it is recommended to purchase the optional RJ45 cable (P#CBRJ45) as the cable supplied in the original kit will not fit due to space restrictions within the console.The optional RJ45 cable (P#CBRJ45) is 1200mm long with a wire gauge of 24AWG and is designed to fit neatly within the limited space available.
WARRANTY
Australia
“Lightforce” means Lightforce Australia Pty Ltd ABN 54 069 439 774 Address: 11 Manton Street, Hindmarsh, SA, 5007. Telephone:+61 8 8440 0888. Email Address: [email protected]
“Lightforce Affiliates” means Lightforce, Lightforce’s related bodies corporate (within the meaning of the Corporations Act 2001), and their respective employees, officers, agents and contractors.
“Warranty Period” means:
(a) For Lightforce products (excluding bulbs and batteries, Custom Built products and mounts and Ace Precision Rifle Systems products) manufactured in Australia and sold either in Australia or overseas, three (3) years from the date of purchase specified on your sales receipt or invoice unless otherwise notified by Lightforce in writing prior to or at the date of purchase;
(b) For
1) Lightforce products and accessories manufactured outside, but imported into, Australia; and
2) Custom Built products and mounts (wherever manufactured);
3) sold in Australia or overseas (but in each case excluding bulbs and batteries, and Ace Precision Rifle Systems products), one (1) year from the date of purchase specified on your sales receipt or invoice unless otherwise notified by Lightforce in writing prior to or at the date of purchase.
What this warranty covers:
Lightforce warrants that it will, at its option, replace or repair each product that you purchase which, during the Warranty Period, has a defect in materials or workmanship under normal use and conditions.
Statutory rights:
Our products come with guarantees that cannot be excluded under the Australian Consumer Law. You are entitled to a replacement or refund for a major failure and compensation for any other reasonably foreseeable loss or damage. You are also entitled to have the products repaired or replaced if the products fail to be of acceptable quality and the failure does not amount to a major failure.
accessories, bulbs, batteries or voltage or operation of the product beyond its technical and or environmental specification.
In addition, the benefits given by this warranty are in addition to your rights and remedies under a law in relation to the products.
When warranty service involves the replacement of a product or a part, the replaced product or part becomes Lightforce’s property.Only unaltered Lightforce products and parts are eligible for replacement. The replacement product or part is warranted for the balance of the period remaining on the original product. Products and parts presented for repair may be replaced by refurbished product or parts of the same type rather than being repaired or replaced with new parts.
Replacement of a product or parts:
When warranty service involves the replacement of a product or a part, the replaced product or part becomes Lightforce’s property. Only unaltered Lightforce products and parts are eligible for replacement. The replacement product or part is warranted for the balance of the period remaining on the original product. Products and parts presented for repair may be replaced by refurbished product or parts of the same type rather than being repaired or replaced with new parts.
Procedure for claiming:
Australia: Make contact with the Lightforce sales office at the above address. We will attempt to resolve the issue over the phone, or we may issue a warranty case notice to arrange return of the product for assessment. Lightforce will not be able to perform our service under this warranty if you refuse to return the product to us for inspection.
Claims in respect of defects covered by this warranty must be made as soon as possible after such defect becomes apparent and, in any event, not later than thirty (30) days after the end of the Warranty Period.
International: Contact the point of purchase for warranty service.
Cost of claiming:
Under this warranty and, unless Lightforce otherwise agrees in writing, you bear the cost of claiming under this warranty including the cost of returning the product to Lightforce.
Under this warranty, Lightforce is responsible for loss or damage to your product only while it is in the possession of Lightforce Affiliates.
Use of personal information:
This warranty will not apply if you do not supply to us or to our Lightforce Affiliates information that we reasonably request to enable us to perform our obligations under this warranty. You have the right to access your personal contact information and request correction of any errors in it pursuant to the Privacy Act 1988 by contacting Lightforce.
Limitation of liability:
Where permitted, or not prohibited, under any law, including under the Australian Consumer Law, Lightforce’s and Lightforce Affiliates’ liability in respect of any defect in materials or workmanship or in respect of a product which is not otherwise of acceptable quality (within the meaning of the Australian Consumer Law), is limited at the option of Lightforce, to:
(a) The replacement or repair of the product,
(b) The payment of the cost of replacing or repairing the product; or
(c) The payment of the cost of acquiring an equivalent product
Accordingly, to the extent permitted or not prohibited under any law (including the Australian Consumer Law):
(a) neither Lightforce nor any Lightforce Affiliates are liable under any circumstances (including in contract, negligence or other tort, or under any other legal doctrine) for:
1) third party claims against you for damages;
2) special, incidental, punitive, indirect or consequential damages, including but not limited to lost profits, business revenue, goodwill or anticipated savings; and
(b) in no case does the total liability of Lightforce, Lightforce Affiliates, or their respective suppliers, resellers or service providers to any person for damages from any cause (including in contract, negligence or other tort, or under any other legal doctrine), in connection with the supply of a product exceed the lesser of the actual direct damages of that person and the amount paid for the product by that person.
The foregoing limitations do not apply to damages for bodily injury (including death), damage to real property or damage to tangible personal property for which Lightforce is liable under any non - excludable law.