Thank you For purchasing this Portable CD MP3 audio system. This uniquely designed product has a built-in CD Mp3 player with programmable memory and repeat playback. It also features a great sounding AM/FM stereo radio and a stereo cassette player/recorder that will allow you to make direct recordings from either the radio or the CD player. It has two full-range dynamic speakers. We are sure that this portable CD/MP3 audio system will provide you with many years of exceptional performance with a minimum of care and maintenance. Please review the contents of this instruction manual completely and carefully before operating your unit, to make sure that you understand all functions and operations and get the maximum benefit out of all the great features included in this product. The serial number of your unit can be found on a label on the bottom of the cabinet. We suggest that you record the serial number in the provided below in case this information is ever needed at a future date. Serial Number ATTENTION The exclamation point within an equilateral Triangle is intended to alert the used to the Presence of important operating and maintenance (servicing) instructions in the literature accompanying the appliance. Danger: Invisible and hazardous laser radiation when Open and interlock failed or defeated. Avoid direct exposure to beam. Dripping warning: Ventilation warning DANGEROUS VOLTAGE The lightning flash with arrowhead symbol, within an equilateral triangle is intended to alert the user to the presence of uninsulated dangerous voltage within the product s enclosure that may be of sufficie nt magnitude to constitute a risk of electric shock to persons. , The product shall not be exposed to dripping or splashing and that no objects filled with liquids, such as vases, shall be placed on the product. The normal ventilation of the product shall not be impeded for intended use. CAUTION RISK OF ELECTRIC SHOCK DO NOT OPEN CAUTION : TO REDUCE THE RISK OF ELECTRIC SHOCK, DO NOT REMOVE COVER (OR BACK). NO USER - SERVICEABLE PARTS INSIDE. REFER SERVICING TO QUALIFIED SERVICE PERSONNEL. -1- LASER SAFETY: This unit employs a laser. Only qualified service personnel should attempt to service this device due to possible eye injury. CAUTION: USE OF CONTROLS, ADJUSTMENTS OR PERFORMANCE, PROCEDURE HEREIN MAY RESULT IN HAZARDOUS RADIATION EXPOSURE. 1~1 1 NPB-425 Portable MP3/CD Player With AM/FM Stereo Radio Cassette Player /Recorder,Twin Detachable Speakers & Remote Control. Instruction Manual Instruction Manual
Transcript
Thank youFor purchasing this Portable CD MP3 audio system. This uniquely designed product has a built-inCD Mp3 player with programmable memory and repeat playback. It also features a great soundingAM/FM stereo radio and a stereo cassette player/recorder that will allow you to make direct recordingsfrom either the radio or the CD player. It has two full-range dynamic speakers.
We are sure that this portable CD/MP3 audio system will provide you with many years of exceptionalperformance with a minimum of care and maintenance. Please review the contents of this instructionmanual completely and carefully before operating your unit, to make sure that you understand all functions and operations and get the maximum benefit out of all the great features included in this product.
The serial number of your unit can be found on a label on the bottom of the cabinet. We suggest thatyou record the serial number in the provided below in case this information is ever needed at a futuredate.
Serial Number
ATTENTIONThe exclamation point within an equilateral Triangle is intended to alert the used to the Presence ofimportant operating and maintenance (servicing) instructions in the literature accompanying theappliance.
Danger:Invisible and hazardous laser radiation when Open and interlock failed or defeated. Avoid direct exposure to beam.
Dripping warning:
Ventilation warning
DANGEROUS VOLTAGEThe lightn ing flash with arro whead symbol, within an equilatera l tri angle is in tended to alert the userto the presence of uninsula ted dangerous voltage within the product s enclosure that may be ofsufficie nt magnitude to consti tu te a risk of electri c shock to persons.
,
The product shall not be exposed to dripping or splashing and that noobjects filled with liquids, such as vases, shall be placed on the product.
The normal ventilation of the product shall not be impeded for intendeduse.
CAUTION
RISK OF ELECTRIC SHOCK
DO NOT OPEN
CAUTION : TO REDUCE THE RISK OF ELECTRIC
SHOCK, DO NOT REMOVE COVER (OR BACK). NO
USER - SERVICEABLE PARTS INSIDE. REFER
SERVICING TO QUALIFIED SERVICE PERSONNEL.
-1-
LASER SAFETY: This unit employs a laser. Only
qualified service personnel should attempt to
service this device due to possible eye injury.
C A U T I O N : U S E O F C O N T R O L S ,
A D J U S T M E N T S O R P E R F O R M A N C E ,
PROCEDURE HEREIN MAY RESULT IN
HAZARDOUS RADIATION EXPOSURE.
1~11
NPB-425
Portable MP3/CD Player With AM/FM Stereo Radio Cassette Player /Recorder,Twin Detachable Speakers& Remote Control.
Instruction Manual
Instruction Manual
,,
-2- -3-
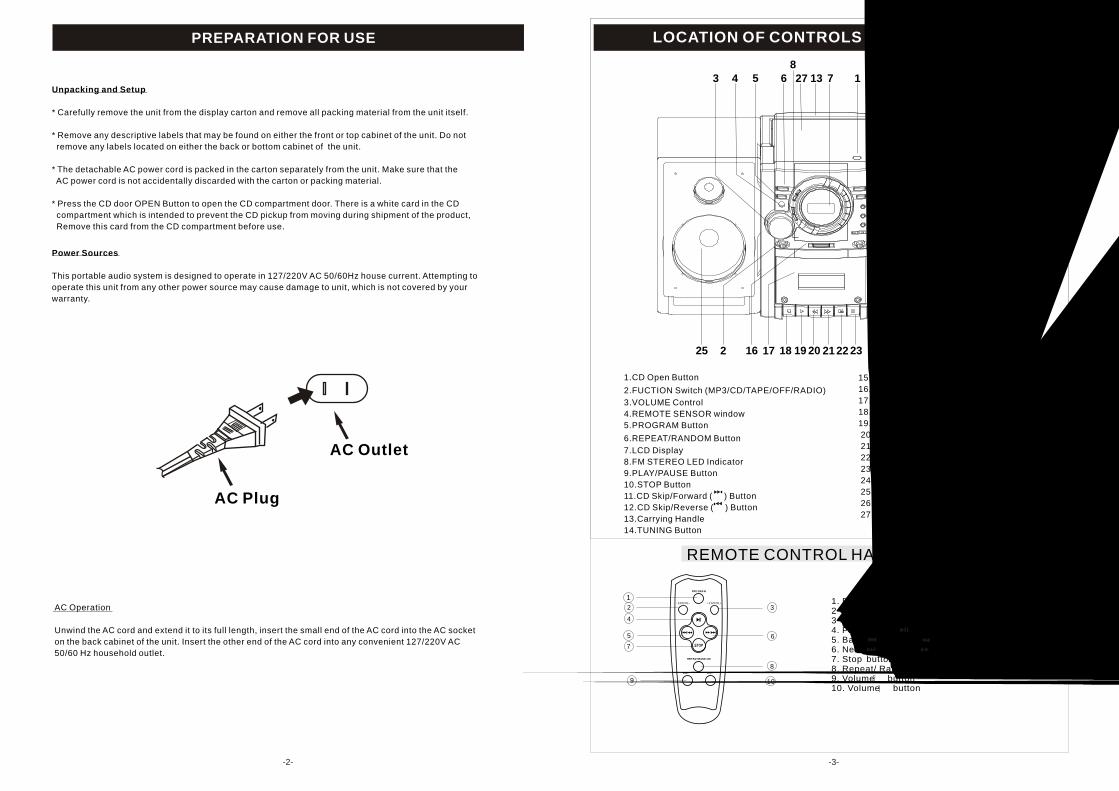
LOCATION OF CONTROLS AND INDICATORS
Unpacking and Setup
* Carefully remove the unit from the display carton and remove all packing material from the unit itself.
* Remove any descriptive labels that may be found on either the front or top cabinet of the unit. Do not
remove any labels located on either the back or bottom cabinet of the unit.
* The detachable AC power cord is packed in the carton separately from the unit. Make sure that the
AC power cord is not accidentally discarded with the carton or packing material.
* Press the CD door OPEN Button to open the CD compartment door. There is a white card in the CD
compartment which is intended to prevent the CD pickup from moving during shipment of the product,
Remove this card from the CD compartment before use.
PREPARATION FOR USE
Power Sources
This portable audio system is designed to operate in 127/220V AC 50/60Hz house current. Attempting to
operate this unit from any other power source may cause damage to unit, which is not covered by your
warranty.
AC Operation
Unwind the AC cord and extend it to its full length, insert the small end of the AC cord into the AC socket
on the back cabinet of the unit. Insert the other end of the AC cord into any convenient 127/220V AC
After the last track has been played,the disc stops automatically and thedisplay shows the total number oftracks on the disc. If you are finished listening, press the CD Door Open Button to open the CD Door. Remove you disc and slide the FUNCTION Switch to the TAPE(OFF) position.
Set the VOLUME Control to a lowsetting.
Slide the FUNCTION Switch to the RADIO position.
Slide the BAND Switch to adesired setting - AM, FM, or FMSTEREO
NOTE: If you select either theFM or FM Stereo bands, be sureto raise the FM rod antenna and extend it to its full length.
When you have finished listening,slide the FUNCTION switch to the TAPE (off) position to shutthe power off.
Rotate the TUNING Control to find the desired station.NOTE: if the BAND Switch is set to the FM STEREO position and you have tuned to an FM stereo station, the FM STEREO LedIndicator will light.
Hints for Better reception
FM/FM Stereo - Make sure that the telescopic FM Rod Antenna is raised and extended to its full length. You mayhave to vary the direction of the antenna to find the strongest signal for each FM station. If you are listeningto weak or distant FM Stereo station, the reception is unsatisfactory.
AM - The AM ferrite bar antenna is located inside the cabinet. It may be necessary to turn the unit slightlyso that the internal antenna is point in the direction of the AM transmitter. You may have to experimentto find the position that provides the strongest reception for each of your favorite AM stations.
Set the VOLUME Control to a lowsetting.
Slide the FUNCTION Switch to the MP3/CD position.
Press the CD Door OPEN Button to open the CD compartment door.
NOTE: If you have not alreadydone so, remove the CD transitlock card from the CD compartmentnow and discard it.
Begin automatically playback on track 01. The desired trackcan be played by remote control.
The MP3/CD player will read the table of contents on the discand the total number of trackson the disc will appear on theMP3/CD Track Display.
Place a MP3/CD on the centerspindle, with the printed label sidefacing up. Close the CD compartment door.
Adjust the VOLUME Playbackwill continue until all the trackson the disc have been played.
To stop playback before the discends, press the CD STOP ( )Button. The disc will stop and the display will show the totalnumber of tracks on the disc.
2 3 2 3
6454
8 9 1
2
-5--4-
1
( / )
1 2
2
3
Press CD PLAY/PAUSEbutton again ,CD/CD-Rresume normal playback.
During MP 3/CD playback, ifyou wish to Pause the disc momentarily, press the Mp3/CD PLAY/PAUSE Button again.Playback stops but the disccontinues to spin and the tracknumber flashes in the MP 3/CD Display.
TO BEGIN PLAYBACK FROM A SPECIFIC TRACK
MP3/CD PAUSE CONTROL
FOR WARD/REVERSE SKIP TRACK
When your desired track numberappears in the display, press theCD PLAY/PAUSE Button.Playback will begin from the trackyou selected.
After you insert the disc into theMP 3/CD player and the totalnumber of tracks appear on thedisplay, you may press eitherthe Skip/Forward ( ) orSkip/Reverse ( ) Button to select a specific track for playback.
During playback, press the Skip/Forward ( ) Buttononce to advance the player to thebeginning of the next track, pressthe Skip/Forward ( ) Buttonrepeatedly to advance the playerto higher number tracks .
During playback, press the Skip/Reverse ( ) Buttononce to move the player to thebeginning of the previous track, press the Skip/Reverse ( )Button repeatedly to move the player back to lower - numbertracks .
21
-6- -7-
1
4
2
5
8
3
6
9
PLAYING CASSETTE TAPES
Set the VOLUME Control to a lowsetting.
Slide the FUNCTION Switch tothe TAPE position.
Open the Cassette Control Coverto expose the cassette controlsand press the STOP/EJECT( ) Button to open the Cassette Door.
Insert a pre-recorded cassetteinto the slots in the Cassette Doorwith the open end facing up and the full reel in the right side.Close the cassette door.
To advance or rewind the taperapidly, press either the cassetteFast Forward ( ) orRewind ( ) button. Whenyou reach the desired point, pressthe cassette play ( ) Button to resume normal playback.
To pause playback momentarily,press the cassette Pause ( )Button. The tape movementstops but the tape motor is sitll running. Press the cassette Pause( )Button again to release Pause and resume normalplayback.
To stop playback before the tapeends, press the Stop/Eject( ) Button. The Play Button is release and the tape motor shuts off.
When the tape reaches the end,the auto-stop mechanismactivates, the tape PLAY Buttonis release and the tape motorshuts off. Press the Stop/Eject( ) Button to open the Cassette Door and remove the tape.
Press the cassette Play ( )Button to begin playback.Adjust the VOLUME .
Open surface side
Emptiest reel.
7
Playing tracks in REPEAT or RANDOM,select this function by pressingREPEAT/RANDOM button.-
-
You can press REPEAT/RANDOM button once/twice/three time/to play the CD in repeat 1/repeat all/random.You can press REPEAT/RANDOM button once/twice/three time/four time to play the Mp3 in repeat 1/repeat all/ repeat album/random.
4
Playing tracks in PROGRAM mode,select this function by pressing PROGRAMon unit.-P
-
- -
ress PROGRAM button to enter into program operation when the unit at stop position.Press BACK or NEXT on the unit or press the number key on the remote control to select the tracks.Press PROGRAM button again to confirm.Repeat above steps to program leavings tracks.You can program 99 tracks total. When program full,it can't continue.
1
4
2
5
3
6
1
2
3
4
, ,
, ,
, ,
CARE AND MAINTENANCE
To record on a tape in which the tab has been
broken, place a piece of adhesive tape over that
area.
On the back of the cassette, there is an erase
prevention tab on each side. To prevent
accidental erasing, break our these tabs with
a screwdriver. If only one side of the tape is to
be protected, break out the tab on the left side
with the side desired facing you.
NOTE: When a tab is broken out, the record
button cannot be depressed.
SAFEGUARD AGAINST ACCIDENTAL ERASURE
When a new recording is made, any problem
material previously recorded is automatically
erased and only the new recording remains. To
safeguard valuable recordings from being erased
accidentally, the cassette and the deck are
equipped with a special device,
Tab for side 1
Tab for side 2
Tab Break out the tab
Cover with tape
CASSETTE TAPE RECOMMENDATIONS
Standard tape lengths have 15 (C-30), 30 (C-60) and 45 (C-90) minutes of recording time on each side.
Longer length tapes of 60 (C-120) minutes of recording time in each side are not recommended. Use
only high quality tapes. If a problem develops, check the unit first with another cassette to determine if
the problem is with the cassette, and not with the unit.
If there is any stack in the tape in the cassette, it should be removed before inserting the cassette. Place
a pencil in one of the hubs and rotate toward the outside of the cassette until all stack is taken up.
MAKING A TAPE RECORDING
The tape recorder in this system allows you to make direct recordings from the radio or CD player to a
blank cassette in the tape compartment. An automatic recording volume level control (ALC) circuit will
automatically control the volume level of your recordings to prevent distortion. You may change the settings
of the volume during a tape recording, as these controls have no effect on the material being recorded onto
the tape.
To make a tape recording, proceed as follows:
Select the function you wish to record, either radio or CD, and operate that function according to its own instructions.
Emptiest reel
Open the cassette Door andinsert a good quality blankcassette tape into the slots on the door, with the open end facingup and the full reel on the right-hand side. Close the Cassette Door.
When you are ready to beginrecording, press the cassette Record ( )Button. The cassettePlay ( ) Button will also engage.The tapes will begin moving and all of the material from yourselected source will be recorded on the tape.
Open surface side
Dynamic Bass Boost System (DBBS)
This special circuit provides bass response, especially at lower volume levels
where the bass has a tendency to disappear. Set the DBBS button to On
to increase the bass. Set the DBBS button to Off for normal bass response.
Note: If you have the DBBS circuit On at high volume and you are listening to
music that contains very strong bass, you may experience some distortion. If
this occurs, reduce the volume or switch the DBBS button Off.
If you wish to listen to yourrecording immediately, press the cassette Rewind ( )Button untilthe tape rewinds to the beginning,then press the Stop/Eject ( ) Button . Set the FunctionSwitch to the TAPE position and press the cassette Play ( )Button to begin playback.
When you are finished recordingpress the Stop/Eject ( )Button to stop the tapes.
To avoid recording unwantedmaterial, such as radiocommercials, use the Pause( ) Button to stop the recordingtemporarily. Release the Pause ( ) Button to begin recordingagain.
2
2
3
4
-8- -9-
CARE AND MAINTENANCE
Should this unit exhibit a problem, check the following before seeking service.
TROUBLESHOOTING GUIDE
Symptom Possible Cause
Retune station, try another station or set
BAND switch to FM STEREO.
Radio
Noise or sound
distorted on radio
broadcasts.
Station not tuned properly for AM or FM.
FM: Telescopic antenna is not properly
adjusted.
AM: Unit is not positioned correctly.
Retune the AM or FM broadcast station.
Reorient FM telescopic antenna.
Rotate unit until best reception is
obtained.
FM STEREO Indicator
dose not light
Poor FM signal being received or BAND
switch is not set to FM STEREO
Station is not broadcasting in the stereo. Change stations.
FUNCTION switch is not set to the
RADIO position.AM or FM, no sound.
Slide the FUNCTION switch to the RADIO
position.
Volume at minimum. Increase Volume.
Cassette player
No sound.
FUNCTION switch is not set to the TAPE
position.
Slide the FUNCTION switch to the TAPE
position.
Increase Volume.Volume at minimum.
Sound distorted.
Speed varied. Tape old or worn.
Batteries are low.
Dirty head. Clean the head.
Replace the Tape.
Replace the batteries.
Cassette Recorder
Will not record. Erase prevention tab removed. Cover hole with adhesive tape.
Distorted sound on
playback.
Defective tape or dirty tape head.
Compact Disc Player
MP3/CD Player
will not play.
FUNCTION switch is not set to the CD
position.
Replace tape or clean tape head.
Slide the FUNCTION switch to the CD
position.
Disc is dirty or scratched.
No sound. Headphones connected into the
Headphones jack.
Insert CD with label side up.
General
MP3/CD skip
while playing.
Wipe disc with cloth or use another disc.
Remove the Headphones from the
Headphones jack.
CD is not installed or installed upside-
down.
NOTE: Never use metal objects on or near the tape heads. Do not allow any cleaning material to fall intothe tape assembly.
Cotton Swab
Capstan
Erase
HeadR/P
HeadPinch Roller
Caring for Compact Discs
* Treat the disc carefully. Handle the disc only by its edges.
Never allow your fingers to come in contact with the shiny,
unprinted side of the disc.
* Do not attach adhensive tape, stickers, etc. To the disc label.
* Clean the disc periodically with a soft, lint-free, dry cloth.
Never use detergents or abrasive cleaners to clean the disc.
If necessary, use a CD cleaning kit.
* If a disc skips or gets stuck on a section of the disc, it is probably dirty or damaged(scratched).
When cleaning the disc, wipe in straight lines from the center of the disc to the outer edge of the disc.
Never wipe in circular motions.
* This unit is designed to play only compact discs bearing the identification logo as showed here.
Other discs may not conform to the CD standard and may not paly properly.
* Compact Disc should be stored in their cases after use to avoid damage.
* Do not expose compact disc to direct sunlight, high humidity, high temperatures, or dust, etc. Prolonged
exposure or extreme temperatures can warp the disc.
* Do not stick or write anything on either side of the disc. Sharp writing instruments, or the ink may
damage the surface,
Cleaning the unit
* To prevent fire or shock hazard, disconnect your unit from the AC power source when cleaning.
* The finish on your unit may be cleaned with a dust cloth and cared for as other furniture. Use cotton cloth
when cleaning and wipe the plastic parts.
* Mild soap and a damp cloth may be used on the front panel.
* Periodic cleaning of the tape heads, capstan and pinch roller is necessary to maintain good sound reproduction.
Clean them after every 100 hours of use or less if playback has deteriorated. Use a cotton
swab moistened with head cleaning solution or isopropyl alcohol, then wipe dry with another swab.