Instruction Manual for 2402 SW Water St. Maysville, MO. 64469 1-800-306-8937 ● www.hambydairysupply.com Hamby Dairy Supply ITP 205/207 Portable Goat Milker Copyright 2017 Hamby Dairy Supply You may print manual for own non-commercial use, but not for resale.
Transcript
Instruction Manual for
2402 SW Water St. Maysville, MO. 644691-800-306-8937 ● www.hambydairysupply.com
Hamby Dairy Supply
ITP 205/207 Portable Goat Milker
Copyright 2017 Hamby Dairy SupplyYou may print manual for own non-commercial use, but not for resale.
1. Unpack all itemsDo not throw away packing materials as you may find small items in packaging materials.
2. Vacuum PumpAdd oil. 10w40 motoroil is recommended.
Remove rubber plug on oil reservoir on top of vacuum pump. Fill the container with oil.
Check oil weekly - small hose on side of oil reservoir has a sight glass.
Instructions for assembly of Goat Bucket Milker
www.hambydairysupply.com ● 800-306-8937 ● www.surgemilker.com 1Copyright 2017 Hamby Dairy Supply: You may print manual for own non-commercial use, but not for resale.
Vacuum pump run on 115 volts. They come on when plugged in. For everyday use in your barn, or for remote mounting of vacuum pump, we recommend installing a 15 amp switched plug on your barn wall. This will allow you to turn the pump on and off with a switch instead of unplugging.
Switched plug-ins are available at most hardware stores.
3. Assemble bucket.Put lid on bucket and snap handle into place.
Instructions for assembly of Bucket Milker (continued)
4. Connect long blue stripe hose from the stallcock (1/4 turn valve) on side of the white pvc to the black plastic hose port on the bucket lid
5. Plug unit in to a 115 volt 15 amp circuit. Unit comes on immediately when plugged in.
6. Adjust vacuum regulator. Loosen lock nut on top, then turn the middle of the unit to adjust vacuum level until gauge reads 12.0 - Adjust while pump is running with the stall cock closed. This reading should be checked while milking and adjusted if necessary to maintain a milking vacuum of 11.0 to 12.5
7. Adjust pulsator speed. 60 to 80 ppm Speed screw is on back of pulsator. DO NOT tighten screw all the way in. More details for pulsator provided on next page
8. Wash your bucket milker prior to using.
Stall cock Hose port
Gauge Regulator
Copyright 2017 Hamby Dairy Supply: You may print manual for own non-commercial use, but not for resale.
Conde Vapor Oil Vacuum Pumps - Start up & Maintenance
www.hambydairysupply.com ● 800-306-8937 ● www.surgemilker.com 3Copyright 2017 Hamby Dairy Supply: You may print manual for own non-commercial use, but not for resale.
Use a high detergency 10w-40 motor oil for all Conde Vapor Oil Vacuum Pumps. Synthetic oil, like Mobil 1, is recommended by Conde. This includes the 7300 portable, 7100 HD portable, or Model 6 stationary pump sold by Hamby Dairy Supply.
When starting a new vapor oil pump, fill oil reservoir above the fittings in which the oil wicks are inserted. This will give the pump extra oil for the first two hours of operation. When refilling, fill to just below oil wick.
By looking in the sight glass you’ll
know when you need oil, because it will be low. It’s best if the oil level inside the sight glass is 1/2 to 3/4 full.
Copyright 2017 Hamby Dairy Supply: You may print manual for own non-commercial use, but not for resale.
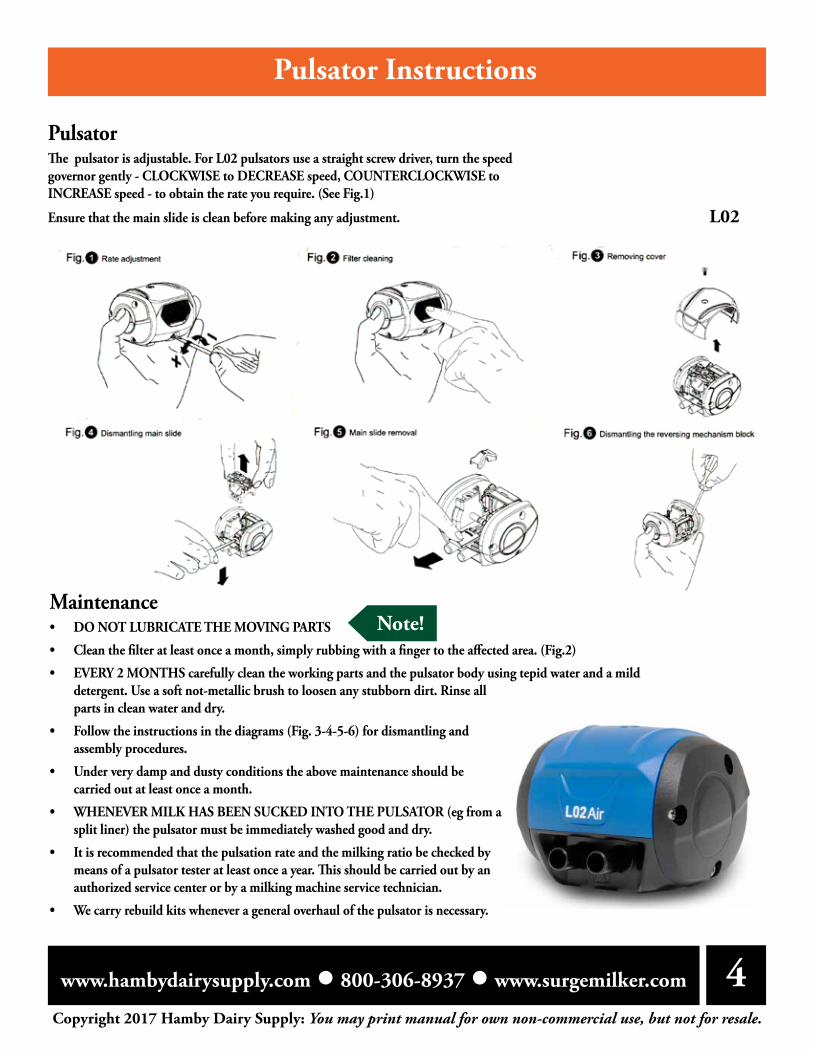
PulsatorThe pulsator is adjustable. For L02 pulsators use a straight screw driver, turn the speed governor gently - CLOCKWISE to DECREASE speed, COUNTERCLOCKWISE to INCREASE speed - to obtain the rate you require. (See Fig.1)
Ensure that the main slide is clean before making any adjustment.
Maintenance• DO NOT LUBRICATE THE MOVING PARTS
• Clean the filter at least once a month, simply rubbing with a finger to the affected area. (Fig.2)
• EVERY 2 MONTHS carefully clean the working parts and the pulsator body using tepid water and a mild detergent. Use a soft not-metallic brush to loosen any stubborn dirt. Rinse all parts in clean water and dry.
• Follow the instructions in the diagrams (Fig. 3-4-5-6) for dismantling and assembly procedures.
• Under very damp and dusty conditions the above maintenance should be carried out at least once a month.
• WHENEVER MILK HAS BEEN SUCKED INTO THE PULSATOR (eg from a split liner) the pulsator must be immediately washed good and dry.
• It is recommended that the pulsation rate and the milking ratio be checked by means of a pulsator tester at least once a year. This should be carried out by an authorized service center or by a milking machine service technician.
• We carry rebuild kits whenever a general overhaul of the pulsator is necessary.
Copyright 2017 Hamby Dairy Supply: You may print manual for own non-commercial use, but not for resale.
Do not overtighten!
Fig. 1 - Rate adjustment
Fig. 2 - Filter cleaning
Fig. 3 - Dismantling main slide and small slide (phase 1)
Fig. 4 - Dismantling main slide and small slide (phase 2)
Fig. 5 - Main slide removal (A) and insertion (B)
Fig. 6 - Cleaning
LL90
Maintenance• DO NOT LUBRICATE THE MOVING PARTS
• Clean the filter at least once a month by means of compressed air. Replace the filter every 6 months. Recommendations are approximate and must be adopted to the real necessities. (Fig.2)
• EVERY 2 MONTHS carefully clean the working parts and the pulsator body using tepid water and a mild detergent. Use a soft not-metallic brush to loosen any stubborn dirt. Rinse all parts in clean water and dry.
• Follow the instructions in the diagrams (Fig. 3-4-5-6) for dismantling and assembly procedures.
• Under very damp and dusty conditions the above maintenance should be carried out at least once a month.
• WHENEVER MILK HAS BEEN SUCKED INTO THE PULSATOR (eg from a split liner) the pulsator must be immediately washed good and dry.
• It is recommended that the pulsation rate and the milking ratio be checked by means of a pulsator tester at least once a year. This should be carried out by an authorized service center or by a milking machine service technician.
• We carry rebuild kits whenever a general overhaul of the pulsator is necessary.
Copyright 2017 Hamby Dairy Supply: You may print manual for own non-commercial use, but not for resale.
The Lid Mount rubber gasket MUST sit flush with lid to create a good seal!
When sliding lid mount into pulsator, make sure FLAT END of the mount is on FLAT
SPACE on bottom of the pusator.
Notice in above photo, the rubber gasket of lid mount is seated IMPROPERLY against lid.
In the photo above, the lid mount is placed PROPERLY in pulsator (angled end goes on
back with speed screw).
CORRECT INCORRECT
www.hambydairysupply.com ● 800-306-8937 ● www.surgemilker.com 6Copyright 2017 Hamby Dairy Supply: You may print manual for own non-commercial use, but not for resale.
4 steps to Cleaning Your Bucket
Washing Accessories & Supplies
Pfanzite powder detergent 25lbs. 7751-0041-033Duophan 45 lbs. pail 7751-0041-074Citrophos acid detergent 4 gallon 7751-0240-184Long handle brush (pic 1. above) C-363FOSwiss pail brush (pic 2. above) C-456FOInflation brush (pic 3. above) 1150-003Hose brush kit 1150-120KAuto Bucket washer 56200Small stainless steel sink 56195Large 29 gallon SS sink (38 inches x 20 inches) 1070-604Wall mout or legs for large sink 1053SSWBMixing faucet - wall mount 1071-571
Your milking machine must be kept clean and sanitary in order to have healthy milk that will keep without spoiling. Cleaning should be done immediately after milking. Don’t let the milking machine sit dirty as the milk residues may dry on and then they will be much harder to clean. Your new milking machine will come with a one month supply of cleaning chemicals (Pfanzite) and 3 brushes for cleaning.
pic. 3
pic. 2
pic. 1
■ Step 1: WARM RINSE with 2-3 gallon warm water. Draw the warm water (100 degrees) from a bucket through the inflations and hoses (vacuum pump on) into the bucket of your milker. Discard water.
■ Step 2: HOT WASH with 2-3 gallon hot water (140 degree) and 1/4 cup of powder Pfanzite dairy detergent. Draw this wash solution through the inflations and hoses and into the bucket. Repeat this step at least 3 times with the hot wash solution.
■ Step 3: WARM RINSE with 2 gallon warm water. Draw through milker. Hang all components so that they drip dry in a clean sanitary place. Store your pail
upside down on an open shelf rack or use bucket hanger so that it may drip dry.
■ Step 4: Remove lid, then remove lid gasket and brush lid with swiss pail brush (pic.2) DO NOT GET PULSATOR WET!
ACID RINSING OPTION
Acid rinsing is very important for removing milkstone. Milkstone is made primarily of calcium residues from the milk and from hard water. Milkstone likes to stick to stainless steel and glass. Other milk residues, such as protein and fat like to stick to milkstone. This will result in a buildup that will leave your shiny stainless steel looking dull. That buildup can contaminate your milk effecting flavor and quality. It also provides a good medium for bad bacteria to grow on.
If your milking machine gets a dull look, then prepare a solution of 1 gallon hot (140 degree) water along with 1 ounce of Citrophos. Draw that through the milker 4 or 5 times, then brush wash the outside with this solution.
■ Step 5: COLD SANITIZE with a chlorine solution 15 minutes prior to milking.
2. Wear Nitrile Gloves to reduce the spread of mastitis causing germs from your hands. The small cracks and crevices in human hands harbor a lot of bacteria including contagious Staph Aureus.
3. Sanitize your milking machine with a chlorinated sanitizing solution just before you milk.
4. Entrance. Bring the Goat into a calm, stress free milking environment. Stress, such as loud noise, inhibits milk let down.
5. Warm hands first and then fore strip. Hand milk 1 or 2 squirts from each teat onto the black screen of a strip cup. Look for clots, clumps, blood, or signs of abnormal milk. Fore stripping promotes milk letdown & faster milkout.
6. Teat Prep & Sanitation. The purpose of this step is to reduce the amount of bacteria on teat skin and promote milk let down.-Teat Wipes: Wipe and massage each teat for 15 seconds. Use one wipe per goat or one per teat if they are visibly dirty. Teats will dry in a few seconds due to the alcohol in the wipes.-Pre Dipping: (optional) Predip with Teat Kote 10/111. Wait 30 seconds, then dry off with a paper or cloth towel. Use one clean towel per goat. Do not reuse the towl as this may spread diseases from one goat to the next.
7. The goal is to milk clean, dry teats. Wet udders are a good conduit for bad bacteria and mastitis (udder infection). Wet udders may drip down to the top of the liner, and if the liner slips it will suck in the dirty water. Limit water use on the udder.
8. Apply the milker within one minute of the beginning of teat preparation. This maximizes the animals natural milk letdown (oxytocin), speeds up milk flow, and reduces the machine on time. Let the vacuum pull the milker onto the teat.
DO NOT force the teat into the liner. It only needs to go in about 1/2 inch.
Milk Goats like consistency. Milk at the same time each day.Follow the same routine each milking.
Copyright 2017 Hamby Dairy Supply: You may print manual for own non-commercial use, but not for resale.
9. Adjust milking unit so it hangs square with out twisting the teats. A little forward tension will provide faster milkout.
10. The goat is finished milking when the large volume of milk flow drops off to a trickle. Milk out time should be 5 to 10 minutes on most goats. Pinch off the rubber milk tubes on the bottom of the inflations, then gently pull the inflation down off the teats.
11. Animals that were hard to milk by hand will take longer to milk with a machine. Most healthy udders will shrink significantly when milked out...Except for the first few days post kidding when the udder has a lot of swelling (edema). Usually the swelling leaves within a few days and then the udder will shrink when milked out. Dynamint udder cream will help reduce swelling if used in the first few days after kidding.
12. Should you post strip? No! Research has shown that post stripping may cause more harm than benefit. It may train the goat to hold back some milk and your hands will contaminate the teat end at a vulnerable time when the Keratin teat end seal is open. If the goat is not milking out properly, then you may need to adjust the way the milker is hanging, adjust the pulsator, or vacuum level, or have your milking machine checked for proper operation.
13. Post dip IMMEDIATELY for Teat disinfection. Post dipping sanitizes the teat skin including the opening at the bottom of the teat. Post dipping has been proven to dramatically reduce cases of udder infections. Post Dip with AstroTek. Teat Kote 10/111, or DermaSept protocol tested teat dips. Use the Hamby Dairy Supply dip cup provided with your milking machine. This non-return style dip cup provides a fresh dose of teat dip for each teat. For temperatures below 25 degrees, DermaSept is recommended because it will not freeze.
14. It is important to keep the dairy goat standing for a while after milking. This will give some time for the wax-like seal of the teat orifice to seal back up. A good solution is to have a rack of fresh hay and fresh water available right after they exit the milking parlor.
Copyright 2017 Hamby Dairy Supply: You may print manual for own non-commercial use, but not for resale.
The Interpuls 205 Claw is especially designed for rapid and efficient goats and sheep milking. Features individual claw piece with a completely automatic shut-off valve controlled by vacuum.
Instructions for use: When ready to milk, complete your normal equipment set-up making sure the lever on the ITP205 is in the UP position. Prep the teats as shown on previous page, then gently place the teat in the liner (figure 2). When the teat enters the liner, the shut-off valve opens automatically turning on the milking unit.
To stop milking, remove the teat from the inflation by gently pressing on the inflation’s opening near the teat to release vacuum (figure 3). The rapid inlet of air creates a pressure difference across the valve which sucks the valve against its seat, creating immediate shut-off. On units with individual green shutoffs, turn off this valve prior to removing from teats.
During washing, position the lever down (figure 4) to keep the valve open. This will prevent closing due to the turbulence of the water. Remember: Lever is UP for milking. DOWN for washing.
ITP205 Advantages
The ITP205 allows you to milk quickly and efficiently.
It reduces vacuum fluctuations during cluster application and removal.
With proper splitters and tubes, it is easily fitted to any make of milking equipment (figure 1). The ITP205 uses industry standard 1/2 milk hose. It works equally well for bucket milking and pipeline milking systems.
The valve closes automatically if the cluster is accidentally removed or kicked off.
Damaged or diseased teats can be isolated from milking.
Comes apart easily for inspections or cleaning.
Milking Goats with the ITP205 Milker
Figure 1
Figure 2
Figure 3
Figure 4
Copyright 2017 Hamby Dairy Supply: You may print manual for own non-commercial use, but not for resale.
Copyright 2017 Hamby Dairy Supply: You may print manual for own non-commercial use, but not for resale.
ITP207 semi automatic Goat Claws.
ITP207 is an individual milking claw incorporating unique automatic shut-off valves which automatically control the vacuum supply to each liner during both milking and washing. Fit the liner to the teat and the valve automatically opens. When you have finished milking, just pull the liner slightly to detach the unit: this lets in air which closes the valve.Washing is fully automatic. ITP207 starts “normally closed”, to prevent vacuum leakages at the activation of the Milking machine.
ITP207 Advantages
ITP 207 claws reduce air loss while attaching the milker, making them ideal for portable milkers and situations with under sized vacuum pumps.
Benefits:· Fewer operations both during milking.· Less vacuum fluctuation· New wool-stop cross in the milk inlet tube· Less vacuum consuptions when liners are fitted and removed.· Valves close automatically if the cluster is kicked off.· An unhealthy teat can be isolated during milking.· Easy to inspect for cleaning and maintenance.· High impact resistant materials are used to construct the milking claw.
Replacement Parts for Goat Milkers
■ Vacuum gauges and regulatorsSmall vacuum gauge for portables 2 inch dia. .............................................7124Better vacuum gauge for portables (glycerin filled). ....................................7126Generic vacuum gauge 3.5 inch dia. ............................................................7135Brass vacuum regulator...all portables up to 1.5 HP 3/4 NPT ....................7121Foam filter for our vacuum regulator. ..........................................................7122
■ Inflations, Liners & ClawsStandard goat silicone that fits our clear & SS shell (1 year life) ............................. 4710 ......................... set of 2Long stem rubber that fits clear shell & SS Jet flow (3 month life) ......................... 4711 ........................ set of 2Standard clear goat shell for above liners ................................................................. 4707 ......................... eachLong stem rubber that fits 06 SS shells (3 month life) ............................................. 1100-022 ................. set of 2Long stem rubber that fits BM SS shells (3 month life) ........................................... 1100-031 ................. set of 2Replacement stainless steel shell for goat liners ....................................................... 4317g ....................... eachSmall silicone fits clear shell for Nigerians, & sheep (1 year life) ............................. 4801 ......................... set of 2Small clear goat shell for mini inflations ................................................................. 4807 ......................... eachITP 205 claw for 1/2” tubing .................................................................................. ITP2059001 ............ set of 2ITP 207 Goat & Sheep autovalve ............................................................................ ITP2079002 ............ set of 2Replacement for Quickie claw ................................................................................. 4336 ......................... set of 2
■ Milk, Vacuum & Pulsation tubing (replace at least once per year)5/8” Silicone Milk Hose opaque ..................................................1090-096FT ....................per foot1/2” Milk Hose clear with blue stripe ..........................................1090-002VFT ..................per footTwin pulsation hose 9/32 I.D. .....................................................7750-0112-618FT ...........per footSingle pulsation hose 9/32 I.D. ...................................................4716 ................................per footClear Milk Y 5/8 x 1/2 x 1/2 ........................................................ITP2020009 ....................eachPulsation Y for 9/32 tubing .........................................................7932 ................................eachBracket to hold hoses and Y’s .......................................................ITP2040010 ....................eachShut off for 3/8 milk hose (green plastic) ....................................4339 ................................eachShut off for 1/2 milk hose (green plastic) ....................................4750 ................................eachShut off for 5/8 milk hose (white plastic) ....................................21910 ..............................eachShut off for 5/8 milk hose (stainless steel) ...................................21918 ..............................each
■ Lid GasketsGasket for our stainless steel lid, Hamby, Caprine Supply Ezee, Nupulse .......1053Gasket for DeLaval (1/4” smaller than 1053) ..................................................1041
■ Pulsators and adaptorsL02 Interpuls Pulsator 60/40 .......................................................................... ITP1099001LL90 Interpuls Pulsator 60/40 ........................................................................ 1081-162L02 Interpuls Rebuild Kit for 60/40 ............................................................... ITP1050061ITP repair kit for LL90 pulsator 60/40 ........................................................... 1081-152ITP repair kit for L80 pulsator 60/40 .............................................................. 1081-154ITP mount for our bucket lid .......................................................................... 1081-173ITP permanent mount ..................................................................................... 161406
ITP Lid Mount
www.hambydairysupply.com ● 800-306-8937 ● www.surgemilker.com 11Copyright 2017 Hamby Dairy Supply: You may print manual for own non-commercial use, but not for resale.
Vacuum Gauge 2.5 inch Glycerin Filled
Shut off for 1/2 milk hose (green plastic)
Gasket for our stainless steel lid, Hamby, Caprine Supply Ezee,


![[Go Igo Baduk Weiqi] [Eng] East Meets West- David Lai & Gary W Hamby](https://static.documents.pub/doc/80x56/55cf9b2f550346d033a50cc9/go-igo-baduk-weiqi-eng-east-meets-west-david-lai-gary-w-hamby.jpg)


![Snapshots from Hamby Trail: Before and After Rim Fire [Dec. 19-20, 2011 vs. Sept. 20, 2013]](https://static.documents.pub/doc/80x56/5681342a550346895d9b1812/snapshots-from-hamby-trail-before-and-after-rim-fire-dec-19-20-2011-vs.jpg)
