23
INSTRUCTION MANUAL DIGITAL STAINLESS STEEL MICROWAVE AND GRILL

INSTRUCTION MANUALDIGITAL STAINLESS STEEL MICROWAVE AND GRILL

DIGITAL STAINLESS STEEL MICROWAVE AND GRILL INSTRUCTION MANUAL MODEL NO.: BBEK1101

(a) Do not attempt to operate this oven with the door open since this can
result in harmful exposure to microwave energy. It is important not to
break or tamper with the safety interlocks.
(b) Do not place any object between the oven front face and the door or allow
soil or cleaner residue to accumulate on sealing surfaces.
(c) WARNING: If the door or door seals are damaged, the oven must not
be operated until it has been repaired by a competent person.
If the apparatus is not maintained in a good state of cleanliness, its surface could
be degraded and affect the lifespan of the apparatus and lead to a dangerous
situation.
ADDENDUM
2
TO EXCESSIVE MICROWAVE ENERGYPRECAUTIONS TO AVOID POSSIBLE EXPOSURE
IMPORTANT SAFETY INSTRUCTIONSWARNING To reduce the risk of fire, electric shock, injury to persons
or exposure to excessive microwave oven energy whenusing your appliance, follow basic precautions, includingthe following:
1. Warning : Liquids and other foods must not be heated in sealed containers since they are liable to explode.2. Warning : It is hazardous for anyone other than a competent person to carry out any service or repair operation that involves the removal of a cover which gives protection against exposure to microwave energy.3. This appliance can be used by children aged from 8 years and above and persons with reduced physical, sensory or mental capabilities or lack of experience and
4. Keep the appliance and its cord out of
5. Only use utensils suitable for use in microwave ovens.6. The oven should be cleaned regularly and any food deposits should be removed.7. Read and follow the specific:"PRECAU-
8. When heating food in plastic or paper containers, keep an eye on the oven due to the possibility of ignition.9. If smoke is emitted, switch off or unplug the appliance and keep the door closed in order to stifle any flames.10. Do not overcook food.11. Do not use the oven cavity for storage purposes. Do not store items, such as bread, cookies, etc. inside the oven.12. Remove wire twist-ties and metal handles from paper or plastic containers/bags before placing them in the oven.
13. Install or locate this oven only in accordance with the installation instructions provided.14. Eggs in the shell and whole hard-boiled eggs should not be heated in microwave ovens since they may explode, even after microwave heating has ended.15. This appliance is intended to be used in household and similar applications such as: -staff kitchen areas in shops, offices and other working environments; -by clients in hotels, motels and other residential type environments; -farm houses; -bed and breakfast type environments.16. If the supply cord is damaged, it must be replaced by the manufacturer, its service agent or similarly qualified persons in order to avoid a hazard.17. Do not store or use this appliance outdoors.18. Do not use this oven near water, in a wet basement or near a swimming pool.19. The temperature of accessible surfaces may be high when the appliance is operating. The surfaces are liable to get hot during use . Keep cord away from heated surface, and do not cover any vents on the oven.20. Do not let cord hang over edge of table or counter.21. Failure to maintain the oven in a clean condition could lead to deterioration of the surface that could adversely affect the life of the appliance and possibly result in a hazardous situation.22. The contents of feeding bottles and baby food jars shall be stirred or shaken and the temperature checked before consumption, in order to avoid burns.
knowledge if they have been givensupervision or instruction concerning useof the appliance in a safe way andunderstand the hazards involved.Children shall not play with the appliance.Cleaning and user maintenance shallnot be made by children unless they areolder than 8 and supervised.
reach of children less than 8 years.
TIONS TO AVOID POSSIBLE EXPOSURE TO EXCESSIVE MICROWAVE ENERGY".
3
34 .The rear surface of appliance shall be placed against a wall .35 .The microwave oven shall not be placed in a cabinet unless it has been tested in
READ CAREFULLY AND KEEP FOR FUTUREREFERENCE
23. Microwave heating of beverages can result in delayed eruptive boiling, therefore care must be taken when handling the container.24. The appliance is not intended for use by persons (including children) with reduced physical , sensory or mental capabilities, or lack of experience and knowledge, unless they have been given supervision or instruction concerning use of the appliance by a person responsible for their safety.25. Children should be supervised to ensure that they do not play with the appliance.26. The appliances are not intended to be operated by means of an external timer or separate remote-control system.27. Accessible parts may become hot during use. Young children should be kept away.28. Steam cleaner is not to be used.29. During use the appliance becomes hot. Care should be taken to avoid touching heating elements inside the oven.30. Only use the temperature probe recommended for this oven.(for ovens provided with a facility to use a temperature-sensing probe.)31. WARNING: The appliance and its accessible parts become hot during use.Care should be taken to avoid touching heating elements. Children less than 8 years of age shall be kept away unless continuously supervised.32. Only use the temperature probe recommended for this oven.(for ovens provided with a facility to use a temperature-sensing probe.)33. The microwave oven must be operated with the decorative door open.(for ovens with a decorative door.)
a cabinet.
4

DANGERElectric Shock HazardTouching some of the interna componentscan cause serious personal injury or death.Do not disassemble this appliance.
WARNINGElectric Shock HazardImproper use of the grounding can result inelectric shock. Do not plug into an outlet untilappliance is properly installed and grounded.
To Reduce the Risk of Injury to PersonsGrounding Installation
CLEANINGBe sure to unplug the appliance from thepower supply.1. Clean the cavity of the oven after using with a slightly damp cloth.2. Clean the accessories in the usual way in soapy water.3. The door frame and seal and neighbouring parts must be cleaned carefully with a damp cloth when they are dirty.
1. A short power-supply cord is provided to reduce the risks resulting from becoming entangled in or tripping over a longer cord.2. If a long cord set or extension cord isused:1)The marked electrical rating of the cordset or extension cord should be at least asgreat as the electrical rating of the appliance.
This appliance must be grounded. In theevent of an electrical short circuit,grounding reduces the risk of electricshock by providing an escape wire forthe electric current. This appliance isequipped with a cord having a groundingwire with a grounding plug. The plug mustbe plugged into an outlet that is properlyinstalled and grounded.
Consult a qualified electrician orserviceman if the ground ing instructionsare not completely understood or if doubtexists as to whether the appliance isproperly grounded. If it is necessary touse an extension cord , use only a 3-wireextension cord .
2)The extension cord must be a grounding-type 3-wire cord.3)The long cord should be arranged so thatit will not drape over the counter top ortabletop where it can be pulled on bychildren or tripped over unintentionally.
4. Do not use harsh abrasive cleaners or sharp metal scrapers to clean the oven door glass since they can scratch the surface, which may result in shattering of the glass.5. Cleaning Tip or easier cleaning of the cavity walls that the food cooked can touch: Place half a lemon in a bowl, add 300ml (1/2 pint) water and heat on 100% microwave power for 10 minutes. Wipe the oven clean using a soft, dry cloth.
-- F
5

TECHNICAL DATA
5 YEAR GUARANTEE
Rated Voltage: 230-240V~ 50HzPower input microwave: 1300W Grill: 1200WConvection: 1200WFrequency: 2450MHzPower output microwave: 750 - 800W
6

KNOW YOUR MICROWAVE • Remove the appliance from the box. • Remove any packaging from the product. • Place the packaging inside the box and store or dispose of safely. In the Box: 1. Microwave 2. Turntable Spindle 3. Turntable Support Ring 4. Turntable 5. Grill Rack 6. Instruction Manual Features: 1. 23 litre Capacity 2. 800W Power Output 3. Compact Design 4. Digital Timer 5. s 6. Child Safety Lock 7. Defrost, Express Cooking Function 8. End of Cycle Alert 9. 10 Express Functions:
• Pizza • Potato • Meat • Fish • Vegetable • Beverage • Pasta • Popcorn • Cake • Roast Chicken
5 Level
7

GENERAL INFORMATION A. Microwaves are high frequency electromagnetic waves, which exist in nature. These naturally
occurring microwaves are dispersed so that they cannot be collected for heating purposes. The key component of a microwave oven, the magnetron, will transform electrical energy to microwave energy. The microwave field is established within the closed cavity of the oven, causing the food molecules to vibrate at very high speed. The heat produced from the friction will cook the food.
B. There are three properties of microwave energy, namely: a) Absorbability: The microwaves cause the vibration of molecules of various
foods so as to obtain heating. Yet, the infiltration ability is largely depending on the size, thickness and properties of the food.
b) Penetrability: Microwaves can penetrate through ceramics, glass, and temperature-resistant plastics. It is necessary to use containers whose materials have good microwave penetrability to achieve best heating result. See the below utensils guide.
c) Reflectivity: Microwaves are reflected by the metal walls of interior cavity so as to establish an even magnetic field, thus can preventing the overheating of partial area.
INSTALLATION OF THE MICROWAVE OVEN
Do not place any objects on the top of microwave oven. The Microwave Oven should be positioned so that it is far from a TV, Radio or antenna, as
picture disturbance or noise may occur. The appliance must be positioned so that the plug is always accessible. The microwave oven is intended to be used free-standing and must not be placed in a cabinet. To keep the microwave oven at a distance from the wall, it is necessary to install a distance
limiter.
Accessible surfaces may become hot during operation.
4.5.
6.
8.7.
20cm
30cm
20cm
min85cm
0cm
Select a level surface that provide enough open space for the intakeand/or outlet vents.
1.
be placed against a wall. Leave a minimum clearance of 30cm above the oven, a minimum clearance of 20cm is required between the oven and any adjacent walls.
85cm.2. The minimum installation height is
3. The rear surface of appliance shall
8

UTENSILS GUIDELINE It is strongly recommended to use the containers that are suitable and safe for microwave cooking. Generally speaking, containers that are made of heat-resistant ceramic, glass or plastic are suitable for microwave cooking. Never use metal containers for microwave cooking and combination cooking as arcing is likely to occur. Make use of the reference table below. MATERIAL OF CONTAINER
MICRO-WAVE
GRILL COMBI NOTES
Ceramic Yes No No Never use ceramics which are decorated with a metallic pattern; metal rim or glazing. Check the back-stamp of the ceramic container before placing it in the microwave oven.
Heat-resistant plastic
Yes No No Cannot be used for lengthy periods of microwave cooking
Heat-resistant glass Yes No No
Only use heat-resistant glass, as ordinary glassware may break if heated.
Grill rack No Yes Yes Only use the grill rack supplied with the microwave oven.
Aluminium foil Yes Yes Yes Aluminium foil can be used to partially shield thin areas of meat or poultry to prevent over-cooking. Keep foil away from oven walls.
Aluminium tray Yes Yes Yes May cause arcing. Transfer food to a microwave safe dish.
Plastic film Yes No No It should not be used when cooking meat or chops as the higher temperature required may do damage to the film.
Paper plates and paper towel
Yes No No Use for short term cooking only. Do not leave unattended while cooking.
Thermometers Yes Yes Yes Microwave safe thermometers only.
9
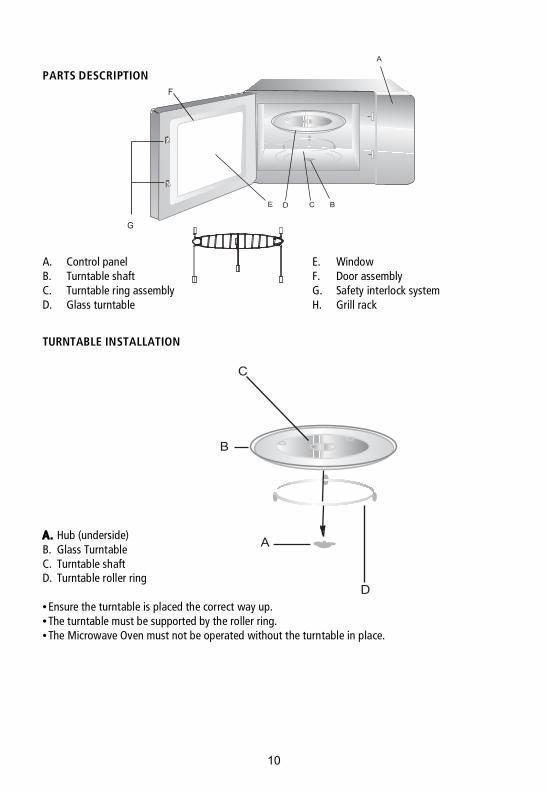
PARTS DESCRIPTION A. Control panel B. Turntable shaft C. Turntable ring assembly D. Glass turntable
E. Window F. Door assembly G. Safety interlock system H. Grill rack
TURNTABLE INSTALLATION
A. Hub (underside) B. Glass Turntable C. Turntable shaft D. Turntable roller ring • Ensure the turntable is placed the correct way up. • The turntable must be supported by the roller ring. • The Microwave Oven must not be operated without the turntable in place.
10
F
G
A
C BE D
A
B
C
D
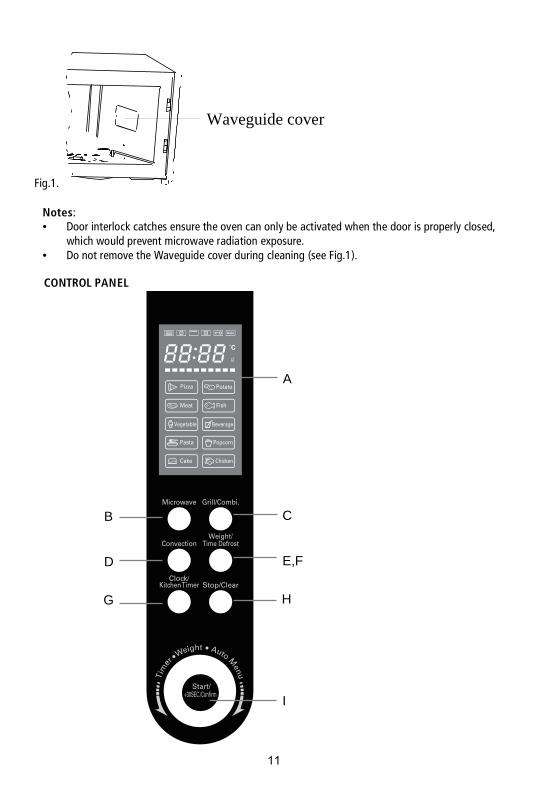
Fig.1.
Waveguide cover
Notes: • Door interlock catches ensure the oven can only be activated when the door is properly closed,
which would prevent microwave radiation exposure. • Do not remove the Waveguide cover during cleaning (see Fig.1). CONTROL PANEL
11
HG
CB
I
A
D E,F

J) Child lock function • Use this feature to lock the control panel when you are cleaning or so that children cannot
use the oven unsupervised. All the buttons are rendered inoperable in this mode. • To set child lock, press and hold the Stop/Clear button for 3 seconds until a KEY symbol
appears. • To cancel the child lock, press and hold the Stop/Clear button for 3 seconds until the KEY
symbol disappears.
D) Convection
• Convection cooking as in a conventional oven.
E) Defrost by weight
• Set the weight of the food to be defrosted. The oven automatically sets the defrosting time
and power level.
F) Defrost by time
• Set the defrosting time. The oven automatically divides the defrosting time into periods of
alternating defrost and stand times by cycling on and off.
G) Clock / Kitchen Timer
• Displays the time and can be used as a separate timer.
H) Stop / Clear
• Clears all previous settings.
I) Input dial
• Touch to start cooking / Instant start (in 30second increments) / Confirm input.
A) Display
• Cooking time, power, indicators and present time are displayed.
B) Microwave
• Press to use the microwave only.
C) Grill / Combi
• Set to grill or the combination of grill and microwave power.
12
OPERATING INSTRUCTIONS 1. Setting the clock
1) Plug the power cord of the Microwave Oven into the mains electrical outlet. The Microwave Oven will beep once and the display will illuminate, showing 0:00.
2) Press the CLOCK/ KITCHEN TIMER button to set the clock. The display will flash, prompting you to set the HOURS. Turn the INPUT DIAL to select the current time. This is a 24 hour clock. Once the hours have been set, press the CLOCK/ KITCHEN TIMER button again to shift the flashing display to MINUTES. Turn the INPUT DIAL again to select the minutes, and then press the CLOCK/ KITCHEN TIMER button again to confirm the time.
2. Kitchen timer
1) Press the CLOCK/ KITCHEN TIMER button twice. The display will show 00:00. 2) Turn the INPUT DIAL to enter the minutes required. (Maximum 95 minutes) 3) Press the START button to confirm the set time. The timer will begin to count down. 4) Once the timer reaches zero, the Microwave Oven will beep five times and the display will
revert to the time. 5) NOTE: The kitchen timer is purely for timing purposes and it will override all other
functions of the microwave oven while it is in operation. The TIMER operation can be cancelled at any time by pressing the STOP/CLEAR button.
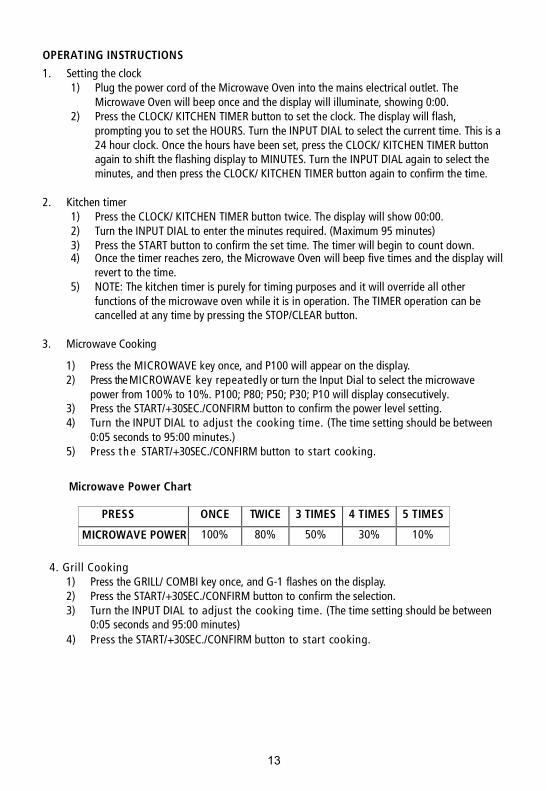
3. Microwave Cooking
1) Press the MICROWAVE key once, and P100 will appear on the display. 2) Press the MICROWAVE key repeatedly or turn the Input Dial to select the microwave
power from 100% to 10%. P100; P80; P50; P30; P10 will display consecutively. 3) Press the START/+30SEC./CONFIRM button to confirm the power level setting. 4) Turn the INPUT DIAL to adjust the cooking time. (The time setting should be between
0:05 seconds to 95:00 minutes.) 5) Press th e START/+30SEC./CONFIRM button to start cooking.
Microwave Power Chart
PRESS ONCE TWICE 3 TIMES 4 TIMES 5 TIMES
MICROWAVE POWER 100% 80% 50% 30% 10%
4. Grill Cooking
1) Press the GRILL/ COMBI key once, and G-1 flashes on the display. 2) Press the START/+30SEC./CONFIRM button to confirm the selection. 3) Turn the INPUT DIAL to adjust the cooking time. (The time setting should be between
0:05 seconds and 95:00 minutes) 4) Press the START/+30SEC./CONFIRM button to start cooking.
13

Note: When half the grill time is reached, the oven will beep twice to tell you to turn the food over. It is not necessary to turn the food, but in order to have even grilling, turn the food over, close the door, and then press the START/+30SEC./CONFIRM button to continue cooking.
5. Combination Cooking 1) Press the GRILL/ COMBI button once. ‘G-1’ will appear on the display. 2) Press the GRILL/COMBI button or turn the INPUT DIAL to select C-1; C-2; C-3 or C-4 on the
display. 3) Press the START/+30SEC./CONFIRM button to confirm the selection. 4) Turn the INPUT DIAL to adjust the cooking time. (The time setting should be between
0:05 seconds - 95:00 minutes) 5) Press START/+30SEC./CONFIRM to start cooking.
Combination Settings
6. Convection Cooking (With pre-heating function)
Convection cooking allows you to cook as in a traditional oven. The Microwave is not used. It is
recommended that you should preheat the oven to the appropriate temperature before placing
the food in the oven. 1) Press the CONVECTION button once. 100°C flashes on the display. 2) Press the CONVECTION button repeatedly or turn the INPUT DIAL to select a higher
temperature, in 10°C increments, up to 190°C. 3) Press the START/+30SEC./CONFIRM button to confirm the temperature selection. 4) Press the START/+30SEC./CONFIRM button again to begin preheating the
oven. When the pre-selected temperature is reached, the oven will beep
twice to indicate that the food can be placed into the oven. The pre-heat
temperature will flash on the display until the door is opened.
5) Put the food into the oven and close the door. 6) Turn the INPUT DIAL to select the cooking time. The maximum time is 95 minutes. 7) Press the START/+30SEC./CONFIRM button to start cooking.
SETTING DISPLAY MICROWAVE
GRILL CONVECTION
1
C-1
2 C-2
3 C-3
4 C-4
14
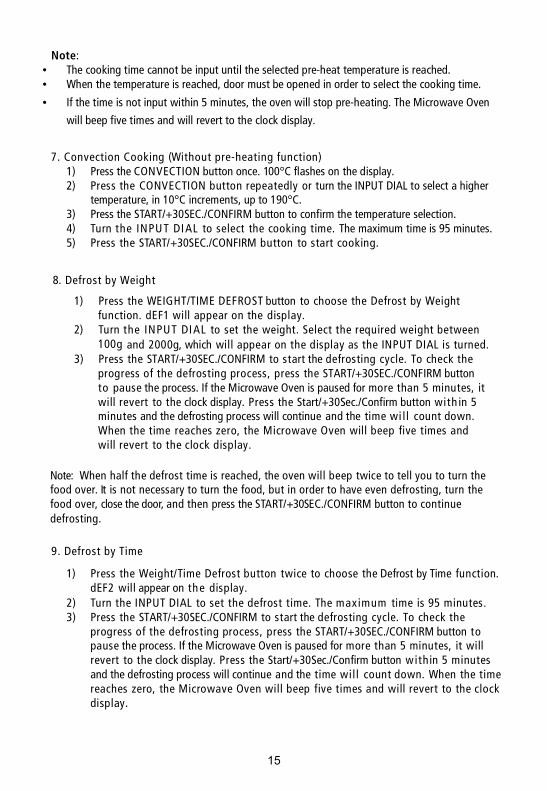
Note: • The cooking time cannot be input until the selected pre-heat temperature is reached. • When the temperature is reached, door must be opened in order to select the cooking time.
• If the time is not input within 5 minutes, the oven will stop pre-heating. The Microwave Oven
will beep five times and will revert to the clock display.
7. Convection Cooking (Without pre-heating function) 1) Press the CONVECTION button once. 100°C flashes on the display. 2) Press the CONVECTION button repeatedly or turn the INPUT DIAL to select a higher
temperature, in 10°C increments, up to 190°C. 3) Press the START/+30SEC./CONFIRM button to confirm the temperature selection. 4) Turn the INPUT DIAL to select the cooking time. The maximum time is 95 minutes. 5) Press the START/+30SEC./CONFIRM button to start cooking.
8. Defrost by Weight
1) Press the WEIGHT/TIME DEFROST button to choose the Defrost by Weight
2) Turn the INPUT DIAL to set the weight. Select the required weight between 100g and 2000g, which will appear on the display as the INPUT DIAL is turned.
3) Press the START/+30SEC./CONFIRM to start the defrosting cycle. To check the progress of the defrosting process, press the START/+30SEC./CONFIRM button to pause the process. If the Microwave Oven is paused for more than 5 minutes, it will revert to the clock display. Press the Start/+30Sec./Confirm button with in 5 minutes and the defrosting process will continue and the time wi ll count down. When the time reaches zero, the Microwave Oven will beep five times and will revert to the clock display.
Note: When half the defrost time is reached, the oven will beep twice to tell you to turn the food over. It is not necessary to turn the food, but in order to have even defrosting, turn the food over, close the door, and then press the START/+30SEC./CONFIRM button to continue defrosting.
9. Defrost by Time
1) Press the Weight/Time Defrost button twice to choose the Defrost by Time function.
2) Turn the INPUT DIAL to set the defrost time. The maximum time is 95 minutes. 3) Press the START/+30SEC./CONFIRM to start the defrosting cycle. To check the
progress of the defrosting process, press the START/+30SEC./CONFIRM button to pause the process. If the Microwave Oven is paused for more than 5 minutes, it will revert to the clock display. Press the Start/+30Sec./Confirm button within 5 minutes and the defrosting process will continue and the time will count down. When the time reaches zero, the Microwave Oven will beep five times and will revert to the clock display.
function. dEF1 will appear on the display.
dEF2 will appear on the display.
15
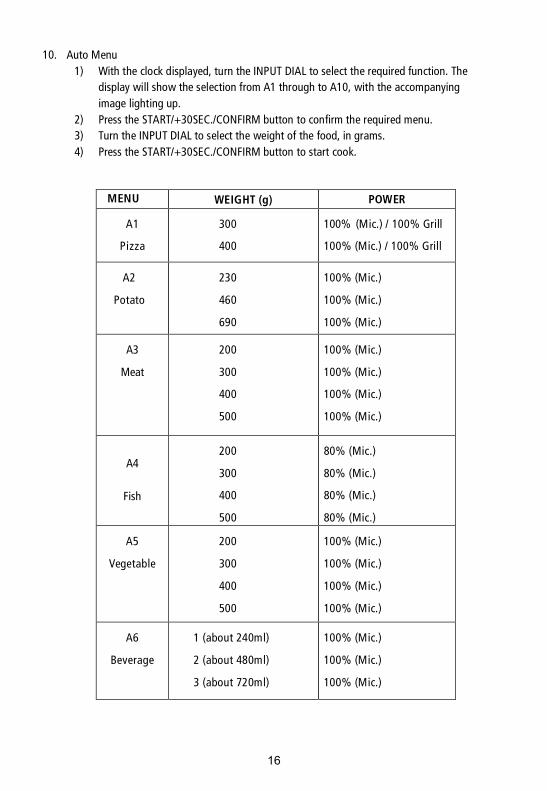
10. Auto Menu 1) With the clock displayed, turn the INPUT DIAL to select the required function. The
display will show the selection from A1 through to A10, with the accompanying image lighting up.
2) Press the START/+30SEC./CONFIRM button to confirm the required menu. 3) Turn the INPUT DIAL to select the weight of the food, in grams. 4) Press the START/+30SEC./CONFIRM button to start cook.
MENU
WEIGHT (g)
POWER
A1
Pizza
300
400
100% (Mic.) / 100% Grill
100% (Mic.) / 100% Grill
A2
Potato
230
460
690
100% (Mic.)
100% (Mic.)
100% (Mic.)
A3
Meat
200
300
400
500
100% (Mic.)
100% (Mic.)
100% (Mic.)
100% (Mic.)
A4
Fish
200
300
400
500
80% (Mic.)
80% (Mic.)
80% (Mic.)
80% (Mic.)
A5
Vegetable
200
300
400
500
100% (Mic.)
100% (Mic.)
100% (Mic.)
100% (Mic.)
A6
Beverage
1 (about 240ml)
2 (about 480ml)
3 (about 720ml)
100% (Mic.)
100% (Mic.)
100% (Mic.)
16
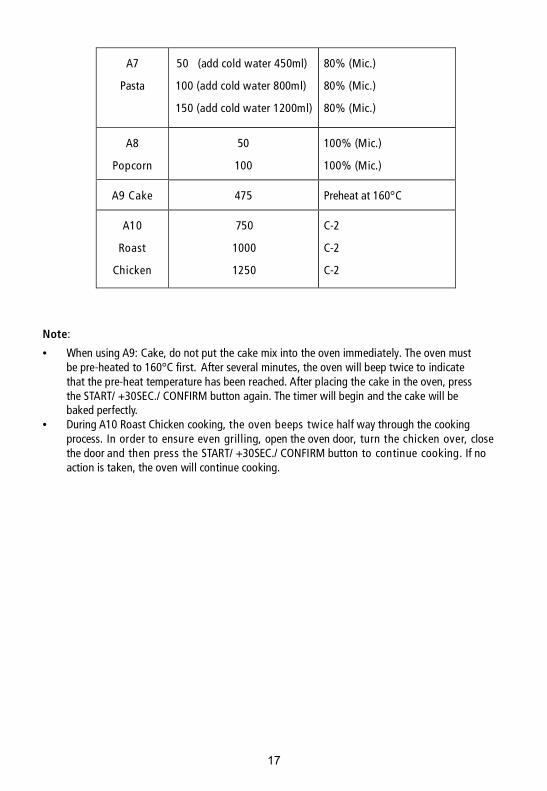
A7
Pasta
50 (add cold water 450ml)
100 (add cold water 800ml)
150 (add cold water 1200ml)
80% (Mic.)
80% (Mic.)
80% (Mic.)
A8
Popcorn
50
100
100% (Mic.)
100% (Mic.)
A9 Cake 475 Preheat at 160°C
A10
Roast
Chicken
750
1000
1250
C-2
C-2
C-2
Note:
• When using A9: Cake, do not put the cake mix into the oven immediately. The oven must be pre-heated to 160°C first. After several minutes, the oven will beep twice to indicate that the pre-heat temperature has been reached. After placing the cake in the oven, press the START/ +30SEC./ CONFIRM button again. The timer will begin and the cake will be baked perfectly.
• During A10 Roast Chicken cooking, the oven beeps twice half way through the cooking process. In order to ensure even grilling, open the oven door, turn the chicken over, close the door and then press the START/ +30SEC./ CONFIRM button to continue cooking. If no action is taken, the oven will continue cooking.
17

11. Instant Cooking 1)
30 seconds. Each press on the START/+30SEC./CONFIRM button adds another 30 seconds to the cooking time. The maximum cooking time is 95 minutes.
2) the START/+30SEC./CONFIRM button will immediately make the oven
START/+30SEC./CONFIRM button will add 30 seconds to the instant cooking time.
12. Notes 1) The maximum cooking time in al l cooking modes is 95 minutes. 2) When the door is opened, the lamp will i l luminate. If the door is left open for 10
minutes, the lamp will switch off and the LED display will revert to the clock display.
3) Settings can be made with the oven door open, but the oven will not operate until the door is closed. Do not attempt to override the interlock safety switches that are activated when the oven door is closed, as this will lead to dangerous microwave radiation exposure.
Note: This function does not work for Defrost by weight, Auto Menu and Multi-stage
During microwave, grill, convection and combination cooking, pressing
cook at 100% power level for 30 seconds. Each press on the
Press the START/+30SEC./inCONFIRM button to cook at 100% power level for
18
cooking. During Defrost by time, the time can be added 30 seconds by pressing the START/+30SEC./CONFIRM button.

MICROWAVE COOKING TIPS
1. Arranging food: • Place thicker areas toward outside of dish and the thinner parts in the centre and spread
them out evenly. Do not overlap if possible. 2. Cooking time:
• Start cooking with the shorter period of time and extend it according to the actual need. Over-cooking may result in smoking and burning.
3. Cover foods before cooking. Refer to the recipe. • Use paper towels, microwave plastic wrap or a cover to cover food to prevent spattering
and help food to cook evenly. (This also helps to keep the oven clean). 4. Partial shielding of food:
• Use small, smooth pieces of aluminium foil to partially cover thin areas of meat or poultry in order to avoid over-cooking. Arcing can occur if foil is too close to the oven walls. The foil should be at least 2,5cm away from the oven walls.
5. Stirring food: • Stir from the outside to the centre of the dish once or twice during cooking.
6. Turning food: • Food such as chicken, hamburgers or steaks should be turned over once during cooking.
7. Rearranging food: • Change the position of the food half-way through the cooking process i.e. from top to
bottom and from the centre of the dish to the outside. 8. Allow standing time:
• After cooking, ensure adequate standing time. Remove food from oven and stir if possible. Cover for standing time which allows the food to finish cooking without over-cooking.
9. Check that food is thoroughly cooked: • Observe the food colour and tenderness to determine whether the food is cooked. Signs
include: • Steam throughout food, not just at the edges. • Joints of poultry move easily. • Pork and poultry show no evidence of blood. • Fish is opaque and flakes easily with a fork.
10. Condensation: • Condensation is normal with microwave cooking. The humidity and moisture of food will
influence the amount of moisture in the oven. Generally, covered foods will not cause as much condensation as uncovered foods. Ensure that the ventilation openings are not blocked.
11. Microwave-safe plastic wrap: • For cooking food with high fat content, do not bring the wrap in contact with the food as it
may melt. 12. Microwave-safe plastic cookware:
• Some microwave-safe plastic cookware is not suitable for cooking food with high fat and sugar content.
19

CLEANING AND MAINTENANCE
Unplug the power cord before cleaning the Microwave Oven. If possible leave the door open to inactivate the oven during cleaning. Exterior: The outside may be wiped clean with a soft damp cloth. Avoid the use of harsh abrasive cleaners. Door: Wipe the door and window on both sides. Wipe the door seals and adjacent parts frequently with a damp cloth to remove any spills or spatters. Do not use abrasive cleaners. Control panel: Care should be taken in cleaning the control panel. Wipe the panel with a slightly dampened cloth. Do not scrub or use any sort of chemical cleaners. Interior walls: To clean the interior surfaces, wipe with a soft, damp cloth. After use, wipe the Waveguide cover in the oven with a soft damp cloth to remove any food splashes. Splashed food that is left on the Waveguide cover may overheat and begin to smoke or catch fire. Do not remove the Waveguide cover. Do not use a commercial oven cleaner, abrasive or harsh cleaners and scouring pads on any part of your microwave oven. Never spray oven cleaners directly onto any part of your oven. Turntable/ Turntable support ring/ Turntable spindle. Wash with mild soapy water and dry thoroughly. TIP: When the Microwave Oven has been used for a long time, food odours remain in the oven, Following 3 methods can get rid of them: • Place several lemon slices in a cup, then heat with high power for 2-3 min. • Place a cup of red tea in the oven, and then heat it on high power. • Put some orange peels into the oven, and then heat them on high power for 1 minute.
20
ENVIRONMENT FRIENDLY DISPOSAL This marking indicates that this product should not be disposed of with other household waste. To prevent possible harm to the environment or human health from uncontrolled waste disposal, recycle it responsibly to promote the sustainable re-use of material resources. To dispose of your appliance correctly, please contact or take it to your local refuse / recycling centre. Alternatively, contact your local council for information on your local re-use centre. Please make this product environmentally safe for recycling.
21

MODEL NO : BBEK1101DIGITAL STAINLESS STEEL MICROWAVE AND GRILL
0844 854 0877BRABANTIA CUSTOMER CARE LINE FOR ONLYUK


