READ THROUGH THIS MANUAL BEFORE STARTING CONSTRUCTION. IT CONTAINS IMPORTANTINSTRUCTIONS AND WARNINGS CONCERNING THE ASSEMBLY AND USE OF THIS MODEL.
WARRANTYGreat Planes® Model Manufacturing Co. guarantees this kit to be free from defects in both material and workmanship at the date of purchase. This warranty does not cover any component parts damaged by use or modification. In no case shall Great Planes’ liability exceed the original cost of the purchased kit. Further, Great Planes reserves the right to change or modify this warranty without notice.
In that Great Planes has no control over the final assembly or material used for final assembly, no liability shall be assumed nor accepted for any damage resulting from the use by the user of the final user-assembled product. By the act of using the user-assembled product, the user accepts all resulting liability.
If the buyer is not prepared to accept the liability associated with the use of this product, the buyer is advised to return
this kit immediately in new and unused condition to the place of purchase.
To make a warranty claim send the defective part or item to Hobby Services at the address below:
Hobby Services3002 N. Apollo Dr. Suite 1Champaign IL 61822 USA
Include a letter stating your name, return shipping address, as much contact information as possible (daytime telephone number, fax number, e-mail address), a detailed description of the problem and a photocopy of the purchase receipt. Upon receipt of the package the problem will be evaluated as quickly as possible.
Wing Area: 174 in2 [11.2 dm2] Weight: 25– 28 oz [710 –795 g]Length: 30.5 in [775mm]
Wing Loading: 20.7– 23.2 oz/ft2 [63–71 g/dm2]
SPECIFICATIONS
INSTRUCTION MANUAL
Motor:ESC:
28-45-3600 Ammo50A for brushless motors
™
2
INTRODUCTIONCongratulations and thank you for purchasing the Rifl e 1M (1-meter). You probably know the “1M’s” little brother and predecessor, the Rifl e. The Rifl e has been successful beyond our expectations and we’ve incorporated everything we’ve learned from it into the 1M. Conveniently, the updates also make the 1M extraordinarily simple—its basic design and layout (not to mention complete instruction manual!) make assembly and installation straight forward without having to do any scratch-building or fi guring out on your own. Although the 1M is not made from exotic (and expensive) composites, its ultra-simplicity will get you into the air easily, quickly and economically. But don’t forget, it’s still wicked-fast too! Someday you may aspire to step up to the big leagues and buy one of those high-end, all-out racers you’ve heard about, but even then you’ll want to keep your 1M on-hand and fl ight-ready for whenever you’re craving some fast and easy fun!
For the latest technical updates or manual corrections to the Rifl e 1M visit the Great Planes web site at www.greatplanes.com. Open the “Airplanes” link, then select the Rifl e 1M ARF. If there is new technical information or changes to this model a “tech notice” box will appear in the upper left corner of the page.
ACADEMY OF MODEL AERONAUTICSIf you are not already a member of the AMA, please join! The AMA is the governing body of model aviation and membership provides liability insurance coverage, protects modelers’ rights and interests and is required to fl y at most R/C sites.
Academy of Model Aeronautics5151 East Memorial DriveMuncie, IN 47302-9252
Tele. (800) 435-9262Fax (765) 741-0057
Or via the Internet at: http://www.modelaircraft.org
IMPORTANT!!! Two of the most important things you can do to preserve the radio controlled aircraft hobby are to avoid fl ying near full-scale aircraft and avoid fl ying near or over groups of people.
SAFETY PRECAUTIONS
Protect Your Model, Yourself & Others…Follow These Important Safety Precautions
1. Your Rifl e 1M should not be considered a toy, but rather a sophisticated, working model that functions very much like a full-size airplane. Because of its performance capabilities, the 1M, if not assembled and operated correctly, could possibly cause injury to yourself or spectators and damage to property.
2. You must assemble the model according to the instructions. Do not alter or modify the model, as doing so may result in an unsafe or unfl yable model. In a few cases the instructions may differ slightly from the photos. In those instances the written instructions should be considered as correct.
3. You must use an R/C radio system that is in good condition, a correctly sized motor, and other components as specifi ed in this instruction manual. All components must be correctly installed so that the model operates correctly on the ground and in the air. You must check the operation of the model and all components before every fl ight.
4. While this kit has been fl ight tested to exceed normal use, if the plane will be used for extremely high stress fl ying, or if a motor larger than one in the recommended range is used, the modeler is responsible for taking steps to reinforce the high stress points and/or substituting hardware more suitable for the increased stress.
5. WARNING: The fuselage, wing and horizontal stabilizer included in this kit are made of fi berglass, the fi bers of which may cause eye, skin and respiratory tract irritation. Never blow into a part to remove fi berglass dust, as the dust will
blow back into your eyes. Always wear safety goggles, a particle mask and rubber gloves when grinding, drilling and sanding fi berglass parts. Vacuum the parts and the work area thoroughly after working with fi berglass parts.
We, as the kit manufacturer, provide you with a top quality, thoroughly-tested kit and instructions, but ultimately the quality and fl yability of your fi nished model depends on how you build it; therefore, we cannot in any way guarantee the performance of your completed model, and no representa-tions are expressed or implied as to the performance or safety of your completed model.
NOTE: Some technically-minded modelers who wish to check the wing, stab and motor thrust angles may do so by visiting the web site at www.greatplanes.com and clicking on “Technical Data.”
Remember: Take your time and follow the instructions to end up with a well-built model that is straight and true.
ADDITIONAL ITEMS REQUIRED
Power SystemTwo power setups are recommended for the Rifl e 1M; a speed setup and a sport setup. Simply, the speed setup will get you approximately 130mph and the sport setup will get you approximately 100mph. If you’re all about speed, then you’ve already made your decision! But for those who may be unsure, the beauty of the sport setup is that the 1M will still have that thrilling “zip,” but will be less powerful and lighter—making it natural to fl y and land slower and closer and perform conventional aerobatics such as loops, rolls and inverted circuits almost the same as a “regular” plane. Conveniently, the only difference between the two setups is the propeller and battery, so when you’re ready to step up all you’ll have to do is mount a new prop, slip in a different battery and recheck the C.G.! Following are the recommended power components for each:
SPEED setup SPORT setup
3S 2200mAh 30CLiPo (GPMP0861)
APC 4.5x4.1(APCQ4840)
2S 2200mAh 30CLiPo (FPWP6197)APC 5.25x6.25
(APCQ4096)28–45–3600 Ammo Brushless
Inrunner (GPMG5220)Castle Creations Ice Lite 50
(CSEM6900)
BATTERY
PROPELLER
MOTOR
ESC*
*Note: The Castle Creations Ice Lite 50 features in-fl ight data logging. To take advantage of Data Logging and view important information such as current, Watts, RPM, etc., the Castle Link USB Programming Kit is also required (CSEM9999).
See page 18 for discussion and more data about these two setups including Watts, current, fl ight time, propellers options, etc.
Radio Control SystemTo take full advantage of the dual aileron servos, a 5-channel programmable radio is required. It will let you operate the aileron servos separately as ailerons, and together as “spoilerons” to aid in landing. You could also use a regular, non-programmable 4-channel radio and link the aileron servos with a Y-connector, but spoilerons will not be available.
Three micro servos in the 20 oz-in [1.5 kg-cm] torque range are also required. Futaba digital, metal gear S3156 servos (FUTM0656) could be considered slightly overkill, at 28 oz-in [2.0 kg-cm] torque. But their durability has been proven in this type of plane and will give you peace of mind. Metal gears aren’t absolutely necessary, however. Futaba S3157 digital servos (FUTM0657) or S3117 servos (FUTM0417) are also suitable.
Z-Bend Pliers
In addition to the list of tools and building supplies listed below, we wanted to specifi cally note that Z-bend pliers (HCAR2000) will be required to make the aileron pushrods. A length of straight wire is included, but the wires must be cut to length and Z-bends made on both ends. Don’t skimp on this important tool which is a “must-have” for your hobby work bench anyway.
Tools and Building SuppliesOther than ordinary hobby tools, the following items were used to assemble the Rifl e 1M as illustrated in this manual:
(DUBQ3551)❍ Deans® Ultra Plug® Male connector (WSDM1302)❍ 30-Minute Epoxy (GPMR6043)❍ (2) 6" [150mm] servo extensions for aileron servos to
receiver (FUTM4506 for Futaba)❍ Spare propellers (See page 19 for more about
propellers)
OPTIONAL: M3 x 5 button-head motor mounting screws (to upgrade the M3 x 5 Phillips screws included with the Ammo motor) (HPIC3250). If button-head screws are used, a quality, 2.0mm Allen hex driver such as a Duratrax Ultimate Hex Driver (DTXR0289) is also recommended.
4
LiPo ChargerA balancing LiPo battery charger is required. Both the Triton EQ (GPMM3155) and Triton 2 EQ (GPMM3156) are perfect for the size of batteries used in the Rifl e 1M. At 50 watts AC the EQ can charge a 3S 2200mAh battery at nearly 2C taking a little less than 30 minutes. At 100 watts AC the 2 EQ can charge batteries even faster. Both chargers also require a banana plug-to-Deans charge lead (GPMM3418).
KIT INSPECTIONBefore starting to build, take an inventory of this kit to make sure it is complete, and inspect the parts to make sure they are of acceptable quality. If any parts are missing or are not of acceptable quality, or if you need assistance with assembly, contact Product Support. When reporting defective or missing parts, use the part names exactly as they are written in the Kit Contents list.
Great Planes Product Support3002 N Apollo Drive, Suite 1 Ph: (217) 398-8970, ext. 5Champaign, IL 61822 Fax: (217) 398-7721
ORDERING REPLACEMENT PARTSReplacement parts for the Great Planes Rifl e 1M are available using the order numbers in the Replacement Parts List that follows. The fastest, most economical service can be provided by your hobby dealer or mail-order company.
To locate a hobby dealer, visit the Great Planes web site at www.greatplanes.com. Choose “Where to Buy” at the
bottom of the menu on the left side of the page. Follow the instructions provided on the page to locate a U.S., Canadian or International dealer.
Parts may also be ordered directly from Hobby Services by calling (217) 398-0007, or via facsimile at (217) 398-7721, but full retail prices and shipping and handling charges will apply. Illinois and Nevada residents will also be charged sales tax. If ordering via fax, include a Visa or MasterCard number and expiration date for payment.
Mail parts orders Hobby Services and payments by 3002 N Apollo Drive, Suite 1 personal check to: Champaign IL 61822
Be certain to specify the order number exactly as listed in the Replacement Parts List. Payment by credit card or personal check only; no C.O.D.
If additional assistance is required for any reason contact Product Support by e-mail at [email protected], or by telephone at (217) 398-8970.
Order No. DescriptionGPMA3400GPMA3401GPMA3402GPMA3403GPMA3404GPMA3405
REPLACEMENT PARTS LIST
Wing Set Fuselage Set Horizontal Stabilizer Set Aileron Hatch CoversSpinner Decal Set
KIT CONTENTS
1.
2.
3.
4.
5.
6.
7.
8.
9.
10.
11.
Fuselage
Wing
Horizontal Stabilizer
Spinner Assembly
Balance Stand
Elevator Pushrod
Battery Spatula
Velcro
Motor Drill Guide
Control Horns
Screws
Kit Contents
1
116
2
4 89
10
7
3
5
5
ASSEMBLY INSTRUCTIONS
Test-Mount the Motor
ESC
Bulletconnectors
Battery
Motorwires
❏ 1. Determine how to orient the mounting holes in your motor so the wires will be positioned as preferred—usually it’s best to have the wires coming out the top positioning the ESC over the battery.
19mm dia.
16mm dia.
45°
Plywood motor mount template(for Ammo and other motors withstandard 16mm/19mm spacing)
Rotate 45° forNeu motors
❏ 2. If using the recommended Ammo motor (or any other motor with the same, standard “16mm/19mm” screw hole spacing), position the included plywood motor mount template on the motor mount in the fuselage to get the mounting holes oriented as described in the previous step.
NOTE: If contemplating switching to a different motor in the future, don’t be too concerned about the possibility of new motor mounting screw holes that may overlap or interfere with the old holes. Most of the mounting patterns are standard. We’ve mounted both Ammo motors and other motors to a couple of different Rifl es, and although four more holes were required, this didn’t present any problems.
❏ 3. Using the plywood template as a guide, drill #40 – #37 (.098" – .104" [2.5mm – 2.6mm]) pilot holes through the motor mount. Note: The motor mount is made from carbon fi ber which can be diffi cult to drill, so although the fuselage is held horizontally in the image, it will be easier to drill the holes if holding the fuselage vertically resting on its tail.
❏ 4. If using a motor that uses 2.5mm mounting screws skip this step. If using an Ammo motor (or any other motor that uses 3mm mounting screws), remove the template and enlarge the pilot holes with a #32 – #30 (.116" – .128") or 1/8" [3.2mm] drill.
6
Enlarge asnecessary
❏ 5. The front bearing on some motors protrudes slightly from the front of the motor. If this is the case for your motor, use a Dremel with a tile cutter bit and/or a small drum sander to enlarge the hole as necessary. Proceed slowly and with care to keep the hole centered and so as not to over enlarge the hole—this may require test-fi tting the motor as you proceed. CAUTION: Wear protective gloves, a long-sleeve shirt and breathing and eye protection whenever working with carbon fi ber.
❏ 6. Test-mount the motor with your motor mounting screws—if using the recommended Ammo motor you may use the M3 x 5 screws included with the motor, but some prefer button-head Allen screws instead (such as the screws shown in the photo—HPIC3250).
PROPELLER MOUNTINGThe collet shaft included with your Rifl e spinner is designed to work with the small O.D. propeller spacer ring that comes with all APC speed 400 propellers.
❏ A. To prep the prop, press the spacer all the way into the propeller hub. Then use a #11 blade to carefully trim any fl ashing from around the inside of the spacer.
❏ B. Firmly press the propeller onto the collet shaft.
❏ C. An 8mm wrench is a must for your tool box. A Traxxas 8mm fl at wrench is pictured here (TRAR5478).
7
13mm-14mm
❏ 7. Test-mount the propeller and spinner to the motor. It is likely that the motor shaft will have to be shortened to set the spinner close enough to the fuselage—it is desirable to have the shaft as long as possible to give the collet shaft as much material as possible to “grab” onto, yet still have the desired spacing between the fuselage and spinner. The proper spacing is such that the spinner is as close to the fuselage as possible without touching—a gap just wide enough to see light through. Typically, a maximum of 13mm—14mm and a minimum of about 10mm—11mm of motor shaft will work. In the case of the Ammo motor used here, approximately 2mm will have to be cut.
❏ 8. Remove the motor from the fuselage and cut the shaft—a Dremel with a reinforced cutoff wheel works best. Wear safety glasses and protect the motor from metal dust while cutting.
❏ 9. Use a metal fi le or sandpaper to deburr the end of the shaft. Remount the motor and test-fi t the spinner to see if the gap is right. Make adjustments if necessary.
Prepare the Motor and ESC
6-1/2" – 7"[165mm-175mm]
❏ 1. As shown in the illustration at step 1 on page 5, the ESC fi ts best inside the fuselage resting over the battery ahead of the wing. Usually, this requires cutting the three motor wires from the ESC just about as short as practically possible—the distance available between the front of the motor and the back of the ESC is about 6-1/2" to 7" [165mm - 175mm]. Determine the length of wires needed from your ESC (taking into account the length of the bullet connectors), and then cut the wires to length.
❏ 2. If using the recommended Ammo motor, solder the female bullets that came with the motor onto the motor wires on the ESC. You can make a handy soldering jig by drilling
8
holes in a wood block for anchoring spare male bullets to hold the female bullets while you solder. (You may also solder the motor wires directly to the ESC if this is your preference, but don’t forget to slide on the heat shrink tubing fi rst and check the motor direction.)
❏ 3. Slide pieces of heat-shrink tubing over the battery wires on the other end of the ESC. Then solder your battery connector to the wires—ElectriFly and ThunderPower batteries use Deans Ultra Plug connectors, so a Deans Ultra Plug male was used on the ESC in this manual.
❏ 4. Slip pieces of 3/16" [5mm] heat shrink tubing over the bullet connectors. Then use a heat gun to shrink the tubing. Also shrink the tubing over the wires on the battery connector.
❏ 5. If you haven’t yet done so, set up a program in your radio dedicated to this model. Be certain the fl ight trims and sub trims are zeroed. In most cases you’ll also have to reverse the direction of the throttle channel.
❏ 6. Temporarily connect the motor to the ESC and hook up the receiver and a battery so you can run the motor with the transmitter. Make sure the motor is turning in the correct direction. If not, disconnect the ESC from the motor and re connect it with the wires in a different order so the motor will be turning the correct direction.
❏ 7. IMPORTANT!: Slip three more pieces of 3/16" [5mm] shrink tubing over each bullet connection and shrink with a heat gun to make sure the connections will remain secure.
❏ 8. Before mounting the motor, apply the rougher, “hook” side of the included Velcro strip to the bottom of the fuselage in the approximate location shown. Apply just a couple of drops of thin CA around the edges of the Velcro to securely hold it in place.
❏ 9. Mount the motor with the mounting screws lightly “wetted” with non-permanent threadlocker, but do not mount the prop and spinner until later after the radio has been set up.
Hook Up the Elevator
❏ 1. Use steel wool or fi ne sandpaper to polish the elevator pushrod and remove any contaminants or oxidation. Remove any burrs on the end of the wire with a metal fi le or sandpaper.
❏ 2. Test-fi t the pushrod into the elevator horn to make sure it fi ts—it should fi t with no free play. If necessary, enlarge the hole with a #56 (.046") [1.18mm] drill.
9
❏ 3. Use medium-grit sandpaper to roughen the elevator horn and the bottom of the elevator around both sides of the slot for the horn (if preferred, the rest of the elevator can be protected with masking tape).
❏ 4. Using care not to get any glue in the pushrod hole, use 30-minute epoxy to securely glue the horn to the elevator. Note: If preferred, CA may also be used, but it must be foam-safe CA.
❏ 5. Temporarily connect your elevator servo and ESC to the receiver with a battery and turn on the transmitter so you can power the servo. Again, make certain there are no mixes setup in your transmitter and that all the trims and sub trims are zeroed.
6mm-8mm 90°
❏ 6. Use a servo arm that has holes 6mm – 8mm out. Position the arm on the servo so it will be 90°, or as close as 90° as possible. If necessary, dial in some elevator sub trim to get the arm 90°. Cut off the unused arms.
❏ 7. Install the screw that secures the servo arm—if using a servo with metal gears use threadlocker on the threads fi rst.
10
❏ 8. Connect the elevator pushrod to the elevator servo and slide the pushrod into the guide tube placing the servo in the fuselage. Position the servo so the arm will be approximately 1-1/2" [40mm] from the end of the guide tube as shown.
❏ 9. Once you have your servo where you want it, cut the other end of the pushrod protruding from the vertical stabilizer to a length of 1" [25mm].
❏ 10. Remove the pushrod/servo assembly from the fuselage and de burr the end again. Add a thin fi lm of oil to the pushrod, and then reinstall in the fuselage.
❏ 11. With the elevator servo laying fl at on the bottom of the fuselage, make a sharp, 90° bend to the left 1/4" [6mm] from the end.
❏ 12. Temporarily connect the elevator horn to the pushrod and mount the horizontal stabilizer to the top of the fuselage with the two included M3 x 10 fl at-head Phillips screws. Move the elevator up and down with your fi ngers. You’ll probably notice that the elevator is easier to move at the ends of its throw than it is to move near center. This means the pushrod needs one more slight bend backward about 1/4" [6mm] ahead of the 90° bend.
11
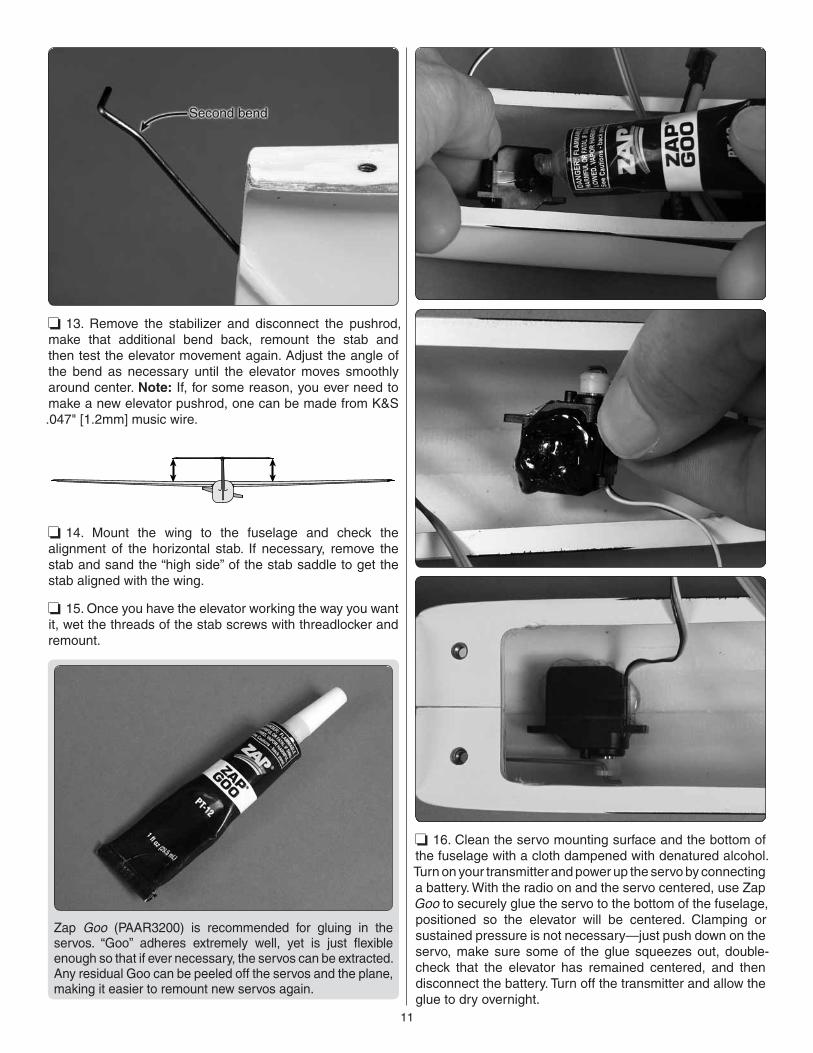
❏ 13. Remove the stabilizer and disconnect the pushrod, make that additional bend back, remount the stab and then test the elevator movement again. Adjust the angle of the bend as necessary until the elevator moves smoothly around center. Note: If, for some reason, you ever need to make a new elevator pushrod, one can be made from K&S .047" [1.2mm] music wire.
❏ 14. Mount the wing to the fuselage and check the alignment of the horizontal stab. If necessary, remove the stab and sand the “high side” of the stab saddle to get the stab aligned with the wing.
❏ 15. Once you have the elevator working the way you want it, wet the threads of the stab screws with threadlocker and remount.
Zap Goo (PAAR3200) is recommended for gluing in the servos. “Goo” adheres extremely well, yet is just fl exible enough so that if ever necessary, the servos can be extracted. Any residual Goo can be peeled off the servos and the plane, making it easier to remount new servos again.
❏ 16. Clean the servo mounting surface and the bottom of the fuselage with a cloth dampened with denatured alcohol. Turn on your transmitter and power up the servo by connecting a battery. With the radio on and the servo centered, use Zap Goo to securely glue the servo to the bottom of the fuselage, positioned so the elevator will be centered. Clamping or sustained pressure is not necessary—just push down on the servo, make sure some of the glue squeezes out, double-check that the elevator has remained centered, and then disconnect the battery. Turn off the transmitter and allow the glue to dry overnight.
12
❏ 17. Determine where you are going to mount your receiver and test-fi t it into position—there may be room ahead of the elevator servo, but the receiver will be out of the way if you can mount it through the cooling hole behind the wing. Apply strips of 1/8" [3.2mm] double-sided adhesive foam mounting tape to the bottom of your receiver. Then mount the receiver in the fuselage.
❏ 18. Connect the elevator servo, ESC and two 3" – 6" [75mm – 300mm] servo extensions for the aileron servos to the receiver. Tip: If your ESC has data logging (as does the recommended Ice Lite 50), connect the ESC to the receiver via. another 3" [75mm] servo extension. This way, when downloading data, all you will have to do is disconnect the ESC from the extension (rather than disconnecting the ESC from the receiver) simplifying the procedure. Also, label the two aileron extensions coming from the receiver with the appropriate channel numbers for easier identifi cation when connecting the ailerons later.
Make the Aileron PushrodsThere may be other ways to make Z-bends on the ends of wires without using Z-bend pliers, but Z-bend pliers make the shortest, sharpest, most accurate bends, so Z-bend pliers are strongly recommended.
❏ 1. Cut one 3" [75mm] wire from the included 1.2mm x 300mm pushrod wire. Use a fi ne-point felt-tip pen to accurately mark two lines on the wire 1-7/8" [48mm] apart.
❏ 2. Use your Z-bend pliers to make the fi rst Z-bend at one of the marks.
13
❏ 3. Load the other end of the wire into the Z-bend pliers as shown. View the wire from the end making sure the fi rst Z-bend is laying horizontally to the next Z-bend (as shown in the top photo). Squeeze the pliers to make the second bend.
❏ 4. You should now have a pushrod wire with Z-bends 1-7/8" [48mm] apart. Cut the ends of the wires approximately 1/8" [3mm] from the ends of the Z-bends and use a metal fi le or a reinforced cutoff wheel to square and de burr the ends.
❏ 5. Make another aileron pushrod the same way.
Hook Up the Ailerons
❏ 1. Connect the aileron servos to the extensions coming out of the fuselage from the receiver. Connect a battery and turn on the transmitter so you can operate the servos. Program a mix so the servos respond opposite each other in the correct direction to aileron control stick inputs.
5–10° 5–10°
Rightaileron servo
Leftaileron servo
❏ 2. Same as was done for the elevator servo, connect servo arms that will be angled slightly forward at about a 5° to 10° angle. Cut off the unused arms. If necessary, use the sub trims to get both arms the same angle.
❏ 3. Secure the servo arms to the servos with the screws—use threadlocker if the output shaft is metal.
❏ 4. Use medium-grit sandpaper to sand any residual foam from the underside of the top wing skin to which the aileron servos will be glued. Tip: This is easily done with adhesive-back sandpaper stuck to your fi nger.
14
❏ 5. Disconnect the servos and guide the leads through the channels in the wing out the hole in the middle. Lay the servos down inside the wing and position the hatch covers just to see how everything fi ts.
❏ 6. Same as was done for the elevator and elevator horn, scuff the sides of both fi berglass aileron horns around the base and the bottom of the ailerons around the slots for the horns so glue will adhere.
❏ 7. Use tape to hold the root ends of the ailerons centered and aligned with the wing. Connect one of the aileron pushrods you made to a hole 6mm – 8mm out in the left aileron servo arm and into the outer hole in one of the aileron horns.
❏ 8. Slit the edge of the left hatch cover opening so it can be fi t over the pushrod and placed over the hatch. Make sure
the horn and servo align and that the arm and pushrod are centered in the opening. If necessary, adjust the bends in the ends of the pushrod to achieve this alignment.
❏ 9. Use 30-minute epoxy to securely glue the aileron horn into the aileron.
❏ 10. Repeat the previous three steps for the right aileron servo.
❏ 11. The same way you glued down the elevator servo, clean the aileron servos and the wing skin in the hatches with a cloth dampened with denatured alcohol. With the radio on and the ailerons centered, glue the servos into position with Zap Goo. Temporarily place the hatch covers over the servos to make sure the arms and pushrods are centered in the openings. Make any adjustments necessary, remove the hatches and make sure the servos are pressed down and securely glued to the wing skin. Allow the glue to dry overnight.
❏ 12. Use clear tape to hold the aileron hatch covers to the wing.
15
PREPARE THE MODEL TO FLY
Do not overlook the following two important procedures. The C.G. and control throws have been determined by thorough testing and record keeping. Later, you may wish to change the C.G. and throws to suit your taste, but the C.G. and throws specifi ed in the manual are a safe starting point and will give you the greatest chances for success.
Check the C.G.
❏ 1. Sharpen one end of the dowels for the included balance stand. Assemble and glue together the stand. (The completed stand is pictured on page 16.)
❏ 2. Mark the leading edge of the bottom of the wing in alignment with the tips of the dowels.
1-3/16" [30mm]
Recommended starting balance point
❏ 3. Lay 2" [50mm] strips of vinyl tape (or similar) on the bottom of the wing aligned with the marks. Use a fi ne-point felt-tip pen to draw lines across the strips 7/8", 1-3/16" and 1-1/2" [22mm, 30mm and 38mm] back from the leading edge.
❏ 4. Attach a strip of the softer, “loop” side of the included Velcro strip to your battery—note that only a narrow strip is required. This is enough to securely hold the battery in position during fl ight and will make it easier to remove the battery.
❏ 5. Temporarily mount the prop and spinner and the wing. At this time all components must be installed in the model.
16
❏ 6. Place the Rifl e on the C.G. stand supported by the dowels on the tape strips on the bottom of the wing. If necessary, remove the wing to adjust the location of the battery so the Rifl e balances at the middle marks 1-3/16" [30mm] from the leading edge of the wing. NOTE: The Rifl e fl ies well balanced anywhere between the forward and aft balance marks, but for initial fl ights we advise beginning at the recommended point.
❏ 7. Once you fi nd the location of the battery that allows the Rifl e to balance, remove the wing and mark the battery location so it will be repeatable out at the fl ying fi eld.
❏ 8. Bevel the front of the included plastic “battery spatula” and slide it under the battery for easier removal.
Set the Control Throws
❏ 1. Remove the propeller and spinner.
❏ 2. Connect the battery to the ESC and turn on the transmitter. If necessary, adjust the sub-trims in your transmitter so the ailerons and elevator are centered.
❏ 3. Measure the throws and use the programming in your transmitter to make adjustments as necessary. NOTE: The throws are measured at the widest part of the elevator and ailerons.
17
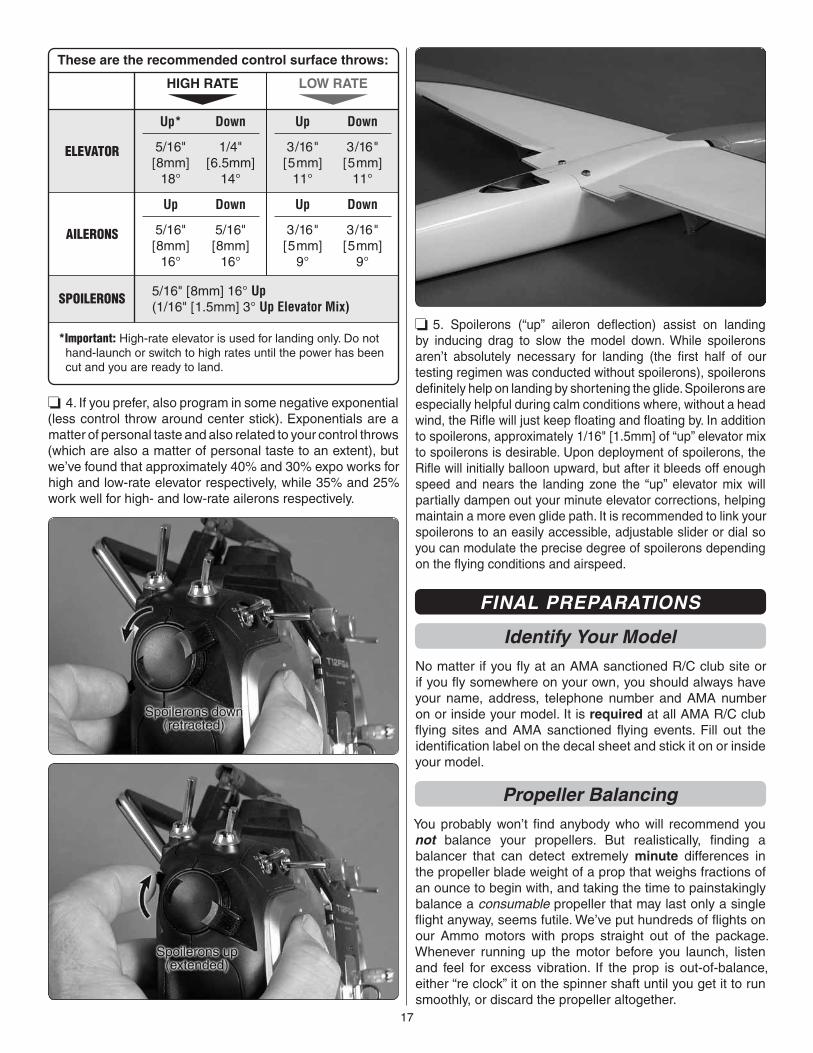
These are the recommended control surface throws:
ELEVATOR
LOW RATE
AILERONS
SPOILERONS
*Important: High-rate elevator is used for landing only. Do nothand-launch or switch to high rates until the power has beencut and you are ready to land.
HIGH RATE
3/16"[5mm]
11°
Up
3/16"[5mm]
9°
Up
5/16"[8mm]
18°
Up*
5/16"[8mm]
16°
Up
5/16" [8mm] 16° Up(1/16" [1.5mm] 3° Up Elevator Mix)
3/16"[5mm]
11°
Down
3/16"[5mm]
9°
Down
1/4"[6.5mm]
14°
Down
5/16"[8mm]
16°
Down
❏ 4. If you prefer, also program in some negative exponential (less control throw around center stick). Exponentials are a matter of personal taste and also related to your control throws (which are also a matter of personal taste to an extent), but we’ve found that approximately 40% and 30% expo works for high and low-rate elevator respectively, while 35% and 25% work well for high- and low-rate ailerons respectively.
❏ 5. Spoilerons (“up” aileron defl ection) assist on landing by inducing drag to slow the model down. While spoilerons aren’t absolutely necessary for landing (the fi rst half of our testing regimen was conducted without spoilerons), spoilerons defi nitely help on landing by shortening the glide. Spoilerons are especially helpful during calm conditions where, without a head wind, the Rifl e will just keep fl oating and fl oating by. In addition to spoilerons, approximately 1/16" [1.5mm] of “up” elevator mix to spoilerons is desirable. Upon deployment of spoilerons, the Rifl e will initially balloon upward, but after it bleeds off enough speed and nears the landing zone the “up” elevator mix will partially dampen out your minute elevator corrections, helping maintain a more even glide path. It is recommended to link your spoilerons to an easily accessible, adjustable slider or dial so you can modulate the precise degree of spoilerons depending on the fl ying conditions and airspeed.
FINAL PREPARATIONS
Identify Your ModelNo matter if you fl y at an AMA sanctioned R/C club site or if you fl y somewhere on your own, you should always have your name, address, telephone number and AMA number on or inside your model. It is required at all AMA R/C club fl ying sites and AMA sanctioned fl ying events. Fill out the identifi cation label on the decal sheet and stick it on or inside your model.
Propeller BalancingYou probably won’t fi nd anybody who will recommend you not balance your propellers. But realistically, fi nding a balancer that can detect extremely minute differences in the propeller blade weight of a prop that weighs fractions of an ounce to begin with, and taking the time to painstakingly balance a consumable propeller that may last only a single fl ight anyway, seems futile. We’ve put hundreds of fl ights on our Ammo motors with props straight out of the package. Whenever running up the motor before you launch, listen and feel for excess vibration. If the prop is out-of-balance, either “re clock” it on the spinner shaft until you get it to run smoothly, or discard the propeller altogether.
18
Prefl ight Ground Check
❏ 1. Perform a thorough prefl ight exam, double-checking that everything on the model is safe, sound and secure. Pay special attention to the servos and linkages and apply moderate pressure to all the control surfaces, ensuring that the horns, servos and control surfaces are secure.
❏ 2. Review the check list to make sure you haven’t left anything out:
CHECK LIST❏ ESC bullets secured to motor bullets with heat-shrink
tubing
❏ Motor securely mounted, threadlocker on screws
❏ Propeller and spinner securely mounted
❏ Motor/prop/spinner turn freely
❏ C.G. checked, battery location marked on wing saddle
❏ Throws checked, controls respond in the correct direction
❏ Servos leads/servo extensions securely connected to receiver
❏ Receiver antennas oriented/positioned as specifi ed by the radio manufacturer
❏ Horizontal stabilizer screws secure with threadlocker
Set a Flight TimerFirst on your agenda before fl ying should be setting a fl ight timer based on a conservative estimate of the length of time you can fl y. This is both so the motor does not quit unexpectedly (causing an unplanned landing) and/or so you do not over discharge your battery. The Rifl e isn’t your typical sport model that drains the battery slowly. In order to achieve maximum speed the motor and batteries are pushed near their limit making it even more important to know what the limits are and therefore when to stop. The recommended 28-45-3600 Ammo powered by either the sport setup or the speed setup can withstand continuous, all-out, full-throttle fl ying for the practical duration of the battery. As shown in the table at the bottom of the page, the sport setup will draw about 34A at full-throttle in-fl ight and the speed setup will draw about 45A at full-throttle in-fl ight. To convert this to fl ight time, divide the capacity you wish to drain from your battery (the size of your “fuel tank”) by the current and convert to minutes:
You should strive to consume no more than 80% of your battery during a fl ight. If using the recommended 2200mAh battery, your capacity available is then 1760mAh (2200mAh x .8 = 1760mAh). Convert the capacity to Amp hours by dividing by 1000; 1760mAh/1000 = 1.76Ah. For the speed setup, divide 1.76Ah by the average, in-fl ight current (45A) to arrive at a fl ight time of .039 hours which equals 2.35 minutes (two minutes, 21 seconds). If using full-throttle exclusively, this is the recommended run time for the 3S speed setup—2:20. If you won’t be fl ying full-throttle exclusively, you may lengthen your fl ight time accordingly.
Though the average, maximum current for the 2S sport setup is 34A, it is likely that you won’t be fl ying full-throttle the whole time as it is intended more for beginners or sport fl ying. Practically, an average fl ight time for the sport setup is more like 4-1/2 minutes or longer.
Set your timer accordingly. If possible, link your timer to the throttle stick so you won’t be counting the time that you are power off. Tip: If your transmitter has two timers, set one timer a minute shorter than the fi nal timer to act as a “wake-up call” alerting you that you have one minute left.
SPEED setup SPORT setup
BATTERY
PROPELLER
MOTOR
MAX. CURRENT
MAX. WATTS
MAX. RPM
28-45-3600 Ammo (GPMG5220)
3S 2200mAh 30C 2S 2200mAh 30C
APC 4.5 x 4.1 APC 5.25 x 6.25
STATIC IN-FLIGHT STATIC IN-FLIGHT
48A 42A - 45A 45A 34A
520W 475W 300W 230W
34,000rpm 34,400rpm 21,000rpm 21,650rpm
19
Spare PropellersAs specifi ed, the APC 5.25 x 6.25 speed 400 propeller is recommended for the 2S sport setup. However, there are a few different propeller options for the speed setup. The 4.5 x 4.1 is the fi rst choice, but a 4.7 x 4.25 pulls only slightly more current and is therefore a suitable option.
In any case, when you get to fl ying your Rifl e often you’ll want to stock your fl ight box with plenty of spare propellers. Breaking propellers is one of those funny things where one day you’ll get fi ve, six, seven or more landings without breaking a prop. Then, you’ll get that one perfect landing and the prop will break anyway.
Select a Proper Flying SiteIf you’re already experienced with this type of small, extremely fast airplane, you already know your preferred fl ying site and fl ying conditions, or are experienced enough so that you can fl y anywhere any time! But if this is your fi rst outing with your Rifl e, think about the optimum time and place to fl y. Clear, blue skies with a moderate breeze and the sun at your back are the best. A 5mph – 10mph breeze will not only assist with your fi rst hand-launch, it will also assist with your fi rst landing. Finally, you’ll also want a site free from obstacles and pedestrians—the fewer distractions the better! If you’re a little apprehensive, maybe you could sneak-in the maiden at your local R/C club site early in the morning before anybody else arrives.
For obvious reasons, it would also be prudent to have a spotter keep an eye on your Rifl e with you. Later, after you’ve become accustomed to fl ying your Rifl e and have your skills and confi dence where you want, you’ll be able to fl y in any and all reasonable conditions.
While fl ying with your peers keep in mind that the Rifl e isn’t your “regular” type of plane. It’s understandable that the speed and sound can be intimidating and/or distracting to other pilots who are fl ying—some don’t seem to mind, but others get nervous or agitated, so always try to be a good sport and respect your fellow club members’ air space. Fortunately, the Rifl e is quick to prep and fl ies for such a short time that it’s easy to “sneak in” a fl ight between the others whenever there’s a lull in the action.
FLYING
Motor Safety Precautions
Failure to follow these safety precautions may result in severe injury to yourself and others.
Wear safety glasses whenever running motors.
Keep your face and body as well as all spectators away from the plane of rotation of the turning propeller.
Keep loose clothing and objects such as pencils or screwdrivers that may fall out of shirt or jacket pockets away from the prop.
One fi nal note: Do not fl y unless your senses and decision-making abilities are sharp. You’ll need clear vision, quick reaction time, and full command of all the basics — having the correct model programmed into your radio, remembering to do a fi nal control check before launching, and knowing not to fl y if the conditions exceed your skill level. Always make sure you’re well-rested and, if the weather is hot, stay hydrated.
Hand LaunchExperienced pilots already know what to do—make a fi nal control check, point the Rifl e into the wind, nail the throttle and throw it hard! But less-experienced pilots should read all of the fl ying instructions thoroughly.
NOTE: Flying on high-rate or low-rate aileron is up to the pilot’s preference, but the Rifl e should be launched and fl own only on low-rate elevator. High-rate elevator is intended for landing only.
Experienced pilots or new pilots with a few fl ights under their belt will be able to launch the Rifl e on their own, but it may be best for inexperienced pilots to get an assistant to launch it for them. This way, your fi ngers will be at the controls ready to make the corrective inputs right away. Try to fi nd an experienced R/C pilot to do the launch. With all due respect, please don’t solicit your child or signifi cant other. Those not experienced in R/C usually underestimate the velocity with which the plane must be thrown and don’t understand the importance of keeping the wings level and launching at the correct angle.
Once you’ve found your assistant, pick weather conditions that are favorable. The most critical part of the fl ight will be the launch. Once your Rifl e is up-and-away it’ll be safely out of the grasp of the earth. Launching for experienced pilots is second-nature, but there is plenty opportunity for beginners to botch the fi rst launch if conditions are not right. In addition to fi nding a competent launcher, your chances for success will be increased ten-fold if you can throw it directly into a breeze. Launching in cross winds or on calm days is fi ne for experts, but if you can make that toss into a nice breeze—say a good fi ve or ten mph—your fl ight will be just about guaranteed!
20
12'[3.5m]
When ready, hold the fuselage under the wing right about at the C.G. Have your assistant “cock” the Rifl e overhead ready to throw it in launch position. Envision trying to throw the Rifl e over a 12' [3.5m] barrier about 12' [3.5m] away.
Double-check that the ailerons, elevator and spoilerons are responding to your control inputs correctly, then advance the throttle to full and throw the Rifl e immediately. Throw it hard, at about a 20° to 30° angle with the wing level.
The tendency may be for motor torque to cause the Rifl e to roll left, but with a good launch into the wind you may not notice any torque at all and the Rifl e will aggressively climb skyward.
Hint: Sometimes, during the thrill of the launch it can be easy to forget good mechanics (such as keeping the wings level or throwing the plane hard enough). But one trick is to actually look at the plane, not where you are throwing it. If you watch what the plane is doing right from the start you can remember to keep the wing level and to throw it at the correct angle. However, actually looking at an object you are throwing is counter-intuitive, so this usually takes a little practice.
Once your Rifl e is up-and-away the fi rst thing will be simply to fl y it. Remember to throttle back and fl y a circuit before reaching for the trims.
FlyingOnce your Rifl e is airborne the fi rst order of business will be to get it trimmed for straight-and-level fl ight. You can nudge the trims yourself, or have your assistant work the trims for you while you focus on fl ying the plane.
One of the initial challenges of fl ying the Rifl e is keeping it within visual sight. This should be easy to do with the 2S sport setup because it’s lighter and not as fast to begin with, making it more natural to fl y slowly. With either setup, just remember to throttle back to slow things down. Give yourself time to think and react.
The second order of business once airborne will be to simulate a few landings and learn how slowly the Rifl e will glide and test its stall reaction. Don’t wait until the end of the fl ight to do this; otherwise, you might run out of battery. Take your Rifl e up to a high altitude, fl y it into the wind, cut the throttle and fl y it around. Add more and more up elevator until it either gets too low or actually stalls. Release the elevator, allow it to build up a little speed, and then gently add throttle to climb and do it again. Do this a few times also practicing with spoilerons and low and high rate elevator. This will show you the glide envelope and give you a more accurate idea of what will happen when it’s actually time to land.
21
Landing
Throttle down, switch to high rates, glide around for about half a circuit,then extend your spoilerons before entering the landing approach.
1. Cut throttle
2. Glide
3. Get into thelanding pattern
The perfect landing approach is a large, descending 180° turn.
The procedure is simple and quick; when you hear your timer, cut the power, switch to high rates, glide around for about half-a-lap, extend the spoilerons, glide around for another half-a-lap, then bring it around and land.
But the tendency for beginners with the Rifl e is to land too long. If this happens, simply throttle up gently, go around and try again. You either entered the landing pattern too early (before bleeding off enough speed), or your approach was too close or too high. The more speed you bleed off (or the more head wind there is) the nearer your approach can be and the easier it will be to track the Rifl e all the way in.
2. Continue increasing “up” elevator holding, holding, holding the Rifle off theground until it just won’t stay airborne anymore and finally touches down.
1. Gradually increase “up” elevator floating the Rifle about a foot or so above the ground.
When the Rifl e is a foot or so off the ground just keep holding…holding…holding elevator, keeping it off the ground as long as possible and causing it to touch down at the slowest possible speed. It takes repetition and experience, but when you get better at judging precisely how slowly your Rifl e can glide you’ll be able to make your approaches shorter—you may even end up landing short one day!
CAUTION: Whenever adding power from a glide, apply throttle slowly—whenever the wing is fl ying slowly (during a glide) it will not have the authority to overcome sudden motor torque caused by jamming the throttle stick quickly.
22
After you land, always use a LiPo battery checker (GPMM3205) to check the individual cell voltages of your battery. The “resting,” “open” voltage of each cell when the batteries “recover” a few minutes after your fl ight should be no less than 3.7V per cell (which also equates to 20% capacity remaining). Adjust your timer accordingly so as not to over discharge your batteries.
Also note the capacity that goes back into your battery after a charge. The battery should take no more than 80% of its capacity to recharge (indicating that no more than 80% was used during the fl ight). Again, adjust your fl ight time and set your timer accordingly.
Lateral Balance
To perform a “pylon” turn,bank the wing verticallyand pull full, low-rate elevator.
Eventually, when you begin fl ying more frequent, high-speed “pylon-style” turns, you’ll want to make sure the Rifl e is laterally balanced and turns correctly. When performing a full-throttle pylon turn, roll the wing vertically, then pull full (low-rate) elevator. Notice whether the plane rolls in either direction with the application of only elevator. If the high wing rolls out of the turn it will probably also yaw upward resulting in an increase in altitude. In this case the high wing is heavy and ballast should be added to the low wing. If the plane does the opposite—the high wing rolls into the turn and the fuselage yaws downward—the low wing is heavy and weight needs to be added to the high wing.
Ballast such as shot or strips can be added to the wing simply by using a Dremel tool or even a hobby knife to carefully cut a small section from the bottom fi berglass wing skin at the tip, then removing the foam and installing the weight with epoxy.
23
Final Thoughts
1. Pull toverticalup line
2. Halfroll
3. Graceful pullwith large,descendingarc back tohorizontalflight
Another maneuver to have in your repertoire is the “humpty bump.” The humpty not only makes it easier to align your Rifl e over the runway and low (for thrilling speed passes when you want to show off to any spectators), it can also be a safer maneuver as the plane is never on a trajectory inward. Like all maneuvers with the Rifl e, the humpty happens fast—you can delay a few seconds on the up line after the initial pull to vertical, but after that you have to get in the half roll and pull back to the down line quickly. Otherwise, if you become complacent the Rifl e may climb out of sight! And other than the instant when the Rifl e is inverted at the top of the arc, you always have a good look at it from the top or bottom improving your ability to track it.
The “sweet spot” for a speed setup is a fl ying weight of about 26 – 28 oz. turning a 4.5 x 4.1 propeller around 35,000rpm (in the neighborhood of 600 watts “in” given typical motor effi ciency). If you adhere to that you’re pretty much looking at 3S setups with motors in the 120g – 140g range, 40mm – 50mm in length. This is pretty much what you’ll get with the recommended 3S Ammo speed setup. We understand that the tendency for this type of plane is to “stuff” in as much power as possible (and we’ve already done that ourselves!), but in order to get all this power you’ll need a bigger motor, ESC and battery. Then, the Rifl e becomes heavier, making it less practical either by complicating launches and/or shortening the fl ight time considerably. Props smaller than 4.5 x 4.1 simply don’t provide enough thrust to overcome the drag of the airframe resulting in little or no increase in speed no matter what RPM you are turning, so should you decide to experiment, keep the minimum prop size to 4.5 x 4.1.
Practically, the amount of power you can jam into the Rifl e is limited by the size of the battery that will fi t and a reasonable weight and fl ying time—you can stuff in only so much motor and battery until the Rifl e is either too heavy and/or the fl ying time is ridiculously short. Sure, you can come up with a motor, propeller and battery that will make 1500 watts, but then it will be too heavy (severely compromising the launch) or will fl y for less than a minute. Basically, just about anything that can be powered by 2200mAh 3S battery and fl y for around two minutes at full throttle is practical.