14
Instruction to Work with M3 Level2 Data with LOLA DEM in ENVI

Instruction to Work with M3 Level2 Data with LOLA DEM in
ENVI

Part 1. Data downloading from ODEhttps://ode.rsl.wustl.edu/moon/indexProductSearch.aspx
• Download the Level2 M3 REFIMG data from ODE, e.g., m3g20090609t095022_v01_rfl.img, please download the ENVI header *_rfl.hdr and label file *_L2.LBL together with the PDS *_rfl.img data file.
2Fig. 1 Product detail page of the search result ‘m3g20090609t095022_v01_rfl.img’
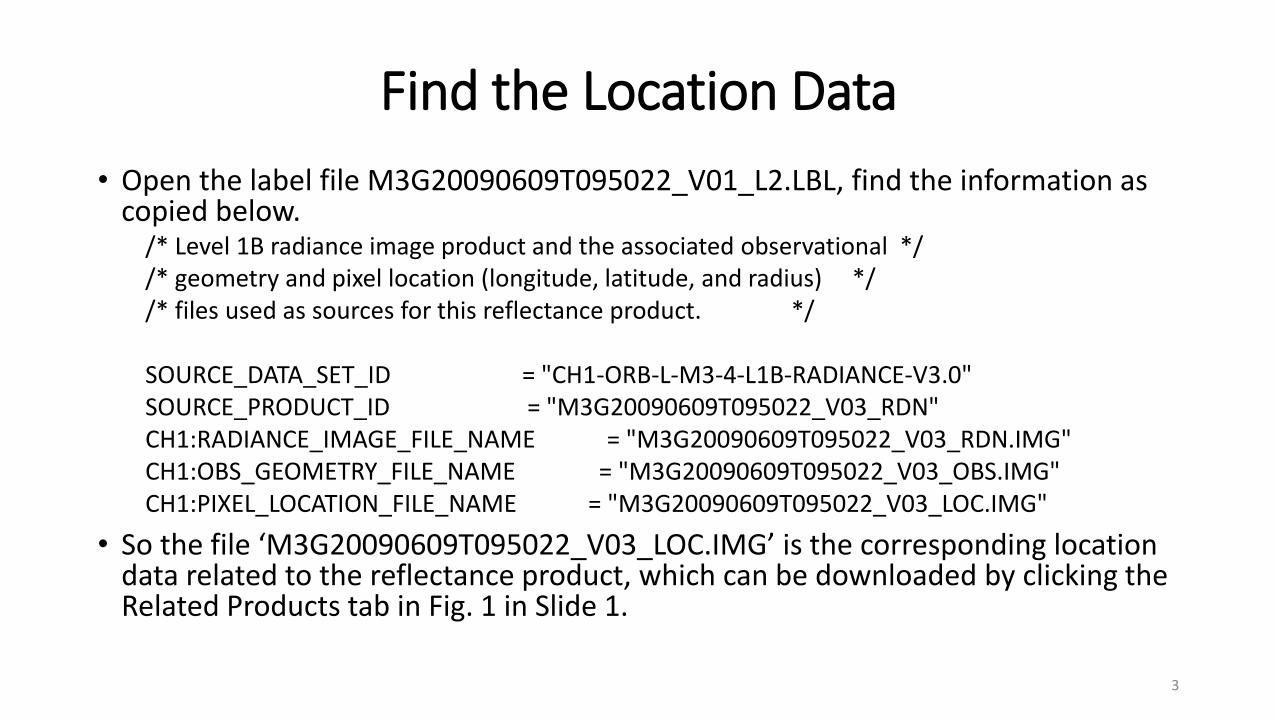
Find the Location Data
• Open the label file M3G20090609T095022_V01_L2.LBL, find the information as copied below.
/* Level 1B radiance image product and the associated observational */ /* geometry and pixel location (longitude, latitude, and radius) *//* files used as sources for this reflectance product. */
SOURCE_DATA_SET_ID = "CH1-ORB-L-M3-4-L1B-RADIANCE-V3.0"SOURCE_PRODUCT_ID = "M3G20090609T095022_V03_RDN"CH1:RADIANCE_IMAGE_FILE_NAME = "M3G20090609T095022_V03_RDN.IMG"CH1:OBS_GEOMETRY_FILE_NAME = "M3G20090609T095022_V03_OBS.IMG"CH1:PIXEL_LOCATION_FILE_NAME = "M3G20090609T095022_V03_LOC.IMG"
• So the file ‘M3G20090609T095022_V03_LOC.IMG’ is the corresponding location data related to the reflectance product, which can be downloaded by clicking the Related Products tab in Fig. 1 in Slide 1.
3
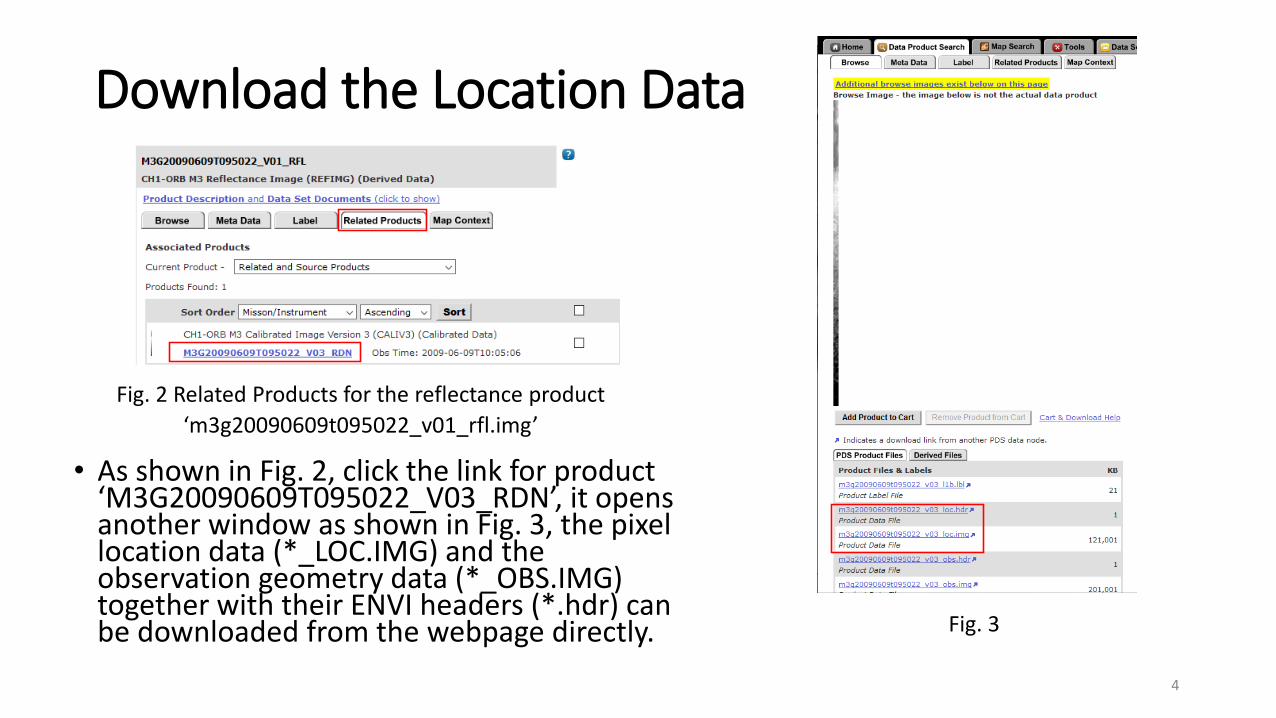
Download the Location Data
• As shown in Fig. 2, click the link for product ‘M3G20090609T095022_V03_RDN’, it opens another window as shown in Fig. 3, the pixel location data (*_LOC.IMG) and the observation geometry data (*_OBS.IMG) together with their ENVI headers (*.hdr) can be downloaded from the webpage directly.
Fig. 2 Related Products for the reflectance product
‘m3g20090609t095022_v01_rfl.img’
Fig. 3
4

Part 2. Georeference from IGM in ENVI (using ENVI 5.4 as an example)
• Start ENVI 5.4, go to File -> Data Manager
5
• From Data Manager, click the yellow folder to open the reflectance product ‘m3g20090609t095022_v01_rfl.img’ and the location file ‘M3G20090609T095022_V03_LOC.IMG’Fig. 4 Data manager window
Fig. 5

Georeference from IGM – Con’t• In Toolbox, go to Geometric Correction, double click Georeference from IGM (Fig.
6). In the pop-up ‘Input Data File’ window, select the reflectance product as the select input file as shown in fig. 7. Click OK.
6
Fig. 6
Fig. 7

Georeference from IGM – Con’t• In the next pop-up ‘Input X Geometry Band’ window, select Longitude band of
the location product ‘M3G20090609T095022_V03_LOC.IMG’ as shown in Fig. 8. Click OK. And in the pop-up ‘Input Y Geometry Band’ window, select Latitude band of the same location product as shown in Fig. 9. Click OK again.
7Fig. 8 Fig. 9
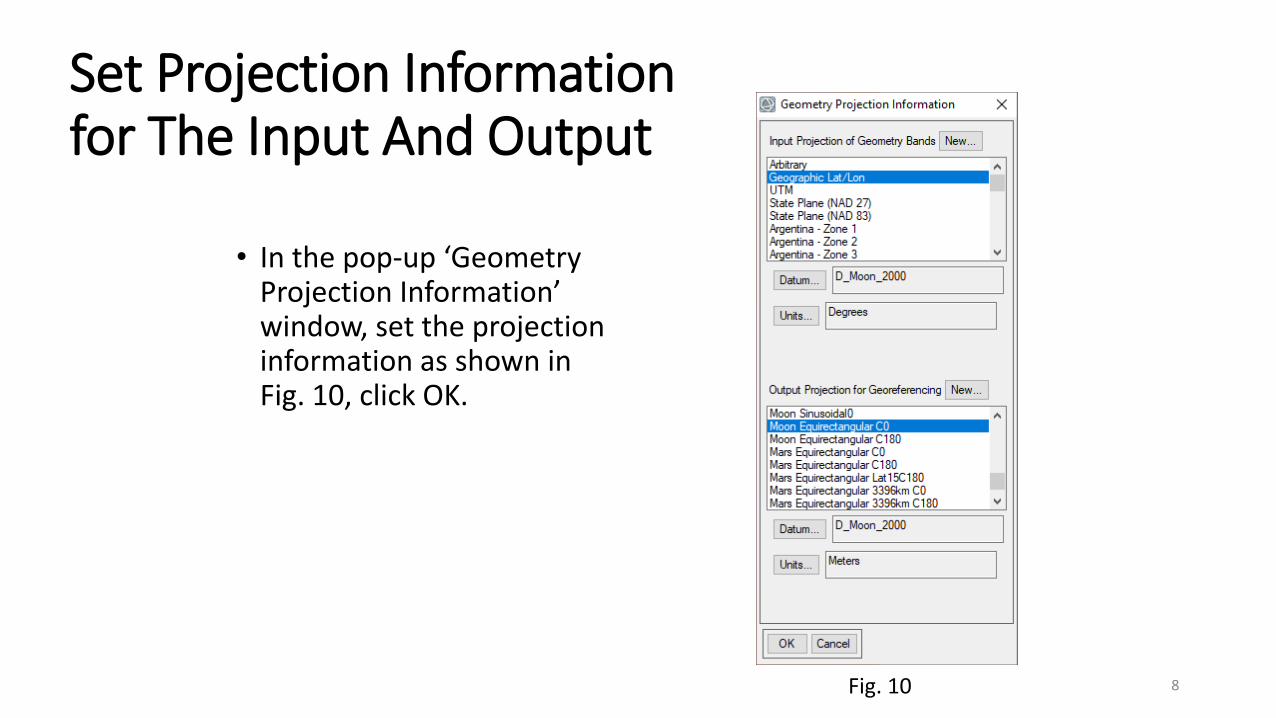
Set Projection Information for The Input And Output
• In the pop-up ‘Geometry Projection Information’ window, set the projection information as shown in Fig. 10, click OK.
8Fig. 10

• In the pop-up ‘Build Geometry Lookup File Parameters’ window, use the default setting for the pixel size, set ouputrotation as 0 and set the outputfile name as shown in Fig. 11, click OK.
• ENVI will start the process of Georeference from IGM. It might take a while to get the output result ‘m3g20090609t095022_v01_rfl_prj.dat’
9
Fig. 11

Part 3. Check the Results of Georeference from IGM
• Use Gdal commands below to translate the LOLA DEM from PDS IMG format to Geotif, overlay them with the ‘m3g20090609t095022_v01_rfl_prj.dat’ in ENVI (Fig. 12) or ArcGIS (Figures 13, 14), you can compare features from both data products. (Note: the reason to use Gdal to translate the PDS IMG to Geotif is because the JP2 data downloaded from PDS cannot be read into ENVI with the correct map projection information. But the JP2 data work fine with ArcGIS.) • gdal_translate -of GTiff D:\test\user_M3\ldem_1024_45s_30s_330_360.lbl
D:\test\user_M3\ldem_1024_45s_30s_330_360_Gdal.tif
• gdal_translate -of GTiff D:\test\user_M3\ldem_45s_100m.lbl D:\test\user_M3\ldem_45s_100m_Gdal.tif
10

11
Fig. 12 Compare
‘m3g20090609t095022_v
01_rfl_prj.dat’ with
ldem_1024_45s_30s_330
_360 in ENVI

12
Fig. 13 Compare ‘m3g20090609t095022_v01_rfl_prj.dat’ with
ldem_1024_45s_30s_330_360 in ArcGIS

13
Fig. 14 Compare ‘m3g20090609t095022_v01_rfl_prj.dat’ with
ldem_45s_100m in ArcGIS

Further Data Registration If Needed
• You can further register the ‘m3g20090609t095022_v01_rfl_prj.dat’ to LOLA DEM in ENVI using Geometric Correction-> Registration->Image Registration Workflow in the toolbox.
• Before registration, we would recommend to use only a subset of the projected M3 data ‘m3g20090609t095022_v01_rfl_prj.dat’, since lots of the M3 data are out of the boundary of the LOLA DEM. The cut will make a better display and operation in ENVI.
14


