23
INSTRUCTIONS FOR ASSEMBLY AND USE SUPER SAM AND SAM CLUB R20090812

INSTRUCTIONS FOR ASSEMBLY AND USESUPER SAM ANDSAM CLUB
R20090812
10061002_Manuals SAM_opmaak 15-12-2011.indd 1 15-12-11 13:11

2NOTHING IN THIS MANUAL MAY BE COPIED OR USED BY A THIRD PARTY WITHOUT THE CONSENT OF SCHELDE SPORTS
INSTRUCTIONS FOR USE AND ASSEMBLY
Super SAM + SAM Club
Super SAM
SAM Club
10061002_Manuals SAM_opmaak 15-12-2011.indd 2 15-12-11 13:11

3NOTHING IN THIS MANUAL MAY BE COPIED OR USED BY A THIRD PARTY WITHOUT THE CONSENT OF SCHELDE SPORTS
INSTRUCTIONS FOR USE AND ASSEMBLY
Super SAM + SAM Club
CONTENT
Introduction 3
Safety 6
Packaging, weight and sizes 9
Installation 11
Instructions for use 18
Maintenance 22
Technical specifications 23
Spare parts 28
INTRO
DU
CTIO
N
SAFET
Y PACK
AGIN
G, W
EIGH
T AN
D SIZES
INSTA
LLATION
IN
STRUC
TION
S FOR U
SE M
AINTEN
AN
CE TECH
NIC
AL IN
FOR
MATIO
N
SPARE PA
RTS
10061002_Manuals SAM_opmaak 15-12-2011.indd 3 15-12-11 13:11
44NOTHING IN THIS MANUAL MAY BE COPIED OR USED BY A THIRD PARTY WITHOUT THE CONSENT OF SCHELDE SPORTS
INSTRUCTIONS FOR USE AND ASSEMBLY
Super SAM + SAM Club
Schelde SportsThe name Schelde Sports is indicative of our core business: manufacturing and supplying a wide range of sports products and sports equipment. A good athlete wants to improve and deliver a good perfor-mance. So do we, which is why we are continuously working on the development and improvement of our products and services. Our user-friendly website is designed to make it even easier for municipali-ties, federations, schools, (top) sports clubs, architects and contractors to explore our range. Schelde Sports is always open to any comments or remarks, in fact, anything that may make the experience even more user-friendly for you. Let us know at [email protected].
INTRODUCTION
The CompanySchelde Sports is the leading manufacturer and distributor of sports equipment for ball sports. Over the last hundred years the company has built a worldwide reputation as a supplier of inno-vative and qualitative products for education, club sport and top-level sport.Schelde Sports holds ISO 9001 certification. This ISO 9001 certificate is the international standard for the quality management system. As a result Schelde Sports is able to meet all the current high requirements in terms of quality assurance.The company exports its products to more than 130 countries worldwide.
Durable and innovativeThat is what Schelde Sports is all about! A strong Research & Development department and more than 100 years of experience have yielded ‘Supe-rior by Design’ products: sports equipment that meets the highest requirements in terms of use and lifespan. A visit to one of the sports facilities equipped by Schelde Sports will convince you of Schelde Sports top-class quality.
Expertise and adviceSchelde Sports was founded 110 years ago. Our ex-pertise is apparent in the advice that the Schelde Sports advisers provide free of charge. Whether you are planning a large project or a small hall, the Schelde Sports experts will give advice based on your wishes and on the norms put in place by the government and the various sports federati-ons.
Mission StatementSchelde Sports’ key values are incorporated in its carefully formulated Mission Statement:1. Optimum collaboration with principals and business partners, aimed at achieving customer satisfaction and continuity.2. Giving advice and offering tailor-made solutions in terms of the equipment of interior and exterior sports accommodations of the highest quality level possible.3. Producing (or commissioning the production of) and supplying sports equipment of the highest quality at the most advantageous price.4. Offer long-term employment and sufficient career possibilities to personnel in order to gua-rantee investments in the training of personnel on the one hand and job satisfaction on the other hand so the company also stands to benefit from this.5. Supplying and maintaining sport accommodati-ons guaranteeing maximum sports practice, safety and durability.
INTRO
DU
CTIO
N
SAFET
Y PACK
AGIN
G, W
EIGH
T AN
D SIZES
INSTA
LLATION
IN
STRUC
TION
S FOR U
SE M
AINTEN
AN
CE TECH
NIC
AL IN
FOR
MATIO
N
SPARE PA
RTS
10061002_Manuals SAM_opmaak 15-12-2011.indd 4 15-12-11 13:11
5NOTHING IN THIS MANUAL MAY BE COPIED OR USED BY A THIRD PARTY WITHOUT THE CONSENT OF SCHELDE SPORTS
INSTRUCTIONS FOR USE AND ASSEMBLY
Super SAM + SAM Club
School and recreation (domestically)
Schelde Sports traditionally has a strong presence in the top sport segment but we also have a lot of equipment for schools and for recreational purposes. In the Netherlands, Schelde Sports’ home country, high standards apply as regards the equipment for sports facilities and play rooms. Schelde Sports meets all these requirements more than sufficiently. Whether you are looking for the simple basic equipment for gyms and play rooms to advanced electronically adjustable units in large sports, Schelde Sports serves every market segment in the same professional manner. In addi-tion to the more traditional articles we increasin-gly supply lighter and user-friendly equipment, in accordance with the wishes of teachers and users.
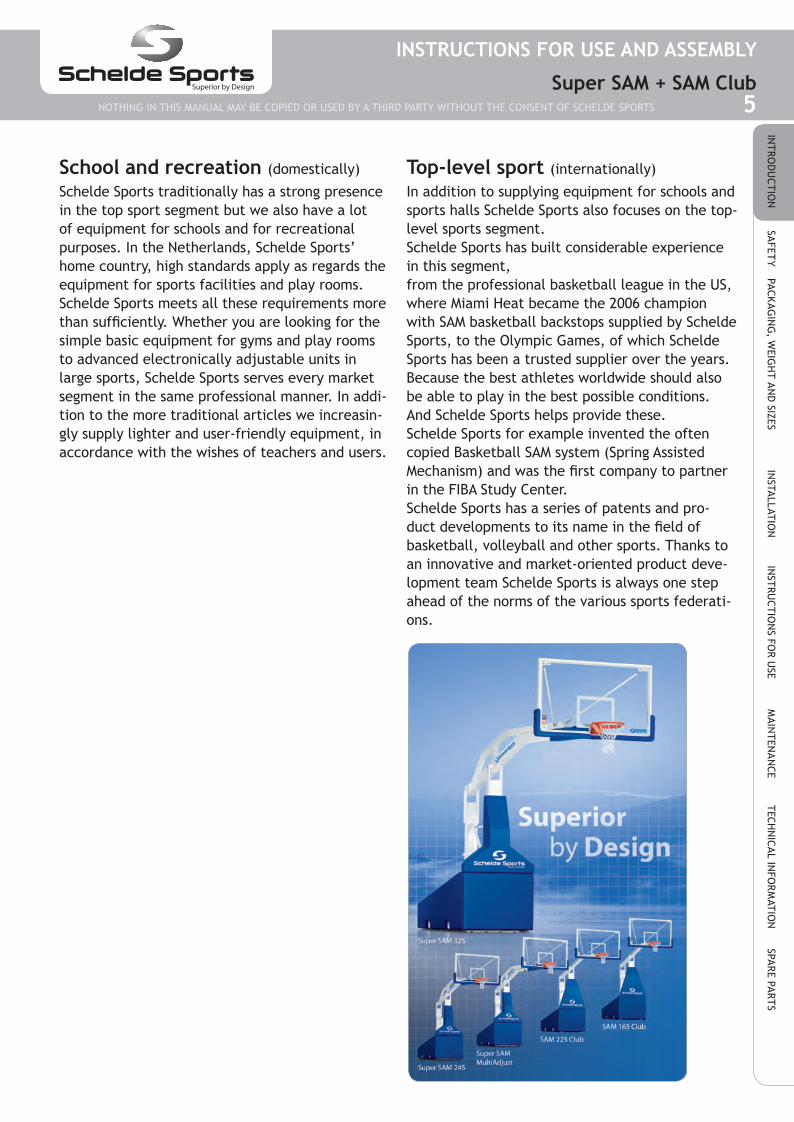
Top-level sport (internationally)
In addition to supplying equipment for schools and sports halls Schelde Sports also focuses on the top-level sports segment. Schelde Sports has built considerable experience in this segment,from the professional basketball league in the US, where Miami Heat became the 2006 champion with SAM basketball backstops supplied by Schelde Sports, to the Olympic Games, of which Schelde Sports has been a trusted supplier over the years. Because the best athletes worldwide should also be able to play in the best possible conditions. And Schelde Sports helps provide these.Schelde Sports for example invented the often copied Basketball SAM system (Spring Assisted Mechanism) and was the first company to partner in the FIBA Study Center.Schelde Sports has a series of patents and pro-duct developments to its name in the field of basketball, volleyball and other sports. Thanks to an innovative and market-oriented product deve-lopment team Schelde Sports is always one step ahead of the norms of the various sports federati-ons.
INTRO
DU
CTIO
N
SAFET
Y PACK
AGIN
G, W
EIGH
T AN
D SIZES
INSTA
LLATION
IN
STRUC
TION
S FOR U
SE M
AINTEN
AN
CE TECH
NIC
AL IN
FOR
MATIO
N
SPARE PA
RTS
10061002_Manuals SAM_opmaak 15-12-2011.indd 5 15-12-11 13:11
6NOTHING IN THIS MANUAL MAY BE COPIED OR USED BY A THIRD PARTY WITHOUT THE CONSENT OF SCHELDE SPORTS
INSTRUCTIONS FOR USE AND ASSEMBLY
Super SAM + SAM Club
1. General informationAlthough this manual has been compiled with great care errors and omissions cannot be ruled out. Schelde Sports therefore accepts no liability, for direct or indirect damage, caused by or in connection with the use and application of these instructions for assembly. Safety regulations as well as the general rules in this manual must be complied with every situation.
2. How to use this manualThis manual contains instructions for assembly.Read this manual and all the instructions pertai-ning to the assembly of this productcarefully and make sure the manual is always within reach.To reduce the risk of (serious) injury read all the warnings, precautions and instructions in this ma-nual and apply them.
The supervisor should point out to users that the manual should be read before using this product.
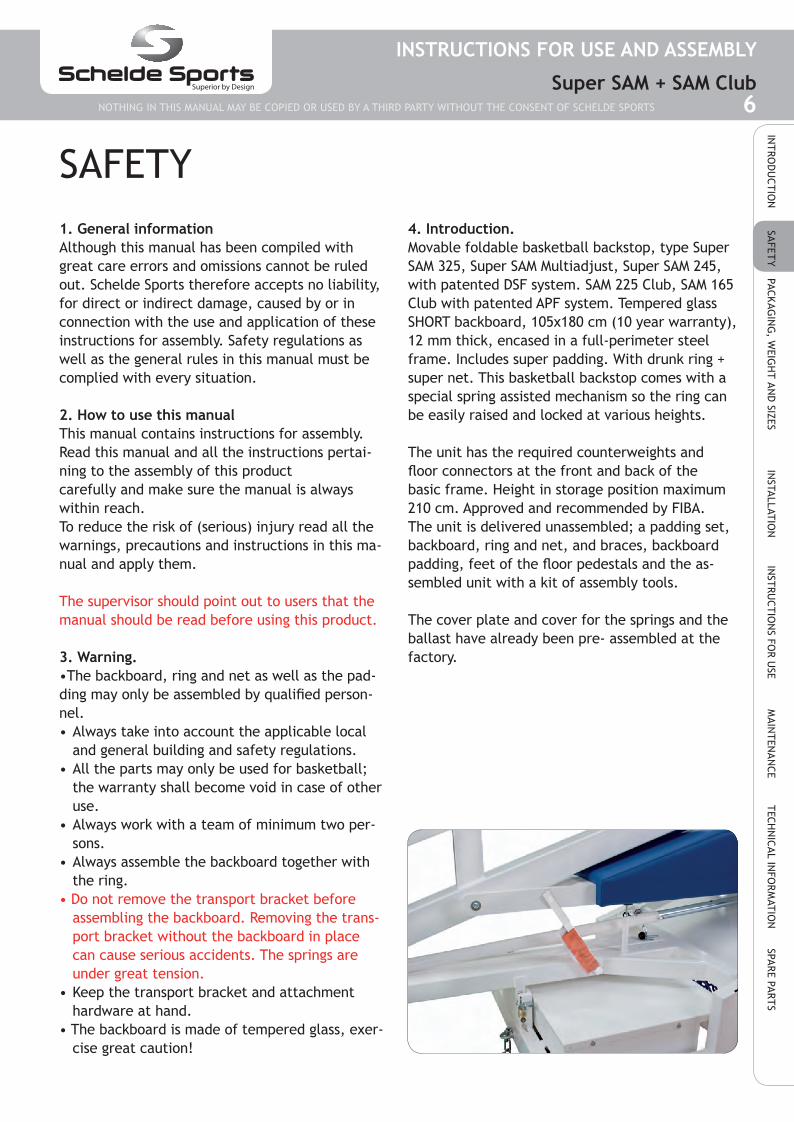
3. Warning.•The backboard, ring and net as well as the pad-ding may only be assembled by qualified person-nel.• Always take into account the applicable local and general building and safety regulations.• All the parts may only be used for basketball; the warranty shall become void in case of other use.• Always work with a team of minimum two per- sons.• Always assemble the backboard together with the ring.• Do not remove the transport bracket before assembling the backboard. Removing the trans- port bracket without the backboard in place can cause serious accidents. The springs are under great tension.• Keep the transport bracket and attachment hardware at hand.• The backboard is made of tempered glass, exer- cise great caution!
4. Introduction.Movable foldable basketball backstop, type Super SAM 325, Super SAM Multiadjust, Super SAM 245, with patented DSF system. SAM 225 Club, SAM 165 Club with patented APF system. Tempered glass SHORT backboard, 105x180 cm (10 year warranty), 12 mm thick, encased in a full-perimeter steel frame. Includes super padding. With drunk ring + super net. This basketball backstop comes with a special spring assisted mechanism so the ring can be easily raised and locked at various heights.
The unit has the required counterweights and floor connectors at the front and back of the basic frame. Height in storage position maximum 210 cm. Approved and recommended by FIBA. The unit is delivered unassembled; a padding set, backboard, ring and net, and braces, backboard padding, feet of the floor pedestals and the as-sembled unit with a kit of assembly tools.
The cover plate and cover for the springs and the ballast have already been pre- assembled at the factory.
SAFETY
INTRO
DU
CTIO
N
SAFET
Y PACK
AGIN
G, W
EIGH
T AN
D SIZES
INSTA
LLATION
IN
STRUC
TION
S FOR U
SE M
AINTEN
AN
CE TECH
NIC
AL IN
FOR
MATIO
N
SPARE PA
RTS
10061002_Manuals SAM_opmaak 15-12-2011.indd 6 15-12-11 13:11

7NOTHING IN THIS MANUAL MAY BE COPIED OR USED BY A THIRD PARTY WITHOUT THE CONSENT OF SCHELDE SPORTS
INSTRUCTIONS FOR USE AND ASSEMBLY
Super SAM + SAM Club
Range Checklist Super SAM 325
SuperSAM 245
Super SAM MA
225 Club
165 Club
Tempered glass backboard S S S S SMultidirectional dunk ring 180° S S S - -Unidirectional dunk ring - - - S S4 swivel wheels (front, 2 x 2) - S - S S6 swivel wheels (front, 2 x 3) S O S O O4 fixed wheels (rear, 2 x 2) - - - S S6 fixed wheels (rear, 2 x 3) S S S O OMaintenance-free pivot bearings S S S S SFolded height max. 210 cm S S S S SForklift tubes in base frame S S S S S305 cm and 260 cm ring height settings S S S S SAutomatic lock on telescopic rod S S S S SLockable deadlock tensioner S S S - -Lockable beam-catch in stored position S S S S SFront-, sides and neck padding set S S S - -Front and sides padding set - - - S SAutomatic DSF (Dynamic Sub Frame) S S S - -Automatic pedestal feet APF - - - S SManual operation of DSF/APF O O O O OFront locator pins and floor plates S S S S SIntegrated rear anchor system and floor plate S S S S SNo-tool ring height adjustment in base frame S S S - -Padding in black/red/orange/yellow/green O O O O OExtra spring for shot clock compensation S O S - -Shot clock brackets O O O O O100% enclosed ballast weight S S S S SAdditional ballast weight in base O O O O OFIBA approved LEVEL 1 LEVEL 3 LEVEL 1 LEVEL 3 -LED strip on backboard O O O O O
The supervisor should point out to users that the manual should be read before using this product.
S = standardO = option- = not available
INTRO
DU
CTIO
N
SAFET
Y PACK
AGIN
G, W
EIGH
T AN
D SIZES
INSTA
LLATION
IN
STRUC
TION
S FOR U
SE M
AINTEN
AN
CE TECH
NIC
AL IN
FOR
MATIO
N
SPARE PA
RTS
10061002_Manuals SAM_opmaak 15-12-2011.indd 7 15-12-11 13:11

8NOTHING IN THIS MANUAL MAY BE COPIED OR USED BY A THIRD PARTY WITHOUT THE CONSENT OF SCHELDE SPORTS
INSTRUCTIONS FOR USE AND ASSEMBLY
Super SAM + SAM Club
CERTIFICATIONThe unit has been FIBA certified for top level (level 1 and level 3) competitions and complies with the European standard EN1270:2005 Playing field equipment. Basketball equipment. Functional and safety requirements, test methods.
INTRO
DU
CTIO
N
SAFET
Y PACK
AGIN
G, W
EIGH
T AN
D SIZES
INSTA
LLATION
IN
STRUC
TION
S FOR U
SE M
AINTEN
AN
CE TECH
NIC
AL IN
FOR
MATIO
N
SPARE PA
RTS
10061002_Manuals SAM_opmaak 15-12-2011.indd 8 15-12-11 13:11

9NOTHING IN THIS MANUAL MAY BE COPIED OR USED BY A THIRD PARTY WITHOUT THE CONSENT OF SCHELDE SPORTS
INSTRUCTIONS FOR USE AND ASSEMBLY
Super SAM + SAM Club
PACKAGE 2
PACKAGE 2A
PACKAGE 3
PACKAGE 1
PACKAGING, WEIGHT AND SIZES
Portable basketball goalWeight: 1,261 kgDimensions: 455x112x137 cm SAM 325 379x112x137 cm SAM 245 351x112x137 cm SAM 225 302x112x137 cm SAM 165 379x112x137 cm SAM MA
Tempered glass backboardWeight: 100 kgDimensions: 186x106x7 cm
Backboard padding Weight: 5 kgDimensions: 98x45x11 cm
Dunk ring + netWeight: 13 kgDimensions: 65x50x20 cm
INTRO
DU
CTIO
N
SAFET
Y PACK
AGIN
G, W
EIGH
T AN
D SIZES
INSTA
LLATION
IN
STRUC
TION
S FOR U
SE M
AINTEN
AN
CE TECH
NIC
AL IN
FOR
MATIO
N
SPARE PA
RTS
10061002_Manuals SAM_opmaak 15-12-2011.indd 9 15-12-11 13:11
10NOTHING IN THIS MANUAL MAY BE COPIED OR USED BY A THIRD PARTY WITHOUT THE CONSENT OF SCHELDE SPORTS
INSTRUCTIONS FOR USE AND ASSEMBLY
Super SAM + SAM Club
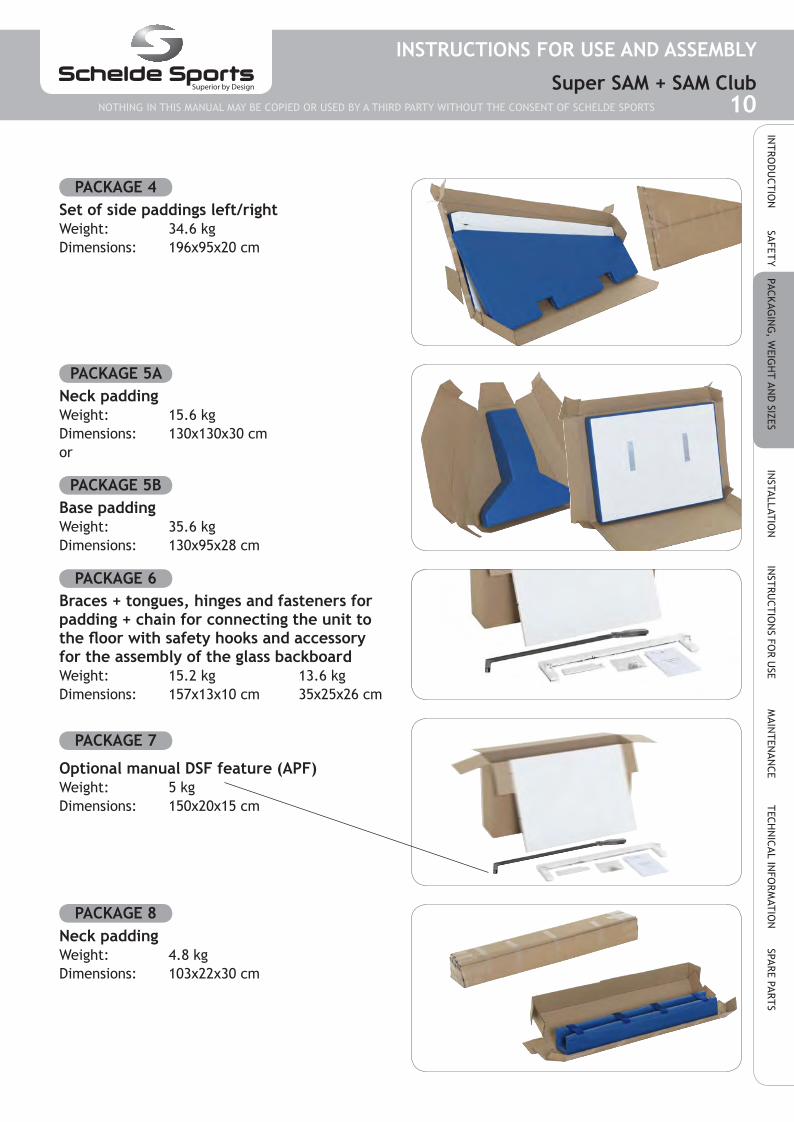
PACKAGE 5A
PACKAGE 6
PACKAGE 7
PACKAGE 8
PACKAGE 5B
Neck paddingWeight: 15.6 kgDimensions: 130x130x30 cmor
Base paddingWeight: 35.6 kgDimensions: 130x95x28 cm
Braces + tongues, hinges and fasteners for padding + chain for connecting the unit to the floor with safety hooks and accessory for the assembly of the glass backboardWeight: 15.2 kg 13.6 kgDimensions: 157x13x10 cm 35x25x26 cm
Optional manual DSF feature (APF)Weight: 5 kgDimensions: 150x20x15 cm
Neck paddingWeight: 4.8 kgDimensions: 103x22x30 cm
PACKAGE 4Set of side paddings left/rightWeight: 34.6 kgDimensions: 196x95x20 cm
INTRO
DU
CTIO
N
SAFET
Y PACK
AGIN
G, W
EIGH
T AN
D SIZES
INSTA
LLATION
IN
STRUC
TION
S FOR U
SE M
AINTEN
AN
CE TECH
NIC
AL IN
FOR
MATIO
N
SPARE PA
RTS
10061002_Manuals SAM_opmaak 15-12-2011.indd 10 15-12-11 13:11

11NOTHING IN THIS MANUAL MAY BE COPIED OR USED BY A THIRD PARTY WITHOUT THE CONSENT OF SCHELDE SPORTS
INSTRUCTIONS FOR USE AND ASSEMBLY
Super SAM + SAM Club
STEP 2
STEP 3
STEP 4
STEP 1
INSTALLATIONAssembly of the portable basketball backstop:Warning.• Backboard, ring, net and padding may only be
installed by qualified technical staff• Always comply with local building codes and
safety regulations• Always work in a team of minimum two techni-
cians• Always mount the backboard simultaneously with
the ring• Use the temporary support tool for mounting the
backboard
• DO NOT EVER REMOVE THE TRANSPORT BRACE WITHOUT THE BACKBOARD BEING MOUNTED ONTO THE BEAM. The springs are under big ten-sion. The weight of the backboard compensates this tension. Therefore the backboard must be mounted first and only then may the transport brace be removed. DANGER FOR SEVERE ACCI-DENTS IF PROPER SEQUENCE NOT FOLLOWED !!
• Store the transport brace and its fixings in a safe place (will be required if backboard needs replacement later on)
• Backboard is made of tempered glass : handle with care !
Remove the cover 5 from the basketball ring; mount the ring onto the heads of the M10x100 bolts and also mount the two M10x25 bolts in the lower ring holes.
Insert the two M10x100 bolts 3 through the back-board and the nose mounting plate of the beam and tighten the selflocking nuts
Hook up the backboard to the nose of the beam (minimum 2 persons needed!!). Use the two M10x25 bolts 2 with washers for bolting the backboard onto the nose of the beam.
Mount temporary support 1 onto the backboard frame
Assemble the backboard / basketball ring:
INTRO
DU
CTIO
N
SAFET
Y PACK
AGIN
G, W
EIGH
T AN
D SIZES
INSTA
LLATION
IN
STRUC
TION
S FOR U
SE M
AINTEN
AN
CE TECH
NIC
AL IN
FOR
MATIO
N
SPARE PA
RTS
10061002_Manuals SAM_opmaak 15-12-2011.indd 11 15-12-11 13:12
12NOTHING IN THIS MANUAL MAY BE COPIED OR USED BY A THIRD PARTY WITHOUT THE CONSENT OF SCHELDE SPORTS
INSTRUCTIONS FOR USE AND ASSEMBLY
Super SAM + SAM Club
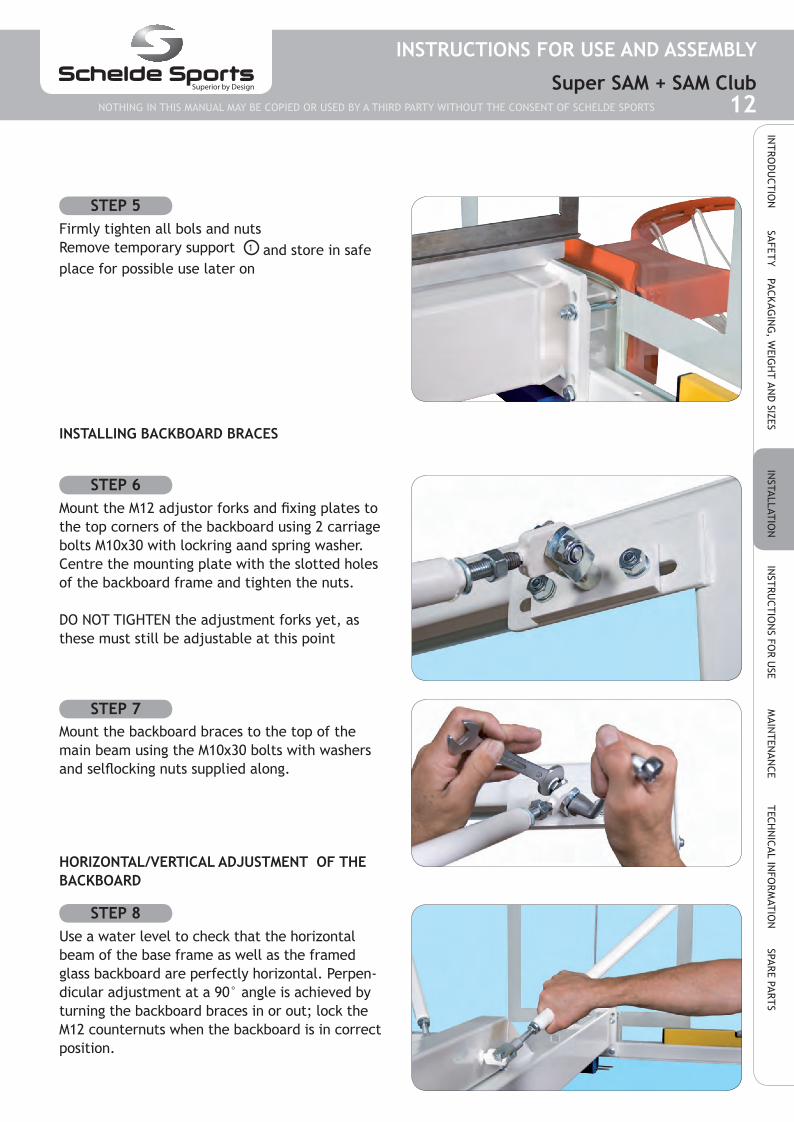
Use a water level to check that the horizontal beam of the base frame as well as the framed glass backboard are perfectly horizontal. Perpen-dicular adjustment at a 90° angle is achieved by turning the backboard braces in or out; lock the M12 counternuts when the backboard is in correct position.
Firmly tighten all bols and nutsRemove temporary support 1 and store in safe place for possible use later on
Mount the M12 adjustor forks and fixing plates to the top corners of the backboard using 2 carriage bolts M10x30 with lockring aand spring washer. Centre the mounting plate with the slotted holes of the backboard frame and tighten the nuts.
DO NOT TIGHTEN the adjustment forks yet, as these must still be adjustable at this point
Mount the backboard braces to the top of the main beam using the M10x30 bolts with washers and selflocking nuts supplied along.
INSTALLING BACKBOARD BRACES
HORIZONTAL/VERTICAL ADJUSTMENT OF THE BACKBOARD
STEP 5
STEP 6
STEP 7
STEP 8
INTRO
DU
CTIO
N
SAFET
Y PACK
AGIN
G, W
EIGH
T AN
D SIZES
INSTA
LLATION
IN
STRUC
TION
S FOR U
SE M
AINTEN
AN
CE TECH
NIC
AL IN
FOR
MATIO
N
SPARE PA
RTS
10061002_Manuals SAM_opmaak 15-12-2011.indd 12 15-12-11 13:12

13NOTHING IN THIS MANUAL MAY BE COPIED OR USED BY A THIRD PARTY WITHOUT THE CONSENT OF SCHELDE SPORTS
INSTRUCTIONS FOR USE AND ASSEMBLY
Super SAM + SAM Club
Important : mount backboard perpendicular to the main beam. After correct horizontal adjustment, firmly tighten all bolts and nuts of ring and back-board onto the beam mounting plate.
Mount cover plate back on the pressure release mechanism compartment of ring.
Install the two halves of the screw-on padding by inserting the bolts with lockrings and spring washers supplied along into the 6 holes (4 in bot-tom part and 1 in each side part).
The transport brace can now be removed safely. Store it in a safe place, for possible future need (in case of transporting the backstop unit to a dif-ferent hall, or when replacing the backboard).
INSTALLING THE BACKBOARD PADDING
REMOVING THE TRANSPORT BRACE
STEP 9
STEP 10
STEP 11
STEP 12
INTRO
DU
CTIO
N
SAFET
Y PACK
AGIN
G, W
EIGH
T AN
D SIZES
INSTA
LLATION
IN
STRUC
TION
S FOR U
SE M
AINTEN
AN
CE TECH
NIC
AL IN
FOR
MATIO
N
SPARE PA
RTS
10061002_Manuals SAM_opmaak 15-12-2011.indd 13 15-12-11 13:12
14NOTHING IN THIS MANUAL MAY BE COPIED OR USED BY A THIRD PARTY WITHOUT THE CONSENT OF SCHELDE SPORTS
INSTRUCTIONS FOR USE AND ASSEMBLY
Super SAM + SAM Club
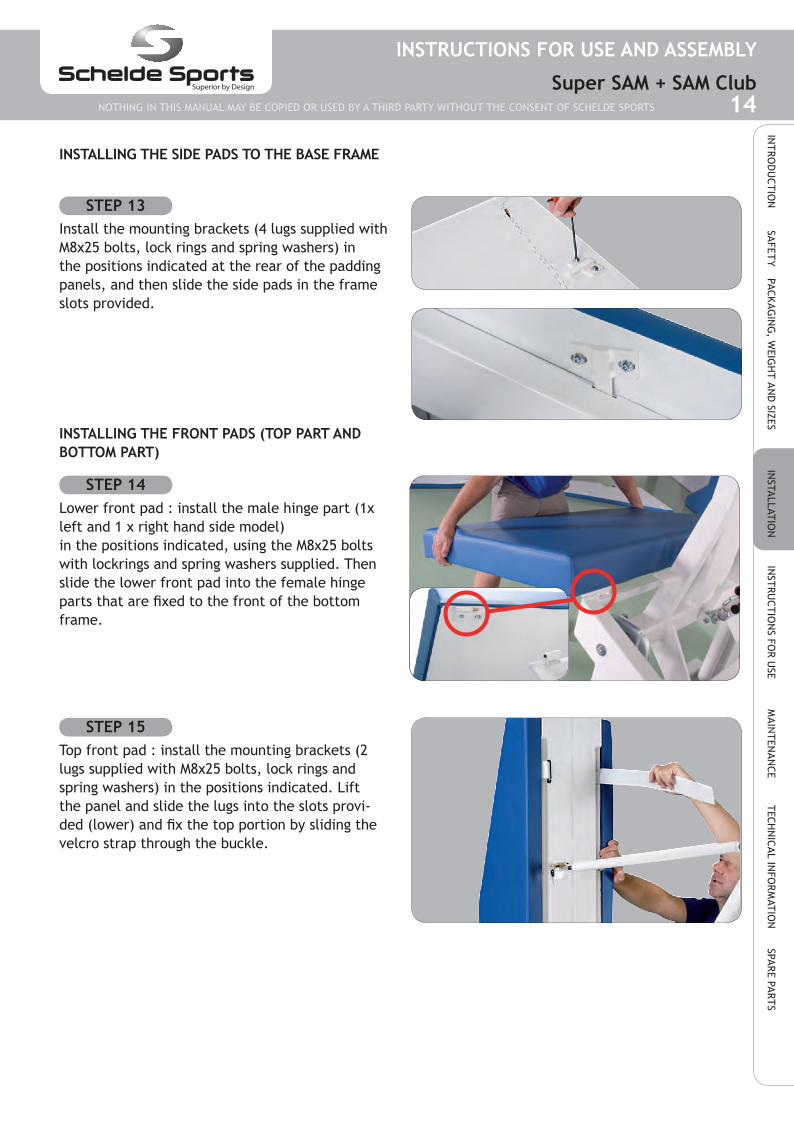
Install the mounting brackets (4 lugs supplied with M8x25 bolts, lock rings and spring washers) in the positions indicated at the rear of the padding panels, and then slide the side pads in the frame slots provided.
Lower front pad : install the male hinge part (1x left and 1 x right hand side model)in the positions indicated, using the M8x25 bolts with lockrings and spring washers supplied. Then slide the lower front pad into the female hinge parts that are fixed to the front of the bottom frame.
Top front pad : install the mounting brackets (2 lugs supplied with M8x25 bolts, lock rings and spring washers) in the positions indicated. Lift the panel and slide the lugs into the slots provi-ded (lower) and fix the top portion by sliding the velcro strap through the buckle.
INSTALLING THE SIDE PADS TO THE BASE FRAME
INSTALLING THE FRONT PADS (TOP PART AND BOTTOM PART)
STEP 13
STEP 14
STEP 15
INTRO
DU
CTIO
N
SAFET
Y PACK
AGIN
G, W
EIGH
T AN
D SIZES
INSTA
LLATION
IN
STRUC
TION
S FOR U
SE M
AINTEN
AN
CE TECH
NIC
AL IN
FOR
MATIO
N
SPARE PA
RTS
10061002_Manuals SAM_opmaak 15-12-2011.indd 14 15-12-11 13:12

15NOTHING IN THIS MANUAL MAY BE COPIED OR USED BY A THIRD PARTY WITHOUT THE CONSENT OF SCHELDE SPORTS
INSTRUCTIONS FOR USE AND ASSEMBLY
Super SAM + SAM Club
Mount the neck pad to the front part of the beam by means of the velcro straps, in such a way that sides and bottom part are covered and velcro straps are on top.
Installing a padlock at the rear base frame catch locks the unit in folded position.Installing a padlock on the locking pin of the tele-scopic rod locks the unit in game position.
INSTALLING THE NECK PAD
INSTALLING PADLOCKS
STEP 16
STEP 17
INTRO
DU
CTIO
N
SAFET
Y PACK
AGIN
G, W
EIGH
T AN
D SIZES
INSTA
LLATION
IN
STRUC
TION
S FOR U
SE M
AINTEN
AN
CE TECH
NIC
AL IN
FOR
MATIO
N
SPARE PA
RTS
10061002_Manuals SAM_opmaak 15-12-2011.indd 15 15-12-11 13:12

16NOTHING IN THIS MANUAL MAY BE COPIED OR USED BY A THIRD PARTY WITHOUT THE CONSENT OF SCHELDE SPORTS
INSTRUCTIONS FOR USE AND ASSEMBLY
Super SAM + SAM Club
Position the DSF frame under the front of the base frame, whereby the sockets line up perfectly with the vertical rods at either side of the front. Gently lift the backstop to its game position, whereby the rods slide into the DSF sockets. Use two M6x50 bolts with washers and selflocking nuts for firmly fixing the rods into the sockets.
INSTALLING/ADJUSTING THE DYNAMIC SUB FRAME (DSF) – only on Super SAM
STEP 18
INTRO
DU
CTIO
N
SAFET
Y PACK
AGIN
G, W
EIGH
T AN
D SIZES
INSTA
LLATION
IN
STRUC
TION
S FOR U
SE M
AINTEN
AN
CE TECH
NIC
AL IN
FOR
MATIO
N
SPARE PA
RTS
10061002_Manuals SAM_opmaak 15-12-2011.indd 16 15-12-11 13:12

17NOTHING IN THIS MANUAL MAY BE COPIED OR USED BY A THIRD PARTY WITHOUT THE CONSENT OF SCHELDE SPORTS
INSTRUCTIONS FOR USE AND ASSEMBLY
Super SAM + SAM Club
Position the two pedestal feet straight under the two vertical rods at either side of the front. Gently lift the backstop in its game posittion, whereby the rods with M30 nut (+slot) and coun-ternut slide into the pedestal feet. Fix the latter to the rods using for each 2 bolts M6x25 and nut in the slot of the couonternut. Do not tighten the bolts, but make sure the pedestal feet can move on the vertical rods.
Fix the chain to the eyebolt at the rear of the backstop and fix the other end to the floor hook by means of the D-lock.
DO NOT FULLY TIGHTEN THE CHAIN BUT LEAVE IT JUST A LITTLE BIT SLACK
Check if the up/down movement is fluent and smooth; if needed, the preset springtension can be adjusted. (see further : adjusting spring ten-sion)
INSTALLING/ADJUSTING THE AUTOMATIC PEDE-STAL FEET (APF) – only on SAM Club
INSTALLING THE FLOOR ANCHOR
CHECK PRIOR TO FIRST USE
STEP 18
STEP 19
STEP 20
INTRO
DU
CTIO
N
SAFET
Y PACK
AGIN
G, W
EIGH
T AN
D SIZES
INSTA
LLATION
IN
STRUC
TION
S FOR U
SE M
AINTEN
AN
CE TECH
NIC
AL IN
FOR
MATIO
N
SPARE PA
RTS
10061002_Manuals SAM_opmaak 15-12-2011.indd 17 15-12-11 13:13

18NOTHING IN THIS MANUAL MAY BE COPIED OR USED BY A THIRD PARTY WITHOUT THE CONSENT OF SCHELDE SPORTS
INSTRUCTIONS FOR USE AND ASSEMBLY
Super SAM + SAM Club
OPERATING INSTRUCTIONS
Check if floor is free of debris, obstacles etc prior to moving the backstop, in order to avoid damage to the wheels
Move (push from the rear or pull from the ring) the folded backstop to the position desired.
IMPORTANT : ALWAYS MOVE THE UNIT FIRST IN THE DIRECTION (POSITION) OF THE SWIVEL WHEELS, THEN STEER THE UNIT ONCE IT IS IN MOTION
Roll the unit in its correct position and drop the front locator pins in the corresponding floor plates in the sportsfloor surface; the DSF/APF systems ensure a correct playing height when unit is raised to game position.
Connect the rear end of the base frame to the floor anchor using the chain and D-lock provided. DO NOT FULLY TIGHTEN THE CHAIN BUT LEAVE IT JUST A LITTLE BIT SLACK, this will avoid vibrations in the unit after heavy dunks.
STEP 1
STEP 2
STEP 4
STEP 3
INTRO
DU
CTIO
N
SAFET
Y PACK
AGIN
G, W
EIGH
T AN
D SIZES
INSTA
LLATION
IN
STRUC
TION
S FOR U
SE M
AINTEN
AN
CE TECH
NIC
AL IN
FOR
MATIO
N
SPARE PA
RTS
10061002_Manuals SAM_opmaak 15-12-2011.indd 18 15-12-11 13:13
19NOTHING IN THIS MANUAL MAY BE COPIED OR USED BY A THIRD PARTY WITHOUT THE CONSENT OF SCHELDE SPORTS
INSTRUCTIONS FOR USE AND ASSEMBLY
Super SAM + SAM Club
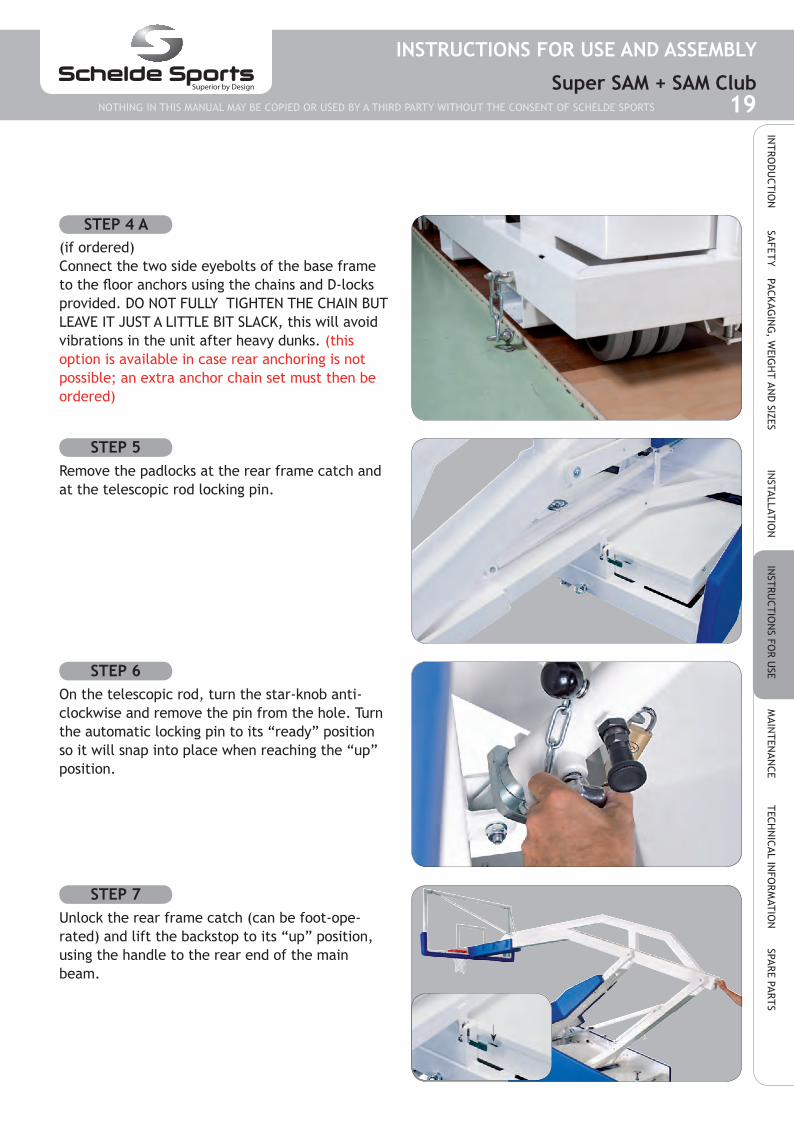
Remove the padlocks at the rear frame catch and at the telescopic rod locking pin.
On the telescopic rod, turn the star-knob anti-clockwise and remove the pin from the hole. Turn the automatic locking pin to its “ready” position so it will snap into place when reaching the “up” position.
Unlock the rear frame catch (can be foot-ope-rated) and lift the backstop to its “up” position, using the handle to the rear end of the main beam.
STEP 6
STEP 5
STEP 7
(if ordered)Connect the two side eyebolts of the base frame to the floor anchors using the chains and D-locks provided. DO NOT FULLY TIGHTEN THE CHAIN BUT LEAVE IT JUST A LITTLE BIT SLACK, this will avoid vibrations in the unit after heavy dunks. (this option is available in case rear anchoring is not possible; an extra anchor chain set must then be ordered)
STEP 4 A
INTRO
DU
CTIO
N
SAFET
Y PACK
AGIN
G, W
EIGH
T AN
D SIZES
INSTA
LLATION
IN
STRUC
TION
S FOR U
SE M
AINTEN
AN
CE TECH
NIC
AL IN
FOR
MATIO
N
SPARE PA
RTS
10061002_Manuals SAM_opmaak 15-12-2011.indd 19 15-12-11 13:13

20NOTHING IN THIS MANUAL MAY BE COPIED OR USED BY A THIRD PARTY WITHOUT THE CONSENT OF SCHELDE SPORTS
INSTRUCTIONS FOR USE AND ASSEMBLY
Super SAM + SAM Club
Lift the deadlock brace to horizontal position, hook it up to the catch at the front yoke, and tighten it in order to create a very firm connection between the two vertical columns.
(only for Super SAM backstops)Use the instant ring height adjuster handwheel at the rear of the base frame for fine tuning of ring height, if necessary.
STEP 9
STEP 10
After the automatic lock pin has snapped into place, insert the pin and install the padlock. Turn the star-knob clockwise.
STEP 8
INTRO
DU
CTIO
N
SAFET
Y PACK
AGIN
G, W
EIGH
T AN
D SIZES
INSTA
LLATION
IN
STRUC
TION
S FOR U
SE M
AINTEN
AN
CE TECH
NIC
AL IN
FOR
MATIO
N
SPARE PA
RTS
10061002_Manuals SAM_opmaak 15-12-2011.indd 20 15-12-11 13:13

21NOTHING IN THIS MANUAL MAY BE COPIED OR USED BY A THIRD PARTY WITHOUT THE CONSENT OF SCHELDE SPORTS
INSTRUCTIONS FOR USE AND ASSEMBLY
Super SAM + SAM Club
ADJUSTING THE SPRING TENSION After a certain period of use, the tension of the springs may have decreased to the point of making it difficult to smoothly lower / raise the backstop. In this case the tension of the springs must be incre-ased, in order to avoid damage to the unit. Especially if heavy shot clocks are mounted on top of the main beam, the springs will need to be adjusted in order to absorb the increased weight of the beam with shot clocks. Proceed as per below, if required.
Raise unit to game position
Expose springs and ballast weight compartment in base frame by removing the cover plates
The springs are attached to a tubular tension bar, which itself ifs fixed to the moving front frame via threaded rods. Loosen the lock nuts 1 on these rods, turn nuts 2 clockwise so that the rod moves minimum 1 cm in the direction of fixing point 3
Tighten lock nuts 1 , while making sure that nuts 2 stay in place
Raise and lower unit and repeat steps 1 through 4 until the up/down operation is a smooth process. Then install the cover plates again.
STEP 1
STEP 2
STEP 3
STEP 4
STEP 5
3
2
2
1
1
INTRO
DU
CTIO
N
SAFET
Y PACK
AGIN
G, W
EIGH
T AN
D SIZES
INSTA
LLATION
IN
STRUC
TION
S FOR U
SE M
AINTEN
AN
CE TECH
NIC
AL IN
FOR
MATIO
N
SPARE PA
RTS
10061002_Manuals SAM_opmaak 15-12-2011.indd 21 15-12-11 13:13

22NOTHING IN THIS MANUAL MAY BE COPIED OR USED BY A THIRD PARTY WITHOUT THE CONSENT OF SCHELDE SPORTS
INSTRUCTIONS FOR USE AND ASSEMBLY
Super SAM + SAM Club
ADJUSTING THE SPRING PACKAGEAdding a springSuper SAM 245 as well as SAM Club units have a provision for inserting an extra spring (if a shot clock is mounted on the beam, this extra spring will be mandatory for a smooth folding cycle). With the extra spring comes a spring fixing plate which has a threaded rod at its rear end, plus a nut and a counternut. Slide the front hook of the spring over the tension bar, bring the spring in line with the other springs, hook up the spring fixing plate at the rear end and push the threaded rod through the frame cross mem-ber; then tighten nut 2 and secure by lock nut 1 (see picture)
INTRO
DU
CTIO
N
SAFET
Y PACK
AGIN
G, W
EIGH
T AN
D SIZES
INSTA
LLATION
IN
STRUC
TION
S FOR U
SE M
AINTEN
AN
CE TECH
NIC
AL IN
FOR
MATIO
N
SPARE PA
RTS
10061002_Manuals SAM_opmaak 15-12-2011.indd 22 15-12-11 13:13

23NOTHING IN THIS MANUAL MAY BE COPIED OR USED BY A THIRD PARTY WITHOUT THE CONSENT OF SCHELDE SPORTS
INSTRUCTIONS FOR USE AND ASSEMBLY
Super SAM + SAM Club
MAINTENANCEPeriodically lubricate the moving parts of the pressure release rings. Failure to do so will cause the ring to become stiffer, and eventually incur damage; absence of lubricating invalidates the warranty !Check if all bolts and nuts are tightly fixed.Check the wheels; damaged wheels can be very harmful to your sportsfloor.Check the general condition of the backstop : correct alignment, torn or damaged welds, any squeaking noises during operation or other visible or audible anomalies should be identified.Check the condition of the net.Check the safety pads for damages; damaged padding should always be replaced.Check and periodically adjust the tension of the springs (see elsewhere) if needed.Keep unit clean, keep it free of dust and dirt.Store backboard installation assist tool as well as transport brace in a secure place; these may be nee-ded in future (in case of backboard replacement; and in case of moving the assembled backstop unit to a different hall, respectively).Use touch-up paint in case of surface damage to paintwork, in order to avoid corrosion build-up.
OPTIONAL FITTINGSS6.S0890 (only for Super SAM 245) : extra spring in compensation for the weight of a shot clockS6.S0891 : shot clock support for single-faced shot clocksS6.S0892 : shot clock support for four-faced shot clocksS6.S0895 : floor anchor set for side-anchoring of SAM Club and Super SAM (instead of standard rear anchoring)S13.NG266 : LED strip for mounting on glass backboard frameFurther possibilities include special colours for the safety padding (standard is blue; also available in green, red, black, yellow and orange) as well as the option of including extra ballast bars in the base frame for non-anchored use of the backstops (for instance on top of an ice rink underneath the basket-ball floor).
INTRO
DU
CTIO
N
SAFET
Y PACK
AGIN
G, W
EIGH
T AN
D SIZES
INSTA
LLATION
IN
STRUC
TION
S FOR U
SE M
AINTEN
AN
CE TECH
NIC
AL IN
FOR
MATIO
N
SPARE PA
RTS
10061002_Manuals SAM_opmaak 15-12-2011.indd 23 15-12-11 13:13


![Backstop Power Purchase Agreement [ ] (the Generator) [ ] (the … · 2015. 2. 23. · Backstop Power Purchase Agreement 3 Available Data Failure Amount means the amount calculated](https://static.documents.pub/doc/80x56/600f7ce81d187e2623461ef7/backstop-power-purchase-agreement-the-generator-the-2015-2-23-backstop.jpg)