20
PICC Instructions For Use

PICC
Instructions For Use
0708058/7827500 IS 12/3/04 4:21 PM Page 2

Table of Contents
Table of Contents
Page Contents
1 Product Description 2 Product Description, Indications & Contraindications
3 Contraindications, Warnings & Precautions
4 Precautions
5 Precautions & Possible Complications
6 Insertion Instructions
1. Identify the Vein and Insertion Site2. Patient Position/ Catheter Measurement3. Preflush the Catheter4. Prepare for Insertion5. Apply Tourniquet and Drape6. Perform Venipuncture7. Withdraw the Introducer Needle8. Insert and Advance the Catheter9. Complete Catheter Insertion10. Retract Introducer. Remove Splitable Introducer11. Attach Suture Wings (Dual Lumen Only)12. Remove the Stylet/Assembly13. Remove Non-Splitable Introducer14. Modification of Catheter Length (SL Only)
15. Attach Connector to SL Catheters
16. Aspirate and Flush
17. Verify Placement
18. Securing the Groshong Catheter
16 Suggested Catheter Maintenance and Catheter Removal
0708058/7827500 IS 12/3/04 4:21 PM Page 3

Product DescriptionGroshong NXT peripherally inserted Central Catheters are made fromspecially formulated and processed medical grade materials, in a tray withaccessories for reliable long (greater than 30 days) or short (less than 30days) term vascular access.
Groshong Valve Function
The Groshong catheter incorporates thepatented, 3-position, pressure-sensitiveGroshong valve. The valve is located near the rounded, closed,radiopaque catheter tip and allows fluid infusion and blood aspiration.When not in use, the valve restricts blood backflow and air embolism byremaining closed.
The Groshong valve is designed to remain closed between -7 and 80 mmHg. Since the normal central venous pressure range in the superior venacava is 0 to 5 mm Hg, the valve remains closed at normal central venouspressure. Pressure in the superior vena cava must exceed 80 mm Hg toopen the valve inward. Also, negative pressure (vacuum) will cause thevalve to open inward, allowing blood aspiration.
Positive pressure into the catheter (gravity, pump, syringe) will open thevalve outward, allowing fluid infusion. The need for the anticoagulant effectof heparin is eliminated because the closed valve prevents blood fromentering the catheter and clotting. If the catheter is aspirated, pulling thevalve inward, it must be flushed with normal saline to clear blood from thelumen and allow the valve to return to its normal closed position.
Product Description
• The Groshong NXT dual-lumen catheter features a reverse-taper catheter design.• For Superior Vena Cava (SVC) placement, measure from the planned insertion
site to the right clavicular head, then down to the third intercostal space. Use the45 or 55cm mark as reference for point of insertion.
• Catheter does not require “s” curve for dress-ing and securement.
Reverse Taper
CLOSEDNeutral Pressure
ASPIRATIONNegative Pressure
INFUSIONPositive Pressure
1
Dual Lumen
0708058/7827500 IS 12/3/04 4:21 PM Page 4

The benefits provided by the Groshong valve are:1. Increased patient safety due to reduced risk of air embolism or
bleedback.2. Elimination of the need for heparin flushing to maintain catheter
patency.3. Reduced need for catheter clamping.4. Reduced need for flushing when the catheter is not in use.
Groshong NXT dual-lumen catheters have Groshong valves whichare rotated and staggered, allowing the simultaneous infusion ofincompatible drugs. Refer to the appropriate drug labeling for indica-tions, contraindications, warnings, precautions, dosage and administra-tion information. Each lumen of a dual-lumen catheter is treated sepa-rately for maintenance and irrigation purposes.
Indications
The Groshong NXT PICC provides short (less than 30 days) or long(greater than 30 days) term peripheral access to the central venoussystem for intravenous therapy or blood sampling.
Contraindications:The Groshong NXT PICC is contraindicated whenever:• The presence of device related infection, bacteremia, or septicemia
is known or suspected.• The patient’s body size is insufficient to accommodate the size of
the implanted device.• Past irradiation of prospective insertion site.• Previous episodes of venous thrombosis or vascular surgical procedures at
the prospective placement site.• Local tissue factors will prevent proper device stabilization
and/or access.
ChloraPrep® One-Step Applicator Contraindications:
• Do not use in children less than 2 months of age because of the potential forexcessive skin irritation and increased drug absorption.
• Do not use on patients with known allergies to chlorhexidine gluconate orisopropyl alcohol.
Product Description, Indications & Contraindications
2
0708058/7827500 IS 12/3/04 4:21 PM Page 5

• Do not use for lumbar puncture or in contact with meninges.• Do not use on open skin wounds or as a general skin cleanser.
Warnings:Groshong NXT PICC• Intended for Single Patient Use. DO NOT REUSE. Bard Access Systems,
Inc. products are single use devices and should never be reimplanted.Reuse carries with it the attendant concern of cross-infection regardless ofthe cleaning or sterilization method. Resterilization of incompletely cleaneddevices may not be effective. Any device that has been contaminated byblood should not be reused or resterilized.
• This is not a right atrium catheter. Avoid positioning the catheter tip in theright atrium. Placement or migration of the catheter tip into the right atriummay cause cardiac arrhythmia, myocardial erosion or cardiac tamponade.Therisk of these complications may be more likely in neonatal patients.
• After use, this product may be a potential biohazard. Handle and discard inaccordance with accepted medical practice and applicable local, state andfederal laws and regulations.
ChloraPrep One-Step Applicator• Flammable, keep away from fire or flame.• Do not use with electrocautery procedures.• For external use only.• When using this product keep out of eyes, ears, and mouth. May cause seri-
ous or permanent injury if permitted to enter and remain. If contact occurs,rinse with cold water right away and contact a physician.
• Stop use and ask a doctor if irritation, sensitization, or allergic reactionoccurs. These may be signs of a serious condition.
• Keep out of reach of children. If swallowed, get medical help or contact apoison control center right away.
Precautions:
• Carefully read and follow all instructions prior to use.• Caution: Federal (U.S.A.) law restricts this device to sale by or on the order
of a physician.• Only qualified healthcare practitioners should insert, manipulate and remove
these devices.• To minimize the risk of catheter breakage and embolization, the suture wing
and / or adapter must be secured in place.
Contraindications, Warnings & Precautions
3
0708058/7827500 IS 12/3/04 4:21 PM Page 6

• Never use force to remove the stylet. Resistance can damage the catheter. Ifresistance or bunching of the catheter is observed, stop stylet withdrawaland allow the catheter to return to normal shape. Withdraw both the catheterand stylet together approximately 2 cm and reattempt stylet removal. Repeatthis procedure until the stylet is easily removed.
• To reduce potential for blood backflow into the catheter tip, always removeneedles or needleless caps slowly while injecting the last 0.5 ml. of saline.
• Follow Universal Precautions when inserting and maintaining the catheter.• Follow all contraindications, warnings, cautions, precautions and instructions
for all infusates as specified by its manufacturer. • Use aseptic techniques whenever the catheter lumen is opened or connected
to other devices. Chlorhexidine gluconate is the suggested antiseptic to use.Acetone and tincture of iodine should not be used. 2% Chlorhexidine glu-conate /70% isopropyl alcohol swabsticks may be used for dressing changes.Povidone-iodine may also be used as an antiseptic.
• The fluid level in the catheter will drop if the catheter connector is held abovethe level of the patient’s heart and opened to air. To help prevent a drop in thefluid level (and thus air entry) while changing injection caps, hold the connec-tor below the level of the patient’s heart before removing the injection cap.
• Examine the package carefully before opening to confirm its integrity and thatthe expiration date has not passed. The device is supplied in a sterile pack-age and is non-pyrogenic. Do not use if package is damaged, opened or theexpiration date has passed. Sterilized by ethylene oxide. Do not Resterilize.
• Inspect kit for inclusion of all components. • Flush the catheter with sterile normal saline prior to use.
• Avoid accidental device contact with sharp instruments and mechanical damageto the catheter material. Use only smooth-edged atraumatic clamps or forceps.
• Avoid perforating, tearing or fracturing the catheter when using a guidewire. • Do not use the catheter if there is any evidence of mechanical damage or
leaking.• Avoid sharp or acute angles during implantation which could compromise the
patency of the catheter lumen(s).
II. To avert device damage and/or patient injury during placement.
I. Prior to beginning placement procedure, do the following:
4
Precautions
0708058/7827500 IS 12/3/04 4:21 PM Page 7

• Use suture wings to secure the catheter without compromising catheterpatency.
• Do not place sutures around catheter.
• Do not use the device if there is any evidence of mechanical damage or leak-ing. Damage to the catheter may lead to rupture, fragmentation and possibleembolism and surgical removal.
• Accessories and components used in conjunction with this device shouldincorporate Luer lock connections.
• If signs of extravasation exist, discontinue injections. Begin appropriate med-ical intervention immediately.
• Infusion pressure greater than 25 psi (172 kPa) may damage blood vesselsand viscus and is not recommended. DO NOT USE A SYRINGE SMALLERTHAN 10 CC!
• For those unfamiliar with the procedure, published studies and a video areavailable from Bard Access Systems, Inc. depicting insertion and mainte-nance techniques.
• For further information or questions, please call 800-443-3385 or 801-595-0700.
Possible Complications
The potential exists for serious complications including the following:
• Air Embolism • Exit Site Infection • Phlebitis• Bleeding • Exit Site Necrosis • Spontaneous Catheter• Brachial Plexus Injury • Extravasation Tip Malposition or Retraction• Cardiac Arrhythmia • Fibrin Sheath Formation • Thromboembolism • Cardiac Tamponade • Hematoma • Venous Thrombosis• Catheter Erosion • Intolerance Reaction to • Ventricular Thrombosis
Through the Skin Implanted Device • Vessel Erosion• Catheter Embolism • Laceration of Vessels or • Risks Normally Associated • Catheter Occlusion Viscus with Local or General • Catheter-related Sepsis • Myocardial Erosion Anesthesia, Surgery and • Endocarditis • Perforation of Vessels Post Operative Recovery
or Viscus
III. After placement, observe the following precautions to avoid device damage and/or patient injury:
5
Precautions & Possible Complications
0708058/7827500 IS 12/3/04 4:21 PM Page 8

6
Insertion Instructions
Insertion Instructions
1. Identify the Vein and Insertion Site
• Apply a tourniquet above the anticipatedinsertion site.
• Select a vein based on patient assess-ment. Veins of the antecubital fossa arerecommended (basilic, cephalic mediancubital veins) with the basilic preferred.
• Release tourniquet.
2. Patient Position/ Catheter Measurement
• Position the arm at a 90° angle.• For SVC placement, measure from the planned insertion site over to
the sternal notch, then down to the third intercostal space. • Note that the external measurement can never exactly duplicate the
internal venous anatomy.
0708058/7827500 IS 12/3/04 4:21 PM Page 9

7
Insertion Instructions
3. Preflush the Catheter
4. Prepare for Insertion• Set-up the sterile field.• Prepare the site with the ChloraPrep One-Step Applicator or
according to institutional policy using sterile technique.- Pinch the wings on the ChloraPrep One-Step Applicator to break
the ampule and release the antiseptic. Do not touch the sponge.
- Wet the sponge by repeatedly pressing and releasing the sponge against the treatment area until fluid is visible on the skin.
- Use repeated back-and-forth strokes of the sponge for approximately 30 seconds. Completely wet the treatment area with antiseptic. Allow the area to dry for approximately 30 seconds.
Do not blot or wipe away.- Maximum treatment area for one applicator is approximately 130
cm2 (approximately 4 x 5 in.). Discard the applicator after a single use.
• Remove and discard gloves.
12
34
5
1
2
3
4
5
• Attach prefilled syringe to luerattachment on flushable stylet.
• Preflush catheter with sterile nor-mal saline or haparinized salineto wet hydrophilic stylet.
• The syringe may be left attachedduring procedure.
• Attach prefilled syringe to theLuer attachment on the exten-sion set.
• Preflush catheter with sterile nor-mal saline or heparinized salineto wet hydrophilic stylet.
• The syringe may be left attachedduring procedure.
0708058/7827500 IS 12/3/04 4:21 PM Page 10

5. Apply Tourniquet and Drape• Apply the tourniquet above the intended insertion site to distend
the vessel.• Put on sterile non-powdered gloves. Powdered gloves should be
washed before use.• Drape the patient by placing the fenestrated drape over the antici-
pated puncture site.
6. Perform Venipuncture
Splitable
• Remove the needle guard.• Grip only the needle hub during
insertion. Do not apply excessive pressure to the T-handles.
• Perform venipuncture and observe for flashback.
• Holding the needle stationary, advance the introducer sheath into the vessel by pushing forward.
8
Insertion Instructions
Non-Splitable
• Remove the needle guard.• Grip only the needle hub during
insertion. • Perform venipuncture and
observe for flashback.
• Holding the needle stationary, advance the introducer sheath into the vessel by pushing forward.
0708058/7827500 IS 12/3/04 4:21 PM Page 11

7. Withdraw the Introducer NeedleSplitable
• Support the introducer sheath to avoid displacement.
• Apply slight pressure on the vessel above the insertion site to minimize blood flow.
• Release the tourniquet.• Withdraw the needle from the
introducer sheath.
8. Insert and Advance the CatheterSplitable
• Insert the catheter into theintroducer.
• Advance the catheter slowly.
Note: Resistance may be felt approximately 7cm distal of catheter hubwhen introducing the dual-lumen catheter into the sheath due to anincrease in O.D. The introducer may be partially split, but not removedto facilitate insertion of the catheter past this point if necessary.
9
Insertion Instructions
Non-Splitable
• Support the introducer sheath to avoid displacement.
• Apply slight pressure on the vessel above the insertion site to minimize blood flow.
• Release the tourniquet.• Withdraw the needle from the
introducer sheath.
Non-Splitable
• Insert the catheter into theintroducer.
• Advance the catheter slowly.
0708058/7827500 IS 12/3/04 4:21 PM Page 12

10
Insertion Instructions
\9. Complete Catheter InsertionSplitable
• Continue to advance thecatheter. For central placement,when the tip has advanced tothe shoulder, have the patientturn head (chin on shoulder)toward the insertion side to pre-vent possible cannulation intothe jugular vein.
• Position the arm at a 90° angle,maintaining sterility. Completecatheter advancement to thedesired position (45 or 55cmmark). Catheter depth markingsare in centimeters.
Non-Splitable
• Continue to advance thecatheter. For central placement,when the tip has advanced tothe shoulder, have the patientturn head (chin on shoulder)toward the insertion side to pre-vent possible cannulation intothe jugular vein.
• Position the arm at a 90° angle,maintaining sterility. Completecatheter advancement to thedesired position (45 or 55cmmark). Catheter depth markingsare in centimeters.
• Warning: This is not a right atrium catheter. Avoid positioning thecatheter tip in the right atrium. Placement or migration of thecatheter tip into the right atrium may cause cardiac arrhythmia,myocardial erosion or cardiac tamponade. The risk of these compli-cations may be more likely in neonatal patients.
10a. Non-Splitable Introducer
• Introducer sheath is left on the catheter at this time.
0708058/7827500 IS 12/3/04 4:21 PM Page 13

10b. Remove Splitable Introducer
• Stabilize the catheter position by applying pressure to the vein distalto the introducer sheath.
• Withdraw the introducer sheath from the vein and away from the site.• Split the introducer sheath and peel it away from the catheter.
11. Attach Suture Wings (Dual Lumen Only)
A. If the dual lumen catheter is not inserted to the bifurcation; • Remove the suture wing from the delivery card• Squeeze the suture wing together so that it splits open• Place the suture wing around the catheter near the venipuncture site• Apply StatLock® securment device to the suture wing and secure to skin
B. If the catheter is inserted to the bifurcation;• Apply StatLock securment device to the bifurcation and secure to skin
Caution To minimize the risk of catheter breakage and embolization, the suturewing, “Y” adapter, and/or connector must be secured in place. See step 18.
Insertion Instructions
11
0708058/7827500 IS 12/3/04 4:21 PM Page 14

12
Insertion Instructions
12. Remove the Stylet/ Assembly
• Stabilize the catheter positionby applying light pressure to the veindistal to the insertion site.
• Slowly remove the stylet.
• Caution: Never use force to remove the stylet. Resistance candamage the catheter. If resistance or bunching of the catheter isobserved, stop stylet withdrawal and allow the catheter to return tonormal shape. Withdraw both the catheter and stylet togetherapproximately 2 cm and reattempt stylet removal. Repeat this proce-dure until the stylet is easily removed.
13. Remove Non-Splittable Introducer
• Remove non-splittable introducer. • Slide the non-splittable introducer off
the proximal end of the catheter.
14. Modification of Catheter LengthSingle Lumen Catheters Only
• Using a sharp scalpel or sterile scis-sors, carefully cut the catheter leav-ing at least 4 cm to 7 cm of thecatheter for connector attachment.
• Inspect cut surface to assure there isno loose material.
0708058/7827500 IS 12/3/04 4:21 PM Page 15

13
Insertion Instructions
15. Attach Connector to Single Lumen Catheters
• Retrieve the oversleeve portion of the connector and advance it overthe end of the catheter. If you feel some resistance while advancingthe oversleeve, gently twist back and forth or spin to ease its pas-sage over the catheter.
• Gently advance the catheter onto the connector blunt until it butts upagainst the colored plastic body. The catheter should lie flat on theblunt without any kinks.
• With a straight motion, slide the oversleeve portion of the connectorand the StatLock compatible connector with extenstion leg together,aligning the grooves on the oversleeve portion of the connector withthe barbs on the StatLock compatible connector and extenstion leg.Do not twist.Note: Connector portions must be gripped on plastic areas for prop-er assembly. Do not grip on distal portion of oversleeve.
• Advance completely until the connector barbs are fully attached. Atactile, locking sensation will confirm that the two pieces are properlyengaged. There may be a small gap between the oversleeve and theStatLock compatible connector with extenstion leg.
0708058/7827500 IS 12/3/04 4:21 PM Page 16
14
Insertion Instructions
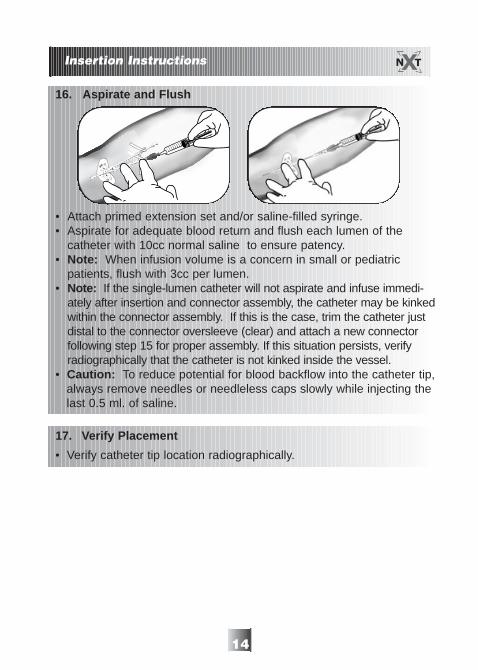
16. Aspirate and Flush
• Attach primed extension set and/or saline-filled syringe. • Aspirate for adequate blood return and flush each lumen of the
catheter with 10cc normal saline to ensure patency.• Note: When infusion volume is a concern in small or pediatric
patients, flush with 3cc per lumen.• Note: If the single-lumen catheter will not aspirate and infuse immedi-
ately after insertion and connector assembly, the catheter may be kinkedwithin the connector assembly. If this is the case, trim the catheter justdistal to the connector oversleeve (clear) and attach a new connectorfollowing step 15 for proper assembly. If this situation persists, verifyradiographically that the catheter is not kinked inside the vessel.
• Caution: To reduce potential for blood backflow into the catheter tip,always remove needles or needleless caps slowly while injecting thelast 0.5 ml. of saline.
17. Verify Placement
• Verify catheter tip location radiographically.
0708058/7827500 IS 12/3/04 4:21 PM Page 17

15
Insertion Instructions
18. Securing the Groshong NXT PICC:
Dual Lumen Singe Lumen Insertioninsertion to bifurcation
Dual Lumen Catheter inserted within 7cm of bifurcation
0708058/7827500 IS 12/3/04 4:21 PM Page 18

Suggested Catheter Maintenance
The catheter should be maintained in accordance with standard hospi-tal protocols.Suggested catheter maintenance is as follows:• Dressing Changes
Assess the dressing in the first 24 hours for accumulation of blood,fluid or moisture beneath the dressing. During all dressing changes,assess the external length of the catheter to determine if migration ofthe catheter has occurred. Periodically confirm catheter placement,tip location, patency and security of dressing.
• FlushingFor intermittent use, flush the catheter with saline once each week orafter each use. Note: When infusion volume is a concern in small orpediatric patients, flush with 3cc per lumen. Caution: To reducepotential for blood backflow into the catheter tip, always remove nee-dles or needleless caps slowly while injecting the last 0.5 ml. of saline.
• Occluded or Partially Occluded CatheterCatheters that present resistance to flushing and aspiration may bepartially or completely occluded. Do not flush against resistance. Ifthe lumen will neither flush nor aspirate and it has been determinedthat the catheter is occluded with blood, a declotting procedure perinstitution protocol may be appropriate.
Catheter Removal
• Remove dressing.• Grasp catheter near insertion site.• Remove slowly. Do not use excessive force.• If resistance is felt, stop removal. Apply warm compress and wait
20-30 minutes.• Resume removal procedure.• Examine catheter tip for completeness and to determine that the
entire catheter has been removed.
Suggested Catheter Maintenance &Catheter Removal
16
0708058/7827500 IS 12/3/04 4:21 PM Page 19

0708058/7827500 IS 12/3/04 4:21 PM Page 20

Bard Access Systems, Inc.
ChloraPrep One-Step Applicator Active Ingredients• Chlorhexidine gluconate 2% w/v...antiseptic• Isopropyl alcohol 70% v/v...antiseptic
Inactive Ingredients• USP purified water
For further information or questions regarding ChloraPrep One-Step Applicator call: 1-800-523-0502 (8 a.m.-5 p.m. CST)
An issued or revision date for these instructions is included for the user’s information. In the event twoyears have elapsed between this date and product use, the user should contact Bard Access Systems,Inc. to see if additional product information is available.
Revised date: November, 2003
Bard and Groshong are registered trademarks of C. R. Bard, Inc., or an affiliate.StatLock is a registered trademark of Venetec International, Inc.ChloraPrep is a registered trademark of Medi-Flex Hospital Products.
Patent Numbers: 4,671,796; 4,701,166; 4,753,640; 4,828,547; 4,995,863; 5,009,642; 5,160,325;5,221,263; 5,810,789; 5,951,520.
© Copyright 2003 Bard Access Systems, Inc. All rights reserved.
0708058 / 0311R
Bard Access Systems, Inc.5425 West Amelia Earhart DriveSalt Lake City, UT 84116 USA801-595-0700Clinical Information Hotline: 1-800-443-3385Ordering Information: 1-800-545-0890bardaccess.com
0708058/7827500 IS 12/3/04 4:21 PM Page 1


