FDM Administration Instructor Guide Page 1 Author: Lea Jensen Updated: June 27, 2011 ORACLE HYPERION FINANCIAL DATA QUALITY MANAGEMENT 11.1.2 ADMINISTRATION D69377GC10 (ILT) D69379GC10 (LVC) INSTRUCTOR GUIDE For Instructor Use Only. This document should not be distributed.
Transcript
FDM Administration Instructor Guide Page 1
Author: Lea Jensen Updated: June 27, 2011
ORACLE HYPERION FINANCIAL DATA QUALITY MANAGEMENT 11.1.2 ADMINISTRATION
D69377GC10 (ILT) D69379GC10 (LVC)
INSTRUCTOR GUIDE
For I
nstru
ctor
Use
Onl
y.
This
doc
umen
t sho
uld
not b
e di
strib
uted
.
FDM Administration Instructor Guide Page 2
Table of Contents ORACLE HYPERION FINANCIAL DATA QUALITY MANAGEMENT 11.1.2 ADMINISTRATION .............. 1
Course Overview ....................................................................................................................................... 5 Instructor Skills ....................................................................................................................................... 5 Target Audience and Prerequisites ....................................................................................................... 5 Errata ..................................................................................................................................................... 5 Major Course Changes .......................................................................................................................... 5 Course Outline and Agenda .................................................................................................................. 6
Machine Setup ........................................................................................................................................... 7 Shortcuts ................................................................................................................................................ 8 Image Configuration ............................................................................................................................... 8 User IDs and Passwords ....................................................................................................................... 9 Applications ............................................................................................................................................ 9 Services ............................................................................................................................................... 10 Image Comments and Issues .............................................................................................................. 10
Course Material ....................................................................................................................................... 11 Using the Course Material to Enhance Instruction .............................................................................. 11 PowerPoint Slide Shows ...................................................................................................................... 12 Instructor Guide ................................................................................................................................... 12 Demos and Exercises .......................................................................................................................... 12 Course Files ......................................................................................................................................... 13 Technical Documentation .................................................................................................................... 13 General Notes ...................................................................................................................................... 14
Lesson 1: Product Orientation ................................................................................................................. 15 Changes to the Lesson in this Release ............................................................................................... 15 Oracle’s Enterprise Performance Management System ..................................................................... 15 Exercises ............................................................................................................................................. 16
Lesson 2: Navigating FDM ...................................................................................................................... 17 Changes to the Lesson in this Release ............................................................................................... 17 Accessing FDM Topics ........................................................................................................................ 17 Exercise ............................................................................................................................................... 18
Lesson 3: Creating FDM Applications ..................................................................................................... 19 Changes to the Lesson in this Release ............................................................................................... 19 FDM Applications ................................................................................................................................. 19 Exercise ............................................................................................................................................... 20
Lesson 4: Integrating Applications .......................................................................................................... 21 Changes to the Lesson in this Release ............................................................................................... 21 Issue of Image ..................................................................................................................................... 21 Errata ................................................................................................................................................... 21 Integration Overview ............................................................................................................................ 22 Adapters ............................................................................................................................................... 22 Application and Integration Settings .................................................................................................... 22 Demos .................................................................................................................................................. 23 Exercise ............................................................................................................................................... 23
Lesson 5: Setting Up Control Tables and Locations ............................................................................... 25 Changes to the Lesson in this Release ............................................................................................... 25 Control Tables ...................................................................................................................................... 25 Locations .............................................................................................................................................. 26 Exercises ............................................................................................................................................. 26
Lesson 6: Setting Up Mapping Tables .................................................................................................... 27 Changes to the Lesson in this Release ............................................................................................... 27 Errata ................................................................................................................................................... 27 Mapping Tables ................................................................................................................................... 27
Review of Day 1 ...................................................................................................................................... 29 Lesson 7: Building Import Formats .......................................................................................................... 30
Changes to the Lesson in this Release ............................................................................................... 30 Errata ................................................................................................................................................... 30 Import Formats ..................................................................................................................................... 30 Demo.................................................................................................................................................... 30 Exercises ............................................................................................................................................. 31
Lesson 8: Loading Data ........................................................................................................................... 32 Changes to the Lesson in this Release ............................................................................................... 32 Importing Source Files ......................................................................................................................... 32
Lesson 9: Building Validation Rules ........................................................................................................ 34 Changes to the Lesson in this Release ............................................................................................... 34 Validation Rules ................................................................................................................................... 34 Demo.................................................................................................................................................... 34 Exercise ............................................................................................................................................... 35
Lesson 10: Setting Up Validation Entities ............................................................................................... 36 Changes to the Lesson in this Release ............................................................................................... 36 Validation Entities ................................................................................................................................ 36 Exercise ............................................................................................................................................... 36
Lesson 11: Processing Batch Files ......................................................................................................... 37 Changes to the Lesson in this Release ............................................................................................... 37 Enabling Batch Processing .................................................................................................................. 37 Setting Up Batch-Load Files ................................................................................................................ 37 Exercise ............................................................................................................................................... 37
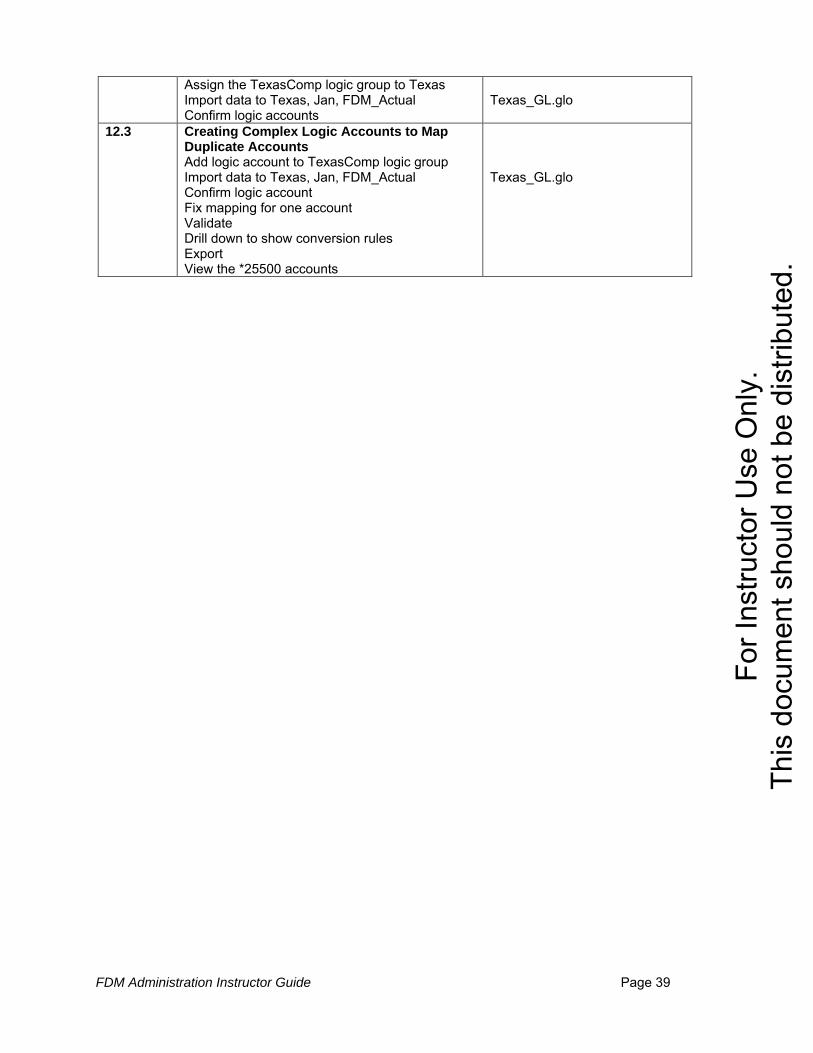
Lesson 12: Creating Logic Accounts ....................................................................................................... 38 Changes to the Lesson in this Release ............................................................................................... 38 Errata ................................................................................................................................................... 38 Logic Accounts ..................................................................................................................................... 38 Demo.................................................................................................................................................... 38 Exercises ............................................................................................................................................. 38
Lesson 13: Loading FDM Journals .......................................................................................................... 40 Changes to the Lesson in this Release ............................................................................................... 40 Journal Templates ............................................................................................................................... 40 Demo.................................................................................................................................................... 40 Loading HFM Journals ......................................................................................................................... 40 Exercise ............................................................................................................................................... 42
Lesson 14: Loading Data with Multiload Files ......................................................................................... 43 Changes to the Lesson in this Release ............................................................................................... 43 Multiload Files ...................................................................................................................................... 43 Exercises ............................................................................................................................................. 43
Lesson 15: Setting Up Security ............................................................................................................... 44 Changes to the Lesson in this Release ............................................................................................... 44 Security ................................................................................................................................................ 44 Demo.................................................................................................................................................... 44
Lesson 16: Working with Financial Controls ........................................................................................... 46 Changes to the Lesson in this Release ............................................................................................... 46 Financial Controls ................................................................................................................................ 46 Demo.................................................................................................................................................... 46 Exercises ............................................................................................................................................. 46
Lesson 17: Working with Import Scripts .................................................................................................. 48 Changes to the Lesson in this Release ............................................................................................... 48 Errata ................................................................................................................................................... 48 Import Scripts ....................................................................................................................................... 48 Demo.................................................................................................................................................... 48
For I
nstru
ctor
Use
Onl
y.
This
doc
umen
t sho
uld
not b
e di
strib
uted
.
FDM Administration Instructor Guide Page 4
Exercises ............................................................................................................................................. 49 Lesson 18: Working with Import Integration Scripts ................................................................................ 50
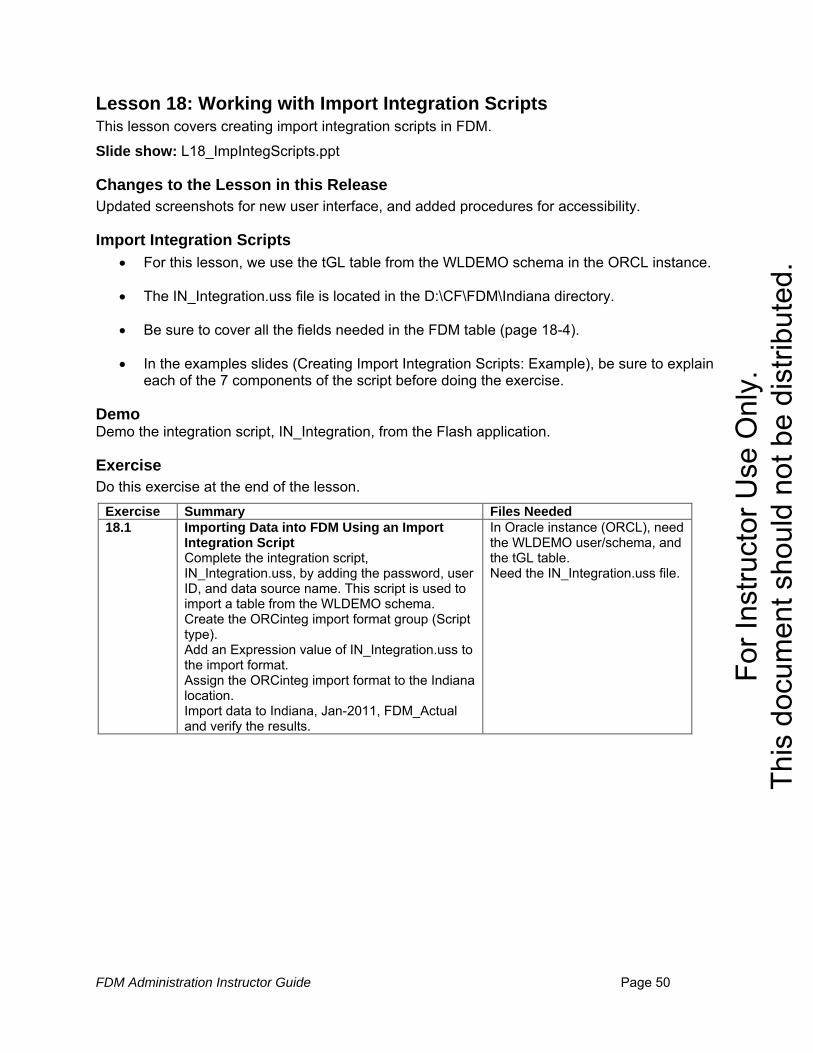
Changes to the Lesson in this Release ............................................................................................... 50 Import Integration Scripts ..................................................................................................................... 50 Demo.................................................................................................................................................... 50 Exercise ............................................................................................................................................... 50
Lesson 19: Working with Event Scripts ................................................................................................... 51 Changes to the Lesson in this Release ............................................................................................... 51 Event Scripts ........................................................................................................................................ 51 Demo.................................................................................................................................................... 51 Exercise ............................................................................................................................................... 51
For I
nstru
ctor
Use
Onl
y.
This
doc
umen
t sho
uld
not b
e di
strib
uted
.
FDM Administration Instructor Guide Page 5
Course Overview In this course, you learn to implement Financial Data Quality Management, an advanced data transformation management (DTM) solution. You learn a single, systematic process for loading source data from disparate systems into target analytical applications. Exercises provide hands-on practice.
The course objectives are listed in the Preface of the student guide.
Instructor Skills • Thorough knowledge of Financial Data Quality Management • Working knowledge of Financial Management • Basic knowledge of Essbase, Planning, and Enterprise
Target Audience and Prerequisites • Audience: Financial Administrators • Prerequisites: Working knowledge of Financial Management
Errata Be sure to review the errata sheet that is posted on the course Web page on the Curriculum Development Group Web site. Major Course Changes This course is an update of the Oracle Hyperion Financial Data Quality Management 11.1.1 Administration course. Please refer to the individual lessons for additional changes and detail.
• Updated screenshots and procedures for this release. The screenshots were taken on an 11.1.2 release, and the course image was built with the 11.1.2.1 release, so you’ll see some differences. For example, the adapter in the screenshots is FM11X-G5-D, and the adapter in release 11.1.2.1 is FM11X-G5-E.
• Changed data load files to 2011.
• Changed the HFM application name to FlashFM. FDM application name is still Flash. Both applications are in the Default Application Group in Shared Services.
• Lesson 1 o When a workflow task fails, a gray fish is displayed instead of a white fish. o Added information on the ERPI adapter. o After ACES builds the class machines, the Flash demo application is NOT on the
image. You must add the application to the image. See lesson 1 in this document for more detail.
• Lesson 2 o Timeline Viewer exercise was removed because students do not yet have the
Flash application. o Students add the Flash application to their machine in exercise 4.3.
• Lesson 3 o Changed exercise to specify different tablespace names (instead of sharing the
o TrainFDM now uses the CL_TrainFDM Oracle user name. o You can create additional applications with the following Oracle user names:
CL_TEST1, CL_TEST2, and CL_TEST3.
• Lesson 4 o According to the HFM adapter readme file (since the 11.1.2 release), dimension
names in FDM must be named exactly as they are named in Financial Management for the drill-through functionality to work correctly. Custom dimensions should never be disabled. Exercise 4.1 was modified accordingly.
o After importing the HFM adapter, you must configure the adapter. o Added information on the ERPI adapter. o Locations of some class files have changed:
Adapters are located in D:\CF\FDM\Adapters. Standard reports are located in D:\CF\FDM\Reports. Templates are located in D:\CF\FDM\Templates.
o Students add the Flash application in exercise 4.3.
• Lesson 5 o In Control Tables, you now select target periods and categories from a drop-
down list instead of browsing for target members. o In the Currency Codes control table, you can add and delete currencies through
the FDM user interface. In the past, you had to import new currencies from Excel. o When you import periods, you must now import the periods to two tables,
tPOVPeriod and tPOVPeriodAdaptor. In exercise 5.1, the All Periods.xls file includes both tables.
• Lesson 6 o If a custom dimension is not used in Financial Management, it must still be
mapped to [None] so that FDM contains that information in the database. o Exercises 6.1 and 6.2 were changed accordingly.
• Lesson 8 o The term “drill back” is replaced with “drill through”. o Review the drill through topics. Enabling drill through is simpler in this release.
• Lesson 15 o Power security level is now called Administrator. o All FDM users are provisioned through Shared Services. You must first add the
user to Shared Services and provision the user for FDM before you can add the user to the FDM application.
• Appendix B (ERPI) was updated with information for this release.
Course Outline and Agenda
The following table lists the lessons and the recommended time allocated for lecture and exercises. The course runs from 9 a.m. to 5 p.m. on each day, with two 15-minute breaks and a one-hour lunch. Use the following information only as a general guideline. The times may vary considerably based on the number of students in the class and their skill level.
3 Creating FDM Applications 20 10 10 4 Integrating Applications 40 15 10 5 Setting Up Control Tables and Locations 40 20 30 6 Setting Up Mapping Tables 45 45 25 Day 2 Review of day 1 15 7 Building Import Formats (continue lesson) 45 40 40 8 Loading Data 20 20 20 9 Building Validation Rules 20 10 15 10 Setting Up Validation Entities 10 5 15 11 Processing Batch Files 10 10 10 12 Creating Logic Accounts 20 10 25 13 Loading FDM Journals 15 5 10 Day 3 Review of day 2 15 14 Loading Data with Multiload Files 15 5 10 15 Setting Up Security 15 15 10 16 Working with Financial Controls 25 20 35 17 Working with Import Scripts 45 45 50 18 Working with Import Integration Scripts 20 10 15 19 Working with Event Scripts 20 10 10
Machine Setup The machine setup in this release is very different from previous releases.
• Machines in the classroom have assigned names, such as EDOLR3P9, EDOLR3P10, and EDOLR3P11. The last two or three characters (P9, P10, P11) of the name refer to the machine number.
• Everyone in the class is assigned two
• In the exercises, we refer to the even-numbered machine as EPM Server, and we refer to the odd-numbered machine as FDM Workstation.
machines.
• Students should sit by their FDM Workstation because most exercises are performed on that machine.
• Make sure students know the name of their corresponding EPM Server machine.
• As the instructor, you use machines P0 and P1. Since most of the demos are done on P1 (FDM Workstation), you need to either remotely connect from P0 to P1, or project to the class what is on P1. See the Demos and Exercises
• EPM Server includes the following Oracle/Hyperion software:
section in this document for more information.
o Oracle® Database 11g o Oracle® Database Client 11g o Shared Services o Workspace
• The EPM Server also includes software (Essbase, Administration Services, and Financial Reporting) which you should not use, as it is not configured. We had a problem
For I
nstru
ctor
Use
Onl
y.
This
doc
umen
t sho
uld
not b
e di
strib
uted
.
FDM Administration Instructor Guide Page 8
configuring the Essbase cluster in the ACES environment, and you cannot configure it in class. FR is installed, but there are no database connections. These products are not
• FDM Workstation includes the following Oracle/Hyperion software:
used in the exercises.
o Oracle® Database Client 11g o FDM o Financial Management o Performance Management Architect (not used in exercises; services are not
started) o Calculation Manager (not used in exercises; service is not started) o Oracle® Hyperion Financial Reporting Studio, Fusion Edition (not used in
exercises; print service is not started)
• The class machines are set up using ACES silent automation. Everything from installing the operating system, to installing and configuring the Oracle database and Hyperion software, to setting up the HFM application and course files is automated. Building the machines takes about 7 hours
• Many of the batch files used to set up this ACES environment are in D:\stage\installs\setup_scripts.
. If any machines fail to build for your class, it is important that you start the build process as soon as possible.
Shortcuts • The Windows Desktop on the FDM Workstation includes the following shortcuts in the FDM
folder: o FDM Web Client o Workbench Client o Notepad o Services o Microsoft Office Excel 2007 o Financial Management (Windows 32 client) o SQLDeveloper o Start Services o Stop Services o Start FR Print Server (ignore this shortcut – not used in class)
• The Windows Desktop on the EPM Server includes the following shortcuts in the FDM folder:
o Workspace URL o Shared Services URL o Services o Start Services o Stop Services o SQLDeveloper
Image Configuration • The course runs on two 32-bit ACES machines per student.
• ACES allows only 4 GB (actually less when you consider the operating system) for a 32-bit machine. The Talleyrand PS1 release recommends 8 GB for the Hyperion products. We therefore split the installation of products between two machines.
• ACES allows 8 GB for a 64-bit environment. Why didn’t we use a 64-bit environment for the class?
For I
nstru
ctor
Use
Onl
y.
This
doc
umen
t sho
uld
not b
e di
strib
uted
.
FDM Administration Instructor Guide Page 9
o FDM runs in 32-bit mode on a 64-bit environment. o The IIS Web server for FDM has to be in 32-bit mode, while FM requires IIS to be in
64-bit mode. o Windows 2008 allows dual mode for IIS, but earlier Windows releases do not. o Oracle University does not have licenses for Windows 2008.
• Software installed on both images o Microsoft Windows 2003 EE Service Pack 2 o Latest MS Windows updates o Internet Explorer 7.0 o Oracle WebLogic 11gR1+ o Java Runtime Environment o Adobe Flash Player 10 ActiveX o Adobe Flash Player Plugin o Adobe Reader 9.4.1 o Microsoft Office Professional Plus 2007 o Microsoft Script Host o AFPL Ghostscript 8.5.1 o Microsoft .NET Framework 2.0 o MSXML 6.0 Parser o 7-Zip 4.65 o WinZip 11.2
• Additional software installed on EPM Server: o Oracle Database 11g R3 o Oracle Client 11g R3 (ODAC included) o Oracle Hyperion Foundation Services 11.1.2.1 o Oracle Enterprise Performance Management Architect 11.1.2.1 o Oracle Hyperion Calculation Manager 11.1.2.1 o Oracle Hyperion Reporting and Analysis 11.1.2.1
• Additional software installed on FDM Workstation: o Oracle Client 11g R3 (ODAC included) o Oracle Hyperion Financial Management 11.1.2.1 o Oracle Hyperion Financial Data Quality Management 11.1.2.1 o Oracle Hyperion Financial Reporting Studio (database connections not set up)
User IDs and Passwords The following user IDs and passwords are on the image:
User ID Password Description
trnadmin hyperion Use for all demos and exercises. This user has access to all products including the Oracle database
system hyperion Can use to log on to SQLDeveloper
admin hyperion Can use for Shared Services, but is not provisioned for FlashFM or the Flash application
o Only trnadmin is provisioned for FlashFM o When you create additional users, you can provision them accordingly
For I
nstru
ctor
Use
Onl
y.
This
doc
umen
t sho
uld
not b
e di
strib
uted
.
FDM Administration Instructor Guide Page 10
o The application includes grids that you can open to verify that data loaded and consolidated in HFM, and to drill through to FDM.
• FDM Application - Flash o The application contains the exercise answers. For example, all control tables,
mapping tables, import formats, logic groups, and scripts that students create in the exercises are included in the application.
o Exports from the Flash application are located in the D:\CF\FDM\zFDM exports folder. Exports were made of the Flash application after many of the exercises. If a student misses part of class and you need to catch them up, you can import parts of the application from these exported files. You can also use the files to create your own application.
Services All Oracle and Hyperion services are set to manual.
• Lesson 1 includes exercises to start services. On each machine, the FDM folder includes a Start Services batch file to start services. Students can start services on both machines at the same time. There is time built into the batch files to wait for the services to stabilize.
• On the FDM Workstation, you start only two services (FDM task manager and HFM Web service manager). On the EPM Workstation, you start everything else. Refer to exercise 1.1 and 1.2 for a list of the services.
• Be sure to follow the exercises to verify that all services have started. For one student in the FGT, two services on the EPM Server did not start automatically. In that case, start the services manually.
Image Comments and Issues • The course material was created on an FDM 11.1.2 (Talleyrand) image. However, the
final course image is an FDM 11.1.2.1 (PS1) image.
• We are using Oracle as the back end database for FDM. When you enter names, such as categories or locations, the names are automatically converted to uppercase letters. This is a requirement of the Oracle database because it is case sensitive. It is done to prevent users from entering duplicate items, such as Jan, JAN, and JaN. This is not the case when you use SQL for the back end database.
• Even though the Flash application shows a completed workflow, the data was deleted from the FlashFM application, so students have a clean slate when class starts.
• Lesson 2 – It takes more time (maybe 2 minutes) to open the FDM Web client Logon window the first time
• Lesson 3 – The time it takes to create an application may vary. During the pilot and FGT, it took about 8 to 9 minutes.
. Plan accordingly before you demo, or open it for the first time before you begin the class.
Ask student to be patient
• Lesson 4 – Do not demo how to register the HFM adapter. We encountered an error when we tried to register the adapter in Workbench and were not able to get the issue
and wait for it to complete. Ask students not to close the window. Give a break or continue with the lecture during this time.
For I
nstru
ctor
Use
Onl
y.
This
doc
umen
t sho
uld
not b
e di
strib
uted
.
FDM Administration Instructor Guide Page 11
resolved. Instead, the adapter was registered for you as part of the image set up by using the following command lines: cd d:\winnt\microsoft.NET\Framework\v2.0.50727
• Lesson 9 – You get a dialog box that prompts you to open the Validation Report. Seems that FDM loses focus of that dialog box. You must click once to set the focus on the dialog box (for example, you can click on the title bar), and then click Open. Alternatively, you can click Open once to set the focus, and then again to open the report. There are other times in the demos and exercises that you need to open this same report. Just remember that you need to click twice.
• Lesson 15 – When you add a new user in FDM, the New User dialog box opens and the following error message is displayed:
Close the error, and you can then add the user to FDM. The error does not cause any issues with adding new users. This bug was supposed to be fixed in PS1, but still exists on this image. It is caused when you have a user set up as a Windows user and also a Shared Services user.
Course Material
Using the Course Material to Enhance Instruction • Review the Preface to learn more about the standards used in the student guide, activity
guide, and the course.
• Each lesson begins with lesson objectives.
• Subject matter is then presented.
• Cover the topics in the order they are presented in the student guide. Cover the material on each slide and the text that goes along with it.
• Tell students where you are in the student guide, so they can follow along. You want them to realize the contents of the student guide and that they can use it as a reference.
• You can use a combination of the PowerPoint slide shows and demonstrations to explain the topics and procedures.
• Decide ahead of time which slides and demos you will use for each topic.
• Especially if you are new to the product, it is recommended that you always test your demos before presenting them in class.
For I
nstru
ctor
Use
Onl
y.
This
doc
umen
t sho
uld
not b
e di
strib
uted
.
FDM Administration Instructor Guide Page 12
• Most lessons contain one or more exercises to reinforce the subject matter. The exercises are in an express format (steps are only outlined, little detail provided). The solutions provide detailed step-by-step procedures.
• Be sure to demonstrate the necessary procedures before students start each exercise.
• Each lesson ends with a summary of the lesson objectives.
PowerPoint Slide Shows There is a slide show for the course introduction, for each lesson, and for the two appendices.
Instructor Guide You must download the instructor guide from the course Web page on the Curriculum Development Group Web site.
Demos and Exercises • The instructor is assigned machines P0 and P1. Since most of the demos are done on
P1 (FDM Workstation), you need to either remotely connect from P0 to P1, or project to the class what is on P1. During the FGT, the instructor remotely connected to P1.
• Any demos that involve Workspace or Shared Services are done on P0 (EPM Server).
• When you demo SQLDeveloper on EPM Server, no setup is required. Just log on as user system, with the password hyperion.
• If you want to demo SQLDeveloper from the FDM Workstation, log on as user system, with the password hyperion, and perform the following steps:
o On the Connections tab, right-click hyperion, and select Properties.
o On the New / Select Database Connection dialog box, enter the password hyperion, change the hostname to <your-EPM-Server-name>.us.oracle.com, and click Connect.
o You should now be able to expand Other Users and view the tables for the CL_Flash, WLDEMO, or other users.
• It is a good idea to change the size of the mouse pointer so that students can better follow the demos.
• This is a very practical course that allows students to practice most features of the software.
o Lessons contain one or more exercises.
o The exercises build on one another. Students first create an FDM application and then continue working with it, adding control tables, locations, mapping tables, etc.
• Students perform all exercises on the FDM Workstation, except for the following two exercises which are done on the EPM Server:
o Exercise 1.1 – start services on EPM Server
o Exercise 15.1 – provision a user in Shared Services
• Since the even-numbered and odd-numbered machines in the classroom are not always next to one another, you can ask students to create favorites on their FDM Workstation. This would eliminate the need to move to the EPM Server for exercise 15.1 and whenever students want to look at the FlashFM application in Workspace.
o Workspace: http://<student’s EPM Server name>:19000/workspace
o Shared Services: http://<student’s EPM Server name>:19000/interop
o Examples of the student’s EPM Server name are EDCHR10P6 or EDCHR10P6.us.oracle.com.
• Exports were made of the Flash application after many of the exercises. If a student misses part of class and you need to catch them up, you can import parts of the application from the exported files located in the D:\CF\FDM\zFDM exports folder.
Course Files Files Folder Location Comments
Training files D:\CF\FDM Contains subfolders for each location with one or more load files
Flash export files D:\CF\FDM\zFDM Exports
Contains application exports (.XML files) from the Flash application. The exports were done after most exercises.
Documentation D:\CF\Documentation FDM Flash application D:\FDMdata\Flash HFM FlashFM application D:\CF\HFM\FlashFM Contains the files for setting up
The adapter readme files are in the D:\CF\FDM\Adapters folder and subfolders.
For I
nstru
ctor
Use
Onl
y.
This
doc
umen
t sho
uld
not b
e di
strib
uted
.
FDM Administration Instructor Guide Page 14
General Notes At some point during the course, you can point out these additional options:
• You can change the status bar icons (the gold and grey fish) that display during the Workflow process.
o Select Administration > Web Settings, and on the General tab, select the icon of your choice: Default (the fish), ButtonFish (fish in a bowl), or Hyperion (a check mark).
o The files for these icons are located in directories below the oracle\Middleware\EPMSystem11R1\products\FinancialDataQuality\WebServerComponents\Website\StatusBarIcons folder and subfolders.
o You can create your own status icons by replacing the graphics in the subfolders. For example, in the ButtonFish directory, you can replace the ProcessFailed.gif and ProcessSucceeded.gif files with your own graphics. Be sure to keep the file names the same.
o If you would like to try this out, you can rename the D:\CF\FDM\SmileyFace.gif file to ProcessSucceeded.gif and copy it to the ButtonFish or Hyperion directory. Change the default icon in Web Settings, and then go through part of the Workflow process and note the new icon.
• You can change the display of error/success messages in Web client. Go to Administration > Web Settings and select the Info Bar tab. You can check the box to only display errors and script messages, and you can change the length of time that the message remains on the screen.
For I
nstru
ctor
Use
Onl
y.
This
doc
umen
t sho
uld
not b
e di
strib
uted
.
FDM Administration Instructor Guide Page 15
Lesson 1: Product Orientation This lesson covers an overview of the benefits and features of FDM, and describes the data-load process. Slide show: L00_Course_Intro.ppt and L01_Overview.ppt
Changes to the Lesson in this Release • The introduction to Oracle’s EPM System was reduced to one topic (2 pages). • In the slide for the FDM topic, for source data, removed E-Business Suite, and added
ERP Integrator. • Added a topic to introduce ERP Integrator. For more information, refer students to
Appendix B. • When a Workflow task fails, a gray fish (instead of a white fish) is displayed. • Updated screenshots for new user interface.
Oracle’s Enterprise Performance Management System Give a brief introduction to Oracle’s EPM System, OBIEE, and where FDM fits in. These tools and processes allow companies to support their decision making.
FDM Overview
• Page 1-4: FDM topic – FDM stores everything in its database before exporting the data to target systems. Majority of clients (85 – 90%) load flat files.
• Page 1-6: Benefits of FDM topic – Cover the benefits of data integrity, minimal IT involvement, and audit trails.
• Page 1-7: Features of FDM topic – FDM includes almost 100 pre-built reports. These reports were Crystal Reports, but are now Active reports. Importing the standard reports is covered in lesson 4.
• Hold off on the discussion of the FDM directory structure until lesson 3.
• Page 1-10: Processing Data Through FDM slide and the 5 slides that follow:
o FDM was originally called WebLink and was owned by a company called UpStream. Hence the gold fish going upstream to denote a successful task.
o Give an overview of processing data in FDM. The objective is to get 4 gold fish to verify that the data was moved from the G/L to the target system.
o Explain each slide, from importing data through checking the validation rules. You can either explain each slide and then demo it, or explain all of the slides and then do a demo. To demo, log on to Web client, the Flash application, and demo loading a file for Texas and taking it through each step. Optionally, you can view the log file. By default, FDM skips header lines in the load file.
NOTE: Before doing any demos, you must add the Flash application to FDM. Review exercise 4.3 for detailed steps. At the end of the exercise, you must also change the machine profile for the Flash application from EDVDR8P1 to <your FDM Workstation name>.
For I
nstru
ctor
Use
Onl
y.
This
doc
umen
t sho
uld
not b
e di
strib
uted
.
FDM Administration Instructor Guide Page 16
Exercises Do these exercises at the end of the lesson.
Exercise Summary Files Needed 1.1 Starting Services on the EPM Server Machine
Start services and verify that they have started.
1.2 Starting Services on the FDM Workstation Start services and verify that they have started.
Note: Be sure that students verify that the services are started on each machine.
For I
nstru
ctor
Use
Onl
y.
This
doc
umen
t sho
uld
not b
e di
strib
uted
.
FDM Administration Instructor Guide Page 17
Lesson 2: Navigating FDM This lesson covers accessing Workbench, FDM Web client, navigating the user interface, setting the point of view, running reports, and Timeline Viewer.
Slide show: L02_Navigate.ppt
Changes to the Lesson in this Release • Updated screenshots for new user interface, and added procedures for accessibility. • Timeline Viewer exercise was removed because students do not yet have the Flash
demo application.
Errata Page 2-20, in the slide, in the Report Group Properties graphic – Power security level should be Administrator.
Accessing FDM Topics • Explain how to access FDM through Workbench and FDM Web client, and the
differences between the two user interfaces.
• Give students an overview of what tasks can be accomplished in Workbench and in Web client.
• Workbench can be accessed only by administrators.
• When logging on to FDM, the password is case sensitive.
You can draw the following diagram on the board to explain how Workbench and Web client access the application server.
For I
nstru
ctor
Use
Onl
y.
This
doc
umen
t sho
uld
not b
e di
strib
uted
.
FDM Administration Instructor Guide Page 18
Workbench Demo
• Log into Workbench and describe the three tabs. For those clients not on release 11.1.2.1, point out that releases prior to FDM 9.3.1 had a Metadata tab in Workbench, but now, all metadata functions are done in Web client. Point out the POV bar, but give the full description of POV when you demo Web client. Give a brief explanation of the three tabs.
• For the Adapters tab, mention that you can have multiple adapters to connect to target systems. Save the discussion on dimensions, dimension labels, registering adapters, and such, until lesson 4.
• For the Scripts tab, mention that you use scripts to enhance the flexibility and power of FDM. Import scripts are executed during the import process. Custom scripts are created for a specific purpose, such as exporting maps. Event scripts are executed in response to events, such as after file import or before consolidating. Save the detail discussion of scripts for the last three lessons.
• For the Reports tab, show that there are 19 report categories with a total of more than 100 pre-defined Active reports that are available in English, German, and French. Creating reports is not covered in this course.
FDM Web Client Demo
• Log into Web client and go through basic navigation as described on the FDM Web Client Interface slide. Describe the menu rollup, Workflow tab, menus, and content area.
• Point out that not all menu commands are available to all users. You use FDM security to limit which menu items and icons are accessible for each user. For example, the MetaData menu is typically used only by administrators. Save the detailed discussion for lesson 15.
• Cover all the slides on the POV, either by going through the slides or in your demo. Emphasize that tasks you run in Web client affect data for the current location selected in the POV. Cover locking the POV when you need to perform maintenance. Administrators can change their POV mode to Local so that they can change their POV without changing the POV for all users. In the security lesson, you will cover how to set the default location for a user.
Running Reports - Demo how to run one of the Process Monitor reports.
Timeline Viewer
• This feature was new in release 11.1.1. • Use the Flash application to demo graphical timelines. For example, you can select the
Jan-2011 period, All Events, and the Texas, Indiana, and Ohio locations. For Indiana, view All Import Events. For Texas, view All Export Events. For Ohio, view All Map Changes Events. As another example, you can select the Dates tab, select the start and end dates, and view all the events for the three locations.
• You cannot print the output from timeline viewer.
Exercise There are not exercises for this lesson.
For I
nstru
ctor
Use
Onl
y.
This
doc
umen
t sho
uld
not b
e di
strib
uted
.
FDM Administration Instructor Guide Page 19
Lesson 3: Creating FDM Applications This lesson covers creating and managing FDM applications. Slide show: L03_CreateApp.ppt
Changes to the Lesson in this Release • Updated screenshots for new user interface, and added procedures for accessibility. • When you create an application, there are new options for the OLE DB Provider.
SQLNCLI is for SQL Server 2005 Native Client, and SQLNCLI10 is for 2008. • Changed the exercise to specify different tablespace names (instead of sharing the
same tablespace). • TrainFDM now uses the CL_TrainFDM Oracle user name.
FDM Applications • Emphasize that an FDM application is made up of both an RDBMS database and
application directories. The directory structure is covered later in the lesson.
• Review the whole application building process (page 3-5). You can ask students to flag this page and come back to it throughout the course to point out which step in the process you are covering in each lesson.
• Point out that you can create applications in both Workbench and Web client, but we will use Workbench because of the integration steps in the next lesson.
• Emphasize that most clients use UNC (Universal Naming Convention) for the application path. Since we use only one server in class, we do not use UNC. The UNC format includes the server name and a shared directory name. You must set up the directory as Shared before you use the UNC format. (In Windows Explorer, right-click a directory name and select Sharing and Security.)
• Starting with this release, when you select Shared Services as the authentication provider and create an application, you can select the Shared Services application group in which to place the application.
• When you select Oracle as the RDBMS, you get an additional Options icon to override the default application table space.
• It makes it easier to keep track of your applications if the name of the RDBMS database is the same as the FDM application name.
• To create the RDBMS database for the new application, you must provide a user name and password with admin rights to the RDBMS.
Demo
• Optional: In SQL Developer, show that there are tables below the CL_Flash schema, but none yet under the CL_TrainFDM schema.
For I
nstru
ctor
Use
Onl
y.
This
doc
umen
t sho
uld
not b
e di
strib
uted
.
FDM Administration Instructor Guide Page 20
• In Web client, demo how to create an application. Students will create an application in Workbench. After creating the application, open Windows Explorer and show the application directory structure. The directory structure is covered on page 3-12. The directory structure is similar to that of Hyperion Enterprise.
• For demo purposes, you can use the Oracle DB user names CL_Test1, CL_Test2, and CL_Test3.
• You can open the D:\Oracle\Middleware\EPMSystem11R1\products\ FinancialDataQuality\SharedComponents\Config\HyperionFDMApplications.xml file to show that the new application is listed in the file with the selected options.
Exercise
Do this exercise at the end of the lesson.
• In the exercise, students give a different name for each tablespace. If they make a mistake and enter the wrong tablespace name, the application is still created with no errors. However, later, when they try importing data, they’ll get an error. Tell students to be careful when entering the tablespace names.
• If students make a mistake, for example, misspell the database password, FDM creates the application directory structure first, and then gives an error about not being able to connect to the database. Be sure students delete the application directory structure first, before trying to create the application again.
• Issue during FGT: One student accidentally closed the window while his application was being created. The application continued to build in the background, but there was no indication of that on the screen. He could not log back on until the application creation was finished.
Create the TrainFDM application. Use Options to specify separate tablespaces.
CL_TrainFDM Oracle database user must be set up. Tablespaces must be set up in Oracle database. See tablespace names in the exercise. Fo
r Ins
truct
or U
se O
nly.
Th
is d
ocum
ent s
houl
d no
t be
dist
ribut
ed.
FDM Administration Instructor Guide Page 21
Lesson 4: Integrating Applications This lesson covers applying settings to connect FDM applications to target applications and import standard reports and templates.
Slide show: L04_IntegrateApp.ppt
Changes to the Lesson in this Release • Updated screenshots for new user interface, and added procedures for accessibility. • Changed the order of some of the topics. First cover how to import an adapter, and then
cover the different source and target adapters. • Since the Talleyrand (11.1.2) release, dimension names in FDM must be named exactly
as they are named in Financial Management for the drill-through functionality to work correctly. Custom dimensions should never be disabled. Exercise 4.1 was modified accordingly.
• Added the Modifying Dimensions Properties topic and procedure. • Added the Configuring Financial Management Adapters topic and procedure. • Default adapter dimension names/aliases have changed. • Added information on importing and configuring the ERPI adapter. • Modified source adapter topic; topic now refers to the ERP source adapter for SAP and
refers to the ERP Integrator adapter. Information on the old E-Business Suite source adapter was removed (it is included in ERPI).
• Modified the file names for the standard reports and templates. • Adapters are now located in D:\CF\FDM\Adapters. • Standard reports are now located in D:\CF\FDM\Reports. • Templates are now located in D:\CF\FDM\Templates. • The HFM adapter was registered on the machine by using a cmd prompt. As in previous
releases, there is no need for students to register the adapter in the exercises. • In exercise 4.1, after importing the FM adapter, you have to configure it. When modifying
dimension properties, you also have to modify the Custom3 and Custom4 dimensions. • Exercise 4.1 got too long in this release, so it was split into two exercises, one for setting
up the integration and one for testing the integration. • Added exercise 4.3 to add the Flash application to FDM.
Issue of Image Do not demo how to register the FM adapter. We could not register the HFM adapter in Workbench without encountering an error. The HFM adapter is registered for you as part of the ACES image setup. It was done through the command line:
cd d:\winnt\microsoft.NET\Framework\v2.0.50727 RegSvcs D:\CF\FDM\Adapters\AdapterComponents\fdmFM11xG5E\fdmFM11xG5E.dll
Errata • Student Guide, page 4-25, Configuring Integration Settings topic: To match the class setup, in
one of the graphics on the slide, the application name should be FlashFM instead of Flash. If your HFM application name is Flash, then the graphic is OK.
• Student Guide, page 4-29, Associating Dimensions Between Applications topic: In the slide, need to recapture two graphics without the Attribute dimensions for FDM.
• Refer to the exercise section for errata for exercise 4.3.
For I
nstru
ctor
Use
Onl
y.
This
doc
umen
t sho
uld
not b
e di
strib
uted
.
FDM Administration Instructor Guide Page 22
Integration Overview • Page 4-2: Use this as an overview of the integration process and an outline of the
lesson.
• Mention that some tasks are completed in Workbench, and some in Web client.
Adapters • Adapters are downloaded from the E-delivery site.
• Adapters are located in the D:\CF\FDM\Adapters directory.
• Each adapter comes with a read me file that includes adapter information. For example, the FM adapter, FM11x-G5-E.xml has the fm_g5_e_target_adapter_readme.pdf file.
• You use the same adapter for both Essbase and Planning.
• You import adapters for your FDM application in Workbench (not available in Web client). Since release 9.3, you can import multiple adapters for one FDM application.
• You register adapters only once per adapter and server. The adapters you register are either .DLL or .EXE files.
• If you have Enterprise, Essbase, or Strategic Finance students, be sure to cover those adapters. For Essbase, explain how to associate the dimensions.
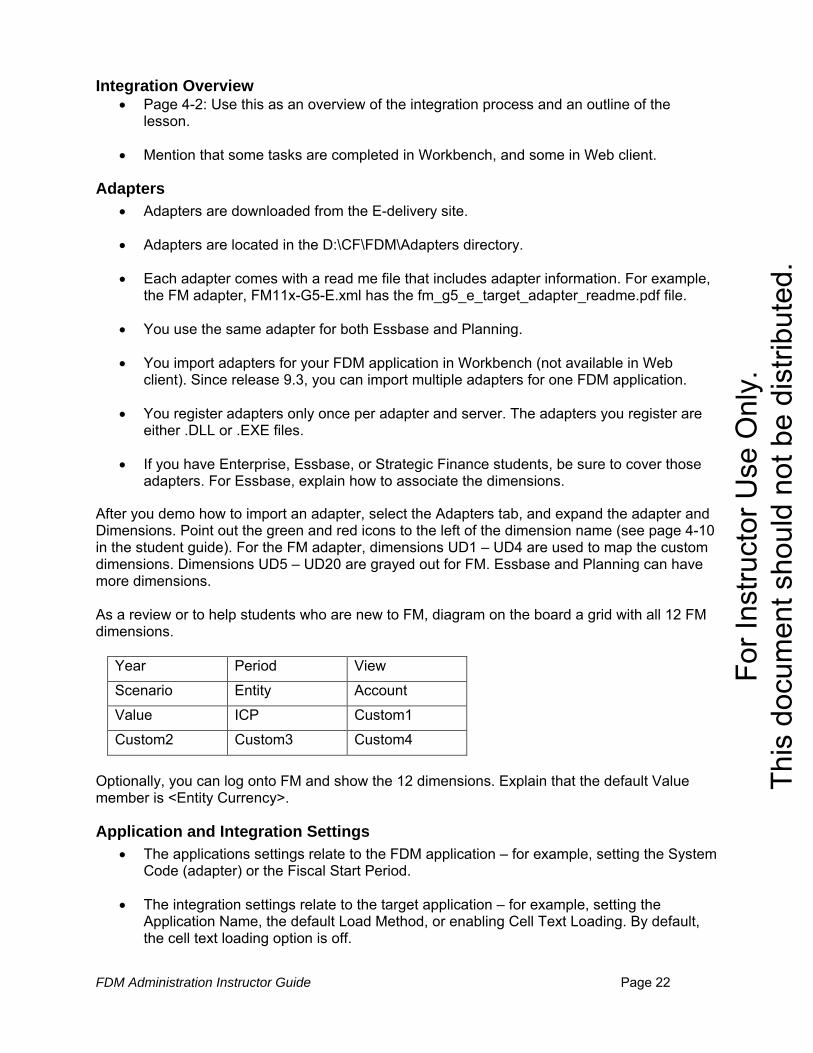
After you demo how to import an adapter, select the Adapters tab, and expand the adapter and Dimensions. Point out the green and red icons to the left of the dimension name (see page 4-10 in the student guide). For the FM adapter, dimensions UD1 – UD4 are used to map the custom dimensions. Dimensions UD5 – UD20 are grayed out for FM. Essbase and Planning can have more dimensions. As a review or to help students who are new to FM, diagram on the board a grid with all 12 FM dimensions.
Year Period View
Scenario Entity Account
Value ICP Custom1
Custom2 Custom3 Custom4
Optionally, you can log onto FM and show the 12 dimensions. Explain that the default Value member is <Entity Currency>.
Application and Integration Settings • The applications settings relate to the FDM application – for example, setting the System
Code (adapter) or the Fiscal Start Period.
• The integration settings relate to the target application – for example, setting the Application Name, the default Load Method, or enabling Cell Text Loading. By default, the cell text loading option is off.
For I
nstru
ctor
Use
Onl
y.
This
doc
umen
t sho
uld
not b
e di
strib
uted
.
FDM Administration Instructor Guide Page 23
• In this release, the Batch Loader application setting is off by default. In the batch processing lesson, students enable Batch Loader as part of the exercise.
• If you import an Essbase adapter, in the Integration settings, you select the Application Name and the Database Name.
Demos • In Workbench, demo how to import, register, and configure the Financial Management
adapter.
• On the Adapters tab, expand the adapter and Dimensions, and demo how to change dimension properties and make them Active or inactive.
• Expand the adapter and add a machine profile.
• Select Tools > Application Settings and verify the System Code option is set to FM11X-G5-E. Students will perform this task in Web client.
• Select Tools > Integration Settings and set the Application Name to FlashFM.
• In Web client, you can test the integration in several ways. For example, you can select MetaData > Control Tables, add a row, and in the Target Per column, select a target period from the drop-down list. Or, select Activities > Maps, add a row, and browse for a target account.
• In Workbench, import the standard reports. On the Reports tab, below the English folder, expand some of the report folders. Right-click any report and select Report Definition Properties. All reports are .RPX files.
• Extract the templates to the <app>\Outbox directory.
Exercise Do these exercises at the end of the lesson.
• Before students start exercise 4.1, be sure they know what their FDM Workstation machine name is so they can enter it in the machine profile.
• Exercise and solution 4.3, pages 10 and 91: At the end of the exercise and solution, tell students to launch Workspace, log on to the Flash application, and change the machine profile name from EDVDR8P1 to <the student’s FDM Workstation name>.
Import, register, and configure the FM adapter. Add machine profile Change dimension properties Import standard reports Copy template files
D:\CF\FDM\Adapters\FM11x-G5-E.xml D:\CF\FDM\Adapters\AdapterComponents\fdmFM11xG5E\fdmFM11x-G5-E.dll D:\CF\FDM\Reports\StandardReportsOracle1112000Active.xml All templates in the D:\CF\FDM\Templates directory
4.2 Testing the Integration Check Application Settings > System
For I
nstru
ctor
Use
Onl
y.
This
doc
umen
t sho
uld
not b
e di
strib
uted
.
FDM Administration Instructor Guide Page 24
Code Set Integration Settings > Application Name Verify connection to target FM app
4.3 Adding Applications Add the Flash demo application to FDM. The application uses the CL_Flash Oracle user name.
D:\FDMdata\Flash directory with subdirectories
For I
nstru
ctor
Use
Onl
y.
This
doc
umen
t sho
uld
not b
e di
strib
uted
.
FDM Administration Instructor Guide Page 25
Lesson 5: Setting Up Control Tables and Locations This lesson covers viewing and modifying control tables to set up periods, categories, and currency codes; adding locations and setting location attributes.
Slide show: L05_SetUpTabLoc.ppt
Changes to the Lesson in this Release Updated screenshots for new user interface, and added procedures for accessibility. • Consolidated some of the topics into one topic (Managing Control Tables) which
includes procedures for adding, modifying, and deleting members in control tables, and also canceling changes.
• Removed the Viewing Currency Codes topic and incorporated it into the main control table topics since all commands are now available for currency codes.
• In Control Tables, you select target periods and categories from a drop-down list instead of browsing for target members in the target application.
• In the Currency Codes control table, you can add and delete currencies. In the past, you could only export the currencies to an Excel file, add currencies to the file, and then import them to the FDM application.
• Added the Adding and Modifying Range Names topic. • When you import periods, you must now import the periods to two tables, tPOVPeriod
and tPOVPeriodAdaptor. You must first import to the tPOVPeriod table before you import to the tPOVPeriodAdaptor table, so name the ranges accordingly. The same applies to categories (tPOVCategory, tPOVCategoryAdaptor tables).
• Modified the All Periods.xls file for exercise 5.1 to include the tPOVPeriodAdaptor table.
Control Tables • Go over the slides on control tables. Start with the Categories table and explain how to
add categories. Continue with the Periods control table and go over the slides for exporting the Periods to Excel, modifying the Excel file, and importing the Periods table to FDM.
• When you import periods from Excel, FDM merges the data, it does not replace the data. If there are any problems with existing periods, you must fix those manually, or delete them, and then import the correct information from Excel.
• Demo adding a couple of periods and then export the periods to Excel. o Open the exported file and display the hidden metadata rows, viewing the range for
upsPOVPeriod, and defining the range name (Insert > Name > Define). The exported file does not include a range for the tPOVPeriodAdaptor table.
o Open the D:\CF\FDM\All Periods.xls file to show a completed import file. In the Text Description column, show the Left function to define the period and year. Show the two range names, upsPeriod1 for the tPOVPeriod table, and upsPeriod2 for the tPOVPeriodAdaptor table.
o Import the All Periods.xls file into FDM.
• Currency Codes control table o Since the Talleyrand (11.1.2) release, you can add and delete currencies in the
Control Tables window. You can also import currencies to the tCTRLCurrency table. o FDM does not translate currencies.
For I
nstru
ctor
Use
Onl
y.
This
doc
umen
t sho
uld
not b
e di
strib
uted
.
FDM Administration Instructor Guide Page 26
Locations • On the board, list a few locations, like NA, OH, MI, and TX.
• Locations in FDM are place holders to hold source data for target systems.
• Locations are unlike entities in FM – they are not aggregated.
• FDM does not do currency conversion, but there are reports that can display currency. You define which currency to display in the reports by selecting the currency for the location on the General tab.
• Controls review locations are for grouping locations together for review.
• Data load locations have no children.
• You can change a data load location to a Review location.
• The Location tab of the Change Point-of-View dialog box displays all locations. If you select a controls review location, you receive an error if you are in a window used only for data load locations, such as in the Workflow tasks or the Maps window.
• Demo adding a few locations. Explain the General and Workflow Behaviors tabs, but save most of the detail for later lessons.
Exercises
Do exercise 5.1 after the Control Tables topics, and exercise 5.2 at the end of the lesson.
Exercise Summary Files Needed 5.1 Setting Up Control Tables
Set up Category control table Delete WLCat category Set up Period control table Export/Import XLS file
All Periods.xls
5.2 Adding Locations Add review and data load locations
For I
nstru
ctor
Use
Onl
y.
This
doc
umen
t sho
uld
not b
e di
strib
uted
.
FDM Administration Instructor Guide Page 27
Lesson 6: Setting Up Mapping Tables This lesson covers mapping source dimensions members to target dimension members by building maps in the FDM Web client, by importing maps, copying maps, and assigning parent maps. The lesson also covers setting up conditional mapping.
Slide show: L06_MapTables.ppt
Changes to the Lesson in this Release • Updated screenshots for new user interface, and added procedures for accessibility. • If a custom dimension is not used in Financial Management, it must still be mapped to
[None] so that FDM contains that information in the database. Exercises 6.1 and 6.2 were changed accordingly.
Errata The CF\FDM\Michigan\MichiganAccount FM.tra file includes some incorrect mapping lines, like the line “1503,1591,15000010” should be “1503>1591,15000010”. This does not impact the exercises, and will be corrected in the next release.
Mapping Tables • Each location has a mapping table for each dimension in FM.
• When you “share” mapping tables, you share ALL maps for the location with another location. You cannot share only the accounts map or only the custom1 map.
• When you Copy maps from a location, it replaces the map in the destination location.
• In the Maps window, when you Delete All, you delete all mapping for that location and that dimension. You are not just deleting the map for the selected Type (Explicit, Between, In, or Like).
• Review activating map dimensions and assigning dimension labels.
• Cover the slides on map types and processing order.
• On the General tab of the Locations window, you can select Sequence Map for a location. After selecting the Sequence Map option, in the Maps window for all map types except Explicit, a Sequence column is displayed. The sequence enables you to sort and process the mapping table by a sequence number, rather than the default order of alphabetically by rule name.
Building Maps Externally • Besides building maps manually within FDM, you can build maps by using MapLoader
files, LedgerLink files, and Enterprise conversion tables. Demo each option. • In addition to the MapLoader.xls file, there is also a MapLoader_With_UpCheck.xls file.
When you load with the MapLoader_With_UpCheck.xls file, it validates the target accounts by checking that they exist, and it takes longer.
• If you open any of the MapLoader files in Excel and notice #Name to the right of the main worksheet, then enable macros (Navigate > Excel Options > Trust Center > Trust Center Settings > Macro Settings > Enable all macros.)
For I
nstru
ctor
Use
Onl
y.
This
doc
umen
t sho
uld
not b
e di
strib
uted
.
FDM Administration Instructor Guide Page 28
• MapLoader files always do a “merge”, and do not replace existing members, for example, existing account mappings. It is recommended that you make sure your MapLoader files are complete, so that you can Delete All before importing the latest file.
• For LedgerLink files, make sure that you first set the dimension and your POV before loading the files, or you will load them to the wrong dimension/location.
• Demo copying maps from one location to another.
• Demo the sharing of dimension maps.
Conditional Mapping • Instead of a range of target members, conditional mapping uses #script and a script
expression to define the mapping.
• Enter the conditional statement as one line, and let the window wrap it. FDM does not like it when you to enter the conditional statement on separate lines.
• VB script is case sensitive; for example, enter the InterCoAp account exactly as you see it, including case.
• Reference the VarValues variables table in the student guide to point out that the varValues(14) variable is for mapping the target account.
Exercises
Do exercise 6.1 after the Assigning Dimension Labels topic. Do exercise 6.2 after the Importing Maps topic. Do the last 2 exercises at the end of the lesson.
6.4 Copying Mapping Tables Copy Texas account map to Indiana and Ohio Copy Texas ICP map to Indiana and Ohio Copy Texas department map to Indiana, Ohio, and Michigan Copy Texas prod/salary map to Indiana, Ohio, and Michigan
For I
nstru
ctor
Use
Onl
y.
This
doc
umen
t sho
uld
not b
e di
strib
uted
.
FDM Administration Instructor Guide Page 29
Review of Day 1 At the beginning of day 2, open the L03_CreateApp.ppt file and review slide 5 (Application-Building Process). Review the steps from day 1 and mention the steps that you will cover on day 2.
Review the day 1 material by asking students to step you through creating an FDM application.
Workbench Create a new application Add, register, and configure the FM adapter Add a machine profile Change dimension names and labels Import standard reports
Windows Explorer Unzip the templates to the Outbox directory Web client Check Application Settings
Set Integration Settings Test the connection to the target application with MetaData > Control Tables or Activities > Maps.
Additional Information At this point, you can add these additional options for FDM applications:
• You can copy an application from a test environment to a production environment with the Export and Import commands.
o Log into the application in Workbench and select File > Export. Browse to a directory, enter a file name, and click Save. Select all of the options on the General and Options tabs and click OK. The application is saved to an XML file.
o You can then create an application on another server, and select File > Import to import all of the application information.
o You can also use Export and Import to export part of one application and move it to another application. For example, you can export just the import formats or the security from one application and import them to another application.
• You can also backup application files to archive applications as well as for support issues when needed.
o The Backup Application Files command automatically compresses all files in the FDM application directory into one ZIP file. Files included are scripts, reports, Excel templates, logs, archives, and any other files that have been created or saved in the application directory.
o Log into the application in Workbench and select File > Backup Application Files. Browse to a directory, enter a file name, and click Save.
For I
nstru
ctor
Use
Onl
y.
This
doc
umen
t sho
uld
not b
e di
strib
uted
.
FDM Administration Instructor Guide Page 30
Lesson 7: Building Import Formats
This lesson covers importing groups by adding fields and expressions to the format; assigning import formats to locations; and managing records by sorting, filtering, and deleting records.
Slide show: L07_ImportForm.ppt
Changes to the Lesson in this Release • Updated screenshots for new user interface, and added procedures for accessibility. • Replaced topic on building import formats for EBS with a topic on building import formats
for ERP Integrator
Errata In the student guide, page 7-26, FillL Expressions topic: In the slide, in the top graphic, in the Length column for the Account dimension, the value should be 7 and not 10.
Import Formats • Format must be the same from month to month.
• If the G/L extract produces a different source file, you must modify the format.
• Every import format must include at least one dimension.
• Files must be in the Inbox folder before you can open them in Format Builder.
• You assign only one import format per location.
• You can write scripts to use more than one import format based on the load file name (covered in the last lesson).
Demo • Build an import format for Texas with Import Format Builder.
• Use the Texas_GL.glo file (a fixed file)
• You can count the length of the field and enter it in the import format, but it is easier to use the drag-and-drop feature of Builder. Highlight the longest member of the field, left-click, and drag it to the “target”.
• You use trial and error until you get the exact length needed for the file.
• Show building a format for a delimited file – you can use the California.dat file to build the format without loading it.
• Show as many of the expressions as you can in your demos. There are many exercises in this lesson, so cover half of the topics, let students do the first 4 exercises, then cover the rest of the topics and have students complete the last 4 exercises.
For I
nstru
ctor
Use
Onl
y.
This
doc
umen
t sho
uld
not b
e di
strib
uted
.
FDM Administration Instructor Guide Page 31
Exercises
Do exercises 7.1 through 7.4 after the Sign Expressions topic. Do the last 4 exercises at the end of the lesson.
Exercise Summary Files Needed 7.1 Building Import Formats for Fixed Files
Create NorthAmerica import format Texas_GL.glo
7.2 Building Import Formats for Delimited Files Create Indiana import format
Indiana_GL.csv
7.3 Creating Import Formats for Multiple Entities Create OhioMulti import format
Ohio_Multiple Ent.glo
7.4 Assigning Import Formats to Locations Assign the NorthAmerica import format to Texas and Michigan Assign the Indiana import format to Indiana Assign the OhioMulti import format to Ohio
7.5 Adding the SKIP Function and DRCRSplit Expression Create Nevada import format Assign the Nevada import format to Nevada
Nevada.txt
7.6 Adding the FILL and SKIP Expressions Create the UK import format Assign the UK import format to UK
UK Trial Bal.txt
7.7 Adding the FillL Expression and Concatenating Fields Create the Illinois import format Assign the Illinois import format to Illinois
Illinois.txt
7.8 Adding the FACTOR Expression Create the California import format Assign the California import format to California
California.dat
For I
nstru
ctor
Use
Onl
y.
This
doc
umen
t sho
uld
not b
e di
strib
uted
.
FDM Administration Instructor Guide Page 32
Lesson 8: Loading Data This lesson covers importing source files to FDM Web client, validating the dimension mappings, and loading (exporting) the data to target systems.
Slide show: L08_LoadData.ppt
Changes to the Lesson in this Release • Updated screenshots for new user interface, and added procedures for accessibility. • In the About Loading Data topic, replaced Oracle E-Business Suite with ERP Integrator
as source data • In the Displaying Source System topic, data from Oracle E-Business Suite was loaded to
FDM through ERP Integrator. From FDM, you open the EBS Financials source system. • The term “drill back” is replaced with “drill through”. • Review the drill through topics. Enabling drill through is simpler in this release. You
enable drill through to FDM from Financial Management with the Enable Drillable Region Load option in Integration Settings.
• Updated topic on drilling through to Essbase.
Importing Source Files • Emphasize that you import the source data to the location, category, and period that you
select in the POV.
• Financial Management Load Methods:
o 0 – Replace – For each unique combination of scenario, year, period, entity, and value in the data file, the system first clears all corresponding values from the application, then loads the values from the data file. If you have multiple values in the file for the same unique combination of dimensions, the system loads only the value for the last entry.
o 1 – Merge – For each unique point of view that exists in the data file and in the application, the value in the data file overwrites the data in the application. If you have multiple values in the file for the same point of view, the system loads only the value for the last entry.
o 2 – Accumulate – For each unique point of view that exists in the data file and in the application, the value from the load file is added to the value in the application. Data for system accounts is not accumulated.
o 3 – Replace by Security – This option enables you to perform a data load in Replace mode even if you do not have access to all accounts. Only cells to which you have access are cleared.
• In Administration > Integration Settings, you have these options: o Enable Load o Enable Line Item Detail Loading o Enable Cell Text Loading o Load Method
For I
nstru
ctor
Use
Onl
y.
This
doc
umen
t sho
uld
not b
e di
strib
uted
.
FDM Administration Instructor Guide Page 33
Demo • Demo loading the data into Texas and correct the 4 validation errors and the invalid
intersection error.
• When fixing validation errors, emphasize updating
• When you export, the name of the load file is listed in the Target System Load dialog box, such as Texas01.dat. You can show these files in the application’s Outbox directory.
the grid after you select the correct member.
• After exporting the data, select Analysis > Reports, and from the English Groups list, select Check Reports. Open the Check Report to display the validation report.
• After you export the data to FM, you can verify the data load by launching Workspace, and opening the FlashFM application. Open one of the available data grids, and select the correct POV for the loaded data. You can also right-click a cell with data and select Drill Through to FDM.
Exercises
• If students misspelled their tablespace names when they created the application, they can run into errors in these exercises. For example, if they misspelled the Work tablespace name, when they import the data, they’ll get a “Data access error”.
• To correct the spelling of tablespace names, go to Administration > Configuration Settings, select the tablespace name option (for example, Oracle Work TableSpaceName), correct the name, and save the change.
Do these exercises at the end of the lesson.
Exercise Summary Files Needed 8.1 Loading Data
Import data to Texas, Jan, FDM_Actual Fix undefined mapping errors Validate Fix Prod/Salary mapping (Brakes) Export
Texas_GL.glo
8.2 Loading Data into Multiple Entities Copy Texas account and department mapping to Ohio Import data to Ohio, Jan, FDM_Actual Fix undefined mapping errors (OH100, OH110, etc) Validate and Export
Ohio_Multiple Ent.glo
For I
nstru
ctor
Use
Onl
y.
This
doc
umen
t sho
uld
not b
e di
strib
uted
.
FDM Administration Instructor Guide Page 34
Lesson 9: Building Validation Rules This lesson covers creating validation rules and assigning them to locations.
Slide show: L09_ValRules.ppt
Changes to the Lesson in this Release Updated screenshots for new user interface, and added procedures for accessibility.
Validation Rules • Emphasize that you must type two pipes || (located above the \ key) in the Rule area of
the Rule tab before you can select target
• To retrieve FDM
members on the Look Up tab.
source
• To retrieve FDM
data, use the tilde character (~).
converted
• In Validation Editor, the pre-defined functions that were available in Workbench 9.3, are not available. On the Look Up tab, after selecting a dimension and clicking Browse for a member, you cannot search for a member – you must scroll through the list to find it.
data, use the grave accent character (`).
• While building the rule, you can copy and paste between the Rule and Display areas.
• On the Look Up tab, you can identify the 12 dimensions of the target FM application. The account dimension is mandatory.
• Examples of rule logic are in the student guide.
• On the board, you can draw a sample validation report and label which parts of the report are created by each Display Value: o #Title – displays the report title, like North America Validation o #Subtitle – displays an indented subtitle, like Key Data o #ModeList – sets the report mode to Listing so that you can display target account
values or custom expression results on the report o #ModeRule – sets the report mode to Rule so that you can display rule results on
the report
• If you get questions on consolidating the data, defer them to the next lesson.
Demo • Use the Flash application to demo creating a validation group and building a validation
rule.
• Enter the two pipes on the Rule tab, and demo selecting members on the Look Up tab.
• You can also use the NorthAmerica validation group and rules for the demo.
• Show that the NorthAmerica validation group is assigned to the Texas location.
• Export the data and check the validation report. During the export, FDM creates the export file. Target system now loads the export file data.
For I
nstru
ctor
Use
Onl
y.
This
doc
umen
t sho
uld
not b
e di
strib
uted
.
FDM Administration Instructor Guide Page 35
Exercise
Do this exercise at the end of the lesson. Exercise Summary Files Needed 9.1 Creating, Assigning, and Verifying Validation
Rules Create NorthAmerica validation rules Assign the NorthAmerica validation rules to Texas, Indiana, and Michigan Export data for Texas, Jan, FDM_Actual View validation report
For I
nstru
ctor
Use
Onl
y.
This
doc
umen
t sho
uld
not b
e di
strib
uted
.
FDM Administration Instructor Guide Page 36
Lesson 10: Setting Up Validation Entities This lesson covers activating validation entity reporting for a location.
Slide show: L10_ValEntities.ppt
Changes to the Lesson in this Release Updated screenshots for new user interface, and added procedures for accessibility.
Validation Entities • The check to consolidate will consolidate the parent member that you specify in the
Parent field.
• Administration > Integration Settings o Enable Consolidation option – selected by default o Consolidation Type option – by default, it is set to 0 – Impacted, which is the most efficient.
• After you set up validation entities and assign them to locations, when you load data from FDM to the target system, FDM consolidates the selected entities. The consolidated values can then be displayed in the validation report.
• Use the slides to step through creating the validation entities and assigning them to locations.
Demo Use the Flash application to display the validation group and entities and to show that the entity group was assigned to the Texas location. Step through an export to FM and view the validation report.
Exercise Do this exercise at the end of the lesson.
Exercise Summary Files Needed 10.1 Setting Up Validation Entities
Create the NA validation entity group Assign the NA validation entity group to Texas Export data for Texas, Jan, FDM_Actual View validation report
For I
nstru
ctor
Use
Onl
y.
This
doc
umen
t sho
uld
not b
e di
strib
uted
.
FDM Administration Instructor Guide Page 37
Lesson 11: Processing Batch Files This lesson covers processing batch files to automate the workflow process in FDM.
Slide show: L11_ProcessBatch.ppt
Changes to the Lesson in this Release Updated screenshots for new user interface, and added procedures for accessibility.
Enabling Batch Processing In addition to enabling the Batch Loader option in Application Settings, the Hyperion Financial Data Quality Management – Task Manager service must be started. The service provides the ability to schedule tasks. The Task Manager service is started in exercise 1.2.
Setting Up Batch-Load Files • You must place the batch-load files in the OpenBatch or OpenBatchML directories.
• You include delimiter characters (~, _, @) in the file names to separate the 5 parts of the file names.
• The example of file names in the student guide uses the _ as the delimiter.
• The files in the exercise use the @ character as the file delimiter.
• After you process the batch load files, they are moved to another directory below the <application-name> > Inbox > Batches directory.
Exercise Do this exercise at the end of the lesson.
Exercise Summary Files Needed 11.1 Processing Data in Batch Loader
Enable Batch Loader Copy load files to OpenBatch directory Create a batch script in Workbench Execute and verify a batch Create and schedule a batch task
Lesson 12: Creating Logic Accounts This lesson covers creating simple and complex logic accounts.
Slide show: L12_LogicAcc.ppt
Changes to the Lesson in this Release Updated screenshots for new user interface, and added procedures for accessibility.
Errata Page 12-21, Creating Logic Expressions topic: In the slide and text, the pipes (||) surrounding Cuval should be removed.
Logic Accounts • With logic accounts, FDM derives new data from the imported data. It allows you to
calculate data.
• Simple logic is used for one account and relates to Enterprise.
• Complex logic is used for any dimension that you can map.
• Logic accounts give you the ability to manipulate information.
• For simple logic accounts, type all of the script in the Value/Exp column on one line – do not hit “Enter”.
• With complex logic, you can use FDM to create a new account that you then export to FM.
• Use page 12-16 as a reference for assigning function return values. You can write a Value/Exp on the board, like the one on the slide: If CurVal > 0 Then Result = CurVal Else Result = “Skip” End If.
Demo • You can demo the simple logic group in the Flash application to show a calculation.
• Show the complex logic group in the Flash application. In the Criteria Value column, add the detail for each dimension.
Exercises Do exercise 12.1 after the Creating Logic Expressions topic. Do the last two exercises at the end of the lesson.
Create IndianaSimp logic group Assign the IndianaSimp logic group to Indiana Import data to Indiana, Jan, FDM_Actual Confirm logic accounts
Indiana_GL.csv
12.2 Creating Complex Logic Accounts to Determine Balance Create TexasComp logic group
For I
nstru
ctor
Use
Onl
y.
This
doc
umen
t sho
uld
not b
e di
strib
uted
.
FDM Administration Instructor Guide Page 39
Assign the TexasComp logic group to Texas Import data to Texas, Jan, FDM_Actual Confirm logic accounts
Texas_GL.glo
12.3 Creating Complex Logic Accounts to Map Duplicate Accounts Add logic account to TexasComp logic group Import data to Texas, Jan, FDM_Actual Confirm logic account Fix mapping for one account Validate Drill down to show conversion rules Export View the *25500 accounts
Texas_GL.glo
For I
nstru
ctor
Use
Onl
y.
This
doc
umen
t sho
uld
not b
e di
strib
uted
.
FDM Administration Instructor Guide Page 40
Lesson 13: Loading FDM Journals This lesson covers importing and posting journal templates.
Slide show: L13_Journals.ppt
Changes to the Lesson in this Release Updated screenshots for new user interface, and added procedures for accessibility.
Journal Templates • There is a journal template, Journal.xls, in the <FDM app>/Outbox/Templates
directory.
• FDM Journals are loaded into the value <Entity Currency> in FM.
• In MetaData > Locations, on the General tab, you can change the Data Value option.
• In Administration > Integration Settings, you have these options: o Enable Journal Loading o Journal Status o Journal Default Data Value o Journal Enable JV ID Per Entity o Journal Balancing Attribute
• Reference the metadata, load method, and dimension tags in the student guide.
Demo • Show students the journal template, Journal.xls.
• Open the D:/CF/FDM/Texas/Texas_JE_HC.xls file. Unhide rows 15 through 23 and identify the metadata tags. Select the upsJournal range to show the rows that will be loaded.
• Load the file in FDM (Activities > Journal) and note the error with the incorrect category name. Modify the category name in the load file and load again in FDM.
• After posting the journals, open the Import window to display the loaded journals.
Loading HFM Journals If there is student interest, you can cover how to load HFM journals from FDM to the target application.
• In HFM, the entities must allow journal adjustments, and you must open the period for journals. On this image, you must open the periods, for example, open Jan and Feb for journals.
• In FDM, under Administration > Integration Settings, select the Enable Journal Loading option and enable it.
• In FDM, under Administration > Integration Settings, select the Journal Status option, and select the status of your choice, such as 4-Posted.
For I
nstru
ctor
Use
Onl
y.
This
doc
umen
t sho
uld
not b
e di
strib
uted
.
FDM Administration Instructor Guide Page 41
• In FDM, under MetaData > Locations, select the Texas location, and on the General tab, click Browse for a data value. Select <Entity Currency>;<Entity Curr Adjs>.
• Set your POV to Texas, Jan-2011, FDM_Actual.
• Select Activities > Journal, and on the Upload File tab, select the Texas_JE_HC.xls file, click Check-In, and then click Post.
• When you export the Texas data, FDM creates 3 load files, such as: Texas032.dat – Texas data load file Texas032-A.dat – Texas load file for journals Texas032-B.dat – Texas load file for cell text
• The Texas032.dat file loads data to the <Entity Currency> value.
The Texas032-A file loads data to the <Entity Curr Adjs> value.
• The Texas032-B.dat file is empty.
• If you now go into the Financial Management FlashFM application, navigate to Tasks > Journal Tasks > Process Journals, set the POV to Actual, 2011, Jan, <Entity Curr Adjs>, you will see the FDM journal.
For I
nstru
ctor
Use
Onl
y.
This
doc
umen
t sho
uld
not b
e di
strib
uted
.
FDM Administration Instructor Guide Page 42
Exercise Do this exercise at the end of the lesson.
Check in journal file for Texas, Jan, FDM_Actual Correct POV error Check in and post journals Validate and fix unmapped dimension members Validate and export
Texas_JE_HC.xls
For I
nstru
ctor
Use
Onl
y.
This
doc
umen
t sho
uld
not b
e di
strib
uted
.
FDM Administration Instructor Guide Page 43
Lesson 14: Loading Data with Multiload Files This lesson covers loading data into multiple periods, categories, and locations.
Slide show: L14_Multiload.ppt
Changes to the Lesson in this Release Updated screenshots for new user interface, and added procedures for accessibility.
Multiload Files • Reference the metadata and load control tags in the student guide.
• The student guide includes load control tags for FM and Enterprise. Each target application (FM or Enterprise) has different load control tags.
• For tags that are not used in a target application, use the comma as a placeholder.
• If you do not specify tag values, the values default to those specified in integration settings.
• If you check-in a multi-load file and go through some of the load processing options, such as import, the status displays a check mark for Import. If you navigate to another window and then back again to multi-load, check the file in again and click the Status button to see the current status.
• FDM processes multiload text files faster than multiload Excel templates – see last paragraph on page 14-16.
• Be sure to cover how to view data load errors, as that is part of the exercise.
Demo Demo the load process with the Budget-12-Period_TX.xls file. Exercises Do exercise 14.1 after the Adding Dimension Tags topic, and exercise 14.2 at the end of the lesson.
Import multiload Excel file to Texas, FDM_Budget, 12 periods Execute Validate, Export, Consolidate, and Check tasks
Budget-12-Period_TX.xls
14.2 Loading Multiload Text Files Import multiload text file to Indiana, FDM_Budget, 12 periods Check-in, import, and validate Fix FDM Validation Error (2 mapping errors) Execute Check-in, Import, Validate, Export, and Check tasks (no need to consolidate)
Budget-12-Period_IN.txt
For I
nstru
ctor
Use
Onl
y.
This
doc
umen
t sho
uld
not b
e di
strib
uted
.
FDM Administration Instructor Guide Page 44
Lesson 15: Setting Up Security This lesson covers the two levels of security in FDM. It also covers authentication providers, adding users and object security to applications, and the Migration utility.
Slide show: L15_Security.ppt
Changes to the Lesson in this Release • Updated screenshots for new user interface, and added procedures for accessibility. • Power security level is now called the Administrator security level. • FDM now uses Shared Services. Changed topic order to first explain provisioning users
in Shared Services, and then adding those users to an FDM application. • Removed topic on migrating FDM users to Shared Services. This is still available for
11.1.1 releases, but is not needed in release 11.1.2 and higher.
Security • Security does not need to be as granular as FM.
• FDM now uses Shared Services for user authentication. o In Shared Services, you create users and define their application role (such as
Administrator, Intermediate-n, Basic Reviewer). o In FDM, add the Shared Services users and define their access rights and location
access.
• In FDM, you set up security for users and objects. o Object security is done only in FDM. o The Auditor option grants the user special administrator rights for financial controls. o With user security, you define access to locations and set up the user’s default
location. You can do this only in FDM, not in Shared Services.
• Reference the student guide for the different user levels, from Administrator to All.
• The different user levels are assigned to objects, so it is up to each client to decide what each user level can access.
• In Workbench, on the Reports tab, you can expand the report folders, right-click a report, and select Report Definition Properties. In the Report Properties dialog box, you can set the security level for the report.
Demo • In Shared Services Console, review the FDM provisioning for trnadmin.
• In Shared Services Console, create additional users, such as rjackson and cwest. Assign the users a role for the TrainFDM application.
• In FDM, add cwest or rjackson to the TrainFDM application and assign user access and location access.
• NOTE: Since the Flash application is the completed class application, it includes the rjackson user. HOWEVER, you cannot log on as rjackson until you create rjackson in Shared Services Console and provision him for the Flash application with the Intermediate 7 role.
For I
nstru
ctor
Use
Onl
y.
This
doc
umen
t sho
uld
not b
e di
strib
uted
.
FDM Administration Instructor Guide Page 45
Exercises Do these exercises at the end of the lesson.
Exercise Summary Files Needed 15.1 Provisioning a User in Shared Services
Create and provision the rjackson user in SS with the Intermdiate 7 role for the TrainFDM application.
15.2 Adding a User to the FDM Application Add the SS Rjackson user to the application. Assign user level and locations to Rjackson. Set Texas as the default location.
15.3 Modifying User Rights Change trnadmin’s default location to Texas Modify access for rjackson Log on as rjackson and verify access
15.4 Changing Object Security Change rjackson’s user level to Intermediate-7 Grant access to all locations Assign the Import control object an Intermediate-5 security level Verify that rjackson cannot access Import button
For I
nstru
ctor
Use
Onl
y.
This
doc
umen
t sho
uld
not b
e di
strib
uted
.
FDM Administration Instructor Guide Page 46
Lesson 16: Working with Financial Controls This lesson covers setting up financial controls, and adding control groups, sections, and questions. It also covers using Process Explorer to certify data by reviewing and submitting questionnaires.
Slide show: L16_FinControls.ppt
Changes to the Lesson in this Release Updated screenshots for new user interface, and added procedures for accessibility.
Financial Controls • Use financial controls for SOX compliance.
• To access financial controls, use the Process Explorer link, or, after successfully loading data to a location, click the Notepad icon.
• Before you can submit in financial controls, the location has to have 4 fishes.
• Review the application settings for financial controls.
Demo • Use the Flash application to demo financial controls.
• Select MetaData > Controls Groups and create a control group and a control section.
• Either add a question or show the questions in the CM or FinancialReporting groups.
• Demo how to delete and restore questions.
• Navigate to Analysis > Process Explorer and demo how to add a memo item.
• Navigate to MetaData > Locations to add (Edit) a profile.
• Assign reviewer, submitter, and proxy rights.
• The risk level for the location works in conjunction with the risk level for questions.
• Demo how to review and submit sections.
Exercises
Do the first 4 exercises after the Restoring Groups, Sections, or Questions topic, and the last 3 exercises at the end of the lesson.
Exercise Summary Files Needed 16.1 Adding Controls Groups and Controls Sections
Set the Controls W/O Data application settings option Add controls groups and controls sections
16.2 Adding Questions Add questions to controls sections
16.3 Deleting and Restoring Questions
For I
nstru
ctor
Use
Onl
y.
This
doc
umen
t sho
uld
not b
e di
strib
uted
.
FDM Administration Instructor Guide Page 47
Delete and restore questions in controls sections 16.4 Adding Profiles
Add profile to the Texas and Division1 locations
16.5 Setting Up Risk Levels, Reviewers, and Submitters Set up risk levels, reviewers, and submitters for the Texas and Division1 locations
16.6 Adding Memos and Attaching Documentation Add memos to questions and attach documents to memos
TR FinStat.xls
16.7 Certifying Data Submit and review data View the Certification Review report
For I
nstru
ctor
Use
Onl
y.
This
doc
umen
t sho
uld
not b
e di
strib
uted
.
FDM Administration Instructor Guide Page 48
Lesson 17: Working with Import Scripts This lesson covers identifying the different types of scripts available in FDM and creating import scripts using script editor in FDM.
Slide show: L17_ImportScripts.ppt
Changes to the Lesson in this Release Updated screenshots for new user interface, and added procedures for accessibility.
Errata • In the student guide, page 17-23, Storing Temporary Variables topic: In the highlighted
line on the slide, “6, 9” should be “6, 4”. • Refer to the exercise section for errata for exercise and solution 17.6.
Import Scripts • You can create scripts in Web client or Workbench. In this course, you use Workbench
to create scripts because it gives you access to the accelerators.
• Show the slides through the Applying the Mid Function topic, demo those features, and have students do the first 3 exercises.
• Go through the rest of the slides, demo those features, and have students do the last 3 exercises.
• There is no exercise for Menu Maker (Tools > Menu Maker).
Demo • You can use the scripts in the Flash application for your demos.
• You might want to show the Left, Right, and Mid functions in Excel and then do them in Scripts.
• In Workbench, show how to create a new script and add accelerators. Position your cursor in the function area of the script, and from the Object Browser pane, expand Accelerators and Import File Parsing, and double-click a function (Left, Mid, or Right) to add it to the script.
• Scripts in the Flash application: o NJ_ParseAccount – Right function o NY_ParseAccount – Mid function o Parse_Account – Left function o NY_Skip10Center – to skip lines (PblnSkip) o NY_ParseCenter – to import the first set of numbers in the file (fParseString) o NY_ParseDesc – to import the last set of numbers in the file (fParseString) o GeorgiaGetCenter – to store the entity in a temporary variable o GeorgiaPutCenter – to assign the temporary variable
For I
nstru
ctor
Use
Onl
y.
This
doc
umen
t sho
uld
not b
e di
strib
uted
.
FDM Administration Instructor Guide Page 49
Exercises Do the first 3 exercises after the Applying the Mid Function topic, and the last 3 exercises at the end of the lesson.
Errata - In exercise and solution 17.6, on pages 73 and 176, in step 5: Tell students to add a closing parenthesis in the following line: strEntity = DW.Utilities.fParseString(strField,3,1,”-“)
Exercise Summary Files Needed 17.1 Creating a Script with the Left Function
Create Parse_Account script – retrieves left four characters of the account number (Left function) For Indiana import format group, assign the script to the Source Account field Import the load file and verify that it displays only four digits for the account
Indiana_GL.csv
17.2 Creating a Script with the Mid Function Create NY_ParseAccount script – retrieves four characters for the middle of a string (Mid function) Create the NewYork import format group Assign the script to the Source Account field Assign the NewYork format to the NewYork location Import data to NewYork, Jan, FDM_Actual and verify results
NewYork.csv
17.3 Creating a Script with the Right Function Create NJ_ParseAccount script – retrieves the last four characters of a string (Right function) Create a NewJersey import format Assign the script to the Source Account field Add NewJersey location and assign it the NewJersey import format Import data to NewJersey, Jan, FDM_Actual and verify the results
NewJersey.csv
17.4 Creating a Script with the fParseString Function Create the NY_ParseCenter and NY_ParseDesc scripts – parse a string that contains multiple fields (fParseString function) In the NewYork import format, assign a script to the Source Entity and Account Description fields Import data to NewYork, Jan, FDM_Actual and verify the results
NewYork.csv
17.5 Creating a Script with Temporary Variables Create the GeorgiaGetCenter and GeorgiaPutCenter scripts – store the entity value in a temporary variable and assign it to the Source Entity field Create the Georgia import format group and assign a script to the Amount and Source Entity fields Create the Georgia location and assign the Georgia import format to it Import data to Georgia, Jan, FDM_Actual and verify the results
Georgia.glo
17.6 Creating a Script with the PBLNSKIP Function Create the NY_Skip10Center script – use the RES.PblnSkip function to parse a string skip certain lines In the NewYork import format group, assign the script to the Source Entity field Import data to NewYork, Jan, FDM_Actual and verify the results
NewYork.csv
For I
nstru
ctor
Use
Onl
y.
This
doc
umen
t sho
uld
not b
e di
strib
uted
.
FDM Administration Instructor Guide Page 50
Lesson 18: Working with Import Integration Scripts This lesson covers creating import integration scripts in FDM.
Slide show: L18_ImpIntegScripts.ppt
Changes to the Lesson in this Release Updated screenshots for new user interface, and added procedures for accessibility.
Import Integration Scripts • For this lesson, we use the tGL table from the WLDEMO schema in the ORCL instance.
• The IN_Integration.uss file is located in the D:\CF\FDM\Indiana directory.
• Be sure to cover all the fields needed in the FDM table (page 18-4).
• In the examples slides (Creating Import Integration Scripts: Example), be sure to explain each of the 7 components of the script before doing the exercise.
Demo Demo the integration script, IN_Integration, from the Flash application.
Exercise Do this exercise at the end of the lesson.
Exercise Summary Files Needed 18.1 Importing Data into FDM Using an Import
Integration Script Complete the integration script, IN_Integration.uss, by adding the password, user ID, and data source name. This script is used to import a table from the WLDEMO schema. Create the ORCinteg import format group (Script type). Add an Expression value of IN_Integration.uss to the import format. Assign the ORCinteg import format to the Indiana location. Import data to Indiana, Jan-2011, FDM_Actual and verify the results.
In Oracle instance (ORCL), need the WLDEMO user/schema, and the tGL table. Need the IN_Integration.uss file.
Fo
r Ins
truct
or U
se O
nly.
Th
is d
ocum
ent s
houl
d no
t be
dist
ribut
ed.
FDM Administration Instructor Guide Page 51
Lesson 19: Working with Event Scripts This lesson covers creating event scripts in FDM.
Slide show: L19_EventScripts.ppt
Changes to the Lesson in this Release Updated screenshots for new user interface, and added procedures for accessibility.
Event Scripts • Event scripts are executed when an event occurs during the FDM process. For example,
executing scripts before or after a file import, or before or after a consolidation.
• For example, you might want to ensure that data loaded for the correct period before running the Import command.
• You can use an event script if the TB load file is in a different format, or if you have multiple files for TB, IncStmt, Sales, and so on. If you have standard file names for the load files, you can modify the event script to check the name of the load file and then select the correct format to use for the load.
• In the exercise, students check for a particular file name and then change the import format. You can also make this more general by checking if the file name contains “IS”. Review the slide “Changing Import Formats Dynamically: Example” to show an example of the If InStr statement.
Demo • On the Scripts tab in Workbench, show all the possible event scripts.
• In the Flash application, show the BefFileImport script, explain its purpose and demo the load.
Exercise Do this exercise at the end of the lesson.
Exercise Summary Files Needed 19.1
Creating an Event Script Modify the Event script, BefFileImport Create the IowaBS and IowaIS import format groups Create the Iowa location and assign IowaBS for the import format Import data to Iowa, Jan, FDM_Actual Append data to Iowa, Jan, FDM_Actual Verify the results