319
Page 1 Instrument Applications AppDynamics Pro Documentation Version 4.0.x

Page 1
Instrument ApplicationsAppDynamics Pro DocumentationVersion 4.0.x
Page 2
Instrument Applications . . . . . . . . . . . . . . . . . . . . . . . . . . . . . . . . . . . . . . . . . . . . . . . . . . . . 5 Install and Administer Agents . . . . . . . . . . . . . . . . . . . . . . . . . . . . . . . . . . . . . . . . . . . . . 5
Connect the Controller and Agents . . . . . . . . . . . . . . . . . . . . . . . . . . . . . . . . . . . . . . . 7 Agent to Controller Communications . . . . . . . . . . . . . . . . . . . . . . . . . . . . . . . . . . . . . 10
Name Business Applications, Tiers, and Nodes . . . . . . . . . . . . . . . . . . . . . . . . . . . . . 12 Metrics Limits . . . . . . . . . . . . . . . . . . . . . . . . . . . . . . . . . . . . . . . . . . . . . . . . . . . . . . . 13
Hierarchical Configuration Model . . . . . . . . . . . . . . . . . . . . . . . . . . . . . . . . . . . . . . . . 15 App Agent Node Properties . . . . . . . . . . . . . . . . . . . . . . . . . . . . . . . . . . . . . . . . . . . . 16
App Agent Node Properties Reference . . . . . . . . . . . . . . . . . . . . . . . . . . . . . . . . . 18 App Agent Node Properties Reference by Type . . . . . . . . . . . . . . . . . . . . . . . . . . 44
Manage App Server and Machine Agents . . . . . . . . . . . . . . . . . . . . . . . . . . . . . . . . . 47 Remove Unused Nodes . . . . . . . . . . . . . . . . . . . . . . . . . . . . . . . . . . . . . . . . . . . . . . . 50
Agent Log Files . . . . . . . . . . . . . . . . . . . . . . . . . . . . . . . . . . . . . . . . . . . . . . . . . . . . . . 51 Request Agent Log Files . . . . . . . . . . . . . . . . . . . . . . . . . . . . . . . . . . . . . . . . . . . . 57
Instrument Java Applications . . . . . . . . . . . . . . . . . . . . . . . . . . . . . . . . . . . . . . . . . . . . . . 62 Java Supported Environments . . . . . . . . . . . . . . . . . . . . . . . . . . . . . . . . . . . . . . . . . . 65
Install the Java Agent . . . . . . . . . . . . . . . . . . . . . . . . . . . . . . . . . . . . . . . . . . . . . . . . . 80 Java Server-Specific Installation Settings . . . . . . . . . . . . . . . . . . . . . . . . . . . . . . . 87
Apache Cassandra Startup Settings . . . . . . . . . . . . . . . . . . . . . . . . . . . . . . . . . 88 Apache Tomcat Startup Settings . . . . . . . . . . . . . . . . . . . . . . . . . . . . . . . . . . . 89
Coherence Startup Settings . . . . . . . . . . . . . . . . . . . . . . . . . . . . . . . . . . . . . . . 92 GlassFish Startup Settings . . . . . . . . . . . . . . . . . . . . . . . . . . . . . . . . . . . . . . . . 92
IBM WebSphere and InfoSphere Startup Settings . . . . . . . . . . . . . . . . . . . . . . 95 JBoss and Wildfly Startup Settings . . . . . . . . . . . . . . . . . . . . . . . . . . . . . . . . . . 99
Jetty Startup Settings . . . . . . . . . . . . . . . . . . . . . . . . . . . . . . . . . . . . . . . . . . . . 108 Mule ESB Startup Settings . . . . . . . . . . . . . . . . . . . . . . . . . . . . . . . . . . . . . . . . 109
Oracle WebLogic Startup Settings . . . . . . . . . . . . . . . . . . . . . . . . . . . . . . . . . . 110 OSGi Infrastructure Configuration . . . . . . . . . . . . . . . . . . . . . . . . . . . . . . . . . . . 112
Resin Startup Settings . . . . . . . . . . . . . . . . . . . . . . . . . . . . . . . . . . . . . . . . . . . 115 Solr Startup Settings . . . . . . . . . . . . . . . . . . . . . . . . . . . . . . . . . . . . . . . . . . . . . 116
Standalone JVM Startup Settings . . . . . . . . . . . . . . . . . . . . . . . . . . . . . . . . . . . 117 Tanuki Service Wrapper Settings . . . . . . . . . . . . . . . . . . . . . . . . . . . . . . . . . . . 118
Tibco ActiveMatrix BusinessWorks Service Engine Settings . . . . . . . . . . . . . . 119 webMethods Startup Settings . . . . . . . . . . . . . . . . . . . . . . . . . . . . . . . . . . . . . . 119
Java Agent Configuration Properties . . . . . . . . . . . . . . . . . . . . . . . . . . . . . . . . . . . 120 Use System Properties for Java Agent Settings . . . . . . . . . . . . . . . . . . . . . . . . . . 131
Use Environment Variables for Java Agent Settings . . . . . . . . . . . . . . . . . . . . . . . 132 Instrument Multiple JVMs on a Single Machine . . . . . . . . . . . . . . . . . . . . . . . . . . . 133
Instrument Dynamically Identified JVMs . . . . . . . . . . . . . . . . . . . . . . . . . . . . . . . . 135 Instrument JVMs in a Dynamic Environment . . . . . . . . . . . . . . . . . . . . . . . . . . . . . 135
Instrument JVMs Started by Batch or Cron Jobs . . . . . . . . . . . . . . . . . . . . . . . . . . 136 Instrument JVMs in Restricted Environments . . . . . . . . . . . . . . . . . . . . . . . . . . . . 138
Automate Java Agent Deployment . . . . . . . . . . . . . . . . . . . . . . . . . . . . . . . . . . . . 138 Instrument Apple WebObjects Applications . . . . . . . . . . . . . . . . . . . . . . . . . . . . . . 139
Upgrade the Java Agent . . . . . . . . . . . . . . . . . . . . . . . . . . . . . . . . . . . . . . . . . . . . . . . 140 Uninstall the Java Agent . . . . . . . . . . . . . . . . . . . . . . . . . . . . . . . . . . . . . . . . . . . . . . . 141
Administer the Java Agent . . . . . . . . . . . . . . . . . . . . . . . . . . . . . . . . . . . . . . . . . . . . . 142 Java Agent Directory Structure . . . . . . . . . . . . . . . . . . . . . . . . . . . . . . . . . . . . . . . 142
Moving Java Nodes to a new Application or Tier . . . . . . . . . . . . . . . . . . . . . . . . . . 143 IBM Java Agent . . . . . . . . . . . . . . . . . . . . . . . . . . . . . . . . . . . . . . . . . . . . . . . . . . . 144
Enable SSL for Java . . . . . . . . . . . . . . . . . . . . . . . . . . . . . . . . . . . . . . . . . . . . . . . 145 Tune Java Agent Performance . . . . . . . . . . . . . . . . . . . . . . . . . . . . . . . . . . . . . . . 151

Page 3
View Agent Diagnostic Data . . . . . . . . . . . . . . . . . . . . . . . . . . . . . . . . . . . . . . . . . 152 Start an Agent Logging Session . . . . . . . . . . . . . . . . . . . . . . . . . . . . . . . . . . . . . . 153
Troubleshooting Java Agent Issues . . . . . . . . . . . . . . . . . . . . . . . . . . . . . . . . . . . . 153 Configure Syslog Logging Output by the Agent . . . . . . . . . . . . . . . . . . . . . . . . . . . 156
Instrument .NET Applications . . . . . . . . . . . . . . . . . . . . . . . . . . . . . . . . . . . . . . . . . . . . . 157 .NET Supported Environments . . . . . . . . . . . . . . . . . . . . . . . . . . . . . . . . . . . . . . . . . . 159
Install the .NET Agent . . . . . . . . . . . . . . . . . . . . . . . . . . . . . . . . . . . . . . . . . . . . . . . . . 164 Configure the .NET Agent . . . . . . . . . . . . . . . . . . . . . . . . . . . . . . . . . . . . . . . . . . . 165
Enable SSL for .NET . . . . . . . . . . . . . . . . . . . . . . . . . . . . . . . . . . . . . . . . . . . . . . . 169 Instrument Windows Services and Standalone Applications . . . . . . . . . . . . . . . . . 175
Name .NET Tiers . . . . . . . . . . . . . . . . . . . . . . . . . . . . . . . . . . . . . . . . . . . . . . . . . . 179 Automatically Name .NET Nodes . . . . . . . . . . . . . . . . . . . . . . . . . . . . . . . . . . . . . 181
Unattended Installation for .NET . . . . . . . . . . . . . . . . . . . . . . . . . . . . . . . . . . . . . . 182 Upgrade the .NET Agent . . . . . . . . . . . . . . . . . . . . . . . . . . . . . . . . . . . . . . . . . . . . 187
Resolve .NET Agent Installation and Configuration Issues . . . . . . . . . . . . . . . . . . 191 Uninstall the .NET Agent . . . . . . . . . . . . . . . . . . . . . . . . . . . . . . . . . . . . . . . . . . . . 201
Install AppDynamics for Windows Azure with NuGet . . . . . . . . . . . . . . . . . . . . . . 202 Register for AppDynamics for Windows Azure . . . . . . . . . . . . . . . . . . . . . . . . . 209
Administer the .NET Agent . . . . . . . . . . . . . . . . . . . . . . . . . . . . . . . . . . . . . . . . . . . . . 214 .NET Agent Directory Structure . . . . . . . . . . . . . . . . . . . . . . . . . . . . . . . . . . . . . . . 215
.NET Agent Configuration Properties . . . . . . . . . . . . . . . . . . . . . . . . . . . . . . . . . . . 217 Configure Multiple Business Application Support for .NET . . . . . . . . . . . . . . . . . . 232
Disable Instrumentation for an IIS Application Pool . . . . . . . . . . . . . . . . . . . . . . . . 238 Configure Application Domain Monitoring . . . . . . . . . . . . . . . . . . . . . . . . . . . . . . . 238
Instrument the DefaultDomain for Standalone Applications . . . . . . . . . . . . . . . . . 243 Configure the .NET Machine Agent . . . . . . . . . . . . . . . . . . . . . . . . . . . . . . . . . . . . 245
Enable Monitoring for Windows Performance Counters . . . . . . . . . . . . . . . . . . . . 247 Enable Correlation for .NET Remoting . . . . . . . . . . . . . . . . . . . . . . . . . . . . . . . . . 248
Enable Thread Correlation for .NET . . . . . . . . . . . . . . . . . . . . . . . . . . . . . . . . . . . 251 Enable Instrumentation for WCF Data Services . . . . . . . . . . . . . . . . . . . . . . . . . . 252
Configure Machine Snapshots for .NET . . . . . . . . . . . . . . . . . . . . . . . . . . . . . . . . 253 Instrument Node.js Applications . . . . . . . . . . . . . . . . . . . . . . . . . . . . . . . . . . . . . . . . . . . 255
Install the Node.js Agent . . . . . . . . . . . . . . . . . . . . . . . . . . . . . . . . . . . . . . . . . . . . . . . 259 Uninstall the Node.js Agent . . . . . . . . . . . . . . . . . . . . . . . . . . . . . . . . . . . . . . . . . . 265 Upgrade the Node.js Agent . . . . . . . . . . . . . . . . . . . . . . . . . . . . . . . . . . . . . . . . . . 265
Run the Proxy Daemon Manually for Node.js Agents . . . . . . . . . . . . . . . . . . . . . . . . 266 Set Up A Multi-Tenant Proxy for Node.js Agents . . . . . . . . . . . . . . . . . . . . . . . . . . . . 266
Node.js Supported Environments . . . . . . . . . . . . . . . . . . . . . . . . . . . . . . . . . . . . . . . . 267 AppDynamics for Node.js Architecture . . . . . . . . . . . . . . . . . . . . . . . . . . . . . . . . . . . . 269
Instrument PHP Applications . . . . . . . . . . . . . . . . . . . . . . . . . . . . . . . . . . . . . . . . . . . . . . 270 Install the PHP Agent . . . . . . . . . . . . . . . . . . . . . . . . . . . . . . . . . . . . . . . . . . . . . . . . . 275
Install the PHP Agent using a Shell Script . . . . . . . . . . . . . . . . . . . . . . . . . . . . . . . 279 Install the PHP Agent using RPM . . . . . . . . . . . . . . . . . . . . . . . . . . . . . . . . . . . . . 282
Upgrade the PHP Agent . . . . . . . . . . . . . . . . . . . . . . . . . . . . . . . . . . . . . . . . . . . . 286 Uninstall the PHP Agent . . . . . . . . . . . . . . . . . . . . . . . . . . . . . . . . . . . . . . . . . . . . 287
Resolve Installation Issues for PHP . . . . . . . . . . . . . . . . . . . . . . . . . . . . . . . . . . . . 288 Special Considerations for PHP on Mac OSX . . . . . . . . . . . . . . . . . . . . . . . . . . . . 290
PHP Supported Environments . . . . . . . . . . . . . . . . . . . . . . . . . . . . . . . . . . . . . . . . . . 290 AppDynamics for PHP Architecture . . . . . . . . . . . . . . . . . . . . . . . . . . . . . . . . . . . . . . 295
Controller Information in the PHP Configuration Files . . . . . . . . . . . . . . . . . . . . . . . . 296 Special Procedures for PHP CLI . . . . . . . . . . . . . . . . . . . . . . . . . . . . . . . . . . . . . . . . 298
Set Up a Multi-Tenant Proxy for PHP Agents . . . . . . . . . . . . . . . . . . . . . . . . . . . . . . . 300
Page 4
Run the Proxy Daemon Manually for PHP Agents . . . . . . . . . . . . . . . . . . . . . . . . . . . 301 Configure Manual Startup of the runProxy Script for PHP Agents . . . . . . . . . . . . . 301
Execute the runProxy Script Manually . . . . . . . . . . . . . . . . . . . . . . . . . . . . . . . . . . 302 Instrument Python Applications . . . . . . . . . . . . . . . . . . . . . . . . . . . . . . . . . . . . . . . . . . . . 303
Python Supported Environments . . . . . . . . . . . . . . . . . . . . . . . . . . . . . . . . . . . . . . . . 309 AppDynamics for Python Architecture . . . . . . . . . . . . . . . . . . . . . . . . . . . . . . . . . . . . 311
Python Agent Settings . . . . . . . . . . . . . . . . . . . . . . . . . . . . . . . . . . . . . . . . . . . . . . . . 312 Disable the Python Agent . . . . . . . . . . . . . . . . . . . . . . . . . . . . . . . . . . . . . . . . . . . . . . 315 Upgrade the Python Agent . . . . . . . . . . . . . . . . . . . . . . . . . . . . . . . . . . . . . . . . . . . . . 316
Python Agent Debugging and Logs . . . . . . . . . . . . . . . . . . . . . . . . . . . . . . . . . . . . . . 316 Start and Stop the Pyagent Proxy Manually . . . . . . . . . . . . . . . . . . . . . . . . . . . . . . . . 318

Copyright © AppDynamics 2012-2015 Page 5
Instrument ApplicationsRelated pages:
Install and Administer AgentsInstrument Java ApplicationsInstrument .NET ApplicationsInstrument PHP ApplicationsInstrument Node.js Applications
Instrumenting an application involves incorporating an AppDynamics application agent (app agent) into the application's runtime process. Instrumentation makes it possible for AppDynamics tomonitor the application's performance.
At a minimum, instrumenting an application involves installing the agent software, identifying thenode represented by the agent (by application name, tier name, and node name), and configuringthe connection to the Controller to which the agent will report metrics and events. The actualprocess for instrumenting an application varies depending on the environment and applicationserver platform.
This section describes how to instrument applications on different platforms and in different typesof application environments. The pages here cover installing, upgrading, uninstalling andadministering the application agents.
covers common topics relating to app agent installation andInstall and Administer Agentsadministration. For specific information by application environment, see the appropriate subsectionfor your platform.
For information on agents that enable product module features that are not application agents, see:
for EUEM agents.End User Experience Management for standalone machine agents.Server Monitoring
for database monitoring.Database Monitoring for transaction and log analytics.Application Analytics
Install and Administer Agents
On this page:
Manual InstallationAutomated InstallationNetwork Requirements for App AgentDeployment
Installing an AppDynamics app agent can be a manual process for small environments with just afew monitored applications, or an automated process for an environment with a large number of

Copyright © AppDynamics 2012-2015 Page 6
1.
2.
3.
4.
agents or if you need to deploy agents on an ongoing basis. The following sections providereferences for each approach, along with general information on installing AppDynamics appagents.
Manual Installation
For information on manually installing agents, see the following links.
For Java application monitoring, see: Instrument Java Applications, orInstall the Java Agent
For .NET : application monitoring, seeInstrument .NET Applications, orInstall the .NET Agent
For PHP application monitoring, see:Instrument PHP Applications, orInstall the PHP Agent
For Node.js see application monitoring, or Instrument Node.js Applications
Install the Node.js Agent
Automated Installation
For automated deployment guidelines, see Deploy AppDynamics.
Network Requirements for App Agent Deployment
The following guidelines can help you estimate how much bandwidth overhead will be added toyour environment by deploying AppDynamics agents.
Keep in mind that the exact bandwidth required for a deployment varies greatly depending on thenature of your application, the agent configuration, and the AppDynamics features you use. Thebest way to determine the bandwidth overhead is to test the AppDynamics deployment in astaging environment that mirrors as closely as possible the live operating environment.
The approximate bandwidth used by a single Java Agent with the default configuration is 5to 8 kilobytes per second. Scaling of additional agents is linear. That is, if the average bandwidth usage for an appagent in a given deployment is 5 kilobytes, adding 10 means that bandwidth usage will be 5× 10, or 50 kilobytes. While the average bandwidth used is 5 to 8 kbytes per second, agents send data to theController in bursts rather than as a steady stream of data. tWhen testing bandwidth usage, o determine the actual kbytes per second used by an agent, you need to observe andaverage out traffic over the course of at least several minutes. When testing bandwidth usage in the environment, keep in mind that different types of tierswill generate a different amount of load. For instance, a database tier tends to generatemore traffic between the agent and Controller than an application server tier. For the best

Copyright © AppDynamics 2012-2015 Page 7
4.
possible estimate, the test should take this into account.
Connect the Controller and Agents
On this page:
Connect the Agent to the ControllerConfiguration File Locations for App Agents Securing the ConnectionVerify the ConnectionTroubleshooting
Before an App Agent can upload data to the Controller, you must configure its connection to theController. Agents connect to the Controller through the same port as the browser connection forthe UI, on port 8090 by default.
You can configure the agent to connection through a web proxy for the Controller. It can alsoconnect to the Controller using an SSL connection. See for information on using SSL.Security
Connect the Agent to the Controller
The connection between the Controller and agent is generally a one-way connection. The agentinitiates the connection to the Controller. Thus, the settings you configure to allow for theconnection are in the agent. If you downloaded the agent through the Agent Download Wizard inthe Controller, the properties are already configured for you.
Configure these properties:
Controller HostController Port
If you are using a SaaS or on-premise multi-tenant Controller, also configure:
Account Name for SaaSAccount Access Key or Password for SaaS
If you are a SaaS user, the account name and access key settings you use should be in yourwelcome email from AppDynamics.
The following section lists the locations and options for configuring the settings for each type ofagent.
Configuration File Locations for App Agents
The way you configure the Controller connection varies slightly among the different types ofagents, as described here.
Java Agent
Configure Controller connectivity for the Java Agent in either of the following places:
In the controller-info.xml configuration file

Copyright © AppDynamics 2012-2015 Page 8
In system properties (-D options) passed in the JVM startup script or command lineIn environment variables
The system properties override the settings in the controller-info.xml.
See .Where to Configure App Agent for Java Properties
.NET Agent
The NET Agent includes the AppDynamics Agent Configuration utility to assist configuration. See .Configure the .NET Agent
For more information, see:
Administer the .NET AgentConfigure the .NET Agent
PHP Agent
Configure Controller connectivity for the App Agent for PHP in the php.ini file.
When you install the PHP agent, provide the relevant Controller connection information. The installscript writes the configuration to php.ini.
For more information, see:
Install the PHP Agent using a Shell ScriptInstall the PHP Agent using RPMController Information in the PHP Configuration Files
Node.js Agent
All the Controller information is in the require statement that you add to the code when youinstrument the application.
See .Install the Node.js Agent
Machine Agent
Configure Controller connectivity for standalone machine agents in<machine_agent_home>/conf/controller-info.xml.
Securing the Connection
The on-premise Controller is installed with an active secure port by default. App Agents can usethe secure port to connect to the Controller.
The certificate used for the connection out-of-the-box is a self-signed certificate. The .NET agentscannot connect on a secure port that uses a self-signed certificate, so you will need to apply yourown certificate to the port. App Agents connecting to an AppDynamics SaaS Controller also mustuse an HTTPS connection.
Controller Security
The default secure listening port for the AppDynamics Controller are:
For on-premise Controllers, port 8181

Copyright © AppDynamics 2012-2015 Page 9
1.
2.
For SaaS Controllers, port 443
On-premise Controller
To implement SSL for the Controller-agent connection:
Set the application server primary port to the SSL port, by default 8181. See Controller Port.Settings
Install a trusted certificate, see . Controller SSL and CertificatesConfigure your agents for SSL. See the following sections, and App Agent Security Machine
, for more information.Agent Security
SaaS Controller
The SaaS Controller is already configured for SSL, so to enable your environment for SSL youonly need to do the following:
Configure your agents for SSL by enabling SSL and setting the port connection for the SaaSController to 443. See the following sections, and App Agent Security Machine Agent
, for more information.Security
App Agent Security
To configure your agents for SSL, set these SSL-related properties:
Set controller-ssl-enabled to true.Set the controller-port to the correct value for either on-premise or SaaS Controller.
In multi-tenant and SaaS environments, App Agents authenticate themselves to the Controllerusing the required account name and account access key values set in the connection propertiesconfiguration file.
Standalone Machine Agent Security
For information on the security settings related to the Standalone Machine Agent connection to theController, see . Standalone Machine Agent Configuration Properties
Verify the Connection
Follow these instructions to verify that the Java or .NET App Agent is reporting to theAppDynamics Controller.
Access the AppDynamics Controller UI:For an on-premise Controller, open a browser at:
http://<hostname>:<port>/controller
For a SaaS Controller, open a browser at the URL provided to you by AppDynamics.
https://<hostname>.saas.appdynamics.com/controller
Provide user credentials:

Copyright © AppDynamics 2012-2015 Page 10
2.
3. 4.
5.
For on-premise Controller installations, provide the credentials for the "admin" user asconfigured during AppDynamics Controller installation.For the SaaS Controller Service, use the credentials provided to you byAppDynamics.
In the left navigation panel, click on an application.Click . Servers -> App Servers -> <TierName>The Tier Dashboard for the selected tier appears. Click the Nodes tab.When an App Agent is reporting to the Controller, the App Agent Status column shows agreen up arrow icon.
Troubleshooting
If the agent is not reporting to the Controller, see troubleshooting information:
Troubleshooting Java Agent IssuesResolve .NET Agent Installation and Configuration Issues
If traffic is not being properly correlated between tiers, make sure that any network components(such as load balancers or routers) that sit between monitored nodes need to preserve theAppDynamics correlation header from HTTP traffic.
Agent to Controller Communications
Agent Behavior When the Controller is NotReachableWhat Happens When you Disable an Agentfrom the Controller UI?
Each AppDynamics agent has multiple communication channels for different purposes that initiateconnections to the Controller independently at different time intervals.
The agent configuration channel queries the Controller for any new configuration changesevery 60 seconds and downloads the changes when they are available.The agent metric channel posts all new periodic metrics, including JMX, Windowsperformance counters, and business transaction to the Controller every 60 seconds. metrics If there are new business transactions that haven’t been seen before by the agent, they areposted to the Controller for registration every 10 seconds.If the agent has collected any new snapshots or events, they are posted to the Controllerevery 20 seconds.

Copyright © AppDynamics 2012-2015 Page 11
Agent Behavior When the Controller is Not Reachable
The Controller may become unreachable when there are network problems, agent errors or whenthe Controller server is down for a variety of reasons.
If the Controller is unreachable for one minute:
The agent goes into standby mode during which it does not detect any transactions.Any collected snapshots and events are dropped and lost. Snapshots and events aredropped because they consume too much memory to cache.All metrics that have not been posted to the Controller are stored in memory. The memoryimpact of retaining metrics is minimal. New business transaction registrations that have not been posted to the Controller arestored in memoryThe agent attempts to connect to the Controller every minute, and resumes normal activitywhen it can download its full configuration.
If the Controller becomes reachable in the following minute or two:
All metrics that have been stored in memory are posted to the Controller. New business transaction registrations that have been stored in memory are posted to theController.Snapshots and events collected in the 20 seconds prior to the reconnection are posted to theController.
If the Controller is not reachable after three failed attempts that are one minute apart:
The agent is muted; all business transaction interceptors are disabled. The interceptors arestill called when monitored application entry point methods are executed, but they areunproductive. No new business transactions are discovered or registered. Correlation exitpoints will set a header such as “notxdetect=true”, which tells downstream tiers to alsoignore the transaction. JMX m are stored in the application server memory and transmitted to Controller afteretrics reconnection; so, there are no gaps in the metric history. Periodic for the last three minutes are stored in memory; older than threemetrics metrics minutes are purged from memory. The agent configuration channel and the metric channel continue to attempt to connect tothe Controller once each minute.
If the Controller is not reachable after five minutes:
The license is freed for another agent to use.
If the connection is later successful and the agent and is able to download its full configuration anda license:
All periodic metrics, such as JMX metrics and Windows performance counters for the lastthree minutes are posted to the Controller. The Controller drops metrics that were collectedtoo long ago in the past, such as when rollups are already completed.The agent is reactivated, business transaction interceptors are re-enabled, businesstransactions are monitored and possibly snapshotted, new business transactions will bediscovered and registered, and downstream correlation is re-enabled.

Copyright © AppDynamics 2012-2015 Page 12
What Happens When you Disable an Agent from the Controller UI?
Business transaction interceptors are disabled and no transaction metrics, snapshots orevents are collected.The agent continues to collect periodic JMX and Windows performance counter .metricsThe agent continues to be registered with the Controller and continues to consume alicense. The only way to free up a license is to restart the app server without the agent,removing the agent from the JVM.
See .Enabling and Disabling App Agents
Name Business Applications, Tiers, and Nodes
On this page:
Tier and Node Naming GuidelinesNaming Components in a Java EnvironmentNaming Components in a .NET EnvironmentNaming Components in a PHP EnvironmentNaming Components in a Node.jsEnvironmentRenaming Icon Labels in the UI
Related pages:
Install the Java AgentInstall the .NET AgentInstall the Node.js AgentInstall the PHP Agent
This topic discusses naming AppDynamics business applications, tiers, and nodes. For anoverview see .AppDynamics Concepts
Tier and Node Naming Guidelines
The maximum length of a tier name is 100 characters and the maximum length of a node name is500 characters.
: Do not use ampersands (neither "&" nor its XML encoding, "&") in application orWarningother component names.
While node names do not need to be unique within a business application, the combination of tierand node name must be unique for the business application. Put another way, a tier cannot havetwo nodes with the same name. The tier names in a business application must also be unique.
Naming Components in a Java Environment
When you start a Java Agent on a monitored system, you have the option of passing values to theagent that will be used as the application, tier, and node name for the system. Alternatively youcan configure names in the controller-info.xml file. Use these guidelines when configuring custom

Copyright © AppDynamics 2012-2015 Page 13
1. 2. 3.
names:
Configure items that are common for all the nodes in the controller-info.xml file.Configure information that is unique to a node in the JVM startup script.
AppDynamics names Java nodes automatically; also you can specify your own node names. In acloud or auto-scale environment, where nodes come and go regularly, it may be best to letAppDynamics give each node a unique name.
For multiple JVMs on a single machine, see .Instrument Multiple JVMs on a Single Machine
Naming Components in a .NET Environment
The .NET AgentConfiguration Utility lets you name IIS tiers automatically or manually. You mustedit the config.xml configuration file to name Windows service or standalone application tiers. See
. By default the agent automatically names nodes. See Name .NET Tiers Automatically Name .NET.Nodes
Naming Components in a PHP Environment
A PHP runtime instance maps to a node. Your naming convention may depend on your exactenvironment. SoUse a name that clearly identifies the Web service that corresponds to the node. me options are:
hostName-appName-nodeNamehostName-tierName-nodeNameappName-nodeNametierName-nodeNameIP addressfully qualified domain name
Naming Components in a Node.js Environment
A Node.js process maps to an AppDynamics node. The nodes are named by combining the prefixthat you specify for the nodeName in the requires statement that you add to the application sourcecode when you install the Node.js agent with a hyphen and a digit. See Modifying the ApplicationCode.
For example, if you designate a prefix of MyNode for the nodes in the MyTier tier, the nodes in thattier are named MyNode-0, MyNode-1, MyNode-2 and so on.
Renaming Icon Labels in the UI
Default or environment-based names may not be very user-friendly. You can use labels to makenodes and tiers more recognizable to the people in your group or company.
In the Application, Node, or Tier Dashboard, click .Actions -> Edit PropertiesIn the Properties dialog, type a new name.Click .Save
Metrics Limits

Copyright © AppDynamics 2012-2015 Page 14
On this page:
Modifying Metric Limits Per AgentModifying Global Metric Limits
AppDynamics agents instrument the transactions flowing through your application and reportmetrics to the Controller. To ensure that you see the metric information that is most relevant toyour application, agents operate under a few limits.
Different limits apply to app agents and per machine agents, as follows:
For an app agent, the default maximum number of registered metrics is 5000.For a machine agent, the default maximum number of registered metrics is 200.
If the limit is reached, an error event is generated of type AGENT_METRIC_REG_LIMIT_REACHED with a summary of "Metric registration limit of reached." n No new metrics are created until theagent restarts. You can increase the default limit if necessary, as described next.
Modifying Metric Limits Per Agent
You can increase or decrease the default metric registration limits for machine agents or appagents. Use caution when increasing the metric registration limits. Increasing the limit can increasethe resource overhead for agents and Controller.
On Java
On Java platforms, modify the limit using the agent.maxMetrics system property. For example, toincrease the machine agent metric limit specify the maximum number of metrics as an argument whenstarting the machine agent in the following format:
-Dappdynamics.agent.maxMetrics=<max-number-of-metrics>
For example, when starting the machine agent, increase the maximum number of metrics that canbe registered to 300 as follows:
nohup java -Dappdynamics.agent.maxMetrics=300 -jar machineagent.jar &
.NET
For the .NET Agent, set the maxMetrics property as an environment variable. This setting onlyaffects the app agent. For example:
appdynamics.agent.maxMetrics=5500
For the .NET Machine Agent, specify the maximum number of metrics using the Metrics element inthe config.xml. See "Machine Agent Element" on . See also .NET Agent Configuration Properties
.Administer the .NET Agent
Copyright © AppDynamics 2012-2015 Page 15
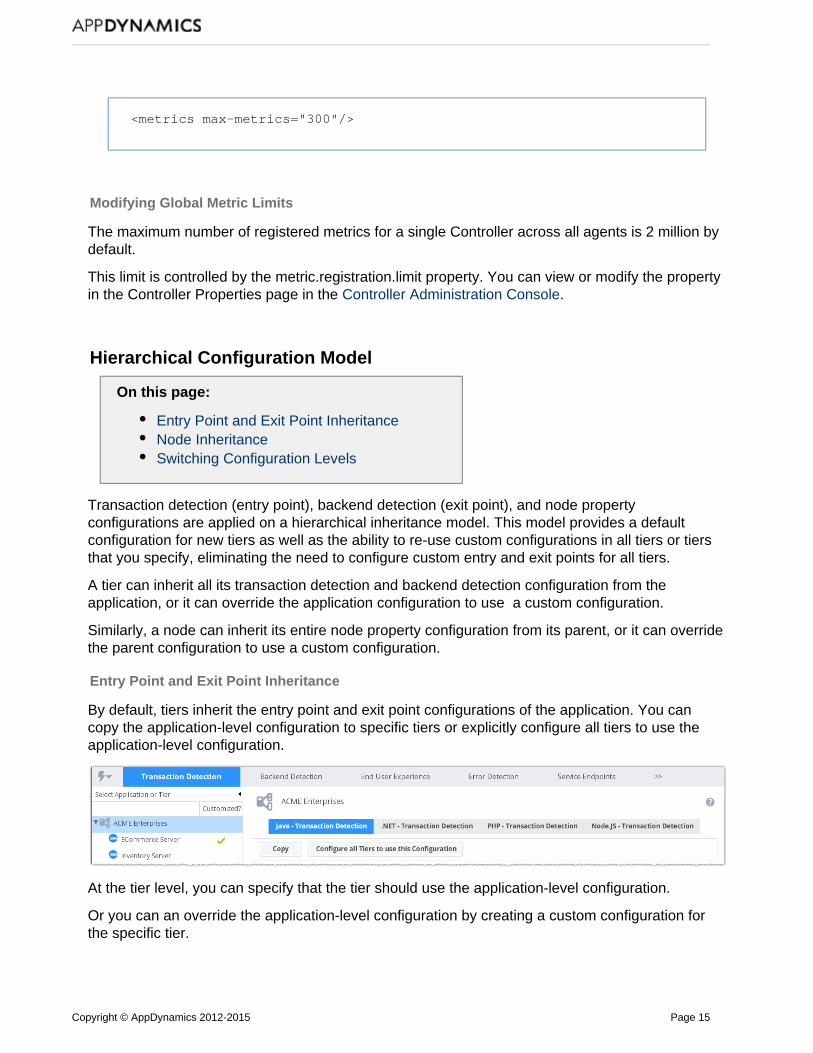
<metrics max-metrics="300"/>
Modifying Global Metric Limits
The maximum number of registered metrics for a single Controller across all agents is 2 million bydefault.
This limit is controlled by the metric.registration.limit property. You can view or modify the propertyin the Controller Properties page in the .Controller Administration Console
Hierarchical Configuration Model
On this page:
Entry Point and Exit Point InheritanceNode InheritanceSwitching Configuration Levels
Transaction detection (entry point), backend detection (exit point), and node propertyconfigurations are applied on a hierarchical inheritance model. This model provides a defaultconfiguration for new tiers as well as the ability to re-use custom configurations in all tiers or tiersthat you specify, eliminating the need to configure custom entry and exit points for all tiers.
A tier can inherit all its transaction detection and backend detection configuration from theapplication, or it can override the application configuration to use a custom configuration.
Similarly, a node can inherit its entire node property configuration from its parent, or it can overridethe parent configuration to use a custom configuration.
Entry Point and Exit Point Inheritance
By default, tiers inherit the entry point and exit point configurations of the application. You cancopy the application-level configuration to specific tiers or explicitly configure all tiers to use theapplication-level configuration.
At the tier level, you can specify that the tier should use the application-level configuration.
Or you can an override the application-level configuration by creating a custom configuration forthe specific tier.

Copyright © AppDynamics 2012-2015 Page 16
You can configure all tiers to use the custom configuration or copy the configuration for re-use inspecific tiers. You can also reset a tier that is currently using a custom configuration to use theapplication-level configuration.
Node Inheritance
By default a node inherits the node properties of its parent tier (or of the application).
You configure node properties by selecting the node and clicking Action -> Configure App. Then you can specify that all nodes in a tier inherit the node properties of theServer Agent
parent (tier or application) or that the node should use a custom configuration.
If you create a custom configuration for a node, you can copy that configuration to the application,tier or to another node.
Switching Configuration Levels
If you customize configuration at the tier or node level and then switch back to the application-levelconfiguration, you will not see the old configuration in the UI. However, the old tier or node levelconfiguration is stored, and if you will see these old settings if you switch to the lower-levelconfiguration again.
App Agent Node Properties
On this page:
Edit a Registered Node PropertyAdd a Registered Node PropertyApply the Configuration to All Nodes
Node properties affect AppDynamics behavior for monitoring a node, for example, enabling or

Copyright © AppDynamics 2012-2015 Page 17
1.
2.
3.
4.
5.
disabling features or setting maximum values for the number of discovered business transactionsor the minimum number of requests to evaluate before triggering a diagnostic session. Nodeproperties are inherited from the parent application or tier, or you can customize them for a specificnode.
You can configure node properties directly in the Controller UI or in the app-agent-config.xml file.
The Controller UI presents only those node properties that are to the agent. As listed onregistered, there are additional, unregistered properties available that do notApp Agent Node Properties
appear in the UI by default. While you can register the properties yourself, the settings areintended for specific application or troubleshooting scenarios, and can have performance impactfor your deployment. We advise against registering properties except under the guidance ofAppDynamics Support or as specifically instructed by the documentation.
Edit a Registered Node Property
To view or change the value of a registered node property:
In the left navigation pane, open the node dashboard for the node for which you want toconfigure a property by clicking . Servers - > App Servers -> <tier> -> <node>In the Node Dashboard, click the subtab. (Click the double arrows to view theAgentsextended subtab menu.)
Click the button. The App Server Agent Configuration window opens.Configure
Select Use Custom Configuration.The list of registered properties appear with their current values. Select the property and click the Edit Property icon to access the configuration dialog for theproperty.
You can copy the configuration to other nodes, to the tier, or apply it to the entire application, asdescribed in .Apply the Configuration to All Nodes
Add a Registered Node Property
You can add and configure unregistered properties listed on App Agent Node PropertiesReference. As previously noted, you should register node properties yourself only as instructed byAppDynamics Support or as specifically documented.
To register a node property, create a custom configuration for the node, as described in Edit. Registered Node Property Add properties by clicking the + plus icon at the top of the list of current
Copyright © AppDynamics 2012-2015 Page 18
node properties.
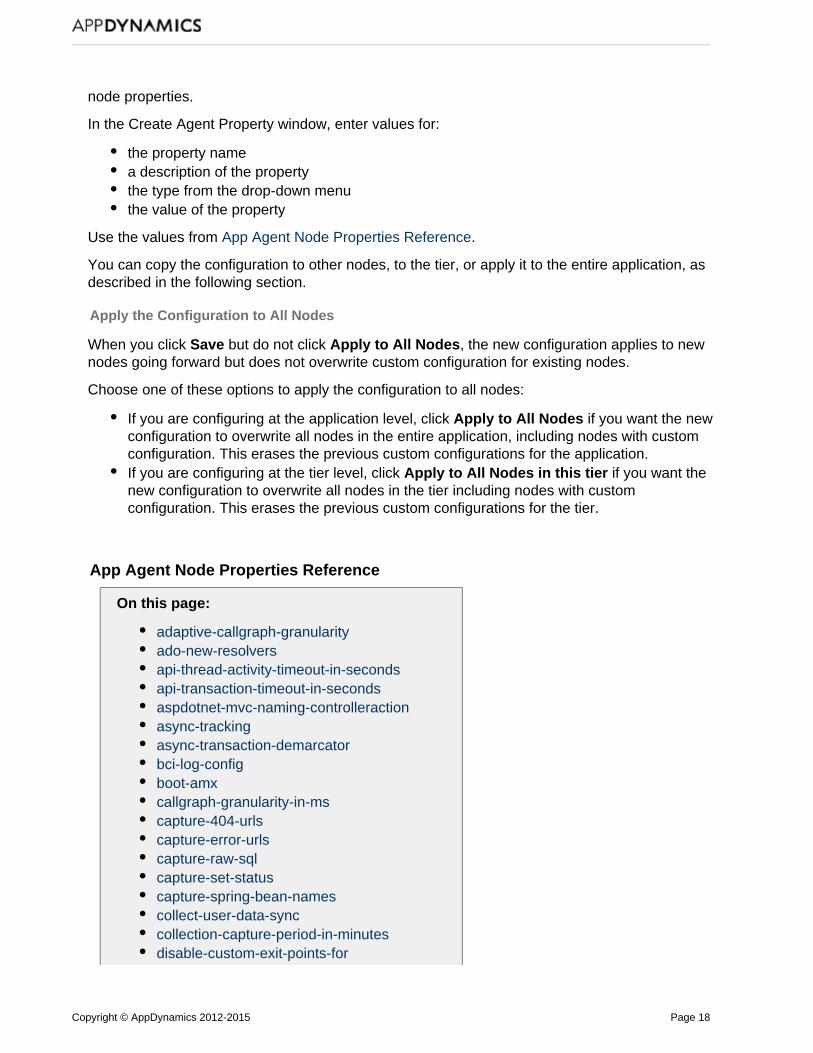
In the Create Agent Property window, enter values for:
the property namea description of the propertythe type from the drop-down menuthe value of the property
Use the values from . App Agent Node Properties Reference
You can copy the configuration to other nodes, to the tier, or apply it to the entire application, asdescribed in the following section.
Apply the Configuration to All Nodes
When you click but do not click , the new configuration applies to newSave Apply to All Nodesnodes going forward but does not overwrite custom configuration for existing nodes.
Choose one of these options to apply the configuration to all nodes:
If you are configuring at the application level, click if you want the newApply to All Nodesconfiguration to overwrite all nodes in the entire application, including nodes with customconfiguration. This erases the previous custom configurations for the application.If you are configuring at the tier level, click if you want theApply to All Nodes in this tiernew configuration to overwrite all nodes in the tier including nodes with customconfiguration. This erases the previous custom configurations for the tier.
App Agent Node Properties Reference
On this page:
adaptive-callgraph-granularityado-new-resolversapi-thread-activity-timeout-in-secondsapi-transaction-timeout-in-secondsaspdotnet-mvc-naming-controlleractionasync-trackingasync-transaction-demarcatorbci-log-configboot-amxcallgraph-granularity-in-mscapture-404-urlscapture-error-urlscapture-raw-sqlcapture-set-statuscapture-spring-bean-namescollect-user-data-synccollection-capture-period-in-minutesdisable-custom-exit-points-for
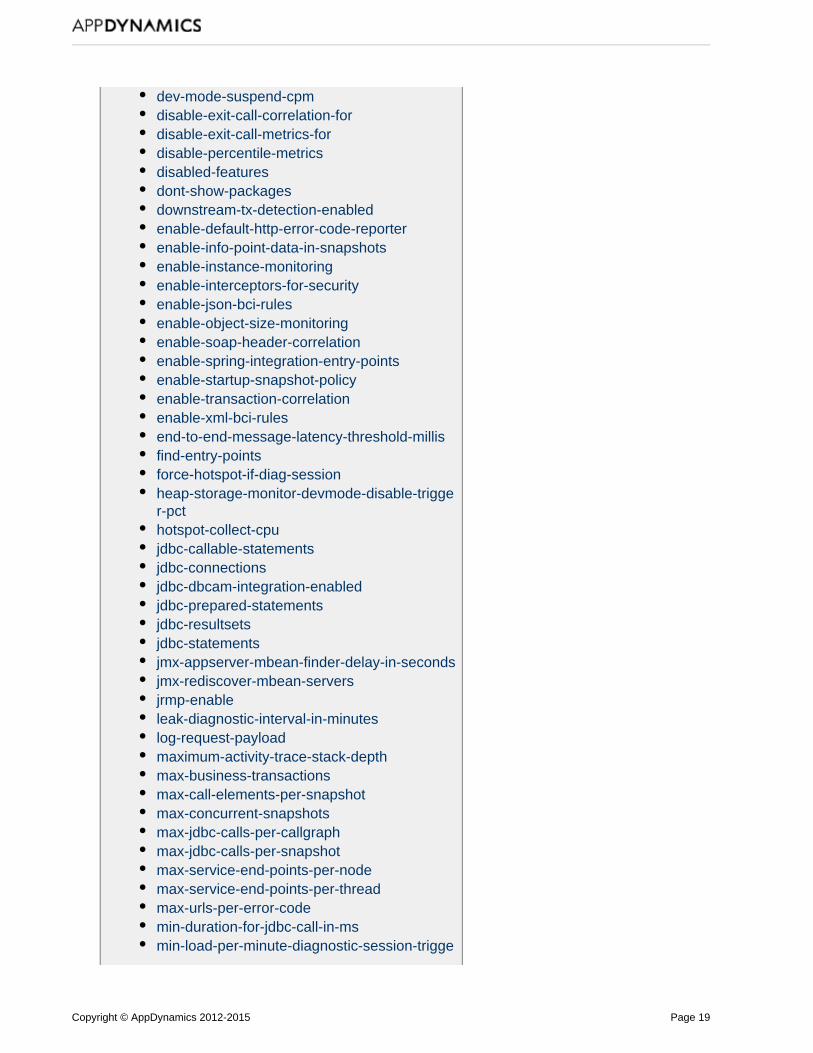
Copyright © AppDynamics 2012-2015 Page 19
dev-mode-suspend-cpmdisable-exit-call-correlation-fordisable-exit-call-metrics-fordisable-percentile-metricsdisabled-featuresdont-show-packagesdownstream-tx-detection-enabledenable-default-http-error-code-reporterenable-info-point-data-in-snapshotsenable-instance-monitoringenable-interceptors-for-securityenable-json-bci-rulesenable-object-size-monitoringenable-soap-header-correlationenable-spring-integration-entry-pointsenable-startup-snapshot-policyenable-transaction-correlationenable-xml-bci-rulesend-to-end-message-latency-threshold-millisfind-entry-pointsforce-hotspot-if-diag-sessionheap-storage-monitor-devmode-disable-trigger-pcthotspot-collect-cpujdbc-callable-statementsjdbc-connectionsjdbc-dbcam-integration-enabledjdbc-prepared-statementsjdbc-resultsetsjdbc-statementsjmx-appserver-mbean-finder-delay-in-secondsjmx-rediscover-mbean-serversjrmp-enableleak-diagnostic-interval-in-minuteslog-request-payloadmaximum-activity-trace-stack-depthmax-business-transactionsmax-call-elements-per-snapshotmax-concurrent-snapshotsmax-jdbc-calls-per-callgraphmax-jdbc-calls-per-snapshotmax-service-end-points-per-nodemax-service-end-points-per-threadmax-urls-per-error-codemin-duration-for-jdbc-call-in-msmin-load-per-minute-diagnostic-session-trigge

Copyright © AppDynamics 2012-2015 Page 20
rminimum-age-for-evaluation-in-minutesminimum-number-of-elements-in-collection-to-deep-sizeminimum-size-for-evaluation-in-mbmsmq-correlation-fieldmsmq-single-threadedon-demand-snapshotspercentile-method-optionrest-num-segmentsrest-transaction-namingrest-uri-segment-scheme rmqsegmentssensitive-data-filtersshow-packagesslow-request-deviationslow-request-monitor-intervalslow-request-thresholdspring-integration-receive-marker-classesthread-correlationthread-correlation-classesthread-correlation-classes-excludethread-cpu-capture-overhead-threshold-in-mswebsocket-entry-calls-enabled
This reference page contains information about app agent node properties. The properties arelisted in alphabetical order.
adaptive-callgraph-granularity
Description: This property enables adaptive snapshots. The call graph granularity for adaptivesnapshots is based on the average response time for the business transaction during the last oneminute and is thus adaptive. The following distribution is used:
Granularity of 10 ms for average response time of <= 10 seconds50 ms for 10 to 60 seconds100 ms for 60 to 600 seconds200 ms for > 600 seconds
Type: Boolean
Default value: false
Platform: Java, .NET
ado-new-resolvers
Description: Enable database detection and naming for ODP.NET backends labeled"Unknown0".
Copyright © AppDynamics 2012-2015 Page 21
Type: Boolean
Default value: true
Platform: .NET
api-thread-activity-timeout-in-seconds
Description: This property provides a time-out value that comes into play when you have addedglobal transactions to your application using APIs from the AppDynamics SDK. In the event thatthe added transaction spawns additional threads that do not return or complete, this propertyprovides a safety valve time-out value. The value is in seconds. The removeCurrentThreadmethod is invoked after the specified time out period.
Type: Integer
Default value: 300 seconds
Range: Minimum =1; Maximum=3600
Platform: Java
api-transaction-timeout-in-seconds
Description: This property provides a time-out value that comes into play when you have addedglobal transactions to your application using APIs from the AppDynamics SDK. In the event thatthe added transaction does not return or complete, this property provides a safety valve time-outvalue. The time-out value is in seconds. The endTransaction method is invoked after the specifiedtime-out period.
Type: Integer
Default value: 300 seconds
Range: Minimum=1; Maximum=3600
Platform: Java
aspdotnet-mvc-naming-controlleraction
Description If set to true, this property configures the agent to identify ASP.NET MVC businesstransactions as Controller/Action. See .Identify MVC Transactions by Controller and Action
Type: Boolean
Default value: false
Platform: .NET
async-tracking
Description: Enable or disable detection of asynchronous exit points. See Monitor Async..Backends for .NET
Type: Boolean
Default value: true
Platform: .NET

Copyright © AppDynamics 2012-2015 Page 22
async-transaction-demarcator
Description: This class name and method name combination marks the end of an asynchronousdistributed transaction.Use the format ClassName/MethodName. For example, foo/bar where foo is the class name andbar is the method name.
Type: String
Default value: none
Platform: Java
bci-log-config
Description: Use this property to configure the bytecode transformer log (BCT log). This logshows what AppD instruments and what classes are loaded in the JVM. The initial file (the ) is0.logsaved to preserve the context of the server start up and is not rolled over. The subsequent filesrotate. The format of the file name is ByteCodeTransformer. .< .log. The time stamp<timestamp> N>is represented as YYYY_MM_DD_HH_mm_ss. N increments starting from zero.
For example:
ByteCodeTransformer.2012_09_12_20_17_57.0.log
Because the file size is checked every 15 seconds, the files may be a bit larger than the specifiedthreshold value before they are rolled over.
The first log file generated is named as follows:ByteCodeTransformer.<timestamp>.0.logThe value for this property is of the format: "20,5,4".
Type: String
Default value: 20,5,4
Example:
For value = 20,5,420 = size, in MB, of the first log file, the version.05 = size in MB for each subsequent rolling file4 = the number of ByteCodeTransformer log files to keep
Platform: Java
boot-amx
Description: If set to true, enables support for Glassfish AMX MBeans. See GlassFish Startup for more information about Glassfish server support.Settings
Type: Boolean
Default value: true
Platform: Java

Copyright © AppDynamics 2012-2015 Page 23
callgraph-granularity-in-ms
Description: Specifies the granularity for call graphs for this node. The global configuration isignored if this property is used. This value is ignored if the adaptive-callgraph-granularity propertyis set to true. A value of zero (default) means the global configuration (from Configure -->
is used. Does not need a restart. Instrumentation --> Call Graph Settings)
Type: Integer
Default value: 0 (zero)
Range: Minimum=0; Maximum=5000
Platform: Java, .NET
capture-404-urls
Description: This property disables or enables the capture of the URLs causing 404 errors. TheURLs are reported as ERROR events every 15 minutes and are viewable through the EventViewer. The JVM needs a restart if retransformation is not supported for the JVM version.
404 errors usually mean that no application code is executed, so there is nothing to snapshot.You can get insight into the 404 error by setting this property to true. It reports all the URLs whichcaused 404 error.
The capture-404-urls node property is in AppDynamics v. 3.6 and replaced withdeprecatedcapture-error-urls.
Type: Boolean
Default value: false
Platform: Java
capture-error-urls
Description: This property enables or disables the capture of the following HTTP errors:
401 - Unauthorized500 - Internal Server Error404 - Page Not FoundAll other error codes are put in a generic HTTP error code bucket.
For these four categories, the agent collects URLs, limited to 25 per category per minute, andsends an event out every 5 minutes.
You can see these URLs when you drill down on an error code by clicking Troubleshoot -> Errors-> Exceptions tab -> HTTP Error Codes.
Type: Boolean
Default value: true
Platform: Java
capture-raw-sql
Description: If capture-raw-sql is enabled, SQL calls with dynamic parameters (i.e., question mark
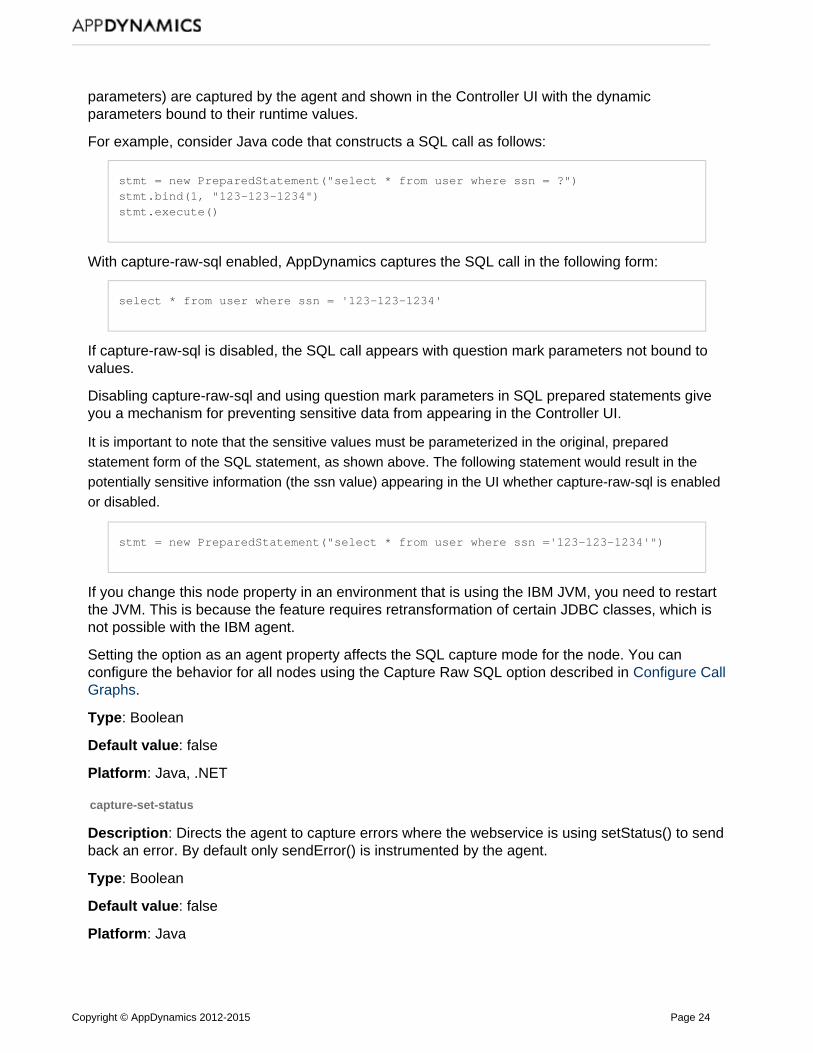
Copyright © AppDynamics 2012-2015 Page 24
parameters) are captured by the agent and shown in the Controller UI with the dynamicparameters bound to their runtime values.
For example, consider Java code that constructs a SQL call as follows:
stmt = new PreparedStatement("select * from user where ssn = ?")stmt.bind(1, "123-123-1234")stmt.execute()
With capture-raw-sql enabled, AppDynamics captures the SQL call in the following form:
select * from user where ssn = '123-123-1234'
If capture-raw-sql is disabled, the SQL call appears with question mark parameters not bound tovalues.
Disabling capture-raw-sql and using question mark parameters in SQL prepared statements giveyou a mechanism for preventing sensitive data from appearing in the Controller UI.
It is important to note that the sensitive values must be parameterized in the original, preparedstatement form of the SQL statement, as shown above. The following statement would result in thepotentially sensitive information (the ssn value) appearing in the UI whether capture-raw-sql is enabledor disabled.
stmt = new PreparedStatement("select * from user where ssn ='123-123-1234'")
If you change this node property in an environment that is using the IBM JVM, you need to restartthe JVM. This is because the feature requires retransformation of certain JDBC classes, which isnot possible with the IBM agent.
Setting the option as an agent property affects the SQL capture mode for the node. You canconfigure the behavior for all nodes using the Capture Raw SQL option described in Configure Call
.Graphs
Type: Boolean
Default value: false
Platform: Java, .NET
capture-set-status
Description: Directs the agent to capture errors where the webservice is using setStatus() to sendback an error. By default only sendError() is instrumented by the agent.
Type: Boolean
Default value: false
Platform: Java

Copyright © AppDynamics 2012-2015 Page 25
capture-spring-bean-names
Description: When a class is mapped to multiple Spring bean names, by default only the name ofthe first Spring bean found displays. This can be misleading. For example, when you see a callgraph for web service A that has Spring beans from web service B. Setting this property to falseshows only the class name when these conflicts occur and does not show the Spring bean name.
Type: Boolean
Default value: true
Platform: Java
collect-user-data-sync
Description: Collect user data from diagnostic POJO data collectors synchronously. Does notrequire a restart.
Type: Boolean
Default value: true
Platform: Java
collection-capture-period-in-minutes
Description: Total interval in minutes since server restart for which collections are captured forleak evaluation. The property takes effect only after the node restart.
Type: Integer
Default value: 30
Range: Minimum=5; Maximum=N/A
Platform: Java
disable-custom-exit-points-for
Description: There is a limited set of "custom" exit points configured by default. You can disablethese preconfigured custom exit points by specifying the type here using this property. Allowedvalues are: SAP, Mail, LDAP, MongoDB. For multiple values, use a comma separated list.
Type: String
Default value: none
Platform: Java
dev-mode-suspend-cpm
Description: The maximum number of transactions monitored per minute during development mode before the system switches out of development mode into normal operation mode.
Type: Integer
Default value: 500
Range: Minimum=0; Maximum=N/A
Copyright © AppDynamics 2012-2015 Page 26
Platform: Java
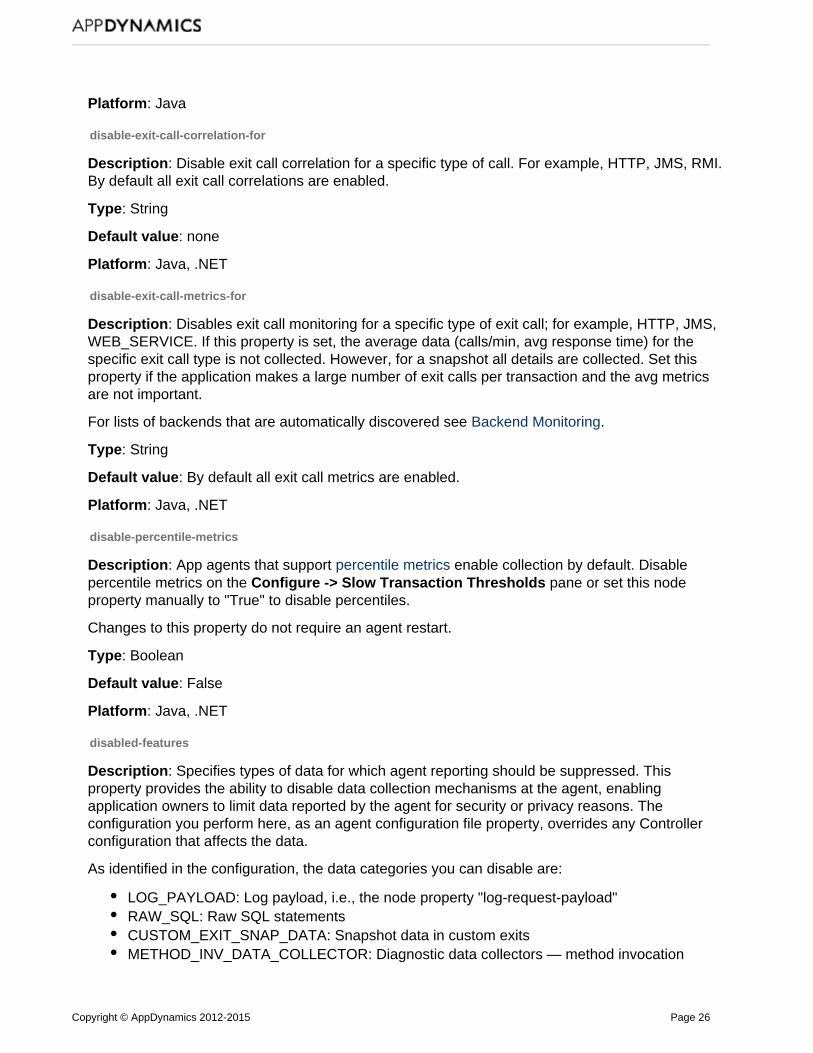
disable-exit-call-correlation-for
Description: Disable exit call correlation for a specific type of call. For example, HTTP, JMS, RMI.By default all exit call correlations are enabled.
Type: String
Default value: none
Platform: Java, .NET
disable-exit-call-metrics-for
Description: Disables exit call monitoring for a specific type of exit call; for example, HTTP, JMS,WEB_SERVICE. If this property is set, the average data (calls/min, avg response time) for thespecific exit call type is not collected. However, for a snapshot all details are collected. Set thisproperty if the application makes a large number of exit calls per transaction and the avg metricsare not important.
For lists of backends that are automatically discovered see .Backend Monitoring
Type: String
Default value: By default all exit call metrics are enabled.
Platform: Java, .NET
disable-percentile-metrics
Description: App agents that support enable collection by default. Disablepercentile metricspercentile metrics on the pane or set this nodeConfigure -> Slow Transaction Thresholdsproperty manually to "True" to disable percentiles.
Changes to this property do not require an agent restart.
Type: Boolean
Default value: False
Platform: Java, .NET
disabled-features
Description: Specifies types of data for which agent reporting should be suppressed. Thisproperty provides the ability to disable data collection mechanisms at the agent, enablingapplication owners to limit data reported by the agent for security or privacy reasons. Theconfiguration you perform here, as an agent configuration file property, overrides any Controllerconfiguration that affects the data.
As identified in the configuration, the data categories you can disable are:
LOG_PAYLOAD: Log payload, i.e., the node property "log-request-payload"RAW_SQL: Raw SQL statementsCUSTOM_EXIT_SNAP_DATA: Snapshot data in custom exitsMETHOD_INV_DATA_COLLECTOR: Diagnostic data collectors — method invocation
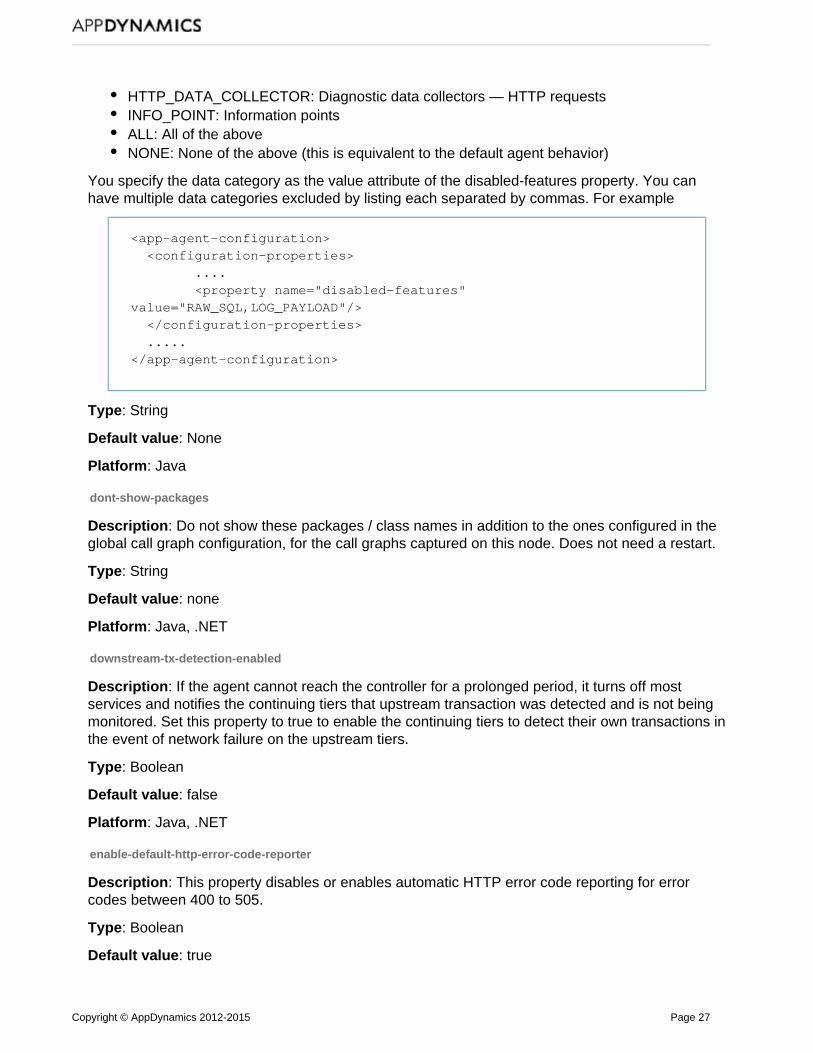
Copyright © AppDynamics 2012-2015 Page 27
HTTP_DATA_COLLECTOR: Diagnostic data collectors — HTTP requestsINFO_POINT: Information pointsALL: All of the aboveNONE: None of the above (this is equivalent to the default agent behavior)
You specify the data category as the value attribute of the disabled-features property. You canhave multiple data categories excluded by listing each separated by commas. For example
<app-agent-configuration> <configuration-properties> .... <property name="disabled-features"value="RAW_SQL,LOG_PAYLOAD"/> </configuration-properties> .....</app-agent-configuration>
Type: String
Default value: None
Platform: Java
dont-show-packages
Description: Do not show these packages / class names in addition to the ones configured in theglobal call graph configuration, for the call graphs captured on this node. Does not need a restart.
Type: String
Default value: none
Platform: Java, .NET
downstream-tx-detection-enabled
Description: If the agent cannot reach the controller for a prolonged period, it turns off mostservices and notifies the continuing tiers that upstream transaction was detected and is not beingmonitored. Set this property to true to enable the continuing tiers to detect their own transactions inthe event of network failure on the upstream tiers.
Type: Boolean
Default value: false
Platform: Java, .NET
enable-default-http-error-code-reporter
Description: This property disables or enables automatic HTTP error code reporting for errorcodes between 400 to 505.
Type: Boolean
Default value: true
Copyright © AppDynamics 2012-2015 Page 28
Platform: Java, .NET
enable-info-point-data-in-snapshots
Description: This property disables or enables the capture of information point calls in snapshots.When this property is set to true, information point calls appear in the User Data section of thesnapshot.
Type: Boolean
Default value: false
Platform: Java, .NET
enable-instance-monitoring
Description: This property enables or disables Instance tracking on this node. Does not need aJVM restart.
Type: Boolean
Default value: false
Platform: Java
enable-interceptors-for-security
Description: This property enables or disables security interceptors on this node. Set this propertyto true in environments where the Java 2 Security Manager is enabled. If the Java 2 Security
is enabled, and this property is not set to true, then the agent will encounterManagerDoes not need a JVMSecurityExceptions, and will not be able to collect the data that it should.
restart.
Type: Boolean
Default value: false
Platform: Java
enable-json-bci-rules
Description: Set this property to true to enable JSON bytecode instrumentation rules.AppDynamics instruments the and methods within the package/class get getString org.json.JSON
when you set this value to true. Needs a JVM restart.Object
Type: Boolean
Default value: true. This only affects new applications; applications created with a 3.7.x controllerwill still have this property set by default to false.
Platform: Java
enable-object-size-monitoring
Description: This property is related to Automatic Leak Detection (ALD) and enables or disablesObject Size monitoring on this node. Changing this property does not need a JVM restart. ALD issupported for JVM version 1.6 and up.

Copyright © AppDynamics 2012-2015 Page 29
Type: Boolean
Default value: false
Platform: Java
enable-soap-header-correlation
Description: This property controls correlation with web service transactions. When enabled, anode which receives a web service transaction may correlate that transaction with anydownstream transactions. The ability to correlate depends on the particular web servicesframework. When disabled, the agent will not perform correlation through any web service tiers.
Type: Boolean
Default value: true
Platform: Java, .NET
enable-spring-integration-entry-points
Description: This property disables or enables the default detection of Spring Integration entrypoints. Set to 'false' to disable.
Default detection of Spring Integration entry points is based on MessageHandler. In cases where alot of application flow happens before the first MessageHandler is executed:
set this property to 'false',configure suitable ,POJO entry pointsand specify the property .spring-integration-receive-marker-classes
See also .Spring Integration Support
Type: Boolean
Default value: true
Platform: Java
enable-startup-snapshot-policy
Description: This property disables or enables the policy for start-up transaction snapshot. Thismeans snapshots are collected for all BTs for all invocations for the first 15 minutes of applicationserver start up.
Type: Boolean
Default value: false
Platform: Java, .NET
enable-transaction-correlation
Description: This property disables or enables transaction correlation. It does not require arestart.
Type: Boolean
Copyright © AppDynamics 2012-2015 Page 30
Default value: true
Platform: Java, .NET
enable-xml-bci-rules
Description: This property enables Java XML Binding and DOM Parser bytecode instrumentationrules. Set to true to enable. The change takes effect after a JVM restart.
Type: Boolean
Default value: true. This only affects new applications; applications created with a 3.7.x Controller will still have this property set by default to false.
Platform: Java
end-to-end-message-latency-threshold-millis
Description: Enables end-to-end message latency monitoring for distributed asynchronoussystems by setting up a threshold. Any message taking more time than the threshold is viewablethrough the Event Viewer.
Type: Integer
Default value: 0
Range: Minimum=0; Maximum=36000
Platform: Java
find-entry-points
Description: Set this property to true to log all potential entry points that are hitting instrumentedexit points or loggers to the Business Transactions log file.
Use this property when you suspect that some traffic is not being detected as businesstransactions.
Note that this property should be enabled for debugging only. It is strongly recommended todisable this property in production setup by changing the value from true to false.
Type: Boolean
Default value: false
Platform: Java, .NET
force-hotspot-if-diag-session
Description: Set this property to true to collect hotspot snapshots for all transactions for whichthere is a manual diagnostic session defined. See also .hotspot-collect-cpu
Type: Boolean
Default value: false
Platform: Java
heap-storage-monitor-devmode-disable-trigger-pct
Copyright © AppDynamics 2012-2015 Page 31
Description: The maximum Java heap utilization percentage for development mode. If the heaputilization exceeds this value, Development mode is automatically disabled.Type: IntegerDefault value: 90Range: Minimum=0, Maximum=100Platform: Java
hotspot-collect-cpu
Description: Set this property to true to collect CPU time, instead of real time, within hotspotsnapshots, if the snapshots are collected as a result of the propforce-hotspot-if-diag-session=trueerty.
Type: Boolean
Default value: false
Platform: Java
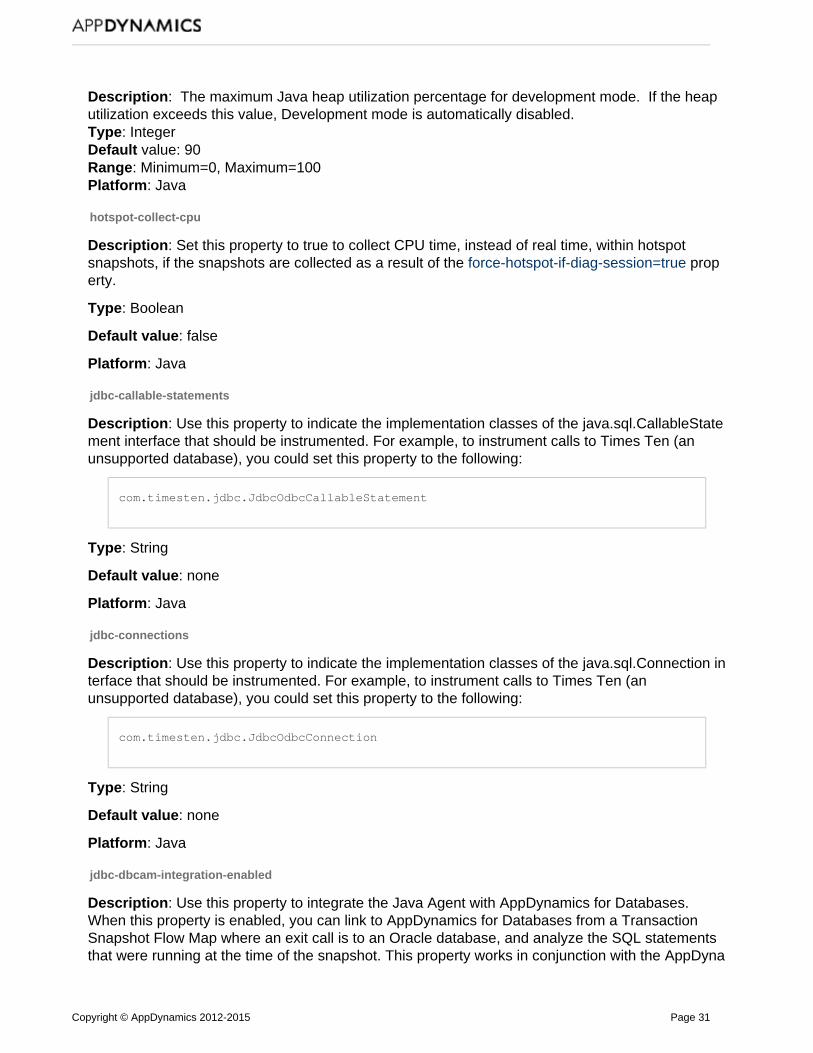
jdbc-callable-statements
Description: Use this property to indicate the implementation classes of the java.sql.CallableState interface that should be instrumented. For example, to instrument calls to Times Ten (anment
unsupported database), you could set this property to the following:
com.timesten.jdbc.JdbcOdbcCallableStatement
Type: String
Default value: none
Platform: Java
jdbc-connections
Description: Use this property to indicate the implementation classes of the injava.sql.Connectionterface that should be instrumented. For example, to instrument calls to Times Ten (anunsupported database), you could set this property to the following:
com.timesten.jdbc.JdbcOdbcConnection
Type: String
Default value: none
Platform: Java
jdbc-dbcam-integration-enabled
Description: Use this property to integrate the Java Agent with AppDynamics for Databases.When this property is enabled, you can link to AppDynamics for Databases from a TransactionSnapshot Flow Map where an exit call is to an Oracle database, and analyze the SQL statementsthat were running at the time of the snapshot. This property works in conjunction with the AppDyna
Copyright © AppDynamics 2012-2015 Page 32
license and database collector that has been previously set up. Integrationmics for Databasesmust also be setup from the Admin pages of the Controller UI. For more information, see Integrate
.and Use AppDynamics for Databases with AppDynamics Pro
Changes to this property do not require a JVM restart for JDK 1.6 and higher. Older 1.5 JVMs donot support class reloading, so for those environments a restart is required.
Type: Boolean
Default value: false
Platform: Java
jdbc-prepared-statements
Description: Use this property to indicate the implementation classes of the java.sql.PreparedStat interface that should be instrumented. For example, to instrument calls to Times Ten (anement
unsupported database), you could set this property to the following:
com.timesten.jdbc.JdbcOdbcPreparedStatement
Type: String
Default value: none
Platform: Java
jdbc-resultsets
Description: Use this property to indicate the implementation classes of the java.sql.ResultSetinterface that should be instrumented. For example, to instrument calls to Times Ten (anunsupported database), you could set this property to the following:
com.timesten.jdbc.JdbcStatement
Type: String
Default value: none
Platform: Java
jdbc-statements
Description: Use this property to indicate the implementation classes of the java.sql.Statementinterface that should be instrumented. For example, to instrument calls to Times Ten (anunsupported database), you could set this property to the following:
com.timesten.jdbc.JdbcOdbcStatement
Type: String
Default value: none

Copyright © AppDynamics 2012-2015 Page 33
Platform: Java
jmx-appserver-mbean-finder-delay-in-seconds
Description: When an app server starts up, the associated MBean server starts and the MBeansare discovered. The timing of these activities varies by app server and by configuration. If thisactivity is not completed in the time that the agent is expecting to discover theAppDynamicsMBeans, then the MBean Browser will not show them. Using this node property, you can delay thediscovery of MBeans to make sure that agent discovers all the domains after complete start up ofthe app server. For example, you can set the delay to a time which is 1.5 times of the serverstartup time. The default delay for the AppDynamics agent is two minutes.
Type: Numeric, seconds
Default value: 200
Platform: Java
jmx-rediscover-mbean-servers
Description: When an app server starts up, the associated MBean server starts and the MBeansare discovered. The timing of these activities varies by app server and by configuration. If thisactivity is not completed in the time that the agent is expecting to discover theAppDynamicsMBeans, then the MBean Browser will not show them. Using this node property, you can triggerthe rediscovery of MBeans to make sure that the agent discovers all the domains after completestart up of the app server. Set this property to 'true' and restart the JVM/server.
Type: Boolean
Default value: false
Platform: Java
jrmp-enable
Description: This property enables or disables AppDynamics support for Sun RMI over JavaRemote Protocol (JRMP). You should test Sun RMI JRMP support in a staging environment beforeusing it on production systems. Enable Sun JRMP support by setting this property to 'true'.
Type: Boolean
Default value: false
Platform: Java
leak-diagnostic-interval-in-minutes
Description: Interval at which diagnostic data, content summary and activity trace, is captured forleaking collections.
Type: Integer
Default value: 30
Range: Minimum=2; Maximum=N/A
Platform: Java

Copyright © AppDynamics 2012-2015 Page 34
log-request-payload
Description: Set this property to true to log the request payload (HTTP parameters, cookies,session keys, etc.) as part of a transaction snapshot. The log-request-payload property includeslogging of WCF HTTP parameters for .NET.
Type: Boolean
Default value: false
Platform: Java, .NET
maximum-activity-trace-stack-depth
Description: This determines the depth of the stack trace to capture as part of an activity tracesession. By default, the size of the code paths for OIT (Object Instance Tracking), ALD (AutomaticLeak Detection) and MIDS (Memory Intensive Data Structures) are set to 10. To increase this limit,use this property.
Type: Integer
Default: 10
Platform: Java
max-business-transactions
Description: Sets a limit on the number of business transactions discovered once an agent isstarted. The limit helps to ensure that the Controller I/O processing capability and agent memoryrequirements are appropriate for a production environment.
Warning: Contact AppDynamics Support before changing this setting.
See .All Other Traffic Business Transaction
Type: Integer
Default value: 50
Range: Minimum=N/A; Maximum=200
Platform: Java, .NET
max-call-elements-per-snapshot
Description: This property represents the maximum number of elements that are collected for anycall graph for a snapshot. When the limit is reached, the agent stops collecting more data for thiscall graph, reports what has been collected to that point, and marks the call graph with a warningthat the limit was reached. it is not recommended to dramatically increase this number as it mayhave overhead implications.
Type: Integer
A larger depth has higher overhead on the system. AppDynamics recommends that youincrease the default value of this property only temporarily, and remove it or set it back to10 once you get the desired output.

Copyright © AppDynamics 2012-2015 Page 35
Default value: 5000
Platform: Java, .NET
max-concurrent-snapshots
Description: The maximum number of total snapshots that are allowed, including continuingtransactions. When the queue goes over the value set, additional snapshots are dropped. Thisproperty is ignored while in mode. Development
Type: Integer
Default value: 20 (v.3.5.x)
Range: Values must be positive integers. No other constraints.
Platform: Java, .NET
max-jdbc-calls-per-callgraph
Description: Maximum number of JDBC/ADO.NET exit-call stack samples per call graph. Onlyqueries taking more time than the value of min-duration-for-jdbc-call-in-ms are reported. Changingthe value does not require a restart.
Type: Integer
Default value: 100
Range: Minimum=1; Maximum=1000
Platform: Java, .NET
max-jdbc-calls-per-snapshot
Description: Maximum number of JDBC/ADO.NET exit calls allowed in a snapshot. Calls after thelimit are not recorded. Changing the value does not require a restart.
Type: Integer
Default value: 500
Range: Minimum=1; Maximum=5000
Platform: Java, .NET
max-service-end-points-per-node
Description: Maximum total number of service endpoints that can be defined on a single node.Increasing the value of this property enables more service end points to be defined on a particularnode. This number ensures a maximum limit on overhead due to service endpoints on an agentsuch that only the service endpoints that are within the limit are evaluated.
Type: Integer
Default value: 100
Range: Minimum=0; Maximum=N/A
Platform: Java, .NET

Copyright © AppDynamics 2012-2015 Page 36
max-service-end-points-per-thread
Description: Maximum number of service endpoints that can defined on a single thread oftransaction execution. If this property is set to the default value of one and there are two serviceendpoints defined that impact one specific transaction, at any point in time only the one serviceendpoint will be evaluated. If a second service endpoint is detected in context of the first one, thesecond is ignored. But, if the second service endpoint starts after the first one ends, the secondservice endpoint will be evaluated. Increase this property to monitor additional service endpointson a thread. This number ensures a maximum limit on overhead and number of metrics due toservice endpoints on each thread execution.
Type: Integer
Default value: 1
Range: Minimum=0; Maximum=N/A
Platform: Java, .NET
max-urls-per-error-code
Description: Increases the number of URLs the agent can track that produced a certain error.Once the maximum has been reached, all remaining errors are classified as unknown."
Type: Numeric
Default value: 50
Platform: Java
min-duration-for-jdbc-call-in-ms
Description: A JDBC/ADO.NET call taking more time than the specified time (in milliseconds) iscaptured in the call graph. The query continues to show up in a transaction snapshot. Setting thisvalue too low (< 10ms) may affect application response times. Changing the value does notrequire a restart
Type: Integer
Default value: 10
Range: Minimum=0; Maximum=N/A
Platform: Java, .NET
min-load-per-minute-diagnostic-session-trigger
Description: Indicates the number of requests per Business Transaction to evaluate beforetriggering a diagnostic session. This is useful to prevent diagnostic sessions when there is notenough load.
Type: Integer
Default value: 10
Range: Minimum=N/A; Maximum=N/A
Platform: Java, .NET
Copyright © AppDynamics 2012-2015 Page 37
minimum-age-for-evaluation-in-minutes
Description: Automatic Leak Detection (ALD) tracks all frequently used Collections. For aCollection object to be identified and monitored it must meet the conditions defined by the ALDproperties. This property is the first criteria that needs to be met. The value is the minimum age ofthe Collection in minutes. The property takes effect after node restart.
From the point the collection is captured, it is monitored if it is still available for the specified periodwithout gettinggarbage collected. If it survives then it is evaluated for size checks and if it meets the criteria thenit is monitored for long term growth in size.
Warning: If you reduce the default there may be a performance hit on the CPU and memorybecause AD needs to process more collections.
Type: Integer
Default value: 30
Range: Minimum=5; Maximum=N/A
Platform: Java
minimum-number-of-elements-in-collection-to-deep-size
Description: Automatic Leak Detection (ALD) tracks all frequently used Collections. For aCollection object to be identified and monitored for it must meet the conditions defined by the ALDproperties. This property sets the number of elements threshold.
Warning: If you reduce the default there may be a performance hit on the CPU and memorybecause AD is processing more collections.
Type: Integer
Default value: 1000
Platform: Java
minimum-size-for-evaluation-in-mb
Description: Automatic Leak Detection (ALD) tracks all frequently used Collections. For aCollection object to be identified and monitored it must meet the conditions defined by the ALDproperties. This property sets the minimum initial size in megabytes for a collection to qualify formonitoring. The collection must also survive for the period specified in theminimum-age-for-evaluation-in-minutes property.
Warning: If you reduce the default there may be a performance hit on the CPU and memorybecause AD is processing more collections.
Type: Integer
Default value: 5
Range: Minimum=1; Maximum,=N/A

Copyright © AppDynamics 2012-2015 Page 38
Platform: Java
msmq-correlation-field
Description: By default the .NET agent disables downstream correlation for MSMQ messagequeues. Register this node property on both the publishing and receiving tiers to enabledownstream correlation for MSMQ and to specify the field where the agent writes correlation data.
MSMQ supports using "Label" or "Extension." In general, "Extension" is the best choice because itis a larger field. The NServiceBus implementation of MSMQ uses the "Extension" field, so forNServiceBus use "Label." See .Monitor MSMQ Backends for .NET
Type: String
Values: None: Disable downstream correlation for MSMQ. Label: Store correlation information in the label field. Extension: Store correlation information in the extension field.
Default: None
Platform: .NET
msmq-single-threaded
Description: Specify the threading architecture for the MSMQ message queue. The value defaultsto "True." For multi-threaded queue implementations like NServiceBus, change the value to"False." See Monitor MSMQ Backends for .NET.
Type: Boolean
Default: True
Platform: .NET
on-demand-snapshots
Description: Collect snapshots for all business transactions executed in this node. Does not needa restart. This property is ignored while in mode. Development
Type: Boolean
Default value: false
Platform: Java, .NET
percentile-method-option
Description: You can choose one of two different algorithms to calculate percentiles inAppDynamics:
P Square algorithm (default): This option consumes the least amount of storage and incursthe least amount of CPU overhead. The accuracy of the percentile calculated variesdepending on the nature of the distribution of the response times. You should use this optionunless you doubt the accuracy of the percentiles presented.
Copyright © AppDynamics 2012-2015 Page 39
Quantile Digest algorithm: This option consumes slightly more storage and CPU overheadbut may offer better percentiles depending on how the response times are distributed.
Changes to this property do not require that you restart the agent.
Type: Numeric
Values:
1: P Square
2: Quantile Digest
Default value: 1
Platform: Java, .NET
rest-num-segments
Description: The property, rest-num-segments specifies the in the first- -segments parametern nin . If this property is 0 or less, then the value of this property is ignored.rest-uri-segment-schemeThe value of this property is also ignored if =full.rest-uri-segment-scheme
Type: String
Default value: 2
Platform: Java
rest-transaction-naming
Description: This node property accepts any or all of the following parameters in string form. Anything that does not match a parameter is treated as text that is appended to the businesstransaction name. Properties can be separated with any character.
The agent takes each parameter and fills in the proper value based on the annotations andproperties of the Java class:
{class-name}: The app agent will fill in the name of the Java class mapped to the RESTresource{method-name}: The method being called{class-annotation}: Path annotation applied to the class{method-annotation}: Method annotation applied to the method (does not always exist){rest-uri}: URI of the REST resource. The REST URI is further configured using the followingproperties:
rest-uri-segment-schemerest-num-segments
{http-method}: HTTP method
Type: String
Default value: {rest-uri}.{http-method}
Platform: Java
Examples: Using Default Settings and Using rest-transaction-naming Properties

Copyright © AppDynamics 2012-2015 Page 40
rest-uri-segment-scheme
Description: The property, rest-uri-segment-scheme has three valid values: first-n-segments,last-n-segments, and full. This property indicates how many segments of the URI to use for theURI in {rest-uri}. This option is case-sensitive. If the value of this property is full, then the value of r
is ignored.est-num-segments
Type: String
Default value: first-n-segments
Platform: Java
rmqsegments
Description: The App Agent for .NET (agent) automatically discovers RabbitMQ remote services.Use the rmqsegments node property to refine the queue backend name to include some or allsegments of the routing key. You must be familiar with your implementation RabbitMQ exchangesand routing keys. See .RabbitMQ Exchanges and Exchange Types
The RabbitMQ routing key is a string. The agent treats dot-separated (".") substrings of the routingkey as segments. Set the value for rmqsegments to an integer that represents the number ofrouting key segments to include in the name. For more details, see information on refiningbackend naming in .Monitor RabbitMQ Backends for .NET
Type: Numeric
Values: Integer representing the number of routing key segments to include in the name.
Default Value: 0
Platform: .NET
sensitive-data-filters
Description: Specifies system properties or environment variables on the monitoredNew in 4.0.4system for which values should not be captured by the Java Agent. This prevents potentiallysensitive information, such as application server passwords or account IDs, from appearing in theController UI or in logs.
New in 4.0.5 Built-in filters exist for key and password. Filter values are matched in acase-insensitive fashion.
To use this property, specify the type of data to filter (a system property or environment variable),a match condition, and match value. See configuration file comments for usage information.
Type: String
Default Value: None
Platform: Java
show-packages
Description: For the call graphs captured on this node, show the specified packages or classnames in addition to the ones configured in the global call graph configuration. Does not need arestart.

Copyright © AppDynamics 2012-2015 Page 41
Type: String
Default value: none
Platform: Java, .NET
slow-request-deviation
Description: The value in milliseconds for the deviation from the current average response time.This setting is used for evaluation of slow in-flight transactions. Also see theslow-request-threshold property for more details.
Type: Integer
Default value: 200
Range: Minimum=10; Maximum=3600
Platform: Java, .NET
slow-request-monitor-interval
Description: In-flight requests are checked for slowness in the interval specified by this property.The value is specified in milliseconds.
Type: Integer
Default value: 100
Range: Minimum=0; Maximum=3600
Platform: Java, .NET
slow-request-threshold
Description: In-flight requests taking more time than this threshold (in ms) with a deviation greaterthan the slow-request-deviation property from the current average response time are monitored tocapture hot spots.
Type: Integer
Default value: 500
Range: Minimum=0; Maximum=3600
Platform: Java, .NET
spring-integration-receive-marker-classes
Description: Use this property to specify the class and method you have identified as suitablePOJO entry points for Spring Integration.
Based on the MessageHandler interface, the App Agent for Java by default automaticallydiscovers exits for all channels except 'DirectChannel.' In cases where a lot of application flowhappens before the first MessageHandler is executed,
set enable-spring-integration-entry-points=false,configure suitable ,POJO entry points

Copyright © AppDynamics 2012-2015 Page 42
and declare each suitable POJO entry point class/method in this property spring-integration-.receive-marker-classes
If the application code polls for messages in a loop, the span of each loop iteration is tracked as atransaction. Tracking begins when the loop begins and end it when the iteration ends. Tosafeguard against cases where pollableChannel.receive() is not called inside a loop, specify thisproperty for each class/method combination that polls messages in a loop.
After setting this property, restart the application server for changes to this property to take effect.
See also .Spring Integration Support
Type: Comma-separated string of fully-qualified class /method name, such asspring-integration-receive-marker-classes = <fully qualified name of class/method>,<> ....
Example: For example, to enable tracking for the following:
class MessageProcessor{void process(){ while(true) { Message message = pollableChannel.receive() }}}
set this property as follows:
spring-integration-receive-marker-classes = MessageProcesser/process
Platform: Java
thread-correlation
Description: Enable thread correlation for the .NET Agent. See Enable Thread Correlation for.NET.
Type: Boolean
Default value: false
Platform: .NET
thread-correlation-classes
Description: For multi-threaded applications, use this property to configure classes to be includedin Java thread correlation when simple prefix-matching (matching on STARTSWITH) is sufficientto identify the classes.
The thread-correlation-classes property specifies the classes to include for thread correlation. Thisproperty can be used together with the thread-correlation-classes-exclude property.

Copyright © AppDynamics 2012-2015 Page 43
The configured correlation takes effect without requiring a restart of the managed application.Also see: .Configure Multithreaded Transactions for Java
Type: Comma-separated string of fully-qualified class names or package names
Default value: none
Platform: Java
thread-correlation-classes-exclude
Description: For multi-threaded applications, use this property to configure classes to be excludedin Java thread correlation when simple prefix-matching (matching on STARTSWITH) is sufficientto identify the classes. This property specifies the classes to exclude from thread correlation. Thisproperty can be used in conjunction with the thread-correlation-classes node property.
The configured correlation takes effect without requiring a restart of the managed application.Also see: .Configure Multi-Threaded Transactions (Java only)
Type: Comma-separated string of fully-qualified class names or package names
Default value: none
Platform: Java
thread-cpu-capture-overhead-threshold-in-ms
Description: Determines the timeout allotted for collecting and calculating Thread CPU Timefor 1000 iterations. If the timeout is exceeded, the Java Agent automatically disables CPU timecollection for threads. CPU usage information will then be absent from the BT overview orsnapshots in the Controller UI. In addition, an INFO-level log similar to the following appears in thelogs:
[Thread-0] 22 Oct 2013 14:19:26,346 INFO JVMThreadCPUTimeCalculator - DisablingBT CPU Monitoring. Time taken to calculate Thread CPU Time for [1000] iterationsis [15 ms] which is greater than the allowed budget of [10 ms].
This issue may particularly affect JDK 1.6 on Linux due to the issue getCurrentThreadCpuTime is.drastically slower than Windows Linux
You can increase the thread-cpu-capture-overhead-threshold-in-ms property, but it is important tonote that this may result in increased overhead on your application. We recommend you use this J
instead to speed up the API call itself:ava HotSpot VM option
-XX:+UseLinuxPosixThreadCPUClocks
Restart is needed after changing this value.
Type: Integer
Default: 10 ms
Platform: Java

Copyright © AppDynamics 2012-2015 Page 44
websocket-entry-calls-enabled
Description: When set to false, no WebSocket entry calls are detected.
Type: Boolean
Default value: true
Platform: Java
App Agent Node Properties Reference by Type
This topic lists the app agent node properties by type.
Type Property
Automatic Leak Detection minimum-age-for-evaluation-in-minutes
minimum-number-of-elements-in-collection-to-deep-size
minimum-size-for-evaluation-in-mb
Bytecode injection (BCI) bci-log-config
enable-interceptors-for-security
enable-json-bci-rules
enable-xml-bci-rules
Backend Detection msmq-correlation-field
msmq-single-threaded
Object Instance Tracking (OIT ) collection-capture-period-in-minutes
enable-collection-monitoring
enable-instance-monitoring
enable-object-size-monitoring
leak-diagnostic-interval-in-minutes
JMX Property heap-storage-monitor-devmode-disable-trigger-pct
Transaction Monitoring ado-new-resolvers
aspdotnet-mvc-naming-controlleraction
api-thread-activity-timeout-in-seconds
Copyright © AppDynamics 2012-2015 Page 45
api-transaction-timeout-in-seconds
async-tracking
async-transaction-demarcator
capture-404-urls
capture-error-urls
capture-raw-sql
capture-set-status
capture-spring-bean-names
disable-custom-exit-points-for
disable-exit-call-correlation-for
disable-exit-call-metrics-for
disable-percentile-metrics
downstream-tx-detection-enabled
enable-default-http-error-code-reporter
enable-soap-header-correlation
enable-spring-integration-entry-points
enable-transaction-correlation
end-to-end-message-latency-threshold-millis
find-entry-points
jdbc-callable-statements
jdbc-connections
jdbc-dbcam-integration-enabled
jdbc-prepared-statements
jdbc-resultsets
jdbc-statements
jmx-appserver-mbean-finder-delay-in-seconds
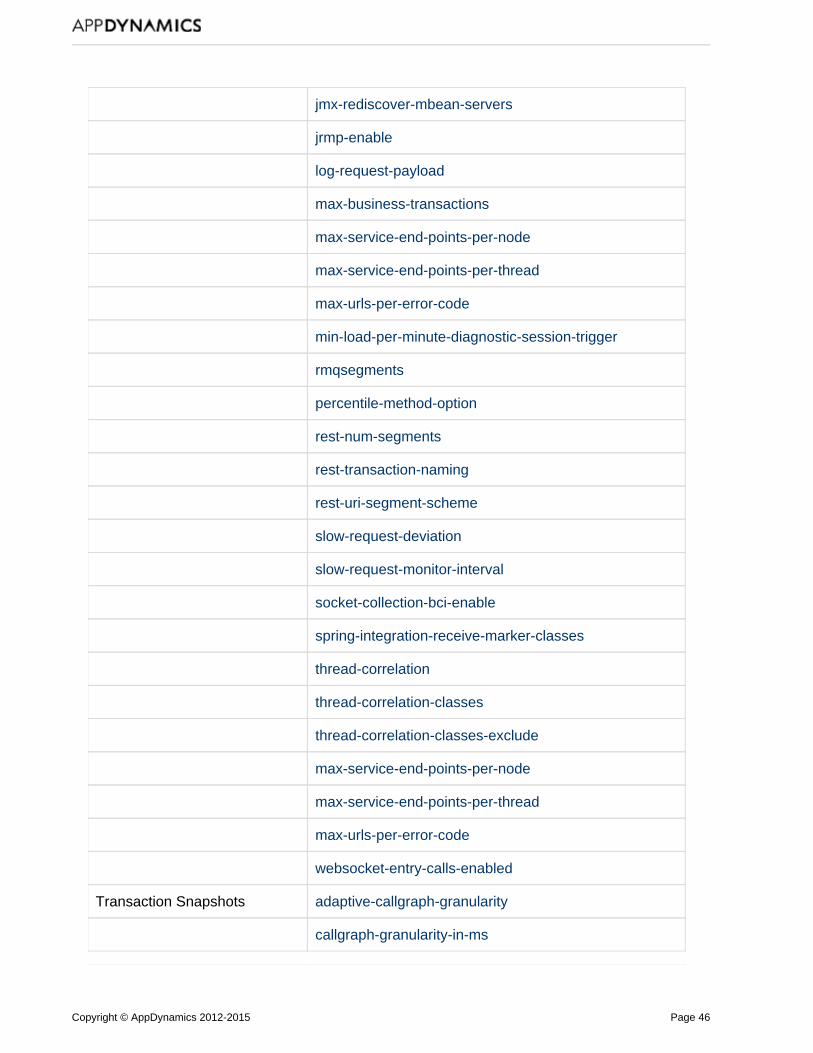
Copyright © AppDynamics 2012-2015 Page 46
jmx-rediscover-mbean-servers
jrmp-enable
log-request-payload
max-business-transactions
max-service-end-points-per-node
max-service-end-points-per-thread
max-urls-per-error-code
min-load-per-minute-diagnostic-session-trigger
rmqsegments
percentile-method-option
rest-num-segments
rest-transaction-naming
rest-uri-segment-scheme
slow-request-deviation
slow-request-monitor-interval
socket-collection-bci-enable
spring-integration-receive-marker-classes
thread-correlation
thread-correlation-classes
thread-correlation-classes-exclude
max-service-end-points-per-node
max-service-end-points-per-thread
max-urls-per-error-code
websocket-entry-calls-enabled
Transaction Snapshots adaptive-callgraph-granularity
callgraph-granularity-in-ms

Copyright © AppDynamics 2012-2015 Page 47
dev-mode-suspend-cpm
dont-show-packages
enable-startup-snapshot-policy
force-hotspot-if-diag-session
hotspot-collect-cpu
max-call-elements-per-snapshot
max-concurrent-snapshots
max-jdbc-calls-per-callgraph
max-jdbc-calls-per-snapshot
min-duration-for-jdbc-call-in-ms
on-demand-snapshots
show-packages
slow-request-threshold
thread-cpu-capture-overhead-threshold-in-ms
Miscellaneous collect-user-data-sync
sensitive-data-filters
Manage App Server and Machine Agents
On this page:
RequirementsAssociate App Agents with a BusinessApplicationReset App Agents to Purge DataEnable and Disable App AgentsDelete App AgentsAssociate Machine Agents with a BusinessApplicationReset Machine AgentsEnable and Disable Machine Agents
You can manage app agents and machine agents connected to the Controller from the App Serverand Machine Agents window. Click to viewSettings > App Server and Machine Agents

Copyright © AppDynamics 2012-2015 Page 48
1.
2.
1.
2.
information, reset agents, disable agents, and more.
Requirements
You must be a member of a role with the following Account Level Permission:Administer users, groups, roles, authentication, etc. View License. ViewAppDynamics Agents. Use Agent Download Wizard.
By default only Account Owners see the list of the agents in the account. See ConfigureRoles.
Associate App Agents with a Business Application
If you start an application server with an app agent without specifying the business application, theagent appears in the list as an unassociated agent. You can associate anApp Server Agentsagent with an application manually:
From the agents list in the panel, select the unassociated app agentApp Server Agentsfrom the list.
Click . This button is enabled only for app agents that areAssociate with Applicationconnected to the Controller but not associated with a business application.
Reset App Agents to Purge Data
Resetting the app agent purges all existing data for the agent, including metrics and discoveredtransactions. You do not need to restart the application server to reset agent data.
Resetting an app agent causes the Controller to:
Purge all data such as gathered metrics, discovered business transactions, etc. for theselected agent.Reset the business transaction limit counter to zero for the selected agent.
Resetting an agent flushes the in-memory business transactions, exit calls, and registrationinformation for the agent. It does not re-instrument or remove existing instrumentation. After areset, the agent re-registers business transactions and backends and it creates new metrics. Youmay lose a few minutes worth of data between the reset and re-registration operations.
You may need to reset agents after you have reconfigured business transaction or backenddetection and the agent is not applying the updated rules:
Delete all existing transactions and backends. "See Delete Old Unwanted Business Transactions" in Refine Business Transaction
.ConfigurationChoose a reset option:
To reset all the app agents for a business application click .Reset AgentsTo disable a individual app agents, select one or more agents and click ResetSelected App Agent(s).
In the menu, click to filter the View Agents not associated with an Application Ap list.p Server Agents
Copyright © AppDynamics 2012-2015 Page 49
1.
Enable and Disable App Agents
An app server agent polls the Controller every minute to check whether the agent is enabled ordisabled. Disabling an agent can help you troubleshoot application problems. For example, youdon't need to uninstall the agent to compare the difference in overhead between when the agent iscapturing data versus when it is not. Disabling the agent does not require you to shut down orrestart the application server.
New in 4.0.7, you can enable and disable .NET Agents.
All agents connected to the Controller count against the agent license limits for that Controller.Even though it only reports minimal app server-related data, a disabled app agent is stillconnected to the Controller and consumes an app agent license.
To enable or disable all the app agents for a business application click orEnable Agents Di.sable Agents
Enable or disable app agents individually from the Agents tab on the Node Dashboard:To disable the agent, click Agent is .OffTo enable the agent, click Agent is .OnIt takes about a minute for the operation to take effect.
4.0.6 and earlier, when you disable the Java Agent, it stops capturing all data except forJVM and JMX metrics such as heap memory, memory pools, garbage collection, and threadcount.
, by default turning the agent completely disables monitoring. Un-check New in 4.0.7 Off Dis on the Disable This App Agentable all monitoring including JVM and JMX metrics
window to keep collecting JVM and JMX metrics such as heap memory, memory pools,garbage collection, and thread count.
Delete App Agents
Deleting an app agent in the Manage App Server Agents and Machine Agents window removesthe agent and any associated data from the Controller database. This does not affect theinstrumentation of the application server. If the application server is still running with an app agent,or if it is subsequently restarted with an app agent, the agent re-registers and appears again in theController.
You can delete an app agent by clicking button.Delete Agent from System
To completely remove an app agent completely so that it does not register again, uninstall it. Seethe uninstall instructions for your agent's platform under .Instrument Applications
Associate Machine Agents with a Business Application
If you start a Standalone Machine Agent without specifying the business application, the agentappears in the list as an unassociated agent. You can associate an agent withMachine Agentsan application manually:
From the agents list under , select the unassociated machine agent fromMachine Agentsthe list.
For all other agent types, always leave the box in the Disable This App Agentwindow checked.

Copyright © AppDynamics 2012-2015 Page 50
1.
2. Click . This button is enabled only for machine agents that areAssociate with Applicationconnected to the Controller but not associated with a business application.
Reset Machine Agents
The reset operation purges all existing metrics for a Standalone Machine Agent or .NET MachineAgent. The machine agent restarts and begins gathering metrics again.
Enable and Disable Machine Agents
A machine agent, either the Standalone Machine Agent or .NET Machine Agent, polls theController every minute to check whether the agent is enabled or disabled. Disabling a machineagent does not require you to shut down or restart the application server.
New in 4.0.7, you can enable and disable the .NET Machine Agent.
To enable or disable all the machine agents for a business application click Enable Agents or .Disable AgentsTo enable or disable individual machine agents, select one or more agents and right click todisplay the contextual menu. Click or Enable Selected Machine Agent(s) Disable
.Selected Machine Agent(s)
Remove Unused Nodes
On this page:
Node Activity and Agent LicensingConfiguring Node Activity Settings
Related pages:
Access the Administration Console
If a node has been out of contact with the Controller for a certain amount of time, the Controllermarks the node as a historical node. The Controller suspends certain types of processing activitiesfor the node, such as rule evaluation.
If the node resumes contact with the Controller before the node deletion period expires, theController restores it to an active state. Otherwise, it is permanently removed from the Controllerand the node level data is no longer accessible in the UI. However, the tier- and application-levelhistorical metric data for the node remain available even after the node is deleted.
By default, the Controller considers a node historical after about 20 days of inactivity and deletesthe node after 30 days. For a highly dynamic application environment in which nodes are createdand destroyed frequently, it usually makes sense to shorten the node activity timeout period. Thisallows recycled nodes to be treated as such in the Controller.
Another consideration for historical nodes is that their names can be assigned to new nodes ifnode name reuse is enabled. is an App Agent for Java option that allows theNode name reuseController to present data generated by multiple, short-lived nodes in a given tier as a singlelogical node.
In the menu, click to filter the list.View Agents not associated with an Application

Copyright © AppDynamics 2012-2015 Page 51
1.
2. 3.
Node Activity and Agent Licensing
For licensing purposes, the Controller releases the license for the agent if the Controller has notreceived data from the agent in the previous 5 minutes. This license availability behavior is notaffected by the historical node status or node deletion timeout settings.
Configuring Node Activity Settings
The node activity settings are global settings that the root AppDynamics administrator can modifyfrom the administration console, as follows:
As a user with global administrator administrator privileges, log in to the Controlleradministration console. For more information, see .Access the Administration ConsoleClick .Controller SettingsSet the retention and deletion properties based on the requirements for your environment.AppDynamics recommends that you set the permanent deletion period at least an hourmore than the retention period.
node.permanent.deletion.period: Time (in hours) after which a node that has lostcontact with the Controller is deleted permanently from the system. The default is 720hours.node.retention.period: Time (in hours) after which a node that has lost contact withthe Controller is deleted. In this case, the AppDynamics UI will not display the node,however the system will continue to retain it. The default is 500 hours.
Agent Log Files
On this page:
Logging LevelsLog File LocationsAgent Log NamingLog File Sizes and Life Cycle DetailsProxy LogBusiness Transactions LogBytecode Transformer LogJMX LogStandalone Machine Agent LogREST Log
Related pages:
Install the PHP AgentInstall the Node.js AgentPython Agent Debugging and Logs
Agent log files can help you resolve troublesome agent configuration and applicationinstrumentation issues. When submitting log files to AppDynamics Support, ensure you send theentire contents of the agent logs directory available as a zip file for download when you request
.the agent logs

Copyright © AppDynamics 2012-2015 Page 52
Agents create log files automatically at launch time. The logs available are agent dependent.
Useful log files include:
Agent Logs and for discovering errorsProxy LogByteCode Transformer Log for resolving instrumentation problems
Logging Levels
The logging levels, in descending order of amount of information collected, are as follows:
all: Logs all events.trace: Reports finer-grained informational events than the debug level that may be useful todebug an application.debug: Reports fine-grained informational events that may be useful to debug anapplication.info: Default log level. Reports informational messages that highlight the progress of theapplication a coarse-grained level.warn: Reports on potentially harmful situations.error: Reports on error events that may allow the application to continue running.
Controlling the Logging Level (Java and PHP)
By default, the logging level for most log files is set to "info". The finer the granularity, the faster thelog file consumes disk space.
You can control the logging level for the Java Agent and PHP Agent by changing the value of the"level value" parameter in the log4j.xml file in the agent installation\logs directory.
<logger name="com.singularity" additivity="false"> <!-- to control the logging level of the agent log files, use the levelattribute below. value="all|trace|debug|info|warn|error"--><level value="info"/><appender-ref ref="AgentLogger"/><appender-ref ref="RESTLogger"/></logger>
Controlling the Logging Level (.NET)
You can control the logging level for the .NET Agent by changing the value of the "min level"parameter in the AppDynamicsAgentLog.config file in the .NET Agent logs directory. The logconfiguration is per server. The .NET Machine Agent and the .NET Agent read the sameconfiguration file and write to the same set of output files.
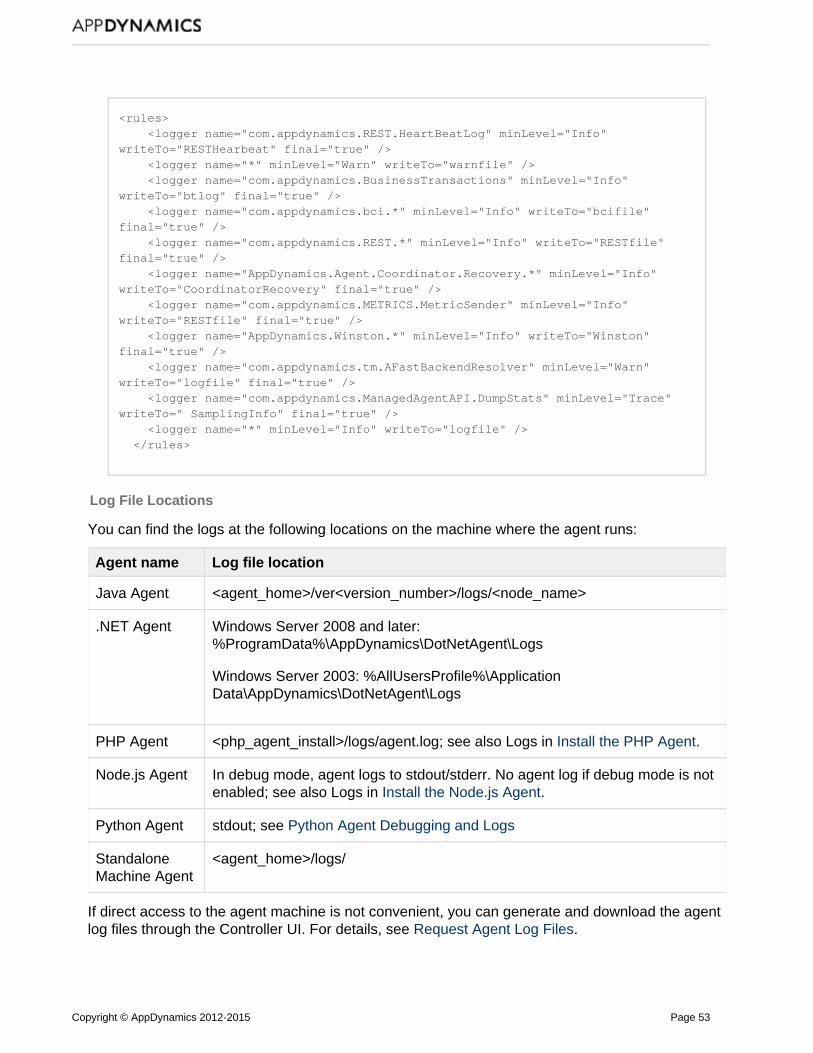
Copyright © AppDynamics 2012-2015 Page 53
<rules> <logger name="com.appdynamics.REST.HeartBeatLog" minLevel="Info"writeTo="RESTHearbeat" final="true" /> <logger name="*" minLevel="Warn" writeTo="warnfile" /> <logger name="com.appdynamics.BusinessTransactions" minLevel="Info"writeTo="btlog" final="true" /> <logger name="com.appdynamics.bci.*" minLevel="Info" writeTo="bcifile"final="true" /> <logger name="com.appdynamics.REST.*" minLevel="Info" writeTo="RESTfile"final="true" /> <logger name="AppDynamics.Agent.Coordinator.Recovery.*" minLevel="Info"writeTo="CoordinatorRecovery" final="true" /> <logger name="com.appdynamics.METRICS.MetricSender" minLevel="Info"writeTo="RESTfile" final="true" /> <logger name="AppDynamics.Winston.*" minLevel="Info" writeTo="Winston"final="true" /> <logger name="com.appdynamics.tm.AFastBackendResolver" minLevel="Warn"writeTo="logfile" final="true" /> <logger name="com.appdynamics.ManagedAgentAPI.DumpStats" minLevel="Trace"writeTo=" SamplingInfo" final="true" /> <logger name="*" minLevel="Info" writeTo="logfile" /> </rules>
Log File Locations
You can find the logs at the following locations on the machine where the agent runs:
Agent name Log file location
Java Agent <agent_home>/ver<version_number>/logs/<node_name>
.NET Agent Windows Server 2008 and later:%ProgramData%\AppDynamics\DotNetAgent\Logs
PHP Agent <php_agent_install>/logs/agent.log; see also Logs in .Install the PHP Agent
Node.js Agent In debug mode, agent logs to stdout/stderr. No agent log if debug mode is notenabled; see also Logs in .Install the Node.js Agent
Python Agent stdout; see Python Agent Debugging and Logs
StandaloneMachine Agent
< >/logs/agent_home
If direct access to the agent machine is not convenient, you can generate and download the agentlog files through the Controller UI. For details, see . Request Agent Log Files
Windows Server 2003: %AllUsersProfile%\ApplicationData\AppDynamics\DotNetAgent\Logs

Copyright © AppDynamics 2012-2015 Page 54
Agent Log Naming
App Agent Type Log Name
Java agent .#.logYear_mon_day_hr_min
PHP (PHP extension component) agent.#.log
PHP (Java proxy) proxy .#.logYear_mon_day_hr_min
.NET AgentLog.#.txt
These logs are generated by all app agents and report the activity of the agents as they monitoryour applications. At the beginning of the log file, it shows the start up of the agent monitoringservices and displays configuration settings. The agent log also contains the sequence of agentruntime activity and exceptions that are encountered. When you are troubleshooting variousissues in an AppDynamics deployment, you can find useful information in this log.
Examples of information in the log:
Agent version and build dateJVM runtime version (Java only)Configuration changesBackend detectionExceptions Output from logging session requests
See the Logs section in for information about the logs generated by theInstall the Node.js AgentNode.js Agent.
Log File Sizes and Life Cycle Details
Log File App Agent Type Max Size
Agent Java, .NET 5 MB
Agent PHP (PHP extension module) 20 MB
Proxy PHP (Java proxy) 5 MB
Business Transaction Java, .NET, PHP 5 MB
ByteCode Transformer Java, .NET 20 MB
JMX Java 5 MB
Machine Agent Machine 5 MB
REST Java, .NET, PHP 5 KB
When the maximum file size is reached, a new log is created. First file is named ...0.log,second file is ...1,log, and so on.
Copyright © AppDynamics 2012-2015 Page 55
Maximum of five files per set.Maximum of five sets. If the maximum number of sets is reached, when a new set iscreated, the oldest set is deleted.While the agent rotates away old log files, it deliberately retains the first log file. The first logfile contains information that reflects the specific context in which the agent was started,
along with other information that can be useful for troubleshooting and record keeping.
Proxy Log
App Agent Type Log Name
PHP (proxy) proxy .#.logYear_mon_day_hr_min
The PHP Agent generates a proxy log., which is useful for determining why snapshots are notbeing taken and for diagnosing communication issues with the Controller.
The Node.js agent also generates a proxy log. When the agent component launches the proxy, itdisplays in the agent log the directory path to which the proxy is logging.
These proxy logs are relevant only for the dynamic languages application agents, which use aproxy component to communicate with the Controller.
Business Transactions Log
App Agent Type Log Name
Java BusinessTransactions .#.logYear_mon_day_hr_min
.NET (proxy) BusinessTransactionsLog.#.txt
PHP BusinessTransactions .#.logYear_mon_day_hr_min
The Business Transactions log is generated by all agents and logs the following information:
discovered business transactions discovery stack trace for each entry pointdropped business transactions, which show up in the "default BT" when there is businesstransaction overflow. Only executed methods show up in the business transaction log. If thebusiness functionality is not exercised by the application, the code is not executed, and themethods are not examined as potential entry points.
Bytecode Transformer Log
App Agent Type Log Name
Java ByteCodeTransformer .logYear_mon_day_hr_min.#
.NET ByteCode.txt
The ByteCode Transformer log is generated by the Java Agent and .NET Agent and contains theinformation associated with the AppDynamics platform bytecode instrumentation (BCI) engine.The BCI engine is used to inject interceptors. The BCI engine logs the classes being loaded in the

Copyright © AppDynamics 2012-2015 Page 56
application.
This log is useful for troubleshooting everything that depend on bytecode instrumentationincluding: Java entry points, exit points, loggers, errors, exceptions, and async threads.Examples of information in the log:
agent version and build dateeach Java class that was examined and whether the methods were considered for bytecodeinstrumentationeach method that was instrumented
This log file is useful to:
verify entry point instrumentationverify backend instrumentationtroubleshoot missing metrics
JMX Log
App Agent Type Log Name
Java JMX .#.log.logYear_mon_day_hr_min
JMX log entries contain information about JMX interactions between the AppDynamics agent andthe monitored server's JMX domains. These log entries are useful for diagnosing problemsassociated with JMX metrics, or issues with JVM metrics, which are reliant on JMX.
The JMX entries can be useful in debugging why MBeans don't appear or why metrics createdfrom MBeans do not appear in the controller UI.
Standalone Machine Agent Log
Agent Log Name
Standalone Machine machine-agent.#.log
The machine agent log captures information from the Standalone Machine Agent as it monitors thehealth of the server in terms of the server's usage of CPU, memory, disk, and network interfaces.
REST Log
App Agent Type Log Name
Java REST .logYear_mon_day_hr_min.#
.NET RESTCommunications.#.txt
PHP (proxy) REST .logYear_mon_day_hr_min.#
This log contains information about the AppDynamics agent and Controller communication. Thelog contains request and response payload data between the agent and the Controller, the rawdetails of communications between the agent and the Controller. By default, the REST logcontains INFO level logging for all registration requests up to a limit of 1 MB every five minutes.
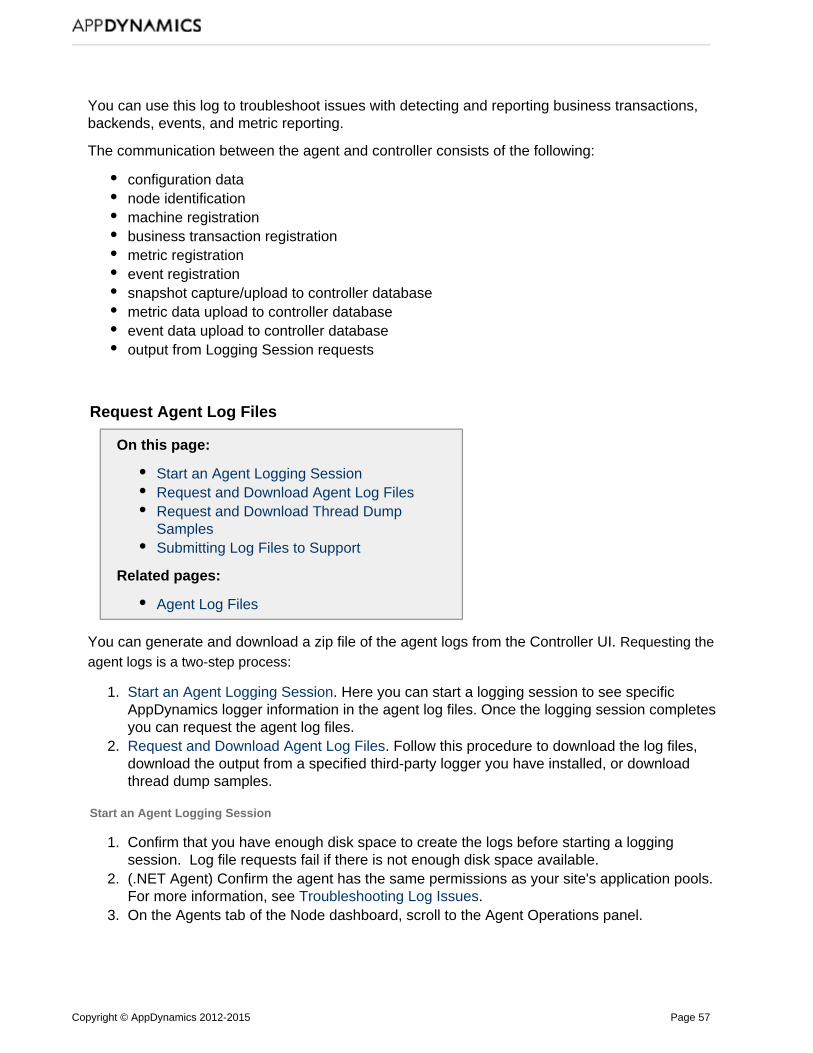
Copyright © AppDynamics 2012-2015 Page 57
1.
2.
1.
2.
3.
You can use this log to troubleshoot issues with detecting and reporting business transactions,backends, events, and metric reporting.
The communication between the agent and controller consists of the following:
configuration datanode identificationmachine registrationbusiness transaction registrationmetric registrationevent registrationsnapshot capture/upload to controller databasemetric data upload to controller databaseevent data upload to controller databaseoutput from Logging Session requests
Request Agent Log Files
On this page:
Start an Agent Logging SessionRequest and Download Agent Log FilesRequest and Download Thread DumpSamplesSubmitting Log Files to Support
Related pages:
Agent Log Files
You can generate and download a zip file of the agent logs from the Controller UI. Requesting theagent logs is a two-step process:
Start an Agent Logging Session. Here you can start a logging session to see specificAppDynamics logger information in the agent log files. Once the logging session completesyou can request the agent log files.Request and Download Agent Log Files. Follow this procedure to download the log files,download the output from a specified third-party logger you have installed, or downloadthread dump samples.
Start an Agent Logging Session
Confirm that you have enough disk space to create the logs before starting a loggingsession. Log file requests fail if there is not enough disk space available.(.NET Agent) Confirm the agent has the same permissions as your site's application pools.For more information, see Troubleshooting Log Issues.On the Agents tab of the Node dashboard, scroll to the Agent Operations panel.
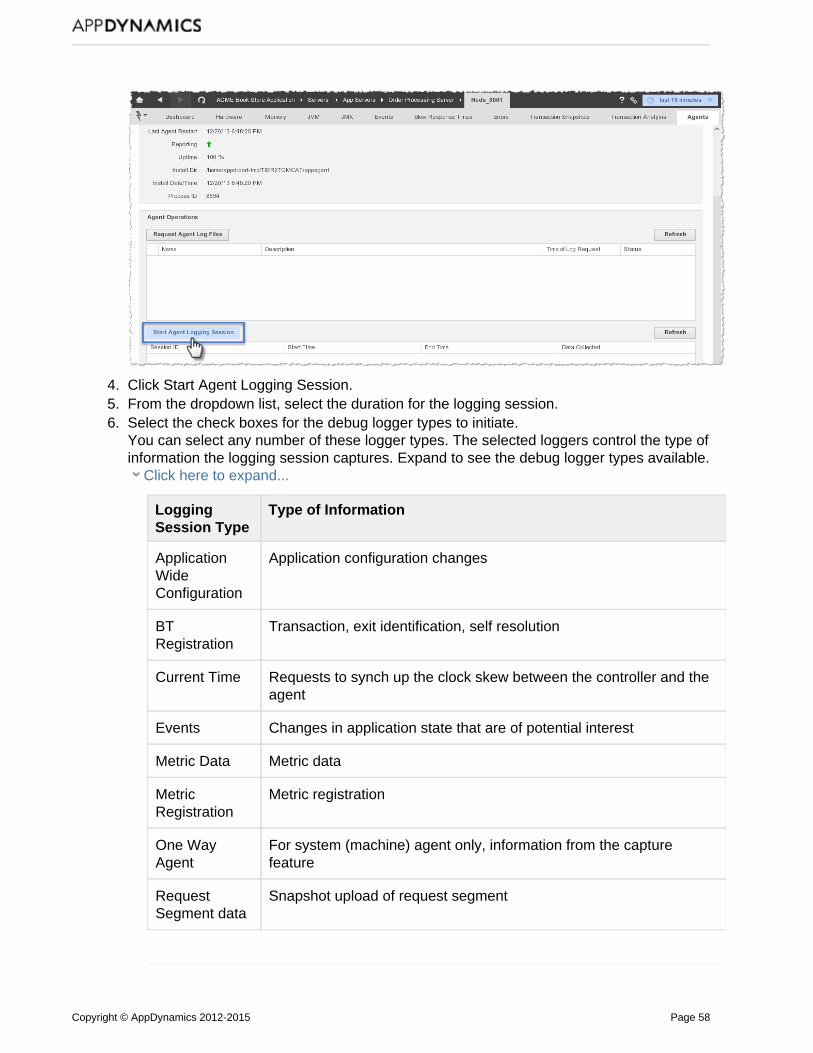
Copyright © AppDynamics 2012-2015 Page 58
3.
4. 5. 6.
Click Start Agent Logging Session.From the dropdown list, select the duration for the logging session.Select the check boxes for the debug logger types to initiate. You can select any number of these logger types. The selected loggers control the type ofinformation the logging session captures. Expand to see the debug logger types available.
Click here to expand...
LoggingSession Type
Type of Information
ApplicationWideConfiguration
Application configuration changes
BTRegistration
Transaction, exit identification, self resolution
Current Time Requests to synch up the clock skew between the controller and theagent
Events Changes in application state that are of potential interest
Metric Data Metric data
MetricRegistration
Metric registration
One WayAgent
For system (machine) agent only, information from the capturefeature
RequestSegment data
Snapshot upload of request segment
Copyright © AppDynamics 2012-2015 Page 59
6.
7.
1. 2.
System AgentRegistration
System (machine) agent registration
System AgentReregistration
System (machine) agent reregistration
System AgentPollingHandler
System (machine) agent configuration request
TaskExecution
Relates to the machine agent where you can create a task to executeon a machine, such as restart application server and run a script
Top SummaryStats
Request to upload the 'most expensive backend' summary
ApplicationConfiguration
Configuration change requests
TransientChannel
Activity of transient channel that is used to upload and downloadinstructions for JMX console live data
Click Start Agent Logging Session.Each session type that you selected appears in the session panel, with a start time and endtime based on the selected Duration of logging session. If you don't see the session you
requested, click Refresh.
Request and Download Agent Log Files
When the End Time of the logging session has been reached, you can request the log files. Youcan also manually take from the Agents tab of the node dashboard. When youthread dumpsrequest the log files, the agent zips the contents of the logs directory and then sends the logs tothe Controller as a single file for download.
On the Agents tab of the Nodes dashboard, scroll down to the Agent Operations panel.Click . Request Agent Log Files
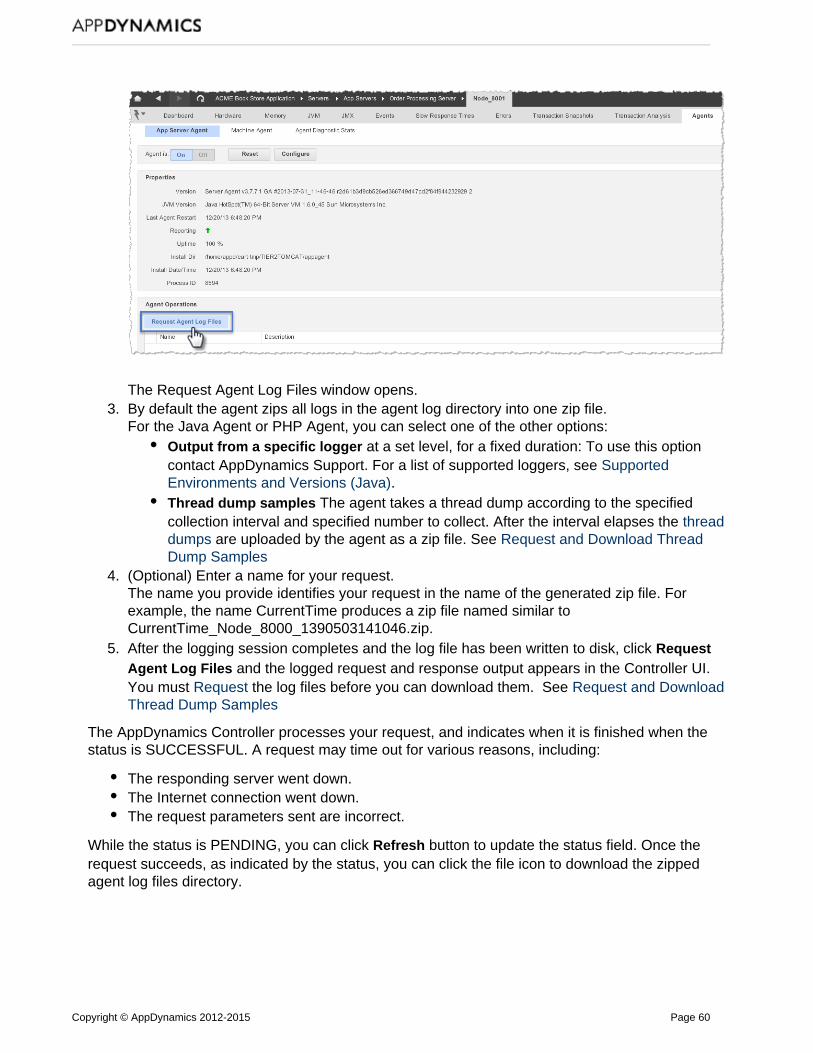
Copyright © AppDynamics 2012-2015 Page 60
2.
3.
4.
5.
The Request Agent Log Files window opens.By default the agent zips all logs in the agent log directory into one zip file. For the Java Agent or PHP Agent, you can select one of the other options:
Output from a specific logger at a set level, for a fixed duration: To use this optioncontact AppDynamics Support. For a list of supported loggers, see Supported
.Environments and Versions (Java)Thread dump samples The agent takes a thread dump according to the specifiedcollection interval and specified number to collect. After the interval elapses the thread
are uploaded by the agent as a zip file. See dumps Request and Download ThreadDump Samples
(Optional) Enter a name for your request. The name you provide identifies your request in the name of the generated zip file. Forexample, the name CurrentTime produces a zip file named similar toCurrentTime_Node_8000_1390503141046.zip.After the logging session completes and the log file has been written to disk, click Request
and the logged request and response output appears in the Controller UI. Agent Log FilesYou must the log files before you can download them. See Request Request and DownloadThread Dump Samples
The AppDynamics Controller processes your request, and indicates when it is finished when thestatus is SUCCESSFUL. A request may time out for various reasons, including:
The responding server went down.The Internet connection went down.The request parameters sent are incorrect.
While the status is PENDING, you can click button to update the status field. Once theRefreshrequest succeeds, as indicated by the status, you can click the file icon to download the zippedagent log files directory.
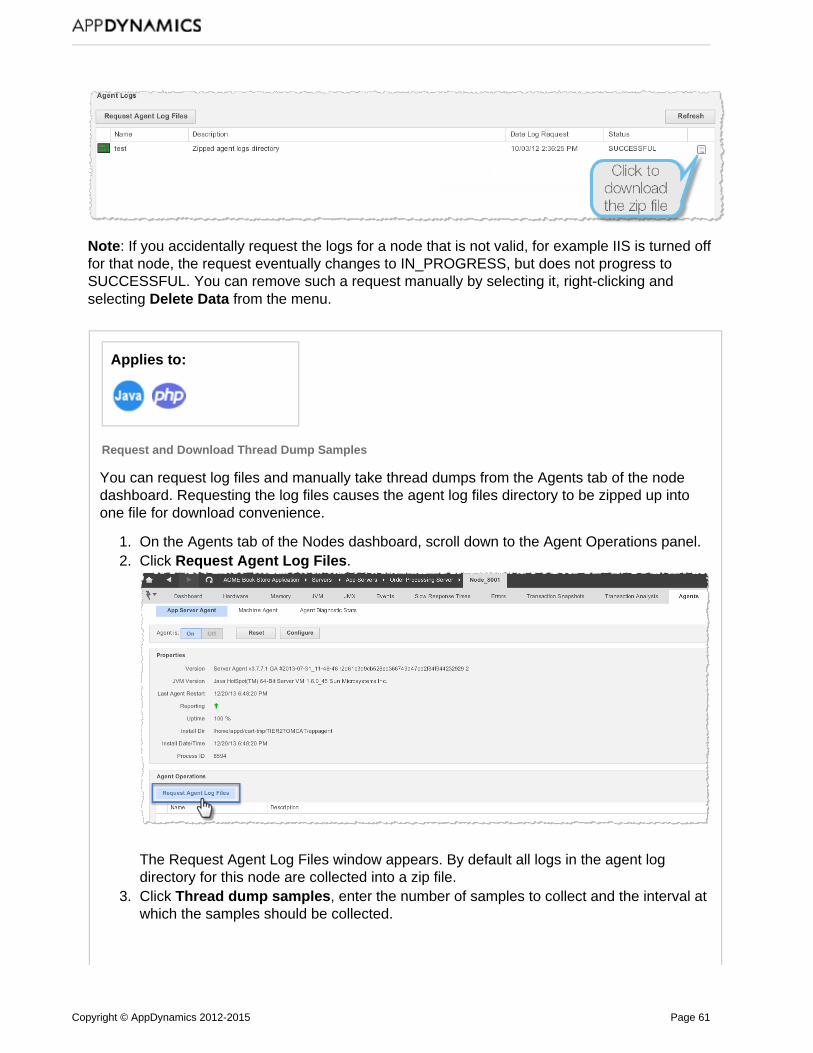
Copyright © AppDynamics 2012-2015 Page 61
1. 2.
3.
Note: If you accidentally request the logs for a node that is not valid, for example IIS is turned offfor that node, the request eventually changes to IN_PROGRESS, but does not progress toSUCCESSFUL. You can remove such a request manually by selecting it, right-clicking andselecting from the menu.Delete Data
Applies to:
Request and Download Thread Dump Samples
You can request log files and manually take thread dumps from the Agents tab of the nodedashboard. Requesting the log files causes the agent log files directory to be zipped up intoone file for download convenience.
On the Agents tab of the Nodes dashboard, scroll down to the Agent Operations panel.Click .Request Agent Log Files
The Request Agent Log Files window appears. By default all logs in the agent logdirectory for this node are collected into a zip file.Click , enter the number of samples to collect and the interval atThread dump sampleswhich the samples should be collected.

Copyright © AppDynamics 2012-2015 Page 62
3.
4.
5.
6. 7.
The agent takes a thread dump according to the specified collection interval andspecified number to collect. After the interval elapses the thread dumps are uploaded bythe agent as a zip file.(Optional) Enter a name for your request. The name you provide is used to identify yourrequest in the name of the generated zip file. For example, the name CurrentTimeproduces a zip file named similar to CurrentTime_Node_8000_1390503141046.zip.After the logging session duration has expired and the log file has been written to disk,click and the logged request and response output appears inRequest Agent Log Filesthe Controller.The AppDynamics controller processes your request. While the status is PENDING, you can click to update the status indicator. RefreshOnce the status is SUCCESSFUL, you can double-click a thread dump sample in the listto download the ZIP file containing the thread dump that you want.
: If you accidentally request the thread dump samples for a node that is not valid,Notefor example IIS is turned off for that node, the request eventually changes toIN_PROGRESS, but does not progress to SUCCESSFUL. You can remove the requestmanually by selecting it, right-clicking and selecting from the menu.Delete Data
Submitting Log Files to Support
When submitting log files to AppDynamics Support, ensure you send the entire contents of theagent logs directory available as a ZIP file for download when you request the agent logs.
Instrument Java Applications
On this page:
Before You BeginOverview of Instrumenting Your JavaApplicationConfigure and Download the Java AgentAutomatic Naming in a Self-Service Pro TrialInstall the Agent on the App ServerView Application Activity in the Controller
Related pages:
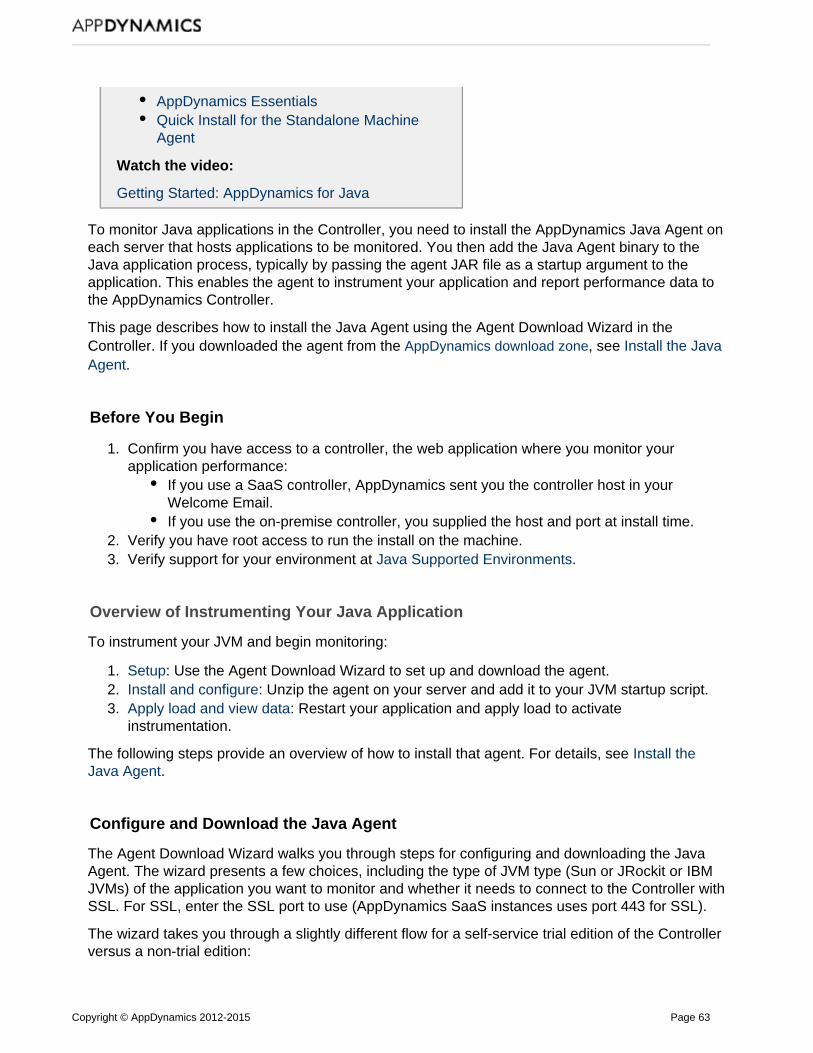
Copyright © AppDynamics 2012-2015 Page 63
1.
2. 3.
1. 2. 3.
AppDynamics EssentialsQuick Install for the Standalone MachineAgent
Watch the video:
Getting Started: AppDynamics for Java
To monitor Java applications in the Controller, you need to install the AppDynamics Java Agent oneach server that hosts applications to be monitored. You then add the Java Agent binary to theJava application process, typically by passing the agent JAR file as a startup argument to theapplication. This enables the agent to instrument your application and report performance data tothe AppDynamics Controller.
This page describes how to install the Java Agent using the Agent Download Wizard in theController. If you downloaded the agent from the , see AppDynamics download zone Install the Java
. Agent
Before You Begin
Confirm you have access to a controller, the web application where you monitor yourapplication performance:
If you use a SaaS controller, AppDynamics sent you the controller host in yourWelcome Email.If you use the on-premise controller, you supplied the host and port at install time.
Verify you have root access to run the install on the machine.Verify support for your environment at . Java Supported Environments
Overview of Instrumenting Your Java Application
To instrument your JVM and begin monitoring:
Setup: Use the Agent Download Wizard to set up and download the agent.Install and configure: Unzip the agent on your server and add it to your JVM startup script.Apply load and view data: Restart your application and apply load to activateinstrumentation.
The following steps provide an overview of how to install that agent. For details, see Install the.Java Agent
Configure and Download the Java Agent
The Agent Download Wizard walks you through steps for configuring and downloading the JavaAgent. The wizard presents a few choices, including the type of JVM type (Sun or JRockit or IBMJVMs) of the application you want to monitor and whether it needs to connect to the Controller withSSL. For SSL, enter the SSL port to use (AppDynamics SaaS instances uses port 443 for SSL).
The wizard takes you through a slightly different flow for a self-service trial edition of the Controllerversus a non-trial edition:

Copyright © AppDynamics 2012-2015 Page 64
you are using a self-service Pro Trial edition of AppDynamics Pro, the application and tierIfnames are generated for you and not shown as entries in the wizard. This helps you getstarted quickly. You can always change these values after you understand how you want tomodel your environment in AppDynamics. See the following section for theautomatic-naming format. If using a non-trial edition, you can configure the application to which the agent will reportdata and the tier to which the node belongs in the wizard. A node name, the value thatidentifies an individual JVM in the monitored environment, is generated and inserted into theagent configuration automatically.
When specifying an application name, keep in mind that this value identifies the businessapplication in the AppDynamics model of your environment to which this agent will report data.Conceptually, an AppDynamics business application does not necessarily correspond to the notionof an application in the monitored environment, where the application is usually thought of, forexample, as a WAR file deployed to an application server. A single business application inAppDynamics may contain multiple applications in the monitored environment. For moreinformation about modeling your environment in AppDynamics, .see AppDynamics Concepts
Each monitored JVM must have a unique node name in AppDynamics. This means that you needto run the wizard for each JVM to monitor, or, after downloading the agent, edit the configurationfile that specifies the agent naming properties, controller-info.xml, to at least change the nodename value before copying it to other nodes.
Automatic Naming in a Self-Service Pro Trial
If you are using a self-service trial edition of AppDynamics Pro, AppDynamics names your application,tier, and node dynamically. AppDynamics uses the following naming scheme to identify agents thatdo not otherwise identify themselves in controller-info.xml or using startup arguments to the JVM:
Application name: MyAppTier name: MyTierNode name: <app_server_type>@<hostname>:<port> (forexample: [email protected]:8080)
The automatically generated node name includes the port number that the server listens on. Byusing the listening port number in the node name, automatic naming ensures that when there aremultiple instances of an application server on a single machine, all instances have unique nodenames.
Note that the port number used in the node name may not be the primary listening port for the server. Ifa server listens on multiple ports, automatic naming uses the lowest numbered port in the node name.For example, if a server uses port 8080 as a primary HTTP port but listens for shutdown requests onport 8005, the node will be named with the 8005 port.
For tiers, the Controller automatically recognizes distinct logical tiers based on traffic flow betweenand associates the nodes to individual tiers accordingly. the nodes All tiers belong to a single
business application, MyApp. As you learn more about how you want to organize your applicationsin AppDynamics, you can change the names of nodes, tiers, or business applications in theController UI or in the configuration.

Copyright © AppDynamics 2012-2015 Page 65
1.
2.
1. 2. 3.
Install the Agent on the App Server
After you download the agent, install it to your app server. The final window of the Agent DownloadWizard includes brief instructions for installing the agent.
Log on as an administrator to the machine running your Java application. Unzip theAppServerAgent.zip file.For example, on Linux unzip the agent to home/appdynamics. This is the <agent home>
directory.
unzip AppServerAgent.zip -d /opt/appdynamics/appagent
Edit your startup configuration file to include the Java Agent. Show more information on startup scripts...
View Application Activity in the Controller
Now you're ready to restart your application and view data in the Controller UI:
Restart the JVM.Apply load to your application.Log on to the Controller to see your application in action.
The agent instruments the application code and reports metrics back to the Controller.
From here, you can install more agents or you can begin monitoring .your application environment
Java Supported Environments
On this page:
JVM SupportJVM Language Frameworks Support

Copyright © AppDynamics 2012-2015 Page 66
Application ServersMessage Oriented Middleware SupportJDBC Drivers and Database Servers SupportBusiness Transaction Error DetectionNoSQL/Data Grids/Cache Servers SupportJava Frameworks SupportRPC/Web Services API Support
Related pages:
Supported Environments and Versions
Supported Platform Matrix for the Java Agent
This page documents known environments in which the Java Agent has been used to instrumentapplications. The Java Agent can target specific Java bytecode. This provides wide-rangingflexibility, so if an environment is not listed here, this does not preclude the Java Agent from beingable to extract valuable performance metrics. Contact AppDynamics Support or Sales foradditional details.
Notes:
A dash ("-") in a table cell indicates that this column is not relevant or not supported for thatparticular environment.In cases where no version is provided, assume that all versions are supported. ContactAppDynamics Support or Sales for confirmation.For environments that require additional configuration, a separate table describing or linkingto configuration information follows the support matrix.For environments supported by AppDynamics End User Monitoring, see Supported
.Environments and Versions - Web EUM
JVM Support
The AppDynamics Java Agent supports applications running with a JRE or a full JDK. These arethe known JVM environments in which the Java Agent has been used to instrument applications.
Vendor Implementation Version OperatingSystem
ObjectInstanceTracking
AutomaticLeakDetection
Custom Memory Structures
ContentInspection
AccessTracking
Oracle Java HotSpot 7Update45+
SolarisSparc 64,Windows,Linux
- - - -

Copyright © AppDynamics 2012-2015 Page 67
Oracle Java SE(StandardEdition)
81 SolarisSparc 64,Windows,Linux
Yes Yes Yes Yes
BEA JRockit 1.5 - - Yes Yes Yes
BEA JRockit 1.6, 1.7 - - Yes Yes -
Oracle JRockit JVM 28.1+ Linux Intel64Windows
- - - -
IBM JVM 1.5.x,1.6.x,1.7.x
- - Yes, asnoted2
Yes, asnoted2,3
-
SUN JVM 1.5,1.6, 1.7
- Yes Yes Yes Yes
OpenSource
OpenJDK 1.6 Linux,windows,everywhere
- Yes - -
HP OpenVMS - - - - - -
Notes:
1 For examples of instrumenting new language constructs in Java SE 8, see InstrumentingJava 8 Constructs.
2 Object instance tracking, automatic leak detection, and custom memory structure monitoringare not supported with the IBM Java Agent on an IBM JVM. It's possible to work around thislimitation by using the , but doing soJava Agent for the Sun and JRockit JVM on an IBM JVM
can result in a negative performance impact.
3 For IBM JVMs, a restart is required after configuring the custom memory structure.
JVM Language Frameworks Support
No additional configuration is required for these frameworks.
Vendor JVMLanguage Framework
Version Correlation/Entry Points
Exit Points Transports Notes

Copyright © AppDynamics 2012-2015 Page 68
OpenSource / TypesafeReactivePlatform
Akka Actor 2.1 -2.3
Yes Yes Netty Remotingexit/entrysupported. Persistence(experimentalmodule in v2.3)is not currentlysupported.
OpenSource
Groovy - Yes Yes
OpenSource / TypesafeReactivePlatform
Play forScala
2.1 -2.3
Yes - HTTPover Netty
Includesframeworkspecific entrypoints
OpenSource / TypesafeReactivePlatform
Spraytoolkit (Spr
)ay.io
1.2.3 No (4.0.0–4.0.7)Yes (4.0.8+)
No (4.0.0–4.0.7)Yes (4.0.8+)
HTTP New in 4.0.8 Entry points aredetected andconfigurable as servlet entrypoint and exitpoints as HTTPexits.
Pivotal Grails - - - -
The is a JVM-based runtime and collection of tools used to build Typesafe Reactive Platform reacti applications. This includes , , , and . ve Scala Play Akka Spray.io
Application Servers
These are the known application server environments in which the Java Agent has been used toinstrument applications. Some require additional configuration. Click the link on the server or OSGiRuntime name in the following support matrix for information about additional configurationrequired or related configuration topics. Application servers are usually found by the Java Agent asan entry point.
Vendor Application Server / OSGi Runtime
Version SOAProtocol
RMISupported
JMX EntryPoints
Apache Felix - - - - Yes
Apache Sling - - - - Yes
Apache Tomcat 5.x,6.x,7.x
- - Yes
Apache Resin 1.x - 4.x - - - -
Copyright © AppDynamics 2012-2015 Page 69
Adobe Cold Fusion 8.x, 9.x - No - Yes
Equinox - - - - Yes
Eclipse Jetty 6.x, 7.x - - - -
IBM InfoSphere 8.x - - - Yes
IBM WebSphere 6.1 JAX-WS - - Yes
IBM WebSphere 7.x JAX-WS Yes, detectand correlate
Yes forWebSpherePMI
Yes
IBM WebSphere 8.x JAX-WS Yes, detectand correlate
- Yes
OpenSource
Liferay Portal - - - - -
GlassFish EnterpriseServer
2.x - - Yes Yes
Oracle GlassFish Server and GlassFish ServerOpen Source Edition
3.1+ - - Yes forAMX
Yes
Oracleand BEA
WebLogic Server 9.x+ JAX-WS Yes, detectand correlatefor 10.x
Yes Yes
SoftwareAG
webMethods 9.5, 9.6 - - - Yes
Tibco ActiveMatrixBusinessWorksService Engine
5.7 - - - Yes
Application Server(OC4J)
- - Yes, detectand correlatefor 10.x
- Yes
- Grails, with Tomcat7.x, Glassfish v3, Weblogic 12.1.1 (12c)
- - - -
- JBoss Server 4.x, 5.x - Yes, detectand correlate
- Yes
JBoss AS/Wildfly 6.x, 7.x,8.x
Yes Yes

Copyright © AppDynamics 2012-2015 Page 70
JBoss EAP 6.11,6.2.0,7.x
Yes Yes
Application Server Configuration
For application server environments that require additional configuration, this section providessome information and links to topics that help you configure the environment. Environments in theApplication Server Support table that require additional configuration, link to the configuration tablebelow.
Application Server Topics for Required and Optional Configuration
Apache Felix OSGi Infrastructure Configuration
Apache Sling OSGi Infrastructure Configuration
Apache Tomcat Apache Tomcat Startup Settings
Apache Resin Resin Startup Settings
Apache Cold Fusion Configuration is required for transaction discovery;see Servlet Entry Points
Equinox OSGi Infrastructure Configuration
Eclipse Jetty Jetty Startup Settings
IBM InfoSphere IBM WebSphere and InfoSphere Startup Settings
IBM WebSphere IBM WebSphere and InfoSphere Startup Settings
Sun GlassFish Enterprise Server GlassFish JDBC connection pools can be manuallyconfigured using MBean attributes and custom JMXmetrics
GlassFish Startup SettingsModify GlassFish JVM Options
Oracle GlassFish Server (includingGlassFish Server Open Source
)Edition
GlassFish Startup SettingsModify GlassFish JVM Options
Oracle and BEA WebLogic Server Oracle WebLogic Startup Settings
Software AG webMethods webMethods Startup Settings

Copyright © AppDynamics 2012-2015 Page 71
Tibco ActiveMatrix BusinessWorksService Engine
Tibco ActiveMatrix BusinessWorks Service EngineSettings
JBoss Server JBoss and Wildfly Startup Settings
Message Oriented Middleware Support
These are the known message oriented middleware environments in which the Java Agent hasbeen used to instrument applications. Some require additional configuration. Click the link on themessaging server name in the following support matrix for information about additionalconfiguration required or related configuration topics. Message oriented middleware servers areusually found by the Java Agent as an entry point.
Vendor Messaging Server Version Protocol Correlation/EntryPoints
ExitPoints
JMX
Apache ActiveMQ 5.x+ JMS 1.x Yes Yes Yes
Apache ActiveMQ 5.x+ STOMP No - Yes
Apache ActiveMQ 5.8.x+ AMQP 1.0 No - Yes
Apache ActiveMQ 5.x+ SOAP Yes - Yes
Apache Axis 1.x, 2.x JAX-WS Yes Yes -
Apache Apache CXF 2.1 JAX-WS Yes Yes -
Apache Synapse 2.1 HTTP Yes Yes -
Fiorano Fiorano MQ - - - -
IBM IBM MQ 6.x, 7.x - - - -
IBM IBM Web ApplicationServer (WAS)
6.1+,7.x
EmbeddedJMS
- Yes -
IBM IBM WebSphere MQ - JMS Yes Yes -
JBoss MQ 4.x - - - Yes
JBoss JBoss Messaging 5.x - - - Yes
JBoss HornetQ - - - - Yes
Open MQ - - - - -
Mulesoft Mule ESB 3.4 HTTP Yes Yes -

Copyright © AppDynamics 2012-2015 Page 72
Oracle Jave Message Service 2.0 JMS correlation of thelistener is disabled bydefault
Yes
Oracle Oracle AQ - JMS - Yes -
Oracle /BEA
WebLogic 9.x+ JMS 1.1 Yes Yes Yes
Progress SonicMQ - - - - -
Pivotal RabbitMQ - HTTP - Yes -
Rabbit RabbitMQ Spring Client - - Yes Yes -
Spring Spring Integration 2.2.0 JMS Yes Yes Yes
WSO2 Enterprise Service Bus(ESB)
4.7 - Yes Yes -
Message Oriented Middleware Configuration
For message oriented middleware environments that require additional configuration, this sectionprovides some information and links to topics that help you configure the environment. Environments in the Message Oriented Middleware Support table that require additionalconfiguration, link to the configuration table below.
Messaging Server Topics for Required and Optional Configuration
Apache ActiveMQ JMS Message Queue Exit Points
Apache Axis Default exclude rules exist for Apache Axis, Axis2, and Axis AdminServlets. See also,
Web Service Entry Points
Apache Synapse To enable correlation, set node property enable-soap-header-correl=true.ation
IBM MQ No additional configuration is required.
IBM Web ApplicationServer
No additional configuration is required. See also,
JMS Message Queue Exit Points
IBM WebSphere MQ IBM Websphere MQ Message Queue Exit Points
Mule ESB Mule ESB Startup SettingsMule ESB SupportSee also HTTP Exit Points for Java

Copyright © AppDynamics 2012-2015 Page 73
BEA WebLogic Oracle WebLogic Startup Settings
Pivotal RabbitMQ No additional configuration is required. See also,
RabbitMQ Message Queue Exit Points
RabbitMQ SpringClient
No addition configuration is required, See also,
Message Queue Exit Points for Java
Spring Integration Spring Integration SupportSee also, JMS Message Queue Exit Points
JDBC Drivers and Database Servers Support
These are the known JDBC driver and database server environments in which the Java Agent hasbeen used to instrument applications. AppDynamics can follow transactions using these drivers tothe designated database.
JDBCVendor
Driver Version Driver Type DatabaseServer
DatabaseVersion
Apache 10.9.1.0 Embedded or client Derby -
Apache - - Cassandra -
Progress DataDirect data connectivity for ODBC andJBDC driver access, dataintegration, and SaaS and cloudcomputing solutions
- -
IBM JDBC 3.0 version3.57.82 or JDBC4.0 version 4.7.85
DB2 Universal JDBC driver DB2 9.x
IBM JDBC 3.0 version3.66.46 or JDBC4.0 version4.16.53
DB2 Universal JDBC driver DB2 10.1
IBM - Type IV Informix -
Microsoft 4 Type II MS SQLServer
2012*
OracleMySQL,MySQLCommunity
5.x Type II, Type IV MySQL 5.x
OpenSource
Connector/J5.1.27
Type IV MySQL 5.x

Copyright © AppDynamics 2012-2015 Page 74
OpenSource
- Type IV Postgres 8.x, 9.x
Oracle 9.x Type II, Type IV OracleDatabase
8i+
Sybase jConnect Type IV Sybase -
Teradata Teradata -
Notes:
Type II is a C or OCI driverType IV is a thin database client and is a pure Java driver
Business Transaction Error Detection
The Java Agent supports the following logging frameworks for business transaction errordetection:
Apache Log4j and Log4j 2 java.util.loggingSimple Logging Facade for Java (SLF4J)Logback
To instrument other types of loggers, see .Configure a Custom Logger
NoSQL/Data Grids/Cache Servers Support
These are the known NoSQL, data grids and cache server environments in which the JavaAgent has been used to instrument applications. Some require additional configuration. Click thelink on the database, data grid or cache name in the following support matrix for information aboutadditional configuration required or related configuration topics.
Vendor Database/Data Grid/Cache Version Correlation/EntryPoints
JMX
Apache Casandra (DataStax, REST) andCassandra CQL3
1.x Correlation Yes
Apache Apache Lucene - Apache Solr 1.4.1 Entry Points Yes
JBoss JBoss Cache TreeCache - - -
Terracotta EhCache - - -
OpenSource
Memcached - - -
OpenSource
MongoDB - - -
Oracle Coherence 3.7.1 Custom-Exit Yes
Copyright © AppDynamics 2012-2015 Page 75
JBoss Infinispan 5.3.0+ Correlation -
NoSQL/Data Grids/Cache Servers Configuration
For NoSQL, data grids, and cache server environments that require additional configuration, thissection provides some information and links to topics that help you configure the environment. Environments in the NoSQL/Data Grids/Cache Servers Support table that require additionalconfiguration, link to the configuration table below.
Database/Data Grid/Cache Topics for Required or OptionalConfiguration
Apache Cassandra (DataStax, REST) andCassandra CQL3
Cassandra Exit Points for JavaApache Cassandra Startup Settings
Apache Lucene - Apache Solr Solr Startup Settings
JBoss JBoss Startup Settings
Terracotta EhCache EhCache Exit Points
Open Source Memcached Memcached Exit Points
Open Source MongoDB Configure Backend Detection for Java
Oracle Coherence Coherence Startup Settings
Java Frameworks Support
These are the known Java framework environments in which the Java Agent has been used toinstrument applications. Some require additional configuration. Click the link on the Javaframework name in the following support matrix for information about additional configurationrequired or related configuration topics.
Vendor Framework Version SOA protocol(WebServices)
AutoNaming
EntryPoints
ExitPoints
Detection
Adobe BlazeDS - HTTP andJMS adaptor
- Yes -
Adobe ColdFusion 8.x, 9.x - - Yes - Configurationrequired fortransactiondiscovery
Apache Cassandrawith Thrift framework
- - - Yes Yes Apache ThriftEntry andExit pointsare detected
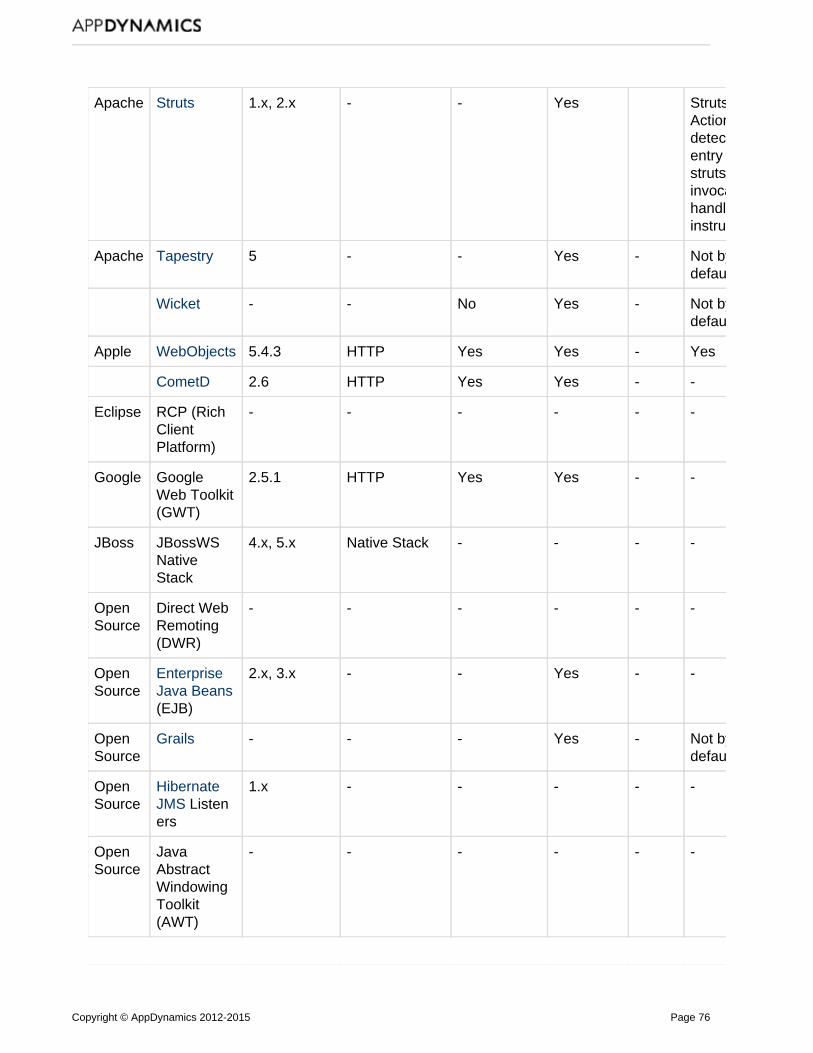
Copyright © AppDynamics 2012-2015 Page 76
Apache Struts 1.x, 2.x - - Yes StrutsActions aredetected asentry points,strutsinvocationhandler isinstrumented
Apache Tapestry 5 - - Yes - Not bydefault
Wicket - - No Yes - Not bydefault
Apple WebObjects 5.4.3 HTTP Yes Yes - Yes
CometD 2.6 HTTP Yes Yes - -
Eclipse RCP (RichClientPlatform)
- - - - - -
Google GoogleWeb Toolkit(GWT)
2.5.1 HTTP Yes Yes - -
JBoss JBossWSNativeStack
4.x, 5.x Native Stack - - - -
OpenSource
Direct WebRemoting(DWR)
- - - - - -
OpenSource
EnterpriseJava Beans(EJB)
2.x, 3.x - - Yes - -
OpenSource
Grails - - - Yes - Not bydefault
OpenSource
HibernateJMS Listeners
1.x - - - - -
OpenSource
JavaAbstractWindowingToolkit(AWT)
- - - - - -

Copyright © AppDynamics 2012-2015 Page 77
OpenSource
Java ServerFaces (JSF)
1.x - Yes Yes - Not bydefault
OpenSource
Java ServerPages
2.x - Yes - - Yes
OpenSource
JavaServlet API
2.x - - - - -
OpenSource
Jersey 1.x, 2.x REST,JAX-RS
Yes Yes No Not bydefault
OpenSource
WebSocket 1.0 (Java EE7, JSR-356)
- Yes,BT Namingnotconfigurable
Yes,correlationnotsupported
Yes Detection isautomatic
OpenSource-Google
AngularJS - - - Yes - -
Oracle Coherencewith SpringBeans
2.x, 3.x - - - - -
Oracle Swing (GUI) - - - - - -
Oracle WebCenter 10.0.2,10.3.0 - - - - -
OpenSource
JRubyHTTP
- - - Yes - Not bydefault
Spring Spring MVC - - - Yes - Not bydefault
Java Frameworks Configuration
For the Java framework environments that require additional configuration, this section providessome information and links to topics that help you configure the environment. Environments in theJava Frameworks Support table that require additional configuration, link to the configuration tablebelow.
Java Framework Topics for Required or Optional Configuration
Adobe BlazeDS Message Queue Exit Points for Java
Adobe ColdFusion Configuration is required for transaction discovery
Java Web Application Entry PointsServlet Entry Points
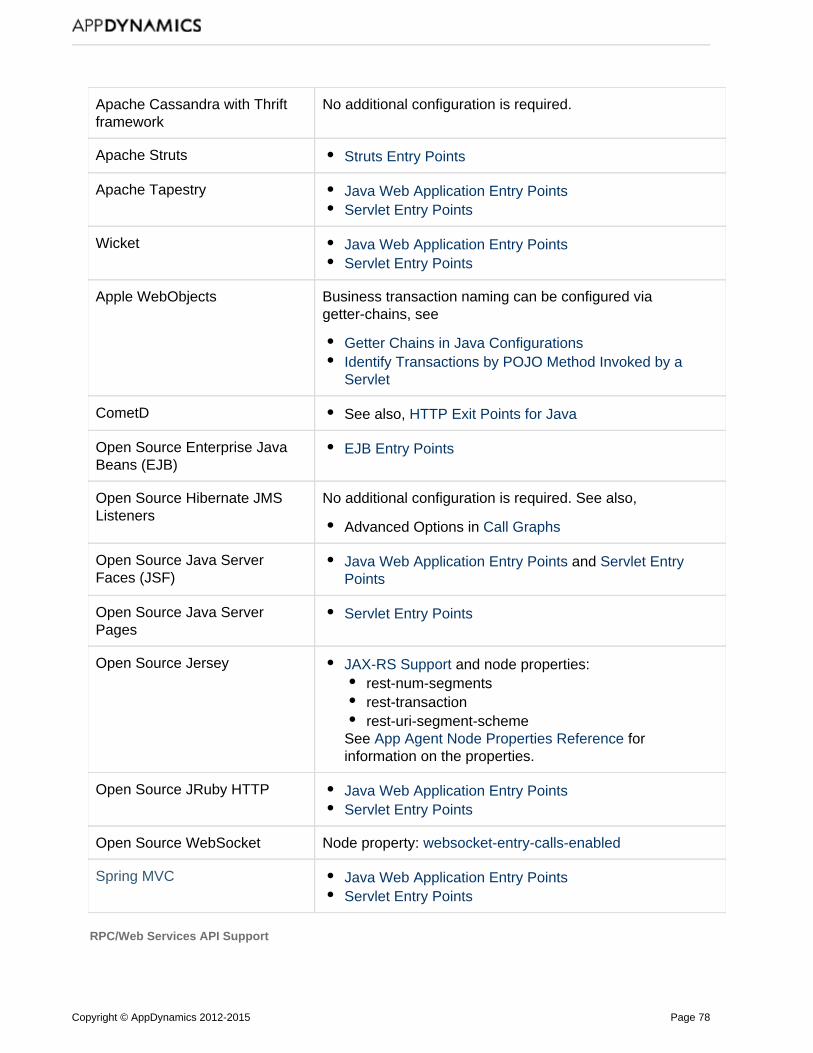
Copyright © AppDynamics 2012-2015 Page 78
Apache Cassandra with Thriftframework
No additional configuration is required.
Apache Struts Struts Entry Points
Apache Tapestry Java Web Application Entry PointsServlet Entry Points
Wicket Java Web Application Entry PointsServlet Entry Points
Apple WebObjects Business transaction naming can be configured viagetter-chains, see
Getter Chains in Java ConfigurationsIdentify Transactions by POJO Method Invoked by aServlet
CometD See also, HTTP Exit Points for Java
Open Source Enterprise JavaBeans (EJB)
EJB Entry Points
Open Source Hibernate JMSListeners
No additional configuration is required. See also,
Advanced Options in Call Graphs
Open Source Java ServerFaces (JSF)
Java Web Application Entry Points and Servlet EntryPoints
Open Source Java ServerPages
Servlet Entry Points
Open Source Jersey JAX-RS Support and node properties:rest-num-segmentsrest-transactionrest-uri-segment-scheme
See forApp Agent Node Properties Referenceinformation on the properties.
Open Source JRuby HTTP Java Web Application Entry PointsServlet Entry Points
Open Source WebSocket Node property: websocket-entry-calls-enabled
Spring MVC Java Web Application Entry PointsServlet Entry Points
RPC/Web Services API Support

Copyright © AppDynamics 2012-2015 Page 79
These are the known Java framework environments in which the Java Agent has been used toinstrument applications. Some require additional configuration. Click the link on the RPC, webservices or API framework name in the following support matrix for information about additionalconfiguration required or related configuration topics.
Vendor RPC/WebServicesAPIFramework
Version SOAProtocol-WebServices
AutoNaming
Correlation/EntryPoints
ExitPoints
ConfigurableBT NamingProperties
Apache ApacheCXF
2.1 JAX-WS Yes Yes Yes Yes
Apache ApacheCommons
- HTTP Client Yes Yes Yes -
Apache ApacheThrift
- - Yes Yes Yes Yes
IBM WebSphere 6.x JAX-RPC - - - -
IBM WebSphere 7.x, 8.x JAX-RPC - - - -
IBM Websphere 7.x, 8.x IIOP - - - -
JBoss JBoss 4.x, 5.x RMI Yes Yes Yes Yes
OpenSource
java.net.Http - HTTP Yes - Yes Yes
OpenSource
HTTPClient 0.3-3 Oracle SOA(andpotentiallyothers thatembed thislibrary)
- Correlation: Yes;Entry: No
Yes -
Oracle GlassFishMetro
- JAX-WS - - - -
Oracle GlassFishMetro withGrails
- JAX-WS - Yes - -
Oracle OracleApplicationServer
ORMI - no - - -
Oracle WebLogic 10.x T3, IIOP Yes Correlation: Yes;Entry: No
Yes -
Oracle WebLogic 9.x,10.x
JAX-RPC - - - -
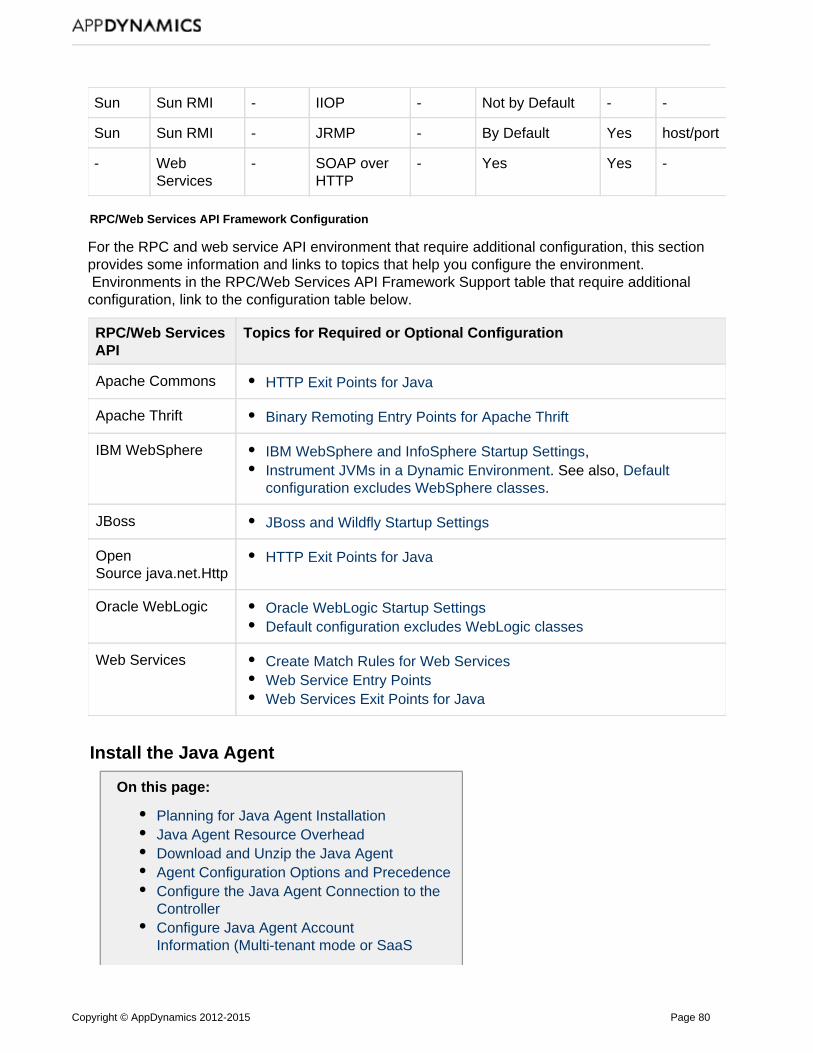
Copyright © AppDynamics 2012-2015 Page 80
Sun Sun RMI - IIOP - Not by Default - -
Sun Sun RMI - JRMP - By Default Yes host/port
- WebServices
- SOAP overHTTP
- Yes Yes -
RPC/Web Services API Framework Configuration
For the RPC and web service API environment that require additional configuration, this sectionprovides some information and links to topics that help you configure the environment. Environments in the RPC/Web Services API Framework Support table that require additionalconfiguration, link to the configuration table below.
RPC/Web ServicesAPI
Topics for Required or Optional Configuration
Apache Commons HTTP Exit Points for Java
Apache Thrift Binary Remoting Entry Points for Apache Thrift
IBM WebSphere IBM WebSphere and InfoSphere Startup Settings,Instrument JVMs in a Dynamic Environment. See also, Default
.configuration excludes WebSphere classes
JBoss JBoss and Wildfly Startup Settings
OpenSource java.net.Http
HTTP Exit Points for Java
Oracle WebLogic Oracle WebLogic Startup SettingsDefault configuration excludes WebLogic classes
Web Services Create Match Rules for Web ServicesWeb Service Entry PointsWeb Services Exit Points for Java
Install the Java Agent
On this page:
Planning for Java Agent InstallationJava Agent Resource OverheadDownload and Unzip the Java AgentAgent Configuration Options and PrecedenceConfigure the Java Agent Connection to theControllerConfigure Java Agent AccountInformation (Multi-tenant mode or SaaS

Copyright © AppDynamics 2012-2015 Page 81
Installations Only) Configure the Business Application, Tier, andNodeAdd the Java Agent as a javaagent Argumentto the JVMAttach the Java Agent to a Running JVMProcessVerify InstallationAdditional Installation Scenarios
Related pages:
Java Agent Configuration Properties
Installing the AppDynamics Java Agent requires putting the agent software on the applicationmachine, configuring the agent settings, and adding the Java Agent to the JVM. You add the agentto the JVM by including it as a argument in the startup script for the JVM.
To avoid permission issues, you should install the agent as the same user that owns the JVM oras an administrator on the host machine. In any case, the user that runs the JVM must have writeprivileges to the and directories in the Java Agent home.conf logs
While it's possible for the Java Agent to run on the same JVM as other Byte Code Injection (BCI)agents as long as the other agents do not interfere with the Java Agent class transformation,AppDynamics advises against it. As always, you should thoroughly test your deployment in astaging environment to detect possible conflicts.
Planning for Java Agent Installation
Before installing the Java Agent, be prepared with the following information.
Planning Item Description
Where is the startupscript for the JVM?
If using a Java servicewrapper, you need toknow the location of thewrapper configuration.
This is where you can add startup arguments in the script file andsystem properties, if needed.
What host and port is theController running on?
For SaaS customers, AppDynamics provides this information toyou. For on-premise Controllers, this information is configuredduring Controller installation. See ( or Install the Controller Configur
).e Windows for Controller Hosting
To what AppDynamicbusiness application doesthis JVM belong?
Usually, all JVMs in your distributed application infrastructurebelong to the same AppDynamics business application. You assigna name to the business application. For details see AppDynamics
.Concepts
Copyright © AppDynamics 2012-2015 Page 82
1. 2.
To what AppDynamicstier does this JVMbelong?
You assign a name to the tier. For details see AppDynamics.Concepts
In addition to the JVM startup script file, two other files are important during installation:
is the agent binary file. javaagent.jar The -javaagent argument should specify thefully-qualified path to this file. No separate classpath arguments need to be added.
undercontroller-info.xml is where you<agent_home>/ver<ver_number>/confadd the configuration mentioned in the planning list. This file contains configuration settingsspecific to the agent version you are using, and take precedence over the same file in the <
directory. For most settings you should use this version-specific file. agent_home>/conf
The following sections take you through the steps for downloading and installing the Java Agentmanually. Alternatively, configure the agent using Agent Download Wizard, as described in Instru
.ment Java Applications
Java Agent Resource Overhead
While relatively lightweight, the Java Agent does add a certain amount of overhead to the overallresource consumption of an application. The existing resource allocation for most applications canabsorb the additional overhead imposed by the agent, so you do not normally need to increase the
. resource allocation for the application when installing the agent
However, the exact CPU or memory overhead added by the agent can vary depending upon yourapplication and how you have configured AppDynamics.
If your application operates within a small margin of its existing memory resource allocation, youmay choose to increase the allocation for the application. AppDynamics recommends allocatingthe following amounts of additional Heap and PermGen space to accommodate the agent:
Maximum heap size (-Xmx): 100 MB in addition to the amount required by the applicationMaximum PermGen ( ) heap size (-XX:MaxPermSize): 20 MB permanent generation in
addition to the amount required by the application
In terms of CPU consumption, the agent can add between 0% to 2% additional overhead on CPUusage.
Certain resource-intensive AppDynamics features, such as asynchronous transaction tracking, canincrease resource consumption as well. AppDynamics recommends that you monitor the memoryconsumption of your application to ensure that there are sufficient resources allocated to it.
Download and Unzip the Java Agent
Download the Java Agent ZIP file from .AppDynamics Download CenterExtract the ZIP file to the destination directory as the same user or administrator of the JVM.Take note of the following:
Extract the Java Agent to a directory that is outside of your containerAll files should be readable by the Java AgentRuntime directory should be writable by the Java Agent

Copyright © AppDynamics 2012-2015 Page 83
1. 2. 3. 4.
Note: Be sure to avoid installing the agent into a directory used by the application server, such asto the Tomcat webapps directory. To avoid this possibility, install the Java Agent to a directoryoutside of application server home directory, such as to \usr\local\agentsetup\appserveragent.
Agent Configuration Options and Precedence
You can configure the Java app agent settings, such as its Controller connection settings, usingone of several mechanisms. Those mechanisms and the order of priority (in the case of conflictingsettings) are:
Environment variable System property <agent_home>/ver<version_number/conf/controller-info.xml <agent_home>/conf/controller-info.xml
When reading its configuration, the agent checks each of these sources in the order shown anduses the value from the first source that contains a non-empty value for a particular setting.
If you used the download Wizard in the UI to get the agent, you can find the settings in the versionspecific controller-info.xml file.
Configure the Java Agent Connection to the Controller
Configure properties for the Controller host name and its port number.
Configure in controller-info.xml
Configure using SystemProperties
Required Default
<controller-host> Dappdynamics.controller.hostName Yes None
<controller-port> -Dappdynamics.controller.port Yes For On-premiseControllerinstallations: Bydefault, port 8090 isused for HTTP and8181 is used for HTTPScommunication. For SaaS Controller
By default,service:port 80 is used forHTTP and 443 is usedfor HTTPScommunication.
Optional settings for Java Agent-to-Controller communication
To configure the Java Agent to use SSL, see Java Agent Configuration Propertiesand .Enable SSL (Java)To configure the Java Agent to use proxy settings see Java Agent Configuration Properties
Configure Java Agent Account Information (Multi-tenant mode or SaaS Installations Only)

Copyright © AppDynamics 2012-2015 Page 84
This step is required only when the AppDynamics Controller is configured in Controller or when you .Tenant Mode use a SaaS Controller
Skip this step if you are using single-tenant mode, which is the default in an on-premiseinstallation.
Specify the properties for Account Name and Account Key. This information is provided inthe Welcome email from the AppDynamics Support Team. You can also find this informationin the <controller_install>/initial_account_access_info.txt file.
Configure using controller-info.xml
Configure using System Properties
Required Default
<account-name> Dappdynamics.agent.accountName Required only ifyour Controller isconfigured for mul
or ti-tenant modeyour controller ishosted.
None.
<account-access-key> Dappdynamics.agent.accountAccessKey Required only ifyour Controller isconfigured for mul
or ti-tenant modeyour controller ishosted.
None.
Configure the Business Application, Tier, and Node
When configuring a Java Agent, you identify the business application, tier, and node it belongs toin the AppDynamics application model. See
and for more informationAppDynamics Concepts Name Business Applications, Tiers, and Nodeson this model.
You can configure these properties using either the controller-info.xml file or JVM startup scriptoptions. Use these guidelines when configuring agents:
Configure items that are common for all the nodes in the controller-info.xml file.Configure information that is unique to a node in the startup script.
Configure using controller-info.xml
Configure using System Properties
Required Default
<application-name> Dappdynamics.agent.applicationName Yes, unless you useautomatic naming
None
<tier-name> Dappdynamics.agent.tierName Yes, unless you useautomatic naming
None
<node-name> Dappdynamics.agent.nodeName Yes, unless you useautomatic naming
None
Your controller-info.xml file should now have values shown in the following sample configuration

Copyright © AppDynamics 2012-2015 Page 85
file:
<controller-info> <controller-host>192.168.1.20</controller-host> <controller-port>8090</controller-port> <application-name>ACMEOnline</application-name> <tier-name>InventoryTier</tier-name> <node-name>Inventory1</node-name></controller-info>
Automatic Naming for Application, Tier, and Node
For a self-service trial edition of AppDynamics Pro, the Agent Download Wizard doesn't promptyou for the application, tier or node name. It uses a default naming scheme instead (described in I
).nstrument Java Applications
You can use automatic naming with a standard edition of AppDynamics Pro by adding thefollowing entry to controller-info.xml file:
<auto-naming>true</auto-naming>
Add the Java Agent as a javaagent Argument to the JVM
Add the Java Agent binary to the monitored process by adding a javaagent argument with the locationof the Java Agent JAR file to the start-up script of the JVM:
-javaagent:<agent_home>/javaagent.jar
Installing the agent with the javaagent argument requires a restart of the JVM. If it's not possible orconvenient to restart the JVM when performing the configuration, you can attach the agent to therunning process, as described in the following section.
Use the server-specific instructions below to add this argument for different application serverJVMs:
Java Server-Specific Installation SettingsJava Agent Configuration PropertiesUse System Properties for Java Agent SettingsUse Environment Variables for Java Agent SettingsInstrument Multiple JVMs on a Single MachineInstrument Dynamically Identified JVMsInstrument JVMs in a Dynamic EnvironmentInstrument JVMs Started by Batch or Cron JobsInstrument JVMs in Restricted EnvironmentsAutomate Java Agent DeploymentInstrument Apple WebObjects Applications
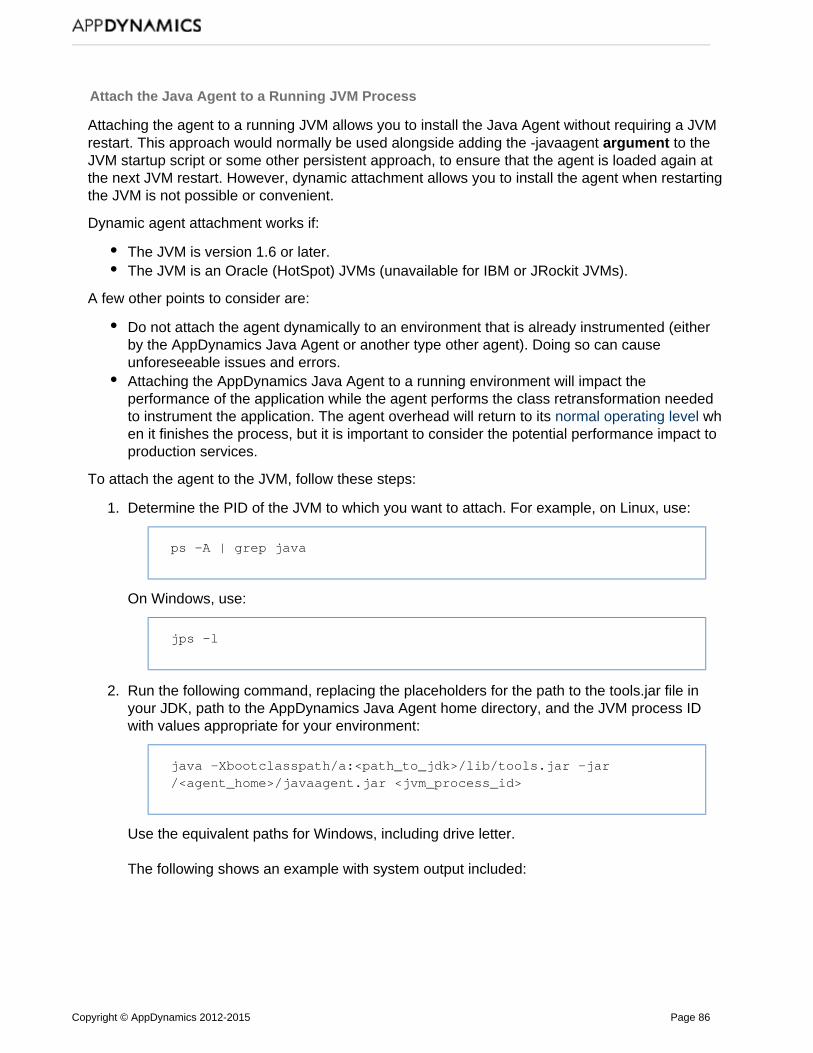
Copyright © AppDynamics 2012-2015 Page 86
1.
2.
Attach the Java Agent to a Running JVM Process
Attaching the agent to a running JVM allows you to install the Java Agent without requiring a JVMrestart. This approach would normally be used alongside adding the -javaagent to theargumentJVM startup script or some other persistent approach, to ensure that the agent is loaded again atthe next JVM restart. However, dynamic attachment allows you to install the agent when restartingthe JVM is not possible or convenient.
Dynamic agent attachment works if:
The JVM is version 1.6 or later.The JVM is an Oracle (HotSpot) JVMs (unavailable for IBM or JRockit JVMs).
A few other points to consider are:
Do not attach the agent dynamically to an environment that is already instrumented (eitherby the AppDynamics Java Agent or another type other agent). Doing so can causeunforeseeable issues and errors. Attaching the AppDynamics Java Agent to a running environment will impact theperformance of the application while the agent performs the class retransformation neededto instrument the application. The agent overhead will return to its whnormal operating levelen it finishes the process, but it is important to consider the potential performance impact toproduction services.
To attach the agent to the JVM, follow these steps:
Determine the PID of the JVM to which you want to attach. For example, on Linux, use:
ps -A | grep java
On Windows, use:
jps -l
Run the following command, replacing the placeholders for the path to the tools.jar file inyour JDK, path to the AppDynamics Java Agent home directory, and the JVM process IDwith values appropriate for your environment:
java -Xbootclasspath/a:<path_to_jdk>/lib/tools.jar -jar/<agent_home>/javaagent.jar <jvm_process_id>
Use the equivalent paths for Windows, including drive letter.
The following shows an example with system output included:
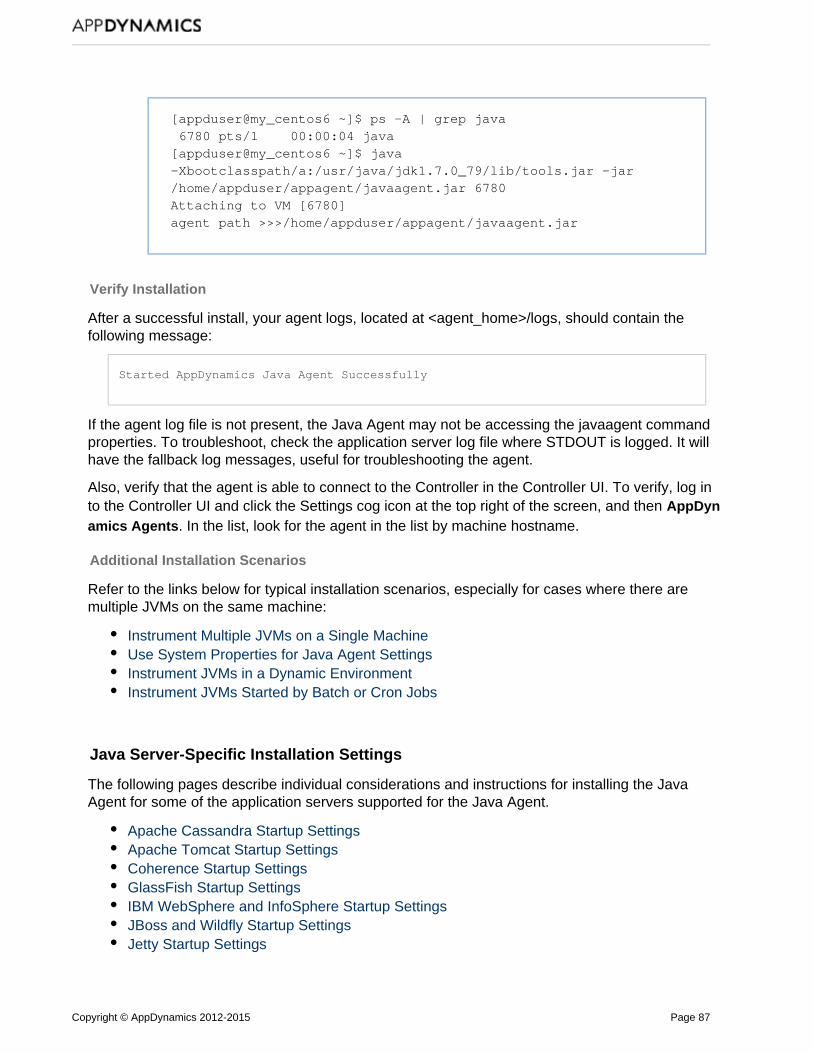
Copyright © AppDynamics 2012-2015 Page 87
2.
[appduser@my_centos6 ~]$ ps -A | grep java 6780 pts/1 00:00:04 java[appduser@my_centos6 ~]$ java-Xbootclasspath/a:/usr/java/jdk1.7.0_79/lib/tools.jar -jar/home/appduser/appagent/javaagent.jar 6780Attaching to VM [6780]agent path >>>/home/appduser/appagent/javaagent.jar
Verify Installation
After a successful install, your agent logs, located at <agent_home>/logs, should contain thefollowing message:
Started AppDynamics Java Agent Successfully
If the agent log file is not present, the Java Agent may not be accessing the javaagent commandproperties. To troubleshoot, check the application server log file where STDOUT is logged. It willhave the fallback log messages, useful for troubleshooting the agent.
Also, verify that the agent is able to connect to the Controller in the Controller UI. To verify, log into the Controller UI and click the Settings cog icon at the top right of the screen, and then AppDyn
. In the list, look for the agent in the list by machine hostname. amics Agents
Additional Installation Scenarios
Refer to the links below for typical installation scenarios, especially for cases where there aremultiple JVMs on the same machine:
Instrument Multiple JVMs on a Single MachineUse System Properties for Java Agent SettingsInstrument JVMs in a Dynamic EnvironmentInstrument JVMs Started by Batch or Cron Jobs
Java Server-Specific Installation Settings
The following pages describe individual considerations and instructions for installing the JavaAgent for some of the application servers supported for the Java Agent.
Apache Cassandra Startup SettingsApache Tomcat Startup SettingsCoherence Startup SettingsGlassFish Startup SettingsIBM WebSphere and InfoSphere Startup SettingsJBoss and Wildfly Startup SettingsJetty Startup Settings

Copyright © AppDynamics 2012-2015 Page 88
1. 2.
3.
1. 2.
Mule ESB Startup SettingsOracle WebLogic Startup SettingsOSGi Infrastructure ConfigurationResin Startup SettingsSolr Startup SettingsStandalone JVM Startup SettingsTanuki Service Wrapper SettingsTibco ActiveMatrix BusinessWorks Service Engine SettingswebMethods Startup Settings
Apache Cassandra Startup Settings
On this page:
Instrument Cassandra in a WindowsEnvironmentInstrument Cassandra in a Linux Environment
The Java Agent bootstraps using the javaagent command line option. Add this option to thecassandra (Linux) or cassandra.bat (Windows) file.
Instrument Cassandra in a Windows Environment
Open the apache-cassandra-x.x.x\bin\cassandra.bat file.Add the Java Agent javaagent path to the JAVA_OPTS variable. Make sure to include thedrive in the full path to the Java Agent directory.
-javaagent:<agent_home>\javaagent.jar
For example:
set JAVA_OPTS=-ea -javaagent:C:\appdynamics\agent\javaagent.jar -javaagent:"%CASSANDRA_HOME%\lib\jamm-0.2.5.jar . . .
Restart the Cassandra server. The Cassandra server must be restarted for the changes totake effect.
Instrument Cassandra in a Linux Environment
Open the apache-cassandra-x.x.x/bin/cassandra.in.sh file.Add the javaagent argument at the top of the file:
JVM_OPTS=-javaagent:<agent_home>/javaagent.jar
For example:
Copyright © AppDynamics 2012-2015 Page 89
2.
3.
1. 2.
JVM_OPTS=-javaagent:/home/software/appdynamics/agent/javaagent.jar
Restart the Cassandra server for the changes to take effect.Apache Tomcat Startup Settings
On this page:
Configure the HTTP Header Maximum SizeConfigure Tomcat in a Linux EnvironmentConfigure Tomcat in a Windows EnvironmentConfigure Tomcat as a Windows Service
To instrument applications on Apache Tomcat, you need to install the Java Agent and verify thedefault maximum HTTP header size in the Tomcat configuration, as described in the followingsection.
Configure the HTTP Header Maximum Size
By default, the maximum HTTP header size for Tomcat is 8 KB. To accommodate the customHTTP header that AppDynamics adds to enable distributed transaction correlation, you need toincrease the default maximum HTTP header size. It is recommended that you set the value of theattribute to at least 24576 (24 KB).
You can increase the size using a Tomcat configuration property in<tomcat_home>/conf/server.xml. The maximum permitted header length is controlled by the maxH
HTTP attribute.ttpHeaderSize
Configure Tomcat in a Linux Environment
Open the catalina.sh file located at <apache_version_tomcat_install_dir>/bin.Add the -javaagent argument to the Catalina environment variables. You can put thiscommand anywhere in the file before the command execution portion of the script.
CATALINA_OPTS="$CATALINA_OPTS -javaagent:<agent_home>/javaagent.jar"
Replace with the full path to the Java Agent JAR file.<agent_home>
For example:

Copyright © AppDynamics 2012-2015 Page 90
2.
3.
4.
1. 2.
Increase the default maximum HTTP header size configuration, if necessary. See Configure. the HTTP Header Maximum Size
Restart the application server. The application server must be restarted for the changes totake effect.
Configure Tomcat in a Windows Environment
Open the file, located at <apache_version_tomcat_install_dir>\bin.catalina.batAdd the following command to set the environment for Catalina anywhere in the file beforethe command execution portion of the script.
set CATALINA_OPTS=%CATALINA_OPTS%-javaagent:"Drive:<agent_home>\javaagent.jar"
Replace with the fully qualified path to the Java Agent JAR file. <agent_home>
For example:
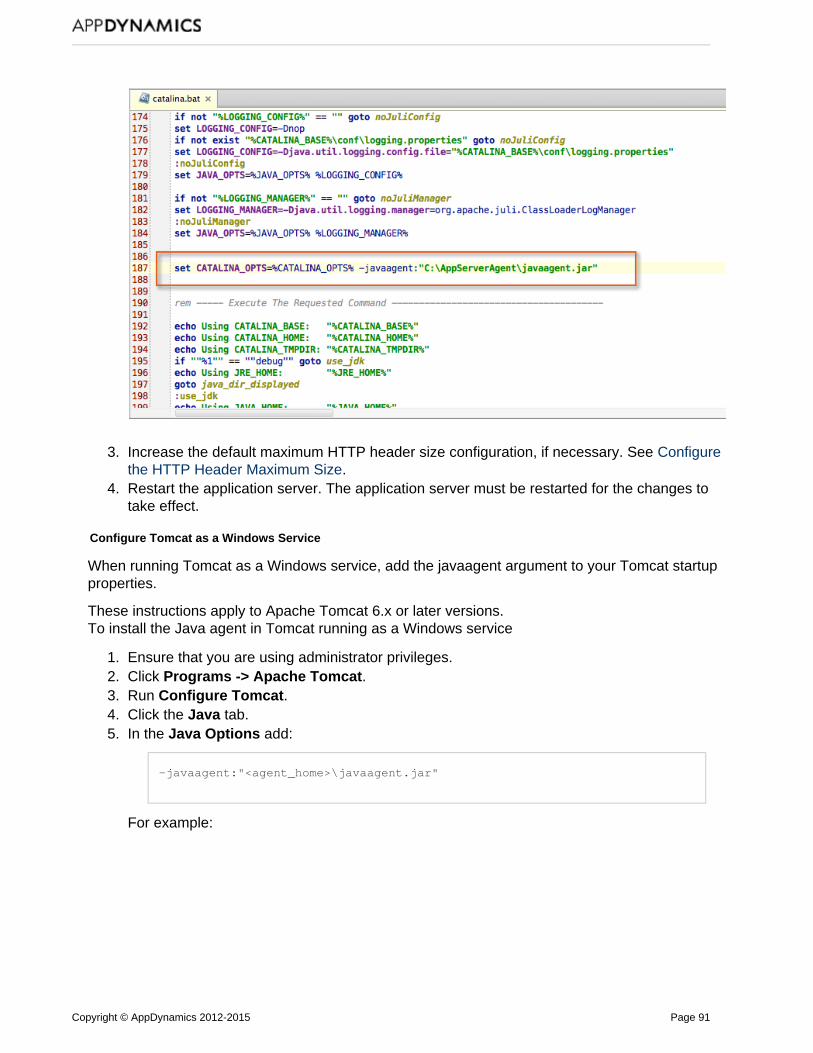
Copyright © AppDynamics 2012-2015 Page 91
2.
3.
4.
1. 2. 3. 4. 5.
Increase the default maximum HTTP header size configuration, if necessary. See Configure
. the HTTP Header Maximum SizeRestart the application server. The application server must be restarted for the changes totake effect.
Configure Tomcat as a Windows Service
When running Tomcat as a Windows service, add the javaagent argument to your Tomcat startupproperties.
These instructions apply to Apache Tomcat 6.x or later versions.To install the Java agent in Tomcat running as a Windows service
Ensure that you are using administrator privileges.Click .Programs -> Apache TomcatRun .Configure TomcatClick the tab.JavaIn the add:Java Options
-javaagent:"<agent_home>\javaagent.jar"
For example:

Copyright © AppDynamics 2012-2015 Page 92
5.
6.
7.
1.
2.
Increase the default maximum HTTP header size configuration, if necessary. See Configure. the HTTP Header Maximum Size
Restart the Tomcat service to have the changes take effect.
Coherence Startup Settings
To add the javaagent command in Oracle Coherence:
In the <coherence_home>/bin/cache-server.sh file, update the following:
$JAVAEXEC -server -showversion $JAVA_OPTS-javaagent:<agent_home>/javaagent.jar -cp"$COHERENCE_HOME/lib/coherence.jar" com.tangosol.net.DefaultCacheServer $1
Restart the application server to have the changes take effect.GlassFish Startup Settings
On this page:
Instrument GlassFish 3.0Instrument GlassFish 3.1Verify the ConfigurationAbout Glassfish AMX Support
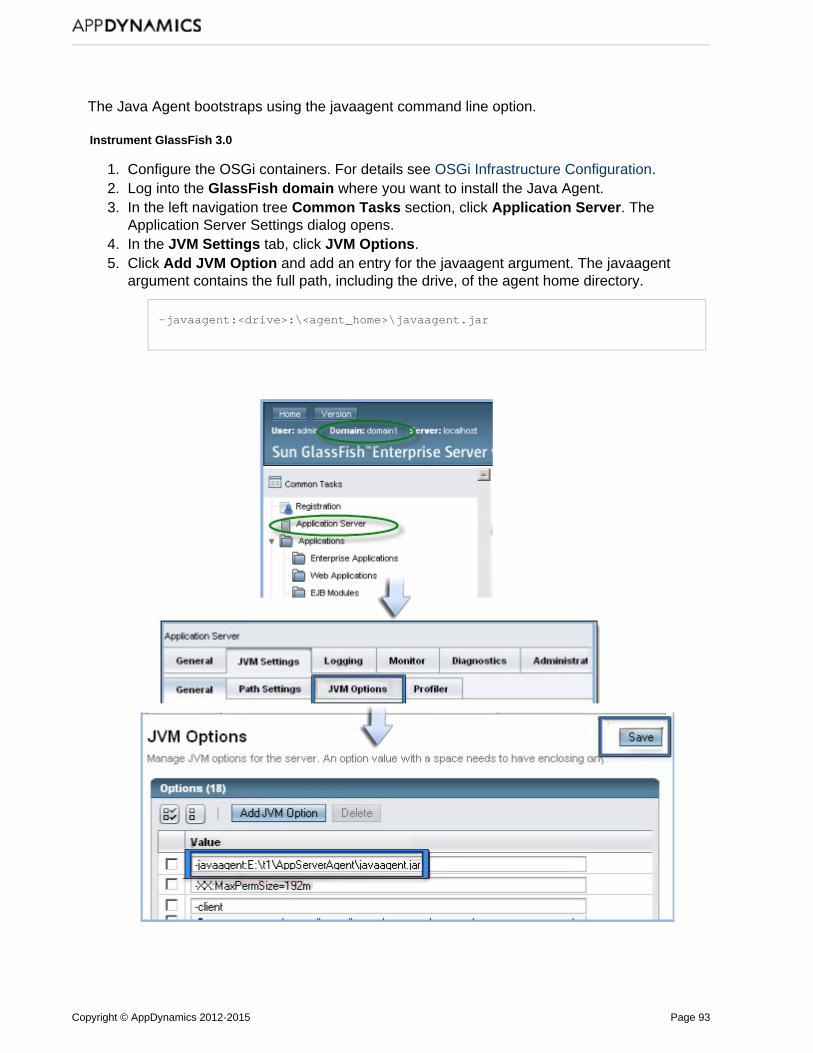
Copyright © AppDynamics 2012-2015 Page 93
1. 2. 3.
4. 5.
6.
The Java Agent bootstraps using the javaagent command line option.
Instrument GlassFish 3.0
Configure the OSGi containers. For details see .OSGi Infrastructure ConfigurationLog into the where you want to install the Java Agent.GlassFish domainIn the left navigation tree section, click . TheCommon Tasks Application ServerApplication Server Settings dialog opens.In the tab, click .JVM Settings JVM OptionsClick and add an entry for the javaagent argument. The javaagentAdd JVM Optionargument contains the full path, including the drive, of the agent home directory.
-javaagent:<drive>:\<agent_home>\javaagent.jar
Copyright © AppDynamics 2012-2015 Page 94
6.
1.
2.
3.
4.
5.
6.
Restart the application server. The application server must be restarted for the changes totake effect.
Instrument GlassFish 3.1
If you are using GlassFish v3.1, first configure the OSGi containers. For details see OSGi.Infrastructure Configuration
Log into the GlassFish domain where you want to install the Java Agent.Note: Remember to turn on remote administration by entering the following command fromthe <Controller_home>/appserver/glassfish/bin directory:
asadmin enable-secure-admin
In the section in the left navigation tree, click and then click Configurations server-config J.VM Settings
On the JVM Settings tab, click . JVM Options
Click and add an entry for the javaagent argument as follows:Add JVM Option
For Windows:
-javaagent:<Drive Letter>:<agent install location>\javaagent.jar
For Linux:
-javaagent:<agent install location>/javaagent.jar
Restart the application server. The application server must be restarted for the changes totake effect.
Verify the Configuration
To verify this configuration, look at the domain.xml file located at<glassfish_home>\domains\<domain_name>. The domain.xml file should have an entry as shownin the following screenshot.

Copyright © AppDynamics 2012-2015 Page 95
About Glassfish AMX Support
AppDynamics supports Glassfish AMX MBeans.
Set the boot-amx node property to enable AMX MBeans. See .boot-amx
You will see the AMX domain in the MBean Browser in the JMX tab of the node dashboard.IBM WebSphere and InfoSphere Startup Settings
On this page:
Instrument WebSphere 7.x or InfoSphere 8.xInstrument WebSphere 6.xInstrument WebSphere 5.xVerifying the Java Agent ConfigurationSecurity RequirementsRunning WebSphere with Security EnabledInstrument WebSphere in z/OS or MainframeEnvironments
The Java Agent bootstraps using the javaagent command line option.
Instrument WebSphere 7.x or InfoSphere 8.x

Copyright © AppDynamics 2012-2015 Page 96
1.
2. 3. 4. 5. 6. 7.
8.
1.
2. 3.
Log in to the Administrator console of the WebSphere node where you want to install theApp Server Agent.In the Administration Console click .ServersExpand Server Type and click .WebSphere application serversClick the name of your server.Expand Java and Process Management and click .Process DefinitionUnder the Additional Properties section, click .Java Virtual MachineEnter the javaagent option with the full path to the AppDynamics javaagent.jar file in theGeneric JVM arguments field.
For Windows:
-javaagent:<Drive Letter>:<agent install location>\javaagent.jar
For Linux:
-javaagent:<agent install location>/javaagent.jar
Click .OK
Instrument WebSphere 6.x
Log in to the Administrator console of the WebSphere node where you want to install theJava Agent.In the left navigation tree, click .Servers -> Application serversClick the name of your server in the list of servers.
May require OSGI bootdelegationWebsphere uses Equinox as its OSGi container. In some cases you may also need to addthe Java agent packages to the OSGi bootdelegation system property as follows:
-Dorg.osgi.framework.bootdelegation=META-INF.services,com.singularity.*,com.ibm.*

Copyright © AppDynamics 2012-2015 Page 97
3.
4.
5.
In the Configuration tab, click .Java and Process Management

Copyright © AppDynamics 2012-2015 Page 98
5.
6.
1.
2. 3. 4. 5.
6.
Enter the javaagent option with the full path to the Java Agentjavaagent.jar file in theGeneric JVM arguments field.
For Windows:
-javaagent:<Drive Letter>:<agent install location>\javaagent.jar
For Linux:
-javaagent:<agent install location>/javaagent.jar
Click . OK
Instrument WebSphere 5.x
Log in to the Administrator console of the WebSphere node where you want to install theApp Server Agent.In the Administrative Console, click .ServersClick .Application ServersClick the name of your server.Under Additional Properties, click .Process Definition

Copyright © AppDynamics 2012-2015 Page 99
6. 7.
8.
On the next page, under Additional Properties, click .Java Virtual MachineEnter the javaagent option with the full path to the Java Agent javaagent.jar file inthe Generic JVM arguments field.
For Windows:
-javaagent:<Drive Letter>:<agent install location>\javaagent.jar
For Linux:
-javaagent:<agent install location>/javaagent.jar
Click .OK
Verifying the Java Agent Configuration
Verify the configuration settings by checking the server.xml file of the WebSphere node where youinstalled the Java Agent. The server.xml file should have this entry:
<jvmEntries ...genericJvmArguments='-javaagent:E:\test1\AppServerAgent\javaagent.jar'disableJIT="false"/>
Security Requirements
Full permissions are required for the agent to function correctly with WebSphere. Grant allpermissions on both the server level and the profile level.
Running WebSphere with Security Enabled
If you want to run WebSphere while J2EE security or Global security is enabled, you need to makechanges to WebSphere's server.policy file to prevent problems within the interaction betweenWebSphere and the Java Agent. Make the change listed below to the server.policy file, which islocated in <websphere_home>/properties or in <websphere_profile_home>/properties.Add the following block to the WebSphere server.policy file:
grant codeBase "file:\* AGENT_DEPLOYMENT_DIRECTORY \*/-" { permission java.security.AllPermission;};
Instrument WebSphere in z/OS or Mainframe Environments
See .Instrument JVMs in a Dynamic EnvironmentJBoss and Wildfly Startup Settings
On this page:
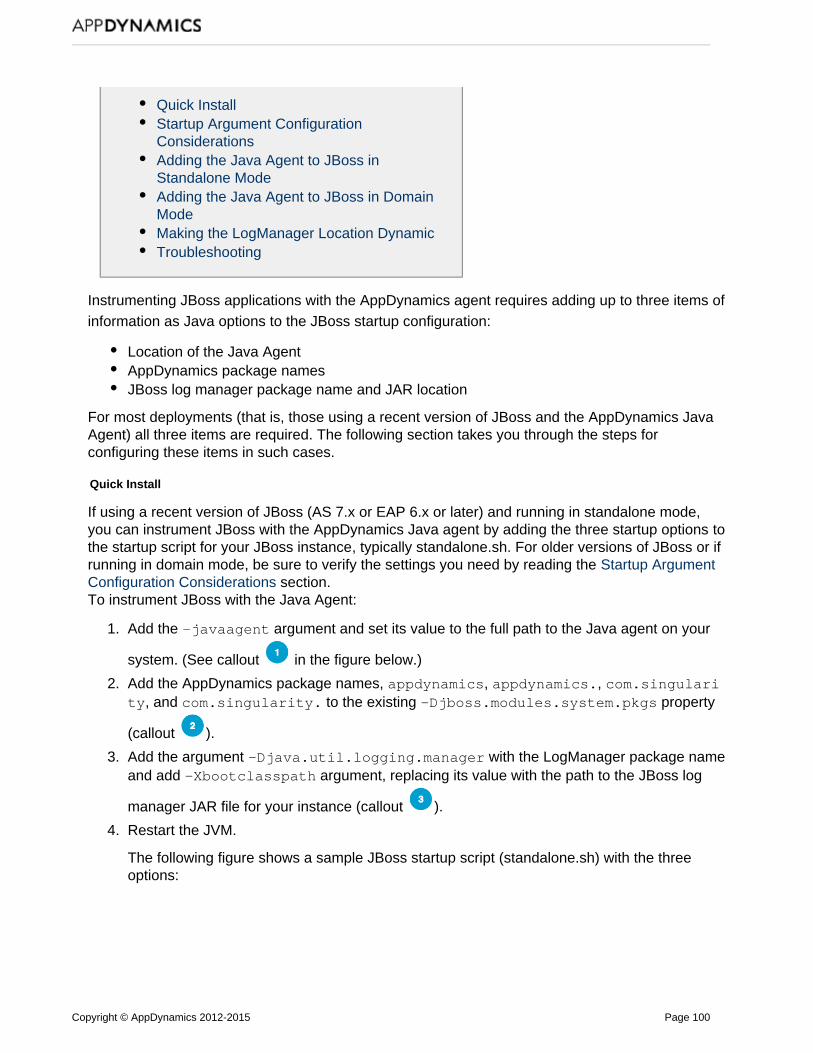
Copyright © AppDynamics 2012-2015 Page 100
1.
2.
3.
4.
Quick InstallStartup Argument ConfigurationConsiderations Adding the Java Agent to JBoss inStandalone ModeAdding the Java Agent to JBoss in DomainModeMaking the LogManager Location DynamicTroubleshooting
Instrumenting JBoss applications with the AppDynamics agent requires adding up to three items ofinformation as Java options to the JBoss startup configuration:
Location of the Java AgentAppDynamics package namesJBoss log manager package name and JAR location
For most deployments (that is, those using a recent version of JBoss and the AppDynamics JavaAgent) all three items are required. The following section takes you through the steps forconfiguring these items in such cases.
Quick Install
If using a recent version of JBoss (AS 7.x or EAP 6.x or later) and running in standalone mode,you can instrument JBoss with the AppDynamics Java agent by adding the three startup options tothe startup script for your JBoss instance, typically standalone.sh. For older versions of JBoss or ifrunning in domain mode, be sure to verify the settings you need by reading the Startup ArgumentConfiguration Considerations section.To instrument JBoss with the Java Agent:
Add the argument and set its value to the full path to the Java agent on your-javaagent
system. (See callout in the figure below.)
Add the AppDynamics package names, , , appdynamics appdynamics. com.singulari, and to the existing propertyty com.singularity. -Djboss.modules.system.pkgs
(callout ).
Add the argument with the LogManager package name-Djava.util.logging.managerand add argument, replacing its value with the path to the JBoss log-Xbootclasspath
manager JAR file for your instance (callout ).
Restart the JVM.
The following figure shows a sample JBoss startup script (standalone.sh) with the threeoptions:
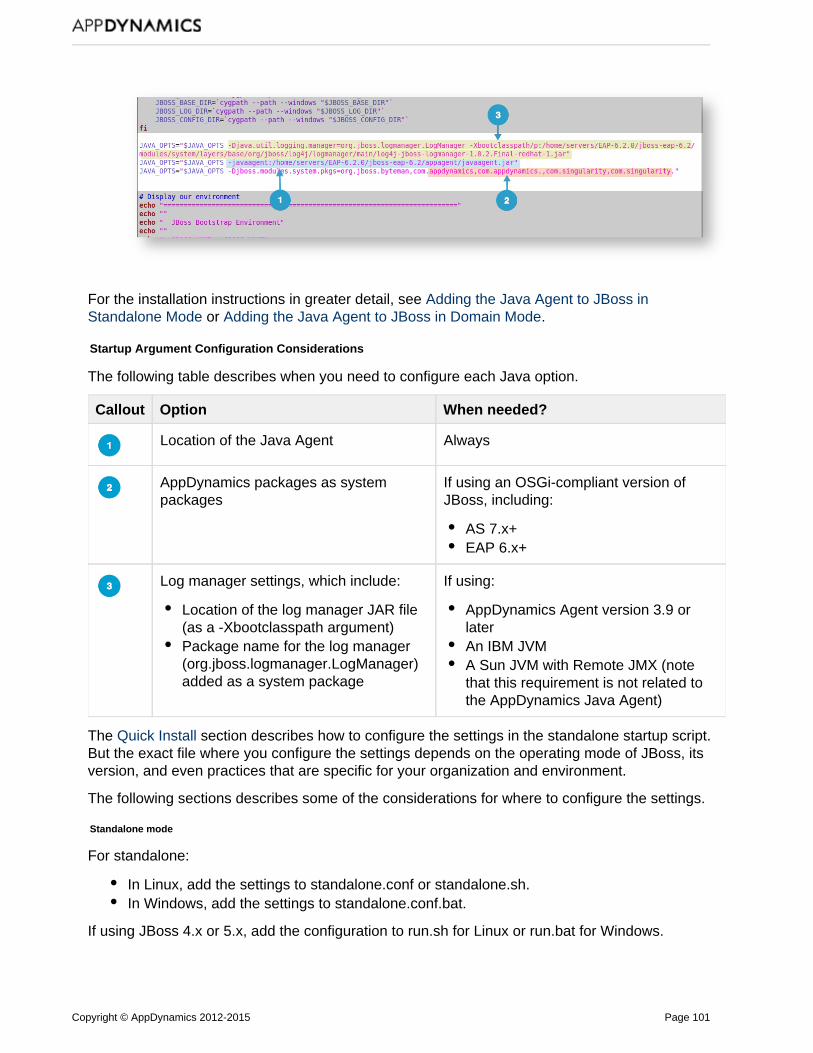
Copyright © AppDynamics 2012-2015 Page 101
4.
For the installation instructions in greater detail, see Adding the Java Agent to JBoss in or .Standalone Mode Adding the Java Agent to JBoss in Domain Mode
Startup Argument Configuration Considerations
The following table describes when you need to configure each Java option.
Callout Option When needed?
Location of the Java Agent Always
AppDynamics packages as systempackages
If using an OSGi-compliant version ofJBoss, including:
AS 7.x+EAP 6.x+
Log manager settings, which include:
Location of the log manager JAR file(as a -Xbootclasspath argument) Package name for the log manager(org.jboss.logmanager.LogManager)added as a system package
If using:
AppDynamics Agent version 3.9 orlaterAn IBM JVMA Sun JVM with Remote JMX (notethat this requirement is not related tothe AppDynamics Java Agent)
The section describes how to configure the settings in the standalone startup script.Quick InstallBut the exact file where you configure the settings depends on the operating mode of JBoss, itsversion, and even practices that are specific for your organization and environment.
The following sections describes some of the considerations for where to configure the settings.
Standalone mode
For standalone:
In Linux, add the settings to standalone.conf or standalone.sh.In Windows, add the settings to standalone.conf.bat.
If using JBoss 4.x or 5.x, add the configuration to run.sh for Linux or run.bat for Windows.
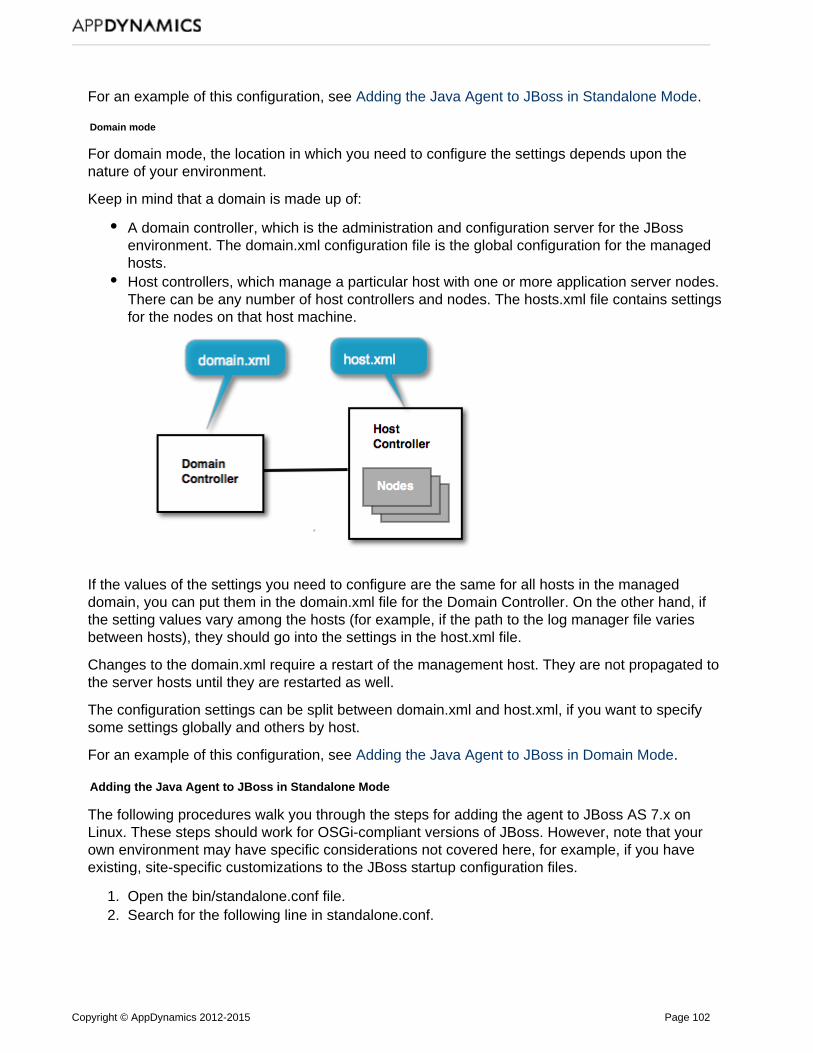
Copyright © AppDynamics 2012-2015 Page 102
1. 2.
For an example of this configuration, see . Adding the Java Agent to JBoss in Standalone Mode
Domain mode
For domain mode, the location in which you need to configure the settings depends upon thenature of your environment.
Keep in mind that a domain is made up of:
A domain controller, which is the administration and configuration server for the JBossenvironment. The domain.xml configuration file is the global configuration for the managedhosts. Host controllers, which manage a particular host with one or more application server nodes.There can be any number of host controllers and nodes. The hosts.xml file contains settingsfor the nodes on that host machine.
If the values of the settings you need to configure are the same for all hosts in the manageddomain, you can put them in the domain.xml file for the Domain Controller. On the other hand, ifthe setting values vary among the hosts (for example, if the path to the log manager file variesbetween hosts), they should go into the settings in the host.xml file.
Changes to the domain.xml require a restart of the management host. They are not propagated tothe server hosts until they are restarted as well.
The configuration settings can be split between domain.xml and host.xml, if you want to specifysome settings globally and others by host.
For an example of this configuration, see .Adding the Java Agent to JBoss in Domain Mode
Adding the Java Agent to JBoss in Standalone Mode
The following procedures walk you through the steps for adding the agent to JBoss AS 7.x onLinux. These steps should work for OSGi-compliant versions of JBoss. However, note that yourown environment may have specific considerations not covered here, for example, if you haveexisting, site-specific customizations to the JBoss startup configuration files.
Open the bin/standalone.conf file.Search for the following line in standalone.conf.

Copyright © AppDynamics 2012-2015 Page 103
2.
3.
4.
5.
6.
JBOSS_MODULES_SYSTEM_PKGS="org.jboss.byteman"
Add the com.singularity and org.jboss.logmanager packages to that line as follows:
JBOSS_MODULES_SYSTEM_PKGS="org.jboss.byteman,com.singularity,org.jboss.logmanager"
Add the following to the end of the standalone.conf file in the JAVA_OPTS section.
-Djava.util.logging.manager=org.jboss.logmanager.LogManager-Xbootclasspath/p:<path_to_jboss_logmanager>/jboss-logmanager-<version>.jar
Replace and with the path and log manager<path_to_jboss_logmanager> <version>JAR filename for your system. See forMaking the LogManager Location Dynamicinformation on making the path dynamic. In the standalone.sh file, add the following javaagent argument.
export JAVA_OPTS="$JAVA_OPTS -javaagent:/agent_install_dir/javaagent.jar"
Put the argument above the following section of standalone.sh
...while true;doif [ "x$LAUNCH_JBOSS_IN_BACKGROUND" = "X" ]; then # Execute the JVM in the foreground eval \"$JAVA\" -D\"[Standalone]\"$JAVA_OPTS \ \"-Dorg.jboss.boot.log.file=$JBOSS_LOG_DIR/boot.log\" \ \"-Dlogging.configuration=file:$JBOSS_CONFIG_DIR/logging.properties\"\ -jar \"$JBOSS_HOME/jboss-modules.jar\" \
Restart the application server.
Adding the Java Agent to JBoss in Domain Mode
The following steps walk you through the configuration for a JBoss installation running in domainmode.
For this type of deployment:
If all the server instances in the server group are part of the same business application, thenconfigure in domain.xml; otherwise,-Dappdynamics.agent.applicationNameconfigure the application name in the host.xml file for each specific server.

Copyright © AppDynamics 2012-2015 Page 104
1.
2.
3.
The argument specifies the name of the-Dappdynamics.agent.applicationNameBusiness Application to use for the data reported by this Java Agent to the AppDynamicsController.If all the server instances in the server group are part of the same tier then configure -Dapp
in domain.xml, otherwise configure the tier name in host.xmldynamics.agent.tierNamefor each specific server.
The argument specifies the name of the tier to use for-Dappdynamics.agent.tierNamethe data reported by this Java Agent to the AppDynamics Controller.
Edit the JBoss domain.xml and host.xml files as indicated in the following sections and then restartthe application server.
Modify the Domain.xml file
Locate and edit domain.xml for the domain. This is usually located under$JBOSS_HOME/domain/configuration/.Find the the element and add a property named system-properties jboss.modules.s
with a value of to the existing system properties. Forystem.pkgs com.singularityexample:
<system-properties> <!-- IPv4 is not required, but setting this helps avoid unintendeduse of IPv6 --> <property name="java.net.preferIPv4Stack" value="true"/> <property name="jboss.modules.system.pkgs"value="com.singularity"/></system-properties>
This property tells the JBoss class loader to load the AppDynamics packages. This isrequired for the Java Agent to run.Under the server group name where you want to enable your agents, add the JVM optionsusing the appropriate values for your agent location, JBoss application name, and tier name.
<server-group name="main-server-group" profile="full"> <jvm name="default"> <heap size="1303m" max-size="1303m"/> <permgen max-size="256m"/> <jvm-options> <option value="-javaagent:<agent_install_dir>/javaagent.jar"/> <option value="-Dappdynamics.agent.applicationName=JBOSS-EAP-APP"/> <option value="-Dappdynamics.agent.tierName=JBOSS-EAP-TIER"/> </jvm-options> </jvm> <socket-binding-group ref="full-sockets"/> </server-group>
Modify the Host.xml file
Add the JVM option in host.xml file (usually located under-Dappdynamics.agent.nodeName

Copyright © AppDynamics 2012-2015 Page 105
$JBOSS_HOME/domain/configuration/). This option tells the Java Agent the node name to use toconnect to the AppDynamics Controller. Use the appropriate values for your node names.
For example:
<servers> <server name="server-one" group="main-server-group"> <!-- Remote JPDA debugging for a specific server <optionvalue="-agentlib:jdwp=transport=dt_socket,address=8787,server=y,suspend=n"/> --> <jvm name="default"> <jvm-options> <optionvalue="-agentlib:jdwp=transport=dt_socket,address=8787,server=y,suspend=n"/> <option value="-Dappdynamics.agent.nodeName=JBOSS-EAP-NODE-1"/> </jvm-options> </jvm> </server> <server name="server-two" group="main-server-group" auto-start="true"> <!-- server-two avoids port conflicts by incrementing the ports in the default socket-group declared in the server-group --> <socket-bindings port-offset="150"/> <jvm name="default"> <jvm-options> <option value="-Dappdynamics.agent.nodeName=JBOSS-EAP-NODE-2"/> </jvm-options> </jvm> </server> <server name="server-three" group="other-server-group" auto-start="false"> <!-- server-three avoids port conflicts by incrementing the ports in the default socket-group declared in the server-group --> <socket-bindings port-offset="250"/> </server></servers>
Making the LogManager Location Dynamic
On standalone JBoss instances, instead of hard coding the path and name of the log managerJAR, you can use techniques to make the path to the log manager file thatglob pattern matchingyou specify in the startup options more resilient to changes.
Windows
In Windows, the standalone.conf.bat gets this additional snippet:

Copyright © AppDynamics 2012-2015 Page 106
...rem jboss.modules.system.pkgsset JAVA_OPTS=%JAVA_OPTS%-Djboss.modules.system.pkgs=org.jboss.byteman,com.singularity,org.jboss.logmanager
rem java.util.logging set JAVA_OPTS=%JAVA_OPTS%-Djava.util.logging.manager=org.jboss.logmanager.LogManager
rem bootclasspathset LOGMANAGER= for /f %%i in ('dir /b"%JBOSS_HOME%\modules\system\layers\base\org\jboss\logmanager\main\jboss-logmanager-*.jar"') do ( setLOGMANAGER_JAR=%JBOSS_HOME%\modules\system\layers\base\org\jboss\logmanager\main\%%i ) set JAVA_OPTS=%JAVA_OPTS% -Xbootclasspath/p:%LOGMANAGER_JAR%
The path to the LogManager JAR file under the JBoss home can vary by JBoss version. Be sure tocheck your system and adjust the path as shown in the example accordingly.
Linux
In Linux, you can populate the path dynamically with the following code:
JBOSS_MODULES_SYSTEM_PKGS="org.jboss.byteman,com.singularity,org.jboss.logmanager"
JAVA_OPTS="$JAVA_OPTS-Djava.util.logging.manager=org.jboss.logmanager.LogManager"JAVA_OPTS="$JAVA_OPTS -Xbootclasspath/p:$(ls${JBOSS_HOME}/modules/system/layers/base/org/jboss/logmanager/main/jboss-logmanager-*.jar)"
If using the ${JBOSS_HOME} variable, as in the example, be sure to set the variable to thedirectory to the JBoss installation directory on your system.
The path to the LogManager JAR file under the JBoss home can vary by JBoss version. Be sure tocheck your system and adjust the path as shown in the example accordingly.
Troubleshooting
The following sections contain information that may assist you in getting the Java Agent installedon JBoss.
Verify JBoss startup arguments

Copyright © AppDynamics 2012-2015 Page 107
Most issues with installing the Java Agent on JBoss are attributable to conflicts between startuparguments. Settings you add for the Java Agent may be overridden or otherwise conflict withexisting arguments in ways that are not always easy to detect.
The best way to begin troubleshoot such startup issues is to print and inspect the startuparguments that JBoss actually gets when attempting to start.
To do this, view JBoss process information during startup using the following command. Note thatthis command needs to be performed while the start up attempt is occurring, and before it fails.
ps -ef | grep [o]rg.jbossas | tr ' ' '\n' | sed -e '/^$/d'
Fix Linkage Error
If you see this error:
Caused by: java.lang.LinkageError: loader constraint violation in interfaceitable initialization: when resolving method"com.microsoft.sqlserver.jdbc.SQLServerXAConnection.getXAResource()Ljavax/transaction/xa/XAResource;" the class loader (instance oforg/jboss/modules/ModuleClassLoader) of the current class,com/microsoft/sqlserver/jdbc/SQLServerXAConnection, and the class loader(instance of <bootloader>) for interface javax/sql/XAConnection have differentClass objects for the type javax/transaction/xa/XAResource used in the signature
Add the following JVM option to the startup script and restart the server:
-Dappdynamics.bciengine.class.lookahead=!*
The error indicates a race condition while loading classes. The flag controls the class loadinghierarchy, thus preventing class loading problems.
JMXRegistrationAdvice callback error for target context ServiceBindingManager
The following error at JBoss start up has been encountered in JBoss 6.x:
14:06:58,531 ERROR [AbstractKernelController] Error installing to Configured: name=ServiceBindingManager state=Configured: java.lang.Exception: Error calling callback JMXRegistrationAdvice for target context ServiceBindingManager at org.jboss.dependency.plugins.AbstractLifecycleCallbackItem.install(AbstractLifecycleCallbackItem.java:91) at org.jboss.dependency.plugins.AbstractController.handleLifecycleCallbacks(AbstractController.java:1830) at ...
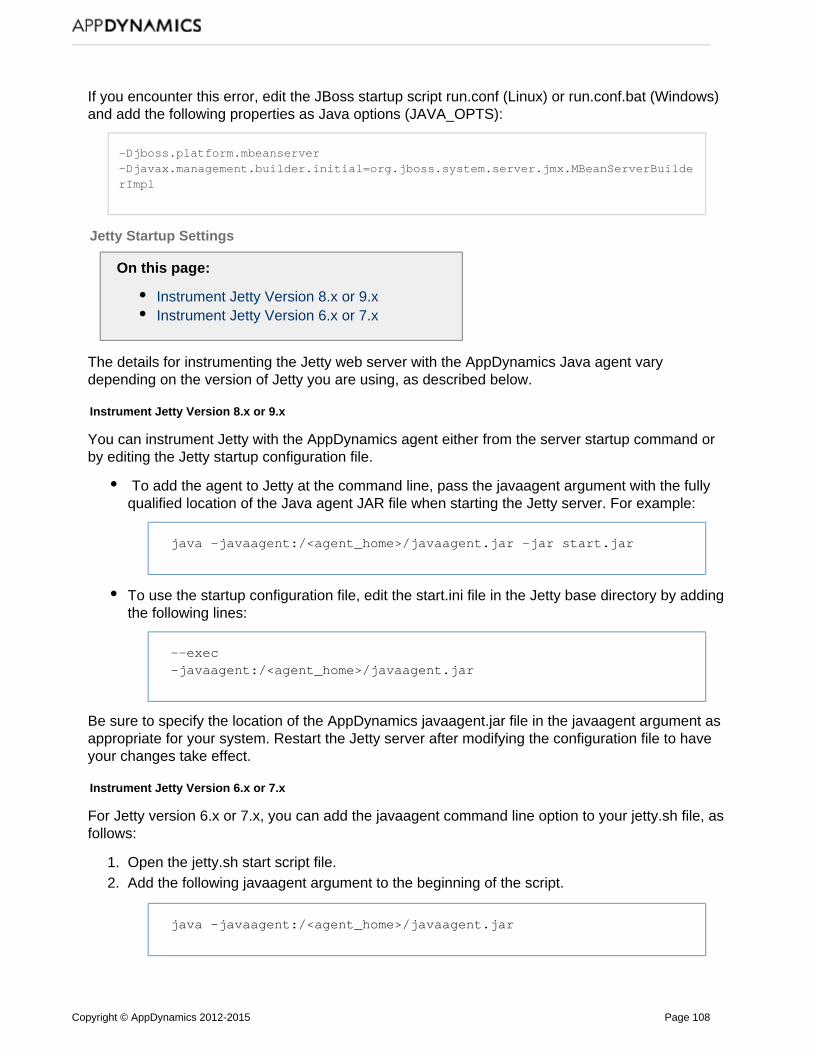
Copyright © AppDynamics 2012-2015 Page 108
1. 2.
If you encounter this error, edit the JBoss startup script run.conf (Linux) or run.conf.bat (Windows)and add the following properties as Java options (JAVA_OPTS):
-Djboss.platform.mbeanserver-Djavax.management.builder.initial=org.jboss.system.server.jmx.MBeanServerBuilderImpl
Jetty Startup Settings
On this page:
Instrument Jetty Version 8.x or 9.xInstrument Jetty Version 6.x or 7.x
The details for instrumenting the Jetty web server with the AppDynamics Java agent varydepending on the version of Jetty you are using, as described below.
Instrument Jetty Version 8.x or 9.x
You can instrument Jetty with the AppDynamics agent either from the server startup command orby editing the Jetty startup configuration file.
To add the agent to Jetty at the command line, pass the javaagent argument with the fullyqualified location of the Java agent JAR file when starting the Jetty server. For example:
java -javaagent:/<agent_home>/javaagent.jar -jar start.jar
To use the startup configuration file, edit the start.ini file in the Jetty base directory by addingthe following lines:
--exec-javaagent:/<agent_home>/javaagent.jar
Be sure to specify the location of the AppDynamics javaagent.jar file in the javaagent argument asappropriate for your system. Restart the Jetty server after modifying the configuration file to haveyour changes take effect.
Instrument Jetty Version 6.x or 7.x
For Jetty version 6.x or 7.x, you can add the javaagent command line option to your jetty.sh file, asfollows:
Open the jetty.sh start script file.Add the following javaagent argument to the beginning of the script.
java -javaagent:/<agent_home>/javaagent.jar

Copyright © AppDynamics 2012-2015 Page 109
3. 4.
1.
2.
3.
Save the script file.Restart the application server for the changes to take effect.
Mule ESB Startup Settings
On this page:
Configuring the Tanuki Service Wrapper
Related pages:
Mule ESB Support
To load the Java Agent in Mule ESB, pass the Java Agent JAR location as a JVM argument toMule.
Mule ESB 3.X or later uses the Tanuki configuration environment. To specify JVM argumentsin your Mule ESB environment, you need to configure them as additional parameters to the Tanuki
configuration file, wrapper.conf, as described below. Java Service Wrapper
Configuring the Tanuki Service Wrapper
Open the Java Service Wrapper configuration file: <MULE_HOME>/conf/wrapper.conf Find the location indicated for Java Additional Parameters:
# Java Additional Parameterswrapper.java.additional.1=
Add the path to the Java Agent JAR file as a JVM argument using a wrapper.java.additional. parameter, as follows.n
wrapper.java.additional.n="-javaagent:/path_to_appagent/javaagent.jar"wrapper.java.additional.n.stripquotes=TRUE
Where "n" is the next available integer among the wrapper.java.additional parametersalready in the wrapper.conf file, if any. The numbers serve to identify each Java AdditionalParameter in the file. Do not skip numbers when adding the property.Replace path_to_appagent to the path to the javaagent.jar file in your system. Thestripquotes parameter is necessary only if there are spaces in the path or filename, but issafe to include if not.
For example, on a Linux system and with seven Java parameters already in the file, add thefollowing properties:
wrapper.java.additional.8="-javaagent:/opt/AppDynamics/Agent/app_agent/javaagent.jar"wrapper.java.additional.8.stripquotes=TRUE
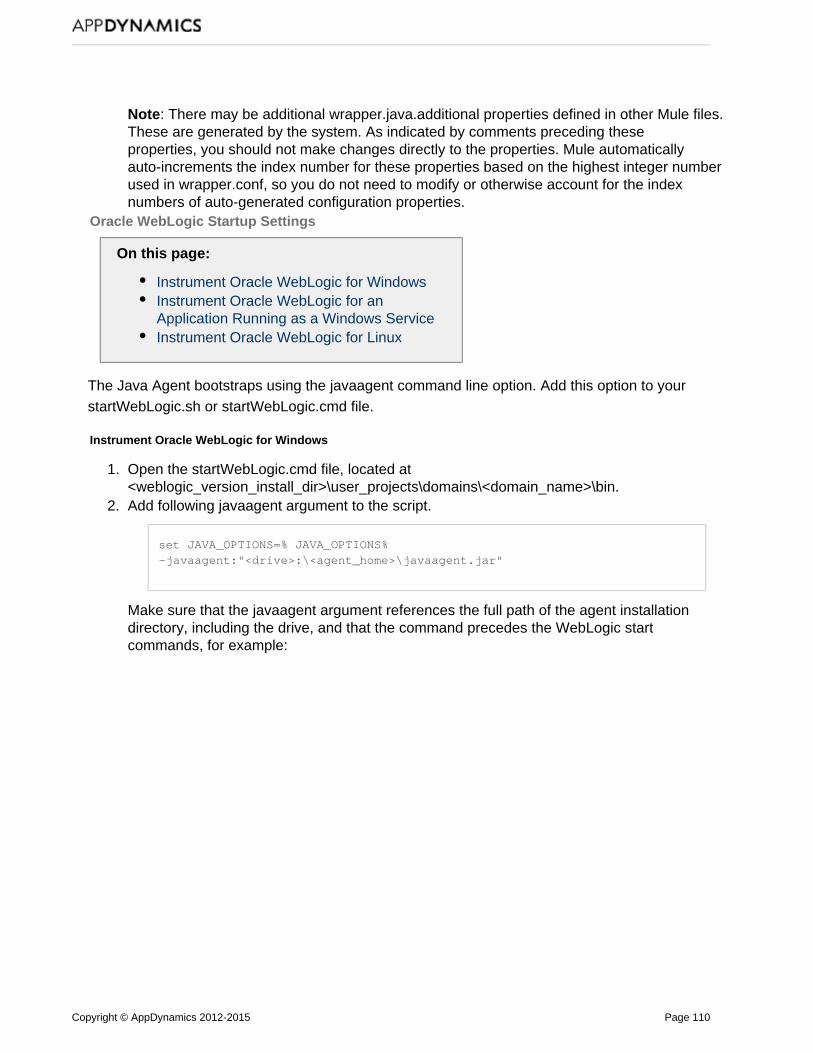
Copyright © AppDynamics 2012-2015 Page 110
3.
1.
2.
Note: There may be additional wrapper.java.additional properties defined in other Mule files.These are generated by the system. As indicated by comments preceding theseproperties, you should not make changes directly to the properties. Mule automaticallyauto-increments the index number for these properties based on the highest integer numberused in wrapper.conf, so you do not need to modify or otherwise account for the indexnumbers of auto-generated configuration properties.
Oracle WebLogic Startup Settings
On this page:
Instrument Oracle WebLogic for WindowsInstrument Oracle WebLogic for anApplication Running as a Windows ServiceInstrument Oracle WebLogic for Linux
The Java Agent bootstraps using the javaagent command line option. Add this option to yourstartWebLogic.sh or startWebLogic.cmd file.
Instrument Oracle WebLogic for Windows
Open the startWebLogic.cmd file, located at<weblogic_version_install_dir>\user_projects\domains\<domain_name>\bin.Add following javaagent argument to the script.
set JAVA_OPTIONS=% JAVA_OPTIONS%-javaagent:"<drive>:\<agent_home>\javaagent.jar"
Make sure that the javaagent argument references the full path of the agent installationdirectory, including the drive, and that the command precedes the WebLogic startcommands, for example:
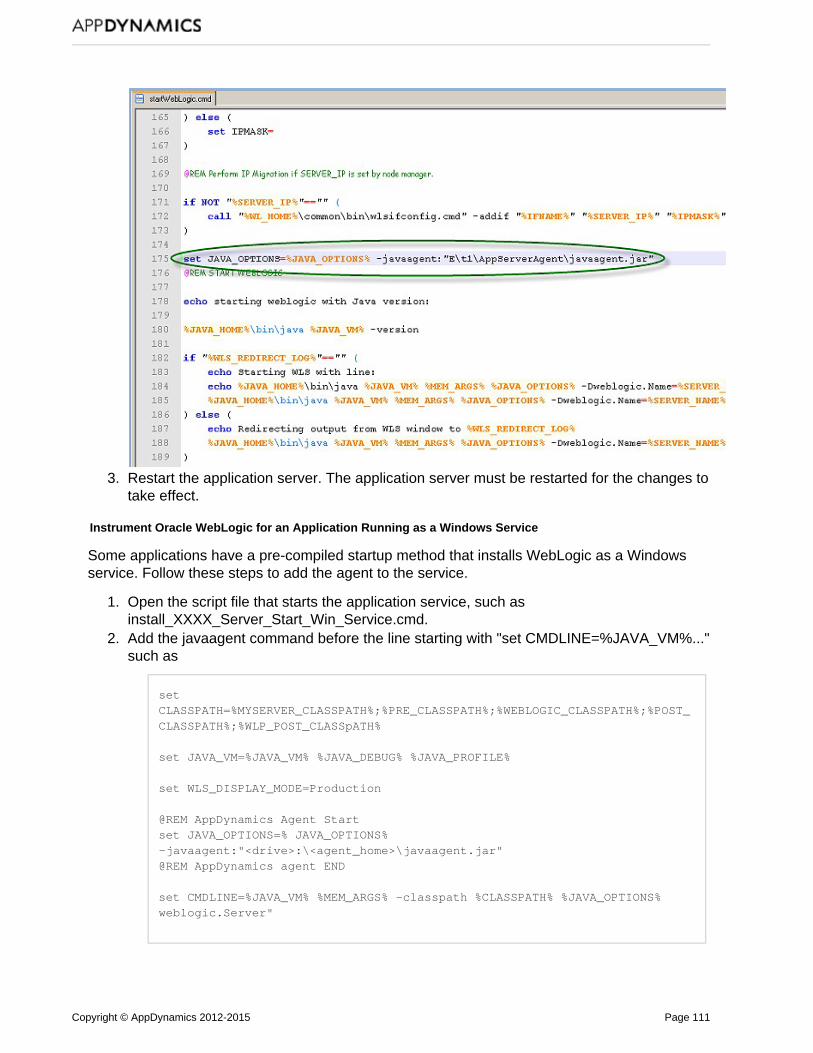
Copyright © AppDynamics 2012-2015 Page 111
2.
3.
1.
2.
3.
Restart the application server. The application server must be restarted for the changes totake effect.
Instrument Oracle WebLogic for an Application Running as a Windows Service
Some applications have a pre-compiled startup method that installs WebLogic as a Windowsservice. Follow these steps to add the agent to the service.
Open the script file that starts the application service, such asinstall_XXXX_Server_Start_Win_Service.cmd.Add the javaagent command before the line starting with "set CMDLINE=%JAVA_VM%..."such as
setCLASSPATH=%MYSERVER_CLASSPATH%;%PRE_CLASSPATH%;%WEBLOGIC_CLASSPATH%;%POST_CLASSPATH%;%WLP_POST_CLASSpATH%
set JAVA_VM=%JAVA_VM% %JAVA_DEBUG% %JAVA_PROFILE%
set WLS_DISPLAY_MODE=Production
@REM AppDynamics Agent Startset JAVA_OPTIONS=% JAVA_OPTIONS%-javaagent:"<drive>:\<agent_home>\javaagent.jar"@REM AppDynamics agent END
set CMDLINE=%JAVA_VM% %MEM_ARGS% -classpath %CLASSPATH% %JAVA_OPTIONS%weblogic.Server"

Copyright © AppDynamics 2012-2015 Page 112
3.
4.
5. 6.
7.
1.
2.
3.
Remove the existing Windows Service for your application. From the command line, run thisscript.
install_XXXXX_Server_Start_Win_Service.cmd XXXXX_xxxxx_Production_Server R
Install the Windows Service for your application to include the AppDynamics agentJAVA_OPTIONS argument.
install_XXXXX_Server_Start_Win_Service.cmd XXXXX_xxxx_Production_Server I
From the WebLogic web console, stop your application.Start your application (which also starts WebLogic) from the Windows Services application,where the Windows service name = XXXXX_xxxx_Production_Server.Ensure that your application is working properly.
For more information, see in the Oracle documentation.Creating a Server-Specific Script
Instrument Oracle WebLogic for Linux
Open the startWebLogic.sh file, located at<weblogic_<version#>_install_dir>/user_projects/domains/<domain_name>/bin.Add the following lines of code to the application server start script.
export JAVA_OPTIONS="$JAVA_OPTIONS -javaagent:/agent_home/javaagent.jar"
Make sure that the javaagent argument references the full path of the agent installationdirectory, including the drive, and that the command precedes the WebLogic startcommands, for example:
Restart the application server to have the changes take effect.OSGi Infrastructure Configuration

Copyright © AppDynamics 2012-2015 Page 113
1.
2.
1.
2.
On this page:
Configure Eclipse EquinoxConfigure Apache SlingConfigure Apache Felix for GlassFishConfigure JIRA or ConfluenceConfigure Other OSGi-based Containers
The GlassFish application server versions 3.x and later uses OSGi architecture. By default, OSGicontainers follow a specific model for bootstrap class delegation. Classes that are not specified inthe container's CLASSPATH are not delegated to the bootstrap classloader; therefore you mustconfigure the OSGi containers for the Java Agentclasses.
For more information see .GlassFish OSGi Configuration per Domain
To ensure that the OSGi container identifies the Java Agent, specify the following package prefix:
org.osgi.framework.bootdelegation=com.singularity.*
This prefix follows the regular boot delegation model so that the Java Agent classes are visible.
If you already have existing boot delegations, add "com.singularity.*" to the existing pathseparated by a comma. For example:
org.osgi.framework.bootdelegation=com.sun.btrace., com.singularity.
Configure Eclipse Equinox
If running Eclipse Equinox under Glassfish:
Open the config.ini file located at <glassfish installdirectory>/glassfish/osgi/equinox/configuration.Add the following package prefix to the config.ini file:
org.osgi.framework.bootdelegation=com.singularity.*
If running Eclipse Equinox under the WebSphere Application Server Liberty profile:
Open the bootstrap.properties file in the JVM directory < >/usr/servers/<WLP_home server_n> for editing.ame
Add the following line:
org.osgi.framework.bootdelegation=com.singularity.*
For more information see .Getting Started with Equinox

Copyright © AppDynamics 2012-2015 Page 114
1.
2.
1. 2.
1. 2. 3.
4.
Configure Apache Sling
Open the sling.properties file. The location of the sling.properties varies depending on theJava platform.In the Sun/Oracle implementation, the sling.properties file is located at <java.home>/lib. Add following package prefix to the sling.properties file:
org.osgi.framework.bootdelegation=com.singularity.*
Configure Apache Felix for GlassFish
Open the config.properties file, located at <glassfish-install>/glassfish/osgi/felix/conf.Add following package prefix to the config.properties file.
org.osgi.framework.bootdelegation=com.singularity.*
GlassFish 3.1.2
In the boot delegation list in the <GlassFish_Home_Directory>\glassfish\config\osgi.properties file,add:
com.singularity.*
For example:
org.osgi.framework.bootdelgation=${eclipselink.bootdelegation}, com.sun.btrace,com.singularity.*
Configure JIRA or Confluence
For JIRA 5.1.8 and newer and Confluence 5.3 and newer:
Open the startup script (i.e., catalina.sh) for editing. Look for the command block (look for " ") start elif [ "$1" = "start" ] ; then
Add the following Java system property alongside the existing properties in both blockelses:
-Datlassian.org.osgi.framework.bootdelegation=META-INF.services,com.yourkit,com.singularity.*,com.jprofiler,com.jprofiler.*,org.apache.xerces,org.apache.xerces.*,org.apache.xalan,org.apache.xalan.*,sun.*,com.sun.jndi,com.icl.saxon,com.icl.saxon.*,javax.servlet,javax.servlet.*,com.sun.xml.bind.*
Add the property to the run command block as well to instrument the application started inrun mode. For example:
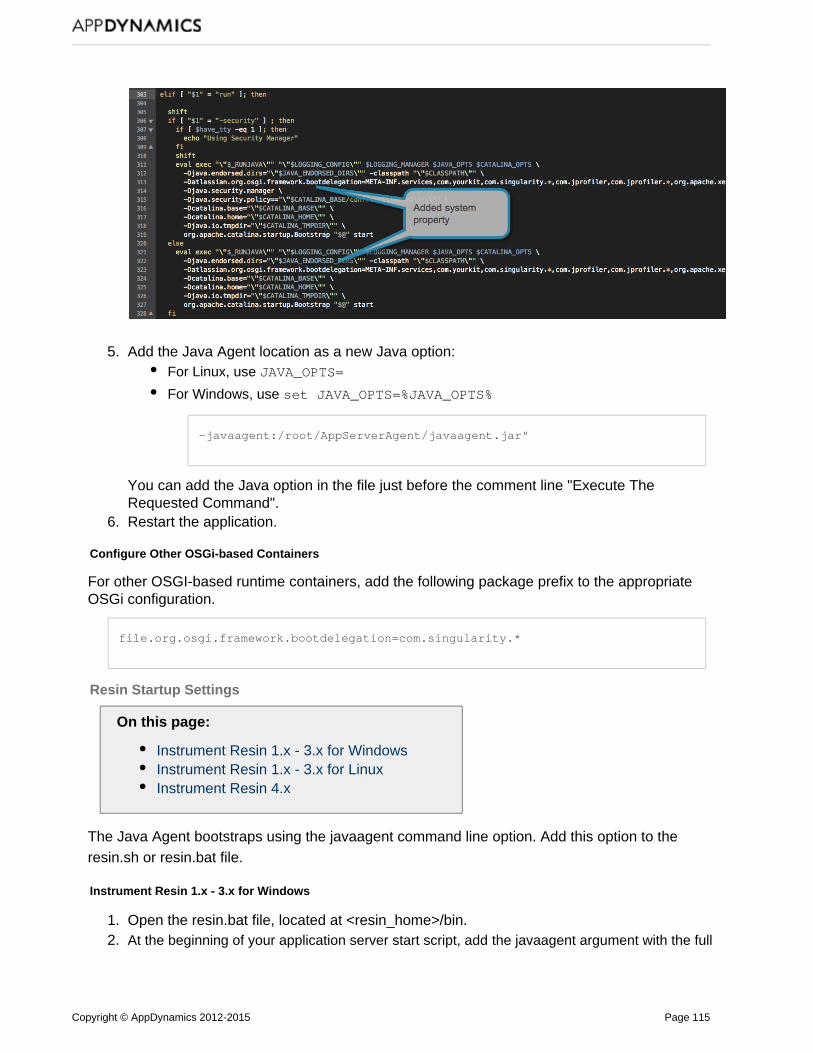
Copyright © AppDynamics 2012-2015 Page 115
4.
5.
6.
1. 2.
Add the Java Agent location as a new Java option:
For Linux, use JAVA_OPTS=
For Windows, use set JAVA_OPTS=%JAVA_OPTS%
-javaagent:/root/AppServerAgent/javaagent.jar"
You can add the Java option in the file just before the comment line "Execute TheRequested Command".Restart the application.
Configure Other OSGi-based Containers
For other OSGI-based runtime containers, add the following package prefix to the appropriateOSGi configuration.
file.org.osgi.framework.bootdelegation=com.singularity.*
Resin Startup Settings
On this page:
Instrument Resin 1.x - 3.x for WindowsInstrument Resin 1.x - 3.x for LinuxInstrument Resin 4.x
The Java Agent bootstraps using the javaagent command line option. Add this option to theresin.sh or resin.bat file.
Instrument Resin 1.x - 3.x for Windows
Open the resin.bat file, located at <resin_home>/bin.At the beginning of your application server start script, add the javaagent argument with the full

Copyright © AppDynamics 2012-2015 Page 116
2.
3.
1. 2.
3.
1.
2.
path (including drive) to the javaagent.jar file on your system:
exec JAVA_EXE -javaagent:"<drive>:\<agent_home>\javaagent.jar"
Restart the application server to have the changes take effect.
Instrument Resin 1.x - 3.x for Linux
Open the resin.sh file, located at <resin_home>/bin.At the beginning of your application server start script, add the javaagent argument with the fullpath to the javaagent.jar file on your system:
exec $JAVA_EXE -javaagent:"<agent_home>/javaagent.jar"
For example:
Restart the application server. The application server must be restarted for the changes totake effect.
Instrument Resin 4.x
To install the Java Agent into Resin 4.X or later, edit the ./conf/resin.xml file and add:
<jvm-arg>-Xmx512m</jvm-arg><jvm-arg>-javaagent:<agent_home>/javaagent.jar</jvm-arg>
Restart the application server. The application server must be restarted for the changes totake effect.
Solr Startup Settings
On this page:
Copyright © AppDynamics 2012-2015 Page 117
1. 2.
1. 2.
1.
2.
Add the javaagent Command in a WindowsEnvironmentAdd the javaagent Command in a LinuxEnvironment
The Java Agent bootstraps using the javaagent command line option. Add this option to your Solrserver.
Add the javaagent Command in a Windows Environment
Open the Windows command line utility.Execute the following commands to add the javaagent argument to the Solr server:
>cd $Solr_Installation_Directory>java -javaagent:"<drive>:\<agent install directory>\javaagent.jar" -jarstart.jar
For the argument value, reference the full path to the Java Agent installation directory, including the drive.
Add the javaagent Command in a Linux Environment
Open the terminal.Execute the following commands to add the javaagent argument to the Solr server:
>cd $Solr_Installation_Directory>java -javaagent:"<agent install directory>/javaagent.jar" -jar start.jar
For the argument value, reference the full path to the Java Agent installation directory.
Standalone JVM Startup Settings
On this page:
Add the javaagent Command in a WindowsEnvironmentAdd the javaagent Command in a LinuxEnvironment
AppDynamics works just as well with JVMs that are not application servers or containers.
The Java Agent bootstraps using the javaagent command line option, a standard Java option andcan be used with any JVM. Add this option to your standalone JVM.
Add the javaagent Command in a Windows Environment
Open the command line utility for Windows.

Copyright © AppDynamics 2012-2015 Page 118
2.
1. 2.
1. 2.
Add javaagent argument to the standalone JVM:
>java -javaagent:"Drive:\<agent install directory>\javaagent.jar"<fully_qualified_class_name_with_main_method>
The javaagent argument value must reference the full path to the Java Agent installationFor example:directory, including the drive.
>java -javaagent:"C:\AppDynamics\agentDir\javaagent.jar" com.main.HelloWorld
Add the javaagent Command in a Linux Environment
Open the terminal.Add the javaagent argument to the standalone JVM:
>java -javaagent:"/<agent install directory>/javaagent.jar"<fully_qualified_class_name_with_main_method>
The javaagent argument value must reference the full path to the Java Agent installationFor example:directory, including the drive.
>java -javaagent:"/mnt/AppDynamics/agentDir/javaagent.jar"com.main.HelloWorld
Tanuki Service Wrapper Settings
On this page:
Configure the Tanuki Service Wrapper
Related pages:
Tanuki Service Wrapper PropertiesExample ConfigurationMore Help On Tanuki Service Wrapper
The Java Agent bootstraps using the javaagent command line option. Add this option to the TanukiService wrapper.conf file.
Configure the Tanuki Service Wrapper
Open the wrapper.conf file.Use the wrapper.java.additional.<n> property to add the javaagent option.
wrapper.java.additional.6=-javaagent:/C:/agent/javaagent.jar

Copyright © AppDynamics 2012-2015 Page 119
1.
2.
Tibco ActiveMatrix BusinessWorks Service Engine Settings
Related pages:
https://docs.tibco.com/https://tibbr.tibcommunity.com/
With Tibco ActiveMatrix BusinessWorks Service Engine, each application is started in its ownJVM. Therefore, for each application you want to monitor, you need to configure the Java agent inthe startup settings for the configuration file of that application.
The file to configure is usually the TRA file named for the application. For example:
<application_name>.traTo instrument the Tibco application
Open the TRA file for the application you want to monitor and add the following to the file:
java.extended.properties=-javaagent:/opt/appagent/javaagent.jar
Restart the application to have the changes take effect using the command line toolbwengine.sh (or .exe) or the Tibco Admin UI.
Since Tibco traffic commonly takes the form of incoming SOAP actions sent via HTTP requests toa single URL (i.e., /BusinessServices/WebGateway), it's likely that you will need to create a POJOsplit rule in the AppDynamics configuration to differentiate business transactions for Tibco. Forinformation, see . Identify Transactions by POJO Method Invoked by a ServletwebMethods Startup Settings
On this page:
Instrumenting webMethods with the TanukiWrapper
Related pages:
Tanuki Service Wrapper Settings
You can instrument the webMethods Integration Server or My webMethods Server by adding the Java agent to the startup script of the server.
The Java agent settings can go in the runtime.bat/runtime.sh file or the server.bat/server.sh fileunder the bin subdirectory of the server home.
Instrumenting webMethods with the Tanuki Wrapper
For webMethods servers that use the Tanuki Java service wrapper for start up, you need toconfigure the agent in the wrapper.conf file.
Note that the order of arguments in the file is important. Specifically, when instrumenting anOSGI-based platform, the agent configuration must precede the bootclasspath argument.

Copyright © AppDynamics 2012-2015 Page 120
For example, the following listing shows the Java options used in a sample wrapper.conf file:
# Java Additional Parameters...wrapper.java.additional.4=-XX:MaxPermSize=256M wrapper.java.additional.5=-javaagent:"/opt/appd/appagent/javaagent.jar" wrapper.java.additional.6=-Xbootclasspath/a:"%OSGI_INSTALL_AREA%/lib/runtime/platform-jaasproxy.jar"
Java Agent Configuration Properties
On this page:
Using a Single Agent with Multiple JVMsExample Agent Configuration Usingcontroller-info.xmlExample Agent Configuration Using SystemProperties at the Command LineJava Agent Properties
Related pages:
Instrument Dynamically Identified JVMsUse System Properties for Java AgentSettingsInstrument JVMs in a Dynamic Environment
You can configure the App Server Agent properties using:
Settings in the controller-info.xml fileSystem properties (-D options) passed to the JVM at start upEnvironment variables read at start up
To avoid conflicts, that agent follows the following order of precedence: environment variable,system properties, and then controller-info.xml file.
Using a Single Agent with Multiple JVMs
For shared binaries among multiple JVM instances, AppDynamics recommends using acombination of the XML file and the startup properties to configure the app agent. Configure all theproperties common to all the JVMs in the controller-info.xml file. Configure the properties unique toa JVM using the system properties in the start-up script.
For example:
For multiple JVMs belonging to the same application serving different tiers, configure theapplication name in the controller-info.xml file and the tier name and node name using thesystem properties.
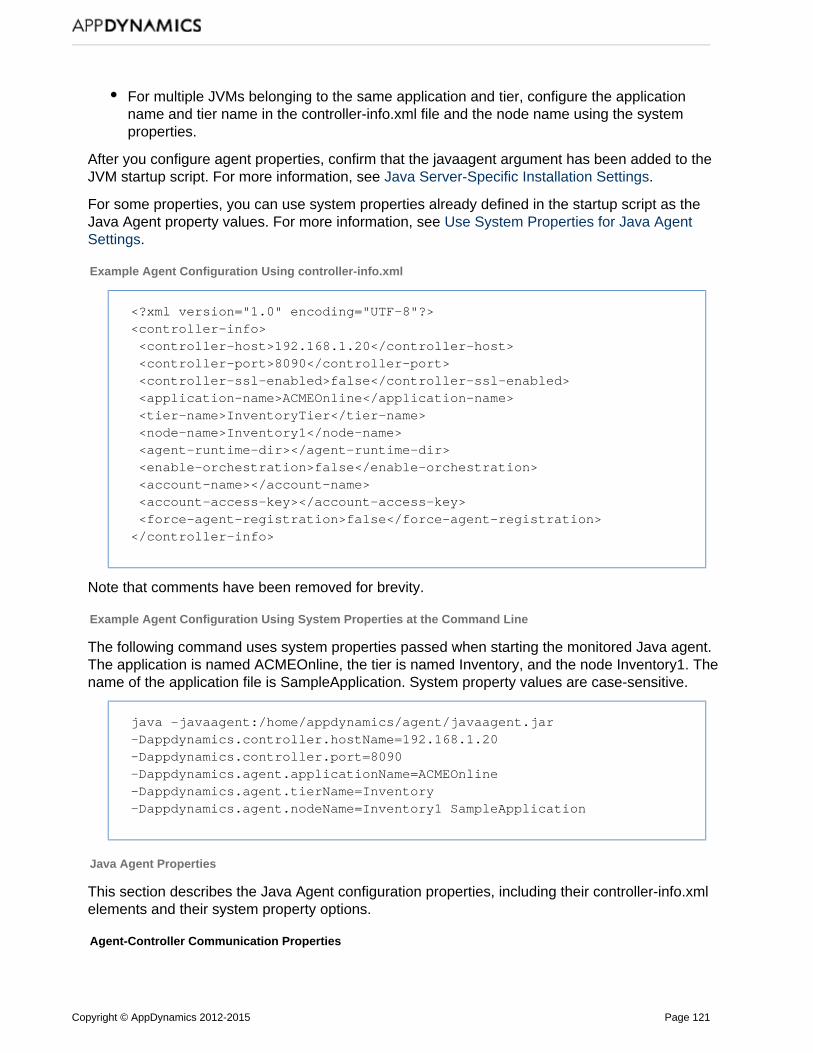
Copyright © AppDynamics 2012-2015 Page 121
For multiple JVMs belonging to the same application and tier, configure the applicationname and tier name in the controller-info.xml file and the node name using the systemproperties.
After you configure agent properties, confirm that the javaagent argument has been added to theJVM startup script. For more information, see .Java Server-Specific Installation Settings
For some properties, you can use system properties already defined in the startup script as theJava Agent property values. For more information, see Use System Properties for Java Agent
.Settings
Example Agent Configuration Using controller-info.xml
<?xml version="1.0" encoding="UTF-8"?><controller-info> <controller-host>192.168.1.20</controller-host> <controller-port>8090</controller-port> <controller-ssl-enabled>false</controller-ssl-enabled> <application-name>ACMEOnline</application-name> <tier-name>InventoryTier</tier-name> <node-name>Inventory1</node-name> <agent-runtime-dir></agent-runtime-dir> <enable-orchestration>false</enable-orchestration> <account-name></account-name> <account-access-key></account-access-key> <force-agent-registration>false</force-agent-registration></controller-info>
Note that comments have been removed for brevity.
Example Agent Configuration Using System Properties at the Command Line
The following command uses system properties passed when starting the monitored Java agent.The application is named ACMEOnline, the tier is named Inventory, and the node Inventory1. Thename of the application file is SampleApplication. System property values are case-sensitive.
java -javaagent:/home/appdynamics/agent/javaagent.jar-Dappdynamics.controller.hostName=192.168.1.20-Dappdynamics.controller.port=8090-Dappdynamics.agent.applicationName=ACMEOnline-Dappdynamics.agent.tierName=Inventory-Dappdynamics.agent.nodeName=Inventory1 SampleApplication
Java Agent Properties
This section describes the Java Agent configuration properties, including their controller-info.xmlelements and their system property options.
Agent-Controller Communication Properties

Copyright © AppDynamics 2012-2015 Page 122
Controller Host Property
The host name or the IP address of the AppDynamics Controller. Example values are192.168.1.22 or myhost or myhost.abc.com. This is the same host that you use to access theAppDynamics browser-based user interface. For an on-premise Controller, use the value forApplication Server Host Name that was configured when the Controller was installed. If you areusing the AppDynamics SaaS Controller service, see the Welcome email from AppDynamics.
Element in controller-info.xml: <controller-host>
System Property: -Dappdynamics.controller.hostName
Environment Variable: APPDYNAMICS_CONTROLLER_HOST_NAME
Type: String
Default: None
Required: Yes, if the Enable Orchestration property is false.
If Enable Orchestration is true, and if the app agent is deployed in a compute cloud instancecreated by an AppDynamics workflow, do not set the Controller host unless you want to overridethe auto-detected value. See .Enable Orchestration Property
Controller Port Property
The HTTP(S) port of the AppDynamics Controller. This is the port used to access theAppDynamics browser-based user interface.
If the Controller SSL Enabled property is set to true, specify the HTTPS port of the Controller;otherwise specify the HTTP port. See .Controller SSL Enabled Property
Element in controller-info.xml: <controller-port>
System Property: -Dappdynamics.controller.port
Environment Variable: APPDYNAMICS_CONTROLLER_PORT
Type: Positive Integer
Default: For On-premise installations, port 8090 for HTTP and port 8181 for HTTPS are thedefaults.For the SaaS Controller Service, port 80 for HTTP and port 443 for HTTPS are the defaults.
Required: Yes, if the Enable Orchestration property is false.
If Enable Orchestration is true, and if the app agent is deployed in a compute cloud instancecreated by an AppDynamics workflow, do not set the Controller port unless you want to overridethe auto-detected value. See .Enable Orchestration Property
SSL Configuration Properties
Controller SSL Enabled Property
If true, specifies that the agent should use SSL (HTTPS) to connect to the Controller. If SSLEnabled is true, set the Controller Port property to the HTTPS port of the Controller. See Controller
.Port Property

Copyright © AppDynamics 2012-2015 Page 123
Element in controller-info.xml: <controller-ssl-enabled>
System Property: -Dappdynamics.controller.ssl.enabled
Environment Variable: APPDYNAMICS_CONTROLLER_SSL_ENABLED
Type: Boolean
Default: False
Required: No
Controller Keystore Password Property
The encrypted value of the Controller certificate password. See .Password Encryption Utility
Element in controller-info.xml: <controller-keystore-password>
System Property: Not applicable
Type: Boolean
Default: None
Required: No
Controller Keystore Filename Property
By default, the agent looks for a Java truststore file named cacerts.jks in the directory in theconfagent home. Use this property to enable full validation of Controller SSL certificates with a differentJava truststore file. See .Enable SSL for Java
Element in controller-info.xml: <controller-keystore-filename>
System Property: Not applicable
Type: String
Default: None
Required: No
Force Default SSL Certificate Validation Property
Used to override the default behavior for SSL validation. The property can have three states:
: Forces the agent to perform full validation of the certificate sent by the controller,trueenabling the agent to enforce the SSL trust chain. Use this setting when a public certificateauthority(CA) signs your Controller SSL certificate. See Enable SSL On-Premise with a
.Trusted CA Signed Certificate: Forces the agent to perform minimal validation of the certificate. This propertyfalse
disables full validation of the Controller's SSL certificate. Use this setting when full validationof a SaaS certificate fails.
: unspecified The validation performed by the agent depends on the context:If the agent is connecting to a SaaS controller, full validation is performed.If the agent is connecting to an on-premise controller, and the cacerts.jks file ispresent, then full validation is performed using the cacerts.jks file.If the agent is connecting to an on-premise controller, and there is no cacerts.jks file,
Copyright © AppDynamics 2012-2015 Page 124
then minimal validation is performed
Element in controller-info.xml: Not applicable
System Property: -Dappdynamics.force.default.ssl.certificate.validation
Type: Boolean
Default: None
Required: No
Agent Identification Properties
Automatic Naming Property
If enabled and other agent identification properties are not specified in other settings, the tier andapplication for the agent are automatically named. The default names are in the format MyApp andMyTier.
Element in controller-info.xml: <auto-naming>
System Property: Not applicable
Type: Boolean
Default: None
Required: No
Application Name Property
The name of the logical business application that this JVM node belongs to. Note that this is notthe deployment name(ear/war/jar) on the application server.
If a business application of the configured name does not exist, it is created automatically.
Element in controller-info.xml: <application-name>
System Property: -Dappdynamics.agent.applicationName
Environment Variable: APPDYNAMICS_AGENT_APPLICATION_NAME
Type: String
Default: None
Required: Yes
Tier Name Property
The name of the tier that this JVM node belongs to. Note that this is not the deployment name(ear/war/jar) on the application server.
If the JVM or application server startup script already has a system property that references a tier,such as -Dserver.tier, you can use ${server.tier} as the tier name. For more information, see Use
.System Properties for Java Agent Settings
The agent registers the named tier with the Controller, if the tier does not already exist, the firsttime it connects with the Controller. If a tier with the name already exists in the Controller model,

Copyright © AppDynamics 2012-2015 Page 125
the agent is associated with the existing tier.
See .Name Business Applications, Tiers, and Nodes
Element in controller-info.xml: <tier-name>
System Property: -Dappdynamics.agent.tierName
Environment Variable: APPDYNAMICS_AGENT_TIER_NAME
Type: String
Default: None
Required: Yes
Node Name Property
The name of the node. Where JVMs are dynamically created, use the system property to set thenode name.
If your JVM or application server startup script already has a system property that can be used asa node name, such as -Dserver.name, you could use ${server.name} as the node name. Youcould also use expressions such as ${server.name}_${host.name}.MyNode to define the nodename. See for more information.Use System Properties for Java Agent Settings
In general, the node name must be unique within the business application and physical host. If youwant to use the same node name for multiple nodes on the same physical machine, createmultiple virtual hosts using the Unique Host ID property. See .Unique Host ID Property
See .Name Business Applications, Tiers, and Nodes
Element in controller-info.xml: <node-name>
System Property: -Dappdynamics.agent.nodeName
Environment Variable: APPDYNAMICS_AGENT_NODE_NAME
Type: String
Default: None
Required: Yes
New
Reuse Node Name Property
The system property provides for the reuse of node names in AppDynamics.
This property is useful for monitoring environments where there are many JVMs with short lifespans. It causes AppDynamics to reuse the node names of historical JVMs for new JVMs. Thisavoids a proliferation of differently named nodes in AppDynamics over time, particularly when thenodes are essentially identical processes that run over different times. An example of thisenvironment is a z/OS Dynamic Workload Manager based-environment where new JVMs arelaunched and shut down based on actual work load.
AppDynamics generates a node name with App, Tier and Sequence number. The node names arepooled. For example, the sequence numbers are reused when the nodes are purged (based on

Copyright © AppDynamics 2012-2015 Page 126
the node lifetime).
The node name is generated by the Controller. The Controller reuses node names based on thenode retention period property.
Element in controller-info.xml: <node-name>
System Property: -Dappdynamics.agent.reuse.nodeName
Type: Boolean
Default: String
Required: No
Example: With the following configuration, the agent directs the Controller to generate a nodename with the prefix "reportGen". Node names will have suffixes --1, --2, and so on, depending onhow many nodes are running in parallel. The name of a node that is shut down and qualifies as ahistorical node may be reused by a new node.
-Dappdynamics.agent.reuse.nodeName=true-Dappdynamics.agent.reuse.nodeName.prefix=reportGen
Reuse Node Name Prefix Property
This property directs the Controller to generate node names dynamically with the prefix specified.
System Property: -Dappdynamics.agent.reuse.nodeName.prefix
Element in controller-info.xml: <node-name>
Type: Boolean
Default: false; when set to , you do not need to specify a node name.true
Required: No
Example: Using the following property specifications, the agent directs the Controller to generatea node name with the prefix "reportGen". Node names will have suffixes --1, --2, and so on,depending on how many nodes are running in parallel.
-Dappdynamics.agent.reuse.nodeName=true-Dappdynamics.agent.reuse.nodeName.prefix=reportGen
Multi-Tenant Mode Properties
If the AppDynamics Controller is running in multi-tenant mode or if you are using the AppDynamicsSaaS Controller, specify the account name and account access key for this agent to authenticatewith the Controller. If you are using the AppDynamics SaaS Controller, the account name isprovided in the Welcome email sent by AppDynamics. You can also find this information in the<controller_home>/initial_account_access_info.txt file.
If the Controller is running in single-tenant mode (the case for most on-premise installations), thereis no need to configure these values.
Account Name Property
Description: This is the account name used to authenticate with the Controller.

Copyright © AppDynamics 2012-2015 Page 127
Element in controller-info.xml: <account-name>
System Properties: -Dappdynamics.agent.accountName
Environment Variable: APPDYNAMICS_AGENT_ACCOUNT_NAME
Type: String
Default: None
Required: Yes for AppDynamics SaaS Controller and other multi-tenant users; no forsingle-tenant users.
Account Access Key Property
The account access key used to authenticate with the Controller.
Element in controller-info.xml: <account-access-key>
System Properties: -Dappdynamics.agent.accountAccessKey
Environment Variable: APPDYNAMICS_AGENT_ACCOUNT_ACCESS_KEY
Type: String
Default: None
Required: Yes for AppDynamics SaaS Controller and other multi-tenant users; no forsingle-tenant users.
Proxy Properties for the Controller
These properties configure the agent to connect to the Controller through a proxy.
Proxy Host Property
The proxy host name or IP address.
Element in controller-info.xml: Not applicable
System Property: -Dappdynamics.http.proxyHost
Type: String
Default: None
Required: No
Proxy Port Property
The proxy HTTP(S) port.
Element in controller-info.xml: Not applicable
System Property: -Dappdynamics.http.proxyPort
Proxy authentication cannot be used in conjunction with SSL. To connect the agentthrough a proxy via SSL, the proxy must be open (no authentication).

Copyright © AppDynamics 2012-2015 Page 128
Type: Positive Integer
Default: None
Required: No
Proxy User Name Property
The name of the user that is authenticated by the proxy host.
Element in controller-info.xml: Not applicable
System Property: -Dappdynamics.http.proxyUser
Type: String
Default: None
Required: No
Proxy Password Property
The absolute path to the file containing the password of the user that is authenticated by the proxyhost. The password must be the first line of the file and can be in clear (unencrypted) text or inhash format, for example, as produced by htdigest: myname:myrealm:17020d0183c61c191b4
. 28ac4ff51feec
Element in controller-info.xml: Not applicable
System Property: -Dappdynamics.http.proxyPasswordFile
Type: String
Default: None
Required: No
Example: -Dappdynamics.http.proxyPasswordFile=/path/to/file-with-password
Other Properties
Enable Orchestration Property
When set to true, enables auto-detection of the controller host and port when the app server is acompute cloud instance created by an AppDynamics orchestration workflow. See Controller Host
and .Property Controller Port Property
In a cloud compute environment, auto-detection is necessary for the Create Machine tasks in theworkflow to run correctly.
If the host machine on which this agent resides is not created through AppDynamics workfloworchestration, this property should be set to false.
Element in controller-info.xml: <enable-orchestration>
System Property: Not applicable
Type: Boolean
Default: False
Copyright © AppDynamics 2012-2015 Page 129
Required: No
Agent Runtime Directory Property
Sets the runtime directory for all runtime files (logs, transaction configuration) for nodes that usethis agent installation. If this property is specified, all agent logs are written to<Agent-Runtime-Directory>/logs/node-name and transaction configuration is written to the<Agent-Runtime-Directory>/conf/node-name directory.
Element in controller-info.xml: <agent-runtime-dir>
System Property: -Dappdynamics.agent.runtime.dir
Environment Variable: APPDYNAMICS_AGENT_BASE_DIR
Type: String
Default: <agent_home>/nodes
Required: No
Redirect Log Files Property
Sets the destination directory to which to redirect log files for a node.
Element in controller-info.xml: Not applicable
System Property: -Dappdynamics.agent.logs.dir
Type: String
Default: < >/logs/<Node_Name>agent_home
Required: No
Force Agent Registration Property
Set to true only under the following conditions:
The Agent has been moved to a new application and/or tier from the UIandYou want to override that move by specifying a new application name and/or tier name inthe agent configuration.
Element in controller-info.xml: <force-agent-registration>
System Property: Not applicable
Type: Boolean
Default: False
Required: No
Auto Node Name Prefix Property
Set this property if you want the Controller to generate node names automatically using a prefixthat you provide.
The Controller generates node names based on the prefix concatenated with a number, which a

Copyright © AppDynamics 2012-2015 Page 130
suffix consisting of a number that is incremented sequentially with each new node. For example, ifyou assign a value of "mynode" to this property, the Controller generates node names "mynode-1","mynode-2" and so on.
This property provides a similar function to the Reuse Node Name Prefix Property property.However, this property is not meant to be used in combination with reusing node names;use Reuse Node Name Prefix Property for those cases instead.
Element in controller-info.xml: Not applicable
System Property: -Dappdynamics.agent.auto.node.prefix=<your_prefix>
Type: String
Default: Serial number maintained by the Controller appended to the tier name
Required: No
Cron/Batch JVM Property
Set this property to true if the JVM is a batch/cron process or if you are instrumenting the main()method. This property can be used to stall the shutdown to allow the agent to send metrics beforeshutdown.
Element in controller-info.xml: Not applicable
System Property: -Dappdynamics.cron.vm
Type: Boolean
Default: False
Required: No
Unique Host ID Property
Logically partitions a single physical host or virtual machine such that it appears to the Controllerthat the application is running on different machines. Set the value to a string that is unique acrossthe entire managed infrastructure. The string may not contain any spaces. If this property is set onthe app agent, it must be set on the machine agent as well.
See .Configure Multiple Standalone Machine Agents for One Machine for Java
System Property: -Dappdynamics.agent.uniqueHostId
Environment Variable: APPDYNAMICS_AGENT_UNIQUE_HOST_ID_ENV_VAR
Type: String
Default: None
Required: No
Hot Spot Learning on Controller
Enables or disables hotspot learning on the Controller. Prior to 3.9, hot spot learning wasperformed by the App Agent for Java. To improve performance and more accurately collect

Copyright © AppDynamics 2012-2015 Page 131
snapshot information, this functionality was moved to the Controller in 3.9. Setting this option tofalse will disable everything related to this new feature. For more information on hotspots, see Tra
and .nsaction Snapshots Call Graphs
System Property: -Dappdynamics.hotspot.learn.enabled
Type: String
Default: true
Required: No
Use System Properties for Java Agent Settings
On this page:
Referencing System PropertiesCombining Properties
Related pages:
AppDynamics ConceptsInstall the Java Agent
You can use system properties to set the Java agent configuration properties dynamically.
This approach to agent configuration is most useful in environments that consist of multiple JVMsrunning on the same machine. In this type of environment, it's likely that Java system propertiesare already used to distinguish the JVMs. If so, you can also use the value of those properties toset the agent node or tier name, as described here.
Referencing System Properties
You can reference system properties from the command line or in the agent configuration file tospecify the node name, tier name, or other agent configuration properties dynamically.
For example, consider an Java application started with a script named startserver.sh. The scriptdefines a system property as follows:
-Dserver.name=$1
The property will get the value of the first argument passed when starting theserver.namescript. For example, the following command to start the JVM would bind the server.name propertyto the value ecommerce01:
startserver.sh ecommerce01
You can use this value in your agent configuration by setting the -Dappdynamics.agent.nodeNameproperty at startup as follows.

Copyright © AppDynamics 2012-2015 Page 132
-Dappdynamics.agent.nodeName=$server.name
Or, you can use the value in the controller-info.xml file, using the following format:
${system_property_name}
For example:
<controller-info> ... <node-name>${server.name}</node-name></controller-info>
If the JVM is started using the sample command discussed previously, the agent will useecommerce01 as the node name.
Note that is simply the parameter name in the example scenario. Be sure to useserver.namethe name of a system property in your environment for the Java agent node name.
Combining Properties
You can combine multiple system properties to name nodes or tiers. For example, incontroller-info.xml, combine properties as follows:
${system_property_name_1}${system_property_name_2}
You can combine system properties with literals. In the following example "_" and "inventory" areliterals.
${myhost.name}_${myserver.name}.inventory
You can use existing system properties for the Controller host and port settings as well; however,combining properties as shown here is not supported for those settings.
Use Environment Variables for Java Agent Settings
On this page:
About Environment VariablesEnvironment Variables Used by the Agent
As an alternative to using system properties or controller-info.xml to configure the applicationname, tier name, and so on, you can configure the agent based on environment variables.
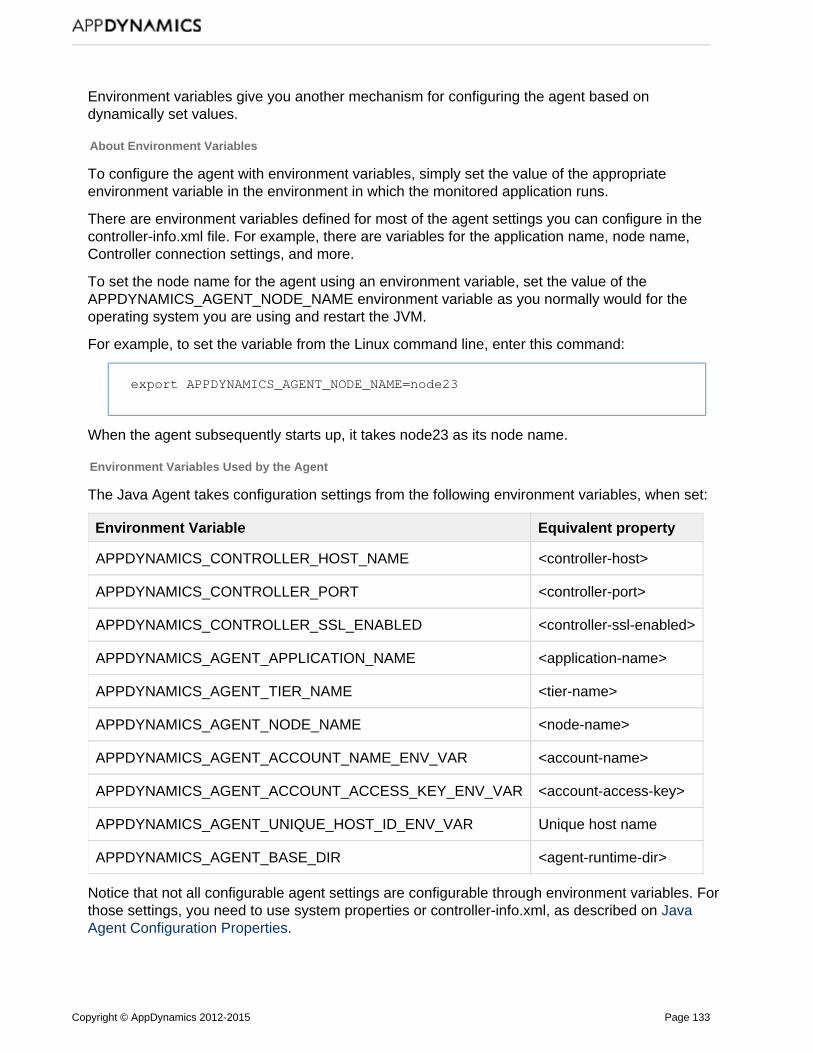
Copyright © AppDynamics 2012-2015 Page 133
Environment variables give you another mechanism for configuring the agent based ondynamically set values.
About Environment Variables
To configure the agent with environment variables, simply set the value of the appropriateenvironment variable in the environment in which the monitored application runs.
There are environment variables defined for most of the agent settings you can configure in thecontroller-info.xml file. For example, there are variables for the application name, node name,Controller connection settings, and more.
To set the node name for the agent using an environment variable, set the value of theAPPDYNAMICS_AGENT_NODE_NAME environment variable as you normally would for theoperating system you are using and restart the JVM.
For example, to set the variable from the Linux command line, enter this command:
export APPDYNAMICS_AGENT_NODE_NAME=node23
When the agent subsequently starts up, it takes node23 as its node name.
Environment Variables Used by the Agent
The Java Agent takes configuration settings from the following environment variables, when set:
Environment Variable Equivalent property
APPDYNAMICS_CONTROLLER_HOST_NAME <controller-host>
APPDYNAMICS_CONTROLLER_PORT <controller-port>
APPDYNAMICS_CONTROLLER_SSL_ENABLED <controller-ssl-enabled>
APPDYNAMICS_AGENT_APPLICATION_NAME <application-name>
APPDYNAMICS_AGENT_TIER_NAME <tier-name>
APPDYNAMICS_AGENT_NODE_NAME <node-name>
APPDYNAMICS_AGENT_ACCOUNT_NAME_ENV_VAR <account-name>
APPDYNAMICS_AGENT_ACCOUNT_ACCESS_KEY_ENV_VAR <account-access-key>
APPDYNAMICS_AGENT_UNIQUE_HOST_ID_ENV_VAR Unique host name
APPDYNAMICS_AGENT_BASE_DIR <agent-runtime-dir>
Notice that not all configurable agent settings are configurable through environment variables. Forthose settings, you need to use system properties or controller-info.xml, as described on Java
. Agent Configuration Properties
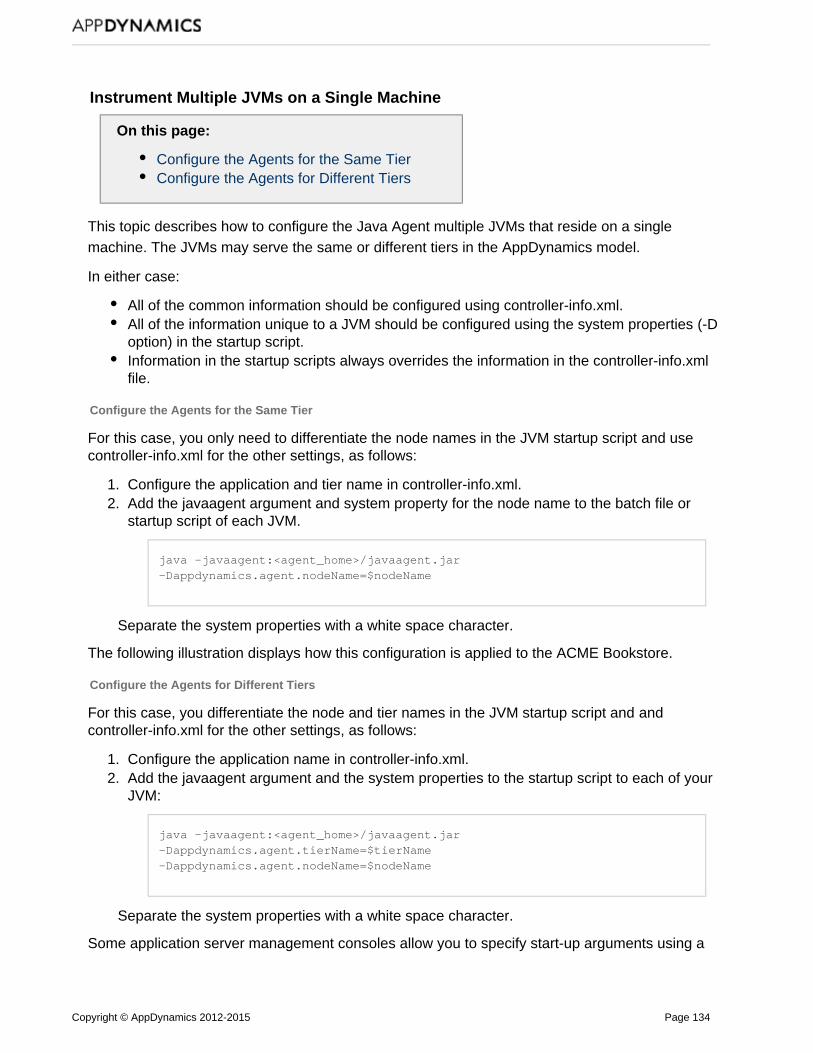
Copyright © AppDynamics 2012-2015 Page 134
1. 2.
1. 2.
Instrument Multiple JVMs on a Single Machine
On this page:
Configure the Agents for the Same TierConfigure the Agents for Different Tiers
This topic describes how to configure the Java Agent multiple JVMs that reside on a singlemachine. The JVMs may serve the same or different tiers in the AppDynamics model.
In either case:
All of the common information should be configured using controller-info.xml.All of the information unique to a JVM should be configured using the system properties (-D
in the startup script.option)Information in the startup scripts always overrides the information in the controller-info.xmlfile.
Configure the Agents for the Same Tier
For this case, you only need to differentiate the node names in the JVM startup script and use, as follows: controller-info.xml for the other settings
Configure the application and tier name in controller-info.xml.Add the javaagent argument and system property for the node name to the batch file orstartup script of each JVM.
java -javaagent:<agent_home>/javaagent.jar-Dappdynamics.agent.nodeName=$nodeName
Separate the system properties with a white space character.
The following illustration displays how this configuration is applied to the ACME Bookstore.
Configure the Agents for Different Tiers
For this case, you differentiate the node and tier names in the JVM startup script and and, as follows:controller-info.xml for the other settings
Configure the application name in controller-info.xml.Add the javaagent argument and the system properties to the startup script to each of yourJVM:
java -javaagent:<agent_home>/javaagent.jar-Dappdynamics.agent.tierName=$tierName-Dappdynamics.agent.nodeName=$nodeName
Separate the system properties with a white space character.
Some application server management consoles allow you to specify start-up arguments using a

Copyright © AppDynamics 2012-2015 Page 135
1. 2.
web interface. See .Java Server-Specific Installation Settings
Instrument Dynamically Identified JVMs
On this page:
Configure the Node Name of the Java AgentConfiguration notes
This topic describes how to configure the App Agent for Java in environments where the JVMs aredynamic.
Configure the Node Name of the Java Agent
Add the application and tier name to the controller-info.xml file.Add the javaagent argument and the following system properties (-D options) to the startupscript of the JVMs:
java -javaagent:<agent_home>/javaagent.jar-Dappdynamics.agent.nodeName=${NODE_NAME}
Configuration notes
The system properties are separated by a white space character.The <agent_home> references the full path of the Java Agent installation directory.The token ${NODE_NAME} identifies the JVMs dynamically and names these JVMs basedon the parameter value passed during the execution of the startup script for your JVMprocess.The application and tier names can also be configured using the system properties. Forexample, you can configure the agent to direct the Controller to create node names using aprefix and to reuse node names so the Controller is not overloaded, using the Dappdynami
and ocs.agent.reuse.nodeName.prefix Dappdynamics.agent.reuse.nodeName
ptions respectively. For more details see .Java Agent Configuration PropertiesSome application server management consoles allow you to specify startup argumentsusing a web interface. For details see .Java Server-Specific Installation Settings
Instrument JVMs in a Dynamic Environment
On this page:
Considerations for a Dynamic EnvironmentConfiguring the Agent for DynamicEnvironmentsExample Settings
In certain types of application environments, a large number of nodes can be spawneddynamically and live for a relatively brief period of time. For example, with WebSphere on z/OS

Copyright © AppDynamics 2012-2015 Page 136
IBM Mainframes, a dynamic workload manager can spawn transient JVMs for an existingapplication server (called a servant) based on application load or other policies. The spawnedJVMs are identical, but each has a different process ID. Similarly, in dynamic hosted environmentssuch as AWS, Rackspace, and others, nodes can be brought up and taken down frequently.
Considerations for a Dynamic Environment
The AppDynamics app agent operates substantially the same way in a dynamic environment as itdoes in a traditional data center. However, a few considerations apply when deploying agents inthese environments:
Ensure that the agents can reach your Controller. Particularly if your Controller operateson-premises while the agents run on hosted servers, you need to ensure that the agents canaccess the Controller through the firewalls in your environment. Configure custom node expiration handling. By default, the Controller manages the lifecyclefor a node based on default timeout settings. You will likely want to reduce the defaultexpiration times for nodes, as described in . To manage this directly,Remove Unused Nodesrather than relying on activity timeouts, a strategy would be to run a script in the JVM beforeit shuts down that invokes the mark-nodes-historical resource in the AppDynamics REST
to declare itself historical to the Controller. APIDepending on the nature of your environment, it may not make sense to track each JVMinstance as a distinct node in AppDynamics, since the set of nodes in this case would beboundless. Also, since the JVMs are identical, representing them as different nodes inAppDynamics does not best reflect the logical model of the environment. The followingsection provides more information.
Configuring the Agent for Dynamic Environments
You can configure AppDynamics to reuse node names for these types of environments. With nodename reuse enabled, after a node is shut down and marked as historical in AppDynamics, thename of the node becomes available for reuse in subsequently registered nodes. You can alsospecify a node name prefix when reusing node names to indicate the association between allconcurrently running JVMs for the dynamic application.
To configure the agent for this environment, use the following properties:
Reuse Node Name Property to enable re-use of node names, andAuto Node Name Prefix Property to set the prefix used for automatically-named nodes
When enabled, the Controller manages name assignments for the agents. It forms node names byappending a sequentially incremented number as the suffix to the prefix you specify. Be sure toavoid specifying the node name using any other mechanism (such as in controller-info.xml file orvia a system property).
Example Settings
The following listing shows sample settings for the properties as they may appear in a startupscript:
-Dappdynamics.agent.reuse.nodeName=true-Dappdynamics.agent.reuse.nodeName.prefix=CloudActivator_

Copyright © AppDynamics 2012-2015 Page 137
1. 2.
Instrument JVMs Started by Batch or Cron Jobs
On this page:
Configure the Java AgentUse the Script Name as the Node Name
Related pages:
Configure Java Background Tasks
You can configure the Java Agent for those JVMs that run as cron or batch jobs where the JVMruns only for the duration of the job. AppDynamics monitors the main method of the Java program.
Configure the Java Agent
Add the application and tier name to the controller-info.xml file.Add the appdynamics.cron.vm property to the AppDynamics javaagent command in thestartup script of your JVM process:
-javaagent:<agent_home>/javaagent.jar-Dappdynamics.agent.nodeName=${NODE_NAME} -Dappdynamics.cron.vm=true
The appdynamics.cron.vm property creates a delay between the end of the main method and theJMV exit so that the Agent has time to upload metrics to the Controller.
Use the Script Name as the Node Name
You can use the script name that executes the cron or batch job as the node name.
The following commands set the value of variable NODE_NAME using the combination of thescript and host name. Add these commands to the startup script of the JVM.
# Use the name of the script (no path, no extension) as the name of the node.NODE_NAME=sampleNODE_NAME="${NODE_NAME%%.}"echo $NODE_NAME# Localize the script to the host.NODE_NAME="$NODE_NAME@$HOSTNAME"
The following illustration shows the sample configuration for controller-info.xml and the startupscript of the JVM.
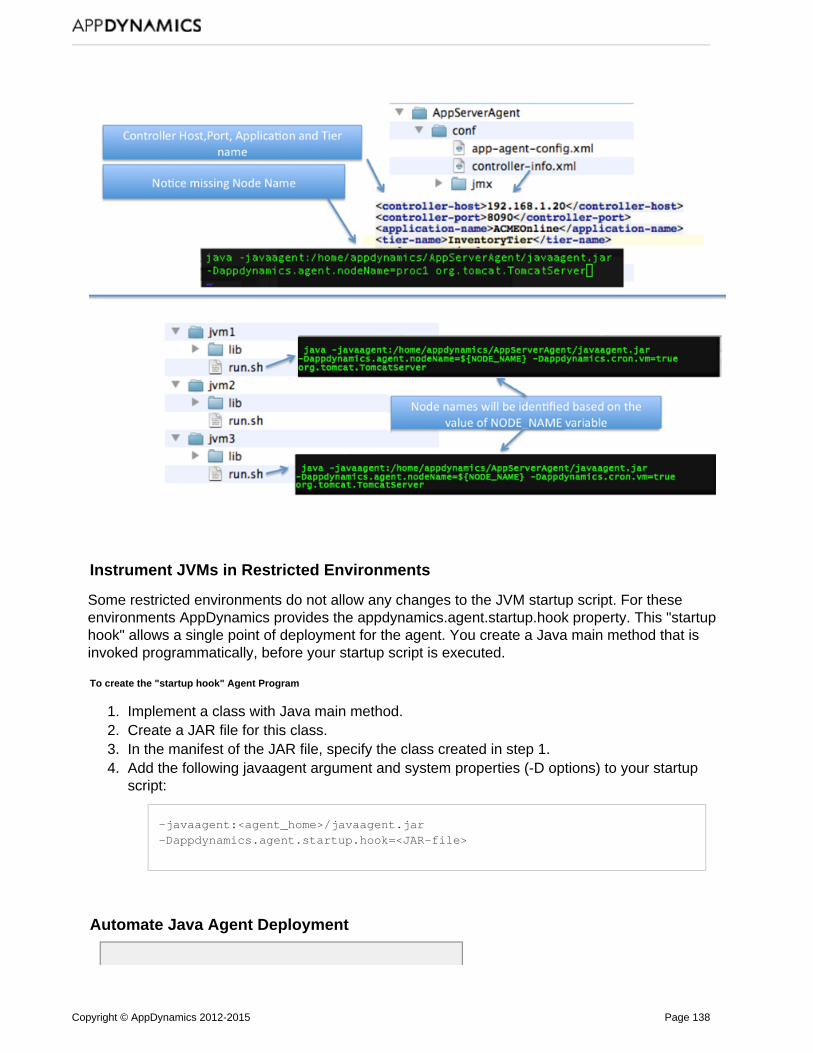
Copyright © AppDynamics 2012-2015 Page 138
1. 2. 3. 4.
Instrument JVMs in Restricted Environments
Some restricted environments do not allow any changes to the JVM startup script. For theseenvironments AppDynamics provides the appdynamics.agent.startup.hook property. This "startuphook" allows a single point of deployment for the agent. You create a Java main method that isinvoked programmatically, before your startup script is executed.
To create the "startup hook" Agent Program
Implement a class with Java main method.Create a JAR file for this class.In the manifest of the JAR file, specify the class created in step 1.Add the following javaagent argument and system properties (-D options) to your startupscript:
-javaagent:<agent_home>/javaagent.jar-Dappdynamics.agent.startup.hook=<JAR-file>
Automate Java Agent Deployment

Copyright © AppDynamics 2012-2015 Page 139
Related pages:
https://github.com/edmunds/cookbook-appdynamicsDeploy Multiple Standalone Machine Agents
This topic lists sample tools created by AppDynamics users for deploying Java Agentsautomatically. You can use these samples for ideas on how to automate AppDynamics agentdeployment for your own environment.
In the samples, the agents are deployed independently of the application deployment
ChefExample1 and ChefExample2 use Opscode Chef recipes provide examples ofautomate deployment on Java platforms. See for informationhttp://www.opscode.com/chef/about Chef.JavaExample1 uses a script, configuration file and package repository.
Click below to download the samples.
ChefExample1.tarChefExample2.tarJavaExample1.tar
Also see a sample Chef cookbook for AppDynamics in the Edmunds.com, Inc., repository https://g. ithub.com/edmunds/cookbook-appdynamics
Instrument Apple WebObjects Applications
This topic helps you instrument applications written with WebObjects 5.4.3 on OSX 10.9 systems.
We will use one of the developer examples to illustrate how to instrument an application createdwith Apple WebObjects. After installing WebObjects, you can find most of the artifacts in thefollowing directories:
/Developer/Examples/JavaWebObjects/Developer/Applications/WebObjects
When you run the HelloWorld application at a/Developer/Examples/JavaWebObjects/HelloWorld, script file is generated:
/Developer/Examples/JavaWebObjects/HelloWorld/dist/legacy/HelloWorld.woa/HelloWorld
Open the generated script file for editing. Towards the end of the file, line 310 in the followingexample, appears the Java execute line:
Add the standard Java Agent arguments to the Java execution script for the HelloWorldapplication:

Copyright © AppDynamics 2012-2015 Page 140
You can configure business transaction name using getter-chains. For more information, see
Getter Chains in Java ConfigurationsIdentify Transactions by POJO Method Invoked by a Servlet
Upgrade the Java Agent
On this page:
About the UpgradeUpgrade the Java Agent
In short, to upgrade the AppDynamics Agent, you simply copy the existing agent directory to abackup location and replace it with the new agent directory. You then copy configuration filechanges made in the old directory to the new agent directory and restart the application server.
This topic provides additional background information and step-by-step instructions.
About the Upgrade
If you are upgrading both the Controller and agents, first upgrade the Controller and thenupgrade the Java Agents.
Also, if upgrading multiple agents in your monitored environment, upgrade the agents for thetiers on which business transactions are originated last. For more information about thisrequirement, along with Controller and agent compatibility information, see Agent - Controller
. Compatibility Matrix
Upgrading the agent requires a restart of the application server.
Before starting, download the latest version of the Java Agent for your JVM from the AppDyna
The Java agent directory structure has changed in 4.0. The new structure is designedto support the ability to perform drop-in upgrades in future versions of the Java agent.The following steps apply to upgrading the Java agent from 3.9.x or earlier to 4.0.x.

Copyright © AppDynamics 2012-2015 Page 141
1. 2.
3.
4.
5.
6.
7.
8.
mics Download Center.
Upgrade the Java Agent
Shut down the application server where the Java Agent is installed.Create a backup copy of the current agent installation directory.
Extract the Java Agent archive to a new directory
Rename the existing agent directory.
Rename the new directory to the original name of the old agent directory. The new agentdirectory and its containing files should have the same directory path as the originalone. Using the same directory path avoids the task of manually changing the agent-relatedconfigurations in your JVM startup script.
Copy from the old agent directory to the following locationcontroller-info.xml config
in the new directory:
<agent_home>/<version>/conf
For example:
appd_javaagent/ver4.0.0.0/conf
If you previously made changes to the or other configuration files,app-agent-config.xml
copy those changes to the new file as well.
Restart the application server.
When done you can archive the original directory and remove it from the application server home.
Uninstall the Java Agent
Related pages:
Manage App Server and Machine AgentsInstall the Java AgentJava Agent Configuration Properties
If you delete an app agent from the Controller UI, as described in Manage App Server and, but do not shut down the JVM that the Java Agent runs on, the Java Agent willMachine Agents
reappear in the UI the next time it connects to the Controller.
To prevent a Java Agent from connecting to the Controller, you need to remove the JavaAgent settings from the JVM configuration. This frees the license associated with the agent in the
Copyright © AppDynamics 2012-2015 Page 142
1. 2. 3.
4.
Controller and makes it available for use by another app agent. This topic describes how touninstall a Java Agent from the JVM configuration.
To uninstall the Java Agent
Stop the application server on which the Java Agent is configured.Remove the -javaagent argument in the startup script of the JVM.Remove any system properties configured for the Java Agent from the startup script of yourJVM.Restart the application server.
Administer the Java Agent
This section covers set up and deployment topics supplemental to those covered in Install the. It also covers some miscellaneous tasks associated with administering an agent, suchJava Agent
as moving it to a new node or using agent logging.
The topics include:
Java Agent Directory StructureMoving Java Nodes to a new Application or TierIBM Java AgentEnable SSL for JavaTune Java Agent PerformanceView Agent Diagnostic DataStart an Agent Logging SessionTroubleshooting Java Agent IssuesConfigure Syslog Logging Output by the Agent
Java Agent Directory Structure
On this page:
Java Agent Directory Contents Contents of the conf DirectoryModifying the Log Directory Location
Unzipping the Java Agent distribution archive extracts the following files and directories to thecurrent directory.
Java Agent Directory Contents
conf: Common configuration files. The configuration files in this directory are used by anagent if a more specific version of the configuration file does not exist in the version specificconf directory, . ver<version_number>/conf
javaagent.jar: The common JAR file used to bootstrap the Java agent. To enable theagent, pass the fully qualified location of this file as the --javaagent argument value to theJVM at startup.readme.txt: Instructions and notes for installing the Java agent. utils: Binary files for utilities shared across versions of the agent.
Copyright © AppDynamics 2012-2015 Page 143
ver<version_number>: The file, configuration files, and otherjavaagent.jarresources specific for this version of the Java agent. This directory contains most of thethings that make the Java agent work, and is named to reflect the Java version number. In 4.0, the . directory contains: ver4.0.0.0
conf: The configuration files used by this version of the Java agent, including contr, , and more. These settings in theseoller-info.xml app-agent-config.xml
files take precedence over configuration file in the directory. <agent_home>/conf
external-services: Dynamically loaded modules that extend the agent, such asthe dynamic service.Application Analyticsjavaagent.jar: A version-specific JAR file that serves as the Java agent binary. Donot use this Java agent JAR when configuring instrumenting directly. Use javaagent
in the root directory instead. .jar
lib: Libraries that support the operation of this version of the Java agent. logs: Log files written by the agent.sdk: Samples, APIs, and Javadoc for extending the capabilities of the AppDynamicsJava agent.utils: Binary files for utilities that are specific to this version of the agent.
Contents of the conf Directory
The files located in this directory are commonly used for agent configuration and deployment.
transactions.xml: Configuration settings for business transactions identified by theagent.controller-info.xml: Configuration settings that identify the node, tier, and applicationassociated with the data that this agent reports to the AppDynamics Controller, along withconnection settings for the Controller. For more information, see Java Agent Configuration
.Propertiesapp-agent-config.xml: Local configuration settings for this agent. The settings in thisfile override any equivalent settings specified globally for the AppDynamics deployment.This file is typically used for short-term properties settings or for debugging agent issues.jmx: Files for configuring the JMX and Websphere PMI metrics.logging/ Flags to control logging levels for the agent. It is highlylog4j.xml:recommended not to change the default logging levels.
Modifying the Log Directory Location
To specify a different log directory, use the following system property:
-Dappdynamics.agent.logs.dir
Moving Java Nodes to a new Application or Tier
On this page:
OverviewChange the Application or Tier from the UI

Copyright © AppDynamics 2012-2015 Page 144
Force node re-registration using thecontroller-info.xml file
Related pages:
AppDynamics Concepts
If your JVM machine has both a Java agent and a Machine Agent, you cannot change theassociations in the Machine Agent controller-info.xml file. You can only change these associationseither through the UI or by modifying the App Agent for Java controller-info.xml file.
Overview
There are two ways to associate a Java node with a new application or tier:
Changing them from the AppDynamics UI. You do not need to restart the JVM.Updating the controller-info.xml file and restarting the JVM.
When you change the tier or application for a Java node using the AppDynamics UI, it is notoverridden by the configuration local to the agent, unless the force-agent-registration flag in
is true.controller-info.xml
Change the Application or Tier from the UI
To change the tier or application association from the UI, find and select the node in the leftnavigation tree and click . You can then choose theActions -> Move Node new application or tier
from the menus. It may take several minutes to complete.
When you change the associations for an App Agent for Java, the Controller registers anApplication Changes event. You can review the details of the event in the view. Monitor Events
Changing application or tier associations in the UI does not modify the agent's controller-info.xmlfile. However if you restart the JVM, the Controller keeps the changes you made in the UI. While itis not necessary, you may wish to keep consistency between the controller-info.xml file and the UI,since the configuration file may serve as informal documentation for your monitored environment.To learn how to change the settings in controller-info.xml, see information on how the Java Agentidentifies the AppDynamics business application, tier, and node in . Install the Java Agent
Force node re-registration using the controller-info.xml file
If you have moved a node in the UI and you want to move it again elsewhere usingcontroller-info.xml, set the force-agent-registration property in the configuration file to 'true' and
. See .restart the JVM Force Agent Registration Property
IBM Java Agent
On this page:
Supported JVMsInstrumenting the IBM Java AgentInstrumenting WebSphere/InfoSphere withWebLogic Security Enabled

Copyright © AppDynamics 2012-2015 Page 145
Under most circumstances, the IBM Java Agent works the same as the Java Agent. This topicgathers information specific to the IBM Java Agent.
Supported JVMs
IBM JVM 1.5.x, 1.6.x, 1.7.x
Instrumenting the IBM Java Agent
To change instrumentation for the IBM Java Agent, the IBM JVM must be restarted. By default theIBM Java Agent does not apply BCI changes without restarting the JVM. This is because in theIBM VM (J9 1.6.0) the implementation of re-transformation affects performance (changes the JITbehavior such that less optimization occurs).
The following changes require that you restart the IBM JVM.
Automatic leak detectionCustom memory structuresInformation pointsAggressive snapshot policy (also called hotspot instrumentation)Custom POJO rules for transaction detectionCustom exit point rulesEnd user experience monitor (EUM), when you enable it and/or disable it after first enablingit
Instrumenting WebSphere/InfoSphere with WebLogic Security Enabled
If your WebSphere/InfoSphere environment includes a security-enabled WebLogic ApplicationServer, several InfoSphere Master Data Management (MDM) Server clients require securityconfiguration.
For more information, see Configuring Java clients to work with WebLogic security in the IBM.documentation
Enable SSL for Java
On this page:
Before You BeginSaaS ControllerOn-Premise Controller with a Trusted CASigned CertificateOn-Premise Controller with an InternallySigned CertificateOn-Premise Controller with a Self-SignedCertificate
Related pages:
SecurityInstall the Java Agent

Copyright © AppDynamics 2012-2015 Page 146
This topic covers how to configure the Java Agent to connect to the Controller using SSL. Itassumes that you use a SaaS Controller or have configured the on-premise Controller to use SSL.
The Java Agent supports extending and enforcing the SSL trust chain when in SSL mode.
Before You Begin
Before you configure the Java Agent to enable SSL, gather the following information:
Identify the Controller SSL port.For SaaS Controllers the SSL port is 443.For on-premise Controllers the default SSL port is 8181, but you may configure theController to listen for SSL on another port.
Identify the signature method for the Controller's SSL certificate:A publicly known certificate authority (CA) signed the certificate. This applies forVerisign, Thawte, and other commercial CAs.A CA internal to your organization signed the certificate. Some companies maintaininternal certificate authorities to manage trust and encryption within their domain.The Controller uses a self-signed certificate.
Decide how to specify the configuration:Add the configuration parameters to<agent_home>/ver<version_number>/conf/controller-info.xml, orInclude system properties in the -javaagent argument in your JVM startup script.
. See Where to Configure App Agent Properties
SSL Utilities
We provide two utilities to help you implement SSL.
Keystore Certificate Extractor Utility
The Keystore Certificate Extractor Utility exports certificates from the Controller's Java keystoreand writes them to an agent truststore. It installs to the following location:
<agent_home>/ver<version_number>/utils/keystorereader/kr.jar
To avoid copying the Controller keystore to an agent machine, you can run this utility from theController server. Access the agent distribution on the Controller at the following location:
<controller_home>/appserver/glassfish/domains/domain1/appagent
To use the Keystore Certificate Extractor, execute kr.jar and pass the following parameters:
The full path to the Controller's keystore:
<controller_home>/appserver/glassfish/domains/domain1/config/keystore.jks
The truststore output file name. By default the Java Agent looks for cacerts.jks.The password for the Controller's certificate, which defaults to "changeit". If you don't include

Copyright © AppDynamics 2012-2015 Page 147
1.
2.
3.
a password, the extractor applies the password "changeit" to the output truststore.
java -jar kr.jar<controller_home>/appserver/glassfish/domains/domain1/config/keystore.jkscacerts.jks <controller_certificate_password>
Password Encryption Utility
The Password Encryption Utility encrypts the Controller's certificate password so you can add it tothe controller-info.xml file. It installs to the following location:
<agent_home>/ver<version_number>/utils/encryptor/encrypt.jar
To use the Password Encryption Utility, execute encrypt.jar and pass the clear text password as aparameter. The utility returns the encrypted password:
java -jar <agent_home>/ver<version_number>/utils/encryptor/encrypt.jar<controller_certificate_password>
Encrypted password is nkV/LwhLMLFjfNTbh0DLow==
SaaS Controller
Update the JVM startup script or controller-info.xml to use SSL enabled settings. See Java.Agent Configuration Properties
Set the Controller Port Property to 443. See Controller Port Property.
Set the Controller SSL Enabled Property to true. See Controller SSL Enabled Property.
Save your changes.
Restart the JVM.
The Java Agentdetects SaaS implementations based upon the controller host URL, which mustcontain ".saas.appdynamics.com". It also checks for an account-name and an access-key. If allthree elements exist, the Java Agentconnects with the SaaS Controller via SSL.
Sample SaaS SSL controller-info.xml configuration
<?xml version="1.0" encoding="UTF-8"?><controller-info> <controller-host>mycompany.saas.appdynamics.com</controller-host> <controller-port>443</controller-port> <controller-ssl-enabled>true</controller-ssl-enabled> ... <account-name>mycompany</account-name> <account-access-key>xxxxxxxxxxxxx</account-access-key> ...</controller-info>

Copyright © AppDynamics 2012-2015 Page 148
1.
2. 3.
1.
Sample SaaS SSL JVM startup script configuration
java -javaagent:/home/appdynamics/AppServerAgent/-Dappdynamics.controller.hostName=<controller_hostname>-Dappdynamics.controller.port=443 -Dappdynamics.controller.ssl.enabled=true ...-Dappdynamics.agent.accountName=<account_name>-Dappdynamics.agent.accountAccessKey=<access_key>
On-Premise Controller with a Trusted CA Signed Certificate
Update your JVM startup script or controller-info.xml to use SSL enabled settings. See Java.Agent Configuration Properties
Set the Controller Port Property to the on-premise SSL port. See Controller Port.Property
Set the Controller SSL Enabled Property to true. See Controller SSL Enabled Property.To configure the agent to perform full validation of the Controller certificate, set theForce Default SSL Certificate Validation app agent node property to true. See Force
.Default SSL Certificate Validation PropertySave your changes.Restart the JVM.
The Java Agentconnects to the Controller over SSL. Because the Force Default SSL CertificateValidation app agent node roperty is set to true, the Java Agentenforces the trust chain using thedefault Java truststore.
Sample on-premise SSL controller.xml configuration for a CA signed certificate
<?xml version="1.0" encoding="UTF-8"?><controller-info> <controller-host>mycontroller.mycompany.com</controller-host> <controller-port>8181</controller-port> <controller-ssl-enabled>true</controller-ssl-enabled> <force-default-certificate-validation>true</force-default-certificate-validation> ...</controller-info>
Sample on-premise SSL JVM startup script configuration for a CA signed certificate
java -javaagent:/home/appdynamics/AppServerAgent/javaagent.jar-Dappdynamics.controller.hostName=<controller domain>-Dappdynamics.controller.port=443 -Dappdynamics.controller.ssl.enabled=true-Dappdynamics.force.default.ssl.certificate.validation=true ...
On-Premise Controller with an Internally Signed Certificate

Copyright © AppDynamics 2012-2015 Page 149
1.
2.
3. 4.
5.
Obtain the root CA certificate from your internal resource. By default the agent looks for aJava truststore named cacerts.jks.
To import a certificate to a truststore, run the following command:
keytool -import -alias rootCA -file <certificate_file_name> -keystorecacerts.jks -storepass <truststore password>
This command creates the truststore cacerts.jks if it does not exist and assigns it thepassword you specify.Copy the truststore file to the Java Agentconfiguration directory:
cp cacerts.jks <agent_home>/conf/cacerts.jks
Encrypt the truststore password. See .Password Encryption UtilityUpdate your JVM startup script or controller-info.xml to use SSL enabled settings. See Java
.Agent Configuration PropertiesSet the Controller Port Property to the on-premise SSL port. See Controller Port
.PropertySet the Controller SSL Enabled Property to true. See Controller SSL Enabled Property.Set the Controller Keystore Password Property to the encrypted password. See Contr
.oller Keystore Password Property You must configure this property in the controller-info.xml. It is not available as a
system property in the JVM startup script.Restart the JVM.
The Java Agentdetects the cacerts.jks truststore in its configuration directory and uses it to enforcethe trust chain when connecting to the Controller over SSL.
Sample on-premise SSL controller.xml configuration for an internally signed certificate
<?xml version="1.0" encoding="UTF-8"?><controller-info> <controller-host>mycontroller.mycompany.com</controller-host> <controller-port>8181</controller-port> <controller-ssl-enabled>true</controller-ssl-enabled> <controller-keystore-password>nkV/LwhLMLFjfNTbh0DLow==</controller-keystore-password> ...</controller-info>
Sample on-premise SSL JVM startup script configuration for an internally signed certificate

Copyright © AppDynamics 2012-2015 Page 150
1.
2.
3. 4.
5.
java -javaagent:/home/appdynamics/AppServerAgent/-Dappdynamics.controller.hostName=<controller_domain>-Dappdynamics.controller.port=443 -Dappdynamics.controller.ssl.enabled=true ...
On-Premise Controller with a Self-Signed Certificate
Extract the Controller's self-signed Certificate to a truststore named cacerts.jks. See Keystor.e Certificate Extractor Utility
Copy the truststore file to the agent configuration directory:
cp cacerts.jks <agent_home>/conf/cacerts.jks
Encrypt the truststore password. See .Password Encryption UtilityUpdate your JVM startup script or controller-info.xml to use SSL enabled settings. See Java
.Agent Configuration PropertiesSet the Controller Port Property to the on-premise SSL port. See Controller Port
.PropertySet the Controller SSL Enabled Property to true. See Controller SSL Enabled Property.Set the Controller Keystore Password Property to the encrypted password. See Contr
.oller Keystore Password Property You must configure this property in the controller-info.xml. It is not available as a
system property in the JVM startup script.Restart the JVM.
The Java Agentdetects the cacerts.jks truststore in its configuration directory and uses it to enforcethe trust chain when connecting to the Controller over SSL.
Sample on-premise SSL controller.xml configuration for a self-signed certificate
<?xml version="1.0" encoding="UTF-8"?><controller-info> <controller-host>mycontroller.mycompany.com</controller-host> <controller-port>8181</controller-port> <controller-ssl-enabled>true</controller-ssl-enabled> <controller-keystore-password>nkV/LwhLMLFjfNTbh0DLow==</controller-keystore-password> ...</controller-info>
Sample on-premise SSL JVM startup script configuration for a self-signed certificate
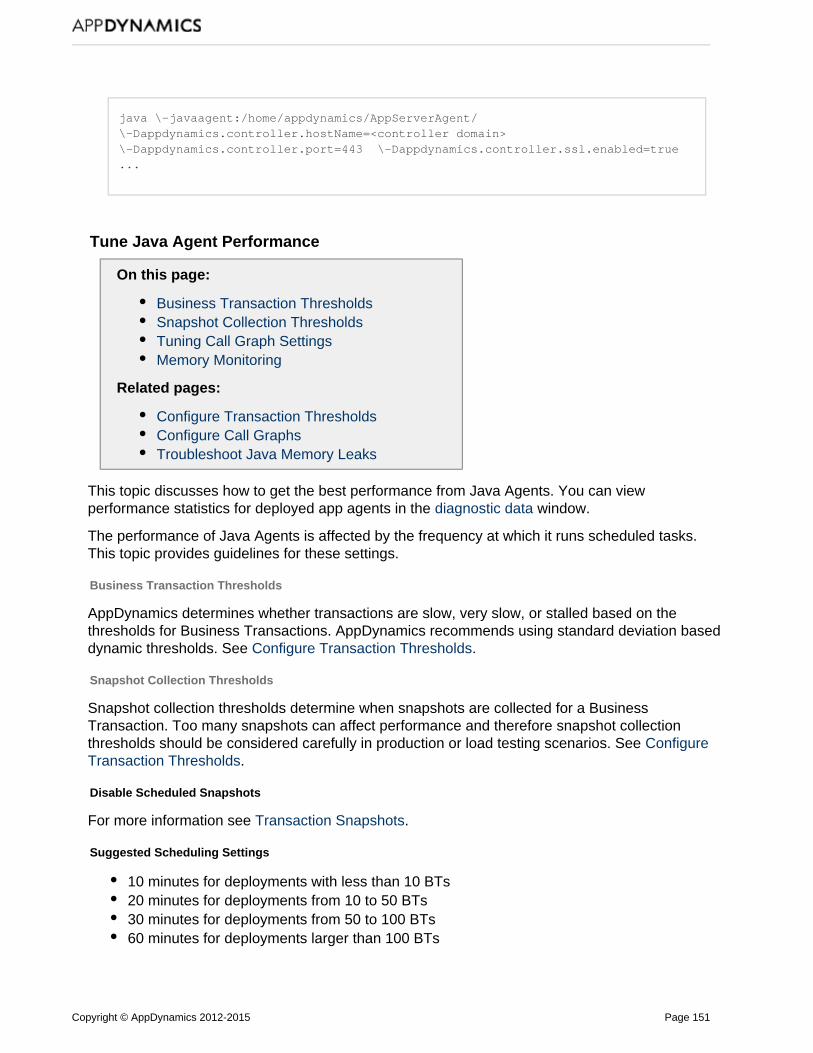
Copyright © AppDynamics 2012-2015 Page 151
java \-javaagent:/home/appdynamics/AppServerAgent/\-Dappdynamics.controller.hostName=<controller domain>\-Dappdynamics.controller.port=443 \-Dappdynamics.controller.ssl.enabled=true...
Tune Java Agent Performance
On this page:
Business Transaction ThresholdsSnapshot Collection ThresholdsTuning Call Graph SettingsMemory Monitoring
Related pages:
Configure Transaction ThresholdsConfigure Call GraphsTroubleshoot Java Memory Leaks
This topic discusses how to get the best performance from Java Agents. You can viewperformance statistics for deployed app agents in the window.diagnostic data
The performance of Java Agents is affected by the frequency at which it runs scheduled tasks.This topic provides guidelines for these settings.
Business Transaction Thresholds
AppDynamics determines whether transactions are slow, very slow, or stalled based on thethresholds for Business Transactions. AppDynamics recommends using standard deviation baseddynamic thresholds. See .Configure Transaction Thresholds
Snapshot Collection Thresholds
Snapshot collection thresholds determine when snapshots are collected for a BusinessTransaction. Too many snapshots can affect performance and therefore snapshot collectionthresholds should be considered carefully in production or load testing scenarios. See Configure
.Transaction Thresholds
Disable Scheduled Snapshots
For more information see .Transaction Snapshots
Suggested Scheduling Settings
10 minutes for deployments with less than 10 BTs20 minutes for deployments from 10 to 50 BTs30 minutes for deployments from 50 to 100 BTs60 minutes for deployments larger than 100 BTs

Copyright © AppDynamics 2012-2015 Page 152
1. 2. 3. 4.
Suggested Diagnostic Session Settings
Settings for Slow requests (%value): 20 – 30Settings for Error requests (%value): 10 20–Click .Apply to all Business Transactions
Tuning Call Graph Settings
To configure call graph settings, click and the Configure -> Instrumentation Call Graph Settingstab. See .Configure Call Graphs
Suggested SQL Query Time and Parameters
Minimum SQL Query Time : 100 ms (Default is 10)Enable .Filter SQL Parameter Values
Memory Monitoring
Memory monitoring features such as leak detection, object instance tracking, and custom memoryshould be enabled only for a specific node or nodes when debugging a memory problem.Automatic leak detection is on-demand, and therefore, the leak detection will execute only for thespecified duration.
When you observe periods of growth in the heap utilization (%), you should enable on-demandmemory leak capture. See .Troubleshoot Java Memory Leaks
View Agent Diagnostic Data
On this page:
Related pages:
Troubleshoot Node Problems
The agent diagnostic data shows you information about the performance of App Server agents.
To view the data for an agent.
Navigate to the App Server node in the application treeIn the Node Dashboard, click the Agents tab.Click the Agent Diagnostic Stats subtab.Click View Diagnostics for all Agents to see stats for all agents.

Copyright © AppDynamics 2012-2015 Page 153
4.
1. 2. 3.
4.
Start an Agent Logging Session
Related pages:
Request Agent Log Files
You can initiate a timed logging session to help you troubleshoot Java agent issues. In thesession, you specify the type of log information you want to capture and the duration of thesession.
In the tab of the node dashboard, scroll down to the Agent Logs panel.AgentsClick .Start Agent Logging SessionChoose the duration for which you want to log and select the check boxes for the types ofrequests that you want to log.
Click .Start Agent Logging Session
The selected logging sessions appear in the logging list.
The logged request and response output appears in the Controller and the agent log.
Troubleshooting Java Agent Issues

Copyright © AppDynamics 2012-2015 Page 154
1. 2. 3.
4.
5.
On this page:
Resolving Java Agent Startup IssuesLocating the Java Agent Log FilesResolving Incomplete Agent ConfigurationIssuesUnblocking the Controller PortCorrecting File Permission IssuesMaximum Async Handoff Call Graph SamplesError
Related pages:
Troubleshooting Controller Installation andOperation
This topic discusses techniques for troubleshooting agent installation and operation. In particular, itdescribes how to find and interpret information in agent log files.
Resolving Java Agent Startup Issues
The first thing the Java agent does upon application startup is register with the Controller. Onceregistered, the agent should appear in the -> list.Settings AppDynamics Agents
If you do not see the agent in the list within a few minutes, check the following:
Make sure you have restarted the application server.Verify that the javaagent argument has been added to the startup script of your JVM.Verify that you configured the agent-controller communication properties and agentidentification properties in the controller-info.xml file or as system properties in the startupscript of your JVM. See Java Agent Configuration Properties.Check the Agent logs directory located at <agent_home>/logs/<Node_Name> for theagent.log file.Verify that the Agent is compatible with the Controller. For details see Agent - ControllerCompatibility Matrix.
Locating the Java Agent Log Files
Agent log files are located in the <agent_home>/logs/<node_name> folder.
The agent.log file is the recommended file to help you with troubleshooting. This log can indicatethe following:
Incomplete information in your Agent configurationThe Controller port is blockedIncorrect file permissions
Error messages related to starting the Java Agent use this format:
ERROR com.singularity.JavaAgent - Could Not Start Java Agent

Copyright © AppDynamics 2012-2015 Page 155
Resolving Incomplete Agent Configuration Issues
The following table lists the typical error messages for incomplete Agent configuration:
Error Message Solution
Cannot connect to the Agent - ERRORcom.singularity.XMLConfigManager - Incomplete Agent Identity data, InvalidController Port Value
This indicates that the value for the Controller port incontroller-info.xml is missing. Add the Controller portand host value to resolve:
For on-premise Controller installations: 8090 forHTTP and 8181 for HTTPS. For Controller SaaS service, use the defaultHTTPS port 443.
Caused by:com.singularity.ee.agent.configuration.a:
Could not resolve agent-controller basicconfiguration
This is usually caused because of incorrectconfiguration in the Controller-info.xml file.
Ensure that the information for agent communication(Controller host and port) and agent identification(application, tier and node names) is correctlyconfigured.
Alternatively, you can also use the system properties(-D options) or environment variables to configurethese settings.
For more information about agent properties see .Java Agent Configuration Properties
Unblocking the Controller Port
The following table lists the typical error message when the Controller port is blocked in yournetwork:
Error Message Solution
ERRORcom.singularity.CONFIG.ConfigurationChannel -Fatal transport error: Connection refused WARNcom.singularity.CONFIG.ConfigurationChannel -Could not connect to the controller/invalid responsefrom controller, cannot get initialization information, controller host\x.x.x.x\, port 8090, exception Fatal transport error:Connection refused
Try pinging the Controller from themachine where you have configured theapplication agent.
To check if a port is blocked in thenetwork, use the commands:
netstat -an for Windowsnmap for Linux.
The default ports are:
For on-premise Controllerinstallations: 8090 for HTTP and8181 for HTTPS. For Controller SaaS service, use thedefault HTTPS port 443.
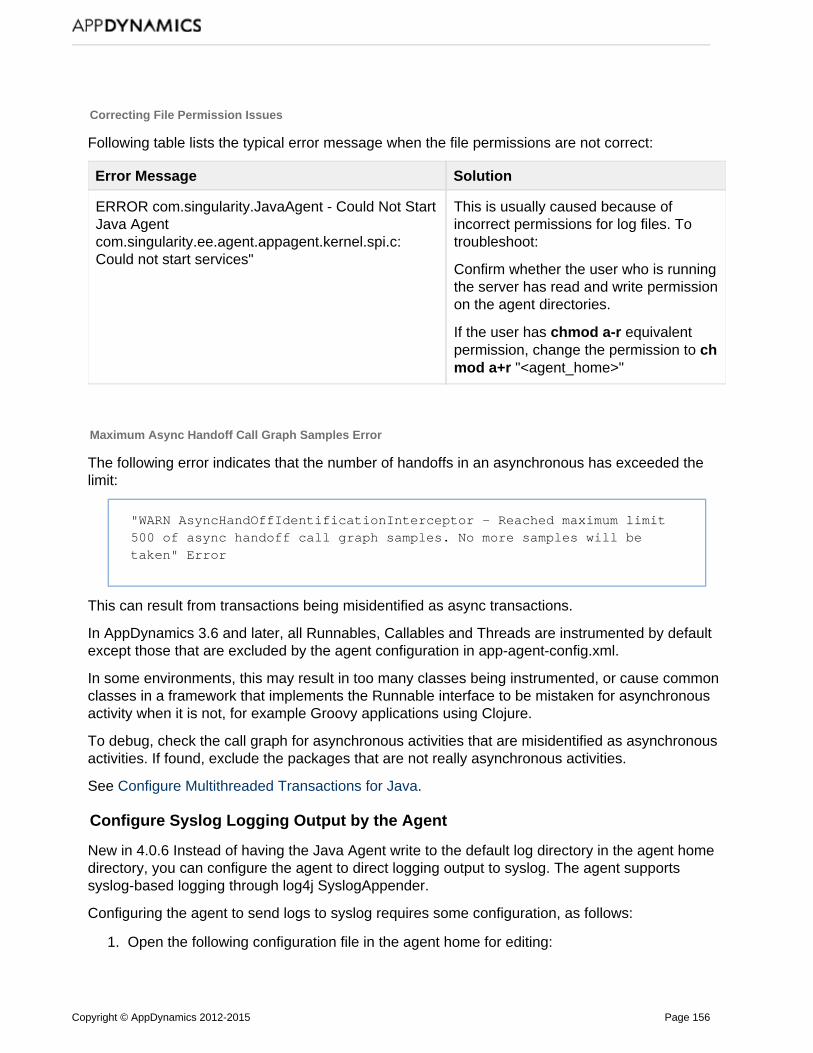
Copyright © AppDynamics 2012-2015 Page 156
1.
Correcting File Permission Issues
Following table lists the typical error message when the file permissions are not correct:
Error Message Solution
ERROR com.singularity.JavaAgent - Could Not StartJava Agentcom.singularity.ee.agent.appagent.kernel.spi.c:Could not start services"
This is usually caused because ofincorrect permissions for log files. Totroubleshoot:
Confirm whether the user who is runningthe server has read and write permissionon the agent directories.
If the user has equivalentchmod a-rpermission, change the permission to ch
"<agent_home>"mod a+r
Maximum Async Handoff Call Graph Samples Error
The following error indicates that the number of handoffs in an asynchronous has exceeded thelimit:
"WARN AsyncHandOffIdentificationInterceptor - Reached maximum limit500 of async handoff call graph samples. No more samples will betaken" Error
This can result from transactions being misidentified as async transactions.
In AppDynamics 3.6 and later, all Runnables, Callables and Threads are instrumented by defaultexcept those that are excluded by the agent configuration in app-agent-config.xml.
In some environments, this may result in too many classes being instrumented, or cause commonclasses in a framework that implements the Runnable interface to be mistaken for asynchronousactivity when it is not, for example Groovy applications using Clojure.
To debug, check the call graph for asynchronous activities that are misidentified as asynchronousactivities. If found, exclude the packages that are not really asynchronous activities.
See .Configure Multithreaded Transactions for Java
Configure Syslog Logging Output by the Agent
New in 4.0.6 Instead of having the Java Agent write to the default log directory in the agent homedirectory, you can configure the agent to direct logging output to syslog. The agent supportssyslog-based logging through log4j SyslogAppender.
Configuring the agent to send logs to syslog requires some configuration, as follows:
Open the following configuration file in the agent home for editing:
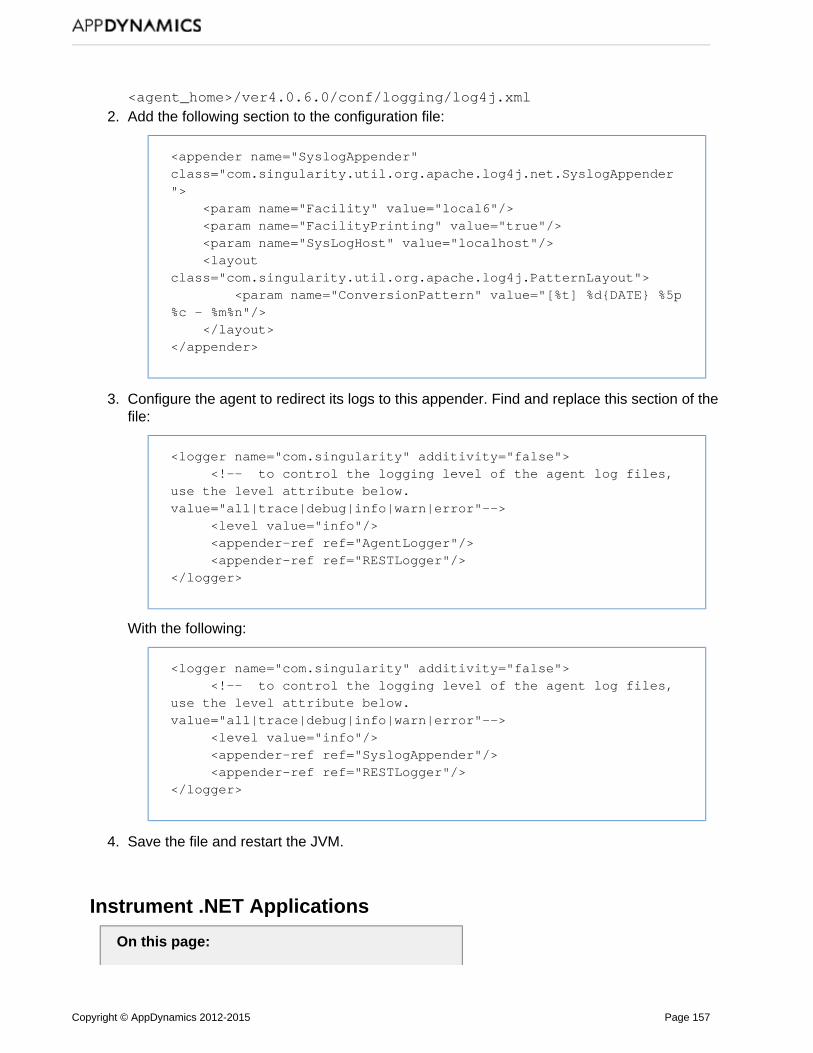
Copyright © AppDynamics 2012-2015 Page 157
1.
2.
3.
4.
<agent_home>/ver4.0.6.0/conf/logging/log4j.xml
Add the following section to the configuration file:
<appender name="SyslogAppender"class="com.singularity.util.org.apache.log4j.net.SyslogAppender"> <param name="Facility" value="local6"/> <param name="FacilityPrinting" value="true"/> <param name="SysLogHost" value="localhost"/> <layoutclass="com.singularity.util.org.apache.log4j.PatternLayout"> <param name="ConversionPattern" value="[%t] %d{DATE} %5p%c - %m%n"/> </layout></appender>
Configure the agent to redirect its logs to this appender. Find and replace this section of thefile:
<logger name="com.singularity" additivity="false"> <!-- to control the logging level of the agent log files,use the level attribute below.value="all|trace|debug|info|warn|error"--> <level value="info"/> <appender-ref ref="AgentLogger"/> <appender-ref ref="RESTLogger"/> </logger>
With the following:
<logger name="com.singularity" additivity="false"> <!-- to control the logging level of the agent log files,use the level attribute below.value="all|trace|debug|info|warn|error"--> <level value="info"/> <appender-ref ref="SyslogAppender"/> <appender-ref ref="RESTLogger"/></logger>
Save the file and restart the JVM.
Instrument .NET Applications
On this page:

Copyright © AppDynamics 2012-2015 Page 158
1.
2.
Before You BeginInstrument Your CLR with the .NET Agent
Related pages:
AppDynamics EssentialsInstall the .NET AgentAppDynamics for Windows Azure with NuGet
Watch the video:
Quick Install: .NET Agent
For AppDynamics to gather performance data about your .NET applications, you must install the .NETAgent (agent) on the servers where the applications run. You only need to install the agent once perserver even if you want to monitor multiple applications on one server. The agent instruments yourapplication and sends performance data back to the AppDynamics Controller.
The instructions on this page help you install the agent for IIS applications using the Agent Downloadwizard in the Controller.
If you downloaded the agent from the download zone AppDynamics , see Install the .NETAgent.For Windows services and standalone applications, see Instrument Windows Services and
.Standalone ApplicationsIf you're using Windows Azure Web Roles or Worker Roles, see Install AppDynamics for
.Windows Azure with NuGet
Before You Begin
Confirm you have access to a controller, the web application where you monitor yourapplication performance:
If you use a SaaS controller, AppDynamics sent you the controller host in yourWelcome Email.If you use the on-premise controller, you supplied the host and port at install time.
Verify you've enabled COM+ on your system. See "Verify COM+ services are enabled" on R.esolve .NET Agent Installation and Configuration Issues
Instrument Your CLR with the .NET Agent
There are four steps to instrument your CLR and begin monitoring:
1. : Use the Agent Download Wizard to configure and download the agent.Download2. : Extract the installer files and run the Installer.bat batch file. Install3. : Apply load to activate instrumentation.Apply Load4. : Log on to the Controller to monitor application performance.View Your Application
Download the .NET Agent
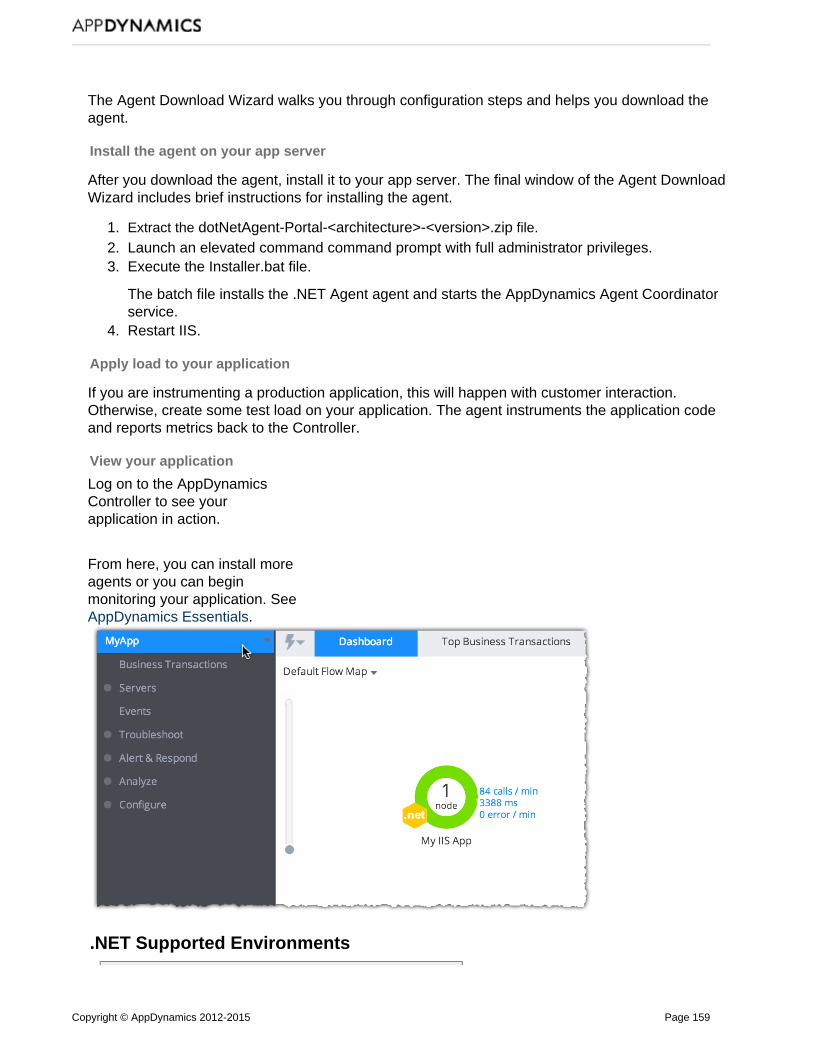
Copyright © AppDynamics 2012-2015 Page 159
1. 2. 3.
4.
The Agent Wizard walks you through configuration steps and helps you download theDownload agent.
Install the agent on your app server
After you download the agent, install it to your app server. The final window of the Agent DownloadWizard includes brief instructions for installing the agent.
Extract the dotNetAgent-Portal-<architecture>-<version>.zip file.
Launch an elevated command command prompt with full administrator privileges.Execute the Installer.bat file.
The batch file installs the .NET Agent agent and starts the AppDynamics Agent Coordinatorservice.Restart IIS.
Apply load to your application
If you are instrumenting a production application, this will happen with customer interaction.Otherwise, create some test load on your application. The agent instruments the application codeand reports metrics back to the Controller.
View your application
Log on to the AppDynamicsController to see yourapplication in action.
From here, you can install moreagents or you can beginmonitoring your application. See
.AppDynamics Essentials
.NET Supported Environments

Copyright © AppDynamics 2012-2015 Page 160
On this page:
Supported Runtime EnvironmentsAutomatically Discovered BusinessTransactionsRemote Service DetectionSupported Windows Azure Remote ServicesData Storage Detection
Related pages:
Web EUEM Supported EnvironmentsSupported Environments and Versions
Supported Platform Matrix for the .NET Agent
Supported Runtime Environments
This section lists the environments where the .NET Agent does some automatic discovery afterlittle or no configuration.
OS Versions
Microsoft* Windows* Server 2003 (32-bit and 64-bit)Microsoft Windows Server 2008 (32-bit and 64-bit)Microsoft Windows Server 2008 R2Microsoft Windows Server 2012Microsoft Windows Server 2012 R2
Microsoft .NET Frameworks
Microsoft .NET Framework versions 2.0, 3.0, 3.5, 4.0, 4.5
Runtime Environments
Microsoft IIS versions 6.0, 7.0, 7.5, 8.0, 8.5Microsoft SharePoint 2010, 2013 as services running inside IISManaged Windows ServicesManaged Standalone Applications
Microsoft Windows Azure
Windows Azure Cloud Services (Web Roles and Worker Roles)
Unsupported Frameworks
Microsoft .NET versions 1.0, 1.1Unmanaged native codeWindows Azure Web Sites
Automatically Discovered Business Transactions
The .NET Agent discovers BTs for the following frameworks by default. The agent enables

Copyright © AppDynamics 2012-2015 Page 161
detection without additional configuration.
Type Custom ConfigurationOptions
Downstream Correlation
ASP.NET Yes Yes
ASP.NET MVC 2 ASP.NET MVC 3ASP.NET MVC 4ASP.NET MVC 5
Yes Yes
.NET Remoting No Requires configuration. See Enable Correlation for
..NET Remoting
Windows CommunicationFoundation (WCF)
No Yes
Web Services including SOAP No Yes
Message Queues
Apache ActiveMQ NMSframework and related MQs
No Yes
IBM WebSphere MQ No Yes
RabbitMQ Requires configuration. See Monitor RabbitMQBackends for .NET.
Yes
TIBCO Enterprise MessageService
No Yes
TIBCO Rendezvous No Yes
The App Agent for .NET automatically discovers entry points for ASP.NET web forms withthe Async property set to "true" in the .Page directive
Supported Loggers for the .NET Agent
Log4NetNLogSystem TraceWindows Event Log
If you are using a different logger, see .Configure a Custom Logger
Remote Service Detection
The .NET Agent automatically detects the following remote service types. The agent enables

Copyright © AppDynamics 2012-2015 Page 162
detection by default. You don't need to perform extra configuration.
Type CustomConfigurationOptions
Async Detection †
DownstreamCorrelation
Directory Services,including LDAP
No No N/A
HTTP Yes Requiresconfiguration.See Monitor Async
.Backends for .NET
Yes
.NET Remoting Yes No Requiresconfiguration. See EnableCorrelation for .NET
.Remoting
WCF Yes Requiresconfiguration.See Monitor Async
.Backends for .NET
Yes
WCF Data Services Yes No No
Web Services, inlcudingSOAP
Yes Requiresconfiguration.See Monitor Async
.Backends for .NET
Yes
Message Queues
Apache ActiveMQ NMSframework and relatedMQs
Yes No Yes
IBM WebSphere MQ(IBM XMS)
Yes No Yes
Microsoft MessageQueuing (MSMQ)
Yes Requiresconfiguration.
See MSMQ.Backends for .NET
Requiresconfiguration.
See MSMQ.Backends for .NET
Microsoft Service Bus /Windows Azure ServiceBus
No No Yes

Copyright © AppDynamics 2012-2015 Page 163
RabbitMQ Requiresconfiguration. See MonitorRabbitMQ Backends
.for .NET
No Yes
Yes No Yes
TIBCO Rendezvous Yes No Yes
Windows Azure Queue No No No
† The agent discovers asynchronous transactions for the Microsoft .NET 4.5 framework. See for details..Monitor Async Backends for .NET
Supported Windows Azure Remote Services
Type Configuration can be customized
Downstream
Correlation
Azure Blob No No
Azure Queue No No
Microsoft Service Bus No Yes
Data Storage Detection
The .NET Agent automatically detects the following data storage types. The agent enablesdetection by default. You don't need to perform extra configuration.
Type ConfigurationCan Be Customized
AsyncDetection †
AppD forDatabases?
ADO.NET (see supported clientsbelow)
Yes New in 4.0.5,Yes
No
Windows Azure Blob Storage No No No
† The agent discovers asynchronous transactions for the Microsoft .NET 4.5 framework. See .Monitor Async Backends for .NET for details.
Supported ADO.NET Clients
AppDynamics can monitor any ADO.NET client version and type. Clients we've tested include thefollowing:
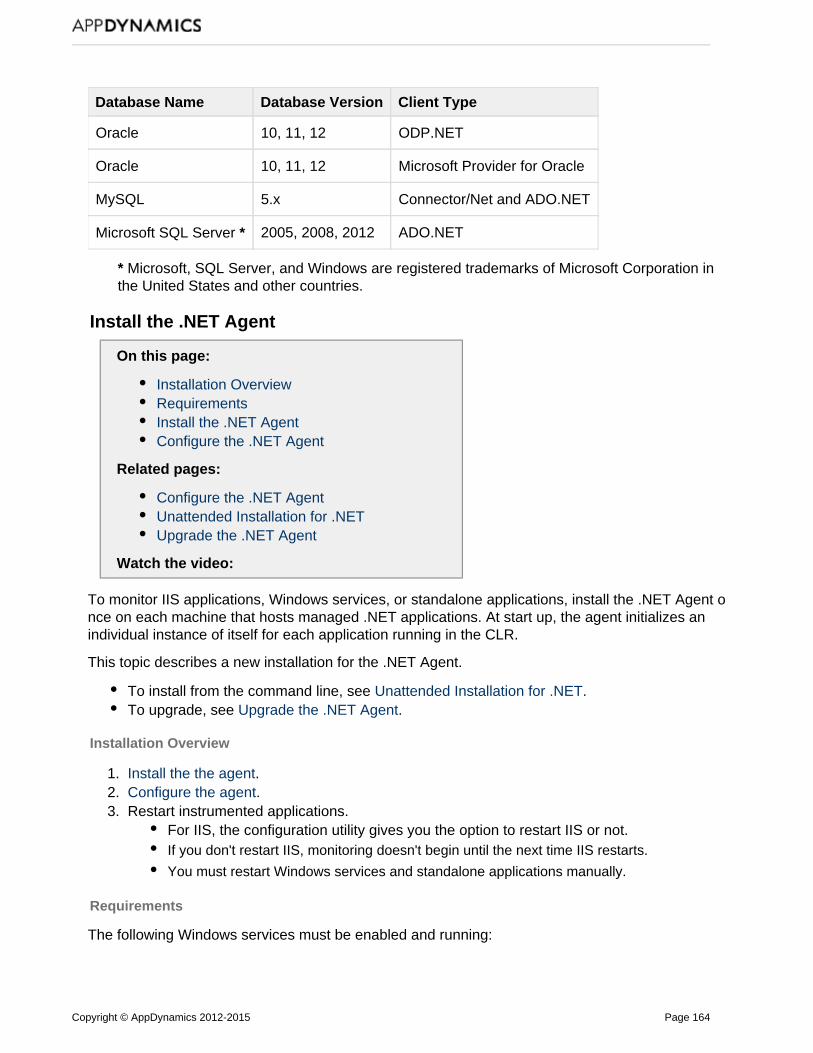
Copyright © AppDynamics 2012-2015 Page 164
1. 2. 3.
Database Name Database Version Client Type
Oracle 10, 11, 12 ODP.NET
Oracle 10, 11, 12 Microsoft Provider for Oracle
MySQL 5.x Connector/Net and ADO.NET
Microsoft SQL Server * 2005, 2008, 2012 ADO.NET
* and are registered trademarks of Microsoft Corporation inMicrosoft, SQL Server, Windowsthe United States and other countries.
Install the .NET Agent
On this page:
Installation OverviewRequirementsInstall the .NET AgentConfigure the .NET Agent
Related pages:
Configure the .NET AgentUnattended Installation for .NETUpgrade the .NET Agent
Watch the video:
To monitor IIS applications, Windows services, or standalone applications, install the .NET Agent once on each machine that hosts managed .NET applications. At start up, the agent initializes anindividual instance of itself for each application running in the CLR.
This topic describes a new installation for the .NET Agent.
To install from the command line, see .Unattended Installation for .NETTo upgrade, see .Upgrade the .NET Agent
Installation Overview
Install the the agent.Configure the agent.Restart instrumented applications.
For IIS, the configuration utility gives you the option to restart IIS or not.If you don't restart IIS, monitoring doesn't begin until the next time IIS restarts.
You must restart Windows services and standalone applications manually.
Requirements
The following Windows services must be enabled and running:

Copyright © AppDynamics 2012-2015 Page 165
1. 2. 3.
4.
5.
6. 7.
Microsoft Distributed Transaction Coordinator (MSDTC): MSDTC must run under the "NTAuthority\NetworkServices" account. See "Verify MSDTC" on Resolve .NET Agent Installation
.and Configuration Issues
COM+: See "Verify COM+ Services are enabled" on Resolve .NET Agent Installation andConfiguration Issues.
Windows Management Instrumentation
Install the .NET Agent
Download the MSI installer package from the .AppDynamics Download ZoneRun the MSI installer package.Read the and click to accept. Click .End User Agreement Next
Optionally change the destination directory for the App Agent for .NET and click .InstallBy default, the agent installs to the following directory:
%ProgramFiles%\AppDynamics\AppDynamics .NET AgentClick on the window to allow the installer to make changes to theYes User Account Control computer.If the current account does not have administrator privileges, the installer prompts you tosupply the password for an administrator account.Wait for the installation to complete.For new installs, AppDynamics recommends you launch the AppDynamics AgentConfiguration utility.
If you encounter problems installing, see Resolve .NET Agent Installation and Configuration Issues.
Configure the .NET Agent
Launch the AppDyanmics Agent Configuration utility to configure the .NET Agent.
For , see .IIS applications Configure the .NET AgentFor orWindows services standalone applications, see Instrument Windows Services andStandalone Applications.
Configure the .NET Agent
On this page:
PrerequisitesConfigure the .NET Agent
Related pages:
Install the .NET AgentName .NET TiersInstrument Windows Services and StandaloneApplicationsUnattended Installation for .NET

Copyright © AppDynamics 2012-2015 Page 166
Watch the video:
.NET Agent Manual Configuration
https://appdynamics-static.com/education/video/dotNETAgentManualInstallationandConfiguration/dotNETAgentManualInstallationandConfiguration_player.html
Configure the .NET Agent according to the types of applications you want to monitor:
For IIS applications, use the configuration utility with either automatic or manual tier naming.See the instructions in this topic.For Windows services or standalone applications, use the configuration utility, then manuallyupdate the config.xml. See .Instrument Windows Services and Standalone Applications
It is possible to instrument any combination of IIS Applications, Windows services, andstandalone applications on a single server. Run the configuration utility to configure IIS, then followthe instructions for Windows services and Standalone applications.
Use the .NET Agent Configuration Utility to configure the agent just after installation, or to makechanges to existing agent configurations. The utility configures the agent for one machine at atime.
Prerequisites
Install the .NET Agent.Uninstall any pre-existing profiler, such as Ant, VS 2010 Performance Tools, or others. Theutility alerts you if it finds a pre-existing profiler.Decide to name tiers automatically or manually.
The configuration utility must restart IIS to apply configurations. The utility offers you theoption to restart IIS or not. If you choose not to restart, configurations apply the next time IISrestarts.
File System Security Settings
The following Windows accounts require specific file system permissions:

Copyright © AppDynamics 2012-2015 Page 167
1.
2.
3.
4.
5.
6.
7.
8.
The account you use to run your web application as defined by its application pool or theWindows service account.The account you use to run the AppDynamics Agent Coordinator, by default the LocalSystem account.
The required permissions are as follows:
Write permission to the .NET App Agent logs directory: For agent version 3.7.8 or later, the default is as follows: Windows Server 2008 and later: %ProgramData%\AppDynamics\DotNetAgent\Logs Windows Server 2003: %AllUsersProfile%\ApplicationData\AppDynamics\DotNetAgent\Logs For agent version 3.7.7 or earlier, the default is C:\Appdynamics\Logs.Read and permissions to to the .NET App Agent install directory, by default Execute C:\Program Files\AppDynamics\AppDynamics .NET AgentRead and permissions the web application installation directory, for example Execute C:\inetpub\wwwroot\myapp
Configure the .NET Agent
In the Windows menu, click AppDynamics -> .NET Agent -> AppDynamics Agent.Configuration
If the "Warning: 3rd Party Profiler installed" message displays, click to exit and uninstallYesany pre-existing profiler.
Check the registry to make sure that the uninstall process cleaned up the registry entries.Use the warning message to identify any undeleted profiler environment variables.When the configuration utility detects legacy agent configurations from version 3.7.7 orearlier, it displays the window.Upgrade Configuration
Answer to remove legacy configurations. See "Clean up legacy configurations"Yeson .Upgrade the .NET Agent
Removing legacy configurations modifies web.config files causing IIS to restartaffected applications.
Answer to leave legacy configurations in place.NoWhen the utility discovers no further profiler conflicts or after any configuration clean up itdisplays the welcome window.
Click to advance to .Next Log directory permissions(Optional) If you want to change the default location of the log directory, click andChangeselect a new location.
The default logs directories are as follows: Windows Server 2008 and later: %ProgramData%\AppDynamics\DotNetAgent\Logs
Windows Server 2003: %AllUsersProfile%\ApplicationData\AppDynamics\DotNetAgent\Logs
If needed, add accounts for log directory permissions. Click . If you get a warningAddmessage, make sure that the account is valid on the system.Click and the wizard confirms the list of accounts.Next
Click to advance to .Next Controller Configuration
Copyright © AppDynamics 2012-2015 Page 168
8.
9.
10.
11.
12.
1. 2.
3.
4.
5.
6.
1.
Enter the Controller access information and credentials.The .NET Agent configuration utility only supports configuration of one Controller andbusiness application per server.
Use tiers to organize different applications you instrument on a single server.Or manually configure support for multiple business applications, see Configure
.Multiple Business Application Support for .NETFor a SaaS Controller, enter the server name or IP, port number, account name, andaccess key as provided to you by AppDynamics.For an on-premise Controller, if you haven't already installed it, cancel this installationand see . Otherwise enter the server name and port number of anInstall the Controllerexisting Controller.For a secure connection, click . Enable SSL
The Controller must use a trusted certificate.If needed, fill in the proxy information. Proxies that use authentication requireadditional configuration.
Click Test Controller Connection to verify the connection.
Click to advance to the Next Application ConfigurationAppDynamics retrieves existing business application information from the Controller anddisplays it in the left column. Controller connection status displays on the right.Click to select business applications from theExisting Applications from the ControllerController.
If you haven't defined business applications in the Controller, the utility displays anempty list.
Click to define a new business application. Be careful about spellingsNew Applicationand capitalization and note down the exact name.
Ampersands are not supported in application names.Click to advance to .Next Assign IIS applications to tiers
Automatically name tiers
In the window click .Assign IIS applications to tiers AutomaticIf prompted, click to confirm Automatic configuration.OKThe configuration utility summarizes the configuration settings.By default when you click the configuration utility restarts IIS.Next
If you do not want to apply the configuration right away, uncheck the box. TheConfiguration Utility saves the information and applies it the next time you restart IIS.If you proceed and click , the configuration utility logs its activities, including stoppingNextand restarting IIS, and reports any problems. Review the summary for any issues in red font.Green font indicates the more interesting logged events. The summary shows any Warnings(W) or Errors (E).When there are no errors, click .Next
Click to close the Configuration Utility. Done
Manually name tiers

Copyright © AppDynamics 2012-2015 Page 169
1. 2.
3.
4.
5.
6.
7.
In the window click , then click .Assign IIS applications to tiers Manual NextAssign IIS Applications to AppDynamics tiers.Select a tier on the right and click a business application on the left. The utility highlights theassigned tier in boldface.
For large IIS installations, use the Max IIS tree depth pulldown to display all the projects.A large tree depth may take some time to view.To create new tiers, enter a name and click .Add Tier
When you are done click . AppDynamics displays a configuration summary.Next
On the window, uncheck if you don't want toConfiguration Summary Restart IISimmediately restart IIS.You may restart later to apply your changes, or they will take effect after a reboot.If you proceed and click , the Configuration Utility logs its activities, including stoppingNextand restarting IIS, and reports any problems.Review the configuration log summary.As it applies the configuration, AppDynamics generates a log of the configuration activitiesand displays a summary. Review the summary for any issues in red font. Green fontindicates the more interesting logged events. The summary shows any Warnings (W) orErrors (E).Click . The wizard completes.Next
For troubleshooting information see .Resolve .NET Agent Installation and Configuration Issues
Enable SSL for .NET
On this page:
PrerequisitesEnable SSLEstablish Trust for the Controller's SSLCertificateTroubleshoot Communication Issues
Related pages:
SecurityAdminister the .NET Agent.NET Agent Configuration Properties
This topic covers how to configure the .NET Agent (the agent) to connect to the Controller usingSSL. It assumes that you use a SaaS Controller or have configured the on-premise Controller touse SSL.
Prerequisites
Before you configure the agent to enable SSL, gather the following information:
Identify if the Controller is SaaS or on-premise.Identify the Controller SSL port.
For SaaS Controllers the SSL port is 443.For on-premise Controllers the default SSL port is 8181, but you may configure the
Copyright © AppDynamics 2012-2015 Page 170
Controller to listen for SSL on another port.Identify the signature method for the Controller's SSL certificate:
A publicly known certificate authority (CA) signed the certificate. This applies forVerisign, Thawte, and other commercial CAs.A CA internal to your organization signed the certificate. Some companies maintaininternal certificate authorities to manage trust and encryption within their domain.The Controller uses a self-signed certificate.
Enable SSL
There are two ways to update the SSL settings for the agent. You can use the AppDynamics. Otherwise, edit the settings directly in the , see Agent Configuration Utility config.xml Administer
. the .NET Agent
When you enable SSL for the .NET Agent, you automatically enable SSL for the .NET MachineAgent.
To configure SSL using the AppDynamics Agent Configuration utility
1. Launch the AppDynamics Agent Configuration utility.
2. In the window, set the to the SSL port for theController Configuration Port NumberController.
For a , set the to 443.SAAS Controller Port NumberFor an , set the to the on-premise SSL port. Theon-premise Controller Port Numberdefault is 8181.
3. Click .Enable SSL
This example demonstrates connection to an on-premise Controller listening for SSL on port 8181:

Copyright © AppDynamics 2012-2015 Page 171
4. Click and proceed with the rest of the windows to complete the configuration.Next
5. Restart instrumented applications: IIS applications or application pools, Windows services, orstandalone applications.
If you use automatic tier configuration, restart IIS. For example, open a command prompt and run:
iisreset
Upon restart the agent connects with the Controller via SSL.
To configure SSL in the config.xml
1. Open the config.xml file as administrator. See . Administer the .NET Agent
2. Update the SSL settings. See .Controller Element
Set the to the on-premise SSL port. The default is 8181. See Controller port attribute Cont.roller port attribute
Set the to "true". See .Controller SSL attribute Controller ssl attribute
3. Save your changes.
4. Restart the AppDynamics.Agent.Coordinator service.
5. Restart instrumented applications: IIS applications or application pools, Windows services, orstandalone applications.

Copyright © AppDynamics 2012-2015 Page 172
If you use Automatic configuration, restart IIS. For example, open a command prompt and run:
iisreset
Upon restart the agent connects with the Controller via SSL.
Sample SaaS SSL config.xml configuration
<?xml version="1.0" encoding="utf-8"?><appdynamics-agent xmlns:xsi="http://www.w3.org/2001/XMLSchema-instance"xmlns:xsd="http://www.w3.org/2001/XMLSchema"> <controller host="mycompany.saas.appdynamics.com" port="443" ssl="true"enable_tls12="true"> <application name="MyDotNetApplication" /> </controller>...</appdynamics-agent>
Sample on-premise SSL config.xml configuration
<?xml version="1.0" encoding="utf-8"?><appdynamics-agent xmlns:xsi="http://www.w3.org/2001/XMLSchema-instance"xmlns:xsd="http://www.w3.org/2001/XMLSchema"> <controller host="mycontroller.mycompany.com" port="8181" ssl="true"enable_tls12="true"> <application name="MyDotNetApplication" /> </controller>...</appdynamics-agent>
Establish Trust for the Controller's SSL Certificate
The .NET Agent requires that the Common Name (CN) on the Controller certificate match the DNSname of the Controller. Additionally, certificates for the root CA that signed the Controller's SSLcertificate must reside in the store for the Windows Trusted Root Certification Authorities Loca
.l Computer
Certificates signed by a publicly known Certificate Authority
The root certificates for most publicly trusted CA signing authorities, such as Verisign, Thawte, andother commercial CAs, are in the Trusted Root Certification Authorities store by default.
Certificates signed by an Internal Certificate Authority
If your organization uses internal CA to sign certificates, you may need to obtain the root CAcertificate from your internal security management resource. To import the root certificate, see Add
.ing certificates to the Trusted Root Certification Authorities store for a local computer
This example shows how to use the Certificate snap-in for the Microsoft Management Console toimport a certificate for a Trusted Root Certification Authority:

Copyright © AppDynamics 2012-2015 Page 173
If an intermediate CA signed the Controller's certificate, you must import the certificate for theintermediate CA in addition to the one for the root CA that signed the intermediate CA's certificate.If your controller is publicly accessible, you can use a certificate checker to identify the certificatesrequired to complete the trust chain. See .the certificate checker from Thawte
This examples shows the store:Intermediate Certification Authorities
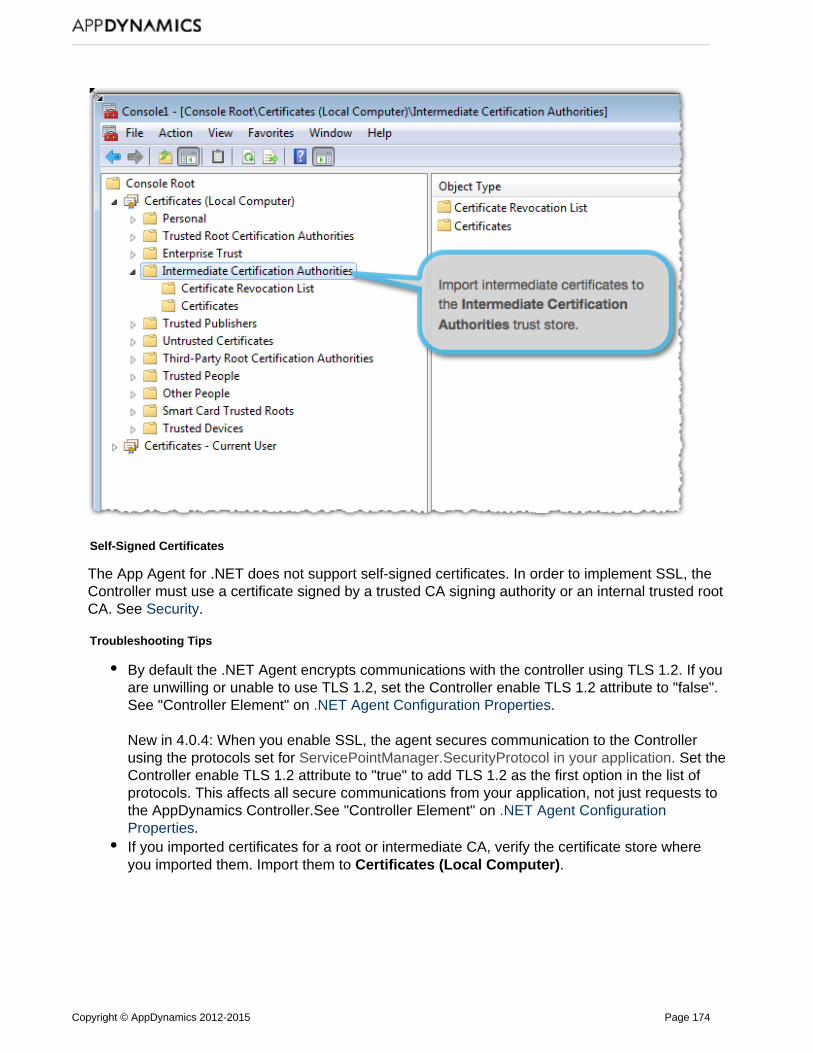
Copyright © AppDynamics 2012-2015 Page 174
Self-Signed Certificates
The App Agent for .NET does not support self-signed certificates. In order to implement SSL, theController must use a certificate signed by a trusted CA signing authority or an internal trusted rootCA. See .Security
Troubleshooting Tips
By default the .NET Agent encrypts communications with the controller using TLS 1.2. If youare unwilling or unable to use TLS 1.2, set the Controller enable TLS 1.2 attribute to "false".See "Controller Element" on ..NET Agent Configuration Properties
New in 4.0.4: When you enable SSL, the agent secures communication to the Controllerusing the protocols set for ServicePointManager.SecurityProtocol in your application. Set theController enable TLS 1.2 attribute to "true" to add TLS 1.2 as the first option in the list ofprotocols. This affects all secure communications from your application, not just requests tothe AppDynamics Controller.See "Controller Element" on .NET Agent ConfigurationProperties.If you imported certificates for a root or intermediate CA, verify the certificate store whereyou imported them. Import them to .Certificates (Local Computer)
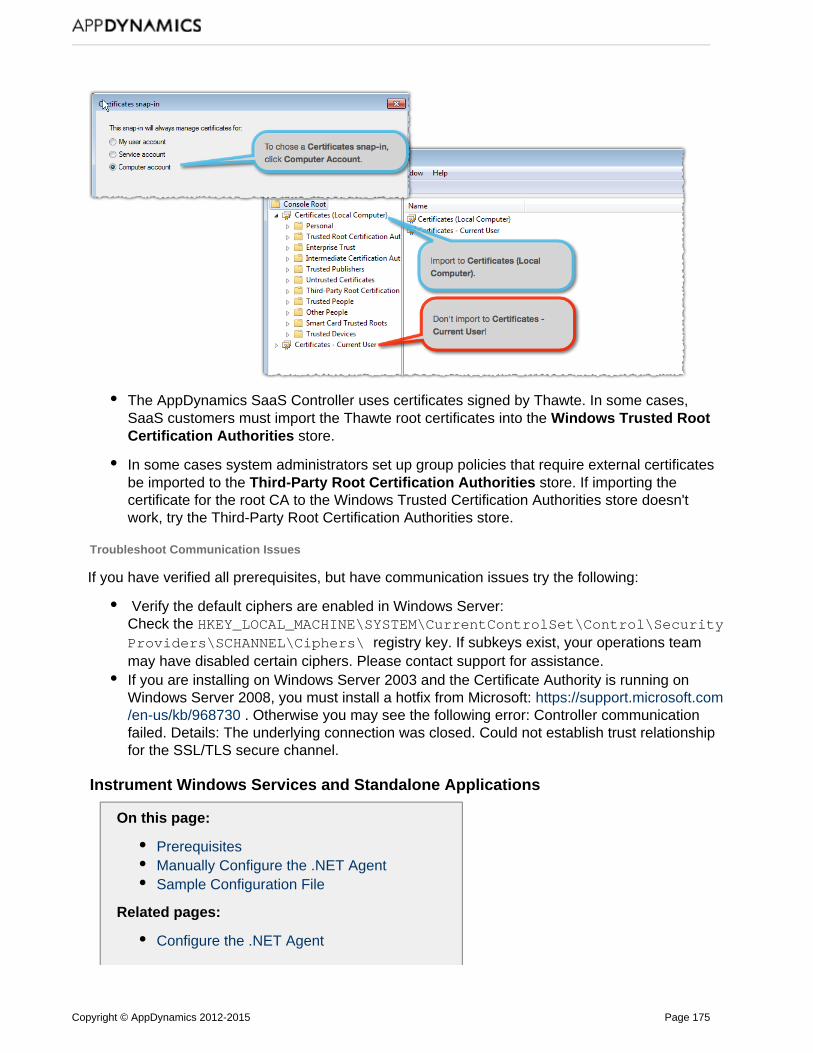
Copyright © AppDynamics 2012-2015 Page 175
The AppDynamics SaaS Controller uses certificates signed by Thawte. In some cases,SaaS customers must import the Thawte root certificates into the Windows Trusted Root
store.Certification Authorities
In some cases system administrators set up group policies that require external certificatesbe imported to the store. If importing theThird-Party Root Certification Authoritiescertificate for the root CA to the Windows Trusted Certification Authorities store doesn'twork, try the Third-Party Root Certification Authorities store.
Troubleshoot Communication Issues
If you have verified all prerequisites, but have communication issues try the following:
Verify the default ciphers are enabled in Windows Server:Check the HKEY_LOCAL_MACHINE\SYSTEM\CurrentControlSet\Control\Security
registry key. If subkeys exist, your operations teamProviders\SCHANNEL\Ciphers\ may have disabled certain ciphers. Please contact support for assistance.If you are installing on Windows Server 2003 and the Certificate Authority is running onWindows Server 2008, you must install a hotfix from Microsoft: https://support.microsoft.com
. Otherwise you may see the following error: Controller communication/en-us/kb/968730failed. Details: The underlying connection was closed. Could not establish trust relationshipfor the SSL/TLS secure channel.
Instrument Windows Services and Standalone Applications
On this page:
PrerequisitesManually Configure the .NET AgentSample Configuration File
Related pages:
Configure the .NET Agent
Copyright © AppDynamics 2012-2015 Page 176
1. 2.
1.
Install the .NET Agent.NET Agent Configuration Properties
By default, the .NET Agent only instruments IIS applications. Edit the .NET Agent config.xmlconfiguration file to enable the agent for Windows services and standalone applications.
It is possible to instrument any combination of IIS applications, Windows services, and standaloneapplications on a single server.
Prerequisites
Install the .NET Agent.Run the AppDynamics Agent Configuration utility to perform basic configuration tasks suchas controller connectivity and to generate a config.xml.
If you have previously instrumented app agents for IIS applications, don't run theconfiguration utility. You already have a config.xml.
Use the configuration utility to do the following:Change the location of the Logs directory and assign permissions.Configure and test connectivity to the Controller.Set the Business Application for the agent.
If you are not instrumenting IIS, choose for the method of tier generation andManualassignment. Don't assign assign any tiers for any IIS applications. This disablesinstrumentation for all IIS applications.
Manually Configure the .NET Agent
Once you have configured the Controller properties for the .NET Agent, instrument your Windowsservice or standalone application by adding an XML element for it to the config.xml.
Edit the config.xml file as an administrator. See . Administer the .NET Agent
If you haven't instrumented IIS applications, the file contains minimal configurations forController connectivity and the machine agent. Verify the Controller properties and theBusiness Application name.
Show minimal configuration without IIS
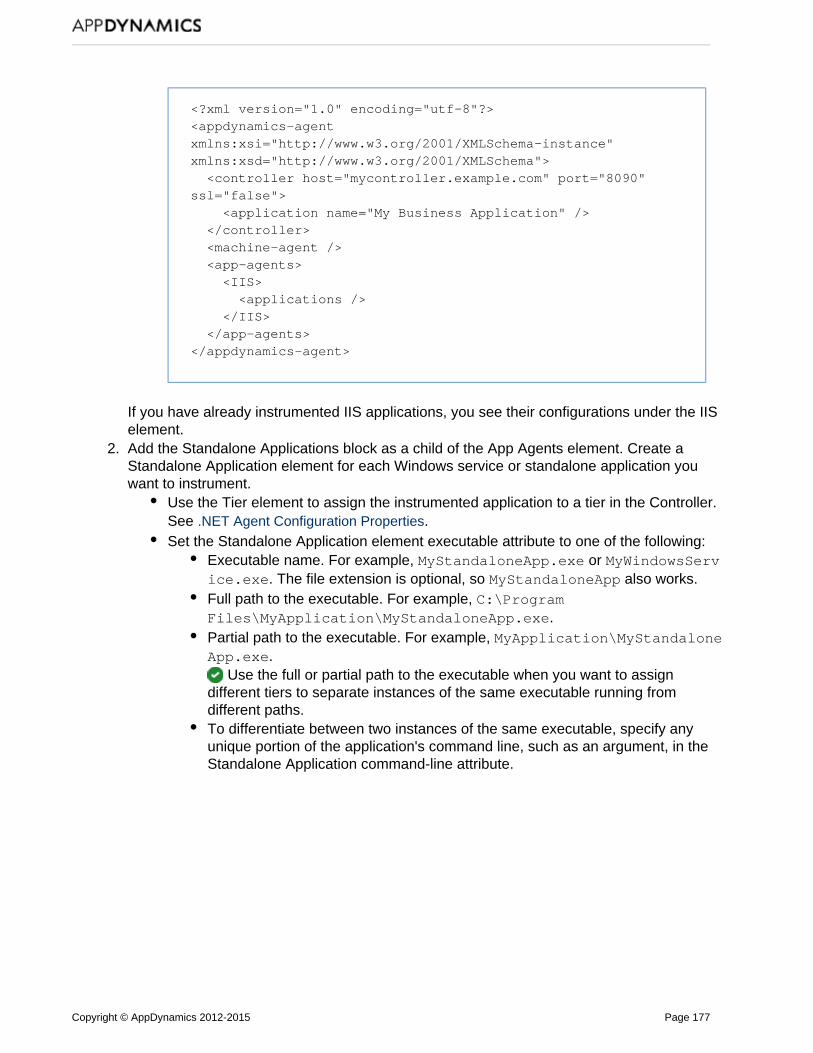
Copyright © AppDynamics 2012-2015 Page 177
1.
2.
<?xml version="1.0" encoding="utf-8"?><appdynamics-agentxmlns:xsi="http://www.w3.org/2001/XMLSchema-instance"xmlns:xsd="http://www.w3.org/2001/XMLSchema"> <controller host="mycontroller.example.com" port="8090"ssl="false"> <application name="My Business Application" /> </controller> <machine-agent /> <app-agents> <IIS> <applications /> </IIS> </app-agents></appdynamics-agent>
If you have already instrumented IIS applications, you see their configurations under the IISelement.Add the Standalone Applications block as a child of the App Agents element. Create aStandalone Application element for each Windows service or standalone application youwant to instrument.
Use the Tier element to assign the instrumented application to a tier in the Controller.See ..NET Agent Configuration Properties
Set the Standalone Application element executable attribute to one of the following:Executable name. For example, or MyStandaloneApp.exe MyWindowsServ
. The file extension is optional, so also works.ice.exe MyStandaloneApp
Full path to the executable. For example, C:\Program.Files\MyApplication\MyStandaloneApp.exe
Partial path to the executable. For example, MyApplication\MyStandalone.App.exe
Use the full or partial path to the executable when you want to assigndifferent tiers to separate instances of the same executable running fromdifferent paths.To differentiate between two instances of the same executable, specify anyunique portion of the application's command line, such as an argument, in theStandalone Application command-line attribute.

Copyright © AppDynamics 2012-2015 Page 178
2.
3. 4.
<standalone-applications> <standalone-applicationexecutable="MyStandaloneApp.exe"> <tier name="Standalone Tier 1" /> </standalone-application> <!-- Instrument a standalone application using a partialpath. --> <standalone-applicationexecutable="MyApplication\MyOtherStandaloneApp.exe"> <tier name="Standalone Tier 2" /> </standalone-application> <!-- Instrument a Windows service using arguments. --> <!-- The following example matches the command"MyWindowsService.exe -d -x -r". --> <standalone-applicationexecutable="MyWindowsService.exe" command-line="-x"> <tier name="Windows Service Tier" /> </standalone-application></standalone-applications>
Restart the AppDynamics.Agent.CoordinatorRestart the Windows service or standalone application.
If your Windows service or standalone application doesn't implement an auto-detected, you must configure a framework POCO entry point for a class/method in your service for the
agent to begin instrumentation.
Sample Configuration File
This sample config.xml demonstrates instrumentation for a Windows service and standaloneapplication:

Copyright © AppDynamics 2012-2015 Page 179
<?xml version="1.0" encoding="utf-8"?><appdynamics-agentxmlns:xsi="http://www.w3.org/2001/XMLSchema-instance"xmlns:xsd="http://www.w3.org/2001/XMLSchema"> <controller host="mycontroller.mycompany.com" port="8090"ssl="false"> <application name="My Business Application" /> </controller> <machine-agent /> <app-agents> <IIS> <applications /> </IIS> <standalone-applications> <standalone-application executable="MyWindowsService.exe"command-line="-x"> <tier name="Windows Service Tier" /> </standalone-application> <standalone-application executable="MyStandaloneApp.exe"> <tier name="Standalone Tier" /> </standalone-application> </standalone-applications> </app-agents></appdynamics-agent>
Name .NET Tiers
On this page:
Name IIS Tiers AutomaticallyName Azure Tiers AutomaticallyName IIS Tiers ManuallyName Windows Service or StandaloneApplication Tiers
Related pages:
Configure the .NET AgentAutomatically Name .NET Nodes
In AppDynamics, a tier represents a key service Such services in your application environment. may include ASP.NET front ends, WCF services, .NET web services, or standalone applications.On flow maps, tiers show up as the primary visual indicators of the component services of yourbusiness application. Therefore, you want to name your tiers so your users find them logical andeasy to understand.
The .NET Agent includes the AppDynamics Agent Configuration Utility (configuration utility) to map

Copyright © AppDynamics 2012-2015 Page 180
IIS sites to tiers, see . Manual configuration options require you to editConfigure the .NET Agentthe config.xml file, see "Where to Configure Agent Properties" on .Administer the .NET Agent
Name IIS Tiers Automatically
Name IIS tiers automatically using the configuration utility. C on the hoose Automatic Assign IIS window. .NET Agent names the tiers usingapplications to tiers The instruments all IIS sites and
the following scheme:
IIS site/app
The agent omits app when the application is the root application for the IIS site.
Use this option in the following cases:
You are new to AppDynamics and the .NET Agent.You want to instrument all IIS applications and your team can easily understand IISapplication names.
Name Azure Tiers Automatically
The .NET Agent automatically names Azure tiers using the following scheme:
Azure role name
If you want to customize tier naming for Azure, see under Edit the config.xml directly Name IIS.Tiers Manually
Name IIS Tiers Manually
The .NET Agent offers two options for naming IIS tiers manually.
OUse the configuration utility: n the Assign IIS applications to tiers window, choose Manual. Theconfiguration utility lets you create new tiers and assign IIS applications to tiers.
Use this option in the following cases:
You don't want to instrument all IIS applications on the server.You want custom tier names.You want to combine multiple applications into a single tier.
Edit the config.xml directly: For each IIS site you want to instrument, add an application elementas a child element of the IIS Applications element in the config.xml. You can specify a static IISsite name or a regular expression which is helpful for variable site names like Azure site names.For the full syntax and an example, see "IIS Applications Element" on .NET Agent Configuration
.Properties
For an example of Azure tier naming using a regular expression, see "Customize Tier Names forAzure Roles" on Install AppDynamics for Windows Azure with NuGet.
Use this option to customize Azure tier names or in cases where it is not feasible to use theconfiguration utility.
Name Windows Service or Standalone Application Tiers
Name the tiers for each instrumented Windows service or standalone application manually in the

Copyright © AppDynamics 2012-2015 Page 181
config.xml. See the following instructions:
Instrument Windows Services and Standalone Applications
Automatically Name .NET Nodes
On this page:
Name IIS Nodes AutomaticallyName Windows Service or StandaloneApplication Nodes Automatically
Related pages:
Configure the .NET AgentName .NET Tiers
By default the AppDynamics .NET Agent (agent) automatically names nodes using a combinationof the Windows machine name, the tier name, and the name of the .NET application.
If you are upgrading from the .NET Agent version 3.7.7 or earlier, the new node namingconvention takes effect upon restart. Nodes named under the old scheme become historical nodeswith no correlation to new nodes.
Name IIS Nodes Automatically
The agent names IIS nodes as follows:
<machine NetBIOS name>-<tier>-<IIS site>/<app>
The agent omits app when the application is the root application for the IIS site.The agent omits tier when the tier name is the same as the IIS site name.
For example:
WIN-86M7CEJO6P5-Order Server-OrderSvc
WIN-86M7CEJO6P5 is the machine NetBIOS name. is the tier name.Order Server
is the IIS site name. The application is the site root, so the agent omits theOrderSvcapplication name.
For another example:
WIN-86M7CEJO6P5-Order Server-Store/ProcessOrder
Store is the IIS site name. is the application name within the site.ProcessOrder
Different .NET versions of the same application have their own versions of the CLR and run onindependent processes. Therefore the agent identifies the two processes as different nodes.
IIS Web Gardens
Copyright © AppDynamics 2012-2015 Page 182
The syntax for web gardens is the same as IIS Nodes, except that the agent appends azero-based process index to differentiate the worker processes.
<machine NetBIOS name>-<tier>-<IIS site>/<app>-<process index>
When IIS first launches web garden processes, the agent assigns a sequential index to eachprocess. However when IIS recycles a process, the agent reuses the available index freed by theterminated process. Therefore there is no correlation between the index sequence and thechronological start of the process.
Sometimes you may see more nodes than the maximum number of worker processes. This canhappen when a long-running request prevents a process from shutting down before itsreplacement launches.
Name Windows Service or Standalone Application Nodes Automatically
The agent names Windows service and standalone application nodes as follows:
<machine NetBIOS name>-<tier>-<Windows service name or executable name>
The agent omits tier when the tier name is the same as the service name or executable name.
For example:
WIN-86M7CEJO6P5-MyWindowsService
WIN-86M7CEJO6P5 is the machine name. is the the Windows service name.MyWindowsService
For another example:
WIN-86M7CEJO6P5-MyStandaloneApp.exe
WIN-86M7CEJO6P5 is the machine name. is the executable file name.MyStandaloneApp.exe
Unattended Installation for .NET
On this page:
Create a Setup Configuration FileSample Setup Configuration FileUnattended InstallationSetup Configuration File Properties
Related pages:
Configure the .NET Agent.NET Agent Configuration PropertiesInstrument Windows Services and StandaloneApplications

Copyright © AppDynamics 2012-2015 Page 183
1.
2.
3.
The .NET Agent provides a command-line unattended installation procedure for cases when youhave multiple servers that require the same AppDynamics configuration. Using unattendedinstallation, you only need to configure once, then use the command line scripts to automateinstallation and instrumentation on multiple servers
For Windows Server 2003, unattended installation of the .NET Agent requires Windows Server2003 SP2.
For more detail about how to install and configure the agent manually see .Install the .NET Agent
Create a Setup Configuration File
The .NET Agent MSI installer package allows you to specify the path to a setup configuration fileto perform an unattended installation. The setup configuration file contains all the properties youneed to enable instrumentation for your .NET applications.
You must run the .NET MSI installer package on one machine before you can use theAppDynamics Agent Configuration utility to create a setup configuration file. See Install the .NET
.Agent
Setup configuration files created in previous versions of the AppDynamics Agent Configurationutility work with the 4.0 installer.
Launch the AppDynamics Agent Configuration utility from the command line. Use the par-sameter to specify the setup configuration file destination.
AppDynamics.Agent.Winston.exe -s <path to setup configuration file>
For example:
c:\Program Files\AppDynamics\AppDynamics .NETAgent\AppDynamics.Agent.Winston.exe -s"c:\temp\configurationSavedSetupConfiguration.xml"
Go through the configuration wizard normally.
The configuration utility saves the setup configuration file to the path you specified.
The configuration utility only configures instrumentation for IIS applications.Optional: To perform unattended installation for Windows services or for standaloneapplications, you must edit the setup configuration file manually. See Instrument Windows
.Services and Standalone Applications
Sample Setup Configuration File
The following example shows a setup configuration file that instruments two IIS Applications(MainBC and SampleHTTPService), a Windows service (BasicWindowsService), and astandalone application (MyStandaloneApp.exe).
The configuration file sets the log directory as C:\ProgramData\AppDynamics\DotNetAgent\Logsand grants write permission to four accounts.

Copyright © AppDynamics 2012-2015 Page 184
<winston> <logFileDirectorydirectory="C:\ProgramData\AppDynamics\DotNetAgent\Logs" /> <logFileFolderAccessPermissions defaultAccountsEnabled="false"> <account name="NT AUTHORITY\LOCAL SERVICE" displayName="LOCALSERVICE" /> <account name="NT AUTHORITY\SYSTEM" displayName="SYSTEM" /> <account name="NT AUTHORITY\NETWORK SERVICE" displayName="NETWORKSERVICE" /> <account name="IIS_IUSRS" displayName="ApplicationPool Identity"/> </logFileFolderAccessPermissions> <appdynamics-agentxmlns:xsi="http://www.w3.org/2001/XMLSchema-instance"xmlns:xsd="http://www.w3.org/2001/XMLSchema"> <controller host="mycontroller.mycompany.com" port="8090"ssl="false"> <application name="My Business Application" /> </controller> <machine-agent /> <app-agents> <IIS> <applications> <application path="/" site="MainBC"> <tier name="Main Site" /> </application> <application path="/" site="SampleHTTPService"> <tier name="HTTP Services" /> </application> </applications> </IIS> <standalone-applications> <standalone-application executable="MyStandaloneApp.exe"> <tier name="Standalone App" /> </standalone-application> <standalone-application executable="MyWindowsService.exe"> <tier name="Windows Service" /> </standalone-application> </standalone-applications> </app-agents> </appdynamics-agent></winston>
Unattended Installation
Requirements
Microsoft Distributed Transaction Coordinator (MSDTC): MSDTC must run under the "NT
Copyright © AppDynamics 2012-2015 Page 185
1.
2.
3.
4.
5.
Authority\NetworkServices" account. See "Verify MSDTC" on Resolve .NET Agent Installation.and Configuration Issues
COM+: See "Verify COM+ Services are enabled" on Resolve .NET Agent Installation and.Configuration Issues
Windows Management Instrumentation
Perform unattended installation
Uninstall any existing agent. If you fail to uninstall the previously installed agent and try to install the same agent
version, the installer package may remove the AppDynamics Agent Coordinator service. Inthis case, uninstall and proceed with the unattended installation as normal.Launch an elevated command prompt with full administrator privileges. See Start a
.Command Prompt as an Administrator Logging on to Windows as a member of the Administrators group does not grant
sufficient permissions to run the installer.Run the agent MSI installer package from the elevated command prompt. Use the AD_Setu
parameter to pass the absolute file path to the setup configuration file.pFile
The parameter accepts paths with spaces in the path name. In previousAD_SetupFileversions spaces were not allowed.
msiexec /i dotNetAgentSetup64.msi /q /norestart /lv%TEMP%\AgentInstaller.log AD_SetupFile=<absolute path to setup config.xml>
Optionally use the parameter to customize the agent installation directory.INSTALLDIR
INSTALLDIR=<custom agent install directory>
For example:
msiexec /i dotNetAgentSetup64.msi /q /norestart /lv%TEMP%\AgentInstaller.log AD_SetupFile=C:\temp\SetupConfig.xmlINSTALLDIR=D:\AppDynamics
Start the AppDynamics.Agent.Coordinator.
net start AppDynamics.Agent.Coordinator
Restart applications you have instrumented: IIS, Windows services, or standaloneapplications.
For example, to restart IIS:
Copyright © AppDynamics 2012-2015 Page 186
5.
iisreset
Setup Configuration File Properties
Winston element
The Winston element is the root element for the configuration file.
Required element: <winston>
Log File Directory element
The Log File Directory element is a child element of the Winston element. Use the attribdirectoryute to specify the log directory. If you omit the Log File Directory element, we use the defaultdirectory:
Windows Server 2008 and later: %ProgramData%\AppDynamics\DotNetAgent\Logs Windows Server 2003: %AllUsersProfile%\Application
Data\AppDynamics\DotNetAgent\Logs
Optional element: <logFileDirectorydirectory="C:\ProgramData\AppDynamics\DotNetAgent\Logs" />
Log File Folder Access Permissions element
The Log File Folder Access Permissions is a child element of the Winston element. Unless you setthe attribute to false, we grant write access to the logs folder for thedefault accounts enableddefault accounts:
LOCAL SERVICESYSTEMNETWORK SERVICEApplicationPool Identity
Optional element: <logFileFolderAccessPermissionsdefaultAccountsEnabled="false">
Account element
The Account element is a child element of the Log File Folder Access Permissions element.Create an element for the Windows account you use to run your application.Account
Set the attribute to the name of account you use to run your application: the account for thenameapplication pool for IIS or the Windows service account.
The attribute is a user-friendly name you choose for the account. The display namedisplay nameshows up in log entries about assigning permissions for the account.
Optional element: <account name="MyAppPoolIdentity" displayName="CustomApplicationPool Identity" />
For example, if you run a Windows service under a domain account:

Copyright © AppDynamics 2012-2015 Page 187
1.
2. 3.
4.
<account name="MYDOMAIN\service_acct" displayName="Domain ServiceAccount" />
AppDynamics Agent element
The AppDynamics Agent element is a child of the Winston element. It follows the same format asthe config.xml to define the agent configuration for all your .NET applications. See .NET Agent
.Configuration Properties
Required element: <appdynamics-agentxmlns:xsi="http://www.w3.org/2001/XMLSchema-instance"xmlns:xsd="http://www.w3.org/2001/XMLSchema">
Upgrade the .NET Agent
On this page:
Upgrade the .NET Agent from Version 3.8.2or NewerUpgrade the .NET Agent from Version 3.7.8to 3.8.1Upgrade the .NET Agent from Version 3.7.7or Earlier
Related pages:
Agent - Controller Compatibility MatrixInstall the .NET AgentConfigure the .NET Agent.NET Agent Directory StructureResolve .NET Agent Installation andConfiguration Issues
This topic describes how to upgrade to the .NET Agent version 4.0. The instructions vary(agent) based upon your current version of the .NET Agent.
Upgrade the .NET Agent from Version 3.8.2 or Newer
You don't need to uninstall the old agent first when you upgrade from the .NET Agent version 3.8.2or newer.
Stop w3wp processes for instrumented IIS applications. Stop instrumented Windowsservices or standalone applications. Install the new agent. See .Install the .NET AgentRestart the AppDynamics Agent Coordinator service:net stop AppDynamics.Agent.Coordinatornet start AppDynamics.Agent.Coordinator
Restart IIS:Launch the AppDynamics Agent Configuration utility and click on theRestart IISConfiguration Summary window.ORExecute from the command line.iisreset
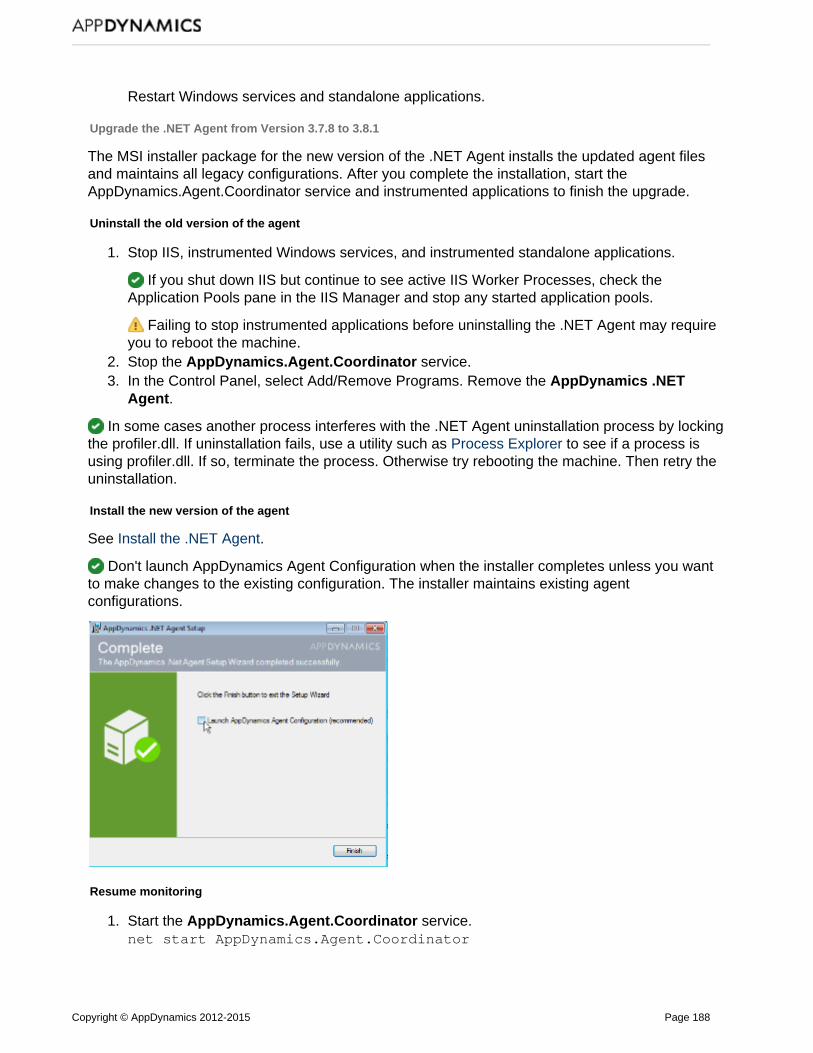
Copyright © AppDynamics 2012-2015 Page 188
4.
1.
2. 3.
1.
2.
Restart Windows services and standalone applications.
Upgrade the .NET Agent from Version 3.7.8 to 3.8.1
The MSI installer package for the new version of the .NET Agent installs the updated agent filesand maintains all legacy configurations. After you complete the installation, start theAppDynamics.Agent.Coordinator service and instrumented applications to finish the upgrade.
Uninstall the old version of the agent
Stop IIS, instrumented Windows services, and instrumented standalone applications.
If you shut down IIS but continue to see active IIS Worker Processes, check theApplication Pools pane in the IIS Manager and stop any started application pools.
Failing to stop instrumented applications before uninstalling the .NET Agent may requireyou to reboot the machine.Stop the service.AppDynamics.Agent.CoordinatorIn the Control Panel, select Add/Remove Programs. Remove the AppDynamics .NET
.Agent
In some cases another process interferes with the .NET Agent uninstallation process by lockingthe profiler.dll. If uninstallation fails, use a utility such as to see if a process isProcess Explorerusing profiler.dll. If so, terminate the process. Otherwise try rebooting the machine. Then retry theuninstallation.
Install the new version of the agent
See .Install the .NET Agent
Don't launch AppDynamics Agent Configuration when the installer completes unless you wantto make changes to the existing configuration. The installer maintains existing agentconfigurations.
Resume monitoring
Start the service.AppDynamics.Agent.Coordinatornet start AppDynamics.Agent.Coordinator

Copyright © AppDynamics 2012-2015 Page 189
2.
1.
2. 3.
Start IIS, instrumented Windows services, and instrumented standalone applications.
Upgrade the .NET Agent from Version 3.7.7 or Earlier
Identify the right upgrade path based upon the method of tier naming and assignment (manual orautomatic) and the type of application you instrument:
If you use manual tier naming and assignment, the installer package upgradesconfigurations for IIS applications and Windows services.If you used automatic tier naming and assignment, run the configuration utility to updateconfigurations.If you used standalone applications with 3.7.7 or earlier, follow the steps for standaloneapplications on Instrument Windows Services and Standalone Applications.
The MSI installer package for the new version installs the updated agent files. After installing, youmay need to run the configuration utility to update your configuration and optionally remove legacyconfigurations. Finally, restart the AppDynamics.Agent.Coordinator service and instrumentedapplications.
Uninstall the old version of the .NET Agent
Stop IIS and instrumented Windows services.
If you shut down IIS but continue to see active IIS Worker Processes, check theApplication Pools pane in the IIS Manager and stop any started application pools.
Failing to stop instrumented applications before uninstalling the App Agent for .NET mayrequire you to reboot the machine.Stop the service.AppDynamics.Agent.CoordinatorIn the Control Panel, select Add/Remove Programs. Remove the AppDynamics .NET
.Agent
In some cases another process interferes with the .NET Agent uninstallation process by lockingthe profiler.dll. If uninstallation fails, use a utility such as to see if a process isProcess Explorerusing profiler.dll. If so, terminate the process. Otherwise try rebooting the machine. Then retry theuninstallation.
Install the new version of the .NET Agent
See .Install the .NET Agent
If you used the following environment variables with the earlier version, the MSI installer migratesthe configurations to the new configuration file:
AppDynamicsAgent_CallGraphOptionsAppDynamicsAgent_DisableAppPoolsAppDynamicsAgent_EnableInProcessesAppDynamicsAgent_IgnoreCLREnvAppDynamicsAgent_Profiler_Classes
Configure the .NET Agent
Configure the agent based on your method of tier generation andassignment: automatic or manual.

Copyright © AppDynamics 2012-2015 Page 190
1.
2.
1. 2.
The .NET Agent configuration utility only supports configuration of one Controller per server. Toconfigure multiple business applications, see Configure Multiple Business Application Support for
..NET
Configure the agent using automatic tier generation and assignment
If you used automatic configuration with the earlier version of the .NET Agent, run theconfiguration utility to configure the agent:
Use the .NET Agent Configuration utility to reconfigure instrumentation for IIS applications.Choose for the method of tier generation and assignment. See Automatic Configure the
..NET AgentConfigure instrumentation for Windows services manually. See Instrument Windows
.Services and Standalone Applications
Configure the agent using manual tier generation and assignment
For agents using manual tier generation and assignment, the installer package migrates theconfigurations for IIS applications and for Windows services to the config.xml. At this stage, theconfiguration for IIS applications and Windows services is complete.
If you choose not to launch the configuration utility and clean up legacy configurations, restartthe service.AppDynamics.Agent.Coordinator
net stop AppDynamics.Agent.Coordinatornet start AppDynamics.Agent.Coordinator
Clean up legacy configurations
You can clean up legacy configurations by launching the AppDynamics Agent Configuration utility.When the utility detects agent settings from a previous version, it offers you the option to clean up.
The clean up procedures modifies the web.config files causing an IIS restart.
Launch the AppDynamics Agent Configuration utility.Answer to clean up old AppDynamics configurations.Yes
The utility removes the following configurations:AppDynamics configSections from web.config files for IIS applications and fromapplication.config files for Windows services.Environment variables:
AppDynamicsAgent_IgnoreCLREnvAppDynamicsAgent_CallGraphOptions

Copyright © AppDynamics 2012-2015 Page 191
2.
3.
1.
2. 3. 4.
AppDynamicsAgent_EnableInProcessesAppDynamicsAgent_DisableAppPoolsAppDynamicsAgent_Profiler_Classes
Proceed through the wizard normally.Verify or update the log directory and grant write permissions to it.Verify the controller connection information.Verify or update manual tier assignment.
Resume monitoring
Start IIS and instrumented Windows services.
Resolve .NET Agent Installation and Configuration Issues
On this page:
Verify Agent Controller CommunicationCheck Internet Explorer proxy settingsChecklist for Resolving .NETAgent Installation IssuesResolve .NET Agent Installation IssuesResolve Configuration ErrorsResolve Log Issues
Related pages:
Install the .NET AgentConfigure the .NET Agent
Verify Agent Controller Communication
Use the AppDynamics UI to verify that the agent is able to connect to the Controller.
In a browser open:
http://<controller-host>:<controller-port>/controller
If you can't connect to the controller in Internet Explorer, see Check Internet Explorer proxy.settings
Log in to the AppDynamics UI.Select the application to open the Application Dashboard.In the left navigation panel click and open the Health tab.Servers -> App Servers
The Health tab lists the tiers, their nodes, and App Agent Status. When an agent successfullyreports to the Controller, you see an "up" arrow symbol.
For details see .Connect the Controller and Agents
When deploying multiple agents for the same tier, determine whether you get the correctnumber of nodes reporting into the same tier.After sending a request to your web application, data should appear on the AppDynamics

Copyright © AppDynamics 2012-2015 Page 192
1. 2.
3.
4.
UI. The agents should be displayed in the Application Flow Map of the ApplicationDashboard.
If no data appears after a few minutes:
Verify that the Agent is writing its log files:: Windows Server 2008 and later %ProgramData%\AppDynamics\DotNetAgent\Logs
\AgentLog.txt: Windows Server 2003 %AllUsersProfile%\Application
Data\AppDynamics\DotNetAgent\Logs\AgentLog.txt
If the log file exists, open it and review it for errors.If the log file doesn't exist, run the Windows Event Viewer and see the applicationmessages.If there are no AppDynamics event messages, look for messages from the .NET Runtime.
Check Internet Explorer proxy settings
Misconfigured proxy settings in Internet Explorer may cause the .NET Agent to fail to connect tothe controller. If fails on the Controller Configuration window in theTest Controller connectionAppDynamics Agent Configuration utility, do the following:
Verify the Controller host and port settings are correct.In Internet Explorer, open:
http://<controller-host>:<controller-port>/controller
If the connection also fails in Internet Explorer, check the proxy settings. See Change IE.Proxy Settings
Correct or remove any incorrect proxy settings.
This section is only for resolving issues connecting to the AppDynamics Controller whenstep 1 of "Verify Agent Controller Connection" above fails. To configure the .NET Agent towork through a proxy, see "Controller Element" on ..NET Agent Configuration Properties

Copyright © AppDynamics 2012-2015 Page 193
Checklist for Resolving .NET Agent Installation Issues
Item Notes
Run the installer as Administrator. VerifyAdministrativeprivileges
Verify that COM+ is enabled. Verify COM+services areenabled
Verify that MSDTC is enabled and that it is running under the correctaccount.
VerifyMSDTC isenabled andrunning underthe correctaccount
Verify permissions for Agent directory. Verify that the.NET Agentdirectory hasthe correctpermissions based on thesite’sapplicationpool identity.
Verify that the Agent is compatible with the Controller. Agent -ControllerCompatibilityMatrix
Verify the correct settings in the config.xml:
Windows Server 2008 and later:%ProgramData%\AppDynamics\DotNetAgent\Config\config.xml
:Windows Server 2003%AllUsersProfile%\ApplicationData\AppDynamics\DotNetAgent\Config\config.xml
Update theconfig.xml fileto include the .NET AgentConfiguration
.Properties
Resolve .NET Agent Installation Issues
If the Agent installation is failing, check the following configurations in your environment:
Verify administrative privileges
Ensure that you have the administrative privileges when you launch the installer. If the currentlyuser doesn't have sufficient privileges, the installer prompts you for an administrator password.

Copyright © AppDynamics 2012-2015 Page 194
1. 2.
3.
Verify COM+ services are enabled
If you encounter an error about the Appdynamics.Agent.Coordinator_service, ensure that theCOM+ applications in your system are enabled.
From the Windows Start Menu, click .RunEnter "services.msc" and click on the "OK" button. Windows opens the Services Console.
Enable the COM+ services (if not enabled).
Verify MSDTC is enabled and running under the correct account
If you encounter an error that MSDTC is not enabled or it is running under the wrong account,launch an elevated command prompt with full administrative privileges and execute the followingcommand:
msdtc -install
Even if MSTDC is already installed, this command resets the service to run using the "NTAuthority\NetworkServices" account.

Copyright © AppDynamics 2012-2015 Page 195
1. 2.
3. 4.
5.
Generate a log for agent installation failures
If installer fails, use the command line utility to launch the installer.
msiexec /i $Path_to_the_MSI_File /l*v verbose.log
A verbose log for the .NET Agent is created at the same location where you saved the installer file.Send this log to the .AppDynamics Support Team
Correct failed installation caused by other APM products
The .NET Agent installation may fail if there are other Application Performance Management(APM) products installed in the same managed environment. Remove the associated"Environment" subkey for certain services for the installed APM products.
Remove associated "Environment" subkey for W2SVC and WAS services in the registry:
Run Regedit or regedt32.In regedit.exe, locate the following registry keys: HKEY_LOCAL_MACHINE\SYSTEM\CurrentControlSet\services\W3SVCHKEY_LOCAL_MACHINE\SYSTEM\CurrentControlSet\services\WASExpand the keys.Modify the subkey to delete the following values:Environment
COMPLUS_ProfAPI_ProfilerCompatibilitySetting=EnableV2Profiler COR_ENABLE_PROFILING=1 COR_PROFILER= {a GUID}
Restart the services. For more details see How to restart the W2SVC and WAS services?
Resolve Configuration Errors
Verify the configuration in the config.xml file
Ensure that you have correctly configured the config.xml file for the .NET Agent. For moredetail, see ..NET Agent Configuration PropertiesIf you made manual edits to the config.xml, check the AgentLog.txt and WarnLog.txt forerrors. Invalid XML shows in the log as follows:
2014-03-13 10:49:18.7199 1232 dllhost 1 1 Error ConfigurationManager Errorreading the configuration file
Resolve Log Issues
The .NET Agent writes logs to the following directories:

Copyright © AppDynamics 2012-2015 Page 196
1.
2. 3.
Windows Server 2008 and later: %ProgramData%\AppDynamics\DotNetAgent\Logs: Windows Server 2003 %AllUsersProfile%\Application
Data\AppDynamics\DotNetAgent\Logs
The agent will not generate logs if the agent directory does not have sufficient permissionspermissions.
If the installation doesn't create the AppDynamics directory, contact IMPORTANT: AppDynamic.s Support Team
Verify that the .NET Agent directory has the correct permissions
Click .IIS -> Application poolsIIS displays the list of application pools for your machine.
Right-click on a particular application pool.Click .Advanced Settings

Copyright © AppDynamics 2012-2015 Page 197
3.
4.
IIS displays the Application Pool Identity for that application.
Ensure that your Agent Directory also has the same permissions as your site's application

Copyright © AppDynamics 2012-2015 Page 198
4.
pools.Navigate to AppDynamics .NET App Server Agent directory location.
Right-click on the "logs" directory for the App Server Agent and select Properties.
Click the Security tab and verify that the same Application Pool Identity is specifiedfor the .NET Agent directory.

Copyright © AppDynamics 2012-2015 Page 199
4.
1. 2.
3.
If the Agent's logs directory does not have the required permissions:
In the Security tab, click .EditClick to add new permissions to the Agent directory.Add
Click .Advanced
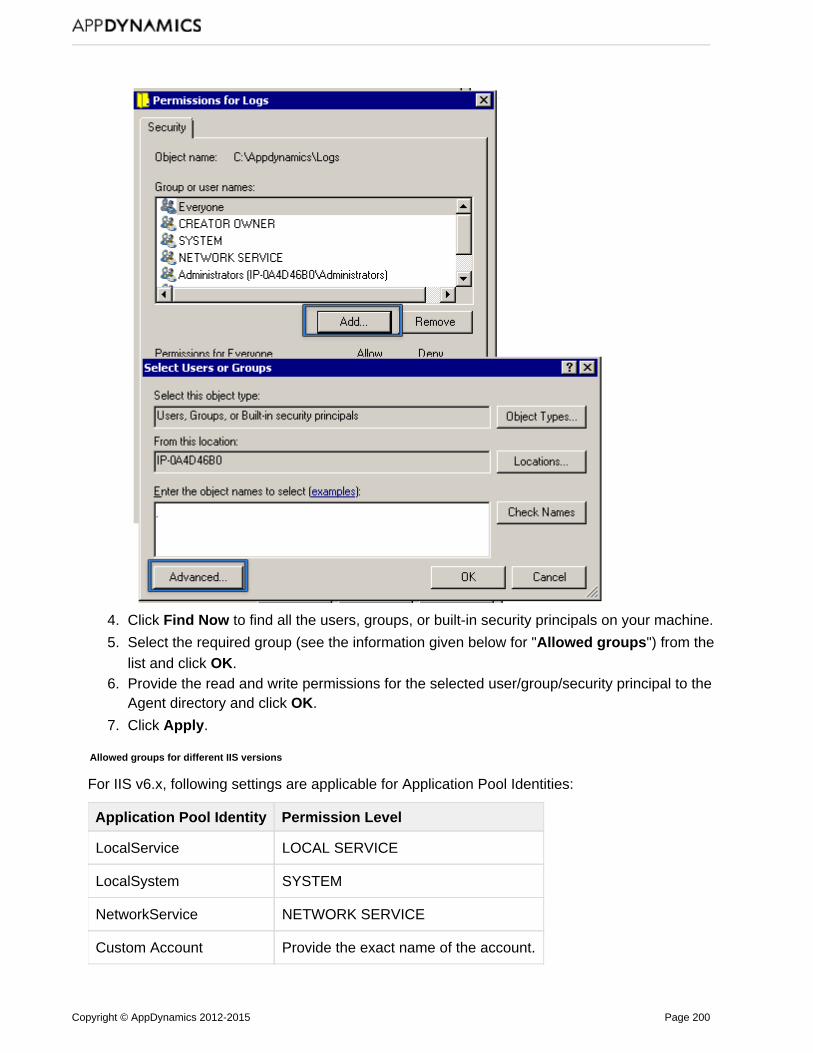
Copyright © AppDynamics 2012-2015 Page 200
3.
4.
5.
6.
7.
Click to find all the users, groups, or built-in security principals on your machine.Find Now
Select the required group (see the information given below for " ") from theAllowed groupslist and click .OKProvide the read and write permissions for the selected user/group/security principal to theAgent directory and click .OK
Click .Apply
Allowed groups for different IIS versions
For IIS v6.x, following settings are applicable for Application Pool Identities:
Application Pool Identity Permission Level
LocalService LOCAL SERVICE
LocalSystem SYSTEM
NetworkService NETWORK SERVICE
Custom Account Provide the exact name of the account.

Copyright © AppDynamics 2012-2015 Page 201
For IIS v7.0 and later, following settings are applicable for Application Pool Identities:
Application Pool Identity Permission Level
LocalService LOCAL SERVICE
LocalSystem SYSTEM
NetworkService NETWORK SERVICE
ApplicationPoolIdentity Provide the group level permissions for IIS_IUSRS Group
(see the screenshot given below).
Custom Account Provide the exact name of the account.
For example, if your application has the identity "ApplicationPoolIdentity", you must provide thepermissions for "IIS_IUSRS" group to your Agent's directory.

Copyright © AppDynamics 2012-2015 Page 202
1.
2. 3.
4.
5.
6.
Uninstall the .NET Agent
Related pages:
Upgrade the .NET AgentPlatform Release Notes
This topic describes how to do a complete uninstall of the .NET Agent.
Do not follow these instructions if you are doing an upgrade. If you want to upgrade to a newversion see .Upgrade the .NET Agent
Completely uninstall the .NET Agent
Stop IIS, instrumented Windows services, and instrumented standalone applications. Failing to stop instrumented applications before uninstalling the agent requires you to reboot
the machine to complete the uninstall.
Stop the service.AppDynamics.Agent.CoordinatorIn the Control Panel, select Add/Remove Programs. Remove the AppDynamics .NET
.AgentThe uninstall procedure does not remove configuration files. Delete the configurationdirectory:
: Windows Server 2008 and later %ProgramData%\AppDynamicsWindows Server 2003: %AllUsersProfile%\Application Data\AppDynamicsVerify the uninstall deleted the AppDynamics executables directory. If not, delete itmanually:
: %ProgramFiles%\AppDynamics.Windows Server 2003 and laterRestart IIS, Windows services, and standalone applications.
In some cases another process interferes with the .NET Agent uninstallation process by lockingthe profiler.dll. If uninstallation fails, use a utility such as to see if a process isProcess Explorerusing profiler.dll. If so, terminate the process. Otherwise try rebooting the machine. Then retry theuninstallation.
Install AppDynamics for Windows Azure with NuGet
On this page:
RequirementsRegister for an AppDynamics for WindowsAzure AccountAdd the .NET Agent to Your Azure SolutionUpdate Agent ConfigurationCustomize Tier Names for Azure Roles
Related pages:
AppDynamics EssentialsAPM for .NET

Copyright © AppDynamics 2012-2015 Page 203
1.
Monitor your Azure cloud solutions with the AppDynamics for Windows Azure NuGet package. Sign upfor the AppDynamics add-on in the Windows Azure portal, then enable the AppDynamics agent in yourVisual Studio solution.
Requirements
The AppDynamics for Windows Azure Nuget package requires the following:
Visual Studio 2010 or laterA Visual Studio solution to monitorVisual Studio must have the following permissions to the solution:
Read and permissions to each Write project directoryRead and permissions to each (*.csproj) fileWrite Visual Studio .NET C# ProjectRead and permissions to the (ServiceDefinition.csdef) fileWrite Service Definition
Windows Azure SDKWindows Azure accountIf the Visual Studio Standalone Profiler is installed, you must uninstall it and remove relatedregistry entries.
Register for an AppDynamics for Windows Azure Account
If you haven't registered for an AppDynamics account, see Register for AppDynamics for Windows.Azure
Once you've registered, we will send you a Welcome email with your URL and credentials toconnect to the AppDynamics Controller. If you already have AppDynamics credentials fromanother product, you can sign in using them.
Add the .NET Agent to Your Azure Solution
Use the NuGet package manager to add the .NET Agent to your Azure solution in Visual Studio.
In Visual Studio, right-click your solution name and chose Manage NuGet Packages for.Solution
Show this step in Visual Studio
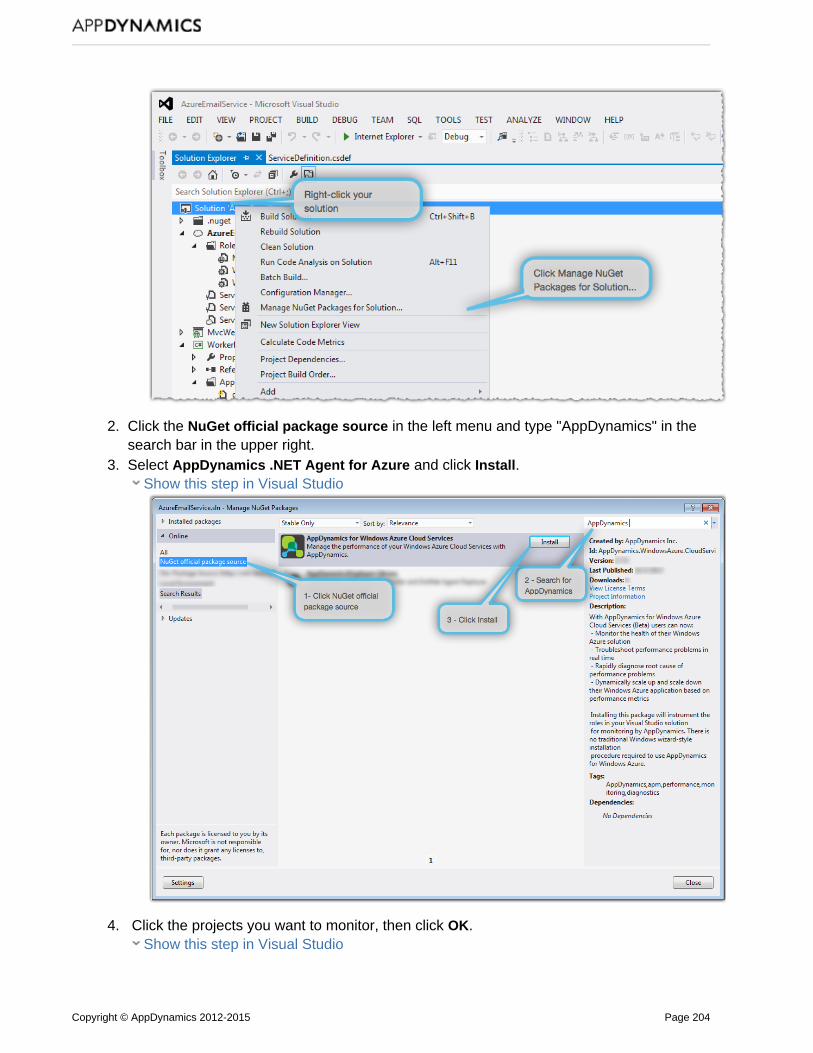
Copyright © AppDynamics 2012-2015 Page 204
1.
2.
3.
4.
Click the in the left menu and type "AppDynamics" in theNuGet official package sourcesearch bar in the upper right. Select and click .AppDynamics .NET Agent for Azure Install
Show this step in Visual Studio
Click the projects you want to monitor, then click .OKShow this step in Visual Studio
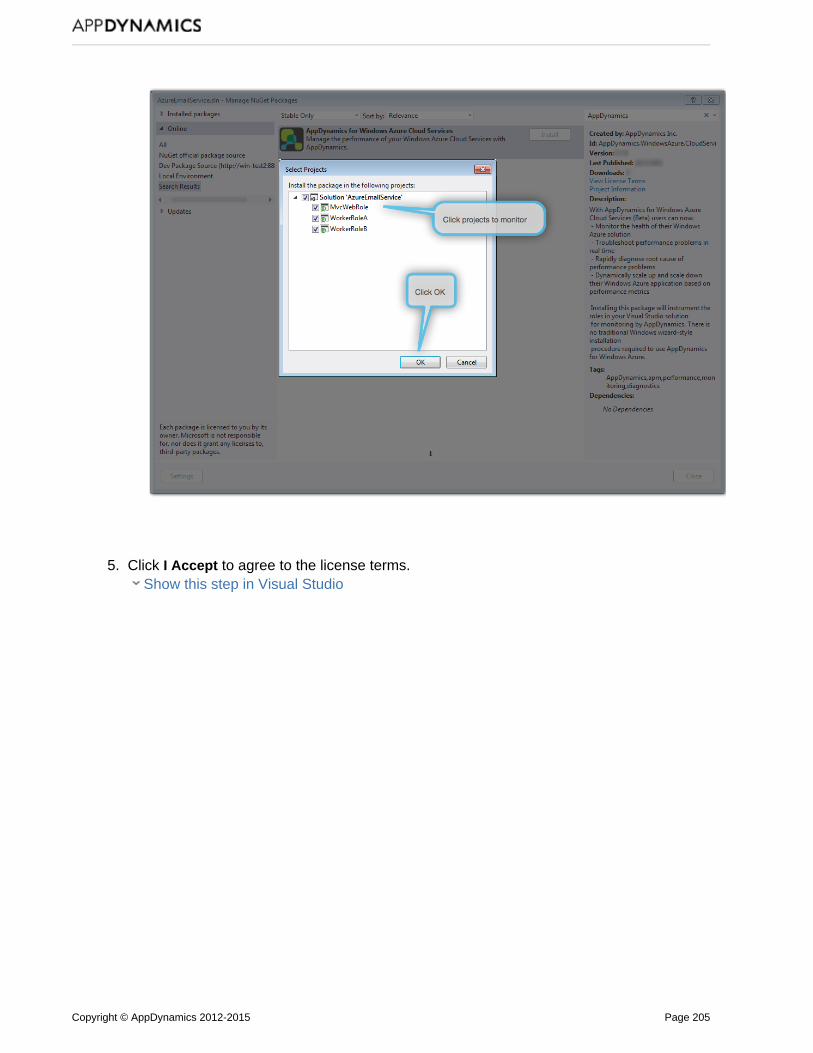
Copyright © AppDynamics 2012-2015 Page 205
4.
5. Click to agree to the license terms.I AcceptShow this step in Visual Studio

Copyright © AppDynamics 2012-2015 Page 206
5.
6. Enter the connection information from your Welcome email:Controller HostController PortAccount NameAccount Key
AppDynamics automatically populates with the name of yourApplication NameWindows Azure solution.
Show this step in Visual Studio

Copyright © AppDynamics 2012-2015 Page 207
6.
7. 8.
9.
You can also find your Account name and key in the AppDynamics Controller under Setti.ngs -> License
Close the Manage NuGet Packages window.
Verify the following:Instrumented projects have an AppDynamics folder.The AppDynamics folders contain an MSI installer package, a config.xml, and asetup.cmd file.The ServiceDefinition.csdef has an AppDynamics startup task.
Show this step in Visual Studio
By Default the .NET Agent names Azure tiers for the role name. For example"AzureEmailService". If you want to customize the tier name, follow the steps under Customi
before you publish the Windows Azure cloud solution.ze Tier Names for Azure Roles

Copyright © AppDynamics 2012-2015 Page 208
9.
1. 2. 3.
4.
1. 2.
Right-click the Windows Azure cloud solution and click Publish.Show this step in Visual Studio
Once you've successfully published your project, you're ready to log on to the Controller and beginmonitoring your solution!
Update Agent Configuration
New in 4.0.1, if you have already published your solution, you can update the .NET Agentconfiguration for the currently installed version without upgrading the agent.
Edit the config.xml file to make configuration changes.Edit the startup.cmd file.Set the CONFIGUPDATE variable to "true".
SET CONFIGUPDATE=true
Publish the Windows Azure cloud solution
Customize Tier Names for Azure Roles
By default the .NET Agent names tiers for Windows Azure role names. For example:MvcWebRole. If you want to customize the tier name for a role, edit the config.xml to specify thetier name using a regular expression for the IIS site.
Edit the config.xml in Visual Studio.Replace the IIS element with the following code block:
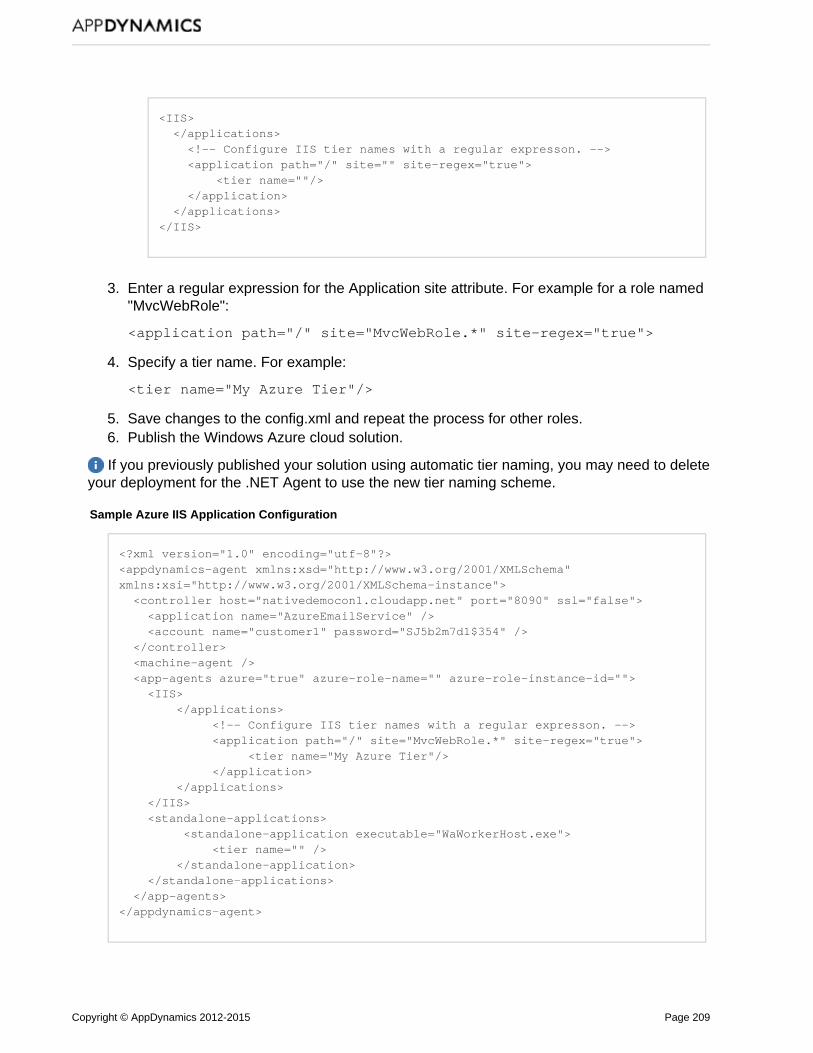
Copyright © AppDynamics 2012-2015 Page 209
2.
3.
4.
5. 6.
<IIS> </applications> <!-- Configure IIS tier names with a regular expresson. --> <application path="/" site="" site-regex="true"> <tier name=""/> </application> </applications></IIS>
Enter a regular expression for the Application site attribute. For example for a role named"MvcWebRole":
<application path="/" site="MvcWebRole.*" site-regex="true">
Specify a tier name. For example:
<tier name="My Azure Tier"/>
Save changes to the config.xml and repeat the process for other roles.Publish the Windows Azure cloud solution.
If you previously published your solution using automatic tier naming, you may need to deleteyour deployment for the .NET Agent to use the new tier naming scheme.
Sample Azure IIS Application Configuration
<?xml version="1.0" encoding="utf-8"?><appdynamics-agent xmlns:xsd="http://www.w3.org/2001/XMLSchema"xmlns:xsi="http://www.w3.org/2001/XMLSchema-instance"> <controller host="nativedemocon1.cloudapp.net" port="8090" ssl="false"> <application name="AzureEmailService" /> <account name="customer1" password="SJ5b2m7d1$354" /> </controller> <machine-agent /> <app-agents azure="true" azure-role-name="" azure-role-instance-id=""> <IIS> </applications> <!-- Configure IIS tier names with a regular expresson. --> <application path="/" site="MvcWebRole.*" site-regex="true"> <tier name="My Azure Tier"/> </application> </applications> </IIS> <standalone-applications> <standalone-application executable="WaWorkerHost.exe"> <tier name="" /> </standalone-application> </standalone-applications> </app-agents></appdynamics-agent>

Copyright © AppDynamics 2012-2015 Page 210
1.
Register for AppDynamics for Windows Azure
On this page:
What is AppDynamics?Register for an AppDynamics for WindowsAzure AccountRegister for an AppDynamics for WindowsAzure Account From Windows AzureMarketplaceNext Steps
Related pages:
Install AppDynamics for Windows Azure withNuGetManually Install the .NET Agent on WindowsAzureAppDynamics EssentialsAPM for .NET
Monitor your Azure cloud solutions with the AppDynamics for Windows Azure NuGet package.Sign up for the AppDyanmics add-on in the Windows Azure portal, then enable the AppDynamicsagent in your Visual Studio solution.
What is AppDynamics?
AppDynamics is an application performance monitoring solution that helps you:
Identify problems, such as slow and stalled user requests and errors, in a productionenvironmentTroubleshoot and isolate the root cause of such problems
There are two components in AppDynamics for Windows Azure:
App Agent: The .NET Agent collects data from your servers. You run a separate agent on everyrole instance that you want to monitor. You install the agent as part of the NuGet package.
AppDynamics Controller: The agent sends information to an AppDynamics Controller hostedservice. Using a browser-based console, you log on to the Controller to monitor, analyze andtroubleshoot your application.
Register for an AppDynamics for Windows Azure Account
Use the Windows Azure portal to sign up for AppDynamics for Windows Azure.
Log on to the Windows Azure portal at https://manage.windowsazure.com.

Copyright © AppDynamics 2012-2015 Page 211
1.
2.
3.
Click at the bottom left corner of the portal.+NEW
In the left menu, click .STORE

Copyright © AppDynamics 2012-2015 Page 212
3.
4.
5.
6.
7.
Click in the list of services and click the arrow.AppDynamics NEXT
Click the plan corresponding to the size (Extra Small, Small, Medium, etc.) and number ofvirtual machines where you will install AppDynamics monitoring agents.Select your and click the arrow.REGION NEXT
After the form validates the field and displays a green check, click the arrow. NAME NEXT

Copyright © AppDynamics 2012-2015 Page 213
7.
8.
1.
2.
3.
Review your purchase and click the to purchase.CHECK
You've successfully signed up for AppDynamics for Windows Azure!
Register for an AppDynamics for Windows Azure Account From Windows Azure Marketplace
Click or for AppDynamics on the Windows Azure Marketplace at Try Free Sign Up https://d.atamarket.azure.com/application/f9949031-b8b9-4da5-b500-c615f3f2a7cd
If you choose , you receive a free version of AppDynamics Pro for Windows AzureSign Upwith full functionality, which downgrades after 30 days to a free version of AppDynamics Litefor Windows Azure with limited functionality. You do not need to provide a credit card for thisoption. You can upgrade to AppDynamics Pro for Windows Azure at any time.
If you choose , you receive a free version of AppDynamics Pro for Windows AzureTry Freewith full functionality. You need to provide a credit card for this option. After 30 days yourcredit account will be charged for continued use of AppDynamics Pro for Windows Azure,unless you cancel your subscription.
You need one agent license for each role instance that you wish to monitor. For example, asite running 2 Web role instances and 2 Worker role instances requires 4 agent licenses.On the registration page, provide your user information, a password, email address,company name, and the name of the application you are monitoring as you will publish itwith Windows Azure.Click .Register Now
Next Steps
AppDynamics will send you a Welcome email with your URL and credentials to connect to theAppDynamics Controller. Then you can use NuGet to add the .NET Agent to your Windows Azuresolution using NuGet. See Install AppDynamics for Windows Azure with NuGet.

Copyright © AppDynamics 2012-2015 Page 214
Administer the .NET Agent
On this page:
Where to Configure Agent PropertiesCustomize .NET Agent Behavior in config.xmlSample Minimal controller-info.xmlAgent Log Files
Related pages:
.NET Agent Configuration Properties
The .NET Agent uses a single configuration file to control agent behavior and .NET Machine Agentbehavior. The configuration file specifies Controller connectivity, .NET Machine Agent operations,and app agent functionality for IIS applications, Windows services, and standalone applications.The single configuration file let's you:
Maintain agent configurations separately from web.config files.Enable instrumentation of Windows services and standalone applications withoutenvironment variables.Control agent behavior for specific applications with hierarchical configuration.
Where to Configure Agent Properties
Configure the agent properties in the config.xml file in the agent Config directory. To edit theconfig.xml, you must launch the editor as an administrator. When you run the .NET AgentConfiguration Utility, it writes the conifg.xml to one of the following locations:
Windows Server 2008 and later
%ProgramData%\AppDynamics\DotNetAgent\Config\config.xml
Windows Server 2003
%AllUsersProfile%\ApplicationData\AppDynamics\DotNetAgent\Config\config.xml
Windows Azure
For Windows Azure deployments, the .NET Agent NuGet pacakage contains the config.xml file.See .Install AppDynamics for Windows Azure with NuGet
Sample config.xml files install to the following location:
%ProgramFiles%\AppDynamics\AppDynamics .NET Agent\SampleConfigurations
After you edit the config.xml, you must restart the AppDynamics.Agent.Coordinator service.Then restart IIS, your Windows service, or standalone application for your instrumentationchanges to take effect.
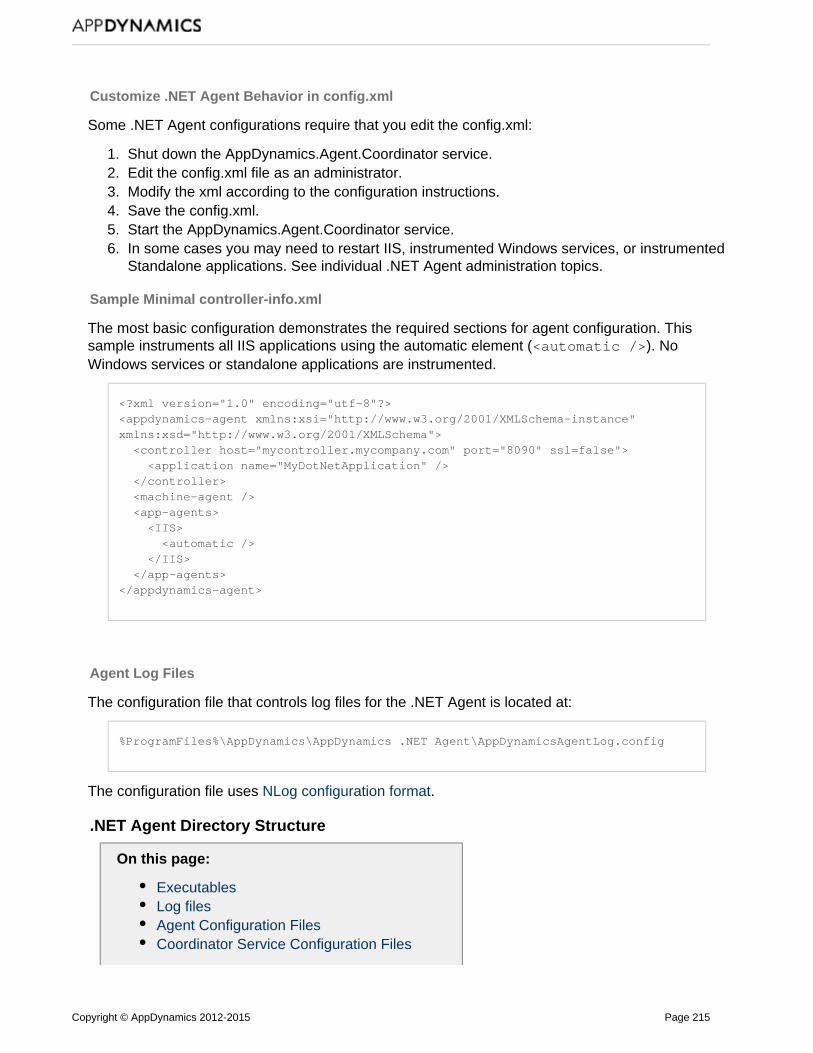
Copyright © AppDynamics 2012-2015 Page 215
1. 2. 3. 4. 5. 6.
Customize .NET Agent Behavior in config.xml
Some .NET Agent configurations require that you edit the config.xml:
Shut down the AppDynamics.Agent.Coordinator service.Edit the config.xml file as an administrator.Modify the xml according to the configuration instructions.Save the config.xml.Start the AppDynamics.Agent.Coordinator service.In some cases you may need to restart IIS, instrumented Windows services, or instrumentedStandalone applications. See individual .NET Agent administration topics.
Sample Minimal controller-info.xml
The most basic configuration demonstrates the required sections for agent configuration. Thissample instruments all IIS applications using the automatic element ( ). No<automatic />Windows services or standalone applications are instrumented.
<?xml version="1.0" encoding="utf-8"?><appdynamics-agent xmlns:xsi="http://www.w3.org/2001/XMLSchema-instance"xmlns:xsd="http://www.w3.org/2001/XMLSchema"> <controller host="mycontroller.mycompany.com" port="8090" ssl=false"> <application name="MyDotNetApplication" /> </controller> <machine-agent /> <app-agents> <IIS> <automatic /> </IIS> </app-agents></appdynamics-agent>
Agent Log Files
The configuration file that controls log files for the .NET Agent is located at:
%ProgramFiles%\AppDynamics\AppDynamics .NET Agent\AppDynamicsAgentLog.config
The configuration file uses .NLog configuration format
.NET Agent Directory Structure
On this page:
ExecutablesLog filesAgent Configuration FilesCoordinator Service Configuration Files

Copyright © AppDynamics 2012-2015 Page 216
About Windows Server System DirectoryVariables
Related pages:
Install the .NET AgentAdminister the .NET Agent
Executables
The .NET Agent executables and supporting files install to the directorAppDynamics .NET Agenty:
Windows Server 2003 and later
%ProgramFiles%\AppDynamics\AppDynamics .NET Agent
Log files
The directory defaults to the following location:Logs
Windows Server 2008 and later
%ProgramData%\AppDynamics\DotNetAgent\Logs
Windows Server 2003
%AllUsersProfile%\Application Data\AppDynamics\DotNetAgent\Logs
Agent Configuration Files
The unified configuration file config.xml installs to the directory:Config
Windows Server 2008 and later
%ProgramData%\AppDynamics\DotNetAgent\Config
Windows Server 2003
%AllUsersProfile%\Application Data\AppDynamics\DotNetAgent\Config
Coordinator Service Configuration Files
The AppDynamics Agent Coordinator service writes configuration files from the Controller to the D directory:ata
Windows Server 2008 and later
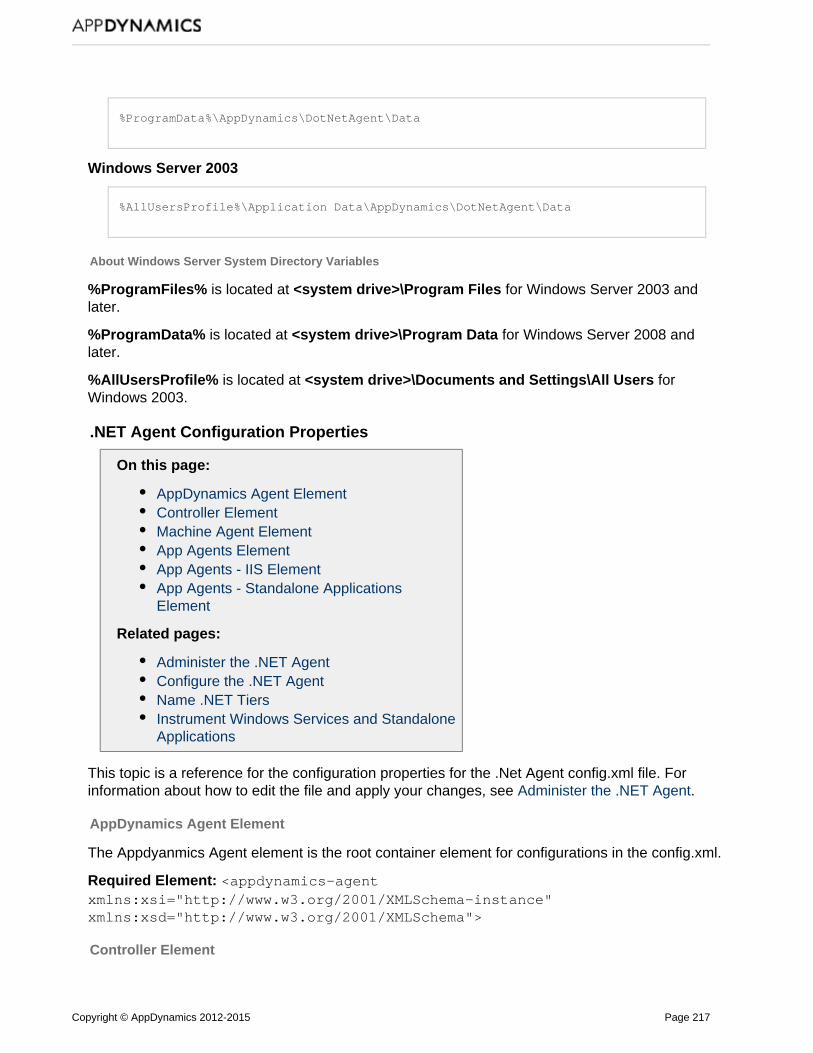
Copyright © AppDynamics 2012-2015 Page 217
%ProgramData%\AppDynamics\DotNetAgent\Data
Windows Server 2003
%AllUsersProfile%\Application Data\AppDynamics\DotNetAgent\Data
About Windows Server System Directory Variables
%ProgramFiles% is located at for Windows Server 2003 and<system drive>\Program Fileslater.
%ProgramData% is located at for Windows Server 2008 and<system drive>\Program Datalater.
%AllUsersProfile% is located at for<system drive>\Documents and Settings\All UsersWindows 2003.
.NET Agent Configuration Properties
On this page:
AppDynamics Agent ElementController ElementMachine Agent ElementApp Agents ElementApp Agents - IIS ElementApp Agents - Standalone ApplicationsElement
Related pages:
Administer the .NET AgentConfigure the .NET AgentName .NET TiersInstrument Windows Services and StandaloneApplications
This topic is a reference for the configuration properties for the .Net Agent config.xml file. Forinformation about how to edit the file and apply your changes, see .Administer the .NET Agent
AppDynamics Agent Element
The Appdyanmics Agent element is the root container element for configurations in the config.xml.
Required Element: <appdynamics-agentxmlns:xsi="http://www.w3.org/2001/XMLSchema-instance"xmlns:xsd="http://www.w3.org/2001/XMLSchema">
Controller Element

Copyright © AppDynamics 2012-2015 Page 218
The Controller element is a child of the AppDynamics Agent element. It specifies the connectioninformation for the AppDyanmics Pro Controller.
The .NET Agent configuration utility only supports configuration of one Controller per server.
Required Element: <controller host="mycontroller.mycompany.com" port="8090">ssl="false" enable_tls12="false" high_availability="false"
Controller host attribute
The Controller host attribute indicates the host name or the IP address of the AppDynamicsController. For an on-premise Controller, use the value for Application Server Host Name youprovided when you installed the Controller. If you use the AppDynamics SaaS Controller, see theWelcome email from AppDynamics.
Type: String NoneDefault:
: YesRequired
Controller port attribute
The Controller port attribute specifies the HTTP(S) port of the AppDynamics Controller. If theController ssl attribute is set to true, specify the HTTPS port of the Controller; otherwise specify theHTTP port.
Type: Positive Integer 8090Default:
For On-premise installations, the defaults are port 8090 for HTTP and port 8181 for HTTPS.
For the SaaS Controller, use port 80 for HTTP or port 443 for HTTPS.
Required: Yes
Controller ssl attribute
To enable encryption over SSL between the agent and the Controller, set the Controller sslattribute to "true".
Type: Boolean falseDefault:
: NoRequired
Controller enable TLS 1.2 attribute
: When you enable SSL, the agent encrypts communications with the Controller using4.0 to 4.0.3TLS 1.2 by default. If you are unwilling or unable to use TLS 1.2, set the Controller enable TLS 1.2attribute to "false".
: New in 4.0.4 When you enable SSL, the agent secures communication to the Controller using theprotocols set for ServicePointManager.SecurityProtocol in your application. Set the Controllerenable TLS 1.2 attribute to "true" to add TLS 1.2 as the first option in the list of protocols. Thisaffects all secure communications from your application, not just requests to the AppDynamicsController.
BooleanType:
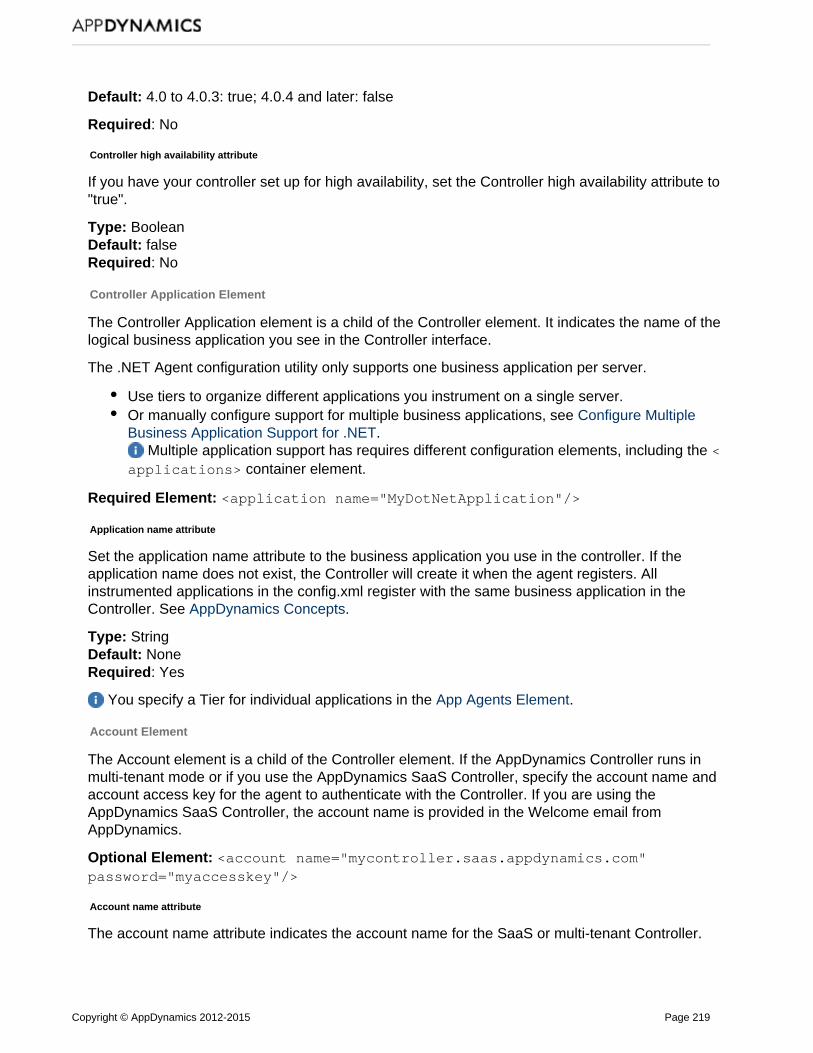
Copyright © AppDynamics 2012-2015 Page 219
: true; : Default: 4.0 to 4.0.3 4.0.4 and later false
: NoRequired
Controller high availability attribute
If you have your controller set up for high availability, set the Controller high availability attribute to"true".
Type: Boolean falseDefault:
: NoRequired
Controller Application Element
The Controller Application element is a child of the Controller element. It indicates the name of thelogical business application you see in the Controller interface.
The .NET Agent configuration utility only supports one business application per server.
Use tiers to organize different applications you instrument on a single server.Or manually configure support for multiple business applications, see Configure Multiple
.Business Application Support for .NET Multiple application support has requires different configuration elements, including the <
container element.applications>
Required Element: <application name="MyDotNetApplication"/>
Application name attribute
Set the application name attribute to the business application you use in the controller. If theapplication name does not exist, the Controller will create it when the agent registers. Allinstrumented applications in the config.xml register with the same business application in theController. See .AppDynamics Concepts
Type: String NoneDefault:
: YesRequired
You specify a Tier for individual applications in the .App Agents Element
Account Element
The Account element is a child of the Controller element. If the AppDynamics Controller runs inmulti-tenant mode or if you use the AppDynamics SaaS Controller, specify the account name andaccount access key for the agent to authenticate with the Controller. If you are using theAppDynamics SaaS Controller, the account name is provided in the Welcome email fromAppDynamics.
Optional Element: <account name="mycontroller.saas.appdynamics.com"password="myaccesskey"/>
Account name attribute
The account name attribute indicates the account name for the SaaS or multi-tenant Controller.
Copyright © AppDynamics 2012-2015 Page 220
Type: String NoneDefault:
: Only for SaaS or multi-tenant ControllersRequired
Account password attribute
The account password attribute indicates the access key for the SaaS or multi-tenant Controller.
Type: String NoneDefault:
: Only for SaaS or multi-tenant ControllersRequired
Proxy Element
The Proxy element is a child of the Controller element. Use it to configure connection to theController through a proxy server with no authentication.
Optional Element: <proxy host="proxy-name" port="3128" enabled="true"/>
Proxy host attribute
The proxy host attribute indicates the proxy server host name or IP address.
Type: String NoneDefault:
: host is required for the proxy elementRequired
Proxy port attribute
The proxy port attribute indicates the proxy server port.
Type: Positive Integer NoneDefault:
: port is required for the proxy elementRequired
Proxy enabled attribute
To enable Controller access through a proxy server, set the proxy enabled attribute to "true".
Type: Boolean falseDefault:
: NoRequired
Machine Agent Element
The Machine Agent element is a child of the AppDynamics Agent element. An empty MachineAgent element enables the default instrumentation for the .NET machine agent (See Monitor CLRsand ). Enable optional additional Microsoft Performance Counters or .NETMonitor IISAgent instrumentors as children of the Machine Agent element.
Required Element: <machine-agent/>
Machine Snapshot Element
The Machine Snapshot element is a child of the Machine Agent element. Use it to tune thesettings for machine snapshots in your environment. If you don't specify an attribute, the agent

Copyright © AppDynamics 2012-2015 Page 221
uses the default values for that attribute. See and Machine Snapshots for .NET Configure Machine.Snapshots for .NET
Optional Element: <machine-snapshot enabled="true" window-size="600" samples-per
-window="60" violations-per-window="6" max-percent-cpu="80" max-percent-memor
y="80" max-queue-item-age="100" periodic-collection="600" />
Machine Snapshot enabled attribute
Set the Machine Snapshot enabled attribute to "false" to disable machine snapshots.
Type: Boolean trueDefault:
: NoRequired
Machine Snapshot window size attribute
Specify the window size time range in seconds for the .NET Machine Agent to take samples.During a window, the agent takes samples and checks them for breached thresholds: max percentCPU, the max percent memory, and max queue item age.
Type: Integer 600Default:
: NoRequired
Machine Snapshot samples per window attribute
Specify the number of samples the .NET Machine Agent takes during the specified window. Forexample, if the window size is 600 and the samples per window is 60, the agent takes a sampleonce every 10 seconds.
Type: Integer 60Default:
: NoRequired
Machine Snapshot violations per window attribute
When the .NET Machine Agent detects the number of violations per window for one threshold, ittakes a snapshot. The agent only takes one snapshot per window for thresholds exceeded. Forexample, if the violations per window is set to 6, and six samples show memory usage at 80% orgreater, the agent takes a snapshot. The counters for each threshold are separate.
Type: Integer 6Default:
: NoRequired
Machine Snapshot max percent memory attribute
When the .NET Machine agent detects CPU usage on the machine equals or exceeds the maxpercent cpu value, it flags the sample as a violation. The minimum value is 20; the maximum valueis 100.
Type: Integer 80Default:

Copyright © AppDynamics 2012-2015 Page 222
: NoRequired
Machine Snapshot max percent cpu attribute
When the .NET Machine agent detects memory usage on the machine equals or exceeds the maxpercent memory value, it flags the sample as a violation. The minimum value is 20; the maximumvalue is 100.
Type: Integer 80Default:
: NoRequired
Machine Snapshot max queue item age attribute
When the .NET Machine agent detects the oldest item in the IIS queue equals or exceeds the maxqueue item age value in milliseconds, it flags the sample as a violation.
Type: Integer 100Default:
: NoRequired
Machine Snapshot periodic collection attribute
The .NET Machine agent takes one snapshot per periodic collection time range. Specify the valuein seconds. The minimum is 60 seconds.
Type: Integer 600Default:
: NoRequired
CLR Crash Reporting Element
The CLR Crash Reporting element is a child element of the Machine Agent element. Use the CLRCrash Reporting element to control whether or not the .NET Machine Agent reports CLR crashevents to the Controller. See .Monitor CLR Crashes
Optional Element: <clrcrash-reporting enabled="true"/>
CLR Crash Reporting enabled attribute
Set the enabled attribute to "false" to stop reporting CLR Crash events to the controller.
Type: Boolean trueDefault:
: NoRequired
Process Monitor Element
The Process Monitor element is a child element of the Machine Agent element. By default, theagent enables process monitoring for all IIS processes.
Optional Element: <process-monitor report-all-iis-processes="true"/>
Process Monitor report all IIS processes attribute
New in 4.0.1, set the attribute to "false" to enable process monitoring onlyreport-all-iis-prcocessesfor instrumented IIS processes.

Copyright © AppDynamics 2012-2015 Page 223
Type: Boolean trueDefault:
: NoRequired
Metrics Element
The Metrics element is a child element of the Machine Agent element. By default, the machineagent registers a maximum of 200 metrics. See . Use the Metrics element toMetrics Limitsincrease the number of metrics the .NET Machine Agent can register.
Use caution when increasing the metric registration limits. Increasing the limit can increase theresource overhead for agents and Controller.
Optional Element: <metrics max-metrics="200"/>
Metrics max-metrics attribute
Specify the maximum number of metrics the .NET Machine Agent can register.
Type: Integer 200Default:
: NoRequired
Performance Counters Element
The Performance Counters element is a child of the Machine Agent element. It is a container forall performance counters.
Optional Element: <perf-counters>
Performance Counter element
The Performance Counter element is a child of the Performance Counters element. For a list ofperformance counters to enable, see .Performance Counters in the .NET Framework
Optional Element: <perf-counter cat="category" name="name"instance="instance"/>
Performance Counter cat attribute
The performance counter cat attribute indicates the performance counter category.
Type: String NoneDefault:
: Category is required for the Performance Counter element.Required
Performance Counter name attribute
The performance counter name attribute indicates the performance counter name.
Type: String NoneDefault:
: Name is required for the Performance Counter element.Required
Performance Counter instance attribute
The performance counter instance attribute is the performance counter instance value.

Copyright © AppDynamics 2012-2015 Page 224
Type: String NoneDefault:
: Instance is required for the Performance Counter element.Required
Sample Machine Agent Configuration with Performance Counters
<machine-agent> <!-- Additional machine level Performance Counters --> <perf-counters> <perf-counter cat="Network Interface" name="Bytes Sent" instance="LocalArea Connection"/> </perf-counters> </machine-agent>
Instrumentation Element
The Instrumentation element is a child of the Machine Agent element. It allows you to enableadditional .NET Agent instrumetors such as or .thread correlation correlation for .NET remoting
Optional Element: <instrumentation>
Instrumentor element
The element is a child of the Instrumentation element. The instrumentor elementInstrumentorspecifies the .NET Agent instrumentor to implement.
Optional Element: <instrumentor name="instrumentor name" enabled="true"/>/>
Instrumentor name attribute
The instrumentor name attribute indicates the instrumentor name.
Type: String NoneDefault:
: Name is required for the Instrumentor element.Required
Instrumentor enabled attribute
Set the instrumentor enabled attribute to "true" to enable instrumentation.
Type: Boolean falseDefault:
: No.Required
The current configuration syntax is . Versions prior to 3.7.8 usedenabled="true"disabled="false".
Sample Machine Agent Configuration with Thread Correlation Instrumentors

Copyright © AppDynamics 2012-2015 Page 225
<machine-agent> <!--Enable thread correlation--> <instrumentation> <instrumentor name="ThreadCorrelationThreadPoolCLR2Instrumentor"enabled="true"/> <instrumentor name="ThreadStartCLR2Instrumentor" enabled="true"/> <instrumentor name="ThreadStartCLR4Instrumentor" enabled="true"/> </instrumentation> </machine-agent>
Additional .NET Agent Instrumetors
See .Enable Thread Correlation for .NETSee .Enable Correlation for .NET RemotingSee .Enable Instrumentation for WCF Data Services
App Agents Element
The App Agents element is a child of the AppDynamics Agent element. It is a container for appagent configurations for IIS applications, Windows services, and standalone applications.
Required Element: <app-agents enabled="true">
App agents enabled attribute
To disable application monitoring on the server, set the app agents enabled attribute to "false".
Type: Boolean trueDefault:
: NoRequired
Default Profiler Element
The default Profiler element is a child of the App Agents element. It defines customizations to thedefault profiler behavior for all instrumented .NET applications on the machine: IIS applications,application pools, Windows services, and standalone applications.
Optional Element: <profiler>
To override the default profiler, you can specify a profiler element as a child of the followingelements
Profiler - Disabled Features Element
The Disabled Features element is a child of the Profiler element. Use this property to disable datacollection mechanisms at the agent level for security or privacy reasons. This configurationoverrides any configuration set by the Controller.
Optional Element: <disabled-features value="NONE"/>
Disabled features value attribute
The disabled features value is a comma separated list of features to disable. The available values

Copyright © AppDynamics 2012-2015 Page 226
are as follows:
LOG_PAYLOAD: Override the log-request-payload node property to suppress logging httprequest payloadsRAW_SQL: Override the capture-raw-sql node property to suppress logging raw sql outputCUSTOM_EXIT_SNAP_DATA: Suppress snapshot data from custom exits pointsMETHOD_INV_DATA_COLLECTOR: Suppress method invocation data collector user dataHTTP_DATA_COLLECTOR: Suppress HTTP request data collector user dataINFO_POINT: Suppress information point metricsALL: Disable all the available featuresNONE: Don't disable features
Type: String NONEDefault:
: NoRequired
Profiler - Successful Exit Code Element
The Successful Exit Code element is a child of the Profiler element. The default successful exitcode determines whether or not the agent flags a CLR restart event as graceful or not for Windowsservices or standalone applications. This configuration doesn't apply to IIS.
Optional Element: <successful-exit-code value="0"/>
Successful exit code value attribute
Type: IntegerDefault: 0Required: No
Sample Default Profiler Configuration
<app-agents> <profiler> <disabled-features value="LOG_PAYLOAD,RAW_SQL,CUSTOM_EXIT_SNAP_DATA"/> <-- Set the successful exit code for Windows services and standaloneapplications to "1." --> <successful-exit-code value="1"/> </profiler>...</app-agents>
App Agents - IIS Element
The element is a child of the App Agents element. There are three options to configure IISIISapplications:
Automatic configurationApplication pool configurationApplication configuration
The settings for any application pool apply to all applications within the app pool unless the

Copyright © AppDynamics 2012-2015 Page 227
individual application has a specific configuration.
Explicit child-level configurations override parent-level configurations. Otherwise, children inheritparent configurations.
Optional Element: <IIS>
IIS Automatic Instrumentation Element
The Automatic element is a child of the IIS element. Use the Automatic element to enable ordisable automatic instrumentation for all IIS apps. You can configure automatic instrumentationand manual instrumentation both. Manual configurations override automatic ones.
Optional Element: <automatic enabled="false" />
Automatic enabled attribute
Set the automatic enabled attribute to "true" to enable instrumentation for all IIS applications. Thisis the default setting if you use the .NET Agent Configuration Utility automatic configuration option.To disable automatic instrumentation for all IIS applications, set the value to "false".
Type: Boolean trueDefault:
: NoRequired
IIS Application Pools Element
The IIS Application Pools element is a child of the IIS element. It is a container element for all theIIS application pools you configure for instrumentation.
Optional Element: <application-pools>
IIS Application Pool Element
The Application Pool element is a child of the Application Pools element.. You may have multipleapplication pool elements distinguished by the name attribute. Use the application pool element toconfigure the app agent for all applications within an application pool. For more information on IISapplication pools, see .Managing Application Pools in IIS
Application-specific configurations in the IIS Applications element override application poolconfigurations.
Optional Element: <application-pool name="DefaultAppPool" enabled="false">
Application pool name attribute
The application pool name attribute indicates the name of the IIS Application Pool.
Type: String NoneDefault:
: Name is required for the Application Pool element.Required
Application pool enabled attribute
Set the application pool enabled attribute to "false" to disable instrumentation for all applications inthe application pool. Set the value to "true" to instrument all applications in the application pool.

Copyright © AppDynamics 2012-2015 Page 228
Type: Boolean None. Defaults to true if not specified.Default:
: NoRequired
Application Pool Tier Element
The Tier element is a child of the Application Pool element. If you enable instrumentation for anApplication pool, you must use a Tier element to assign the pool's applications to a tier in theController. See AppDynamics Concepts.
Required Element: <tier name="Inventory" />
Tier name attribute
Use the tier name attribute to specify the tier.
Type: String NoneDefault:
YesRequired:
IIS Applications Element
The element is a child of the IIS element. It is a container element for all the IISIIS Applicationsapplications you configure for instrumentation.
Optional Element: <applications>
Application Element
The Application element is a child of the Applications element. Use multiple application elementsto instrument different sites and applications. To learn more about IIS sites and applications, see U
.nderstanding Sites, Applications, and Virtual Directories on IIS 7 and Above
Optional Element: <application path="/" site="FirstSite"port="8008" site-regex="false">
Application site attribute
The application site attribute indicates the root site in IIS for the application. The site name acceptsa for cases like windows Azure where you may only know a partial site name. Ifregular expressionyou use a regular expression, set the Application site-regex attribute to true. For an example, see "Customize Tier Names for Azure Roles" on Install AppDynamics for Windows Azure with NuGet.
Type: String NoneDefault:
: Site is required for the Application element.Required
Application site-regex attribute
Set the Application site-regex attribute to true to treat the value of the Application site attribute asa .regular expression
Type: Boolean falseDefault:
: NoRequired

Copyright © AppDynamics 2012-2015 Page 229
Application path attribute
The application path attribute indicates the application's path relative to the root site. Use theforward slash to indicate the root site and instrument all children applications. Use the path to anapplication to instrument the specific application and any children.
For example: Site1 hosts two applications AppX and AppY. To instrument Site 1, AppY and AppZ,set the path to "/". To instrument AppY, but not AppZ, set the path to "/AppY".
Type: String /Default:
: Path is required for the Application element.Required
Application port attribute
For cases where two or more sites in IIS 6 have the same site name, set the site port attribute todifferentiate between the sites.
Type: Positive Integer NoneDefault:
: NoRequired
Application enabled attribute
In certain cases you may want to enable instrumentation for a parent application, but disable it fora child application. In this case create an Application element for the child application to disableand set the application enabled attribute to to "false".
Type: Boolean trueDefault:
: NoRequired
Application Tier Element
The Tier element is a child of the Application element. If you enable instrumentation for anapplication, your must use a Tier element to assign the application to a tier in the Controller. See AppDynamics Concepts.
Required Element: <tier name="Consumer" />
Tier name attribute
The tier name attribute indicates the business application tier.
Type: String NoneDefault:
YesRequired:
Sample IIS Application Configuration
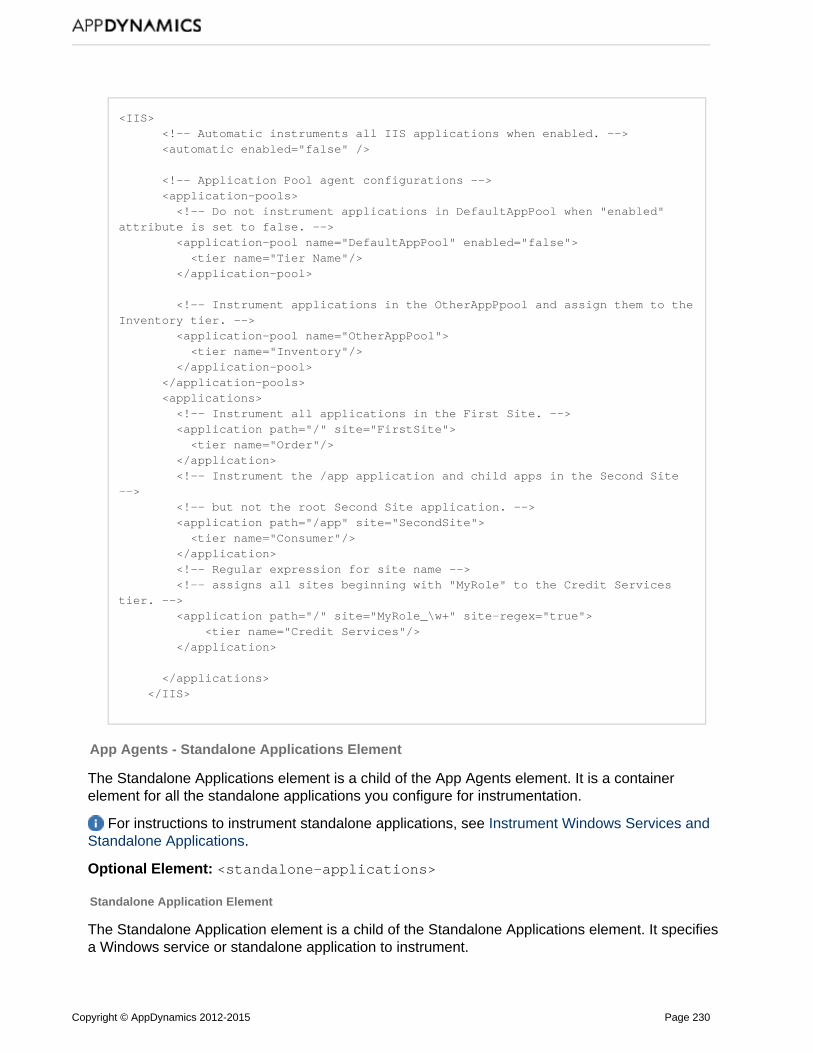
Copyright © AppDynamics 2012-2015 Page 230
<IIS> <!-- Automatic instruments all IIS applications when enabled. --> <automatic enabled="false" />
<!-- Application Pool agent configurations --> <application-pools> <!-- Do not instrument applications in DefaultAppPool when "enabled"attribute is set to false. --> <application-pool name="DefaultAppPool" enabled="false"> <tier name="Tier Name"/> </application-pool>
<!-- Instrument applications in the OtherAppPpool and assign them to theInventory tier. --> <application-pool name="OtherAppPool"> <tier name="Inventory"/> </application-pool> </application-pools> <applications> <!-- Instrument all applications in the First Site. --> <application path="/" site="FirstSite"> <tier name="Order"/> </application> <!-- Instrument the /app application and child apps in the Second Site--> <!-- but not the root Second Site application. --> <application path="/app" site="SecondSite"> <tier name="Consumer"/> </application> <!-- Regular expression for site name --> <!-- assigns all sites beginning with "MyRole" to the Credit Servicestier. --> <application path="/" site="MyRole_\w+" site-regex="true"> <tier name="Credit Services"/> </application> </applications> </IIS>
App Agents - Standalone Applications Element
The Standalone Applications element is a child of the App Agents element. It is a containerelement for all the standalone applications you configure for instrumentation.
For instructions to instrument standalone applications, see Instrument Windows Services and.Standalone Applications
Optional Element: <standalone-applications>
Standalone Application Element
The Standalone Application element is a child of the Standalone Applications element. It specifiesa Windows service or standalone application to instrument.
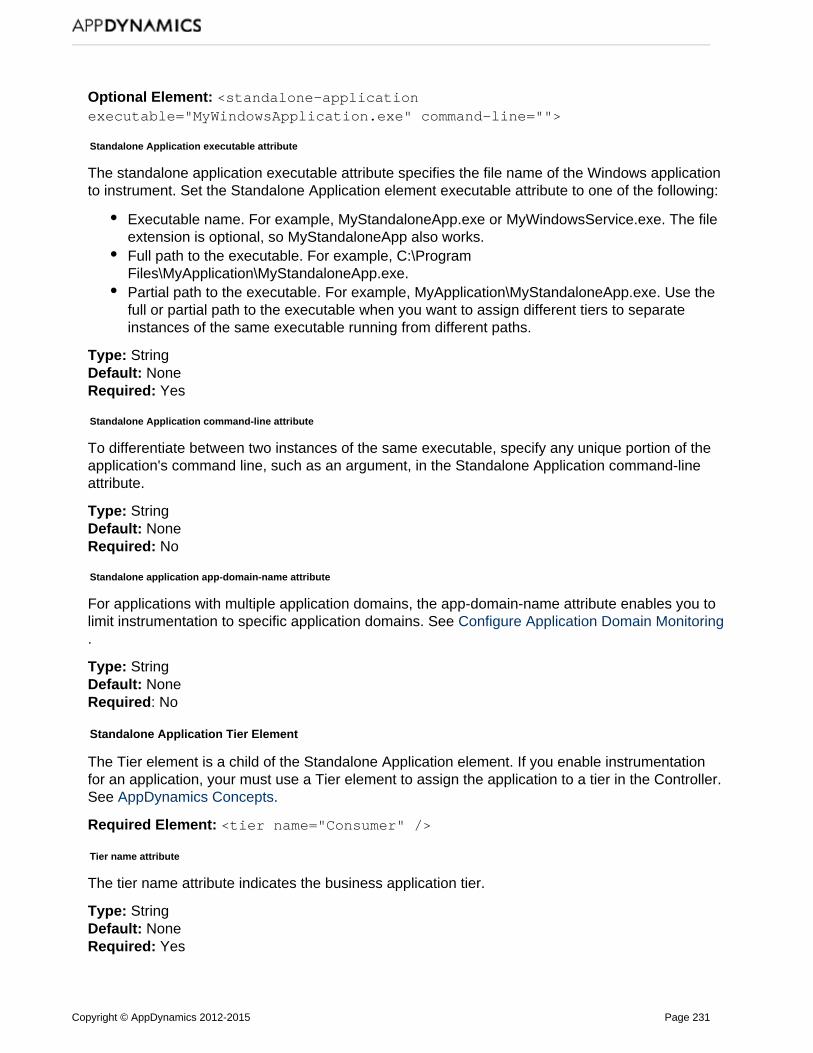
Copyright © AppDynamics 2012-2015 Page 231
Optional Element: <standalone-applicationexecutable="MyWindowsApplication.exe" command-line="">
Standalone Application executable attribute
The standalone application executable attribute specifies the file name of the Windows applicationto instrument. Set the Standalone Application element executable attribute to one of the following:
Executable name. For example, MyStandaloneApp.exe or MyWindowsService.exe. The fileextension is optional, so MyStandaloneApp also works.Full path to the executable. For example, C:\ProgramFiles\MyApplication\MyStandaloneApp.exe.Partial path to the executable. For example, MyApplication\MyStandaloneApp.exe. Use thefull or partial path to the executable when you want to assign different tiers to separateinstances of the same executable running from different paths.
Type: String NoneDefault:
YesRequired:
Standalone Application command-line attribute
To differentiate between two instances of the same executable, specify any unique portion of theapplication's command line, such as an argument, in the Standalone Application command-lineattribute.
Type: String NoneDefault:
NoRequired:
Standalone application app-domain-name attribute
For applications with multiple application domains, the app-domain-name attribute enables you tolimit instrumentation to specific application domains. See Configure Application Domain Monitoring.
Type: String NoneDefault:
: NoRequired
Standalone Application Tier Element
The Tier element is a child of the Standalone Application element. If you enable instrumentationfor an application, your must use a Tier element to assign the application to a tier in the Controller. See AppDynamics Concepts.
Required Element: <tier name="Consumer" />
Tier name attribute
The tier name attribute indicates the business application tier.
Type: String NoneDefault:
YesRequired:

Copyright © AppDynamics 2012-2015 Page 232
Sample Windows service and Standalone Application Configuration
<standalone-applications> <standalone-application executable="ExampleApplication.exe"> <tier name="Standalone Application Tier"/> </standalone-application> <!-- Instrument a Windows service using arguments. --> <!-- The following example matches the command "MyWindowsService.exe -d -x-r". --> <standalone-application executable="MyWindowsService.exe" command-line="-x"> <tier name="Windows Service Tier"/> </standalone-application></standalone-applications>
Configure Multiple Business Application Support for .NET
On this page:
Prepare to Configure Multiple BusinessApplicationsManually Configure the .NET AgentSample ConfigurationAgent Configuration Properties for MultipleApplication Support
Related pages:
.NET Agent Configuration Properties
.NET Agent versions prior to 3.9 required that monitoring data for all .NET applications running ona Windows host report to one business application in the Controller. This topic describes how toconfigure the agent to register different applications on the same Windows host with multiplebusiness applications in the Controller.
If a tier in the first business application makes an exit call to a second tier in another businessapplication, AppDynamics applies . To learn more about AppDynamicsCross Application Flowbusiness applications, see AppDynamics Concepts.
Multiple business application support in the .NET Agent requires manually editing theconfig.xml to use a schema that the AppDynamics Agent Configuration utility doesn't currentlysupport.
If you follow these instructions to configure multiple application support, you can't use theconfiguration utility to make configuration changes afterward. If you launch the configuration utilityon a server where you've configured multiple application support, the utility will prompt you todelete the configurations.
Prepare to Configure Multiple Business Applications
Before you configure the .NET Agent, you must install the agent. Use the AppDynamics AgentConfiguration utility to perform basic configuration tasks.

Copyright © AppDynamics 2012-2015 Page 233
1.
2.
3.
4.
5.
1.
2.
Identify how you want to organize your business applications and identify the businessapplication names.
For example, consider a Windows host running IIS. The IIS instance serves two applicationsfor two separate customers: Ticket Search and Travel Search. The applications performsimilar functions, but it makes sense to monitor them separately because they functionindependently. In this case, create two business applications based upon the applicationname: Ticket Search Engine and Travel Search Engine.Map your IIS applications or application pools, Windows services, and standaloneapplications to tiers in the different business applications.
For example, map the TicketSearch site to the Ticket Search Web tier in the Ticket SearchEngine business application. Map the TravelSearch site to the Travel Search Web tier in theTravel Search Engine business application.
If you have not already done so, install the .NET Agent. See Install the .NET Agent.
Run the AppDynamics Agent Configuration utility to generate a config.xml and configure theController connection. See Configure the .NET Agent
When prompted, choose Manual for the method of tier generation and assignment.
Currently the configuration utility only supports mapping one business application perserver.
Manually Configure the .NET Agent
Once you have configured the Controller properties for the .NET Agent, instrument your .NETApplications in the config.xml.
Open the config.xml file as administrator and edit the file. See "Where to Configure Agent.Properties" on Administer the .NET Agent
Copy the block and paste it as a child element of the elController Applications Controllerement. Replace any existing or elements:<applications> <application>
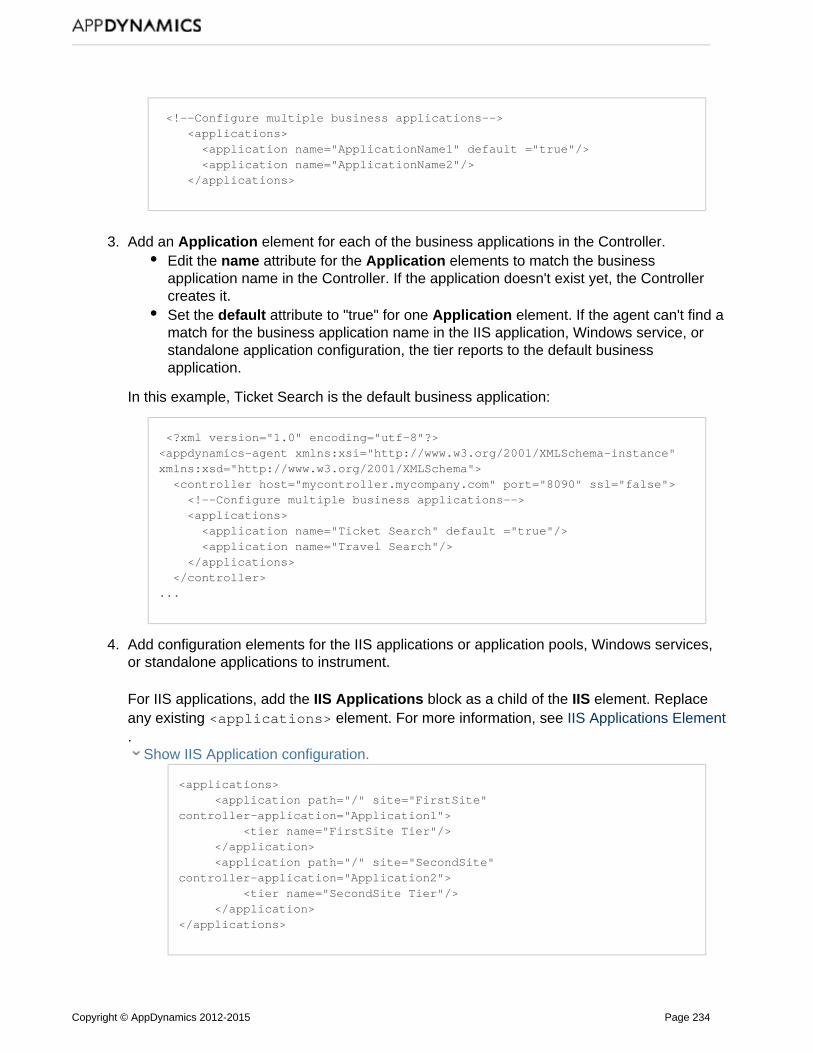
Copyright © AppDynamics 2012-2015 Page 234
2.
3.
4.
<!--Configure multiple business applications--> <applications> <application name="ApplicationName1" default ="true"/> <application name="ApplicationName2"/> </applications>
Add an element for each of the business applications in the Controller.ApplicationEdit the attribute for the elements to match the businessname Applicationapplication name in the Controller. If the application doesn't exist yet, the Controllercreates it.Set the attribute to "true" for one element. If the agent can't find adefault Applicationmatch for the business application name in the IIS application, Windows service, orstandalone application configuration, the tier reports to the default businessapplication.
In this example, Ticket Search is the default business application:
<?xml version="1.0" encoding="utf-8"?><appdynamics-agent xmlns:xsi="http://www.w3.org/2001/XMLSchema-instance"xmlns:xsd="http://www.w3.org/2001/XMLSchema"> <controller host="mycontroller.mycompany.com" port="8090" ssl="false"> <!--Configure multiple business applications--> <applications> <application name="Ticket Search" default ="true"/> <application name="Travel Search"/> </applications> </controller>...
Add configuration elements for the IIS applications or application pools, Windows services,or standalone applications to instrument.
For IIS applications, add the block as a child of the element. ReplaceIIS Applications IIS any existing For more information, see < element. applications> IIS Applications Element.
Show IIS Application configuration.
<applications> <application path="/" site="FirstSite"controller-application="Application1"> <tier name="FirstSite Tier"/> </application> <application path="/" site="SecondSite"controller-application="Application2"> <tier name="SecondSite Tier"/> </application></applications>

Copyright © AppDynamics 2012-2015 Page 235
4.
5.
6. 7. 8. 9.
For IIS application pools, add the IIS Application Pools block as a child of the IIS element.Replace any existing element. For more information, see <application-pools> IISApplication Pools Element.
Show IIS Application Pool configuration.
<application-pools> <application-pool name="MyAppPool1"controller-application="Application1"> <tier name="App1 AppPool Tier"/> </application-pool> <application-pool name="MyAppPool2"controller-application="Application2"> <tier name="App2 AppPool Tier"/> </application-pool></application-pools>
For Windows services or standalone applications, add the blockStandalone Applications as a child of the element. For more information, see App Agents Standalone Applications
.ElementShow standalone application configuration.
<standalone-applications> <standalone-application executable="MyStandaloneApp.exe"controller-application="ApplicationName1"> <tier name="Standalone App Tier"/> </standalone-application> <standalone-application executable="MyWindowsService.exe"command-line="-x" controller-application="ApplicationName2"> <tier name="Windows Service Tier"/> </standalone-application></standalone-applications>
Configure your application elements as follows:Add the corresponding element for each IIS application or application pool, Windowsservice, or standalone application to instrument. For information on specific elementssee ..NET Agent Configuration PropertiesFor each application element set the controller-application attribute to the name ofthe corresponding business application. If you omit the controller-application attribute,the agent adds the application to a tier in the configured default business application.Set the element attribute to the business application tier name.Tier name
After you complete configuration, save the changes to config.xml.Restart the AppDynamics.Agent.Coordinator service.Restart IIS applications or application pools, Windows services, or standalone applications.As your applications begin processing traffic, the agent registers them with the Controller.Log on to the Controller to see that your applications have registered with the correspondingbusiness application.
Sample Configuration
This sample config.xml demonstrates configuration for multiple business applications in the

Copyright © AppDynamics 2012-2015 Page 236
Controller. Because the Windows service TicketService doesn't specify a controller-applicationattribute, it reports to the default business application Ticket Search Engine. All applications in theTravelAPIPool report to the Travel Search Engine.
<?xml version="1.0" encoding="utf-8"?><appdynamics-agentxmlns:xsi="http://www.w3.org/2001/XMLSchema-instance"xmlns:xsd="http://www.w3.org/2001/XMLSchema"> <controller host="mycontroller.mycompany.com" port="8090"ssl="false"> <!--Configure multiple business applications--> <applications> <application name="Ticket Search Engine" default ="true"/> <application name="Travel Search Engine"/> </applications> </controller> <machine-agent /> <app-agents> <IIS> <automatic enabled="false" /> <application-pools> <application-pool name="TravelAPIPool"controller-application="Travel Search Engine"> <tier name="Travel APIs"/> </application-pool> </application-pools> <applications> <application path="/" site="TicketSearch"controller-application="Ticket Search Engine"> <tier name="Ticket Search Web"/> </application> <application path="/" site="TravelSearch"controller-application="Travel Search Engine"> <tier name="Travel Search Web"/> </application> </applications> </IIS> <standalone-applications> <standalone-application executable="StandaloneApp.exe"controller-application="Ticket Search Engine"> <tier name="Ticket Standalone Tier"/> </standalone-application> <standalone-application executable="WindowsService.exe"command-line="-x" controller-application="Travel Search Engine"> <tier name="Travel Windows Service Tier"/> </standalone-application> </standalone-applications> </app-agents></appdynamics-agent>

Copyright © AppDynamics 2012-2015 Page 237
Agent Configuration Properties for Multiple Application Support
Multiple business application support includes configuration properties for the .NET Agent. Theseconfiguration properties supersede the ones documented in ..NET Agent Configuration Properties
Controller Applications Element
The element is a child of the element. It is a containerController Applications Controller element for all controller applications elements that map to business applications in the Controller.
Required Element: <applications>
Controller Application Element
The element is a child of the element. ItController Application Controller Applicationsindicates the name of the logical business application you see in the Controller. When you havemore than one Controller Application element, you must set the default attribute to "true" for one ofthem.
Required Element: <application name="MyDotNetApplication" default="true"/>
Application name attribute
Set the application attribute to the business application name in the Controller. If thenameapplication name does not exist, the Controller creates it when the agent registers.
Type: String NoneDefault:
: YesRequired
Application default attribute
Set the application attribute to "true" for one element.default Controller ApplicationInstrumented applications without the attribute register with the defaultcontroller-applicationbusiness application in the Controller.
Type: Boolean falseDefault:
: For one application in multiple application configurationsRequired
Controller-Application Attribute
The , , , and eleIIS Application IIS Application Pool Windows Service Standalone Applicationments accept the attribute. Set the value to the elecontroller-application Controller Applicationment name. If you don't include a controller-application attribute, the application registers with thedefault business application.
For example, an IIS application:
<application path="/" site="MySite" controller-application="My BusinessApplication">
Type: String NoneDefault:

Copyright © AppDynamics 2012-2015 Page 238
1.
2.
3.
4. 5.
: NoRequired
Disable Instrumentation for an IIS Application Pool
Related pages:
Administer the .NET Agent.NET Agent Configuration Properties
When you install the .NET Agent on a machine and use automatic tier naming, the agentinstruments every IIS application by default. If you don't need to monitor all application pools,disable monitoring for selected pools.
Open the config.xml file for editing as administrator. See "Where to Configure AgentProperties" on Administer the .NET Agent.Add the Application Pools block as a child of the IIS element. See .NET Agent Configuration
.Properties
<!-- Disable instrumentation for an application pool --> <application-pools> <!-- Do not instrument applications in DefaultAppPool when "enabled"attribute is set to false --> <application-pool name="DefaultAppPool" enabled="false" /> </application-pools>
Set the Application Pool element name attribute to the application pool name. This exampledisables instrumentation for the DefaultAppPool. You may add multiple Application Poolelements.
Restart the AppDynamics.Agent.Coordinator.Restart IIS.
Configure Application Domain Monitoring
On this page:
Overview of AppDomains in .NETConfigure Monitoring for Multiple ApplicationDomains
Related pages:
Instrument DefaultDomain for StandaloneApplicationsApplication Domains.NET Agent Configuration PropertiesInstrument Windows Services and StandaloneApplications

Copyright © AppDynamics 2012-2015 Page 239
You can configure the .NET Agent to monitor ASP.NET applications with multiple ApplicationDomains (AppDomains). This topic assumes you have a working knowledge of AppDomains andthat you are familiar with the AppDomain implementation in your application.
This topic does not cover the System Domain, Shared Domain, or DefaultDomain AppDomains theCLR instantiates before it executes the managed code. If your standalone application runs in theDefaultDomain, see .Instrument the DefaultDomain for Standalone Applications
Overview of AppDomains in .NET
Windows uses processes to manage security and performance isolation between runningapplications. Process isolation ensures one application's running code doesn't interfere withanother application. However, for applications that share data, making calls between Windowsprocesses can introduce complications and performance issues. AppDomains enable developersto create several applications that run inside a single process but maintain application isolation.
Single Application Domain
In the case of a single application running inside its own process, the runtime host typicallymanages the AppDomain. The application executable and the AppDomain have the same name.The .NET Agent (agent) installs itself inside the single AppDomain and creates a node for theapplication.
Multiple Application Domains
When developers include multiple AppDomains in an application, all the AppDomains run inside asingle process. The application executable may have the same name as one AppDomain, butthere are other, uniquely named AppDomains. By default, the agent installs itself inside all theAppDomains and creates nodes for them.

Copyright © AppDynamics 2012-2015 Page 240
Configure Monitoring for Multiple Application Domains
If the application you monitor contains multiple AppDomains, the App Agent for .NET automaticallyinstruments each AppDomain and creates a node. You can configure the .NET Agent toinstrument only the AppDomains you specify. This is useful to exclude AppDomains you don't wantto monitor and to limit the number of nodes in a tier.
You can configure application domain monitoring for:
Windows ServicesStandalone Applications
Configure all instrumentation settings for the .NET Agent in the config.xml file. See "Where to.Configure Agent Properties" on Administer the .NET Agent
1. Identify the name of the AppDomains you want to instrument.
If you have already instrumented your application, you can see the AppDomain names inthe Node Dashboard.
Click the node in the left navigation pane, then click .CLR

Copyright © AppDynamics 2012-2015 Page 241
2. Launch a text editor as administrator.
3. Edit the config.xml file as an administrator. See .Administer the .NET Agent
4. Find the element that corresponds to your application with multiple AppDomains:
element: Windows Service <windows-service name="MyWindowsService"> element: Standalone Application <standalone-applicationexecutable="MyWindowsApplication.exe">
5. Add the attribute to the element.app-domain-name
For example, to instrument the MyApp.exe AppDomain for the MyApp.exe standalone application:
<standalone-application executable="MyApp.exe" app-domain-name="MyApp.exe"> <tier name="StandaloneApplication Tier"/></standalone-application>
6. To instrument additional AppDomains, add an element for each AppDomain as if they wereseparate applications.
For example, to instrument MyAppDomain1 in MyApp.exe:
As soon as you instrument one AppDomain in the config.xml, the agent instruments onlythe AppDomains you specify. Other AppDomains are not instrumented.

Copyright © AppDynamics 2012-2015 Page 242
<standalone-application executable="MyApp.exe" app-domain-name="MyAppDomain1"> <tier name="StandaloneApplication Tier"/> </standalone-application>
7. Save the config.xml file.
8. Restart the AppDynamics.Agent.Coordinator service.
9. Restart instrumented applications: Windows services or standalone applications.
Sample Standalone Application configuration with multiple AppDomains
This sample config.xml shows the configuration for the application MyApp.exe. Instrumentationonly applies to the AppDomains specified in the config.xml: MyApp.exe and MyAppDomain2.

Copyright © AppDynamics 2012-2015 Page 243
1.
<?xml version="1.0" encoding="utf-8"?><appdynamics-agent xmlns:xsi="http://www.w3.org/2001/XMLSchema-instance"xmlns:xsd="http://www.w3.org/2001/XMLSchema"> <controller host="mycontroller.mycompany.com" port="8090" ssl=false"> <application name="MyDotNetApplication" /> </controller> <machine-agent /> <app-agents> <standalone-applications> <standalone-application executable="MyApp.exe"app-domain-name=""MyApp.exe"> <tier name="StandaloneApplication Tier"/> </standalone-application> <standalone-application executable="MyApp.exe"app-domain-name=""MyAppDomain2"> <tier name="StandaloneApplication Tier"/> </standalone-application> </standalone-applications> </app-agents></appdynamics-agent>
Instrument the DefaultDomain for Standalone Applications
On this page:
Check if Your Application Runs in theDefaultDomainInstrument the DefaultDomain
Related pages:
Instrument Windows Services and StandaloneApplicationsPOCO Entry Points.NET Agent Configuration Properties
By default, the .NET Agent does not instrument the .NET AppDomain. Before youDefaultDomaininstrument the DefaultDomain:
Follow the instructions to instrument a .standalone applicationCreate a for a class/method in the application.POCO entry point
If you complete those steps and still don't see business transactions in the Controller, check if yourmanaged code runs in the DefaultDomain. If so, you must configure the agent to instrument theDefaultDomain.
Check if Your Application Runs in the DefaultDomain
If you are unfamiliar with your application's managed code, you can use the agent logs to identifythe AppDomain.

Copyright © AppDynamics 2012-2015 Page 244
1.
2.
1.
2.
Open the agent log:Windows Server 2008 and later:%ProgramData%\AppDynamics\DotNetAgent\Logs\AgentLog.txtWindows Server 2003:%AllUsersProfile%\ApplicationData\AppDynamics\DotNetAgent\Logs\AgentLog.txtSearch the agent log for "AppDomain".
Few log entries contain "AppDomain" when the agent starts up. Look for an entry by"dllhost" or your instrumented application similar to the following:
2013-12-16 08:23:02.3120 3068 MYPROGRAM 1 1 Info ConfigurationappDomainName=DefaultDomain appDomainId=1 iis-app=null site=null port=nullappPoolId=2013-12-16 08:23:02.6240 3192 dllhost 1 17 Info ConfigurationManager Notinstrumenting DefaultDomain for pid 3068
In this example MYPROGRAM is the name of the instrumented standalone application. Youcan see the name of the AppDomain in the log entry: .appDomainName=DefaultDomain
Instrument the DefaultDomain
Open the config.xml file for editing as administrator. See "Where to Configure AgentProperties" on Administer the .NET Agent.Copy the code block below to a child element of the element. See Standalone Application
..NET Agent Configuration Properties
<profiler> <instrument-defaultdomain enabled="true"/> </profiler>
The Profiler element must follow the Standalone Application Tier element.
For example:
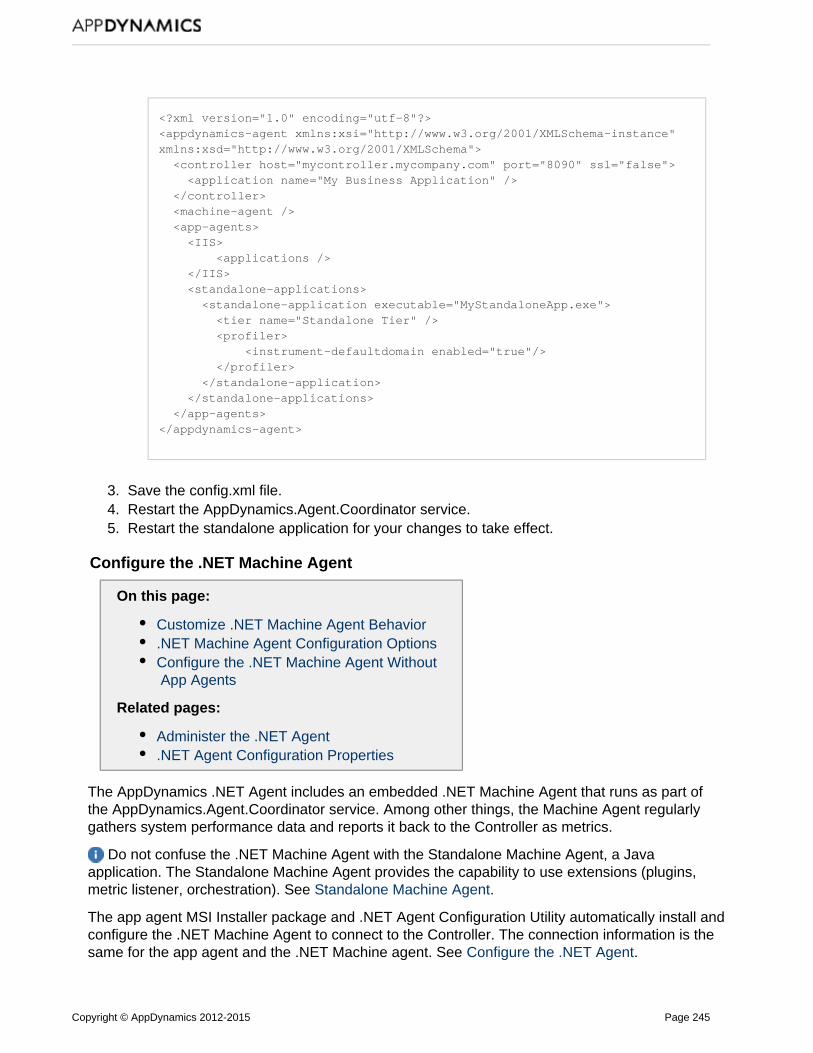
Copyright © AppDynamics 2012-2015 Page 245
2.
3. 4. 5.
<?xml version="1.0" encoding="utf-8"?><appdynamics-agent xmlns:xsi="http://www.w3.org/2001/XMLSchema-instance"xmlns:xsd="http://www.w3.org/2001/XMLSchema"> <controller host="mycontroller.mycompany.com" port="8090" ssl="false"> <application name="My Business Application" /> </controller> <machine-agent /> <app-agents> <IIS> <applications /> </IIS> <standalone-applications> <standalone-application executable="MyStandaloneApp.exe"> <tier name="Standalone Tier" /> <profiler> <instrument-defaultdomain enabled="true"/> </profiler> </standalone-application> </standalone-applications> </app-agents></appdynamics-agent>
Save the config.xml file.Restart the AppDynamics.Agent.Coordinator service.Restart the standalone application for your changes to take effect.
Configure the .NET Machine Agent
On this page:
Customize .NET Machine Agent Behavior.NET Machine Agent Configuration OptionsConfigure the .NET Machine Agent Without App Agents
Related pages:
Administer the .NET Agent.NET Agent Configuration Properties
The AppDynamics .NET Agent includes an embedded .NET Machine Agent that runs as part ofthe AppDynamics.Agent.Coordinator service. Among other things, the Machine Agent regularlygathers system performance data and reports it back to the Controller as metrics.
Do not confuse the .NET Machine Agent with the Standalone Machine Agent, a Javaapplication. The Standalone Machine Agent provides the capability to use extensions (plugins,metric listener, orchestration). See Standalone Machine Agent.
The app agent MSI Installer package and .NET Agent Configuration Utility automatically install andconfigure the .NET Machine Agent to connect to the Controller. The connection information is thesame for the app agent and the .NET Machine agent. See .Configure the .NET Agent
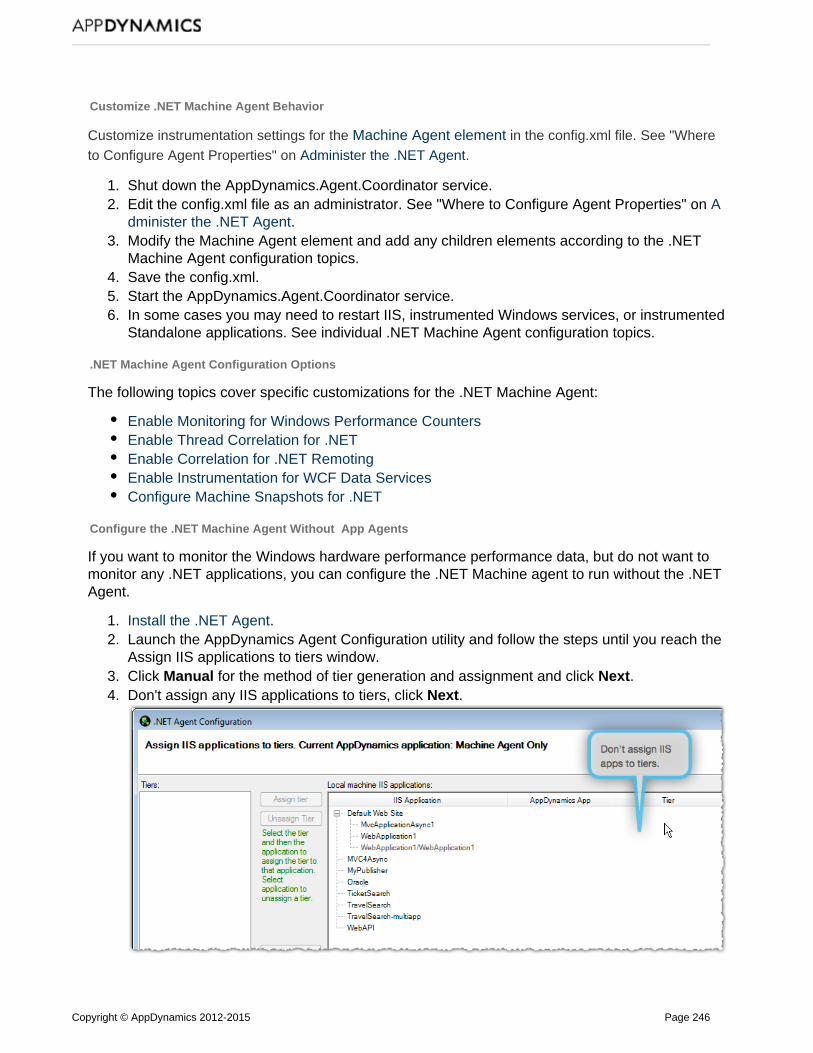
Copyright © AppDynamics 2012-2015 Page 246
1. 2.
3.
4. 5. 6.
1. 2.
3. 4.
Customize .NET Machine Agent Behavior
Customize instrumentation settings for the Machine Agent element in the config.xml file. See "Whereto Configure Agent Properties" on Administer the .NET Agent.
Shut down the AppDynamics.Agent.Coordinator service.Edit the config.xml file as an administrator. See "Where to Configure Agent Properties" on Administer the .NET Agent.Modify the Machine Agent element and add any children elements according to the .NETMachine Agent configuration topics.Save the config.xml.Start the AppDynamics.Agent.Coordinator service.In some cases you may need to restart IIS, instrumented Windows services, or instrumentedStandalone applications. See individual .NET Machine Agent configuration topics.
.NET Machine Agent Configuration Options
The following topics cover specific customizations for the .NET Machine Agent:
Enable Monitoring for Windows Performance CountersEnable Thread Correlation for .NETEnable Correlation for .NET RemotingEnable Instrumentation for WCF Data ServicesConfigure Machine Snapshots for .NET
Configure the .NET Machine Agent Without App Agents
If you want to monitor the Windows hardware performance performance data, but do not want tomonitor any .NET applications, you can configure the .NET Machine agent to run without the .NETAgent.
Install the .NET Agent.Launch the AppDynamics Agent Configuration utility and follow the steps until you reach theAssign IIS applications to tiers window.Click for the method of tier generation and assignment and click .Manual NextDon't assign any IIS applications to tiers, click .Next

Copyright © AppDynamics 2012-2015 Page 247
4.
5.
1. 2.
3.
4.
If you configured any Windows services or standalone applications, manually disablethose agents in the config.xml.
Continue with the remaining steps and click .Done
Monitoring resumes for the .NET Machine Agent only. Metrics appear in the Controller underthe Machine Agent tier, see .Monitor Windows Hardware Resources
Enable Monitoring for Windows Performance Counters
On this page:
Performance Counters and the .NET MachineAgentConfigure Additional Performance Countersfor .NetSample .NET Machine Agent Configurationwith Performance Counters
Related pages:
Monitor CLRsMonitor IIS
Performance Counters and the .NET Machine Agent
By default, the .NET Machine Agent uses Microsoft Performance Counters to gather and report.NET metrics. For details on the preconfigured .NET metrics see and .Monitor CLRs Monitor IIS
You can specify additional performance counters to be reported by the .NET Machine Agent.
Configure Additional Performance Counters for .Net
Shut down the AppDynamics.Agent.Coordinator service.Open the config.xml file for editing as administrator. See "Where to Configure AgentProperties" on Administer the .NET Agent.Add the Performance Counters block as a child of the Machine Agent element.
<perf-counters> <perf-counter cat="" name="" instance=""/> </perf-counters>
Create a Performance Counter element for each performance counter you want to add.Use any of the performance counters as specified in Performance Counters in .NET
.FrameworkSet the cat attribute to the category of the performance counter.Set the name attribute to the performance counter name.Set the instance attribute to the of the performance counter.
If a particular performance counter has many instances you can specify the following
Copyright © AppDynamics 2012-2015 Page 248
4.
5. 6.
1.
2.
options:instance ="*" ORinstance ="all" (This will report the sum of all instances)
For example, to add the performance counter for measuring CPU Idle time(%), add thefollowing element in the <perf-counters> block:
<perf-counter cat="Processor" name="% Idle Time"instance="_Total"/>
Save the config.xml.Start the AppDynamics.Agent.Coordinator service.
Sample .NET Machine Agent Configuration with Performance Counters
<machine-agent> <!-- Additional machine level Performance Counters --> <perf-counters> <perf-counter cat="Processor" name="% Idle Time" instance="_Total"/> </perf-counters></machine-agent>
Enable Correlation for .NET Remoting
On this page:
Instrument Applications That Use .NETRemotingSpecify an Agent Trigger
Related pages:
Configure Backend Detection for .NETMonitor Remote Services
Developers use to build distributed applications that share objects across.NET remotingprocesses or across application domains running in the same process. AppDynamics disablescorrelation for .NET remoting functions by default.
Instrument Applications That Use .NET Remoting
You can configure the .NET Agent to discover .NET remoting entry and exit points.
Open the config.xml file for editing as administrator. See "Where to Configure AgentProperties" on Administer the .NET Agent.Copy the code block below to a child element of the Machine Agent element. See .NET

Copyright © AppDynamics 2012-2015 Page 249
2.
3. 4. 5.
1.
:Agent Configuration Properties
<instrumentation> <instrumentor name="RemotingMscorlibEntryInstrumentor"enabled="true"/> <instrumentor name="RemotingExitInstrumentor" enabled="true"/> </instrumentation>
For example:
<?xml version="1.0" encoding="utf-8"?><appdynamics-agent xmlns:xsi="http://www.w3.org/2001/XMLSchema-instance"xmlns:xsd="http://www.w3.org/2001/XMLSchema">... <machine-agent> <!--Enable correlation for .NET remoting--> <instrumentation> <instrumentor name="RemotingMscorlibEntryInstrumentor"enabled="true"/> <instrumentor name="RemotingExitInstrumentor" enabled="true"/> </instrumentation> </machine-agent>...</appdynamics-agent>
Save the config.xml file.Restart the AppDyanmics.Agent.Coordinator Service.Restart instrumented applications for your changes to take effect.
If the agent doesn't discover the entry points after configuration, .specify an agent trigger
Specify an Agent Trigger
.NET remoting entry point functions execute in low-level .NET libraries that may not triggerautomatic agent instrumentation. If the agent doesn't discover the .NET remoting entry points afterconfiguration you can specify a function that triggers the agent to begin instrumentation.
Identify a function to trigger the agent to begin instrumentation. The function can be anyfunction that executes as part of the application process.
For example, consider the following code for a MovieTicket remoting object. In this case,use the function GetTicketStatus to trigger the agent.

Copyright © AppDynamics 2012-2015 Page 250
1.
2. 3.
4.
5.
using System;namespace MovieGoer{ public class MovieTicket : MarshalByRefObject { public MovieTicket() { } public string GetTicketStatus(string stringToPrint) { return String.Format("Enquiry for {0} -- Sending back status:{1}", stringToPrint, "Ticket Confirmed"); } }}
Edit the config.xml file as an administrator. See .Administer the .NET AgentUpdate the Instrumentation element to include the AgentTriggerInstrumentor. See .NET
:Agent Configuration Properties
<instrumentation> <instrumentor name="AgentTriggerInstrumentor" enabled="true" args="" /> <instrumentor name="RemotingMscorlibEntryInstrumentor"enabled="true"/> <instrumentor name="RemotingExitInstrumentor" enabled="true"/> </instrumentation>
Set the AgentTriggerInstrumentor value to the name of the trigger function from stepargs 1.
For example:
<?xml version="1.0" encoding="utf-8"?><appdynamics-agent xmlns:xsi="http://www.w3.org/2001/XMLSchema-instance"xmlns:xsd="http://www.w3.org/2001/XMLSchema">... <machine-agent> <!--Enable correlation for .NET remoting--> <instrumentation> <instrumentor name="AgentTriggerInstrumentor" enabled="true"args="MovieGoer.MovieTicket.GetTicketStatus" /> <instrumentor name="RemotingMscorlibEntryInstrumentor"enabled="true"/> <instrumentor name="RemotingExitInstrumentor" enabled="true"/> </instrumentation> </machine-agent>...</appdynamics-agent>
Copyright © AppDynamics 2012-2015 Page 251
5. 6.
1.
2.
Save the config.xml file.Restart instrumented applications for your changes to take effect.
Enable Thread Correlation for .NET
On this page:Configure Thread Correlation for .NET
Related pages:
Configure Backend Detection for .NETMonitor Remote Services
The AppDynamics .NET Agent supports multi-threaded correlation for the following patterns:
Thread.Start on the Common Language Runtime (CLR) 2.x and CLR 4.xThreadPool.QueueUserWorkItem on the Common Language Runtime (CLR) 2.x and CLR4.x
Configure Thread Correlation for .NET
Configure all instrumentation settings for the .NET Agent in the config.xml file. See Administer the..NET Agent
Open the config.xml file for editing as an administrator. See "Where to Configure AgentProperties" on Administer the .NET Agent.Copy the code block below to a child element of the Machine Agent element. (See Machine
):Agent Element
<instrumentation> <instrumentor name="ThreadCorrelationThreadPoolCLR2Instrumentor"enabled="true"/> <instrumentor name="ThreadStartCLR2Instrumentor" enabled="true"/> <instrumentor name="ThreadStartCLR4Instrumentor" enabled="true"/> </instrumentation>
For example:
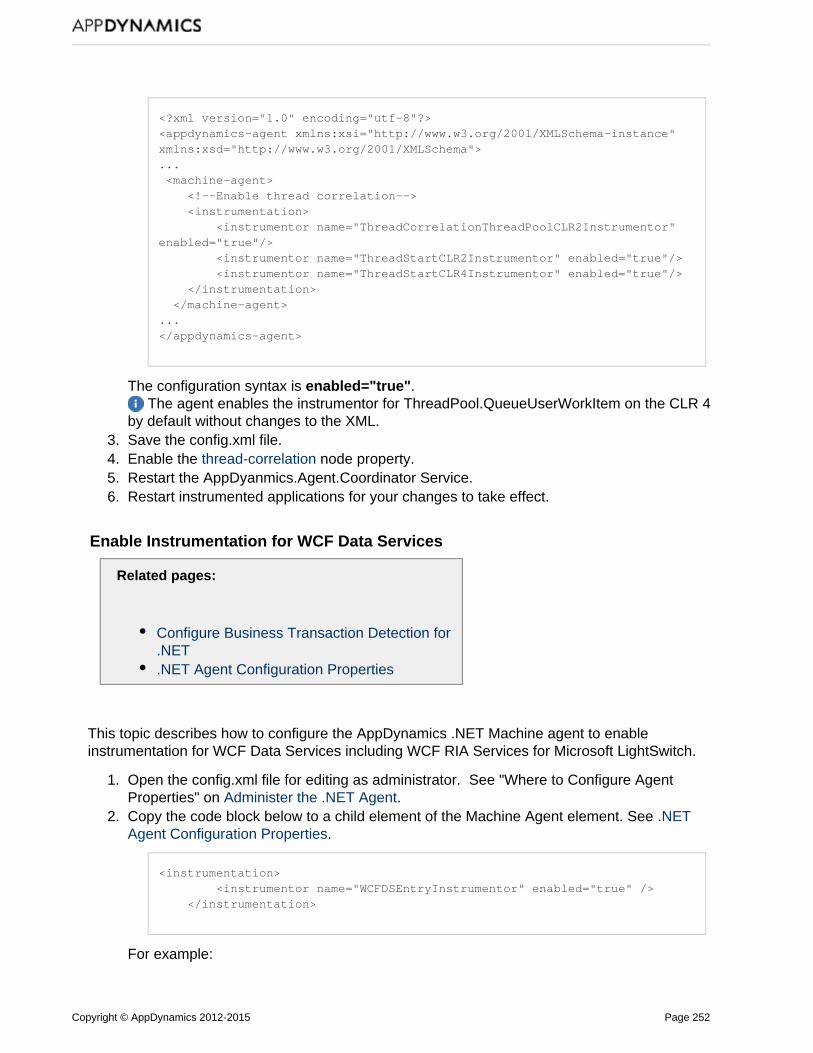
Copyright © AppDynamics 2012-2015 Page 252
2.
3. 4. 5. 6.
1.
2.
<?xml version="1.0" encoding="utf-8"?><appdynamics-agent xmlns:xsi="http://www.w3.org/2001/XMLSchema-instance"xmlns:xsd="http://www.w3.org/2001/XMLSchema">... <machine-agent> <!--Enable thread correlation--> <instrumentation> <instrumentor name="ThreadCorrelationThreadPoolCLR2Instrumentor"enabled="true"/> <instrumentor name="ThreadStartCLR2Instrumentor" enabled="true"/> <instrumentor name="ThreadStartCLR4Instrumentor" enabled="true"/> </instrumentation> </machine-agent>...</appdynamics-agent>
The configuration syntax is .enabled="true" The agent enables the instrumentor for ThreadPool.QueueUserWorkItem on the CLR 4
by default without changes to the XML.Save the config.xml file.Enable the node property.thread-correlationRestart the AppDyanmics.Agent.Coordinator Service.Restart instrumented applications for your changes to take effect.
Enable Instrumentation for WCF Data Services
Related pages:
Configure Business Transaction Detection for.NET.NET Agent Configuration Properties
This topic describes how to configure the AppDynamics .NET Machine agent to enableinstrumentation for WCF Data Services including WCF RIA Services for Microsoft LightSwitch.
Open the config.xml file for editing as administrator. See "Where to Configure AgentProperties" on Administer the .NET Agent.Copy the code block below to a child element of the Machine Agent element. See .NET
.Agent Configuration Properties
<instrumentation> <instrumentor name="WCFDSEntryInstrumentor" enabled="true" /> </instrumentation>
For example:

Copyright © AppDynamics 2012-2015 Page 253
2.
3. 4. 5.
<?xml version="1.0" encoding="utf-8"?><appdynamics-agent xmlns:xsi="http://www.w3.org/2001/XMLSchema-instance"xmlns:xsd="http://www.w3.org/2001/XMLSchema">... <machine-agent> <!--Enable instrumentation for WCF Data Services correlation--> <instrumentation> <instrumentor name="WCFDSEntryInstrumentor" enabled="true" /> </instrumentation> </machine-agent>...</appdynamics-agent>
The configuration syntax is .enabled="true"Save the config.xml file.Restart the AppDyanmics.Agent.Coordinator Service.Restart instrumented applications for your changes to take effect.
Configure Machine Snapshots for .NET
On this page:
Default Settings and ConfigurationConsiderationsConfigure machine snapshots for the .NETMachine Agent
Related pages:
Machine Snapshots for .NET.NET Agent Configuration Properties
The .NET Machine Agent takes machine snapshots to capture vital system data for Windows andIIS. Use these guidelines to tune the frequency the .NET Machine Agent takes machine snapshotsin your environment.
To learn how to analyze machine snapshots in the Controller, see .Machine Snapshots for .NET
Default Settings and Configuration Considerations
By default the .NET Machine Agent takes machine snapshots under the following conditions:
Periodic collection: The agent takes one snapshot every 10 minutes.Breached thresholds: The .NET Machine agent takes samples of machine statistics every 10 seconds within a 10 minute window. For each sample, the agent checks the CPU percentusage, the memory percent usage, and oldest item in the IIS application pool queue. The
when the current usage meets or exceeds one of theagent flags a sample as a violation following thresholds:
CPU at 80% or higherMemory at 80% or higherIIS application pool queue item older than 100 milliseconds

Copyright © AppDynamics 2012-2015 Page 254
The agent takes a snapshot when it identifies 6 violations of a single type, such as CPUusage, within the window. The agent only takes one snapshot per window for breached
.thresholds
With the default window size of 10 minutes and the violations per window of six, the sixth violation ofa single type triggers a machine snapshot:
Before you change the machine snapshot settings, decide which configuration options work bestfor your environment. The following questions and considerations should help you decide how toset your thresholds:
What percentage CPU or memory usage might flag the beginnings of an issue in yourenvironment?How long is too long for items to wait in the IIS queue?Do you expect occasional CPU or memory spikes?Are periodic collections every ten minutes frequent enough?Make sure the value for violations is larger than the number of samples per window.
For example: If you decrease the window size to 60 seconds and take 6 samples per window, theagent takes samples at the same frequency as the default settings, once every 10 seconds.However you are likely to get more snapshots because the agent only takes one snapshot per

Copyright © AppDynamics 2012-2015 Page 255
1.
2.
3.
4. 5.
window. If you set the violations per window to 5, the agent takes a snapshot any time half thesamples in the window violate a specific threshold.
Configure machine snapshots for the .NET Machine Agent
Configure all instrumentation settings for the .NET Machine Agent in the config.xml file. See"Where to Configure Agent Properties" on Administer the .NET Agent.
Open the config.xml file for editing as an administrator. See "Where to Configure AgentProperties" on Administer the .NET Agent.
Copy the code block below to a child element of the AppDynamics Agent element. See App.Dynamics Agent Element
<machine-agent> <machine-snapshot enabled="true" window-size="600"samples-per-window="60" violations-per-window="6" max-percent-cpu="80"max-percent-memory="80" max-queue-item-age="100" periodic-collection="600"/></machine-agent>
If you have already customized the .NET Machine Agent, only copy the MachineSnapshot element and paste it as a child of the Machine Agent element.Edit the values for the Machine Snapshot element attributes:
<?xml version="1.0" encoding="utf-8"?><appdynamics-agent xmlns:xsi="http://www.w3.org/2001/XMLSchema-instance"xmlns:xsd="http://www.w3.org/2001/XMLSchema">... <machine-agent> <!--Configure machine snapshots--> <machine-snapshot enabled="true" window-size="60" samples-per-window="10"violations-per-window="5" max-percent-cpu="80" max-percent-memory="80"max-queue-item-age="100" periodic-collection="600"/> </machine-agent>...</appdynamics-agent>
Save the config.xml file.Restart the AppDyanmics.Agent.Coordinator Service.
Instrument Node.js Applications
On this page:
Before You BeginInstrument Your Node.js Application
Related pages:
AppDynamics Essentials

Copyright © AppDynamics 2012-2015 Page 256
1.
2. 3.
Install the Node.js AgentUpgrade the Node.js AgentUninstall the Node.js AgentNode.js Supported EnvironmentsAppDynamics for Node.js Architecture
Watch the video:
Quick Install: Node.js Agent
Use the instructions on this page to install the Node.js Agent using the Agent Download Wizard inthe Controller. This installer configures your agents with the values that you supply in the wizard.This is the simplest way to install the agent.
If you downloaded the agent from , use the instructions in npm Install the Node.js Agent toinstrument your application manually. This page includes a complete list of all the Node.js Agentsettings that can be used in the AppDynamics require statement.
Before You Begin
Confirm you have access to a controller, the web application where you monitor yourapplication performance:
If you use a SaaS controller, AppDynamics sent you the controller host in yourWelcome Email.If you use the on-premise controller, you supplied the host and port at install time.
Verify you have root access to run the install.Verify support for your environment at .Node.js Supported Environments
Instrument Your Node.js Application
There are four steps to instrument your Node.js application and begin monitoring:
1. : Use the Agent Download Wizard to set up the agent.Setup2. : Run the install script and configure the connection to the controller.Install and Configure3. : Restart your application and apply load to activate instrumentation.Apply Load4. : Log on to the Controller to monitor application performance.View Your Application
Set up the Node.js Agent
The Agent Wizard walks you through configuration steps and helps you download theDownload agent.
Show me the Download Agent Wizard steps...1. Log on to the Controller andclick the Agent Download
tab.Wizard
The download wizard configures theagent with information to connect to theController.
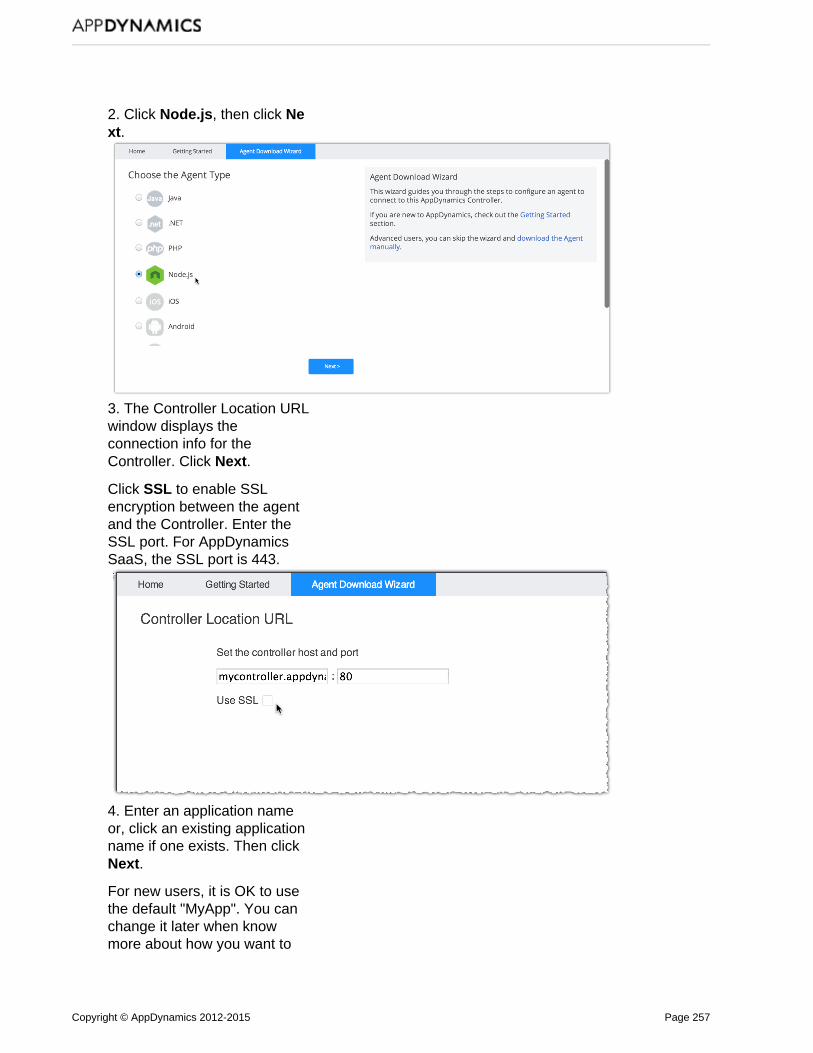
Copyright © AppDynamics 2012-2015 Page 257
2. Click , then click Node.js Ne
.xt
3. The Controller Location URLwindow displays theconnection info for theController. Click .Next
Click to enable SSLSSLencryption between the agentand the Controller. Enter theSSL port. For AppDynamicsSaaS, the SSL port is 443.
4. Enter an application nameor, click an existing applicationname if one exists. Then click
.Next
For new users, it is OK to usethe default "MyApp". You canchange it later when knowmore about how you want to

Copyright © AppDynamics 2012-2015 Page 258
organize your applications inAppDynamics.
5. Enter a tier name. Then click
.Next
For new users, it is OK to usethe default "MyTier". You canchange it later when knowmore about how you want toorganize your applications inAppDynamics.
Install and Configure
1. From the root directory ofyour Node.js application run thiscommand: npm installappdynamics2. Insert the require statementgenerated by the wizard in theapplication source code at thefirst line of the main module(such as the server.js file),before any other requirestatements. You can copy thecode in the wizard and paste itdirectly into your application.Each require statement isespecially generated for yourapp based on the values you
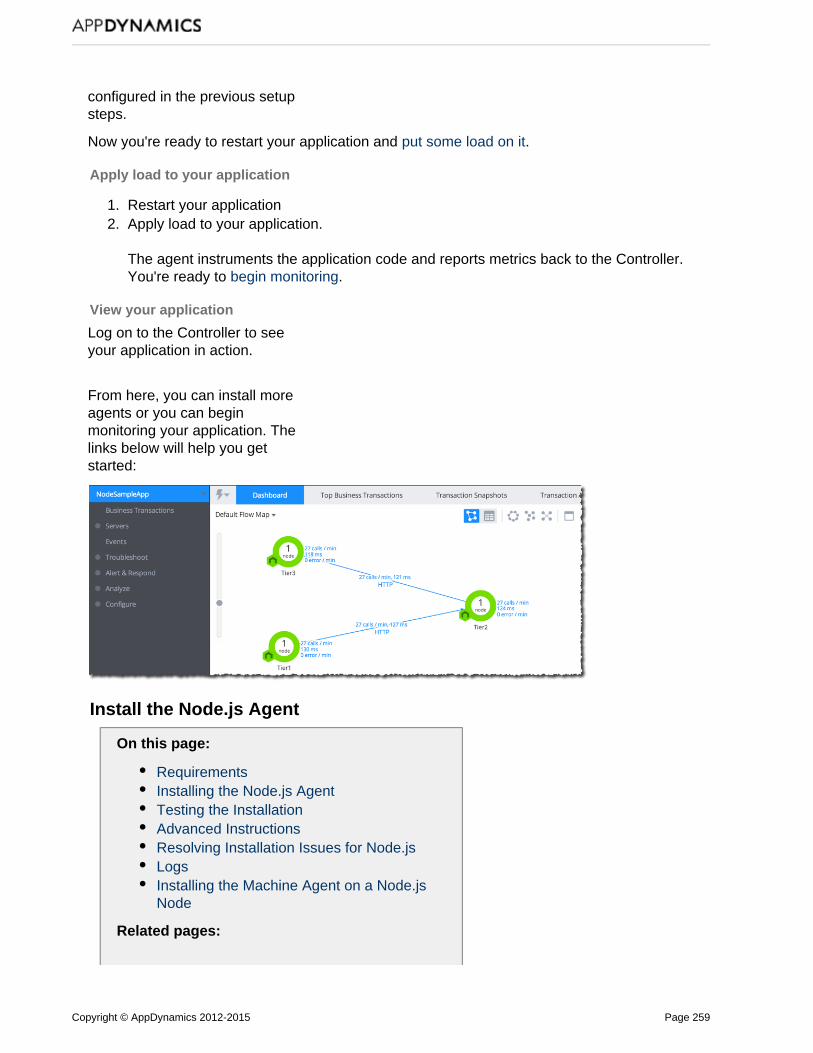
Copyright © AppDynamics 2012-2015 Page 259
1. 2.
configured in the previous setupsteps.
Now you're ready to restart your application and put some load on it.
Apply load to your application
Restart your applicationApply load to your application.
The agent instruments the application code and reports metrics back to the Controller.You're ready to .begin monitoring
View your application
Log on to the Controller to seeyour application in action.
From here, you can install moreagents or you can beginmonitoring your application. Thelinks below will help you getstarted:
Install the Node.js Agent
On this page:
RequirementsInstalling the Node.js AgentTesting the InstallationAdvanced InstructionsResolving Installation Issues for Node.jsLogsInstalling the Machine Agent on a Node.jsNode
Related pages:

Copyright © AppDynamics 2012-2015 Page 260
Upgrade the Node.js AgentUninstall the Node.js Agent
This topic describes how to install the Node.js Agent using npm.
Requirements
AppDynamics Controller
To use the AppDynamics Node.js Agent, you need an AppDynamics account on a running v4.0+controller.
You can use the AppDynamics SaaS controller. If you do not already have an account on theSaaS controller you can . sign up for a subscription here
Or you can use an on-premise controller that is installed at your site. You can download an, and then .on-premise controller from here follow these instructions on how to install it
You need to know the controller host and port to complete the agent installation. Check yourwelcome email from AppDynamics for the host and port if you signed up for a SaaS account.
Permissions
You need write access to the Node.js project.
Installing the Node.js Agent
To install the latest version you can run 'npm install appdynamics' for each application you want tomonitor, but we recommend matching the agent version to your AppDynamics Controller version:
npm install appdynamics@<version>
For example, if your AppDynamics controller version is 4.0.0, we recommend installing the 4.0.0Node.js Agent:
npm install [email protected]
Then paste the following require statement in your application. Replace the variables with thevalues for your setup:
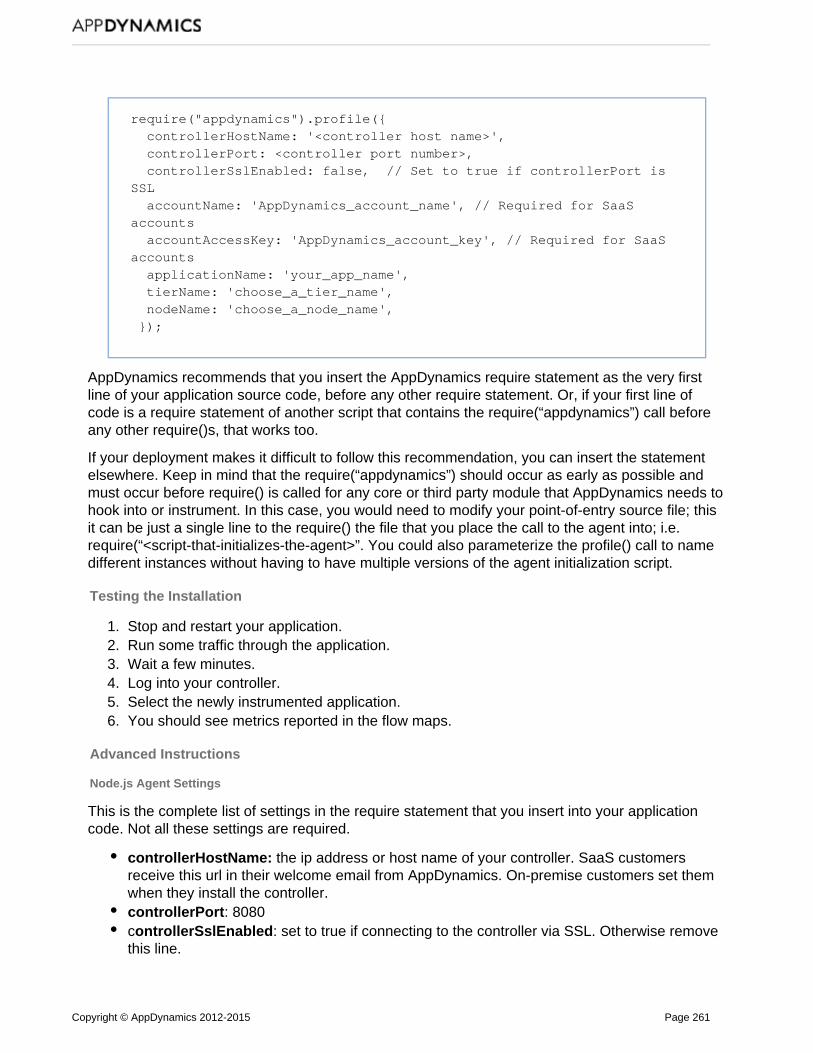
Copyright © AppDynamics 2012-2015 Page 261
1. 2. 3. 4. 5. 6.
require("appdynamics").profile({ controllerHostName: '<controller host name>', controllerPort: <controller port number>, controllerSslEnabled: false, // Set to true if controllerPort isSSL accountName: 'AppDynamics_account_name', // Required for SaaSaccounts accountAccessKey: 'AppDynamics_account_key', // Required for SaaSaccounts applicationName: 'your_app_name', tierName: 'choose_a_tier_name', nodeName: 'choose_a_node_name', });
AppDynamics recommends that you insert the AppDynamics require statement as the very firstline of your application source code, before any other require statement. Or, if your first line ofcode is a require statement of another script that contains the require(“appdynamics”) call beforeany other require()s, that works too.
If your deployment makes it difficult to follow this recommendation, you can insert the statementelsewhere. Keep in mind that the require(“appdynamics”) should occur as early as possible andmust occur before require() is called for any core or third party module that AppDynamics needs tohook into or instrument. In this case, you would need to modify your point-of-entry source file; thisit can be just a single line to the require() the file that you place the call to the agent into; i.e.require(“<script-that-initializes-the-agent>”. You could also parameterize the profile() call to namedifferent instances without having to have multiple versions of the agent initialization script.
Testing the Installation
Stop and restart your application.Run some traffic through the application.Wait a few minutes.Log into your controller.Select the newly instrumented application.You should see metrics reported in the flow maps.
Advanced Instructions
Node.js Agent Settings
This is the complete list of settings in the require statement that you insert into your applicationcode. Not all these settings are required.
controllerHostName: the ip address or host name of your controller. SaaS customersreceive this url in their welcome email from AppDynamics. On-premise customers set themwhen they install the controller.controllerPort: 8080c : set to true if connecting to the controller via SSL. Otherwise removeontrollerSslEnabledthis line.
Copyright © AppDynamics 2012-2015 Page 262
accountName: your username on the SaaS controller or multi-tenant on-premise controller.SaaS customers receive this their welcome email from AppDynamics. If you have asingle-tenant controller, remove this line.accountAccessKey: your account access key on the SaaS controller or multi-tenanton-premise controller. SaaS customers receive this their welcome email from AppDynamics.If you have a single-tenant controller, remove this line.applicationName: name that represents the entire application in the AppDynamics consoletierName: name that represents your Node.js app or service in the flow mapsnodeName: name of the Node.js process to be monitored by this agent. See .Node Names
Optional: Set to true if you do not want the agent to add a suffix (-0,noNodeNameSuffix:-1, -2, etc.) to the node name. See .Node NamesproxyHost, proxyPort: Set these options to route data to the controller through a proxyserver. The is the host name or IP address of the proxy server. The iproxyHost proxyPorts the proxy server's HTTP or HTTPS port, whichever you are using. If you set the host youmust set the port as well.New in 4.0.3
, proxyUser proxyPasswordFileConfigure the prosy user name and password file if the proxy server requires credentials.btEntryPointDelayDisabled: true|false - Optional: defaults to false. Setting to true canaccelerate the startup of business transactions, but it can adversely affect drilldown indistributed transactions.maxProcessSnapshotsPerPeriod: integer - Optional: defaults to 2. Number of automaticprocess snapshots allowed in processSnapshotCountResetPeriodSeconds seconds (seebelow).processSnapshotCountResetPeriodSeconds: Optional: defaults to 60. Frequency, inseconds, at which the automatic process snapshot count is reset to 0.autoSnapshotDurationSeconds: Optional: defaults to 10. Length, in seconds, ofautomatically-triggered process snapshots.proxyAutoLaunchDisabled: true|false - Optional: default to false. Set to true if you need tomanually launch the proxy for this agent. See Run the Proxy Daemon Manually for Node.js
.Agents proxyCtrlDir: directory path for the directory containing the domain control socket, whichthe agent uses to start an AppDynamics node. Optional: set by the agent. Set manually ifyou are setting up a multi-tenant proxy. See Set Up A Multi-Tenant Proxy for Node.js Agents.rootTmpDir: directory path for the root of the directory that stores the agent's files. Optional:defaults to /tmp/appd.tmpDir: directory path for the sub directory of the root directory for the monitored node.Optional: defaults to a hash of the controller info for the instrumented node.debug: true|false - Optional: defaults to false. Turn this option on for logging andtroubleshooting.
Node Names
Individual Nodes
By default, the agent uses the value configured for as a prefix and adds a dash and anodeNamenumber to it to form the node name. For example, if you instrument a single node with the

Copyright © AppDynamics 2012-2015 Page 263
following setting:
nodeName=MyNode
the node is named "MyNode-0". This convention is used to accommodate node naming in anenvironment where the number after the dash represents an increasing number for each workerprocess running on the machine.
If you are not running multiple worker processes, and you want the name to be just "MyNode" withno dash or number, set to true.noNodeNameSuffix
For example, the following settings name the node "MyNode":
nodeName=MyNodenoNodeNameSuffix=true
Clustered Nodes on a Single Machine
If the agent detects that you are instrumenting nodes in a cluster on a single machine (and noNod=false, which is the default) it numbers the first node in the cluster using the suffixeNameSuffix
"-0" and then auto-numbers the suffixes for the remaining node names. For example, with thissetting:
nodeName=MyNode
the clustered nodes are named "MyNode-0", "MyNode-1", "MyNode-2", . . . for multiple workerprocesses on the same machine.
Clustered Nodes on Multiple Machines
The agent begins numbering the node name suffixes at -0 on each new machine.
If you are instrumenting clusters of worker processes on different machines, specify different node prefixes for each server. For example, for the cluster on the first server, the followingName
setting:
nodeName=Server1
creates nodes named "Server1-0", "Server1-1", "Server1-2" . . .
For the cluster on the second server, the following setting:
nodeName=Server2
creates nodes named "Server2-0", "Server2-1", "Server2-2" . . .

Copyright © AppDynamics 2012-2015 Page 264
And so on for the remaining servers.
Keep in mind that each combination must be unique.applicationName/nodeName
Older Node.js Versions
If your Node.js version is between 0.8.1 and 0.8.18 inclusive, you need to set the user-agent npmproperty before you run the npm install command. The syntax is:
npm config set user-agent "node/<version> {linux|darwin} {x64|i86}"
For example:
npm config set user-agent “node/v0.8.14 linux x64"
Instrumenting a Cluster of Node.js processes
If you are launching a cluster of Node.js processes to implement your app, add the appdynamicsrequire statement to the master process code and to the code of each of the worker processes.
Resolving Installation Issues for Node.js
If you are trying to install the Node.js Agent on a version of Node.js that the agent does not support, the installation will fail and you will see a message similar to the following:
npm ERR! notsup Unsupportednpm ERR! notsup Not compatible with your version of node/npm:[email protected] ERR! notsup Required: {"node":">=0.8.0 <=0.10.31"}npm ERR! notsup Actual: {"npm":"1.4.28","node":"0.10.32"}
npm ERR! System Linux 2.6.18-348.16.1.el5npm ERR! command "<your command>"npm ERR! cwd <path>npm ERR! node -v v0.10.32npm ERR! npm -v 1.4.28npm ERR! code ENOTSUPnpm ERR!npm ERR! Additional logging details can be found in:npm ERR! <path>/npm-debug.lognpm ERR! not ok code 0
Check the AppDynamics to find out the latest Node.js version supported by therelease notesagent.
If you need an agent for an unsupported version, contact about getting anAppDynamics Supportagent for that is compatible with your environment.0.8.X and 0.10.X versions of Node.js

Copyright © AppDynamics 2012-2015 Page 265
1.
2.
Logs
There is an agent log and a proxy log for each application.
Node.js Agent Log
If the agent is running in debug mode, the agent component logs stdout/stderr. This log containsto the transactions that the agent processes and sends to the proxy. This log is available in the samelocation to which stdout/stderr streams are directed from the monitored application.
If debug mode is not enabled, no agent log is generated.
You may set debug mode in the require statement that instruments your Node.js application. See .Node.js Agent Settings
Proxy Log
The proxy logs the transactions that it accepts from the agent and sends to the Controller. Theproxy generates logs whether or not the agent is running in debug mode.
When the agent component launches the proxy, it displays in the agent log the directory path towhich the proxy is logging. By default the proxy log is in ./tmp/appd/logs
Installing the Machine Agent on a Node.js Node
If you install the Standalone Machine Agent on the machine hosting the instrumented Node.jsnode and you specify the tier and node name in the machine agent's controller-info.xml file, theNode.js Agent will fail to register.
To avoid this problem:
Install the Node.js Agent before you install the Standalone Machine Agent.Do not specify the tier and node in the machine agent controller-info.xml, where it isoptional. The Standalone Machine Agent will pick up the tier and node from the app agentconfiguration.
Uninstall the Node.js Agent
To uninstall the Node.js Agent:
From the application root directory of the application from which you want to uninstall theagent enter:
npm uninstall appdynamics
Remove the "require("appdynamics")" statement from your Node.js applications.
Upgrade the Node.js Agent
If you are upgrading both the Controller and agents, first and then upgradeupgrade the Controllerthe agents.
Also, if you are upgrading multiple agents in your monitored environment, upgrade the agents forthe tiers on which business transactions originate last. For more information about this

Copyright © AppDynamics 2012-2015 Page 266
1. 2.
3.
4.
requirement, along with Controller and agent compatibility information, see Agent - ControllerCompatibility Matrix.
To upgrade the app agent:
Stop the Node.js application.From the root directory of the application for which you want to upgrade the agent, uninstallthe old version of the agent by entering:
npm uninstall appdynamics
From the same directory install the new version by entering:
npm install appdynamics@<version>
The version is the three-digit version number of the new version that you are installing; forexample, 3.9.1.Restart the Node.js application.
Run the Proxy Daemon Manually for Node.js Agents
By default, when the Node.js Agent starts up, it automatically executes the runproxy shell script.This script runs the Java proxy daemon that handles communication between the Node.js Agentsand the controller. See for information about how the Java AppDynamics for Node.js Architectureproxy daemon fits into the Node.js Agent architecture.
Automatic startup of the proxy works for the great majority of situations. However, you cansuppress the automatic startup of this script and run it manually. You would do this if you arerunning a cluster of Node.js nodes on the same machine and you want to reduce overhead byhaving them report to a single proxy. In this case, you need to configure the agents for a singleproxys and for manual proxy launch. Then you need to launch the proxy manually. See:
Execute the runProxy Script ManuallySet Up A Multi-Tenant Proxy for Node.js Agents
Set Up A Multi-Tenant Proxy for Node.js Agents
On this page:
Multi-tenant SetupLimits on Agents Sharing a Proxy
Related pages:
Execute the runProxy Script ManuallySet User Preferences
By default, if you are running multiple agents, each agent automatically launches its own Java

Copyright © AppDynamics 2012-2015 Page 267
1.
2.
3.
4.
5.
proxy to communicate with the controller.
In this single-tenant scenario, each agent has its own proxy control directory. In the requirestatement for each agent, the proxy control directory is set to a unique path (a uniqueapp/tier/node combination). The agent creates these directories automatically.
This results in a configuration in which each agent has its own proxy. The Node.js Agents willauto-launch their proxies when they start up.
If you want to run multiple Node.js Agents on the same machine, you can reduce your overheadby setting up the agents to report to a single multi-tenant Java proxy. In this case, you would needto start that proxy manually and create the mutli-tenant proxy directory manually. Thisconfiguration is appropriate for Node.js processes running in cluster mode.
Multi-tenant Setup
To set up a multi-tenant proxy, you need to configure the proxy control directory. This directorycontains the domain control socket, which the agent uses to start an AppDynamics node. Thisdirectory is where the agent gets the configuration for the node. The permissions on this directorymust be readable and executable by the application user that the application and writable by theproxy user.
To configure agents for a multi-tenant proxy
Configure each agent for manual launch of the proxy. To do this, in the require statement ofeach agent, set the proxyAutoLaunchDisabled setting to true.Manually create a single proxy control directory for use by all the agents that will share theproxy.In the AppDynamics require statement for all the agents reporting to the proxy,set proxyCtrlDir to the directory that you created in step 2.Verify that each agent reporting to the multi-tenant proxy is configured with a unique nodename.Manually launch the multi-tenant proxy before you start the agents, passing the agentcontrol directory set in step 3 as the proxyCommunicationDir argument to the runproxyscript. See . AppDynamics recommends that you Run the Node.js Proxy Daemon Manually launch the proxy on system startup.
Limits on Agents Sharing a Proxy
The proxy is set up to handle a maximum of 10 agents reporting to a single proxy. The proxy.outfile, visible if you are running in debug mode, indicates if the proxy is running out of heap. You mayneed to adjust the maxHeapSize and maxPermSize settings in the runproxy script if you havemore than ten agents reporting to a single proxy. Contact if you need toAppDynamics Supportchange these settings.
Node.js Supported Environments
On this page:
Node.js VersionsOperating Systems

Copyright © AppDynamics 2012-2015 Page 268
Transaction NamingHTTP Exit PointsDatabase Exit PointsCache Exit Points
Related pages:
Configure Transaction Detection for Node.js
Supported Platform Matrix for the Node.js Agent
Node.js Versions
Supported Node.js Versions
0.8
0.10; 0.10.38 and earlier
Operating Systems
Supported Operating System
Linux 32-bit
Linux 64-bit
Mac OSX v10.9.2
Transaction Naming
Entry Type Default Transaction Naming
Node.js Web URI
HTTP Exit Points
Supported HTTP Exit Points
Node.js HTTP client library
See for information about the Node.js HTTP client library.http://nodejs.org/api/http.html
Database Exit Points
Supported Database Exit Points
MongoDB
MySQL
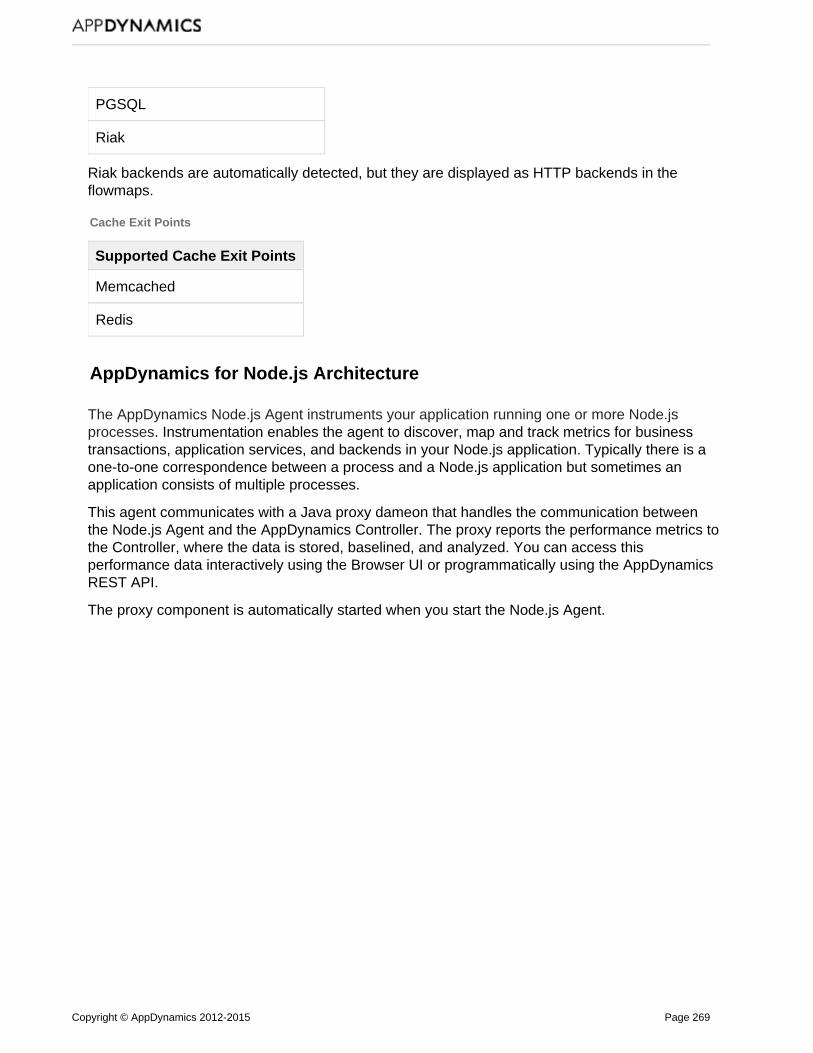
Copyright © AppDynamics 2012-2015 Page 269
PGSQL
Riak
Riak backends are automatically detected, but they are displayed as HTTP backends in theflowmaps.
Cache Exit Points
Supported Cache Exit Points
Memcached
Redis
AppDynamics for Node.js Architecture
The AppDynamics Node.js Agent instruments your application running one or more Node.jsprocesses. Instrumentation enables the agent to discover, map and track metrics for businesstransactions, application services, and backends in your Node.js application. Typically there is aone-to-one correspondence between a process and a Node.js application but sometimes anapplication consists of multiple processes.
This agent communicates with a Java proxy dameon that handles the communication betweenthe Node.js Agent and the AppDynamics Controller. The proxy reports the performance metrics tothe Controller, where the data is stored, baselined, and analyzed. You can access thisperformance data interactively using the Browser UI or programmatically using the AppDynamicsREST API.
The proxy component is automatically started when you start the Node.js Agent.

Copyright © AppDynamics 2012-2015 Page 270
Instrument PHP Applications
On this page:
Before You BeginInstrument Your PHP Application
Related pages:
AppDynamics EssentialsUpgrade the PHP AgentUninstall the PHP Agent
Install the PHP AgentPHP Supported EnvironmentsAppDynamics for PHP ArchitectureResolve Installation Issues for PHP
Watch the video:
Quick Install: App Agent for PHP
Use these instructions to install the PHP Agent using the Agent Download Wizard in the Controller.This installer configures your agents with the values that you supply in the wizard. This is thesimplest way to install the agent.
If you downloaded the agent from the AppDynamics download zone, see Install the PHP Agent and its subpages to instrument your application manually, using either a shell script or an RPMinstaller.
If you are instrumenting an application running on Mac OSX, you need to instrument it manually

Copyright © AppDynamics 2012-2015 Page 271
1.
2. 3.
. using the shell script
If you are instrumenting a PHP CLI script, see .Special Procedures for PHP CLI
Before You Begin
Confirm you have access to a controller, the web application where you monitor yourapplication performance:
If you use a SaaS controller, AppDynamics sent you the controller host in yourWelcome Email.If you use the on-premise controller, you supplied the host and port at install time.
Verify you have root access to run the install.Verify support for your environment at .PHP Supported Environments
Instrument Your PHP Application
There are four steps to instrument your PHP application and begin monitoring:
1. : Use the Agent Download Wizard to configure and download the agent.Download2. : Unzip the agent on your server and run the install script.Install3. : Restart your web server and application and apply load to activateApply Loadinstrumentation.4. : Log on to the Controller to monitor application performance.View Your Application
Download the PHP Agent
The Agent Wizard walks you through configuration steps and helps you download theDownload agent.
Show me the Download Agent Wizard steps...1. Log on to the Controller andclick the Agent Download
tab.Wizard
2. Click , then click PHP Next.
The download wizard configures theagent with information to connect to theController.

Copyright © AppDynamics 2012-2015 Page 272
3. Click to Select Operating
and System 32-bit or 64-bit, then click bit System Next.
4. The Controller Location URLwindow displays theconnection info for theController. Click .Next
Click to enable SSLSSLencryption between the agentand the Controller. Enter theSSL port. For AppDynamicsSaaS, the SSL port is 443.

Copyright © AppDynamics 2012-2015 Page 273
5. Enter an application nameor, click an existing applicationname if one exists. Then click
.Next
For new users, it is OK to usethe default "MyApp". You canchange it later when knowmore about how you want toorganize your applications inAppDynamics.
6. Enter a tier name. Then click
.Next
For new users, it is OK to usethe default "MyTier". You canchange it later when knowmore about how you want toorganize your applications inAppDynamics.

Copyright © AppDynamics 2012-2015 Page 274
1.
2.
7. Click Click here to
to download theDownloadApp Agent for PHP.
Now you're ready to install the.agent on your app server
Install the PHP Agent on your app server
After you download the agent, install it to your app server. The final window of the Agent DownloadWizard includes brief instructions for installing the agent.
Log on as an administrator to the machine running your PHP application. Unzip the agentzip file into a directory that can be accessed the same user that runs Apache or php-fpm.
For example, for a 64 bit agent on Linux:
unzip appdynamics-php-agent-x64-linux-tar-self-service.zip -d/opt/appdynamics/appagent
Run the installer script.
sudo bash runme.sh
By default the PHP agent installer uses the PHP directory specified in yourenvironment's PATH variable to determine where to install the agent. If you are usinga different PHP installation not specified in the PATH environment variable, follow

Copyright © AppDynamics 2012-2015 Page 275
2.
1. 2.
Now you're ready to restart your application and put some load on it.
Apply load to your application
Restart your web server.Apply load to your application.
The agent instruments the application code and reports metrics back to the Controller.You're ready to .begin monitoring
View your application
Log on to the Controller to seeyour application in action.
From here, you can install moreagents or you can beginmonitoring your application. Thelinks below will help you getstarted:
Install the PHP Agent
On this page:
Prerequisites for Agent InstallationInstalling the PHP AgentFiles Added to Your InstallationInstalling the Standalone Machine Agent on aPHP Node
the instructions below to run the installer with custom options instead of using theAgent Download Wizard.
Install the PHP Agent using a Shell ScriptInstall the PHP Agent using RPM

Copyright © AppDynamics 2012-2015 Page 276
Related pages:
Install the PHP Agent using a Shell ScriptInstall the PHP Agent using RPMSpecial Procedures for PHP CLISpecial Considerations for PHP on Mac OSXUpgrade the PHP AgentResolve Installation Issues for PHP
You can install the PHP Agent using either a shell script (install.sh) or the RPM Package Manager(RPM).
These instructions assume that you are installing the AppDynamics PHP Agent in a standard PHPenvironment, specifically:
a single PHP installation running on the Linux or OSX machinePHP running in a single Apache or FPM poolstandard packages have been used to install PHP, Apache and/or PHP-FPMno customizations have been made to your PHP configuration
It is possible that the installer will work if one or more of these assumptions is violated.
This installation results in an AppDynamics model of your application consisting of one application,one tier, and one node.
Prerequisites for Agent Installation
1. Confirm that you have a installed on the server and that the server issupported environmentconfigured correctly to run PHP scripts.How you do this depends on your PHP environment. For example, in our Ubuntu 12+ web serverrunning Apache we use:
sudo apt-get install apache2 php5 php5-cliphp -i
In our CentOS 5+ web server running Apache mod_ssl we use:
sudo yum install httpd mod_ssl php53 php53-cliphp -i
2. Confirm that your PHP was not built with the configure option.enable-debug
The PHP Agent is incompatible with PHP builds that were compiled with debugging symbols. To determine whether your PHP was built with debugging symbols you can use the followingcommand:
php -i | grep -e "Debug Build"
Copyright © AppDynamics 2012-2015 Page 277
The response should be:
Debug Build => no
3. Install the PHP application that you want to monitor, if it is not already installed.
4. Download the the appropriate PHP agent installer for your platform.
On RedHat and CentOS:
PHP Agent - 32 bit RPMPHP Agent - 64 bit RPM
On all other Linux:
PHP Agent - 32 bit LinuxPHP Agent - 64 bit Linux
On Mac OSX:
PHP Agent - 64 bit OSX
If you use an on-premise Controller, download the latest version of the AppDynamics Controller.The download site is .http://download.appdynamics.com
5. Be prepared to provide the following information to the installation script:
controller host and controller port: These are the host name or IP address and the portnumber of the AppDynamics controller that the agent connects to. SaaS customers receivethis information from AppDynamics. On-premise customers establish these settings whenthey install the controller.AppDynamics application name: This is the name that you assign to the businessapplication you will monitor with AppDynamics.AppDynamics tier name: This is the name that you assign to the tier you will monitor withAppDynamics.AppDynamics node name: This is the name of the basic unit of processing that the agentmonitors.
If you have an on-premise AppDynamics controller running in multi-tenant mode or if you are usingthe AppDynamics SaaS Controller, you will also need to provide the following, which wereincluded in your Welcome email from AppDynamics:
AppDynamics account nameAppDynamics account key
6. Stop the Apache server.
Tip: Do not install the PHP Agent along with other non-AppDynamics ApplicationPerformance Management (APM) tools, especially in a production environment. ThePHP agent installation may fail if there are other APM products installed in the samemanaged environment.
Installing the PHP Agent
Copyright © AppDynamics 2012-2015 Page 278
To use install.sh, see . Use install.sh to install on OSX asInstall the PHP Agent using a Shell Scriptwell as LInux.
To use RPM, see .Install the PHP Agent using RPM
To instrument PHP CLI, see also .Special Procedures for PHP CLI
To instrument an application on OSX, see .Special Considerations for PHP on Mac OSX
Files Added to Your Installation
PHP configuration files
For AppDynamics, the PHP configuration files of interest are the php.ini andappdynamics_agent.ini fragment. AppDynamics settings can be found in either .ini file, dependingon the operating system under which your PHP is installed.
The PHP agent installer adds the appdynamics_agent.ini file to the directory that contains yourphp.ini file. You can find this directory using the following command:
php -i | grep -e "Additional .ini files parsed"
If the installer is not able to determine the directory where the ini fragments for your PHPdeployment live, it displays the required AppDynamics ini fragment and prompts you to copy andpaste it into your main php.ini file.
Also see for information about possible locations.http://php.net/manual/en/configuration.file.php
.so files
The installer also installs the appdynamics_agent.so file in your PHP extensions directory. Youcan find this directory using the following command:
php -i | grep extension_dir
Logs
There is an agent log and a proxy log for each application.
The agent log is located at $<php_agent_install>/logs/agent.log. The log contains the transactionsthat the agent processes and then sends to the proxy. The default pattern for agent log naming is:
agent.log: the current logagent.log.1: most recent logagent.log.2: second most recent logagent.log.3: third most recent logagent.log.4: fourth most recent logagent.log.5: fifth recent log
The proxy log is located $<php_agent_install>/logs/proxy_$date.log. This log contains thetransactions that the proxy accepts from the agent and then sends to the Controller.

Copyright © AppDynamics 2012-2015 Page 279
Installing the Standalone Machine Agent on a PHP Node
If you install the Standalone Machine Agent on the machine hosting the instrumented PHP nodeand you specify the tier and node name in the Standalone Machine Agent controller-info.xml file,the PHP Agent will fail to register.
To avoid this problem:
Install the PHP Agent before you install the Standalone Machine Agent.Do not specify the tier and node in the Standalone Machine Agent controller-info.xml, whereit is optional. The Standalone Machine Agent will pick up the tier and node from the appagent configuration.
Install the PHP Agent using a Shell Script
On this page:
Install the PHP Agent using install.shInstallation SamplesUninstall the PHP Agent using install.sh
Related pages:
Install the PHP AgentInstall the PHP Agent using RPMUpgrade the PHP AgentResolve Installation Issues for PHP Special Considerations for PHP on Mac OSXSpecial Procedures for PHP CLI
Watch the video:
PHP Agent Installation and Manual Configuration
Install the PHP Agent using install.sh
1. Untar the tarball containing the agent into a directory. The directory should be owned by thesame user that runs Apache or php-fpm. AppDynamics recommends /opt/appdynamics/php-agent.
This documentation refers to this directory as the php_agent_install directory or$<php_agent_install>.
cd $<php_agent_install>tar -xvjf appdynamics-php-agent-x64-linux.tar.bz2
2. Set the following permissions.
php - Make every directory that leads to the PHP agent logs directory readable andexecutable by all and writable by the directory owner.

Copyright © AppDynamics 2012-2015 Page 280
chmod -R 755 <path_to_php_agent_install_logs>
logs - Make the logs subdirectory readable/writable/executable by all.
chmod 777 <php_agent_install>/logs
3. Run the installation script using the following syntax. Each PHP instance is a single node.
$<php_agent_install>/install.sh [-s][-a=<account_name>@<account_key>][--http-proxy-host=<proxy_host>] [--http-proxy-port=<proxy_port>][--enable-cli-long-running=true|false][-e <php_ext_dir>] [-i <php_ini_dir>][-p <php_binary_dir>] [-v <php_version>] <controller-host> <controller-port> <app_name> <tier_name><node_name>
-s option: You can optionally specify the option if you want the agent to use SSL-s(HTTPS) to connect to the controller. In this case, set the Controller port to the HTTPS portof the controller.
account_key and_account name: The AppDynamics account_key and account_name arerequired for a controller running in multi-tenant mode. These values are provided in yourwelcome email from AppDynamics.
http-proxy-host:http-proxy-port:http-proxy-user:http-proxy-password-file:
Set the http-proxy-host and http-proxy-port to route data to the controller through a proxyserver. The http-proxy-host is the host name or IP address of the proxy server. Thehttp-proxy-port is the proxy server's HTTP or HTTPS port, whichever you are using. If you setthe http-proxy-host you must set the http-proxy-port as well.
Use the http-proxy-user and http-proxy-password-file if the proxy server requires credentials.
-e option: extensions directory for the appdynamics_agent.so file; needed only when thedefault PHP CLI binary cannot be determined.-i option: ini directory for the appdynamics_agent.ini file; needed only when the default PHP
If 777 access on the logs directory is too permissive for your organization's securitypolicies, this setting is not strictly necessary as long as that directory is owned by theapache/php/proxy user.

Copyright © AppDynamics 2012-2015 Page 281
CLI binary cannot be determined.-v option: version of PHP that you are instrumenting. Valid formats are version numbers toone or two decimal positions; e.g. "5.4" and "5.4.21" are both valid. Needed only when thedefault PHP CLI binary cannot be determined or there is no PHP CLI binary.- path to the PHP binaryp option:enable-cli-long-running: Set to true to defend PHP in long-running CLI applications.Defaults to false. See Long-Running CLI Applications with the Suhosin Patch in Special
.Procedures for PHP CLI
By default the installer uses the PHP CLI binary to determine where to install the PHP Agent. Thisworks for most PHP environments.If you are instrumenting a different PHP, use the option to-eindicate the correct extensions directory for the appdynamics_agent.so file and the option for the-icorrect ini directory for the appdynamics_agent.ini file. If you are installing in an environmentwhere there is no PHP CLI binary available, you must use the option as well as the , and - op-v -e i tions.
If all options are used, the , and options have precedence over the option.-e -i -v -p
4. Restart the web server, unless you are installing an agent to monitor PHP-CLI only.
If you are running multiple installations of Apache on the same machine, run install.sh once foreach Apache, each time with the appropriate node, php_ini dir and php_ext dir options. In thiscase see also .Run the PHP Proxy Daemon Manually
See for information about the default installation directories.Files Added to Your Installation
If your installation failed, see .Resolve Installation Issues for PHP
Installation Samples
Here is a sample command to install the agent on a single-tenant controller:
install.sh controller 8090 myApp myTier myNode
Here is a sample command to install the agent using SSL on a multi-tenant on-premise controller:
install.sh -s -a=PHPCust1000@9456d222-66e2-54d2-f8aabbc66c4econtroller1.appdynamics.com 8818 myApp myTier myNode
Here is a sample command to route traffic to the controller through a proxy server.
Installing as rootOn some systems, such as Ubuntu, it is necessary to perform the installation as root. Verifywhether you need to install as root in your environment.
You can use sudo to do this. See .http://linux.about.com/od/commands/l/blcmdl8_sudo.htm

Copyright © AppDynamics 2012-2015 Page 282
install.sh --http-proxy-host=myproxyhost --http-proxy-port=8099controller 8090 myApp myTier myNode
Tip: The installer overwrites your existing settings in the AppDynamics PHP Agent inifragment, found in appdynamics-php-agent/php/conf/appdyanmics_agent.ini. If youconfigured properties in that file, you need to update them every time you run the
. It does not overwrite the php.ini file.installer
If the startup does not succeed, .file a support ticket
Uninstall the PHP Agent using install.sh
If you installed the agent using install.sh, use install.sh to uninstall it.
To uninstall:
1. Shut down the web server.2. From the PHP agent install directory, run the PHP installer with the -u option:
install.sh -u
3. Delete the <php_agent_install> directory.
Install the PHP Agent using RPM
On this page:
Procedure for Installing the PHP Agent UsingRPMRPM Environment VariablesRun the RPM PackageRPM Log FileUninstall the Agent for PHP using RPM
Related pages:
Install the PHP AgentInstall the PHP Agent using a Shell ScriptRun the Proxy Daemon Manually for PHPAgentsResolve Installation Issues for PHP
The RPM package lets you automate the installation of the PHP Agent.
RPM is supported on RHEL and CentOS. You must run the package as root.
RPM installs one agent at a time. Installation of multiple agents is not supported.
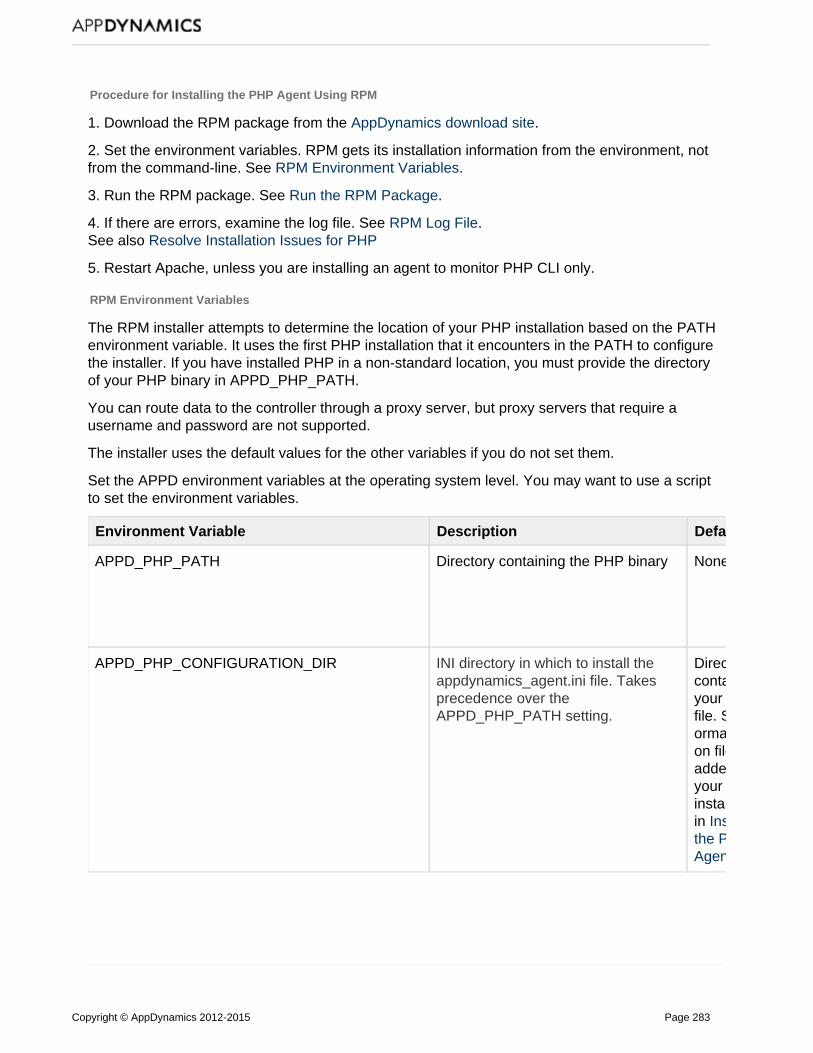
Copyright © AppDynamics 2012-2015 Page 283
Procedure for Installing the PHP Agent Using RPM
1. Download the RPM package from the .AppDynamics download site
2. Set the environment variables. RPM gets its installation information from the environment, notfrom the command-line. See .RPM Environment Variables
3. Run the RPM package. See .Run the RPM Package
4. If there are errors, examine the log file. See .RPM Log FileSee also Resolve Installation Issues for PHP
5. Restart Apache, unless you are installing an agent to monitor PHP CLI only.
RPM Environment Variables
The RPM installer attempts to determine the location of your PHP installation based on the PATHenvironment variable. It uses the first PHP installation that it encounters in the PATH to configurethe installer. If you have installed PHP in a non-standard location, you must provide the directoryof your PHP binary in APPD_PHP_PATH.
You can route data to the controller through a proxy server, but proxy servers that require ausername and password are not supported.
The installer uses the default values for the other variables if you do not set them.
Set the APPD environment variables at the operating system level. You may want to use a scriptto set the environment variables.
Environment Variable Description Default
APPD_PHP_PATH Directory containing the PHP binary None
APPD_PHP_CONFIGURATION_DIR INI directory in which to install theappdynamics_agent.ini file. Takesprecedence over theAPPD_PHP_PATH setting.
Directorycontainingyour php.inifile. See informationon filesadded toyourinstallationin Installthe PHP
.Agent
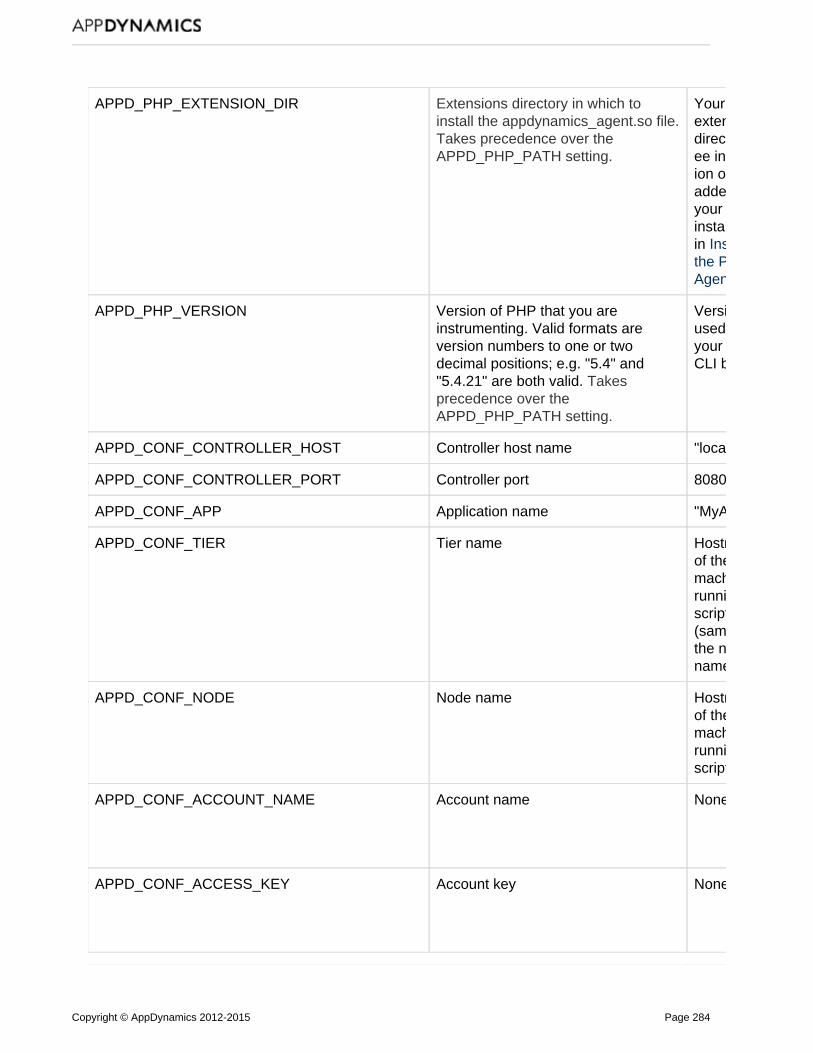
Copyright © AppDynamics 2012-2015 Page 284
APPD_PHP_EXTENSION_DIR Extensions directory in which toinstall the appdynamics_agent.so file.Takes precedence over theAPPD_PHP_PATH setting.
Your PHPextensionsdirectory. See information on filesadded toyourinstallationin Installthe PHP
.Agent
APPD_PHP_VERSION Version of PHP that you areinstrumenting. Valid formats areversion numbers to one or twodecimal positions; e.g. "5.4" and"5.4.21" are both valid. Takesprecedence over theAPPD_PHP_PATH setting.
Versionused byyour PHPCLI binary
APPD_CONF_CONTROLLER_HOST Controller host name "localhost"
APPD_CONF_CONTROLLER_PORT Controller port 8080
APPD_CONF_APP Application name "MyApp"
APPD_CONF_TIER Tier name Hostnameof themachinerunning thescript(same asthe nodename)
APPD_CONF_NODE Node name Hostnameof themachinerunning thescript
APPD_CONF_ACCOUNT_NAME Account name None
APPD_CONF_ACCESS_KEY Account key None
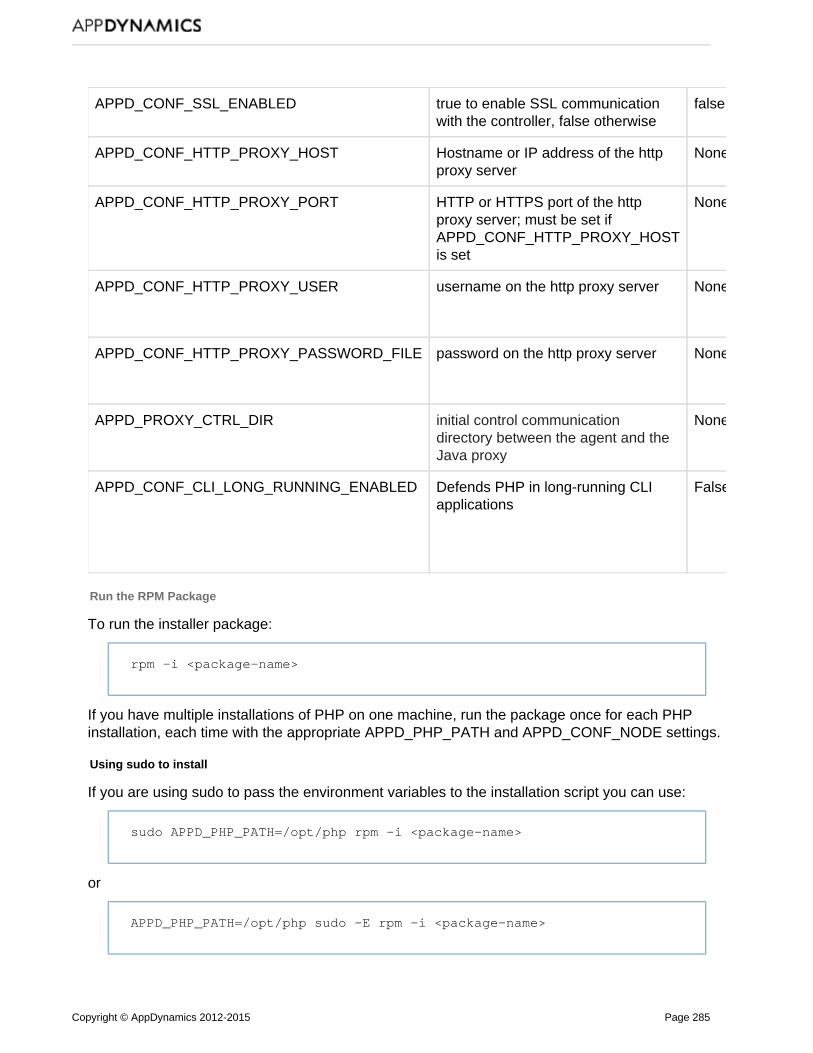
Copyright © AppDynamics 2012-2015 Page 285
APPD_CONF_SSL_ENABLED true to enable SSL communicationwith the controller, false otherwise
false
APPD_CONF_HTTP_PROXY_HOST Hostname or IP address of the httpproxy server
None
APPD_CONF_HTTP_PROXY_PORT HTTP or HTTPS port of the httpproxy server; must be set ifAPPD_CONF_HTTP_PROXY_HOSTis set
None
APPD_CONF_HTTP_PROXY_USER username on the http proxy server None
APPD_CONF_HTTP_PROXY_PASSWORD_FILE password on the http proxy server None
APPD_PROXY_CTRL_DIR initial control communicationdirectory between the agent and theJava proxy
None
APPD_CONF_CLI_LONG_RUNNING_ENABLED Defends PHP in long-running CLIapplications
False
Run the RPM Package
To run the installer package:
rpm -i <package-name>
If you have multiple installations of PHP on one machine, run the package once for each PHPinstallation, each time with the appropriate APPD_PHP_PATH and APPD_CONF_NODE settings.
Using sudo to install
If you are using sudo to pass the environment variables to the installation script you can use:
sudo APPD_PHP_PATH=/opt/php rpm -i <package-name>
or
APPD_PHP_PATH=/opt/php sudo -E rpm -i <package-name>

Copyright © AppDynamics 2012-2015 Page 286
Updating the Installation
Any changes that you made to the configuration files are preserved when you re-run the installer.RPM saves your original settings and appdynamics_agent_log4cxx.xml files with the settings fromthe previous installation.
RPM Log File
If the installation succeeds, no log file is generated.
If there were errors, a message displays the location of the log file generated in the /tmp directory.Examine this log file to identify the cause of the problem.
Uninstall the Agent for PHP using RPM
If you installed the agent using RPM, use RPM to uninstall it.To uninstall:
rpm -e appdynamics-php-agent-<version>
To find the version of the package that you installed you can use:
rpm -qa | grep appdynamics-php-agent
The existing configurations are saved in a tarball in /tmp, the location of which will be displayedafter the uninstall completes.
Upgrade the PHP Agent
On this page:
Upgrade the PHP Agent
Related pages:
Install the PHP AgentUninstall the PHP AgentResolve Installation Issues for PHP
If you are upgrading both the Controller and agents, first upgrade the Controller and then upgradethe agents.
Also, if you are upgrading multiple agents in your monitored environment, upgrade the agents forthe tiers on which business transactions originate last. For more information about thisrequirement, along with Controller and agent compatibility information, see Agent - Controller
. Compatibility Matrix
Upgrade the PHP Agent
1. Shut down the web server or php-fpm.
2. Copy the controller host, controller port, application name, tier name and node name property
Copyright © AppDynamics 2012-2015 Page 287
values from your ini file.If you are running in multi-tenant mode, also copy the account name and account access keyproperty values.
3. Recursively remove or rename the old AppDynamics PHP installation directory.
4. Download and extract the most recent agent tarball.
5. Run the installation script, using the values that you copied from controller-info.xml for theparameters.
6. Restart Apache or php-fpm.
Uninstall the PHP Agent
On this page:
Uninstall the PHP AgentAgents Installed with the Agent DownloadWizard
Related pages:
Install the PHP Agent using a Shell ScriptInstall the PHP Agent using RPM
Uninstall the PHP Agent
1. Shut down Apache. If you are using the agent to monitor PHP CLI without running a web server, you can omit step 1.2. Do one of the following:
If the agent was installed with the shell script installer, enter:
install.sh -u
Then delete the <php_agent_install> directory.
If the agent was installed with the RPM installer, enter:
rpm -e appdynamics-php-agent-<version>
where <version> is the package you installed. You can find the version using:
If you are using the agent to monitor PHP CLI without running a web server, you can omitsteps 1 and 6.

Copyright © AppDynamics 2012-2015 Page 288
rpm -qa | grep appdynamics-php-agent
Agents Installed with the Agent Download Wizard
If your agent was downloaded and installed using the Agent Download Wizard, it might not beobvious which installer was used. The name of the actual installer called by the runme.shcommand in the wizard is hidden from the user.
Normally, if was selected in the wizard, the RPM installer was used. If RHEL and CentOS All was selected in the wizard, the shell script installer was used. So use theOther LInux OS
appropriate uninstall command based on the command that was used to install the agent..
If you do not know which selection was checked in the wizard, run
rpm -qa | grep appdynamics-php-agent
If this does not list any results, assume that the shell script installer was used to install the agent.
Resolve Installation Issues for PHP
On this page:
Determine whether the installer installed inthe correct directory.Verify that the AppDynamics settings blockexists in the configuration file.Confirm that the correct permissions are set.Confirm that the proxy is running.Check the Configuration Properties.
If you installed the PHP Agent, started up your instrumented server, and your application isreceiving traffic but no metrics are being reported, try these suggestions for investigatinginstallation issues.
Determine whether the installer installed in the correct directory.
It is possible that the agent was installed in the wrong directory. Verify the location of your PHPinstallation.
Verify the location of your PHP by running phpinfo. See .http://us1.php.net/phpinfo
Then check where the installer actually installed the agent files.
The appdynamics_agent.ini file should be in the same directory that contains the php.ini filefor your PHP installation.The appdynamics_agent.so file should be in the extensions directory for your PHPinstallation.
See for information about how to locate these directories.Files Added to Your Installation

Copyright © AppDynamics 2012-2015 Page 289
1. 2.
In addition, on Linux you can use pstree to locate the agent. Pstree displays the AppDynamicsagent running under Apache if the agent is installed properly. See http://freecode.com/projects/pstr
.ee
If the agent files are not in the correct directories, re-install the agent with the and options.-i -e
Re-install the agent
If the app agent is not installed in the right directory, re-install the agent using the install.sh installerwith the and options. Use the to install the in the same directory-i -e -i appdynamics_agent.ini fileas your php.ini file and the file in the same directory as to install the appdynamics_agent.so-eyour . See . PHP extensions directory Install the PHP Agent using a Shell Script
If you initially installed the agent using the RPM installer, you can find the shell script installer at /usr/lib/appdynamics-php5/install.sh.
Check error messages in the installation output
When you reinstall, examine carefully any error messages in the output of the install script,especially those that direct you to copy some settings into php.ini.
If necessary copy those settings into the php.ini file. See Controller Information in the PHP for information on common settings that may be missing.Configuration Files
Verify that the AppDynamics settings block exists in the configuration file.
Run this command:
php -i | less
and examine the output. You should see should be an appdynamics_agent.ini and a configurationblock listing appdynamics ini values.
Confirm that the correct permissions are set.
Check that the following permissions are set:
chown -R <apacheuser>:<apacheuser> <php_agent_install>chmod -R 755 <path_to_php_agent_install_logs>chmod 777 <php_agent_install>/logs
Confirm that the proxy is running.
The Java proxy is the part of the agent that communicates with the Controller. If the agent isinstalled in the right place, confirm that the Java proxy is running.
From the command line enter 'ps aux | grep java'.Inspect the list. You should see output similar to the following if the proxy is running:

Copyright © AppDynamics 2012-2015 Page 290
/usr/lib/appdynamics-php5/proxy/jre/bin/java -server -Xmx120m-classpath/usr/lib/appdynamics-php5/proxy/conf/logging/*:/usr/lib/appdynamics-php5/proxy/lib/*:/usr/lib/appdynamics-php5/proxy/lib/tp/*:/usr/lib/appdynamics-php5/proxy/*-Djava.library.path=/usr/lib/appdynamics-php5/proxy/lib/tp-Dappdynamics.agent.logs.dir=/usr/lib/appdynamics-php5/logs-Dcomm=/tmp/ad-siJ4rp -DagentType=PHP_APP_AGENT-Dappdynamics.agent.runtime.dir=/usr/lib/appdynamics-php5/proxycom.appdynamics.ee.agent.proxy.kernel.Proxy
If you are instrumenting a PHP CLI script, you need to start the proxy manually. You may alsoneed to start the proxy manually if you have special requirements for running Java processes.See .Run the Proxy Daemon Manually for PHP Agents
Check the Configuration Properties.
It is possible that the properties that the proxy uses to communicate with the Controller were notset properly.
You can modify these properties in the php.ini or appdynamics_agent.ini file, wherever they areset in your environment. See .Controller Information in the PHP Configuration Files
Special Considerations for PHP on Mac OSX
If you are installing the PHP Agent on OSX, set max_execution_time to 0 in theappdynamics_agent.ini file
If you have another INI file that is loaded after appdynamics_agent.ini, and sets max_executiontime to a non-zero value, set max_execution_time to 0 in the php.ini file instead.
PHP Supported Environments
On this page:
PHP VersionsPHP Web ServersOperating SystemsArchitecturePHP Frameworks and ProtocolsTransaction NamingExit PointsOpcode Cache CompatibilityCorrelation with AppDynamics for Databases
Related pages:

Copyright © AppDynamics 2012-2015 Page 291
Configure Transaction Detection for PHP
Supported Platform Matrix for the PHP Agent
PHP Versions
Supported PHPVersions
Comment
5.2 Does not detect mysqli backends instantiated with the keyword.newSee note below.
5.3
5.4
5.5
5.6
PHP 5.2 Note
The PHP Agent is incompatible with PHP 5.2 applications that use the keyword to instantiatenewa mysqli backend.For example, AppDynamics will not detect the mysqli backend created by a PHP 5.2 applicationthat uses an expression like this:
// Does not get detected.$db = new mysqli("localhost", "user", "password", "database");
The workaround is to change such expressions to use mysqli_connect():
$db = mysqli_connect("localhost", "user", "password", "database");
PHP ZTS Note
The PHP Agent is incompatible with the mode of PHP called Zend Thread Safety (ZTS).
If you are using ZTS, AppDynamics suggests that you review your dependencies on ZTS toconfirm that you actually need it, and if you do not, to switch to non-ZTS mode.
If you have a legacy infrastructure which requires ZTS or an app library that needs it, such aspthreads, contact AppDynamics Support.
PHP Web Servers
Supported Web Server Version Comment
Apache 2.2 in prefork mode using mod_php

Copyright © AppDynamics 2012-2015 Page 292
Apache 2.4 in prefork mode using mod_php
Apache 2.2 in worker MPM mode using mod_fastcgi with php-fpmor mod_fcgid with php-cgi
Apache 2.4 2.4 in worker MPM mode using mod_fastcgi with php-fpmor mod_fcgid with php-cgi
Any Web Server compatiblewith php-fpm
Operating Systems
Supported Operating System Version Comment
RHEL/CentOS 5.8+ SELinux is disabled.
Ubuntu 10+ SELinux is disabled.
Debian 6 SELinux is disabled.
OSX Mavericks
Architecture
Supported Architecture
32-bit
64-bit
PHP Frameworks and Protocols

Copyright © AppDynamics 2012-2015 Page 293
Framework/Protocol Version Entry Point Type
Drupal 7 Drupal
WordPress 3.4 & 3.5 Wordpress
Zend 1 & 2 PHP MVC
CodeIgniter 2.x PHP MVC
FuelPHP 1.5x & 1.6x PHP MVC
Magento 1.5, 1.6 & 1.7 PHP MVC
Symfony 1 & 2 PHP MVC
CakePHP 2.x PHP MVC
HTTP PHP Web
CLI PHP CLI
If your PHP framework is not listed here, the agent detects your entry points as PHP Web andnames the business transactions based on the first two segments of the URI (the default namingconvention for PHP Web transactions). So it is still possible to monitor applications on"unsupported" frameworks. You can modify the naming convention used for PHP Web Entrypoints. See .Configure PHP Web Transaction Naming
Transaction Naming
Framework/Environment Default Transaction Naming
Drupal page callback name
Wordpress template name
PHP MVC Frameworks controller:action
PHP Modular MVCFrameworks
module:controller:action
PHP Web URI
PHP Web Service service name.operation name
PHP CLI last two segments of the script's directory path plus the name ofthe script
Virtual host prefixing is available for all supported entry point types except PHP CLI.
Exit Points
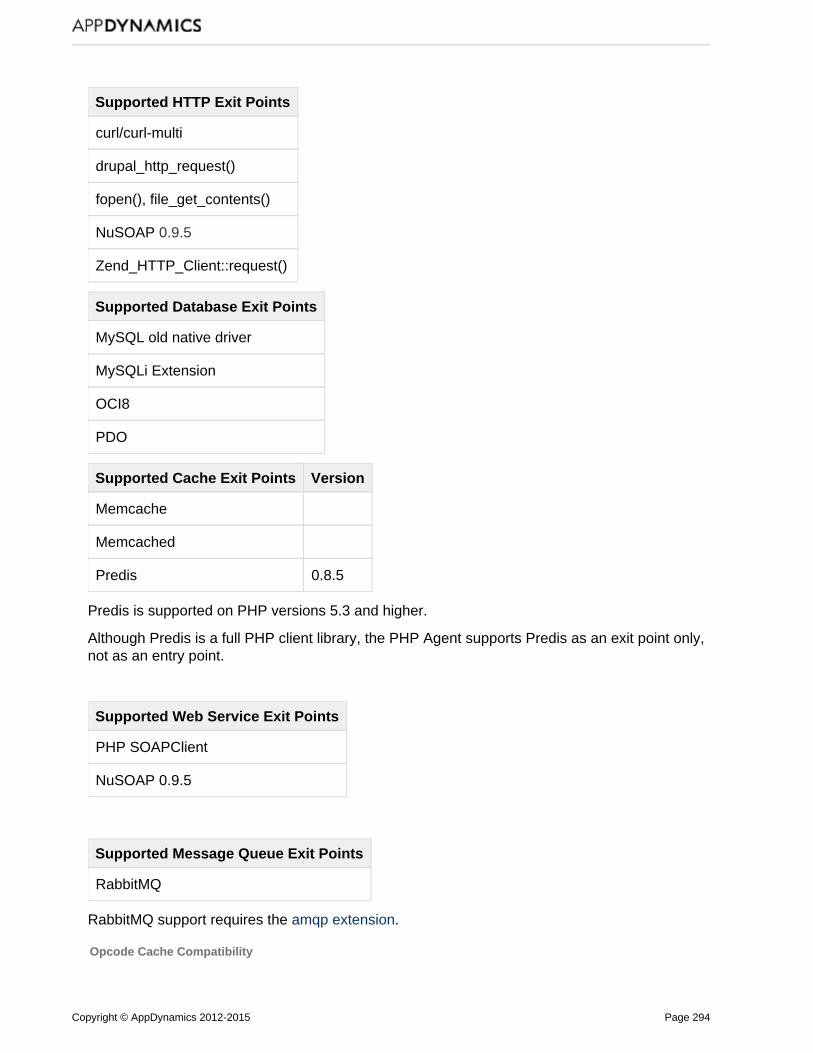
Copyright © AppDynamics 2012-2015 Page 294
Supported HTTP Exit Points
curl/curl-multi
drupal_http_request()
fopen(), file_get_contents()
NuSOAP 0.9.5
Zend_HTTP_Client::request()
Supported Database Exit Points
MySQL old native driver
MySQLi Extension
OCI8
PDO
Supported Cache Exit Points Version
Memcache
Memcached
Predis 0.8.5
Predis is supported on PHP versions 5.3 and higher.
Although Predis is a full PHP client library, the PHP Agent supports Predis as an exit point only,not as an entry point.
Supported Web Service Exit Points
PHP SOAPClient
NuSOAP 0.9.5
Supported Message Queue Exit Points
RabbitMQ
RabbitMQ support requires the .amqp extension
Opcode Cache Compatibility

Copyright © AppDynamics 2012-2015 Page 295
Alternative PHP Cache (APC)
Correlation with AppDynamics for Databases
AppDynamics for Databases version 2.7.4 or higher is required if you want to correlateAppDynamics for Databases with the PHP Agent.
AppDynamics for PHP Architecture
The PHP Agent consists of:
a PHP extension componenta proxy component
The PHP extension component discovers, maps and tracks metrics for business transactions, appservices, and backends in your web application by injecting instrumentation into the PHPapplication at runtime.
The proxy component is a Java daemon process that handles the communication between thePHP extension component and the Controller. The proxy reports the performance metrics to theController, where the data is stored, baselined, and analyzed. You can access this performancedata interactively using the Controller console or programmatically using the AppDynamics RESTAPI.
By default, the proxy component is automatically started when you start the PHP Agent. Certaindeployments require starting the proxy manually.
Architecture with Each Agent With Its Own Proxy
Architecture with Multi-Tenant Proxy
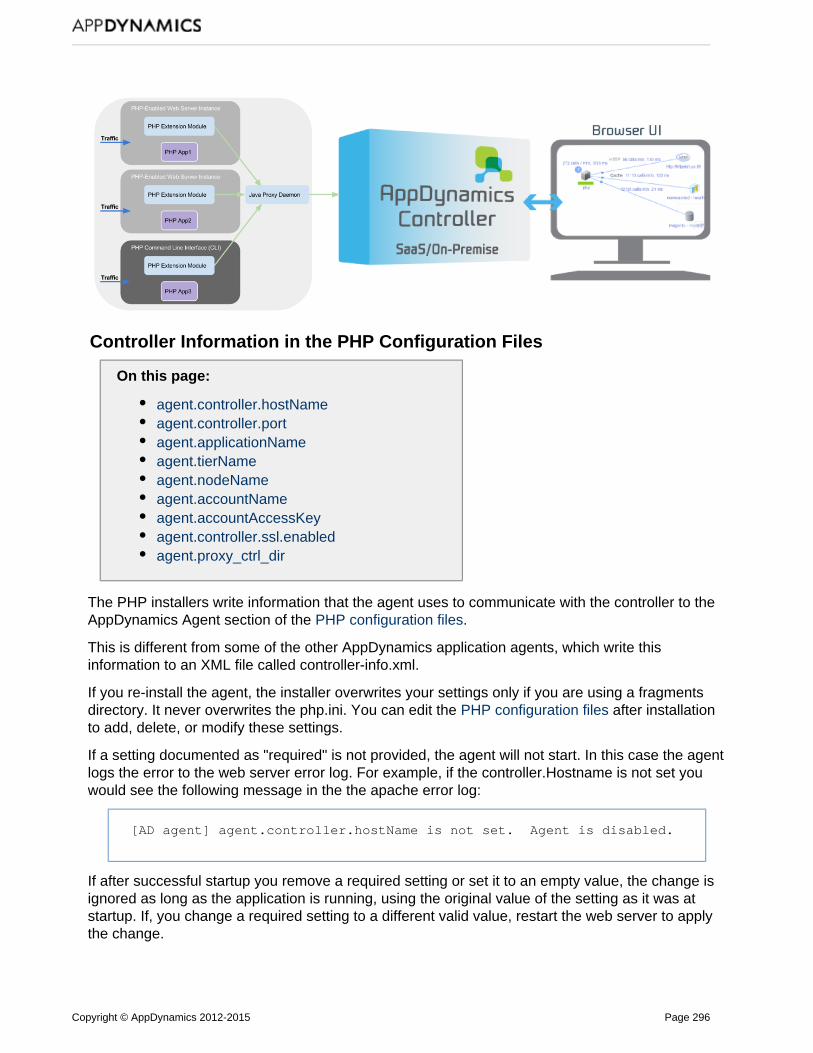
Copyright © AppDynamics 2012-2015 Page 296
Controller Information in the PHP Configuration Files
On this page:
agent.controller.hostNameagent.controller.portagent.applicationNameagent.tierNameagent.nodeNameagent.accountNameagent.accountAccessKeyagent.controller.ssl.enabledagent.proxy_ctrl_dir
The PHP installers write information that the agent uses to communicate with the controller to theAppDynamics Agent section of the .PHP configuration files
This is different from some of the other AppDynamics application agents, which write thisinformation to an XML file called controller-info.xml.
If you re-install the agent, the installer overwrites your settings only if you are using a fragmentsdirectory. It never overwrites the php.ini. You can edit the after installationPHP configuration filesto add, delete, or modify these settings.
If a setting documented as "required" is not provided, the agent will not start. In this case the agentlogs the error to the web server error log. For example, if the controller.Hostname is not set youwould see the following message in the the apache error log:
[AD agent] agent.controller.hostName is not set. Agent is disabled.
If after successful startup you remove a required setting or set it to an empty value, the change isignored as long as the application is running, using the original value of the setting as it was atstartup. If, you change a required setting to a different valid value, restart the web server to applythe change.

Copyright © AppDynamics 2012-2015 Page 297
The controller information settings are described below.
agent.controller.hostName
This is the host name or the IP address of the AppDynamics Controller. Example values are192.168.1.22 or myhost or myhost.abc.com. This is the same host that you use to access theAppDynamics browser-based user interface. For an on-premise Controller, use the value forapplication server host name that was configured when the Controller was installed.
This setting is required.
agent.controller.port
This is the HTTP(S) port of the AppDynamics Controller. This is the same port that you use toaccess the AppDynamics browser-based user interface.
If agent.controller.ssl.enabled is true, specify the HTTPS port of the Controller; otherwise specifythe HTTP port. See .agent.controller.ssl.enabled
For on-premise installations, port 8090 for HTTP and port 8181 for HTTPS are the defaults.
This setting is required.
agent.applicationName
This is the name of the logical business application that the instrumented node belongs to.
If a business application of the configured name does not exist, it is created automatically.
This setting is required.
agent.tierName
This is the name of the logical tier that this node belongs to.
This setting is required.
agent.nodeName
This is the name of the instrumented node.
This setting is required.
agent.accountName
This is the account name used to authenticate with the Controller.
This setting is required if the AppDynamics Controller is running in multi-tenant mode or if you areusing the AppDynamics SaaS Controller. It specifies the account name for the agent to use toauthenticate with the Controller. If you are using the AppDynamics SaaS Controller, the Welcomeemail sent by AppDynamics provides the account name.
This setting is not required if the Controller is running in single-tenant mode.
agent.accountAccessKey
This is the account access key used to authenticate with the Controller.

Copyright © AppDynamics 2012-2015 Page 298
This setting is required if the AppDynamics Controller is running in multi-tenant mode or if you areusing the AppDynamics SaaS Controller. It specifies the account access key for the agent to useto authenticate with the Controller. If you are using the AppDynamics SaaS Controller, theWelcome email sent by AppDynamics provides this information.
This setting is not required if the Controller is running in single-tenant mode.
agent.controller.ssl.enabled
When set to true, this setting specifies that the agent should use SSL (HTTPS) to connect to theController. If agent.controller.ssl.enabled is true, set the agent.controller.port to the HTTPs port ofthe Controller.
agent.proxy_ctrl_dir
This specifies the . Needed initial control communication directory between the agent and the proxyonly for manual proxy start. See .Run the Proxy Daemon Manually for PHP Agents
Special Procedures for PHP CLI
On this page:
Instrumenting PHP CLIConsiderations for Various ScenariosLong-Running CLI Applications with theSuhosin Patch
Related pages:
Run the Proxy Daemon Manually for PHPAgentsController Information in the PHPConfiguration Files
The main consideration for instrumenting a PHP CLI application is that you must arrange to runthe proxy dameon manually.
By default the proxy is launched automatically when the agent starts up, which works better inmost cases for the non-CLI platforms
Instrumenting PHP CLI
1. Create the proxy control directory, which is used for agent/proxy communication.
2. In your PHP configuration file (php.ini or appdynamics_agent.ini depending on your

Copyright © AppDynamics 2012-2015 Page 299
environment) include the following settings:
agent.cli_enabled = 1agent.auto_launch_proxy = 0agent.proxy_ctrl_dir = <proxy control directory>If you are using the RPM installer to install the agent you may have configured the proxycontrol directory using the APPD_PROXY_CTRL_DIR environment variable. See Install the
. This environment variable takes precedence over the setting in thePHP Agent using RPMini file.
3. Before running any traffic through the CLI, run the proxy from the directory into which youinstalled the PHP agent, passing the proxy control directory and proxy log directory as arguments.
proxy/runProxy <proxy_control_dir> <log_dir>
For example:
proxy/runProxy /tmp/proxy.communication /tmp/agentLogs
For the full set of options to runProxy see .Execute the runProxy Script Manually
Considerations for Various Scenarios
If you have PHPs running CLI and apache on the same machine, your AppDynamics setupdepends on whether you want all the traffic reported against a single AppDynamics node orseparate nodes. A separate proxy is required for each AppDynamics node that you want tomonitor in the controller.
If you want all the CLI traffic to be reported against one node and all the web traffic to be reportedagainst a different node, configure apache to auto-launch the proxy (the default) and configure CLIto use a manually-launched proxy. This requires separate .ini files - one for the web PHP withagent.auto_launch_proxy set to 1 and another for PHP CLI with agent.auto_launch_proxy set to 0.
If you want the web traffic and the CLI traffic to be reported against the same node, configure bothapache and CLI to use the same manually launched proxy.
Long-Running CLI Applications with the Suhosin Patch
New in 4.0.3
A side effect of the is that it prevents the PHP Agent from ensuring cleanup inSuhosin patchlong-running CLI applications.
If your PHP has the Suhosin patch, it is possible that resources will not be freed in long-runningapplications. Thus memory leaks could result if the application itself does not explicitly free theseresources.
The long-running-cli feature defends PHP applications in a environment in which both of thefollowing conditions exist:
PHP with the is running on Debian or Ubuntu. It is common for Debian andSuhosin patch

Copyright © AppDynamics 2012-2015 Page 300
Ubuntu PHPs to have this patch. This feature is not needed for PHPs with only the Suhosin extension, which is different fromthe patch. Be aware that some PHPs use both the extension and the patch.Using the , you are instrumenting a CLI application that has multiplePHP Agent APIunbounded business transactions running on the same process,
How the Long-Running-Cli Feature Works
At Install Time
If the installer determines that PHP has the Suhosin patch and CLI is enabled(agent.cli_enabled=1) and the installer option is set to a fatal error is generated and thetrue,installer terminates. With the option set, the installer refuses to instrument a long-running CLIapplication on a PHP installation with the Suhosin patch.
If the installer determines that PHP has the Suhosin patch and CLI is enabled(agent.cli_enabled=1) and the installer option is set to (the default), the installation continuesfalseand warns that memory leaks could occur in long running CLI processes.
If the installer determines that PHP does not have the Suhosin patch, the installation continues.Long-running CLI processes are supported by the agent, since there is no Suhosin patch.
Installer Option
If the agent could not determine whether your PHP has the Suhosin patch at install time but it doesdetect the patch at runtime, having set the installer option to prevents the agent fromtrueinstrumenting any CLI processes, not just long-running ones. This is done to prevent theSuhosin-patched PHP from exiting.
If CLI is enabled and the installer did not terminate because of the detection of the Suhosin patch,AppDynamics recommends that you install the agent with the optionenable-cli-long-running(shell script installs) or the environment variableAPPD_CONF_CLI_LONG_RUNNING_ENABLED(RPM installs) set to . This will defend your PHP if the patch is detected at runtime.true
If the CLI part of your application does not get instrumented (because the installer detected theSuhosin patch), you can unset the option by setting the option in the PHPagent.cli_long_runningini file to . Or alternatively, you can re-install with the installeroff
Set Up a Multi-Tenant Proxy for PHP Agents
On this page:
Setting up a Multi-Tenant Proxy
Related pages:
AppDynamics for PHP ArchitectureExecute the runProxy Script ManuallyRun the Proxy Daemon Manually for PHPAgentsInstall the PHP Agent
By default, if you are running multiple agents, each agent automatically launches its own Java
Copyright © AppDynamics 2012-2015 Page 301
1.
2.
3.
4.
proxy to communicate with the controller.
However, if you are running multiple PHP Agents on the same machine, you can reduce youroverhead by setting up the agents to report to a single multi-tenant Java proxy. In this case youwould need to start that proxy manually.
The number of nodes that can report to a single proxy is limited by the size of the heap given tothe proxy. You may need to adjust the maxHeapSize and maxPermSize settings in the runproxyscript if you have a large number of agents reporting to a single proxy. Contact AppDynamics
if you need to change these settings.Support
Setting up a Multi-Tenant Proxy
Configure each agent for manual launch of the proxy. To do this, in the PHP configurationfile (php.ini or appdynamics_agent.ini depending on your setup) for each agent, set theagent.auto_launch_proxy value to 0.Configure a single proxy control directory for all the agents that will share the proxy. Theymust all be on the same machine. To do this, in the PHP configuration file for each agent,set agent.proxy_ctrl_dir to the same proxy control directory.The permissions on this directory should be readable and executable by the process thatruns apache and writable by the process that runs the proxy.Before you start the agents, arrange to launch the proxy manually, passing the proxy controldirectory configured in step 2 as the proxyCommunicationDir argument to the runProxyscript. See . AppDynamics recommends launching theExecute the runProxy Script Manuallyproxy on system startup.Verify that each agent reporting to the multi-tenant proxy is configured with a uniqueapp_name/node_name combination. The app_name and node_name are arguments to theagent install script.
Run the Proxy Daemon Manually for PHP Agents
Related pages:
Set Up a Multi-Tenant Proxy for PHP AgentsSpecial Procedures for PHP CLI
By default, when the PHP agent starts up, it automatically executes the runproxy shell script. Thisscript runs the Java proxy daemon that handles communication between the PHP agents and thecontroller. See for information about how the Java proxy AppDynamics for PHP Architecturedaemon fits into the PHP agent architecture.
Automatic startup of the proxy works for the great majority of situations. However, you cansuppress the automatic startup of this script and run it manually. You would do this if:
You plan to instrument a PHP CLI entry point. The PHP CLI entry point requires manualstartup of the proxy and immediate creation of the node on startup.You have multiple apache pools on the same machine reporting to the same proxy.
To do this, you first need to configure the agent for manual proxy launch. Then you need to launchthe proxy manually. See:

Copyright © AppDynamics 2012-2015 Page 302
1.
2.
3.
Configure Manual Startup of the runProxy Script for PHP Agents
Related pages:
Controller Information in the PHPConfiguration FilesInstall the PHP AgentExecute the runProxy Script ManuallyRun the Proxy Daemon Manually for PHPAgents
You need to configure the agent for manual startup if you plan to start the runproxy scriptmanually. To do this:
By default the agent.auto_launch_proxy setting in php.ini or appdynamics_agent.ini is set to1 to enable automatic startup of the proxy.Change it to 0 to suppress automatic startup if you want to execute runProxy manually.In the PHP configuration file (php.ini or appdynamics_agent.ini depending on your setup),set the agent.proxy_script to the path of the runproxy that you want to use. The file in thescript is relative to the root of the PHP agent. You can specify the absolute path if youprefer.In the PHP configuration file, set the agent.proxy_ctrl_dir to the directory to use for initial
. This directory contains the domainbetween the agent and the proxycontrol communication control socket, which the agent uses to start an AppDynamics node. This directory is wherethe agent gets the configuration for the node. The application user must have readpermission on the proxy_ctrl_dir.
Whenever you install the PHP agent, the installer overwrites the runproxy script and theappdynamics_agent.ini file, but not the php.ini. If you re-install, you need to reset theagent.auto_launch_proxy setting in the appdynamics_agent.ini file before you restart the server.
Execute the runProxy Script Manually
Related pages:
Configure Manual Startup of the runProxyScript for PHP AgentsRun the Proxy Daemon Manually for PHPAgents
By default, the proxy component is automatically started when you start the agent. Use thecommand described here only if you have configured the agent for manual proxy launch.
Before any traffic is run on the instrumented server, execute the appropriate version of therunproxy script to start the proxy.
Here is the full set of options for the runProxy script. The proxy control directory is required.

Copyright © AppDynamics 2012-2015 Page 303
1.
Usage: runProxy options -- proxyCommunicationDir logDirectory[jvmOption [ jvmOption [...] ]
Options: -r <dir>, --proxy-runtime-dir=<dir> Specifies proxy runtimedirectory -d <dir>, --proxy-dir=<dir> Specifies root proxydirectory -j <dir>, --jre-dir=<dir> Specifies root JRE directory -v, --verbose Enable verbose output -h,--help Show this message
Example Usage:
./proxy/runProxy -d ./proxy -r <agent.proxy_ctrl_dir>/tmp/proxy.communication /tmp/agentLogs
When the proxy starts, nodes are not created immediately. A node is created when the agent firstdetects traffic on it.
Every time you reboot the server, you need to execute the runproxy script if you have opted tostart the proxy manually.
Instrument Python Applications
On this page:
Before You BeginInstall the Python AgentConfigure the AgentInstrument the Application
Related pages:
Python Agent SettingsPython Supported EnvironmentsAppDynamics for Python ArchitectureDisable the Python AgentUpgrade the Python AgentPython Agent Debugging and Logs
Before You Begin
Confirm you have access to a 4.0 or later AppDynamics controller:If you use a SaaS controller, AppDynamics sent you the controller host name in yourWelcome email.

Copyright © AppDynamics 2012-2015 Page 304
1.
2.
3.
4.
If you use the on-premise controller, you supplied the host and port when you installedthe controller.
Verify that your Python environment meets the following requirements:CPython 2.6 or CPython 2.7pip 1.4 or lateraccess to the Python Package Index ( ) by the machine onhttps://pypi.python.org/which you will install the agent
Verify that you have a WSGI-based application to monitor. See Supported Environments.and Versions for Python
If the application that you will monitor runs in a virtual environment, activate the virtualenvironment. This is not necessary if the application runs in the global Python environment.
Example of activating a virtual environment:
source /<path_to_virtual_environment>/bin/activate
Install the Python Agent
The machine that the application is running on must have access to the Python Package Index (htt).ps://pypi.python.org/
To install the agent package in the virtual environment you need to be the user who owns thatvirtual environment. Install the agent into the virtual environment after you have activated it.
If the application uses the global Python environment, you need to run the install command asroot.
To install the agent and its dependencies, run the pip install command as follows:
pip install -U appdynamics\<4.1
When there are multiple packages, you can locate the agent using the command orpip listusing the List packages facility at and then find "appdynamics" in thehttps://pypi.python.org/pypioutput. Here is sample output from the List packages command:
Configure the Agent
Provide a configuration file that specifies at least the minimal AppDynamics settings forcommunication between the agent and the controller.
Copyright © AppDynamics 2012-2015 Page 305
The configuration file should be in The Python application userthe Python ConfigParser format.must have read access on the configuration file.
Note that lines in the configuration file must not start with spaces. Lines that begin with a # arecomments and are ignored by the agent,
Here is a simple sample configuration file with the minimal settings.
[agent]app = <app_name>tier = <tier_name>node = <node_name>
[controller]host = <controller_host>port = <controller_port>ssl = on|off account = <your AppDynamics controller account key>accesskey = <your AppDynamics controller account access key>
The ssl setting is off by default. Set it to on if you are connecting to the controller via SSL.
The account and accesskey are required if you are using a SaaS account or a multi-tenanton-premise controller.
Other settings, such as ssl or http-proxy or wsgi_module, may be required depending on yourapplication deployment. See for the complete list of settings.Python Agent Settings
You can store this configuration file anywhere.
When you instrument an application using , you pass the configuration file's path aspyagent runa parameter to the command. In other deployments set the pyagent run APPD_CONFIG_FILE
as illustrated below in the samples for and environment variable uWSGI with Emperor Apache with.mod_wsgi
Instrument the Application
Which instrumentation instructions to uses depends on how the application is deployed.
There are three deployment options.
pyagent runuWSGI with EmperorApache with mod_wsgi
pyagent run
I , you can instrument the application using f you can control the way your WSGI server is invoked p. This command yagent run runs your WSGI server with the Python agent enabled. This option
is generally possible if you use a process launcher/manager that takes a command to execute; forexample, frameworks managed by Supervisor, uWSGI without Emperor, init.d scripts, etc.

Copyright © AppDynamics 2012-2015 Page 306
1.
2. 3.
To use the pyagent run command, prepend to your existing application run command the pyagent run command, passing the AppDynamics configuration file described in Configure the Agentas a parameter.
Django and Flask
If your framework is Django or Flask, all you need to do is prepend the pyagent run to your runcommand.
For example:
If your current run command looks like this:
gunicorn -w 8 -b '0.0.0.0:9000' example.app:application
replace it with this:
pyagent run -c <path_to_appdynamics_config_file> -- gunicorn -w 8 -b'0.0.0.0:9000' example.app:application
Other Pure Python WSGI-Based Frameworks
If you use a WSGI-based framework that is not Django or Flask:
In the AppDynamics configuration file, specify your actual WSGI application by setting eitherthe APPD_WSGI_MODULE directive to point to your app module or the
directive to point to your WSGI script. See APPD_WSGI_SCRIPT_ALIAS Python Agent.Settings
Prepend the pyagent run to your run command.Run the Appdynamics-generated application.
For example:
Important for Supervisor UsersAfter updating your Supervisor configuration you must use the commsupervisorctl reloadand to get the Python agent loaded. Supervisor does not re-read its configuration fileswhen you use the command.tsupervisorctl restar
To verify that the agent was loaded, look for the Python agent log file. Its default location is . For example, if your application name is/tmp/appd/logs/<app_name>-<node_name>.log
"myapp" and your node name is "mynode" as specified in the agent configuration file, andyou have not changed the location of the log file, the log file will be /tmp/appd/logs/myapp-mynode.
If the log file exists, the agent was loaded. If the log file does not exist, the agent was notloaded, in which case you should try reloading the Supervisor configuration with superviso
.rctl reload

Copyright © AppDynamics 2012-2015 Page 307
1. 2.
If your run command looks like this:
gunicorn -w 8 -b '0.0.0.0:9000' example.app:application
replace it with these two commands:
pyagent run -c /path/to/appdynamics.cfg -- gunicorn -w 8 -b'0.0.0.0:9000'appdynamics.scripts.wsgi:application
uWSGI with Emperor
If your environment is uWSGI with Emperor, you need to modify your s and WSGI configuration filethen manually launch the proxy.
uWSGI Emperor is a process manager specific to the uWSGI server. It does not allow you tocontrol how the uWSGI processes that it manages are launched and therefore cannot be usedwith the command.pyagent run
The location of the WSGI configuration files is deployment-dependent. See http://uwsgi-docs.readt for details of Emperor deployment.hedocs.org/en/latest/Emperor.html
To instrument an application for :uWSGI with Emperor
Create the configuration file described in .Configure the Agent Modify the uWSGI configuration file. Do one of the following, depending on whether theconfiguration uses a module directive or a wsgi-file directive:Module DirectiveIf the uWSGI configuration has a module directive like so:
module = yourcompany.sample:app
modify that configuration by changing the module setting and adding theAPPD_WSGI_MODULE and APPD_CONFIG_FILE settings to look like this, assuming thatyou have stored the configuration file in /etc/appdynamics.cfg:
env = APPD_CONFIG_FILE=/etc/appdynamics.cfgenv = APPD_WSGI_MODULE=yourcompany.sample:appmodule = appdynamics.scripts.wsgi:application
WSGI-File DirectiveIf the uWSGI configuration has a wsgi-file directive like so:
wsgi-file = /var/www/yourcompany/sample.pycallable = app

Copyright © AppDynamics 2012-2015 Page 308
2.
3.
1. 2.
modify that configuration to look like this, assuming you have stored the configuration file in/etc/appdynamics.cfg:
env = APPD_CONFIG_FILE=/etc/appdynamics.cfgenv = APPD_WSGI_SCRIPT_ALIAS=/var/www/yourcompany/sample.pyenv = APPD_WSGI_CALLABLE_OBJECT=appmodule = appdynamics.scripts.wsgi
Before running any traffic through the instrumented application, manually launch the proxyby executing:
pyagent proxy start
Apache with mod_wsgi
The Python Agent supports only mod_wsgi configurations that use WSGIScriptAlias pointingto a single WSGI file. For example, the following type of configuration is supported:
WSGIScriptAlias /books /var/www/acme/bookstore/app.wsgi
If, instead, the script alias points to a directory, or if they are using the WSGIScriptAliasMatch directive, contact [email protected] to discuss how the Python Agent can be deployed inyour environment.
If the environment is apache with mod_wsgi with a supported configuration as described above,you need to modify their mod_wsgi s and manually launch the proxy. configuration file
To instrument an app for :apache with mod_wsgi
Create the configuration file described in .Configure the Agent Modify the mod_wsgi configuration file.If the mod_wsgi configuration file has an entry like this:
WSGIScriptAlias /books /var/www/acme/bookstore/app.wsgiWSGICallableObject application
modify it to look like this, assuming that you have stored the configuration file in/etc/appdynamics.cfg:

Copyright © AppDynamics 2012-2015 Page 309
2.
3.
SetEnv APPD_CONFIG_FILE /etc/appdynamics.cfgSetEnv APPD_WSGI_SCRIPT_ALIAS /var/www/acme/bookstore/app.wsgiSetEnv APPD_CALLABLE_OBJECT applicationWSGIScriptAlias /books/<path_to_virtualenv>/lib/python2.7/site-packages/appdynamics/scripts/wsgi.py
Before running any traffic through the instrumented app, manually launch the proxy byexecuting:
pyagent proxy start
Python Supported Environments
On this page:
Python VersionsOperating SystemsPython Frameworks and ProtocolsTransaction NamingDatabase Exit PointsHTTP Exit CallsCache Exit Points
Related pages:
Instrument Python Applications
Supported Platform Matrix for the Python Agent
Python Versions
Supported Python Versions
CPython 2.6
CPython 2.7
Operating Systems
Supported Operating System
Linux 64-bit
Linux 32-but

Copyright © AppDynamics 2012-2015 Page 310
Mac
Python Frameworks and Protocols
Framework/Protocol Version Entry Point Type
WSGI 1.0 Python Web
AppDynamics has tested the Python Agent on Django, Flask, and CherryPy.
The agent may be configured to instrument any WSGI-based application or framework as Python, including (but not limited to) those listed belowWeb .
At present, the Python agent fully supports exception detection in Django, Flask, and CherryPyframeworks. Other WSGI frameworks and custom WSGI applications may install exceptionhandlers that effectively hide some exceptions from the agent. In such cases, the agent will onlydetect exceptions during exit calls, uncaught exceptions which are propagated to the WSGI server,and exceptions reported via the custom business transaction API.
WSGI-Based Frameworks
Bottle
CherryPy
Django
Flask
Pyramid
Zope 3
Transaction Naming
Framework/Environment Default Transaction Naming
WSGI first two segments of the URI
Database Exit Points
Supported Database Exit Points Version
MySQL-Python
MySQL Connector/Python
Psycopg 2
HTTP Exit Calls

Copyright © AppDynamics 2012-2015 Page 311
Supported HTTP Exit Calls
httplib*
httplib2
requests
urllib
urllib2
urllib3
*The agent detects calls to any external library built on top of httplib. Therefore, backend calls tosuch services, such as boto, dropbox, python-twitter, etc. are detected and displayed as HTTP exitcalls.
Cache Exit Points
Supported Cache Exit Points
Memcache
Redis-py
AppDynamics for Python Architecture
Related pages:
Start and Stop the Pyagent Proxy Manually
The Python Agent consists of:
a Python extension componenta proxy component
The Python Agent discovers, maps and tracks metrics for business transactions, app services, andbackends in your web application by injecting instrumentation into the Python application atruntime. The agent lives inside the WSGI server that contains the instrumented application.
The proxy component is a Java daemon process that handles the communication between thePython Agent and the Controller. The proxy reports the performance metrics to the Controller,where the data is stored, baselined, and analyzed. You can access this performance datainteractively using the Controller console or programmatically using the AppDynamics REST API.
In pure Python environments the proxy component is automatically started when you startthe Python Agent , but in some deployments it is necessary to start the proxy manually. SeeInstrument the Application in for details.Instrument Python Applications
The proxy is mutli-tenant, serving multiple instrumented applications simultaneously. Whether theproxy is started automatically or manually, the commands that start the agent check whether the

Copyright © AppDynamics 2012-2015 Page 312
proxy is already running and do not attempt to start it again if it is.
Python Agent Settings
On this page:
[agent][wsgi][log][controller][controller:http-proxy]
Related pages:
Instrument Python ApplicationsPython Agent Debugging and Logs
This is the complete list of settings and directives for the AppDynamics Python Agent, settable inthe AppDynamics configuration file.
See Configure the Agent in for information about the configurationInstrument Python Applicationsfile.
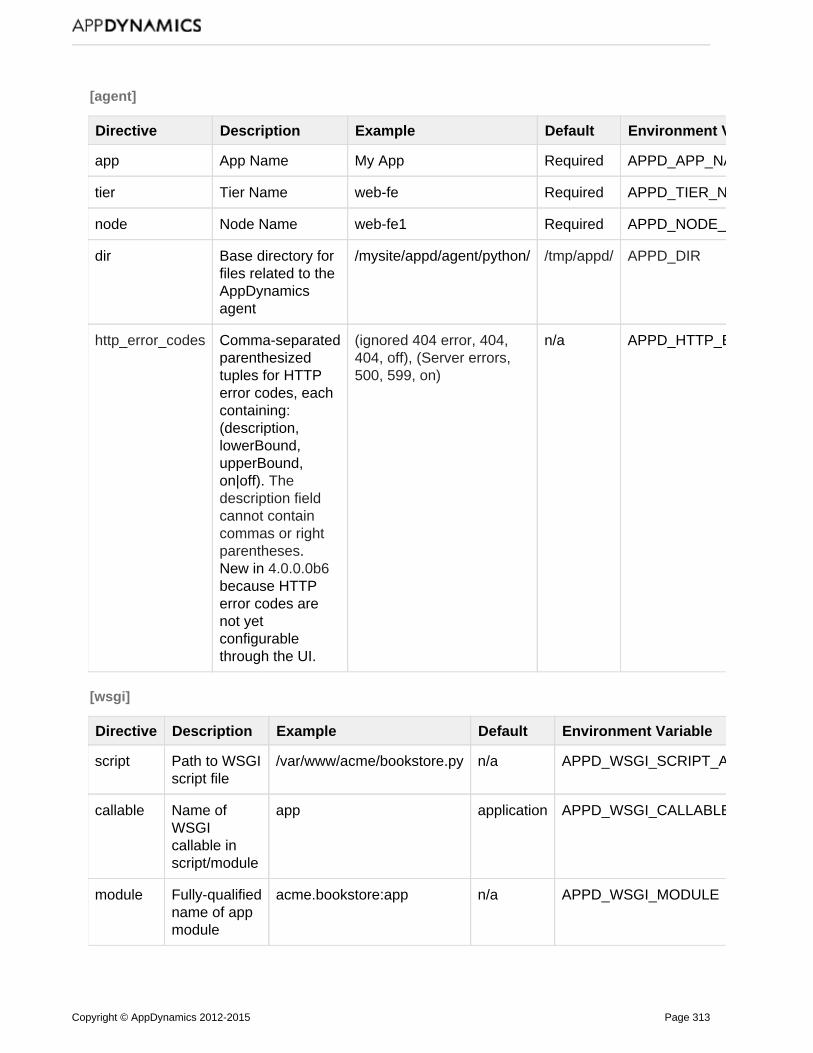
Copyright © AppDynamics 2012-2015 Page 313
[agent]
Directive Description Example Default Environment Variable
app App Name My App Required APPD_APP_NAME
tier Tier Name web-fe Required APPD_TIER_NAME
node Node Name web-fe1 Required APPD_NODE_NAME
dir Base directory forfiles related to theAppDynamicsagent
/mysite/appd/agent/python/ /tmp/appd/ APPD_DIR
http_error_codes Comma-separatedparenthesizedtuples for HTTPerror codes, eachcontaining:(description,lowerBound,upperBound,on|off). Thedescription fieldcannot containcommas or right
.parenthesesNew in 4.0.0.0b6 because HTTPerror codes arenot yetconfigurablethrough the UI.
(ignored 404 error, 404,404, off), (Server errors,500, 599, on)
n/a APPD_HTTP_ERROR_CODES
[wsgi]
Directive Description Example Default Environment Variable
script Path to WSGIscript file
/var/www/acme/bookstore.py n/a APPD_WSGI_SCRIPT_ALIAS
callable Name ofWSGIcallable inscript/module
app application APPD_WSGI_CALLABLE_OBJECT
module Fully-qualifiedname of appmodule
acme.bookstore:app n/a APPD_WSGI_MODULE
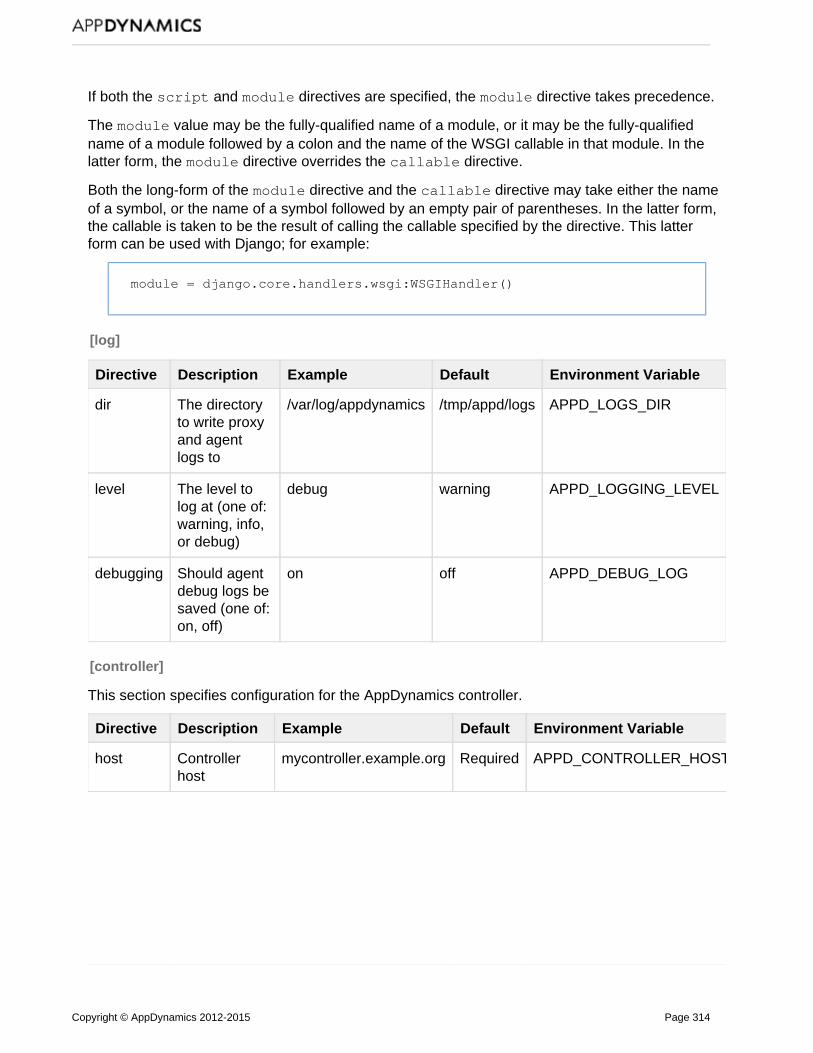
Copyright © AppDynamics 2012-2015 Page 314
If both the and directives are specified, the directive takes precedence.script module module
The value may be the fully-qualified name of a module, or it may be the fully-qualifiedmodulename of a module followed by a colon and the name of the WSGI callable in that module. In thelatter form, the directive overrides the directive.module callable
Both the long-form of the directive and the directive may take either the namemodule callableof a symbol, or the name of a symbol followed by an empty pair of parentheses. In the latter form,the callable is taken to be the result of calling the callable specified by the directive. This latterform can be used with Django; for example:
module = django.core.handlers.wsgi:WSGIHandler()
[log]
Directive Description Example Default Environment Variable
dir The directoryto write proxyand agentlogs to
/var/log/appdynamics /tmp/appd/logs APPD_LOGS_DIR
level The level tolog at (one of:warning, info,or debug)
debug warning APPD_LOGGING_LEVEL
debugging Should agentdebug logs besaved (one of:on, off)
on off APPD_DEBUG_LOG
[controller]
This section specifies configuration for the AppDynamics controller.
Directive Description Example Default Environment Variable
host Controllerhost
mycontroller.example.org Required APPD_CONTROLLER_HOST

Copyright © AppDynamics 2012-2015 Page 315
port Controllerport
9000 8080 forhttp
443 forhttps, inwhichcase sslmustalso beset
APPD_CONTROLLER_PORT
ssl Is SSL set beused to talkto thecontroller?(one of: on,off)
on off APPD_SSL_ENABLED
account AppDynamicscontrolleraccount
user1 n/a APPD_ACCOUNT_NAME
accesskey AppDynamicscontrolleraccountaccess key
secretkey n/a APPD_ACCOUNT_ACCESS_KEY
[controller:http-proxy]
If you need to use an HTTP proxy to talk to your controller, use this section to configure the HTTPproxy.
Directive Description Example Default Environment Variable
host HTTP proxyhost
proxy.example.org n/a APPD_HTTP_PROXY_HOST
port HTTP proxyport
8080 80 APPD_HTTP_PROXY_PORT
user HTTP proxyuser
proxyuser n/a APPD_HTTP_PROXY_USER
password-file HTTP proxypasswordfile
/etc/http-proxy.passwd n/a APPD_HTTP_PROXY_PASSWORD_FILE

Copyright © AppDynamics 2012-2015 Page 316
Disable the Python Agent
On this page:
Disable the Python AgentUninstall the Python Agent
Related pages:
Instrument Python Applications
Disable the Python Agent
If you want to stop instrumenting your application, revert your deployments scripts to remove allpyagent commands and all APPD environment variables.
Uninstall the Python Agent
There is no pressing reason to uninstall the agent after you have disabled it as described above,but if you want to you can uninstall using pip. Because installed apip install appdynamicsseparate dependencies package as well as the agent, two pip uninstall commands are required:
pip uninstall appdynamicspip uninstall <python_agent_package>
If you do not know which package is installed, you can find out using pip freeze and grep:
pip freeze | grep appdynamics
Upgrade the Python Agent
If you are upgrading both the Controller and agents, first and then upgradeupgrade the Controllerthe agents.
To upgrade the agent, run this command:
pip install -U appdynamics\<4.1
The upgrade will take effect the next time you restart the agent.
Python Agent Debugging and Logs
On this page:
Logging SettingsLogging LevelsLocation and Names of Agent Log Files

Copyright © AppDynamics 2012-2015 Page 317
Location of Proxy Logs
Related pages:
Instrument Python ApplicationsPython Agent Settings
Logging Settings
Logging is configured in the logging section of the AppDynamics configuration file. See Python.Agent Settings
Logging Levels
Set the logging level or the amount of detail that you want to see: INFO, WARNING and DEBUG.The default is level is WARNING.
For maximum debugging information, set the logging level to . DEBUG-level logs show the DEBUGinformation that the Python Agent is sending to the proxy, which is useful for debugging the agent.
When debug is , log messages are sent to stderr as well as to the log files.on
For quick debugging, set the debugging configuration option to . This causes DEBUG-level logsonto be written to both stderr and log files.
This is the behavior you can expect with various combinations of logging level and debug settings:
level=info, debugging=off
Info-level logs are written to the log file.level=warning, debugging=offWarning-level logs are written to the log file.
level=debug, debugging=off
Debug-level logs are written to the log file.
level=info, debugging=on
Debug-level logs are written to the log file and to stderr.
level=warning, debugging=on
Debug-level logs are written to the log file and to stderr.
level=debug, debugging=on
Debug-level logs are written to the log file and to stderr.
Location and Names of Agent Log Files
Agent logs are written in the directory specified by the dir (APPD_LOGS_DIR) directive in thelogging section of the configuration file.
For each node, the log is output to a file named APP_NAME-<NODE_NAME>.log. These files livein the log dir directory (APPD_LOGS_DIR).
The agent creates and rotates a maximum of 5 log files. Maximum log size is 20MB, which gives

Copyright © AppDynamics 2012-2015 Page 318
1. 2. 3. 4. 5.
you a maximum of the most recent 100MB of log data at one time.
For example:
myApp-myNode.logmyApp-myNode.log.1myApp-myNode.log.2myApp-myNode.log.3myApp-myNode.log.4
Location of Proxy Logs
The proxy logs are always written to dir (APPD_LOGS_DIR), which defaults to /tmp/appd/logs(APPD_DIR/logs).
Start and Stop the Pyagent Proxy Manually
Related pages:
Instrument Python ApplicationsPython Agent Settings
If you use the command to instrument your application, the proxy component ispyagent runautomatically started when you start the agent. Use the command described here only if you needto launch the proxy manually, because your Python environment is uWSGI with Emperor orapache with mod_wsgi.
When the proxy starts, nodes are not created immediately. A node is created when the agent firstdetects traffic on it.
Every time you reboot the server, you need to re-start the proxy if your setup requires that youstart the proxy manually.
Directory Configuration Setting
The pyagent proxy start command needs to read the dir (APPD_DIR) configuration setting, whichis the base directory for the AppDynamics Python Agent configuration. Make sure it is correctlyset. The default is ./tmp/appd/
As with the agent itself, you can make this, as well as other, settings available to the proxy in anyof the following ways:
setting the environment variable (APPD_DIR) manually.setting the APPD_CONFIG_FILE environment variable to point to the configuration file andthen setting the base directory in the configuration file. See .Instrument Python Applicationspassing in the path to the configuration file to the pyagent proxy command using -c (—config-file ) option as illustrated below.
Start and Stop Options for the pyagent proxy
The optional start and stop options are:
—debug (-d): starts the proxy in debugging mode

Copyright © AppDynamics 2012-2015 Page 319
—no-watchdog: disables the proxy watchdog (not recommended)—config-file (-c): path to the Python Agent configuration file
Usage:
Usage: pyagent proxy start|start start_options -- [jvmOption[jvmOption [...] ]
Examples:
pyagent proxy start -c appdynamics.config -dpyagent proxy stop -c appdynamics.config


