56
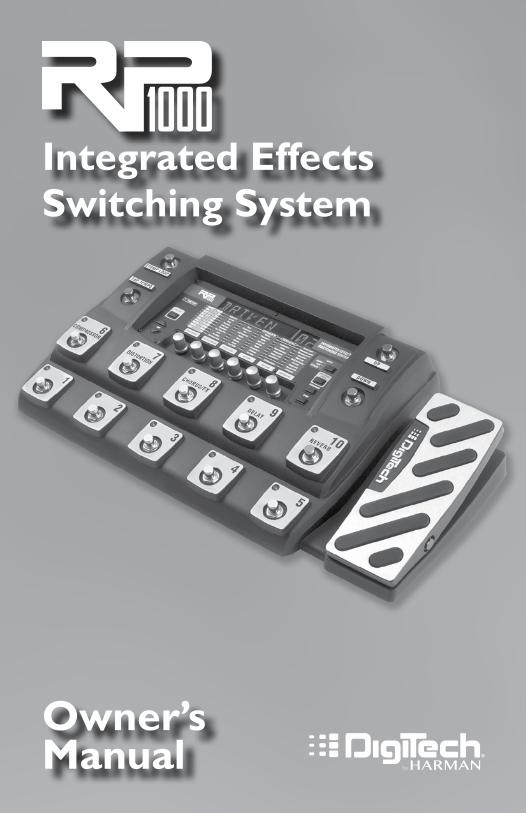
Owner’s Manual Integrated Effects Switching System
| Date post: | 19-Apr-2018 |
| Category: |
Documents |
| Upload: | trinhtuyen |
| View: | 220 times |
| Download: | 4 times |
Owner’s Manual
Integrated Effects Switching System
WarrantyWe at DigiTech® are very proud of our products and back up each one we sell with the following warranty:
1. Please register online at digitech.com within ten days of purchase to validate this warranty. This warranty is valid only in the United States.
2. DigiTech warrants this product, when purchased new from an authorized U.S. DigiTech dealer and used solely within the U.S., to be free from defects in materials and workmanship under normal use and service. This warranty is valid to the original purchaser only and is non-transferable.
3. DigiTech liability under this warranty is limited to repairing or replacing defective materials that show evidence of defect, provided the product is returned to DigiTech WITH RETURN AUTHORIZATION, where all parts and labor will be covered up to a period of one year. A Return Authorization number may be obtained by contacting DigiTech. The company shall not be liable for any consequential damage as a result of the product’s use in any circuit or assembly.
4. Proof-of-purchase is considered to be the responsibility of the consumer. A copy of the original purchase receipt must be provided for any warranty service.
5. DigiTech reserves the right to make changes in design, or make additions to, or improvements upon this product without incurring any obligation to install the same on products previously manufactured.
6. The consumer forfeits the benefits of this warranty if the product’s main assembly is opened and tampered with by anyone other than a certified DigiTech technician or, if the product is used with AC voltages outside of the range suggested by the manufacturer.
7. The foregoing is in lieu of all other warranties, expressed or implied, and DigiTech neither assumes nor authorizes any person to assume any obligation or liability in connection with the sale of this product. In no event shall DigiTech or its dealers be liable for special or consequential damages or from any delay in the performance of this warranty due to causes beyond their control.
NOTE: The information contained in this manual is subject to change at any time without notification. Some information contained in this manual may also be inaccurate due to undocumented changes in the product since this version of the manual was completed. The information contained in this version of the owner’s manual supersedes all previous versions.
Technical Support & Service If you require technical support, contact DigiTech Technical Support. Be prepared to accurately describe the problem. Know the serial number of your device – this is printed on a sticker attached to the chassis. If you have not already taken the time to register your product, please do so now at digitech.com.
Before you return a product to the factory for service, we recommend you refer to this manual. Make sure you have correctly followed installation steps and operating procedures. For further technical assistance or service, please contact our Technical Support Department at (801) 566-8800 or visit digitech.com. If you need to return a product to the factory for service, you MUST first contact Technical Support to obtain a Return Authorization Number.
NO RETURNED PRODUCTS WILL BE ACCEPTED AT THE FACTORY WITHOUT A RETURN AUTHORIZATION NUMBER.
Please refer to the Warranty information, which extends to the first end-user. After expiration of the warranty, a reasonable charge will be made for parts, labor, and packing if you choose to use the factory service facility. In all cases, you are responsible for transportation charges to the factory. If the product is still under warranty, DigiTech will pay the return shipping.
Use the original packing material if it is available. Mark the package with the name of the shipper and with these words in red: DELICATE INSTRUMENT, FRAGILE! Insure the package properly. Ship prepaid, not collect. Do not ship parcel post.
Table of ContentsSection 1 - Introduction ................................ 1Getting Acquainted ........................................................1About the RP1000 .........................................................1
Preset Mode and Pedalboard Mode .....................1Bypass .........................................................................1Amp/Cabinet Bypass ...............................................1Tuner ............................................................................2Tone Library (Knob 1) .............................................2Effects Library (Knob 2) ..........................................2Effects Level (Knob 3) .............................................2Amp Gain/Effect Parameter (Knob 4) .................2Amp Level/Effect Parameter (Knob 5) ................3Master Level (Knob 6) .............................................3X-EditTM Editor/Librarian ........................................3Presets .........................................................................3
Create Your Sound in Three Easy Steps ...................3A Guided Tour of the RP1000 ....................................4
Front Panel .................................................................4Rear Panel ...................................................................7
Getting Started ...............................................................8Making Connections ................................................8Amp/Cabinet Bypass ................................................8Amp Loop ...................................................................8Stomp Loop................................................................8Connection Setups ...................................................9Applying Power ......................................................14
Section 2 - Editing Functions ...................... 14Preset Mode and Pedalboard Mode ........................14Editing/Creating Presets .............................................15Editing Amp/Cabinet Models .....................................15Amp/Cabinet Bypass ...................................................15Storing/Copying/Naming a Preset ............................16
Section 3 - Effects and Parameters ............ 17About the Effects .........................................................17Effect Definitions ..........................................................17
Wah ............................................................................17Compressor ............................................................17Distortion .................................................................18Amplifier ...................................................................20EQ ..............................................................................22Noise Gate/Auto Swell .........................................22Chorus/FX ................................................................22Delay .........................................................................29Reverb ......................................................................30
Section 4 - Other Functions ....................... 31Expression Pedal ..........................................................31Footswitch Assign ........................................................31LFOs ................................................................................31Wah Min/Max................................................................32Expression Update .......................................................32Factory Reset ................................................................32Expression Pedal Calibration ....................................32Preset Level ...................................................................33Bypass .............................................................................33Looper ............................................................................33Tuner ...............................................................................35USB Setup ......................................................................36
Section 5 - RP1000 Effects Descriptions .. 37Wahs ...............................................................................37Compressors ................................................................37Noise Gates ..................................................................37EQ....................................................................................38Chorus Stompbox Models .........................................38Flanger ............................................................................38Phasers ...........................................................................39Pitch ................................................................................40Vibrato / Rotary ...........................................................40Tremolo ..........................................................................40Envelope / Special ........................................................41Delays .............................................................................41Reverbs ...........................................................................42Distortions ....................................................................43Amps ...............................................................................45Cabinets .........................................................................49
Section 6 - Appendix .................................... 51Specifications .................................................................51Tone Library ..................................................................52Effects Library ...............................................................52
1
Section 1 - IntroductionGetting AcquaintedCongratulations on your purchase of the RP1000. The RP1000 Integrated Effects Switching System takes your tone to the next level giving you the control that you need over your external amp and stompboxes while packing in the power of a multi-effects processor. Use the RP1000 to control and spice up your tone without any compromises. The RP1000’s vast pallet of stompboxes, effects, amps and cabinets allow you to get any sound imaginable and then some. Easily dial up a sound using the Tone and Effects Library knobs. You will appreciate the tone and dynamic interaction of each of the amps, stompboxes, and effects with your system. Add USB support for computer recording and you have the RP1000: the key to unlock your creative potential.
About the RP1000Do yourself a favor and read the next couple pages before you start playing with your new RP1000. It’ll help you get the most out of it without having to read the whole manual.
Preset Mode and Pedalboard ModeThere are two different ways to use the footswitches with the presets: Preset Mode and Pedalboard Mode. Push the Pedalboard button (just to the right of the knobs below the Display) to toggle between these two modes.
Preset ModeIn Preset mode (Pedalboard button is off), each of the 10 numbered footswitches loads a preset, and you can’t turn individual models on or off with the footswitches. The Up/Down footswitches select banks of 10 presets.
Pedalboard ModeIn Pedalboard mode, footswitches 1-5 select presets, and footswitches 6-10 act like pedals on a pedalboard. That means you can turn the distortion, chorus, etc. on and off within each preset. The first time you power up the RP1000 when you take it out of the box (or after doing a factory restore), it’s in Pedalboard mode.
The RP1000 remembers which mode you’re in when you turn it off, and keeps it in that mode when you turn it back on.
Bypass You can bypass all the internal amps and effects in the RP1000 by stepping on the currently active preset’s footswitch. In bypass mode, your guitar’s clean signal comes through without any processing. To exit bypass mode and re-activate the preset you were in, just step the same footswitch again. To exit bypass mode and activate another preset, step on a different footswitch.
If you’re using the Amp Loop and/or the Stomp Loop when you go into bypass mode, any devices connected to the Amp Loop and Stomp Loop are still active. So you can use bypass to kill all the effects in the RP1000 without bypassing your amp/preamp connected to the Amp Loop.
Amp/Cabinet Bypass You can also turn off the internal amps and cabinets for all the presets in the RP1000. This is really useful when you just want to add effects processing to your own core amplifier sound. So basically the RP1000 becomes a straight multi-effects box when you do this, and only Wah, Compressor, Distortion, Equalizer, Noise Gate, Chorus/FX, Delay, and Reverb are used.
To bypass amp/cabinet modeling in all presets, press the Amp/Cabinet Bypass button. When that button is lit, amp/cabinet modeling is bypassed in all presets.
You can use amp/cabinet bypass in Preset or Pedalboard mode.
2
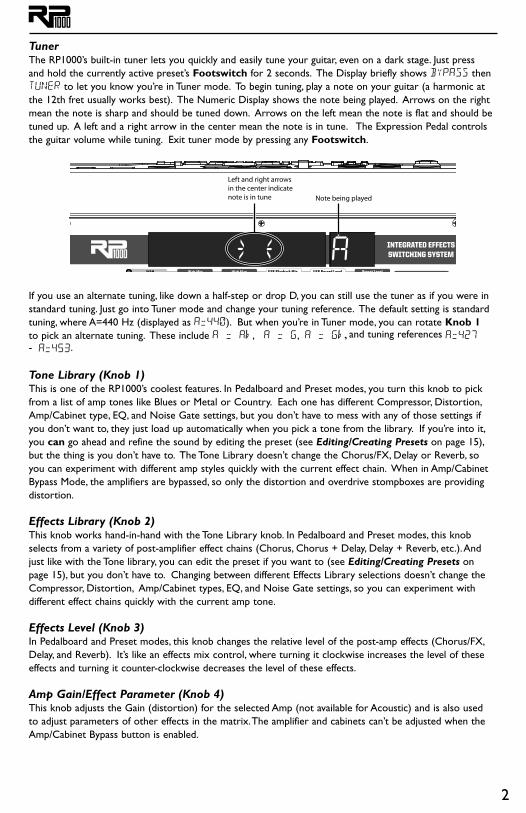
TunerThe RP1000’s built-in tuner lets you quickly and easily tune your guitar, even on a dark stage. Just press and hold the currently active preset’s Footswitch for 2 seconds. The Display briefly shows BYPASS then TUNER to let you know you’re in Tuner mode. To begin tuning, play a note on your guitar (a harmonic at the 12th fret usually works best). The Numeric Display shows the note being played. Arrows on the right mean the note is sharp and should be tuned down. Arrows on the left mean the note is flat and should be tuned up. A left and a right arrow in the center mean the note is in tune. The Expression Pedal controls the guitar volume while tuning. Exit tuner mode by pressing any Footswitch.
A
Note being played
Left and right arrowsin the center indicatenote is in tune
If you use an alternate tuning, like down a half-step or drop D, you can still use the tuner as if you were in standard tuning. Just go into Tuner mode and change your tuning reference. The default setting is standard tuning, where A=440 Hz (displayed as A=440). But when you’re in Tuner mode, you can rotate Knob 1 to pick an alternate tuning. These include A = A , A = G, A = G , and tuning references A=427 - A=453.
Tone Library (Knob 1)This is one of the RP1000’s coolest features. In Pedalboard and Preset modes, you turn this knob to pick from a list of amp tones like Blues or Metal or Country. Each one has different Compressor, Distortion, Amp/Cabinet type, EQ, and Noise Gate settings, but you don’t have to mess with any of those settings if you don’t want to, they just load up automatically when you pick a tone from the library. If you’re into it, you can go ahead and refine the sound by editing the preset (see Editing/Creating Presets on page 15), but the thing is you don’t have to. The Tone Library doesn’t change the Chorus/FX, Delay or Reverb, so you can experiment with different amp styles quickly with the current effect chain. When in Amp/Cabinet Bypass Mode, the amplifiers are bypassed, so only the distortion and overdrive stompboxes are providing distortion.
Effects Library (Knob 2)This knob works hand-in-hand with the Tone Library knob. In Pedalboard and Preset modes, this knob selects from a variety of post-amplifier effect chains (Chorus, Chorus + Delay, Delay + Reverb, etc.). And just like with the Tone library, you can edit the preset if you want to (see Editing/Creating Presets on page 15), but you don’t have to. Changing between different Effects Library selections doesn’t change the Compressor, Distortion, Amp/Cabinet types, EQ, and Noise Gate settings, so you can experiment with different effect chains quickly with the current amp tone.
Effects Level (Knob 3)In Pedalboard and Preset modes, this knob changes the relative level of the post-amp effects (Chorus/FX, Delay, and Reverb). It’s like an effects mix control, where turning it clockwise increases the level of these effects and turning it counter-clockwise decreases the level of these effects.
Amp Gain/Effect Parameter (Knob 4)This knob adjusts the Gain (distortion) for the selected Amp (not available for Acoustic) and is also used to adjust parameters of other effects in the matrix. The amplifier and cabinets can’t be adjusted when the Amp/Cabinet Bypass button is enabled.
3
Amp Level/Effect Parameter (Knob 5)This knob adjusts the Level (volume) of the selected amp and adjusts other effect parameters in the matrix. Amp Level can’t be adjusted when the Amp/Cabinet Bypass button is enabled.
Master Level (Knob 6)This knob controls the overall output volume of all of the RP1000’s presets and adjusts other effect parameters in the matrix.
X-EditTM Editor/LibrarianYou can edit your RP1000 with your computer, using the X-EditTM Editor/Librarian, which you can download from www.digitech.com.
PresetsPresets are named and numbered locations of programmed sounds which reside in the RP1000 (in case you didn’t know). You load Presets with the Footswitches (see Preset Mode and Pedalboard Mode on page 14 for more information about that). The active effects in each preset are indicated by lighted LEDs in the Effect Matrix, and if you’re in Pedalboard mode, the LEDs over footswitches 6-10 show you which of those effects are on or off. The RP1000 comes with 100 User presets (1-00) and 100 Factory presets (F1-F00). You can save changes to the User presets, but not the Factory presets. From the factory, the 100 User presets are exact duplicates of the 100 Factory presets. That way you can create your own presets without losing the sounds that came with the RP1000.
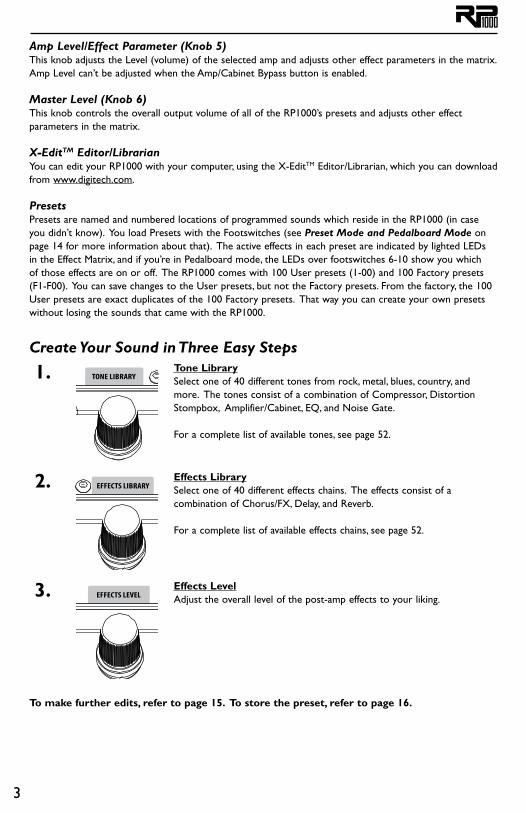
Create Your Sound in Three Easy Steps
1. Tone LibrarySelect one of 40 different tones from rock, metal, blues, country, and more. The tones consist of a combination of Compressor, Distortion Stompbox, Amplifier/Cabinet, EQ, and Noise Gate.
For a complete list of available tones, see page 52.
2. Effects LibrarySelect one of 40 different effects chains. The effects consist of a combination of Chorus/FX, Delay, and Reverb.
For a complete list of available effects chains, see page 52.
3. Effects LevelAdjust the overall level of the post-amp effects to your liking.
To make further edits, refer to page 15. To store the preset, refer to page 16.
4
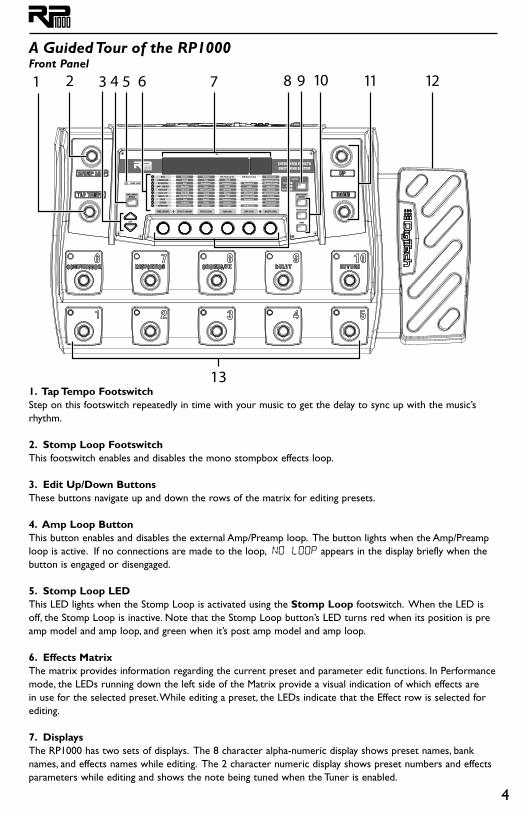
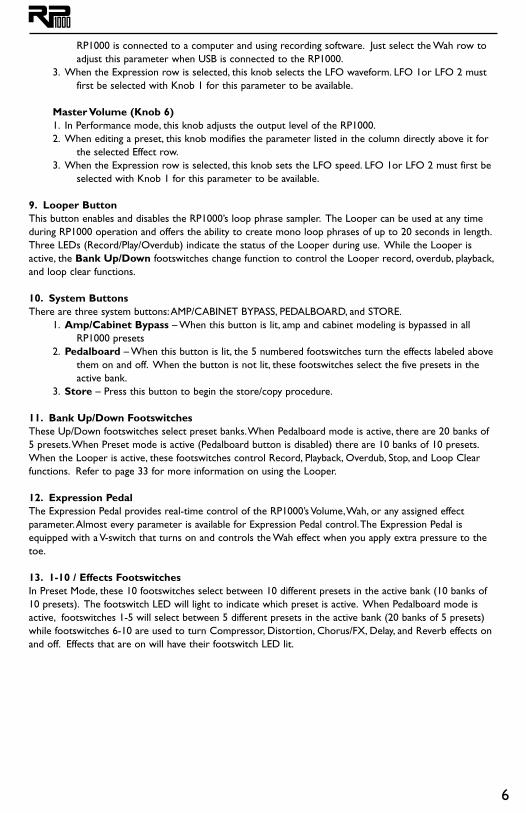
A Guided Tour of the RP1000Front Panel
1 2 3 4 5 6 7 8 9 10 11 12
131. Tap Tempo FootswitchStep on this footswitch repeatedly in time with your music to get the delay to sync up with the music’s rhythm.
2. Stomp Loop FootswitchThis footswitch enables and disables the mono stompbox effects loop.
3. Edit Up/Down ButtonsThese buttons navigate up and down the rows of the matrix for editing presets.
4. Amp Loop ButtonThis button enables and disables the external Amp/Preamp loop. The button lights when the Amp/Preamp loop is active. If no connections are made to the loop, NO loop appears in the display briefly when the button is engaged or disengaged.
5. Stomp Loop LEDThis LED lights when the Stomp Loop is activated using the Stomp Loop footswitch. When the LED is off, the Stomp Loop is inactive. Note that the Stomp Loop button’s LED turns red when its position is pre amp model and amp loop, and green when it’s post amp model and amp loop.
6. Effects MatrixThe matrix provides information regarding the current preset and parameter edit functions. In Performance mode, the LEDs running down the left side of the Matrix provide a visual indication of which effects are in use for the selected preset. While editing a preset, the LEDs indicate that the Effect row is selected for editing.
7. DisplaysThe RP1000 has two sets of displays. The 8 character alpha-numeric display shows preset names, bank names, and effects names while editing. The 2 character numeric display shows preset numbers and effects parameters while editing and shows the note being tuned when the Tuner is enabled.
5
8. Knobs 1-6 (From left to right)These six knobs perform various functions, depending on which mode is currently active and what (if anything) is being edited. The functions are listed below:
Tone Library (Knob 1)1. In Performance mode, this knob selects from a library of preset amp tones.2. When editing a preset, this knob changes the Amp or Effect model for the selected row and
pressing the knob will turn the effect row on or off. When editing an Effect row, press this knob to turn the effect on or off. When editing the Amp/Cabinet row, pressing this knob will switch between editing the amp model or the cabinet model.
3. When the Expression row is selected, this knob selects the Expression Pedal, LFO 1, and LFO 2 parameter links, footswitch 6-10* assignments, Wah pedal range, Expression Pedal update, and Stomp Loop position.
*NOTE: The assignments selected for footswitches 6-10 are only available when the Pedalboard button is active.
Effects Library (Knob 2)1. In Performance mode, this knob selects from a library of preset effect chains.2. When editing a preset, this knob modifies the parameter listed in the column directly above it for
the selected Effect row.3. When the Expression row is selected, this knob selects which parameter is assigned to the
Expression Pedal, footswitches 6-10*, and LFO1or LFO2.
*NOTE: The assignments selected for footswitches 6-10 are only available when the Pedalboard button is active.
Effects Level (Knob 3)1. In Performance mode, this knob adjusts the overall level of post amp model effects (Chorus/FX,
Delay, and Reverb).2. When editing a preset, this knob modifies the parameter listed in the column directly above it for
the selected Effect row.3. When the Expression row is selected, this knob selects the heel value for the parameter linked to
the Expression Pedal or the off state are parameters assigned to footswitches 6-10*.
*NOTE: The assignments selected for footswitches 6-10 are only available when the Pedalboard button is active.
Amp Gain (Knob 4)1. In Performance mode, this knob adjusts the Amp Gain (distortion) for the selected Amp model. 2. When editing a preset, this knob modifies the parameter listed in the column directly above it for
the selected Effect row. This knob also is used to adjust the RP/USB mix when the RP1000 is connected to a computer and using recording software. Just select the Wah row to adjust this parameter when USB is connected to the RP1000.
3. When the Expression row is selected, this knob selects the toe value for the parameter linked to the Expression Pedal Expression Pedal or the on state are parameters assigned to footswitches 6-10*.
*NOTE: the assignments selected for footswitches 6-10 are only available when the Pedalboard button is active.
Amp Level (Knob 5)1. In Performance mode, this knob adjusts the Amp Level (volume) of the selected Amp model. 2. When editing a preset, this knob modifies the parameter listed in the column directly above it
for the selected Effect row. This knob is also used to adjust the USB Record Level when the
6
RP1000 is connected to a computer and using recording software. Just select the Wah row to adjust this parameter when USB is connected to the RP1000.
3. When the Expression row is selected, this knob selects the LFO waveform. LFO 1or LFO 2 must first be selected with Knob 1 for this parameter to be available.
Master Volume (Knob 6)1. In Performance mode, this knob adjusts the output level of the RP1000.2. When editing a preset, this knob modifies the parameter listed in the column directly above it for
the selected Effect row.3. When the Expression row is selected, this knob sets the LFO speed. LFO 1or LFO 2 must first be
selected with Knob 1 for this parameter to be available.
9. Looper ButtonThis button enables and disables the RP1000’s loop phrase sampler. The Looper can be used at any time during RP1000 operation and offers the ability to create mono loop phrases of up to 20 seconds in length. Three LEDs (Record/Play/Overdub) indicate the status of the Looper during use. While the Looper is active, the Bank Up/Down footswitches change function to control the Looper record, overdub, playback, and loop clear functions.
10. System ButtonsThere are three system buttons: AMP/CABINET BYPASS, PEDALBOARD, and STORE.
1. Amp/Cabinet Bypass – When this button is lit, amp and cabinet modeling is bypassed in all RP1000 presets
2. Pedalboard – When this button is lit, the 5 numbered footswitches turn the effects labeled above them on and off. When the button is not lit, these footswitches select the five presets in the active bank.
3. Store – Press this button to begin the store/copy procedure.
11. Bank Up/Down FootswitchesThese Up/Down footswitches select preset banks. When Pedalboard mode is active, there are 20 banks of 5 presets. When Preset mode is active (Pedalboard button is disabled) there are 10 banks of 10 presets. When the Looper is active, these footswitches control Record, Playback, Overdub, Stop, and Loop Clear functions. Refer to page 33 for more information on using the Looper.
12. Expression PedalThe Expression Pedal provides real-time control of the RP1000’s Volume, Wah, or any assigned effect parameter. Almost every parameter is available for Expression Pedal control. The Expression Pedal is equipped with a V-switch that turns on and controls the Wah effect when you apply extra pressure to the toe.
13. 1-10 / Effects Footswitches In Preset Mode, these 10 footswitches select between 10 different presets in the active bank (10 banks of 10 presets). The footswitch LED will light to indicate which preset is active. When Pedalboard mode is active, footswitches 1-5 will select between 5 different presets in the active bank (20 banks of 5 presets) while footswitches 6-10 are used to turn Compressor, Distortion, Chorus/FX, Delay, and Reverb effects on and off. Effects that are on will have their footswitch LED lit.
7
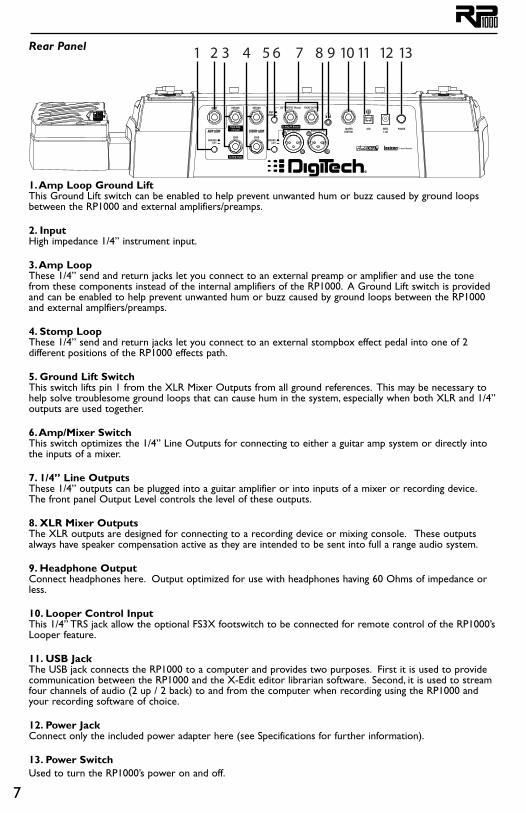
Rear Panel 1 2 3 4 5 6 7 8 9 10 11 12 13
1. Amp Loop Ground LiftThis Ground Lift switch can be enabled to help prevent unwanted hum or buzz caused by ground loops between the RP1000 and external amplifiers/preamps.
2. InputHigh impedance 1/4” instrument input.
3. Amp LoopThese 1/4” send and return jacks let you connect to an external preamp or amplifier and use the tone from these components instead of the internal amplifiers of the RP1000. A Ground Lift switch is provided and can be enabled to help prevent unwanted hum or buzz caused by ground loops between the RP1000 and external amplfiers/preamps.
4. Stomp LoopThese 1/4” send and return jacks let you connect to an external stompbox effect pedal into one of 2 different positions of the RP1000 effects path.
5. Ground Lift SwitchThis switch lifts pin 1 from the XLR Mixer Outputs from all ground references. This may be necessary to help solve troublesome ground loops that can cause hum in the system, especially when both XLR and 1/4” outputs are used together.
6. Amp/Mixer SwitchThis switch optimizes the 1/4” Line Outputs for connecting to either a guitar amp system or directly into the inputs of a mixer.
7. 1/4” Line OutputsThese 1/4” outputs can be plugged into a guitar amplifier or into inputs of a mixer or recording device. The front panel Output Level controls the level of these outputs.
8. XLR Mixer OutputsThe XLR outputs are designed for connecting to a recording device or mixing console. These outputs always have speaker compensation active as they are intended to be sent into full a range audio system.
9. Headphone OutputConnect headphones here. Output optimized for use with headphones having 60 Ohms of impedance or less.
10. Looper Control Input This 1/4” TRS jack allow the optional FS3X footswitch to be connected for remote control of the RP1000’s Looper feature.
11. USB JackThe USB jack connects the RP1000 to a computer and provides two purposes. First it is used to provide communication between the RP1000 and the X-Edit editor librarian software. Second, it is used to stream four channels of audio (2 up / 2 back) to and from the computer when recording using the RP1000 and your recording software of choice.
12. Power JackConnect only the included power adapter here (see Specifications for further information).
13. Power SwitchUsed to turn the RP1000’s power on and off.
8
Getting Started
Making ConnectionsThere are lots of ways to connect the RP1000 to amps, effects, mixers, and other equipment. Before connecting the RP1000 to anything, make sure both your amp and the RP1000 are turned off.
Amp/Cabinet BypassThe RP1000 lets you bypass its amp and cabinet tones so you can apply its effects to your own amp/cabinet tone. To bypass the RP1000 amp and cabinet tones in all presets, push the Amp/Cabinet Bypass button so it’s lit. To utilize the RP1000 amp and cabinet tones, push the Amp/Cabinet Bypass button so it’s not lit.
Amp LoopThe RP1000’s Amp Loop lets you use an external amplifier or preamp with the RP1000’s signal path instead of the RP1000’s internal amps and cabinets. You can turn on the Amp Loop with the Amp Loop button on the left side of the matrix. With this button enabled, the external amp or preamp is placed in the signal path around internal amps and cabinets, so the internal amps and cabinets are totally bypassed when the Amp Loop is engaged. To enable the Amp Loop, follow these steps: 1. Press the Amp Loop button on the left side of the effects matrix. When the LED on the Amp Loop
button is lit, the Amp Loop is enabled and the connected device is now in the RP1000’s effects chain. Internal Amp/Cabinets are basically bypassed when the Amp Loop is enabled.
2. Press the Amp Loop button again to turn off the Amp Loop. Internal Amp/Cabinets are now again active in the RP1000’s effects chain and the external device is bypassed.*
The Amp Loop can also be assigned to any of the 6-10 numbered footswitches for remote control operation during performance. To assign a footswitch to control the Amp Loop, follow these steps:
1. Press either Edit button until the Expression row has been selected (indicated by the Expression row’s LED lighting).
2. Rotate Knob 1 until FS6 ASN - FS10 ASN appears in the Display. This selects which footswitch you are about to change the assignment for.
3. Rotate Knob 2 until AMP LOOP appears in the Display. 4. Store your footswitch assignment to your preset.
*NOTE: If the Amp/Cabinet Bypass button is enabled, internal amp and cabinet effects are bypassed in all presets regardless of whether the Amp Loop is disabled. Also, if you attempt to enable the Amp Loop without connections being made, the display will briefly read no Loop indicating there are no connections made to the Amp Loop and the loop will not enable.
Stomp LoopThe RP1000 also has a stompbox effects loop (Stomp Loop). This loop lets you use an external effects device or effects chain with the RP1000’s signal path. The Stomp Loop has a dedicated Stomp Loop footswitch that enables and disables this loop during performance.
The Stomp Loop has the option of being inserted into two different positions in the RP1000’s signal path: Pre Amp, or Post Amp. This lets you pick where to place external effects in the loop. The placement of the Stomp Loop can be saved on a per preset basis.
To change the position of the Stomp Loop, follow these steps: 1. Press the Edit Down button so that the Expression row is selected.2. Turn Knob 1 until STOMPPOS appears in the Display.3. Turn Knob 2 to select one of the two different positions you want to insert the Stomp Loop: PRE
AMP (post Distortion, pre Amp Model/Amp Loop send), or POST AMP (Post Amp Model/Amp Loop
9
return). Note that the Stomp Loop button’s LED turns red when it’s pre amp, and green when it’s post amp or post FX.
4. Store these changes using the Store procedure.
NOTE: If you try to enable the Stomp Loop but nothing is connected to the Stomp Loop jacks, the Display will briefly read NO loop. The Stomp Loop will not enable when no connections are present at these jacks.
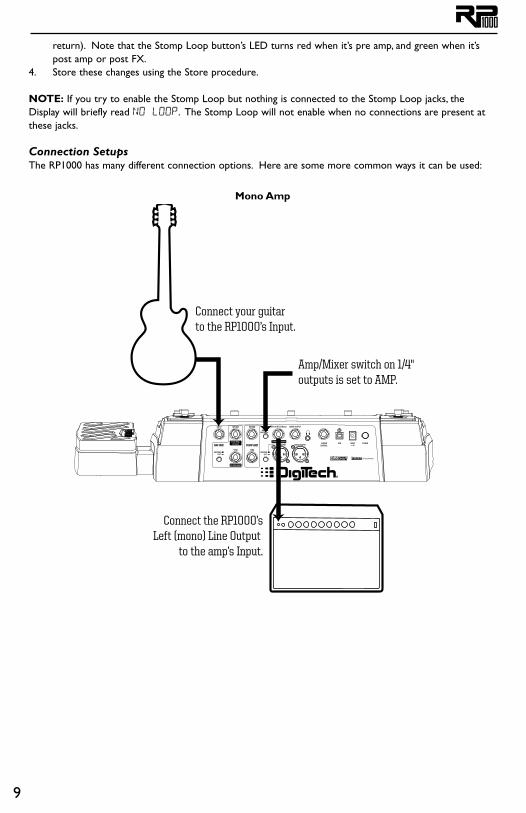
Connection SetupsThe RP1000 has many different connection options. Here are some more common ways it can be used:
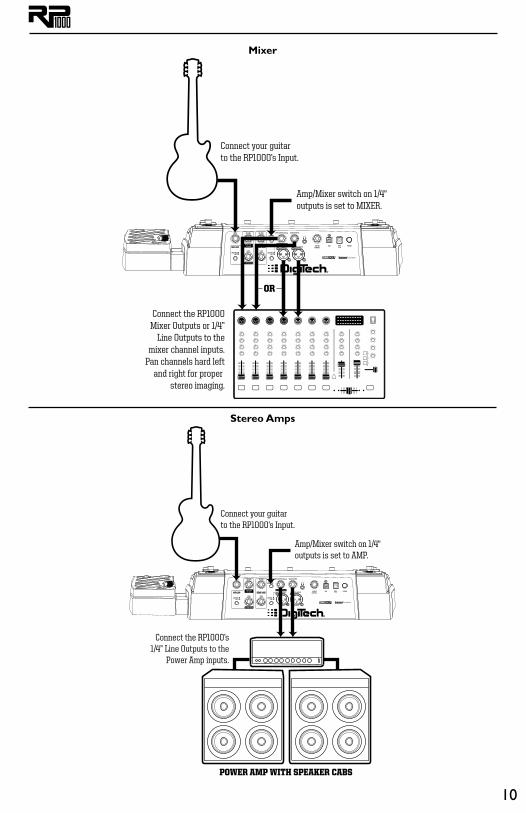
Mono Amp
Connect your guitarto the RP1000’s Input.
Connect the RP1000’sLeft (mono) Line Output
to the amp’s Input.
Amp/Mixer switch on 1/4" outputs is set to AMP.
10
Mixer
Connect your guitarto the RP1000’s Input.
OR
Connect the RP1000Mixer Outputs or 1/4”
Line Outputs to themixer channel inputs.
Pan channels hard leftand right for proper
stereo imaging.
Amp/Mixer switch on 1/4" outputs is set to MIXER.
Stereo Amps
Connect the RP1000’s1/4” Line Outputs to the
Power Amp inputs.
POWER AMP WITH SPEAKER CABS
Connect your guitarto the RP1000’s Input.
Amp/Mixer switch on 1/4" outputs is set to AMP.
11
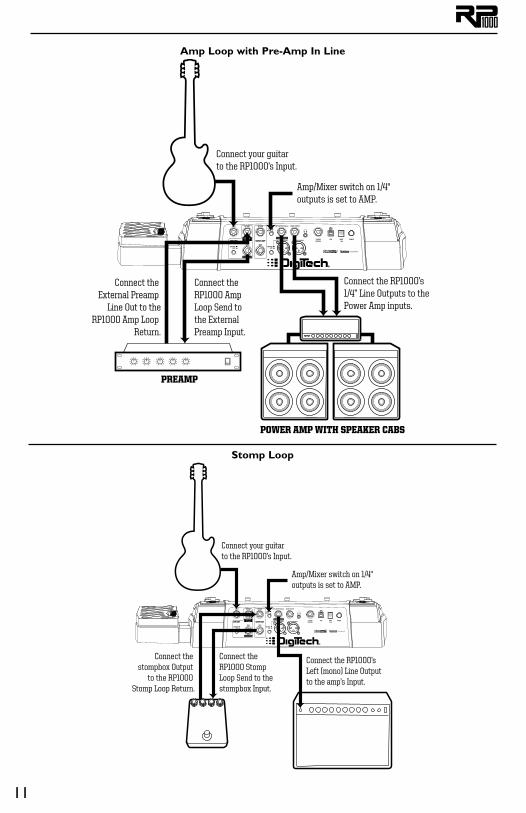
Amp Loop with Pre-Amp In Line
Connect the RP1000’s1/4” Line Outputs to thePower Amp inputs.
POWER AMP WITH SPEAKER CABS
PREAMP
Connect the RP1000 AmpLoop Send to the External Preamp Input.
Connect the External Preamp
Line Out to theRP1000 Amp Loop
Return.
Connect your guitarto the RP1000’s Input.
Amp/Mixer switch on 1/4" outputs is set to AMP.
Stomp Loop
Connect the RP1000’sLeft (mono) Line Output to the amp’s Input.
Connect the RP1000 StompLoop Send to thestompbox Input.
Connect the stompbox Output
to the RP1000 Stomp Loop Return.
Connect your guitarto the RP1000’s Input.
Amp/Mixer switch on 1/4" outputs is set to AMP.
12
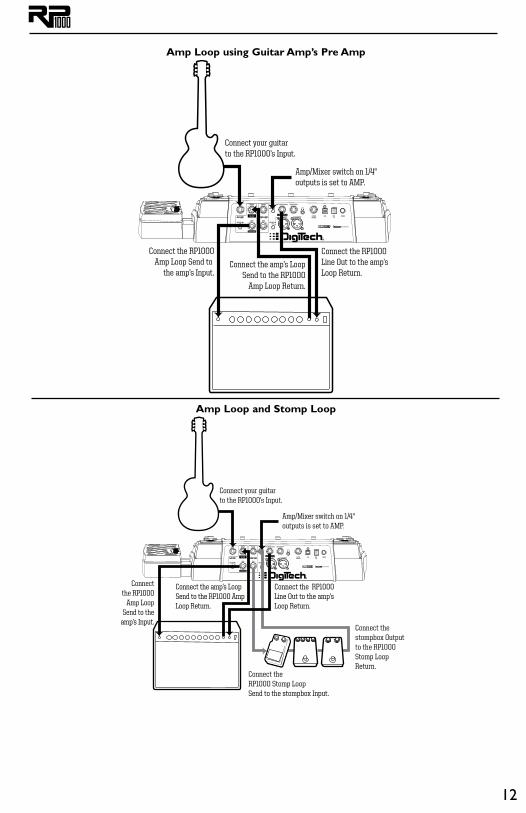
Amp Loop using Guitar Amp’s Pre Amp
Connect the RP1000Amp Loop Send to
the amp’s Input.Connect the amp’s Loop
Send to the RP1000Amp Loop Return.
Connect the RP1000Line Out to the amp’sLoop Return.
Connect your guitarto the RP1000’s Input.
Amp/Mixer switch on 1/4" outputs is set to AMP.
Amp Loop and Stomp Loop
Connect the RP1000 Stomp LoopSend to the stompbox Input.
Connectthe RP1000
Amp LoopSend to the
amp’s Input.Connect the stompbox Output to the RP1000 Stomp Loop Return.
Connect the amp’s LoopSend to the RP1000 AmpLoop Return.
Connect the RP1000Line Out to the amp’sLoop Return.
Connect your guitarto the RP1000’s Input.
Amp/Mixer switch on 1/4" outputs is set to AMP.
13
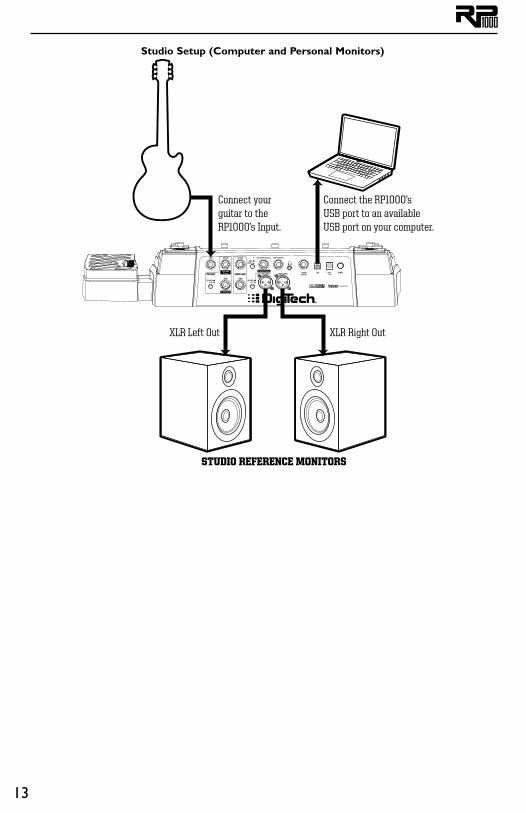
Studio Setup (Computer and Personal Monitors)
Connect yourguitar to theRP1000’s Input.
XLR Left Out XLR Right Out
STUDIO REFERENCE MONITORS
Connect the RP1000’sUSB port to an availableUSB port on your computer.
14
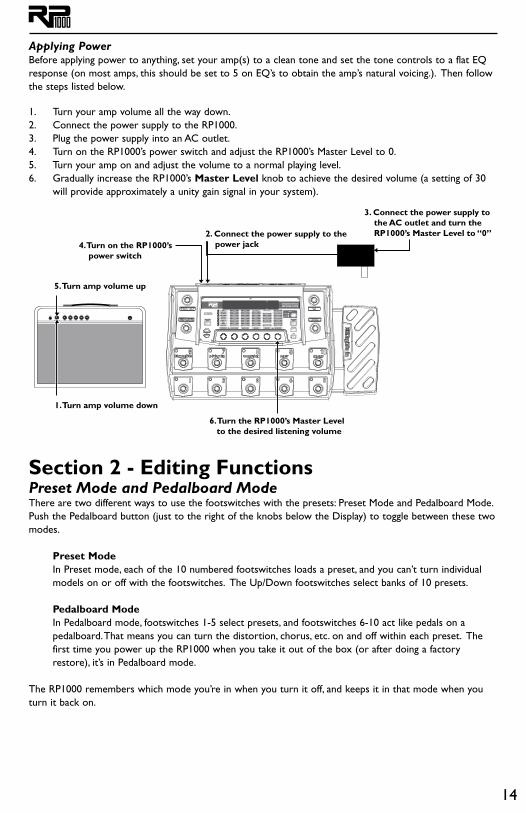
Applying Power Before applying power to anything, set your amp(s) to a clean tone and set the tone controls to a flat EQ response (on most amps, this should be set to 5 on EQ’s to obtain the amp’s natural voicing.). Then follow the steps listed below.
1. Turn your amp volume all the way down.2. Connect the power supply to the RP1000. 3. Plug the power supply into an AC outlet. 4. Turn on the RP1000’s power switch and adjust the RP1000’s Master Level to 0. 5. Turn your amp on and adjust the volume to a normal playing level. 6. Gradually increase the RP1000’s Master Level knob to achieve the desired volume (a setting of 30
will provide approximately a unity gain signal in your system).
5. Turn amp volume up
1. Turn amp volume down
2. Connect the power supply to the power jack
3. Connect the power supply to the AC outlet and turn the RP1000’s Master Level to “0”
6. Turn the RP1000’s Master Level to the desired listening volume
4. Turn on the RP1000’s power switch
Section 2 - Editing FunctionsPreset Mode and Pedalboard ModeThere are two different ways to use the footswitches with the presets: Preset Mode and Pedalboard Mode. Push the Pedalboard button (just to the right of the knobs below the Display) to toggle between these two modes.
Preset ModeIn Preset mode, each of the 10 numbered footswitches loads a preset, and you can’t turn individual models on or off with the footswitches. The Up/Down footswitches select banks of 10 presets.
Pedalboard ModeIn Pedalboard mode, footswitches 1-5 select presets, and footswitches 6-10 act like pedals on a pedalboard. That means you can turn the distortion, chorus, etc. on and off within each preset. The first time you power up the RP1000 when you take it out of the box (or after doing a factory restore), it’s in Pedalboard mode.
The RP1000 remembers which mode you’re in when you turn it off, and keeps it in that mode when you turn it back on.
15
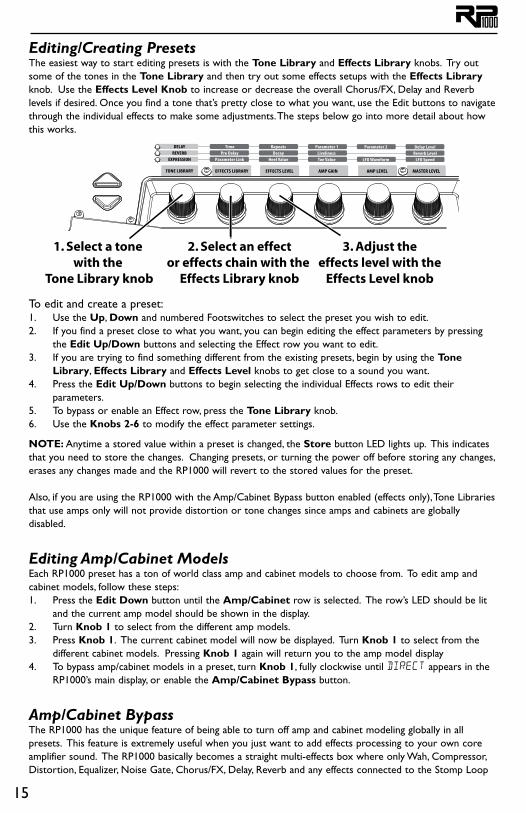
Editing/Creating PresetsThe easiest way to start editing presets is with the Tone Library and Effects Library knobs. Try out some of the tones in the Tone Library and then try out some effects setups with the Effects Library knob. Use the Effects Level Knob to increase or decrease the overall Chorus/FX, Delay and Reverb levels if desired. Once you find a tone that’s pretty close to what you want, use the Edit buttons to navigate through the individual effects to make some adjustments. The steps below go into more detail about how this works.
1. Select a tone with the
Tone Library knob
2. Select an effector effects chain with the
Effects Library knob
3. Adjust theeffects level with the
Effects Level knob
To edit and create a preset:1. Use the Up, Down and numbered Footswitches to select the preset you wish to edit.2. If you find a preset close to what you want, you can begin editing the effect parameters by pressing
the Edit Up/Down buttons and selecting the Effect row you want to edit. 3. If you are trying to find something different from the existing presets, begin by using the Tone
Library, Effects Library and Effects Level knobs to get close to a sound you want.4. Press the Edit Up/Down buttons to begin selecting the individual Effects rows to edit their
parameters.5. To bypass or enable an Effect row, press the Tone Library knob.6. Use the Knobs 2-6 to modify the effect parameter settings.
NOTE: Anytime a stored value within a preset is changed, the Store button LED lights up. This indicates that you need to store the changes. Changing presets, or turning the power off before storing any changes, erases any changes made and the RP1000 will revert to the stored values for the preset.
Also, if you are using the RP1000 with the Amp/Cabinet Bypass button enabled (effects only), Tone Libraries that use amps only will not provide distortion or tone changes since amps and cabinets are globally disabled.
Editing Amp/Cabinet ModelsEach RP1000 preset has a ton of world class amp and cabinet models to choose from. To edit amp and cabinet models, follow these steps:1. Press the Edit Down button until the Amp/Cabinet row is selected. The row’s LED should be lit
and the current amp model should be shown in the display.2. Turn Knob 1 to select from the different amp models.3. Press Knob 1. The current cabinet model will now be displayed. Turn Knob 1 to select from the
different cabinet models. Pressing Knob 1 again will return you to the amp model display4. To bypass amp/cabinet models in a preset, turn Knob 1, fully clockwise until direct appears in the
RP1000’s main display, or enable the Amp/Cabinet Bypass button.
Amp/Cabinet BypassThe RP1000 has the unique feature of being able to turn off amp and cabinet modeling globally in all presets. This feature is extremely useful when you just want to add effects processing to your own core amplifier sound. The RP1000 basically becomes a straight multi-effects box where only Wah, Compressor, Distortion, Equalizer, Noise Gate, Chorus/FX, Delay, Reverb and any effects connected to the Stomp Loop
16
are the only effects being used. To bypass amp/cabinet modeling in all presets, press the Amp/Cabinet Bypass button. When it is lit, amp/cabinet modeling is bypassed in all presets.
Amp/Cabinet Bypass can be used in either Preset or Pedalboard mode.
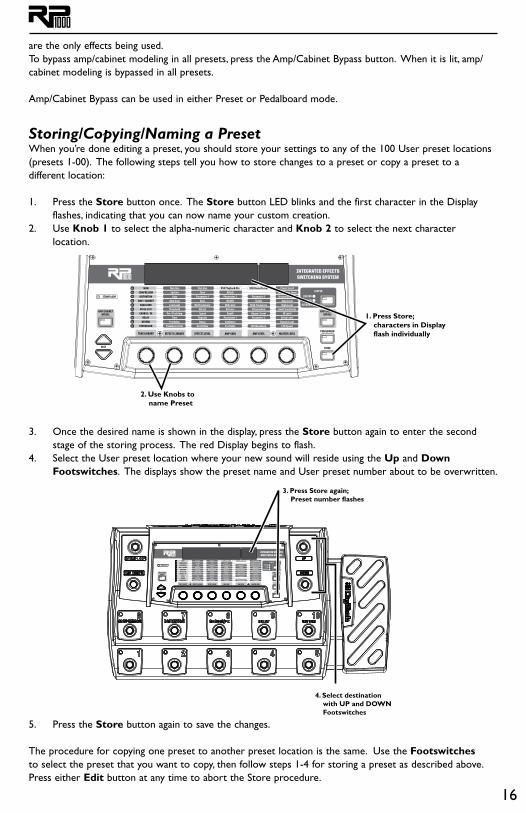
Storing/Copying/Naming a PresetWhen you’re done editing a preset, you should store your settings to any of the 100 User preset locations (presets 1-00). The following steps tell you how to store changes to a preset or copy a preset to a different location:
1. Press the Store button once. The Store button LED blinks and the first character in the Display flashes, indicating that you can now name your custom creation.
2. Use Knob 1 to select the alpha-numeric character and Knob 2 to select the next character location.
1. Press Store; characters in Display flash individually
2. Use Knobs to name Preset
3. Once the desired name is shown in the display, press the Store button again to enter the second stage of the storing process. The red Display begins to flash.
4. Select the User preset location where your new sound will reside using the Up and Down Footswitches. The displays show the preset name and User preset number about to be overwritten.
4. Select destination with UP and DOWN Footswitches
3. Press Store again; Preset number flashes
5. Press the Store button again to save the changes.
The procedure for copying one preset to another preset location is the same. Use the Footswitches to select the preset that you want to copy, then follow steps 1-4 for storing a preset as described above. Press either Edit button at any time to abort the Store procedure.
17
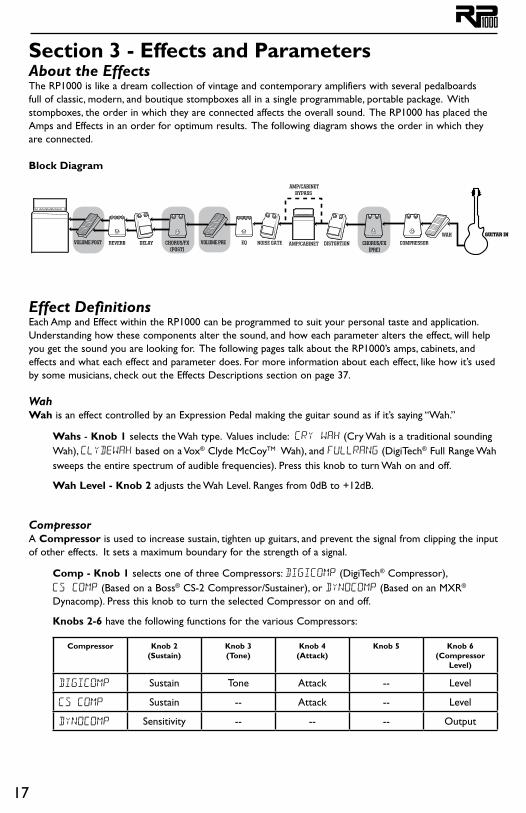
Section 3 - Effects and ParametersAbout the EffectsThe RP1000 is like a dream collection of vintage and contemporary amplifiers with several pedalboards full of classic, modern, and boutique stompboxes all in a single programmable, portable package. With stompboxes, the order in which they are connected affects the overall sound. The RP1000 has placed the Amps and Effects in an order for optimum results. The following diagram shows the order in which they are connected.
Block Diagram
WAH
COMPRESSORDELAYREVERB
GUITAR IN
CHORUS/FX(PRE)
AMP/CABINET
AMP/CABINETBYPASS
NOISE GATE DISTORTIONEQVOLUME PRECHORUS/FX(POST)
VOLUME POST
Effect DefinitionsEach Amp and Effect within the RP1000 can be programmed to suit your personal taste and application. Understanding how these components alter the sound, and how each parameter alters the effect, will help you get the sound you are looking for. The following pages talk about the RP1000’s amps, cabinets, and effects and what each effect and parameter does. For more information about each effect, like how it’s used by some musicians, check out the Effects Descriptions section on page 37.
WahWah is an effect controlled by an Expression Pedal making the guitar sound as if it’s saying “Wah.”
Wahs - Knob 1 selects the Wah type. Values include: CRY wah (Cry Wah is a traditional sounding Wah), clydewah based on a Vox® Clyde McCoyTM Wah), and FULlRaNG (DigiTech® Full Range Wah sweeps the entire spectrum of audible frequencies). Press this knob to turn Wah on and off.
Wah Level - Knob 2 adjusts the Wah Level. Ranges from 0dB to +12dB.
Compressor A Compressor is used to increase sustain, tighten up guitars, and prevent the signal from clipping the input of other effects. It sets a maximum boundary for the strength of a signal.
Comp - Knob 1 selects one of three Compressors: DIGiCoMP (DigiTech® Compressor), CS COMP (Based on a Boss® CS-2 Compressor/Sustainer), or DYNoCOMP (Based on an MXR® Dynacomp). Press this knob to turn the selected Compressor on and off.
Knobs 2-6 have the following functions for the various Compressors:
Compressor Knob 2(Sustain)
Knob 3(Tone)
Knob 4(Attack)
Knob 5 Knob 6(Compressor
Level)
digicomp Sustain Tone Attack -- Level
cs comp Sustain -- Attack -- Level
dynocomp Sensitivity -- -- -- Output
18
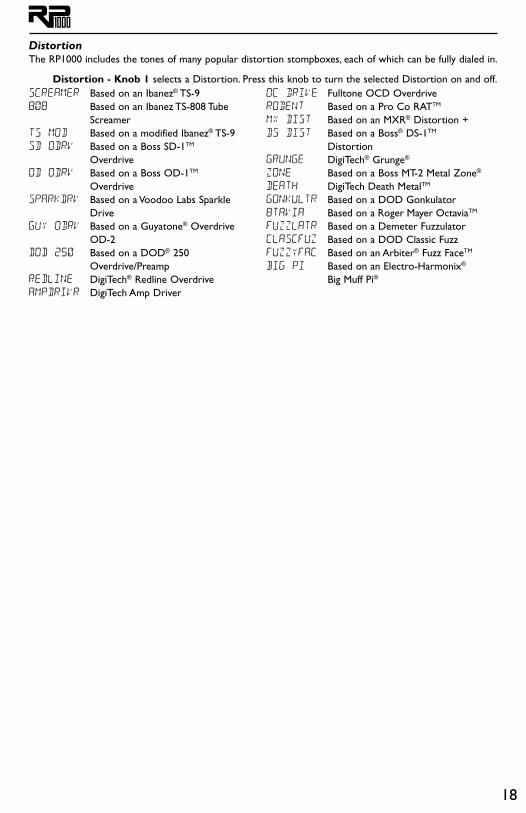
DistortionThe RP1000 includes the tones of many popular distortion stompboxes, each of which can be fully dialed in.
Distortion - Knob 1 selects a Distortion. Press this knob to turn the selected Distortion on and off.screamer Based on an Ibanez® TS-9808 Based on an Ibanez TS-808 Tube ScreamerTS mod Based on a modified Ibanez® TS-9sd odrv Based on a Boss SD-1TM OverdriveOd odrv Based on a Boss OD-1TM Overdrive Sparkdrv Based on a Voodoo Labs Sparkle Driveguy odrv Based on a Guyatone® Overdrive OD-2dod 250 Based on a DOD® 250 Overdrive/Preampredline DigiTech® Redline Overdriveampdrivr DigiTech Amp Driver
oc drive Fulltone OCD Overdriverodent Based on a Pro Co RATTM
mx dist Based on an MXR® Distortion +DS Dist Based on a Boss® DS-1TM Distortiongrunge DigiTech® Grunge®
zone Based on a Boss MT-2 Metal Zone®
death DigiTech Death MetalTM
gonkultr Based on a DOD Gonkulator 8tavia Based on a Roger Mayer OctaviaTM
fuzzlatr Based on a Demeter Fuzzulatorclascfuz Based on a DOD Classic FuzzfuzzYFAC Based on an Arbiter® Fuzz FaceTM
big pi Based on an Electro-Harmonix® Big Muff Pi®
19
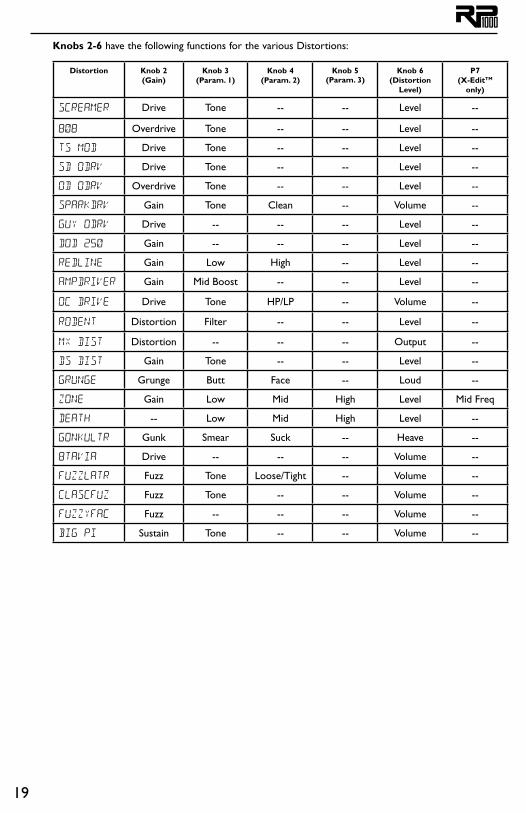
Knobs 2-6 have the following functions for the various Distortions:
Distortion Knob 2(Gain)
Knob 3(Param. 1)
Knob 4(Param. 2)
Knob 5 (Param. 3)
Knob 6 (Distortion
Level)
P7 (X-EditTM
only)
ScreamER Drive Tone -- -- Level --
808 Overdrive Tone -- -- Level --
TS MOD Drive Tone -- -- Level --
SD odrv Drive Tone -- -- Level --
OD ODRv Overdrive Tone -- -- Level --
SPARKDRV Gain Tone Clean -- Volume --
GUY ODRV Drive -- -- -- Level --
DOD 250 Gain -- -- -- Level --
Redline Gain Low High -- Level --
ampdriver Gain Mid Boost -- -- Level --
oc drive Drive Tone HP/LP -- Volume --
rodent Distortion Filter -- -- Level --
mx dist Distortion -- -- -- Output --
ds dist Gain Tone -- -- Level --
Grunge Grunge Butt Face -- Loud --
zone Gain Low Mid High Level Mid Freq
death -- Low Mid High Level --
gonkUltR Gunk Smear Suck -- Heave --
8tavia Drive -- -- -- Volume --
fuzZlAtr Fuzz Tone Loose/Tight -- Volume --
clasCfUz Fuzz Tone -- -- Volume --
fuzzYFAC Fuzz -- -- -- Volume --
big pi Sustain Tone -- -- Volume --
20
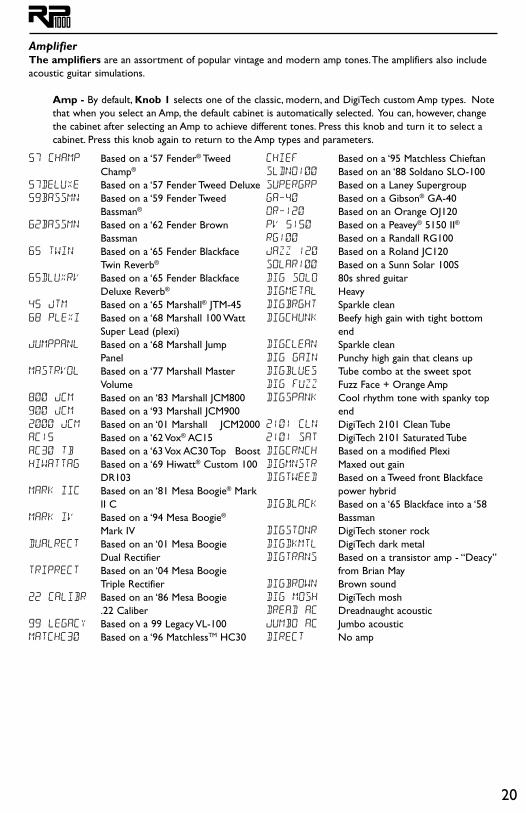
AmplifierThe amplifiers are an assortment of popular vintage and modern amp tones. The amplifiers also include acoustic guitar simulations.
Amp - By default, Knob 1 selects one of the classic, modern, and DigiTech custom Amp types. Note that when you select an Amp, the default cabinet is automatically selected. You can, however, change the cabinet after selecting an Amp to achieve different tones. Press this knob and turn it to select a cabinet. Press this knob again to return to the Amp types and parameters.
57 champ Based on a ‘57 Fender® Tweed Champ®
57deluxe Based on a ‘57 Fender Tweed Deluxe59BassMN Based on a ‘59 Fender Tweed
Bassman®
62BAssmn Based on a ‘62 Fender Brown Bassman
65 twin Based on a ‘65 Fender Blackface Twin Reverb®
65dluxrv Based on a ‘65 Fender Blackface Deluxe Reverb®
45 jtm Based on a ‘65 Marshall® JTM-4568 plexi Based on a ‘68 Marshall 100 Watt
Super Lead (plexi)jumppanl Based on a ‘68 Marshall Jump
Panelmastrvol Based on a ‘77 Marshall Master
Volume800 jcm Based on an ‘83 Marshall JCM800900 jcm Based on a ‘93 Marshall JCM9002000 jcm Based on an ‘01 Marshall JCM2000ac15 Based on a ‘62 Vox® AC15AC30 tb Based on a ‘63 Vox AC30 Top Boosthiwattag Based on a ‘69 Hiwatt® Custom 100
DR103mark iic Based on an ‘81 Mesa Boogie® Mark
II Cmark iv Based on a ‘94 Mesa Boogie® Mark IVdualrect Based on an ‘01 Mesa Boogie
Dual Rectifiertriprect Based on an ‘04 Mesa Boogie
Triple Rectifier22 calibr Based on an ‘86 Mesa Boogie .22 Caliber 99 legacy Based on a 99 Legacy VL-100matchc30 Based on a ‘96 MatchlessTM HC30
chief Based on a ‘95 Matchless Chieftansldno100 Based on an ‘88 Soldano SLO-100supergrp Based on a Laney Supergroupga-40 Based on a Gibson® GA-40or-120 Based on an Orange OJ120PV 5150 Based on a Peavey® 5150 II®
RG100 Based on a Randall RG100jazz 120 Based on a Roland JC120solar100 Based on a Sunn Solar 100Sdig solo 80s shred guitardigmetal Heavydigbrght Sparkle cleandigchunk Beefy high gain with tight bottom
enddigclean Sparkle cleandig gain Punchy high gain that cleans updigblues Tube combo at the sweet spot dig fuzz Fuzz Face + Orange Ampdigspank Cool rhythm tone with spanky top
end2101 Cln DigiTech 2101 Clean Tube2101 saT DigiTech 2101 Saturated Tubedigcrnch Based on a modified Plexidigmnstr Maxed out gaindigtweed Based on a Tweed front Blackface
power hybriddigblack Based on a ‘65 Blackface into a ‘58
Bassmandigstonr DigiTech stoner rockdigdkmtl DigiTech dark metaldigtrans Based on a transistor amp - “Deacy”
from Brian Maydigbrown Brown sounddig mosh DigiTech moshdread AC Dreadnaught acousticjumbo ac Jumbo acousticdirect No amp
21
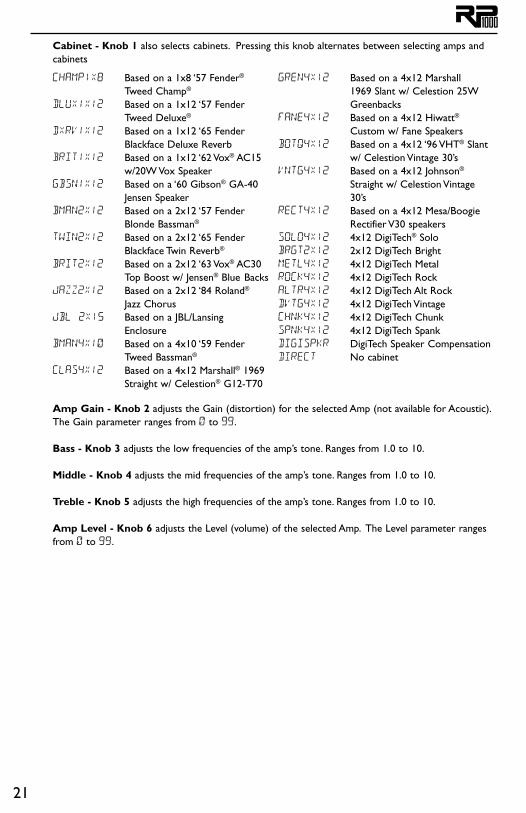
Cabinet - Knob 1 also selects cabinets. Pressing this knob alternates between selecting amps and cabinets
champ1x8 Based on a 1x8 ‘57 Fender® Tweed Champ®
dlux1x12 Based on a 1x12 ‘57 Fender Tweed Deluxe®
dxrv1x12 Based on a 1x12 ‘65 Fender Blackface Deluxe Reverb
brit1x12 Based on a 1x12 ‘62 Vox® AC15 w/20W Vox Speaker
gbsn1x12 Based on a ‘60 Gibson® GA-40 Jensen Speaker
bman2x12 Based on a 2x12 ‘57 Fender Blonde Bassman®
twin2x12 Based on a 2x12 ‘65 Fender Blackface Twin Reverb®
brit2x12 Based on a 2x12 ‘63 Vox® AC30 Top Boost w/ Jensen® Blue Backs
jazz2x12 Based on a 2x12 ‘84 Roland® Jazz Chorus
jbl 2x15 Based on a JBL/Lansing Enclosure
bman4x10 Based on a 4x10 ‘59 Fender Tweed Bassman®
clas4x12 Based on a 4x12 Marshall® 1969 Straight w/ Celestion® G12-T70
GRen4x12 Based on a 4x12 Marshall 1969 Slant w/ Celestion 25W Greenbacks
fane4x12 Based on a 4x12 Hiwatt® Custom w/ Fane Speakers
botq4x12 Based on a 4x12 ‘96 VHT® Slant w/ Celestion Vintage 30’s
vntg4x12 Based on a 4x12 Johnson® Straight w/ Celestion Vintage 30’s
rect4x12 Based on a 4x12 Mesa/Boogie Rectifier V30 speakers
solo4x12 4x12 DigiTech® Solobrgt2x12 2x12 DigiTech Brightmetl4x12 4x12 DigiTech Metalrock4x12 4x12 DigiTech Rockaltr4x12 4x12 DigiTech Alt Rockdvtg4x12 4x12 DigiTech Vintagechnk4x12 4x12 DigiTech Chunkspnk4x12 4x12 DigiTech Spankdigispkr DigiTech Speaker Compensationdirect No cabinet
Amp Gain - Knob 2 adjusts the Gain (distortion) for the selected Amp (not available for Acoustic). The Gain parameter ranges from 0 to 99.
Bass - Knob 3 adjusts the low frequencies of the amp’s tone. Ranges from 1.0 to 10.
Middle - Knob 4 adjusts the mid frequencies of the amp’s tone. Ranges from 1.0 to 10.
Treble - Knob 5 adjusts the high frequencies of the amp’s tone. Ranges from 1.0 to 10.
Amp Level - Knob 6 adjusts the Level (volume) of the selected Amp. The Level parameter ranges from 0 to 99.
22
EQThe RP1000’s EQ helps further shape your tone with Low, Mid, and High controls.
Knob 1 - Press Knob 1 to turn the EQ on and off.
Low Level - Knob 2 adjusts the Low EQ level. Ranges from -12dB to12dB.
Mid Frequency - Knob 3 selects the frequency that the Mid parameter adjusts. RangeIs from 300 Hz to 4000 Hz.
Mid Level - Knob 4 adjusts the Mid EQ level. Range isfrom -12dB to 12dB.
High Frequency - Knob 5 adjusts the High EQ frequency. Range is from 2000 Hz to 8000 Hz
High Level - Knob 6 adjusts the High EQ level. Range isfrom -12dB to 12dB.
Low Frequency (X-EditTM only) - This parameter selects the Low EQ frequency. Ranges from 60 Hz to 500 Hz.
Low, Mid, and High Bandwidth (X-Edit only) - This parameter selects the frequency bandwidth for each frequency band. Range is from Narrow to Wide.
Noise Gate/Auto SwellA Noise Gate is designed to eliminate noise while you are not playing, or provide an auto volume swell effect.
Gate Type - Knob 1 selects between the DigiTech® noise gate or the volume swell effect. Values include: gate (Selects the Noise Gate) and swEll (Selects the Auto Swell effect.) Press this knob to turn the Noise Gate/Auto Swell on and off.
Threshold (Noise Gate only) - Knob 2 sets the signal strength (Threshold) required to open or close the Noise Gate. Parameters range from 0 (opens easily) to 99 (requiring strong signals to open).
Attack Time - Knob 3 sets the attack time. Ranges from 0 (shorter attack time) to 99 (longer attack time).
Release - Knob 4 sets the Release parameter. Ranges from 0 to 99.
Attenuation - Knob 5 sets the Attenuation parameter. Ranges from 0 to 99.
Swell Sensitivity (Auto Swell only) - Knob 6 sets the Swell Sensitivity parameter of the Auto Swell. Ranges from 0 to 99.
Chorus/FXThe Chorus/FX row in the RP1000 is a multi-function module, allowing you to select Effect types such as Chorus, Flanger, Phaser, Vibrato, Rotary Speaker, Tremolo, Panner, Envelope Filter, Detune, Whammy™, Pitch Shift, Detune, Harmony, OC Octaver and more. When the Chorus/FX row is selected, Knob 1 is used to choose the Effect type. Press this knob to turn these Effects on and off. Only one of the effects in this row can be used at a time. After selecting the type of effect in this module, Knobs 2-6 can then be used to adjust the individual parameters associated with the selected effect. The following list describes each Effect and its parameters in more detail:
ChorusA Chorus adds a short delay to your signal. The delayed signal is modulated in and out of tune and then mixed back with the original signal to create a thicker sound. The RP1000 includes the following Chorus Effects: CECHoruS (based on the classic Boss® CE-2 Chorus), tcchoruS (based on the TC Electronic
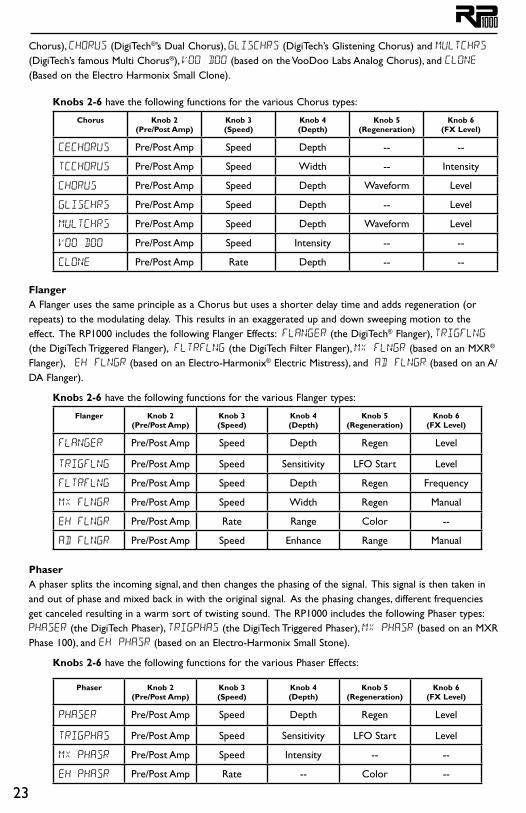
23
Chorus), CHORUS (DigiTech®’s Dual Chorus), glischrs (DigiTech’s Glistening Chorus) and MultCHRS (DigiTech’s famous Multi Chorus®), voo doo (based on the VooDoo Labs Analog Chorus), and clone (Based on the Electro Harmonix Small Clone).
Knobs 2-6 have the following functions for the various Chorus types:
Chorus Knob 2(Pre/Post Amp)
Knob 3(Speed)
Knob 4(Depth)
Knob 5(Regeneration)
Knob 6(FX Level)
CECHoruS Pre/Post Amp Speed Depth -- --
TCCHorus Pre/Post Amp Speed Width -- Intensity
chorus Pre/Post Amp Speed Depth Waveform Level
glischrs Pre/Post Amp Speed Depth -- Level
Multchrs Pre/Post Amp Speed Depth Waveform Level
voo doo Pre/Post Amp Speed Intensity -- --
clone Pre/Post Amp Rate Depth -- --
FlangerA Flanger uses the same principle as a Chorus but uses a shorter delay time and adds regeneration (or repeats) to the modulating delay. This results in an exaggerated up and down sweeping motion to the effect. The RP1000 includes the following Flanger Effects: fLanger (the DigiTech® Flanger), trigfLnG (the DigiTech Triggered Flanger), fLtrFLng (the DigiTech Filter Flanger), mx FLngr (based on an MXR® Flanger), eh FLngr (based on an Electro-Harmonix® Electric Mistress), and ad FLngr (based on an A/DA Flanger).
Knobs 2-6 have the following functions for the various Flanger types:
Flanger Knob 2(Pre/Post Amp)
Knob 3(Speed)
Knob 4(Depth)
Knob 5(Regeneration)
Knob 6(FX Level)
flanger Pre/Post Amp Speed Depth Regen Level
trigflng Pre/Post Amp Speed Sensitivity LFO Start Level
fltrflng Pre/Post Amp Speed Depth Regen Frequency
mx flngr Pre/Post Amp Speed Width Regen Manual
EH flngr Pre/Post Amp Rate Range Color --
AD flngr Pre/Post Amp Speed Enhance Range Manual
PhaserA phaser splits the incoming signal, and then changes the phasing of the signal. This signal is then taken in and out of phase and mixed back in with the original signal. As the phasing changes, different frequencies get canceled resulting in a warm sort of twisting sound. The RP1000 includes the following Phaser types: phaser (the DigiTech Phaser), trigphas (the DigiTech Triggered Phaser), mx phasr (based on an MXR Phase 100), and eh phasr (based on an Electro-Harmonix Small Stone).
Knobs 2-6 have the following functions for the various Phaser Effects:
Phaser Knob 2(Pre/Post Amp)
Knob 3(Speed)
Knob 4(Depth)
Knob 5(Regeneration)
Knob 6(FX Level)
Phaser Pre/Post Amp Speed Depth Regen Level
trigphas Pre/Post Amp Speed Sensitivity LFO Start Level
mx phasr Pre/Post Amp Speed Intensity -- --
eh phasr Pre/Post Amp Rate -- Color --
24
Vibrato (viBRaTo)The DigiTech Vibrato effect modulates the pitch of the incoming signal at an even rate.
Pre/Post Amp - Knob 2 determines where the effect appears in the effects chain. Turn counter-clockwise for Pre (appears before the Distortion effect), or clockwise for Post (appears after the Noise Gate effect).
Speed - Knob 3 adjusts the rate (Speed) at which the pitch modulates. Ranges from 0 to 99.
Depth - Knob 4 adjusts the intensity (Depth) of the modulating pitch. Ranges from 0 to 99.
Rotary Speaker (ROTARY)The Rotary Speaker emulates a device that included a spinning horn and woofer. The rotation of these two speakers produced an interesting combination of the sound panning from side to side. This produced a slight pitch change due to the speed of the sound coming towards, and then going away from the listener.
Pre/Post Amp - Knob 2 determines where the effect appears in the effects chain. Turn counter-clockwise for Pre (appears before the Distortion effect), or clockwise for Post (appears after the Noise Gate effect).
Speed - Knob 3 adjusts the rate (Speed) of the spinning speakers. Ranges from 0 to 99.
Intensity - Knob 4 controls the intensity of the effect. Ranges from 0 to 99.
Doppler - Knob 5 controls the Pitch Shift effect that is the ratio between the horn and the rotor positions. Ranges from 0 to 99.
Crossover - Knob 6 selects the crossover frequency between the horn and rotor. Ranges from 0 (200 Hz) to 99 (1600 Hz).
VibroPan (vibropan)A vibrato is an effect that modulates the pitch of the incoming signal. This will take the whole signal slightly in and out of tune at a steady pace. The DigiTech® VibroPan also incorporates an automatic panner with the vibrato effect that creates a lush chorus-like sound.
Pre/Post Amp - Knob 2 determines where the effect appears in the effects chain. Turn counter-clockwise for Pre (appears before the Distortion effect), or clockwise for Post (appears after the Noise Gate effect).
Speed - Knob 3 adjusts how fast the signal is being modulated.
Depth - Knob 4 adjusts the amount of pitch change.
Vibrato/Pan- Knob 5 adjusts the amount of panning incorporated with the vibrato effect. When set at 0, this effect is a standard vibrato. As the parameter is turned up, the phase difference of the vibrato signal sent to the two channels is changed until a full stereo image is obtained at 99.
Waveform - Knob 6 selects a waveform: triangle, Sine, or Square.
25
Unicord Uni-Vibe™ (unovibe)Based on the Unicord® Uni-VibeTM pedal, Uni-Vibe adds a lush chorus or rotary speaker (vibrato) effect to your tone.
Pre/Post Amp - Knob 2 determines where the effect appears in the effects chain. Turn counter-clockwise for Pre (appears before the Distortion effect), or clockwise for Post (appears after the Noise Gate effect).
Speed - Knob 3 adjusts the rate (Speed) of the chorus modulation or spinning speaker (vibrato) effect. Ranges from 0 to 99.
Intensity - Knob 4 controls the intensity of the effect. Ranges from 0 to 99.
Chorus/Vibrato - Knob 5 selects either the chorus or vibrato effect. Turn counter-clockwise for Chorus, or clockwise for Vibrato.
Volume - Knob 6 adjusts the volume of the effect.
Tremolo/PannerA Tremolo effect modulates the volume of the signal at an even rate. The RP1000 includes the following Tremolo types: tremolo (the DigiTech® Tremolo), sctrtrem (DigiTech Scattertrem (dual asynchronized tremolos)), optotrem (based on the Fender® Opto Tremolo), biastrem (based on the Vox® Bias Tremolo), and panner (the DigiTech Panner).
Pre/Post Amp - Knob 2 determines where the effect appears in the effects chain. Turn counter-clockwise for Pre (appears before the Distortion effect), or clockwise for Post (appears after the Noise Gate effect).
Speed - Knob 3 adjusts the rate (Speed) at which the volume modulates. Ranges from 0 to 99
Depth - Knob 4 adjusts the intensity (Depth) of the modulating volume. Ranges from 0 to 99.
Waveform (DigiTech Tremolo and Panner only) - Knob 5 selects a waveform: triangle, Sine, or Square.
Envelope Filter (eNvfiltr)The DigiTech Envelope Filter is a dynamic Wah effect that alters your sound based upon how hard you play.
Pre/Post Amp - Knob 2 determines where the effect appears in the effects chain. Turn counter-clockwise for Pre (appears before the Distortion effect), or clockwise for Post (appears after the Noise Gate effect).
Sensitivity - Knob 3 adjusts the sensitivity or the input signal required to trigger the Wah effect. Ranges from 0 to 99.
Range - Knob 4 controls the range of the Envelope effect. Ranges from 0 to 99.
DOD FX25 (fx25 env)This envelope filter is based on the DOD FX25.
Pre/Post Amp - Knob 2 determines where the effect appears in the effects chain. Turn counter-clockwise for Pre (appears before the Distortion effect), or clockwise for Post (appears after the Noise Gate effect).
Blend - Knob 3 adjusts the balance between effect signal and dry signal.
Sensitivity - Knob 4 adjusts the sensitivity or the input signal required to trigger the Wah effect. Ranges from 0 to 99.
Range - Knob 5 controls the range of the envelope effect. Ranges from 0 to 99.
26
AutoYa™ (AUTO YA)An AutoYaTM combines the characteristics of a Wah and a Flanger together creating an almost human vowel characteristic as if the guitar were saying “Yah.” The AutoYa automatically provides this animation to the sound at an even rate.
Pre/Post Amp - Knob 2 determines where the effect appears in the effects chain. Turn counter-clockwise for Pre (appears before the Distortion effect), or clockwise for Post (appears after the Noise Gate effect).
Speed - Knob 3 adjusts the speed of the AutoYa sweep. Ranges from 0 to 99.
Intensity - Knob 4 adjusts the intensity of the AutoYa effect. Ranges from 0 to 99.
Range - Knob 5 adjusts the throaty quality of the AutoYa effect. Ranges from 0 to 49.
YaYa™ (ya ya)The YaYaTM is another effect exclusive to DigiTech products. Like the AutoYa, it combines the characteristics of a wah and a flanger together providing a unique talk box type of effect, but is controlled by the Expression Pedal.
Pre/Post Amp - Knob 2 determines where the effect appears in the effects chain. Turn counter-clockwise for Pre (appears before the Distortion effect), or clockwise for Post (appears after the Noise Gate effect).
Pedal - Knob 3 adjusts the Ya pedal position. Ranges from 0 to 99.
Intensity - Knob 4 adjusts the intensity of the YaYa effect. Ranges from 0 to 99.
Range - Knob 5 adjusts the throaty quality of the YaYa effect. Ranges from 0 to 49.
SynthTalk™ (synthtlk)SynthTalkTM is another effect exclusive to DigiTech®. It makes your guitar appear to speak based upon the dynamics of your playing style.
Pre/Post Amp - Knob 2 determines where the effect appears in the effects chain. Turn counter-clockwise for Pre (appears before the Distortion effect), or clockwise for Post (appears after the Noise Gate effect).
Release - Knob 4 adjusts the release of the synthesized voice. Ranges 0 to 99, and oo (infinity).
Vox - Knob 5 changes the characteristics of the various synth voices. Ranges from 0 to 99.
Sensitivity - Knob 6 adjusts the sensitivity of the input signal required to trigger the SynthTalk effect. Ranges from 0 to 99.
Balance (X-EditTM only) - adjusts the left to right balance of the wet signal, Ranges from left 99 to right 99.
Step Filter (stepfltr)The DigiTech Step Filter is like an automatic “random wah” with a square waveform.
Pre/Post Amp - Knob 2 determines where the effect appears in the effects chain. Turn counter-clockwise for Pre (appears before the Distortion effect), or clockwise for Post (appears after the Noise Gate effect).
Speed - Knob 3 adjusts the speed of the Wah effect. Ranges from 0 to 99.
Intensity - Knob 4 controls the intensity of the Wah effect. Ranges from 0 to 99.
27
Sample Hold (smplhold)The DigiTech Sample Hold randomly shifts the pitch of the note you’re playing, creating an “electronic” or “robotic” sound.
Pre/Post Amp - Knob 2 determines where the effect appears in the effects chain. Turn counter-clockwise for Pre (appears before the Distortion effect), or clockwise for Post (appears after the Noise Gate effect).
Speed - Knob 3 adjusts the speed of the Sample Hold effect. Ranges from 0 to 99.
Intensity - Knob 4 controls the intensity of the Sample Hold effect. Ranges from 0 to 99.
DigiTech Whammy® (wHammy)The DigiTech Whammy® is an effect that uses an Expression Pedal to bend the pitch of the incoming signal, or add a bendable harmony with the original signal. As the Pedal is moved, the note bends either up or down. When DigiTech Whammy is selected, it is automatically placed before the internal amplifiers as shown in the block diagram on page 17.
Pre/Post Amp - Knob 2 determines where the effect appears in the effects chain. Turn counter-clockwise for Pre (appears before the Distortion effect), or clockwise for Post (appears after the Noise Gate effect).
Shift Amount - Knob 3 selects the interval and direction of the pitch bend. Choices are as follows:WhammyTM (no Dry Signal)1 oct up (1 octave above) 2 oct up (2 octaves above)2nd down (a second below)rev 2nd (a second below reversed pedal
action) 4th down (a fourth below)1 oct dn (an octave below)2 oct dn (2 octaves below)DIVeBoMb (Dive Bomb)
Harmony Bends (Dry Signal Added)mn3>Maj3 (a minor third to a Major third)2nd>maj3 (a second above to a Major third
above) 3rd->4th (a third above to a fourth above) 4th->5th (a fourth above to a fifth above) 5thoctup (a fifth above to an octave above)h oct up (one octave above)h oct dn (one octave down)octup>dn (octave up/down)
Pedal Position - Knob 5 provides a manual control of the Whammy pedal position. Ranges from 0 to 99.
Mix - Knob 6 adjusts the Whammy mix. Ranges from 0 to 99.
Pitch Shift (PitCH)A Pitch Shifter copies the incoming signal, then shifts the pitch of the copy to a different note. The shifted note is then mixed back with the original signal, sounding as if two guitars were playing different notes.
Pre/Post Amp - Knob 2 determines where the effect appears in the effects chain. Turn counter-clockwise for Pre (appears before the Distortion effect), or clockwise for Post (appears after the Noise Gate effect).
Shift Amount - Knob 3 selects the interval of the shifted pitch. Ranges from -24 (2 octaves below) to 24 (2 octaves above).
Mix - Knob 6 controls the mix level of the shifted pitch. Ranges from 0 to 99.
28
Detune (DetUNe)A Detuner makes a copy of your incoming signal, takes the copied signal slightly out of tune from the original, then mixes the two signals together. The result is a doubling type of effect as if two guitars were playing the same part together.
Pre/Post Amp - Knob 2 determines where the effect appears in the effects chain. Turn counter-clockwise for Pre (appears before the Distortion effect), or clockwise for Post (appears after the Noise Gate effect).
Shift Amount - Knob 3 adjusts the amount of detune shift. Ranges from -24 to 24 cents.
Level - Knob 6 controls the mix of the detuned note. Ranges from 0 to 99.
Harmony Pitch Shifting (harmony) Harmony Pitch Shifting makes a copy of the incoming signal, and then changes the pitch of the copied note to a diatonically correct interval specified by the Amount parameter. A Harmony Pitch Shifter sharpens or flattens the shifted pitch in order to keep the specified interval within the selected key and scale creating a true harmony.
Pre/Post Amp - Knob 2 determines where the effect appears in the effects chain. Turn counter-clockwise for Pre (appears before the Distortion effect), or clockwise for Post (appears after the Noise Gate effect).
Shift Amount - Knob 3 selects the amount or harmony interval for the Harmony Pitch Shifter. Interval choices include:
OCT Dn (octave down)7TH Dn (a seventh below)6tH Dn (a sixth below)5tH Dn (a fifth below)4tH Dn (a fourth below)3RD Dn (a third below)2ND Dn (a second below)
2ND UP (a second above)3RD UP (a third above)4TH UP (a fourth above)5TH UP (a fifth above)6TH UP (a sixth above)7TH UP (a seventh above)OCT UP (an octave above)
Key - Knob 4 selects the musical key that the HPS uses. Key choices range from the Key of E (KEY E) through the Key of Eb (KEY E ).
Scale - Knob 5 selects the scale the HPS will use. Scale choices include: Major (MAJOR), Minor (MINOR), Dorian (DORIAN), Mixolydian (MIXOLYdn), Lydian (LYDIAN), and Harmonic Minor (HarmMINr).
Level - Knob 6 adjusts the HPS Level of all the pitch-altering effects in this module. Ranges from 0 to 99.
Boss® OC-2 Octaver™ (octaver)Based on the Boss® OC-2 OctaverTM, this adds two signals to your original guitar signal. The first is one octave below your guitar, and the second is two octaves below your guitar. Each additional signal has its own volume control.
Pre/Post Amp - Knob 2 determines where the effect appears in the effects chain. Turn counter-clockwise for Pre (appears before the Distortion effect), or clockwise for Post (appears after the Noise Gate effect).
Octave 1- Knob 3 adjusts the the volume of the signal 1 octave below the input signal. Ranges from 0 to 99.
Octave 2 - Knob 4 controls the volume of the signal 2 octaves below the input signal. Ranges 0 to 99.
Dry Level - Knob 6 controls the volume of the dry signal. Ranges from 0 to 99.
29
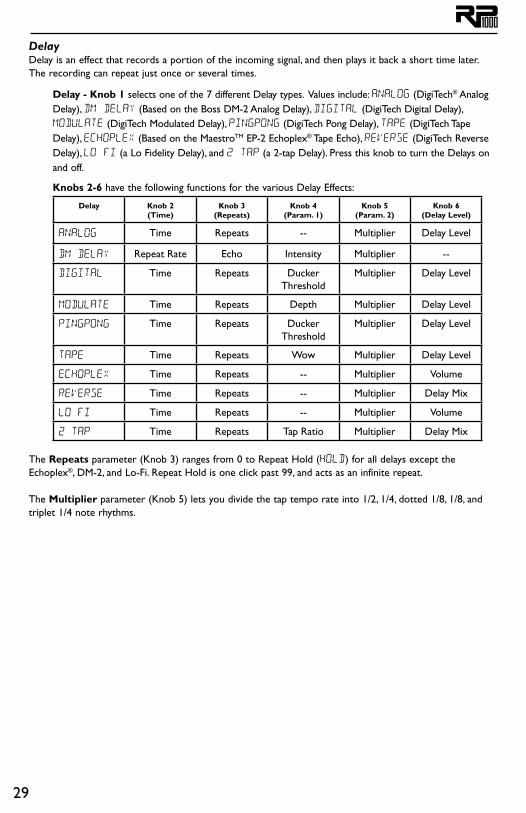
Delay Delay is an effect that records a portion of the incoming signal, and then plays it back a short time later. The recording can repeat just once or several times.
Delay - Knob 1 selects one of the 7 different Delay types. Values include: analog (DigiTech® Analog Delay), dm delay (Based on the Boss DM-2 Analog Delay), digital (DigiTech Digital Delay), modulate (DigiTech Modulated Delay), pingpong (DigiTech Pong Delay), tape (DigiTech Tape Delay), echoplex (Based on the MaestroTM EP-2 Echoplex® Tape Echo), reverse (DigiTech Reverse Delay), lo fi (a Lo Fidelity Delay), and 2 tap (a 2-tap Delay). Press this knob to turn the Delays on and off.
Knobs 2-6 have the following functions for the various Delay Effects:
Delay Knob 2(Time)
Knob 3(Repeats)
Knob 4(Param. 1)
Knob 5(Param. 2)
Knob 6 (Delay Level)
analog Time Repeats -- Multiplier Delay Level
dm delay Repeat Rate Echo Intensity Multiplier --
digital Time Repeats Ducker Threshold
Multiplier Delay Level
modulate Time Repeats Depth Multiplier Delay Level
pingpong Time Repeats Ducker Threshold
Multiplier Delay Level
tape Time Repeats Wow Multiplier Delay Level
echoplex Time Repeats -- Multiplier Volume
reverse Time Repeats -- Multiplier Delay Mix
LO FI Time Repeats -- Multiplier Volume
2 tap Time Repeats Tap Ratio Multiplier Delay Mix
The Repeats parameter (Knob 3) ranges from 0 to Repeat Hold (Hold) for all delays except the Echoplex®, DM-2, and Lo-Fi. Repeat Hold is one click past 99, and acts as an infinite repeat.
The Multiplier parameter (Knob 5) lets you divide the tap tempo rate into 1/2, 1/4, dotted 1/8, 1/8, and triplet 1/4 note rhythms.
30
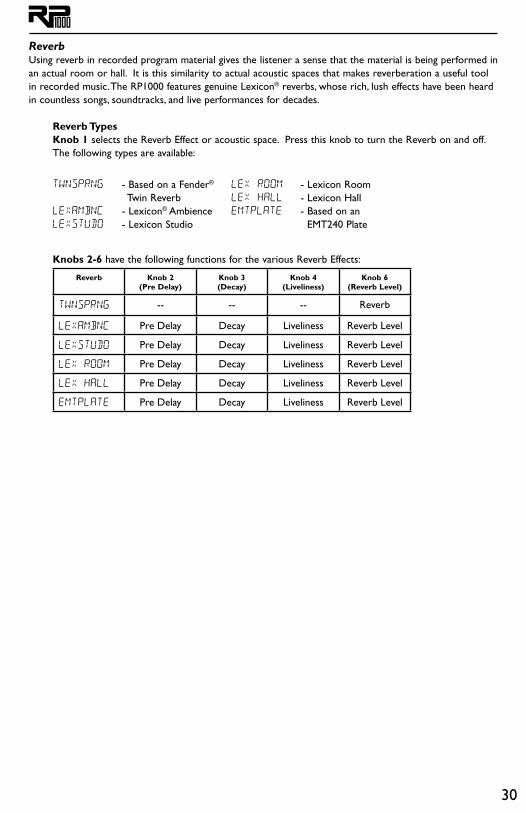
Reverb Using reverb in recorded program material gives the listener a sense that the material is being performed in an actual room or hall. It is this similarity to actual acoustic spaces that makes reverberation a useful tool in recorded music. The RP1000 features genuine Lexicon® reverbs, whose rich, lush effects have been heard in countless songs, soundtracks, and live performances for decades.
Reverb TypesKnob 1 selects the Reverb Effect or acoustic space. Press this knob to turn the Reverb on and off. The following types are available:
twnsprng - Based on a Fender® Twin Reverblexambnc - Lexicon® Ambiencelexstudo - Lexicon Studio
lex room - Lexicon Roomlex hall - Lexicon Hallemtplate - Based on an EMT240 Plate
Knobs 2-6 have the following functions for the various Reverb Effects:
Reverb Knob 2(Pre Delay)
Knob 3(Decay)
Knob 4(Liveliness)
Knob 6(Reverb Level)
twnsprng -- -- -- Reverb
lexambnc Pre Delay Decay Liveliness Reverb Level
lexstudo Pre Delay Decay Liveliness Reverb Level
lex room Pre Delay Decay Liveliness Reverb Level
lex hall Pre Delay Decay Liveliness Reverb Level
emtplate Pre Delay Decay Liveliness Reverb Level
31
Section 4 - Other FunctionsExpression PedalYou can link the Expression Pedal on the RP1000 to control the RP1000’s Volume, Wah, Whammy™, YaYa™, or almost any of the RP1000’s other parameters in real time with your foot. When a parameter has been linked to the Expression Pedal, you can also set the minimum (heel) and maximum (toe) value for the range. When you push down hard on the toe of the Expression Pedal to activate the V-switch, the Expression Pedal switches between the linked parameter and the Wah. To link a parameter to the Expression Pedal, follow these steps:
1. Press either Edit button until the Expression row is selected (indicated by the LED lighting on the Expression row).
2. Rotate Knob 1 until EXP PeDL appears in the Display. 3. Rotate Knob 2 until the desired parameter to be linked appears in the Display. 4. Rotate Knob 3 to select the minimum (heel) value the assigned parameter will reach with the
Expression Pedal in the toe up position.5. Rotate Knob 4 to select the maximum (toe) value the assigned parameter will reach with the
Expression Pedal in the toe down position.6. Store your Expression Pedal assignment to your preset. See page 16 for more information on the
storing procedure.
Footswitch AssignYou can link footswitches 6-10 to almost any of the RP1000’s parameters or to enable and disable the Amp Loop. From the factory, footswitches 6-10 are set to turn on and off the Compressor, Distortion, Chorus/FX, Delay, and Reverb respectively when the Pedalboard button is enabled. If a parameter other than these on/off parameters is linked to these footswitches, you can specify a minimum value (LED off) and maximum value (LED on) for the parameter. That way you can toggle a parameter like chorus speed between two distinct values while you’re performing. Footswitch assignments are stored with the preset so they can be different for every preset. To link a parameter to the footswitches 6-10, follow these steps:
1. Press either Edit button until the Expression row is selected (indicated by the Expression row’s LED lighting).
2. Rotate Knob 1 until FS6 ASN - FS10 ASN appears in the Display. This selects which footswitch you are about to change the assignment for.
3. Rotate Knob 2 until the desired parameter to be linked appears in the Display. 4. Rotate Knob 3 to select the minimum value the assigned parameter will reach when the footswitch is
off (LED off).5. Rotate Knob 4 to select the maximum value the assigned parameter will reach when the footswitch
is on (LED on).6. Store your footswitch assignments to your preset.
LFOsThe RP1000 includes two assignable low frequency oscillators (LFO 1 and LFO 2) that you can assign to any of the same parameters available for assignment to the ExpressionPedal. A low frequency oscillator automatically varies the value of the assigned parameter ata steady rate. You can set the minimum and maximum value that each LFO will reach. For instance, if the Amp Gain is assigned to LFO 1, and the minimum value is set to 1 andthe maximum value is set to 99, the RP1000 will automatically sweep the amount ofdistortion from a clean sound to a distorted sound. You can also set the LFO speeds. In the previous example, the LFO speed would determine the length of time it takes the LFO to sweep from the clean to the distorted sound. To assign the LFOs in the RP1000, follow these steps:
1. Press the Edit button until the Expression row is selected (indicated by the LED lighting on the Expression row).
32
2. Rotate Knob 1 to select one of the two LFO links, LFO 1 (LFO 1) or LFO 2 (LFO 2). 3. Rotate Knob 2 to select the parameter you want linked to the LFO 1 or LFO 2. 4. Rotate Knob 5 to select which waveform you want the LFO to use, Triangle (TRIanGle), Sine
(SINE), or Square (SQUARE). 5. Rotate Knob 6 to select the speed you want the parameter to be controlled at.
Wah Min/MaxYou can set the Wah effect’s minimum and maximum values with the Expression row. To do so, follow these steps:
1. Press the Edit button until the Expression row is selected (indicated by the LED lighting on the Expression row).
2. Rotate Knob 1 to select wah pedl. 3. Rotate Knob 3 to adjust the Wah effect’s minimum value.4. Rotate Knob 4 to adjust the Wah effect’s maximum value.
Expression UpdateYou can set up the RP1000’s Expression pedal to update its position each time you change presets. Normally, the Expression pedal only updates its position on a preset change when it’s linked to the Volume Pre or Volume Post parameter in a preset. This lets the Expression pedal behave like a real volume pedal between preset changes. When Expression Update is enabled (ON), the Expression pedal will update its position no matter what parameter it’s linked to, so it has more of an “analog” feel like a typical standalone expression pedal. To enable the Expression Update function, follow these steps: 1. Press the Edit button until the Expression row is selected (indicated by the LED lighting on the
Expression row).2. Rotate Knob 1 to select EXPUPDAT. The default setting is for Expression Update is OF.3. Press Knob 1 to enable or disable Expression Update. Expression Update affects all presets. You don’t have to save this change to each preset.
Factory ResetThis function resets the RP1000 to its original factory settings. This procedure erases all custom User presets, and recalibrates the Expression Pedal.
ATTENTION: Performing this function will erase all user-programmed data. All such data will be lost forever! Be sure you want to erase the memory and start fresh before continuing with this procedure.
The procedure for performing a Factory Reset is as follows:
1. Press and hold the Store button while powering up the RP1000. 2. When the display prompts you with FACt RST, release the Store button, which is now flashing. 3. Press and hold the flashing Store button for 3 seconds until ReSTOReD appears in the display and
release. The Restore procedure takes several seconds to complete; during the procedure, the display will count up. After the Restore procedure is complete, the Expression Pedal calibration procedure will begin.
Expression Pedal CalibrationThe Expression Pedal on the RP1000 needs to be recalibrated for use after you do a factory reset. This calibration procedure automatically starts after the factory reset procedure is completed. (You can also
33
start the calibration procedure by pressing and holding the currently active preset’s footswitch for about 5 seconds.) If the pedal’s calibration fails, or if the pedal does not function properly, it can be re-calibrated using the calibration procedure. This will not erase the User presets. The procedure for calibrating the expression pedal is as follows:
1. Press and hold the currently active preset’s footswitch until PEDL CAL appears in the display (BYPASS, TUNER, and EXIT will be displayed before PEDL CAL is accessed, after about 5 seconds.)
2. When the Display prompts you with TOE DowN, rock the Expression Pedal forward (toe down) and press Footswitch 5.
3. When the Display prompts you with TOE UP, rock the Expression Pedal back (toe up) and press Footswitch 5.
4. The Display now prompts you to calibrate the V-Switch sensitivity (VSWitchxxx), where XXX is the current V-Switch threshold. Rock the Expression Pedal forward and press firmly on the toe once to turn the V-Switch on (WAH ON), and again to turn the V-Switch off (WAH OFF).
5. If the V-Switch is too sensitive, press the Up Footswitch to raise the threshold (range is 0-199). The Down Footswitch decreases sensitivity. Keep testing the V-Switch sensitivity and adjust the threshold until it only engages when you want it to (too sensitive a setting will lead to the V-Switch falsely triggering on or off when using the Expression Pedal).
6. When the V-Switch sensitivity is set to your satisfaction, press Footswitch 5 to exit.
NOTE: If the Display shows error, an error has occurred and steps 2 through 5 should be repeated.
Preset LevelEach of the presets in the RP1000 can have a specified programmed level. To change the level of a preset, follow these steps:
1. From the preset name display, press the Edit Down button once. The Wah row will be lit. 2. Turn Knob 6 to change the Preset Level parameter.3. Store these changes to the preset using the Store procedure if these changes are to be recalled later.
BypassAny preset in the RP1000 can be bypassed using the preset footswitches. Bypass will defeat all amp and effects modeling an output an unprocessed bypass signal. Bypass can be selected any time during performance or editing. 1. Press the currently active preset’s footswitch. The display will read BYPASS and unprocessed guitar
signal will be heard on all outputs.2. Press any footswitch again to exit bypass and return to the last state (edited or unedited) the RP1000
was in.
When a preset is bypassed, any devices connected to the Amp Loop and Stomp Loop will still be active, meaning you can use bypass to kill all effects in the RP1000 without bypassing your core tone.
LooperThe RP1000 includes a dedicated Looper phrase sampler that lets you record up to 20 seconds of your guitar playing and play it back as an endless loop so you can solo over it, You can also add more guitar work to the recorded loop (overdub). What’s great about the RP1000’s Looper is that even while the Looper is playing back and/or recording you can select different presets or turn on and off effects to add different sounds to your loop or overdubs.
You turn on the RP1000’s Looper with the Looper button in the matrix section and control it with the Up/Down footswitches when the Looper is turned on. You can also connect an FS3X footswitch to the Looper Control input jack on the rear panel for stand-alone remote control of the Looper.
34
Normally, when the Looper is turned on, the Up/Down footswitches won’t change preset banks. However, if an FS3X footswitch is connected to the Looper Control input on the rear panel of the RP1000, the Looper will always be enabled, the Looper button will always be lit, and the RP1000’s Up/Down footswitches will always change banks.
There are two ways to use the Looper: with a “quiet start” or “on the fly.” “Quiet start” means you activate the Looper’s record feature when you’re not playing your guitar, and it automatically starts recording when you start playing. “On the fly” means you activate the record feature while you’re playing, and it starts recording as soon as you step on the Down footswitch.
To use the Looper with a quiet start, follow these steps:
1. Press the Looper button to enable the Looper. The Looper button should now be lit. None of the Record, Play, Overdub LEDs will be lit at this time.
2. To begin looping, press the Down footswitch. The Record LED on the matrix will flash red indicating the Looper is armed and ready to record but not actually recording yet.
3. To begin recording, just start playing. The Record LED will now light solid red indicating recording is in progress.
4. To set the loop point, press the Down footswitch again. The loop point will be set and the recorded phrase will now begin playback. The Record LED will turn off and the green Play LED will now be lit.
5. To add overdubs to the loop, press the Down footswitch again. The yellow Overdub LED will now light (the green Play LED will still be lit) indicating that anything being played will be merged with the loop being played.
6. Press the Down footswitch again to stop overdub recording which will turn off the Overdub LED and return the loop to normal playback.
7. To stop loop playback, press the Up footswitch. This does not clear out the loop but simply stops playback. Pressing the Down footswitch again will resume playback.
8. To clear a loop from memory, press and hold the Up footswitch until the main display shows LOOPCLRD.
To use the Looper on the fly, follow these steps:
1. Press the Looper button to enable the Looper. The Looper button should now be lit. None of the Record, Play, Overdub LEDs will be lit at this time.
2. Start playing your guitar. 3. To begin looping, press the Down footswitch. The Looper will start recording as soon as you press
the Down footswitch, and the Record LED on the matrix will light red after about half a second.4. To set the loop point, press the Down footswitch again. The loop point will be set and the recorded
phrase will now begin playback. The Record LED will turn off and the green Play LED will now be lit.
5. To add overdubs to the loop, press the Down footswitch again. The yellow Overdub LED will now light (the green Play LED will still be lit) indicating that anything being played will be merged with the loop being played.
6. Press the Down footswitch again to stop overdub recording which will turn off the Overdub LED and return the loop to normal playback.
7. To stop loop playback, press the Up footswitch. This does not clear out the loop but simply stops playback. Pressing the Down footswitch again will resume playback.
8. To clear a loop from memory, press and hold the Up footswitch until the main display shows LOOPCLRD.
If using the optional FS3X to control the Looper, follow these steps for a quiet start:
1. To begin looping, press the Down footswitch. The Record LED on the matrix will flash red indicating the Looper is armed and ready to record but not recording yet.
2. To begin recording, just start playing. The Record LED will now light solid red indicating recording is
35
in progress.3. To set the loop point, press the Down footswitch again. The loop point will be set and the recorded
phrase will now begin playback. The Record LED will turn off and the green Play LED will now be lit.
4. To add overdubs to the loop, press the Down footswitch again. The yellow Overdub LED will now light (the green Play LED will still be lit) indicating that anything being played will be merged with the loop being played.
5. Press the Down footswitch again to stop overdub recording which will turn off the Overdub LED and return the loop to normal playback.
6. To stop loop playback, press the Up (right) footswitch. This does not clear out the loop but simply stops playback. Pressing the Down (left) footswitch again will resume playback.
7. To clear a loop from memory, press and hold the Mode (left) footswitch until the main display shows LOOPCLRD.
If using the optional FS3X to control the Looper, follow these steps for on the fly use:
1. Start playing your guitar. 2. To begin looping, press the Down footswitch. The Looper will start recording as soon as you press
the Down footswitch, and the Record LED on the matrix will light red after about half a second.3. To set the loop point, press the Down footswitch again. The loop point will be set and the recorded
phrase will now begin playback. The Record LED will turn off and the green Play LED will now be lit.
4. To add overdubs to the loop, press the Down footswitch again. The yellow Overdub LED will now light (the green Play LED will still be lit) indicating that anything being played will be merged with the loop being played.
5. Press the Down footswitch again to stop overdub recording which will turn off the Overdub LED and return the loop to normal playback.
6. To stop loop playback, press the Up (right) footswitch. This does not clear out the loop but simply stops playback. Pressing the Down (left) footswitch again will resume playback.
7. To clear a loop from memory, press and hold the Mode (left) footswitch until the main display shows LOOPCLRD.
TunerThe RP1000 features a built-in chromatic tuner with variable tuning references (427-453, A=Ab, A=G, A=Gb). To use the tuner, follow these steps:
1. Press and hold the currently active preset’s footswitch to access the Tuner for 2 seconds. The display briefly flashes TUNER.
2. To begin tuning, play a note on your guitar (a harmonic at the 12th fret usually works best).3. The numeric display shows the note being played, and the alpha-numeric display indicates whether the
note is sharp or flat. Arrows to the left (<<<) indicate the note is sharp and should be tuned down. Arrows to the right (>>>) indicate the note is flat and should be tuned up. When your note is in tune, -><- is displayed.
4. To exit the Tuner, press any numbered footswitch.
While the tuner is selected, you can set your tuning reference with Knob 1. The default factory setting is A=440 Hz. The tuning references range from 427 Hz to 453 Hz (± 50 cents (1/2 semitone) from either direction of 440 Hz). Below 427 Hz, are alternate dropped tunings. The alternate tunings are REF A(A=Ab), REF G(A=G), and REF G(A=Gb). The display window briefly flashes the selected tuning preference.

36
USB SetupThe RP1000 features a USB jack which connects it to a computer. The USB jack serves two purposes: Streaming audio to and from a computer recording software application, and as a connection for use with the X-Edit editor librarian software (downloadable from www.digitech.com).
Visit www.digitech.com for free X-Edit and driver downloads.
NOTE: PC users must download and install the ASIO driver to use the RP1000 with recording software.
There are two parameters in the effects matrix for adjusting USB parameters; USB Record Level and USB Playback Mix
USB Record Level – This option provides a digital level control for boosting or cutting the level sent to your recording application. Range is -12dB to +24dB.
USB Playback Mix – This option controls the playback mix between RP1000 processing and USB playback from your computer’s recording application. The range for this control is from USB Mix 0% (all that is heard is the RP1000 processing, no playback) to USB = RP (both USB playback and RP1000 have equal levels) to RP Mix 0% (all that is heard is the USB playback in the outputs, no RP1000 processing).
To change the USB Setup options, follow these steps
1. From the preset name display, press the Edit Down button once to enter Edit mode. The Wah row’s LED will be lit.
2. Turn Knob 4 to adjust the USB Playback Mix.3. Turn Knob 5 to adjust the USB Record Level. Changes made to the USB parameters are saved automatically and will affect the global performance of the RP1000 and all of its presets. Audio recorded via USB in the RP1000 is always tapped off of the audio feeding the XLR outputs.
37
Section 5 - RP1000 Effects Descriptions WahsWah is an effect controlled by an Expression Pedal making the guitar sound as if it’s saying “Wah.”
DigiTech® WahDigiTech’s Full range Wah sweeps the entire spectrum of audible frequencies giving you the most range of tone from the wah pedal.
Dunlop® Crybaby™ Wah:This Wah pedal is the more “traditional” sounding Wah pedal that you will have heard in the 60’s to the 80’s guitar solos. This Wah sweeps the lower to mid range of the audible spectrum.
Vox® Clyde McCoy™ WahThis Wah pedal was the “original” and was designed to try to emulate the sound of a muted trumpet. Clyde McCoy was a trumpet player that had asked Vox for a device that could make an instrument sound like his muted trumpet. This Wah has a “thinner” tone and sweeps more of the upper end of the audible spectrum.
CompressorsA Compressor is used to increase sustain, tighten up guitars, and prevent the signal from clipping the input of other effects. It sets a maximum boundary for the strength of a signal.
Boss® CS-2 Compressor/SustainerThe CS-2 compresses high-input signals while boosting low-input signals, giving you smooth and long sustain without degrading the quality of the original sound.
DigiTech CompressorThe DigiTech Compressor compresses high-input signals while boosting low-input signals, giving you smooth and long sustain without degrading the quality of the original sound and also allows you to adjust the tone of the compression.
MXR® Dynacomp The MXR® Dynacomp will compress the high-input signals and boost the low-input signals while adding its unique voicing that has become popular with many players for leads, clean chicken picking, and simple boosts.
Noise GatesA Noise Gate is used to control the volume of an audio signal. In its most simple form, a noise gate allows a signal to pass through only when it is above a set threshold. When this happens, the gate is ‘open’. If the signal falls below the threshold no signal is allowed to pass (or the signal is substantially attenuated) and the gate is ‘closed’.
DigiTech Silencer Noise Gate This noise gate allows you to reduce line noise or audio signal when that signal goes below the set threshold. Depending on how you set the parameters (Threshold, Attack Time, Release, and Attenuation) you can make the audio transition cut your signal at very low noise volumes or high noise volumes.
DigiTech Auto Swell Gate:This noise gate will also let you set the threshold of the noise floor but instead of a strict feel of “opening and closing” the gate, you get more of an auto volume swell effect making it a smoother transition between the open and closed positions.
38
EQThe RP1000 is equipped with a 3 band semi-parametric EQ which helps shape your tone with Low, Mid, and High controls.
3 Band Semi-Parametric EQBy adjusting the frequency and levels of each band, you can control how much or little of the frequency range of 60 Hz to 8 kHz you want in your overall tone.
Chorus Stompbox ModelsA Chorus adds a short delay to your signal. The delayed signal is modulated in and out of tune and then mixed back with the original signal to create a thicker sound. The RP1000 includes the following Chorus Effects: Boss® CE-2 Chorus, DigiTech® Dual Chorus, DigiTech Glistening Chorus, DigiTech Multi-Chorus, Electro Harmonix® Small Clone, TC Electronics Chorus, and Voodoo Labs Analog Chorus.
Boss® CE-2 Chorus A very simple but popular Chorus pedal. Its simplistic two knob design makes it easy to use adjusting the Speed and Depth of the Chorus while keeping a nice warm tone.
DigiTech Dual Chorus:A warm dual voice chorus that allows you to adjust the speed, depth, level, AND wave form.DigiTech Glistening Chorus: A more simplistic Chorus giving you a warm Chorus tone like the CE-2 but adding a 3rd knob allowing you to adjust the overall level as well.
DigiTech Multi-ChorusDigiTech’s famous Multi-Chorus allows you to get an incredible warm Chorus tone using 16 voices that interact with each other in Stereo Mode giving you the most incredible unique Chorus tone you can imagine.
Electro Harmonix® Small Clone A very lush, watery Chorus which can be heard on hits by bands including Nirvana. This Chorus has a very “earthy” tone to it and definitely take your Chorus tone to a different place.
TC Electronics® Chorus A Chorus pedal that was made for guitar but also used by Bass and keyboard players as well. Many keyboardists use it to enhance their electric piano “Rhoads” sound. The speed knob controls the speed of the chorus or flanger sweeps. The width knob controls how much frequency change the effect spans. The intensity controls how much of the effect is used.
Voodoo Labs Analog Chorus A strikingly vocal with distinct organic tone Chorus pedal. It is capable of a wide range of sounds from a thick analog doubling, to an ultra-lush chorus, and even a Leslie rotating speaker.
FlangerA Flanger uses the same principle as a Chorus but uses a shorter delay time and adds regeneration (or repeats) to the modulating delay. This results in an exaggerated up and down sweeping motion to the effect. The RP1000 includes the following Flanger Effects:ADA Flanger, DigiTech Flanger, DigiTech Filter Flanger, DigiTech Triggered Flanger, Electro Harmonix® Electric Mistress, and the MXR® Flanger.
A/DA Flanger A super quiet Flanger with plenty of headroom. Made popular by its ability to get thick and juicy tones from using not only the standard knobs of the normal Flanger but also the Harmonic knob which offers the user a slightly different timbre going from even to odd harmonics.
39
DigiTech FlangerDigiTech’s own Flanger model! This gives you the Flnager effect and allows you to control the standard Speed, Depth, Regeneration, and Level of the Flanger effect.
DigiTech® Filter FlangerThe DigiTech tone team expanded on the traditional flanger by adding a band pass filter in the feedback path of the effect. Because of the filter, the filter flanger’s feedback affects only a set amount of frequencies to generate a different flanger effect.
DigiTech Triggered FlangerBy setting the threshold sensitivity, you control when the Flanger starts sweeping, and by setting the LFO Start knob, you control WHERE in the sweep it starts! Next you can adjust the speed that it sweeps and the overall level of the Flanger effect!
Electro Harmonix® Electric MistressThis Flanger has a unique tone giving it a sort of Chorus/Flanger mixed tone making it not as dry as some of the other Flangers (but with a more pronounced sweep). Its easy to use with only 3 knobs (Color, Range, and Rate) which also makes it a little easier to dial in your tone quicker.
MXR® FlangerA big rich and organic Flanger tone made popular by such people as Eddie Van Halen. The MXR® flanger creates a variety of wild sounds from dynamic jet plane or cool space effects to short delay, chorus and vibrato. Back off Width to zero to disengage auto-sweep, then use the Manual knob to physically place the effect anywhere along the frequency spectrum. Manual knob selects frequency center of effect when auto-sweep is disengaged Width knob at zero disengages auto-sweep, rotates clockwise to increase total phase sweep of effect Speed knob modulates rate of effect Regen knob feeds effect back onto itself at adjustable intensity, increasing the total phase effect.
PhasersA phaser splits the incoming signal, and then changes the phasing of the signal. This signal is then taken in and out of phase and mixed back in with the original signal. As the phasing changes, different frequencies get canceled resulting in a warm sort of twisting sound. The RP1000 includes the following Phaser types: DigiTech Phaser, DigiTech Triggered Phaser, Electro-Harmonix® Small Stone, and the MXR® Phase 100.
DigiTech Phaser This Phaser will give you the standard Phaser tone and options for controlling it via the Speed, Depth, Regeneration, and Level settings.
DigiTech Triggered PhaserLike the Triggered Chorus, You can set the threshold of the sensitivity knob to state what volume you would like the Phaser triggered. Then using the LFO Start knob, you can set where in the range of the Phaser you would like it to start from.
Electro-Harmonix® Small Stone The Small Stone’s full-bodied, 3-dimensional phasing adds a special swirl to every musical style. Blues players dig its rapidly rotating speaker effect while Country players use it to add seasoning to their chicken’ pickin’. Metal-heads and Industrialists dig the Stone’s jet plane woosh. Its simplistic 2 knob control panel (Rate and Color) make it easier to dial in a quick Phaser tone that will be just right for you!
MXR® Phase 100Another industry standard in Phase pedals with its own unique tones. It as well has a simplistic 2 knob control panel (Intensity and Speed). Along with the speed control that controls the speed of the Phase sweep, there is the Intensity knob that selects four different intensities, defined as preset waveform patterns. Between the intensity and speed settings, you’ll find quite a supply of excellent sounds!
40
PitchThe RP1000 comes equipped with effects to manipulate your pitch and do incredible things with it like harmonize both intelligently and by using standard semitones, detune, and do cool effects by raising and/or lowering your original notes from 2 octaves down to 2 octaves up! Pitch pedals it is equipped with are: Boss® OC-2 Octaver, DigiTech Detune, DigiTech Harmony Pitch, DigiTech Pitch Shift, and the ever popular DigiTech Whammy Pedal!!
Boss® OC-2 OctaverBased on the Boss® OC-2 Octaver™, this adds two signals to your original guitar signal. The first is one octave below your guitar, and the second is two octaves below your guitar. Each additional signal has its own volume control.
DigiTech® DetuneA Detuner makes a copy of your incoming signal, takes the copied signal slightly out of tune from the original, then mixes the two signals together. The result is a doubling type of effect as if two guitars were playing the same part together.
DigiTech Harmony PitchHarmony Pitch Shifting makes a copy of the incoming signal, and then changes the pitch of the copied note to a diatonically correct interval specified by the Amount parameter. A Harmony Pitch Shifter sharpens or flattens the shifted pitch in order to keep the specified interval within the selected key and scale creating a true harmony.
DigiTech Pitch ShiftA Pitch Shifter copies the incoming signal, then shifts the pitch of the copy to a different note. The shifted note is then mixed back with the original signal, sounding as if two guitars were playing different notes.
DigiTech Whammy™The DigiTech Whammy is an effect that uses an Expression Pedal to bend the pitch of the incoming signal, or add a bendable harmony with the original signal. As the Pedal is moved, the note bends either up or down.
Vibrato / RotaryDigiTech RotaryThe Rotary is an effect that produces the Doppler effect and volume change of a rotary speaker. The sound is lush and full.
DigiTech VibratoThe Vibrato produces volume and tone change that can be found on surf and country classics.
DigiTech Vibro / PanThe Vibro/Pan not only changes volume but shifts it side to side. This effect is great for stereo setups.
Unicord Uni-Vibe™The Uni-Vibe creates a chorus type effect in tandem with a vibrato to produce a lush swirling effect.
TremoloDigiTech PannerPans the sound from side to side. The speed controls how fast and the depth controls how much of the signal is panned.
DigiTech TremoloThe Tremolo is a volume changing effect that can be heard on surf and country classics.
41
DigiTech ScatterTremThe ScatterTrem combines two tremolos that are “out of sync” to produce an unpredictable scattered tremolo sound.
Fender® Opto Tremolo™The sound of the Fender® Opto Tremolo is as classic as their amps. Both tone shift and volume effects are produced to create this unique tone.
Vox® Bias Tremolo Another way to achieve a tremolo effect is to alter the bias of the poweramp tubes. This Vox® Bias Tremolo produces the volume and tone effects to create a tone heard on many famous British tunes.
Envelope / SpecialDigiTech® Envelope FilterAn envelope filter is also called a “auto-wah” for its wah effect. The amount of wah is dependent of the output volume of your guitar – he harder you play, the more wah you get. A definite B-Movie soundtrack tone.
DigiTech Auto Yah™If a wah, why not an effect that says “yah” when you use it? This is another take on the vowel based effects but it is controlled the same way that the envelope filter is controlled.
DigiTech Sample & HoldUsing a changing filter, the Sample and Hold produces skipping tones that can be heard in experimental and alternative music. Best used with distortion in front of the effect.
DigiTech Step FilterThe Step Filter changes frequency in related patterns much like a sample and hold effect.
DigiTech Synth Talk™Another DigiTech first, the Synth Talk™ makes your guitar sound like it’s talking due to vowel like qualities.
DigiTech YaYa™A descendent of a wah, the YaYa™ is a more complex circuit that produces a “ya” sound.
DOD® FX25 Envelope FilterThe DOD® FX25 is an classic analog envelope filter that can be found on many funk and alternative tracks. Used by both guitar and bass players. Try this one clean for a really funky sound.
DelaysAnalog DelayThe analog delay produces delays that were derived from ”BBD” analog delay chips. The BBD chips were the first ways to produce delay aside from the costly tape delays. The delay sound was not HiFi but was reminiscent of the original signal and quickly became a cornerstone to modern guitar sounds due to their warm qualities.
Boss® DM2 Analog Delay:The DM2 is a classic and standard BBD analog delay that used 4,096 stages of delay. The frequency response and noise depended upon the delay time. The signal derogates with every repeat so as the repeats are turned up, the signal becomes less and less recognizable and actually becomes more of an “effect” than a delay.
42
Digital DelayA digital delay can be called a perfect representation of your guitar’s signal. Desired for their brilliant qualities, digital delays have virtually no noise and a full frequency response. Lo Fi Delay: The Lo Fi delay is an analog delay with a severely limited frequency response to produce an even grungier delay effect.
Maestro EP-2 Tube EchoplexThe Echoplex is the standard to which all analog delays are judged. The Echoplex was the first widely used tape delay and had a tone all of it’s own. The Echoplex can be heard on many rockabilly, surf, country and rock tracks.
Modulated DelayA modulated delay is a digital delay with chorus added to the delays to produce a wider sounding stereo delay.
Pong DelayA pong delay’s repeats jump from side to side and requires a stereo setup. Reverse Delay: The Reverse Delay senses the guitar’s input signal and plays the delayed guitar backwards once it is sampled. Reverse delay used to be a studio trick, now with modern technology it exists in a stompbox!
Tape DelayThe tape delay effect produces a warm tone by limiting the frequency response and adding the distortion that exists in a tape delay.
2-Tap DelayWhile most delays are derived from a signal delay with one end tap, the 2-Tap Delay uses a single delay line but with two endpoints that are spaced about at different ratios. Use this effect to add more of a rhythmic quality to your delays.
ReverbsEMT® 240 Plate ReverbThe EMT Plate Reverb is the reverence reverb to which all studio reverbs are compared to. Using a large sheet of metal, one end of the “plate” was excited by a transducer and the sound would then travel through the plate to the other side where the delayed tone was received. The frequency response and dynamics of the signal would change when traveling through the plate creating a reverb effect.
Lexicon® AmbienceThe Lexicon Ambience reverb is full, bright and produces ambience around or behind your guitar signal.
Lexicon HallThe largest of the Lexicon reverbs, the Hall produces lush reverbs with a swirling decay unlike any other reverbs today.
Lexicon RoomA great effect to produce a small room, the Lexicon Room produces that reverb found in many isolation rooms in recording studios today.
Lexicon StudioLarger than the Room reverb, the Studio Reverb is the Lexicon studio standard reverb algorithm.
Spring based on a Fender® Twin Reverb™The tone and reaction of the spring reverb is captured! Surf’s up, the best setting is at maximum - Cowabunga.
43
DistortionsDistortion and overdrive pedals were designed to give your guitar tone gain before it reaches your amp. Many heavily distorted pedals such as the DigiTech Grunge™ were designed to provide most or all of the gain and run through a cleaner amp. Overdrives are great for boosting the gain of your guitar sound and driving an already distorted amp giving your total tone, more gain and a heavier feel. Overdrives on their own and ran into clean amps provide a bluesy tone.
Arbiter® Fuzz Face™The Dallas Arbiter Fuzz Face surfaced in 1966 and used germanium transistors to get it’s unique fuzzy sound and inspired many other fuzz pedals to follow. The Fuzz Face produces a thick wall of edgy distortion and a very full low end. Perfect for creating ‘60s or modern stonerrock tones.
Boss® DS-1™ DistortionA truly classic distortion. A nice, common distortion that ranges in tone from rock to mild metal. Use it to drive a distorted amp!
Boss MT-2 Metal Zone®The Metal Zone will produce nearly any metal tone needed from tight, percussive Bay area thrash to deep detuned grind core.
Boss OD-1 OverdriveThe OD-1 is perfect for just adding a little gain to your tone no matter what type of amp you use. To produce a bluesy tone, use it with a clean combo. To drive your stack, crank the gain and level.
Boss SD-1 OverdriveWith a little more gain than the OD-1, the SD-1 will drive any amp into another realm. If you’re just looking for a good classic rock tone, this is it.
Demeter FuzzulatorEnhancing the proper frequencies with a pre-emphasis tone circuit, the Fuzzulator produces distortion that is unique and does not get muddy. It just gets better and the Fuzz is turned up.
DigiTech® Amp DriverThe Amp Driver distortion is designed to turn a regular distorted amp into a monster. The Amp Driver not only distorts the guitar’s signal but also boosts frequencies around 600Hz. By emphasizing the frequencies around 600Hz amps can be driven harder and take on more of a metal tone. A mean sound is not only how determined by how much gain you put in front of your amp, but how hard you drive the amp and with what frequencies the amp is driven with.
DigiTech Death Metal™Designed in 1992 to provide death metal musicians with a wall of sound, the Death Metal™ pedal does just that. Whether you play early ‘90s grindcore or modern death metal, the Death Metal’s tone controls that are placed at the correct frequencies give you a multitude of sonic options.
DigiTech Grunge®In late 1991 as Grunge hit the radio the pedal was designed as the DOD FX69 Grunge. The pedal was designed by a young engineer who played “punk” and was released as an experiment to see what this “new type” of music was all about. Now a decade later, the Grunge is still a top-seller. The Grunge produces tones from early famous Seattle sounds to borderline metal. Don’t forget your flannel….
DigiTech Redline Modified OverdriveNot your standard overdrive, the Redline takes overdrive to a place that never existed. The Redline’s circuit overdrives the guitar’s signal in a way that is not evenly clipped like the way a tube amp distorts. Add extra gain and a thicker low end and the Redline was born.
44
DOD 250 Overdrive/PreampThe DOD®250 is another classic overdrive. With no tone control to get in the way, the 250’s beauty is just it’s pure overdrive.
DOD Classic FuzzA part of the original DOD FX family, the Classic Fuzz gained a following for its clearer voicing as compared to many fuzz pedals.
DOD Gonkulator Ring ModulatorMeet the needs of many experimental guitarists, the Gonkulator was a silent hit only to become a high cost interned item. The Gonkulator is a compination of a Grunge pedal and a ring modulator that produces distortion and mixes in bell-like ringing. The first pedal with a “suck” knob.
Electro-Harmonix® Big Muff Pi®A requirement for any alternative player, the Big Muff Pi’s thick fuzz is unmistakable in grunge, new wave and many punk hits.
Fulltone® OCD OverdriveStraddling the border of overdrive and distortion, the OCD produces amazing harmonics and drives any amp into oblivion. The overdrive is thicker than most yet clear letting every string and note come through.
Guyatone® Overdrive OD-2The OD-2 is yet a different flavor of overdrive. The OD-2’s is transparent and does not get in the way when playing single notes or chords.
Ibanez® TS-9 Tube Screamer™One of the most famous pedals ever created, the TS-9 has not only stood the test of time but can be found on nearly every pedal board.
Ibanez TS-808 Tube Screamer™The predecessor to the famed TS-9 the TS-808 has spawned a whole boutique market around modifications to this classis design. If you want one of the standards in overdrive, this is it.
Modified Ibanez® TS-9Take a TS-9, add more gain and modify the low end to produce a thicker, bluesier overdrive.
MXR® Distortion +A classic pedal due to it’s simplicity. Just plug in an go. The Distortion + produces good honest distortion, perfect for driving a distorted amp.
Pro Co RAT™Want gain? Want more gain? The Rat was one of the first pedals to take the gain to another dimension. The filter control gives the Rat it’s unique tones and flexibility. It is rumored that early Bay area thrash bands used it in conjunction with a Marshall® JCM800 to achieve their heavy tones.
Roger Mayer Octavia™Designed in 1967, the Octavia was featured on “Purple Haze” and “Fire” by Jimi.
Voodoo® Lab Sparkle Drive®The Sparkle Drive mixes a 808 tone with boosted clean to form a perfect device to drive amps.
45
Amps’99 Carvin® Legacy VL-100Steve Vai’s signature amp that he has been using since 1999. Custom tweaked tone to Steve’s specifications featuring an EL-34 tube output stage. Very smooth for soloing.
‘57 Fender® Tweed Champ®The Tweed Champ is a straight ahead, growly amp with that is best suited for blues and garage music. The tone is nasely, distorts easy due to the low wattage but cuts through!
‘57 Fender Tweed Deluxe™One of the most sought after amps ever made, this is a tone you can’t get enough of. This baby shows off its glory when pushed to the limits.
‘59 Fender Tweed Bassman®This classic really roars with lots of bottom end. Great for blues riffs but equally great for driving rock and roll rhythm guitar parts.
‘62 Fender Brownface Bassman®From the era of the first tolex covered Fender® amps, this particular amp was used on the classic Hendrix song “Voodoo Child”.
‘65 Fender Blackface Twin Reverb® The benchmark for twin speaker combos. This great amp is one of the most recognizable clean tone on recordings for the last 40 years.‘65 Fender® Blackface Deluxe Reverb®The single speaker version of its bigger brother, this amp is equally at home for blues, country and rock players.
’59 Gibson® GA-40A very cool blues/rock amp in the ranks with the Deluxes but with a personality all its own.
‘69 Hiwatt® Custom 100 DR103This superb rock and roll amp was the staple of Pete Townshend’s tone in the early /70s. A monster that has loads of headroom, this is at its best when cranked up all the way and paired with the Fane 4x12 cab.
’69 Laney™ SupergroupThe Supergroup was used most notably by Tony Iommi and was key to the sound of early Black Sabbath records.
‘65 Marshall® JTM-45Perhaps the turning point for blues and rock and roll, this amp set the course for the future of Marshall® amps. It started the “crunch” revolution, turning up on classic songs from AC/DC and most notably the Bluesbreakers “Beano” album featuring Eric Clapton.
‘68 Marshall 100 Watt Super Lead (plexi)This is undoubtedly the amp that changed rock and roll. It is a benchmark for many of the greatest guitar sounds ever heard. From Hendrix to Van Halen, this amp is the real deal.
‘68 Marshall Jump PanelThis is the method to get the most saturation from the classic plexi. By jumping channel 1 into channel 2, you get a bit more push over the top.
‘77 Marshall Master VolumeThis amp was king of rock and roll in the 70’s and one of our favorites. This JMP 100W amp featured four 6550 output tube making it hot and punchy for rock and punk music alike.
46
‘83 Marshall JCM800The amp that defined many of the metal sounds of the 80’s is still one of the most highly respected Marshall® amps ever made.
‘93 Marshall JCM900Incorporating a diode clipping stage, this amp gives you more gain than you can shake a stick at.
‘01 Marshall JCM2000 (Solo Channel)The TSL100 is a superb tone with tons of sustain for grinding riffs or singing solos.
‘81 Mesa Boogie® Mark II CBased originally off hot rodded Fender® amps, this classic has some of the best rhythm and lead tones ever. This amp was the peak for Mesa Boogie during their custom built to order days.
’86 Mesa Boogie .22 CaliberA monster little combo with the classic Boogie Mark tone.
‘93 Mesa Boogie Mark IVIf high gain is your bag, this is up your alley. Still a hugely influential amp today as it was when introduced over a decade ago.
‘96 Mesa Boogie Dual RectifierThe new benchmark for metal guitar, this mid 90’s Rectifier series unleashed a new era of high gain amp mayhem.
‘01 Mesa Boogie Triple RectifierThe latest from the guys in Petaluma, this bigger brother of the dual rectifier packs and additional 50 Watts of power.
’95 Matchless™ ChieftainA beautifully full amp tone with plenty of character. The Chief is a really great amp to use for putting a slightly different color in your musical palette.
‘96 Matchless HC30The perfect Class A crunch tone with tight responsive low end. This is right at home with country, blues, and rock
’74 Orange™ OR 120This often overlooked amp from a great British amp company was used by greats like Jimmy and Frank Zappa. No wonder the great Orange is making a comeback.
’99 Peavey® 5150® IIDesigned in conjunction with Eddie Van Halen by Peavey®, this amp offers gain for days.
’88 Randall® HT-100A vintage solid state amp that ushered in a new metal generation. This was the amp Dimebag used in the earlier Pantera days.
’84 Roland® JC-120This solid state combo was synonymous with the sparkling clean sounds of the 80’s.
‘88 Soldano SLO-100Considered one of the first “boutique” amp companies, the SLO 100 is a pure gain head’s dream. Smooth distortion with incredible sustain, this amp is amazing.
47
’67 Sunn® 100SUsed by Pete Townshend in the late ‘60s US tour, these amps offered tons of headroom which certainly delivered the SPLs The Who loved.
‘62 Vox® AC15The first great Vox® amp. A single 12” version of its more famous 30 Watt big brother, this amp has much of the same character to offer.
‘63 Vox AC30 Top BoostThe quintessential amp that defined both Brian May’s and Edge’s sound. Just crank this amp up and get some of the most awesome growl you will ever hear from an amp.
DigiTech® Blackbass – ’65 Blackface preamp w/ Bassman powerampWhat happens when you combine the cleaner input stage of Blackface and connect it to the gritty poweramp of a Bassman? You get an experimental amp that works perfect for blues, rock-a-billy, country and rock. You’ll want to drive this hard.
DigiTech BluesA perfect combination of clarity and grit. The Blues amp cuts through but doesn’t get too muddy as the gain is turned up.
DigiTech Bright CleanA perfect clean combo amp structure, the amp is bright yet cleaner than most. Great for jazz, surf, country, clean rock and metal.
DigiTech Brownsound - Hot rodded 80’s stack toneThe Brownsound is a hot-rodded Marshall® tone of the early ‘80s made famous by a wild, finger-tapping guitarist.
DigiTech ChunkThicker than a Marshall®, the Chuck gives you lots of gain with plenty of low end that doesn’t get in your way.
DigiTech Clean TubeThe Clean Tube is a very clean tube combo tone with just the right amount of 2nd harmonics.
DigiTech® CrunchThe Crunch is just that, a tube head that crunches more than the rest. The crunch has extra gain and cuts through. Perfect for both rhythms and solos.
DigiTech Tweedface – Tweed preamp w/Blackface powerampImagine combining two of the greatest Fender® amps into a single beast. That’s what we have done with the Tweedface. Take the preamp of the classic Tweed Deluxe™ and combine it with the output stage of the Blackface Twin Reverb® and here is the monster you get.
DigiTech DarkmetalProducing a tight, focused tone, the Darkmetal has high gain, yet does not muddy up you guitars tone. Perfect if you play intricate metal.
DigiTech FuzzThe DigiTech Fuzz tone is based off of the fuzz tone of the late 60’s English bands with our own twist with fizz. Thus making the DigiTech Fuzz ideal for 90’s grunge to today’s mix of music.
DigiTech GSP2101TM Artist Clean TubeThe GSP2101 has become an iconic preamp processor for many players over the years. After years of requests from players, we have brought the sounds back from their glory days. The GSP2101 Clean Tube
48
captures the warmth and brightness while being able to drive it hard to produce a nice warm clean sound with grit.
DigiTech GSP2101 Artist Saturated TubeThe sound of the GSP2101 preamp being the most used sound from the GSP2101. Mild to over the top gain without getting a muddy sound. A perfect tone setting for all types of music.
DigiTech High GainFor the rock or hard rock player who requires a lot of distortion as a starting point. A very punchy tone for both rhythm and lead work reminiscent of a well polished production album.
DigiTech MetalA true metal tone for both classic or modern style metal with a chunky bottom end. This setting is able to achieve a variety of metal tones with the use of the EQ and gain controls.
DigiTech MonsterThe DigiTech Monster was created on an operating table in a European castle with one thing in mind, full-on dimed out molten metal gain. This is the perfect setting for death metal or the Norwegian Sound.
DigiTech MoshThis sound was created after the mid 80’s NYC and Bay Area tones. You will feel like you’re in the pit while taken a “thrashing.” Big metal sound with a bit of sizzle.
DigiTech SoloDialed in tone ideal for laying down solos for country, rock, jazz, blues and even metal. Add a bit of delay and reverb, and you have the perfect sound for any lick you can come up with.
DigiTech SpankA bright and punchy clean sound that can be driven for a bit of edge. At home with funk or any tone that needs some spanking.
DigiTech StonerrockThe Stonerrock amp produces tones made famous by So-Cal and dessert bands. The Stonerrock’s huge, flubby low end and warm high end make you want to use your bridge pickup, turn your guitar’s tone knob down and play Godzilla all night…….
DigiTech TransistorThe Transistor setting emulates a grainy narrow EQ band sound of a solid state transistor lo-fi amplifier. Great for use as an effect or to set the mood.
DirectNo amp model
Dreadnaught AcousticAwesome dreadnaught acoustic simulation with an articulate top end. Best suited for middle and neck pickups.
Jumbo AcousticA warmer acoustic model with more midrange.
49
Cabinets1x8 ‘57 Fender® Tweed Champ®A small speaker but a great way to cut through the mix.
1x12 ‘57 Fender Tweed Deluxe®A bluesman’s delight. Wonderful response with a classic tone when matched with its namesake amp model.
1x12 ‘65 Fender Blackface Deluxe Reverb®Solid tone can be combined with any amp for a great rhythm tone.
1x12 ‘62 Vox® AC15A great little cab perfect for rock and blues.
1x12 ‘59 Gibson® GA-40Similar to the Deluxe cabs with emphasized top end for more bite.
2x12 ‘57 Fender® Blonde Bassman®Warm dual speaker combo. Great for driving rhythm playing or clean chord comps.
2x12 ‘65 Fender Blackface Twin Reverb®The benchmark that many others have tried to imitate. The classic clean tone at it’s best.
2x12 ‘63 Vox AC30 Top Boost w/ Jensen® Blue BacksAmazing low end. These were our favorite speakers of the early Vox/Jensen era.
2x12 ‘84 Roland® JC-120Awesome for spankin’ clean tones with emphasized top end.
2x15 ’68 Sunn 200S w/JBL®-LansingsPowerful bottom end from a landmark speaker designer. Classic tones from the late ‘60s.
4x10 ‘59 Fender Tweed Bassman®Powerful, throaty, and just plain cool. This mixed with its matching amp get you tones as cool as they come.
4x12 Hiwatt® Custom w/ Fane SpeakersUnique warm tone was the perfect balance for the head it is originally paired with.
4x12 Marshall® 1969 Straight w/ Celestion® G12-T70Great power handling speakers give you the classic Marshall® bite and chunk. Takes a lot of power to break these up.
4x12 Marshall 1969 Slant w/ Celestion® 25W Green backsSuper speaker design provides a voice that is distinctive as it’s name. Great match for the Plexi.
4x12 ‘96 Johnson® Vintage w/ Celestion® Vintage 30’sClassic V30 sound with throaty midrange and great low end.
4x12 ‘96 VHT® Slant w/ Celestion® Vintage 30’sA rare matchup from the guys at VHT. Great bite that really cuts through.
4x12 ‘07 Mesa/Boogie Rectifier w/Celestion® Vintage 30’sThe ultimate 4x12 for the heaviest tone. Massive bottom end and punchy midrange.
2x12 DigiTech® BrightA particularly bright but full sounding combo cabinet. Great for clean.
50
4x12 DigiTech Alt RockThe DigiTech Alt Rock is a dirtier cabinet with more sizzle than a standard 4x12 cabinet. Use if you want to drive your tone over the edge.
4x12 DigiTech ChunkThe Chunk is a thicker cabinet that lends itself to hard rock and solos. This will help any amp cut through the mix.
4x12 DigiTech MetalThe Metal cabinet provides a deeper but tight low end response. Great with any amp that needs a little focus.
4x12 DigiTech RockTake a standard 4x12 and add just a little more 600Hz to cut through the mix, the Rock cabinet not only sounds good for rock but excels at hard rock and gives distorted combos new life.
4x12 DigiTech SoloOne issue with solos, the need to cut through and not squash the sound. The Solo cabinet is phrased to provide clear tone with maximum distortion.
4x12 DigiTech SpankNeed a jangley, funk high end? The Spank is perfect for funk.
4x12 DigiTech Speaker CompensationThe speaker compensation is from the GSP2101. The has become a standard in direct micing for music of all types.
4x12 DigiTech VintageA vintage speaker cabinet with that “broken in” warm tone.
4x12 Johnson® Straight w/ Celestion Vintage 30’sThis tone is great when used for rock, hard rock and metal. The low end compresses just the right amount due to the combination of the Celestion Vintage 30’s and cabinet volume.
DirectNo cabinet model
51
Section 6 - AppendixSpecificationsGeneral SpecificationsA/D/A Converter: 24-bit high performance audioSample rate: 44.1 kHz 24 bitDSP Section: AudioDNA2™ DSP ProcessorVoltage Rails: +/-15VElectronic SNR: ≥ 107dBUSB: 2.0 compliantAudio streaming: 2 channels to computer, 2 channels from computerSimultaneous Effects: 10Preset Memory: 100 User Presets (1-00) / 100 Factory Presets (F1-F00)Dimensions: 19.5˝ Length x 10.75˝ Width x 3.75˝ HeightUnit Weight: 11.5 lbs.
Analog Input ConnectionsGuitar InputImpedance: 1M OhmsMaximum Input signal: 8 dBuStompbox Loop InputImpedance: 475K OhmsMaximum Input signal: 8 dBuAmp Loop InputImpedance: 16K OhmsMaximum Input signal: 8 dBu
Analog Output ConnectionsLine OutputsImpedance: 1K Ohms unbalanced / 2K Ohms balancedMaximum Output level: 8 dBu XLR Mixer OutputsImpedance: 2k Ohms balancedMaximum Output level: 14 dBuStompbox Loop OutputImpedance: 600 Ohms unbalanced / 1.2K Ohms balancedMaximum Output signal: 8 dBuAmp Loop OutputImpedance: 600 Ohms unbalanced / 1.2K Ohms balancedMaximum Output signal: 8 dBuHeadphone OutputMinimum Headphone Impedance: 50 Ohms
External Control InputLooper Footswitch Input: For use with optional DigiTech FS3X
Power RequirementsPower Supply: *Important Note: There are two different models of this product. If purchasing a replacement power supply, ensure that you properly match the power requirements screening on the back panel of the product with the corresponding adapter model listed below.
Back Panel Screening = 9 VAC 1.3 A*
Country Voltage Adapter Model
Japan: 100 VAC, 50/60 Hz PS0913B-100*
US and Canada: 120 VAC, 60 Hz PS0913B-120*
Europe: 230 VAC, 50 Hz PS0913B-230*
UK: 240 VAC, 50 Hz PS0913B-240*
Australia: 240 VAC, 50 Hz PS0913B-240-AU*
Back Panel Screening = 9 VDC 1.3 A*
Country Voltage Adapter Model
US, Canada, Europe, Japan: 100-240 VDC, 50/60 Hz PS0913DC-01*
Australia & UK: 100-240 VDC, 50/60 Hz PS0913DC-02*
52
Windows® Software RequirementsWindows 7, 8.x, 10 (32/64-bit)Intel/AMD Dual Core4GB RAM USB PortUSB driver installedInternet connection for software download
Mac® Software RequirementsMac OS 10.8.5 or laterIntel Dual Core4GB RAM USB PortInternet connection for software download
Tone LibraryOVERDRIVEDISTORTIONHOT RATSUSTAINERFUZZOHOVEREASYDIRTY TUBESROCK 1ROCK 2BLUES 1BLUES 2METAL 1METAL 2COUNTRY 1
COUNTRY 2WARM DRIVECRUNCHTEXAS TONEROCKABILLYSOLO 1SOLO 2ROCK WAHCHUNKYSMOOTHHEAVYCLEAN 1CLEAN 2BRITISH 1
BRITISH 2AMERICAN 1AMERICAN 2TUBE DRIVESCOOPEDPUNCHYBRIGHT CLEANBIG PUNCHSUPER GAINGRINDERBAD BOYLEGACY LEAD
Effects LibraryCUSTOM/CHORUSPHASERFLANGERPITCHTREMOLOROTARYENVELOPE FILTERDIGITAL DELAYANALOG DELAYPONG DELAYMODULATED DELAYTAPE DELAYHALL REVERBPLATE REVERB
SPRING REVERBCHORUS-DELAYCHORUS-DLEAY-REVERBFLANGER-DELAYPHASER-DELAYPHASER-MOD DELAYPHASER-REVERBDIGITAL DELAY-REVERBDELAY-SPRING REVERBCHORUS-REVERBPONG DELAY-HALL REVERBTAPE DELAY-SPRING REVERBTREMOLO-TAPE DELAYPITCH-DELAY
MOD DELAY-PLATE REVERBROTARY-DELAYENVELOPE-REVERBVIBRO-DELAYROTARY-DELAY-SPRINGSLOW SWEEPVIBROPANVIBE-DELAYOCTAVE ROOMA MAJORTRIPLET DELAYSPACIOUS

53
DigiTech, X-Edit, Production Modeling, Grunge, Death Metal, Jimi Hendrix™ Artist Series Pedal, DOD, Gonkulator, DigiTech Whammy, Multi Chorus, Auto Ya, YaYa, Synth Talk, Lexicon, Johnson Amplification and AudioDNA are trademarks of Harman. Other product names modeled in this product are trademarks of their respective companies that do not endorse and are not associated or affiliated with DigiTech or Harman. ADA Flanger, Arbiter Fuzz Face, Boss CE-2 Chorus, Boss CS-2, Boss DM-2, Boss DS-1, Boss Metal Zone, Boss OC-2 Octaver, Boss OD-1, Boss SD-1, Celestion, Carvin Legacy, Demeter Fuzzulator, Dunlop Cry Baby, EH Big Muff ?, EH Electric Mistress, EH Small Clone, EH SmallStone, EMT 240 Plate, Fender Blackface Deluxe Reverb, Fender Blackface Twin Reverb, Fender Blonde Bassman, Fender Brownface Bassman, Fender Opto Tremolo, Fender Tweed Bassman, Fender Tweed Champ, Fender Tweed Deluxe, Fender Twin Reverb, Fulltone OCD Overdrive, Gibson GA-40, Guyatone Overdrive, Hiwatt, Ibanez Tube Screamer, Jensen Blue Backs, Laney Supergroup, Maestro EP-2, Marshall, Marshall JTM-45, Marshall JumpPanel, Marshall Master Volume, Marshall SuperLead, Matchless, Matchless Chieftain, Mesa/Boogie, .22 Caliber, Mark II, Mark IV, Dual Rectifier, Triple Rectifier, MXR, MXR Distortion +, MXR DynaComp, MXR Flanger, MXR Phase 100, Orange OR120, Peavey 5150, ProCo Rat, Randall HT-100, Roger Mayer Octavia, Roland JC-120, Soldano, Sunn 100S, TC Electronic Chorus, Unicord Uni-Vibe, VHT Amplification, Voodoo Labs Analog Chorus, Voodoo Labs Sparkle Drive, Vox, Vox Bias Tremolo, Vox Clyde McCoy Wah, and Vox Top Boost are trademarks or trade names of other manufacturers and were used merely to identify products whose sounds were reviewed in the creation of this product. All other trademarks are the property of their respective holders.
PHONE: (801) 566-8800
WEB: digitech.com
SUPPORT: digitech.com/en-US/support
RP1000 Owner's Manual 5059526-A
© 2016 HarmanAll rights reserved
DigiTech is a registered trademark of Harman


