96
Version: 13, DECEMBER/2018 Designed and manufactured in Australia by Ampcontrol Pty Ltd IPD INTEGRATED PROTECTION RELAY User Manual
Version: 13, DECEMBER/2018
Designed and manufactured in Australia by Ampcontrol Pty Ltd
IPD INTEGRATED PROTECTION RELAY
User Manual

Ampcontrol Pty Ltd – ABN 28 000 915 542
IPD USER MANUAL
IPDB014 Version 13 – DEC/2018
Uncontrolled Copy - Refer to Ampcontrol Website for Latest Version Page 2 of 96
AP
PR
OV
ED
FO
R E
XT
ER
NA
L D
IST
RIB
UT
ION
– P
RO
PE
RT
Y O
F A
MP
CO
NT
RO
L P
TY
LT
D
–
NO
T T
O B
E R
EP
RO
DU
CE
D IN
PA
RT
WARNING!
The warning symbol highlights a potential risk of injury or death.
Please share these warnings with other operators.
CAUTION!
The caution symbol highlights a potential risk of damage to equipment.
Please share these cautions with other operators.
NOTE
The note symbol highlights key information.
Please share these notes with other operators.
ENVIRO
The enviro (environmental) symbol highlights areas which may have an impact on the surrounding fauna and/or flora.

Ampcontrol Pty Ltd – ABN 28 000 915 542
IPD USER MANUAL
IPDB014 Version 13 – DEC/2018
Uncontrolled Copy - Refer to Ampcontrol Website for Latest Version Page 3 of 96
AP
PR
OV
ED
FO
R E
XT
ER
NA
L D
IST
RIB
UT
ION
– P
RO
PE
RT
Y O
F A
MP
CO
NT
RO
L P
TY
LT
D
–
NO
T T
O B
E R
EP
RO
DU
CE
D IN
PA
RT
Copyright Notice
The Ampcontrol relay described in this document is the property of AMPCONTROL PTY LTD. It is furnished under a license agreement and is to be used only in accordance with the terms of the agreement.
No part of the hardware or documentation may be reproduced, transmitted, transcribed, stored in a retrieval system, or translated into any language or computer language, in any form or by any means, without prior written permission of AMPCONTROL PTY LTD.
Disclaimer
While every effort has been made to assure the accuracy and clarity of this document, AMPCONTROL PTY LTD assumes no liability resulting from any omissions in this document, or from misuse of the information obtained herein. The information in this document has been carefully checked and is believed to be entirely reliable with all of the necessary information included. AMPCONTROL PTY LTD reserves the right to make changes to any products described herein to improve reliability, function, or design, and reserves the right to revise this document and make changes from time to time in content hereof with no obligation to notify any persons of revisions or changes. AMPCONTROL PTY LTD does not assume any liability arising out of the application or any use of any product or circuit described herein; neither does it convey license under its patent rights or the rights of others.
Before You Begin
Thank you for purchasing the Ampcontrol IPD Integrated Protection Relay.
WARNING!
In the interests of safety and correct equipment operation, please take the time to read and understand the content in this manual.
WARNING!
To minimise the possibility of unsafe operation of this equipment, the user must be competent, via appropriate training, in regards to international standards and safety requirements relating to its installation, operation and maintenance. Safety related Information
contained within this manual is supplementary to such standards, but must be equally understood and applied to both maximise safe use of this equipment and minimise risk to persons or other equipment.
Ampcontrol Contact Details
7 Billbrooke Close, Cameron Park, NSW, 2285
P +61 1300 267 373 | F +61 2 4903 4888
EMAIL: [email protected]
WEB: ampcontrolgroup.com

Ampcontrol Pty Ltd – ABN 28 000 915 542
IPD USER MANUAL
IPDB014 Version 13 – DEC/2018
Uncontrolled Copy - Refer to Ampcontrol Website for Latest Version Page 4 of 96
AP
PR
OV
ED
FO
R E
XT
ER
NA
L D
IST
RIB
UT
ION
– P
RO
PE
RT
Y O
F A
MP
CO
NT
RO
L P
TY
LT
D
–
NO
T T
O B
E R
EP
RO
DU
CE
D IN
PA
RT
TABLE OF CONTENTS
1 VERSION HISTORY ......................................................................................... 7
1.1 IPD Hardware Version History ................................................................... 7
1.2 IPD Software Version History ..................................................................... 7
1.3 RTU-D Version History .............................................................................. 7
2 SAFETY AND OTHER WARNINGS .................................................................. 8
2.1 Safe Use of Equipment .............................................................................. 8
2.2 Operational Restrictions and Limits ............................................................ 9
3 RECEIVING AND STORAGE .......................................................................... 11
3.1 Receiving ................................................................................................. 11
3.2 Inspection ................................................................................................ 11
3.3 Storage after Delivery .............................................................................. 11
3.4 Unpacking of Equipment .......................................................................... 11
4 PRODUCT OVERVIEW .................................................................................. 12
4.1 IPD Integrated Protection Relay ............................................................... 12
4.2 Accessories ............................................................................................. 15
5 INSTALLATION ............................................................................................... 19
5.1 General Warnings .................................................................................... 19
5.2 Mandatory Installation Practices .............................................................. 20
5.3 Mechanical Installation Information .......................................................... 20
5.4 Electrical Installation Information ............................................................. 27
6 COMMISSIONING AND CALIBRATION ......................................................... 31
6.1 Fan Interlock ............................................................................................ 31
6.2 Earth Leakage ......................................................................................... 31
6.3 Earth Fault Lockout .................................................................................. 31
6.4 Earth Continuity ....................................................................................... 31
6.5 Insulation test .......................................................................................... 31
6.6 Over Current / Motor Overload Current Injection ...................................... 31
6.7 Short Circuit Current Injection .................................................................. 32
6.8 Current Detection in CTs ......................................................................... 32
6.9 Main Contactor Fail .................................................................................. 32
6.10 Voltage Measurement ............................................................................ 32
6.11 RDM ...................................................................................................... 32
6.12 PLC Interface ......................................................................................... 32
6.13 RTU ....................................................................................................... 32
6.14 Start, MCI and Stop Inputs ..................................................................... 32
7 REMOTE DISPLAY MODULE (RDM-D) .......................................................... 33

Ampcontrol Pty Ltd – ABN 28 000 915 542
IPD USER MANUAL
IPDB014 Version 13 – DEC/2018
Uncontrolled Copy - Refer to Ampcontrol Website for Latest Version Page 5 of 96
AP
PR
OV
ED
FO
R E
XT
ER
NA
L D
IST
RIB
UT
ION
– P
RO
PE
RT
Y O
F A
MP
CO
NT
RO
L P
TY
LT
D
–
NO
T T
O B
E R
EP
RO
DU
CE
D IN
PA
RT
7.1 Trip / Status Messages ............................................................................ 34
7.2 Last Trip Status Messages ...................................................................... 35
8 MACHINE COMMUNICATION ........................................................................ 36
8.1 Remote Termination Unit (RTU-D) ........................................................... 36
8.2 Machine Type Codes ............................................................................... 37
8.3 Machine Type Number ............................................................................. 37
9 EARTH PROTECTION FUNCTIONS .............................................................. 38
9.1 Earth Leakage Protection ........................................................................ 38
9.2 Earth Fault Lockout Protection ................................................................. 39
9.3 Earth Continuity Protection ...................................................................... 44
10 CURRENT RELATED FUNCTIONS .............................................................. 45
10.1 General Information ............................................................................... 45
10.2 Time Dependent Current Protection ....................................................... 47
10.3 Short Circuit Protection .......................................................................... 49
10.4 Phase Current Balance .......................................................................... 50
10.5 Transient Overreach Compensation ...................................................... 50
11 VOLTAGE RELATED FUNCTIONS .............................................................. 52
11.1 Main Contactor Fail Protection ............................................................... 53
11.2 Under-Voltage Trip................................................................................. 53
11.3 Voltage Metering .................................................................................... 53
12 FAN CONTROL ............................................................................................. 54
12.1 Fan Interlocking ..................................................................................... 54
12.2 Interlocking Sequence ........................................................................... 55
13 USER ADJUSTABLE SETTINGS .................................................................. 56
13.1 Parameter Groups ................................................................................. 56
13.2 Changing Parameter Settings ................................................................ 58
13.3 Changing the Time & Date Settings ....................................................... 59
14 SYSTEM CONTROL ..................................................................................... 60
14.1 Inputs and Outputs ................................................................................ 60
14.2 Outlet Control ......................................................................................... 61
14.3 Operational Sequence ........................................................................... 62
15 EVENT LOG .................................................................................................. 63
16 REMOTE DATA COMMUNICATIONS .......................................................... 65
17 SERVICE, MAINTENANCE & DISPOSAL ..................................................... 66
17.1 Equipment Service ................................................................................. 66
17.2 Equipment Maintenance ........................................................................ 66
17.3 Disposal ................................................................................................. 67

Ampcontrol Pty Ltd – ABN 28 000 915 542
IPD USER MANUAL
IPDB014 Version 13 – DEC/2018
Uncontrolled Copy - Refer to Ampcontrol Website for Latest Version Page 6 of 96
AP
PR
OV
ED
FO
R E
XT
ER
NA
L D
IST
RIB
UT
ION
– P
RO
PE
RT
Y O
F A
MP
CO
NT
RO
L P
TY
LT
D
–
NO
T T
O B
E R
EP
RO
DU
CE
D IN
PA
RT
18 SPECIFICATIONS ........................................................................................ 68
19 EQUIPMENT LIST ........................................................................................ 70
20 TROUBLESHOOTING .................................................................................. 72
APPENDIX A: DRAWINGS ................................................................................ 74
APPENDIX B: ADDITIONAL INFORMATION ON CURRENT PROTECTION .... 94
TABLE OF FIGURES Figure 4.1: IPD Integrated Protection Relay ....................................................... 12 Figure 4.2: IPD System Block Diagram .............................................................. 13 Figure 5.1: IPD Mounting Orientation ................................................................. 20 Figure 5.2: IPD Relay and Base Dimensional Details ......................................... 21 Figure 5.3: Optional RDM Installation Arrangement ............................................ 22 Figure 5.4: RDM-D Dimensional Details ............................................................. 22 Figure 5.5: 3.3kV CCMD Dimensional Details .................................................... 23 Figure 5.6: 1kV and 415V CCMD Dimensional Details ....................................... 24 Figure 5.7: Earth Leakage Transformer Dimensional Details .............................. 25 Figure 5.8: Current Transformer 45mm I.D. (Part: 101272)
Dimensional Details ......................................................................... 26 Figure 5.9: Current Transformer 88mm I.D. (Part: 101703)
Dimensional Details ......................................................................... 26 Figure 9.1: Earth Leakage Protection Circuit Terminations ................................. 38 Figure 9.2: Earth Fault Lockout Protection Circuit
Terminations .................................................................................... 39 Figure 10.1: Current Transformer Circuit Terminations ....................................... 45 Figure 10.2: Transient Overreach During Contactor Closure
(Source: IEC 60255-151) ................................................................. 50 Figure 10.3: Transient Overreach Protection Timing Diagram ............................ 51 Figure 11.1: Voltage Monitoring Circuit Terminations ......................................... 52 Figure 13.1: Memory “Switching” for Group 2 Parameters .................................. 56 Figure 16.1: PLC Communications Block Diagram ............................................. 65
TABLE OF TABLES Table 1: Cable Recommendations: Intrinsically Safe Circuits.................................. 28 Table 2: Cable Recommendations: Low Voltage Signal Circuits ............................. 29 Table 3: RDM-D Trip / Status Messages ................................................................. 34 Table 4: RDM-D Last Trip Status Messages ........................................................... 35 Table 5: RTU-D Machine Type Codes .................................................................... 37 Table 6: Insulation Test Trip Threshold and Alarm Level
Comparison ............................................................................................ 41 Table 7: Insulation Test Accuracy with Respect to Trip Setting ............................... 42 Table 8: Group 1 Settings ....................................................................................... 57 Table 9: Group 2 Settings ....................................................................................... 57 Table 10: Event Log Identifiers and Descriptions .................................................... 64 Table 11: Appendix A Drawing Register ................................................................. 74

Ampcontrol Pty Ltd – ABN 28 000 915 542
IPD USER MANUAL
IPDB014 Version 13 – DEC/2018
Uncontrolled Copy - Refer to Ampcontrol Website for Latest Version Page 7 of 96
AP
PR
OV
ED
FO
R E
XT
ER
NA
L D
IST
RIB
UT
ION
– P
RO
PE
RT
Y O
F A
MP
CO
NT
RO
L P
TY
LT
D
–
NO
T T
O B
E R
EP
RO
DU
CE
D IN
PA
RT
1 VERSION HISTORY
1.1 IPD Hardware Version History
Version Release Date Changes
V01 - Original Release
1.2 IPD Software Version History
Version Release Date Changes
V01 - Original Release
V02 17 MAR 2009
Change to Fan Interlocking Operation:
A delay was added in both master and slave mode to delay the amount of time it takes for a fan interlock stop to occur
FRS was added as an option for the RL3 control. FRS includes the added delay; FIR doesn't.
In master mode, a log message is now created when asserting or de-asserting the FID signal.
V03 18 JAN 2013 Added the transient inrush function for short circuit.
V04 15 DEC 2014
Isolated release only, not generally released.
Extended the maximum delay for the transient inrush function to 320ms.
V05 10 MAR 2015
Removed the extended delay for the transient inrush function that was implemented in Version V04.
Extended the trip time for CT detect trips to 4 seconds.
Changed the AC detection method to make the CT detect less prone to false trips in the presence of low frequency signals.
Added the transient inrush parameter value to the IPSI comms table.
1.3 RTU-D Version History
Version Release Date Changes
6 - First release of RTUs that were for use with the IPD. Earlier RTU versions (5 and below) are not certified for use with the IPD.
7 01 MAR 2013 Field trial firmware for the first of the “Blue” RTU-D3 hardware. Improved noise tolerance on the pilot line.
8 21 JUL 2015 Product release firmware for the first of the “Blue” RTU-D3 hardware. Improved noise tolerance on the pilot line.
9 16 FEB 2016 Changes to the digital input and PTC sampling and cross checks to improve robustness.

Ampcontrol Pty Ltd – ABN 28 000 915 542
IPD USER MANUAL
IPDB014 Version 13 – DEC/2018
Uncontrolled Copy - Refer to Ampcontrol Website for Latest Version Page 8 of 96
AP
PR
OV
ED
FO
R E
XT
ER
NA
L D
IST
RIB
UT
ION
– P
RO
PE
RT
Y O
F A
MP
CO
NT
RO
L P
TY
LT
D
–
NO
T T
O B
E R
EP
RO
DU
CE
D IN
PA
RT
2 SAFETY AND OTHER WARNINGS
For safety reasons, the IPD must be installed, operated and serviced only by competent personnel. Please read and understand this instruction manual completely before installing, operating or servicing this equipment. Failure to install or operate this instrument in accordance with the instructions contained in this manual may create hazardous operating conditions.
2.1 Safe Use of Equipment The equipment supplied has been designed and manufactured to ensure safe operation. The equipment must only be used within the design parameters.
The instructions within this manual must be observed as an aid towards achieving the safest possible installation.
Persons responsible for installation, maintenance, or operation, must observe the following instructions:
2.1.1 Intended Use of Equipment
The IPD is intended to be used as a part of the electrical protection system operating on outlets supplying underground mining machinery. Multiple protection functions, as listed in this document, are combined into a compact, plug-in unit, which can be easily changed out to minimise down time in the event of a problem with the relay.
The IPD is not intended to be the sole method of providing electrical protection for machinery and personnel. Other measures, such as e-stops, interlocks and earth-fault-current limiting resistors are to be employed to ensure the highest level of operational safety. It is recommended that safety analysis techniques such as risk assessment or FMEA be conducted on installations employing the IPD to maximise the safe operation of the installation.
2.1.2 Changes to Equipment
Changes in the design and modifications to the equipment are not permitted. Unauthorised changes made to the hardware or operating firmware will void the manufacturer's warranty, and may compromise the integrity of the system into which it is installed and other connected equipment.
2.1.3 Equipment Knowledge
Experience with, or understanding of, this equipment is essential for the safe installation and removal of the equipment. Therefore, please read and understand this manual prior to use. Competency based training courses are recommended and are available on request.
2.1.4 Manual Handling
Precautions have been taken to ensure all equipment is safe to handle and free from sharp edges. However care should always be taken when handling enclosures and gloves should be worn.
2.1.5 Installation
Correct operation and safety depend on the IPD and associated equipment being installed correctly. Mechanical and or electrical installation and maintenance of plant and equipment must only be carried out by appropriately qualified personnel and must be tested thoroughly prior to operation.
2.1.6 Operation
As safety depends on the IPD functioning correctly it is highly recommended that all safety functions of the IPD be periodically tested to ensure correct operation.

Ampcontrol Pty Ltd – ABN 28 000 915 542
IPD USER MANUAL
IPDB014 Version 13 – DEC/2018
Uncontrolled Copy - Refer to Ampcontrol Website for Latest Version Page 9 of 96
AP
PR
OV
ED
FO
R E
XT
ER
NA
L D
IST
RIB
UT
ION
– P
RO
PE
RT
Y O
F A
MP
CO
NT
RO
L P
TY
LT
D
–
NO
T T
O B
E R
EP
RO
DU
CE
D IN
PA
RT
2.2 Operational Restrictions and Limits The operational restrictions listed below must be understood before considering using the IPD within systems designed to ensure the safety of personnel.
2.2.1 Installation
CAUTION!
The selection, installation, commissioning and use of this protective device should only be undertaken following the application of a detailed
risk assessment that is consistent with the methodology outlined in AS/NZS ISO 31000 risk management. Additionally, identified risk
control measures identified within the risk assessment additional to safety controls and/or directions contained within the products operating manual must be validated as effective before use of the product in any
capacity.
CAUTION!
The IPD integrated protection relay is NOT designed to be used as the sole means of ensuring safety to personnel or equipment.
CAUTION!
The IPD integrated protection relay is NOT water resistant and must be mounted within a suitably IP rated enclosure for use where the
overall system is to be rated water resistant
2.2.2 Certification
WARNING!
To comply with the Conditions of Certification, ensure full serviceable life of the product, and avoid nullifying the warranty, it is essential to
exercise great care with the installation, use and storage of the System components. Failure to comply with the Conditions of Certification may
seriously compromise the integrity of the system and/or its components, and the consequence could be fatal. The user must
ensure that the “Conditions of Safe Use” outlined in the certificate are met or the certificate (and the IS rating) will not be valid.
WARNING!
The IPD integrated protection relay is NOT certified for use in Group II hazardous area applications
WARNING!
The IPD integrated protection relay must NOT be modified in any way. A controller that differs in any way from its ‘as-certified’ condition
must not be used.

Ampcontrol Pty Ltd – ABN 28 000 915 542
IPD USER MANUAL
IPDB014 Version 13 – DEC/2018
Uncontrolled Copy - Refer to Ampcontrol Website for Latest Version Page 10 of 96
AP
PR
OV
ED
FO
R E
XT
ER
NA
L D
IST
RIB
UT
ION
– P
RO
PE
RT
Y O
F A
MP
CO
NT
RO
L P
TY
LT
D
–
NO
T T
O B
E R
EP
RO
DU
CE
D IN
PA
RT
2.2.3 Maintenance
CAUTION!
The IPD integrated protection relay is NOT on-site repairable and contains no user serviceable parts.
CAUTION!
An IPD integrated protection relay showing any visible signs of damage must not be used.
CAUTION!
All ancillary equipment used with the IPD integrated protection relay should be as specified in the IPD Equipment List to ensure safe
operation of the relay.
CAUTION!
Cleaning the controller may create an electrostatic hazard. Anti-static cleaning media must be used.

Ampcontrol Pty Ltd – ABN 28 000 915 542
IPD USER MANUAL
IPDB014 Version 13 – DEC/2018
Uncontrolled Copy - Refer to Ampcontrol Website for Latest Version Page 11 of 96
AP
PR
OV
ED
FO
R E
XT
ER
NA
L D
IST
RIB
UT
ION
– P
RO
PE
RT
Y O
F A
MP
CO
NT
RO
L P
TY
LT
D
–
NO
T T
O B
E R
EP
RO
DU
CE
D IN
PA
RT
3 RECEIVING AND STORAGE
3.1 Receiving
All possible precautions are taken to protect the equipment against damage or losses during shipment, however before accepting delivery, check all items against the packing list or bill of loading. If there is evidence of physical damage, notify Ampcontrol immediately.
Notify Ampcontrol immediately in case of any discrepancies to the packing list. Keep a record of any claims and correspondence. Photographs are recommended.
Where practicable do not remove protective covers prior to installation unless there are indications of damage. Boxes opened for inspection and inventory should be carefully repacked to ensure protection of the contents or else the parts should be packaged and stored in a safe place. Examine all packing boxes, wrappings and covers for items attached to them, retain and store any approval documentation for your safety file as applicable prior to wrapping being discarded.
3.2 Inspection
Equipment that is found to be damaged or has been modified away from its published specification must not be used. Please contact Ampcontrol if the equipment is suspected to be different than that ordered or if it does not match the published specifications.
3.3 Storage after Delivery
When the equipment is not to be installed immediately, proper storage is important to ensure protection of equipment and validity of warranty.
All equipment should be stored indoors between 0-40˚C, preferably on shelves and protected from moisture and sunlight.
3.4 Unpacking of Equipment
The method of packing used will depend on the size and quantity of the equipment. The following cautions should be interpreted as appropriate.
CAUTION!
Take care when unpacking crates as the contents may have shifted during transport.
ENVIRO
The disposal of packaging materials, replaced parts, or components must comply with environmental restrictions without polluting the soil,
air or water.
Ensure that any timber and cardboard used as packaging is disposed of in a safe and environmentally responsible manner.
Where possible, dispose of all waste products i.e. oils, metals, plastic and rubber products by using an approved recycling service centre.

Ampcontrol Pty Ltd – ABN 28 000 915 542
IPD USER MANUAL
IPDB014 Version 13 – DEC/2018
Uncontrolled Copy - Refer to Ampcontrol Website for Latest Version Page 12 of 96
AP
PR
OV
ED
FO
R E
XT
ER
NA
L D
IST
RIB
UT
ION
– P
RO
PE
RT
Y O
F A
MP
CO
NT
RO
L P
TY
LT
D
–
NO
T T
O B
E R
EP
RO
DU
CE
D IN
PA
RT
4 PRODUCT OVERVIEW
4.1 IPD Integrated Protection Relay
The Ampcontrol IPD Integrated Protection Relay is an intelligent protection relay based on microprocessor technology.
The integrated relay provides the necessary functions required for protecting electrical outlets supplying underground mining machinery. All of the protection functions are combined into a compact, plug-in unit, which can be easily changed out to minimise down time in the event of a problem with the relay.
IPD features include:
Earth leakage protection
Earth fault lockout protection
Earth continuity protection
Over-current /overload protection
Short circuit protection
Frozen/failed contactor protection
Machine recognition
Fan Interlocking
Remote Display Module (RDM)
Figure 4.1: IPD Integrated Protection Relay
The IPD relay mounts into the IPD Base Plate. All connections are made to the IPD Base Plate, allowing the relay to be changed out easily if required.
The IPD relay has 5 Digital inputs, which feed into a microprocessor unit. The microprocessor has been

Ampcontrol Pty Ltd – ABN 28 000 915 542
IPD USER MANUAL
IPDB014 Version 13 – DEC/2018
Uncontrolled Copy - Refer to Ampcontrol Website for Latest Version Page 13 of 96
AP
PR
OV
ED
FO
R E
XT
ER
NA
L D
IST
RIB
UT
ION
– P
RO
PE
RT
Y O
F A
MP
CO
NT
RO
L P
TY
LT
D
–
NO
T T
O B
E R
EP
RO
DU
CE
D IN
PA
RT
programmed to control four output relays. Relay MCR for the main contactor and Relay CBR for the circuit breaker. Relay RL3 can be turned off or configured to follow the Fan Interlock Drive output of the IPD Relay. Relay RL4, when closed, applies 110V to the CCMD Cable Connecting Module for the Insulation Test. All of the tripping logic and outlet control is performed by the microprocessor, so that virtually no external control is required (See Typical Connection Diagram IPDE001, in Appendix A – Drawings).
The IPD Relay can provide machine communication through the use of a Remote Termination Unit (RTU-D) connected between the pilot and earth at the machine end of the trailing cable. The IPD’s protection parameters are automatically uploaded from the remote machine’s RTU-D when the cable is inserted into a power outlet. For detailed information on the operation of the machine communication function, refer to Section 8.
Extensive information display and monitoring features are included to facilitate fault finding and system trending. This information can be read locally on the Remote Display Module (RDM-D) or remotely via a communication link.
Opto Isolated Outputs are available for connection to optional LED or Relay Modules to provide additional “run and trip” indications. The Ampcontrol Relay Output Module (ROU) enables these indications to be interfaced with a PLC. Direct connections to the Opto Isolated Outputs can also be made for remote monitoring with no additional interfacing required. The maximum voltage for these outputs is 30V with an internal impedance of 4.7kΩ.
Protection trips are stored in a non-volatile memory requiring a reset function before power can be restored to the load. This remains the case even if a power down occurs following a trip condition.
Figure 4.2: IPD System Block Diagram
M
RDM-D
RTU-D(Optional)
IPSI-D(Optional)
DNET-IP2 Protocol Converter(Optional)
IPDRelay
IKD Interface
(Optional)
IKDKeypad
(Optional)
Phase CT
Phase CT
EL Toroid
CCMD
External Communications Device (e.g. PLC)
Pilot
Diode(Alternative)
To Outlet Contactor
Control Interface
Display Module
Pilot Termination
CBR Output Relay
MCR Output Relay
IPDBasePlate

Ampcontrol Pty Ltd – ABN 28 000 915 542
IPD USER MANUAL
IPDB014 Version 13 – DEC/2018
Uncontrolled Copy - Refer to Ampcontrol Website for Latest Version Page 14 of 96
AP
PR
OV
ED
FO
R E
XT
ER
NA
L D
IST
RIB
UT
ION
– P
RO
PE
RT
Y O
F A
MP
CO
NT
RO
L P
TY
LT
D
–
NO
T T
O B
E R
EP
RO
DU
CE
D IN
PA
RT
An introduction to the main protection functions is given in the following subsections. For detailed information, please refer to the dedicated sections within this document.
4.1.1 Earth Leakage Protection
The IPD monitors the outlet’s earth leakage current through the use of an approved core balance toroid. This protection function is tested to AS/NZS 2081.3 (2002).
A definite time operating characteristic is provided with independently adjustable trip sensitivity and time delay.
When a trip is initiated, the IPD will open its MCR output relay, opening the outlet’s contactor.
For detailed information on the operation of the Earth Leakage protection function, refer to Section 9.1.
4.1.2 Earth Fault Lockout Protection
The earth fault lockout function tests the resistance of the 3 phase lines to earth by applying an intrinsically safe signal prior to the closure of the main contactor in accordance with AS/NZS 2081.4 (2002). The test is initiated once all starting conditions are met.
If the resistance is above the preset level then an automatic high voltage DC “Insulation Test” to earth of the cable can be carried out. If the result of the Insulation Test is above the preset resistance level, the IPD’s MCR relay energises, which in turn closes the main contactor.
A manual “Insulation Test” is also provided as a maintenance/fault finding tool. (When this test is performed the MCR relay does not close at completion of a healthy test).
The Insulation Test allows cable insulation levels to be trended as an aid to preventative maintenance.
For detailed information on the operation of the Earth Fault Lockout protection function, refer to Section 9.2.
4.1.3 Earth Continuity Protection
The earth continuity function tests for the continuity of the earthing between the outlet and the machine, via the pilot core in the trailing cable. This is in accordance with AS/NZS 2081.2 (2002). The pilot core is also used to transfer data when a Remote Termination Unit is used to achieve machine communication.
For detailed information on the operation of the Earth Continuity protection function, refer to Section 9.3.
4.1.4 Over-Current/Overload Protection
The IPD relay monitors the outlet phase currents via two current transformers. The measured current allows the IPD to implement over-current, thermal motor overload and phase imbalance protection.
When a trip is initiated, the IPD will open its MCR output relay, opening the outlet’s contactor.
For detailed information on the operation of the Over-Current and Overload protection functions, refer to Section 10.2.
4.1.5 Short Circuit Protection
In addition to the overload protection functions, the IPD relay uses the currents measured from the two phase CTs to provide short circuit protection.
The IPD can be set to open either its MCR output or CBR output when a short circuit trip is initiated. In typical installations the CBR output is used to trip a circuit breaker upstream from the outlet’s contactor.
For detailed information on the operation of the Short Circuit protection function, refer to Section 10.3.

Ampcontrol Pty Ltd – ABN 28 000 915 542
IPD USER MANUAL
IPDB014 Version 13 – DEC/2018
Uncontrolled Copy - Refer to Ampcontrol Website for Latest Version Page 15 of 96
AP
PR
OV
ED
FO
R E
XT
ER
NA
L D
IST
RIB
UT
ION
– P
RO
PE
RT
Y O
F A
MP
CO
NT
RO
L P
TY
LT
D
–
NO
T T
O B
E R
EP
RO
DU
CE
D IN
PA
RT
4.1.6 Frozen/Failed Contactor Protection
The IPD relay provides failed contactor protection, initiating a back-trip to an upstream circuit breaker if the contactor is deemed to have failed to open when required.
The position of outlet’s contactor is monitored via the MCI input. The state of the contactor is then compared to the state of the IPD’s output relay. If the contactor is closed whilst the MCR is in the open position, a failed contactor trip will be initiated.
The IPD also monitors the voltage on the load side of the outlet’s contactor, via the Cable Connection Module, whilst the contactor is in the open position. If this voltage exceeds 10% of the rated line voltage, a failed contactor trip will be initiated.
When a trip is initiated, the IPD will open its CBR output relay, opening the upstream circuit breaker.
For detailed information on the operation of the Frozen/Failed Contactor protection function, refer to Section 11.1.
4.2 Accessories The IPD relay requires a number of accessories to perform its protection functions. These accessories will be introduced in the following subsections.
Some accessories are marked as optional and are not required for the IPD to perform its basic protection functions. Purchasing these optional items will, however, expand the capabilities of the installation.
4.2.1 IPD Base Plate
The IPD Base Plate provides a mounting point for the IPD relay. The base plate is a panel mounted unit and allows the user to terminate all of the IPD’s control cabling.
The IPD relay plugs into the IPD Base Plate and is secured there using two mounting screws that are accessible through the relay’s fascia.
In the event of a fault occurring within the IPD relay, this design allows the relay to be removed and replaced with minimal down time.
4.2.2 Cable Connection Modules Type D (CCMD)
The IPD is connected to the outlet’s phase conductors via a high impedance Cable Connection Module (CCMD). This allows the IPD to perform an intrinsically safe earth fault lockout test prior to the closing of the outlet’s contactor.
In addition to the intrinsically safe earth fault lockout test, the CCMD also provides an optional high voltage insulation test function for the outlet’s power cable.
The IPD also uses the CCMD to monitor the magnitude of the phase voltages. This is used during the frozen contactor testing to ensure that when the outlet’s contactor opens, voltage is removed from the outlet.

Ampcontrol Pty Ltd – ABN 28 000 915 542
IPD USER MANUAL
IPDB014 Version 13 – DEC/2018
Uncontrolled Copy - Refer to Ampcontrol Website for Latest Version Page 16 of 96
AP
PR
OV
ED
FO
R E
XT
ER
NA
L D
IST
RIB
UT
ION
– P
RO
PE
RT
Y O
F A
MP
CO
NT
RO
L P
TY
LT
D
–
NO
T T
O B
E R
EP
RO
DU
CE
D IN
PA
RT
4.2.3 Phase Current Transformers (CTs)
The IPD relay measures the phase currents from two of the outlet’s three phases. Using these measured current values, the IPD is able to implement its overload and short circuit protections functions.
The IPD requires two (2) current transformers to measure the phase currents.
The phase current transformers are available in two standard sizes: 45mm inner diameter and 88mm inner diameter.
The current transformers are panel mounted units.
4.2.4 Earth Leakage Toroid
The IPD requires a summation toroid to be installed around the outlet’s three phase conductors. This toroid allows the IPD to measure the magnitude of outlet’s earth leakage current.
Only one (1) earth leakage toroid is required per IPD.
Earth leakage toroids are available in two standard sizes: 60mm inner diameter and 88mm inner diameter.
4.2.5 Remote Display Module Type D (RDM-D)
The IPD requires a Remote Display Module (RDM-D) to configure the IPD’s parameters. This unit also allows the user to check the status of the outlet, including trip type and status, as well as the position of the run output relay (MCR).
This unit is certified for use in hazardous areas, allowing the IPD’s protection settings to be modified external to the enclosure.
The RDM-D is panel mounted via the mounting screws located on the unit’s fascia.

Ampcontrol Pty Ltd – ABN 28 000 915 542
IPD USER MANUAL
IPDB014 Version 13 – DEC/2018
Uncontrolled Copy - Refer to Ampcontrol Website for Latest Version Page 17 of 96
AP
PR
OV
ED
FO
R E
XT
ER
NA
L D
IST
RIB
UT
ION
– P
RO
PE
RT
Y O
F A
MP
CO
NT
RO
L P
TY
LT
D
–
NO
T T
O B
E R
EP
RO
DU
CE
D IN
PA
RT
4.2.6 Remote Termination Unit Type D (RTU-D) (Optional)
The RTU-D is an optional component in the IPD system. It is used to terminate the pilot cable in the motor enclosure instead of a diode.
When used, the RTU-D stores the IPD’s Group 2 protection settings for that particular motor. This means that the cable supplying the motor can be moved to another outlet without the need to re-configure all of the IPD’s protection settings.
The RTU-D also offers a start input, a stop input, a PTC trip input and four (4) RTD temperature inputs.
4.2.7 IKD Keypad Pushbutton System (IKD) (Optional)
The IKD Keypad Pushbutton system consists of an IKD Interface and an IKD Keypad. The IKD Interface is mounted inside the enclosure with the IPD, whilst the IKD Keypad is mounted external to the enclosure.
The IKD Interface receives the intrinsically safe control signals from the IKD Keypad and communicates these signals to the IPD through opto-ioslated outputs.
The IKD Interface is panel mounted and requires an 110VAC supply.
The IKD Keypad is mounted externally to the enclosure, allowing the user to control the IPD.
Functions provided by the IKD Keypad include starting and stopping the outlet, resetting faults and testing some of the IPD’s protection functions.
The IKD Keypad is panel mounted and is certified for use in hazardous areas.
For more information on the IKD Keypad Pushbutton System, refer to the separate user manual for this product: IKDB003 IKD Keypad Pushbutton System User Manual.

Ampcontrol Pty Ltd – ABN 28 000 915 542
IPD USER MANUAL
IPDB014 Version 13 – DEC/2018
Uncontrolled Copy - Refer to Ampcontrol Website for Latest Version Page 18 of 96
AP
PR
OV
ED
FO
R E
XT
ER
NA
L D
IST
RIB
UT
ION
– P
RO
PE
RT
Y O
F A
MP
CO
NT
RO
L P
TY
LT
D
–
NO
T T
O B
E R
EP
RO
DU
CE
D IN
PA
RT
4.2.8 Integrated Protection Serial Interface Type D (IPSI-D) (Optional)
The ISPI-D is an optional unit that converts the IPD’s communication protocol into the Ampcontrol IP2 Protocol. A DNET-IP2 Protocol Converter can then be used to convert the Ampcontrol IP2 Protocol into RS232, RS422 or RS485.
This communications system allows external devices, such as PLCs, to communicate with the IPD relay.
For more information on the DNET-IP2 Communication System, refer to the separate user manual for this product: DNET-IP2 Serial Communication System User Manual.
4.2.9 Earth Fault Test Module (EFTM) (Optional)
The Ampcontrol EFTM can be used to test the operation of the IPD’s earth fault lockout (EFLO) protection. This connection is made between the CCMD and the IPD, via a three (3) pole relay. The EFTM is connected between this relay and earth.
To test the operation of the EFLO protection, the relay is held closed during an attempted start of the outlet. The IPD will sense the resistance to ground and will trip on EFLO, preventing the outlet from starting.
4.2.10 CCM Load Module (Optional)
The CCM Load Module is an optional unit that should only be installed if the user is experiencing spurious Main Contactor Fail (MCF) trips due to induced and electrostatic noise pick-up.
The CCM Load Module is designed to reduce spurious MCF trips which may occur in 3.3kV systems by adding a parallel resistance to the CCMD, reducing total impedance and improving noise immunity. The Module forms part of the overall integrated protection system, working with existing outlet protection.

Ampcontrol Pty Ltd – ABN 28 000 915 542
IPD USER MANUAL
IPDB014 Version 13 – DEC/2018
Uncontrolled Copy - Refer to Ampcontrol Website for Latest Version Page 19 of 96
AP
PR
OV
ED
FO
R E
XT
ER
NA
L D
IST
RIB
UT
ION
– P
RO
PE
RT
Y O
F A
MP
CO
NT
RO
L P
TY
LT
D
–
NO
T T
O B
E R
EP
RO
DU
CE
D IN
PA
RT
5 INSTALLATION
5.1 General Warnings
These instructions have been designed to assist users of the IPD with installation.
Before the IPD can be installed, there are a number of things that need to be considered and understood to prevent incorrect or unsafe operation of the IPD or the system into which it is installed.
Along with relevant competence, and an understanding of the target application, the following points should be considered:
5.1.1 Ensure that the information provided in this user manual is fully understood.
It is extremely important that the limitations and functionality of the IPD are understood to prevent incorrect installation and use from creating a potentially dangerous risk. If in doubt as to the nature of the limitations or their implication, consult a competent authority such as a supervisor or Ampcontrol technical representative.
5.1.2 Ensure that the application into which the IPD is being installed has been properly defined, designed and approved.
Any system intended to mitigate the risk of injury needs to be properly designed and implemented. Such a system must be the result of structured risk analysis with the outcomes used to define the system requirements. These requirements, in turn, will guide the choice of instrumentation, logic solvers and actuators needed to implement the system. Understanding the needs of the system will ensure proper selection of equipment.
5.1.3 Ensure that the IPD will properly perform the required functions within the system design.
It is important to understand how the IPD is intended to interact with other equipment within a system. For safe and reliable use, it is crucial that neither the IPD’s logical operation nor its signalling be compromised by incompatibilities with connected equipment.
5.1.4 Modifications of any form to the IPD are prohibited.
The IPD as supplied has been designed and manufactured to comply with the requirements of protection standards. If modifications of any form are made to the IPD, the equipment may no longer be fit for use. If any modifications or damage to the IPD is evident, do not use the equipment and contact Ampcontrol for advice.

Ampcontrol Pty Ltd – ABN 28 000 915 542
IPD USER MANUAL
IPDB014 Version 13 – DEC/2018
Uncontrolled Copy - Refer to Ampcontrol Website for Latest Version Page 20 of 96
AP
PR
OV
ED
FO
R E
XT
ER
NA
L D
IST
RIB
UT
ION
– P
RO
PE
RT
Y O
F A
MP
CO
NT
RO
L P
TY
LT
D
–
NO
T T
O B
E R
EP
RO
DU
CE
D IN
PA
RT
5.2 Mandatory Installation Practices
The following information must be adhered to when installing the IPD. Failure to adhere to this information may give rise to unsafe operation.
Using the IPD in a manner that exceeds its electrical, functional or physical specifications, or in a way that is contrary to its operating restrictions, may create risks to personnel and/or equipment resulting in injury or death.
The IPD must be powered within the specified voltage range.
The installation of the IPD must be carried out by suitably trained and qualified personnel.
Identification labels fixed to the IPD must not be damaged, removed or covered before, during or after installation.
The installation is to be in accordance with the relevant installation Standards/Codes of Practice.
Modifications must not be made to any part of the IPD. As supplied, the unit is built to, and complies with the relevant standards. Modifications to its construction will render the unit non-compliant.
Complete and accurate records of the installation must be kept as part of the site installation.
The equipment is to be installed and maintained as per the conditions in the certification documentation.
5.3 Mechanical Installation Information
5.3.1 IPD Integrated Protection Relay
The IPD Relay has a powder coated sheet steel enclosure designed to be mounted into existing enclosures, i.e. flameproof equipment or other enclosures of adequate IP rating.
The relay is designed to operate when mounted either laid down flat or in a vertical position. Vent holes are provided at both the top and bottom of the relay to assist in the cooling of the electronics inside the relay. These vents should not be blocked or restricted in any way.
CAUTION!
The IPD should not be installed on its side unless precautions are taken to avoid overheating. Mounting in this manner will prevent air
from flowing through the IPD’s vents and could cause the IPD relay to overheat.
Figure 5.1: IPD Mounting Orientation
Ver
tica
l
Ampcontrol Pty Ltd – ABN 28 000 915 542
IPD USER MANUAL
IPDB014 Version 13 – DEC/2018
Uncontrolled Copy - Refer to Ampcontrol Website for Latest Version Page 21 of 96
AP
PR
OV
ED
FO
R E
XT
ER
NA
L D
IST
RIB
UT
ION
– P
RO
PE
RT
Y O
F A
MP
CO
NT
RO
L P
TY
LT
D
–
NO
T T
O B
E R
EP
RO
DU
CE
D IN
PA
RT
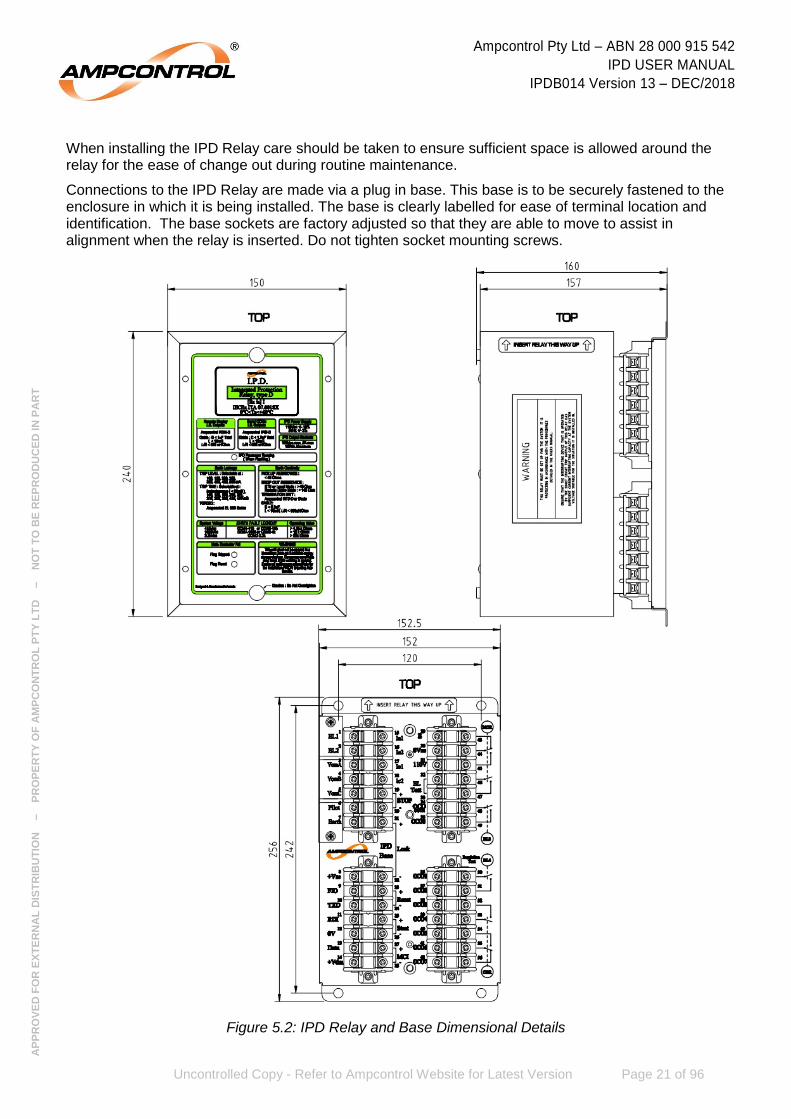
When installing the IPD Relay care should be taken to ensure sufficient space is allowed around the relay for the ease of change out during routine maintenance.
Connections to the IPD Relay are made via a plug in base. This base is to be securely fastened to the enclosure in which it is being installed. The base is clearly labelled for ease of terminal location and identification. The base sockets are factory adjusted so that they are able to move to assist in alignment when the relay is inserted. Do not tighten socket mounting screws.
Figure 5.2: IPD Relay and Base Dimensional Details

Ampcontrol Pty Ltd – ABN 28 000 915 542
IPD USER MANUAL
IPDB014 Version 13 – DEC/2018
Uncontrolled Copy - Refer to Ampcontrol Website for Latest Version Page 22 of 96
AP
PR
OV
ED
FO
R E
XT
ER
NA
L D
IST
RIB
UT
ION
– P
RO
PE
RT
Y O
F A
MP
CO
NT
RO
L P
TY
LT
D
–
NO
T T
O B
E R
EP
RO
DU
CE
D IN
PA
RT
5.3.2 Remote Display Module (RDM-D)
The Remote Display Module is an intrinsically safe device (Ex ia), designed to be mounted into the cut out of an IP54 enclosure and can therefore be mounted external to the switchgear it is controlling. To provide maximum benefit to the operator, one RDM is normally used per relay. This allows information from several relays to be simultaneously accessed and compared. However, if space restrictions preclude this, a compromise is to use one (1) RDM-D to monitor and control more than one IPD Relay. In these circumstances the following wiring arrangement is recommended:
Figure 5.3: Optional RDM Installation Arrangement
CAUTION!
The 3 pole change over switch must have sufficient clearance and creepage allowance between IPD Relay channels in accordance with
IEC installation requirements.
Figure 5.4: RDM-D Dimensional Details
IPDRelay
IPDRelay
RDM-DDisplay

Ampcontrol Pty Ltd – ABN 28 000 915 542
IPD USER MANUAL
IPDB014 Version 13 – DEC/2018
Uncontrolled Copy - Refer to Ampcontrol Website for Latest Version Page 23 of 96
AP
PR
OV
ED
FO
R E
XT
ER
NA
L D
IST
RIB
UT
ION
– P
RO
PE
RT
Y O
F A
MP
CO
NT
RO
L P
TY
LT
D
–
NO
T T
O B
E R
EP
RO
DU
CE
D IN
PA
RT
5.3.3 Cable Connection Module
The Cable Connection Module (CCMD) is a resistor-diode barrier, which interfaces between the power circuit and the IPD Relay. It also provides an automatic High Voltage DC ‘Insulation Test’ following a successful Intrinsically Safe Earth Fault Lockout Test. The CCMD is housed in an encapsulated module.
Ensure that the earth connections are reliably installed, as this is the basis of protection for all barriers, including the CCMD.
Figure 5.5: 3.3kV CCMD Dimensional Details

Ampcontrol Pty Ltd – ABN 28 000 915 542
IPD USER MANUAL
IPDB014 Version 13 – DEC/2018
Uncontrolled Copy - Refer to Ampcontrol Website for Latest Version Page 24 of 96
AP
PR
OV
ED
FO
R E
XT
ER
NA
L D
IST
RIB
UT
ION
– P
RO
PE
RT
Y O
F A
MP
CO
NT
RO
L P
TY
LT
D
–
NO
T T
O B
E R
EP
RO
DU
CE
D IN
PA
RT
Figure 5.6: 1kV and 415V CCMD Dimensional Details
NOTE
The 1kV CCMD and the 415V CCMD are mechanically the same size.
5.3.4 Overload & Earth Leakage Toroids
Current transformers are not ideal devices and if correct procedures are not followed during installation, nuisance tripping can result.
If, for example, we consider a single phase earth leakage system where active and neutral pass through a toroid, then at all times currents in the two wires are equal and opposite so that the net current through the toroid is zero. An ideal current transformer would have all the flux from each wire contained in the core and so would accurately add the opposing fluxes to get a net result to zero. A real current transformer has “leakage fluxes”. That is, a very small proportion of the total flux from each cable is not contained in the core, but in the space outside it and as result it may link some turns but not others, depending on the positioning of the cables.
The effect of this is that a small output may be obtained from the CT where none would arise if the device were ideal.
The size of the error will vary from CT to CT of the same type because of slight differences in the core and the symmetry of the winding.
Problems caused in this way become worse as CT sizes increase, as currents increase and a decrease occurs in the symmetry of the cables. Nuisance tripping tends to occur when the total current rises, such as when a large motor is started.
This is not normally a problem with the current levels found in flameproof enclosure applications. To help avoid problems in other applications, select the smallest internal diameter CT, to suit the cable size.
Ampcontrol Pty Ltd – ABN 28 000 915 542
IPD USER MANUAL
IPDB014 Version 13 – DEC/2018
Uncontrolled Copy - Refer to Ampcontrol Website for Latest Version Page 25 of 96
AP
PR
OV
ED
FO
R E
XT
ER
NA
L D
IST
RIB
UT
ION
– P
RO
PE
RT
Y O
F A
MP
CO
NT
RO
L P
TY
LT
D
–
NO
T T
O B
E R
EP
RO
DU
CE
D IN
PA
RT
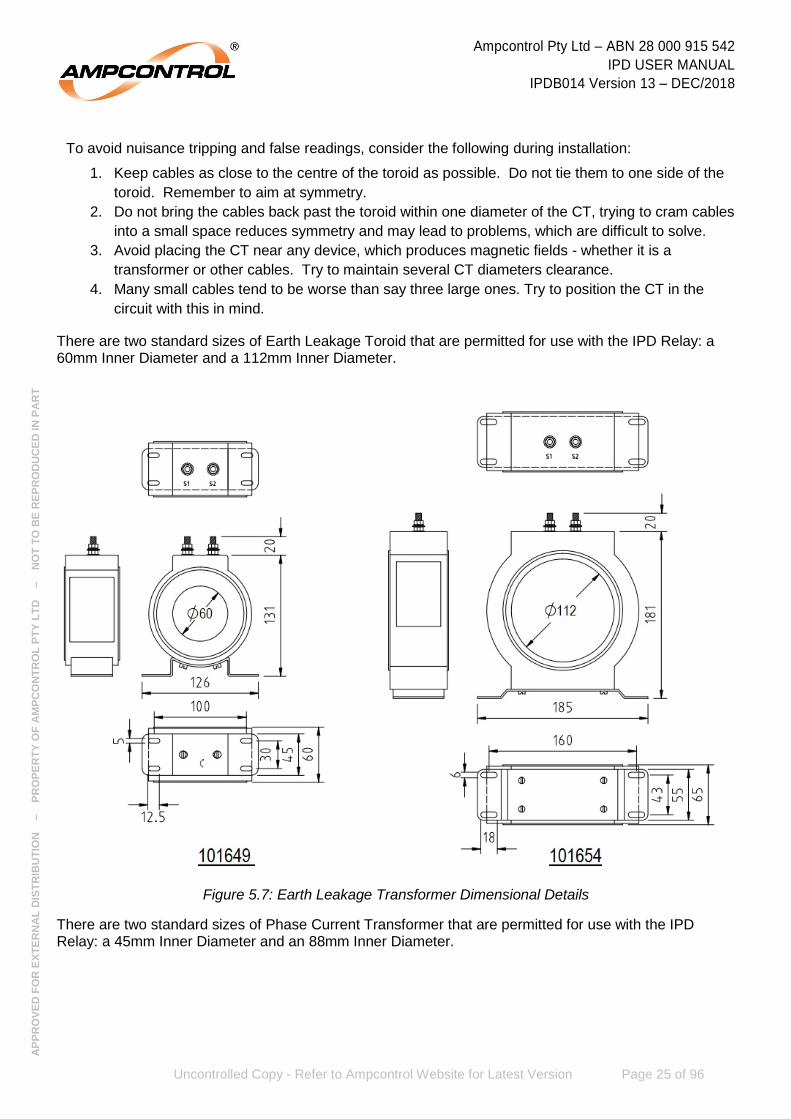
To avoid nuisance tripping and false readings, consider the following during installation:
1. Keep cables as close to the centre of the toroid as possible. Do not tie them to one side of the
toroid. Remember to aim at symmetry.
2. Do not bring the cables back past the toroid within one diameter of the CT, trying to cram cables
into a small space reduces symmetry and may lead to problems, which are difficult to solve.
3. Avoid placing the CT near any device, which produces magnetic fields - whether it is a
transformer or other cables. Try to maintain several CT diameters clearance.
4. Many small cables tend to be worse than say three large ones. Try to position the CT in the
circuit with this in mind.
There are two standard sizes of Earth Leakage Toroid that are permitted for use with the IPD Relay: a 60mm Inner Diameter and a 112mm Inner Diameter.
Figure 5.7: Earth Leakage Transformer Dimensional Details
There are two standard sizes of Phase Current Transformer that are permitted for use with the IPD Relay: a 45mm Inner Diameter and an 88mm Inner Diameter.

Ampcontrol Pty Ltd – ABN 28 000 915 542
IPD USER MANUAL
IPDB014 Version 13 – DEC/2018
Uncontrolled Copy - Refer to Ampcontrol Website for Latest Version Page 26 of 96
AP
PR
OV
ED
FO
R E
XT
ER
NA
L D
IST
RIB
UT
ION
– P
RO
PE
RT
Y O
F A
MP
CO
NT
RO
L P
TY
LT
D
–
NO
T T
O B
E R
EP
RO
DU
CE
D IN
PA
RT
Figure 5.8: Current Transformer 45mm I.D. (Part: 101272) Dimensional Details
Figure 5.9: Current Transformer 88mm I.D. (Part: 101703) Dimensional Details

Ampcontrol Pty Ltd – ABN 28 000 915 542
IPD USER MANUAL
IPDB014 Version 13 – DEC/2018
Uncontrolled Copy - Refer to Ampcontrol Website for Latest Version Page 27 of 96
AP
PR
OV
ED
FO
R E
XT
ER
NA
L D
IST
RIB
UT
ION
– P
RO
PE
RT
Y O
F A
MP
CO
NT
RO
L P
TY
LT
D
–
NO
T T
O B
E R
EP
RO
DU
CE
D IN
PA
RT
5.4 Electrical Installation Information The IPD Integrated Protection Relay is a microprocessor based protection relay that has the facility for connecting intrinsically safe remote monitoring equipment. This can be in the form of either the Remote Display Module or other peripheral equipment such as PLC’s.
These instructions have been designed to assist users of the IPD Relay with installation and special wiring techniques required maintaining the integrity of the intrinsically safe circuits.
The connections to the IPD Relay consist of a mix of intrinsically safe circuits through to “high” voltage supplies and relay contact circuits. To ensure the integrity of the intrinsic safety is maintained and to reduce induction from high voltages, care needs to be taken in the layout of the wiring and the installation.
For installations on high voltage systems (>3.3kV) it is advisable to install a power supply filter, e.g. Schaffner FN612-1106 (1A, 250VAC chassis mounted filter) adjacent to the IPD Relay. The earth should be connected to Pin 7 on the relay as directly as possible.
The IPD Relay’s approval requires that the relay is installed in accordance with the Australian Standard for Intrinsic Safety Installation AS/NZS 60079.14. This makes it necessary for anyone installing IPD Relays to be familiar with, and have a good understanding of, AS/NZS 60079.14.
The IPD Integrated Protection Relay is typically installed into a system along with appropriate devices providing input signals (sensors) and output control, per IPDE001. The following information should be considered in conjunction with this typical installation drawing.
5.4.1 Earthing
The IPD must be infallibly connected to the main system earth via the three earth terminal provided on pins 2, 7 and 12. To maintain the intrinsically safe properties of the relay it is vital that the earth pins 2, 7 and 12 are all individually connected with a minimum earth conductor size of 1.5mm2. The intrinsic safety circuits have been tested to IEC60079.11 and require at least three independent connecting elements for ‘ia’ circuits to maintain the intrinsic safety properties. These three earth connections shall be connected in parallel back to the main earth point and are not to be connected in series.
The IKD interface must be infallibly connected to the main system earth via at least one of the earthed mounting bolts on the chassis.
The earth on pin 29 connects to the earth shield of the IPD Relay’s internal transformer. This earth is a protection earth and is not an intrinsic safety earth.

Ampcontrol Pty Ltd – ABN 28 000 915 542
IPD USER MANUAL
IPDB014 Version 13 – DEC/2018
Uncontrolled Copy - Refer to Ampcontrol Website for Latest Version Page 28 of 96
AP
PR
OV
ED
FO
R E
XT
ER
NA
L D
IST
RIB
UT
ION
– P
RO
PE
RT
Y O
F A
MP
CO
NT
RO
L P
TY
LT
D
–
NO
T T
O B
E R
EP
RO
DU
CE
D IN
PA
RT
5.4.2 Intrinsically Safe Circuits
Table 1: Cable Requirements: Intrinsically Safe Circuits
Duty Pins Signal Cable Type
Cable Connection
Module
3
4
5
7
VcmA
VcmB
VcmC
Earth
Three core screened
Screen = Earth
Pilot Core 6
7
Pilot
Earth
Single core screened
Screen = Earth
Serial Comms Port
8
10
11
12
+Vsc
TXD
RDI
Earth
Four core screened
Screen = Earth
Remote Display
13
14
12
Data
+Vdm
Earth
Three core screened
Screen = Earth
NOTE
It is recommended that these circuits be loomed separately from all non-IS circuits.
NOTE
Wherever a screened cable is to be connected to Earth, ensure that the screen is earthed at ONE END ONLY, as near to the IPD as is
practicable.

Ampcontrol Pty Ltd – ABN 28 000 915 542
IPD USER MANUAL
IPDB014 Version 13 – DEC/2018
Uncontrolled Copy - Refer to Ampcontrol Website for Latest Version Page 29 of 96
AP
PR
OV
ED
FO
R E
XT
ER
NA
L D
IST
RIB
UT
ION
– P
RO
PE
RT
Y O
F A
MP
CO
NT
RO
L P
TY
LT
D
–
NO
T T
O B
E R
EP
RO
DU
CE
D IN
PA
RT
5.4.3 Low Voltage Signals
Although these signals are not IS signals themselves, care must be taken to ensure these circuits cannot come into contact with higher voltages (e.g. via insulation breakdown, or broken wires etc.). It is recommended that these circuits be run in a separate loom from both the IS circuits and the “high” voltage circuits. To ensure that interference is kept to a minimum, the following cabling is required.
Table 2: Cable Requirements: Low Voltage Signal Circuits
Duty Pins Signal Cable Type
Earth Leakage Toroid
1
2
EL1
EL2
Two core screened
Screen = Earth
Earth Leakage Toroid Test
32
33
EL Test
EL Test
Single core, not screened. Loop
Resistance < 1
Current Protection
Transformers
15
16
17
18
Ia1
Ia2
Ic1
Ic2
2xTwo core screened
Screen = Earth
Local Stop Button
(Digital Input)
19
20
SpDig+
SpDig-
*Two core screened
Screen = Earth
Lock Switch (Digital Input)
21
22
Lock+
Lock-
*Two core screened
Screen = Earth
Reset Switch (Digital Input)
23
24
Reset+
Reset-
*Two core screened
Screen = Earth
Start Switch (Digital Input)
25
26
Start+
Start-
*Two core screened
Screen = Earth
Motor Contactor Aux Contact (Digital Input)
27
28
MCI+
MCI+
*Two core screened
Screen = Earth
* The IPD’s digital inputs could alternatively be run in a screened multi-core cable. (Separate cable for each IPD Relay in multiple installations.)
Where these “low voltage” circuits need to connect near the power circuits (e.g. current transformers, cable connection module, main contactor auxiliaries etc.), care needs to be taken to ensure that the circuits are adequately separated and restrained so that the separation is maintained, even if a wire termination comes loose etc.

Ampcontrol Pty Ltd – ABN 28 000 915 542
IPD USER MANUAL
IPDB014 Version 13 – DEC/2018
Uncontrolled Copy - Refer to Ampcontrol Website for Latest Version Page 30 of 96
AP
PR
OV
ED
FO
R E
XT
ER
NA
L D
IST
RIB
UT
ION
– P
RO
PE
RT
Y O
F A
MP
CO
NT
RO
L P
TY
LT
D
–
NO
T T
O B
E R
EP
RO
DU
CE
D IN
PA
RT
5.4.4 High Voltage Circuits
The “high” voltage circuits of the IPD Relay are the 110VAC supply (pins 30, 31) and the relay contacts. Apart from keeping these separate from the other wiring to the relay there are no special requirements.
WARNING!
In accordance with Australian Standards the relay contacts of the IPD Relay must not be used to switch more than 190VAC, 5A or 100VA;
the intrinsic safety will be compromised if any of these values are exceeded.

Ampcontrol Pty Ltd – ABN 28 000 915 542
IPD USER MANUAL
IPDB014 Version 13 – DEC/2018
Uncontrolled Copy - Refer to Ampcontrol Website for Latest Version Page 31 of 96
AP
PR
OV
ED
FO
R E
XT
ER
NA
L D
IST
RIB
UT
ION
– P
RO
PE
RT
Y O
F A
MP
CO
NT
RO
L P
TY
LT
D
–
NO
T T
O B
E R
EP
RO
DU
CE
D IN
PA
RT
6 COMMISSIONING AND CALIBRATION
Prior to being put into service, the electrical protection system must be correctly commissioned. This manual does not cover system commissioning; the full scope of commissioning tests should be determined during the risk assessment or FMEA covering the design of the electrical protection system.
The following test can provide guidance on checking the correct operation of the IPD during commissioning. This is not intended to provide an exhaustive commissioning checklist, but should be considered to be a minimum set of tests.
6.1 Fan Interlock
Ensure that systems employing fan interlock circuits do not allow outlets to energise until the interlocked fan outlet is running correctly.
6.2 Earth Leakage Test the correct operation of earth leakage circuits by injecting a fault current through the toroid. Ensure that all relevant tripping circuits operate successfully and that latched trips may be reset in the appropriate manner.
Disconnect the toroid from the IPD and ensure that a toroid fault trip is issued with similar effect.
6.3 Earth Fault Lockout Test the correct operation of Earth Fault Lockout protection by connecting test resistors on the relay side of the CCMD, per IPDE001. With these resistors in circuit, the outlet should be prevented from energising.
6.4 Earth Continuity Test that the Earth Continuity protection is operational by creating an open circuit on the pilot wire. Ensure that all relevant tripping circuits operate successfully and that latched trips may be reset in the appropriate manner.
Repeat with a short circuit between the pilot and earth.
6.5 Insulation test If the Earth Fault Lockout and Earth Continuity tests are successful, ensure that a manual insulation test can be successfully conducted via the IPD.
Also check that an automatic insulation test is initiated by the IPD when a START signal is generated.
6.6 Over Current / Motor Overload Current Injection Test the Over Current / Motor Overload protection by carrying out secondary injection on the CT terminals of the IPD.
Where Over Current (IEC 60255-151) protection is employed, inject 2x FLC into one of the CT terminals and ensure that all relevant tripping circuits operate successfully, in the time expected according to the settings employed, and that latched trips may be reset in the appropriate manner. Repeat on the second set of CT terminals.
If Motor Overload that all relevant tripping circuits operate successfully, in the time expected according to the settings employed, and that latched trips may be reset in the appropriate manner.

Ampcontrol Pty Ltd – ABN 28 000 915 542
IPD USER MANUAL
IPDB014 Version 13 – DEC/2018
Uncontrolled Copy - Refer to Ampcontrol Website for Latest Version Page 32 of 96
AP
PR
OV
ED
FO
R E
XT
ER
NA
L D
IST
RIB
UT
ION
– P
RO
PE
RT
Y O
F A
MP
CO
NT
RO
L P
TY
LT
D
–
NO
T T
O B
E R
EP
RO
DU
CE
D IN
PA
RT
6.7 Short Circuit Current Injection Test the Short Circuit protection by carrying out secondary injection on the CT terminals of the IPD.
Inject a current value relevant for the settings employed into one of the CT terminals and ensure that all relevant tripping circuits operate successfully, in the time expected, and that latched trips may be reset in the appropriate manner. Repeat on the second set of CT terminals.
6.8 Current Detection in CTs Ensure the integrity of the current-detection CTs by injecting primary current into the CT aperture and validating the reading on the RDM.
6.9 Main Contactor Fail Validate the correct operation of the CCMD and MCF protection by applying a voltage on the load side of the contactor. The voltage must be >10% of the rated voltage of the CCMD. Ensure that a CBR trip is initiated by the IPD which can only be reset by pressing the MCF reset on the IPD relay.
6.10 Voltage Measurement Validate the voltage measurement function of the IPD by checking the measured voltages on the RDM when the main contactor is closed.
6.11 RDM Ensure that the RDM is functioning correctly by operating the menu system and checking that the corresponding trip indication LED is illuminated with each trip test conducted.
6.12 PLC Interface The correct operation of the PLC interface is determined by polling the IPD relay from either a PLC or a MODBUS capable PC, via the IPSI.
6.13 RTU Validate the correct operation of the RTU by making changes to Group 2 settings, moving the machine to a different outlet and ensuring that the correct settings are available on the new outlet.
6.14 Start, MCI and Stop Inputs Ensure that the digital inputs to the IPD are operating correctly by initiating an outlet start via the START input. Wait 10 seconds to ensure that the MCI input has been correctly operated, and then initiate a contact open via the STOP input. Ensure that the outlet correctly de-energises.

Ampcontrol Pty Ltd – ABN 28 000 915 542
IPD USER MANUAL
IPDB014 Version 13 – DEC/2018
Uncontrolled Copy - Refer to Ampcontrol Website for Latest Version Page 33 of 96
AP
PR
OV
ED
FO
R E
XT
ER
NA
L D
IST
RIB
UT
ION
– P
RO
PE
RT
Y O
F A
MP
CO
NT
RO
L P
TY
LT
D
–
NO
T T
O B
E R
EP
RO
DU
CE
D IN
PA
RT
7 REMOTE DISPLAY MODULE (RDM-D)
The Ampcontrol RDM-D is the user interface for the IPD relay. The RDM-D consists of a two line, 16 character LCD display, LED status indicators and a tactile keypad.
The display level is changed with the <UP> and <DOWN> arrow keys and the <LEFT> and <RIGHT> arrow keys control the display position. The display map (Drawing IPDB002, in Appendix A – Drawings) shows the layout of the various display screens. The module is approved to Ex ia Intrinsic Safety Standards so that it can be installed outside of a flameproof enclosure.
The healthy LED located top centre of the module flashes at 3Hz to indicate healthy communications with the relay. (A flash rate of 1Hz indicates that the module is powered, but is not receiving data).
The module displays the following information:
1. IPD Status.
2. Software version and serial number.
3. Operational information from the protection functions, e.g. earth leakage current, earth continuity
resistance etc.
4. System information including the line voltage and current.
5. Status of digital inputs and relay outputs.
6. Protection trip settings, which can be viewed at any time. Authorised personnel can modify these
settings via the RDM, thus eliminating the need to open the flameproof enclosure.
7. Data logging information. The 120 most recent events are logged, with time and date, in a non-
volatile memory, for example power-up, trip, reset, close etc.
NOTE
A review of the first few log events is a useful tool for fault finding.
The IPD status display is one of the most useful features of the relay’s display system and should be viewed as the first step in fault finding. The Status display is the default screen on power up and indicates what the IPD Relay requires in order to allow the outlet to close. These messages are useful to unskilled personnel. If more than one message is active the display cycles around all active messages showing them for 1 second each.
Through the use of the serial communications port, PLC’s and SCADA Systems can be configured to display the same messages that appear on the Remote Display Module. This helps to provide consistent information to operators.

Ampcontrol Pty Ltd – ABN 28 000 915 542
IPD USER MANUAL
IPDB014 Version 13 – DEC/2018
Uncontrolled Copy - Refer to Ampcontrol Website for Latest Version Page 34 of 96
AP
PR
OV
ED
FO
R E
XT
ER
NA
L D
IST
RIB
UT
ION
– P
RO
PE
RT
Y O
F A
MP
CO
NT
RO
L P
TY
LT
D
–
NO
T T
O B
E R
EP
RO
DU
CE
D IN
PA
RT
7.1 Trip / Status Messages The following table shows a list of the twenty-nine (29) status messages and the category (type) of the messages. Messages are cleared according to their message category.
Type 1
Messages are cleared by either pressing the <ENT> key while on the Status Display Page or by starting a new starting sequence i.e. EFLO test started.
Type 2
Messages are enabled and cleared automatically.
Type 3
Messages are triggered by the respective trip functions and are cleared by resetting the trip function.
Table 3: RDM-D Trip / Status Messages
Message Type Comment
Tripped-No Volts 1 Voltage on load side of contactor is too low
MC Close Fail 1 MCI input did not close within 5 Sec of MCR relay closing
External MC Open 1 IPD detected (via MCI input) that MC was opened – not initiated by the IPD relay
Insulation Alarm 1 Test result at alarm level (1.5 x selected trip level)
Last T: --------- 1 Shows ‘Last Trip’ record
Need IPD Start 2 Awaiting IPD start digital input
Need RTU Start 2 Awaiting RTU start digital input
Outlet Paused 2 IPD waits 5 Sec between running (or testing) and re-testing
Closing MainCont 2 MCR closed, waiting for MCI feedback (5 Sec max)
. . EFLO Testing 2 In process of EFLO Test (1 second)
Insulat. Testing 2 In process of Insulation Test (2 seconds)
Manual Ins. Test 2 In process of manual Insulation Test
IPD Memory Error 3 Corrupted memory in relay’s stored settings
RTU Memory Error 3 IPD detected errors in set up data received from RTU
Trip-RTU Offline 3 IPD can’t communicate with RTU
Stopped-RTU PTC 3 RTU PTC input Tripped (open)
Stopped - RTU 3 RTU Stop input Tripped (open)
I Balance Trip 3 Phase Current Balance Function Tripped
Locked Out - Fan 3 Fan interlock system is locking out IPD
Stopped IPD 3 IPD Stop Digital input activated (closed)
Earth Leak. CT Fail 3 Earth Leakage CT has Failed Trip Occurs
Earth Leak. Trip 3 Earth Leakage Function Tripped
Earth Cont. Trip 3 Earth Continuity Function Tripped
E/F Lockout Trip 3 Earth Fault Lockout Function Tripped
Over-current Trip 3 Over Current Function Tripped
Short Circ. Trip 3 Short Circuit Function Tripped
Main Cont. Fail 3 Main Contactor Fail Function Tripped
Insulation Fail 3 Insulation Test Function Tripped
Running: ----Amps 3 Outlet Closed: shows average of 3 phase currents (in amps)
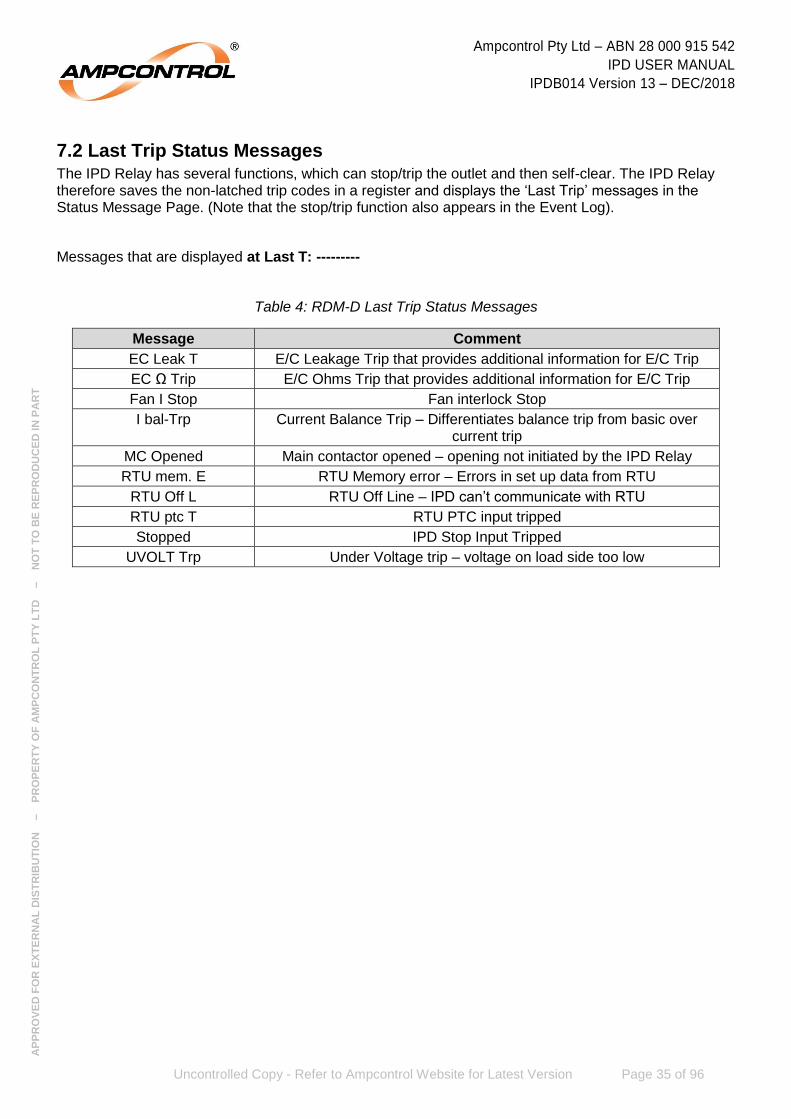
Ampcontrol Pty Ltd – ABN 28 000 915 542
IPD USER MANUAL
IPDB014 Version 13 – DEC/2018
Uncontrolled Copy - Refer to Ampcontrol Website for Latest Version Page 35 of 96
AP
PR
OV
ED
FO
R E
XT
ER
NA
L D
IST
RIB
UT
ION
– P
RO
PE
RT
Y O
F A
MP
CO
NT
RO
L P
TY
LT
D
–
NO
T T
O B
E R
EP
RO
DU
CE
D IN
PA
RT
7.2 Last Trip Status Messages The IPD Relay has several functions, which can stop/trip the outlet and then self-clear. The IPD Relay therefore saves the non-latched trip codes in a register and displays the ‘Last Trip’ messages in the Status Message Page. (Note that the stop/trip function also appears in the Event Log).
Messages that are displayed at Last T: ---------
Table 4: RDM-D Last Trip Status Messages
Message Comment
EC Leak T E/C Leakage Trip that provides additional information for E/C Trip
EC Ω Trip E/C Ohms Trip that provides additional information for E/C Trip
Fan I Stop Fan interlock Stop
I bal-Trp Current Balance Trip – Differentiates balance trip from basic over current trip
MC Opened Main contactor opened – opening not initiated by the IPD Relay
RTU mem. E RTU Memory error – Errors in set up data from RTU
RTU Off L RTU Off Line – IPD can’t communicate with RTU
RTU ptc T RTU PTC input tripped
Stopped IPD Stop Input Tripped
UVOLT Trp Under Voltage trip – voltage on load side too low

Ampcontrol Pty Ltd – ABN 28 000 915 542
IPD USER MANUAL
IPDB014 Version 13 – DEC/2018
Uncontrolled Copy - Refer to Ampcontrol Website for Latest Version Page 36 of 96
AP
PR
OV
ED
FO
R E
XT
ER
NA
L D
IST
RIB
UT
ION
– P
RO
PE
RT
Y O
F A
MP
CO
NT
RO
L P
TY
LT
D
–
NO
T T
O B
E R
EP
RO
DU
CE
D IN
PA
RT
8 MACHINE COMMUNICATION
8.1 Remote Termination Unit (RTU-D) The Remote Termination unit is a microprocessor based, fully encapsulated module that replaces the diode at the end of the pilot conductor of the trailing cable. It is powered by and communicates via the pilot line. Its non-volatile memory stores the parameters to configure the outlet as appropriate for that machine.
All terminals are fully shrouded, with the pilot and earth terminals being kept segregated from the other terminals. (See RTU-D General Case Dimensions, Drawing IPDA015 in Appendix A – Drawings)
The Remote Termination Unit (RTU-D) provides remote stop, start facilities of the IPD Relay’s controlled outlet. The circuitry involved for these functions are self-diagnostic and will cause the outlet to turn off if the circuits are earthed or interconnected. This reduces the chance of the outlet operating when not required to do so due to wiring faults. It should be noted that these functions are operational only, and that any emergency stops should be wired direct into the pilot circuit.
CAUTION!
Emergency Stops should not be wired into the Stop input of the RTU-D. They should be directly wired into the pilot circuit of the IPD.
PTC terminals are provided for a semiconductor thermistor connection. These terminals are protected in a similar manner to the stop and start circuits.
If the remote stop, start and PTC functions are not required, each set of terminals must be bridged, or the IPD Relay will not energise.
Four RTD inputs are provided for PT 100 temperature measuring devices. These terminals could also be used with resistor networks to provide digital information back at the IPD Relay.
NOTE
The RX, TX and 0V terminals are no longer required and should remain unconnected.
On/Off Line Status, machine type, machine number, software version and input status of the Remote Termination Unit can be examined by selecting “Machine Module Information” (Level 2, Positions 1-2). RTD temperature is available, Level 2, Position 4.
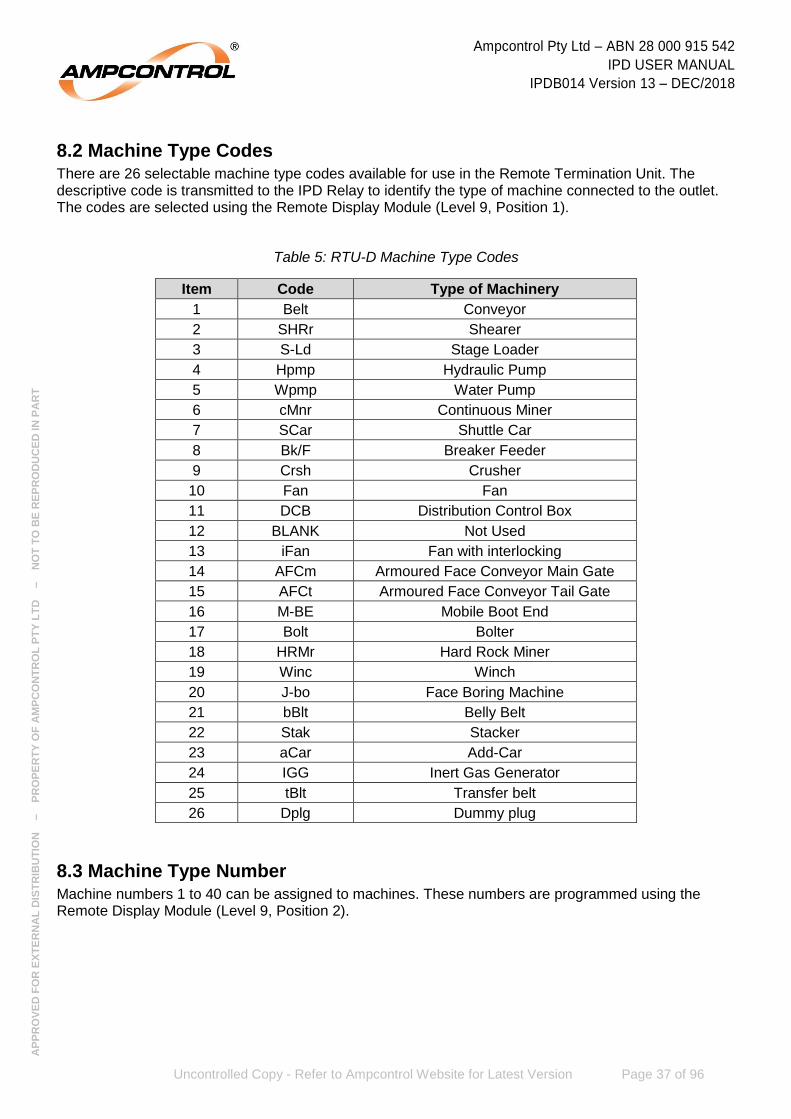
Ampcontrol Pty Ltd – ABN 28 000 915 542
IPD USER MANUAL
IPDB014 Version 13 – DEC/2018
Uncontrolled Copy - Refer to Ampcontrol Website for Latest Version Page 37 of 96
AP
PR
OV
ED
FO
R E
XT
ER
NA
L D
IST
RIB
UT
ION
– P
RO
PE
RT
Y O
F A
MP
CO
NT
RO
L P
TY
LT
D
–
NO
T T
O B
E R
EP
RO
DU
CE
D IN
PA
RT
8.2 Machine Type Codes There are 26 selectable machine type codes available for use in the Remote Termination Unit. The descriptive code is transmitted to the IPD Relay to identify the type of machine connected to the outlet. The codes are selected using the Remote Display Module (Level 9, Position 1).
Table 5: RTU-D Machine Type Codes
Item Code Type of Machinery
1 Belt Conveyor
2 SHRr Shearer
3 S-Ld Stage Loader
4 Hpmp Hydraulic Pump
5 Wpmp Water Pump
6 cMnr Continuous Miner
7 SCar Shuttle Car
8 Bk/F Breaker Feeder
9 Crsh Crusher
10 Fan Fan
11 DCB Distribution Control Box
12 BLANK Not Used
13 iFan Fan with interlocking
14 AFCm Armoured Face Conveyor Main Gate
15 AFCt Armoured Face Conveyor Tail Gate
16 M-BE Mobile Boot End
17 Bolt Bolter
18 HRMr Hard Rock Miner
19 Winc Winch
20 J-bo Face Boring Machine
21 bBlt Belly Belt
22 Stak Stacker
23 aCar Add-Car
24 IGG Inert Gas Generator
25 tBlt Transfer belt
26 Dplg Dummy plug
8.3 Machine Type Number Machine numbers 1 to 40 can be assigned to machines. These numbers are programmed using the Remote Display Module (Level 9, Position 2).

Ampcontrol Pty Ltd – ABN 28 000 915 542
IPD USER MANUAL
IPDB014 Version 13 – DEC/2018
Uncontrolled Copy - Refer to Ampcontrol Website for Latest Version Page 38 of 96
AP
PR
OV
ED
FO
R E
XT
ER
NA
L D
IST
RIB
UT
ION
– P
RO
PE
RT
Y O
F A
MP
CO
NT
RO
L P
TY
LT
D
–
NO
T T
O B
E R
EP
RO
DU
CE
D IN
PA
RT
9 EARTH PROTECTION FUNCTIONS
The IPD relay provides the following earth protection functions:
Earth Leakage
Earth Fault Lockout
Earth Continuity
9.1 Earth Leakage Protection The earth leakage protection function uses an Ampcontrol EL500 series toroid to measure the earth fault current. This function is tested to AS/NZS 2081.3 - 2002. A definite time operating characteristic is provided with adjustable trip sensitivity and an adjustable time delay.
Figure 9.1: Earth Leakage Protection Circuit Terminations
9.1.1 Operation
When a fault occurs that exceeds the trip threshold for an interval longer than that of the time delay, an earth leakage trip is initiated. The trip opens the Main Contactor Relay (MCR) and is latched.
When a trip occurs, the “EL” LED on the remote display module is illuminated and the open collector output on the relay is switched on to provide remote monitoring if required.
The leakage current (EL) is displayed on the RDM “Earth Fault Information” page as a % of the trip level. When the leakage reaches 100% for the selected time delay a trip occurs.
9.1.2 Resetting a Trip
An earth leakage trip is treated as a special fault and requires an authorised person to perform the reset function. This is achieved by operating and holding the lock button closed and then closing the reset button.
9.1.3 Setting the Parameters
The trip level is adjustable in 50mA increments in the range of 100mA to 500mA.
The time delay is adjustable in the range of instantaneous (<50ms), 100ms, then 150ms to 470ms in 40ms increments.
IPDRelay
Toroid Test132
EL101
Toroid Test2
02
33
Minimum 1.5mm2
I.S. Earth
EL2
A B C
Phase Conductors
AC ControlSupply
EL Test P/B
Test Resistor
Optional EL Test Circuit
EL500Toroid

Ampcontrol Pty Ltd – ABN 28 000 915 542
IPD USER MANUAL
IPDB014 Version 13 – DEC/2018
Uncontrolled Copy - Refer to Ampcontrol Website for Latest Version Page 39 of 96
AP
PR
OV
ED
FO
R E
XT
ER
NA
L D
IST
RIB
UT
ION
– P
RO
PE
RT
Y O
F A
MP
CO
NT
RO
L P
TY
LT
D
–
NO
T T
O B
E R
EP
RO
DU
CE
D IN
PA
RT
9.1.4 CT Detection Monitoring
The IPD generates a CT Detection Signal continuously to test the integrity of earth leakage circuit. The CT Detection signal continually tests the toroidal current transformer, the wiring loop to the toroid and the input to the protection relay as required by AS/NZS 2081.3 - 2002.
The signal generated by pins 32 and 33 is a 20mA signal at 200Hz. It must be fed from pin 32, one loop through the toroid then back to pin 33.The CT detection signal can be monitored by pushing the ‘Enter’ switch when viewing the ‘Earth Fault Information’ on Level 3 position 1 of the Remote Display Module.
When the trip occurs the remote display module “EL” LED will flash and the open collector output on the relay is switched on to provide remote monitoring if required.
The trip time for a CT detection fault has been fixed at 4 seconds in Version 5 of the IPD relay. This differs from earlier versions of the IPD firmware that derived the trip time from the Earth Leakage Time Delay setting.
NOTE
The loop resistance of the CT Detection Signal circuit connected to pins 32 and 33 must remain below 1Ω.
9.2 Earth Fault Lockout Protection The IPD relay can provide a two-step insulation test as part of the Earth Fault Lockout protection function. The initial test is the mandatory intrinsically safe test and can be followed by an automatic High Voltage ‘Insulation Test’. A manual ‘Insulation Test’ is also provided.
Figure 9.2: Earth Fault Lockout Protection Circuit Terminations
IPDRelay
VCmA03
VCmB04
05
EFTM
VCmC
A B C
Phase ConductorsFrom Contactor
CC
MD
VcmA
VcmB
VcmC
Earth
Minimum 4mm2
Va
Vb
Vc
Flying Leads
RL4 110Vcom
RL4-COM51
RL4-NO50
To 110Vac Power Supply
VcmA VcmB VcmC
EFLO Test P/B
Ensure type matches system voltage

Ampcontrol Pty Ltd – ABN 28 000 915 542
IPD USER MANUAL
IPDB014 Version 13 – DEC/2018
Uncontrolled Copy - Refer to Ampcontrol Website for Latest Version Page 40 of 96
AP
PR
OV
ED
FO
R E
XT
ER
NA
L D
IST
RIB
UT
ION
– P
RO
PE
RT
Y O
F A
MP
CO
NT
RO
L P
TY
LT
D
–
NO
T T
O B
E R
EP
RO
DU
CE
D IN
PA
RT
9.2.1 Cable Connection Modules
A cable connecting module, which is a resistive isolation device, is used to interface the power conductors to the IPD Relay. Modules are selected in the Group 1 Settings (Level 8, Position 3) for rated line voltages of 110V, 415V, 1000V or 3.3kV.
IPD Cable Connection Modules (CCMD) are the preferred modules and must be used when the ‘Insulation Test’ function is required.
IPA Cable Connecting Modules (CCMA) are available with rated voltages of 110V, 415V & 1000V for use with the IPD Relay. The use of these modules only allows the normal (Intrinsically Safe) EFLO Test to be carried out. The High Voltage DC ‘Insulation Test’ is not available with the CCMA Modules. The 3.3 kV CCMA is not to be used in conjunction with the with the IPD relay.
An IPA CCMA110V Cable Connecting Module is available for use when the relay is installed to control the high-tension supply and/or to provide voltage related functions via 110V PT’s. In this application the EFLO and Insulation test functions are not provided.
When CCM None is selected the IPD Relay does not provide an EFLO or ‘Insulation Test’, or voltage functions. Also under voltage checking does not occur.
CAUTION!
The ‘CCM None’ and ‘CCMA110V’ Modes MUST NOT BE USED in applications where EFLO is required by mining regulations.
9.2.2 Intrinsically Safe EFLO Test
The initial earth fault lockout function tests the resistance of the 3 phase lines to earth by applying an intrinsically safe signal prior to the closure of the main contactor in accordance with AS/NZS 2081.4 2002. The test is initiated by closure of the start button once all starting conditions are met (See Section 14.3, Operational Sequence). This test takes 1 second.
If the value is less than the pre-set level; (See Specifications in Section 18) a trip occurs. The “EF” LED on the Remote Display Module is illuminated and the open collector output on the relay is switched on to provide remote monitoring if required. To reset the relay following an earth fault lockout trip, operate the reset button.
The earth fault leakage level (EF) of the three phases is displayed on the RDM “Earth Fault Information” page as a % of the trip level and relates to the last earth fault lockout test performed

Ampcontrol Pty Ltd – ABN 28 000 915 542
IPD USER MANUAL
IPDB014 Version 13 – DEC/2018
Uncontrolled Copy - Refer to Ampcontrol Website for Latest Version Page 41 of 96
AP
PR
OV
ED
FO
R E
XT
ER
NA
L D
IST
RIB
UT
ION
– P
RO
PE
RT
Y O
F A
MP
CO
NT
RO
L P
TY
LT
D
–
NO
T T
O B
E R
EP
RO
DU
CE
D IN
PA
RT
9.2.3 Automatic Insulation Test
If a CCMD Mode has been selected in the Group 1 Settings, an automatic High Voltage DC ‘Insulation Test’ is carried out following a successful Intrinsically Safe Earth Fault Lockout Test (i.e. the resistance is above the preset level selected in the Group 2 Settings Level 9, Position 15).
The HV DC ‘Insulation Test’ is initiated when the IPD Relay closes its relay output RL4 for 2 seconds. This applies 110VAC to the CCMD Cable Connecting Module. A HV DC voltage is generated in the CCMD Module, which applies a voltage approaching the peak system voltage between each phase and earth.
The IPD Relay measures the voltage on the line and calculates the meg-ohm resistance to earth for each phase. At the end of the test the result is stored in the Event Log as ‘it -- . - MΩ’. If the resistance value is above the preset threshold the MCR Relay picks up allowing the outlet to be energised. Additionally, if the result is equal to or below an Alarm Level (typically 1.5 times the selected trip level, see Table 6) the status message ‘Insulation Alarm’ is displayed on the Status Page (level 0, position 0). The alarm message is displayed until a new EFLO Test is initiated or the <ENT> key is pressed while displaying the alarm message. ‘Insul. Alm’ is also recorded in the Event Log.
Table 6: Insulation Test Trip Threshold and Alarm Level Comparison
Ins . TstT: Selection
MΩ
Alarm Level
MΩ
0.1 0.2
0.2 0.3
0.5 0.8
1.0 1.5
2.0 3
5.0 7.5
10 15
15 20
None None
If the value is less than the preset trip level (0.1 MΩ to 15 MΩ) a trip occurs and is latched and saved in a non-volatile memory. The “EF” LED on the Remote Display Module is illuminated and the open collector output on the relay is switched on to provide remote monitoring if required. An Insulation Trip shares the “EF” LED on the Remote Display Module with an EFLO trip but has dedicated trip messages on the Status Page. To reset the relay following an insulation test fail trip, operate the reset button.
At the completion of a test the leakage level for each phase is retained in memory until the next test is carried out. This can be viewed on the Remote Display Module RDM (Level 3, Position 3).
If the ‘Insulation Test’ is not selected by either not selecting CCMD or setting ‘Ins.TstT:’ value to ‘None’ then the MCR Relay closes at the completion of a healthy EFLO Test.
The accuracy of the insulation test and expected trip ranges are outlined in Table 7. The results from insulation test should only be used as a guide to confirm that insulation remains above the preset threshold. Insulation tests apart from the generated insulation test via the IPD and CCMD should be still carried out on a regular basis for maintenance purposes.

Ampcontrol Pty Ltd – ABN 28 000 915 542
IPD USER MANUAL
IPDB014 Version 13 – DEC/2018
Uncontrolled Copy - Refer to Ampcontrol Website for Latest Version Page 42 of 96
AP
PR
OV
ED
FO
R E
XT
ER
NA
L D
IST
RIB
UT
ION
– P
RO
PE
RT
Y O
F A
MP
CO
NT
RO
L P
TY
LT
D
–
NO
T T
O B
E R
EP
RO
DU
CE
D IN
PA
RT
Table 7: Insulation Test Accuracy with Respect to Trip Setting
Actual Fault Resistance (MΩ)
Trip Setting Minimum Maximum
0.5 0.4 0.6
1 0.8 1.2
2 1.6 2.4
5 4.0 6.4
The values in the expected fault resistance range represent ±20% of the nominal value with the exception of the higher end of the 5MΩ range.
CAUTION!
Trip setting values of 10MΩ and 15MΩ aren’t specified above but are available for configuration within the software. These trip settings of 10MΩ and 15MΩ are not recommended for use by Ampcontrol.
NOTE
The start input must be held closed for the duration of the test.
NOTE
The recommended trip setting values to be utilised for the insulation test trip settings are to be less than 5MΩ. To obtain optimum results
the 2MΩ trip setting is recommended.
NOTE
If a CCM Load Module is installed on the outlet’s CCMD, the maximum allowable trip setting on the Insulation Test is reduced, depending on the type of load module installed. Refer to the CCM Load
Module Technical Datasheet for more details.

Ampcontrol Pty Ltd – ABN 28 000 915 542
IPD USER MANUAL
IPDB014 Version 13 – DEC/2018
Uncontrolled Copy - Refer to Ampcontrol Website for Latest Version Page 43 of 96
AP
PR
OV
ED
FO
R E
XT
ER
NA
L D
IST
RIB
UT
ION
– P
RO
PE
RT
Y O
F A
MP
CO
NT
RO
L P
TY
LT
D
–
NO
T T
O B
E R
EP
RO
DU
CE
D IN
PA
RT
9.2.4 Manual Insulation Test
A manual “Insulation Test” is provided as a maintenance/fault finding tool. The manual test can only be carried out when the load is not energised. When this test is performed the MCR relay is prevented from closing at the completion of a healthy test.
Before a manual Insulation Test can be performed the following conditions must apply:
1. The Remote Display Module must be online with the Insulation Test page being displayed. This
is located on the ‘EARTH FAULT INFORMATION’ Page, level 3, position 2.
2. Pilot must be healthy (and any previous trips reset).
3. EFLO function must not be tripped.
4. Insulation Test function must not be tripped.
5. Outlet must not be running.
6. Outlet must not be in the process of ‘closing’.
7. Outlet must not be ‘Paused’
8. The ‘Lock’ digital input must be closed.
When the above conditions are met the <ENT> key must be pressed and held (for the duration of the test). After 3 seconds the EFLO test will commence. If the test result is healthy the manual insulation test is initiated. The test voltage is applied to the outgoing feeder while ever the above conditions are held (including holding the <ENT> key). The test results are continuously calculated and displayed. The operator should maintain the test at least long enough for the readings to stabilize, this being a function of the cable length. Once the test is completed (usually by releasing the <ENT> key) the results are held in memory until another insulation test is commenced either manually or as part of the starting sequence, or IPD control power is lost.
NOTE
The manual test can be carried out even if the ‘Ins.TstT:’ selection is set to ‘none’ (i.e. the automatic insulation test in the starting sequence is
turned off).
If the ‘CCM’ selection (see Section 9.2.1) is not a CCMD Cable Connecting Module, then the manual test will only perform an EFLO
test.
The status of the manual insulation test is shown on the Insulation Test Information Page (level 3, position 3). A single letter following ‘Mt:’ indicates the status of the test:
Mt:x Manual Test is blocked - by any one or more of the conditions 1 to 8 above.
Mt:e Only the <ENT> key is required to initiate the manual test.
Mt:t The manual test is timing through the enabling period (3 seconds).
Mt:A The manual test is Active. The display will show measured values.

Ampcontrol Pty Ltd – ABN 28 000 915 542
IPD USER MANUAL
IPDB014 Version 13 – DEC/2018
Uncontrolled Copy - Refer to Ampcontrol Website for Latest Version Page 44 of 96
AP
PR
OV
ED
FO
R E
XT
ER
NA
L D
IST
RIB
UT
ION
– P
RO
PE
RT
Y O
F A
MP
CO
NT
RO
L P
TY
LT
D
–
NO
T T
O B
E R
EP
RO
DU
CE
D IN
PA
RT
9.3 Earth Continuity Protection The earth continuity function tests for the continuity of the earthing between the outlet and the machine, via the pilot core in the trailing cable. This is in accordance with AS/NZS 2081.2 2002.
The pilot core is also used to transfer data when a Remote Termination Unit is used to achieve machine communication.
The IPD relay can be configured to operate in either diode or RTU mode.
NOTE
The Remote Termination Unit will only be recognised by an IPD Relay and will not be seen as a diode by other earth continuity devices.
CAUTION!
Cable parameters are important to the correct operation of the Pilot E/C function. Resistance & capacitance values can determine the length of
cable that the relay can drive.
(See Specifications, Section 18)
9.3.1 Operation
The relay measures the resistance of the pilot - earth loop and the leakage between the pilot and earth conductors. The leakage measurement ensures that pilot to earth faults are detected. If the pilot - earth loop is not healthy a trip occurs (See Specifications, Section 18) which in turn opens the main contactor control circuit. The fault can be configured as latching or non-latching. This allows the user to determine if the fault is manually or automatically reset once the pilot - earth loop is healthy.
The “EC” LED on the Remote Display Module is illuminated and the open collector output on the relay is switched on to provide remote monitoring if required.
The earth continuity resistance (ECR) of the pilot – earth loop and the leakage (L) between the pilot and earth conductors is displayed on the RDM “Earth Fault Information” page as a % of the trip levels. When either value reaches 100% a trip occurs.
9.3.2 Resetting a Trip
If the Pilot Latch is configured as “Pilot Latch: On”, then any earth continuity trips will need to be reset manually by operating the IPD relay’s reset button. The “Lock” input is not required for resetting an earth continuity fault.
9.3.3 Setting the Parameters
The IPD relay is configured to operate in either diode or RTU mode using the “Pilot Type” parameter, (Level 8, Position 1). This determines what terminating device the IPD expects to see on the pilot.
The EC trip latching is configured using “Pilot Latch: On” or “Pilot Latch: Off” (Level 9, Position 11).
Pilot Trip Time is adjustable to allow for operation in noisy electrical environments. The following trip times are available: 80,120, 160, 200, 300, 400 and 500ms.
A setting of 120ms should be suitable for most installations. Long time delays (>200 ms) should only be used where necessary. Consequence of long trip times should be thoroughly assessed from a safety point of view before using the higher values.

Ampcontrol Pty Ltd – ABN 28 000 915 542
IPD USER MANUAL
IPDB014 Version 13 – DEC/2018
Uncontrolled Copy - Refer to Ampcontrol Website for Latest Version Page 45 of 96
AP
PR
OV
ED
FO
R E
XT
ER
NA
L D
IST
RIB
UT
ION
– P
RO
PE
RT
Y O
F A
MP
CO
NT
RO
L P
TY
LT
D
–
NO
T T
O B
E R
EP
RO
DU
CE
D IN
PA
RT
10 CURRENT RELATED FUNCTIONS
10.1 General Information
The IPD relay uses two current transformers to measure the three line currents. The measured currents are used to implement the following protection functions:
Time Dependent Protection, including: o Over-Current Protection o Motor Overload Protection
Short Circuit Protection
Phase Current Balance
In addition to the above functions, IPD relays from Version 3 onwards have also had a Transient Overreach Compensation function implemented to compensate for spurious tripping from overreach at start-up. The IPD has a transient overreach performance figure of 35% (determined per IEC 60255-151, section 6.5.2). See Section 10.5 for more information.
Figure 10.1: Current Transformer Circuit Terminations
10.1.1 Full Load Current Parameter
Full load settings cover a range from 7.5 Amps to 464 Amps. A current range and current multiplier are utilised to select and store the full load current value in the non-volatile memory. This forms the basic reference level for the over-current protection functions.
The current range is selectable in 4 Amp increments between 60 and 116 Amps. The current multiplier is selectable at 1/8, 1/4, 1/2, 1, 2, 4 times (see Section 13, User Adjustable Settings).
NOTE
Example: Full Load Current Setting To obtain a full load current of 152 Amps; select a current range of 76
Amps and a multiplier of 2.
A B C
Phase Conductors
Current TXF1000/1
Current TXF1000/1
IPDRelay
Ic117
Ia115
Ic2
16
18
Ia2
S1
S2
P1
P2
S1
S2
P1
P2

Ampcontrol Pty Ltd – ABN 28 000 915 542
IPD USER MANUAL
IPDB014 Version 13 – DEC/2018
Uncontrolled Copy - Refer to Ampcontrol Website for Latest Version Page 46 of 96
AP
PR
OV
ED
FO
R E
XT
ER
NA
L D
IST
RIB
UT
ION
– P
RO
PE
RT
Y O
F A
MP
CO
NT
RO
L P
TY
LT
D
–
NO
T T
O B
E R
EP
RO
DU
CE
D IN
PA
RT
10.1.2 Time Parameter
Two dependent time protection types can be selected and a time multiplier modifies the basic trip time characteristic. There are eighteen (18) time multiplier settings that can be selected ranging from 0.005 times to 1.0 times (see Section 13, User Adjustable Settings).
NOTE
Settings 0.005, 0.01, 0.015, 0.02, 0.03 and 0.04 are positioned after setting 1.0 in the stored setting’s list (Level 9, Position 4).
10.1.3 Viewing the Instantaneous Current
The instantaneous current in each of the three phases can be displayed on the RDM (Level 5, Position 1). The three phase currents are displayed, as a % of the overload set current. The average current value is expressed in Amps and is displayed at Level 5 and the Status Page (Level 0, Position 0).
10.1.4 Resetting a Trip
To reset a current related trip (excluding a short circuit trip), the following conditions must be met:
a) The IPD reset input must be closed
b) The trip accumulator must be less than 80%
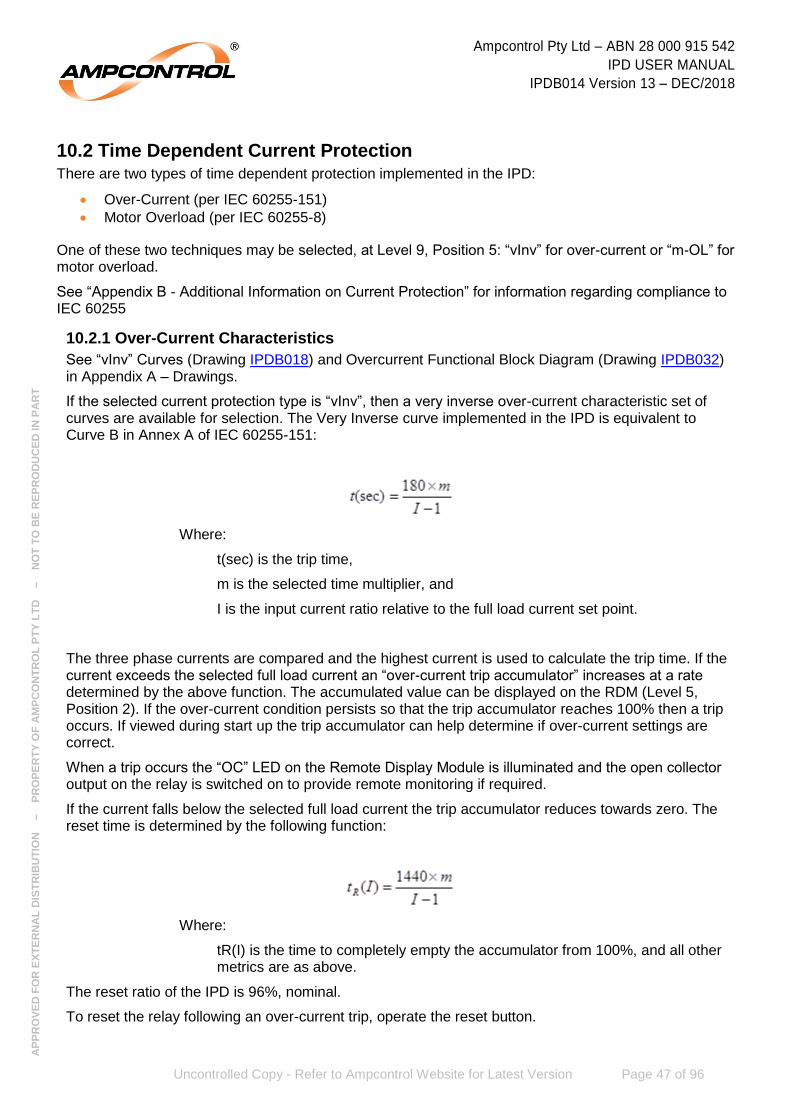
Ampcontrol Pty Ltd – ABN 28 000 915 542
IPD USER MANUAL
IPDB014 Version 13 – DEC/2018
Uncontrolled Copy - Refer to Ampcontrol Website for Latest Version Page 47 of 96
AP
PR
OV
ED
FO
R E
XT
ER
NA
L D
IST
RIB
UT
ION
– P
RO
PE
RT
Y O
F A
MP
CO
NT
RO
L P
TY
LT
D
–
NO
T T
O B
E R
EP
RO
DU
CE
D IN
PA
RT
10.2 Time Dependent Current Protection There are two types of time dependent protection implemented in the IPD:
Over-Current (per IEC 60255-151)
Motor Overload (per IEC 60255-8)
One of these two techniques may be selected, at Level 9, Position 5: “vInv” for over-current or “m-OL” for motor overload.
See “Appendix B - Additional Information on Current Protection” for information regarding compliance to IEC 60255
10.2.1 Over-Current Characteristics
See “vInv” Curves (Drawing IPDB018) and Overcurrent Functional Block Diagram (Drawing IPDB032) in Appendix A – Drawings.
If the selected current protection type is “vInv”, then a very inverse over-current characteristic set of curves are available for selection. The Very Inverse curve implemented in the IPD is equivalent to Curve B in Annex A of IEC 60255-151:
Where:
t(sec) is the trip time,
m is the selected time multiplier, and
I is the input current ratio relative to the full load current set point.
The three phase currents are compared and the highest current is used to calculate the trip time. If the current exceeds the selected full load current an “over-current trip accumulator” increases at a rate determined by the above function. The accumulated value can be displayed on the RDM (Level 5, Position 2). If the over-current condition persists so that the trip accumulator reaches 100% then a trip occurs. If viewed during start up the trip accumulator can help determine if over-current settings are correct.
When a trip occurs the “OC” LED on the Remote Display Module is illuminated and the open collector output on the relay is switched on to provide remote monitoring if required.
If the current falls below the selected full load current the trip accumulator reduces towards zero. The reset time is determined by the following function:
Where:
tR(I) is the time to completely empty the accumulator from 100%, and all other metrics are as above.
The reset ratio of the IPD is 96%, nominal.
To reset the relay following an over-current trip, operate the reset button.

Ampcontrol Pty Ltd – ABN 28 000 915 542
IPD USER MANUAL
IPDB014 Version 13 – DEC/2018
Uncontrolled Copy - Refer to Ampcontrol Website for Latest Version Page 48 of 96
AP
PR
OV
ED
FO
R E
XT
ER
NA
L D
IST
RIB
UT
ION
– P
RO
PE
RT
Y O
F A
MP
CO
NT
RO
L P
TY
LT
D
–
NO
T T
O B
E R
EP
RO
DU
CE
D IN
PA
RT
10.2.2 Motor Overload Characteristic
See “m-OL” Curves (Drawing IPDB019) and Motor Overload Functional Block Diagram (Drawing IPDB035) in Appendix A – Drawings.
The current protection type “m-OL” is used when a motor overload characteristic is required. This protection scheme uses a thermal model of the motor to determine the tripping characteristic. Thermal modelling is based on a thermal time constant of 30 minutes (time multiplier setting of 1.0 times). The time multiplier can reduce this value to a minimum thermal time constant of 1.5 minutes (time multiplier setting of 0.05 times).
The three measured phase currents are squared and added together to provide the heating input into the thermal model, which is described by:
Where:
m is the time multiplier
h is 0 for ‘cold motor’ and 1 for ‘hot motor’
Note that unlike Very Inverse current protection, Motor Overload protection does not have strictly defined tripping times. The curves and function above describe the boundaries of the trip time, where:
The hot curve corresponds to the trip time after the motor has been running at the selected full load current indefinitely (which results in a thermal accumulation of 89%), and
The cold curve corresponds to the trip time when the motor starts with zero accumulated thermal energy.
The actual tripping times will normally be between these bounds, depending on the time the motor has been running and the load, and hence the accumulated thermal energy in the motor.
The motor manufacturer’s data should be consulted to select the time multiplier appropriate for the motor being protected. Typically, the capacity of a cold motor is given at six times its rated current. The IPD trip curves can be used to select the time multiplier, which best suits the motors overload capacity.
While the main contactor is closed, the cooling output from the thermal model is calculated to achieve the necessary time constants.
When the main contactor is open a “Cooling Multiplier” is used to modify the basic time constant. This can be used to account for the reduced cooling capacity while the motor is not running (when applicable, e.g. fan-cooled motors). This multiplier is selectable at 0.2, 0.3, 0.4, 0.5, 0.8, 1.0, 2, 5, 10, 20, and 50 times.
When 0.2 times is selected the motor off cooling rate is reduced to 20% of the motor running cooling rate. A selection of 1.0 times sets the motor-off cooling rate equal to motor running cooling rate. This selection is appropriate where cooling is maintained even when the motor is stopped, eg water cooled motors.

Ampcontrol Pty Ltd – ABN 28 000 915 542
IPD USER MANUAL
IPDB014 Version 13 – DEC/2018
Uncontrolled Copy - Refer to Ampcontrol Website for Latest Version Page 49 of 96
AP
PR
OV
ED
FO
R E
XT
ER
NA
L D
IST
RIB
UT
ION
– P
RO
PE
RT
Y O
F A
MP
CO
NT
RO
L P
TY
LT
D
–
NO
T T
O B
E R
EP
RO
DU
CE
D IN
PA
RT
A selection of 50 times effectively disables the thermal memory. With this selection, as soon as the main contactor opens, the thermal model resets quickly so that a cold restart is achieved.
CAUTION!
Repeated restart attempts in this condition may damage the motor.
Typical fan cooled motor protection is based on a cooling multiplier setting of 0.4, however, for the best protection consult your motor manufacturer.
The thermal model continues to simulate the motor’s thermal behaviour even if the power is removed from the relay. When power is restored the thermal memory would be at the same level had there been no loss of power.
The “OC Trip” Accumulator shows the state of the thermal model: 0% = Cold, 100% = Trip.
When a trip occurs the IPD Relay cannot be reset using the reset button until the accumulator is less than 80%. For the purposes of an emergency restart on a hot motor, the thermal memory can be reset by selecting Level 5, Position 3 on the Remote Display Module. The display shows:
ZERO THERM MEM?
RESET + LOCK[100]
The [100] indicates the current value of the trip accumulator. Operating the lock and reset buttons simultaneously while the above display is being shown will zero the OC Trip Accumulator after 1.5 seconds.
Indication of the trip condition for motor overload is the same that occurs for an over-current trip.
10.3 Short Circuit Protection The short circuit function has a definite time characteristic. If the current exceeds the selected level for the pre-set time then a trip occurs.
The “SC” LED on the Remote Display Module is illuminated and the open collector output on the relay is switched on to provide monitoring if required.
To reset the relay following a short circuit trip it is necessary to operate and hold the lock button closed and then close the reset button.
The relay can be programmed so that a short circuit condition can trip either the “CBR” relay or the “MCR relay. This can be achieved by selecting either relay at the “SC Relay” selection in the non-volatile memory (Level 8, Position 5) on the Remote Display Module. Normally the “CBR” selection would be used. If “MCR” is selected then the user must ensure that the interrupting device that is operated by the short circuit trip output of the relay has sufficient current interrupting capacity at the system voltage for the situation in which it is installed.
The short circuit trip level is adjustable from 3 to 10 times (full load current) in 0.5 increments. The trip time is selectable from 20ms to 160ms.
CAUTION!
When “CBR” is selected for the Short Circuit trip it is important to consider the S/C trip time in relation to the trip times for faults that trip
the “MCR” and could occur at the same time as the S/C (e.g. Earth Leakage and Earth Continuity).

Ampcontrol Pty Ltd – ABN 28 000 915 542
IPD USER MANUAL
IPDB014 Version 13 – DEC/2018
Uncontrolled Copy - Refer to Ampcontrol Website for Latest Version Page 50 of 96
AP
PR
OV
ED
FO
R E
XT
ER
NA
L D
IST
RIB
UT
ION
– P
RO
PE
RT
Y O
F A
MP
CO
NT
RO
L P
TY
LT
D
–
NO
T T
O B
E R
EP
RO
DU
CE
D IN
PA
RT
10.4 Phase Current Balance Phase current balance protection is selected via the “Cur Bal Trp” selection (See Section 13, User Adjustable Settings). The current balance measurement is displayed on the Remote Display Module and is calculated as:
𝐼𝑏𝑎𝑙 = 𝑀𝐴𝑋 ∆ 𝐼 × 100%
𝐼𝑎𝑣𝑒
Where:
Iave = Average of the 3 phase currents
MAX∆I = The maximum deviation of a phase current from the average
The trip level is selectable at 5%, 10%, 20%, 50% and off.
The phase current balance protection is inhibited until the average current exceeds both 20% of the selected full load current and the selected balance trip level.
If the trip level is exceeded, a timer is triggered. If the imbalance remains above the set level for more than two seconds the relay trips. The event log records “Ibal” to differentiate it from a true over-current trip.
The status of the timer is displayed adjacent to the “Ibal” value (Level 5, Position 2). A trip condition occurs when the timer reaches 100%.
10.5 Transient Overreach Compensation Transient overreach is a phenomenon experienced by overcurrent relays where a measured AC signal is offset by a decaying DC component (see figure below, taken from IEC 60255-151). The effect is typically caused by a step change in the measured signal, such as at contact closure for a direct-online motor.
Figure 10.2: Transient Overreach During Contactor Closure (Source: IEC 60255-151)

Ampcontrol Pty Ltd – ABN 28 000 915 542
IPD USER MANUAL
IPDB014 Version 13 – DEC/2018
Uncontrolled Copy - Refer to Ampcontrol Website for Latest Version Page 51 of 96
AP
PR
OV
ED
FO
R E
XT
ER
NA
L D
IST
RIB
UT
ION
– P
RO
PE
RT
Y O
F A
MP
CO
NT
RO
L P
TY
LT
D
–
NO
T T
O B
E R
EP
RO
DU
CE
D IN
PA
RT
For the IPD, transient overreach may cause spurious tripping on short circuit due to resulting measurement inaccuracies. To compensate for this effect, a ‘START TRANSIENT’ mode has been implemented, with the following selectable options on Level 9, Position 16 of the Remote Display Module: OFF, 40ms, 60ms, 80ms, 100ms or 120ms.
When the START TRANSIENT mode is enabled, the IPD current setting is increased for the specified period of time, after the main contactor has been closed. The increased current is achieved by the following:
1. For current multiplier 1/8x to 2x, the current multiplier will be increased one step (e.g. 1/2x
increases to 1x for the selected time period)
2. For current multiplier 4x, the base current will be increased to the maximum setting of 116A.
NOTE
Example 1: Start Transient Setting IPD set to 88A, 1x current multiplier and 6x short circuit multiplier,
resulting in a short circuit set point of 528A.
With START TRANSIENT mode set to 90ms, the current multiplier goes to 2x, and the short circuit trip level will increase to 1136A until 90ms after the MCI input (from the auxiliary contact on the main contactor)
closes.
NOTE
Example 2: Start Transient Setting IPD set to 72A, 4x current multiplier and 8x short circuit multiplier,
resulting in a short circuit set point of 2304A.
With START TRANSIENT mode set to 150ms, the base current goes to 116A, and the short circuit trip level will increase to 3712A
(116A x 4 x 8) until 150ms after the MCI input closes.
START input
EFLO + HV test
MCR output
MCI input
Startup Transient Mode
Sele
cted
Tim
e
Figure 10.3: Transient Overreach Protection Timing Diagram

Ampcontrol Pty Ltd – ABN 28 000 915 542
IPD USER MANUAL
IPDB014 Version 13 – DEC/2018
Uncontrolled Copy - Refer to Ampcontrol Website for Latest Version Page 52 of 96
AP
PR
OV
ED
FO
R E
XT
ER
NA
L D
IST
RIB
UT
ION
– P
RO
PE
RT
Y O
F A
MP
CO
NT
RO
L P
TY
LT
D
–
NO
T T
O B
E R
EP
RO
DU
CE
D IN
PA
RT
11 VOLTAGE RELATED FUNCTIONS
The IPD relay uses the Cable Connection Module (CCMD/CCMA) to monitor the magnitude of the voltage on the load side of the outlet’s main contactor. The voltage measurement is used to implement the following functions:
Main Contactor Fail Protection
Under-Voltage Trip
Voltage Metering
Figure 11.1: Voltage Monitoring Circuit Terminations
IPDRelay
VCmA03
VCmB04
05VCmC
A B C
Phase ConductorsFrom Contactor
CC
MD
VcmA
VcmB
VcmC
Earth
Minimum 4mm2
Va
Vb
Vc
Flying Leads
RL4 110Vcom
See EFLO Connections
Ensure type matches system voltage
MC
MCI+27
MCI-28
Main Contactor Position Feedback

Ampcontrol Pty Ltd – ABN 28 000 915 542
IPD USER MANUAL
IPDB014 Version 13 – DEC/2018
Uncontrolled Copy - Refer to Ampcontrol Website for Latest Version Page 53 of 96
AP
PR
OV
ED
FO
R E
XT
ER
NA
L D
IST
RIB
UT
ION
– P
RO
PE
RT
Y O
F A
MP
CO
NT
RO
L P
TY
LT
D
–
NO
T T
O B
E R
EP
RO
DU
CE
D IN
PA
RT
11.1 Main Contactor Fail Protection
11.1.1 Operation
The Main Contactor Fail (MCF) protection operates if the Main Contactor (MC) fails to function by either:
1. Failing to open when required. This is achieved by comparing the state of the main contactor (via
the Main Contactor Input MCI) against the state of the MCR relay output. This test provides
“Frozen Contactor Protection”.
2. Failing to maintain insulation across the contacts when the contactor is open. The Cable
Connecting Module is used to measure the voltage on the load side of the contactor. If this
exceeds 10% of the rated line voltage, a trip will occur. This test provides “Loss of Vacuum
Protection”.
A main contactor fail trip causes the CBR relay to de-energise, which trips the circuit breaker. An internal battery backed flag in the IPD Relay is also tripped. A LED on the front panel of the IPD Relay begins to flash.
The “MCF” LED on the Remote Display Module is illuminated and the open collector output on the relay is switched on to provide remote monitoring if required.
11.1.2 Back EMF Parameter
Test 2 is inhibited immediately after the main contactor opens to allow for back EMF voltages generated by some motors to dissipate. The inbuilt time is adjustable from 2 to 20 seconds (See Section 13, User Adjustable Settings).
11.1.3 Resetting a Trip
To reset the flag, access to the relay is necessary. In the case of flameproof equipment the power has to be removed in accordance with AS1039. The reset button is accessible through the front fascia of the relay and must be pressed for 1 second.
11.2 Under-Voltage Trip Under-voltage protection is enabled as soon as the main contactor is closed (indicated by closing the MCI input). If any of the phase voltages drop below the selected trip setting of the nominal line voltage for 800ms then the outlet is stopped. This is recorded in the event log as “uVOLT Trp”.
The trip level is selectable from 20% to 80% in 10% increments (Level 8, Position 4) on the Remote Display Module.
Line voltages from 415V, 1000V, 3300V or 110V are configured when the appropriate CCMD/CCMA Cable Connecting Module is selected in the Group 1 Settings (Level 8, Position 4) on the Remote Display Module.
An Under-Voltage trip does not require a reset operation.
11.3 Voltage Metering The cable connecting interface module (CCMD/CCMA) is also used to provide line voltage metering.
The outgoing line voltages for each of the 3 phases are displayed as a % of the selected rated line voltage on the Remote Display Module (Level 4, Position 1). The maximum reading is 120%.
Line voltages from 415V, 1000V, 3300V or 110V are configured when the appropriate CCMD/CCMA Cable Connecting Module is selected in the Group 1 Settings (Level 8, Position 4) on the Remote Display Module. This parameter is also used in determining the cable fault leakage levels.

Ampcontrol Pty Ltd – ABN 28 000 915 542
IPD USER MANUAL
IPDB014 Version 13 – DEC/2018
Uncontrolled Copy - Refer to Ampcontrol Website for Latest Version Page 54 of 96
AP
PR
OV
ED
FO
R E
XT
ER
NA
L D
IST
RIB
UT
ION
– P
RO
PE
RT
Y O
F A
MP
CO
NT
RO
L P
TY
LT
D
–
NO
T T
O B
E R
EP
RO
DU
CE
D IN
PA
RT
12 FAN CONTROL
12.1 Fan Interlocking A fan interlocking facility can be selected to prevent outlets from being energised until a mine section ventilation fan is operational. This facility eliminates the need for dedicated outlets. The configuration of the fan interlocking system is shown on Drawing IPDB003 in Appendix A – Drawings.
Each relay is linked together via the “FIO” (Fan Interlock Input/Output Terminal).
For single fan operation a 100 Ω resistor is connected between this link and earth. This causes all relays in the system to default to a “Slave” mode waiting to receive an interlocking signal before they can run.
For dual fan operation it is necessary to connect two 100 Ω resistors in parallel to the FIO Terminal, otherwise all FIR Inputs will read as off and the slave outlets will not run.
When an IPD Relay detects a Remote Termination Unit that has been programmed with the special machine type identifier “iFan” that particular relay switches to a “Master” configuration. This relay controls the slave outlets allowing them to run when the fan current is above the selected threshold setting.
Each relay has the ability to read and drive the FIO link via the Fan Input Read (FIR) processor input and the Fan Interlock Drive (FID) processor output. The status of the input/output can be viewed on the Remote Display Module - “Relay and Digital Input Status” Section (Level 6, Position 4).
The outlet control in each IPD Relay has been designed so that an outlet will not run unless either:
a) The FIR input is “ON”, or
b) The Remote Termination Unit connected to that IPD has been programmed with machine type
“iFan”.
The result of these conditions is reflected in an internal Fan Run Status (FRS) bit. The status of this can be viewed on the Remote Display Module. If the FRS is on, then the fan interlocking system will allow the associated outlet to run.
Relay 3 can be selected to be either non-functional (off) or can be configured to follow the Fan Interlock Drive (FID) or Fan Interlock Read (FIR) outputs of the Relay.
For single fan operation select FID or FIR. Relay 3 will energise as soon as current is above the preselected threshold.
If FID is selected for dual fan operation then Relay 3 will energise as soon as current from either fan is above the preselected threshold. If FIR is selected Relay 3 will only energise if the current from both fans are above the preselected threshold.

Ampcontrol Pty Ltd – ABN 28 000 915 542
IPD USER MANUAL
IPDB014 Version 13 – DEC/2018
Uncontrolled Copy - Refer to Ampcontrol Website for Latest Version Page 55 of 96
AP
PR
OV
ED
FO
R E
XT
ER
NA
L D
IST
RIB
UT
ION
– P
RO
PE
RT
Y O
F A
MP
CO
NT
RO
L P
TY
LT
D
–
NO
T T
O B
E R
EP
RO
DU
CE
D IN
PA
RT
12.2 Interlocking Sequence The fan interlocking operates as follows:
1. Each IPD powers up with the FID output turned off. At this point the FIR input on all IPD Relays
will read, as off, therefore no outlet will run.
2. When a machine is plugged into an outlet that has its Remote Termination Unit programmed
“iFan” then that relay will be allowed to run when requested (provided there are no protection
trips, stops etc preventing its operation).
3. When that outlet is running and the current is above the preselected current threshold, a 5
second time delay is initiated. At the completion of this delay, that IPD Relay turns on its FID
output. The fan current threshold is adjustable from 32% to 96% of full load current in 8%
increments (See Section 13, User Adjustable Settings).
4. Detecting the interlocking signal via their FIR inputs then enables all other IPD Relays on the FIO
link.
5. If at any stage the fan current drops below the threshold, or the fan is stopped, the master IPD
Relay turns off the FID output. This causes all slave IPD Relays to stop.
If fan interlocking is not required, the system can be disabled by connecting a 10kΩ 1W resistor from the FIO Terminal (Terminal 9) to 0V (Terminal 12) on each relay. In this case the FIO Terminals are not interlinked. This causes the FIR inputs to read high at all times.
An auxiliary fan being used in this situation would have its Remote Termination Unit programmed with machine type “Fan”.

Ampcontrol Pty Ltd – ABN 28 000 915 542
IPD USER MANUAL
IPDB014 Version 13 – DEC/2018
Uncontrolled Copy - Refer to Ampcontrol Website for Latest Version Page 56 of 96
AP
PR
OV
ED
FO
R E
XT
ER
NA
L D
IST
RIB
UT
ION
– P
RO
PE
RT
Y O
F A
MP
CO
NT
RO
L P
TY
LT
D
–
NO
T T
O B
E R
EP
RO
DU
CE
D IN
PA
RT
13 USER ADJUSTABLE SETTINGS
13.1 Parameter Groups There are two groups of adjustable settings contained in the IPD Relay’s non-volatile memory. Both groups can be viewed and modified via the Remote Display Module.
The first group of settings is always stored in the relay and relates to parameters which are linked to the system rather than the particular load connected to the outlet.
The second group of settings consists of parameters that are related to the load connected to the protected outlet. These settings are stored and retrieved to/from the memory in the IPD Relay or the memory in the Remote Termination Unit, depending on the “Pilot Mode” setting. Figure 13.1 shows how the memory is “switched”.
If diode pilot mode is selected, the IPD Relay reads and writes to and from the relay’s internal memory for the Group 2 settings.
If RTU Mode is selected, the Group 2 settings are sent to and retrieved from the memory in the Remote Termination Unit.
Figure 13.1: Memory “Switching” for Group 2 Parameters

Ampcontrol Pty Ltd – ABN 28 000 915 542
IPD USER MANUAL
IPDB014 Version 13 – DEC/2018
Uncontrolled Copy - Refer to Ampcontrol Website for Latest Version Page 57 of 96
AP
PR
OV
ED
FO
R E
XT
ER
NA
L D
IST
RIB
UT
ION
– P
RO
PE
RT
Y O
F A
MP
CO
NT
RO
L P
TY
LT
D
–
NO
T T
O B
E R
EP
RO
DU
CE
D IN
PA
RT
13.1.1 Group 1 Settings (Stored in the IPD)
Table 8: Group 1 Settings
Setting Description
Pilot Mode Determines if the pilot is to be terminated with a diode or remote
termination unit
EL Time Sets the trip time for the earth leakage protection
EL Sens Sets the sensitivity trip level for the earth leakage protection
EFLO Selects the Cable Connection module to be used with the IPD Relay
U/V Trip Selects the under-voltage trip threshold as a % of line volts
SC Relay Selects which output relay (MCR or CBR) is tripped in event of a
short circuit trip
EC Time Sets the trip time for the earth continuity protection
Relay 3 Selects “off”, “FID” or “FIR” operation of the relay
13.1.2 Group 2 Settings (Stored in the RTU-D)
Table 9: Group 2 Settings
Setting Description
RTU MC Type: Selects the RTU descriptive code transmitted to identify the machine
connected to the outlet.
RTU MC No: Selects the assigned machine number to be transmitted by the
Remote termination Unit.
OC I range: Sets the basic current range
OC I mul: This multiplier combines with OC range to define the full load current
OC Type: Selects either very inverse over-current or motor overload protection
OC t mul: Modifies the basic over-current time curves to achieve the desired trip
times
Cool mul: Allows the cooling rate of the thermal model to be modified
Cur Bal Trp: Adjusts current phase balance trip
SC I trip: Sets the short circuit trip level
SC Trip t: Sets the trip time for the short circuit function
Pilot Latch: Determines whether earth continuity trips are self-resetting or not
B-emf TIME: Adjustable time delay to inhibit main contactor fail following opening
of main contactor
Fan i Level: Sets the fan current threshold at which other outlets are allowed to
run
Remote Start: When “Yes” is selected the IPD Relay ignores the local start input. When “No” is selected the local start/stop inputs control the relay
Ins . TstT: Sets the trip threshold or disables the function
Start Trns Adjusts the parameters of the transient overreach function of the IPD

Ampcontrol Pty Ltd – ABN 28 000 915 542
IPD USER MANUAL
IPDB014 Version 13 – DEC/2018
Uncontrolled Copy - Refer to Ampcontrol Website for Latest Version Page 58 of 96
AP
PR
OV
ED
FO
R E
XT
ER
NA
L D
IST
RIB
UT
ION
– P
RO
PE
RT
Y O
F A
MP
CO
NT
RO
L P
TY
LT
D
–
NO
T T
O B
E R
EP
RO
DU
CE
D IN
PA
RT
13.2 Changing Parameter Settings The procedure for adjusting the settings is independent of where the values are stored. The pilot mode should be checked prior to making any other adjustments to be certain the changes are made to the desired memory.
1. Ensure the outlet is stopped.
2. For Group 2 Settings in RTU Mode, ensure RTU is on line.
3. Display the parameter that has to be changed on the Remote Display Module’s liquid crystal
display.
4. Momentarily operate the lock push button. A warning message appears.
5. Press the enter button to acknowledge the warning message and to confirm that a change is
desired.
6. Use the left and right arrows to step through the allowable values until the desired new setting is
displayed. If the right arrow key is pressed when viewing the last parameter the display wraps
back around to show the first parameter.
7. Press the enter button to indicate that the value is the required setting.
8. Momentarily operate the lock push button. The display will show a confirming message then
return to the viewing level.
If the up or down keys are operated during the procedure the IPD Relay aborts the modifying sequence.
When changes have been made to the stored values, the old value and the new value are stored in the event log.
A separate log immediately proceeds this recording the time and date that the change was made.
NOTE
While in the diode mode the IPD Relay can be pre-set with operating values in the Group 2 memory prior to switching to the RTU mode.
When in this mode the relay uses the Remote Termination Unit settings. If the Remote Termination Unit is replaced with a diode and the “Pilot
Mode” switched back to diode, the settings will revert back to the values pre-set in the IPD Relay.
NOTE
When the relay has been selected for RTU Mode the RTU must be on line before the RTU set up mode can be entered.

Ampcontrol Pty Ltd – ABN 28 000 915 542
IPD USER MANUAL
IPDB014 Version 13 – DEC/2018
Uncontrolled Copy - Refer to Ampcontrol Website for Latest Version Page 59 of 96
AP
PR
OV
ED
FO
R E
XT
ER
NA
L D
IST
RIB
UT
ION
– P
RO
PE
RT
Y O
F A
MP
CO
NT
RO
L P
TY
LT
D
–
NO
T T
O B
E R
EP
RO
DU
CE
D IN
PA
RT
13.3 Changing the Time & Date Settings If there is a need to adjust the real time clock, carry out the following procedure:
1. Using the Remote Display Module select the time and date information page (Level 7, Position 1)
to display the Day, Month, Year, Hours and Minutes.
---------------
MO 150595 09:46
2. Press the enter key. A “v” will appear in the top line above the minute section. This indicates the
number to be changed.
3. Use the left and right arrow keys to move the “v” to the desired position.
4. Press the enter key. The “v” now changes to a “?” The right arrow key is used to increment the
allowable values, once the desired value is obtained, press the enter key again. The “?” returns
to a “v”.
5. Repeat steps 3 and 4 until the correct time and date are displayed.
6. With the “v” showing press the lock push button. The “v” then changes to “E”. (This is a prompt to
press the enter key).
7. Press the enter key. At that instant, the seconds are zeroed and the selected time/date
information is transferred to the internal clock.
If the battery voltage is low the time will zero and the date will reset to 1st January on power up. If the battery is flat or faulty the relay is likely to trip on main contactor fail on power up.
NOTE
The date and time are used only to time stamp the events in the log (which are recorded sequentially regardless of the date/time). Date and
time data is not used for any control functions.

Ampcontrol Pty Ltd – ABN 28 000 915 542
IPD USER MANUAL
IPDB014 Version 13 – DEC/2018
Uncontrolled Copy - Refer to Ampcontrol Website for Latest Version Page 60 of 96
AP
PR
OV
ED
FO
R E
XT
ER
NA
L D
IST
RIB
UT
ION
– P
RO
PE
RT
Y O
F A
MP
CO
NT
RO
L P
TY
LT
D
–
NO
T T
O B
E R
EP
RO
DU
CE
D IN
PA
RT
14 SYSTEM CONTROL
14.1 Inputs and Outputs
14.1.1 Digital Inputs
The IPD Relay has five digital inputs, which are all voltage free contact inputs. Shorting the two input terminals together activates them. The inputs are:
MCI – Main Contactor Position Feedback
Start – Local Start Input
Stop – Local Stop Input
Lock – Lock input for setting changes and locked reset operations
Reset – Reset input
The status of inputs can be displayed on the Remote Display Module (Level 6, Positions 2 and 3).
14.1.2 Output Relays
The IPD Relay has output relays to control the main contactor (MCR) and the circuit breaker (CBR). Both relays are fail safe with respect to power supply loss and are controlled on the basis of protection functions.
Relay 3 has a selective function (see Section 12.1, Fan Interlocking). RL4 applies 110V for the Insulation Test (see Section 9.2.3, Automatic Insulation Test).
The status of the relays can be displayed on the Remote Display Module (Level 6, Position 1).
14.1.3 Open Collector Outputs
The IPD Relay has eight open collector outputs, which are driven through opto-couplers to provide additional indication if required. These can be used to drive LED’s, or additional relays (with appropriate drive circuitry). The eight outputs correspond to the LED’s on the display module, turning on whenever the corresponding LED is flashing. The signals are available on the IPD Relay’s base pins 35-42, and the common is on pin 34.
Contact Ampcontrol if further information is required about these outputs.

Ampcontrol Pty Ltd – ABN 28 000 915 542
IPD USER MANUAL
IPDB014 Version 13 – DEC/2018
Uncontrolled Copy - Refer to Ampcontrol Website for Latest Version Page 61 of 96
AP
PR
OV
ED
FO
R E
XT
ER
NA
L D
IST
RIB
UT
ION
– P
RO
PE
RT
Y O
F A
MP
CO
NT
RO
L P
TY
LT
D
–
NO
T T
O B
E R
EP
RO
DU
CE
D IN
PA
RT
14.2 Outlet Control The outlet can be energised by local or remote operation depending on the “Remote Start” option. The selection is “Yes” or “No” (Level 9, Position 14).
14.2.1 RTU Mode
If “Yes” is selected the relay ignores the local start input thus allowing operation of the outlet from the remote machine.
NOTE
Both the remote and local stop buttons will turn off the outlet.
If “No” is selected the local start/stop buttons control the outlet. The Remote Termination Unit’s start, stop and PTC terminals must be bridged to energise the outlet.
WARNING!
Stop/Start functions are operational only. Emergency stops must be wired directly into the pilot circuit.
14.2.2 Remote Operation in Diode Mode
In this mode the stop/start station is connected in the pilot (see Typical Connection Diagram IPDE001 in Appendix A – Drawings). The pilot has a hysteresis of 100 ohms. This is to allow a 100 ohm resistor to be connected across the start button. The hysteresis is linked to the main contactor input (MCI). If MCI is open, then the earth continuity will trip at 45 ohms. If the MCI is closed, the earth continuity trips at 145 ohms.
It is also necessary to bridge the local start button or start input on the relay, on the outlet controlled by this method.
NOTE
Both the remote and local stop buttons will turn off the outlet.
WARNING!
Stop/Start functions are operational only. Emergency stops must be wired directly into the pilot circuit.

Ampcontrol Pty Ltd – ABN 28 000 915 542
IPD USER MANUAL
IPDB014 Version 13 – DEC/2018
Uncontrolled Copy - Refer to Ampcontrol Website for Latest Version Page 62 of 96
AP
PR
OV
ED
FO
R E
XT
ER
NA
L D
IST
RIB
UT
ION
– P
RO
PE
RT
Y O
F A
MP
CO
NT
RO
L P
TY
LT
D
–
NO
T T
O B
E R
EP
RO
DU
CE
D IN
PA
RT
14.3 Operational Sequence
14.3.1 Starting the Outlet
Before an outlet can be energised the following conditions must apply:
a) No protection faults present
b) Fan interlocking enabled
c) Stop input open
d) Local and remote start inputs closed
e) RTU stop and PTC inputs closed
Once these conditions are obtained a cable fault lock out test is performed automatically. This takes 1 second. If the result of this test is satisfactory the IPD Relay goes into the run mode and the MCR relay picks up.
The “RUN” LED on the Remote Display Module is illuminated and the open collector output on the relay is switched on to provide remote monitoring if required.
A time delay of 5 seconds is allowed for the Main Contactor Interlock (MCI) to close. If it does not close within this time, then the run mode is exited.
NOTE
The Start input must be held closed whilst the IPD is performing the initial EFLO test. If the Start input is released prior to the
completion of this test, the start sequence will be aborted.
It should be noted that if the main contactor does not close when the MCR relay closes and the start/stop conditions are maintained, then the IPD will cycle through the following start sequence: testing, run, stopped, pause then repeat the sequence while ever the start input is closed.
14.3.2 Stopping the Outlet
If a stop input is closed while the relay is in run mode, the run is cleared, and the MCR relay de-energises. The event log reads “Stopped”. If a stop input is closed during a cable fault lockout test, then the test is aborted.
WARNING!
Stop inputs are operational only. Emergency stops must be wired directly into the pilot circuit.
14.3.3 Uncommanded Open
While the main contactor is closed, the MCI input is continuously monitored. If it opens, the run is cleared and the MCR relay de-energises. In this case the event log records “MC Opened” which indicates that the outlet was turned off by something other than the IPD Relay, e.g. open circuited main contactor coil or control supply.

Ampcontrol Pty Ltd – ABN 28 000 915 542
IPD USER MANUAL
IPDB014 Version 13 – DEC/2018
Uncontrolled Copy - Refer to Ampcontrol Website for Latest Version Page 63 of 96
AP
PR
OV
ED
FO
R E
XT
ER
NA
L D
IST
RIB
UT
ION
– P
RO
PE
RT
Y O
F A
MP
CO
NT
RO
L P
TY
LT
D
–
NO
T T
O B
E R
EP
RO
DU
CE
D IN
PA
RT
15 EVENT LOG
A real time clock/calendar is included in the IPD Relay. This combines with the non-volatile memory to provide a data-logging feature. This log sequentially records the time, date and details of the most recent event. A chronological list of the previous 120 events is stored.
The event log can be automatically scrolled so as to view the entire log. To achieve this press “Enter” followed by the “Right or Left” arrow keys to commence the scroll. The log will scroll one log per second in the direction of the arrow key pressed. Press “Enter” to stop the scroll at the desired log.
A typical display shows:
LOG 10: EL TRIP
MO 15/05 09:46:21
This records that an earth leakage fault caused a trip condition on Monday, 15 May at 9.46am. Log 10 indicates that it is the 10th log in the list.
NOTE
The log entries are arranged in chronological order.
Log 1 is always the most recent event.
NOTE
The Event Log contains 120 entries. Each time a new log is recorded, the 120th log is removed from the list.
Table 10 details the log entry identifiers and their associated descriptions.
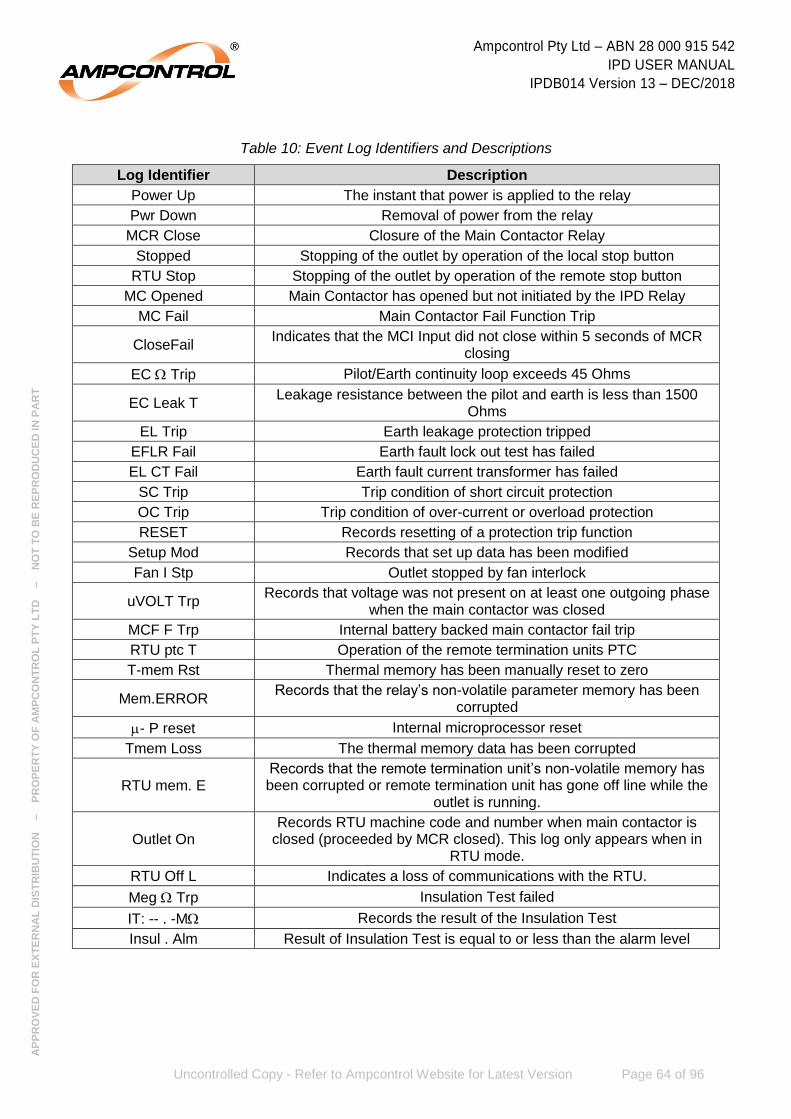
Ampcontrol Pty Ltd – ABN 28 000 915 542
IPD USER MANUAL
IPDB014 Version 13 – DEC/2018
Uncontrolled Copy - Refer to Ampcontrol Website for Latest Version Page 64 of 96
AP
PR
OV
ED
FO
R E
XT
ER
NA
L D
IST
RIB
UT
ION
– P
RO
PE
RT
Y O
F A
MP
CO
NT
RO
L P
TY
LT
D
–
NO
T T
O B
E R
EP
RO
DU
CE
D IN
PA
RT
Table 10: Event Log Identifiers and Descriptions
Log Identifier Description
Power Up The instant that power is applied to the relay
Pwr Down Removal of power from the relay
MCR Close Closure of the Main Contactor Relay
Stopped Stopping of the outlet by operation of the local stop button
RTU Stop Stopping of the outlet by operation of the remote stop button
MC Opened Main Contactor has opened but not initiated by the IPD Relay
MC Fail Main Contactor Fail Function Trip
CloseFail Indicates that the MCI Input did not close within 5 seconds of MCR
closing
EC Trip Pilot/Earth continuity loop exceeds 45 Ohms
EC Leak T Leakage resistance between the pilot and earth is less than 1500
Ohms
EL Trip Earth leakage protection tripped
EFLR Fail Earth fault lock out test has failed
EL CT Fail Earth fault current transformer has failed
SC Trip Trip condition of short circuit protection
OC Trip Trip condition of over-current or overload protection
RESET Records resetting of a protection trip function
Setup Mod Records that set up data has been modified
Fan I Stp Outlet stopped by fan interlock
uVOLT Trp Records that voltage was not present on at least one outgoing phase
when the main contactor was closed
MCF F Trp Internal battery backed main contactor fail trip
RTU ptc T Operation of the remote termination units PTC
T-mem Rst Thermal memory has been manually reset to zero
Mem.ERROR Records that the relay’s non-volatile parameter memory has been
corrupted
- P reset Internal microprocessor reset
Tmem Loss The thermal memory data has been corrupted
RTU mem. E Records that the remote termination unit’s non-volatile memory has been corrupted or remote termination unit has gone off line while the
outlet is running.
Outlet On Records RTU machine code and number when main contactor is
closed (proceeded by MCR closed). This log only appears when in RTU mode.
RTU Off L Indicates a loss of communications with the RTU.
Meg Trp Insulation Test failed
IT: -- . -M Records the result of the Insulation Test
Insul . Alm Result of Insulation Test is equal to or less than the alarm level

Ampcontrol Pty Ltd – ABN 28 000 915 542
IPD USER MANUAL
IPDB014 Version 13 – DEC/2018
Uncontrolled Copy - Refer to Ampcontrol Website for Latest Version Page 65 of 96
AP
PR
OV
ED
FO
R E
XT
ER
NA
L D
IST
RIB
UT
ION
– P
RO
PE
RT
Y O
F A
MP
CO
NT
RO
L P
TY
LT
D
–
NO
T T
O B
E R
EP
RO
DU
CE
D IN
PA
RT
16 REMOTE DATA COMMUNICATIONS
The IPD Integrated Protection Relay has the facility for connecting remote monitoring equipment. This can be in the form of either the Remote Display Module or other peripheral equipment such as PLC’s.
For PLC applications each integrated protection relay is connected to a Serial Interface Module (IPSI-D), which has its output drop connected to a DNET-IP2 Protocol Converter. The Protocol Converter provides the communications link to a PLC (see DNET-IP2 Serial Communication System User Manual for further details).
The Ampcontrol DNET-IP2 Serial Communication System transfers data and commands between the Host System and the modules using RS232, RS422 and RS485 protocols.
Figure 16.1: PLC Communications Block Diagram
External Communications Device (e.g. PLC)
IPSI-DDNET-IP2 Protocol
ConverterIPD
Relay
IPSI-DIPD
Relay
IPSI-DIPD
Relay

Ampcontrol Pty Ltd – ABN 28 000 915 542
IPD USER MANUAL
IPDB014 Version 13 – DEC/2018
Uncontrolled Copy - Refer to Ampcontrol Website for Latest Version Page 66 of 96
AP
PR
OV
ED
FO
R E
XT
ER
NA
L D
IST
RIB
UT
ION
– P
RO
PE
RT
Y O
F A
MP
CO
NT
RO
L P
TY
LT
D
–
NO
T T
O B
E R
EP
RO
DU
CE
D IN
PA
RT
17 SERVICE, MAINTENANCE & DISPOSAL
17.1 Equipment Service
A number of external system based checks should be completed on a regular basis. These ‘routine inspections’ must be carried out by suitably trained people with knowledge of the IPD and the systems into which it is fitted. Routine inspections may take the form of either visual-only checks, or visual and ‘hands-on’ checks.
17.1.1 Visual Only Inspections
A basic visual inspection focuses on looking at the installation for signs of physical damage, water or dust ingress and the condition of cables and labels. This type of inspection may involve opening cabinets to gain access to the IPD and other equipment. This level of inspection may also include cleaning display windows that have become obscured by dirt.
Observations would typically be:
Check that equipment enclosures, cable trays, conduits, etc. are in good order with no physical damage.
Check that sealed wall boxes are free from water and dust ingress internally. Door seals are in good condition.
Check that connected cables are free from cuts, abrasions and obvious signs of damage. Cable restraints are in good order and correctly fitted.
Check that labels on equipment, wall boxes and cables are present and in good condition (especially certification labels).
Check that no modifications have been carried out to installed equipment.
17.1.2 Hands-On (Detailed) Inspections
A more detailed inspection would include all of the elements of a visual inspection, plus some checks that cover the integrity of connections, fixtures and fittings.
In addition to basic visual observations, more detailed integrity checks would involve:
Verify that equipment housings, wall boxes and other mechanical fixtures are secured in place. This includes terminal box lids, tightness of cable glands, integrity of wall-box mountings, security of equipment fixing to walls/DIN rails etc.
Verify all electrical connections are secure with no loose screw terminals or DIN rail terminals not fitted to rails etc.
17.2 Equipment Maintenance
WARNING!
The IPD has no user-serviceable parts.
All repairs must be carried out by Ampcontrol only.
If a fault develops, return the IPD to Ampcontrol for repair. It is essential that no attempt be made to repair the IPD as any attempt to
dismantle or repair the IPD can seriously compromise the safety of the unit and voids product warranty.
It is required that the electrical protection system incorporating the IPD and its associated elements be subjected to regular functional tests at intervals determined by risk assessment and FMEA. These intervals typically coincide with periodic maintenance checks and should cover as a minimum (but not be limited to) tests such as:-

Ampcontrol Pty Ltd – ABN 28 000 915 542
IPD USER MANUAL
IPDB014 Version 13 – DEC/2018
Uncontrolled Copy - Refer to Ampcontrol Website for Latest Version Page 67 of 96
AP
PR
OV
ED
FO
R E
XT
ER
NA
L D
IST
RIB
UT
ION
– P
RO
PE
RT
Y O
F A
MP
CO
NT
RO
L P
TY
LT
D
–
NO
T T
O B
E R
EP
RO
DU
CE
D IN
PA
RT
Earth Leakage Tests
Earth continuity tests
Earth Fault lockout tests
Overcurrent injection tests
Equipment maintenance, repair and overhauls shall also be in accordance with legislation and standards applicable to the Country and State of use. In Australia to ensure compliance to the legislative referenced standards AS/NZS2290, AS/NZS3800 and HB239, the manufacturers requirements are as follows:-
17.2.1 External Inspections
External inspections are to be carried out daily, when mounted externally & visible, or 6 Monthly, when mounted inside Ex-d enclosures.
17.2.2 Internal Inspections
Internal inspections are not permitted - do not open any of the IPD components.
17.2.3 Repair and Overhaul
This is required every 4 years. The following components shall be returned to Ampcontrol for AS3800 inspection, repair and overhaul:-
Integrated Protection Relay IPD - Part # 162131
Remote Display Module RDM-D - Part # 110141
CCMD Cable Connection Module(s) - Part # 110146, 110147, 110148
Remote Termination Unit RTU-D3 - Part # 161575 (where used & available)
Keypad Interface Module IKD - Part # 110142
IS Keypad IKD - Part # 110143
IPSI-D IPD Serial Interface Module - Part # 110144
NOTE
IS battery life (and the interoperability of the IS system components) is fundamental to reliable operation of the product and maintaining safety
in operation.
CAUTION!
All ancillary equipment used with the IPD integrated protection relay should be as specified in the IPD Equipment List to ensure safe
operation of the relay.
17.3 Disposal
ENVIRO
The electronic equipment discussed in this manual must not be treated as general waste. By ensuring that this product is disposed of
correctly you will be helping to prevent potentially negative consequences for the environment which could otherwise be caused by
incorrect waste handling of this product.

Ampcontrol Pty Ltd – ABN 28 000 915 542
IPD USER MANUAL
IPDB014 Version 13 – DEC/2018
Uncontrolled Copy - Refer to Ampcontrol Website for Latest Version Page 68 of 96
AP
PR
OV
ED
FO
R E
XT
ER
NA
L D
IST
RIB
UT
ION
– P
RO
PE
RT
Y O
F A
MP
CO
NT
RO
L P
TY
LT
D
–
NO
T T
O B
E R
EP
RO
DU
CE
D IN
PA
RT
18 SPECIFICATIONS
General
Auxiliary Supply Voltage
110vac ± 10% 10VA, 50Hz ± 2 Hz
Dimensions See Section 5.3
Ambient Temperature 0˚C to 60˚C
Relay Contact Ratings 5A/190VAC 100VA maximum (MCR, CBR, RL3, RL4)
Certification
IECEx IECEx ITA 07.0018X (refer to http://iecex.iec.ch/ for certificate)
Earth Leakage Protection
Trip Setting 100-500mA in 50mA increments
Time Delay Setting Instantaneous (<50ms), 100ms, then 150ms to 470ms in 40ms increments.
Earth Continuity Protection
Trip Threshold (Series) > 45Ω
Trip Threshold (Shunt) < 1500Ω
Time Delay Setting 80ms, 120ms, 160ms, 200ms, 300ms, 400ms, 500ms
Pilot Cable Parameters C < 0.3F, L < 10mH, L/R<600uH/Ω
Earth Fault Lockout Protection
Lockout Resistance (IS Test)
415V < 4.15kΩ 1000V < 10kΩ 3.3kV < 33kΩ
IS Test Time 1 second
Lockout Resistance (Insulation Test)
Selectable at 0.1, 0.2, 0.5, 1, 2, 5, 10 and 15 MΩ and off
Insulation Test Time 2 second
Alarm Settings Insulation Test Trip Setting x1.5
Over-Current / Overload Protection
Current Range 7.5 to 464 Amps (60 to 116 Amps in 4 Amp increments, times current multiplier)
Current Multiplier 1/8, 1/4, 1/2, 1, 2, 4 times
Time Multiplier 0.005, 0.01, 0.015, 0.02, 0.03, 0.04, 0.05, 0.075, 0.1, 0.15, 0.2, 0.3, 0.4, 0.5, 0.6, 0.7, 0.8, 1.0 times
Cooling Multiplier 0.2, 0.3, 0.4, 0.5, 0.8, 1.0, 2.0, 5.0, 10, 20, 50 times
Current Balance
Trip Settings 5%, 10%, 20%, 50% and off
Short Circuit Protection
Trip Setting 3.0 to 10.0 times in 0.5 increments (times full load current)
Trip Time 20, 40, 60, 80, 100, 120, 160ms
Transient Delay Setting DISABLED, 40, 60, 80, 100, 120
Back EMF Timer
Trip Delay Settings 2, 5, 10, 20 seconds

Ampcontrol Pty Ltd – ABN 28 000 915 542
IPD USER MANUAL
IPDB014 Version 13 – DEC/2018
Uncontrolled Copy - Refer to Ampcontrol Website for Latest Version Page 69 of 96
AP
PR
OV
ED
FO
R E
XT
ER
NA
L D
IST
RIB
UT
ION
– P
RO
PE
RT
Y O
F A
MP
CO
NT
RO
L P
TY
LT
D
–
NO
T T
O B
E R
EP
RO
DU
CE
D IN
PA
RT
Machine Numbers
Machine Numbers Can be allocated from 1 to 40
Fan Current
Threshold Level 32% to 96% in 8% increments (% of full load current)
Undervoltage Protection
Trip Setting Selectable from 20% to 80% in 10% increments
Trip Delay 800ms
Serial Communications
For information on Protocol and hardware requirements see DNET-IP2 Serial Communication System User Manual.

Ampcontrol Pty Ltd – ABN 28 000 915 542
IPD USER MANUAL
IPDB014 Version 13 – DEC/2018
Uncontrolled Copy - Refer to Ampcontrol Website for Latest Version Page 70 of 96
AP
PR
OV
ED
FO
R E
XT
ER
NA
L D
IST
RIB
UT
ION
– P
RO
PE
RT
Y O
F A
MP
CO
NT
RO
L P
TY
LT
D
–
NO
T T
O B
E R
EP
RO
DU
CE
D IN
PA
RT
19 EQUIPMENT LIST
RELAY, BASE PLATE, DISPLAY
One of each is required for each installation.
Part Number Description
162831 Integrated Protection Relay IPD1V05
121115 IPD Base Plate
110141 IPD Remote Display Module RDM-D
CABLE CONNECTION MODULES
One (only) of the following is required for each installation.
Part Number Description
101487 CCMA 110V Cable Connection Module
101489 CCMA 415V Cable Connection Module
101486 CCMA 1000V Cable Connection Module
110146 CCMD 415V Cable Connection Module
110147 CCMD 1000V Cable Connection Module
110148 CCMD 3.3kV Cable Connection Module
EARTH LEAKAGE TOROID
One (only) of the following is required for each installation.
Part Number Description
101649 Toroid EL500/60/100T 500mA 60mm Inner Diameter
101654 Toroid EL500/112/100T 500mA 112mm Inner Diameter
PHASE CURRENT TRANSFORMERS
Two Phase Current Transformers are required for each installation. Select size to suit the cable diameter.
Part Number Description
101272 CT 1000/1 45mm Inner Diameter OL1 (1000:1)
101703 CT 1000/1 88mm Inner Diameter OL2 (1000:1)
REMOTE TERMINATION UNITS
The IPD requires an RTU-D for its Machine Communication function. If this function is not required, than the RTU-D can be replaced with an appropriately rated diode.
Part Number Description
161575 Module RTU D3 Remote Termination Unit
KEYPAD
Optional Intrinsically Safe Keypad Assembly, requires both and Interface and a Keypad. Refer to the IKD Keypad Pushbutton System User Manual for more details.
Part Number Description
110142 Module IKD V01 Keypad Interface
110143 Keypad IKD IS
SERIAL COMMUNICATION
The IPD serial communication system is optional. Refer to the DNET Serial Communications User Manual for more details.
Part Number Description
101270 DNET-IP2 Protocol Converter
171107 DNET-IP2 Power Supply 85-285Vac V2
110144 IPSI-D IPD Serial Interface Module

Ampcontrol Pty Ltd – ABN 28 000 915 542
IPD USER MANUAL
IPDB014 Version 13 – DEC/2018
Uncontrolled Copy - Refer to Ampcontrol Website for Latest Version Page 71 of 96
AP
PR
OV
ED
FO
R E
XT
ER
NA
L D
IST
RIB
UT
ION
– P
RO
PE
RT
Y O
F A
MP
CO
NT
RO
L P
TY
LT
D
–
NO
T T
O B
E R
EP
RO
DU
CE
D IN
PA
RT
OTHER ACCESSORIES
Part Number Description
101826 EFTM 415/1kV IPC Earth/Fault Test
121170 EFTM 3.3kV IPC Earth/Fault Test
101296 Fuse Holder C/W 3A/660V Fuse
117139 Fuse 3A/660V (Spare Item)

Ampcontrol Pty Ltd – ABN 28 000 915 542
IPD USER MANUAL
IPDB014 Version 13 – DEC/2018
Uncontrolled Copy - Refer to Ampcontrol Website for Latest Version Page 72 of 96
AP
PR
OV
ED
FO
R E
XT
ER
NA
L D
IST
RIB
UT
ION
– P
RO
PE
RT
Y O
F A
MP
CO
NT
RO
L P
TY
LT
D
–
NO
T T
O B
E R
EP
RO
DU
CE
D IN
PA
RT
20 TROUBLESHOOTING
If a problem is experienced with the relay, use the following table to aid in fault finding. Should the fault persist, remove the relay and return the relay, plus a description of the fault, to Ampcontrol for repairs.
NOTE
Checking the Status page (level 0, position 0) should be the first step in troubleshooting. This displays what the relay requires to make it
operate. Also check the first six event logs.
Symptom Cause Remedy
Remote Display shows a blank screen. The RDM Healthy LED indicator located on the top of the RDM module is off.
Loss of power to the Display
Check there is power to the relay and it is correctly plugged in. The Relay supplies 15v dc to RDM. Check cable between RDM and the relay.
Faulty Display Module. Replace module.
Remote Display shows a blank screen. The RDM Healthy LED flashes at 1 Hz.
Power to RDM is healthy but there is no data
Check data cable between the relay and the RDM.
Status Message:
IPD Memory Error
When in diode pilot mode
Corruption in the Group 1 or 2 Settings, stored in the IPD Relay
Examine the Group 1 and 2 Settings (level 8 and 9) to check the stored parameters in the non-volatile memory. Machine type and number are irrelevant and should be ignored. One or several settings will show ‘???’. Re-program lost settings into the memory.
Status Message:
IPD Memory Error
When in RTU pilot mode
Corruption in the Group 1 Settings in the IPD Relay
Examine the Group 1 Settings (level 8) to check the stored parameters in the non-volatile memory. One or several other settings will show ‘???’. Re-program lost settings into the memory.
Status Message:
RTU Memory Error
Either the RTU is not on line or the RTU’s non - volatile memory has been corrupted
Check that the RTU is on line (level 3, position 1) i.e. a healthy pilot loop. If the RTU is on line examine the Group 2 Settings stored in the RTU (level 9). One or several other settings will show ‘???’. Re-program lost settings into the RTU memory.
Relay will not close. EC fault indicated.
Faulty pilot circuit (open or high resistance or shorted to earth)
Check pilot circuit e.g., operate relay with a dummy plug if in diode mode. If still faulty replace the relay.
Check pilot fuse
Status Message:
Need RTU Start or
Stopped - RTU or
Stopped - RTU PTC
Relay is waiting for the RTU digital inputs to be closed
Ensure all three RTU digital inputs are closed.

Ampcontrol Pty Ltd – ABN 28 000 915 542
IPD USER MANUAL
IPDB014 Version 13 – DEC/2018
Uncontrolled Copy - Refer to Ampcontrol Website for Latest Version Page 73 of 96
AP
PR
OV
ED
FO
R E
XT
ER
NA
L D
IST
RIB
UT
ION
– P
RO
PE
RT
Y O
F A
MP
CO
NT
RO
L P
TY
LT
D
–
NO
T T
O B
E R
EP
RO
DU
CE
D IN
PA
RT
Symptom Cause Remedy
Status Message:
“Locked Out - Fan”
Relay is waiting for fan interlocking system.
If interlocking is not required then a 10k ohm resistor must be connected between terminals 9 and 12.
If fan interlocking is used ensure that the fan is running and the current threshold setting in the fan outlet’s RTU is correct.
The Fan Outlet IPD should pick up its FID (Fan Interlock Drive) signal, which causes all other relays to pick up their FIR (Fan Interlock Read). Check these conditions level 6, position 4.
If fan interlocking is not correct check the wiring between the fan relay and other relays (terminal 9).
Relay displays ‘Outlet Close Fail’ message after start is pressed.
The relay’s MCI input is not closing within 5 Sec of MCR relay pickup (level 6 position 2).
Check that main contactor is closing. If not check circuit or replace main contactor.
RDM displays ‘Tripped-No Volts’ message.
Relay not receiving/lost voltage feedback on one or all three outlet phases when contactor closed.
Check system voltage display (level 4, position 1) as contactor closes. Compare this with the under voltage threshold.
Check continuity from the relay, through the CCMD to power conductors. This can be achieved by testing each phase to earth at the outlet, provided the circuit is isolated.
Typical readings:
CCMD-415 2340k ohm
CCMD-1000 2340k ohm
CCMD-3.3k 7520k ohm
Relay Trips on MCF on power up.
Main Contactor Fail condition.
Check main contactor for leakage across terminals on frozen contactor condition.
Flat or faulty battery. Return to Ampcontrol for battery replacement and full testing.
Time and date incorrect.
Resets to 1/01/9? on power up. Low IS battery
Return to Ampcontrol for battery replacement and full testing.

Ampcontrol Pty Ltd – ABN 28 000 915 542
IPD USER MANUAL
IPDB014 Version 13 – DEC/2018
Uncontrolled Copy - Refer to Ampcontrol Website for Latest Version Page 74 of 96
AP
PR
OV
ED
FO
R E
XT
ER
NA
L D
IST
RIB
UT
ION
– P
RO
PE
RT
Y O
F A
MP
CO
NT
RO
L P
TY
LT
D
–
NO
T T
O B
E R
EP
RO
DU
CE
D IN
PA
RT
APPENDIX A: DRAWINGS
The drawings listed in the below table appear in Appendix A in the same order.
Table 11: Appendix A Drawing Register
Drawing No. Description
IPDE001 Typical Connection Diagram
IPDB002 Display Map
IPDB018 Over-current Curve & Short Circuit Curves, Very Intense Curve
IPDB019 Motor Overload & Short Circuit Curves
IPDB003 Fan Interlocking System
IPDB032 Overcurrent Functional Block Diagram
IPDB033 Overcurrent & Short Circuit Curves
IPDB034 Motor Overload Hot & Cold Curves
IPDB035 Motor overload Block Diagram
IPDA021 IPD Relay & Base Dimension Details
IPDA015 Remote Termination Unit - General Arrangement
IPDA016 Remote Display Module RDM-D - G A & Mounting Details
IPDA017 IPD Baseplate Connection Details and General Arrangement
IPDA018 415V Cable Connecting Module – Dimensions & Marking Details
IPDA019 1000V Cable Connecting Module – Dimensions & Marking Details
IPDA020 3.3kV Cable Connecting Module – Dimensions & Marking Details
IPAA033 110V Cable Connecting Module – Dimensions & Marking Details
IPAA031 Relay Output Module PCB & Card Holder - General Arrangement

Ampcontrol Pty Ltd – ABN 28 000 915 542
IPD USER MANUAL
IPDB014 Version 13 – DEC/2018
Uncontrolled Copy - Refer to Ampcontrol Website for Latest Version Page 75 of 96
AP
PR
OV
ED
FO
R E
XT
ER
NA
L D
IST
RIB
UT
ION
– P
RO
PE
RT
Y O
F A
MP
CO
NT
RO
L P
TY
LT
D
–
NO
T T
O B
E R
EP
RO
DU
CE
D IN
PA
RT

Ampcontrol Pty Ltd – ABN 28 000 915 542
IPD USER MANUAL
IPDB014 Version 13 – DEC/2018
Uncontrolled Copy - Refer to Ampcontrol Website for Latest Version Page 76 of 96
AP
PR
OV
ED
FO
R E
XT
ER
NA
L D
IST
RIB
UT
ION
– P
RO
PE
RT
Y O
F A
MP
CO
NT
RO
L P
TY
LT
D
–
NO
T T
O B
E R
EP
RO
DU
CE
D IN
PA
RT

Ampcontrol Pty Ltd – ABN 28 000 915 542
IPD USER MANUAL
IPDB014 Version 13 – DEC/2018
Uncontrolled Copy - Refer to Ampcontrol Website for Latest Version Page 77 of 96
AP
PR
OV
ED
FO
R E
XT
ER
NA
L D
IST
RIB
UT
ION
– P
RO
PE
RT
Y O
F A
MP
CO
NT
RO
L P
TY
LT
D
–
NO
T T
O B
E R
EP
RO
DU
CE
D IN
PA
RT

Ampcontrol Pty Ltd – ABN 28 000 915 542
IPD USER MANUAL
IPDB014 Version 13 – DEC/2018
Uncontrolled Copy - Refer to Ampcontrol Website for Latest Version Page 78 of 96
AP
PR
OV
ED
FO
R E
XT
ER
NA
L D
IST
RIB
UT
ION
– P
RO
PE
RT
Y O
F A
MP
CO
NT
RO
L P
TY
LT
D
–
NO
T T
O B
E R
EP
RO
DU
CE
D IN
PA
RT

Ampcontrol Pty Ltd – ABN 28 000 915 542
IPD USER MANUAL
IPDB014 Version 13 – DEC/2018
Uncontrolled Copy - Refer to Ampcontrol Website for Latest Version Page 79 of 96
AP
PR
OV
ED
FO
R E
XT
ER
NA
L D
IST
RIB
UT
ION
– P
RO
PE
RT
Y O
F A
MP
CO
NT
RO
L P
TY
LT
D
–
NO
T T
O B
E R
EP
RO
DU
CE
D IN
PA
RT

Ampcontrol Pty Ltd – ABN 28 000 915 542
IPD USER MANUAL
IPDB014 Version 13 – DEC/2018
Uncontrolled Copy - Refer to Ampcontrol Website for Latest Version Page 80 of 96
AP
PR
OV
ED
FO
R E
XT
ER
NA
L D
IST
RIB
UT
ION
– P
RO
PE
RT
Y O
F A
MP
CO
NT
RO
L P
TY
LT
D
–
NO
T T
O B
E R
EP
RO
DU
CE
D IN
PA
RT

Ampcontrol Pty Ltd – ABN 28 000 915 542
IPD USER MANUAL
IPDB014 Version 13 – DEC/2018
Uncontrolled Copy - Refer to Ampcontrol Website for Latest Version Page 81 of 96
AP
PR
OV
ED
FO
R E
XT
ER
NA
L D
IST
RIB
UT
ION
– P
RO
PE
RT
Y O
F A
MP
CO
NT
RO
L P
TY
LT
D
–
NO
T T
O B
E R
EP
RO
DU
CE
D IN
PA
RT

Ampcontrol Pty Ltd – ABN 28 000 915 542
IPD USER MANUAL
IPDB014 Version 13 – DEC/2018
Uncontrolled Copy - Refer to Ampcontrol Website for Latest Version Page 82 of 96
AP
PR
OV
ED
FO
R E
XT
ER
NA
L D
IST
RIB
UT
ION
– P
RO
PE
RT
Y O
F A
MP
CO
NT
RO
L P
TY
LT
D
–
NO
T T
O B
E R
EP
RO
DU
CE
D IN
PA
RT

Ampcontrol Pty Ltd – ABN 28 000 915 542
IPD USER MANUAL
IPDB014 Version 13 – DEC/2018
Uncontrolled Copy - Refer to Ampcontrol Website for Latest Version Page 83 of 96
AP
PR
OV
ED
FO
R E
XT
ER
NA
L D
IST
RIB
UT
ION
– P
RO
PE
RT
Y O
F A
MP
CO
NT
RO
L P
TY
LT
D
–
NO
T T
O B
E R
EP
RO
DU
CE
D IN
PA
RT

Ampcontrol Pty Ltd – ABN 28 000 915 542
IPD USER MANUAL
IPDB014 Version 13 – DEC/2018
Uncontrolled Copy - Refer to Ampcontrol Website for Latest Version Page 84 of 96
AP
PR
OV
ED
FO
R E
XT
ER
NA
L D
IST
RIB
UT
ION
– P
RO
PE
RT
Y O
F A
MP
CO
NT
RO
L P
TY
LT
D
–
NO
T T
O B
E R
EP
RO
DU
CE
D IN
PA
RT

Ampcontrol Pty Ltd – ABN 28 000 915 542
IPD USER MANUAL
IPDB014 Version 13 – DEC/2018
Uncontrolled Copy - Refer to Ampcontrol Website for Latest Version Page 85 of 96
AP
PR
OV
ED
FO
R E
XT
ER
NA
L D
IST
RIB
UT
ION
– P
RO
PE
RT
Y O
F A
MP
CO
NT
RO
L P
TY
LT
D
–
NO
T T
O B
E R
EP
RO
DU
CE
D IN
PA
RT

Ampcontrol Pty Ltd – ABN 28 000 915 542
IPD USER MANUAL
IPDB014 Version 13 – DEC/2018
Uncontrolled Copy - Refer to Ampcontrol Website for Latest Version Page 86 of 96
AP
PR
OV
ED
FO
R E
XT
ER
NA
L D
IST
RIB
UT
ION
– P
RO
PE
RT
Y O
F A
MP
CO
NT
RO
L P
TY
LT
D
–
NO
T T
O B
E R
EP
RO
DU
CE
D IN
PA
RT

Ampcontrol Pty Ltd – ABN 28 000 915 542
IPD USER MANUAL
IPDB014 Version 13 – DEC/2018
Uncontrolled Copy - Refer to Ampcontrol Website for Latest Version Page 87 of 96
AP
PR
OV
ED
FO
R E
XT
ER
NA
L D
IST
RIB
UT
ION
– P
RO
PE
RT
Y O
F A
MP
CO
NT
RO
L P
TY
LT
D
–
NO
T T
O B
E R
EP
RO
DU
CE
D IN
PA
RT

Ampcontrol Pty Ltd – ABN 28 000 915 542
IPD USER MANUAL
IPDB014 Version 13 – DEC/2018
Uncontrolled Copy - Refer to Ampcontrol Website for Latest Version Page 88 of 96
AP
PR
OV
ED
FO
R E
XT
ER
NA
L D
IST
RIB
UT
ION
– P
RO
PE
RT
Y O
F A
MP
CO
NT
RO
L P
TY
LT
D
–
NO
T T
O B
E R
EP
RO
DU
CE
D IN
PA
RT

Ampcontrol Pty Ltd – ABN 28 000 915 542
IPD USER MANUAL
IPDB014 Version 13 – DEC/2018
Uncontrolled Copy - Refer to Ampcontrol Website for Latest Version Page 89 of 96
AP
PR
OV
ED
FO
R E
XT
ER
NA
L D
IST
RIB
UT
ION
– P
RO
PE
RT
Y O
F A
MP
CO
NT
RO
L P
TY
LT
D
–
NO
T T
O B
E R
EP
RO
DU
CE
D IN
PA
RT

Ampcontrol Pty Ltd – ABN 28 000 915 542
IPD USER MANUAL
IPDB014 Version 13 – DEC/2018
Uncontrolled Copy - Refer to Ampcontrol Website for Latest Version Page 90 of 96
AP
PR
OV
ED
FO
R E
XT
ER
NA
L D
IST
RIB
UT
ION
– P
RO
PE
RT
Y O
F A
MP
CO
NT
RO
L P
TY
LT
D
–
NO
T T
O B
E R
EP
RO
DU
CE
D IN
PA
RT
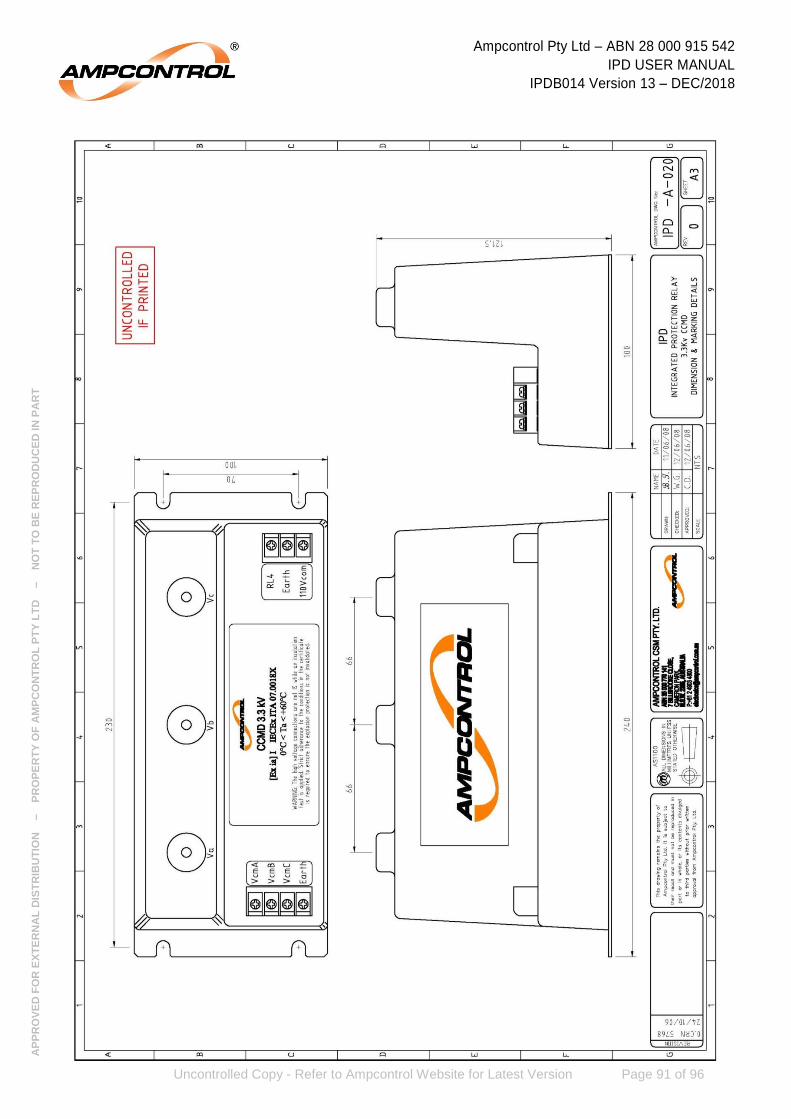
Ampcontrol Pty Ltd – ABN 28 000 915 542
IPD USER MANUAL
IPDB014 Version 13 – DEC/2018
Uncontrolled Copy - Refer to Ampcontrol Website for Latest Version Page 91 of 96
AP
PR
OV
ED
FO
R E
XT
ER
NA
L D
IST
RIB
UT
ION
– P
RO
PE
RT
Y O
F A
MP
CO
NT
RO
L P
TY
LT
D
–
NO
T T
O B
E R
EP
RO
DU
CE
D IN
PA
RT

Ampcontrol Pty Ltd – ABN 28 000 915 542
IPD USER MANUAL
IPDB014 Version 13 – DEC/2018
Uncontrolled Copy - Refer to Ampcontrol Website for Latest Version Page 92 of 96
AP
PR
OV
ED
FO
R E
XT
ER
NA
L D
IST
RIB
UT
ION
– P
RO
PE
RT
Y O
F A
MP
CO
NT
RO
L P
TY
LT
D
–
NO
T T
O B
E R
EP
RO
DU
CE
D IN
PA
RT

Ampcontrol Pty Ltd – ABN 28 000 915 542
IPD USER MANUAL
IPDB014 Version 13 – DEC/2018
Uncontrolled Copy - Refer to Ampcontrol Website for Latest Version Page 93 of 96
AP
PR
OV
ED
FO
R E
XT
ER
NA
L D
IST
RIB
UT
ION
– P
RO
PE
RT
Y O
F A
MP
CO
NT
RO
L P
TY
LT
D
–
NO
T T
O B
E R
EP
RO
DU
CE
D IN
PA
RT

Ampcontrol Pty Ltd – ABN 28 000 915 542
IPD USER MANUAL
IPDB014 Version 13 – DEC/2018
Uncontrolled Copy - Refer to Ampcontrol Website for Latest Version Page 94 of 96
AP
PR
OV
ED
FO
R E
XT
ER
NA
L D
IST
RIB
UT
ION
– P
RO
PE
RT
Y O
F A
MP
CO
NT
RO
L P
TY
LT
D
–
NO
T T
O B
E R
EP
RO
DU
CE
D IN
PA
RT
APPENDIX B: ADDITIONAL INFORMATION ON CURRENT PROTECTION
This section of the document will outline the equivalence of the Over Current and Motor Overload protection schemes employed in the IPD with IEC60255 parts 151 and 8, respectively.
See Section 10 of this manual for basic operational information for the time dependent protection schemes.
Very Inverse Overcurrent – IEC60255-151
See “vInv” Curves (Drawing IPDB018) and Overcurrent Functional Block Diagram (Drawing IPDB032) in Appendix A – Drawings.
Over Current protection is implemented in conjunction with the time independent short circuit functions of the IPD. The overcurrent value (“energising quantity”) used in the IPD is calculated from the highest current of the three phases measured.
When the measured current exceeds the Full Load Current value (GS), an accumulator begins incrementing, according to the Very Inverse function:
1
5.13)(
SG
GTMSGt
Where:
t(G) is the operate/trip time,
TMS is the time multiplier,
G/Gs is the input current ratio relative to the full load current setpoint
Also,
TMS=13.3 x m
Where:
m is the time multiplier setting, programmed in the IPD menu.
The value of GT (the lowest value at which the relay is guaranteed to operate) for this function is 110% relative to GS. GD (the threshold of independent time operation) is made redundant by the independent time characteristic of the IPD’s short circuit protection, which has a maximum setting of 10 times GS.
NOTE: the function which has been published elsewhere in this document for Over Current is:
1
180(sec)
I
mt
Where:
t(sec) is the operate/trip time,
m is the selected time multiplier, and
I is the input current ratio relative to the full load current set point,

Ampcontrol Pty Ltd – ABN 28 000 915 542
IPD USER MANUAL
IPDB014 Version 13 – DEC/2018
Uncontrolled Copy - Refer to Ampcontrol Website for Latest Version Page 95 of 96
AP
PR
OV
ED
FO
R E
XT
ER
NA
L D
IST
RIB
UT
ION
– P
RO
PE
RT
Y O
F A
MP
CO
NT
RO
L P
TY
LT
D
–
NO
T T
O B
E R
EP
RO
DU
CE
D IN
PA
RT
These two algorithms are mathematically and operationally identical. For purposes of demonstrating conformance to Curve B of IEC 60255-151, the algorithm has been rewritten for clarity. Equivalence with the IEC 60255-151 requirements is established with:
TMS = 13.33 x m
k = 13.5, per curve B
c = 0, per curve B
α = 1, per curve B
Resultant values of TMS (based on the range of m values) are 0.066 ≤TMS ≤ 13.33 (0.005 ≤ m ≤ 1.0).
The overall error in tripping accuracy for the Over Current and Short Circuit is 5% (per IEC60355-151 part 6.3).
The transient overreach performance is 35% (per IEC60255-151 part 6.5.2).
The response to time varying energising quantities is < 5% (per IEC60255-151 part 6.5.4).
Motor Overload – IEC60255-8
See “m-OL” Curves (Drawing IPDB019) and Motor Overload Functional Block Diagram (Drawing IPDB035) in Appendix A – Drawings.
The Ampcontrol IPD implements the motor thermal model in line with IEC 60255 Part 8, represented by two curves:
Cold Motor Curves
Hot Motor Curves
Motor overload is implemented in conjunction with the time independent short circuit functions of the IPD. The three measured phase currents are squared and added together to provide the heating input into the thermal model.
The overcurrent time dependent curve is based on a Motor Thermal Model. Using this model, the relay will trip according to the following formula:
22
22
)(ln
b
p
IkI
IIt
Where:
𝑡 is the operate/trip time, 𝜏 is the thermal time constant
𝐼𝐵 is the basic current. A value of 1.0 is used. 𝑘 is a constant. A value of 1.0601 is used in the IPD.
𝐼 is the relay current
𝐼𝑝 is the specific load current before the overload occurs. 0pI for ‘cold’, 1pI
for ‘hot’.

Ampcontrol Pty Ltd – ABN 28 000 915 542
IPD USER MANUAL
IPDB014 Version 13 – DEC/2018
Uncontrolled Copy - Refer to Ampcontrol Website for Latest Version Page 96 of 96
AP
PR
OV
ED
FO
R E
XT
ER
NA
L D
IST
RIB
UT
ION
– P
RO
PE
RT
Y O
F A
MP
CO
NT
RO
L P
TY
LT
D
–
NO
T T
O B
E R
EP
RO
DU
CE
D IN
PA
RT
Also,
m1800
Where:
m is the time multiplier setting, programmed in the IPD menu.
After a trip occurs, the thermal time constant is modified by the cooling modifier:
torCoolingFaccold
NOTE: the function which has been published elsewhere in this document for motor overload is:
1238.1ln1800\
2
2
I
hImLTriptimeMO
Where:
m is the time multiplier
h is 0 for ‘cold’ and 1 for ‘hot’
These two algorithms are mathematically and operationally identical. For purposes of demonstrating conformance to 3.1.2 of IEC 60255-8, the algorithm has been rewritten for clarity.
Equivalence with the IEC 60255-8 is established with:
IB = 1.0 k= 1.0601
= 1800m
Resultant values of (based on the range of m values) is 9 ≤ ≤ 1800 (0.005 ≤ m ≤ 1.0).
The overall error in tripping accuracy for Motor Overload is 5%.


