26
Integrator C15/C30 Manual Contents subject to change without notice Version 01.02 05/2015 Ce manuel est disponible en français à www.kilotech.com
| Date post: | 20-Jul-2018 |
| Category: |
Documents |
| Upload: | trinhhuong |
| View: | 230 times |
| Download: | 1 times |
Integrator C15/C30
Manual
Contents subject to change without notice
Version 01.02
05/2015
Ce manuel est disponible en français à www.kilotech.com

2
TABLE OF CONTENTS TABLE OF CONTENTS .................................................................................................................. 2
Introduction .............................................................................................................................. 3
General Precautions ................................................................................................................... 4
Specifications............................................................................................................................. 5
Outline ...................................................................................................................................... 5
Unpacking and setup.................................................................................................................. 6
Contents .................................................................................................................................... 6
Display and keypad .................................................................................................................... 7
Faceplate .................................................................................................................................................... 7 Symbols on Display .................................................................................................................................... 7 Keypad ........................................................................................................................................................ 8 Layout and characters ................................................................................................................................ 8 Key combinations ....................................................................................................................................... 9
Weighing operations ................................................................................................................ 10
Key functions ............................................................................................................................................10
Store/program PLU’s ................................................................................................................ 11
Recall PLU ................................................................................................................................ 13
Recall direct PLU .......................................................................................................................................13 Recall indirect PLU’s .................................................................................................................................13 Miscellaneous transaction .......................................................................................................................13
Parameter setting .................................................................................................................... 14
Business name .........................................................................................................................................14 LCD contrast .............................................................................................................................................15 Auto off ....................................................................................................................................................15 Internal code ............................................................................................................................................16 Communication settings ..........................................................................................................................16
The system will automatically reboot after changing the above parameter settings .................. 18
Set date and time .....................................................................................................................................18 Group code...............................................................................................................................................19 Back feed ..................................................................................................................................................19 Origin setting ............................................................................................................................................20 LCD test ....................................................................................................................................................20
Format of barcode for printing ................................................................................................. 21
RS-232 cable pinout for host .................................................................................................... 21
Printer cable pinout (OS-203/213) ............................................................................................. 21
Error codes .............................................................................................................................. 22
Communication output format ................................................................................................. 23
Host ..........................................................................................................................................................23 Print format with OS-203 / 213 printer ....................................................................................................23 Available Label formats ............................................................................................................................23
Display Character Reference ..................................................................................................... 25
Troubleshooting ....................................................................................................................... 26

3
Introduction Thank you for choosing a Kilotech Scale. We appreciate your business and hope that you will enjoy using your
scale. Should you require support, please contact your local dealer from whom you have purchased. Happy
Weighing!

4
General Precautions Avoid lengthy exposure to heat or cold.
Allow the scale to acclimate to normal room temperature before use.
Allow sufficient warm up time. Turn the scale on and wait for a few minutes to allow the internal components a chance to stabilize before weighing.
Do not leave a load or weight on a scale for a prolonged period of time.
Do not tamper with the scale yourself.
This will void the warranty. Contact your local distributor to properly repair your scale.
Do not dissemble the scale yourself.
This will void the warranty. Contact your local distributor to properly repair your scale.
Do not load beyond max cap the maximum weight limit.
Do not pull the plug by its cord when unplugging.
Do not use the scale near fire or corrosive gas.
Do not spill water or immerse in water.
Avoid placing the scale near a heater.
It could cause a fluctuation to the indicator reading.
Always make sure to use a Kilotech approved adapter.
Do not drop the scale or apply a sudden shock.
Do not drag the scale.
Avoid exposing to other electromagnetic devices.
These devices emit RF and can cause unstable readings. If your scale should perform poorly, try moving the scale to a different room or location.
Level the scale or make sure it is on an even surface.
A scale used on an uneven surface may provide an unstable reading.
Scale should be used within stated temperature & humidity limits.
5
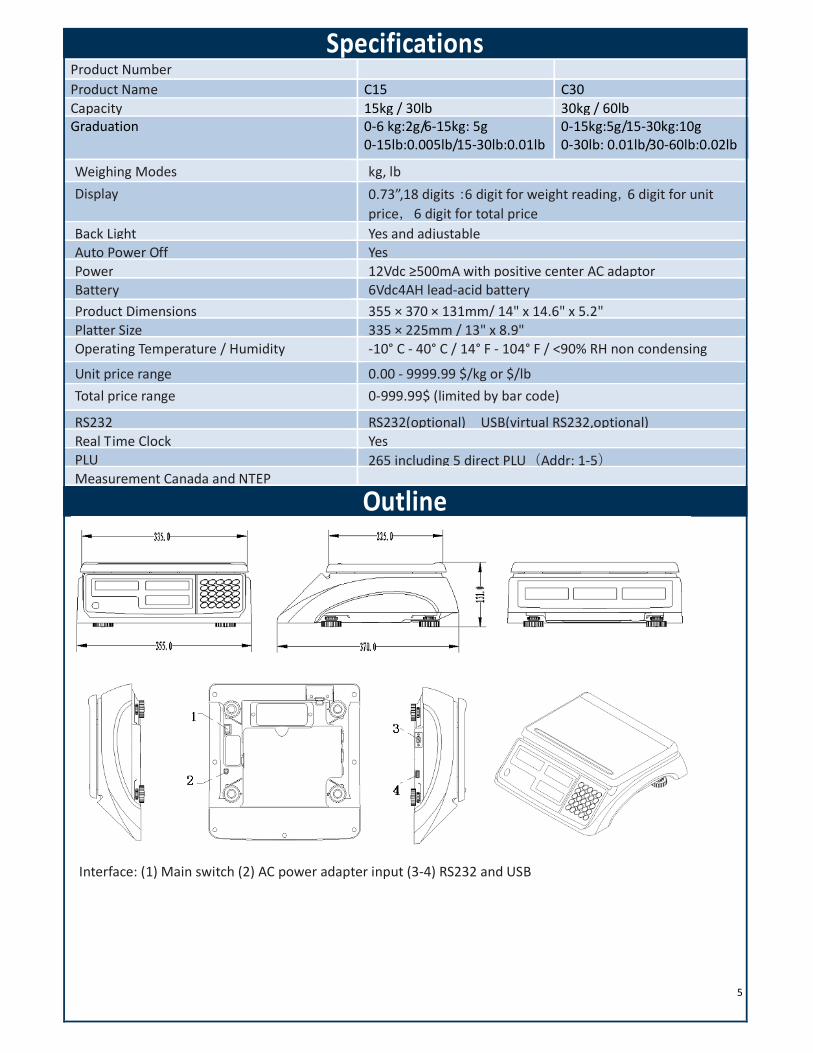
Specifications Product Number
Product Name C15 C30
Capacity 15kg / 30lb 30kg / 60lb Graduation 0-6 kg:2g/6-15kg: 5g
0-15lb:0.005lb/15-30lb:0.01lb 0-15kg:5g/15-30kg:10g 0-30lb: 0.01lb/30-60lb:0.02lb
Weighing Modes kg, lb
Display 0.73”,18 digits:6 digit for weight reading,6 digit for unit
price,6 digit for total price
Back Light Yes and adjustable Auto Power Off Yes
Power 12Vdc ≥500mA with positive center AC adaptor Battery 6Vdc4AH lead-acid battery
Product Dimensions 355 × 370 × 131mm/ 14" x 14.6" x 5.2"
Platter Size 335 × 225mm / 13" x 8.9" Operating Temperature / Humidity -10° C - 40° C / 14° F - 104° F / <90% RH non condensing
Unit price range 0.00 - 9999.99 $/kg or $/lb
Total price range 0-999.99$ (limited by bar code)
RS232 RS232(optional) USB(virtual RS232,optional)
Real Time Clock Yes PLU 265 including 5 direct PLU(Addr: 1-5) Measurement Canada and NTEP
Outline
Interface: (1) Main switch (2) AC power adapter input (3-4) RS232 and USB
6
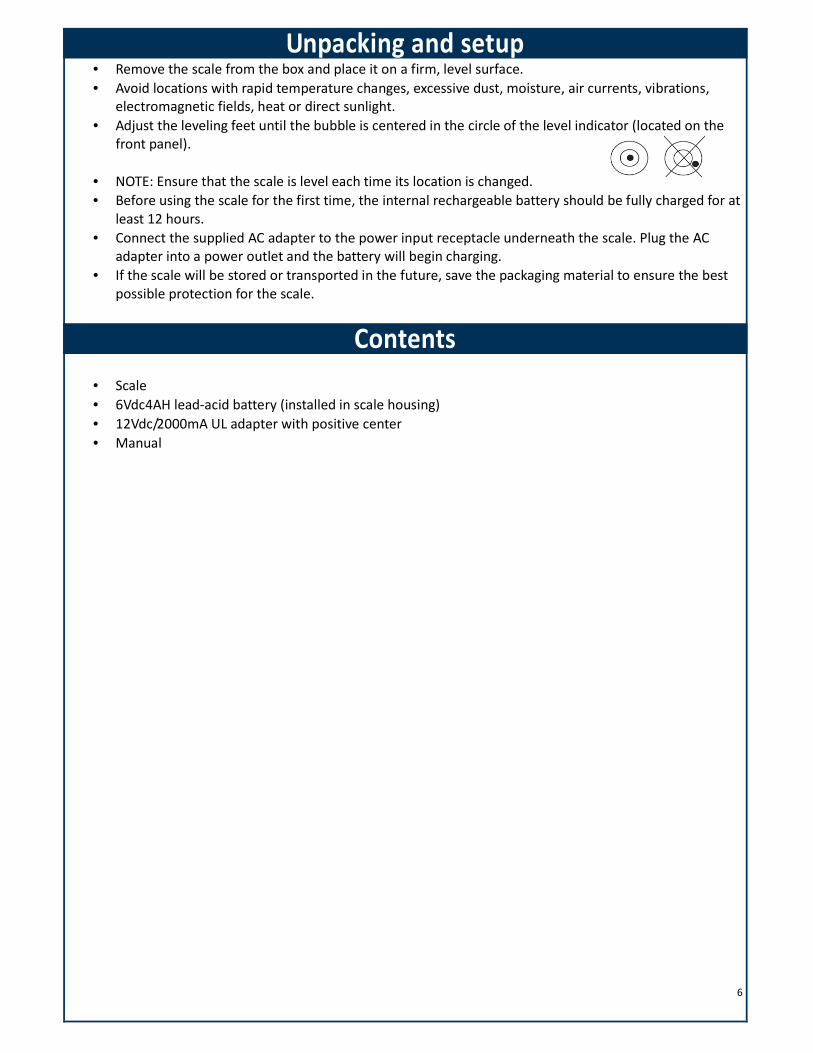
Unpacking and setup • Remove the scale from the box and place it on a firm, level surface.
• Avoid locations with rapid temperature changes, excessive dust, moisture, air currents, vibrations, electromagnetic fields, heat or direct sunlight.
• Adjust the leveling feet until the bubble is centered in the circle of the level indicator (located on the front panel).
• NOTE: Ensure that the scale is level each time its location is changed.
• Before using the scale for the first time, the internal rechargeable battery should be fully charged for at least 12 hours.
• Connect the supplied AC adapter to the power input receptacle underneath the scale. Plug the AC adapter into a power outlet and the battery will begin charging.
• If the scale will be stored or transported in the future, save the packaging material to ensure the best possible protection for the scale.
Contents
• Scale
• 6Vdc4AH lead-acid battery (installed in scale housing)
• 12Vdc/2000mA UL adapter with positive center
• Manual

7
Display and keypad
Faceplate
Symbols on Display � WEIGHT - Weight display window
� - Centre-of-zero annunciator
� – TARE annunciator
� / - Weight unit annunciator
� UNIT PRICE - Unit price display window
� – Save mode annunciator
� / - Unit price per kg/lb annunciator
� TOTAL PRICE($) - Total price display window
� - Data output annunciator
� - Charging annunciator
� - AC Adapter in-use annunciator
8
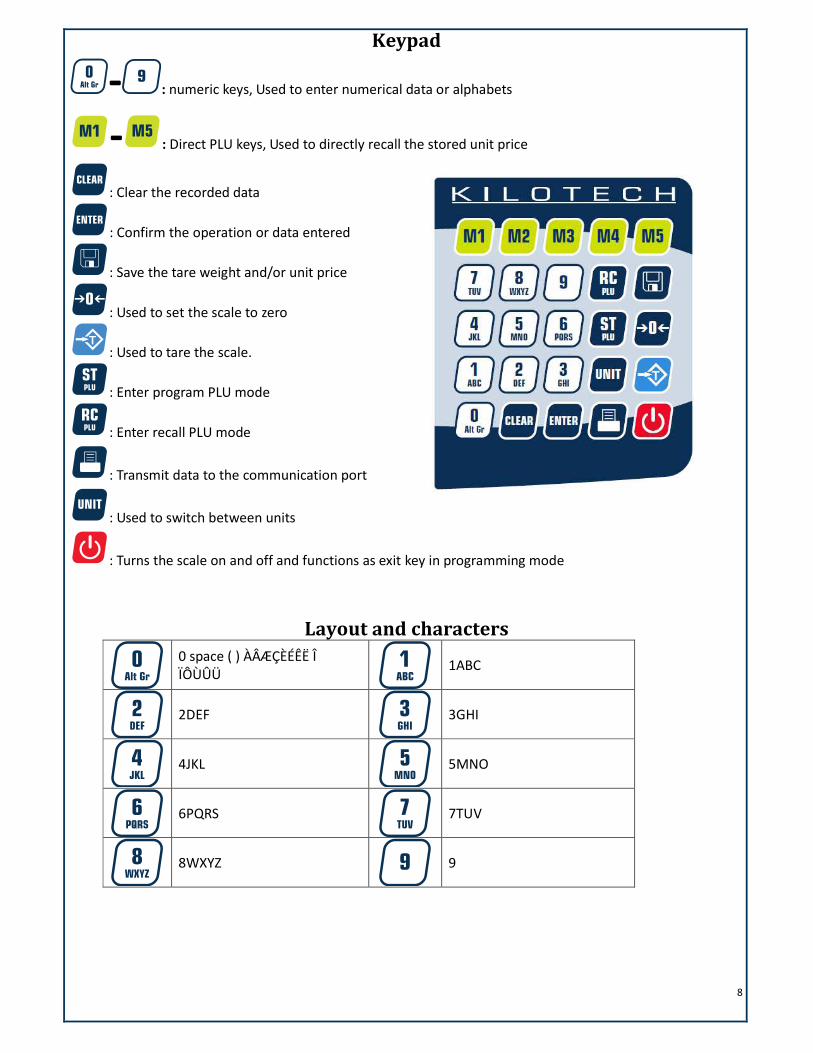
Keypad
- : numeric keys, Used to enter numerical data or alphabets
- : Direct PLU keys, Used to directly recall the stored unit price
: Clear the recorded data
: Confirm the operation or data entered
: Save the tare weight and/or unit price
: Used to set the scale to zero
: Used to tare the scale.
: Enter program PLU mode
: Enter recall PLU mode
: Transmit data to the communication port
: Used to switch between units
: Turns the scale on and off and functions as exit key in programming mode
Layout and characters
0 space ( ) ÀÂÆÇÈÉÊË Î ÏÔÙÛÜ
1ABC
2DEF
3GHI
4JKL
5MNO
6PQRS
7TUV
8WXYZ
9

9
Key combinations Press both key simultaneously and hold down for more than three seconds.
(for details on these operations, please see their respective sections in the manual)
+ : Used to enter the business’s name setup mode
+ : Used to enter the LCD’s contrast setup mode
+ : Used to enter the auto-off time setup mode
+ Used to display A/D inner code or working voltage
+ : Used to enter RS232 parameters setup mode
+ : Used to enter the date and time setup mode
+ : Used to enter Group Code setup mode
+ : Used to set OS-203/213 Back Feed setup mode
+ Used to enter OS-203/213 Origin setup mode
+ : Enter LCD test mode
10
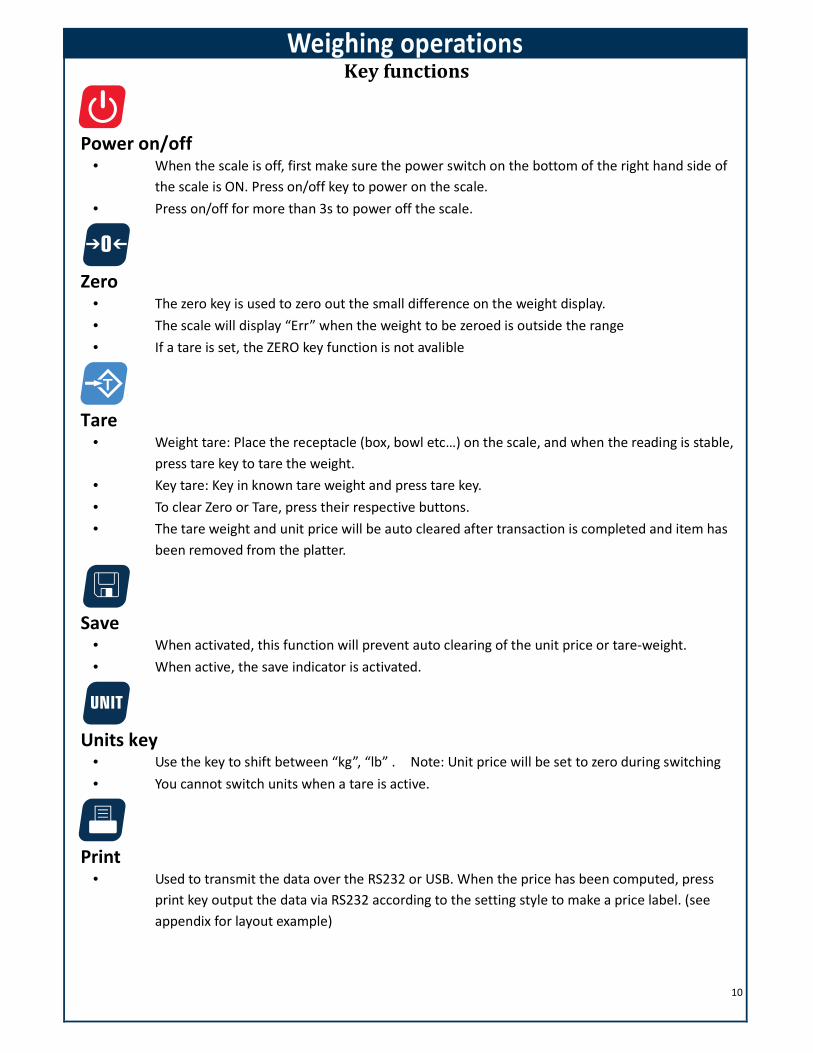
Weighing operations Key functions
Power on/off • When the scale is off, first make sure the power switch on the bottom of the right hand side of
the scale is ON. Press on/off key to power on the scale.
• Press on/off for more than 3s to power off the scale.
Zero
• The zero key is used to zero out the small difference on the weight display.
• The scale will display “Err” when the weight to be zeroed is outside the range
• If a tare is set, the ZERO key function is not avalible
Tare • Weight tare: Place the receptacle (box, bowl etc…) on the scale, and when the reading is stable,
press tare key to tare the weight.
• Key tare: Key in known tare weight and press tare key.
• To clear Zero or Tare, press their respective buttons.
• The tare weight and unit price will be auto cleared after transaction is completed and item has
been removed from the platter.
Save
• When activated, this function will prevent auto clearing of the unit price or tare-weight.
• When active, the save indicator is activated.
Units key
• Use the key to shift between “kg”, “lb” . Note: Unit price will be set to zero during switching
• You cannot switch units when a tare is active.
Print • Used to transmit the data over the RS232 or USB. When the price has been computed, press
print key output the data via RS232 according to the setting style to make a price label. (see
appendix for layout example)

11
Store/program PLU’s
To cancel and return to normal mode at any time, press
Weight
Display
Total
Price
Display
Unit Price
Display
Keys used
Comment
0.00 0.00 0.00 Press to start
St.PLU ADDR
Enter address using numerical keys
~
To confirm press
The system will overwrite any previous data
The address range is from 1 to 265
1-5 is for direct unit price
St.PLU NAME
Enter product name using numerical key
~
To confirm press
Use the numerical keys to select the letter needed Only the last six characters
will show Max length is 20 characters
St.PLU INGRDT
Enter ingredients using numerical keys
~
To confirm press
This field is only visible when activated
(Host, PRTd60, PRDnd6) Max 80 characters
St.PLU LIFE
Enter shelf life using numerical keys
~
To confirm press
Refers to shelf life of the product.
Max number of days = 253
St.PLU
“Unit.0”
(kg) or
“Unit.1”
(lb)
Use the key to switch
To confirm press

12
Weight
Display
Total
Price
Display
Unit Price
Display
Keys used
Comment
St.PLU UNIT.P
Enter price using numerical keys
~
To confirm press
St.PLU Tare
Enter tare weight using numerical
keys
~
To confirm press
St.PLU ITEM.C
Enter item code using numerical keys
~
To confirm press
If the PLU data has been
changed, the unit price
window will briefly display
“Save” and the total price
window will briefly display
“Data.ch”.
Repeat the steps for the next PLU or press to return to the normal weighing mode.

13
Recall PLU
Recall direct PLU
Recall a PLU that is stored under a speed key by pressing key, the stored unit price will be
displayed in unit price window. The total price window will display “DUP. xx”, and then the actual total price
will appear.
Recall indirect PLU’s
Icon Weight
Display
Total Price
Display Unit Price Display Confirm or Exit Comment
rc.PLU ADDR
Enter the unit price
using numerical keys
~ ie010.
The address range is
from 1 to 265,
To confirm press
To exit and
return to regular
weighing mode
Press
The unit price
window will display
the recalled unit
price. The total price
window displays
“PLU.xxx”(xxx is the
Address) and then
will go back to the
normal total price
displaying mode
later, using the new
unit price, tare
weight, new weight
unit, trade name,
and shell life)
Miscellaneous transaction
Use the numerical keys ~ , to enter unit price (range: 0000.00~9999.99).
The programmed price can be cleared by pressing the key.
The unit price will be cleared automatically after weighing and removing the objects.
14
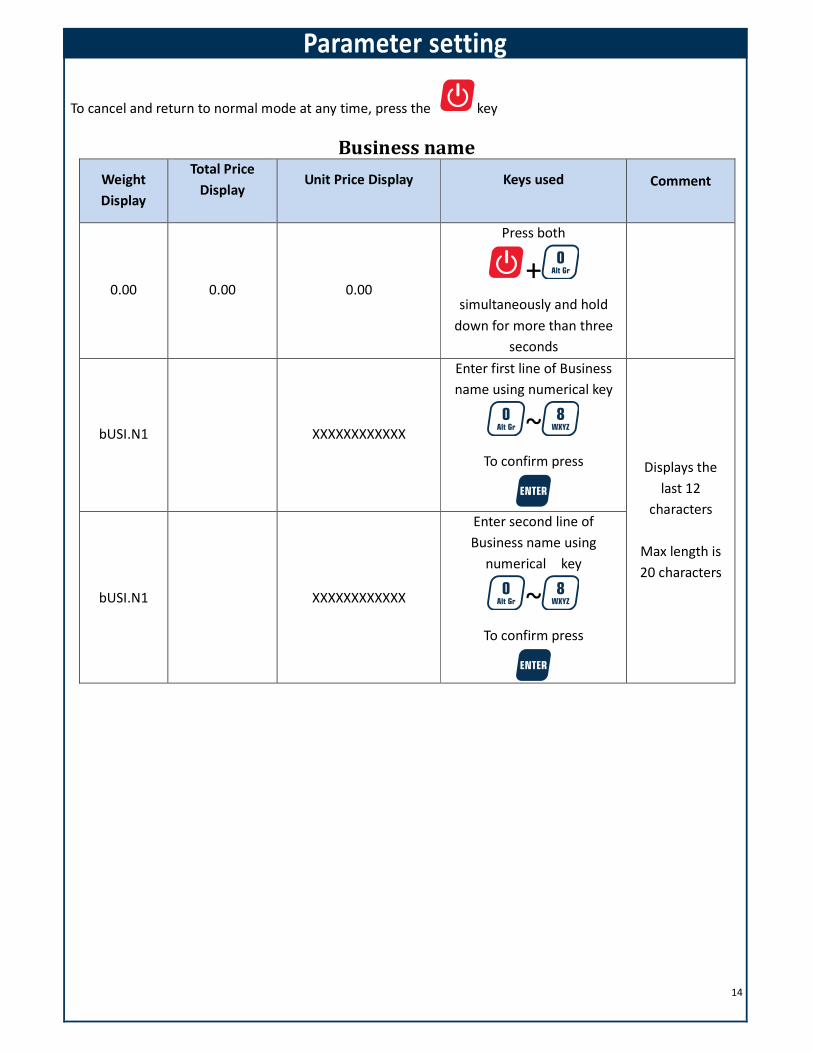
Parameter setting
To cancel and return to normal mode at any time, press the key
Business name
Weight
Display
Total Price
Display
Unit Price Display
Keys used
Comment
0.00 0.00 0.00
Press both
+
simultaneously and hold
down for more than three
seconds
bUSI.N1 XXXXXXXXXXXX
Enter first line of Business
name using numerical key
~
To confirm press
Displays the
last 12
characters
Max length is
20 characters
bUSI.N1 XXXXXXXXXXXX
Enter second line of
Business name using
numerical key
~
To confirm press
15
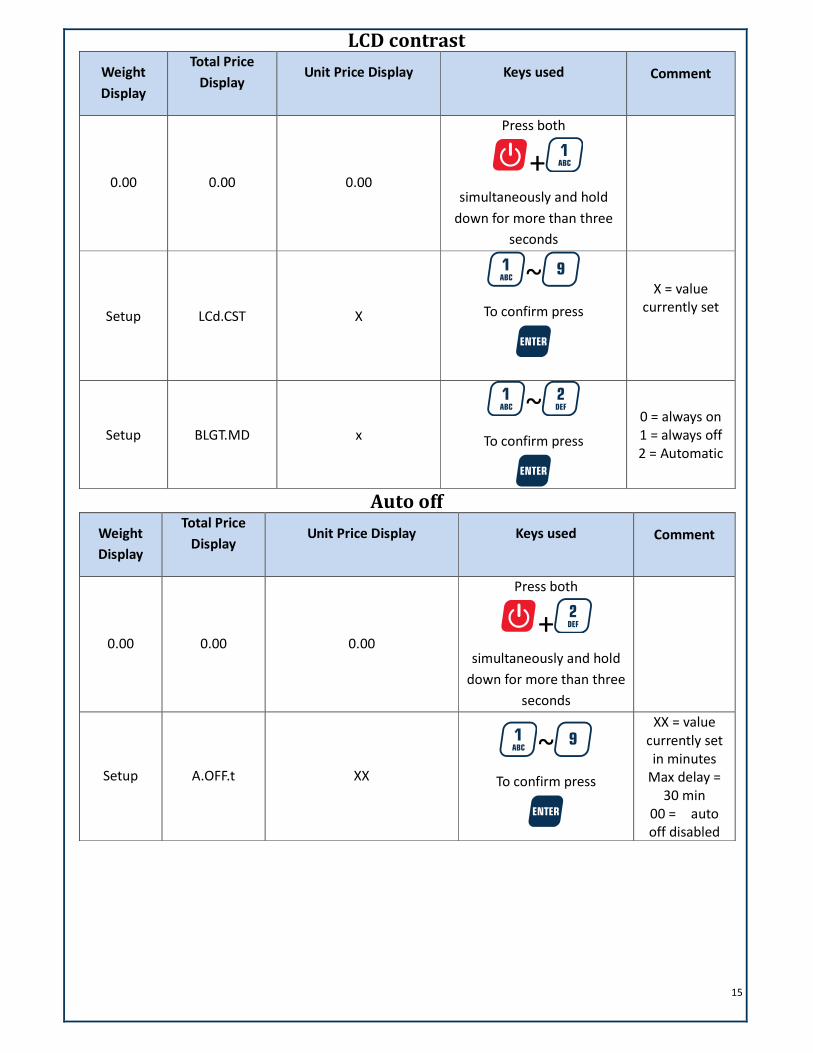
LCD contrast
Weight
Display
Total Price
Display
Unit Price Display
Keys used
Comment
0.00 0.00 0.00
Press both
+
simultaneously and hold
down for more than three
seconds
Setup LCd.CST X
~
To confirm press
X = value currently set
Setup BLGT.MD x
~
To confirm press
0 = always on 1 = always off 2 = Automatic
Auto off
Weight
Display
Total Price
Display
Unit Price Display
Keys used
Comment
0.00 0.00 0.00
Press both
+
simultaneously and hold
down for more than three
seconds
Setup A.OFF.t XX
~
To confirm press
XX = value currently set in minutes
Max delay = 30 min
00 = auto off disabled
16
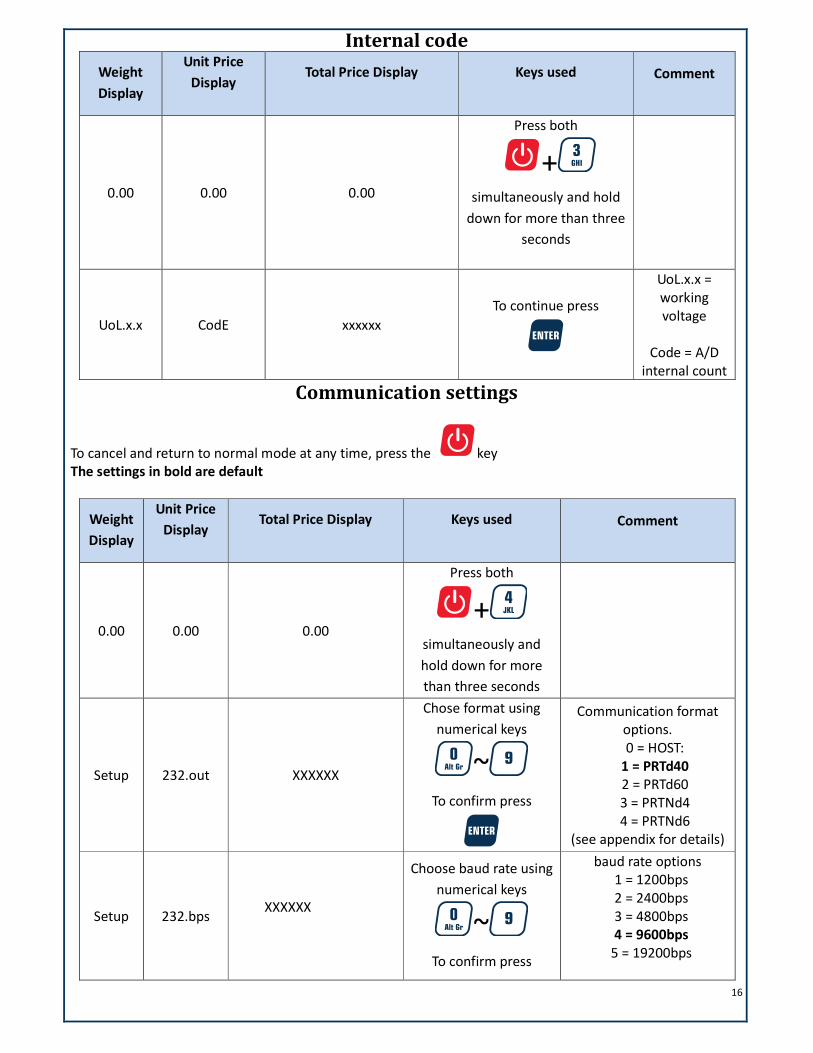
Internal code
Weight
Display
Unit Price
Display
Total Price Display
Keys used
Comment
0.00 0.00 0.00
Press both
+
simultaneously and hold
down for more than three
seconds
UoL.x.x CodE xxxxxx
To continue press
UoL.x.x = working voltage
Code = A/D
internal count
Communication settings
To cancel and return to normal mode at any time, press the key The settings in bold are default
Weight
Display
Unit Price
Display
Total Price Display
Keys used
Comment
0.00 0.00 0.00
Press both
+
simultaneously and
hold down for more
than three seconds
Setup 232.out XXXXXX
Chose format using
numerical keys
~
To confirm press
Communication format options. 0 = HOST:
1 = PRTd40
2 = PRTd60 3 = PRTNd4 4 = PRTNd6
(see appendix for details)
Setup 232.bps XXXXXX
Choose baud rate using
numerical keys
~
To confirm press
baud rate options 1 = 1200bps 2 = 2400bps 3 = 4800bps 4 = 9600bps
5 = 19200bps

17
Weight
Display
Unit Price
Display
Total Price Display
Keys used
Comment
Setup 232.dFt XXX
Choose parity rate
using numerical keys
~
To confirm press
Parity options 1 = 8N1
2 = 7O1 3 = 7E1
Setup Prtd.Ft XXXXXX
Choose format using
numerical keys
~
To confirm press
0 = CANADA YY-MM-DD 1 = USA
DD-MMM-YY 2 = Num
Numerical format
Setup B.PRT.FT XXXX
Choose format using
numerical keys
~
To confirm press
0 = 5I4P
1 = 4I5P 2 = 5I5P 3 = 4I6P
See Appendix for details barcode formats
Setup USb.oUt XXXX
Choose format using
numerical keys
~
To confirm press
0 = None USB disabled
1 = Host, USB activated
.
Setup Usb.bps XXXXX
Choose baud rate using
numerical keys
~
To confirm press
baud rate options 1 = 1200bps 2 = 2400bps 3 = 4800bps 4 = 9600bps
5 = 19200bps

18
Weight
Display
Unit Price
Display
Total Price Display
Keys used
Comment
Setup Usb.dft XXX
Choose baud rate using
numerical keys
~
To confirm press
Format options 1 = 8N1
2 = 7O1 3 = 7E1
Setup Urt.CFt XXX
Choose format setting
using numerical keys
~
To confirm press
0 = None 1 = SN
Data will be transmitted when the print key is
pressed and scale is stable
The system will automatically reboot after changing the above parameter settings
Set date and time
Weight Display
Unit Price
Display
Total Price Display Keys used Comment
0.00 0.00 0.00
Press both
+
simultaneously and
hold down for more
than three seconds
.
Setup dAtE xx.xx.xx
Enter date using
numerical keys
~
To confirm press
format:
YY.MM.DD
Setup timE xx.xx.xx
Enter time using
numerical keys
~
To confirm press
Format:
hh.mm.ss

19
Group code
Weight Display
Unit Price
Display
Total Price Display Keys used Comment
0.00 0.00 0.00
Press both
+
simultaneously and
hold down for more
than three seconds
Setup GroUP.C XX
Enter time using
numerical keys
~
To confirm press
Default = 00 Range = 00~
99
Back feed
Weight Display
Unit Price
Display
Total Price Display Keys used Comment
0.00 0.00 0.00
Press both
+
simultaneously and
hold down for more
than three seconds
Setup bAk.FEd XXXXXX
Choose mode
using numerical keys
~
To confirm press
Printer must
be on and
connected
0 = disable
1 = enable
20
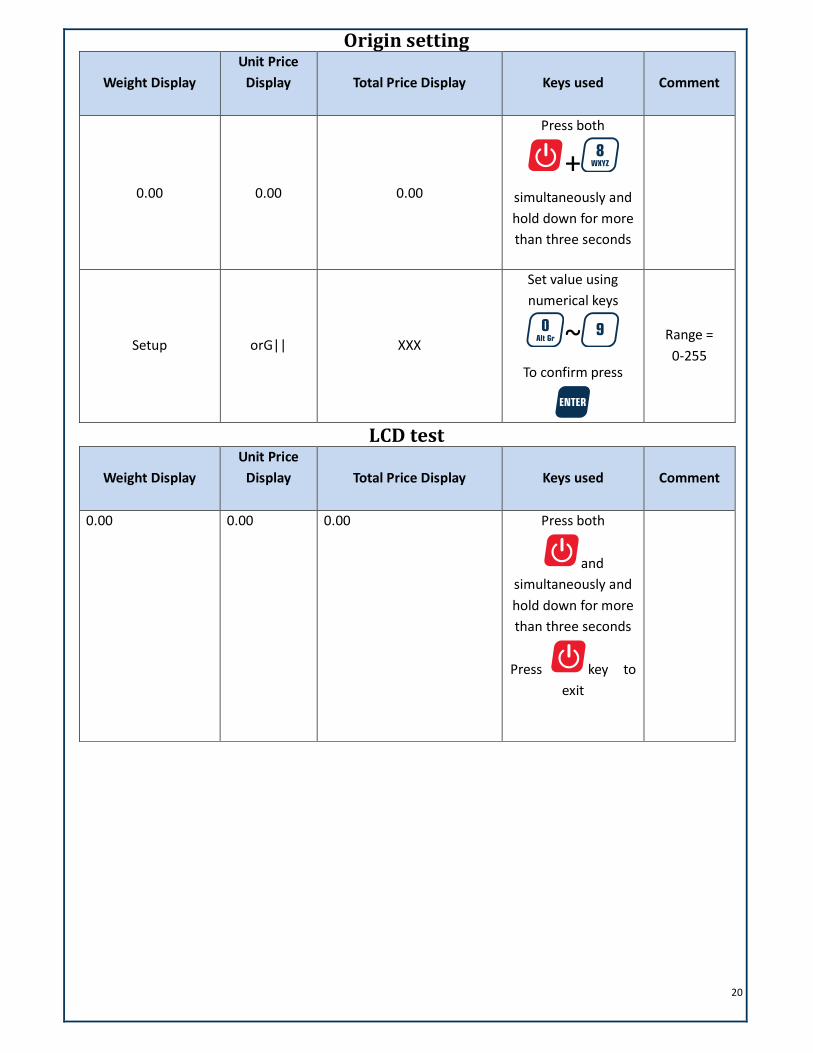
Origin setting
Weight Display
Unit Price
Display
Total Price Display Keys used Comment
0.00 0.00 0.00
Press both
+
simultaneously and
hold down for more
than three seconds
Setup orG|| XXX
Set value using
numerical keys
~
To confirm press
Range =
0-255
LCD test
Weight Display
Unit Price
Display
Total Price Display Keys used Comment
0.00 0.00 0.00 Press both
and
simultaneously and
hold down for more
than three seconds
Press key to
exit
21
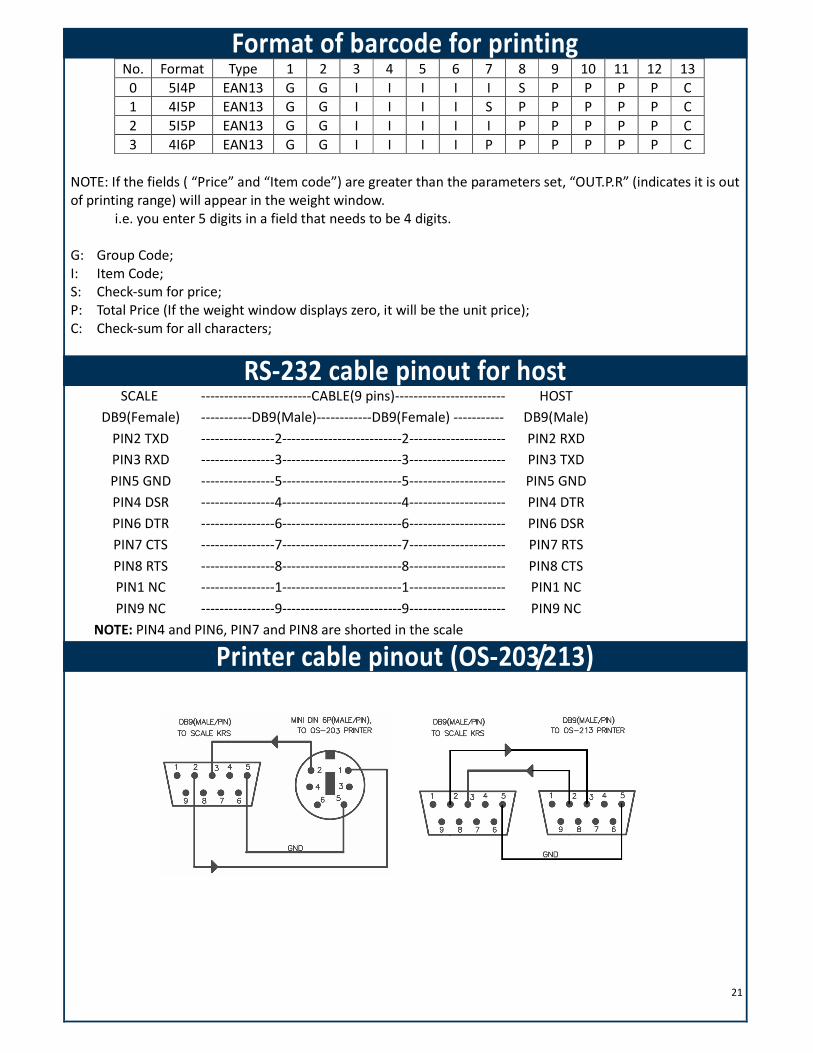
Format of barcode for printing No. Format Type 1 2 3 4 5 6 7 8 9 10 11 12 13
0 5I4P EAN13 G G I I I I I S P P P P C
1 4I5P EAN13 G G I I I I S P P P P P C
2 5I5P EAN13 G G I I I I I P P P P P C
3 4I6P EAN13 G G I I I I P P P P P P C
NOTE: If the fields ( “Price” and “Item code”) are greater than the parameters set, “OUT.P.R” (indicates it is out of printing range) will appear in the weight window.
i.e. you enter 5 digits in a field that needs to be 4 digits.
G: Group Code; I: Item Code; S: Check-sum for price; P: Total Price (If the weight window displays zero, it will be the unit price); C: Check-sum for all characters;
RS-232 cable pinout for host SCALE ------------------------CABLE(9 pins)------------------------ HOST
DB9(Female) -----------DB9(Male)------------DB9(Female) ----------- DB9(Male)
PIN2 TXD ----------------2--------------------------2--------------------- PIN2 RXD
PIN3 RXD ----------------3--------------------------3--------------------- PIN3 TXD
PIN5 GND ----------------5--------------------------5--------------------- PIN5 GND
PIN4 DSR ----------------4--------------------------4--------------------- PIN4 DTR
PIN6 DTR ----------------6--------------------------6--------------------- PIN6 DSR
PIN7 CTS ----------------7--------------------------7--------------------- PIN7 RTS
PIN8 RTS ----------------8--------------------------8--------------------- PIN8 CTS
PIN1 NC ----------------1--------------------------1--------------------- PIN1 NC
PIN9 NC ----------------9--------------------------9--------------------- PIN9 NC
NOTE: PIN4 and PIN6, PIN7 and PIN8 are shorted in the scale
Printer cable pinout (OS-203/213)
22
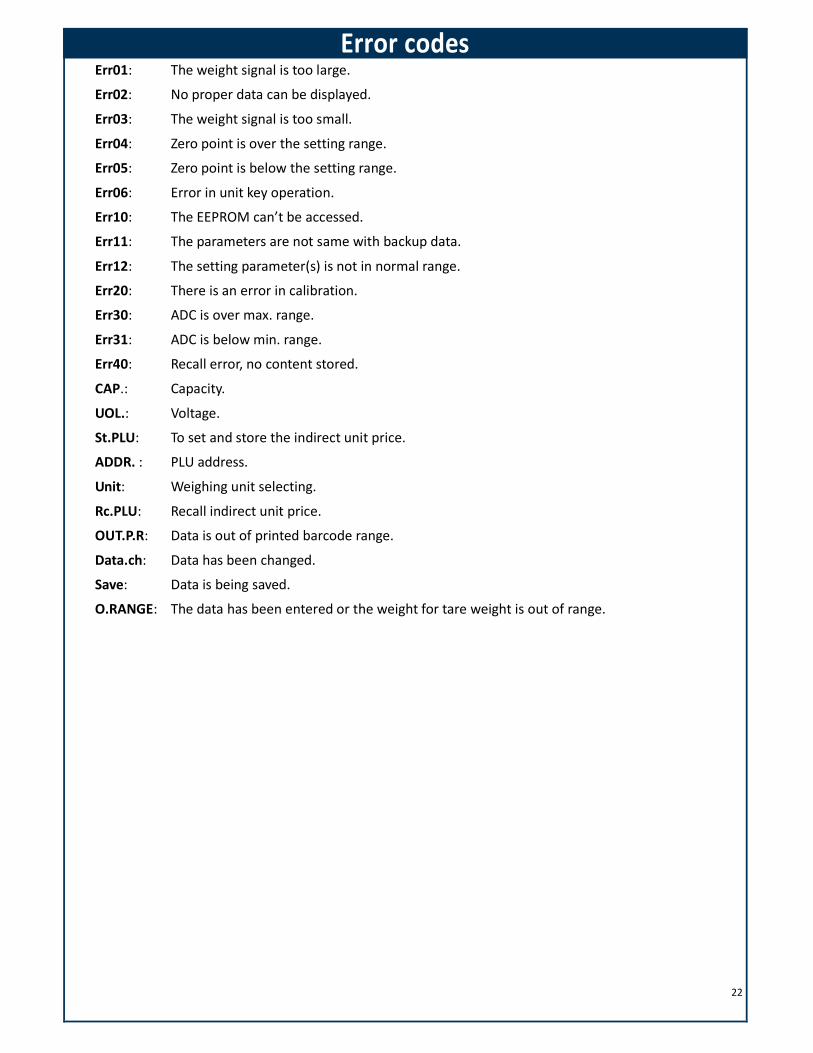
Error codes Err01: The weight signal is too large.
Err02: No proper data can be displayed.
Err03: The weight signal is too small.
Err04: Zero point is over the setting range.
Err05: Zero point is below the setting range.
Err06: Error in unit key operation.
Err10: The EEPROM can’t be accessed.
Err11: The parameters are not same with backup data.
Err12: The setting parameter(s) is not in normal range.
Err20: There is an error in calibration.
Err30: ADC is over max. range.
Err31: ADC is below min. range.
Err40: Recall error, no content stored.
CAP.: Capacity.
UOL.: Voltage.
St.PLU: To set and store the indirect unit price.
ADDR. : PLU address.
Unit: Weighing unit selecting.
Rc.PLU: Recall indirect unit price.
OUT.P.R: Data is out of printed barcode range.
Data.ch: Data has been changed.
Save: Data is being saved.
O.RANGE: The data has been entered or the weight for tare weight is out of range.
23
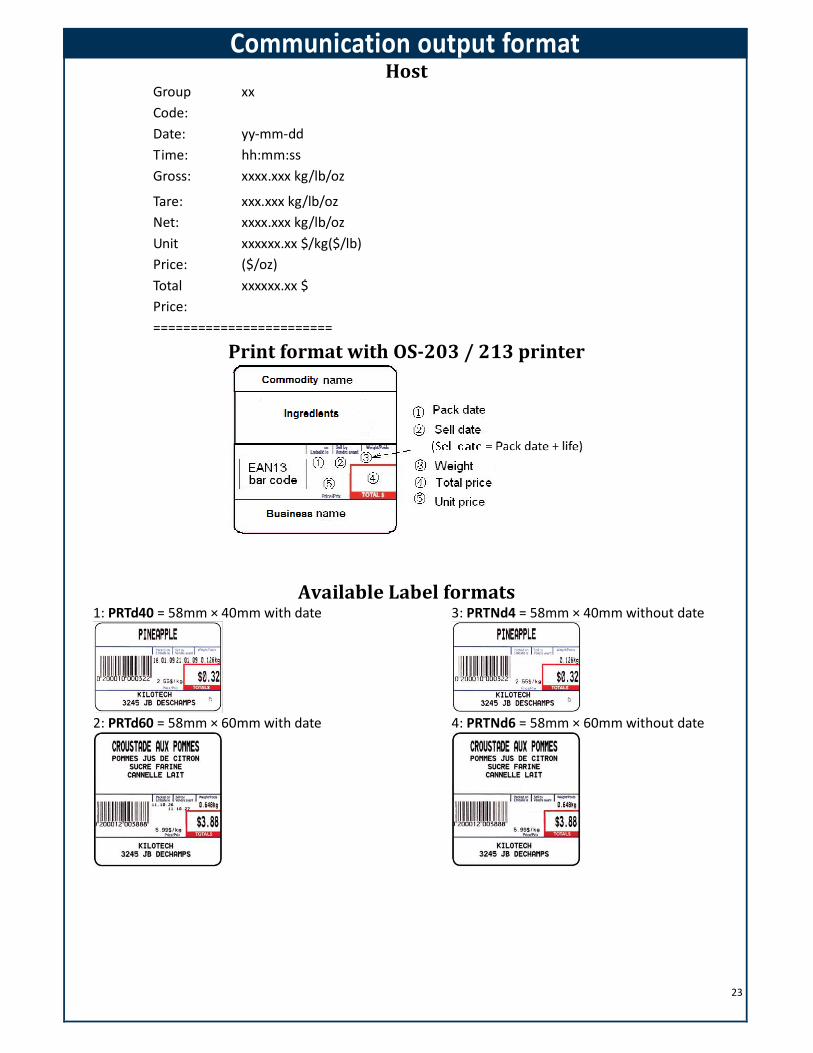
Communication output format Host
Group
Code:
xx
Date: yy-mm-dd
Time: hh:mm:ss
Gross: xxxx.xxx kg/lb/oz
Tare: xxx.xxx kg/lb/oz
Net: xxxx.xxx kg/lb/oz
Unit
Price:
xxxxxx.xx $/kg($/lb)
($/oz)
Total
Price:
xxxxxx.xx $
========================
Print format with OS-203 / 213 printer
Available Label formats 1: PRTd40 = 58mm × 40mm with date
2: PRTd60 = 58mm × 60mm with date
3: PRTNd4 = 58mm × 40mm without date
4: PRTNd6 = 58mm × 60mm without date

25
Display Character Reference

26
Troubleshooting Troubleshooting Possible causes Solution
Power-on problem
No display after pressing the power on button
• Batteries failed
• No electricity
• Adapter or plug is not inserted properly.
• Main switch is off
• Check if the batteries
• Check the power supply with the adapter and ensure the adapter is plugged in properly at both ends
• Turn on main switch
Key button is not working Contact your supplier
Display irregular characters after you press a button
LCD or its driver IC are not soldered well, or are damaged; or some keys are not free to move down or up
Contact your supplier Display 888888, does not revert back to 0
Err
Err04 • Zero point signal is over or below the limitation
• There are objects on the platform
• Load cell is not at zero balance
• One foot is not level with the others
• Remove the objects on the platform
• Adjust the foot to be level with the other feet. Using the leveling indicator to assist.
• Contact your supplier
Err05
Err20
• Load cell has no output
• The signal is too small or too large
• Scale is not stable
• Input incorrect number or loaded wrong load
• Contact your supplier
Err01
• The weight exceed 9d of the max capacity
• The load cell output signal is too big
• Empty platter and check for obstruction
• Contact your supplier
Err31
Err30
The load cell signal is too small or too large.
• Contact your supplier
Err11 EEPROM on the PCB broken Replace with new PCB
Display Lo.bAt Voltage lower than 5.7V • Charge the battery
• Contact your supplier for a new battery
Capacity not accurate
Linearity is not accurate
• The platform is not installed level
• The four feet are not level
• The load cell is broken
• There are some objects between load cell and scale.
• Make sure the platform is level
• Make sure the four feet are level
• Clear the objects between load cell and scale
• Contact your supplier

27
Troubleshooting Possible causes Solution
Big error between the corners
• The platform is not installed level
• The four feet are not level
• The load cell is broken
• There are some objects between load cell and scale.
• Make sure the platform is level
• Make sure the four feet are level
• Clear the objects between load cell and scale
• Contact your supplier
Inconsistent readings
• The platform is not installed level
• Broken load cell
• Aging problem with PCB
• There is some objects between load cell and scale.
• Make sure the platform is level
• Make sure the four feet are level
• Clear the objects between load cell and scale
• Contact your supplier
Function problem
Key button(s) is/are not functioning
• Key button(s) is/ are not working
• • Contact your supplier
Communication is erratic
• Communication wire is broken
• The interface is broken
• Replace the communication wire
• Contact your supplier


