36
Intel ® Learning Series Developer Program Self Verification Program Test Script

Intel® Learning Series Developer Program
Self Verification Program Test Script

2 Version 1.1-20110314
Information in this document is provided in connection with Intel® products. No license, express or implied, by estoppel or otherwise, to any intellectual property rights is granted by this document. Except as provided in Intel’s Terms and Conditions of Sale for such products, Intel assumes no liability whatsoever, and Intel disclaims any express or implied warranty, relating to sale and/or use of Intel products including liability or warranties relating to fitness for a particular purpose, merchantability, or infringement of any patent, copyright or other intellectual property right. Intel products are not intended for use in medical, life saving, or life sustaining applications.
Intel may make changes to specifications and product descriptions at any time, without notice.
Designers must not rely on the absence or characteristics of any features or instructions marked "reserved" or "undefined." Intel reserves these for future definition and shall have no responsibility whatsoever for conflicts or incompatibilities arising from future changes to them.
The Intel® Learning Series may contain design defects or errors known as errata which may cause the product to deviate from published specifications. Current characterized errata are available on request.
Contact your local Intel sales office or your distributor to obtain the latest specifications and before placing your product order.
Intel, and the Intel logo are trademarks or registered trademarks of Intel Corporation or its subsidiaries in the United States and other countries.
*Other names and brands may be claimed as the property of others.
Copyright © 2011, Intel Corporation

Version 1.1-20110314 3
Contents
Contents
1 INTRODUCTION ................................................................................................................ 4
1.1 OVERVIEW ........................................................................................................................... 4
2 MINIMUM REQUIREMENTS .............................................................................................. 5
2.1 INTEL LEARNING SERIES CLASSMATE PC ..................................................................................... 5 2.2 THUMB DRIVE ...................................................................................................................... 5
3 SYSTEM SET UP ................................................................................................................ 6
3.1 STARTING UP THE SYSTEM FOR THE FIRST TIME ............................................................................ 6 3.2 SET UP THE INTEL LEARNING SERIES EDUCATION DESKTOP ............................................................. 7 3.3 INSTALL YOUR PROGRAM ......................................................................................................... 9 3.4 SET UP PROGRAMS TO RUN ON EDUCATION DESKTOP ................................................................. 9
4 VERIFYING YOUR PRODUCT ............................................................................................ 14
4.1 OVERVIEW TESTING PRODUCT FEATURES AND FUNCTIONS ............................................................ 14 4.2 RESTART THE SYSTEM NOW IN THE “STUDENT” ACCOUNT ............................................................ 14 4.3 TESTING YOUR PRODUCT FEATURES AND FUNCTIONS .................................................................. 14 4.4 TESTING YOUR PRODUCT FOR ROTATION .................................................................................. 15 4.5 TESTING YOUR PRODUCT IN OTHER RESOLUTIONS ....................................................................... 15
5 INTEL LEARNING SERIES SOFTWARE SUITE ...................................................................... 16
5.1 PREPARATION FOR TESTING COMPATIBILITY .............................................................................. 16 5.2 TEST INTEL LEARNING SERIES CLASSROOM MANAGEMENT .......................................................... 17 5.3 TEST INTEL LEARNING SERIES SYSTEM RECOVERY TOOL ............................................................... 18 5.4 TEST INTEL LEARNING SERIES WEBCAM COMPANION ................................................................. 19 5.5 TEST INTEL LEARNING SERIES NOTE TAKER ............................................................................... 21 5.6 TEST INTEL LEARNING SERIES QUICK CONTROLLER ..................................................................... 22 5.7 TEST INTEL LEARNING SERIES E‐READER .................................................................................. 24 5.8 TEST INTEL LEARNING SERIES HARD DRIVE PROTECTION ............................................................. 26 5.9 TEST INTEL LEARNING SERIES PAINTING AND DRAWING .............................................................. 26 5.10 TEST INTEL LEARNING SERIES PEN INPUT .................................................................................. 27 5.11 TEST INTEL LEARNING SERIES EDUCATION DESKTOP ................................................................... 28 5.12 TEST INTEL LEARNING SERIES ASSET MANAGEMENT ................................................................... 31 5.13 TEST INTEL LEARNING SERIES ACCESS MANAGEMENT ................................................................. 32
6 COMPLETION ................................................................................................................. 36
6.1 COMPLETE SELF VERIFICATION TEST REPORT ............................................................................ 36

Introduction
4 Version 1.1-20110314
1 Introduction
1.1 Overview
This form is provided to perform Self Verification in conjunction with the Intel Learning Series classmate PCs. This is the Software and Driver Self Verification Test Script for Intel® Learning Series classmate PCs running on Windows 7 (please note the other versions of Windows are not supported through this process). Vendors of software or drivers targeted to work with Intel Learning Series classmate PCs products are urged to follow the test procedures and submit the results on the Self Verification Test Report to Intel for customers to reference. For more detail on Self Verification and other required documents see the Self Verification Process document posted at Intel Learning Series web site www.intellearningseries.com/alliance under the “Verification” tab.
You must follow all required test procedures in this Self Verification Test Script and pass them before submitting your test results. If you have any questions on the process, this script or other general questions, please send a note to the Alliance Admin at [email protected]. You are also encouraged to fill in optional information on the Self Verification Test Report document before submitting the test results. For details on submitting the Self Verification Test Report refer to instructions on that document.
The Self Verification Process is targeted at ensuring that your product is compatible with the Intel Learning Series Software Suite and Intel Learning Series classmate PCs. It is not designed to ensure that all of your product features operate correctly on the Intel Learning Series classmate PCs. You are expected as a part of the Self Verification Process to test all features of your product with an Intel Learning Series classmate PC in an environment that mimics a standard classroom environment in which your product may be deployed. You are solely responsible for following all aspects of the Self Verification Process and the testing of all features for your product in conjunction with the Intel Learning Series classmate PCs.
Although it is NOT required to test with every model of Intel Learning Series classmate PC, customers may make purchase decisions based on this information, so you may need to do additional testing. Generally most software and drivers that are tested with the default Self Verification unit will work with all Intel Learning Series classmate PCs, but there may be exceptions depending on the features and functions used during operation. If you need access to other models of Intel Learning Series classmate PC, please send a note to the Alliance Admin at [email protected] with a specific request.

Minimum requirements
Version 1.1-20110314 5
2 Minimum requirements
2.1 Intel Learning Series classmate PC
You will need access to the current required default Self Verification unit to perform this testing. For access to Intel Learning Series classmate PCs to use for Self Verification please check the Self Verification Process document and/or the Intel Learning Series website www.intellearningseries.com/alliance under the “Verification” tab. Units are available for both purchase and loan to complete development work and Self Verification. Ensure that your system has the latest Intel Learning Series Software Suite on it. If you borrowed a system from the loaner pool or purchased a system within the last 90 days it should have the most recent Intel Learning Series Software Suite, but if you have purchased a system more than 90 days before completing the Self Verification you will need to get updates for the core software before continuing. Please see the Self Verification Process document for the current process to obtain this software.
2.2 Thumb Drive
During one part of this test you will need a USB storage device. The device should be at least 256MB. This will be used to test certain features of the software and will need to be overwritten, so please ensure there is no data on the device that will be needed after testing. Please ensure the device is working correctly previous to performing tests.

System set up
6 Version 1.1-20110314
3 System set up
3.1 Starting up the system for the first time The first time you start up the system, you will need to go through the Windows 7 Starter OOBE. This may take several minutes to complete. Once Windows has gone through several startup steps you will need to input some information. Please follow these steps: On the first Windows 7 Starter set up dialogue make selections as follows:
Country or region: “United States” Time and currency: “English (United States)” Keyboard layout: “US” Click “Next”
The next dialogue box will require a user name:
Enter a User Name: “Admin” Click “Next”
The next dialogue box will require a password and hint (password is NOT required):
Enter a password: “Admin” Retype password: “Admin” Enter a password hint: “same as user name” Click “Next”
In the next dialogue box you must accept the license terms to continue.
Click the box for “I accept the license terms”. Click “Next”
In the next dialogue box you must select set up options.
Click on the “Use recommended settings” In the next dialogue box you must set up time zone, time and date.
Set the time zone and update the time and date. Click “Next”
In the next dialogue box you may be requested to join a wireless network.
Click “Skip” The system will now begin installing drivers. The first driver to install is the touch screen driver. This will require some interaction. You will need to use the stylus for this part. Locate the stylus on the left side of the system and remove it.
Click “OK” (using either the stylus or mouse) The next screen will take you through the touch screen calibration using a 9 point calibration. Follow the on screen instructions by touching and holding the stylus on the 9 points on the screen as requested. You will then use the stylus to click the “save” button on the screen. It will save the calibration information at this point.

System set up
Version 1.1-20110314 7
Next the other drivers will be installed for the Camera, touchpad, WLAN, and Blue-Tooth. This may take several minutes to complete. Next a dialogue box will appear with “Login to desktop to complete the driver installation”
Click “OK” Windows will continue to configure your system. You will see a couple of dialogue boxes appear including an Inspirus Manager dialogue box that appears (note if a windows dialogue box appears requesting you to restart the system, please select “no” at this time):
3.2 Set up the Intel Learning Series Education Desktop You will need to do some minor configuration of the Education Desktop before it is ready to use. Please follow these steps.
1) Click the “proceed” button
2) Click the top item “Click here to assign/change your Master Password”

System set up
8 Version 1.1-20110314
3) Enter a password such as “password” and confirm it (write down the password as you will need it later to exit the desktop). Then click “OK”
4) Click the second item “Click here to create a new Windows user account for your child”
5) Input a user name such as “Student”. Then click “OK”

System set up
Version 1.1-20110314 9
6) Next you will be requested to enter the user configuration, but we will use the defaults for now. Click “Finish”
7) Close the Inspirus Manager by clicking on the “X” in the upper right corner.
3.3 Install your program
Before rebooting the system you should install your program or driver that you intend to perform Self Verification on. Ensure that your program or driver installs normally.
3.4 Set Up Programs to Run On Education Desktop
You will need to enter the Inspirus Manager application by double clicking the desktop icon for this application.

System set up
10 Version 1.1-20110314
Click on the “Student” user account icon at the bottom of the screen.
1) On the left menu find the item “Programs” item and click it
2) Expand the “Start Menu” item under the “Installed Programs” pane by clicking the “+” to the left of “Start Menu” (Note: you may need to use the browse or desktop selection options if your program does not install on the start menu. The Education Desktop requires that an application use an *.lnk extension to install in the Education Desktop. If your program does not follow this convention you will need to adapt this convention before continuing. Shortcut or "link" is used by Windows as a reference to an original file, contains the shortcut target type, location, and filename as well as program that opens the target file and an optional shortcut key. This can be created in Windows by right-clicking a file and then selecting "Create Shortcut." LNK files. These typically use the same icon as their target file, but add a small curled arrow to indicate that the file points to another location. When double-clicked, the shortcut acts exactly the same way as if the user clicked the original file).

System set up
Version 1.1-20110314 11
3) Once you have located the icon for your program simply click it once and it will appear in the lower window “Approved programs”.
Note: If your program has dependencies on other applications to run you will need to enable those. Go to the “Approved Program” window, find your application icon, right click the icon, hightlight “Advanced Settings” from the popup menu and left click. A submenu will appear that allows you to select dependent applications. There is an explanation of this function in the pop up window. These dependent applications will NOT appear on the desktop or in the approved program list, but will be enabled to run in conjunction with the approved program. When you have added all dependent applications click “OK”.
4) Add any other applications you wish to test in the Intel Learning Series Education Desktop using the same process as in steps 2 and 3.
5) Add the following applications from the start menu items under “Intel(R) Learning Series” as these will be needed to complete the Self Verification Process:
System Recovery Tool (in System Recovery Tool)
WebCam Companion (in WebCam Companion by ArcSoft)
Pen Input Method 3.2 (in Pen Input Method by Vision Objects)
Quick Controller (in Quick Controller)
E-Reader (in E-Reader by Foxit)
Note Taker (in Note Taker by Vision Objects)

System set up
12 Version 1.1-20110314
HDD Protection (in HDD Protection)
ArtRage (in Painting and Drawing by Ambient Design)
6) Select “Taskbar” from the left menu item and click the radio button in the middle of the screen “Show all notification icons”
7) Select “Permissions” from the left menu and click on the radio button to allow USB access.

System set up
Version 1.1-20110314 13
8) Once you have completed these steps, click the “Finish” button at the bottom of the screen.
9) You may then exit the “Inspirus Manager” by clicking the “X” in the upper right corner.
Your application and other required applications are now enabled to operate in the Intel Learning Series Education Desktop.

Verifying Your Product
14 Version 1.1-20110314
4 Verifying Your Product
4.1 Overview testing product features and functions The Self Verification process is targeted at ensuring that your product is compatible with the Intel Learning Series Software Suite and Intel Learning Series classmate PCs. It is not designed to ensure that all of your product features operate correctly on the Intel Learning Series classmate PCs. You are expected as a part of the Self Verification process to test all features of your product with an Intel Learning Series classmate PC in an environment that mimics a typical classroom environment in which your product may be deployed. You are solely responsible for following all aspects of the Self Verification process and the testing of all features for your product in conjunction with the Intel Learning Series classmate PCs. Please ensure that you test installing and removing your software on the Intel Learning Series classmate PC to ensure correct installation and removal. Please ensure you have your software completely installed before proceeding. In addition you may need to test your software with localized version of the operating system. Please see the Self Verification Process document for more information.
4.2 Restart the system now in the “Student” account
Restart the system now. At the windows login screen select the “Student” account you created earlier during Education Desktop set up. Your program should be available from the desktop icons in the Intel Learning Series Educational Desktop. Start your software running through using the desktop icon. If you have any problems, revisit the previous steps for enabling your product in the Intel Learning Series Education Desktop to ensure all applications and dependent programs are enabled. If changes are needed you can make those by entering the Inspirus Manager from the menu, but you will need the password you created earlier to access this. Alternately you can restart the system and reenter the “admin” account to access the Inspirus Manager.
4.3 Testing your product features and functions You should ensure that you test every feature and function of your software to ensure they function correctly from within the Intel Learning Series Education Desktop. You should ensure that all documentation and help files are also tested to ensure adequate access to help you identify if any additional resources are needed (e.g. *.pdf readers). You may want to consider developing a script for installation and use of your software on an Intel Learning Series classmate PC that you can provide to customers to use in conjunction with your product. This should include instructions on how to set your software up in the Intel Learning Series Education Desktop and Intel Learning Series Access Management if any special steps are required.

Verifying Your Product
Version 1.1-20110314 15
4.4 Testing your product for rotation Turn the screen on the system around so that it is facing away from you by rotating the screen relative to the keyboard surface. Fold the LCD down toward the keyboard so that the system becomes a tablet.
Pick the system up and rotate it to see if your program reacts correctly. Ensure that your program does not have content that is not accessible. You should also try testing the rotation outside of the education shell (in the “admin” account) to ensure it works correctly in Windows. Rotate the screen back into standard laptop mode where the screen is perpendicular to the keyboard.
4.5 Testing your product in other resolutions Restart the system and enter the admin account. Right click the touchpad anywhere on the desktop and select “Screen Resolution”
Try each available setting for screen resolution and repeat steps 4.2, 4.3 and 4.4. After you have completed these steps, enter the admin account and reset the system to the highest resolution.

Intel Learning Series Software Suite
16 Version 1.1-20110314
5 Intel Learning Series Software Suite
5.1 Preparation for testing compatibility
Restart the system now to ensure a clean test environment. Log into the “Student” account you created.
If you are verifying an application start your software running by using the desktop icon on the Intel Learning Series Education Desktop. If you have more than one software application under test, you will need to either run them all in the background or test them individually. We would suggest using all of your program modules together if feasible as this could present a more challenging environment. Once your application is running, minimizes your application(s) so it allows you to do the testing of the Software Suite, but ensure your software continues to run in the background. Follow all steps listed here for testing each module individually. Please document any anomalies noted, or any special considerations that users may want to anticipate during use of your product on an Intel Learning Series classmate PC.
If you are verifying drivers you must ensure they are running on the system. This can be done by exiting the educational desktop. Access the menu by clicking this icon at the lower right of the screen:
Then select “Return to Windows”
A dialogue box will appear asking for your password (“password”). Once you enter your password hit <ENTER> key or click “OK”. This will bring you to Windows desktop in the “Student” account. You can then use Task Manager to ensure that your drivers are running. Once you have verified this you can reenter the Education Desktop by double clicking the icon “Inspirus Desktop”

Intel Learning Series Software Suite
Version 1.1-20110314 17
5.2 Test Intel Learning Series Classroom Management
Due to the fact that testing a complete solution for classroom management takes additional resources it is not part of the basic Self Verification Process at this time. If you wish to test a complete Classroom Management environment for interaction, please contact the site admin by sending a note to the Alliance Admin at [email protected] to request information. Note that testing the full Intel Learning Classroom Management in conjunction with your product will require you to have an addition system running Windows that can be configured as a Teacher and an 802.11 b/g/n AP device. The Intel Learning Classroom Management application should already be running and is accessed through the floating bar at the top of the screen. First open the “Connect and Join Class” function by clicking on the left most icon on the floating bar (Note: hovering over the icons brings up text to identify the function of the icon).
When you click on this a “Session List” dialogue box will appear on the screen. Since no teacher PC is set up the dialogue box will appear empty. Click on the “Help” button on the dialogue box and the help window should open.
Close the help window using the X in the upper right corner.
Use the “Close” button on the Session List dialogue box. Expected behavior is that the screen should go back as it was previous to opening the dialogue box.

Intel Learning Series Software Suite
18 Version 1.1-20110314
Shrink and expand the floating bar by pressing the arrow icon on the left of the floating bar. Expected behavior is that when you push the left arrow the floating bar will reduce in length to show only the arrow and two icons. Again press the arrow to expand the floating bar and it should return to its original state. Please note this floating bar can be moved by clicking and holding it and moving the mouse. You many need to move this during verification if it gets in the way of items you need to access.
If any anomalies are noted in the behavior, please note them on the Self Verification Test Report. In no anomalies are noted fill in a pass on the Self Verification Test Report.
5.3 Test Intel Learning Series System Recovery Tool
Open the Intel Learning Series System Recovery Tool by clicking the icon “System Recovery Tool”.
A password dialogue box will appear. You will need to enter the admin password you set up during Windows OOBE. If no password was used simply click “Yes”. A Dialogue box for the System Recovery Tool will appear. Insert a USB flash drive in one of the USB ports. Next click the “Generate USB recovery key” button.
The system should recognize the USB device and give information about it on the screen. (If this does not recognize your USB device you will need to try another device.)

Intel Learning Series Software Suite
Version 1.1-20110314 19
Click on the “Generate” button and answer “Yes” to the dialogue box (Note: this will overwrite information on your USB device. If you receive an error, you may want to try reformatting or using an alternate device). It will take several minutes for the USB recovery generation process to complete. A dialogue box will appear to alert you that the process is complete. Click “OK”. Exit the tool by clicking the X in the upper right corner.
Restart the system by accessing the menu at the lower left and selecting “Restart computer”. As the system begins to boot press the “F11” key on the keyboard to access the boot menu. Once the menu opens there will be several items to select from depending on the configuration of the system you have. Select the USB device using the arrow keys, followed by the <enter> key. The system should enter the Intel Learning Series USB Recovery Tool. Exit this application with your touchpad by using the “Exit” button on the upper right and then clicking “Yes” on the dialogue box. Let the system fully reboot to Windows login screen and enter the “Student” account. If you are testing an application, use the desktop icon in the Intel Learning Series Education Desktop to start your software and minimize it to run in the background.
If any anomalies are noted in the behavior, please note them on the Self Verification Test Report. In no anomalies are noted fill in a pass on the Self Verification Test Report.
5.4 Test Intel Learning Series WebCam Companion
Open Intel Learning Series WebCam Companion with the “WebCam Companion” icon.
Click on the icon labeled “Capture” in the WebCam Companion user interface.

Intel Learning Series Software Suite
20 Version 1.1-20110314
At the bottom of the screen, click on the icon to “Take Picture”. (Note: hovering over the icons brings up text to identify the function of the icon). Click the “Burst” icon to take a series of pictures. Click the “Record Video” button to take a video and press it again to stop taking the video. The pictures and video you just recorded will appear in the window on the left of the user interface. Double click the video to open it and play it to make sure it recorded correctly. Close the video by clicking on the “X” in the upper right corner.
Open one of the pictures you captured by double clicking it. Try zoom features and using the next button to move through all of the shots you captured. Close this viewing window by clicking the “X” in the upper right corner. Click the “Edit” icon at the top of the user interface. Try rotating the image and changing contrast-brightness of the picture.
Click on the annotation button on the top of the user interface (note if a dialogue appears to save the image, there is no need to do so at this juncture). Use the mouse to create annotation on the image. Use the color, width and transparency features for annotation to ensure all are functioning correctly. Also try the erase and text features to further annotate the picture. Click the home icon at the top left of the user interface.

Intel Learning Series Software Suite
Version 1.1-20110314 21
When the dialogue to save the image appears, click “yes” to save your edits. Reenter the annotation interface by clicking the annotation icon and ensure that your annotations were saved. Close the WebCam Companion by clicking the “X” in the upper left of the user interface.
If any anomalies are noted in the behavior, please note them on the Self Verification Test Report. In no anomalies are noted fill in a pass on the Self Verification Test Report.
5.5 Test Intel Learning Series Note Taker Open the Intel Learning Series Note Taker by clicking on the desktop icon “Note Taker”.
Turn the screen around so that it is facing away from you by rotating if relative to the keyboard surface. Fold the LCD down toward the keyboard so that the system becomes a tablet. Turn the system and ensure that the application rotates correctly.
Use the stylus from the system to click the box in the upper right corner of the application screen to maximize the program so that it takes up the full screen. Click on the second icon from the left on the top of the menu bar to start a new document.
The screen will change to something resembling paper. Write a brief note on the screen using the stylus. Click the convert button at the top of the screen. A dialogue box will appear. Click OK to convert the text. Ensure that this functioned correctly to record and convert the text. (Note: the quality of the writing can affect conversion accuracy)
Rotate the screen back into standard laptop mode where the screen is perpendicular to the keyboard and facing it. Next use the mouse to click on part of the converted text and

Intel Learning Series Software Suite
22 Version 1.1-20110314
use the keyboard to edit the document. Next highlight some of the text and change the font to bold and underline (Note: hovering over the icons brings up text to identify the function of the icon). Find the icon on the upper right for “open in Notepad”.
A notepad interface should open and the text should be imported to there. Close the notepad application by clicking the “X” in the upper left corner of the notepad window.
Exit Note Taker application by clicking the large “X” on the upper right corner of the user interface. A dialogue box will appear asking you to “Save New Document”. Click yes to save the document (use default location and any legitimate file name).
If any anomalies are noted in the behavior, please note them on the Self Verification Test Report. In no anomalies are noted fill in a pass on the Self Verification Test Report.
5.6 Test Intel Learning Series Quick Controller Open Intel Learning Series Quick Controller using the desktop icon “Quick Controller”.
This should bring up a dialogue box on the right side of the screen.

Intel Learning Series Software Suite
Version 1.1-20110314 23
Use the stylus to interact with this dialogue box. Click on the “Calibrate Screen” menu item (please note that the menu will fade if not used for some seconds. If it closes simply reopen it). Use the stylus to interact with the screen and follow on screen instructions. Next click the “save” button on the screen calibration dialogue.
Reopen Quick Controller by double clicking the home button on the right side of the screen.
Adjust contrast and volume on the system using the Quick Controller. Click on the autorotation feature and additional icons will appear. Rotate the screen 90CW, 180, 180 and 90CCW to ensure it is functioning properly. Turn the autorotation feature back on. By not interacting with the interface for a few seconds it should close the dialogue box. Turn the screen around and flip it down to convert the unit to tablet mode. Pick the unit up and ensure that the screen rotates correctly with the system rotation. Rotate the screen back into standard laptop mode where the screen is perpendicular to and facing the keyboard.
If any anomalies are noted in the behavior, please note them on the Self Verification Test Report. In no anomalies are noted fill in a pass on the Self Verification Test Report.

Intel Learning Series Software Suite
24 Version 1.1-20110314
5.7 Test Intel Learning Series E-Reader
Open the Intel Learning Series E-Reader by clicking on the desktop icon “E-Reader”.
The interface should open with literature about the Intel Learning Series. Click the “Library View” icon on the upper left of the screen (Note: hovering over the icons brings up text to identify the function of the icon).
Once the user interface opens click on the icon to add a book to the current bookshelf.
When the Import book dialogue box opens it should default to the “E-Reader by Foxit” directory. Open up the file “Readme.txt” located in that directory by selecting the file and clicking “open” (If the location does not contain that file please navigate to any location and find another *.pdf, or *.txt file on the system to use for E-Reader interaction).

Intel Learning Series Software Suite
Version 1.1-20110314 25
The file you just selected should now appear in the library.
Use the mouse to double click on the “Readme.txt” file and it should open in E-Reader mode. Turn the screen around and flip it down to convert the unit to tablet mode. Pick the unit up and ensure that the document rotates correctly with the system rotation. There are two buttons on the side of the LCD screen closest to the handle for scrolling up and down in the document. Press each in turn to ensure that they function properly.
Rotate the screen back into standard laptop mode where the screen is perpendicular to and facing the keyboard. Select the annotation icon at the top of the screen and a new menu will appear on the left side of the reading screen. Click on the “draw freeform” icon and draw some lines on the screen. Click on the “select text to highlight” icon and select some text to highlight on the document. Click on the “draw a rectangular” icon and draw a box over the text. Click on the “Add a Note” button and add a note. Next close this application by clicking on the large “X” in the upper right corner. Answer NO to the save file dialogue box.
If any anomalies are noted in the behavior, please note them on the Self Verification Test Report. In no anomalies are noted fill in a pass on the Self Verification Test Report.

Intel Learning Series Software Suite
26 Version 1.1-20110314
5.8 Test Intel Learning Series Hard Drive Protection
Go to the taskbar icons which are located at the lower right side of the desktop (Note: hovering over the icons brings up text to identify the function of the icon). Identify the icon for Intel Learning Series HDD Protection. Note if the icon is not on the task menu, the application may not be running and you will need to start it from the desktop icon “HDD Protection”.
Right click this icon and select “options” from the menu.
A dialogue box should open. Interact with the dialogue box by clicking various items to ensure it is working. Click on the “Start” button for calibration and follow the instruction. Another dialogue box will appear, and you will need to click “Start” followed by “Finish”.
Close this application by clicking on the large “X” in the upper right corner.
If any anomalies are noted in the behavior, please note them on the Self Verification Test Report. In no anomalies are noted fill in a pass on the Self Verification Test Report.
5.9 Test Intel Learning Series Painting and Drawing
Open the Intel Learning Series Painting and Drawing using the desktop icon “ArtRage”.

Intel Learning Series Software Suite
Version 1.1-20110314 27
Draw a picture using the mouse and stylus on the screen. Select several colors from the lower right pallet and several tools from the lower left pallet. Once you have tried several tools you can close the application by clicking on the large “X” in the upper right corner of the menu at the top of the screen. Answer no to the dialogue box to save the drawing.
If any anomalies are noted in the behavior, please note them on the Self Verification Test Report. In no anomalies are noted fill in a pass on the Self Verification Test Report.
5.10 Test Intel Learning Series Pen Input
The function of the pen input is to convert writing to text. This requires using it to input text into other applications. Open the “Notes” gadget at the bottom of the screen by clicking on the icon (Note: hovering over the icons brings up text to identify the function of the icon).
Use the stylus to touch the notes user interface. The icon for the Pen Input application will appear on the screen. It appears as an icon of a pen on paper. Click on this icon and it will open the pen input user interface.

Intel Learning Series Software Suite
28 Version 1.1-20110314
Use stylus to write inside user interface. As you write it will automatically convert to text.
Click on the enter icon on the lower right of this interface to transfer text to the notes gadget. Close the Pen Input application interface by clicking on the large “X” in the upper right corner. Close the notes gadget by clicking on the large “X” in the lower right corner.
If any anomalies are noted in the behavior, please note them on the Self Verification Test Report. In no anomalies are noted fill in a pass on the Self Verification Test Report.
5.11 Test Intel Learning Series Education Desktop
Click the “?” on the lower right of the Intel Learning Series Education Desktop and text should appear above all gadgets identifying what they are.
Open the Slide Show gadget on the Intel Learning Series Education Desktop.
A dialogue box appears on the screen to allow selection of images. Click on the “New Playlist” icon at the top of the screen.
This should open to some default images under the “my pictures” folder. Select all of the images by clicking on them while holding the ctrl key on the keyboard. Next you should click on the “open” button at the bottom of the screen.

Intel Learning Series Software Suite
Version 1.1-20110314 29
Next click the “OK” button at the bottom of the playlist interaction interface. Ensure that the slide show starts and cycles through all of the selected pictures. When you have seen all photos move the mouse, then close the gadget by clicking on the large “X” in the upper right corner.
Open the calculator gadget on the Intel Learning Series Education Desktop.
The calculator interface will open. Perform several calculations to ensure it is functioning properly. Click on the advanced button and a side window should open showing calculations completed. Do some additional calculations. When you have completed several calculations close the gadget by clicking on the large “X” in the upper right corner of the calculator.
Open the “My Files” gadget on the Intel Learning Series Education Desktop.
Click on several of the subdirectories on the left window of the folders tree. Try opening a picture by double clicking on a picture under the “my pictures” folder and ensure it opens correctly.

Intel Learning Series Software Suite
30 Version 1.1-20110314
If the picture opens correctly close the picture viewer by clicking on the large “X” in the upper right corner of that window. Then close the gadget by clicking on the large “X” in the upper right corner.
Click on the mute button on the desktop the Intel Learning Series Education Desktop and ensure it mutes the system. This can be tested by opening a gadget or program to see if the mute button operated correctly.
Open the desktop personalization interface by clicking the “personalize” icon on the upper right of the Intel Learning Series Education Desktop icon on the top right of the screen.
Select the gadgets tab at the top of the screen and deselect some of the gadgets by clicking on them. Next click on the Wallpaper tab at the top of the screen and select an alternate background by clicking on one of them. Click the “OK” button at the bottom of the screen to exit and make modifications. Ensure that the gadget and background changes made are correctly reflected in the desktop configuration.
At this point go to the menu by clicking the icon on the lower left of the screen.
Click on the “Return to Windows” from the menu.

Intel Learning Series Software Suite
Version 1.1-20110314 31
A dialogue box will come up and ask you for a password. Enter the password that you used in setting up the system (“password”). Once you are in Windows reenter the Inspirus Desktop by using the icon “Inspirus Desktop” on the Windows desktop.
If any anomalies are noted in the behavior, please note them on the Self Verification Test Report. In no anomalies are noted fill in a pass on the Self Verification Test Report.
5.12 Test Intel Learning Series Asset Management
At this point you will need to exit the Intel Learning Series Education Desktop by going to the menu and selecting “restart computer”. At the Windows logon screen select the admin user account (NOT the student account you created earlier).
If you are verifying a program, you should start your program using the start menu, or desktop icon. Once your program is running minimize it so it is running in the background.
Open the Intel Learning Series PC Theft Deterrent Agent to ensure it is functioning properly. This can be done by going to the task menu icons on the lower left of the Windows main screen. Find the icon for the Theft Deterrent Agent and right click on the icon. (Note: there is a red x on this icon and it gives a warning message that it is not activated. This is because it has not been connect to a Theft Deterrent Server. This is expected behavior).
When the menu appears click on the “Settings” menu item.
This should open a dialogue box for the theft deterrent agent. Only limited interaction can be done with this software due to the fact that there is no server present. Click “OK”.
If any anomalies are noted in the behavior, please note them on the Self Verification Test Report. In no anomalies are noted fill in a pass on the Self Verification Test Report.

Intel Learning Series Software Suite
32 Version 1.1-20110314
5.13 Test Intel Learning Series Access Management
Open the Intel Learning Series Access Management interface by going to the task menu icons on the lower left of the Windows main screen. Find the “Access Management” icon and right click on the icon.
A menu will appear on the screen. Click on “Policy Configuration” menu item.
A dialogue box will appear for setting the password. Enter a password (it may be best to use the same password used for the Inspirus Manager earlier in the test script). You will need to enter the password twice and then click “OK”.
A secondary password dialogue box will appear. Re-enter the password and click OK.
This will open the Policy Configuration user interface. Click on the “New” button in the middle of the screen.

Intel Learning Series Software Suite
Version 1.1-20110314 33
This will bring up a new policy dialogue box. Input a name such as “My Policy” and click the “OK” button.
The dialogue box for new policy will close and your “My Policy” will show up in the main window. Click the “edit” button and another dialogue box will open.
Select “Website Whitelist” from the left side menu. Enter a website (www.intel.com) in the “Website” text entry box at the bottom of the dialogue box and click “Add”. Click “Apply”.
Click on “Application Blacklist” from the left side menu.
Intel Learning Series Software Suite
34 Version 1.1-20110314
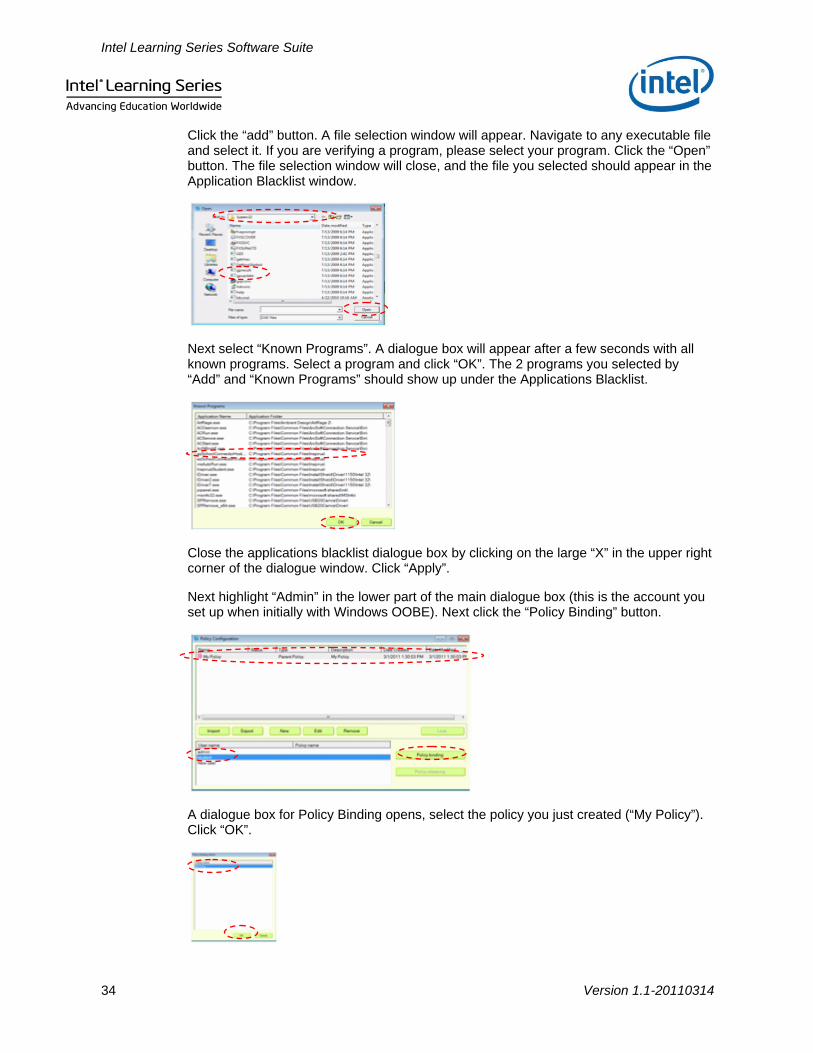
Click the “add” button. A file selection window will appear. Navigate to any executable file and select it. If you are verifying a program, please select your program. Click the “Open” button. The file selection window will close, and the file you selected should appear in the Application Blacklist window.
Next select “Known Programs”. A dialogue box will appear after a few seconds with all known programs. Select a program and click “OK”. The 2 programs you selected by “Add” and “Known Programs” should show up under the Applications Blacklist.
Close the applications blacklist dialogue box by clicking on the large “X” in the upper right corner of the dialogue window. Click “Apply”.
Next highlight “Admin” in the lower part of the main dialogue box (this is the account you set up when initially with Windows OOBE). Next click the “Policy Binding” button.
A dialogue box for Policy Binding opens, select the policy you just created (“My Policy”). Click “OK”.

Intel Learning Series Software Suite
Version 1.1-20110314 35
The “Policy” should now show next to the user name in the lower window of the dialogue box. This should also result in a message that terminates your application. Click “OK”.
Try to restart your application it should start followed by a message that tell you the application is blocked. Again click “OK”. Make sure “Admin” is selected in the lower part of the window and click “Policy Releasing”. Try to restart your application and it should open successfully. Close the dialogue box by clicking on the large “X” in the upper right corner of the dialogue window.
If any anomalies are noted in the behavior, please note them on the Self Verification Test Report. In no anomalies are noted fill in a pass on the Self Verification Test Report.

Completion
36 Version 1.1-20110314
6 Completion
6.1 Complete Self Verification Test Report
You should now complete the Self Verification Test Report and submit it as described in the Self Verification Test Report document.


