44
Intel® Unite™ Solution User Guide v2.6 Intel® Unite™ Solution User Guide
Intel® Unite™ Solution User Guide v2.6
Intel® Unite™ Solution User Guide

Intel® Unite™ Solution User Guide v2.6 2
Legal Disclaimers & Copyrights
All information provided here is subject to change without notice. Contact your Intel representative to
obtain the latest Intel product specifications and roadmaps.
Intel technologies’ features and benefits depend on system configuration and may require enabled
hardware, software or service activation. Performance varies depending on system configuration. No
computer system can be absolutely secure. Check with your system manufacturer or retailer or learn
more at intel.com.
You may not use or facilitate the use of this document in connection with any infringement or other
legal analysis concerning Intel products described herein. You agree to grant Intel a non-exclusive,
royalty-free license to any patent claim thereafter drafted which includes subject matter disclosed
herein.
No license (express or implied, by estoppel or otherwise) to any intellectual property rights is granted
by this document.
The products described may contain design defects or errors known as errata which may cause the
product to deviate from published specifications. Current characterized errata are available on request.
Intel disclaims all express and implied warranties, including without limitation, the implied warranties
of merchantability, fitness for a particular purpose, and non-infringement, as well as any warranty
arising from course of performance, course of dealing, or usage in trade.
Intel, the Intel logo, and Intel Unite are trademarks of Intel Corporation in the United States and/or other
countries.
*Other names and brands may be claimed as the property of others
© 2016 Intel Corporation. All rights reserved.

Intel® Unite™ Solution User Guide v2.6 3
Table of Contents
1 Introduction ............................................................................................................................................................................. 5
1.1 Audience................................................................................................................................................................... 5
1.2 Intel Unite Solution Terminology & Definitions ............................................................................ 5
1.3 Client Requirements ........................................................................................................................................ 5
1.4 Client Compatibility Table............................................................................................................................ 6
2 Launching the Intel Unite Application ................................................................................................................... 7
2.1 Starting the Intel Unite application on a Client ........................................................................... 7
2.2 Getting Connected ............................................................................................................................................ 8
3 Intel Unite Solution Features (Windows Client) ............................................................................................ 9
3.1 Present Content .................................................................................................................................................. 9
3.1.1 Present Extended Display ................................................................................................... 10 3.1.2 Presenting Applications ......................................................................................................... 11
3.2 View Presentation ............................................................................................................................................ 13
3.3 Take Over a Presentation .......................................................................................................................... 14
3.4 Annotation ............................................................................................................................................................ 15
3.5 Share a File .......................................................................................................................................................... 16
3.6 Video Playback with Audio Support .................................................................................................... 18
3.7 Disconnect User ................................................................................................................................................ 20
3.8 Meeting Lock ....................................................................................................................................................... 21
3.9 Scheduled Meetings ....................................................................................................................................... 23
3.10 Peer To Peer ........................................................................................................................................................ 25
3.11 Connection Status Indicator .................................................................................................................... 26
3.12 Intel Unite Application Settings ............................................................................................................. 27
4 Intel Unite Solution Features (OS X* Client) ................................................................................................. 28
4.1 Present Content ................................................................................................................................................ 28
4.1.1 Presenting Applications ......................................................................................................... 29
4.2 Take Over a Presentation .......................................................................................................................... 31
4.3 View Presentation ............................................................................................................................................ 31
4.4 Annotation ............................................................................................................................................................ 33
4.5 Zoom ........................................................................................................................................................................ 34
4.6 Share a file ........................................................................................................................................................... 35
4.7 Disconnect User ................................................................................................................................................ 37
4.8 Meeting Lock ....................................................................................................................................................... 38
4.9 Connection Status Indicator .................................................................................................................... 39
5 Intel Unite Solution on iPad ....................................................................................................................................... 40
5.1 Launching the application .......................................................................................................................... 40
5.2 Connect to Screen ........................................................................................................................................... 40
5.3 View Presentation ............................................................................................................................................ 41
5.4 Auto-Reconnect................................................................................................................................................. 42
5.5 Disconnect ............................................................................................................................................................ 42
Appendix A: Windows Client Installation ............................................................................................................................ 43

Intel® Unite™ Solution User Guide v2.6 4
Appendix B: Intel Unite Plugin for Microsoft® Outlook ............................................................................................ 44

Intel® Unite™ Solution User Guide v2.6 5
1 Introduction
Intel Unite application is an easy-to-use solution to have smarter conference rooms. Meetings start
quickly with wireless technology that connects immediately to new or existing displays, projectors, or
interactive whiteboards – no cables needed. Intel Unite application users can share and edit content in
real time, whether they are in the room or in a remote location.
The solution is designed to allow fast wireless screen sharing and collaboration in three steps:
1. Launch the Client application
2. Enter a PIN to connect to a specific session
3. Click Present Screen or Present Application to share content
1.1 Audience This guide focuses on enabling users to launch and get familiar with the Intel Unite application and its
features. The following areas will be addressed in this document:
o Launching the Intel Unite application
o Connecting to a Hub display
o Intel Unite application features
This guide does not focus on installing and deploying the complete solution. For information on
installation and deployment of the solution, refer to the “Intel® Unite™ Solution Enterprise
Deployment Guide.”
1.2 Intel Unite Solution Terminology & Definitions
Enterprise Server (Server) – This term refers to the web server, PIN service running on the server that
will assign and resolve pins, provide a download page for the Clients, and provide the admin portal for
configuration.
Client – This term refers to a device (Windows* or Mac*) that will be used to connect to the Hub.
Hub – This term refers to a mini form factor PC with Intel® vPro™ technology that is connected to a
display in a conference room running the Intel Unite application.
Plugin – This term refers to a software component that is installed on the Hub which extends the
functionality of the Intel Unite solution.
1.3 Client Requirements Make sure the following requirements are met by the Client:
Microsoft* Windows* 7, 8, 8.1 or 10
o Recommended latest patch level
Microsoft .NET* 4.5 or greater
OS X* 10.10.5 or greater
iOS 9.3 or higher
1 GB Ram 1 GB available storage Intel® Unite™ application installed

Intel® Unite™ Solution User Guide v2.6 6
1.4 Client Compatibility Table
Use the following table as a guide when using available features in the Intel Unite application
according to each Client Operating System (your laptop or device used as the Client).
Note: Only shown current features available in the latest software version of the Intel Unite
application (v3.0), some of the features on the table are not available in previous software versions (v1
and v2).
FEATURE Windows*
7, 8.1, 10
OS X* iOS
iPads
View Presentation
Present Content
Present Extended Display
Virtual Extended Display
Present Applications
Share screen with up to 4 presenters
(Dynamic)
Take Over a Presentation
Annotation
Share a File
Meeting Lock
Auto Disconnect (close lid)
View Attendees
Peer to Peer (vPro* technology only)
Video with Audio (screen sharing)
Scheduled Meetings

Intel® Unite™ Solution User Guide v2.6 7
2 Launching the Intel Unite Application
2.1 Starting the Intel Unite application on a Client
Ensure that the Intel Unite application is installed on your Client. If you need to download the
application, follow the instructions displayed on your Hub. For instructions on how to install
the Client, refer to Appendix A: Windows Client Installation.
Launch the Intel Unite application by searching for the installed program on your Client or by
clicking on the Intel Unite application icon if it is present on your desktop.
The Client application will try to contact your server. When it does, you will see a “Connect to
a screen” where the 6 digit PIN needs to be entered.
Note: There is a timeout for the startup screen (60 seconds) if the Client cannot find the
server.

Intel® Unite™ Solution User Guide v2.6 8
2.2 Getting Connected On the Connect to a screen window of the Client application, enter the PIN displayed on the
Hub.
Once the correct PIN is entered, you will join the session and can click on Present Screen or
Present Application if you wish to present your content.

Intel® Unite™ Solution User Guide v2.6 9
3 Intel Unite Solution Features (Windows Client)
Once the Client connects to a Hub, the solution provides useful collaboration features that include the
ability to present content side-by-side, share files, and annotate. This section will provide instructions
on how to use the features included with the Intel Unite solution.
3.1 Present Content
The Intel Unite solution allows you to quickly present content to the Hub display to which you are
connected. To present your screen:
1. Connect a Client to a Hub.
2. Click Present Screen to present the content of your primary display.
3. To stop sharing, click Stop Presenting

Intel® Unite™ Solution User Guide v2.6 10
In addition to being able to present your primary display, the Intel Unite application will allow you to
share content in the following ways:
Share a physical extended display
Share a virtual extended display
Share selected applications
3.1.1 Present Extended Display
If your system has multiple physical monitors connected, which are configured as extended displays,
Intel Unite application will allow you to share those extended desktops, keeping your primary
desktops private. If your system has only one display, an additional option to create a virtual extended
display will be available.
To present an extended display:
1. Click on the More (…) button next to Present Screen
2. Select the device you want to present from

Intel® Unite™ Solution User Guide v2.6 11
NOTE: The Choose Virtual Extended Display option will only be available if the extended display
drivers are installed and the system has been rebooted.
You can also change your selection by clicking on the More (…) button next to Stop Presenting.
3.1.2 Presenting Applications
This option allows you to select one or multiple applications to present while keeping the rest of the
content on your display private.
NOTE: Only one application is shared at a time. If multiple applications are selected, only the active
application window will be shared to the Hub.
To present an application:
1. Click on Present Application

Intel® Unite™ Solution User Guide v2.6 12
2. Select the application(s) you want to share from the list and click OK
NOTE: To change your selection, you can click the More (…) button next to Stop Presenting
Intel® Unite™ Solution User Guide v2.6 13
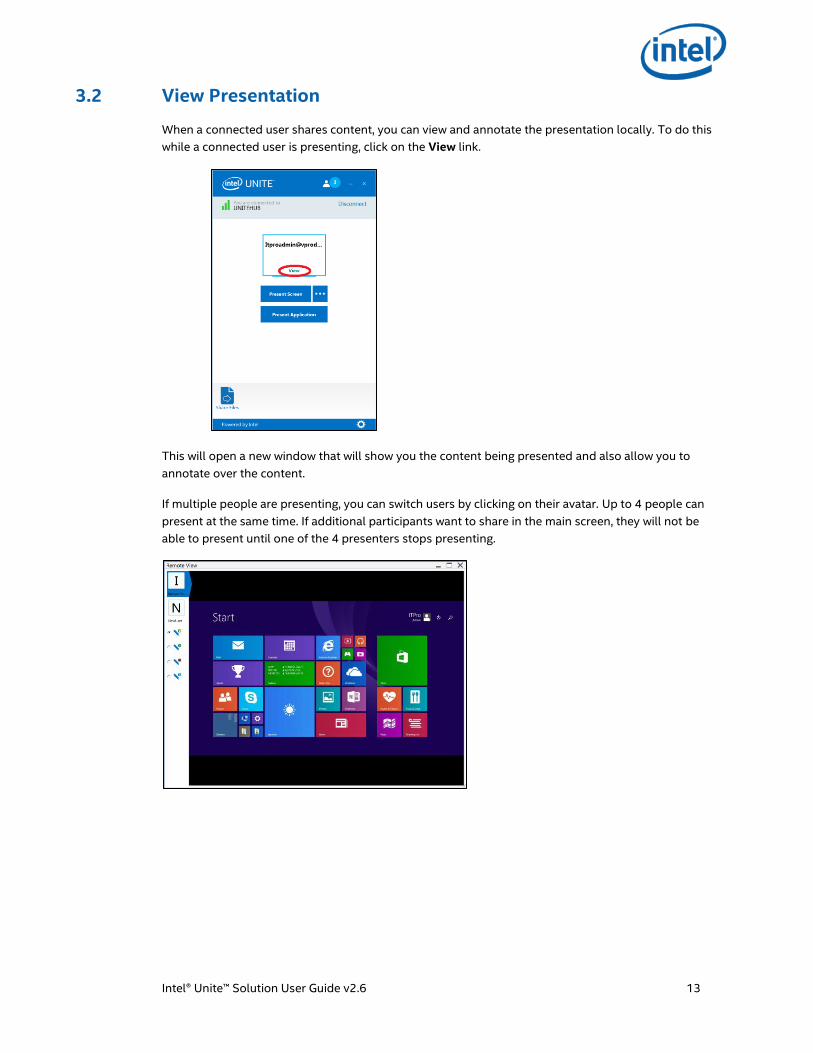
3.2 View Presentation
When a connected user shares content, you can view and annotate the presentation locally. To do this
while a connected user is presenting, click on the View link.
This will open a new window that will show you the content being presented and also allow you to
annotate over the content.
If multiple people are presenting, you can switch users by clicking on their avatar. Up to 4 people can
present at the same time. If additional participants want to share in the main screen, they will not be
able to present until one of the 4 presenters stops presenting.

Intel® Unite™ Solution User Guide v2.6 14
3.3 Take Over a Presentation
When multiple users are presenting, a single user may want to take over the Hub screen. To do this,
the user who wants to take over the screen can use the Take Over option.
To take over a presentation:
1. Start presenting your content.
2. Click Take Over. You will see the Take Over option only when you are presenting your
content screen simultaneously with other users.
NOTE: This action will not remove the other presenters from the collaboration session, it only stops
them from sharing their content. They can re-share at any time.

Intel® Unite™ Solution User Guide v2.6 15
3.4 Annotation
Annotation is used to quickly highlight and point out a specific item or section on a displayed screen.
The ink shown will slowly fade after five seconds. To use annotation while presenting:
1. Connect a Client to a Hub.
2. Present your content.
3. A persistent tool menu will appear in the top, center of your display. Click on the down arrow
to expose a set of options
The annotation menu has three options:
Enable Remote Annotation
Make Annotation Persistent
Draw on my screen
You can also change the pen color using the pen dropdown menu.
When you toggle Draw on my screen to the right, you can make annotations on your own screen.
To exit annotation mode, toggle Draw on my screen to the left.
To annotate when someone else is presenting, choose the View Presentation link and begin drawing.

Intel® Unite™ Solution User Guide v2.6 16
3.5 Share a File
This option must be enabled by your IT administrator in the Admin Portal. The Share Files feature
provides an easy way for users to share presentations, meeting minutes, pictures, or other files with
other users connected to the same Hub. To send a file using the Intel Unite application:
1. Connect multiple Clients to a Hub
2. Click on Share Files.
3. Click on Select Files and navigate to the file to be sent, or drag and drop files to the select files
area. Please note that the maximum file size is 2GB.
4. Once the files are ready to send, select the recipients and click on the Send button.

Intel® Unite™ Solution User Guide v2.6 17
5. Recipients will receive an indicator on the Share Files button that files are waiting for them. Click
Share Files to retrieve files.
6. In the file list, click on the download button next to the file you want to download. Files will be
placed in the Received Files folder on your desktop.
On this window you will notice different icons next to the file:
- An arrow pointing down is for files which are received and available for download
- When the arrow is pointing to the right the file has been downloaded. Click on the arrow
pointing to the right to open the file
- The “X” is to close the file or cancel the download. When the user clicks on the ”X” the download
list is updated as well as the number of files.

Intel® Unite™ Solution User Guide v2.6 18
3.6 Video Playback with Audio Support
The audio and video streaming feature that allows in room attendees to view movies or video clips
during presentations is available only when you share the display.
If this feature has been enabled by your IT administrator, a speaker button will be displayed after you
click on Present Screen. This button will allow you to mute or unmute your audio to the room.
1. Connect to the Intel Unite application, click on Present Screen or select the display you want to
use by clicking (…)
2. You can now share video content with accompanying audio.
3. The speaker button will allow you to mute or unmute your audio to the room with a simple click.

Intel® Unite™ Solution User Guide v2.6 19
Note: the audio and video experience is only available if you are sharing your display and not when
using the feature Present Application. To share video content, your client PC requires at minimum a
3rd Gen Intel® CoreTM processor running Windows* 7, 8.1 or 10.

Intel® Unite™ Solution User Guide v2.6 20
3.7 Disconnect User
Any user connected to a session can view a list of participants and disconnect other participants by
clicking on the participant icon located on the upper navigation bar.
1. To disconnect a user, click on the Disconnect button next to the user.
2. To disconnect all users and end the meeting, click on Disconnect All and End Session.

Intel® Unite™ Solution User Guide v2.6 21
3.8 Meeting Lock
This feature allows users to lock a session to prevent other Intel Unite application users from joining
and viewing the content being shared. When a session is locked, no other Intel Unite application users
will be able to connect.
1. Once connected to the Intel Unite application, click on the participant button to view the list of
participants that have joined the session.
2. When ready to lock the session, move the toggle button to the On position. To unlock the session
move the toggle button to the Off position. The session can be locked or unlocked by any
participant on the list at any time during the session.
3. When locking a session, the hub will display a “lock” icon next to the PIN and a toast message will
appear for a few seconds indicating the session has been locked.
The session has been locked by User X
When unlocking:
The session has been unlocked by
User X

Intel® Unite™ Solution User Guide v2.6 22
4. If a user wants to join a locked session the following message will be displayed:
5. If the user choses to reset the locked session, all the participants will be disconnected and the
user resetting the session will be connected when accepting the Reset Confirmation.
6. All the participants connected to the locked session will receive a message indicating that
another user has reset the session.
7. If a session is unlocked while you are presenting, content sharing will be stopped to avoid any
Intel Unite application users from being able to see the content until the content is shared again.

Intel® Unite™ Solution User Guide v2.6 23
3.9 Scheduled Meetings
This feature allows users to schedule a session with Intel Unite using Microsoft* Outlook, providing a
convenient way to include a link to the meeting invitee. Users can connect to a pre-scheduled meeting
without having to enter a PIN after a hub has been added to the meeting by the first meeting
attendee.
To use this feature, the Intel Unite plugin for Microsoft* Outlook has to be installed on your laptop.
See Appendix B: Intel Unite Plugin for Microsoft® Outlook for installation and usage instructions.
1. To join, click on the Join Intel Unite link in the meeting invitation. You will be directed to a virtual
room. If you don’t see this window, someone else has already added the room display to the
meeting.
2. If you are in the conference room, the room display can be added by clicking on the + sign and
entering the PIN from the Hub display on the Host From Room Solution window. Once the room
has been added, everyone in the virtual lobby will join the session. To start the meeting, only one
participant needs to add the room display.

Intel® Unite™ Solution User Guide v2.6 24
3. You also have the option to host a meeting using your laptop as the main display by clicking on
Host From My Device. To use this option, please note that you will need to have a PC with Intel®
vPro™ technology.
Intel® Unite™ Solution User Guide v2.6 25
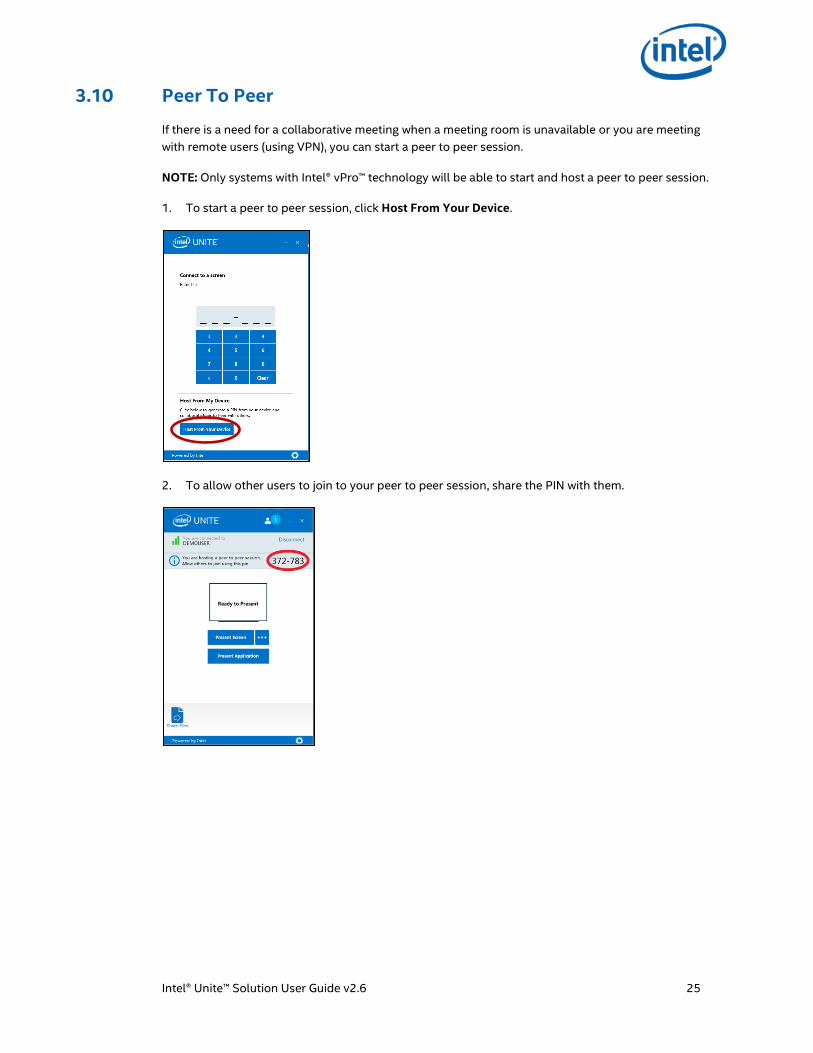
3.10 Peer To Peer
If there is a need for a collaborative meeting when a meeting room is unavailable or you are meeting
with remote users (using VPN), you can start a peer to peer session.
NOTE: Only systems with Intel® vPro™ technology will be able to start and host a peer to peer session.
1. To start a peer to peer session, click Host From Your Device.
2. To allow other users to join to your peer to peer session, share the PIN with them.

Intel® Unite™ Solution User Guide v2.6 26
3.11 Connection Status Indicator
The connection status indicator provides a reliability indicator of the connection between a Hub and
Client. When the connection becomes less reliable, the icon will turn yellow and then red.

Intel® Unite™ Solution User Guide v2.6 27
3.12 Intel Unite Application Settings
Intel Unite application settings are located at the right lower corner of the window. Click on the gear
symbol to access your options:
Your Name: Your user name or chosen name.
Avatar: Click on Change to select a desired .png, .gif, or .jpg file.
Prompt before allowing people to connect to me: In a peer to peer connection, the user with this
option checked will be sent a connection request message before another user can connect to this
user.
If this option is left checked and a peer-to-peer session is started by the first user, a Connection
Consent message will appear when another user tries to connect to it.
Collect and send anonymous usage data: By selecting this option the user allows the Intel Unite
application to collect and send anonymous usage data. The Privacy Statement displayed when the
application is launched has details on what information is collected by the application.
Intel® Unite™ Solution User Guide v2.6 28
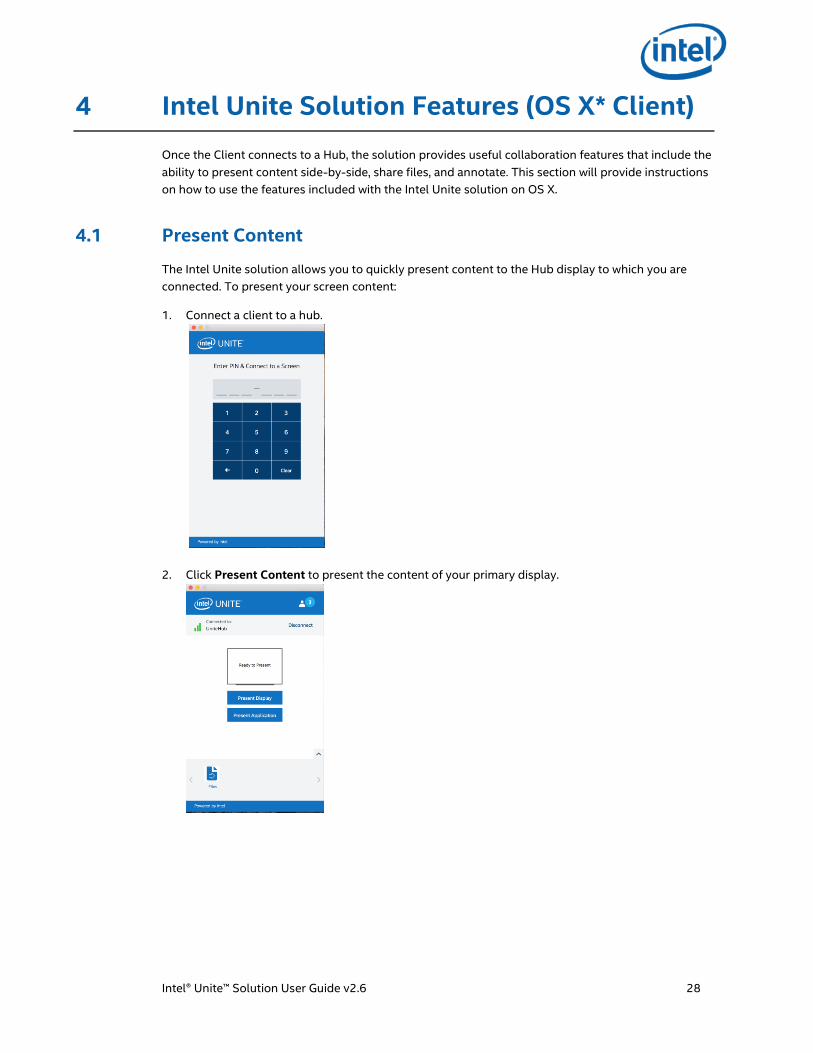
4 Intel Unite Solution Features (OS X* Client)
Once the Client connects to a Hub, the solution provides useful collaboration features that include the
ability to present content side-by-side, share files, and annotate. This section will provide instructions
on how to use the features included with the Intel Unite solution on OS X.
4.1 Present Content
The Intel Unite solution allows you to quickly present content to the Hub display to which you are
connected. To present your screen content:
1. Connect a client to a hub.
2. Click Present Content to present the content of your primary display.

Intel® Unite™ Solution User Guide v2.6 29
3. To stop sharing, click Stop Presenting
In addition to being able to present the content on your primary display, the Intel Unite application
will allow you to share selected applications.
4.1.1 Presenting Applications
This option allows you to select one or multiple applications to present while keeping the rest of the
content on your display private.
NOTE: Only one application is shared at a time. If multiple applications are selected, only the active
application window will be shared to the Hub.
To present an application, Click on Present Application

Intel® Unite™ Solution User Guide v2.6 30
3. Select the application(s) you want to share from the list and click OK
NOTE: To change your selection, you can click the More (…) button next to Stop Presenting
Intel® Unite™ Solution User Guide v2.6 31
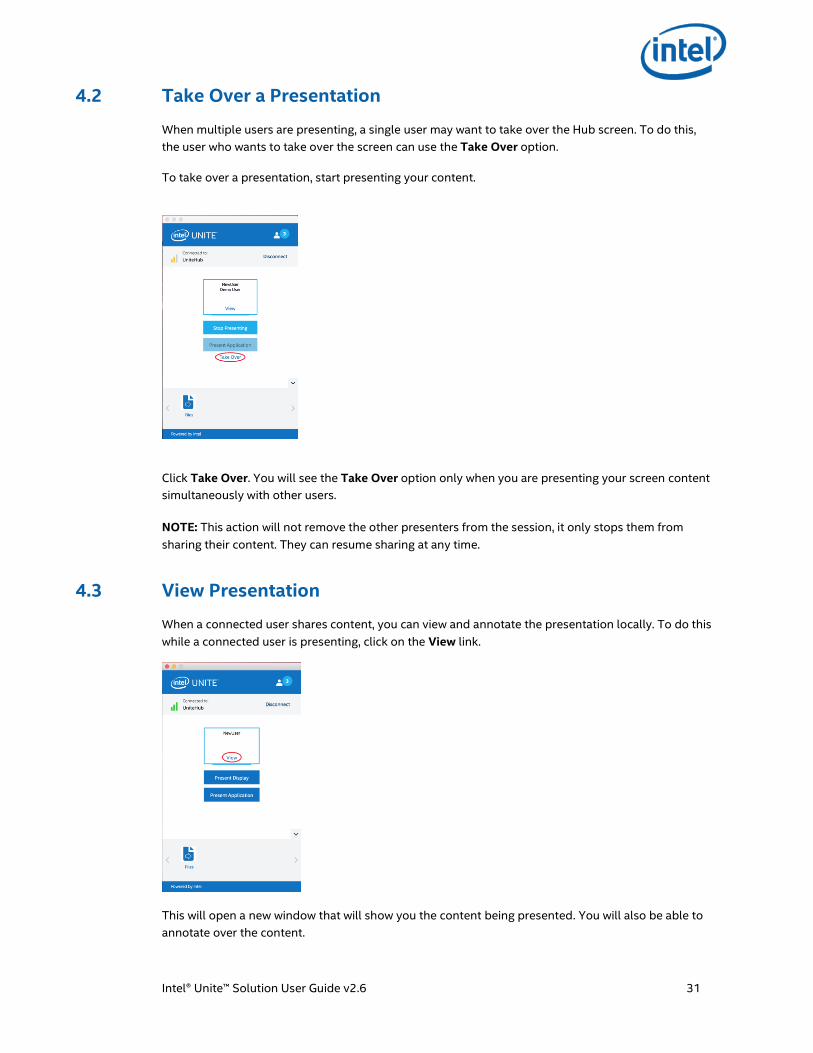
4.2 Take Over a Presentation
When multiple users are presenting, a single user may want to take over the Hub screen. To do this,
the user who wants to take over the screen can use the Take Over option.
To take over a presentation, start presenting your content.
Click Take Over. You will see the Take Over option only when you are presenting your screen content
simultaneously with other users.
NOTE: This action will not remove the other presenters from the session, it only stops them from
sharing their content. They can resume sharing at any time.
4.3 View Presentation
When a connected user shares content, you can view and annotate the presentation locally. To do this
while a connected user is presenting, click on the View link.
This will open a new window that will show you the content being presented. You will also be able to
annotate over the content.

Intel® Unite™ Solution User Guide v2.6 32
If multiple people are presenting, you can switch users by clicking on their avatar on the right.
You can also annotate by clicking on the marker below. For more annotation options click on (…)

Intel® Unite™ Solution User Guide v2.6 33
4.4 Annotation
Annotation is used to quickly highlight and point out a specific item or section on a displayed screen.
The ink shown will slowly fade after five seconds. To use annotation while presenting:
1. Connect a Client to a Hub.
2. Present your content.
3. A persistent tool menu will appear on the right side of your display.
4. Click on the … to view more Annotation options.
Choose marker color for annotations.
Choose either fading or persistent annotations
Allow other participants to annotate.
5. Click on the marker to start drawing on the screen. To clear your annotations, click on Clear.
6. To annotate when someone else is presenting, choose the View Presentation link and begin
drawing.

Intel® Unite™ Solution User Guide v2.6 34
4.5 Zoom
When viewing a presentation, you can zoom in and out to see the presentation by clicking on the
magnifying glass.

Intel® Unite™ Solution User Guide v2.6 35
4.6 Share a file
This option must be enabled by your IT administrator in the Admin Portal. The Share Files feature
provides an easy way for users to share presentations, meeting minutes, pictures, or other files with
other users connected to the same Hub. To send a file using the Intel Unite application:
1. Connect multiple Clients to a Hub
2. Click on Files.
3. Drag and drop files to the select files area. Please note that the maximum file size is 2GB.
4. Once the files are ready to send, select the recipients and click on the Send button.

Intel® Unite™ Solution User Guide v2.6 36
5. Recipients will receive an indicator on the Share Files button that files are waiting for them. Click
Files to retrieve files.
6. In the file list, click on the download button next to the file you want to download. Files will be
placed in Downloads.
On this window you will notice different icons next to the file:
- An arrow pointing down is for files which are received and available for download.
- When the arrow is pointing to the right the file has been downloaded. Click on the arrow
pointing to the right.
- The “X” is to close the file or cancel the download. When the user clicks on the “X” the download
list is updated as well as the number of the files

Intel® Unite™ Solution User Guide v2.6 37
4.7 Disconnect User
Any user connected to a session can view a list of participants and disconnect other participants by
clicking on the minus sign (-) located next to the participant on the upper navigation bar.
You can disconnect all the users and end session by clicking on Disconnect All and End Session.

Intel® Unite™ Solution User Guide v2.6 38
4.8 Meeting Lock
This feature allows users to lock a meeting to prevent other Intel Unite application users from joining
and viewing the content being shared. When a meeting is locked, no other Intel Unite application
users will be allowed to connect.
Once connected to the Intel Unite application, click on the participant button to view the list of
participants that have joined the session.
When ready to lock the session, move the toggle button to the On position. To unlock the session
move the toggle button to the Off position. The session can be locked or unlocked by any participant
on the list at any time during the session.
If the session is unlocked while you are presenting, content sharing will be stopped to avoid any Intel
Unite application users from being able to see the content until it is shared again.
If a user wants to join a locked session the following message will be displayed:
If the user chooses to reset the locked session, all the participants will be disconnected. The user
resetting the session will be connected when accepting the Reset Confirmation.

Intel® Unite™ Solution User Guide v2.6 39
All the participants connected to the locked session will receive a message indicating that another
user has reset the solution.
4.9 Connection Status Indicator
The connection status indicator provides a reliability indicator of the connection between a Hub and
Client. When the connection becomes less reliable, the icon will turn yellow and then red.
Intel® Unite™ Solution User Guide v2.6 40
5 Intel Unite Solution on iPad
Once the iPad connects to a Hub, the solution provides useful features that include the ability to view
presentation. This section will provide instructions on how to use the solution on iOS.
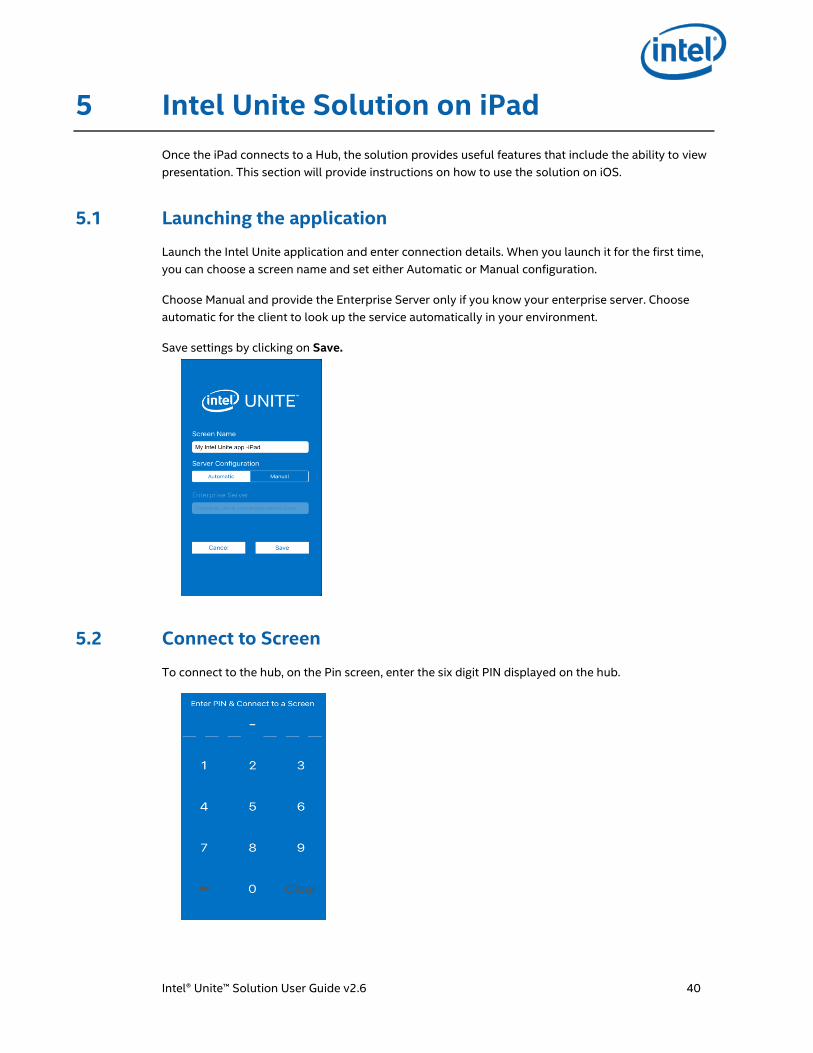
5.1 Launching the application
Launch the Intel Unite application and enter connection details. When you launch it for the first time,
you can choose a screen name and set either Automatic or Manual configuration.
Choose Manual and provide the Enterprise Server only if you know your enterprise server. Choose
automatic for the client to look up the service automatically in your environment.
Save settings by clicking on Save.
5.2 Connect to Screen
To connect to the hub, on the Pin screen, enter the six digit PIN displayed on the hub.
Intel® Unite™ Solution User Guide v2.6 41
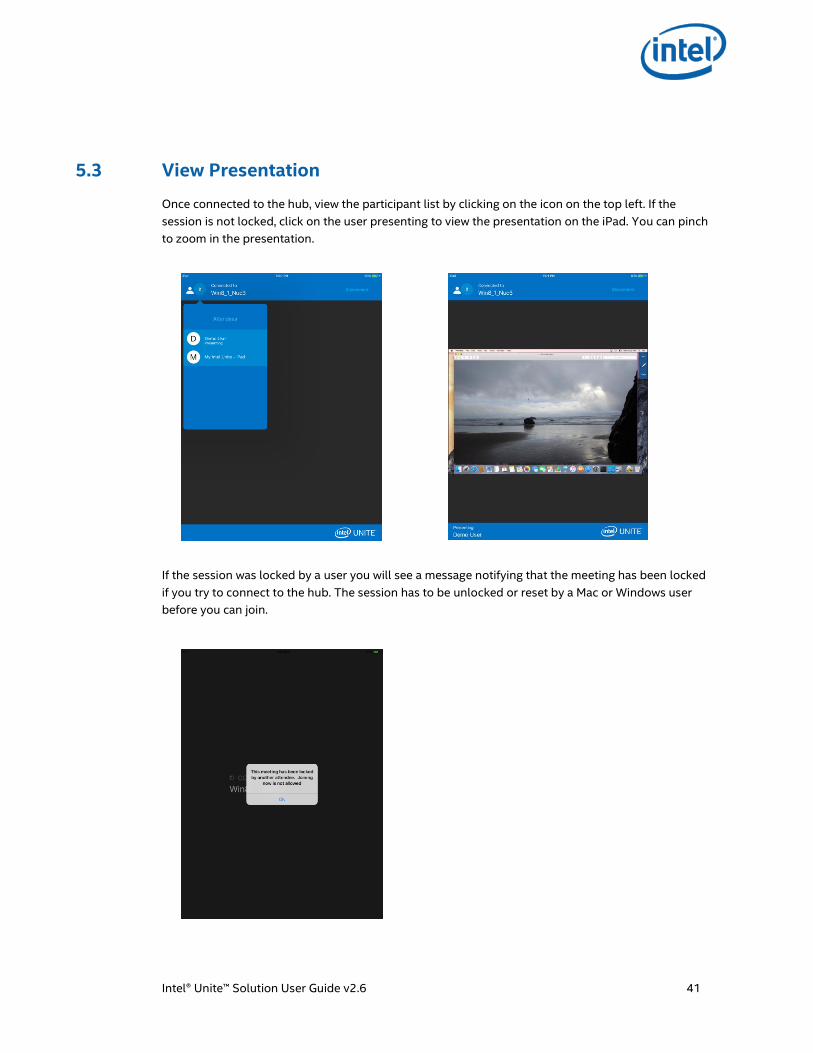
5.3 View Presentation
Once connected to the hub, view the participant list by clicking on the icon on the top left. If the
session is not locked, click on the user presenting to view the presentation on the iPad. You can pinch
to zoom in the presentation.
If the session was locked by a user you will see a message notifying that the meeting has been locked
if you try to connect to the hub. The session has to be unlocked or reset by a Mac or Windows user
before you can join.

Intel® Unite™ Solution User Guide v2.6 42
5.4 Auto-Reconnect
If you open any other application on your iPad while you are connected to a hub, re-opening the Intel
Unite application will automatically connect you to the hub and the application will not prompt you to
enter a PIN again.
Note: If your device does not re-connect to the hub, the room hardware may need an upgrade.
5.5 Disconnect
To disconnect from the hub, click on Disconnect on the top right corner.

Intel® Unite™ Solution User Guide v2.6 43
Appendix A: Windows Client Installation
1. Download the Client installer by following the instructions displayed on the Hub.
2. Locate the installer folder and run the file for the Client: Intel Unite Client.msi
3. Click Next to continue.
4. Click Next after you check the box I accept the terms in the License Agreement.
5. Select Enterprise and click Next.
6. In the Connect to PIN Server window, select Automatically Find Server and click Next.
7. The Destination Folder window will show the default location where the application is
installed on your Client. In this step you can also create a desktop icon.
8. At this point, you can go back to review your settings or click on Install to continue.
9. Once the installation has ended, you will see the Completed the Intel Unite Software Setup
Wizard window.
10. Click on Finish and launch the installation if you wish.

Intel® Unite™ Solution User Guide v2.6 44
Appendix B: Intel Unite Plugin for Microsoft® Outlook
How to install the Intel Unite Plugin for Microsoft Outlook.
1. Run the file Intel Unite Add-in for Microsoft® Outlook.msi.
2. Complete the installation.
3. Go to Outlook and in the ribbon window click on the new Intel Unite Application Create
Meeting.
The meeting created using the Scheduled Meetings functionality will look like this:


