26
Interactive Web Design 5 Introduction January 13, 2015 Week 2
| Date post: | 15-Jul-2015 |
| Category: |
Education |
| Upload: | katherine-mccurdy-lapierre-rgd |
| View: | 1,029 times |
| Download: | 1 times |

Interactive Web Design 5
Introduction January 13, 2015
Week 2

Introduction
Our goals:
• Further your understanding of
CSS and HTML
• Introduce Bootstrap framework for
responsive design
• Review content management system
(CMS) options
• Build a portfolio website using
Wordpress
• Look at ways to get found online

Course description
“Create a personal portfolio
website that includes social media
elements, forms and various
levels of interactivity.
Integrate technologies and
methodologies such as e-
marketing strategies, reserving a
domain name and web site
hosting.”

What we’ll cover
5 modules:• Module 1: CSS basics
• Module 2: Using CSS to create image rollovers
• Module 3: Bootstrap framework
• Module 4: Templates using Dreamweaver
• Module 5: Creating a Portfolio in Wordpress
Each module contains:• In-class lecture content
• Online learning/independent study content
• 10-20 question quiz based on the independent
study content and activities
• In-class exercises and assignment

Online learning
• Short videos (a few minutes each)
• Reviewing video content before class
will helps to prepare you for the in-class
instruction and tasks
• Complete the quiz after each video
Each video/quiz component is worth
4% of your mark for a total of 20
(…there are 5 of them)

Course schedule and assessment(Let’s flip into eLearn to review…)

Katherine McCurdy-LapierrePlease call me Katherine
• Work full time in Marketing at Mohawk College as the
Creative and Web Services Manager/Art Director
• Employed as a Graphic/Web Designer for the past 15 years
• Registered Graphic Designer with RGD Ontario
• Contact me via eLearn email
Your instructor

HTML & CSS Review
• HTML and CSS basics will be covered in the Online
Learning content for this week
• Please review and complete the quiz before next class
Today:
• Review how to define a site in Dreamweaver
• Saving images for web (file types)

Module 1
Defining a site in Dreamweaver
We’ll be using Dreamweaver to
work on Exercise 1.

Why do we define our site?
• Dreamweaver was designed to
create websites; other editors
were designed to create
webpages
• Defining a site Dreamweaver
allows it to resolve links, check
related files or help you manage
any of your assets

Question:
On the web, what is the difference between
relative and absolute paths?

Answer:
Absolute Links:
• specifies a fully-qualified URL
• the protocol
(eg. http://)
+ domain name
(eg. www.canada.com)
…may also include:
a file name / path
(/articles/2014/why-vote.com)
• This link is accessible from anywhere on the web:
http://www.canada.com/articles/2014/why-vote.com

Answer (continued):
Relative Links:• specifies a path to a page or file from the current
page
• E.g., links on “PageB.htm:”
• Link to “PageA.htm” will look in the same folder
• Link to “../Application3/Page1.html” will look up/out
one folder to find the “Application3” folder, then
look for Page1.html within it
• “../file.html” will look up/out of folder for the file (no
file exists in the example to the right)
• Dreamweaver helps to build relative links correctly
• Corrects them if you move files/folders

Defining a site in Dreamweaver
• Websites are a collection of files and folders
with links connecting them
• Standards have emerged when structuring
your site, e.g:
• Images and graphics go in a folder called
“assets” or “images”
• CSS files go in a folder called “CSS” or
“style”
• Javascript files go in a folder called “JS”
or “scripts”
• Using this typical structure helps keep the
site organized
• Allows other site editors or developers to
easily find files

Let’s open Dreamweaver

Defining a site in Dreamweaver
1. Decide what the root folder is. When you define
your site, this is the folder that you'll point Dreamweaver
to. (For Exercise 1, this will be the folder we download from eLearn… let’s do that
now…)
2. Inside the root folder you'll structure any folders for
assets (images), video, CSS, JS, etc.
• For HTML-based sites, the folder structure is visible in the URL
(http://www.url.com/folder/folder/file.html)
• Mapping out the site structure is essential for larger sites

Defining a site in Dreamweaver
3. Site’s homepage typically sits in
the root folder
• Homepage is often called index.html
4. Open Dreamweaver.
5. Ensure the Files panel is visible. If it’s
not, you’ll find it in the Menu under Window

Defining a site in Dreamweaver
6. From the files panel, in the
dropdown, select “Manage Sites”

Defining a site in Dreamweaver
7. From the files panel select
“Manage Sites”
• Either using beside the dropdown
• Or, from the dropdown
Defining a site in Dreamweaver
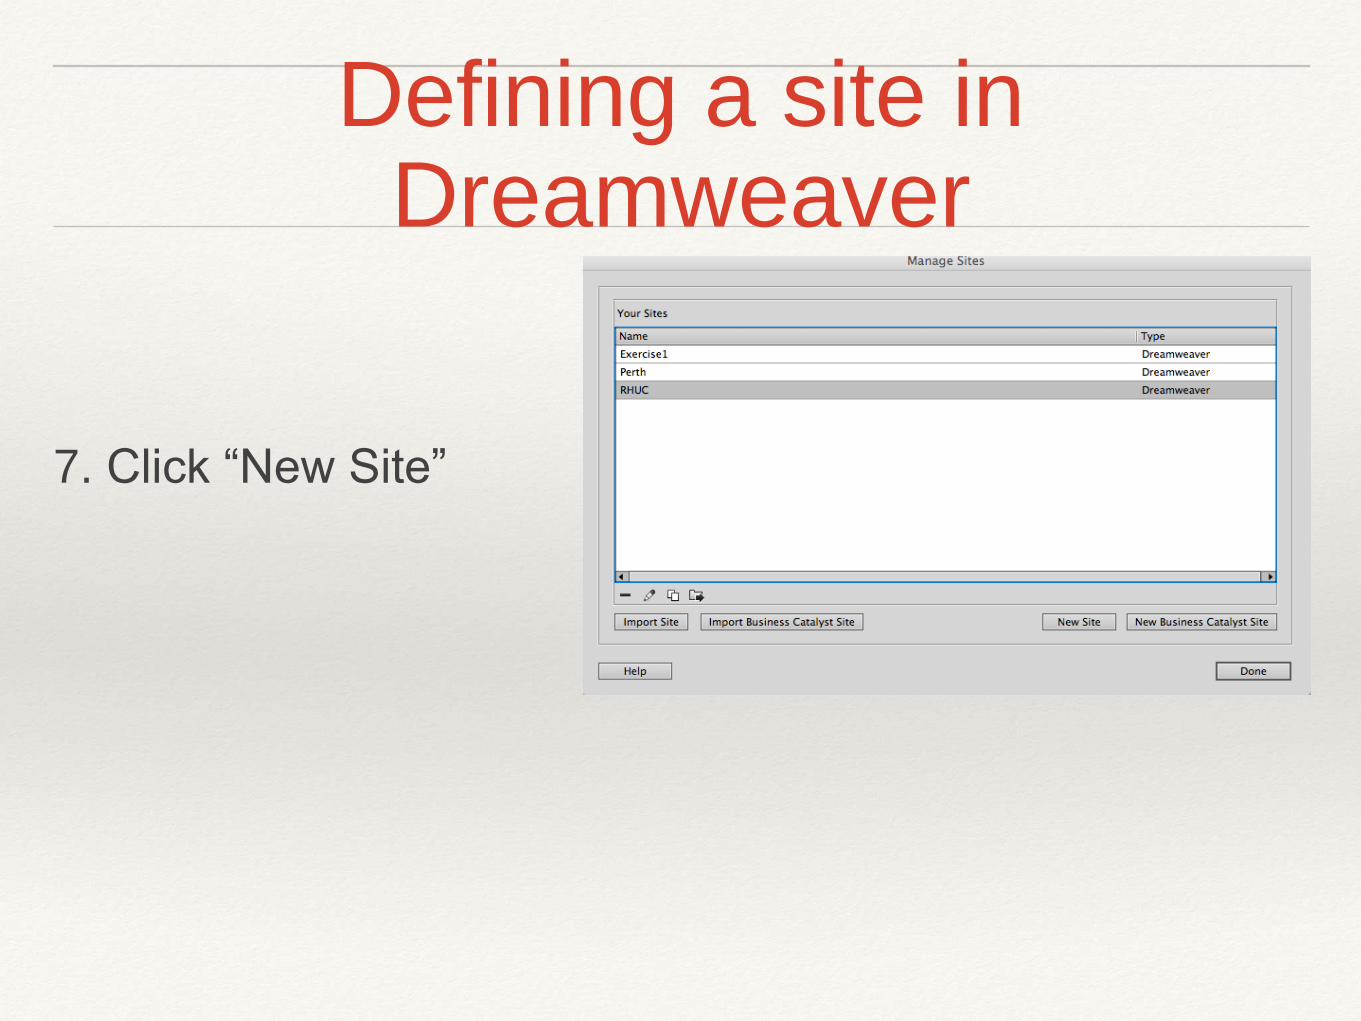
7. Click “New Site”

Defining a site in Dreamweaver
8. Give your site a name, e.g. Exercise1
9. Select the root folder under “Local Site Folder”
• The root folder is the one that will house all your site files

Defining a site in Dreamweaver
10. You will now see the folders and files in the root folder
• Note: if you are using a public computer, do this every time
you work on your site. (You’ll need to save it to a memory
stick.) If you are using your own personal laptop you will only
have to do this once.

Module 1
Saving images for the web
Review of web file types and
saving for the web…

Saving images for the web
Key things to remember:
• Save at size-as
• Do not insert a larger image then shrink it down
• Use the “Save for Web” tool in Photoshop and Illustrator
• Easily compare and preview how the file will appear in various formats and
qualities
• Optimize
• What is the lowest quality setting you can go while still maintaining the quality of
the image?
• Choose the best format for the type of graphic
• jpg? png? gif?

File format comparison
Best for… type of image Extension
JPG
• colourful, complex images
• images containing gradients or colour
blend
• creates smaller files sizes because of
lossy compression
• 8-bit grayscale images
• 24-bit color images (8 bits each
for red, green, and blue)
• no transparency
.jpg
GIF• line art (such as one- or two-color logos)
• simple drawings
• images with no gradients or blends
• limited to an 8-bit palette, or 256
colours
• allows for transparency, matted
to a defined colour
.gif
PNG
• images with large, uniformly coloured
areas
• files size is typically larger than jpg
because of lossless compression
• 8 bit paletted images
• 24 or 48 bit truecolor
• allows for transparency on any
colour/background
.png
SVG• images that must be scalable
• most browsers have at least some degree
of SVG rendering support
• XML-based vector image format
for two-dimensional graphics
with support for interactivity and
animation
.svg

Let’s open Photoshop and try it out…


