12
Deutsche Bank Global Transaction Banking www.deutschebank.nl Internet Bankieren Import File

Deutsche Bank Global Transaction Banking
www.deutschebank.nl
Internet Bankieren Import File

Internet Bankieren – Importing Payment Files 2
Importing payment files
You can import your payment file from your accounting software package. This way you no longer have to enter payments and collections manually. These can be authorised in Internet Bankieren and are then ready to be executed.
Contents
1. Import a file 3
2. View the status of uploaded files 6
3. Create your own file formats 8

Internet Bankieren – Importing Payment Files 3
1. Import a file
Internet Bankieren automatically detects which type of transaction is involved and, after importing, groups the transactions according to category, such as international payments, SEPA payments or collections. You can also indicate the type of transactions contained in your file.
You can also choose whether you wish only to import a summary of each transaction, or all the details. If you import the details, you can still change the transactions within Internet Bankieren before they are sent to the bank.
DB Internet Bankieren supports the following file types:
BTL91
XML
CSV fixed format of beneficiaries (address book data)
CSV fixed format payer (address book data)
CSV fixed format general payments/collections
CSV fixed format multiple collections
CSV stands for "comma separated value". This is a file type that can be created with a programme such as Excel.
Please note
Up until now, Internet Bankieren also supported the ClieOp03 format. As of the first of February 2014, this format will disappear due to the transition to SEPA. To import batch payments and collections, you use the XML format from now on.
For more information on reports and formats, including the Deutsche Bank XML file format specifications, click on www.deutschebank.nl/SEPA.
Get in touch with the Internet Bankieren Helpdesk if you want to test your XML file first with the XML syntax check.
To get started:
1 Under Pay & Collect, click on Import File.
2 The Manual Upload tab will open.
Internet Bankieren – Importing Payment Files 4
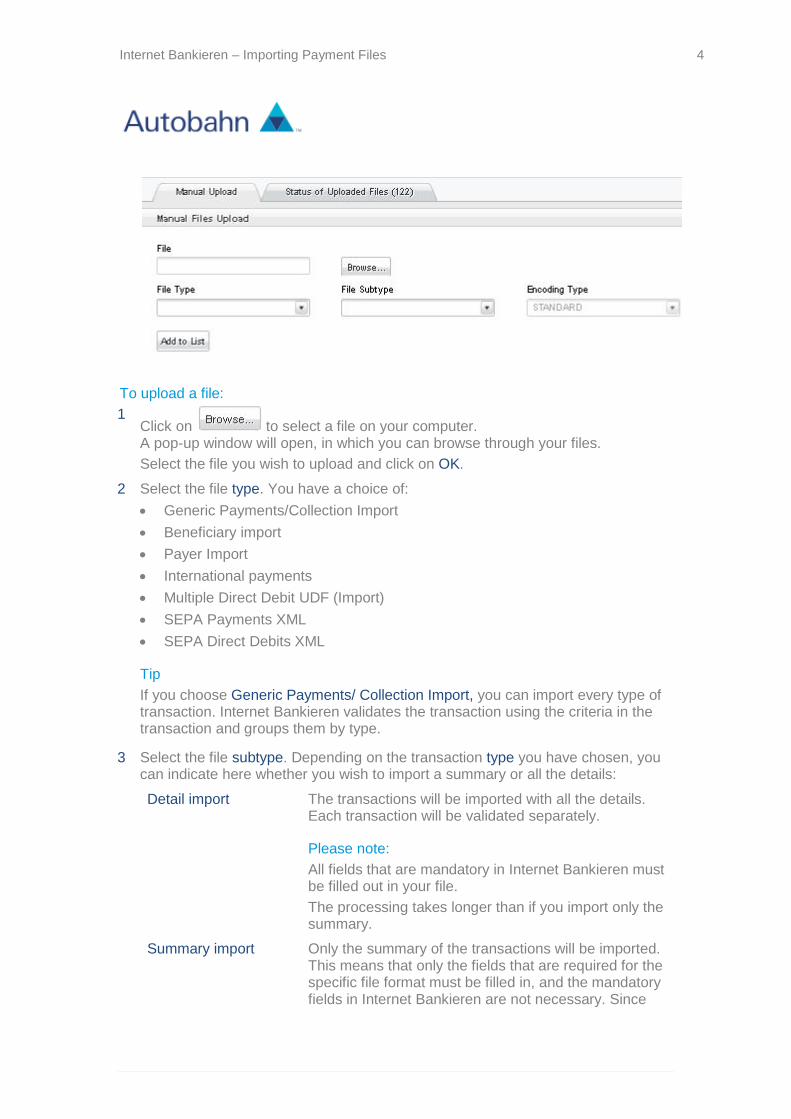
To upload a file:
1 Click on to select a file on your computer. A pop-up window will open, in which you can browse through your files.
Select the file you wish to upload and click on OK.
2 Select the file type. You have a choice of:
Generic Payments/Collection Import
Beneficiary import
Payer Import
International payments
Multiple Direct Debit UDF (Import)
SEPA Payments XML
SEPA Direct Debits XML
Tip
If you choose Generic Payments/ Collection Import, you can import every type of transaction. Internet Bankieren validates the transaction using the criteria in the transaction and groups them by type.
3 Select the file subtype. Depending on the transaction type you have chosen, you can indicate here whether you wish to import a summary or all the details:
Detail import The transactions will be imported with all the details. Each transaction will be validated separately.
Please note:
All fields that are mandatory in Internet Bankieren must be filled out in your file.
The processing takes longer than if you import only the summary.
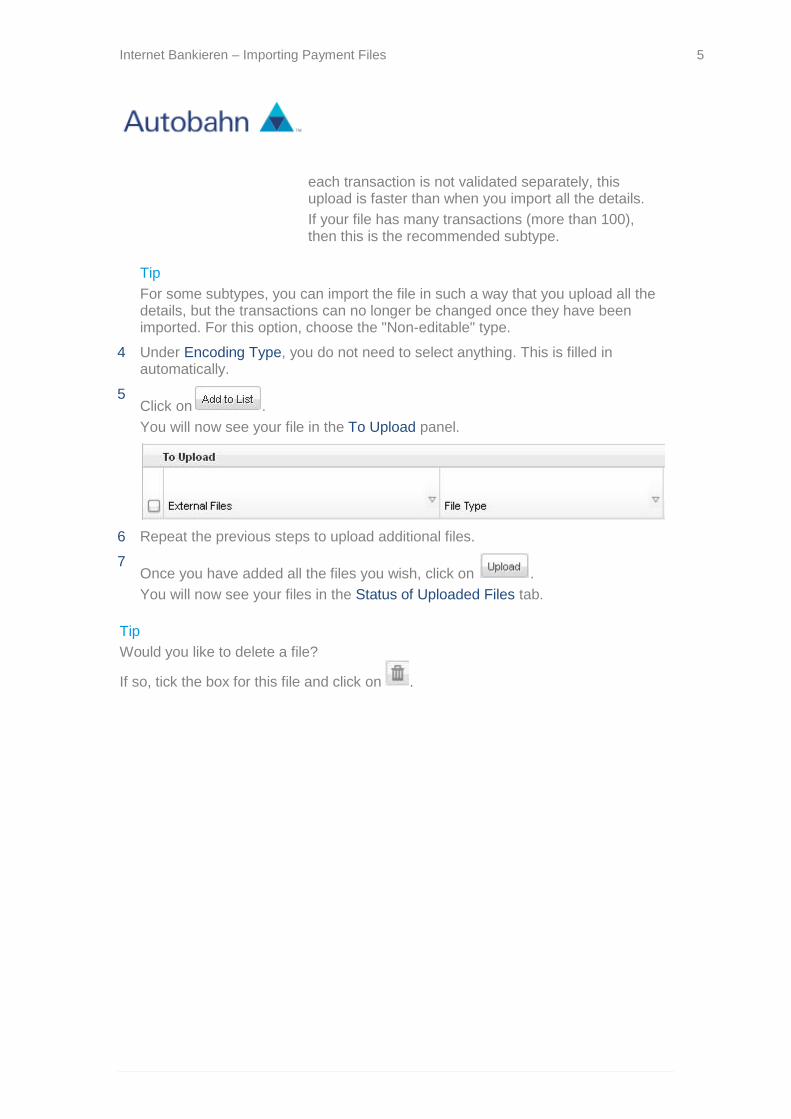
Summary import Only the summary of the transactions will be imported. This means that only the fields that are required for the specific file format must be filled in, and the mandatory fields in Internet Bankieren are not necessary. Since
Internet Bankieren – Importing Payment Files 5
each transaction is not validated separately, this upload is faster than when you import all the details.
If your file has many transactions (more than 100), then this is the recommended subtype.
Tip
For some subtypes, you can import the file in such a way that you upload all the details, but the transactions can no longer be changed once they have been imported. For this option, choose the "Non-editable" type.
4 Under Encoding Type, you do not need to select anything. This is filled in automatically.
5 Click on .
You will now see your file in the To Upload panel.
6 Repeat the previous steps to upload additional files.
7 Once you have added all the files you wish, click on .
You will now see your files in the Status of Uploaded Files tab.
Tip
Would you like to delete a file?
If so, tick the box for this file and click on .

Internet Bankieren – Importing Payment Files 6
2. View the status of uploaded files
After uploading, you can check whether the file has been uploaded correctly. The status indicates whether the import was successful:
FT File Transferring: the file is still being processed.
FE File Error: there is a problem with the file, please try uploading it again.
OK The file has been uploaded successfully.
FW File Uploaded with Warning: the file has been uploaded, but one or more transactions require your attention. You need to upload the file again.
FP File Partially Uploaded: the file has only partially been uploaded. You need to upload the file again.

Internet Bankieren – Importing Payment Files 7
To check the status of your uploaded files:
1 Click on the Status of Uploaded Files tab.
2 You will see a list of the files you have imported. In the Status column you will see the results of the importation.
To see more information about the status:
After the uploading, you can click the status of the file to view more information about the upload. If there is, for example, a problem with the file (red status), you can click on the status to find out what the problem is. Another possibility is an XML-file with an OK status, in the same way you can check how many transactions the XML-file contains.
When you click on the status, a pop-up appears with more information.

Internet Bankieren – Importing Payment Files 8
3. Create your own file formats
If you do not have an accounting software package, you can also import transactions to Internet Bankieren by means of a file format that you have created yourself. You can then select this type of file format in Internet Bankieren whenever you import a file.
The file format ensures that the fields from Internet Bankieren are correctly linked to each other and that the exchange works smoothly.
Under Administration > File Format Maintenance, there are a number of ready-made file formats. These file formats are generated by the system and cannot be changed. To create an own file format, copy an existing one and change the duplicate to your liking.
You can make changes to the following file format types:
Generic payments/collections Import or export of generic payments and direct debits. Internet Bankieren recognizes the type of transaction. You can add up to 51 fields.
Multiple Direct Debit Import or export of multiple direct debits. You can add up to 32 fields.
Returned transaction Export of returned transactions from Internet Bankieren. You can add up to 30 fields.
Payer import Import of payers in your address book. You can add up to 11 fields.
Payer file export Export of payers from Internet Bankieren. You can add up to 11 fields.
Beneficiary import Import of beneficiaries in your address book. You can add up to 28 fields.
Beneficiary export Export of beneficiaries from Internet Bankieren. You can add up to 28 fields.
Account Names & Numbers Export of account names and numbers from Internet Bankieren. You can add up to 7 fields.
Account statement Export of account statements from Internet Bankieren. You can add up to 49 fields.

Internet Bankieren – Importing Payment Files 9
SEPA-payments Import or export of SEPA-payments. You can add up to 51 fields.
SEPA-collections Import or export of SEPA-collections. You can add up to 51 fields.
On the File Format Maintenance tab you can see in the column Format type if the file format is for importing or exporting data.
To get started:
1 Under Administration, click on Domain Settings.
2 The Account Views tab will open.
3 Click on the File Format Maintenance tab.

Internet Bankieren – Importing Payment Files 10
To copy a file format:
1 Click on the File Format Maintenance tab.
2 Tick the box for the file format you wish to copy.
Tip
You can copy only one file format at a time, so tick only one file format.
3 Click on the Clone button at the bottom of the list.
A pop-up window will open, into which you can enter a code and a description of the file format.
4 Click on OK.
The new file format is now in the list. You can now set up the file format as you wish.

Internet Bankieren – Importing Payment Files 11
To change a file format:
1 Click on for the file format you have just created.
The details area will open.
2 Click on Edit.
The Edit Import File Format window will open, in which you can change the file format.
3 Change the file format as you wish:
Product If you import a file under Pay & Collect > Import File, you have to choose a file type.
Here you can choose which file type you want to link to your own format.
Format Code Next, if you import a file you need to choose a subtype.
The name you enter here will appear in the list of subtypes.

Internet Bankieren – Importing Payment Files 12
Format Description The description is found in the Format Description column in the File Format Maintenance tab.
Import Mode Indicate whether or not you want the file to be editable after importing.
Date Format Select the date format for the file.
Field Separator From the selection list, choose the character you want to use to separate the fields in the file, or enter a character you want to use.
This applies to .txt files, among others: if you fill in the information in a .txt file, you must use a separator to indicate where one field stops.
Start/End Indicate where a line begins and ends. This field is optional.
Escape Character Indicate which character will be used to indicate that the following characters have a special meaning. This field is optional.
4 Then add the fields which are present in your payment file and that must therefore be included in the file format. On the left, you find the fields that are available and on the right you see the fields that you have selected.
For the account number of the payer, you can, for instance, add File Beneficiary Account.
Tip
Depending on the type of file format, you can add up to 51 fields.
5 Then place the fields in the correct order. The fields must be in the same order as in your payment file.
To do so, use the up or down arrows or .
6 Once you have changed all the criteria to suit your preferences, click on Save complete.
You have created your own file format and can now use it when importing or exporting payment files in Internet Bankieren.


![[BALKANIZE DEUTSCHE BANK]](https://static.documents.pub/doc/80x56/56815b15550346895dc8c5cf/balkanize-deutsche-bank-56b6efac56326.jpg)
