Page 1
[Type here]
Internet Based
Fully Automated
Online Trading
System
CONFIDENTIAL
All rights reserved. No part of this publication may be reprinted,
reproduced, stored in a retrieval system or transmitted, in any form
or by any means, without the prior permission in writing from the
owners.
Trade Management System User Manual
Page 2
2 | P a g e
CONFIDENTIAL ©2018 YCO Private Limited. All Rights Reserved.
Contents 1 Introduction ....................................................................................................................... 4
1.1 Purpose ...................................................................................................................... 4
1.2 Target Audience ......................................................................................................... 4
1.3 Glossary ...................................................................................................................... 4
2 Global Administration ........................................................................................................ 5
2.1 Manage Application ................................................................................................... 5
2.1.1 Setup Application Type ........................................................................................ 5
2.1.2 Setup Approval Levels .......................................................................................... 7
2.2 Roles and Privileges ................................................................................................. 16
2.2.1 Manage Roles ..................................................................................................... 16
2.2.2 Manage Functionalities ...................................................................................... 22
2.2.3 View Privileges ................................................................................................... 23
2.3 User Management ................................................................................................... 25
2.3.1 Configure User Type .......................................................................................... 25
2.3.2 Manage Users .................................................................................................... 32
2.4 System Options ........................................................................................................ 37
2.4.1 Manage System Options .................................................................................... 37
2.5 DNA Login ................................................................................................................. 39
3 Member Admin Terminal ................................................................................................. 42
3.1 Manage Client/Dealers ............................................................................................ 42
3.1.1 Client/Dealer creation........................................................................................ 42
3.1.2 Approve Client/Dealer application .................................................................... 53
3.1.3 Send the UCC request to RMS ........................................................................... 57
4 Order Management ......................................................................................................... 59
4.1 DNA Login ................................................................................................................. 59
4.2 Normal Order ........................................................................................................... 62
4.2.1 Completely Matched Order ............................................................................... 68
4.2.2 Partially-Matched Order .................................................................................... 71
4.3 Edit Orders (Buy/Sell) ............................................................................................... 74
4.3.1 Edit Partially_Traded Order ............................................................................... 74
4.3.2 Edit Open Order ................................................................................................. 76
4.4 Cancelled Order (Buy/Sell) ....................................................................................... 78
4.4.1 Cancel Open order ............................................................................................. 78
4.4.2 Cancel Partially_Trader Order (Buy/Sell) ........................................................... 80
4.4.3 Order Cancelled At the End of Day (Buy/Sell) ................................................... 81
Page 3
3 | P a g e
CONFIDENTIAL ©2018 YCO Private Limited. All Rights Reserved.
4.5 Rejected Order (Buy/Sell) ........................................................................................ 81
4.6 Executed Orders (Buy/Sell) ...................................................................................... 83
5 Market Data ..................................................................................................................... 84
5.1 Market Watch .......................................................................................................... 84
5.2 Stock Information .................................................................................................... 92
5.3 Market Depth ........................................................................................................... 95
5.4 News/Message/Connection Log .............................................................................. 97
5.4.1 News................................................................................................................... 98
5.4.2 Messages ............................................................................................................ 99
5.4.3 Connection Log .................................................................................................. 99
5.5 Admin Messages .................................................................................................... 100
5.6 Active Stocks .......................................................................................................... 104
5.7 Top 10 gainers and losers ...................................................................................... 106
Page 4
4 | P a g e
CONFIDENTIAL ©2018 YCO Private Limited. All Rights Reserved.
1 Introduction
1.1 Purpose The purpose of this document is to instruct users on the functionalities of Order Management System that can be used to perform the desired task using the system. It details step by step procedure of all implemented functionalities in Order Management System.
1.2 Target Audience This Manual has been prepared to provide guidance to the users of Order Management System. This document is targeted for external users of NEPSE (Brokers) carrying out trading transactions on day to day basis.
1.3 Glossary
Term Definition
TMS Trading Management System
NOTS NEPSE Online Trading System
DNA Direct NOTS Access
LTP Last Traded Price
CLI Client
CNC Cash & Carry
Page 5
5 | P a g e
CONFIDENTIAL ©2018 YCO Private Limited. All Rights Reserved.
2 Global Administration
2.1 Manage Application
2.1.1 Setup Application Type
Navigate to Global Administration -> Manage Application -> Setup Application Type.
Fig. 3.1.1 (a) Navigate to Setup Application Types
A screen will appear with the list of all the types of application.
Page 6
6 | P a g e
CONFIDENTIAL ©2018 YCO Private Limited. All Rights Reserved.
Fig. 3.1.1 (b) Setup Application Types Screen
The status ‘ACTIVE’ or ‘INACTIVE’ can also be viewed.
Click on View icon in the action bar to see the details of the application.
A Pop up will appear with the details.
Fig. 3.1.1 (c) View Application Type Screen
Click on Edit icon in the action bar to edit the application.
Page 7
7 | P a g e
CONFIDENTIAL ©2018 YCO Private Limited. All Rights Reserved.
A Pop up will appear, change detail/s to update and click on Update.
Fig. 3.1.1 (d) Edit Application Type Screen
2.1.2 Setup Approval Levels
Navigate to Global Administration -> Manage Application -> Setup Approval Levels.
Fig. 3.1.2 (a) Navigate to Setup Approval Levels
Page 8
8 | P a g e
CONFIDENTIAL ©2018 YCO Private Limited. All Rights Reserved.
This screen allows users to view and edit the approvals for different application
available in the system.
Click on View icon in the action bar of an application to see approval details.
Fig. 3.1.2 (b) View Application Approval Level
Click on Edit icon in the action bar to edit the application approval level.
Page 9
9 | P a g e
CONFIDENTIAL ©2018 YCO Private Limited. All Rights Reserved.
A pop up will appear.
Fig. 3.1.2 (c) Edit Application Approval Level
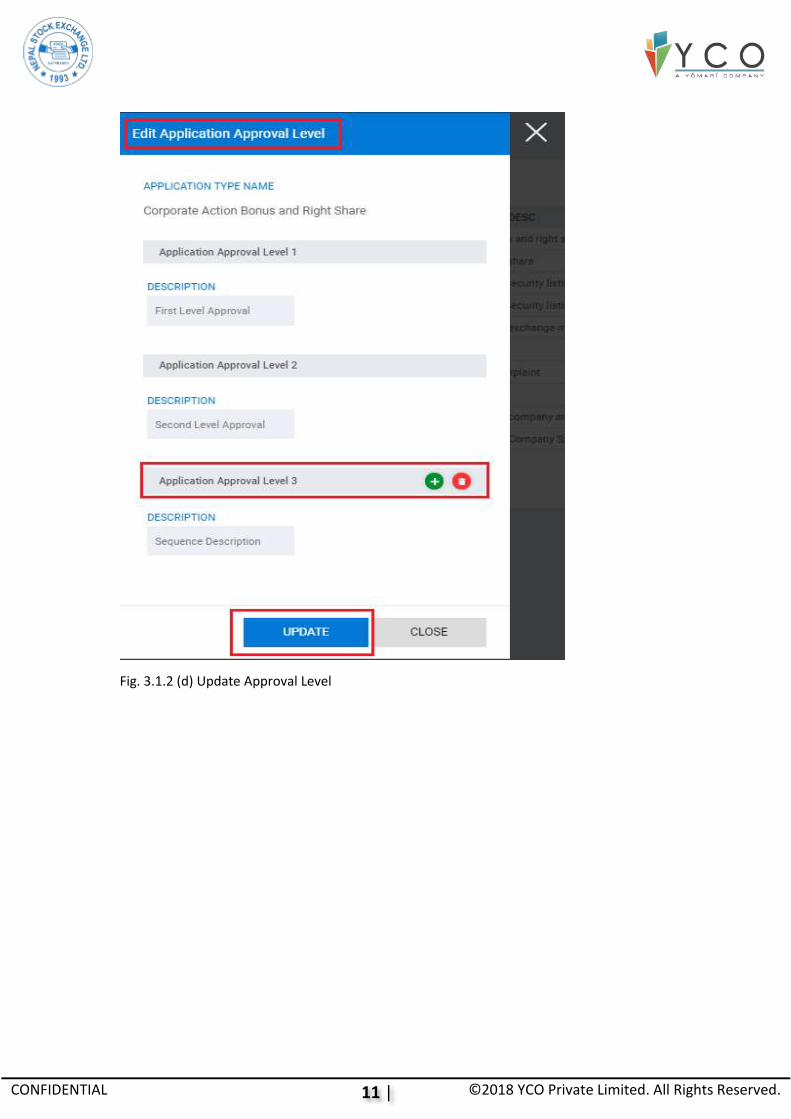
To add a new approval level click on Add. A new sequence is added at the bottom.
Enter sequence details and click on Update. Approval level for respective application
will increase by 1.
Page 10
10 | P a g e
CONFIDENTIAL ©2018 YCO Private Limited. All Rights Reserved.
Fig. 3.1.2 (d) Adding New Approval Level
Page 11
11 | P a g e
CONFIDENTIAL ©2018 YCO Private Limited. All Rights Reserved.
Fig. 3.1.2 (d) Update Approval Level
Page 12
12 | P a g e
CONFIDENTIAL ©2018 YCO Private Limited. All Rights Reserved.
Fig. 3.1.2 (e) New Approval Level Added
Page 13
13 | P a g e
CONFIDENTIAL ©2018 YCO Private Limited. All Rights Reserved.
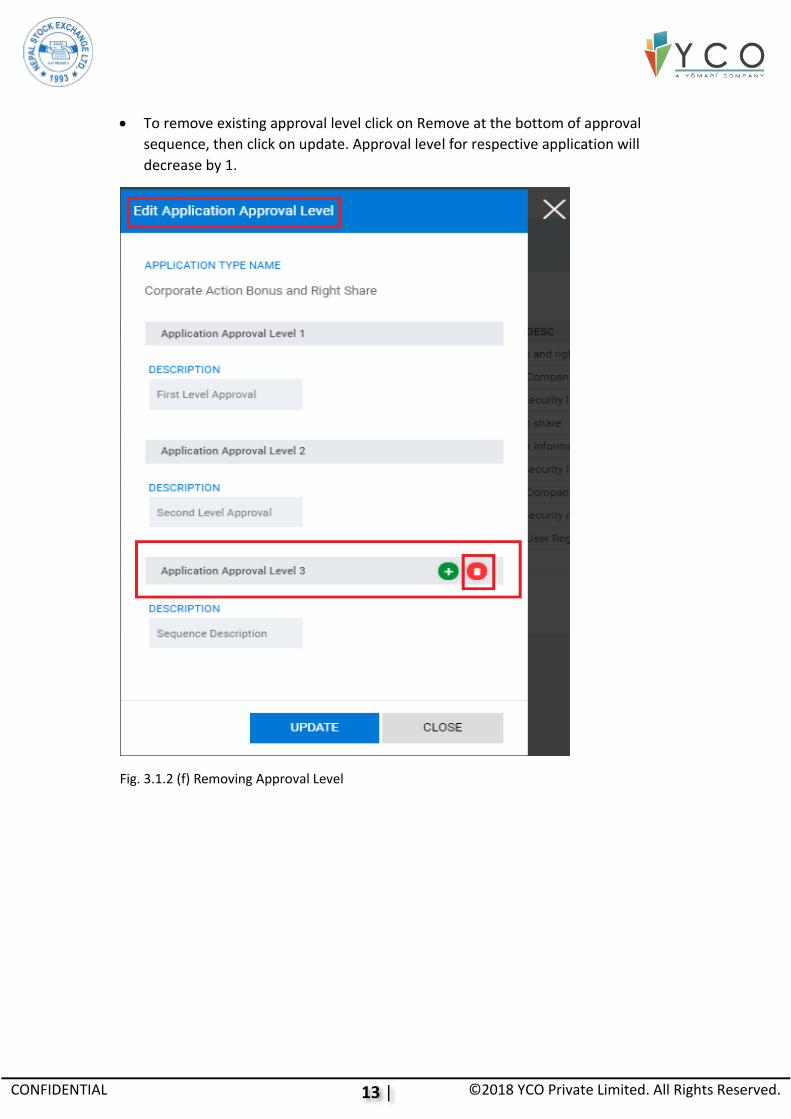
To remove existing approval level click on Remove at the bottom of approval
sequence, then click on update. Approval level for respective application will
decrease by 1.
Fig. 3.1.2 (f) Removing Approval Level
Page 14
14 | P a g e
CONFIDENTIAL ©2018 YCO Private Limited. All Rights Reserved.
Fig. 3.1.2 (g) Updating the Application Type
Page 15
15 | P a g e
CONFIDENTIAL ©2018 YCO Private Limited. All Rights Reserved.
Fig. 3.1.2 (h) Approval Level is removed
Page 16
16 | P a g e
CONFIDENTIAL ©2018 YCO Private Limited. All Rights Reserved.
2.2 Roles and Privileges
2.2.1 Manage Roles
Navigate to Global Administration -> Roles Privileges -> Manage Roles.
Fig. 3.2.1 (a) Navigate to Manage Roles
Page 17
17 | P a g e
CONFIDENTIAL ©2018 YCO Private Limited. All Rights Reserved.
A screen will appear with the name, description and privilege assigned to different
roles.
This screen allows users to add, view, edit and delete different roles.
Fig. 3.2.1 (b) Manage Roles Screen
Click on Add New to add a new role.
Page 18
18 | P a g e
CONFIDENTIAL ©2018 YCO Private Limited. All Rights Reserved.
A Pop up screen will appear.
Enter name, code, description, check in the privileges that are to be assigned to this
role and click on Save.
Fig. 3.2.1 (c) Add Role Screen
To View the details of a role, click on View in the action bar.
Page 19
19 | P a g e
CONFIDENTIAL ©2018 YCO Private Limited. All Rights Reserved.
A Pop up will appear with role details.
Fig. 3.2.1 (d) View Role Screen
To edit a role, click on Edit icon in the action bar.
A Pop up will appear.
Change detail/s and click on Update.
Page 20
20 | P a g e
CONFIDENTIAL ©2018 YCO Private Limited. All Rights Reserved.
Fig. 3.2.1 (e) Edit Role Screen
To delete a role, click on Delete icon in the action bar.
Page 21
21 | P a g e
CONFIDENTIAL ©2018 YCO Private Limited. All Rights Reserved.
A Pop up will appear for confirmation, click on Delete.
Fig. 3.2.1 (f) Delete Role Screen
Page 22
22 | P a g e
CONFIDENTIAL ©2018 YCO Private Limited. All Rights Reserved.
2.2.2 Manage Functionalities
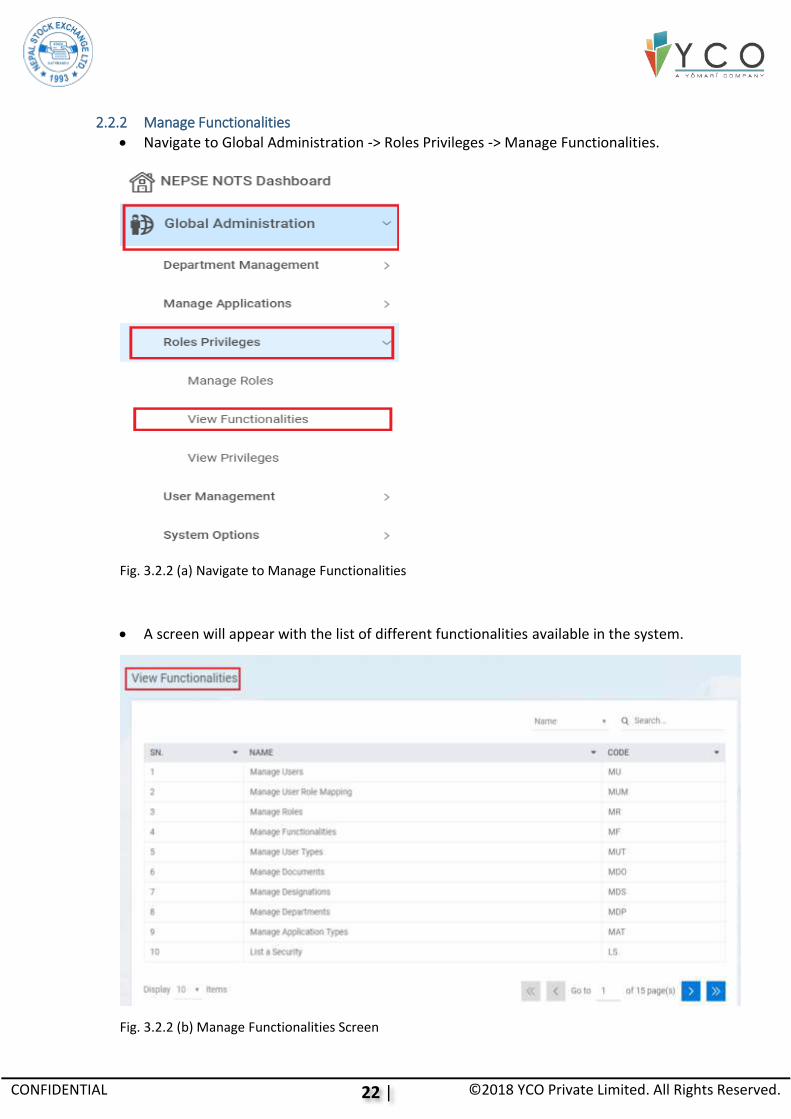
Navigate to Global Administration -> Roles Privileges -> Manage Functionalities.
Fig. 3.2.2 (a) Navigate to Manage Functionalities
A screen will appear with the list of different functionalities available in the system.
Fig. 3.2.2 (b) Manage Functionalities Screen
Page 23
23 | P a g e
CONFIDENTIAL ©2018 YCO Private Limited. All Rights Reserved.
2.2.3 View Privileges
Navigate to Global Administration -> Roles Privileges -> View Privileges.
Fig. 3.2.3 (a) Navigate to View Privileges
A screen will appear with the list of privileges that a user can have.
Page 24
24 | P a g e
CONFIDENTIAL ©2018 YCO Private Limited. All Rights Reserved.
Fig. 3.2.3 (b) View Privileges Screen
Click on View icon in the action bar to see the details of a privilege.
A Pop up will appear with the details.
Fig. 3.2.3 (c) View Privilege
Page 25
25 | P a g e
CONFIDENTIAL ©2018 YCO Private Limited. All Rights Reserved.
2.3 User Management
2.3.1 Configure User Type
Navigate to Global Administration -> User Management -> Configure User Type.
Fig. 3.3.1 (a) Navigate to Configure User Type
Page 26
26 | P a g e
CONFIDENTIAL ©2018 YCO Private Limited. All Rights Reserved.
A screen will appear with the user type, department, category, expiration date and
active status of all user types.
Fig. 3.3.1 (b) Configure User Type Screen
This screen allows users to add, view, edit, delete and deactivate any user type.
Click on Add New to add a new user type.
Fill in the Form with all the required details and click on Save.
Page 27
27 | P a g e
CONFIDENTIAL ©2018 YCO Private Limited. All Rights Reserved.
Fig. 3.3.1 (c) Add New User Type
To View the details of a user type, click on View icon in the action bar.
Page 28
28 | P a g e
CONFIDENTIAL ©2018 YCO Private Limited. All Rights Reserved.
A Pop up will appear with the details.
Fig. 3.3.1 (d) View User Type
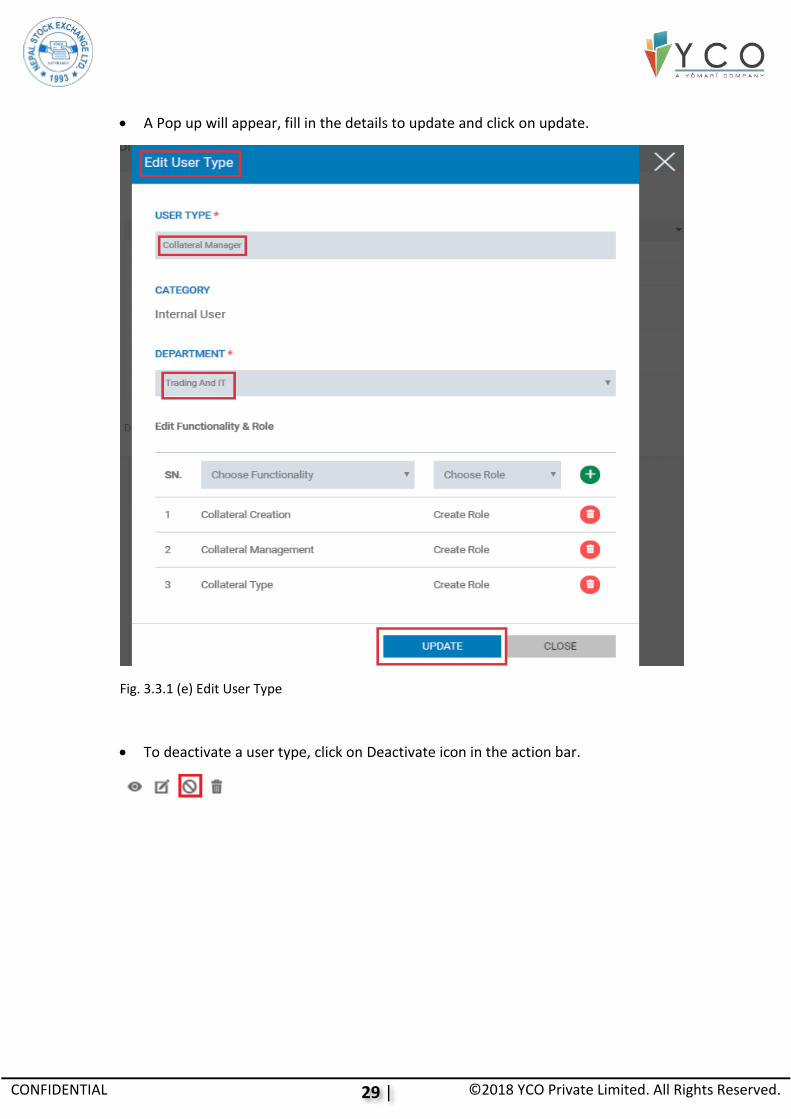
To edit a user type, click on Edit icon in the action bar.
Page 29
29 | P a g e
CONFIDENTIAL ©2018 YCO Private Limited. All Rights Reserved.
A Pop up will appear, fill in the details to update and click on update.
Fig. 3.3.1 (e) Edit User Type
To deactivate a user type, click on Deactivate icon in the action bar.
Page 30
30 | P a g e
CONFIDENTIAL ©2018 YCO Private Limited. All Rights Reserved.
A Pop up screen will appear.
Enter Expiration date of the user type and click Confirm. The assigned functionality
for respective user type will expire on the same date.
Fig. 3.3.1 (f) Deactivate User Type
Click on Delete icon in the action bar to delete a user type.
Page 31
31 | P a g e
CONFIDENTIAL ©2018 YCO Private Limited. All Rights Reserved.
A Pop up will appear for confirmation, click on Delete.
Fig. 3.3.1 (g) Delete User Type
Page 32
32 | P a g e
CONFIDENTIAL ©2018 YCO Private Limited. All Rights Reserved.
2.3.2 Manage Users
Navigate to Global Administration -> User Management -> Manage Users.
Fig. 3.3.2 (a) Navigate to Manage Users
A screen will appear with the list of all users, their user type and active status.
Fig. 3.3.2 (b) Manage Users Screen
Page 33
33 | P a g e
CONFIDENTIAL ©2018 YCO Private Limited. All Rights Reserved.
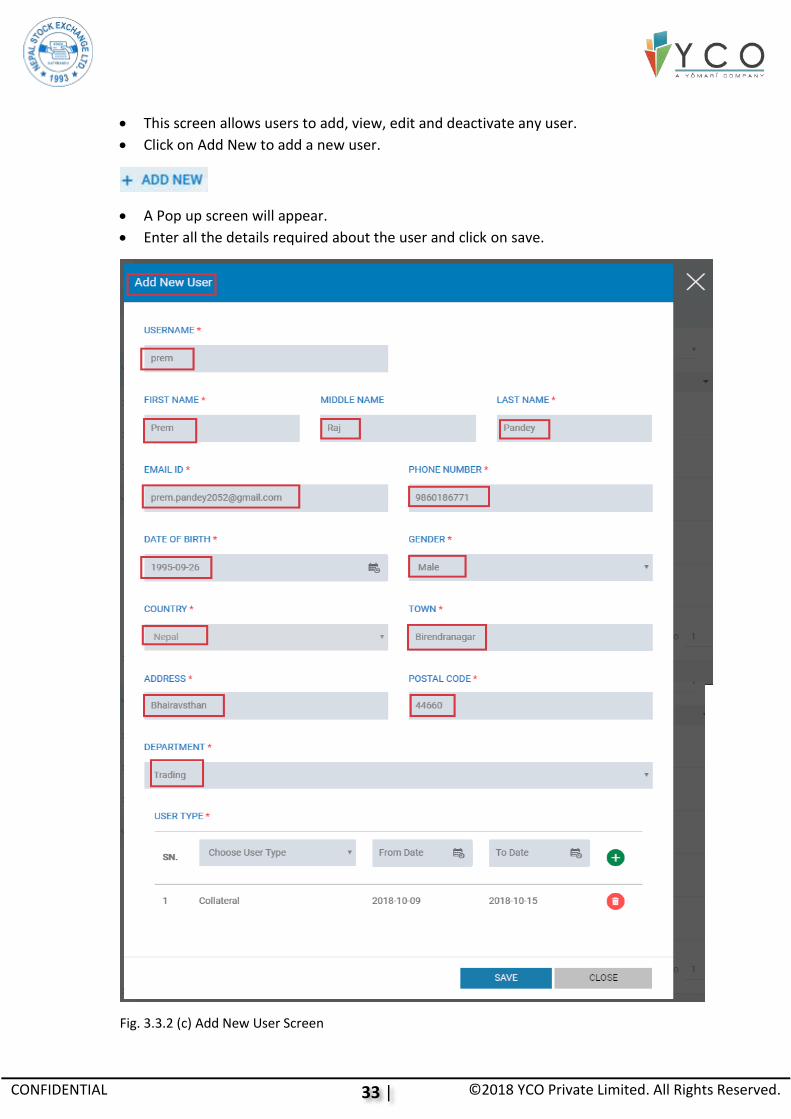
This screen allows users to add, view, edit and deactivate any user.
Click on Add New to add a new user.
A Pop up screen will appear.
Enter all the details required about the user and click on save.
Fig. 3.3.2 (c) Add New User Screen
Page 34
34 | P a g e
CONFIDENTIAL ©2018 YCO Private Limited. All Rights Reserved.
To View the details of a user, click on View icon in the action bar
A Pop up will appear with all the details.
Fig. 3.3.2 (d) View User Details Screen
To edit a user, click on Edit icon in the action bar.
Page 35
35 | P a g e
CONFIDENTIAL ©2018 YCO Private Limited. All Rights Reserved.
A Pop up will appear.
Fill in details you wish to update and click on Update.
Fig. 3.3.2 (e) Edit User Details Screen
Page 36
36 | P a g e
CONFIDENTIAL ©2018 YCO Private Limited. All Rights Reserved.
To deactivate a user, click on Deactivate icon in the action bar.
A Pop up screen will appear.
Enter reason code, description and click Suspend. Respective user will be suspended
from accessing TMS system.
Fig. 3.3.2 (f) Deactivate User Screen
Page 37
37 | P a g e
CONFIDENTIAL ©2018 YCO Private Limited. All Rights Reserved.
2.4 System Options
2.4.1 Manage System Options
Navigate to Global Administration -> System Options -> Manage System Options.
Fig. 3.4.1 (a) Navigate to Manage System Options
Page 38
38 | P a g e
CONFIDENTIAL ©2018 YCO Private Limited. All Rights Reserved.
A screen will appear where you can edit any system settings and click save to make
changes.
Fig. 3.4.1 (b) Manage System Options Screen
Page 39
39 | P a g e
CONFIDENTIAL ©2018 YCO Private Limited. All Rights Reserved.
Fig. 3.4.1 (c) Editing and Saving System Options
Basically, system setting implements password policies where user can define
different password policies for the system.
2.5 DNA Login Before placing an order, make sure you are logged in to exchange via DNA Login.
For DNA Login, Navigate to Global Administration- > NOTS DNA Login- > DNA Login
Page 40
40 | P a g e
CONFIDENTIAL ©2018 YCO Private Limited. All Rights Reserved.
Fig. 3.5 (a)
Enter DNA password and click on Login.
Fig. 3.5 (b)
A success message will be displayed at top right corner of the screen.
Page 41
41 | P a g e
CONFIDENTIAL ©2018 YCO Private Limited. All Rights Reserved.
A connection will be established with the exchange enabling user to place orders
from respective trade station.
Fig. 3.5 (c)
NOTE: 3 unsuccessful login attempts will automatically block login ID. Also, use DNA
password while logging out.
Page 42
42 | P a g e
CONFIDENTIAL ©2018 YCO Private Limited. All Rights Reserved.
3 Member Admin Terminal
3.1 Manage Client/Dealers
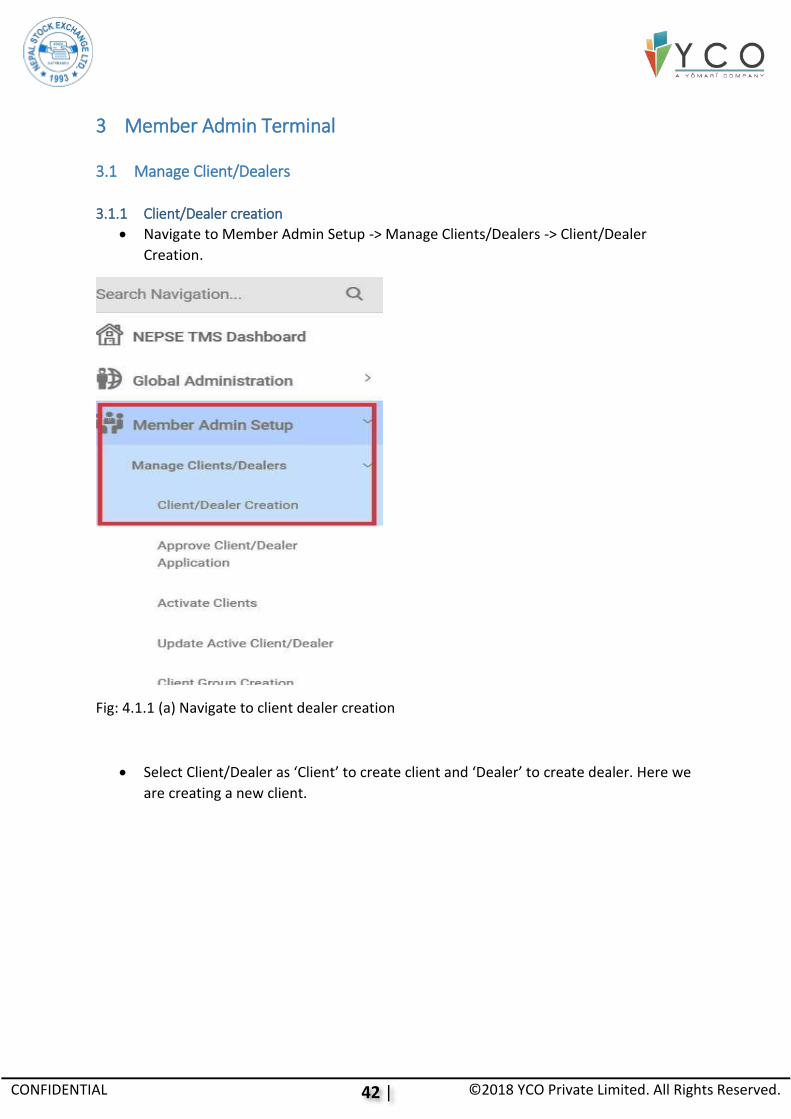
3.1.1 Client/Dealer creation
Navigate to Member Admin Setup -> Manage Clients/Dealers -> Client/Dealer
Creation.
Fig: 4.1.1 (a) Navigate to client dealer creation
Select Client/Dealer as ‘Client’ to create client and ‘Dealer’ to create dealer. Here we
are creating a new client.
Page 43
43 | P a g e
CONFIDENTIAL ©2018 YCO Private Limited. All Rights Reserved.
Fig: 4.1.1 (b) Client Creation
Page 44
44 | P a g e
CONFIDENTIAL ©2018 YCO Private Limited. All Rights Reserved.
Fill in General details.
Fig: 4.1.1 (c) General Client Creation
Page 45
45 | P a g e
CONFIDENTIAL ©2018 YCO Private Limited. All Rights Reserved.
Fill in Individual Details.
Fig: 4.1.1 (d) Individual Details Creation
Page 46
46 | P a g e
CONFIDENTIAL ©2018 YCO Private Limited. All Rights Reserved.
Fig: 4.1.1 (e) Individual Details Creation
Page 47
47 | P a g e
CONFIDENTIAL ©2018 YCO Private Limited. All Rights Reserved.
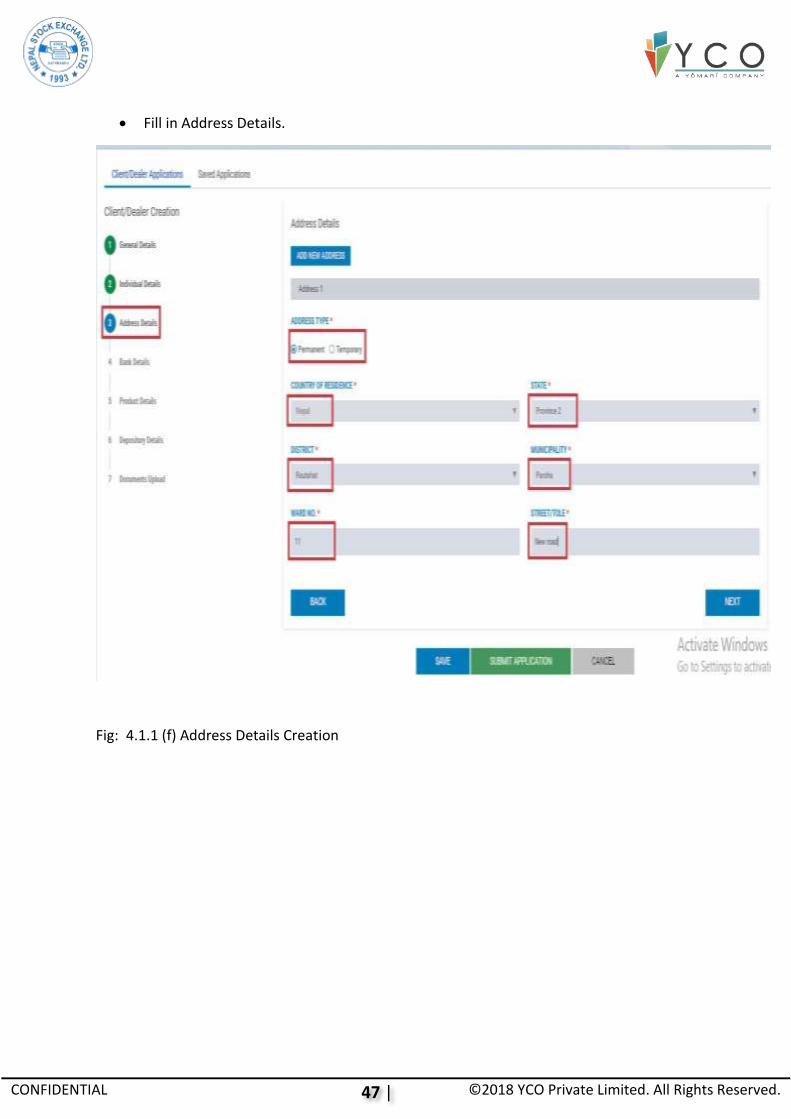
Fill in Address Details.
Fig: 4.1.1 (f) Address Details Creation
Page 48
48 | P a g e
CONFIDENTIAL ©2018 YCO Private Limited. All Rights Reserved.
Fill in Bank Details.
Fig: 4.1.1 (g) Bank Details Creation
Fill in Product Details.
Page 49
49 | P a g e
CONFIDENTIAL ©2018 YCO Private Limited. All Rights Reserved.
Fig: 4.1.1 (h) Product Details Creation
Page 50
50 | P a g e
CONFIDENTIAL ©2018 YCO Private Limited. All Rights Reserved.
Fill in Depositary Details.
Fig: 4.1.1 (i) Depository Details
Upload required documents. User can upload multiple documents for same
document type by clicking on Add symbol and remove existing upload by clicking on
Cross symbol.
Page 51
51 | P a g e
CONFIDENTIAL ©2018 YCO Private Limited. All Rights Reserved.
Fig. 4.1.1 (j) Before uploading required documents.
Fig. 4.1.1 (k) Document upload
Page 52
52 | P a g e
CONFIDENTIAL ©2018 YCO Private Limited. All Rights Reserved.
Click on Save to partially save application.
Fig. 4.1.1 (l) Partially Save Application
Click on Submit to submit application for approval.
Fig. 4.1.1 (m) Submit Application
Page 53
53 | P a g e
CONFIDENTIAL ©2018 YCO Private Limited. All Rights Reserved.
3.1.2 Approve Client/Dealer application
Navigate to Member Admin Setup -> Manage Clients/Dealers -> Approve
Client/Dealer Application.
Fig. 4.1.2 (a) Navigate to Approve Client/Dealer Creation
Page 54
54 | P a g e
CONFIDENTIAL ©2018 YCO Private Limited. All Rights Reserved.
Verify that application created has ‘NEW’ status.
Fig. 4.1.2 (b) Verify the client/dealer status
Open the application by clicking on View icon in the action bar.
Page 55
55 | P a g e
CONFIDENTIAL ©2018 YCO Private Limited. All Rights Reserved.
Verify the application details and approve the application.
Fig. 4.1.2 (c) Verify and Approve application details
Page 56
56 | P a g e
CONFIDENTIAL ©2018 YCO Private Limited. All Rights Reserved.
Ensure that the status of the application is changed to ‘TMS Approved’.
Fig. 4.1.2 (d) Application status changed to Approved
Page 57
57 | P a g e
CONFIDENTIAL ©2018 YCO Private Limited. All Rights Reserved.
3.1.3 Send the UCC request to RMS
UCC is a Unique Client Code that uniquely identifes each client. It is assigned by NOTS.
Once client application is TMS approved, an UCC request is sent to NOTS.
Navigate to Job Scheduling -> Job Management.
Fig. 4.1.3 (a) Navigate to Job Management
Execute UCC_REQUEST. A request will be sent to NOTS to create UCC for newly
approved client.
Fig. 4.1.3 (b) UCC_REQUEST sent for newly approved client.
Page 58
58 | P a g e
CONFIDENTIAL ©2018 YCO Private Limited. All Rights Reserved.
A success message will be displayed once job is trigerred.
Fig. 4.1.3 (c) Success message
A request file will be created and sent to NOTS which will assign UCC to respective
client/s. A batch (UCC Generation) is scheduled to run every 5 minutes which will
generate a NOTS response file and send it back to respective member.
Once again, navigate to Job Scheduling -> Job Management and execute
UCC_RESPONSE.
Page 59
59 | P a g e
CONFIDENTIAL ©2018 YCO Private Limited. All Rights Reserved.
4 Order Management 4.1 DNA Login
Before placing an order, make sure you are logged in to exchange via DNA Login.
For DNA Login, Navigate to Global Administration- > NOTS DNA Login- > DNA Login
Fig. 5.1 (a) Navigate to DNA Login
Enter DNA password and click on Login.
Page 60
60 | P a g e
CONFIDENTIAL ©2018 YCO Private Limited. All Rights Reserved.
Fig. 5.1 (b) DNA Login
A success message will be displayed at top right corner of the screen.
Fig. 5.2 (c) Success message
A connection will be established with the exchange enabling user to place orders
from respective trade station.
Page 61
61 | P a g e
CONFIDENTIAL ©2018 YCO Private Limited. All Rights Reserved.
Fig. 5.1 (d) Connection Establishment.
NOTE: 3 unsuccessful login attempts will automatically block login ID. Also, use DNA
password while logging out.
Page 62
62 | P a g e
CONFIDENTIAL ©2018 YCO Private Limited. All Rights Reserved.
4.2 Normal Order Navigate to Order Management -> Normal order.
This screen allows user to place orders.
There are different market sessions from which you can place orders. As of now, verify that Continuous market session is checked and order placed as a Buy order.
Fig. 5.2 (a) Navigate to Normal Orders
Choose CNC as Product Type and LMT as Order Type. Place an order as a client by checking CLI.
Page 63
63 | P a g e
CONFIDENTIAL ©2018 YCO Private Limited. All Rights Reserved.
Fig. 5.2 (b) Product type CNC, Order Type LMT and CLI is checked.
Enter Client Name. Respective Client Code will be automatically populated.
Fig. 5.2 (c) Enter Client Name
Page 64
64 | P a g e
CONFIDENTIAL ©2018 YCO Private Limited. All Rights Reserved.
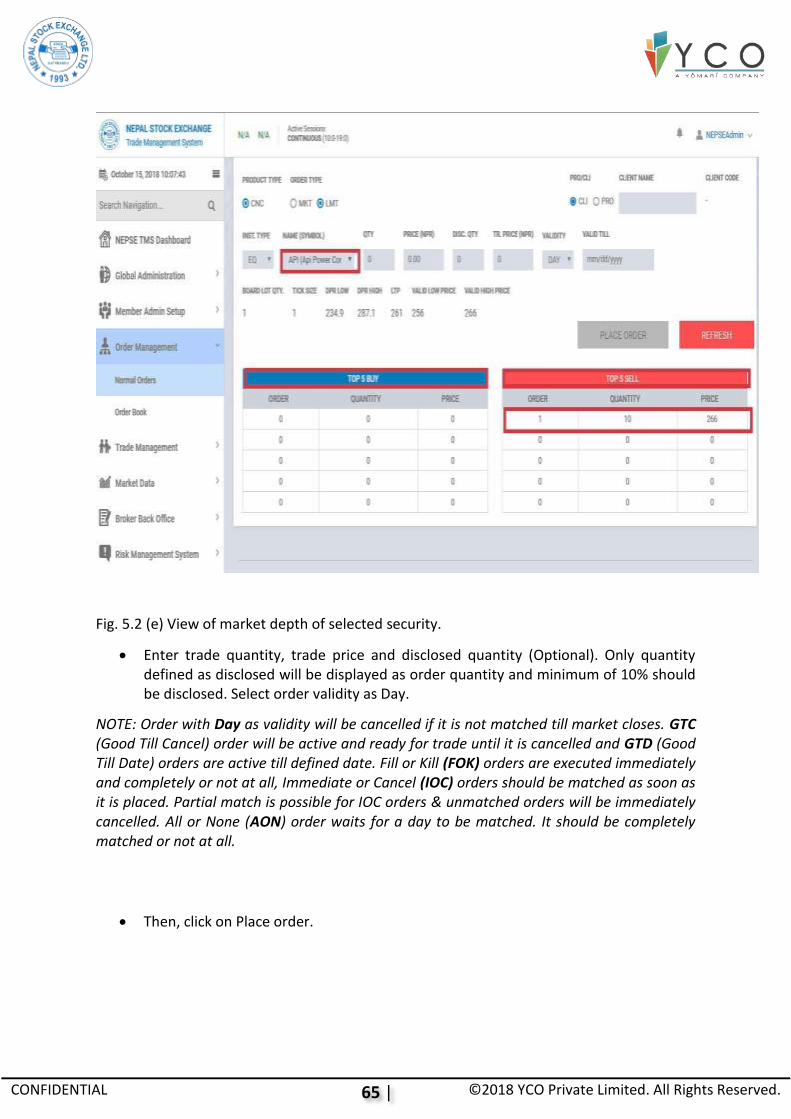
Select Instrument Type as Equity. Select Security Symbol to be traded. Once the security is selected for trading, trading parameters for respective security will be displayed as shown in below fig: -
Fig. 5.2 (d) Inst.Type, Security Symbol selected and respective trading parameters displayed.
NOTE: - Price should be in between Valid Low Price & Valid High Price & multiple of tick size defined. Quantity should be multiple of Board Lot Quantity defined in trading parameters. LTP is Last Traded Price for respective security.
Once Security to be traded is selected, user can view market depth of chosen
security just below order entry screen as shown in below figure. Here TOP 5 buy and
sell orders for respective security will be displayed on the basis of which user can
place his/her orders. Market depth is dynamically updated on real-time basis.
NOTE: - On each order placement either it’s a buy or sell order user can view market depth for each security.
Page 65
65 | P a g e
CONFIDENTIAL ©2018 YCO Private Limited. All Rights Reserved.
Fig. 5.2 (e) View of market depth of selected security.
Enter trade quantity, trade price and disclosed quantity (Optional). Only quantity defined as disclosed will be displayed as order quantity and minimum of 10% should be disclosed. Select order validity as Day.
NOTE: Order with Day as validity will be cancelled if it is not matched till market closes. GTC (Good Till Cancel) order will be active and ready for trade until it is cancelled and GTD (Good Till Date) orders are active till defined date. Fill or Kill (FOK) orders are executed immediately and completely or not at all, Immediate or Cancel (IOC) orders should be matched as soon as it is placed. Partial match is possible for IOC orders & unmatched orders will be immediately cancelled. All or None (AON) order waits for a day to be matched. It should be completely matched or not at all.
Then, click on Place order.
Page 66
66 | P a g e
CONFIDENTIAL ©2018 YCO Private Limited. All Rights Reserved.
Fig. 5.2 (f) Order placement
Once the order is placed, a success message will be displayed at top right corner of the screen.
Fig. 5.2 (g) Success message
Once the order is successfully placed, it gets populated in order book of respective client.
To verify, Navigate to Order Management- > Order Book.
Page 67
67 | P a g e
CONFIDENTIAL ©2018 YCO Private Limited. All Rights Reserved.
Fig. 5.2 (h) Navigate to Order Book
Enter Client Name. All orders by respective client will be populated in a table. Order status will be ‘Open’ until the order is Matched/Partially matched/rejected.
Fig. 5.2 (i) client orders
Page 68
68 | P a g e
CONFIDENTIAL ©2018 YCO Private Limited. All Rights Reserved.
4.2.1 Completely Matched Order
Now, place a counter sell order for same security. If the order is of same quantity and price, the order will be completely matched and status will change to completed. The counter order should be placed by a different client or member can place an order for him/herself.
Fig. 5.2.1 (a) Navigate to Normal Order and place a sell order.
Once the order is completely matched, the total quantity will be equal to traded quantity and remaining quantity will be zero. It is shown in below figure: -
Page 69
69 | P a g e
CONFIDENTIAL ©2018 YCO Private Limited. All Rights Reserved.
Fig. 5.2.1 (b) Status changed to completed after order is matched.
Click on view icon in Action bar to view order details.
Fig. 5.2.1 (c) View of the Order Details.
Page 70
70 | P a g e
CONFIDENTIAL ©2018 YCO Private Limited. All Rights Reserved.
Once the order is matched, it becomes a Trade which will be populated in Trade Book of respective client.
To verify, Navigate to Trade Management- > Trade Book.
Fig. 5.2.1 (d) Navigate to Trade Book after order is matched.
Enter Client Name. All orders by respective client will be populated in a table.
Page 71
71 | P a g e
CONFIDENTIAL ©2018 YCO Private Limited. All Rights Reserved.
Fig. 5.2.1 (e) Respective orders of the entered client name.
Click on view icon in Action bar to view Trade details.
4.2.2 Partially-Matched Order
An order is partially matched if two counter orders are for same security and price but order quantity is different.
Select a Client and place a buy order for a security.
Fig. 5.2.2 (a) Navigate to Normal Orders and place order.
Once the order is successfully placed, it gets populated in respective client’s Order Book. The status of the order will be ‘OPEN’.
Page 72
72 | P a g e
CONFIDENTIAL ©2018 YCO Private Limited. All Rights Reserved.
Fig. 5.2.2 (b) Status will be open after successful order placement.
Now, place a counter order for same security with same price but different order quantity.
Fig. 5.2.2 (c) Place order for same security with different values.
Page 73
73 | P a g e
CONFIDENTIAL ©2018 YCO Private Limited. All Rights Reserved.
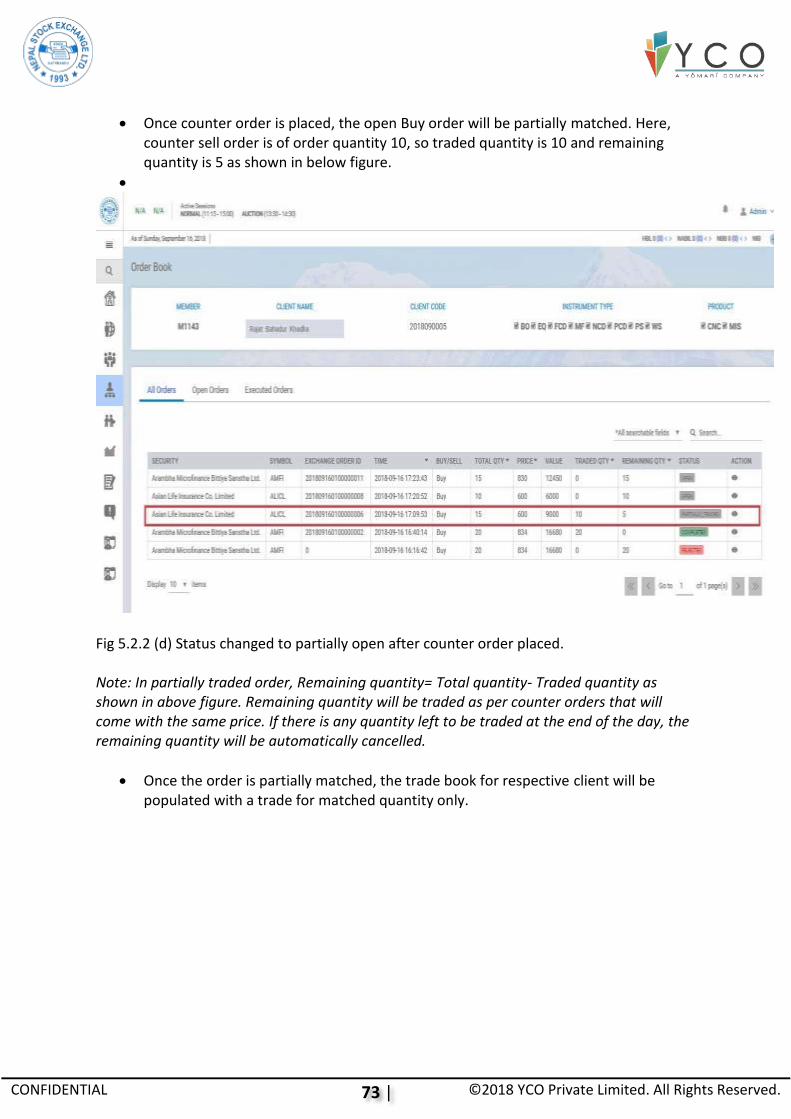
Once counter order is placed, the open Buy order will be partially matched. Here, counter sell order is of order quantity 10, so traded quantity is 10 and remaining quantity is 5 as shown in below figure.
Fig 5.2.2 (d) Status changed to partially open after counter order placed. Note: In partially traded order, Remaining quantity= Total quantity- Traded quantity as shown in above figure. Remaining quantity will be traded as per counter orders that will come with the same price. If there is any quantity left to be traded at the end of the day, the remaining quantity will be automatically cancelled.
Once the order is partially matched, the trade book for respective client will be populated with a trade for matched quantity only.
Page 74
74 | P a g e
CONFIDENTIAL ©2018 YCO Private Limited. All Rights Reserved.
Fig 5.2.2 (e) Navigate to trade book and view the respective order of client.
4.3 Edit Orders (Buy/Sell)
4.3.1 Edit Partially_Traded Order
User can edit Partially_Traded (buy/sell) order. The update will only be applicable to order quantity yet to be traded.
Navigate to Order Book. Go to Open Orders tab. Choose Partially_Traded (buy/sell) order and click on edit icon in Action bar.
Fig. 5.3.1 (a) Navigate to Order book and Click on edit icon of partially traded status.
Page 75
75 | P a g e
CONFIDENTIAL ©2018 YCO Private Limited. All Rights Reserved.
Once edit icon is clicked, it directs user to Order Entry window for respective order.
Note: - This Partially_Traded order is a sell order.
Fig. 5.3.1 (b) order entry
Make necessary changes to existing order details and click on Place Order.
The order will be placed for trading with updated order details. The status of the order will remain ‘PARTIALLY_TRADED’. Navigate to Order Book to verify.
Page 76
76 | P a g e
CONFIDENTIAL ©2018 YCO Private Limited. All Rights Reserved.
4.3.2 Edit Open Order
User can manually edit Open buy/sell order. Navigate to Order Book and click on Open Orders tab.
Fig. 5.3.2 (a) Navigate to Order Book and click on Open Orders tab.
Choose an open buy/sell order to edit. Click on edit icon in Action bar.
Fig. 5.3.2 (b) Click on edit icon in Action Bar.
Once edit icon is clicked, it directs user to Order Entry window for respective order.
Page 77
77 | P a g e
CONFIDENTIAL ©2018 YCO Private Limited. All Rights Reserved.
Fig. 5.3.2 (c) Place order in the order entry.
Make necessary changes to existing order details and click on Place Order.
The order will be placed for trading with updated order details. The status of the order will remain ‘NEW’. Navigate to Order Book to verify.
Note: Only quantity, price and validity of the existing order can be changed.
Page 78
78 | P a g e
CONFIDENTIAL ©2018 YCO Private Limited. All Rights Reserved.
4.4 Cancelled Order (Buy/Sell)
4.4.1 Cancel Open order
User can manually cancel his/her open (buy/sell) order. Click on Open Orders tab in Order Book.
Fig. 5.4.1 (a) Click on Open Orders tab in Order Book.
Choose an open buy/sell order to cancel. Click on cancel icon in Action bar.
Page 79
79 | P a g e
CONFIDENTIAL ©2018 YCO Private Limited. All Rights Reserved.
Fig. 5.4.1 (b) Cancel an open/buy sell order in action bar.
Fig. 5.4.1 (c) Pop up message for approvement.
The status of the order will be changed to ‘CANCELLED’. The cancelled order will not be available for trading.
Fig. 5.4.1 (d) Status changed to cancelled.
Page 80
80 | P a g e
CONFIDENTIAL ©2018 YCO Private Limited. All Rights Reserved.
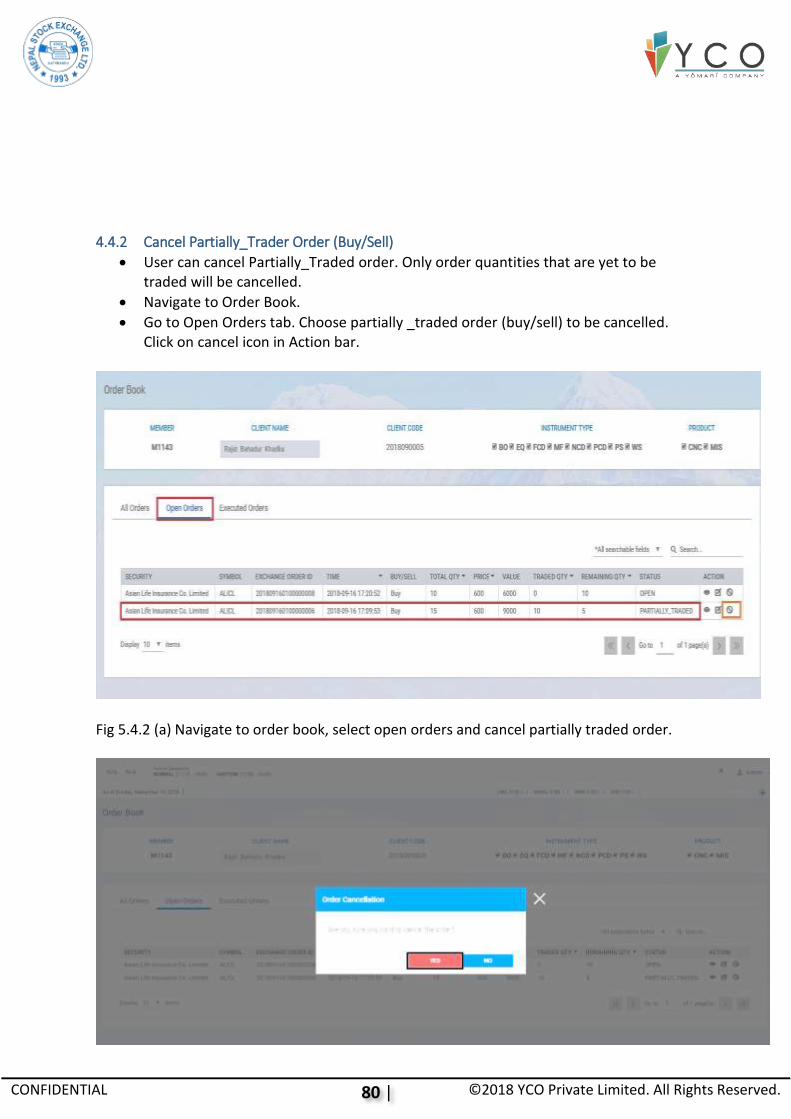
4.4.2 Cancel Partially_Trader Order (Buy/Sell)
User can cancel Partially_Traded order. Only order quantities that are yet to be traded will be cancelled.
Navigate to Order Book.
Go to Open Orders tab. Choose partially _traded order (buy/sell) to be cancelled. Click on cancel icon in Action bar.
Fig 5.4.2 (a) Navigate to order book, select open orders and cancel partially traded order.
Page 81
81 | P a g e
CONFIDENTIAL ©2018 YCO Private Limited. All Rights Reserved.
Fig 5.4.2 (b) Pop up message for approve of order cancellation.
The status of the order will be changed to ‘CANCELLED’. Once the order is cancelled, the remaining quantity of Partially_Traded order will not be available for trading again.
Fig. 5.4.2 (c) Status changed to cancelled.
4.4.3 Order Cancelled At the End of Day (Buy/Sell)
All open and Partially_Traded orders will be automatically cancelled at the end of day. All unmatched orders will be cancelled at market close.
4.5 Rejected Order (Buy/Sell) Buy/Sell order can be rejected for various reasons like Member Suspension, Client
Suspension or total collateral utilized.
To verify Rejected order, navigate to Order Book of respective client. The status of the order will be ‘REJECTED’.
Page 82
82 | P a g e
CONFIDENTIAL ©2018 YCO Private Limited. All Rights Reserved.
Fig 5.5 (a) Status changed to rejected in order book.
The Rejected will not have EXCHANCE ORDER ID.
To view rejection details, click on view icon in Action bar.
Fig 5.5 (b) Exchange Order Id and rejection reason shown.
Page 83
83 | P a g e
CONFIDENTIAL ©2018 YCO Private Limited. All Rights Reserved.
4.6 Executed Orders (Buy/Sell) All Completed, Cancelled and Rejected buy/sell order will be displayed as Executed
Orders.
Navigate to Order Book. Go to Executed Orders tab.
Page 84
84 | P a g e
CONFIDENTIAL ©2018 YCO Private Limited. All Rights Reserved.
5 Market Data
5.1 Market Watch Navigate to Market Data -> Market Watch.
Fig. 6.1 (a) Navigate to Market watch.
This screen allows user to watch market statistics of each security that are added to
the watch.
For each security in the Market Watch window, market information is dynamically
updated on real-time basis.
To add a new Market Watch, click on Add New Market Watch.
Page 85
85 | P a g e
CONFIDENTIAL ©2018 YCO Private Limited. All Rights Reserved.
Fig. 6.1 (b) Add New Market Watch.
Select an appropriate name and click on Create MW.
Fig. 6.1 (c) Market Watch is created.
Page 86
86 | P a g e
CONFIDENTIAL ©2018 YCO Private Limited. All Rights Reserved.
Fig. 6.1 (d) View the parameters of created market watch.
To Add Securities to the market watch screen select the security to add from the
drop down menu and click on Add Security.
Fig. 6.1 (e) Click on Add Security to add securities.
Once security is added, as success message is displayed at top right corner. Added
security will be displayed in Market Watch.
Page 87
87 | P a g e
CONFIDENTIAL ©2018 YCO Private Limited. All Rights Reserved.
Fig. 6.1 (f) Success message after creation of market watch.
Fig. 6.1 (g) View the change in market watch.
User can add multiple securities to a Market Watch.
The market information that is displayed of each added security are Buy/Sell
quantity, Buy/Sell price, LTP , the LTP change indicator (‘+’ if LTP is better than the
previous LTP and ‘–‘ if it is worse).
Other market information are opening price of the day, day high, day low, closing
price of the day, volumes traded, last traded quantity and the last traded time.
Page 88
88 | P a g e
CONFIDENTIAL ©2018 YCO Private Limited. All Rights Reserved.
Fig. 6.1 (h) View the different parameters in market watch.
User cannot have more than three Market Watch.
User also has the option to invoke the stock quote or market depth (MPB) window
from the market watch screen. User can place buy/sell order, view stock information
and intraday chart and delete a security from market watch screen as well. Right click
on Security and user will have all the options to invoke above mentioned windows.
Page 89
89 | P a g e
CONFIDENTIAL ©2018 YCO Private Limited. All Rights Reserved.
Fig. 6.1 (i) Right clicks on security display option for different windows.
To rename existing Market Watch, right click on market watch screen that you want to rename and click on Rename Market Watch.
Fig. 6.1 (j) Rename existing Market Watch
To delete existing Market Watch, right click on market watch screen that you want to delete and click on Delete.
Rename existing Market Watch and click on Rename MW.
Page 90
90 | P a g e
CONFIDENTIAL ©2018 YCO Private Limited. All Rights Reserved.
Fig. 6.1 (k) Rename existing Market Watch Name
Once market watch is renamed, as success message is displayed at top right corner.
Existing market watch will be renamed.
Fig. 6.1 (l) Successfully market watch renamed.
To delete existing Market Watch, right click on market watch that you want to delete and click on Delete.
Page 91
91 | P a g e
CONFIDENTIAL ©2018 YCO Private Limited. All Rights Reserved.
Fig. 6.1 (m) Delete Market Watch
A Pop up will appear for confirmation, click on Yes.
Fig. 6.1 (n) Confirmation to delete market watch.
Once existing market watch is deleted, a success message will be displayed at top
right corner.
Page 92
92 | P a g e
CONFIDENTIAL ©2018 YCO Private Limited. All Rights Reserved.
Fig. 6.1 (o) successfully deleted market watch.
5.2 Stock Information Navigate to Market Data -> Stock Information.
Fig. 6.2 (a) Navigate to stock information.
Stock Information Screen provides the users with a snapshot of the stock for any
specific security at any given point in time.
Page 93
93 | P a g e
CONFIDENTIAL ©2018 YCO Private Limited. All Rights Reserved.
Fig. 6.2 (b) Stock information of specific security.
Select the security whose stock details you want to see. Stock information for
selected security will be displayed as shown in below figure: -
Page 94
94 | P a g e
CONFIDENTIAL ©2018 YCO Private Limited. All Rights Reserved.
Fig. 6.2 (c) Selection of specific securities.
Page 95
95 | P a g e
CONFIDENTIAL ©2018 YCO Private Limited. All Rights Reserved.
5.3 Market Depth Navigate to Market Data -> Market Depth.
Fig. 6.3 (a) Navigate to Market Depth.
Select the instrument type and security.
The default instrument type selected is EQ (Equity).
It displays top 5 buy and sell orders for selected security.
Market Depth for each security is dynamically updated on real-time basis.
Page 96
96 | P a g e
CONFIDENTIAL ©2018 YCO Private Limited. All Rights Reserved.
Fig. 6.3 (b) Market Depth of specific security.
Stock information for selected security will also be displayed below market depth.
Fig. 6.3 (c) Stock Information of selected security.
Page 97
97 | P a g e
CONFIDENTIAL ©2018 YCO Private Limited. All Rights Reserved.
User can place buy/sell order by clicking Buy/Sell button. It will invoke Normal Order screen.
5.4 News/Message/Connection Log Navigate to Market Data -> News/Message/Connection Log
Fig. 6.4 Navigate to News/Message/Connection Log
Page 98
98 | P a g e
CONFIDENTIAL ©2018 YCO Private Limited. All Rights Reserved.
This screen allows user to view news published by listed companies, messages
published by exchange (NEPSE) and exchange connection logs.
Each news and message published has validity. It will be no longer available after
expiry date.
5.4.1 News
News are published by listed companies which are circulated to all trade work stations.
To view company news, click on News tab (default).
Fig. 6.4.1 Company news, messages and connection logs.
The validity of news is defined by a publishing company.
Page 99
99 | P a g e
CONFIDENTIAL ©2018 YCO Private Limited. All Rights Reserved.
5.4.2 Messages
Exchange Messages are published by NEPSE which are circulated to all trade work stations.
To view exchange messages, click on Exchange Message tab.
Fig. 6.4.2 Exchange Message published by NEPSE.
The validity of message is defined by exchange (NEPSE).
5.4.3 Connection Log
Connection log records all instances of DNA connection. Once trade work station is logged into exchange via DNA login, a record is maintained with connection time.
Click on Connection Log tab to view connection details.
Page 100
100 | P a g e
CONFIDENTIAL ©2018 YCO Private Limited. All Rights Reserved.
Fig. 6.4.3 Connection Details
5.5 Admin Messages Navigate to Market Data->Admin Messages
Page 101
101 | P a g e
CONFIDENTIAL ©2018 YCO Private Limited. All Rights Reserved.
Fig 6.5 (a) Navigate to Admin Messages.
This screen allows clients and dealers to communicate with Admin (Broker).
This is a two way communication where user can receive and send messages to its
contacts.
All clients and brokers contact will be available in left panel of the screen.
Select a contact, type a message in text box and press enter.
Page 102
102 | P a g e
CONFIDENTIAL ©2018 YCO Private Limited. All Rights Reserved.
Fig. 6.5 (b) Window for Admin and Broker to communicate.
The message will be sent to client/dealer.
Page 103
103 | P a g e
CONFIDENTIAL ©2018 YCO Private Limited. All Rights Reserved.
Fig. 6.5 (c) Message sent to client/dealer.
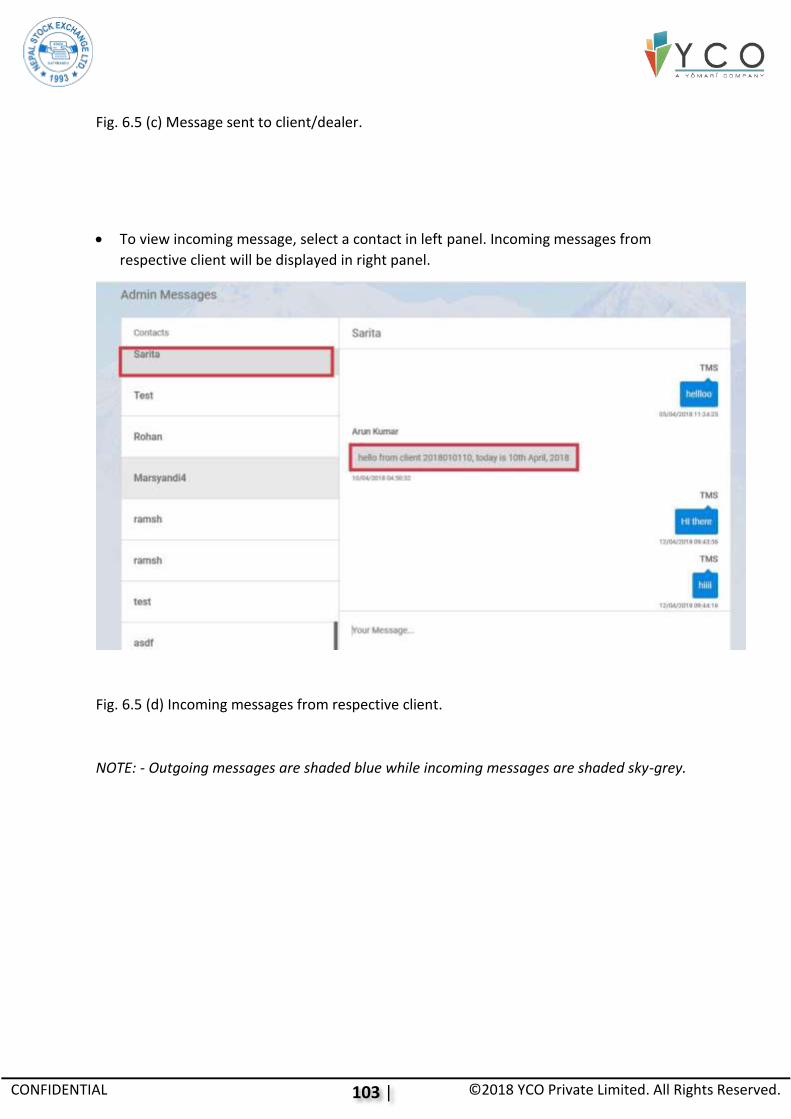
To view incoming message, select a contact in left panel. Incoming messages from
respective client will be displayed in right panel.
Fig. 6.5 (d) Incoming messages from respective client.
NOTE: - Outgoing messages are shaded blue while incoming messages are shaded sky-grey.
Page 104
104 | P a g e
CONFIDENTIAL ©2018 YCO Private Limited. All Rights Reserved.
5.6 Active Stocks Navigate to Market Data->Active Stocks.
Fig. 6.6 (a) Navigate to Active Stocks
This screen allows user to view trade value and trade volume of active stocks that
are available for trading.
Select Trade value or Trade volume to view respective details for active stocks.
Page 105
105 | P a g e
CONFIDENTIAL ©2018 YCO Private Limited. All Rights Reserved.
Fig. 6.6 (b) Trade value or Trade volume to view respective details for active stocks.
Basically, it displays change and % change in value and volume of stocks along with
price details.
Page 106
106 | P a g e
CONFIDENTIAL ©2018 YCO Private Limited. All Rights Reserved.
Fig 6.6 (c) Changes and % change in value and volume of stocks along with price
details.
5.7 Top 10 gainers and losers User can view stocks that are top 10 gainers and losers in terms of % price change,
trade price and trade volume. This helps users in trading of different stocks.
Navigate to Market Data -> Top 10 gainers and losers.
Fig. 6.7 (a) Navigate to Top 10 Gainers and Losers.
Check on Top Ten Securities-Losers if you wish to view Top 10 losers or else check on
Top Ten Securities-Gainers to view Top 10 gainers.
Select Order By option from dropdown.
Select the instrument type. EQ (Equity) is selected as default.
Page 107
107 | P a g e
CONFIDENTIAL ©2018 YCO Private Limited. All Rights Reserved.
Fig. 6.7 (b) Top 10 gainers and losers