s:\its\uss\pclan\documentation\ipsec.pdf 1 CHAPTER 1 Internet Protocol Security (IPSec) Introduction Internet Protocol Security (IPSec) provides application-transparent encryption ser- vices for IP network traffic as well as other network access protections for the Win- dows® 2000 operating system. This guide focuses on the fastest way to use IPSec transport mode to secure appli- cation traffic between a client and a server. It demonstrates how to enable security using IPSec default policies between two Windows 2000-based systems that belong to a Windows 2000 domain. Once the two computers have joined the domain, you should complete the first part of the walkthrough, which demonstrates default poli- cies in 30 minutes or less. Notes are included on how to enable non-IPSec clients to communicate to the server. Steps are provided on how to use certificates, and how to build your own custom policy for further interoperability testing, or to demon- strate IPSec when a Windows 2000 domain is not available. Using Internet Protocol Security (IPSec), you can provide data privacy, integrity, authenticity, and anti-replay protection for network traffic in the following scenar- ios: • Provide for end-to-end security from client-to-server, server-to-server, and cli- ent-to-client using IPSec transport mode.
Transcript
CHAPTER 1 Internet ProtocolSecurity (IPSec)
Introduction
Internet Protocol Security (IPSec) provides application-transparent encryption ser-vices for IP network traffic as well as other network access protections for the Win-dows® 2000 operating system.
This guide focuses on the fastest way to use IPSec transport mode to secure appli-cation traffic between a client and a server. It demonstrates how to enable securityusing IPSec default policies between two Windows 2000-based systems that belongto a Windows 2000 domain. Once the two computers have joined the domain, youshould complete the first part of the walkthrough, which demonstrates default poli-cies in 30 minutes or less. Notes are included on how to enable non-IPSec clients tocommunicate to the server. Steps are provided on how to use certificates, and howto build your own custom policy for further interoperability testing, or to demon-strate IPSec when a Windows 2000 domain is not available.
Using Internet Protocol Security (IPSec), you can provide data privacy, integrity,authenticity, and anti-replay protection for network traffic in the following scenar-ios:
• Provide for end-to-end security from client-to-server, server-to-server, and cli-ent-to-client using IPSec transport mode.
s:\its\uss\pclan\documentation\ipsec.pdf 1
Internet Protocol Security (IPSec)
2
• Secure remote access from client-to-gateway over the Internet using Layer TwoTunneling Protocol (L2TP) secured by IPSec.
IPSec provides secure gateway-to-gateway connections across outsourced privatewide area network (WAN) or Internet-based connections using L2TP/IPSec tunnelsor pure IPSec tunnel mode. IPSec tunnel mode is not designed to be used for virtualprivate network (VPN) remote access. The Windows® 2000 Server operating sys-tem simplifies deployment and management of network security with Windows2000 IP Security, a robust implementation of IP Security (IPSec). Designed by theInternet Engineering Task Force (IETF) as the security architecture for the InternetProtocol (IP), IPSec defines IP packet formats and related infrastructure to provideend-to-end strong authentication, integrity, anti-replay, and (optionally) confidenti-ality for network traffic. An on-demand security negotiation and automatic keymanagement service is also provided using the IETF-defined Internet KeyExchange (IKE), RFC 2409. IPSec and related services in Windows 2000 havebeen jointly developed by Microsoft and Cisco Systems, Inc.
Windows 2000 IP Security builds upon the IETF IPSec architecture by integratingwith Windows 2000 domains and the Active DirectoryTM services. Active Direc-tory delivers policy-based, directory-enabled networking using Group Policy toprovide IPSec policy assignment and distribution to Windows 2000 domain mem-bers.
The implementation of IKE provides three IETF standards-based authenticationmethods to establish trust between computers:
• Kerberos v5.0 authentication provided by the Windows 2000-based domaininfrastructure, used to deploy secure communications between computers in adomain or across trusted domains.
• Public/Private Key signatures using certificates, compatible with several certifi-cate systems, including Microsoft, Entrust, VeriSign, and Netscape.
• Passwords, termed pre-shared authentication keys, used strictly for establishingtrust—not for application data packet protection.
Once peer computers have authenticated each other, they generate bulk encryptionkeys for the purpose of encrypting application data packets. These keys are knownonly to the two computers, so their data is very well protected against modificationor interpretation by attackers who may be in the network. Each peer uses IKE tonegotiate what type and strength of keys to use, as well as what type of securitywith which to protect the application traffic. These keys are automatically refreshed
s:\its\uss\pclan\documentation\ipsec.pdf
Introduction
according to IPSec policy settings to provide constant protection under the adminis-trator’s control.
Scenarios for Using IPSec End to End
Internet Protocol Security (IPSec) in Windows 2000 is designed to be deployed bynetwork administrators so that users' application data can be transparently secured.In all cases, using Kerberos authentication and domain trusts is the easiest choicefor deployment. Certificates or pre-shared keys can be used for untrusted domain orthird-party interoperability. You can use Group Policy to deliver the IPSec configu-ration, called an IPSec policy, to many clients and servers.
Secure Servers
IPSec security for all unicast IP traffic is either requested but optional, or requestedand required, as established by the administrator’s configuration of the server.Using this model, clients need only a default policy for how to respond to securityrequests from servers. Once IPSec security associations (one in each direction) areestablished between the client and server, they remain in effect for 1 hour after thelast packet was sent between them. After that hour, the client cleans up the securityassociations and return to the initial "respond only" state. If the client sends unse-cured packets to the same server again, the server will re-establish IPSec security.This is the easiest approach to take, and can be done safely as long as the first pack-ets sent to the server by the application do not contain sensitive data, and as long asthe server is permitted to receive unsecured, clear text packets from clients.
Caution: This server-side configuration is appropriate for internal network serversONLY, because the server is configured by IPSec policy to allow incoming, cleartext, unsecured packets. If the server is placed on the Internet, then it must NOThave this configuration because of the opportunity for denial of service attacks thattake advantage of the server’s ability to receive incoming unsecured packets.
Lockdown Servers
If the server is directly accessible from the Internet, or if the first client packets con-tain sensitive data, then the client must receive an IPSec policy so that it requestsIPSec security for traffic when it attempts to send data to the server. This walk-through will not demonstrate this configuration, but it can be easily enabled usingthe steps explained in the section Configure an IPSec Filter Action.
s:\its\uss\pclan\documentation\ipsec.pdf 3
Internet Protocol Security (IPSec)
4
Clients and servers can have specific rules for permitting, blocking, or securingonly certain network packets (protocol or port specific). This approach is more dif-ficult to configure and prone to error because it requires in-depth knowledge of thetype of network traffic that an application sends and receives, and administrativecoordination to be sure that all clients and servers have compatible policy.
Prerequisites
This guide is designed as a lab for network and system administrators to gainunderstanding and knowledge of how Windows 2000 IPSec works. You can config-ure an IP security policy locally on each computer, and then implement this policyand test the results to see secure network communications.
To complete this walkthrough, you need the following hardware:
• Two computers running the Windows 2000 operating system. You can use twoWindows 2000 Professional systems as the domain members, one to act as a cli-ent and the other as a server in the IPSec sense. The two test systems must bemembers of the same (or a trusted) domain.
• A Windows 2000 Server domain controller.
• A LAN or WAN to connect these three computers.
The common infrastructure assumed in this guide is covered in the "Step-by-StepGuide to a Common Infrastructure for Windows 2000 Server Deployment" (Part 1and Part 2). If you are not using the common infrastructure, you need to make theappropriate changes to this set of instructions. The computer names you seethroughout this document are based upon the common infrastructure.
The Advanced Section requires the ability to contact a certification authority (CA)server. If you need to install a CA server on your network, see Step by Step Guideto Setting Up a Certification Authority.
If you have an MIT-compatible Kerberos v5 server and wish to test Windows 2000IPSec using that Kerberos trust, please refer to Step-by-Step Guide to Kerberos 5Interoperability.
You must have two domain members to use the built-in policies, because theyrequire Kerberos authentication provided by the domain controller. You can alsouse IP Security without the two computers being domain members. To achieve this,see the section on building a custom policy.
s:\its\uss\pclan\documentation\ipsec.pdf
Preparing for Testing
After completing this walkthrough, you will be able to:
• Use a built-in IPSec policy.
• Create your own IPSec policy.
• Check the status of IP Security.
Collecting Information
You will need the following information for both test computers:
• Your host name (right-click the My Computer icon on the desktop, click Prop-erties, and click the Network Identification tab.)
• Your IP address (click Start, click Run, type cmd, and click OK. Type ipconfigat the command prompt and press Enter. After retrieving your IP address, typeexit and press Enter.
Preparing for Testing
Creating a Custom Console
Log on to the first test computer as a user with administrative privileges. In ourexample, this is the computer named HQ-RES-WRK-01.
Note: For the remainder of this document, HQ-RES-WRK-01 will refer to the firsttest computer, and HQ-RES-WRK-02 will refer to the second test computer. If yourmachines have different names, be sure and track the steps using the proper name.
Create a custom MMC console
1. From the Windows desktop, click Start, click Run, and in the Open textboxtype mmc. Click OK.
2. On the Consolemenu, click Add/Remove Snap-in.
3. In the Add/Remove Snap-in dialog box, click Add.
4. In the Add Standalone Snap-in dialog box, click Computer Management,and then click Add.
5. Verify that Local Computer is selected, and click Finish.
s:\its\uss\pclan\documentation\ipsec.pdf 5
Internet Protocol Security (IPSec)
6
6. In the Add Standalone Snap-in dialog box, click Group Policy, and then clickAdd.
7. Verify that Local Computer is selected in the Group Policy Object dialog box,and click Finish.
8. In the Add Standalone Snap-in dialog box, click Certificates, and then clickAdd.
9. Select Computer Account, and click Next.
10. Verify that Local Computer is selected, and click Finish.
11. To close the Add Standalone Snap-in dialog box, click Close.
12. To close the Add/Remove Snap-in dialog box, click OK.
Enabling Audit Policy for Your Computer
In the next procedure, you will configure auditing, so that an event will be loggedwhen IPSec is involved in communication. Later, this will be a useful confirmationthat IPSec is working properly.
To enable audit policy
1. In the MMC console, select Local Computer Policy from the left pane andclick + to expand the tree. Navigate to Computer Configuration, to WindowsSettings, to Security Settings, then to Local Policies, and select Audit Policy.
s:\its\uss\pclan\documentation\ipsec.pdf
Preparing for Testing
FIGURE 1.
2. From the list of Attributes displayed in the right pane, double-click AuditLogon Events. The Audit Logon Events dialog box appears.
3. In the Audit Logon Events dialog box, click to select both the Audit theseattempts: Success and Failed check boxes, and click OK.
4. Repeat steps 2 and 3 for the Audit Object Access attribute.
Configuring the IP Security Monitor
To monitor the successful security connections that the IPSec policy will create, usethe IP Security Monitor tool. Before creating any policies, first start and configurethe tool.
To start and configure the IP Security Monitor
1. To start the IP Security Monitor tool, click Start, click Run, and type ipsecmoninto the Open text box. Click OK.
2. Click Options in the IP Security Monitor tool, and change the default value forRefresh Seconds from 15 to 1. Click OK.
3. Minimize the IP Security Monitor window.
You will use this minimized tool to monitor the policies later in this walkthrough.
s:\its\uss\pclan\documentation\ipsec.pdf 7
Internet Protocol Security (IPSec)
8
Return to the beginning of this section, Creating a Custom Console and repeat allsteps to this point for the second computer (in our example, this is the machinenamed HQ-RES-WRK-02).
Using a Built-in IPSec Policy
In this exercise, you will activate one of the built-in IPSec policies to secure trafficbetween the two computers. The default policies use Kerberos as the initial authen-tication method. Because both machines are members of a Windows 2000 domain,a minimal amount of configuration is required.
To activate the policy on HQ-RES-WRK-01:
1. In the MMC console you created earlier, select IP Security Policies on LocalMachine from the left pane. There are three entries in the right pane: Client,Secure Server, and Server.
2. Right-click Secure Server, and then choose Assign. The status in the PolicyAssigned column should change from No to Yes.
3. Repeat step 1 on HQ-RES-WRK-02. Right-click Client, and then chooseAssign. The status in the Policy Assigned column changes from No to Yes.
Now you have one computer (HQ-RES-WRK-01) acting as a secure server, andthe other (HQ-RES-WRK-02) acting as a client. The client will initially sendunprotected ICMP Echo packets (using the ping utility) to the server, but theserver will request security from the client, after which the rest of the communi-cation will be secure. If the server were to initiate the ping, then the ping wouldhave to be secured to the client before the server would allow it on the network.If the client computer had a secure server policy as well, it would not sendunprotected pings or any other traffic; rather, it would request IPSec protectionbefore any application data was sent. If both computers had client policies, nodata would be protected, because neither side requests security.
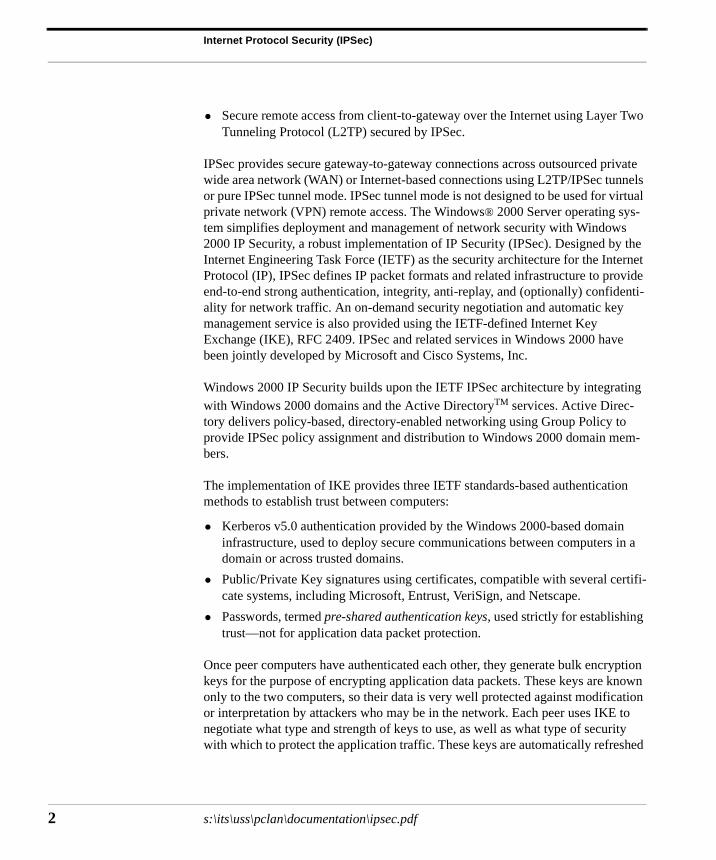
4. On HQ-RES-WRK-02, click Start, click Run, type cmd in the text box, andclick OK. Type ping IP1(the IP address ofHQ-RES-WRK-01).In this example,IP1 is 10.10.1.5. As shown in figure 2 below, the ping response will indicatethat IPSec is being negotiated.
s:\its\uss\pclan\documentation\ipsec.pdf
Using a Built-in IPSec Policy
FIGURE 2.
5. Restore the IP Security Monitor window, which you minimized earlier. Youshould see details of the Security Association that is currently in use betweenyour two machines, as well as statistics on the number of Authenticated andConfidential bytes transmitted.
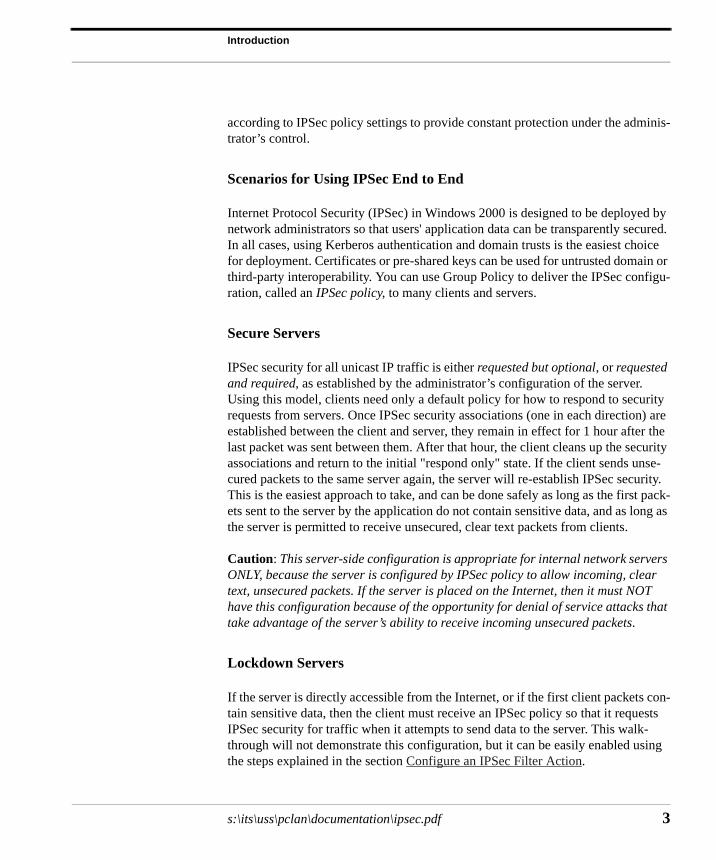
6. Repeat the ping command. Now that the two computers have established IPSecsecurity associations between them, you should receive four successful repliesas shown in figure 3 below. In this example, IP1 is 10.10.1.5.
FIGURE 3.
7. Still working on HQ-RES-WRK-02, from the left pane in the MMC, click the +next to Computer Management to expand it, then expand System Tools,
s:\its\uss\pclan\documentation\ipsec.pdf 9
Internet Protocol Security (IPSec)
10
expand Event Viewer, and click Security Log. Double-click the top instance ofSuccess Audit in the right pane.
8. You should see the successful establishment of an IPSec Security Association(SA). Use the scroll bar to view the entire description. It should read somethinglike the following code sample (machine names and IP addresses may differdepending on your configuration):
IKE security association establishedMode:Data Protection Mode (Quick Mode)
Peer Identity:Kerberos based Identity: [email protected] IP Address: 10.10.1.5
Filter:Source IP Address 10.10.1.6Source IP Address Mask 255.255.255.255Destination IP Address 10.10.1.5Destination IP Address Mask 255.255.255.255Protocol 0Source Port 0Destination Port 0
Parameters:ESP Algorithm DES CBCHMAC Algorithm SHAAH Algorithm NoneEncapsulation Transport ModeInboundSpi <a large number>1128617882OutBountSpi <a large number>865899841Lifetime (sec) 900Lifetime (kb) 100000
You have successfully configured and used IP Security between the two computers.
Impact of Secure Server Policy on a Computer
Only IPSec clients that can successfully negotiate can communicate with the secureserver computer. Also, the secure server will not be able to talk to any other sys-tems, such as Domain Name System (DNS) servers, unless that traffic can besecured using IPSec. Because many services are running in the background on theserver, they will probably fail to communicate and generate event log messages.
s:\its\uss\pclan\documentation\ipsec.pdf
Building A Custom IPSec Policy
This is normal, because the default Secure Server policy is very severe and attemptsto secure almost all IP packets before letting them into the network. For actual usein production environments, you must create a custom policy that has the behavioryou want according to your security requirements, network topology, and specificserver application usage.
Allowing Non-IPSec Clients To Talk with A Server
To allow non-IPSec clients to communicate as well, you should assign the Serverpolicy, instead of Secure Server. This always requests security, but allows unse-cured communication with clients, by falling back to clear text if the client does notreply to the IKE negotiation request. If at any time the client does reply, then anegotiation is in progress and must succeed completely. If negotiation fails thecommunication will be blocked for one minute, whereupon another negotiation willbe attempted. See the section, Configuring an IPSec Filter Action, for more expla-nation on the settings that are used to control this behavior.
Unassign the Secure Server or Server and Client policies to return your comput-ers to their previous states, by right-clicking the policy in the right pane (under IPSecurity Policies on Local Machine in the left pane), and then clicking Unassign.
Building A Custom IPSec Policy
In the previous section, you used one of the built-in IPSec policies to secure trafficbetween two domain members. If you want to secure traffic between two computersthat are not domain members, you need to create a custom policy because the built-in policies require Kerberos authentication provided by the domain controller.There are other reasons for creating a custom policy; for example, if you wanted tosecure traffic based on network address. In this section, you will create a customIPSec policy, first by defining a security rule, then by defining a filter list, thenfinally by specifying the filter action.
Configuring an IPSec Policy
Before configuring the IPSec Authentication Method, Filter List, or Negotiationmethod, you must first create a new policy.
s:\its\uss\pclan\documentation\ipsec.pdf 11
Internet Protocol Security (IPSec)
12
To create an IPSec Policy
1. Using HQ-RES-WRK-01, in the left pane of the MMC Console, right-click IPSecurity Policies on Local Machine, and then click Create IP Security Pol-icy. The IP Security Policy Wizard appears.
2. Click Next.
3. Type Partner as the name of your policy, and click Next.
4. Clear the Activate the default response rule check box, and then click Next.
5. Make sure the Edit Properties check box is selected (it is by default), and thenclick Finish.
6. In the Properties dialog box for the policy you have just created, ensure thatUse Add Wizard check box in the lower-right corner is selected, and then clickAdd to start the Security Rule Wizard.
7. Click Next to proceed through the Security Rule Wizard, which you started atthe end of the previous section.
8. Select This rule does not specify a tunnel, (selected by default) and then clickNext.
9. Select the radio button for All network connections, (selected by default) andclick Next.
Configuring an IKE Authentication Method
Next you specify how the computers will trust each other, by specifying how theywill authenticate themselves, or prove their identities to each other when trying toestablish a security association. IKE for Windows 2000 provides three authentica-tion methods to establish trust between computers:
• Kerberos v5 authentication provided by the Windows 2000 domain that servesas a Kerberos v5 Key Distribution Center (KDC). This provides easy deploy-ment of secure communications between Windows 2000 computers who aremembers in a domain or across trusted domains. IKE only uses the authentica-tion properties of Kerberos. Key generation for IPSec security associations isdone using IKE RFC 2409 methods. This is documented in draft-ietf-ipsec-isakmp-gss-auth-02.txt.
• Public/Private key signatures using certificates, compatible with several certifi-cate systems, including Microsoft, Entrust, VeriSign, and Netscape.
• Pre-shared key, which is a password used strictly for establishing trust betweencomputers.
s:\its\uss\pclan\documentation\ipsec.pdf
Building A Custom IPSec Policy
In this exercise, you use pre-shared key authentication. This is a text word or phrasethat both computers, the sender and the receiver, must know in order to be trustedby each other. Both sides of the IPSec communication must know this value. It isnot used to encrypt the application data. Rather, it is only used during negotiation toestablish whether the two computers will trust each other. The IKE negotiation usesthis value, but does not pass it across the network. However, the authentication keyis stored in plain text form within the IPSec policy. Anyone with administrativeaccess to the computer (or any valid domain user id for a computer that is a memberof the domain where the IPSec policy is stored in the Active Directory) can see theauthentication key value. The domain administrator must set custom access con-trols on the directory IPSec policy to prevent normal users from reading the IPSecpolicy. Therefore, Microsoft does not recommend use of a pre-shared key for IPSecauthentication unless for testing, or in cases where it is required for interoperabilitywith third-party vendor IPSec implementations. Instead, Microsoft recommendsusing either Kerberos or certificate authentication instead.
To configure the authentication method for the rule
1. Choose Use this string to protect this key exchange and enter ABC123 as thestring. You must not use a blank string. Click Next.
Note: If you want to use certificates for authentication, see the instructions forobtaining a certificate for testing from Microsoft using the Internet available certif-icate servers.
Configuring an IPSec Filter List
IP Security is applied to IP packets as they are sent and received. Packets arematched against filters when being sent (outbound) to see if they should be secured,blocked, or passed through in clear text. Packets are also matched when received(inbound) to see if they should have been secured, should be blocked, or should bepermitted into the system. There are two types of filters: those that control IPSectransport mode security, and those that control IPSec tunnel mode security. IPSectunnel filters are applied first to all packets. Then, if none match, the IPSec trans-port mode filters are searched. A few types of IP traffic cannot be secured by thedesign of IPSec transport filters in Windows 2000, including:
• Broadcast addresses—usually ending with .25—with appropriate subnet masks.
• Multicast-addresses from 224.0.0.0 through 239.255.255.255.
s:\its\uss\pclan\documentation\ipsec.pdf 13
Internet Protocol Security (IPSec)
14
• RSVP-IP protocol type 46. This is to allow RSVP to signal Quality of Service(QOS) requests for application traffic that may then be IPSec protected.
• Kerberos-UDP source or dest port 88. Kerberos is itself a secure protocol,which the IPSec’s IKE negotiation service uses for authentication of other com-puters in a domain.
• IKE-UDP dest port 500. This is required to allow IKE to negotiate parametersfor IPSec security.
These exemptions apply to IPSec transport mode filters. Transport mode filtersapply to host packets that have a source address of the computer that is sending thepacket, or a destination address of the computer that is receiving the packet. IPSectunnels can only secure unicast IP traffic. Filters used for IPSec tunnels must bebased on addresses only, not on protocol and port fields. If the tunnel filter were tobe protocol or port specific, then fragments of the original packet would not be car-ried by the tunnel, and the original full IP packet would be lost. If unicast Kerberos,IKE, or RSVP packets are received on one interface, and routed out of anotherinterface, (using packet forwarding, or the Routing and Remote Access Service),then they are not exempt from IPSec tunnel mode filters, and thus could be carriedinside the tunnel. IPSec tunnel mode filters cannot filter multicast or broadcastpackets, so these would not be carried inside the IPSec tunnel.
Individual filter specifications are grouped into a filter list to enable complex pat-terns of traffic to be grouped and managed as one named filter list, such as Building7 File Servers, or All blocked traffic. Filter lists can be shared as necessary betweendifferent IPSec rules in the same policy or different IPSec policies.
When configuring IP filters for traffic that must be secured, always be sure to mir-ror the filters. Mirroring the filters automatically configures both inbound and out-bound filters.
You will be configuring filters between your computer and your partner's computer.You must configure an outbound filter specifying your IP address as the sourceaddress and your partner as the destination address. Then the mirror processingconfiguration will automatically configure an inbound filter specifying your part-ner’s computer as the source address, and your computer’s IP address as the desti-nation. In this simple case, there will be only one mirrored filter specification in thefilter list.
s:\its\uss\pclan\documentation\ipsec.pdf
Building A Custom IPSec Policy
The same filter list will need to be defined on both computers. Toconfigure an IP Filter List
1. In the IP Filter List dialog box, click Add. An empty list of IP filters is dis-played. Name your filter Partner Filter.
2. Make sure Use Add Wizard is selected in the center-right area of the screen andthen click Add. This starts the IP Filter Wizard.
3. Click Next to continue.
4. Accept My IP Address as the default sourceaddress by clicking Next.
5. Choose A Specific IP address from the drop-down list box, enter your Part-ners IP Address, and then click Next.
6. Click Next to accept the protocol type of Any.
7. Make sure the Edit Properties check box is cleared (this is the default setting),and click Finish.
8. Click Close to leave the IP Filter List dialog box, and return to the New RuleWizard.
9. In the IP Filter List dialog box, select the radio button next toPartner Filter.
FIGURE 4.
s:\its\uss\pclan\documentation\ipsec.pdf 15
Internet Protocol Security (IPSec)
16
10. Click Next.
Read the following section before proceeding to the steps involved in configuringthe filter action.
Configuring an IPSec Filter Action
You have just configured both the input and output filters for matching TCP/IPpackets. The second step is to configure the action to take for those packets. Youcan permit, block, or secure the packets that match the filters. If you want to securethe traffic, both computers must have a compatible negotiation policy configured.The built-in defaults should serve well for trying out different features. If you wantto experiment with specific capabilities, you should create your own new filteraction.
Two methods allow communication with computers that are not able to do IPSec:
• Use the filter action Permit to let the packets go in the clear, or unsecured. Usethis action in combination with a filter that matches the traffic you want to per-mit in its own rule within the IPSec policy. Typical uses would be to permit traf-fic types of ICMP, DNS, or SNMP, or to permit traffic to certain destinations,such as the default gateway, DHCP and DNS servers, or other non-IPSec sys-tems.
• Configure your filter action to use the setting Fall back to unsecured commu-nication. You will see this option presented in the wizard. Selecting this optionin the wizard will enable the filter action parameter Allow unsecured commu-nication with non-IPSec aware computer. Using this setting allows unsecuredcommunication with a destination, by falling back to clear text if the destinationdoes not reply to the IKE negotiation request. If at any time the client doesreply, then a negotiation is in progress and must succeed completely. If IKEnegotiation fails, the outbound packets that matched the filter will be discarded(blocked) for one minute, whereupon another outbound packet will causeanother IKE negotiation to be attempted. This setting only affects IKE negotia-tions that are initiated by the computer. It has no effect on computers thatreceive a request and thus respond. The IKE RFC 2409 standard does not pro-vide a method for both sides to negotiate to normal, or unsecured, or clear textmode.
s:\its\uss\pclan\documentation\ipsec.pdf
Building A Custom IPSec Policy
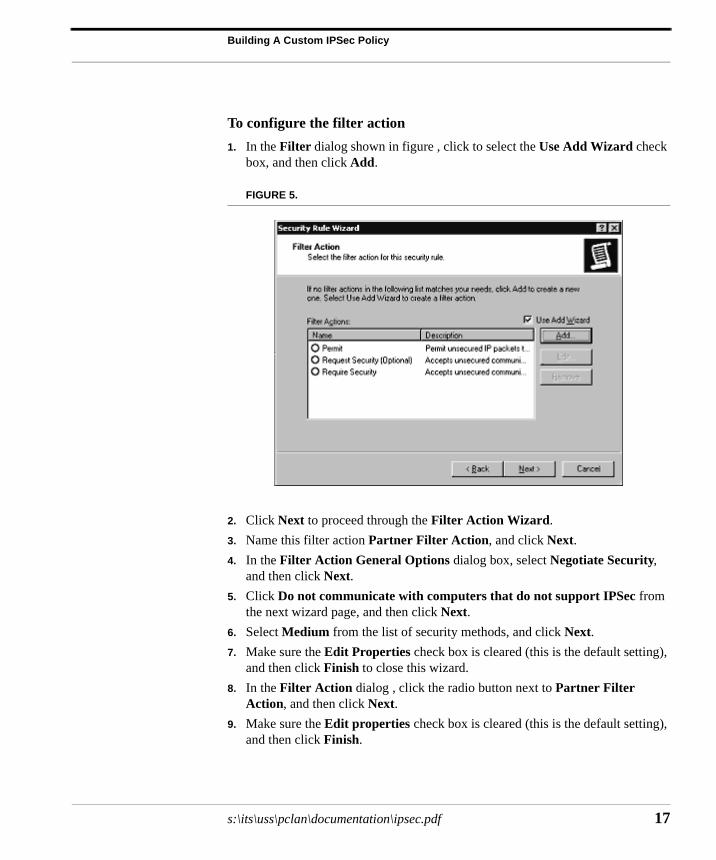
To configure the filter action
1. In the Filter dialog shown in figure , click to select the Use Add Wizard checkbox, and then click Add.
FIGURE 5.
2. Click Next to proceed through the Filter Action Wizard.
3. Name this filter action Partner Filter Action, and click Next.
4. In the Filter Action General Options dialog box, select Negotiate Security,and then click Next.
5. Click Do not communicate with computers that do not support IPSec fromthe next wizard page, and then click Next.
6. Select Medium from the list of security methods, and click Next.
7. Make sure the Edit Properties check box is cleared (this is the default setting),and then click Finish to close this wizard.
8. In the Filter Action dialog , click the radio button next to Partner FilterAction, and then click Next.
9. Make sure the Edit properties check box is cleared (this is the default setting),and then click Finish.
s:\its\uss\pclan\documentation\ipsec.pdf 17
Internet Protocol Security (IPSec)
18
You have just configured the filter action that will be used during negotiations withyour partner. Note that you can re-use this filter action in other policies.
10. In the Properties page that is now displayed, click Close. You have success-fully configured an IPSec Policy.
11. Repeat all steps in this procedure on HQ-RES-WRK-02 before proceeding.
Testing Your Custom IPSec Policy
Now that you have built an IPSec policy, you should test it before applying it in anetwork.
To test your custom IPSec policy
1. In the left pane of the MMC console, select IP Security Policies on LocalMachine. Note that in addition to the three built-in policies, the Partner policyyou just configured is listed in the right pane.
2. Right-click Partner, and then click Assign from the context menu. The status inthe Policy Assigned column should change from No to Yes. Do this step onboth machines before continuing.
3. Open a command prompt window, and type ping partners-ip-address. Youshould receive four Negotiating IP Security responses. Repeat the command,and you should receive four successful ping replies.
4. Restore the IP Security Monitor window (which you minimized earlier). Youshould see details of the Security Association that is currently in use betweenyour two computers, as well as statistics on the number of Authenticated andConfidential bytes transmitted among others. Minimize this window again.
5. In the left pane of the MMC console, select Computer Management, and nav-igate to System Tools, to Event Viewer, and then select Security. In the secu-rity log, you should see event 541, which notes the establishment of an IPSecsecurity association (SA).
6. Repeat step three to unassign the Partner policy, and return both computers totheir previous states. This time, when you right-click the policy, click Unassign.
s:\its\uss\pclan\documentation\ipsec.pdf
Using Certificate Authentication
Using Certificate Authentication
The Windows 2000 IPSec implementation provides the ability to authenticate com-puters during IKE using certificates. All certificate validation is performed by theCryptographic API (CAPI). IKE simply serves to negotiate which certificates touse and provides security for the exchange of the certificate credentials. The IPSecpolicy specifies which root certificate authority (CA) to use, not which specific cer-tificate to use. Both sides must have a common root CA in their IPSec policy con-figuration.
Here are the requirements for the certificate to be used for IPSec:
• Certificate stored in computer account (machine store)
• Certificate contains an RSA public key that has a corresponding private key thatcan be used for RSA signatures.
• Used within certificate validity period
• The root certification authority is trusted
• A valid certification authority chain can be constructed by the CAPI module
These requirements are quite basic.IPSec does not require the machine certificate tobe an IPSec type of certificate because existing certificate authorities may not issuethese type of certificates.
Obtaining a Microsoft Certificate for Testing
You must first obtain a valid certificate from a certificate server. Even if you haveanother certificate server you want to use, obtain a Microsoft certificate first fortesting. Any valid computer certificate can be used. User-based certificates are notused. We have tested compatibility with several certificate systems, includingMicrosoft, Entrust, VeriSign, and Netscape.
Note: Not all certificate servers automatically enroll your computer with a certifi-cate. The certificate must appear in the local computer account under personal cer-tificates, and have the root CA certificate in the Trusted Root CertificationAuthorities store. Consult the Certification Authority step-by-step guides on theWindows 2000 Step-by-Step Guides Web site for more information on how to obtainmachine certificates from non-Microsoft certificate servers.
s:\its\uss\pclan\documentation\ipsec.pdf 19
Internet Protocol Security (IPSec)
20
To obtain a certificate
1. Open Internet Explorer and go to the certification authority site. If you do nothave another site from which to receive certificates, use:
http://sectestca1.rte.microsoft.com
This site provides access to four certification authorities. For simplicity, this proce-dure uses a certificate issued from the stand-alone root CA, sectestca3.
2. Select Standalone Root (RSA 2048).
3. Select Request a Certificate, and then click Next.
4. Select Advanced Request, and then click Next.
5. Select Submit a Certificate Request Using a Form.
6. In the Advanced Certificate Request form, enter the following responses:
• Identifying Information: as desired.
• Intended Purpose: Client Authentication or Server Authentication.
This field sets the extended key usage field in the certificate. There is also anIPSec Certificate field to support the specification that is still being developedby the standards groups. You can use this type if you want to inter-operate withother IPSec implementations that require it. However, Windows 2000 IPSeccertificate authentication uses any valid certificate in the computer account,meaning any setting of extended key usage will be acceptable. There is no wayin IPSec policy to restrict the use to only IPSec certificates. If there are multi-ple machine certificates in the personal certificates folder on the local machine,only one will be chosen. Starting with the first root CA in the AuthenticationMethod of the rule, the chosen certificate will be the first certificate found thathas a trust path back to that root CA.
• Cryptographic Service Provider: Microsoft Base Cryptographic Provider v1.0
• Key Usage: Signature.
• Key Size: 1024
You can choose a larger key size if you choose the Microsoft Enhanced Crypto-graphic Provider. However, the enrollment request may fail because the versionof Windows 2000 does not have the Strong Cryptography Pack installed. If thiscertificate will be used for interoperability with other IPSec implementations, besure to check if the third-party IPSec product is able to process a signature witha key size larger than 1024. Some third-party products may also place limits in
s:\its\uss\pclan\documentation\ipsec.pdf
Using Certificate Authentication
IPSec policy on the size of the key used.
Note: This setting determines what the private key can be used to do—encryp-tion of data or signatures only. The current implementation of IKE uses certifi-cate private keys only for signatures. Thus, a certificate issued with a usagelimited to exchange (for data encryption) will not work. Certificates with ausage of both will work.
• Create A New Key Set: enabled
• Use local machine store: enabled
• Additional Options: fill in as desired
• Hash Algorithm: SHA1/RSA
7. Submit the request. You will receive a message stating that the certificate wasissued to you.
8. Click Install this certificate.
9. You will get a message stating that the certificate has been successfullyinstalled. Close Internet Explorer.
10. Open the IPSec Management MMC console to which you added a snap-in tomanage Certificates (Local Computer).
Verify that the certificate enrollment succeeded
1. The Personal Certificates folder should contain the computer's certificate namethat you selected for your name IPSec testing.
2. Click the + next to Certificates (Local Computer) to expand it. Expand thePersonal folder, and click the Certificates folder. You should see a certificate inthe right pane that was issued to Administrator (or the username you logged onwith).
3. Double-click this certificate in the right pane. It should contain the message,You have a private key that corresponds to this certificate. Note the name ofthe CA where it says Issued by: (in our example, SectestCA3). Click OK.
Note: If the computer certificate properties say "You do not have a private key thatcorresponds to the certificate," then enrollment has failed and the certificate willnot work for IPSec IKE authentication. You must successfully get a private key thatcorresponds to the public key in the machine certificate.
4. Expand Trusted Root Certification Authorities, and click the Certificatesfolder. Scroll down and find a certificate in this store with the name of theIssued By certification authority.
s:\its\uss\pclan\documentation\ipsec.pdf 21
Internet Protocol Security (IPSec)
22
5. Repeat all the steps in this procedure to retrieve a certificate on the other testmachine.
Note: If a certificate was obtained from the Microsoft Certificate Server with theoption set for Strong Private Key Protection, a user must enter a PIN number toaccess the private key each time that the private key is used to sign data in the IKEnegotiation. Because the IKE negotiation is being done in the background by a sys-tem service, there is no window available to the service to prompt the user. There-fore, certificates obtained with this option will not work for IKE authentication.
Configuring Certificate Authentication for a Rule
If you are creating a new rule, you can browse for a certification authority to use.This is a list of certification authority certificates that are in the Trusted Root Certi-fication Authorities folder, not a list of your computer personal certificates. Thisroot CA specification in an IPSec rule serves two purposes. First, it provides IKEwith a root CA that it trusts. IKE on your computer will send a request for a validcertificate from this root CA to the other computer. Second, the CA specificationprovides the name of the root CA that your computer will use to look for its ownpersonal certificate to offer in response to a request from the peer.
Caution: You must at least select the certification authority root that your computercertificate chains back to, that is, the top level CA in the certification path of thecomputer certificate in your computer’s personal store.
1. Return to the IP Security Policies folder in the MMC.
2. Double-click the Partner policy in the right pane.
3. Make sure Partner Filter option is selected, and click Edit.
4. Select the radio button for All IP Traffic.
5. Click Edit.
6. Make sure the New Rule Wizard check box is selected, and click OK.
7. Click the Authentication Methods tab.
8. Select the Preshared Key with details ABC123, and click Edit.
9. Select the option Use a certificate from this certification authority (CA) andclick Browse. Click to select the CA you used before: in our example, this isSecTestCA3.
s:\its\uss\pclan\documentation\ipsec.pdf
Using Certificate Authentication
FIGURE 6.
10. Click OK.
The IPSec Rule editor allows you to build an ordered list of certification authoritiesthat your computer will send in a request to the peer computer during IKE negotia-tion. The peer computer must have a personal certificate issued by one of the rootCAs in your list in order for the authentication to succeed.
You can continue to add and arrange certification authorities as you wish.
11. Click OK twice and click Close.
12. On the other test machine, repeat this full procedure. Now have each computerping the other.
You can order the list of authentication methods to specify certificates first, thenKerberos or pre-shared key. However, you cannot break up the list of certificates byadding a non-certificate method in the middle.
By adding additional root CAs, you are able to build a list of root CAs that youtrust, which is a greater list than the one (or few) that has issued your computer acertificate. This is necessary for interoperability in many enterprise scenarios.
It is important to understand that your computer may receive certificate requestsfrom a destination peer that may or may not include a root CA in the list of root
s:\its\uss\pclan\documentation\ipsec.pdf 23
Internet Protocol Security (IPSec)
24
CAs you have specified in IPSec policy. Coordination with the administrator of thedestination is required to agree on which root CAs each side will be using.
• If the destination’s request to you does include a certification authority in thislist, then IKE will check to see if your computer has a valid personal certificatethat chains back to this root CA. If you do, then it will choose the first validcomputer personal certificate it finds and send that as the computer’s identity.
• If your computer receives a certificate request for a root CA that was not speci-fied in this IPSec policy rule, then your computer will send the first certificate itfinds that chains back to the root CA name that is specified in its own IPSec pol-icy rule. Because certificate requests are optional in the RFC 2409 standard,once your computer agrees to certificate authentication, your computer mustsend a certificate even if it did not receive an IKE certificate request, or if thecertificate request yielded no match with your computer’s root CA names inpolicy. In this case, it is likely that the IKE negotiation will fail because the twocomputers could not agree on a common root CA. If the destination’s request toyou does not include one of the certificate authorities here, then the IKE negoti-ation will fail.
Certificate Revocation List Checking
Most certificate servers issue certificates that contain a Certificate Revocation List(CRL) Distribution Point (sometimes wholly abbreviated as CDP). In order for acomputer to validate a certificate completely, it must check to see that the certifi-cate has not been revoked by the issuer. Since the standards for making this checkhave been evolving, and various certificate servers and PKI systems are already inuse, not all of the certificate systems support the same method and functionality ofCRL checking. Therefore CRL checking is disabled by default. Before enablingCRL checking, make sure you are successfully authenticating using certificates,and you have examined the Oakley .log trace file to see how the log shows this.(Step 3 below shows you where this file is located.)
IKE specifies to CAPI how to handle CRL checking when it requests a certificate tobe validated. To enable CRL checking, the computer administrator must change thevalue of the registry key below. The proper setting of this value should be deter-mined by the IPSec policy administrator, and the certificate server administrator.
s:\its\uss\pclan\documentation\ipsec.pdf
Using Certificate Authentication
To enable CRL checking by IKE
1. On the Start menu, click Run, and enter regedt32. Click OK. This starts theRegistry Editor.
2. Navigate to HKEY_LOCAL_MACHINE on Local Machine.
3. Navigate to the following location: System\CurrentControlSet\Services\Policy-Agent
4. Double-click PolicyAgent.
5. On the Edit menu, click Add Key.
FIGURE 7.
6. Enter the Key Name (case sensitive): Oakley.
7. Leave Class blank, and click OK.
8. Select the new key, Oakley.
9. On the Edit menu, click Add Value.
10. Enter the Value Name (case sensitive): StrongCrlCheck.
11. Select Data Type: REG_DWORD and click OK.
12. Enter a value, either 1 or 2, according to the behavior you want to enable:
• Use 1 to fail the certificate validation only if the CRL check returns that the cer-tificate has been revoked (the normal form of CRL checking).
s:\its\uss\pclan\documentation\ipsec.pdf 25
Internet Protocol Security (IPSec)
26
• Use 2 to fail the certification validation on any CRL check error. This is thestrongest form, and is used when the CRL distribution point must be reachableon the network, and must not say that it never issued the certificate or provideany other error. Effectively, a certificate will pass this level of check only if theCRL processing can positively conclude that the certificate is not revoked.
13. Click Hex as the Radix. Click OK
14. Exit from the Registry Editor.
15. At the Windows 2000 command prompt, type net stop policyagent, then typenet start policyagent to restart the IPSec related services.
Note: If your system is configured as a VPN server for L2TP/IPSec, you mustrestart Windows 2000.
To disable the CRL checking, simply delete the StrongCRLCheck value under theOakley key, and restart the service or Windows 2000 as necessary.
Understanding IKE Negotiation (Advanced Users)
This section is provided for those who want to learn more about the details of IKEnegotiation behavior. It is not required to complete the steps in this guide. Detailedexplanations of IPSec, IKE and other aspects of the implementation are available inthe online help for both Windows 2000 Server and Professional versions. (Thesame help content is provided on both Professional and Server though a differenttable of contents is used. Simply start the IPSec Policy Management snap-in andchoose Help).
Failure and Success of IKE, along with a reason for the failure, are events auditedin the Security event log. The procedure for enabling auditing is given at the start ofthis walkthrough. If the server is using the built-in policy Server (request secu-rity), (or actually any custom policy that has a rule which uses the built-in filteraction Request Security (optional)), then the IKE negotiation may fall back toclear for destinations that do not reply to the IKE request. This is tracked by anaudit event for what is called a soft security association. This appears in the IPSecmonitor as having a Security column value of <none>. If the server is using SecureServer and gives up trying to reach a destination with no IKE response from thatdestination, a failure audit event in the security log will show that no responsefrom peer was the reason.
s:\its\uss\pclan\documentation\ipsec.pdf
Understanding IKE Negotiation (Advanced Users)
You can use the Server (request security) policy and the audit log on a server todiscover and track the destinations that the server communicates with in normaloperation over time. Thus, you can better understand how to build a custom policythat will secure to the right destinations, while permitting other maintenance andinfrastructure communication to go unprotected in the clear.
IKE Main Mode (Phase 1)
The initial long form of the IKE negotiation (main mode, or phase 1) performs theauthentication and establishes an IKE security association (SA) between machines,which involves generating the master key material. The result is referred to as anIKE security association. IKE main mode is controlled by the IPSec policy rules bythe system using just the source and destination address information from the filtersin the rules. Once successful, default settings in the default policies (see KeyExchange on the policy’s General tab) will make the IKE SA last for 8 hours. Ifdata is actively being transferred at the end of the 8 hours, then the main modesecurity association will be renegotiated automatically. The IKE main mode secu-rity association is not visible in the IPSec monitor tool. However, it may be dis-played by the local administrator using the netdiag.exe /test:ipsec /v commandline. Netdiag.exe is a support tool, located on the Windows 2000 Professional andServer CDs, in the \Support folder.
IKE Quick Mode (Phase 2)
The shorter version of IKE negotiation (quick mode) occurs after main mode toestablish an IPSec security association to secure particular traffic according to thesource and destination addresses (and if present, protocol and port) parts of thepacket filters in the policy’s rules. The IPSec SA negotiation involves choosingalgorithms, generating session keys, and determining the Security Parameter Index(SPI) numbers used in the packets. Two IPSec security associations are established,each with its own SPI (the label in the packet), one for inbound traffic, one for out-bound traffic. The IPSec monitor shows only one IPSec security association, theoutbound one. After five minutes of idle time on the inbound SA, both IPSec SAsare cleaned up, causing the outbound SA to disappear from the IPSec monitor dis-play. If traffic is sent again that requires IPSec security, then an IKE quick modenegotiation occurs to re-establish two new IPSec security associations, which willuse new keys and SPIs. The default values set in the default security methodsrequire new quick mode IPSec security associations every 1 hour (3600 seconds) orafter 100 megabytes have been transferred. If data has been actively transferredwithin the previous 5 minutes, then the IPSec security associations will be automat-
s:\its\uss\pclan\documentation\ipsec.pdf 27
Internet Protocol Security (IPSec)
28
ically renegotiated before they expire. The side that has transmitted more data orthat initiated the previous quick mode will initiate the new quick mode.
Troubleshooting
Troubleshooting Policy Configuration
This guide is intended to cover only local computer IPSec policy that uses IPSectransport (not tunneling) to secure traffic between a source computer and a destina-tion computer. It does not cover using Group Policy in the Active Directory to dis-tribute IPSec policy. IPSec policy configuration is very flexible and very powerful,though proper settings require understanding of the IKE and IPSec protocols them-selves. There are a number of security configuration issues that you will want to beaware of. Please read the online help, and search the Microsoft Knowledge Base forIPSec related articles. Then read the additional notes below to help clarify what isnot supported in policy configurations by design. If you are not able to get anyIPSec communication to work, then follow the steps provided below to build thesimplest policy, and use it for testing.
Only One Authentication Method Between a Pair of Hosts
IPSec policy is designed so that only one authentication method can be usedbetween a single pair of hosts, regardless of how many are configured. If you havemultiple rules that apply to the same pair of computers (look at the source and des-tination IP addresses only), you must make certain those rules allow that pair ofcomputers to use the same authentication method. You must also make sure the cre-dential used for that authentication method is valid. For example, the IPSec snap-inallows you to configure one rule that uses Kerberos to authenticate just TCP databetween two host IP addresses, and to create a second rule with the same addressesbut specifying UDP data to use certificates to authenticate. This policy will notwork properly, because outbound data traffic can more specifically select a rule(because it matches the protocol UDP, not just the addresses) than the IKE negotia-tion on the destination computer can use when it tries to find a matching rule in pol-icy to respond with in main mode (which can use only the source IP address of theIKE packet). Thus, this policy configuration uses two different authenticationmethods between a single pair of IP addresses (hosts). To avoid this problem, don’tuse protocol- or port-specific filters for the purpose of negotiating security for traf-
s:\its\uss\pclan\documentation\ipsec.pdf
Troubleshooting
fic. Instead, use protocol and port specific filters mainly for permit and blockactions.
One-Way IPSec Protection of Traffic Not Allowed
IPSec policy is not designed to allow one-way protection of traffic by IPSec. If youcreate a rule to protect traffic between IP addresses of hosts A and B, then you mustspecify both traffic from A to B and traffic from B to A in the same filter list. Youcan do this by creating two filters in the same filter list. Alternatively, you can go tothe Filter Specification Properties dialog box in the IPSec snap-in and select theMirrored box. This option is selected by default, because protection must be nego-tiated for both directions, even if the data traffic itself only flows one way most ofthe time.
You can create one-way filters to block or permit traffic, but not tosecure traffic. To secure traffic, you have to specify the filter mirrormanually or have the system generate it for you automatically usingthe mirror checkbox.
Computer Certificates Must Have a Private Key
Incorrectly obtained certificates may result in a condition in which the certificateexists, and is chosen to be used for IKE authentication, but fails to work because theprivate key corresponding to the certificate’s public key is not present on the localcomputer.
To verify that the Certificate has a private key
1. On the Start menu, click Run, and then type mmc in the text box. Click OK.
2. On the Console menu, click Add/Remove Snap-in, and then click Add.
3. In the Snap-in list, double-click Certificates. Click Close, and then click OK.
4. Expand the Certificates-User (local computer), and then expand Personal.
5. Click the Certificates folder.
6. In the right pane, double-click the certificate you want to check.
On the General tab, you should see the text You have a private key that corre-sponds to this certificate. If you don’t see this message, the system won’t use thiscertificate successfully for IPSec.
s:\its\uss\pclan\documentation\ipsec.pdf 29
Internet Protocol Security (IPSec)
30
Depending upon how the certificate was requested and populated into the host’slocal certificate store, this private key value may not exist, or may not be availableto be used during the IKE negotiation. If the certificate in the personal folder doesnot have a corresponding private key, then certificate enrollment has failed. If a cer-tificate was obtained from the Microsoft Certificate Server with the option set forstrong private key protection, the user must enter a PIN number to access the pri-vate key each time that the private key is used to sign data in the IKE negotiation.Because the IKE negotiation is being done in the background by a system service,there is no window available to the service to prompt the user. So certificatesobtained with this option will not work for IKE authentication.
Build and Test the Simplest End-to-End Policy
Most problems, particularly interoperability problems, can be resolved by creatingthe simplest policy rather than by using the default policies. When you create a newpolicy, do not enable an IPSec tunnel, or the default response rule. Edit the policyon the General tab; edit the key exchange to have only one option that the destina-tion will accept. For example, use the RFC 2049 required options of DES, SHA1,with the Low (1) 1 Diffie Hellman group. Create a filter list with one mirrored filterthat specifies source My IP Address and destination of the IP address that you aretrying to with communicate securely. We recommend testing by creating a filtercontaining only IP addresses. Create your own filter action to negotiate securityusing only one security method. If you want to see the traffic in the IPSec formattedpackets with a packet sniffer, use Medium Security (AH format). Otherwise,choose custom, and build one single security method. For example, use the RFC2049 required set of parameters such as format ESP using DES with SHA1, with nolifetimes specified, and no Perfect Forward Secrecy (PFS). Make sure both checkboxes are cleared in the security method, so that it requires IPSec for the destina-tion, and will not communicate with non-IPSec computers, and does not acceptunsecured communications. Use an authentication method of pre-shared keys forthe rule, and make sure there are no white spaces in the string of characters. Thedestination must use exactly the same pre-shared key.
Note: The same configuration must be configured on the destination also, only theIP addresses are reversed for source and destination.
You should assign this policy on a computer, then ping the destination from thatcomputer. You should see the ping return Negotiating security. This indicates thatthe policy’s filter is being matched and that IKE should be trying to negotiate secu-rity with the destination for the ping packet. If you continue to see Negotiating IP
s:\its\uss\pclan\documentation\ipsec.pdf
Troubleshooting
Security from multiple tries to ping the destination, then you probably do not havea policy problem; rather, you may have an IKE problem. See the section Trouble-shooting IKE Negotiation, below.
Troubleshooting IKE Negotiation
The IKE service runs as part of the IPSec Policy Agent service. Be sure that thisservice is running.
Make sure that auditing is enabled for success and failure for the audit attributeAudit Logon Events. The IKE service will make audit entries and provide anexplanation for why negotiation failed in the security event log.
Clearing IKE State: Restarting the IPSec Policy Agent Service
To completely clear the state of IKE negotiation, it is necessary to stop and start thepolicy agent service using the commands below from a command shell promptwhen logged in as a local administrator:
net stop policyagent
net start policyagent
Retry your steps to secure traffic.
Caution: When you stop the IPSec Policy Agent Service, the IPSec filter protec-tions will be deactivated. Active VPN tunnels will no longer be IPSec protected. Ifyou were also running the Routing or Remote Access services, or if you haveenabled incoming VPN connections, you must stop and restart the remote accessservice, net start remoteaccess, after restarting the IPSec Policy Agent service.
Using the Security log To See IKE Errors
The Security event log records the reason for failure when an IKE negotiation fails.Use these messages to detect that a negotiation failed and why. You must enableauditing using the procedure at the start of this walkthrough.
s:\its\uss\pclan\documentation\ipsec.pdf 31
Internet Protocol Security (IPSec)
32
Using A Packet Sniffer
If none of the above has helped, and you have not read the section, UnderstandingIKE Negotiation, do so now.
For more detailed investigations, use a packet sniffer, such as Microsoft NetworkMonitor, to capture the packets being exchanged. Remember that most of the con-tent of the packets used in IKE negotiation is encrypted and cannot be interpretedby a packet sniffer. Still, it may be worthwhile to sniff all traffic to and from thecomputer to be sure that you see the traffic you are expected to see. A limited ver-sion of Microsoft Network Monitor is provided with Windows 2000 Server. It is notinstalled by default, so you must go into Control Panel, Add/Remove WindowsComponents, Management and Monitoring Tools, then select Network MonitorTools, and follow the steps required.
Using IKE Debug Tracing (Expert Users)
The security log is the best place to determine the failure reason for an IKE negoti-ation. However, for experts in the IKE protocol negotiation, the debug tracingoption for IKE negotiation is enabled using a registry key. The logging is disabledby default. To enable debug logging, you must stop and start the IPSec PolicyAgent Service.
To enable debug logging by IKE
1. From the Windows desktop, click Start, click Run, and type regedt32 in thetext box. Click OK. This starts the Registry Editor.
2. Navigate to HKEY_LOCAL_MACHINE on Local Machine.
3. Navigate to the following location: System\CurrentControlSet\Services\Poli-cyAgent.
4. Double-click PolicyAgent.
5. If the Oakley key doesn’t exist, on the Edit menu, click Add Key.
6. Enter the Key Name (case sensitive): Oakley.
7. Leave Class blank, and click OK.
8. Select the new key, Oakley.
9. On the Edit menu, click Add Value.
10. Enter the Value Name (case sensitive): EnableLogging
11. Select Data Type: REG_DWORD and click OK.
s:\its\uss\pclan\documentation\ipsec.pdf
For More Information
12. Enter value 1
13. Click Hex as the Radix. Click OK
14. Exit from the Registry Editor.
15. At the Windows 2000 command prompt, type net stop policyagent, then typenet start policyagent to restart the IPSec related services.
The file will be written to windir\debug\oakley.log by default, and the file oak-ley.log.sav is the previous version of the log after the policy agent service isrestarted.
The log is limited to 50,000 entries, which usually limits the file size to less than 6megabytes.
For More Information
For the latest information on Microsoft Windows 2000 operating system, visit ourWorld Wide Web site at http://www.microsoft.com/windows2000/ and the Win-dows NT Server Forum on the Microsoft Network (GO WORD: MSNTS).
IPSec Tools and Information
On the Windows 2000 platform CD
• IPSec snap-in for policy configuration
• IPSecmon.exe monitor to show active state
• Network Connections UI IPSec property
• Event log snap-in
• Group Policy snap-in to show local security audit policy
• IKE logging in oakley.log
• Online Help
• Context Sensitive Help
• netdiag/test:ipsec /v /debug
s:\its\uss\pclan\documentation\ipsec.pdf 33
Internet Protocol Security (IPSec)
34
As part of the Windows 2000 Resource Kit
• IPSec chapter
• ipsecpol.exe — command line policy create, delete
• group policy tools to show which GPO policy is applied
• IPSec end-to-end walkthrough (this document)
• Deployment scenarios available online
This guide is intended to cover only local computer IPSec policy that uses IPSectransport (not tunneling) to secure traffic between a source computer and a destina-tion computer. It does not cover using Group Policy in the Active Directory to dis-tribute IPSec policy. IPSec policy configuration is very flexible and thus verypowerful, though proper settings require understanding of the IKE and IPSec proto-cols themselves. There are a number of security configuration issues that you willwant to be aware of. Please read the Online Help, and search the Microsoft Knowl-edge Base for IPSec-related articles. Then read the additional notes below to helpclarify what is not supported in policy configurations by design.
For information about default security settings in Windows 2000, see the whitepaper Default Access Control Settings.


![[MS-L2TPIE]: Layer 2 Tunneling Protocol (L2TP) IPsec ... · Layer 2 Tunneling Protocol (L2TP) IPsec Extensions ... available standard specifications and ... as well as non-standard](https://static.documents.pub/doc/80x56/5af2fe077f8b9a4d4d8b8480/ms-l2tpie-layer-2-tunneling-protocol-l2tp-ipsec-2-tunneling-protocol-l2tp.jpg)


![[MS-GPIPSEC]: Group Policy: IP Security (IPsec) Protocol ...€¦ · The Group Policy: IP Security (IPsec) Protocol Extension is layered on top of the Group Policy: Core Protocol](https://static.documents.pub/doc/80x56/5f89813f662c5059fe2ecdf3/ms-gpipsec-group-policy-ip-security-ipsec-protocol-the-group-policy-ip.jpg)

