429
Edition December 2006 interNet Services V3.2A Administrator Guide

Edition December 2006
interNet Services V3.2AAdministrator Guide

Comments… Suggestions… Corrections…The User Documentation Department would like to know your opinion on this manual. Your feedback helps us to optimize our documentation to suit your individual needs.
Fax forms for sending us your comments are included at the back of the manual.
There you will also find the addresses of the relevant User Documentation Department.
Certified documentation according to DIN EN ISO 9001:2000To ensure a consistently high quality standard anduser-friendliness, this documentation was created tomeet the regulations of a quality management system which complies with the requirements of the standardDIN EN ISO 9001:2000.
cognitas. Gesellschaft für Technik-Dokumentation mbHwww.cognitas.de
Copyright and TrademarksCopyright © Fujitsu Siemens Computers GmbH 2006.
All rights reserved.Delivery subject to availability; right of technical modifications reserved.
All hardware and software names used are trademarks of their respective manufacturers.
This product includes software developed by the OpenSSL Project for use in the OpenSSL Toolkit (http://www.openssl.org/).
This product includes cryptographic software written by Eric Young ([email protected]).

U41095-J-Z125-4-76
Contents
1 Preface . . . . . . . . . . . . . . . . . . . . . . . . . . . . . . . . . . . . . . . . . 13
1.1 Target group of the manual . . . . . . . . . . . . . . . . . . . . . . . . . . . . . . 13
1.2 Summary of contents . . . . . . . . . . . . . . . . . . . . . . . . . . . . . . . . . 14
1.3 Licensing regulations . . . . . . . . . . . . . . . . . . . . . . . . . . . . . . . . . 15
1.4 Overview of interNet Services . . . . . . . . . . . . . . . . . . . . . . . . . . . . . 19
1.5 Changes compared to the previous version . . . . . . . . . . . . . . . . . . . . . 20
1.6 Notational conventions . . . . . . . . . . . . . . . . . . . . . . . . . . . . . . . . 22SDF syntax representation . . . . . . . . . . . . . . . . . . . . . . . . . . . . . . . 23
1.7 README files . . . . . . . . . . . . . . . . . . . . . . . . . . . . . . . . . . . . . . 32
2 Installing/uninstalling the services without FTP, TELNET and Mail . . . . . . . . 33
2.1 Installation . . . . . . . . . . . . . . . . . . . . . . . . . . . . . . . . . . . . . . . 33
2.2 Uninstallation . . . . . . . . . . . . . . . . . . . . . . . . . . . . . . . . . . . . . . 35
2.3 Initial operation . . . . . . . . . . . . . . . . . . . . . . . . . . . . . . . . . . . . . 35
2.4 Shutting down . . . . . . . . . . . . . . . . . . . . . . . . . . . . . . . . . . . . . 36
3 Installing FTP and TELNET . . . . . . . . . . . . . . . . . . . . . . . . . . . . . . 37
3.1 Installing FTP and TELNET via SDF command . . . . . . . . . . . . . . . . . . . . 38
3.2 Installing FTP and TELNET via FHS masks . . . . . . . . . . . . . . . . . . . . . 463.2.1 Notational conventions . . . . . . . . . . . . . . . . . . . . . . . . . . . . . . . . . . 473.2.2 Calling the installation program . . . . . . . . . . . . . . . . . . . . . . . . . . . . . 47
3.3 Installing and uninstalling FTP and TELNET clients in POSIX . . . . . . . . . . . 59
3.4 Frequently asked questions (FAQ) . . . . . . . . . . . . . . . . . . . . . . . . . . 60

Contents
U41095-J-Z125-4-76
4 FTP configuration and operation . . . . . . . . . . . . . . . . . . . . . . . . . . . 65
4.1 TLS/SSL support on the FTP server . . . . . . . . . . . . . . . . . . . . . . . . . 664.1.1 Parameterization of TLS/SSL support on the FTP server . . . . . . . . . . . . . . . . 664.1.2 FTP login commands . . . . . . . . . . . . . . . . . . . . . . . . . . . . . . . . . . 68
4.2 Configuration of FTP using the SET-FTP-TELNET-PARAMETERS installation command . . . . . . . . . . . . . . . . . . . . . . . . . . . . . . . . . 69
4.3 Configuring FTP via the option file . . . . . . . . . . . . . . . . . . . . . . . . . . 81-appPrefix | -A . . . . . . . . . . . . . . . . . . . . . . . . . . . . . . . . . . . . . . 82-FTAClevel | -B . . . . . . . . . . . . . . . . . . . . . . . . . . . . . . . . . . . . . . 83-childName | -C . . . . . . . . . . . . . . . . . . . . . . . . . . . . . . . . . . . . . 84-debugLevel | -D . . . . . . . . . . . . . . . . . . . . . . . . . . . . . . . . . . . . . 84-serverInfoFile | -E . . . . . . . . . . . . . . . . . . . . . . . . . . . . . . . . . . . . 85-childEnterJob | -F . . . . . . . . . . . . . . . . . . . . . . . . . . . . . . . . . . . . 85-childJobClass | -J . . . . . . . . . . . . . . . . . . . . . . . . . . . . . . . . . . . . 86-FTACuserId | -K . . . . . . . . . . . . . . . . . . . . . . . . . . . . . . . . . . . . . 86-logonExtension | -L . . . . . . . . . . . . . . . . . . . . . . . . . . . . . . . . . . . 87-maxConn | -N . . . . . . . . . . . . . . . . . . . . . . . . . . . . . . . . . . . . . . 87-timeout | -O . . . . . . . . . . . . . . . . . . . . . . . . . . . . . . . . . . . . . . . 88-portNumber | -P . . . . . . . . . . . . . . . . . . . . . . . . . . . . . . . . . . . . . 88-DSSidLength | -S . . . . . . . . . . . . . . . . . . . . . . . . . . . . . . . . . . . . 89-socketTraceLevel | -T . . . . . . . . . . . . . . . . . . . . . . . . . . . . . . . . . . 89-convSelector | -U . . . . . . . . . . . . . . . . . . . . . . . . . . . . . . . . . . . . 90-verbose | -V . . . . . . . . . . . . . . . . . . . . . . . . . . . . . . . . . . . . . . . 90-systemExit | -X . . . . . . . . . . . . . . . . . . . . . . . . . . . . . . . . . . . . . 91-initialChildCmds | -Z . . . . . . . . . . . . . . . . . . . . . . . . . . . . . . . . . . 92-acctActive . . . . . . . . . . . . . . . . . . . . . . . . . . . . . . . . . . . . . . . . 93-acctFile . . . . . . . . . . . . . . . . . . . . . . . . . . . . . . . . . . . . . . . . . 93-allowTsosLogin . . . . . . . . . . . . . . . . . . . . . . . . . . . . . . . . . . . . . 94-defaultFTACsecurityLevel . . . . . . . . . . . . . . . . . . . . . . . . . . . . . . . . 95-disableSiteExecCommand . . . . . . . . . . . . . . . . . . . . . . . . . . . . . . . 96-disableSizeCommand . . . . . . . . . . . . . . . . . . . . . . . . . . . . . . . . . . 97-tlsProtocol . . . . . . . . . . . . . . . . . . . . . . . . . . . . . . . . . . . . . . . . 98-tlsCipherSuite . . . . . . . . . . . . . . . . . . . . . . . . . . . . . . . . . . . . . . 99-tlsRSAcertificateFile . . . . . . . . . . . . . . . . . . . . . . . . . . . . . . . . . 104-tlsRSAkeyFile . . . . . . . . . . . . . . . . . . . . . . . . . . . . . . . . . . . . . 105-tlsDSAcertificateFile . . . . . . . . . . . . . . . . . . . . . . . . . . . . . . . . . 106-tlsDSAkeyFile . . . . . . . . . . . . . . . . . . . . . . . . . . . . . . . . . . . . . 107-tlsCertificateChainFile . . . . . . . . . . . . . . . . . . . . . . . . . . . . . . . . 108-tlsCAcertificateFile . . . . . . . . . . . . . . . . . . . . . . . . . . . . . . . . . . 109-tlsAcceptableClientCAFile . . . . . . . . . . . . . . . . . . . . . . . . . . . . . . 110-tlsCArevocationFile . . . . . . . . . . . . . . . . . . . . . . . . . . . . . . . . . . 111

Contents
U41095-J-Z125-4-76
-tlsVerifyClient . . . . . . . . . . . . . . . . . . . . . . . . . . . . . . . . . . . . . 112-tlsVerifyDepth . . . . . . . . . . . . . . . . . . . . . . . . . . . . . . . . . . . . . 113-tlsSecureControlConnection . . . . . . . . . . . . . . . . . . . . . . . . . . . . . 114-tlsSecureDataConnection . . . . . . . . . . . . . . . . . . . . . . . . . . . . . . . 115-tlsRandFile . . . . . . . . . . . . . . . . . . . . . . . . . . . . . . . . . . . . . . 116-tlsUseCryptoHardware . . . . . . . . . . . . . . . . . . . . . . . . . . . . . . . . 117-tlsOpenSSLlibName . . . . . . . . . . . . . . . . . . . . . . . . . . . . . . . . . 118
4.4 Starting up and shutting down the FTP server . . . . . . . . . . . . . . . . . . . 1194.4.1 Starting up the FTP server . . . . . . . . . . . . . . . . . . . . . . . . . . . . . . 1194.4.2 Shutting down the FTP server . . . . . . . . . . . . . . . . . . . . . . . . . . . . . 1204.4.3 Setting up further FTP server tasks . . . . . . . . . . . . . . . . . . . . . . . . . . 1214.4.4 Shutdown . . . . . . . . . . . . . . . . . . . . . . . . . . . . . . . . . . . . . . . 1224.4.5 Notes and restrictions for starting up and shutting down servers . . . . . . . . . . . 1224.4.6 Messages and return codes . . . . . . . . . . . . . . . . . . . . . . . . . . . . . . 123
4.5 Notes on installing FTAC functionality . . . . . . . . . . . . . . . . . . . . . . . 124
4.6 Accounting in FTP . . . . . . . . . . . . . . . . . . . . . . . . . . . . . . . . . . 1254.6.1 Enabling/disabling accounting and defining the accounting file . . . . . . . . . . . . 1254.6.2 Structure of the accounting records . . . . . . . . . . . . . . . . . . . . . . . . . . 125
4.7 Logging file of the FTP server . . . . . . . . . . . . . . . . . . . . . . . . . . . . 129
4.8 Displaying the current settings of the FTP server . . . . . . . . . . . . . . . . . 129
4.9 Console interface . . . . . . . . . . . . . . . . . . . . . . . . . . . . . . . . . . . 132debug - Enable / disable trace to user level . . . . . . . . . . . . . . . . . . . . . . 132trace - Enable / disable trace to TCP/IP interface . . . . . . . . . . . . . . . . . . . 133shutdown - Shut down service . . . . . . . . . . . . . . . . . . . . . . . . . . . . . 133acctActive - Enable / disable FTP accounting . . . . . . . . . . . . . . . . . . . . . 134acctFile - Change accounting file for FTP accounting . . . . . . . . . . . . . . . . . 134RDPROT - Save logging file of FTP servers . . . . . . . . . . . . . . . . . . . . . . 135
4.10 IPv6 addresses in FTP . . . . . . . . . . . . . . . . . . . . . . . . . . . . . . . . 1364.10.1 Control connection setup . . . . . . . . . . . . . . . . . . . . . . . . . . . . . . . 1364.10.2 Data connection setup . . . . . . . . . . . . . . . . . . . . . . . . . . . . . . . . . 1364.10.3 Proxy mechanism . . . . . . . . . . . . . . . . . . . . . . . . . . . . . . . . . . . 1384.10.4 Notes on using heterogeneous networks . . . . . . . . . . . . . . . . . . . . . . . 138
4.11 SNMP subagent for FTP . . . . . . . . . . . . . . . . . . . . . . . . . . . . . . . 139
4.12 FTP exit . . . . . . . . . . . . . . . . . . . . . . . . . . . . . . . . . . . . . . . . 1404.12.1 FTP system exit . . . . . . . . . . . . . . . . . . . . . . . . . . . . . . . . . . . . 1404.12.1.1 FTP system exit events . . . . . . . . . . . . . . . . . . . . . . . . . . . . . . 141

Contents
U41095-J-Z125-4-76
4.12.2 Exit mechanisms for the FTP server and FTP client . . . . . . . . . . . . . . . . . . 1494.12.2.1 Dummy routines . . . . . . . . . . . . . . . . . . . . . . . . . . . . . . . . . . 1494.12.2.2 User-defined exit routines . . . . . . . . . . . . . . . . . . . . . . . . . . . . . 1504.12.2.3 Enabling / disabling user-defined exit routines . . . . . . . . . . . . . . . . . . 153
5 TELNET configuration and operation . . . . . . . . . . . . . . . . . . . . . . . . 155
5.1 TLS/SSL support on the TELNET server . . . . . . . . . . . . . . . . . . . . . . 156
5.2 Configuring TELNET using the SET-FTP-TELNET-PARAMETERS installation command . . . . . . . . . . . . . . . . . . . . . . . . . . . . . . . . 158
5.3 Configuring TELNET using an option file . . . . . . . . . . . . . . . . . . . . . 1685.3.1 Options for general configuration of the TELNET server . . . . . . . . . . . . . . . 170
-A - Specify a name prefix . . . . . . . . . . . . . . . . . . . . . . . . . . . . . . . 170-D - Debug level . . . . . . . . . . . . . . . . . . . . . . . . . . . . . . . . . . . . 170-E - Specify exit routines . . . . . . . . . . . . . . . . . . . . . . . . . . . . . . . . 171-N - Specify the number of connections . . . . . . . . . . . . . . . . . . . . . . . . 171-P - Specify port number . . . . . . . . . . . . . . . . . . . . . . . . . . . . . . . . 172-S - Define terminal name . . . . . . . . . . . . . . . . . . . . . . . . . . . . . . . 172-T - Specify socket trace level . . . . . . . . . . . . . . . . . . . . . . . . . . . . . 173-V - Enable/disable verbose . . . . . . . . . . . . . . . . . . . . . . . . . . . . . . 173-X - Select code tables . . . . . . . . . . . . . . . . . . . . . . . . . . . . . . . . . 174
5.3.2 Options for safe use of TELNET with the aid of authentication and encryption . . . . 1755.3.3 -Z option - Support of the START-TLS option . . . . . . . . . . . . . . . . . . . . . 176
-Z tls-required . . . . . . . . . . . . . . . . . . . . . . . . . . . . . . . . . . . . . 177-Z RSACertificateFile . . . . . . . . . . . . . . . . . . . . . . . . . . . . . . . . . 178-Z RSAKeyFile . . . . . . . . . . . . . . . . . . . . . . . . . . . . . . . . . . . . . 179-Z DSACertificateFile . . . . . . . . . . . . . . . . . . . . . . . . . . . . . . . . . 180-Z DSAKeyFile . . . . . . . . . . . . . . . . . . . . . . . . . . . . . . . . . . . . . 181-Z CACertificateFile . . . . . . . . . . . . . . . . . . . . . . . . . . . . . . . . . . 182-Z CARevocationFile . . . . . . . . . . . . . . . . . . . . . . . . . . . . . . . . . . 183-Z CipherSuite . . . . . . . . . . . . . . . . . . . . . . . . . . . . . . . . . . . . . 184-Z RandFile . . . . . . . . . . . . . . . . . . . . . . . . . . . . . . . . . . . . . . 189-Z CertificateChainFile . . . . . . . . . . . . . . . . . . . . . . . . . . . . . . . . . 190-Z Protocol . . . . . . . . . . . . . . . . . . . . . . . . . . . . . . . . . . . . . . . 191-Z AcceptableClientCAFile . . . . . . . . . . . . . . . . . . . . . . . . . . . . . . . 192-Z VerifyDepth . . . . . . . . . . . . . . . . . . . . . . . . . . . . . . . . . . . . . 193-Z VerifyClient . . . . . . . . . . . . . . . . . . . . . . . . . . . . . . . . . . . . . 194-Z OpenSSLlibName . . . . . . . . . . . . . . . . . . . . . . . . . . . . . . . . . . 195-Z UseCryptoHardware . . . . . . . . . . . . . . . . . . . . . . . . . . . . . . . . 196
5.3.4 -B option - Enable/disable the AUTHENTICATION option . . . . . . . . . . . . . . . 1975.3.5 Option -H - Enable/disable the ENCRYPTION option . . . . . . . . . . . . . . . . . 198

Contents
U41095-J-Z125-4-76
5.4 Starting up and shutting down the TELNET server . . . . . . . . . . . . . . . . 1995.4.1 Starting up the TELNET server . . . . . . . . . . . . . . . . . . . . . . . . . . . . 1995.4.2 Shutting down the TELNET server . . . . . . . . . . . . . . . . . . . . . . . . . . 1995.4.3 Shutdown . . . . . . . . . . . . . . . . . . . . . . . . . . . . . . . . . . . . . . . 2005.4.4 Notes and restrictions for starting up and shutting down servers . . . . . . . . . . . 2005.4.5 Messages and return codes . . . . . . . . . . . . . . . . . . . . . . . . . . . . . . 201
5.5 Logging file of TELNET servers . . . . . . . . . . . . . . . . . . . . . . . . . . . 202
5.6 Displaying the current settings of TELNET servers . . . . . . . . . . . . . . . . 202
5.7 Console interface . . . . . . . . . . . . . . . . . . . . . . . . . . . . . . . . . . . 205debug - Enable / disable trace to user level . . . . . . . . . . . . . . . . . . . . . . 205trace - Enable / disable trace to TCP/IP interface . . . . . . . . . . . . . . . . . . . 206shutdown - Shut down service . . . . . . . . . . . . . . . . . . . . . . . . . . . . . 206RDPROT - Save logging file of TELNET servers . . . . . . . . . . . . . . . . . . . 207
5.8 IPv6 addresses in TELNET . . . . . . . . . . . . . . . . . . . . . . . . . . . . . 207
5.9 TELNET exits . . . . . . . . . . . . . . . . . . . . . . . . . . . . . . . . . . . . . 2085.9.1 DUMMY module . . . . . . . . . . . . . . . . . . . . . . . . . . . . . . . . . . . . 2085.9.2 Exit routines . . . . . . . . . . . . . . . . . . . . . . . . . . . . . . . . . . . . . . 2095.9.3 User-defined exits . . . . . . . . . . . . . . . . . . . . . . . . . . . . . . . . . . . 212
6 Generating random numbers . . . . . . . . . . . . . . . . . . . . . . . . . . . . 215
6.1 Generating random numbers in BS2000/OSD with PRNGD . . . . . . . . . . . . 2166.1.1 Entropy sources of the BS2000/OSD PRNGD . . . . . . . . . . . . . . . . . . . . 2166.1.2 Configuration of the BS2000/OSD PRNGD . . . . . . . . . . . . . . . . . . . . . . 217
poolSize . . . . . . . . . . . . . . . . . . . . . . . . . . . . . . . . . . . . . . . . 218minimalEntropy . . . . . . . . . . . . . . . . . . . . . . . . . . . . . . . . . . . . 218entropyThreshold . . . . . . . . . . . . . . . . . . . . . . . . . . . . . . . . . . . 219seedFile . . . . . . . . . . . . . . . . . . . . . . . . . . . . . . . . . . . . . . . . 219file . . . . . . . . . . . . . . . . . . . . . . . . . . . . . . . . . . . . . . . . . . . 220fileInterval . . . . . . . . . . . . . . . . . . . . . . . . . . . . . . . . . . . . . . . 220cmd . . . . . . . . . . . . . . . . . . . . . . . . . . . . . . . . . . . . . . . . . . 221cmdInterval . . . . . . . . . . . . . . . . . . . . . . . . . . . . . . . . . . . . . . 222bcamInterval . . . . . . . . . . . . . . . . . . . . . . . . . . . . . . . . . . . . . . 222
6.1.3 GPRBYTE program interface of the BS2000/OSD PRNGD . . . . . . . . . . . . . . 2236.1.4 Messages . . . . . . . . . . . . . . . . . . . . . . . . . . . . . . . . . . . . . . . 227
6.2 Random number generation in POSIX with the prngd server daemon . . . . . . 229

Contents
U41095-J-Z125-4-76
7 DNS . . . . . . . . . . . . . . . . . . . . . . . . . . . . . . . . . . . . . . . . . . 231
7.1 Concept of the DNS . . . . . . . . . . . . . . . . . . . . . . . . . . . . . . . . . 2337.1.1 Development of the DNS . . . . . . . . . . . . . . . . . . . . . . . . . . . . . . . 2337.1.2 DNS name space . . . . . . . . . . . . . . . . . . . . . . . . . . . . . . . . . . . 2347.1.3 Storing information in the DNS . . . . . . . . . . . . . . . . . . . . . . . . . . . . 2377.1.4 Format of a DNS message . . . . . . . . . . . . . . . . . . . . . . . . . . . . . . 2387.1.5 DNS resolver (overview) . . . . . . . . . . . . . . . . . . . . . . . . . . . . . . . . 2397.1.6 DNS name server NAMED (overview) . . . . . . . . . . . . . . . . . . . . . . . . . 2427.1.7 DNS security concepts . . . . . . . . . . . . . . . . . . . . . . . . . . . . . . . . 2447.1.8 Interaction of the security mechanisms of BCAM and DNS . . . . . . . . . . . . . . 245
7.2 DNS resolver . . . . . . . . . . . . . . . . . . . . . . . . . . . . . . . . . . . . . 2467.2.1 Installing and uninstalling the DNS resolver . . . . . . . . . . . . . . . . . . . . . . 2467.2.2 Configuring the DNS resolver . . . . . . . . . . . . . . . . . . . . . . . . . . . . . 249
nameserver entry . . . . . . . . . . . . . . . . . . . . . . . . . . . . . . . . . . . . 250domain entry . . . . . . . . . . . . . . . . . . . . . . . . . . . . . . . . . . . . . . 251search entry . . . . . . . . . . . . . . . . . . . . . . . . . . . . . . . . . . . . . . 253options entry . . . . . . . . . . . . . . . . . . . . . . . . . . . . . . . . . . . . . . 255
7.2.3 DNS resolver - administration and operation . . . . . . . . . . . . . . . . . . . . . 2577.2.3.1 Startup and shutdown of the DNS resolver . . . . . . . . . . . . . . . . . . . . 2577.2.3.2 Modifying the DNS resolver configuration file . . . . . . . . . . . . . . . . . . . 2587.2.4 DNS resolver - diagnosis and maintenance . . . . . . . . . . . . . . . . . . . . . . 2597.2.4.1 DNS resolver - logging . . . . . . . . . . . . . . . . . . . . . . . . . . . . . . . 2597.2.4.2 DNS resolver - diagnostic options . . . . . . . . . . . . . . . . . . . . . . . . . 259
7.3 DNS name server NAMED . . . . . . . . . . . . . . . . . . . . . . . . . . . . . . 2607.3.1 Installing and uninstalling NAMED . . . . . . . . . . . . . . . . . . . . . . . . . . . 2607.3.2 Configuring NAMED . . . . . . . . . . . . . . . . . . . . . . . . . . . . . . . . . . 2647.3.2.1 NAMED configuration file named.conf . . . . . . . . . . . . . . . . . . . . . . . 2647.3.2.2 NAMED zone data files . . . . . . . . . . . . . . . . . . . . . . . . . . . . . . 2657.3.2.3 NAMED and security . . . . . . . . . . . . . . . . . . . . . . . . . . . . . . . 2687.3.2.4 NAMED process models . . . . . . . . . . . . . . . . . . . . . . . . . . . . . 2707.3.3 NAMED - administration and operation . . . . . . . . . . . . . . . . . . . . . . . . 2737.3.3.1 Starting up and shutting down NAMED . . . . . . . . . . . . . . . . . . . . . . 2737.3.3.2 Modifying the zone data files of NAMED . . . . . . . . . . . . . . . . . . . . . 2747.3.4 NAMED - diagnosis and maintenance . . . . . . . . . . . . . . . . . . . . . . . . . 2767.3.4.1 NAMED - logging . . . . . . . . . . . . . . . . . . . . . . . . . . . . . . . . . 2767.3.4.2 NAMED - diagnostic options . . . . . . . . . . . . . . . . . . . . . . . . . . . . 277
7.4 DNS tools . . . . . . . . . . . . . . . . . . . . . . . . . . . . . . . . . . . . . . . 2787.4.1 Diagnostic tool dig - examples . . . . . . . . . . . . . . . . . . . . . . . . . . . . . 279

Contents
U41095-J-Z125-4-76
8 NTP . . . . . . . . . . . . . . . . . . . . . . . . . . . . . . . . . . . . . . . . . . 283
8.1 NTP concept . . . . . . . . . . . . . . . . . . . . . . . . . . . . . . . . . . . . . 2838.1.1 NTP functionality . . . . . . . . . . . . . . . . . . . . . . . . . . . . . . . . . . . . 2838.1.2 Implementing NTP in BS2000/OSD . . . . . . . . . . . . . . . . . . . . . . . . . . 286
8.2 Installing and uninstalling NTP . . . . . . . . . . . . . . . . . . . . . . . . . . . 2888.2.1 Installation . . . . . . . . . . . . . . . . . . . . . . . . . . . . . . . . . . . . . . . 2888.2.2 Uninstallation . . . . . . . . . . . . . . . . . . . . . . . . . . . . . . . . . . . . . 289
8.3 Startup and shutdown of NTP . . . . . . . . . . . . . . . . . . . . . . . . . . . . 2908.3.1 Starting and shutting down NTP . . . . . . . . . . . . . . . . . . . . . . . . . . . . 2908.3.2 NTP time synchronization . . . . . . . . . . . . . . . . . . . . . . . . . . . . . . . 2918.3.3 Creating the NTP daemon xntpd configuration file . . . . . . . . . . . . . . . . . . . 2928.3.4 Startup options of the NTP daemon xntpd . . . . . . . . . . . . . . . . . . . . . . . 2998.3.5 Setting the date and time via NTP with the ntpdate program . . . . . . . . . . . . . . 301
8.4 Administration and operation . . . . . . . . . . . . . . . . . . . . . . . . . . . . 3038.4.1 Querying the NTP status via command-line options . . . . . . . . . . . . . . . . . . 3038.4.2 Querying the NTP status interactively with commands . . . . . . . . . . . . . . . . 3048.4.2.1 Querying the NTP status with internal commands of ntpq . . . . . . . . . . . . . 3058.4.2.2 Querying the NTP status with commands for control messages . . . . . . . . . 308
8.5 Diagnosis and maintenance of NTP . . . . . . . . . . . . . . . . . . . . . . . . . 3118.5.1 Logging function . . . . . . . . . . . . . . . . . . . . . . . . . . . . . . . . . . . . 3118.5.2 Trace functionality of NTP . . . . . . . . . . . . . . . . . . . . . . . . . . . . . . . 3148.5.2.1 ntptrace - Trace a chain of NTP servers back to the prevailing clock . . . . . . . 314
9 OpenSSH . . . . . . . . . . . . . . . . . . . . . . . . . . . . . . . . . . . . . . . 317
9.1 Concept of OpenSSH . . . . . . . . . . . . . . . . . . . . . . . . . . . . . . . . 3189.1.1 Component parts of the OpenSSH protocol suite . . . . . . . . . . . . . . . . . . . 3189.1.2 Network security with OpenSSH . . . . . . . . . . . . . . . . . . . . . . . . . . . . 3199.1.3 Features of OpenSSH . . . . . . . . . . . . . . . . . . . . . . . . . . . . . . . . . 320
9.2 Installing and uninstalling OpenSSH . . . . . . . . . . . . . . . . . . . . . . . . 3229.2.1 Installing OpenSSH . . . . . . . . . . . . . . . . . . . . . . . . . . . . . . . . . . 3229.2.2 Uninstalling OpenSSH . . . . . . . . . . . . . . . . . . . . . . . . . . . . . . . . . 325

Contents
U41095-J-Z125-4-76
9.3 OpenSSH server daemon sshd . . . . . . . . . . . . . . . . . . . . . . . . . . . 3269.3.1 Configuring the OpenSSH server daemon sshd . . . . . . . . . . . . . . . . . . . . 3269.3.2 Starting sshd . . . . . . . . . . . . . . . . . . . . . . . . . . . . . . . . . . . . . . 3279.3.3 Internal procedure when setting up a connection between
sshd and ssh . . . . . . . . . . . . . . . . . . . . . . . . . . . . . . . . . . . . . . 3279.3.4 Authentication between OpenSSH client ssh and server sshd . . . . . . . . . . . . 3309.3.5 Login process . . . . . . . . . . . . . . . . . . . . . . . . . . . . . . . . . . . . . 3339.3.6 Files of the OpenSSH server daemon sshd . . . . . . . . . . . . . . . . . . . . . . 334
9.4 BS2000/OSD-specific restrictions . . . . . . . . . . . . . . . . . . . . . . . . . . 337
10 Mail servers in POSIX . . . . . . . . . . . . . . . . . . . . . . . . . . . . . . . . 339
10.1 Overview . . . . . . . . . . . . . . . . . . . . . . . . . . . . . . . . . . . . . . . 341
10.2 Functionality . . . . . . . . . . . . . . . . . . . . . . . . . . . . . . . . . . . . . 342
10.3 Installing and uninstalling the mail servers . . . . . . . . . . . . . . . . . . . . 34410.3.1 Installing and uninstalling the Postfix server (SMTP server) . . . . . . . . . . . . . . 34410.3.2 Installing and uninstalling the IMAP and POP3 servers . . . . . . . . . . . . . . . . 349
10.4 Starting up Mail servers . . . . . . . . . . . . . . . . . . . . . . . . . . . . . . . 35310.4.1 Starting up the Postfix server (SMTP server) . . . . . . . . . . . . . . . . . . . . . 35310.4.2 Starting up IMAP and POP3 servers . . . . . . . . . . . . . . . . . . . . . . . . . 35410.4.3 TLS/SSL protection of IMAP/POP3 and SMTP connections . . . . . . . . . . . . . 355
10.5 Operating the Postfix server . . . . . . . . . . . . . . . . . . . . . . . . . . . . . 35810.5.1 Postfix lookup tables (index files) . . . . . . . . . . . . . . . . . . . . . . . . . . . 35810.5.2 Programs for operating the Postfix mail server . . . . . . . . . . . . . . . . . . . . 362
postfix - Starting and stopping the Postfix server . . . . . . . . . . . . . . . . . . . 362postconf - Displaying and modifying Postfix configuration parameters . . . . . . . . . 363postqueue (mailq) - Processing mail queues (as a normal user) . . . . . . . . . . . . 364postsuper - Processing mail queues (with SYSROOT authorization) . . . . . . . . . . 365postcat - Displaying the contents of messages in the mail queues . . . . . . . . . . . 366postmap - Generating and processing index files (Postfix format) . . . . . . . . . . . 367postalias - Generating and processing index files (alias format) . . . . . . . . . . . . 369newaliases - Generating index files (alias format) . . . . . . . . . . . . . . . . . . . 370
10.6 Migration from Sendmail to Postfix . . . . . . . . . . . . . . . . . . . . . . . . . 371

Contents
U41095-J-Z125-4-76
11 Mail senders in BS2000/OSD . . . . . . . . . . . . . . . . . . . . . . . . . . . . 373
11.1 Installing and uninstalling mail senders . . . . . . . . . . . . . . . . . . . . . . 373
11.2 Option files . . . . . . . . . . . . . . . . . . . . . . . . . . . . . . . . . . . . . . 37311.2.1 SYSSSI . . . . . . . . . . . . . . . . . . . . . . . . . . . . . . . . . . . . . . . . 373
defaultOptionFileName . . . . . . . . . . . . . . . . . . . . . . . . . . . . . . . . 374backendConfigurationFileName . . . . . . . . . . . . . . . . . . . . . . . . . . . . 375
11.2.2 Configuration file for the mail sender backend . . . . . . . . . . . . . . . . . . . . . 376logFile . . . . . . . . . . . . . . . . . . . . . . . . . . . . . . . . . . . . . . . . . 376logLevel . . . . . . . . . . . . . . . . . . . . . . . . . . . . . . . . . . . . . . . . 377logMailContent . . . . . . . . . . . . . . . . . . . . . . . . . . . . . . . . . . . . . 378mailServer . . . . . . . . . . . . . . . . . . . . . . . . . . . . . . . . . . . . . . . 379mailServerPort . . . . . . . . . . . . . . . . . . . . . . . . . . . . . . . . . . . . . 379mailLogLevel . . . . . . . . . . . . . . . . . . . . . . . . . . . . . . . . . . . . . . 380mailLogFile . . . . . . . . . . . . . . . . . . . . . . . . . . . . . . . . . . . . . . 381tempFilePrefix . . . . . . . . . . . . . . . . . . . . . . . . . . . . . . . . . . . . . 381tlsSecureConnection . . . . . . . . . . . . . . . . . . . . . . . . . . . . . . . . . . 382tlsProtocol . . . . . . . . . . . . . . . . . . . . . . . . . . . . . . . . . . . . . . . 383tlsCipherSuite . . . . . . . . . . . . . . . . . . . . . . . . . . . . . . . . . . . . . 384tlsCertificateFile . . . . . . . . . . . . . . . . . . . . . . . . . . . . . . . . . . . . 389tlsKeyFile . . . . . . . . . . . . . . . . . . . . . . . . . . . . . . . . . . . . . . . 389tlsCACertificateFile . . . . . . . . . . . . . . . . . . . . . . . . . . . . . . . . . . 390tlsCARevocationFile . . . . . . . . . . . . . . . . . . . . . . . . . . . . . . . . . . 391tlsVerifyServer . . . . . . . . . . . . . . . . . . . . . . . . . . . . . . . . . . . . . 391tlsVerifyDepth . . . . . . . . . . . . . . . . . . . . . . . . . . . . . . . . . . . . . 392tlsUseCryptoHardware . . . . . . . . . . . . . . . . . . . . . . . . . . . . . . . . . 392
11.3 Mail service commands . . . . . . . . . . . . . . . . . . . . . . . . . . . . . . . 393START-MAIL-SERVICE . . . . . . . . . . . . . . . . . . . . . . . . . . . . . . . . 393MODIFY-MAIL-SERVICE-PARAMETER . . . . . . . . . . . . . . . . . . . . . . . . 395SHOW-MAIL-SERVICE-PARAMETER . . . . . . . . . . . . . . . . . . . . . . . . 398STOP-MAIL-SERVICE . . . . . . . . . . . . . . . . . . . . . . . . . . . . . . . . . 400
11.4 Messages . . . . . . . . . . . . . . . . . . . . . . . . . . . . . . . . . . . . . . . 401
Related publications . . . . . . . . . . . . . . . . . . . . . . . . . . . . . . . . . 407
Index . . . . . . . . . . . . . . . . . . . . . . . . . . . . . . . . . . . . . . . . . 411

Contents
U41095-J-Z125-4-76
U41095-J-Z125-4-76 13
1 PrefaceThe interNet Services product supplements the TCP/IP functionality of openNet Server with the following standards:
– DNS Resolver and Server– NTP Client and Server– FTP Client and Server– TELNET Client and Server– OpenSSH– Mail Sender in BS2000/OSD– Mail Reader in BS2000/OSD– Mail Server in POSIX
1.1 Target group of the manual
This Administrator Guide is intended for BS2000/OSD system administrators who want to install and operate interNet Services on BS2000/OSD. Knowledge of the BS2000/OSD operating system and the basic concepts of TCP/IP is therefore assumed. Apart from this administrator’s manual, there is also a User Guide for interNet Services, which should be available to system administrators in addition to this manual.

14 U41095-J-Z125-4-76
Summary of contents Preface
1.2 Summary of contents
This manual is arranged as follows:
● Chapter 2: Installing Internet Services without FTP and TELNET
This chapter describes the installation of the PRNGD, DNS, NAMED and NTP services as POSIX program packages using the POSIX installation routine.
● Chapter 3: Installing FTP and TELNET
This chapter describes the installation of the FTP and TELNET services via SDF command and FHS masks.
● Chapter 4: Configuration and operation of FTP
This chapter describes the TLS/SSL support in the FTP server and configuration using an option file. It also describes the startup, termination, operation and server exits of the FTP server.
● Chapter 5: Configuration and operation of TELNET
This chapter describes the TLS/SSL support in the TELNET server and configuration using an installation command or an option file. It also describes the startup, termi-nation, operation and server exits of the TELNET server.
● Chapter 6: Generating random numbers
This chapter describes how random numbers are generated in BS2000/OSD and POSIX.
● Chapters 7 - 11
These chapters present the individual components of the interNet Services in detail. The main topics discussed here are the functionality of the components, configuration, operational notes and diagnostic options.

U41095-J-Z125-4-76 15
Preface Licensing regulations
1.3 Licensing regulations
The licensing regulations for the OpenSSL package and the TLS-FTP patch of Peter ’Luna’ Runestig are printed below.
LICENSE ISSUES==============
The OpenSSL toolkit stays under a dual license, i.e. both the conditions ofthe OpenSSL License and the original SSLeay license apply to the toolkit.See below for the actual license texts. Actually both licenses are BSDstyleOpen Source licenses. In case of any license issues related to OpenSSLplease contact [email protected].
OpenSSL License---------------
/* ==================================================================== * Copyright (c) 1998-2003 The OpenSSL Project. All rights reserved. * * Redistribution and use in source and binary forms, with or without* modification, are permitted provided that the following conditions
* are met: * * 1. Redistributions of source code must retain the above copyright * notice, this list of conditions and the following disclaimer. * * 2. Redistributions in binary form must reproduce the above copyright * notice, this list of conditions and the following disclaimer in * the documentation and/or other materials provided with the * distribution. * * 3. All advertising materials mentioning features or use of this * software must display the following acknowledgment: * "This product includes software developed by the OpenSSL Project * for use in the OpenSSL Toolkit. (http://www.openssl.org/)" * * 4. The names "OpenSSL Toolkit" and "OpenSSL Project" must not be used to * endorse or promote products derived from this software without * prior written permission. For written permission, please contact * [email protected]. * * 5. Products derived from this software may not be called "OpenSSL" * nor may "OpenSSL" appear in their names without prior written * permission of the OpenSSL Project. * * 6. Redistributions of any form whatsoever must retain the following * acknowledgment: * "This product includes software developed by the OpenSSL Project * for use in the OpenSSL Toolkit (http://www.openssl.org/)"
16 U41095-J-Z125-4-76
Licensing regulations Preface
* THIS SOFTWARE IS PROVIDED BY THE OpenSSL PROJECT ``AS IS'' AND ANY * EXPRESSED OR IMPLIED WARRANTIES, INCLUDING, BUT NOT LIMITED TO, THE * IMPLIED WARRANTIES OF MERCHANTABILITY AND FITNESS FOR A PARTICULAR * PURPOSE ARE DISCLAIMED. IN NO EVENT SHALL THE OpenSSL PROJECT OR * ITS CONTRIBUTORS BE LIABLE FOR ANY DIRECT, INDIRECT, INCIDENTAL, * SPECIAL, EXEMPLARY, OR CONSEQUENTIAL DAMAGES (INCLUDING, BUT * NOT LIMITED TO, PROCUREMENT OF SUBSTITUTE GOODS OR SERVICES; * LOSS OF USE, DATA, OR PROFITS; OR BUSINESS INTERRUPTION) * HOWEVER CAUSED AND ON ANY THEORY OF LIABILITY, WHETHER IN CONTRACT, * STRICT LIABILITY, OR TORT (INCLUDING NEGLIGENCE OR OTHERWISE) * ARISING IN ANY WAY OUT OF THE USE OF THIS SOFTWARE, EVEN IF ADVISED * OF THE POSSIBILITY OF SUCH DAMAGE. * ==================================================================== * * This product includes cryptographic software written by Eric Young * ([email protected]). This product includes software written by Tim * Hudson ([email protected]). * */
Original SSLeay License -----------------------
/* Copyright (C) 1995-1998 Eric Young ([email protected]) * All rights reserved. * * This package is an SSL implementation written * by Eric Young ([email protected]). * The implementation was written so as to conform with Netscapes SSL. * * This library is free for commercial and non-commercial use as long as * the following conditions are aheared to. The following conditions * apply to all code found in this distribution, be it the RC4, RSA, * lhash, DES, etc., code; not just the SSL code. The SSL documentation * included with this distribution is covered by the same copyright terms * except that the holder is Tim Hudson ([email protected]). * * Copyright remains Eric Young's, and as such any Copyright notices in * the code are not to be removed. * If this package is used in a product, Eric Young should be given attribution * as the author of the parts of the library used.

U41095-J-Z125-4-76 17
Preface Licensing regulations
* This can be in the form of a textual message at program startup or * in documentation (online or textual) provided with the package.* Redistribution and use in source and binary forms, with or without
* modification, are permitted provided that the following conditions * are met: * 1. Redistributions of source code must retain the copyright * notice, this list of conditions and the following disclaimer. * 2. Redistributions in binary form must reproduce the above copyright * notice, this list of conditions and the following disclaimer in the * documentation and/or other materials provided with the distribution. * 3. All advertising materials mentioning features or use of this software * must display the following acknowledgement: * "This product includes cryptographic software written by * Eric Young ([email protected])" * The word 'cryptographic' can be left out if the rouines from the library * being used are not cryptographic related :-). * 4. If you include any Windows specific code (or a derivative thereof) from * the apps directory (application code) you must include an acknowledgement: * "This product includes software written by Tim Hudson ([email protected])" * * THIS SOFTWARE IS PROVIDED BY ERIC YOUNG ``AS IS'' AND * ANY EXPRESS OR IMPLIED WARRANTIES, INCLUDING, BUT NOT LIMITED TO, THE * IMPLIED WARRANTIES OF MERCHANTABILITY AND FITNESS FOR A PARTICULAR PURPOSE * ARE DISCLAIMED. IN NO EVENT SHALL THE AUTHOR OR CONTRIBUTORS BE LIABLE * FOR ANY DIRECT, INDIRECT, INCIDENTAL, SPECIAL, EXEMPLARY, OR CONSEQUENTIAL * DAMAGES (INCLUDING, BUT NOT LIMITED TO, PROCUREMENT OF SUBSTITUTE GOODS * OR SERVICES; LOSS OF USE, DATA, OR PROFITS; OR BUSINESS INTERRUPTION) * HOWEVER CAUSED AND ON ANY THEORY OF LIABILITY, WHETHER IN CONTRACT, STRICT * LIABILITY, OR TORT (INCLUDING NEGLIGENCE OR OTHERWISE) ARISING IN ANY WAY * OUT OF THE USE OF THIS SOFTWARE, EVEN IF ADVISED OF THE POSSIBILITY OF * SUCH DAMAGE. * * The licence and distribution terms for any publically available version or * derivative of this code cannot be changed. i.e. this code cannot simply be * copied and put under another distribution licence * [including the GNU Public Licence.] */

18 U41095-J-Z125-4-76
Licensing regulations Preface
/* * Copyright (c) 1999 - 2002 Peter 'Luna' Runestig <[email protected]> * All rights reserved. * * Redistribution and use in source and binary forms, with or without modifi- * cation, are permitted provided that the following conditions are met: * * o Redistributions of source code must retain the above copyright notice, * this list of conditions and the following disclaimer. * * o Redistributions in binary form must reproduce the above copyright no- * tice, this list of conditions and the following disclaimer in the do- * cumentation and/or other materials provided with the distribution. * * o The names of the contributors may not be used to endorse or promote * products derived from this software without specific prior written * permission. * * THIS SOFTWARE IS PROVIDED BY THE COPYRIGHT HOLDERS AND CONTRIBUTORS * ``AS IS'' AND ANY EXPRESS OR IMPLIED WARRANTIES, INCLUDING, BUT NOT LIMITED * TO, THE IMPLIED WARRANTIES OF MERCHANTABILITY AND FITNESS FOR A PARTICULAR * PURPOSE ARE DISCLAIMED. IN NO EVENT SHALL THE REGENTS OR CONTRIBUTORS BE LI- * ABLE FOR ANY DIRECT, INDIRECT, INCIDENTAL, SPECIAL, EXEMPLARY, OR CONSEQUEN- * TIAL DAMAGES (INCLUDING, BUT NOT LIMITED TO, PROCUREMENT OF SUBSTITUTE GOODS * OR SERVICES; LOSS OF USE, DATA, OR PROFITS; OR BUSINESS INTERRUPTION) HOWEV- * ER CAUSED AND ON ANY THEORY OF LIABILITY, WHETHER IN CONTRACT, STRICT LIABI- * LITY, OR TORT (INCLUDING NEGLIGENCE OR OTHERWISE) ARISING IN ANY WAY OUT OF * THE USE OF THIS SOFTWARE, EVEN IF ADVISED OF THE POSSIBILITY OF SUCH DAMAGE.
*/
U41095-J-Z125-4-76 19
Preface Overview of interNet Services
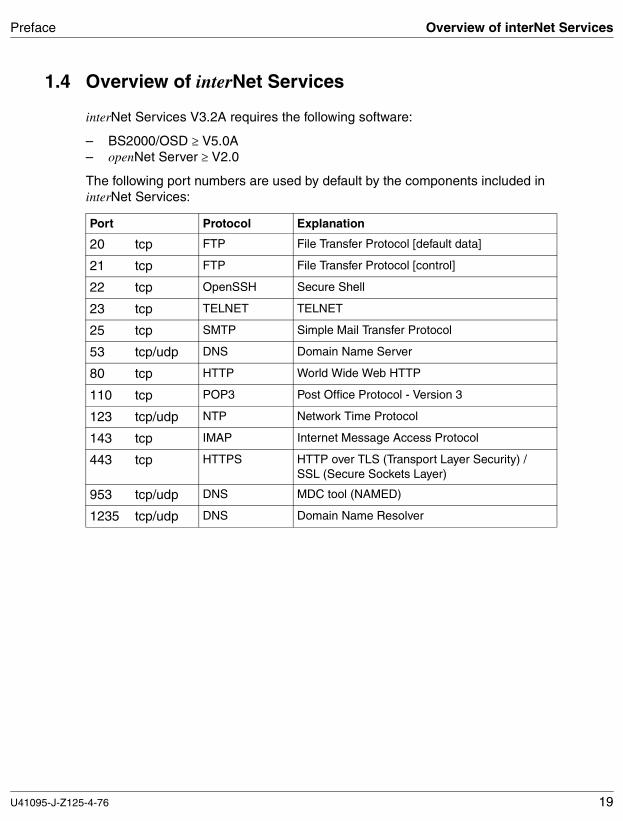
1.4 Overview of interNet Services
interNet Services V3.2A requires the following software:
– BS2000/OSD ≥ V5.0A– openNet Server ≥ V2.0
The following port numbers are used by default by the components included in interNet Services:
Port Protocol Explanation
20 tcp FTP File Transfer Protocol [default data]
21 tcp FTP File Transfer Protocol [control]
22 tcp OpenSSH Secure Shell
23 tcp TELNET TELNET
25 tcp SMTP Simple Mail Transfer Protocol
53 tcp/udp DNS Domain Name Server
80 tcp HTTP World Wide Web HTTP
110 tcp POP3 Post Office Protocol - Version 3
123 tcp/udp NTP Network Time Protocol
143 tcp IMAP Internet Message Access Protocol
443 tcp HTTPS HTTP over TLS (Transport Layer Security) / SSL (Secure Sockets Layer)
953 tcp/udp DNS MDC tool (NAMED)
1235 tcp/udp DNS Domain Name Resolver

20 U41095-J-Z125-4-76
Changes compared to the previous version Preface
1.5 Changes compared to the previous version
The following list of changes provides an overview of what is new in interNet Services V3.2A and relevant to this manual. The changes since both interNet Services V3.0 and interNet Services V3.1A are listed. (The documentation for interNet Services V3.1A consists of PDF supplements to the User Guide and Administrator Guide.)
The changes that affect the interNet Services User Guide are listed in the corresponding section of that manual.
New chapters
● OpenSSH
This chapter describes the concept and protocol suite of Open SSH and the OpenSSH server daemon as described in the manual supplement for interNet Services V3.1A (Administrator Guide).
● Mail server in POSIX
This chapter describes the mail server in POSIX as described in the manual supplement for interNet Services V3.1A (Administrator Guide).
● Mail sender in BS2000/OSD
This chapter describes the installation and uninstallation of the Mail Sender in BS2000/OSD and the configuration of the Mail Sender backend. The Mail Sender described in this chapter replaces the Mail Sender shipped with interNet Services V3.1A.
The Mail Sender of interNet Services V3.1A is still shipped for compatibility reasons. However, any corrections in future will only be made to the new Mail Sender. You are therefore urgently advised to switch to the new Mail Sender. The Mail Sender from Version 3.1 will no longer be shipped with the next version.
New chapters as a result of changes to the manual’s structure
● “Installing/uninstalling the services without FTP, TELNET and Mail”
● “Installing FTP and TELNET”
● “FTP configuration and operation”
● “TELNET configuration and operation”
i
U41095-J-Z125-4-76 21
Preface Changes compared to the previous version
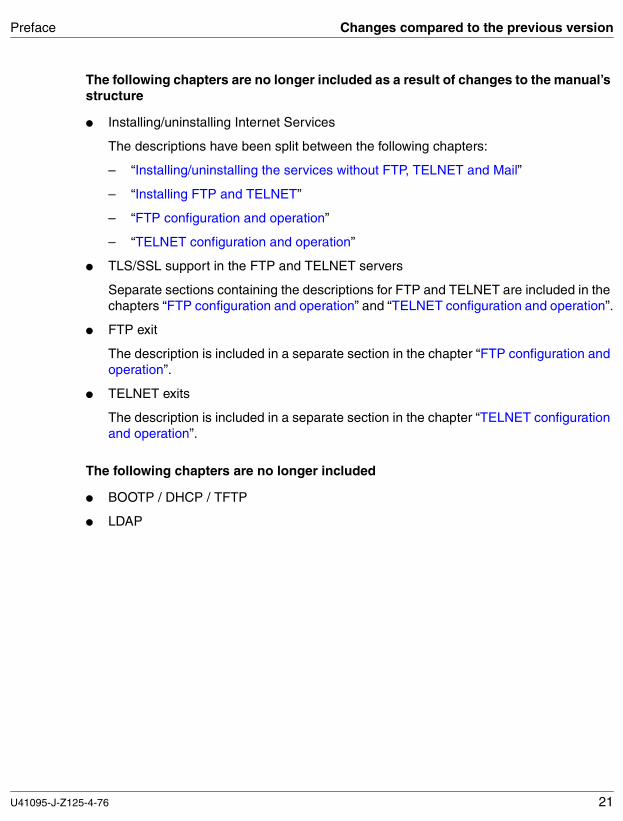
The following chapters are no longer included as a result of changes to the manual’s structure
● Installing/uninstalling Internet Services
The descriptions have been split between the following chapters:
– “Installing/uninstalling the services without FTP, TELNET and Mail”
– “Installing FTP and TELNET”
– “FTP configuration and operation”
– “TELNET configuration and operation”
● TLS/SSL support in the FTP and TELNET servers
Separate sections containing the descriptions for FTP and TELNET are included in the chapters “FTP configuration and operation” and “TELNET configuration and operation”.
● FTP exit
The description is included in a separate section in the chapter “FTP configuration and operation”.
● TELNET exits
The description is included in a separate section in the chapter “TELNET configuration and operation”.
The following chapters are no longer included
● BOOTP / DHCP / TFTP
● LDAP
22 U41095-J-Z125-4-76
Notational conventions Preface
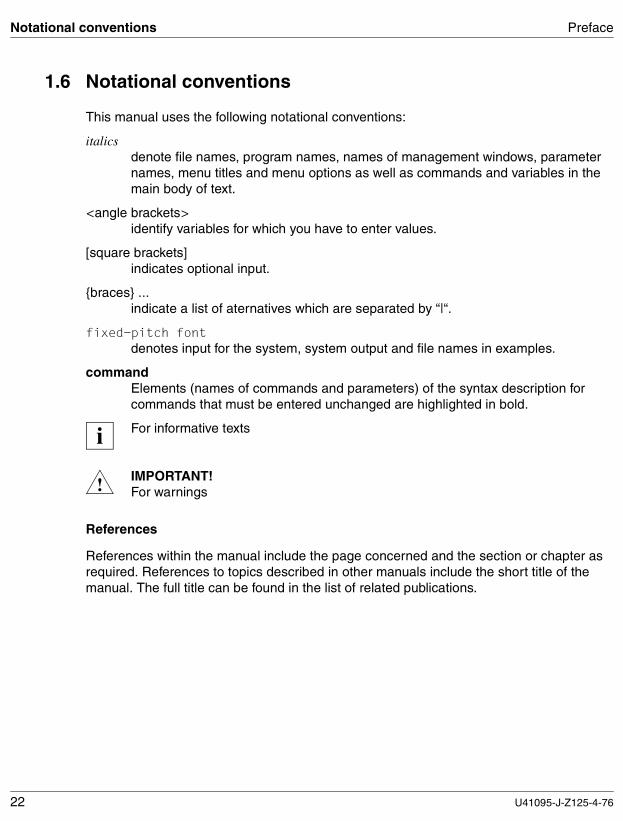
1.6 Notational conventions
This manual uses the following notational conventions:
italicsdenote file names, program names, names of management windows, parameter names, menu titles and menu options as well as commands and variables in the main body of text.
<angle brackets>identify variables for which you have to enter values.
[square brackets]indicates optional input.
{braces} ... indicate a list of aternatives which are separated by “|“.
fixed-pitch fontdenotes input for the system, system output and file names in examples.
commandElements (names of commands and parameters) of the syntax description for commands that must be entered unchanged are highlighted in bold.
For informative texts
IMPORTANT!For warnings
References
References within the manual include the page concerned and the section or chapter as required. References to topics described in other manuals include the short title of themanual. The full title can be found in the list of related publications.
i
!

U41095-J-Z125-4-76 23
Preface Notational conventions
SDF syntax representation
Metasyntax
Representation Meaning Examples
UPPERCASE
LETTERS Uppercase letters denote keywords (command, statement or operand names, keyword values) and constant operand values. Keyword values begin with *.
HELP-SDF
SCREEN-STEPS = *NO
UPPERCASE
LETTERS
in boldface
Uppercase letters printed in boldface denote guaranteed or suggested abbreviations of keywords.
GUIDANCE-MODE = *YES
= The equals sign connects an operand name with the associated operand values.
GUIDANCE-MODE = *NO
< > Angle brackets denote variables whose range of values is described by data types and suffixes (see Tables 2 and 3).
SYNTAX-FILE = <filename 1..54>
Underscoring Underscoring denotes the default value of an operand.
GUIDANCE-MODE = *NO
/ A slash serves to separate alternative operand values.
NEXT-FIELD = *NO / *YES
(…) Parentheses denote operand values that initiate a structure.
,UNGUIDED-DIALOG = *YES (...) / *NO
[ ] Square brackets denote operand values which introduce a structure and are optional. The subsequent structure can be specified without the initiating operand value.
SELECT = [*BY-ATTRIBUTES](...)
Indentation Indentation indicates that the operand is dependent on a higher-ranking operand.
,GUIDED-DIALOG = *YES (...)
*YES(...)
⏐ SCREEN-STEPS = *NO /
⏐ *YES
Table 1: Metasyntax (Part 1 of 2)

24 U41095-J-Z125-4-76
Notational conventions Preface
⏐⏐
A vertical bar identifies related operands within a structure. Its length marks the beginning and end of a structure. A structure may contain further structures. The number of vertical bars preceding an operand corresponds to the depth of the structure.
SUPPORT = *TAPE(...)
*TAPE(...)
⏐ VOLUME = *ANY(...)⏐⏐ *ANY(...)⏐⏐ ⏐ ...
⏐ ⏐
, A comma precedes further operands at the same structure level.
GUIDANCE-MODE = *NO / *YES
,SDF-COMMANDS = *NO / *YES
list-poss(n): The entry “list-poss” signifies that a list of operand values can be given at this point. If (n) is present, it means that the list must not have more than n elements. A list of more than one element must be enclosed in parentheses.
list-poss: *SAM / *ISAM
list-poss(40): <structured-name 1..30>
list-poss(256): *OMF / *SYSLST(...) /
<filename 1..54>
Alias: The name that follows represents a guaranteed alias (abbreviation) for the command or statement name.
HELP-SDF Alias: HPSDF
Representation Meaning Examples
Table 1: Metasyntax (Part 2 of 2)

U41095-J-Z125-4-76 25
Preface Notational conventions
Data types
Data type Character set Special rules
alphanum-name A…Z0…9$, #, @
cat-id A…Z0…9
Not more than 4 characters; must not begin with the string PUB
command-rest freely selectable
composed-name A…Z0…9$, #, @hyphenperiod catalog ID
Alphanumeric string that can be split into multiple substrings by means of a period or hyphen. If a file name can also be specified, the string may begin with a catalog ID in the form :cat: (see data type filename).
c-string EBCDIC character Must be enclosed within single quotes; the letter C may be prefixed; any single quotes occurring within the string must be entered twice.
date 0…9Structure identifier: hyphen
Input format: yyyy-mm-dd jjjj: year; optionally 2 or 4 digitsmm: monthtt: day
device A…Z0…9hyphen
Character string, max. 8 characters in length, corresponding to a device available in the system. In guided dialog, SDF displays the valid operand values. For notes on possible devices, see the relevant operand description.
fixed +, - 0…9period
Input format: [sign][digits].[digits]
[sign]: + oder -[digits]: 0...9
must contain at least one digit, but may contain up to 10 characters (0...9, period) apart from the sign.
Table 2: Data types (Part 1 of 6)

26 U41095-J-Z125-4-76
Notational conventions Preface
filename A…Z0…9$, #, @hyphenperiod
Input format:
[:cat:][$user.]
:cat: optional entry of the catalog identifier; character set limited to A...Z and 0...9; maximum of 4 characters; must be enclosed in colons; default value is the catalog identifier assigned to the user ID, as specified in the user catalog.
$user. optional entry of the user ID; character set is A…Z, 0…9, $, #, @; maximum of 8 characters; first character cannot be a digit; $ and period are mandatory; default value is the user's own ID.
$. (special case)system default ID
file file or job variable name; may be split into a number of partial names using a period as a delimiter: name1[.name2[...]] namei does not contain a period and must not begin or end with a hyphen; file can have a maximum length of 41 characters; it must not begin with a $ and must include at least one character from the range A...Z.
Data type Character set Special rules
Table 2: Data types (Part 2 of 6)
filefile(no)group
group(*abs)(+rel)(-rel)

U41095-J-Z125-4-76 27
Preface Notational conventions
filename (contd.)
#file (special case) @file (special case)
# or @ used as the first character indicates temporary files or job variables, depending on system generation.
file(no) tape file name no: version number; character set is A...Z, 0...9, $, #, @. Parentheses must be specified.
group name of a file generation group (character set: as for “file”)
group
(*abs) absolute generation number (1-9999); * and parentheses must be specified.
(+rel) (-rel)
relative generation number (0-99); sign and parentheses must be specified.
integer 0…9, +, - + or -, if specified, must be the first character.
name A…Z 0…9$, #, @
Must not begin with 0...9.
Data type Character set Special rules
Table 2: Data types (Part 3 of 6)
(*abs)(+rel)(-rel)

28 U41095-J-Z125-4-76
Notational conventions Preface
partial-filename A…Z0…9$, #, @hyphenperiod
Input format: [:cat:][$user.][partname.]
:cat: see filename$user. see filename
partname optional entry of the initial part of a name common to a number of files or file generation groups in the form: name1.[name2.[...]] namei (see filename).The final character of “partname” must be a period. At least one of the parts :cat:, $user. or partname must be specified.
posix-filename A...Z0...9special characters
String with a length of up to 255 characters; consists of either one or two periods or of alpha-numeric characters and special characters. The special characters must be escaped with a preceding \ (backslash); the / is not allowed. Must be enclosed within single quotes if alter-native data types are permitted, separators are used, or the first character is a ?, ! or ^. A distinction is made between uppercase and lowercase.
posix-pathname A...Z0...9special charactersstructure identifier: slash
Input format: [/]part1/.../partnwhere parti is a posix-filename; max. 1023 characters; must be enclosed within single quotes if alter-native data types are permitted, separators are used, or the first character is a ?, ! or ^.
Data type Character set Special rules
Table 2: Data types (Part 4 of 6)

U41095-J-Z125-4-76 29
Preface Notational conventions
product-version A…Z0…9periodsingle quote
Input format:
where m, n, s and o are all digits and a is a letter. Whether the release and/or correction status may/must be specified depends on the suffixes to the data type (see suffixes without-corr, without-man, mandatory-man and mandatory-corr in Table 3). product-version may be enclosed within single quotes (possibly with a preceding C). The specification of the version may begin with the letter V.
structured-name A…Z0…9$, #, @hyphen
Alphanumeric string which may comprise a number of substrings separated by a hyphen. First character: A...Z or $, #, @
text freely selectable For the input format, see the relevant operand descriptions.
time 0…9structure identifier: colon
Time-of-day entry:
Input format:
hh: hoursmm: minutesss: seconds
vsn a) A…Z 0…9
a) Input format: pvsid.sequence-no max. 6 characters pvsid: 2-4 characters; PUB must
not be enteredsequence-no: 1-3 characters
b) A…Z 0…9 $, #, @
b) Max. 6 characters;PUB may be prefixed, but must not be followed by $, #, @.
Data type Character set Special rules
Table 2: Data types (Part 5 of 6)
[[C]’][V][m]m.naso[’]
correction status
release status
hh:mm:sshh:mmhh
Leading zeros may be omitted

30 U41095-J-Z125-4-76
Notational conventions Preface
x-string Hexadecimal: 00…FF
Must be enclosed in single quotes; must be prefixed by the letter X. There may be an odd number of characters.
x-text Hexadecimal: 00…FF
Must not be enclosed in single quotes; the letter X must not be prefixed. There may be an odd number of characters.
Data type Character set Special rules
Table 2: Data types (Part 6 of 6)

U41095-J-Z125-4-76 31
Preface Notational conventions
Suffixes for data types
Suffix Meaning
x..y unit With data type “integer”: interval specification
x minimum value permitted for “integer”. x is an (optionally signed) integer.
y maximum value permitted for “integer”. y is an (optionally signed) integer.
unit with “integer” only: additional units. The following units may be specified: days byte hours 2Kbyte minutes 4Kbyte seconds Mbyte milliseconds
x..y special With the other data types: length specification For data types catid, date, device, product-version, time and vsn the length specification is not displayed.
x minimum length for the operand value; x is an integer.
y maximum length for the operand value; y is an integer.
x=y the length of the operand value must be precisely x.
special Specification of a suffix for describing a special data type that is checked by the implementation. “special” can be preceded by other suffixes. The following specifications are used: arithm-expr arithmetic expression (SDF-P) bool-expr logical expression (SDF-P) string-expr string expression (SDF-P) expr freely selectable expression (SDF-P) cond-expr conditional expression (JV) symbol CSECT or entry name (BLS)
Table 3: Data type suffixes

32 U41095-J-Z125-4-76
README file Preface
1.7 README files
Information on any functional changes and additions to the current product version described in this manual can be found in the product-specific README files.You will find the README files on your BS2000/OSD computer under the file name SYSRME.TCP-IP-SV.030.E or SYSRME.TCP-IP-AP.050.E or SYSRME.MAIL.031.E. The user ID under which the README files are cataloged can be obtained from your system administrator. You can view a README file using the /SHOW-FILE command or an editor and print it out on a standard printer using the following command:
/PRINT-DOCUMENT <filename>,LINE-SPACING=*BY-EBCDIC-CONTROL

U41095-J-Z125-4-76 33
2 Installing/uninstalling the services without FTP, TELNET and MailPlease read the Release Notice supplied with the product in addition to this chapter.
You will find further information on the installation/uninstallation of the various interNet Services in the corresponding description.
2.1 Installation
The individual components of the interNet Services software package are installed by the POSIX package installation program like any POSIX program package (see the manual "POSIX Basics for Users and System Administrators").
The interNet Services V3.2A software package must be installed component by component. The DNS, NAMED, PRNGD, NTP and OpenSSH components are available for selection.
If you are installing interNet Services for the first time, you will need to customize theconfiguration files of the individual components to your specific requirements as described in the relevant chapters.
If interNet Services V3.2A is to replace a previously installed version, please uninstall the old version first.
If you uninstall an existing installation and then reinstall it ("new installation"), the configu-ration files /etc/resolv.conf, /etc/named.conf and /etc/ntp.conf will be saved in the /etc/tcpipsv directory with the suffix _sav. These backup copies can be transferred back to the active /etc directory following successful installation.
With an "UPDATE installation", i.e. if you install the services without uninstalling the earlier version, the configuration files of the individual components will not be overwritten. In this case, the default configuration files are saved in the /etc/tcpipsv directory under the name <daemonname>.conf_inst and active daemons, if any, are terminated before the actual installation process.
i
i

34 U41095-J-Z125-4-76
Installation Installing/uninstalling the services without FTP, TELNET and Mail
After installing the interNet Services and before calling the individual services, the configu-ration files of the individual services must be customized to individual requirements. This is done by editing the files.
The general startup procedure (startservices) ensures that the services dns and ntp are started. This can be checked via the entries in the /var/adm/messages message file (only POSIX root has read access rights). If the POSIX subsystem is stopped and then restarted, the interNet Services daemons that have not been deactivated are also started automati-cally.
Example
/START-POSIX-INSTALLATION
Function: Installs POSIX program packages (IMON support: Y)Product name: TCP-IP-SVPackage name: DNS or NAMED or NTP or PRNGD
The screen mask of the installation program for DNS installation is shown below. User entries are highlighted with bold print.
An installation path can only be specified with DNS, NAMED and PRNGD.
BS2000 POSIX package installation
IMON support ? : Y (y) mandatory for official package (n) private package (SINLIB...)
name of product : TCP-IP-SV package of product : DNS optional for certain products)
version of product : (format Vmm.n or mmn)
correction state : (format aso, optional for IMON support)
installation userid : (mandatory for no IMON support)
The definition of a installation path is optional for this product.Please enter the full pathname of the wanted installation directory:/opt/TCP-IP-SV/dns
install: DUE help: F1 terminate: F2--------------------------------------------------------------------------------
i

U41095-J-Z125-4-76 35
Installing/uninstalling the services without FTP, TELNET and Mail Uninstallation
2.2 Uninstallation
As when installing the interNet Services components, uninstallation is also performed via the POSIX installation program under the TSOS ID. During uninstallation, a search is made for active interNet Services daemons, and these processes are then terminated. The termi-nation of active daemons is logged in the /var/adm/messages message file. All files, links and procedures of the interNet Services components are then deleted. The startservices procedure is not deleted until the last interNet Services package has been uninstalled.
During uninstallation, a number of configuration files are saved with the suffix _sav in the /etc/tcpipsv directory, provided there are no files of the same name already there. You will find more detailed information in the uninstallation descriptions of the different interNet Services.
2.3 Initial operation
The user can start the daemons of the components of interNet Services individually. The corresponding procedures are installed in the /usr/sbin or /etc/init.d/ directory.
If no interNet Services daemons are yet active, after installing the services the user can use the startservices procedure to start the following daemons together under /usr/sbin: dnsd, dhcpd, tftpd and ntpd.
When a daemon startup call is issued, an implicit stop is executed for that daemon if the check determines that the daemon is already active. A new start is then executed in each such case. Startup occurs via the link, i.e. the link is tested for executability. No startup occurs if no execution rights for the link exist.
Restart calls are also provided for all daemons (except for PRNGD and NAMED) and are required if a modified configuration file is to be read in during a session.
The restart calls are:
● restartdns, restartntp
● For OpenSSH: /etc/init.d/TCP-IP-SV.openssh restart
● For PRNGD: /etc/init.d/TCP-IP-SV.prngd stop, followed by /etc/init.d/TCP-IP-SV.prngd start
During the restart procedure, a check is carried out to establish whether the corresponding daemon has been started. If no active daemon is found, a normal restart is carried out.
i
i

36 U41095-J-Z125-4-76
Shutting down Installing/uninstalling the services without FTP, TELNET and Mail
2.4 Shutting down
The following calls are provided under /usr/sbin for stopping the various daemons:stopdns, stopnamed, stoptntp.
The shutdown only applies until the POSIX subsystem is terminated. If an automatic restart is to be prevented when the POSIX subsystem is restarted, the daemons’ programs must be made non-executable as described under the installation of the individual components (chmod u-x link).
All services installed on a component-by-component basis (PRNGD, NAMED, OPENSSH) are permanently deactivated by the POSIX uninstallation.

U41095-J-Z125-4-76 37
3 Installing FTP and TELNETPlease read the Release Notice supplied with the product in addition to this chapter.
Following the installation of the product files, another installation step is required for FTP and TELNET. There are two options available for this:
● Installation with the SDF command SET-FTP-TELNET-PARAMETERS. Configuration is also carried out when installation is executed using the SDF command.
● Installation using a mask-driven installation program (not for newer functions such as FTAC and TLS). In this case, you have to configure FTP and TELNET after installation (see chapter “FTP configuration and operation” on page 65 or chapter “TELNET config-uration and operation” on page 155).
When the SET-FTP-TELNET-PARAMETERS command is executed (see page 39), one option file each is generated for the FTP server and the TELNET server in which the FTP server parameters or TELNET server parameters are stored as options.
i

38 U41095-J-Z125-4-76
Installing FTP and TELNET via SDF Installing FTP and TELNET
3.1 Installing FTP and TELNET via SDF command
The SDF command SET-FTP-TELNET-PARAMETERS offers the following functionality:
– Definition of parameters for FTP and TELNET servers and placing them in separate option files for the FTP and TELNET servers (see page 81 or page 168)
– Creation of ENTER files for the FTP and TELNET daemons
– Management of installation parameters in the installation file
TCP-IP-AP V5.0 must be reinstalled. Files created by an older version of the instal-lation program may not be used.
You can use the option files of the FTP and TELNET servers (see page 81 and page 168) to modify the configuration of the FTP and TELNET servers without needing to restart installation with the aid of the SET-FTP-TELNET-PARAMETERS command.
Storing of the installation parameters in the installation fileSYSDAT.TCP-IP-AP.050.INSTALL no longer takes place for the new parameters supported as of interNetServices V3.0.
i

U41095-J-Z125-4-76 39
Installing FTP and TELNET Installing FTP and TELNET via SDF
SET-FTP-TELNET-PARAMETERS
INPUT= *NO / *INSTALLATION-FILE(...)
*INSTALLATION-FILE(...)
⏐ INSTALLATION-FILE= *STD / <filename 1..54_without-generation-version>
⏐ , PARAMETER-RECORD= *STD / <name 1..8>
, BS2000-VERSION= *STD / <alphanum-name 3..3>
, FTP-SERVER-PROC=*NO / *CREATE(...)
*CREATE(...)
⏐ JOB-NAME= *STD / <name 1..5>
⏐ , JOB-CLASS= *STD / <name 1..8>
⏐ , CPU-TIME= *STD / <integer 1..32767>
⏐ , PRIORITY= *STD / <integer 0..255>
⏐ , DEBUG= *STD / <integer 0..9>
⏐ , TRACE= *STD / <integer 0..9>
⏐ , MAXIMUM-CONNECTIONS= *STD / <integer 1..900>
⏐ , STATION-ID= *STD / <integer 0..6>
⏐ , TRANSFER-JOB-CLASS= *STD / <name 1..8>
⏐ , TRANSFER-CPU-TIME= *STD / <integer 1..32767>
⏐ , TIMEOUT-VALUE= *STD / <integer 1..32767>
⏐ , SYSTEM-EXIT-LEVEL= *STD/<integer 0..3>
⏐ , FTAC-SUPPORT= *STD / *NO / *YES(...)
⏐ *YES(...)
⏐ ⏐ LEVEL= *STD / <integer 1..2>
⏐ ⏐ , JOB-CLASS= *STD / <name 1..8>
⏐ ⏐ , ENTER-FILE= *STD / <filename 1..54_without-generation-version>
⏐ ⏐ , SERVER-INFORMATION-FILE= *STD / <filename 1..54_without-generation-version>
⏐ ⏐ ,FTAC-USERID=*STD /<name 1..8>
⏐ , TLS-SUPPORT= *STD / *NO / *YES(...)
⏐ *YES(...)
⏐ ⏐ PROTOCOL= *STD / <text 1..80>
⏐ ⏐ , CIPHER-SUITE= *STD / <text 1..80>
⏐ ⏐ , RSA-CERTIFICATE-FILE= *STD / *NONE / <filename 1..54_without-generation-version>
⏐ ⏐ , RSA-KEY-FILE= *STD / *NONE / <filename 1..54_without-generation-version>
⏐ ⏐ , DSA-CERTIFICATE-FILE= *STD / *NONE / <filename 1..54_without-generation-version>
⏐ ⏐ , DSA-KEY-FILE= *STD / *NONE / <filename 1..54_without-generation-version>
⏐ ⏐ , CA-CERTIFICATE-FILE= *STD / *NONE / <filename 1..54_without-generation-version>
⏐ ⏐ , CLIENT-CA-FILE= *STD / *NONE / <filename 1..54_without-generation-version>
⏐ ⏐ , CERT-CHAIN-FILE= *STD / *NONE / <filename 1..54_without-generation-version>

40 U41095-J-Z125-4-76
Installing FTP and TELNET via SDF Installing FTP and TELNET
SET-FTP-TELNET-PARAMETERS
⏐ ⏐ , CA-REVOCATION-FILE= *STD / *NONE / <filename 1..54_without-generation-version>
⏐ ⏐ , RANDOM-FILE= *STD / *NONE / <filename 1..54_without-generation-version>
⏐ ⏐ , SSL-LIBRARY= *STD / *NONE / <filename 1..54_without-generation-version>
⏐ ⏐ , VERIFY-CLIENT= *STD / *NONE / *OPTIONAL / *REQUIRE
⏐ ⏐ , VERIFY-DEPTH= *STD / <1..32767>
⏐ ⏐ , SEC-CONTROL-CONNECTION= *STD / *NONE / *OPTIONAL / *REQUIRE
⏐ ⏐ , SEC-DATA-CONNECTION= *STD / *NONE / *OPTIONAL / *REQUIRE
⏐ ⏐ , USE-CRYPTO-HARDWARE = *STD / *NO / *SERVER / *CHILD / *ALL
⏐ , ACCOUNTING= *STD / *NO / *YES(...)
⏐ *YES(...)
⏐ ⏐ FILE= *STD / <filename 1..54_without-generation-version>
⏐ , OPTION-FILE= *STD / <filename 1..54_without-generation-version>
⏐ , SELECTOR= *STD / <text 1..511>
⏐ , INITIAL-COMMANDS= *STD / <c-string 2..256>
⏐ , PORT-NUMBER= *STD / <integer 1..32767>
⏐ , SERVER-ENTER-FILE= *STD / <filename 1..54_without-generation-version>
⏐ , LOGGING-FILE= *STD / <filename 1..54_without-generation-version>
⏐ , ALLOW-TSOS-LOGIN= *STD / *NO / *YES / *TLS

U41095-J-Z125-4-76 41
Installing FTP and TELNET Installing FTP and TELNET via SDF
SET-FTP-TELNET-PARAMETERS
, TELNET-SERVER-PROC= *NO / *CREATE(...)
*CREATE(...)
⏐ JOB-NAME= *STD / <name 1..5>
⏐ , JOB-CLASS= *STD / <name 1..8>
⏐ , CPU-TIME= *STD / <integer 1..32767>
⏐ , PRIORITY= *STD / <integer 0..255>
⏐ , DEBUG= *STD / <integer 0..9>
⏐ , TRACE= *STD / <integer 0..9>
⏐ , MAXIMUM-CONNECTIONS= *STD / <integer 1..900>
⏐ , STATION-ID= *STD / <integer 0..6>
⏐ , ASCII-TABLE= *STD / <text 1..8>
⏐ , EBCDIC-TABLE= *STD / <name 1..8>
⏐ , TLS-SUPPORT= *STD / *NO / *PARAMETERS(...)
⏐ *PARAMETERS (...)
⏐ ⏐ OPTION= *STD / *START-TLS / *AUTHENTICATION(...)
⏐ ⏐ *AUTHENTICATION(...)
⏐ ⏐ ⏐ DEBUG= *STD / *NO / *YES
⏐ ⏐ , PROTOCOL= *STD / <text 1..80>
⏐ ⏐ , CIPHER-SUITE = *STD / <text 1..80>
⏐ ⏐ , RSA-CERTIFICATE-FILE = *STD / *NONE / <filename 1..54_without-generation-version>
⏐ ⏐ , RSA-KEY-FILE = *STD / *NONE / <filename 1..54_without-generation-version>
⏐ ⏐ , DSA-CERTIFICATE-FILE = *STD / *NONE / <filename 1..54_without-generation-version>
⏐ ⏐ , DSA-KEY-FILE = *STD / *NONE / <filename 1..54_without-generation-version>
⏐ ⏐ , CA-CERTIFICATE-FILE = *STD / *NONE / <filename 1..54_without-generation-version>
⏐ ⏐ , CLIENT-CA-FILE = *STD / *NONE / <filename 1..54_without-generation-version>
⏐ ⏐ , CERT-CHAIN--FILE = *STD / *NONE / <filename 1..54_without-generation-version>
⏐ ⏐ , CA-REVOCATION-FILE = *STD / *NONE / <filename 1..54_without-generation-version>
⏐ ⏐ , RANDOM-FILE = *STD / <filename 1..54_without-generation-version>
⏐ ⏐ , SSL-LIBRARY = *STD / *NONE / <filename 1..54_without-generation-version>
⏐ ⏐ , VERIFY-CLIENT= *STD / *NONE / *OPTIONAL / *REQUIRE
⏐ ⏐ , VERIFY-DEPTH= *STD / <1..32767>
⏐ ⏐ , USE-CRYPTO-HARDWARE= *STD / *NO / *YES
⏐ , ENCRYPTION= *STD / *NO / *YES(...)
⏐ *YES(...)
⏐ ⏐ DEBUG= = *STD / *NO / *YES
⏐ ⏐ , KEY= <x-text 1..16>
⏐ ⏐ , SSL-LIBRARY = *STD / *NONE / <filename 1..54_without-generation-version>

42 U41095-J-Z125-4-76
Installing FTP and TELNET via SDF Installing FTP and TELNET
Shared operands of FTP and TELNET
For a description of the FTP operands, see page 69. For a description of the TELNET operands, see page 158.
INPUTDetermines whether or not an existing installation file may be used to preset the values.
INPUT=*NONo installation file is used.
INPUT=*INSTALLATION-FILE(...)The default values are already in an existing installation file.
INSTALLATION-FILE= *STDCorresponds to the entry SYSDAT.TCP-IP-AP.050.INSTALL.
INSTALLATION-FILE=<filename 1..54_without-generation-version>Specifies the name of the installation file to be used.
PARAMETER-RECORD= *STDCorresponds to the entry TCP.
PARAMETER-RECORD=<name 1..8>Specifies the name of the required installation in the specified installation file.
SET-FTP-TELNET-PARAMETERS
⏐ , OPTION-FILE= *STD / <filename 1..54_without-generation-version>
⏐ , SELECTOR= *STD / <text 1..511>
⏐ , PORT-NUMBER= *STD / <integer 0..32767>
⏐ , SERVER-ENTER-FILE= *STD / <filename 1..54_without-generation-version>
⏐ , LOGGING-FILE= *STD / <filename 1..54_without-generation-version>
, START-PROCEDURE= *NO / *CREATE
, INSTALLATION-FILE= *UNCHANGED / *NEW-FILE(...) / *UPDATE-FILE(...)
/ *DELETE-PARAMETER-RECORD(...)
*NEW-FILE(...)
⏐ FILE-NAME= *STD / <filename 1..54_without-generation-version>
⏐ , PARAMETER-RECORD= *STD / <name 1..8>
*UPDATE-FILE(...)
⏐ FILE-NAME= *STD / <filename 1..54_without-generation-version>
⏐ , PARAMETER-RECORD= *STD / <name 1..8>
*DELETE-PARAMETER-RECORD(...)
⏐ FILE-NAME= *STD / <filename 1..54_without-generation-version>
⏐ , PARAMETER-RECORD = *STD / <name 1..8>
i

U41095-J-Z125-4-76 43
Installing FTP and TELNET Installing FTP and TELNET via SDF
BS2000-VERSION=Operating system version for which the installation is being performed.
BS2000-VERSION=*STDCorresponds to the current version or the value in the installation file, if specified.
BS2000-VERSION=<alphanum-name 3..3>Three-digit version name.
START-PROCEDURE=Specifies whether the SYSENT.TCP-IP-AP.050.START file will be created, which contains the start enter file for FTP and TELNET.
START-PROCEDURE=*NO The file will not be created.
START-PROCEDURE=*CREATEThe file will be created.
INSTALLATION-FILE=Parameter for managing the installation file.
INSTALLATION-FILE=*UNCHANGEDThere is no write access to an installation file.
INSTALLATION-FILE=*NEW-FILE(...)A new installation file is created and any specified parameters are stored in it.
FILE-NAME=*STD/<filename 1..54_without-generation-version>Name of the new installation file to be createdDefault setting: SYSDAT.TCP-IP-AP.050.INSTALL
PARAMETER-RECORD=*STD/<name 1..8>Specifies the name of the required installation in the specified installation file. Default: TCP
INSTALLATION-FILE=*UPDATE-FILE(...)The data entered is stored in the specified installation file under the specified element name.
FILE-NAME=*STD/<filename 1..54_without-generation-version>Name of the installation file Default setting: SYSDAT.TCP-IP-AP.050.INSTALL
PARAMETER-RECORD=*STD/<name 1..8>Specifies the name of the installation to be stored. Default setting: TCP

44 U41095-J-Z125-4-76
Installing FTP and TELNET via SDF Installing FTP and TELNET
INSTALLATION-FILE=*DELETE-PARAMETER-RECORD(...)The installation with the specified element name will be deleted in the specified installation file.
FILE-NAME=*STD/<filename 1..54_without-generation-version>Name of the installation fileDefault setting: SYSDAT.TCP-IP-AP.050.INSTALL
PARAMETER-RECORD=*STD/<name 1..8>Specifies the name of the installation to be deleted. Default: TCP

U41095-J-Z125-4-76 45
Installing FTP and TELNET Installing FTP and TELNET via SDF
Return codes of SET-FTP-TELNET-PARAMETERS commands
SC2 SC1 Main code Message
0 TCP9000 INSTALLATION WAS TERMINATED SUCCESSFULLY
1 CMD0202 SYNTAX ERROR IN COMMAND (this return code occurs with syntax errors, which are identified at the level of the SDF command defini-tions.)
1 TCP9002 INVALID FILE NAME: (&00)
1 TCP9003 THE PASSWORD (&00) IS NOT VALID.
1 TCP9004 THE INSTALLATION KEY (&00) IS NOT VALID.
1 TCP9005 THE ID (&00) IS NOT VALID.
1 TCP9006 THE BS2000 VERSION (&00) IS NOT VALID.
1 TCP9007 THE LOGON NAME (&00) IS NOT VALID.
1 TCP9008 (&00) MAXIMUM CONNECTIONS ARE IN AN INVALID AREA.
1 TCP9009 THE (&01) PARAMETER (&00) IS NOT VALID.
1 TCP9010 THE JOB CLASS (&00) IS NOT VALID.
1 TCP9011 THE CPU LIMIT (&00) IS NOT VALID.
1 TCP9012 SET (&00) PARAMETERS.
1 TCP9014 THE PRIORITY (&00) IS NOT VALID.
1 TCP9015 THE DCAM APPLICATION NAME (&00) IS NOT VALID.
1 TCP9016 THE PORT NUMBER (&00) IS NOT VALID.
1 TCP9017 THE VALUE (&00) FOR PORT MONITORING IS NOT CORRECT.
1 TCP9018 THE VALUE (&00) FOR AUTORIZATION SERVICE IS NOT CORRECT.
1 TCP9020 THE NUMBER OF POSITIONS FOR GENERATING THE DCAM APPLICATION NAME(&00) IS NOT VALID.
1 TCP9021 THE STANDARD ASCII CODE TABLE (&00) IS NOT VALID.
1 TCP9022 THE STANDARD EBCDIC CODE TABLE (&00) IS NOT VALID.
1 TCP9023 SDF ERROR READING THE STATEMENT.
64 TCP9200 OPENING OF (&00) NOT POSSIBLE: DVS: (&01)
64 TCP9201 WRITE ERROR IN INSTALLATION FILE: DVS: (&00)
64 TCP9202 INSTALLATION PROGRAM AND PARAMETER FILE ARE NOT THE SAME VERSION.
64 TCP9203 FILE COMMANDO COULD NOT BE ISSUED.
64 TCP9205 INSTALLATION (&00) WAS NOT FOUND. DVS:(&01)
64 TCP9206 (&00) ENTER DATEI COULD NOT BE CREATED. DVS:(&01)

46 U41095-J-Z125-4-76
Installing FTP and TELNET via FHS masks Installing FTP and TELNET
3.2 Installing FTP and TELNET via FHS masks
Apart from the SDF command SET-FTP-TELNET-PARAMETERS, you can still use an installation program as before to install FTP and TELNET.
The installation program is only provided for reasons of compatibility and has not been developed any further. The following restrictions therefore apply:
– Configuration with FTAC access is not possible.
– The new features of interNet Services V3.0 which must be explicitly configured are not supported (see also page 20).
We recommend that you no longer use this installation program.
The Installation program allows you to enter the parameters for the FTP and TELNETservers via screen masks.
The following functions are offered via the installation program:
● specification of parameters for FTP and TELNET servers
● creation of ENTER files for the FTP and TELNET daemons
● administration of the installation parameters in the installation file
The component TCP-IP-AP V5.0 must be installed. Files from installation programs of an older version cannot be used.
64 TCP9207 INST. FILE (&00) CANNOT BE CLOSED. DVS:(&01)
64 TCP9208 MSG GROUP TCP COULD NOT BE INSTALLED.CODE (&00)
64 TCP9209 READ ERROR IN INSTALLATION FILE (&00)
SC2 SC1 Main code Message
i
i

U41095-J-Z125-4-76 47
Installing FTP and TELNET Installing FTP and TELNET via FHS masks
3.2.1 Notational conventions
The following notational conventions are used to describe the installation program:
Four types of entries may be made in the masks:
● filling in input fields, when mandatory entries are involved.
● overwriting entries in input fields, when default values or entries from earlier installations are to be modified.
● marking and thus selecting functions, which are then activated by pressingthe {DUE} key.
● pressing the {F1} key to terminate processing of the mask involved.
3.2.2 Calling the installation program
The files for FTP and TELNET are installed by default in the DMS system of the user ID $TSOS. On calling the installation program with:
/START-PROG *M(L=SYSLNK.TCP-IP-AP.050,E=INS,RUN-MODE=ADV,PROG-MODE=ANY) or for SR2000 with:/START-PROG *M(L=SRMLNK.TCP-IP-AP.050,E=INS,RUN-MODE=ADV,PROG-MODE=ANY) or for SX systems with:/START-PROG *M(L=SPMLNK.TCP-IP-AP.050,E=INS,RUN-MODE=ADV,PROG-MODE=ANY) you will initially receive a welcome screen. You can then access the main menu from here by pressing the {DUE} key (or any {F} key).
Both English and German masks are available. Depending on which system message language is selected, either the English or the German masks will be displayed. You can switch from the English to the German masks, and vice versa, by pressing the {K1} key.
Notation Meaning
@@@ (sequence of commercial at symbols)
Identifies output fields (supplied by the program)
### (sequence of hash characters)
Identifies numeric input fields; the permitted values are the digits 0-9.
___ (sequence of underscores) Identifies all other input fields; all characters on the keyboard are allowed
str (underlined character string) Identifies default values (preset), which may be modified by overwriting.
Notational conventions

48 U41095-J-Z125-4-76
Installing FTP and TELNET via FHS masks Installing FTP and TELNET
TCPID000 - Main menu
The upper part of the mask contains input fields. The values entered are used in the follow-up masks. Any element required from the installation file is automatically read in. You can then select one of the functions displayed in the lower part of the mask.
● If you select function (01), (02), (04) or (05), you will be presented with another input mask.
● If you select function (03), the program branches to the editor EDT.
TCP Installation MAIN MENU Version V04.0A00 TCPID000-------------------------------------------------------------------------------- Installation file Name: ________________________________________________________ Password: ____ Element: _______ Product ID: ______ BS2000 Version: Version V##.#
SELECT ONE OF THE FOLLOWING FUNCTIONS:--------------------------------------------------------------------------------
(01) Entering or updating TELNET-SERVER parameters TCPID010 (02) Entering or updating FTP-SERVER parameters TCPID020 (03) Calling EDT EDT (04) Performing the installation TCPID100 (05) Maintaining the installation file TCPID110
<MAR><SEND> Select function <F1> Quit TCP Installation--------------------------------------------------------------------------------@@@@@@@@@@@@@@@@@@@@@@@@@@@@@@@@@@@@@@@@@@@@@@@@@@@@@@@@@@@@@@@@@@@@@@@@@@@@@@@@

U41095-J-Z125-4-76 49
Installing FTP and TELNET Installing FTP and TELNET via FHS masks
Explanation of fields
TCPID100 - Performing the installation
This menu is called by selecting “(04) Performing the installation”.An ENTER job is created for every component marked with a cross. The appropriate application is thus installed. If TCP is marked, a common start ENTER job is generated for the marked standard applications.
If you want to customize the parameters of the standard applications (e.g. job class, code table assignments, etc.), you should begin by selecting functions (01) or (02) in the TCPID100 menu.
Name of the field Field type, default value, value range
Meaning
Name (installation file) BS2000 file name $TSOS.SYSDAT.TCP-IP-AP.050.INSTALL
File where changes are stored
Password BS2000 password (4 spaces)
Access protection for the file
Element (installation file)
Key;8 bytes, alphanumeric
For administering multiple installations in a single file
Product ID BS2000 IDThe entry ’Ë’ indicates the IMON default setting.
Name of the ID under which the product was installed. If IMON was used for the installation, the ID under which SYSLNK.TCP-IP-AP.050 orSRMLNK.TCP-IP-AP.050 orSPMLNK.TCP-IP-AP.050was installed.
BS2000 Version Default setting:loaded version
Version of operating system for which the product is being installed

50 U41095-J-Z125-4-76
Installing FTP and TELNET via FHS masks Installing FTP and TELNET
Starting the applications
The startup ENTER procedure for TCP contains instructions for starting TELNET and FTP only if the corresponding lines were also marked.
Component Name of ENTER file Start time
TCP $TSOS.SYSENT.TCP-IP-AP.050.START(contains the startup ENTER job for FTP and TELNET)
Started with /START-TCP
TELNET $TSOS.SYSENT.TCP-IP-AP.050.TELNETD Started either with the command /START-TELNET-DEMON orimplicitly by the TCP ENTER
FTP $TSOS.SYSENT.TCP-IP-AP.050.FTPD Started either with the command /START-FTP-DEMON or implicitly by TCP ENTER
TCP Installation Performing the Installation Version V04.0A00 TCPID100--------------------------------------------------------------------------------
COMPONENT: Create ENTER file
TCP (X)
TELNET server (X)
FTP server (X)
<MAR><SEND> Select function <F1> Return to main menu--------------------------------------------------------------------------------@@@@@@@@@@@@@@@@@@@@@@@@@@@@@@@@@@@@@@@@@@@@@@@@@@@@@@@@@@@@@@@@@@@@@@@@@@@@@@@@

U41095-J-Z125-4-76 51
Installing FTP and TELNET Installing FTP and TELNET via FHS masks
TCPID110 - Maintaining the installation file
This menu is called by selecting "(05) Maintaining the Installation file".
The administrator can
● store the current installation,
● load an old installation,
● create a new installation file,
● delete an old installation
The input fields Name, Password and Element (installation file) are preset to the values entered in the main menu.
Installations that have been edited must be subsequently saved. Otherwise, the changes are not incorporated in the installation file.
Installations may be copied within the same installation file or to a different installation file.
TCP Installation Maintaining the Installation File Version V04.0A00 TCPID110--------------------------------------------------------------------------------Date of generation: @@@@@@@@@ Time of generation: @@@@@@@@@
Installation file Name: ______________________________________________________ Password: _____ Element: __________
The following functions are available for maintaining the installation file:--------------------------------------------------------------------------------
(01) Storing an installation.
(02) Loading an installation.
(03) Creating a new installation file.
(04) Deleting an installation.
<MAR><SEND> Select function <F1> Return to main menu--------------------------------------------------------------------------------@@@@@@@@@@@@@@@@@@@@@@@@@@@@@@@@@@@@@@@@@@@@@@@@@@@@@@@@@@@@@@@@@@@@@@@@@@@@@@@@
i

52 U41095-J-Z125-4-76
Installing FTP and TELNET via FHS masks Installing FTP and TELNET
Explanation of fields
Name of the field Field type, default value, value range
Meaning
Date of generation Output field Shows the current date
Time of generation Output field Shows the current time
Name(installation file)
BS2000 file nameDefault value:entry in main menu
File in which the updated installation is to be stored
Password(installation file)
BS2000 passwordDefault value:entry in main menu
Access protection for the file
Element(installation file)
Key; 8 bytes, alphanumericDefault value:entry in main menu
For administering multiple installations within a single installation file

U41095-J-Z125-4-76 53
Installing FTP and TELNET Installing FTP and TELNET via FHS masks
TCPID010 - TELNET server parameters
The following values are defined in the mask to enter parameters for the TELNET server:
● the maximum number of connections to be concurrently supported by the server
● the scope of debug outputs (trace to user level)
● the scope of trace outputs (trace to TCP/IP interface),
● the job class in which the TELNET server process is to run,
● the job name of the TELNET server process,
● the priority for the ENTER process,
● the maximum CPU time available to the TELNET server process,
● the DCAM application name for station identification.
TCP Installation TELNET Server Parameters Version V04.0A00 TCPID010--------------------------------------------------------------------------------
ENTER parameters for TELNET server Job name: ___ Job class: ______ CPU time: ___ Priority: __
Trace to user level: # to TCP/IP interface: #
Maximum number of connections: ####
Standard ASCII codetable :_______ Standard EBCDIC codetable:_______
Number of figures for terminal identification: #
<F1> Return to main menu--------------------------------------------------------------------------------@@@@@@@@@@@@@@@@@@@@@@@@@@@@@@@@@@@@@@@@@@@@@@@@@@@@@@@@@@@@@@@@@@@@@@@@@@@@@@@@

54 U41095-J-Z125-4-76
Installing FTP and TELNET via FHS masks Installing FTP and TELNET
Explanation of fields
Name of the field Field type, default value, value range
Meaning
Job name (TELNET server)
1 to 5 bytes; alphanumericDefault: TELSR
This name is used as a prefix. In order to retain the terminal name of the current connection, the sequence number is appended to TELSR.
Job class (TELNET server)
BS2000 job classDefault: standard job class of thesystem
The job class in which the server process is to run. Make sure that ENTER jobs with the parameters TIME=NTL and PRIORITY=(120,EXPRESS) may be started in this job class.
CPU time (TELNET server)
AlphanumericDefault: NTL
The maximum CPU time available to the server process.
Priority(TELNET server)
Numeric; 0 to 255Default: 120
The priority with which the server process is to run.
Trace to user level NumericValue range: 0 to 9Default: 0
Output of additional messages in TELNET; see the TELNET command debug
Trace to TCP/IPinterface
NumericValue range: 0 to 9Default: 0
Output of debug information on TCP/IP level; see the trace command.
Maximum number of connections
NumericValue range: 1 to 900Default: 15
Maximum number of connections to be supported by the server.
Number of figures for terminal identification
NumericValue range: 0-6Default: 0
Number of places with which the name of the remote computer is to be taken into account in the terminal name.If the value î 0, the job name of the TELNET server is not used to construct names.
Standard ASCIIcode table
1 to 8 bytes; alphanumericDefault: 8 blanks
7-bit code defined in ISO
Standard EBCDICcode table
1 to 8 bytes; alphanumericDefault: 8 blanks
Extended BS2000 code EDF04x(7-bit code)

U41095-J-Z125-4-76 55
Installing FTP and TELNET Installing FTP and TELNET via FHS masks
Example
/.TELSR LOGON/REMARK * Installation TELNET Version V05.0A00/REMARK * Installation from Tue Jan 13 17:41:28 2004/REMARK * Enter file for TELNET-Server/SYSFILE SYSLST=$TSOS.SYSOUT.TCP-IP-AP.050.TELNETD /SKIP .CONTINUE/STEP/TYPE TCP0000 TEL-SERVER CANNOT BE STARTED./TYPE TCP0000 TEL-SERVER SYSLST LOCKED./TYPE TCP0000 NOTE: SERVER ALLREADY STARTED?/LOGOFF NOSPOOL/.CONTINUE REMARK * Start TEL-S/OPTION MSG=FHL/REMARK * Start the TELNET server/OPTION DUMP=YES/START-PROGRAM *MOD($TSOS.SYSLNK.TCP-IP-AP.050,TELNETD,/RUN=ADV,PROG=ANY)-A TELSR -N 0015 -D 0 -T 0 -S 0 -U $TSOS/STEP/SYSFILE SYSLST=(PRIMARY)/LOGOFF NOSPOOL
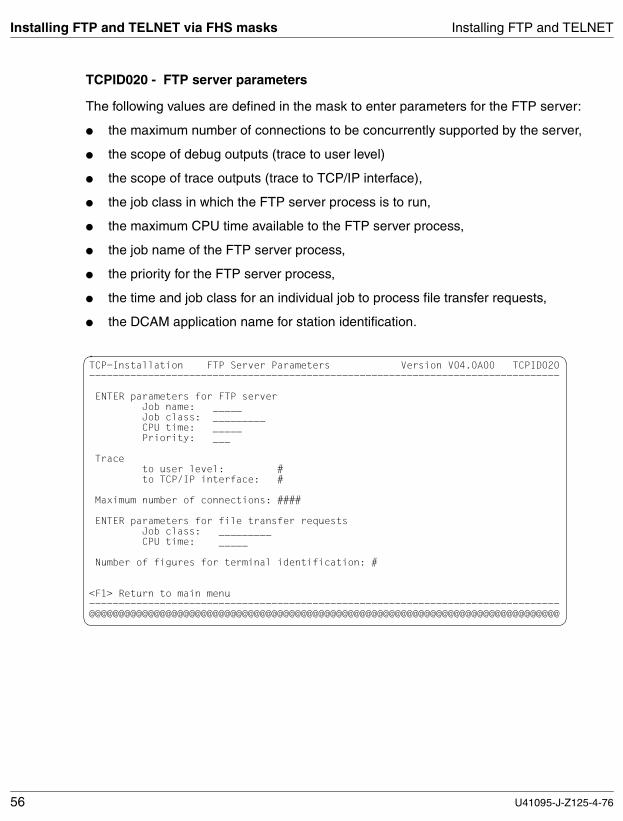
56 U41095-J-Z125-4-76
Installing FTP and TELNET via FHS masks Installing FTP and TELNET
TCPID020 - FTP server parameters
The following values are defined in the mask to enter parameters for the FTP server:
● the maximum number of connections to be concurrently supported by the server,
● the scope of debug outputs (trace to user level)
● the scope of trace outputs (trace to TCP/IP interface),
● the job class in which the FTP server process is to run,
● the maximum CPU time available to the FTP server process,
● the job name of the FTP server process,
● the priority for the FTP server process,
● the time and job class for an individual job to process file transfer requests,
● the DCAM application name for station identification.
TCP-Installation FTP Server Parameters Version V04.0A00 TCPID020--------------------------------------------------------------------------------
ENTER parameters for FTP server Job name: _____ Job class: _________ CPU time: _____ Priority: ___
Trace to user level: # to TCP/IP interface: #
Maximum number of connections: ####
ENTER parameters for file transfer requests Job class: _________ CPU time: _____
Number of figures for terminal identification: #
<F1> Return to main menu--------------------------------------------------------------------------------@@@@@@@@@@@@@@@@@@@@@@@@@@@@@@@@@@@@@@@@@@@@@@@@@@@@@@@@@@@@@@@@@@@@@@@@@@@@@@@@

U41095-J-Z125-4-76 57
Installing FTP and TELNET Installing FTP and TELNET via FHS masks
Explanation of fields
Name of the field Parameters in ENTER
Field type, default value, value range
Meaning
Trace to user level - T <level> NumericValue range: 0 to 9Default: 0
Output of additional messages in FTP; see the trace command in the FTP section
Trace to TCP/IPinterface
- D <level> NumericValue range: 0 to 9Default: 0
Output of debug information on TCP/IP level; see the debug command
Maximum number of connections
- N <maxcon>
NumericValue range: 1 to 900Default: 15
Maximum number of connections to be supported by the server
Job name (FTP server)
- A <appl> 1 to 5 bytes,alphanumericDefault: FTPSR
This name is used as a prefix. To construct the terminal name of the current connection, the sequence number is appended to the job name. The task that is initiated by the server for each client in order to process file transfer requests is assigned the name <jobname>.
Number of places for station identi-fication
- S <digits> NumericValue range: 0-6Default: 0
Number of places with which the name of the remote computer and the job name of the file transfer request is to be taken into account in the terminal name.If the value î 0, the job name of the FTP server is not used to construct names.
Job class (FTP server)
- J <jobclass>
BS2000 job classDefault: standard job class on the system
The job class in which the server process is to run. Make sure that ENTER jobs with the parameters TIME=NTL and PRIORITY=(120,EXPRESS) may be started in this job class.
CPU time (FTP server)
AlphanumericDefault: NTL
The maximum CPU time available to the server process.
Priority (FTP server)
Numeric; 0 to 255Default: 120
The priority with which the server process is to run.
Job class (file transferrequest)
-L,JOB-CLASS=<job-class>
BS2000 job classDefault: standard interactive job class on the system
The job class in which the file transfer requests are to be placed.

58 U41095-J-Z125-4-76
Installing FTP and TELNET via FHS masks Installing FTP and TELNET
The monitoring of the connection between the server and clients can be set with the parameter -O <seconds>. If no activity between the server and client is registered within the specified time period, the connection between them is cleared:
-O <seconds>The monitoring period can be set to between 1 and 32767 seconds; the default value is 3600 seconds.
The -O parameter must be entered with an editor in the FTP startup ENTER file$TSOS.SYSENT.TCP-IP-AP.050.FTPD.
Example
/.FTPSR LOGON/REMARK * installation FTP version V05.0A00/REMARK * installation from Wed Jan 09:41:28 2004/REMARK * enterfile for FTP-Server/SYSFILE SYSLST=$TSOS.SYSOUT.TCP-IP-AP.050.FTPD /SKIP .CONTINUE/STEP/TYPE TCP0000 FTP-SERVER COULD NOT BE STARED./TYPE TCP0000 FTP-SERVER SYSLST LOCKED./TYPE TCP0000 NOTE: SERVER ALREADY STARTED?/LOGOFF NOSPOOL/.CONTINUE REMARK * start FTP-Server/OPTION MSG=FHL/REMARK * start FTP-Server/OPTION DUMP=YES/START-PROGRAM *MOD($TSOS.SYSLNK.TCP-IP-AP.050,FTPD,/RUN=ADV,PROG=ANY)-B 0 -F $TSOS.SYSENT.TCP-IP-AP.050.FTPDC -E $TSOS.SYSDAT.TCP-IP-AP.050.SI \-K $FTAC -J cccccccc -X 0 -O 03600 -A FTPSR -N 0015 -D 0 -T 0 -S 0 \-C *MOD($TSOS.SYSLNK.TCP-IP-AP.050,FTPDC,RUN=ADV,PROG=ANY)/STEP/SYSFILE SYSLST=(PRIMARY)/LOGOFF NOSPOOL
CPU time(file transfer request)
-L,TIME=<cputime
AlphanumericDefault: NTL
CPU time available for running a single file transfer request
Name of the field Parameters in ENTER
Field type, default value, value range
Meaning

U41095-J-Z125-4-76 59
Installing FTP and TELNET FTP and TELNET clients in POSIX
3.3 Installing and uninstalling FTP and TELNET clients in POSIX
FTP and TELNET client are installed together with the SNMP subagent for FTP (see the manual “SNMP Management for openNet Server and interNet Services”) like a POSIX program package via package installation with the POSIX installation program. Any older versions of the TCP-IP-AP program package which may exist must be uninstalled beforehand.
Installation
/START-POSIX-INSTALLATION
Function: Install POSIX program packages (IMON support: Y)Product name: TCP-IP-AP
The figure below shows the installation mask with the information for installation of the FTP client.
Deinstallation
/START-POSIX-INSTALLATION
Function: Uninstall POSIX program packagesProduct name: TCP-IP-AP
BS2000 POSIX package installation
IMON support ? : Y (y) mandatory for official package (n) private package (SINLIB...)
name of product : TCP-IP-AP package of product : optional for certain products)
version of product : (format Vmm.n or mmn)
correction state : (format aso, optional for IMON support)
installation userid : (mandatory for no IMON support)
install: DUE help: F1 terminate: F2--------------------------------------------------------------------------------@@@@@@@@@@@@@@@@@@@@@@@@@@@@@@@@@@@@@@@@@@@@@@@@@@@@@@@@@@@@@@@@@@@@@@@@@@@@@@@@

60 U41095-J-Z125-4-76
Frequently asked questions (FAQ) Installing FTP and TELNET
3.4 Frequently asked questions (FAQ)
● Question: What is the meaning of the output of the following messages after the FTP/TELNET client or FTP/TELNET server has been loaded?
BLS0340 UNRESOLVED EXTERNAL REFERENCESBLS0342 ### 'YS6GSBN ……………………BLS0342 ### 'YS6SOCE …………………….BLS0342 ### 'YS6CLOS …………………….BLS0342 ### 'YS6SHTD …………………….BLS0342 ### 'YS6ERRO …………………….
Answer: The programs were started either with START-PROG ...... without PROG-MODE=*ANY or the Socket subsystem SOC6 has not been started.
● Question: Connection setup with open in the FTP or TELNET client takes a very long time. What is the reason?
Answer: For connection setup both the client and the server use DNS functions. If the associated resolver files are not correctly set, this can result in lengthy wait times. This is the case when, for example, the DNS server specified in the resolver files cannot be reached.
The name of the resolver file in BS2000/OSD is:
SYSDAT.SOCKETS.020.SOC6.RESOLV or SYSDAT.SOCKETS.021.SOC6.RESOLV
● Question: What does the following FTP client message mean?
"time limit for server response exceeded"
Answer: The client is waiting for an answer from the server which has not arrived after a predefined number of seconds (30 seconds). The reason for this can, for example, be that the network load is too high.You can often solve the problem by increasing the predefined timeout value of 30 seconds using the FTP user command settime (see the manual “interNet Services User Guide”).

U41095-J-Z125-4-76 61
Installing FTP and TELNET Frequently asked questions (FAQ)
● Question:When I transfer a file using FTP and save it as a PAM file in the target system, the string “C-DATEIENDE” is appended to it. What is the purpose of this, and how can I stop it?
Answer: The string “C-DATEIENDE” is normally used to mark the exact end of a PAM file. With the FTP user command setfile datend off you can stop “C-DATEIENDE” being appended.
● Question: In earlier FTP versions (< V4.0) tabulator characters in a text file were automatically converted into the corresponding number of blanks. This is now no longer the case. What is the reason?
Answer: In the course of supporting restart capability in BS2000/OSD-FTP as of V4.0 the default for the transfer of text files was changed from ftyp text to ftyp textbin. Conse-quently tabulator characters are no longer converted by default.
If you still want to use conversion of the tabulator characters, you can select this via the ftyp command or via the option file:
– ftyp command (see the manual “interNet Services User Guide”). Specify ftyp text on the client or quote site ftyp text on the server.
– Option file of the FTP client (initialCommand option, see the manual “interNet Services User Guide”) or option file of the FTP server ( initialChildCmds option, see page 92)
● Question: In earlier FTP versions (< V4.0), SAM files with a fixed record length for which type binary was specified were entirely in binary format and stored without end-of-record characters. In the current FTP version the target file contains end-of-record characters. How can I prevent this?
Answer: ftyp settings are now also taken into account for SAM files with a fixed record length. If ftyp is not “binary”, the record structure of the original file is retained when the file is transferred. To prevent this, you must select ftyp binary explicitly.

62 U41095-J-Z125-4-76
Frequently asked questions (FAQ) Installing FTP and TELNET
● Question: In BS2000/OSD FTP and TELNET it is possible to generate diagnostic information with the trace and debug commands (on clients) or with the -T and -D options (on servers). What is the difference between trace and -T on the one hand and debug and -D on the other?
Answer: debug and -D generate diagnostic information which concerns the products FTP and TELNET. The highest useful level here is 2.trace and -T, by contrast, output diagnostic information generated by the sockets. The highest useful level here is 9.
● Question: I have started a second FTP or TELNET server but cannot set up a connection to it. What can be the reason?
Answer: The most frequent causes of the problem are:
– Specification of a port number for the server which had already been allocated.– Use of an application name in the server (-A option) which had already been
allocated.
● Question: My FTP login is rejected by the (BS2000/OSD) FTP server with the message invalid login. I cannot find any reason for this behavior, however. What should I do?
Answer: If possible, enable the FTP trace in the FTP server using the following console command:
/INTR <tsn ftpserver>,debug 2
Repeat the login and, using the console command
/INTR <tsn ftpserver>,rdprot
store the trace in the file SYSOUT.TCP-IP-AP.050.FTPD.<MMDDHHMMSS>.
(MMDDHHMMSS is the date and time specification in the formatMonth Day Hour Minute Second).

U41095-J-Z125-4-76 63
Installing FTP and TELNET Frequently asked questions (FAQ)
● Question: How do I reach a BS2000/OSD-FTP server with a Web browser?
Answer: You can access the POSIX directory of the ID <userid> via the following URL:
ftp://<userid>,<account-number>@<host-name>:<port-number>/
This will at least allow you to output the directories. Access to the BS2000/OSD directory is not possible via a Web browser.
● Question: In FTP it is possible to use quote <command> to send the command <command> to the server. However, there is also quote site <command> and quote site exec <command>. What is the difference?
Answer:
– With quote <command> you send FTP commands that conform with the standard to the server.
– With quote site <command> you send BS2000/OSD-specific (“proprietary”) commands to the server which are not defined in the standard. These commands include ftyp, cmod, modc, file, setc, sfil.
– With quote site exec <command> you send BS2000/OSD commands to the server to be executed. To prevent misuse of these commands in the tagret system, this variant is disabled when FTAC is used (option -FTAClevel >0) or via the option -disableSiteExecCommand (see the manual “interNet Services Administrator Guide”).
● Question: When using FTP clients with a graphical user interface (GUI) there is often no way of specifying the account number required for the connection to BS2000/OSD. What should I do in this case?
Answer: In cases like this enter the account number when you enter your ID as follows:
<userid>,<account>

64 U41095-J-Z125-4-76
Frequently asked questions (FAQ) Installing FTP and TELNET
● Question:When fetching a file from a BS2000/OSD FTP server my non-BS2000/OSD FTP client aborts execution after a certain time without data transfer actually having begun.
Answer: Some FTP clients show the progress of the transfer with a progress bar. For this purpose, the clients first of all use the FTP protocol command SIZE to query the size of the file from the server. Generally the server must read the relevant file in full to process this command. With very large files this can naturally take quite a time, with the result that the client’s timeout monitoring clears the connection.Unfortunately on some clients this timeout monitoring cannot be reconfigured to permit longer wait times. In addition, in many cases a SIZE command is sent to the server even when the progress bar has been disabled.
If an enhancement of the configuration options can be obtained from the vendor of the FTP client, there is an option on the BS2000/OSD FTP server to disable the SIZE command using the - disableSizeCommand option (see the manual “interNet Services Administrator Guide”).
As a client cannot require that the server should support the SIZE command, transfer should always function. However, you must accept that the restart mechanism no longer functions because the SIZE command is needed for this.
● Question:
When an LMS file is transferred from an NK2 pubset to an NK4 pubset, the destination file is no longer a valid LMS file.
Answer: Transfer the file initially to a non-NK4 pubset on the destination computer and then use LMS to copy the LMS library to the NK4 pubset.
Alternatively, you can convert the LMS library to an NK4 pubset on the source computer and then use FTP to transfer it to the NK4 pubset of the destination computer.

U41095-J-Z125-4-76 65
4 FTP configuration and operationYou can configure FTP using either the SDF command or the option file.
Please note the limitations on configuration and operation and the use of TLS/SSL and FTAC when carrying out installation using FHS masks (page 46).
If you installed FTP using the SDF command SET-FTP-TELNET-PARAMETERS, FTP was configured during installation (see the chapter “Installing FTP and TELNET” on page 37). If you installed FTP using FHS masks, you have to configure FTP for operation.
This chapter covers the following topics related to the configuration and operation of FTP servers:
● Using TLS/SSL to secure the FTP server (see page 66)
● Configuration of FTP via SDF command (see page 69) or option file (see page 81)
● Startup and shutdown of FTP servers (see page 119)
● Notes on the installation and use of the FTAC functionality (see page 124)
● Enabling/disabling accounting and specifying the accounting file (see page 125)
● Saving the logging file of FTP servers (see page 129)
● Displaying the current settings of the FTP server (see page 129)
● Specification of commands using the console interface (see page 132)
● Using IPv6 addresses in FTP (see page 136)
● Notes on the use of the SNMP subagent for FTP (see page 139)
● Exits for FTP clients and the FTP server (see page 140)
i
i

66 U41095-J-Z125-4-76
TLS/SSL support on the FTP server FTP configuration and operation
4.1 TLS/SSL support on the FTP server
You will find a general overview of SSL in the interNet Services User Guide.
The following instruments are available for providing TLS/SSL support on the FTP server:
● Option file or files
● Installation command SET-FTP-TELNET-PARAMETERS
● FTP login commands
4.1.1 Parameterization of TLS/SSL support on the FTP server
TLS/SSL support offers a wide range of setting options. You can make these settings as follows:
● With the aid of options which are stored in one or more option files and are interpreted when the FTP server is started (see section “Configuring FTP via the option file” on page 81).
● With the aid of the installation command parameters SET-FTP-TELNET-PARAMETERS (see section “Configuration of FTP using the SET-FTP-TELNET-PARAMETERS installation command” on page 69).
The table below shows the options for TLS/SSL support on the FTP server. For the individual options there are also corresponding parameters of theSET-FTP-TELNET-PARAMETERS command.
i
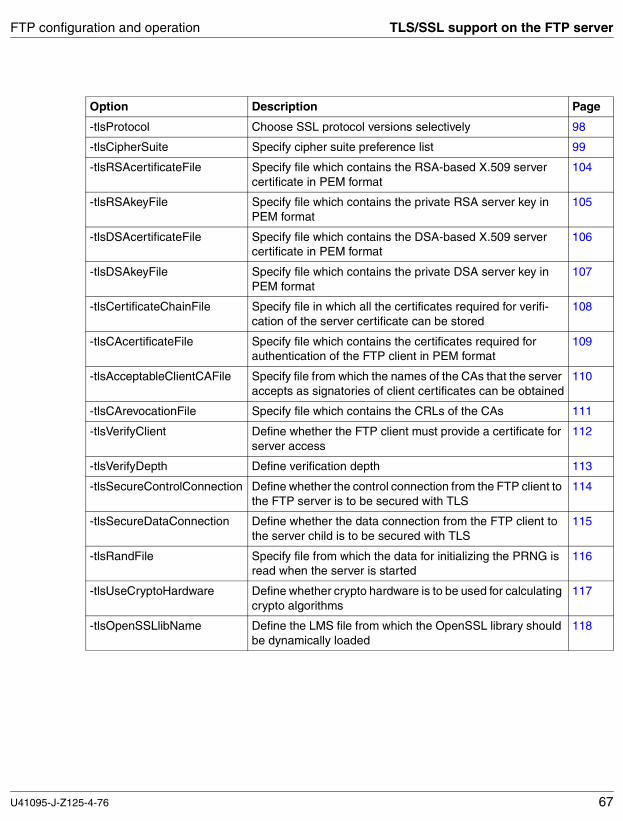
U41095-J-Z125-4-76 67
FTP configuration and operation TLS/SSL support on the FTP server
Option Description Page
-tlsProtocol Choose SSL protocol versions selectively 98
-tlsCipherSuite Specify cipher suite preference list 99
-tlsRSAcertificateFile Specify file which contains the RSA-based X.509 server certificate in PEM format
104
-tlsRSAkeyFile Specify file which contains the private RSA server key in PEM format
105
-tlsDSAcertificateFile Specify file which contains the DSA-based X.509 server certificate in PEM format
106
-tlsDSAkeyFile Specify file which contains the private DSA server key in PEM format
107
-tlsCertificateChainFile Specify file in which all the certificates required for verifi-cation of the server certificate can be stored
108
-tlsCAcertificateFile Specify file which contains the certificates required for authentication of the FTP client in PEM format
109
-tlsAcceptableClientCAFile Specify file from which the names of the CAs that the server accepts as signatories of client certificates can be obtained
110
-tlsCArevocationFile Specify file which contains the CRLs of the CAs 111
-tlsVerifyClient Define whether the FTP client must provide a certificate for server access
112
-tlsVerifyDepth Define verification depth 113
-tlsSecureControlConnection Define whether the control connection from the FTP client to the FTP server is to be secured with TLS
114
-tlsSecureDataConnection Define whether the data connection from the FTP client to the server child is to be secured with TLS
115
-tlsRandFile Specify file from which the data for initializing the PRNG is read when the server is started
116
-tlsUseCryptoHardware Define whether crypto hardware is to be used for calculating crypto algorithms
117
-tlsOpenSSLlibName Define the LMS file from which the OpenSSL library should be dynamically loaded
118

68 U41095-J-Z125-4-76
TLS/SSL support on the FTP server FTP configuration and operation
4.1.2 FTP login commands
The FTP server supports the FTP login commands AUTH, PBSZ and PROT in the format required by RFC 4217:
● The TLS, TLS-C, TLS-P and SSL parameters are permissible for the AUTH command. SSL, TLS and TLS-C have the same meaning and request TLS security only for the control connection. With TLS-P, security of the data connection is also requested.
● The PBSZ command is only supported pro forma with the parameter 0 to ensure a login process as per RFC 2228.
● The PROT command is supported with the parameters C and P where C (= Clear) disables encryption of the data connection andP (= Private) enables it.
● If TLS support is enabled, the FEAT command [RFC 2389] reports this with additional enumeration of AUTH TLS, PBSZ and PROT.
STAT command output is complemented by two lines. These lines first of all document whether the control connection is secured with TLS. Any algorithms with which the control and data connections are secured are also specified.
Examples
1. Non-secured control connection:
Protected control channel: No, cipher: clearPrivate data channel: No
2. Control connection secured with Triple DES, data connection not secured:
Protected control channel: Yes, cipher: DES-CBC3-SHA (168 bits)Private data channel: No
3. Control and data connections secured with Triple DES:
Protected control channel: Yes, cipher: DES-CBC3-SHA (168 bits)Private data channel: Yes

U41095-J-Z125-4-76 69
FTP configuration and operation Configuration via SET-FTP-TELNET-PARAMETERS
4.2 Configuration of FTP using the SET-FTP-TELNET-PARAMETERS installation command
For the full command syntax and the description of the installation operands, see page 38.
SET-FTP-TELNET-PARAMETERS
(...)
, FTP-SERVER-PROC=*NO / *CREATE(...)
*CREATE(...)
⏐ JOB-NAME= *STD / <name 1..5>
⏐ , JOB-CLASS= *STD / <name 1..8>
⏐ , CPU-TIME= *STD / <integer 1..32767>
⏐ , PRIORITY= *STD / <integer 0..255>
⏐ , DEBUG= *STD / <integer 0..9>
⏐ , TRACE= *STD / <integer 0..9>
⏐ , MAXIMUM-CONNECTIONS= *STD / <integer 1..900>
⏐ , STATION-ID= *STD / <integer 0..6>
⏐ , TRANSFER-JOB-CLASS= *STD / <name 1..8>
⏐ , TRANSFER-CPU-TIME= *STD / <integer 1..32767>
⏐ , TIMEOUT-VALUE= *STD / <integer 1..32767>
⏐ , SYSTEM-EXIT-LEVEL= *STD/<integer 0..3>
⏐ , FTAC-SUPPORT= *STD / *NO / *YES(...)
⏐ *YES(...)
⏐ ⏐ LEVEL= *STD / <integer 1..2>
⏐ ⏐ , JOB-CLASS= *STD / <name 1..8>
⏐ ⏐ , ENTER-FILE= *STD / <filename 1..54_without-generation-version>
⏐ ⏐ , SERVER-INFORMATION-FILE= *STD / <filename 1..54_without-generation-version>
⏐ ⏐ ,FTAC-USERID=*STD /<name 1..8>
⏐ , TLS-SUPPORT= *STD / *NO / *YES(...)
⏐ *YES(...)
⏐ ⏐ PROTOCOL= *STD / <text 1..80>
⏐ ⏐ , CIPHER-SUITE= *STD / <text 1..80_with-lower-case>
⏐ ⏐ , RSA-CERTIFICATE-FILE= *STD / *NONE / <filename 1..54_without-generation-version>
⏐ ⏐ , RSA-KEY-FILE= *STD / *NONE / <filename 1..54_without-generation-version>
⏐ ⏐ , DSA-CERTIFICATE-FILE= *STD / *NONE / <filename 1..54_without-generation-version>
⏐ ⏐ , DSA-KEY-FILE= *STD / *NONE / <filename 1..54_without-generation-version>
⏐ ⏐ , CA-CERTIFICATE-FILE= *STD / *NONE / <filename 1..54_without-generation-version>
⏐ ⏐ , CLIENT-CA-FILE= *STD / *NONE / <filename 1..54_without-generation-version>
⏐ ⏐ , CERT-CHAIN-FILE= *STD / *NONE / <filename 1..54_without-generation-version>
(...)
i

70 U41095-J-Z125-4-76
Configuration via SET-FTP-TELNET-PARAMETERS FTP configuration and operation
FTP-SERVER-PROC =Parameters for the FTP server
FTP-SERVER-PROC=*NOAn installation may not be performed for the FTP server.
FTP-SERVER-PROC=*CREATE(...)The FTP server should be configured. The enter procedure for starting the FTP server is created from the parameters entered.
JOB-NAME=This name is used as a prefix. To construct the terminal name of the current connection, the sequence number is appended to the JOB-NAME. See also the -appPrefix option on page 82.
JOB-NAME=*STDCorresponds to the entry FTPSR or the value in the installation file.
JOB-NAME=<name 1..5>Job name
JOB-CLASS=The job class in which the server process should run. Make sure that Enter jobs with the parameters TIME=NTL and PRIORITY=(120,EXPRESS) may be started in this job class.
JOB-CLASS=*STDCorresponds to the standard job class on the system or the value in the installation file.
JOB-CLASS=<name 1..8>Name of job class.
CPU-TIME=Maximum CPU time available for the server process.
CPU-TIME=*STDCorresponds to the entry NTL or the value in the installation file.
CPU-TIME=<integer 1..32767>CPU time in seconds.
PRIORITY=Priority with which the server process is to run.
PRIORITY=*STDCorresponds to the entry 120 or the value in the installation file.
PRIORITY=<integer 0..255>Server priority.

U41095-J-Z125-4-76 71
FTP configuration and operation Configuration via SET-FTP-TELNET-PARAMETERS
DEBUG=Trace at user level. See also the -debugLevel option on page 84.
DEBUG=*STDCorresponds to the entry 0 or the value in the installation file.
DEBUG=<integer 0..9>Debug level.
TRACE=Trace for TCP/IP (socket) interface. See also the -socketTraceLevel option on page 89.
TRACE=*STDCorresponds to the entry 0 or the value in the installation file.
TRACE=<integer 0..9>Socket trace level.
MAXIMUM-CONNECTIONS=Maximum number of connections that the server is to operate. See also the -maxConn option on page 87.
MAXIMUM-CONNECTIONS=*STDCorresponds to the entry 15 or the value in the installation file.
MAXIMUM-CONNECTIONS=<integer 1..900>Maximum number of connections that the server is to operate.
STATION-ID=Number of places with which the name of the remote computer or the job name of the FTP server is to be taken into account in the terminal name. See also the -DSSidLength option on page 89.
STATION-ID=*STDCorresponds to the entry 0 or the value in the installation file.
STATION-ID=<integer 0..6>Number of places with which the name of the remote computer or the job name of the FTP server is to be taken into account in the terminal name.
TRANSFER-CPU-TIME=CPU time available for the job run of the child process. See also the -logonExtension option on page 87.
TRANSFER-CPU-TIME=*STDCorresponds to the entry NTL or the value in the installation file.
TRANSFER-CPU-TIME=<integer 1..32767>CPU time available for the job run of the child process.

72 U41095-J-Z125-4-76
Configuration via SET-FTP-TELNET-PARAMETERS FTP configuration and operation
TRANSFER-JOB-CLASS=The job class into which the child process jobs are to be classified. See also the -logonExtension option on page 87.
TRANSFER-JOB-CLASS=*STDCorresponds to the standard job class of the system or the value in the installation file.
TRANSFER-JOB-CLASS=<name 1..8> Default: Standard dialog job class on the system.
TIMEOUT-VALUE=Time after which the connection between the client and server will be aborted if no activity was observed in the specified period between the client and server. See also the -timeout option on page 88.
TIMEOUT-VALUE=*STDCorresponds to the default setting of 3600 seconds.
TIMEOUT-VALUE=<integer 1..32767>Timeout value in seconds.
SYSTEM-EXIT-LEVEL=The FTP system exit is enabled with a value other than 0. If FTAC-SUPPORT=*YES is also set, the system exit is only called for the sub-events FTPBYE and FTPCMDE or otherwise for all sub-events. See also the -systemExit option on page 91.
SYSTEM-EXIT-LEVEL=*STDCorresponds to the entry 0 or the value in the installation file.
SYSTEM-EXIT-LEVEL=<integer 0..3>System exit level.
FTAC-SUPPORT=Specifies whether or not the FTP server is to use FTAC functionality.
FTAC-SUPPORT=*STDDefault: *NO or value in the specified installation file INSTALLATION-FILE.
FTAC-SUPPORT=*NO(...)The transfer admission check using FTAC functionality is not performed.
FTAC-SUPPORT=*YES(...)The transfer admission check is performed using FTAC functionality.

U41095-J-Z125-4-76 73
FTP configuration and operation Configuration via SET-FTP-TELNET-PARAMETERS
LEVEL=FTAC level: Level at which the FTAC transfer admission check is performed. A value of 1 indicates that access via a dialog id is not checked by FTAC but additional access is possible with a FTAC transfer admission. A value of 2 means that access via a dialog id is also checked by FTAC (using the respective admission set). Access with the TSOS ID may not be possible from value 1. See also the -allowTSOSLogin option on page 94 and the -FTAClevel option on page 83.
LEVEL=*STDThis corresponds to value 1.
LEVEL=<integer 1..2>FTAC level.
JOB-CLASS=Job class in which the child processes are to run. Make sure that Enter jobs with the parameter SCHEDULING-TIME=*PARAMETERS(START=*IMMEDIATELY) may be started in this job class. The only jobs that can run in this job class are those that are started in the framework of a logon with FTAC transfer admission. See also the -childJobClass option on page 86.
JOB-CLASS=*STD Corresponds to the standard batch job class on the current system.
JOB-CLASS=<name 1..8>Name of the job class.
ENTER-FILE=Name of the Enter file that starts the child process. See also the -childEnterJob option on page 85.
ENTER-FILE=*STDCorresponds to the file SYSENT.TCP-IP-AP.050.FTPDC.
ENTER-FILE=<filename 1..54_without-generation-version>Name of the Enter file that starts the child process.
SERVER-INFORMATION-FILE=Name of the file for exchanging information between the server and child process. This file contains the port number, for example, under which the server can be accessed for the child process. See also the -serverInfoFile option on page 85.
SERVER-INFORMATION-FILE=*STDCorresponds to the file SYSDAT.TCP-IP-AP.050.SI.
SERVER-INFORMATION-FILE=<filename 1..54_without-generation-version>Name of the file for exchanging information between the server and child process.
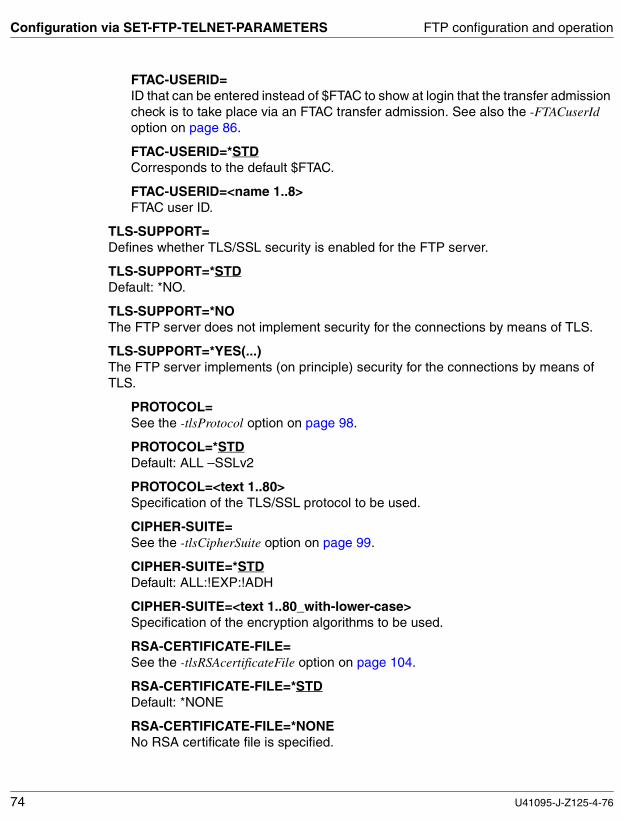
74 U41095-J-Z125-4-76
Configuration via SET-FTP-TELNET-PARAMETERS FTP configuration and operation
FTAC-USERID=ID that can be entered instead of $FTAC to show at login that the transfer admission check is to take place via an FTAC transfer admission. See also the -FTACuserId option on page 86.
FTAC-USERID=*STDCorresponds to the default $FTAC.
FTAC-USERID=<name 1..8>FTAC user ID.
TLS-SUPPORT=Defines whether TLS/SSL security is enabled for the FTP server.
TLS-SUPPORT=*STDDefault: *NO.
TLS-SUPPORT=*NOThe FTP server does not implement security for the connections by means of TLS.
TLS-SUPPORT=*YES(...)The FTP server implements (on principle) security for the connections by means of TLS.
PROTOCOL=See the -tlsProtocol option on page 98.
PROTOCOL=*STDDefault: ALL –SSLv2
PROTOCOL=<text 1..80>Specification of the TLS/SSL protocol to be used.
CIPHER-SUITE=See the -tlsCipherSuite option on page 99.
CIPHER-SUITE=*STDDefault: ALL:!EXP:!ADH
CIPHER-SUITE=<text 1..80_with-lower-case>Specification of the encryption algorithms to be used.
RSA-CERTIFICATE-FILE=See the -tlsRSAcertificateFile option on page 104.
RSA-CERTIFICATE-FILE=*STDDefault: *NONE
RSA-CERTIFICATE-FILE=*NONENo RSA certificate file is specified.

U41095-J-Z125-4-76 75
FTP configuration and operation Configuration via SET-FTP-TELNET-PARAMETERS
RSA-CERTIFICATE-FILE=<filename 1..54_without-generation-version>Name of the RSA certificate file.
RSA-KEY-FILE=See the -tlsRSAkeyFile option on page 105.
RSA-KEY-FILE=*STDDefault: *NONE
RSA-KEY-FILE=*NONENo RSA key file is specified.
RSA-KEY-FILE=<filename 1..54_without-generation-version>Name of the RSA key file.
DSA-CERTIFICATE-FILE=See the -tlsDSAcertificateFile option on page 106.
DSA-CERTIFICATE-FILE=*STDDefault: *NONE
DSA-CERTIFICATE-FILE=*NONENo DSA certificate file is specified.
DSA-CERTIFICATE-FILE=<filename 1..54_without-generation-version>Name of the DSA certificate file.
DSA-KEY-FILE=See the -tlsDSAkeyFile option on page 107.
DSA-KEY-FILE=*STDDefault: *NONE
DSA-KEY-FILE=*NONENo DSA key file is specified.
DSA-KEY-FILE=<filename 1..54_without-generation-version>Name of the DSA key file.
CA-CERTIFICATE-FILE=See the -tlsCACertificateFile option on page 109.
CA-CERTIFICATE-FILE=*STDDefault: *NONE
CA-CERTIFICATE-FILE=*NONENo CA certificate file is specified.
CA-CERTIFICATE-FILE=<filename 1..54_without-generation-version>Name of the CA certificate file.

76 U41095-J-Z125-4-76
Configuration via SET-FTP-TELNET-PARAMETERS FTP configuration and operation
CLIENT-CA-FILE=See the -tlsAcceptableClientCAFile option on page 110.
CLIENT-CA-FILE=*STDDefault: *NONE
CLIENT-CA-FILE=*NONENo file is specified.
CLIENT-CA-FILE=<filename 1..54_without-generation-version>Name of the file with the certificates of the accepted CAs.
CERT-CHAIN-FILE=See the -tlsCertificateChainFile option on page 108.
CERT-CHAIN-FILE=*STDDefault: *NONE
CERT-CHAIN-FILE=*NONENo CA certificate chain file is specified.
CERT-CHAIN-FILE=<filename 1..54_without-generation-version>Name of the CA certificate chain file.
CA-REVOCATION-FILE=See the -tlsCArevocationFile option on page 111.
CA-REVOCATION-FILE=*STDDefault: *NONE
CA-REVOCATION-FILE=*NONENo CA revocation file is specified.
CA-REVOCATION-FILE=<filename 1..54_without-generation-version>Name of the CA revocation file.
RANDOM-FILE=See the -tlsRandFile option on page 116.
RANDOM-FILE=*STDDefault: SYSDAT.TCP-IP-AP.050.FTPD.RAND
RANDOM-FILE=<filename 1..54_without-generation-version>Name of the random numbers file.
SSL-LIBRARY=See the -tlsOpenSSLlibName option on page 118.
SSL-LIBRARY=*STDDefault: LMS library to which the IMON logical ID SYSLNK refers.

U41095-J-Z125-4-76 77
FTP configuration and operation Configuration via SET-FTP-TELNET-PARAMETERS
SSL-LIBRARY=*NONENo LMS library is specified.
SSL-LIBRARY=<filename 1..54_without-generation-version>Name of the LMS library which contains the OpenSSL dynamically loadable module.
VERIFY-CLIENT=See the -tlsVerifyClient option on page 112.
VERIFY-CLIENT=*STDDefault: *NONE
VERIFY-CLIENT=*NONENo certificate is requested from the FTP client.
VERIFY-CLIENT=*OPTIONALA certificate is requested from the FTP client. However, if no certificate or only an invalid one is returned, the FTP client is still granted access.
VERIFY-CLIENT=*REQUIREA certificate is requested from the FTP client. However, if no certificate or only an invalid one is returned, the FTP client is denied access.
VERIFY-DEPTH=See the -tlsVerifyDepth option on page 113.
VERIFY-DEPTH=*STDDefault: 1
VERIFY-DEPTH=<integer 1..32767>Number of certificates between the client certificate and the certificate which is known to the FTP server (including the latter).
SEC-CONTROL-CONNECTION=See the -tlsSecureControlConnection option on page 114.
SEC-CONTROL-CONNECTION=*STDDefault: *OPTIONAL
SEC-CONTROL-CONNECTION=*NONEThe control connection is never secured with TLS. Corresponding requests from the client are rejected.
SEC-CONTROL-CONNECTION=*OPTIONALThe control connection is secured if the client requests this.
SEC-CONTROL-CONNECTION=*REQUIRENo login is permitted via a non-secured control connection.

78 U41095-J-Z125-4-76
Configuration via SET-FTP-TELNET-PARAMETERS FTP configuration and operation
SEC-DATA-CONNECTION=See the -tlsSecureDataConnection option on page 115.
SEC-DATA-CONNECTION=*STDDefault: *OPTIONAL
SEC-DATA-CONNECTION=*NONEThe data connection is never secured with TLS. Corresponding requests from the client are rejected.
SEC-DATA-CONNECTION=*OPTIONALThe data connection is secured if the client requests this.
SEC-DATA-CONNECTION=*REQUIRENo data transfer is permitted via a non-protected data connection.
USE-CRYPTO-HARDWARE=See the -tlsUseCryptoHardware option on page 117.
USE-CRYPTO-HARDWARE=*STDDefault: *NO
USE-CRYPTO-HARDWARE=*NONo crypto hardware is used.
USE-CRYPTO-HARDWARE=*SERVERCrypto hardware is used by the FTP server process.
USE-CRYPTO-HARDWARE=*CHILDCrypto hardware is used by the FTP child processes.
USE-CRYPTO-HARDWARE=*ALLCrypto hardware is used by all FTP server processes.
ACCOUNTING=Specifies whether FTP accounting records are to be collected. See also the -acctActive and -acctFile options on page 93.
ACCOUNTING=*STDDefault: *NO
ACCOUNTING=*NOThe accounting records are not collected.
ACCOUNTING=*YES(...)Accounting records are collected.
FILE=Name of the accounting file.
FILE=*STDThis corresponds to the file SYSDAT.TCP-IP-AP.050.FTPD.ACCOUNTING.
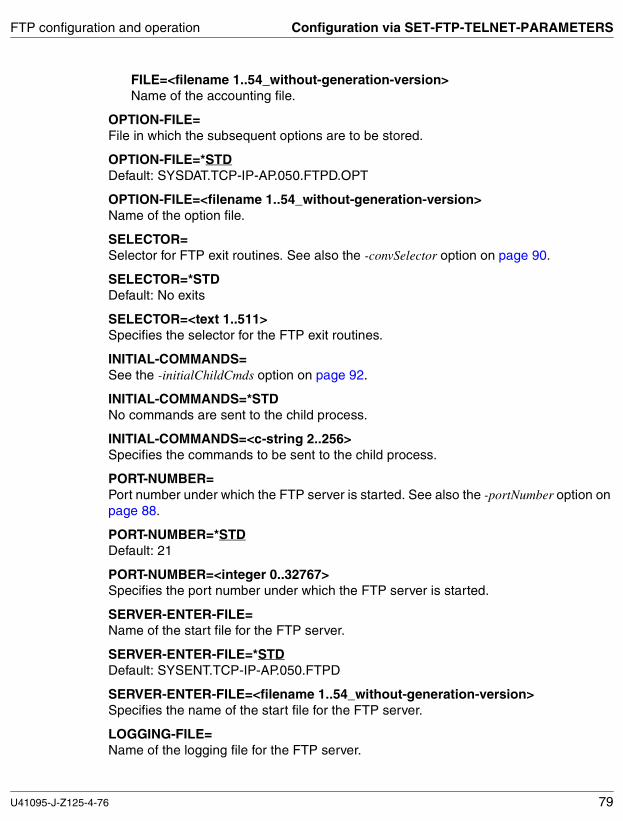
U41095-J-Z125-4-76 79
FTP configuration and operation Configuration via SET-FTP-TELNET-PARAMETERS
FILE=<filename 1..54_without-generation-version>Name of the accounting file.
OPTION-FILE=File in which the subsequent options are to be stored.
OPTION-FILE=*STD Default: SYSDAT.TCP-IP-AP.050.FTPD.OPT
OPTION-FILE=<filename 1..54_without-generation-version> Name of the option file.
SELECTOR=Selector for FTP exit routines. See also the -convSelector option on page 90.
SELECTOR=*STDDefault: No exits
SELECTOR=<text 1..511>Specifies the selector for the FTP exit routines.
INITIAL-COMMANDS=See the -initialChildCmds option on page 92.
INITIAL-COMMANDS=*STDNo commands are sent to the child process.
INITIAL-COMMANDS=<c-string 2..256>Specifies the commands to be sent to the child process.
PORT-NUMBER=Port number under which the FTP server is started. See also the -portNumber option on page 88.
PORT-NUMBER=*STDDefault: 21
PORT-NUMBER=<integer 0..32767>Specifies the port number under which the FTP server is started.
SERVER-ENTER-FILE=Name of the start file for the FTP server.
SERVER-ENTER-FILE=*STDDefault: SYSENT.TCP-IP-AP.050.FTPD
SERVER-ENTER-FILE=<filename 1..54_without-generation-version>Specifies the name of the start file for the FTP server.
LOGGING-FILE=Name of the logging file for the FTP server.

80 U41095-J-Z125-4-76
Configuration via SET-FTP-TELNET-PARAMETERS FTP configuration and operation
LOGGING-FILE=*STDDefault: SYSOUT.TCP-IP-AP.050.FTPD
LOGGING-FILE=<filename 1..54_without-generation-version>Specifies the name of the logging file for the FTP server.
ALLOW-TSOS-LOGIN=See the -allowTsosLogin option on page 94.
ALLOW-TSOS-LOGIN=*STDAs in the older versions, the behavior is determined by the level setting for FTAC support.
ALLOW-TSOS-LOGIN=*NOA login attempt is rejected when the TSOS ID is used.
ALLOW-TSOS-LOGIN=*YESA login attempt is permitted when the TSOS ID is used.
ALLOW-TSOS-LOGIN=*TLSA login attempt is permitted only when the TSOS ID is used via a connection secured with TLS/SSL.

U41095-J-Z125-4-76 81
FTP configuration and operation Installing FTP via the option file
4.3 Configuring FTP via the option file
When the SET-FTP-TELNET-PARAMETERS command is executed (see page 38) an option file is generated in which the various FTP server parameters are stored. The default file name for the option file is:
SYSDAT.TCP-IP-AP.050.FTPD.OPT
Under $TSOS, the execution ID.
If a file with this name exists in the FTP server’s execution ID it is interpreted when the FTP server is started via the FTP server start file (default file name: SYSENT.TCP-IP-AP.050.FTPD), and the FTP server is configured accordingly.
You can thus make changes to the FTP server parameters via the option file without needing to start installation again using the SET-FTP-TELNET-PARAMETERS command.
If you want to use a file with a different name as the option file, enter the following option in the start file:
-M option-file-name
Option file and parameter line options
You can also specify the parameter line options supported in earlier versions. In this case you can choose between the familiar option name consisting of one character and the new, more easily recognizable name consisting of several characters.
Mixed application of the option file and options in the parameter line is also possible. Here only option names comprising one character are permitted in the parameter line. If a particular option is specified in both the parameter line and in the option file, the option specified in the parameter line has priority.

82 U41095-J-Z125-4-76
-appPrefix | -A FTP configuration and operation
Notation of the options in the option file
The various options must be entered in the option file according to the following rules:
● Each option must be in a separate line
● If an option’s arguments extend over more than one line, each line that is to be continued must be terminated with the continuation character “\”.
● A line beginning with the character “#” in column 1 is ignored when the file is read in.
● No distinction is made between upper and lower case in the option names.
Description of the options
The individual options are described below:
● With the options that correspond to the parameter line options already supported, the name, which consists of one character, is specified as an alias name.
● The options which govern TLS/SSL support in the FTP server are marked by the prefix “tls” in the option name.
-appPrefix | -A
The -appPrefix option is used to specify a name prefix. This name prefix is used to form the terminal name by appending a serial number. The job started by the server for each client is given this name prefix as the job name.
<job-name-prefix>Name prefixDefault: FTPSR
-appPrefix
-A
<job-name-prefix>

U41095-J-Z125-4-76 83
FTP configuration and operation -FTAClevel | -B
-FTAClevel | -B
The -FTAClevel option is used to specify the FTAC level. The FTAC level specifies the level at which the FTAC transfer admission check is performed.
0FTAC is not used.0 is the default
1Access via a dialog ID is not checked by FTAC. Access is also possible with an FTAC transfer admission.
2Access via a dialog ID is also checked by FTAC on the basis of the relevant admission set.
If the FTAC level > 0, it may be that access is not possible with the TSOS ID (see the -allowTsosLogin option on page 94).
-FTAClevel
-B
0 | 1 | 2
i

84 U41095-J-Z125-4-76
-childName | -C, -debugLevel | -D FTP configuration and operation
-childName | -C
The -childName option is used to specify the path for calling the child program.
<path-for-child-call>Path for calling the child program.Default: FTPDC
-debugLevel | -D
The -debugLevel option is used to specify the debug level. The debug level defines whether or which diagnostic information on the FTP server run is written to the logging file.
<integer 0..9>Debug level.“0” disables logging. The higher the value, the more information is placed in the logging file.Default: 0
-childName
-C
<path-for-child-call>
-debugLevel
-D
<integer 0..9>

U41095-J-Z125-4-76 85
FTP configuration and operation -serverInfoFile | -E, -childEnterJob | -F
-serverInfoFile | -E
The -serverInfoFile is used to specify a file for exchanging information between the server and child processes. This file contains, for example, the port number under which the server can be reached by the child process. This only applies for child processes which are started in the context of a login via an FTAC transfer admission.
<file-name 1..54>Name of the file used for exchanging information between the server and child processes.Default: SYSDAT.TCP-IP-AP.050.SI
-childEnterJob | -F
The -childEnterJob option is used to specify an enter file which starts the child process if login takes place via an FTAC transfer admission.
<file-name 1..54>Name of the enter file.Default: SYSDAT.TCP-IP-AP.050.FTPDC
-serverInfoFile
-E
<file-name 1..54>
-childEnterJob
-F
<file-name 1..54>

86 U41095-J-Z125-4-76
-childJobClass | -J, -FTACuserId | -K FTP configuration and operation
-childJobClass | -J
The -childJobClass option is used to specify a job class in which the child processes run which are started via an FTAC transfer admission.
Ensure that Enter jobs can be started with the parameter SCHEDULING-TIME=*PARAMETERS(START=*IMMEDIATELY) in this job class.
<job-class 1..8>Job class in which the child processes run.The default is system-dependent.
-FTACuserId | -K
The -FTACuserId option is used to specify a pseudo ID which is used at login to show that login is not to be performed with a genuine BS2000/OSD user ID but with an FTAC transfer admission.
<userid 1..8>Pseudo ID.Default: $FTAC
-childJobClass
-J
<job-class 1..8>
-FTACuserId
-K
<userid 1..8>

U41095-J-Z125-4-76 87
FTP configuration and operation -logonExtension | -L, -maxConn | -N
-logonExtension | -L
The -logonExtension option can be used to specify additional information for the logon command for starting the FTP child. This includes above all the job class and the CPU limit for the interactive job.
<logon-ext 1..511>Additional information for the logon command for starting the FTP child.The default is system-dependent.
-maxConn | -N
The -maxConn option is used to specify the maximum number of connections which the FTP server is to handle simultaneously.
<integer 1..900>Maximum number of connections which the FTP server is to handle simultaneously.Default: 15
-logonExtension
-L
<logon-ext 1..511>
-maxConn
-N
<integer 1..900>

88 U41095-J-Z125-4-76
-timeout | -O, -portNumber | -N FTP configuration and operation
-timeout | -O
The -timeout option is used to select the timeout interval for the connection between the FRP server and FTP client. If no activity is detected between the server and the client in the specified time, the connection is cleared down.
<number-of-seconds>Timeout interval in seconds.Default: 3600
-portNumber | -P
The -portNumber option is used to specify the port number under which the FTP server can be reached.
<integer 1..65535>Port number under which the FTP server can be reached.Default: 21
-timeout
-O
<number-of-seconds>
-portNumber
-P
<integer 1..65535>

U41095-J-Z125-4-76 89
FTP configuration and operation -DSSidLength | -S, -socketTraceLevel | -T
-DSSidLength | -S
The -DSSidLength is used to define the name of the remote computer or job name of the FTP server to be included in the terminal name.
<integer 0..6>Number of digits to be included.Default: 0
-socketTraceLevel | -T
The -socketTraceLevel option is used to specify the socket trace level. The socket trace level specifies whether or which diagnostic information of the TCP/IP (socket) system is to be written to the logging file.
<integer 0..9>Socket trace level“0” disables logging. The higher the value, the more information is placed in the logging file.Default: 0
-DSSidLength
-S
<integer 0..6>
-socketTraceLevel
-T
<integer 0..9>

90 U41095-J-Z125-4-76
-convSelector | -U, -verbose | -V FTP configuration and operation
-convSelector | -U
The -convSelector option is used to enable and disable user-defined exit routines of the FTP server. Details on this are provided in the section “Exit mechanisms for the FTP server and FTP client” on page 149.
<selector-definition 1..511>Selector definitionDefault: <empty-string>, in other words no user-defined exit routines.
-verbose | -V
The -verbose option is the short form of -debugLevel 1 and -socketTraceLevel 1.
-convSelector
-U
<selector-definition 1..511>
-verbose
-V

U41095-J-Z125-4-76 91
FTP configuration and operation -systemExit | -X
-systemExit | -X
The -systemExit option is used to enable and disable the system exit.
0System exit is disabled.0 is the default.
1System exit is enabled.
-systemExit
-X
0 | 1

92 U41095-J-Z125-4-76
-initialChildCmds FTP configuration and operation
-initialChildCmds | -Z
The -initialChildCmds option is used to specify commands which are sent to the child program directly after it has started. The commands suitable for use here are above all those which make permanent settings, such as the RFC 959 commands type, stru and mode and the BS2000/OSD proprietary commands ftyp, setc, modc, sfil and cmod. In special cases it may make sense to use the RFC 959 commands dele and cwd and the BS2000/OSD proprietary command file. The BS2000/OSD proprietary commands are described in the manual “interNet Services User Guide”. Please note: In contrast to the method of use described there, the proprietary commands may not be prefixed with a “site” in the option argument. Each command in the command string must be terminated with \n or \N.
You can use the -initialChildCmds option to change defaults, for example. Thus with -initialChildCmds FTYP text\nSFIL pademptyrec on\n you can set the FTYP default to text (this is the default in older FTP versions) and have empty SAM records padded with a blank.
<string 2..511>String containing the commands.Default: <empty-string>, in other words no command.
-initialChildCmds
-Z
<string 2..511>

U41095-J-Z125-4-76 93
FTP configuration and operation -acctActive, -acctFile
-acctActive
The -acctActive option is used to enable and disable collecting of FTP accounting data (FTP accounting).
ONFTP accounting is enabled.
OFFFTP accounting is disabled.OFF is the default.
-acctFile
The -acctFile option is used to specify the name of the accounting file for FTP accounting in which the accounting records are stored. The accounting file is a SAM file with variable record length.
If an accounting file with this name already exists for FTP accounting, this is updated when the FTP server starts up.
<accounting-file-name 1..54>Name of the accounting file for FTP accounting.Default: SYSDAT.TCP-IP-AP.050.FTPD.ACCOUNTING
-acctActive
ON | OFF
-acctFile
<accounting-file-name1..54>

94 U41095-J-Z125-4-76
-allowTsosLogin FTP configuration and operation
-allowTsosLogin
The -allowTsosLogin option is used to specify whether or under what conditions a login is possible under the user ID TSOS.
Until now, a login under the user ID TSOS was rejected if FTAC support was enabled (-FTAClevel > 0, see page 83).
With the -allowTsosLogin option you can now specify whether a TSOS login is possible regardless of the setting of the -FTAClevel option:
● If you do not use the -allowTsosLogin option, whether or not a TSOS login is possible depends on the -FTACLevel option, as in interNet Services V2.0.
● If you use the -allowTsosLogin option, the following argument-dependent conditions described below apply regardless of FTAC activation.
NOA login attempt under TSOS is always rejected.
TLSWhen “TLS” is specified, login can only take place via a connection secured with TLS/SSL.
YESThere are no restrictions for the TSOS login.
For security reasons only the value “NO” or “TLS” should be used. “NO” should be preferred.
-allowTsosLogin
NO | TLS | YES
i

U41095-J-Z125-4-76 95
FTP configuration and operation -defaultFTACsecurityLevel
-defaultFTACsecurityLevel
The -defaultFTACsecurityLevel option is used to define an FTAC security level that is to be assigned to the FTP partners. If a lower value is specified in an admission set, the associated basic function is not available to FTP partners.
If, for example, the majority of FT partners are assigned a security level of 80, and if FTP partners are to have access to the same basic functions as these FT partners, then -defaultFTACsecurityLevel 80 should be used.
<integer 1..100> Security level to be assigned to the FTP partners Default: 100
-defaultFTACsecurityLevel
<integer 1..100>

96 U41095-J-Z125-4-76
-disableSiteExecCommand FTP configuration and operation
-disableSiteExecCommand
The -disableSiteExecCommand option is used to specify whether the server supports the proprietary FTP protocol command SITE EXEC. This command allows the FTP client user to execute BS2000/OSD commands on the server and thus opens up great potential for misuse. Consequently this command has to date always been disabled when FTAC support is activated (-FTAClevel > 0, see page 83), while it is still supported in all other cases.
With the -disableSiteExecCommand option you can enable or disable the SITE EXEC command regardless of the -FTAClevel option:
● If you do not use the -disableSiteExecCommand option, the usability of the command depends on the -FTACLevel option, as in interNet Services < V3.0.
● If you use the -disableSiteExecCommand option with the argument “YES”, the command is never available.
● If you use the -disableSiteExecCommand option with the argument “NO”, the command is always available.
NOSupport of the SITE EXEC command is not disabled.
YESSupport of the SITE EXEC command is disabled.
-disableSiteExecCommand
NO | YES
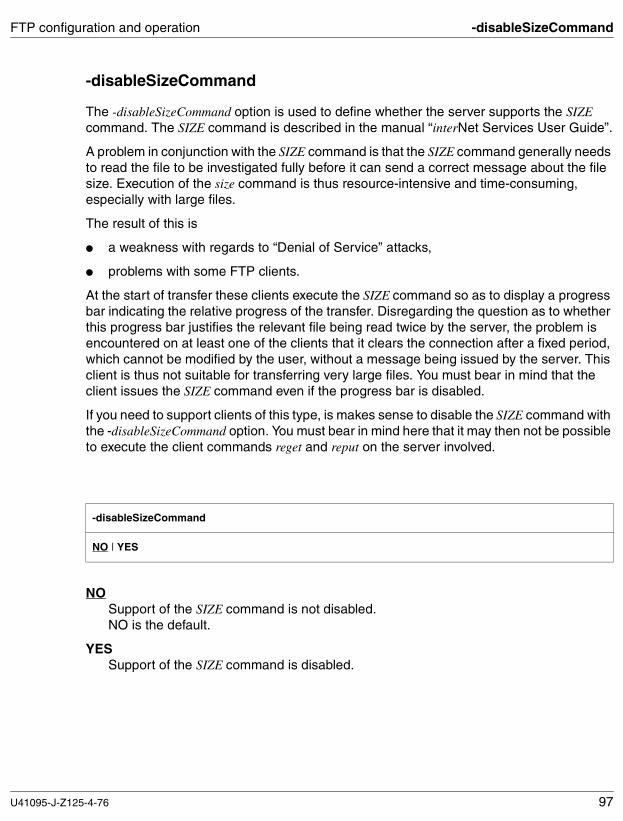
U41095-J-Z125-4-76 97
FTP configuration and operation -disableSizeCommand
-disableSizeCommand
The -disableSizeCommand option is used to define whether the server supports the SIZE command. The SIZE command is described in the manual “interNet Services User Guide”.
A problem in conjunction with the SIZE command is that the SIZE command generally needs to read the file to be investigated fully before it can send a correct message about the file size. Execution of the size command is thus resource-intensive and time-consuming, especially with large files.
The result of this is
● a weakness with regards to “Denial of Service” attacks,
● problems with some FTP clients.
At the start of transfer these clients execute the SIZE command so as to display a progress bar indicating the relative progress of the transfer. Disregarding the question as to whether this progress bar justifies the relevant file being read twice by the server, the problem is encountered on at least one of the clients that it clears the connection after a fixed period, which cannot be modified by the user, without a message being issued by the server. This client is thus not suitable for transferring very large files. You must bear in mind that the client issues the SIZE command even if the progress bar is disabled.
If you need to support clients of this type, is makes sense to disable the SIZE command with the -disableSizeCommand option. You must bear in mind here that it may then not be possible to execute the client commands reget and reput on the server involved.
NOSupport of the SIZE command is not disabled.NO is the default.
YESSupport of the SIZE command is disabled.
-disableSizeCommand
NO | YES
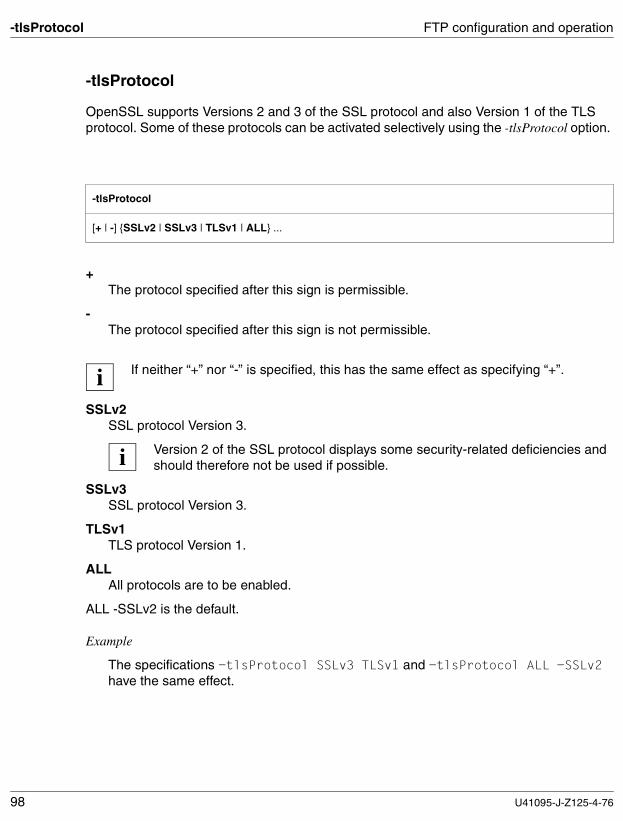
98 U41095-J-Z125-4-76
-tlsProtocol FTP configuration and operation
-tlsProtocol
OpenSSL supports Versions 2 and 3 of the SSL protocol and also Version 1 of the TLS protocol. Some of these protocols can be activated selectively using the -tlsProtocol option.
+The protocol specified after this sign is permissible.
-The protocol specified after this sign is not permissible.
If neither “+” nor “-” is specified, this has the same effect as specifying “+”.
SSLv2SSL protocol Version 3.
Version 2 of the SSL protocol displays some security-related deficiencies and should therefore not be used if possible.
SSLv3SSL protocol Version 3.
TLSv1TLS protocol Version 1.
ALLAll protocols are to be enabled.
ALL -SSLv2 is the default.
Example
The specifications -tlsProtocol SSLv3 TLSv1 and -tlsProtocol ALL -SSLv2 have the same effect.
-tlsProtocol
[+ | -] {SSLv2 | SSLv3 | TLSv1 | ALL} ...
i
i

U41095-J-Z125-4-76 99
FTP configuration and operation -tlsCipherSuite
-tlsCipherSuite
The -tlsCipherSuite option is used to specify a cipher suite preference list. If this option is not specified, a default preference list is used.
<specification>Specification of a a cipher suite preference list (for details, see the description of the specification structure below).ALL: !EXP: !ADH is the default.
Description of the specification structure
The specification consists of one or more cipher mnemonics which are separated by a colon (:).
A cipher mnemonic can have the following forms:
● A cipher mnemonic can consist of a single cipher suite such as DES-CBC-SHA.
● A cipher mnemonic can represent:
– a list of cipher suites which contain a particular algorithm
– cipher suites of a particular type
For example, SHA1 represents all cipher suites which use the digest algorithm SHA1, and SSLv3 represents all SSL Version-3 algorithms.
● Lists of cipher suites can be combined to form a single cipher mnemonic with the aid of the “+” character. This is then interpreted as a logical AND operation. Thus SHA1+DES represents all cipher suite which contain the SHA1 and DES algorithms.
-tlsCipherSuite
<specification>

100 U41095-J-Z125-4-76
-tlsCipherSuite FTP configuration and operation
● Each cipher mnemonic can optionally be prefixed by one of the characters “!”, “-” or “+”:
– If the prefix is “!”, the relevant cipher suites are permanently deleted from the preference list. Subsequently these no longer appear in the preference list when they are specified explicitly.
– If the prefix is “-”, the relevant cipher suites are deleted from the preference list, but some or all of them can be added again using subsequent options.
– If the prefix is “+”, the relevant cipher suites are moved to the end of the preference list. This means that no cipher suites are added to the preference list, but only existing ones moved.
– If none of the three characters “!”, “-” or “+” is prefixed, the cipher mnemonic is inter-preted as a list of cipher suites which is appended to the current preference list. If this includes a cipher suite which is already contained in the current preference list, it is ignored. It is not moved to the end of the preference list.
● The cipher mnemonic “@STRENGTH” can be added at any position in order to sort the current preference list according to the length of the encryption key.
Permissible cipher mnemonics
The permissible cipher mnemonics are described below.
DEFAULTThe following cipher list is the default:
ALL:!ADH:RC4+RSA:+SSLv2:@STRENGTH
If it is used, this cipher mnemonic must be at the start of the specification.
ALLAll cipher suites with the exception of the eNULL ciphers. The latter must be enabled explicitly.
HIGHCipher suites with key lengths greater than 128 bits. As 3DES is interpreted with a length of168 bits (instead of with 112 bits as many cryptographers do), it belongs to this suite class.
MEDIUMCipher suites with a key length of 128 bits.

U41095-J-Z125-4-76 101
FTP configuration and operation -tlsCipherSuite
LOWCipher suites with key lengths of 64 or 56 bits, except Export cipher suites.
EXP, EXPORTExport encryption algorithms including 40- and 56-bit algorithms.
EXPORT4040-bit Export encryption algorithms.
EXPORT5656-bit Export encryption algorithms.
eNULL, NULL“NULL” encryption algorithms, in other words those without encryption. As these offer no encryption and thus present a security risk, they are by default disabled and, if required, must be specified explicitly.
aNULLCipher suites without authentication. This means at present the anonymous Diffie-Hellman algorithms. These algorithms are vulnerable to “man in the middle” attacks, and you are consequently advised not to use them.
kRSA, RSACipher suites with RSA key exchange.
kEDHCipher suites with ephemeral Diffie-Hellmann key negotiation.
aRSACipher suites with RSA authentication, in other words the certificates contain RSA keys.
aDSS, DSSCipher suites with DSS authentication, in other words the certificates contain DSS keys.
TLSv1, SSLv3, SSLv2TLSv1, SSLv3 and SSLv2 cipher suites. The TLSv1 suites and the SSLv3 suites are identical.
DHCipher suites with Diffie-Hellman key exchange, including anonymous exchange.
ADHCipher suites with anonymous Diffie-Hellman key exchange.

102 U41095-J-Z125-4-76
-tlsCipherSuite FTP configuration and operation
AESCipher suites with AES encryption (key length of128 and 256 bits).
3DESCipher suites with Triple DES encryption.
DESCipher suites with DES encryption (no Triple DES).
RC4Cipher suites with RC4 encryption.
RC2Cipher suites with RC2 encryption.
MD5Cipher suites with MD5 hash function.
SHA1, SHACipher suites with SHA1 hash function.
The available cipher suites are listed in the table below.
Name Version Key exchange
Authenti-cation
Encryption Digest Export
DHE-RSA-AES256-SHA SSLv3 DH RSA AES(256) SHA1
DHE-DSS-AES256-SHA SSLv3 DH DSS AES(256) SHA1
AES256-SHA SSLv3 RSA RSA AES(256) SHA1
DHE-RSA-AES128-SHA SSLv3 DH RSA AES(128) SHA1
DHE-DSS-AES128-SHA SSLv3 DH DSS AES(128) SHA1
AES-128-SHA SSLv3 RSA RSA AES(128) SHA1
DHE-DSS-RC4-SHA SSLv3 DH DSS RC4(128) SHA1
EDH-RSA-DES-CBC3-SHA SSLv3 DH RSA 3DES(168) SHA1
EDH-DSS-DES-CBC3-SHA SSLv3 DH DSS 3DES(168) SHA1
DES-CBC3-SHA SSLv3 RSA RSA 3DES(168) SHA1
RC4-SHA SSLv3 RSA RSA RC4(128) SHA1
RC4-MD5 SSLv3 RSA RSA RC4(128) MD5
EDH-RSA-DES-CBC-SHA SSLv3 DH RSA DES(56) SHA1
EDH-DSS-DES-CBC-SHA SSLv3 DH DSS DES(56) SHA1
DES-CBC-SHA SSLv3 RSA RSA DES(56) SHA1
Available cipher suites

U41095-J-Z125-4-76 103
FTP configuration and operation -tlsCipherSuite
DES-CBC3-MD5 SSLv2 RSA RSA 3DES(168) MD5
RC2-CBC-MD5 SSLv2 RSA RSA RC2(128) MD5
RC4-MD5 SSLv2 RSA RSA RC4(128) MD5
RC4-64-MD5 SSLv2 RSA RSA RC4(64) MD5
DES-CBC-MD5 SSLv2 RSA RSA DES(56) MD5
EXP1024-DHE-DSS-RC4-SHA SSLv3 DH(1024) DSS RC4(56) SHA1 export
EXP1024-RC4-SHA SSLv3 RSA(1024) RSA RC4(56) SHA1 export
EXP1024-DHE-DSS-DES-CBC-SHA SSLv3 DH(1024) DSS DES(56) SHA1 export
EXP1024-DES-CBC-SHA SSLv3 RSA(1024) RSA DES(56) SHA1 export
EXP1024-RC2-CBC-MD5 SSLv3 RSA(1024) RSA RC2(56) MD5 export
EXP1024-RC4-MD5 SSLv3 RSA(1024) RSA RC4(56) MD5 export
EXP-EDH-RSA-DES-CBC-SHA SSLv3 DH(512) RSA DES(40) SHA1 export
EXP-EDH-DSS-DES-CBC-SHA SSLv3 DH(512) DSS DES(40) SHA1 export
EXP-DES-CBC-SHA SSLv3 RSA(512) RSA DES(40) SHA1 export
EXP-RC2-CBC-MD5 SSLv3 RSA(512) RSA RC2(40) MD5 export
EXP-RC4-MD5 SSLv3 RSA(512) RSA RC4(40) MD5 export
EXP-RC2-CBC-MD5 SSLv2 RSA(512) RSA RC2(40) MD5 export
EXP-RC4-MD5 SSLv2 RSA(512) RSA RC4(40) MD5 export
ADH-AES256-SHA SSLv3 DH none AES(256) SHA1
ADH-AES128-SHA SSLv3 DH none AES(128) SHA1
ADH-DES-CBC3-SHA SSLv3 DH none 3DES(168) SHA1
ADH-DES-CBC-SHA SSLv3 DH none DES(56) SHA1
ADH-RC4-MD5 SSLv3 DH none RC4(128) MD5
EXP-ADH-DES-CBC-SHA SSLv3 DH(512) none DES(40) SHA1 export
EXP-ADH-RC4-MD5 SSLv3 DH(512) none RC4(40) MD5 export
NULL-SHA SSLv3 RSA RSA none SHA1
NULL-MD5 SSLv3 RSA RSA none MD5
Name Version Key exchange
Authenti-cation
Encryption Digest Export
Available cipher suites

104 U41095-J-Z125-4-76
-tlsRSAcertificateFile FTP configuration and operation
-tlsRSAcertificateFile
The -tlsRSAcertificateFile option is used to specify a file which contains the RSA-based X.509 server certificate in PEM format. This file can also contain the private RSA server key. However, generally the certificate and key are stored in different files. In this case the key file is specified using the -tlsRSAkeyFile option (see page 105).
<file-name 1..54>Name of the file which contains the RSA-based X.509 client certificate in PEM format.
*NONE No file with RSA certificates is used.*NONE is the default.
-tlsRSAcertificateFile
<file-name 1..54> | *NONE

U41095-J-Z125-4-76 105
FTP configuration and operation -tlsRSAkeyFile
-tlsRSAkeyFile
The -tlsRSAkeyFile option is used to specify a file which contains the private RSA server key in PEM format.
If both an X.509 client certificate and a private server key are contained in the same file (see the -tlsRSAcertificateFile option on page 104), the -tlsRSAkeyFile option need not be specified.
As it should be possible to start up the FTP server automatically in unattended operation, no passphrase may be entered for the private server key at server startup. You must therefore remove any existing encryption of the private key with a passphrase. In this event, ensure that unauthorized persons cannot access this key.
<file-name 1..54>Name of the file which contains the private RSA server key.
*NONE No separate file is used for the RSA server key.*NONE is the default.
-tlsRSAkeyFile
<file-name 1..54> | *NONE

106 U41095-J-Z125-4-76
-tlsDSAcertificateFile FTP configuration and operation
-tlsDSAcertificateFile
The -tlsDSAcertificateFile option is used to specify a file which contains the DSA-based X.509 server certificate in PEM format. This file can also contain the private DSA server key. However, generally the certificate and key are stored in different files. In this case the key file is specified using the -tlsDSAkeyFile option (see page 107).
<file-name 1..54>Name of the file which contains the DSA-based X.509 client certificate in PEM format.
*NONE No file with DSA certificates is used.*NONE is the default.
-tlsDSAcertificateFile
<file-name 1..54> | *NONE

U41095-J-Z125-4-76 107
FTP configuration and operation -tlsDSAKeyFile
-tlsDSAkeyFile
The -tlsDSAkeyFile option is used to specify a file which contains the private DSA server key in PEM format.
If both an X.509 client certificate and a private server key are contained in the same file (see the -tlsDSAcertificateFile option on page 106), the -tlsDSAkeyFile option need not be specified.
As it should be possible to start up the FTP server automatically in unattended operation, no passphrase may be entered for the private server key at server startup. You must therefore remove any existing encryption of the private key with a passphrase. In this event, ensure that unauthorized persons cannot access this key.
<file-name 1..54>Name of the file which contains the private DSA server key.
*NONENo separate file is used for the DSA server key.*NONE is the default.
-tlsDSAkeyFile
<file-name 1..54> | *NONE

108 U41095-J-Z125-4-76
-tlsCertificateChainFile FTP configuration and operation
-tlsCertificateChainFile
The -tlsCertificateChainFile option is used to specify a file in which all certificates can be stored which are required for verification of the server certificate. The first certificate in this file is the server certificate. The remaining certificates must form an unbroken chain, starting with the certificate of the CA which issued the server certificate, through to the root certificate of a CA which can be verified directly by the FTP client. The certificates in the chain must be sorted in such a way that the root certificate is in last place.
The specified file is only required if the server certificate was issued by a CA that is not known to the FTP clients and verification can thus not be performed by the FTP clients without the certificate chain being sent. This mechanism requires that RSA and DSA certif-icates should not be used simultaneously for the server, as the file is used for both variants.
<file-name 1..54>Name of the file in which all certificates are stored which are required for verification of the server certificate.
*NONENo file is specified.*NONE is the default.
-tlsCertificateChainFile
<file-name 1..54> | *NONE

U41095-J-Z125-4-76 109
FTP configuration and operation -tlsCAcertificateFile
-tlsCAcertificateFile
The -tlsCAcertificateFile option is used to specify a file containing the CA certificates in PEM format which are required for FTP client authentication. The individual PEM certificates are arranged sequentially in the file.
You can process the file with a text editor of your choice when you wish to add or delete certificates. The individual certificates are registered in the file as follows:
-----BEGIN CERTIFICATE-----
< CA certificate in Base64 encoding >
-----END CERTIFICATE-----
Text outside these sequences is ignored by the FTP server and can therefore be used to identify the certificates which, owing to the ASN.1/Base64 encoding, are available in non-readable form.
<file-name 1..54>Name of the file containing the certificates in PEM format which are required for FTP client authentication.
*NONENo file is specified.*NONE is the default.
-tlsCAcertificateFile
<file-name 1..54> | *NONE

110 U41095-J-Z125-4-76
-tlsAcceptableClientCAFile FTP configuration and operation
-tlsAcceptableClientCAFile
When client authentication is enabled, the server notifies the clients upon TLS/SSL connection setup of the names of the CAs which it accepts as signatories of client certifi-cates. These name are taken from the certificates in the file specified by the -tlsAcceptableClientCAFile option. The individual certificates in PEM format are arranged sequentially in this file.
You can process the file with a text editor of your choice when you wish to add or delete certificates. The individual certificates are registered in the file as follows:
-----BEGIN CERTIFICATE-----
< CA certificate in Base64 encoding >
-----END CERTIFICATE-----
Text outside these sequences is ignored by the FTP server and can therefore be used to identify the certificates which, owing to the ASN.1/Base64 encoding, are available in non-readable form.
<file-name 1..54>Name of the file.
*NONENo file is specified.*NONE is the default.
-tlsAcceptableClientCAFile
<file-name 1..54> | *NONE

U41095-J-Z125-4-76 111
FTP configuration and operation -tlsCArevocationFile
-tlsCArevocationFile
The -tlsCArevocationFile option is used to specify a file which contains the CRLs (Certificate Revocation Lists) of the Certificate Authorities (CAs). (Certificates issued by a Certificate Authority can be declared invalid by publication of a Certificate Revocation List (CRL).)
<file-name 1..54>Name of the file which contains the CRLs of the Certificate Authorities.
*NONENo file with CRLs is specified.*NONE is the default.
-tlsCArevocationFile
file-name 1..54> | *NONE

112 U41095-J-Z125-4-76
-tlsVerifyClient FTP configuration and operation
-tlsVerifyClient
The -tlsVerifyClient option is used to define whether an FTP client requires a certificate to access a server.
NONEThe FTP server does not request a certificate from the FTP client.NONE is the default.
OPTIONALThe FTP server requests the FTP client to send its certificate. If the client refuses to do this or supplies an invalid certificate, access is nevertheless allowed.
REQUIREThe FTP client must transfer a valid certificate, otherwise access is refused.
-tlsVerifyClient
NONE | OPTIONAL | REQUIRE
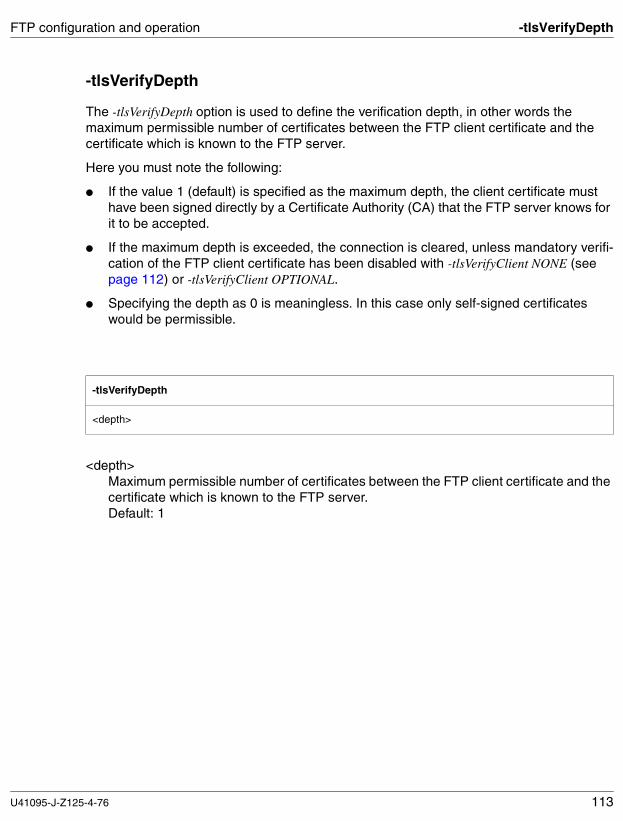
U41095-J-Z125-4-76 113
FTP configuration and operation -tlsVerifyDepth
-tlsVerifyDepth
The -tlsVerifyDepth option is used to define the verification depth, in other words the maximum permissible number of certificates between the FTP client certificate and the certificate which is known to the FTP server.
Here you must note the following:
● If the value 1 (default) is specified as the maximum depth, the client certificate must have been signed directly by a Certificate Authority (CA) that the FTP server knows for it to be accepted.
● If the maximum depth is exceeded, the connection is cleared, unless mandatory verifi-cation of the FTP client certificate has been disabled with -tlsVerifyClient NONE (see page 112) or -tlsVerifyClient OPTIONAL.
● Specifying the depth as 0 is meaningless. In this case only self-signed certificates would be permissible.
<depth>Maximum permissible number of certificates between the FTP client certificate and the certificate which is known to the FTP server.Default: 1
-tlsVerifyDepth
<depth>

114 U41095-J-Z125-4-76
-tlsSecureControlConnection FTP configuration and operation
-tlsSecureControlConnection
The -tlsSecureControlConnection option is used to define whether the control connection from the FTP client to the FTP server is to be secured with TLS.
NONEThe control connection is never secured, in other words a corresponding AUTH command (see page 68) is rejected with a negative return code.NONE is the default.
OPTIONALThe control connection is secured when this is requested by the client.
REQUIREA login is only permitted if the control connection is secured beforehand.
-tlsSecureControlConnection
NONE | OPTIONAL | REQUIRE

U41095-J-Z125-4-76 115
FTP configuration and operation -tlsSecureDataConnection
-tlsSecureDataConnection
The -tlsSecureDataConnection option is used to define whether the data connection from the FTP client to the server child should be secured with TLS.
As the data connection can only be secured if the control connection is secured, it makes no sense to select a weaker setting for -tlsSecureControlConnection (see page 114) than for-tlsSecureDataConnection. Consequently -tlsSecureControlConnection will, if required, automatically be raised to the same value as -tlsSecureDataConnection.
NONEThe control connection is never secured, in other words a corresponding PROT command (see page 68) is rejected with a negative return code.NONE is the default.
The setting “NONE” makes sense if, for example, you only want to offer the option of transferring the password in encrypted form but are not ready or, because of the server performance, not able to offer encryption of the files transferred. However, here you must bear in mind that a large number of Windows FTP clients do not permit the option of just securing the control connection.
OPTIONALThe data connection is secured when this is requested by the client.
REQUIREData transfer is only permitted if the data connection is secured beforehand.
-tlsSecureDataConnectionr
NONE | OPTIONAL | REQUIRE
i

116 U41095-J-Z125-4-76
-tlsRandFile FTP configuration and operation
-tlsRandFile
The -tlsRandFile option is used to specify a file from which data is read for initializing the pseudo random numbers generator (PRNG) when the server is started. When the server is shut down, the relevant data from the PRNG is read to this file so that it can be used the next time the server is started.
If several FTP servers are operated in parallel, a separate file must be defined for each server.
IMPORTANT!
This file may not be accessible to unauthorized people.
<file-name 1..54>Name of the file which contains the data for initializing the PRNG.Default: SYSDAT.TCP-IP-AP.050.FTPD.RAND
-tlsRandFile
<file-name 1..54>
!

U41095-J-Z125-4-76 117
FTP configuration and operation -tlsUseCryptoHardware
-tlsUseCryptoHardware
The -tlsUseCryptoHardware option is used to define whether crypto hardware, for example an openCRYPTTM box (see the “openCrypt” manual) is to be used for calculating crypto-graphic algorithms. If the option specifies the use of crypt-hardware but the hardware/software requirements for using crypt-hardware are not met, FTP server startup is aborted.
NONo crypto hardware is used. NO is the default.
SERVERThe crypto hardware is only used for the FTP server process.
CHILDThe crypto hardware is only used for the child processes.
ALLThe crypto hardware is used for both the FTP server process and for the child processes.
-tlsUseCryptoHardware
NO | SERVER | CHILD | ALL

118 U41095-J-Z125-4-76
-tlsOpenSSLlibName FTP configuration and operation
-tlsOpenSSLlibName
The -tlsOpenSSLlibName option is used to specify the LMS file from which the OpenSSL library is dynamically loaded. It may be necessary to specify a name other than the default name if, for example, the OpenSSL library is also used by other products.
Dynamic loading of the OpenSSL library can be expedited with the aid of DAB using caches. If the OpenSSL library is used jointly by a number of products, the size of the DAB buffer used is reduced.
<openssl-libname>Name of the LMS file from which the OpenSSL library is to be dynamically loaded. Default: LMS file to which the IMON logical ID SYSLNK refers.
-tlsOpenSSLlibName
<openssl-libname>

U41095-J-Z125-4-76 119
FTP configuration and operation Starting up/shutting down the server
4.4 Starting up and shutting down the FTP server
You can use the commands described below to start up the FTP server.
These commands can also be entered at the operator console.
4.4.1 Starting up the FTP server
The following requirements must be met:
● The /START commands are only permitted under IDs that have the NET-ADMIN privilege.
● The TCPIPAP subsystem must be started before /START-FTP-DEMON or /START-TCP-IP-DEMON.
● The FTP server must be started under the $TSOS ID.
● To start up an FTP server secured by means of FTAC, you must make sure that FTAC is ready for operation when the FTP server is started up and thus, in particular, that the FTAC and FT subsystems have been activated.
The /START commands for the Enter jobs are as follows:
If you want to start FTP and TELNET simultaneously, use the START-TCP-IP-DEMON command.
/START-TCP-IP-DEMON Enter job for TCP-IP-AP
/START-FTP-DEMON Enter job for the FTP server
i
i
i

120 U41095-J-Z125-4-76
Starting up/shutting down the server FTP configuration and operation
4.4.2 Shutting down the FTP server
The commands for shutting down the FTP server which are described below are only valid for servers as of interNet Services V3.0.
You shut down the FTP server with the STOP-FTP-DEMON command.
PORT-NUMBER=Specifies the port number of the FTP server to be shut down.Default: The FTP server with default port number 21 is shut down.
PORT-NUMBER=*STD-PORTHas the same effect as specifying no parameters.
PORT-NUMBER=*ANYAll active FTP servers are shut down.
PORT-NUMBER=<integer 0..32767>An FTP server with the specified port number is to be shut down.
STOP-FTP-DEMON
PORT-NUMBER=*STD-PORT/*ANY/<integer 0..32767>

U41095-J-Z125-4-76 121
FTP configuration and operation Starting up/shutting down the server
4.4.3 Setting up further FTP server tasks
It may be desirable in certain situations to operate additional FTP servers, for example as test versions. A copy is made of the standard ENTER jobs SYSENT.TCP-IP-AP.050.FTPD and SYSENT.TCP-IP-AP.050.FTPDC for this purpose.
When configuration takes place via an option file, a second option file with correspondingly modified server options must be created. The name of this second option file must be specified in the copy of SYSENT.TCP-IP-AP.050.FTPD using the -M option.
The following table describes the essential changes to be made to Server 2. The changes are highlighted in bold.
Server 1 Server 2
SYSENT.TCP-IP-AP.050.FTPD:
/.FTPSR LOGON...
/SYSFILE SYSLST=$TSOS.SYSOUT.TCP-IP-AP.050.FTPD ...
-B 0 \-F $TSOS.SYSENT.TCP-IP-AP.050.FTPDC\-E $TSOS.SYSDAT.TCP-IP-AP.050.SI\-K $FTAC \-J cccccccc\-X 0\-O 03600\-A FTPSR\-N 0015\- D 0\- T 0\- S 0\-C *MOD($TSOS.SYSLNK.TCP-IP-AP.050, FTPDC,RUN=ADV,PROG=ANY)
SYSENT.TCP-IP-AP.050.FTPD2:
/.FTPS2 LOGON.../SYSFILE SYSLST=$TSOS.SYSOUT.TCP-IP-AP.050.FTPD2 ...
-B 0 \-F $TSOS.SYSENT.TCP-IP-AP.050.FTPDC2\-E $TSOS.SYSDAT.TCP-IP-AP.050.SI2\-K $FTAC \-J cccccccc\-X 0\-O 03600\-A FTPS2\-N 0015\- D 0\- T 0\- S 0\-C *MOD($TSOS.SYSLNK.TCP-IP-AP.050, FTPDC,RUN=ADV,PROG=ANY) \-P nnn (nnn is the port number)
SYSENT.TCP-IP-AP.050.FTPDC:
/.FTPSR LOGON...
-N\-E $TSOS.SYSDAT.TCP-IP-AP.050.SI\-D 0\-T 0
SYSENT.TCP-IP-AP.050.FTPDC2:
/.FTPS2 LOGON...
-N\-E $TSOS.SYSDAT.TCP-IP-AP.050.SI2\-D 0\-T 0
Start of server task:/START-FTP-DEMON
Start of second server task:/ENTER-JOB SYSENT.TCP-IP-AP.050.FTPD2

122 U41095-J-Z125-4-76
Starting up/shutting down the server FTP configuration and operation
Other changes are possible to the server parameters. The backslash "\" after the server statements is interpreted as a continuation character. No further characters may follow "\".
4.4.4 Shutdown
Servers can still be shut down using the console command/INTR <tsn>,shutdown. <tsn> is the TSN of the relevant server task.
4.4.5 Notes and restrictions for starting up and shutting down servers
The following points must be borne in mind when you start up or shut down servers:
● The START-FTP-DEMON command is only effective if the SYSENT.TCP-IP-AP.050.FTPD start procedure exists.
If the commands are entered at the console they must also be shareable. This has no negative effect on security since from TCP-IP-AP V5.0 on all server options can be stored in a separate option file which does not need to be shareable (see the section “Configuring FTP via the option file” on page 81).
● The VERSION parameter in the START commands also permits servers withTCP-IP-AP Versions < 5.0 to be started. However, as the servers only log on to the TCPIPAP subsystem after every start as of V5.0, only such servers can be shut down again using the STOP command.
● A maximum of 20 users can be connected to the TCPIPAP subsystem. No more users are permitted owing to the size of internal tables. In practice the maximum number of 20 is, however, sufficient. If the maximum number is exceeded, the server shuts down on startup and issues the following message:
"error: too many connections to Subsystem TCPIPAP"
Connection setup:
/FTPopen <host>
Connection setup:
/FTPopen <host> nnn (nnn is a port number)
Server 1 Server 2

U41095-J-Z125-4-76 123
FTP configuration and operation Starting up/shutting down the server
● If the server was not started under TSOS it shuts down and issues the following message:
"error: no privilege to connect to Subsystem TCPIPAP"
This can only occur if you attempt to start the server by calling the start procedure explicitly instead of using the START-...-DEMON command, because this would be rejected under an ID other than TSOS.
4.4.6 Messages and return codes
Messages
TCP2000 (&00)-COMMAND FOR (&01)-SERVER SUCCESSFULLY COMPLETED.&00 = START or STOP&01 = FTP or TELNET or TCP-IP
MeaningFTP/TELNET-server successfully started/stopped.
Response<None>
TCP2001 STOP-COMMAND FOR (&00)-SERVER HAS NO EFFECT.&00 = FTP or TELNET
MeaningNo servers existing.
Response<None>
TCP2003 NO (&00)-SERVER FOR THE GIVEN PORTNUMBER.&00 = FTP or TELNET
MeaningNo (&00) server for the given port number.
Response<None>
TCP2004 WAS NOT ABLE TO START PROCEDURE FOR (&00): (&01).&00 = FTP or TELNET or TCP-IP&01 = <start procedure>
MeaningCould not start procedure (&01) for (&00) server.
Response<None>

124 U41095-J-Z125-4-76
Installing FTAC functionality FTP configuration and operation
Command return codes
4.5 Notes on installing FTAC functionality
In addition to describing the FTAC-SUPPORT operand in theSET-FTP-TELNET-PARAMETERS command (see page 38/page 69), this section provides additional information to be noted when using FTAC functionality:
● In order to access the FTAC functionality, you will need to use openFT-BS2000 from Version 7.0.
● Once FTAC functionality is activated, further FTP access to the TSOS ID via an inter-active logon is not possible because an alternative access option is provided in this case by means of FTAC transfer admission (the -allowTsosLogin option on page 94).
● In order to protect the TSOS password from being illegally intercepted, the input of a wrong LOGON password for the TSOS ID (when FTAC functionality is disabled) is penalized with a time delay, which increases with each further invalid attempt. Following each invalid password attempt, the connection request is rejected after about five seconds. It is only on completion of this time penalty that a successful LOGON attempt can be made, regardless of whether or not the correct password was specified in the mean time. The duration of the time penalty remains invisible to potential "intruders".
● If the FTAC check has been enabled, even the FTAC administrator and the owners of the user IDs involved in an FTP transfer will need to take some actions (e.g. adapt the admission sets), since FTP access could otherwise be locked for many/all user IDs.
It is therefore important to define an appropriate migration strategy in advance:
– One option is to select the FTAC check at level 1, i.e. where access is not verified as before by FTAC via an interactive logon, but where access can be additionally controlled via FTAC transfer admissions.
– A further (or additional) option would be to install two servers in parallel (one with the standard port number 21 and one with some other port number) during a transi-tional phase, for example (see the section “Setting up further FTP server tasks” on page 121). In this case, only one server performs the full FTAC check (level 2).
(SC2) SC1 Maincode Meaning0 CMD0001 See message TCP20000 CMD0001 See message TCP20011 TCP2003 See message TCP2003
32 TCP2004 See message TCP200432 CMD0220 An error occurred in the /CANCEL-JOB command

U41095-J-Z125-4-76 125
FTP configuration and operation Accounting in FTP
4.6 Accounting in FTP
FTP accounting records can be collected and output to a file with the aid of FTP accounting (default: SYSDAT.TCP-IP-AP.050.FTPD.ACCOUNTING).
4.6.1 Enabling/disabling accounting and defining the accounting file
The following options are available for enabling/disabling FTP accounting and defining the accounting file:
● Installation command SET-FTP-TELNET-PARAMETERS (see page 38/page 69)
● Options -acctActive and -acctFile (see page 93)
You can use the console command /INTR to modify these settings during operation in order to enable/disable recording of the accounting records or to change the accounting file:
4.6.2 Structure of the accounting records
The structure of the FTP accounting record in the accounting file is based on the structure of the FT accounting record. The individual components of an accounting record are connected to each other in such a way and provided with length and offset information so as to ensure compatibility with older evaluation programs even with the following modifica-tions:
● Individual components enlarged
● Number of variable record extensions increased
The FTP accounting record consists of the following four components:
1. Record description
2. Identification section
3. Basic information
4. Variable information
/INTR <tsn>, acctActive: Enable/disable FTP accounting (see page 134)
/INTR <tsn>, acctFile: Specify new accounting file (see page 134)

126 U41095-J-Z125-4-76
Accounting in FTP FTP configuration and operation
Description of the components of the FTP accounting record
The individual parts of the record contain the following identifiers:
● Field number: Sequence number of the data field within the written record part
● Offset: Relative distance of the data field to the start of the written record part
● Length: Length of the data field (in bytes)
● Format: Format of the data field
The following abbreviations are used in the description of the components of the FTP accounting record provided below:
Record description section
Identification section
A = Alphanumeric (including $, # and @)
B = Binary number
C = Printable characters
F = File name for BS2000
Z = Time specification in the format YYYYMMDDHHMMSS
- = Undefined
Field no.
Offset Length Format Meaning
1 0x00 4 A Record ID “FTP0”
2 0x04 8 -/B Time stamp of the time-of-day clock
3 0x0C 2 B Length of the identification section
4 0x0E 2 B Length of the basic information
5 0x10 4 - Reserved
Field no.
Offset Length Format Meaning
1 0x00 8 A User ID
2 0x08 8 A Accounting number
3 0x10 4 Z TSN of the FTP child

U41095-J-Z125-4-76 127
FTP configuration and operation Accounting in FTP
Basic information
Explanation of field no. 3
The FTP server cannot always recognize whether or not transfer has failed. Reason: In many cases the end of file transfer is signaled by the data connection clearing down. However, this connection cleardown can also be caused by an error. In such cases the “Result of transfer” is marked with “0” (= indeterminate).
Explanation of field no. 8
The CPU utilization from the end of the preceding transfer (or from the start of the child) to the end of the transfer of the current file is measured here. This includes activities such as setting options, and switching and listing directories. Some activities cannot be assigned to a subsequent file transfer because the connection had been cleared down in the meantime. These activities are incorporated in a special accounting record which is written when a connection finishes. The value X’00’ is entered in this record as the result of the transfer. The “File name” field contains no entry (see the table “Record extension for the file name” on page 128).
Field no.
Offset Length Format Meaning
1 0x00 14 Z Command reception time
2 0x0E 14 Z End of transfer time
3 0x1C 1 C Result of transfer:+: successfully completed-: errored0: indeterminate
4 0x1D 3 - Reserved
5 0x20 8 B Number of bytes from/to disk
6 0x28 8 B Number of bytes to/from network
7 0x30 4 B Number of disk accesses
8 0x34 4 B CPU time used in milliseconds

128 U41095-J-Z125-4-76
Accounting in FTP FTP configuration and operation
Variable information
Field no.
Offset Length Format Meaning
1 0x00 2 B Number of extensions = 1
2 0x02 2 B Offset between the record extension for the partner ID and the start of record
3 0x04 2 B Offset between the record extension for the file name and the start of record
If an offset of 0 is set, the corresponding record extension is not specified.
Header of the variable section
Field no.
Offset Length Format Meaning
1 0x00 2 A Extension ID = “PI”
2 0x02 1 B Extension type = 0x00
3 0x03 1 - Reserved
4 0x04 2 B Length of the extension (without ID, type and length field)
5 0x06 1 B Address type: 1: IPv4 2: IPv6
6 0x07 16 B IP address (left-justified)
7 0x17 1 - Reserved
8 0x18 2 B Length of the partner name
9 0x1A see field 8
F Partner name
Record extension for partner identification
Field no.
Offset Length Format Meaning
1 0x00 2 A Extension ID = “FN”
2 0x02 1 B Extension type = 0x00
3 0x03 1 - Reserved
4 0x04 2 B Length of the file name
5 0x06 see field 4
F File name
Record extension for the file name

U41095-J-Z125-4-76 129
FTP configuration and operation Logging file of the FTP server
4.7 Logging file of the FTP server
The FTP server logs its outputs in a logging file with the default file nameSYSOUT.TCP-IP-AP.050.FTPD. The logging file always contains the difference entries for the current backup with the /INTR command RDPROT (see the section “RDPROT - Save logging file of FTP servers” on page 135).
4.8 Displaying the current settings of the FTP server
You can use the BS2000/OSD command SHOW-FTP-TELNET-STATUS to obtain infor-mation on the current settings of BS2000/OSD FTP servers.
The following information is output:
● Settings made when the servers were generated
● Current information on the TSN of the server task’ and number of active connections
The servers place the data in auxiliary files with the following names:
● SYSDAT.TCP-IP-AP.050.FTPD.CONF.<port>
<port> specifies the port number of the relevant server.
These files are deleted when the relevant FTP server is shut down.

130 U41095-J-Z125-4-76
Settings of FTP and TELNET servers FTP configuration and operation
SERVER=Name of the server whose data is to be output (FTP or TELNET).
SERVER=*FTP(...)Output of an FTP server’s configuration data. This is the default.
PORT-NUMBER=Port number of the FTP server whose configuration data is to be output.
PORT-NUMBER=*STD-PORTPort number 21. This is the default.
PORT-NUMBER=*ANYInformation on all FTP servers currently active is output.
PORT-NUMBER=<integer 0..32767>Port number of the FTP server whose configuration data is to be output.
INFORMATION=Type and scope of the information output.
INFORMATION= *STDOutput of a list of servers specified by PORT-NUMBER. This is the default.
INFORMATION= *ALLOutput of all information on all servers specified by PORT-NUMBER.
OUTPUT= Output medium to which the information is to be written.
OUTPUT=*SYSOUT Output is to SYSOUT. This is the default.
OUTPUT=*SYSLST Output is to SYSLST.
SHOW-FTP-TELNET-STATUS
SERVER= *FTP(...)/ *TELNET(...)
*FTP(...)
⏐ PORT-NUMBER= *STD-PORT / *ANY / <integer 0..32767>
*TELNET(...)
⏐ PORT-NUMBER=*STD-PORT / *ANY / <integer 0..32767>
, INFORMATION= *STD /*ALL
, OUTPUT=*SYSOUT/*SYSLST

U41095-J-Z125-4-76 131
FTP configuration and operation Settings of FTP and TELNET servers
Messages and return codes
Messages
TCP9240 COMMAND SHOW-FTP-TELNET-STATUS SUCCESSFULLY COMPLETED.
MeaningSHOW-FTP-TELNET-STATUS successfully completed.
Response<None>
TCP9241 ERROR DMS(&00) DURING EXECUTION OF FSTAT.
MeaningError in FSTAT on configuration files.
ResponseCheck whether any servers are active.
TCP9242 COULD NOT OPEN CONFIGURATION FILE (&00).
MeaningConfiguration file (&00) could not be opened.
ResponseCheck whether the desired server is active.
TCP9243 COULD NOT READ CONFIGURATION FILE (&00).
MeaningConfiguration file (&00) could not be read.
ResponseCheck file.
Command return codes
(SC2) SC1 Maincode Meaning0 TCP9240 Command successfully completed
64 TCP9241 See message TCP924164 TCP9242 See message TCP924264 TCP9243 See message TCP9243

132 U41095-J-Z125-4-76
debug INTR interface
4.9 Console interface
Some commands can also be specified by the system operator via the console interface. These commands are introduced with the command /INTR (or the SDF command /INFORM-PROGRAM). Commands issued with /INTR are used to
– control server traces, – exit the various server tasks, – control FTP accounting,– save the logging files.
The following server commands are possible via the console interface:
The commands for starting up and shutting down the FTP server (see page 119) can also be entered via the console.
debug - Enable / disable trace to user level
<tsn>TSN of the server task for which the trace to the user level is to be activated.
debug <debug-value>The permitted values are from 0 to 9. Higher values result in the output of more information. A value of 0 means that the trace is disabled. This command is used by the system customer service for error diagnostics. A debug value > 2 is not meaningful.
Operation Brief description
debug Enable / disable trace to user level
trace Enable / disable trace to TCP/IP interface
shutdown Shut down service
acctActive Enable / disable FTP accounting
acctFile Change to new accounting file for FTP accounting
RDPROT Save the FTP server’s logging file
/INTR
<tsn> , debug <debug-value>
i

U41095-J-Z125-4-76 133
INTR interface trace / shutdown
trace - Enable / disable trace to TCP/IP interface
<tsn>TSN of the server task for which the trace to the TCP/IP interface is to be activated.
trace <trace-value>The permitted values are from 0 to 9. Higher values result in the output of more information. A value of 0 means that the trace is disabled. This command is used by the system customer service for error diagnostics.
shutdown - Shut down service
<tsn>TSN of the server task to be shut down.
/INTR
<tsn> , trace <trace-value>
/INTR
<tsn> , shutdown
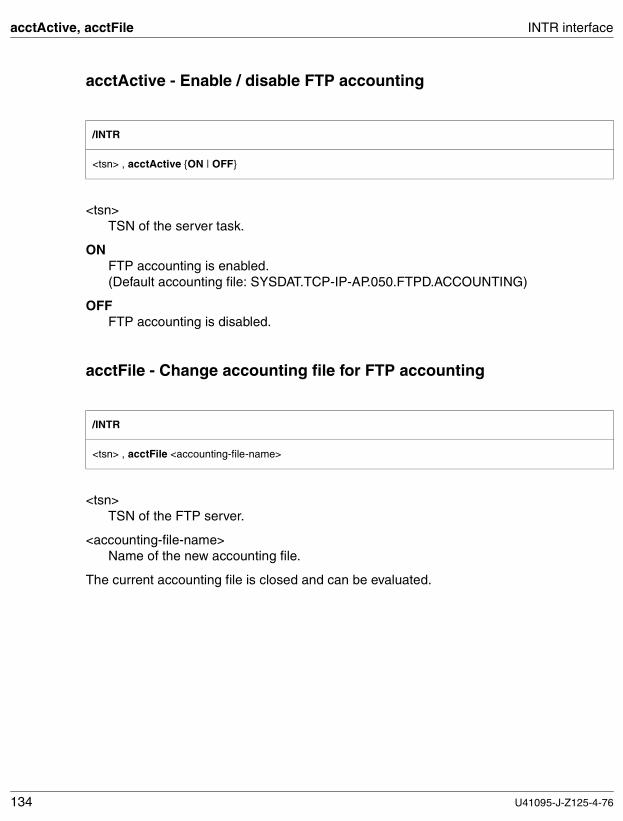
134 U41095-J-Z125-4-76
acctActive, acctFile INTR interface
acctActive - Enable / disable FTP accounting
<tsn>TSN of the server task.
ONFTP accounting is enabled.(Default accounting file: SYSDAT.TCP-IP-AP.050.FTPD.ACCOUNTING)
OFFFTP accounting is disabled.
acctFile - Change accounting file for FTP accounting
<tsn>TSN of the FTP server.
<accounting-file-name>Name of the new accounting file.
The current accounting file is closed and can be evaluated.
/INTR
<tsn> , acctActive {ON | OFF}
/INTR
<tsn> , acctFile <accounting-file-name>

U41095-J-Z125-4-76 135
INTR interface RDPROT
RDPROT - Save logging file of FTP servers
The RDPROT command is used to save the logging file of an FTP server under the name of the original logging file (default file name: SYSOUT.TCP-IP-AP.050.FTPD), extended by a suffix specifying the date and time in the format <MMDD><HHMMSS>. This file always contains the difference entries for the previous backup. Make sure that you do not select a name that is too long for the logging file: RDPROT fails when the name exceeds the permis-sible length of 38 characters after the suffix is appended.
<tsn>TSN of the server task.
/INTR
<tsn> , RDPROT

136 U41095-J-Z125-4-76
IPv6 addresses in FTP IPv6 addresses
4.10 IPv6 addresses in FTP
This section deals with the following topics in conjunction with the use of IPv6 addresses in FTP:
● Control connection setup
● Data connection setup in active and passive mode
● Proxy mechanism
● Note on use in heterogeneous networks
4.10.1 Control connection setup
When the control connection is set up using the client command open, an IPv6 address can be used which is specified in hexadecimal notation with a colon (:) (see the manual “interNet Services User Guide”).
4.10.2 Data connection setup
The following two FTP protocol commands are available for setting up the data connection with IPv6 addresses:
● EPRT: PORT command extended by IPv6 capability
● EPSV: PASV command extended by IPv6 capability
The following two modes are available for setting up data connections:
● Active mode
● Passive mode

U41095-J-Z125-4-76 137
IPv6 addresses IPv6 addresses in FTP
Active mode
Connection setup takes place with an active child and passive client. The child is notified of its own connection endpoint with the aid of the following commands:
● PORT command if the home address is anIPv4 address (IPv4-MAPPED address).
● EPRT command if the home address is an IPv6 address.
Passive mode
Passive mode is selected using the client command passive (see the manual “interNet Services User Guide”).
The data connection is set up with a passive child and active client. The child sends its IPv4 address including the port number (PASV) or just its port number (EPSV), which the client then combines with the server’s IPv6 address known from the control connection.
This process is started by one of the two following commands sent by the client:
● PASV command if the server’s IP address for the control connection is an IPv4-MAPPED address.
● EPSV command if the server’s IP address for the control connection is an IPv6 address.
Passive mode is now the default setting in many client implementations and is used to go from a LAN onto the Internet via a firewall. Such firewalls often prevent active connection setup to the user’s own LAN.
PORT a1, a2, a3, a4, p1, p2 ai, i = 1,..,4: IPv4 address; pi, i = 1, 2: port number
EPRT |2|a|p| 2: IPv6 protocol,a: IPv6 address in colon notation, p: port number
227 Entering Passive Mode (a1, a2, a3, a4, p1, p2) ai, i = 1,..,4: IPv4 address; pi, i = 1, 2: port number (response to PASV)
229 Entering Extended Passive Mode EPRT (|||p|) p: port number(response to EPSV)

138 U41095-J-Z125-4-76
IPv6 addresses in FTP IPv6 addresses
4.10.3 Proxy mechanism
In the event of data transfer between two FTP servers (referred to as first server and proxy server below) the FTP client sends either a PASV or EPSV command to the proxy server, depending on whether the proxy server can be reached on the control connection via an IPv4 or IPv6 address. The client sends the address information contained in the response to the first server using a PORT or EPRT command.
The following problem can occur here:
● The proxy server has an IPv6 address.
● The first server, however, is a pure IPv4 server which cannot be reached via IPv6 addresses and is consequently still operating with IPv4 FTP.
In order to solve this problem, the proxy server must have at least one IPv4 address in addition to the IPv6 addresses. You must specify this IPv4 address as an IPv4-MAPPED address when you set up the control connection. The PASV command then returns an IPv4 address under which the proxy server can be reached and which the first server can also process.
4.10.4 Notes on using heterogeneous networks
The most important requirement for using an IPv6 FTP in BS2000/OSD is the existence of sockets with IPv6 capability. In BS2000/OSD the SOC6 subsystem has been developed for this purpose. This subsystem is implemented as of SOCKETS(BS2000) Version 2.0A.
Please note the following here:
● If a host only has IPv4 addresses, you can use an FTP server with IPv6 capability provided sockets with IPv6 capability are available. However, no other IPv4 server may run in parallel.
● If a host only has IPv4 and IPv6 addresses, you should only use FTP with IPv6 capability. If you do not do this, an IPv6-capable client could attempt to set up an IPv6 connection, which would then fail.
● If a host only has IPv6 addresses, you must use the FTP with IPv6 capability.

U41095-J-Z125-4-76 139
IPv6 addresses SNMP subagent for FTP
4.11 SNMP subagent for FTP
The FTP server has its own subagent (FTP subagent), which is operated via a management application, the BCAM Manager.
The “SNMP Management for openNet Server and interNet Services” manual contains infor-mation on the following topics:
● Handling the BCAM Manager
● Software requirements
● Installation and deinstallation
● Starting up and shutting down the FTP subagent
Interaction between the FTP subagent and FTP server
The FTP server accesses the FTP subagent via the fixed port number 3237. Immediately after starting up, the FTP server reports to the FTP subagent, provided this subagent is also started, and provides it with the following information:
● Port number, under which the FTP subagent can access the FTP server
● Server port number for the control connection to the FTP client
Assuming a server entity with this server port number does not already exist, the FTP server creates the relevant server entry.
Each FTP server writes its two port numbers to the SYSDAT.TCP-IP-AP.050.SNMP file at startup. If the FTP subagent is only started subsequently, it can checkSYSDAT.TCP-IP-AP.050.SNMP for the currently active FTP server and create the relevant data structures.
If the FTP server is shut down, it deletes its entry from the SYSDAT.TCP-IP-AP.050.SNMP file.

140 U41095-J-Z125-4-76
FTP exit IPv6 addresses
4.12 FTP exit
The following exits exist for the FTP client and the FTP server:
● FTP system exits
● Exit mechanisms for the FTP server and FTP client
4.12.1 FTP system exit
The FTP system exit enables the operator of a BS2000-FTP server to extend or modify FTP server functions and to add new functions. Such functions may include:
● security checks in addition to the interactive login on accessing the FTP server andfor the FTP commands subsequently received,
● logging of verified FTP commands,
● modification of FTP commands.
If the system exit is called from the FTP server, the following actions must be performed, depending on the selected installation mode (see page 37 in the chapter “Installing FTP and TELNET”):
● A system exit level other than 0 must be set in the SDF command SET-FTP-TELNET-PARAMETERS (see page 72) or
● The -systemExit 1 (see page 91) option must be specified in the option file or
● The -x 1 option must be specified in the respective enter job.
If FTAC is used at the same time, the system exit is not selected for the subevents FTPLOG and FTPCMD.
In order to protect the BS2000 FTP server, the input of an incorrect LOGON password for the TSOS ID (when FTAC functionality is disabled) is penalized with a time delay, which increases with each further invalid attempt. Following each invalid password entry, the connection request is rejected after about five seconds. It is only on completion of this time that a successful LOGON attempt can be made, regardless of whether or not the correct password was specified in the mean time. The duration of the time penalty remains invisible to potential "intruders".
i

U41095-J-Z125-4-76 141
IPv6 addresses FTP exit
4.12.1.1 FTP system exit events
The FTP system exit is called for the events described below. Each event is uniquely identified by the main event name and the subevent name. At present, there is only one main event FTP for the FTP system exit routine, with the subevents FTPLOG, FTPBYE, FTPCMD and FTPCMDE.
When programming exit routines, you should bear in mind that there could be more main events and subevents in future versions of the exit.
Each call to the exit is issued with the port number of the FTP server and a "connection ID". If multiple FTP servers (with different port numbers) are started, a separate behavior can be implemented in the exit routine for each server by means of the port number. The "connection ID" enables all FTPCMD, FTPCMDE, FTPBYE subevents associated with a particular FTP session to be identified, i.e. all events with a certain "connection ID" belong to the last preceding FTPLOG event with the same "connection ID". This enables the exit routine to temporarily save and retrieve information that is needed by the same FTP session in subsequent calls.
Subevent FTPLOG
The subevent FTPLOG is called at each FTP login attempt. The exit routine can decide on the basis of the supplied parameters (user ID, account, password, partner system) whether or not this login attempt should be allowed. In addition, the exit routine can log all access attempts and return some parameters (user ID, account, password) changed by using the "Modify call" return code. This can be used, for example, to make the output of interactive access authorizations unnecessary, since the exit routine can map special FTP login passwords, which do not enable interactive access, to actual interactive passwords.
Subevent FTPBYE
The subevent FTPBYE is called when an FTP session is ended. The exit routine can then create a closing log of the FTP session, for example, and delete any buffered data, if necessary. In addition to the data that is always supplied, the user id, account, password, partner system and ftp login are always supplied as action classes with this call.

142 U41095-J-Z125-4-76
FTP exit IPv6 addresses
Subevent FTPCMD
The subevent FTPCMD is called on receiving certain FTP commands. Not only the name of the FTP (protocol) command is supplied, but also an associated action class (see the table below). Note that the decision to grant or deny permission should preferably be based on the action class instead of the command name to avoid unnecessary updates in case the set of verified FTP commands is changed in future versions.
The command parameter (file or directory name) is also supplied.
(The system exit is not called for any of the other FTP commands.)
Command Action class
RETR YAPXREAD
STOR YAPXWRT
STOU YAPXWRT
APPE YAPXWRT
RNFR YAPXMODA
DELE YAPXDEL
FILE YAPXCREA
PWD YAPXSHDR
XPWD YAPXSHDR
CWD YAPXSHDR
XCWD YAPXSHDR
LIST YAPXSHDR
NLST YAPXSHDR
CDUP YAPXSHDR
XDUP YAPXSHDR
MKD YAPXCRDR
XMKD YAPXCRDR
RMD YAPXDLDR
XRMD YAPXDLDR
SIZE YAPXSHDR
MDTM YAPXSHDR

U41095-J-Z125-4-76 143
IPv6 addresses FTP exit
If the exit is caused by a command that results in a write access from the viewpoint of the server, a parameter is used to specify whether this access is to extend, replace or create a new file. In addition, the name of the file or directory on which the command works is also supplied. This name could potentially be modified (by adding a prefix, for example) and returned, and the FTP server could then use only this modified name thereafter. The "Modify call" return code should be used here.
Subevent FTPCMDE
The subevent FTPCMDE is called with the same parameters as FTPCMD when a command has been processed. It is also established whether the command has been terminated with-out errors (YAPXCMDR field with the values YAPXOK or YAPXERR).
Register values
On entering the exit routine, registers 4 to 11 are undefined, and the remaining registers have the following values:
R0 = Exit number '023'
R1 = A(YAPXPARL) = FTP system exit parameter list; see below
R2 = A(Task Control Block)
R3 = A(Executive Vector Table)
R12 = A(TPR Program Manager)
R13 = A(Save area of the calling component)
R14 = A(Indirect return)
R15 = A(Exit routine)
Registers 12, 13 and 14 must not be destroyed by the exit routine.

144 U41095-J-Z125-4-76
FTP exit IPv6 addresses
Return information
The exit routine supplies return information to the calling FTP component in register 15 in the following format:
R15 = X'BB0000RR'
BB = Return information of the basic mechanism
00 No error04 Exit routine not active08 Invalid call
RR = Return information of the exit routine to the calling FTP component.
The following values are possible:
The YAPSEPA macro can be used to create a DSECT for the FTP system exit parameter list.
Layout of operand list
(macro resolution with MF=D and default values for PREFIX and MACID)
[label] YAPSEPA MF=D [,PREFIX=Y | <prefix>]-
[,MACID=APX | <mac-id>] ---
00 Reject call
04 Accept call
08 Modify call

U41095-J-Z125-4-76 145
IPv6 addresses FTP exit
Example
YAPSEPA MF=D 1 MFTST MF=D,PREFIX=Y,MACID=APX,ALIGN=F, C 1 DMACID=APX,SUPPORT=(D,C,M,L),DNAME=APXPARL 2 YAPXPARL DSECT , 2 *,##### PREFIX=Y, MACID=APX ##### 1 * Parameter area 1 * 1 YAPXHDR DS 0XL16 Header 1 YAPXVERS DS F Interface version 1 * VERSION 1 YAPXVER1 EQU 1 Internet Services V1.0 1 YAPXVER2 EQU 2 Internet Services V2.0
1 * 1 YAPXMCAS DS F Exit main case 1 * Exit main case 1 YAPXFTP EQU 1 FTP 1 *
1 YAPXSCAS DS F Exit sub case 1 * Exit sub case 1 YAPXFLOG EQU 1 FTP login 1 YAPXFCMD EQU 2 FTP command1 YAPXFCDE EQU 3 FTP command end1 YAPXFBYE EQU 4 FTP logout1 *1 YAPXRSLT DS F Internally used1 *
1 * 1 YAPXIND DS 0XL856 Input parameters 1 YAPXPORT DS F FTP server port number 1 YAPXCNID DS F Connection id 1 YAPXACT DS F FTP action class 1 * Action class 1 YAPXWRT EQU 1 write 1 YAPXREAD EQU 2 read 1 YAPXSHAT EQU 4 show attributes 1 YAPXDEL EQU 8 delete 1 YAPXCREA EQU 16 create 1 YAPXMODA EQU 32 modify attributes 1 YAPXSHDR EQU 64 show directory 1 YAPXMOVE EQU 128 move 1 YAPXCRDR EQU 256 create directory 1 YAPXDLDR EQU 512 delete directory 1 YAPXMDDR EQU 1024 modify directory 1 YAPXLOG EQU 2048 ftp login 1 * 1 YAPXWRMD DS F Write mode
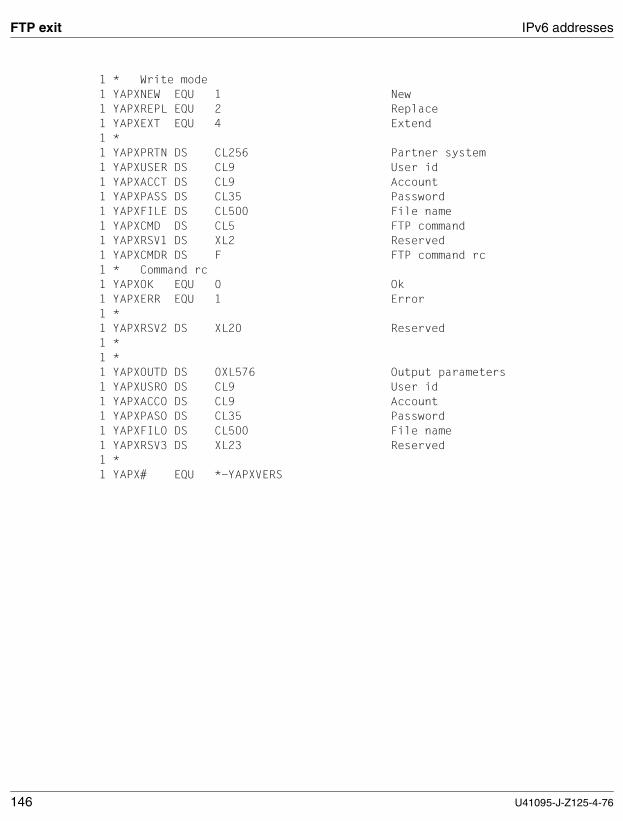
146 U41095-J-Z125-4-76
FTP exit IPv6 addresses
1 * Write mode 1 YAPXNEW EQU 1 New 1 YAPXREPL EQU 2 Replace 1 YAPXEXT EQU 4 Extend 1 * 1 YAPXPRTN DS CL256 Partner system 1 YAPXUSER DS CL9 User id 1 YAPXACCT DS CL9 Account 1 YAPXPASS DS CL35 Password 1 YAPXFILE DS CL500 File name 1 YAPXCMD DS CL5 FTP command 1 YAPXRSV1 DS XL2 Reserved 1 YAPXCMDR DS F FTP command rc
1 * Command rc 1 YAPXOK EQU 0 Ok 1 YAPXERR EQU 1 Error1 *
1 YAPXRSV2 DS XL20 Reserved 1 *1 *1 YAPXOUTD DS 0XL576 Output parameters
1 YAPXUSRO DS CL9 User id 1 YAPXACCO DS CL9 Account 1 YAPXPASO DS CL35 Password 1 YAPXFILO DS CL500 File name1 YAPXRSV3 DS XL23 Reserved 1 *
1 YAPX# EQU *-YAPXVERS

U41095-J-Z125-4-76 147
IPv6 addresses FTP exit
Alternatively, there is also a corresponding C include YAPSEPA.H:
#ifndef _YAPSEPA_H#define _YAPSEPA_H #if 0/********************************************************************* BEGIN-INTERFACE YAPSEPA TITLE (/ TCP-IP-AP System exit parameter list /) NAME YAPSEPA.H DOMAIN TCP-IP-AP LANGUAGE C COPYRIGHT (C) Fujitsu Siemens Computers GmbH 1998 ALL RIGHTS RESERVED COMPILATION-SCOPE USER INTERFACE-TYPE CALL RUN-CONTEXT TU PURPOSE (/ YAPSEPA describes the parameter list for the FTP system exit. /) END-INTERFACE YAPSEPA.*********************************************************************/#endif /* Version *//* ENUM version_s */#define YAPSEPAvers1 1 /* Internet Services V1.0 */#define YAPSEPAvers2 2 /* Internet Services V2.0 */ /* Exit main case *//* ENUM mainCase_s */#define YAPSEPAFTP 1 /* FTP */ /* Exit sub case *//* ENUM subCase_s */#define YAPSEPAFTPLOG 1 /* FTP login */#define YAPSEPAFTPCMD 2 /* FTP command */#define YAPSEPAFTPCMDE 3 /* FTP command end */#define YAPSEPAFTPBYE 4 /* FTP logout */ /* Action class *//* ENUM action_s */#define YAPSEPAwrite 1 /* write */#define YAPSEPAread 2 /* read */#define YAPSEPAshow_attr 4 /* show attributes */#define YAPSEPAdelete 8 /* delete */

148 U41095-J-Z125-4-76
FTP exit IPv6 addresses
#define YAPSEPAcreate 16 /* create */#define YAPSEPAmod_attr 32 /* modify attributes */#define YAPSEPAshow_dir 64 /* show directory */#define YAPSEPAmove 128 /* move */#define YAPSEPAcre_dir 256 /* create directory */#define YAPSEPAdel_dir 512 /* delete directory */#define YAPSEPAmod_dir 1024 /* modify directory */#define YAPSEPAlogin 2048 /* ftp login */ /* Write mode *//* ENUM writeMode_s */#define YAPSEPAnew 1 /* New */#define YAPSEPAreplace 2 /* Replace */#define YAPSEPAextend 4 /* Extend */ /* Command rc *//* ENUM commandRc_s */#define YAPSEPAok 0 /* Ok */#define YAPSEPAerror 1 /* Error */ /* Parameter area */struct YAPSEPA_pl_mdl { /* Header */ struct { unsigned long version; /* Interface version */ unsigned long mainCase; /* Exit main case */ unsigned long subCase; /* Exit sub case */ unsigned long result; /* Internally used */ } header; /* Input parameters */ struct { unsigned long portNum; /* FTP server port number */ unsigned long connId; /* Connection id */ unsigned long action; /* FTP action class */ unsigned long writeMode; /* Write mode */ char partner[256]; /* Partner system */ char userId[9]; /* User id */ char account[9]; /* Account */ char password[35]; /* Password */ char fileName[500]; /* File name */ char command[5]; /* FTP command */ char reserved_1[2]; /* Reserved */ unsigned long commandRc; /* FTP command rc */ char reserved_2[20]; /* Reserved */ } in_data;
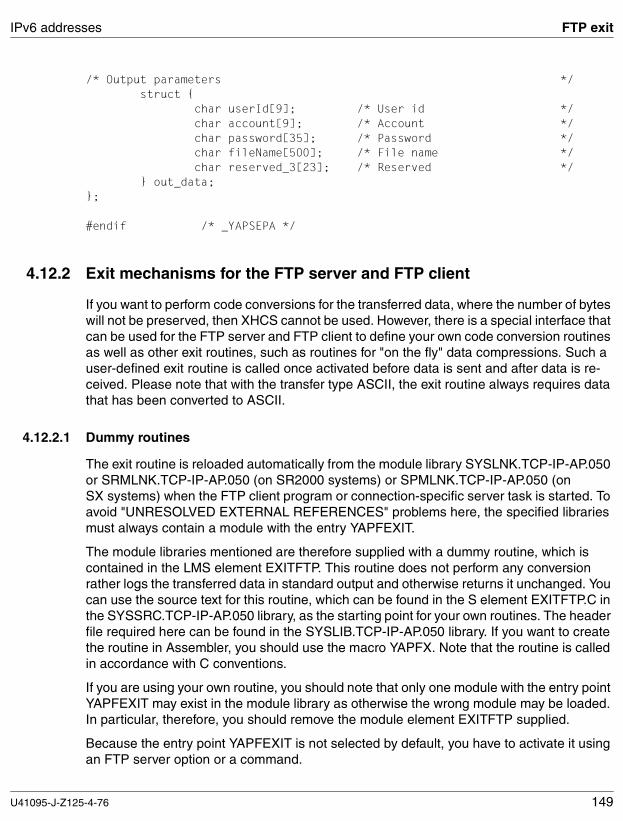
U41095-J-Z125-4-76 149
IPv6 addresses FTP exit
/* Output parameters */ struct { char userId[9]; /* User id */ char account[9]; /* Account */ char password[35]; /* Password */ char fileName[500]; /* File name */ char reserved_3[23]; /* Reserved */ } out_data;};
#endif /* _YAPSEPA */
4.12.2 Exit mechanisms for the FTP server and FTP client
If you want to perform code conversions for the transferred data, where the number of bytes will not be preserved, then XHCS cannot be used. However, there is a special interface that can be used for the FTP server and FTP client to define your own code conversion routines as well as other exit routines, such as routines for "on the fly" data compressions. Such a user-defined exit routine is called once activated before data is sent and after data is re-ceived. Please note that with the transfer type ASCII, the exit routine always requires data that has been converted to ASCII.
4.12.2.1 Dummy routines
The exit routine is reloaded automatically from the module library SYSLNK.TCP-IP-AP.050 or SRMLNK.TCP-IP-AP.050 (on SR2000 systems) or SPMLNK.TCP-IP-AP.050 (on SX systems) when the FTP client program or connection-specific server task is started. To avoid "UNRESOLVED EXTERNAL REFERENCES" problems here, the specified libraries must always contain a module with the entry YAPFEXIT.
The module libraries mentioned are therefore supplied with a dummy routine, which is contained in the LMS element EXITFTP. This routine does not perform any conversion rather logs the transferred data in standard output and otherwise returns it unchanged. You can use the source text for this routine, which can be found in the S element EXITFTP.C in the SYSSRC.TCP-IP-AP.050 library, as the starting point for your own routines. The header file required here can be found in the SYSLIB.TCP-IP-AP.050 library. If you want to create the routine in Assembler, you should use the macro YAPFX. Note that the routine is called in accordance with C conventions.
If you are using your own routine, you should note that only one module with the entry point YAPFEXIT may exist in the module library as otherwise the wrong module may be loaded. In particular, therefore, you should remove the module element EXITFTP supplied.
Because the entry point YAPFEXIT is not selected by default, you have to activate it using an FTP server option or a command.

150 U41095-J-Z125-4-76
FTP exit IPv6 addresses
4.12.2.2 User-defined exit routines
For handling the various exit routines, the callers of the exit routine (FTP client or FTP server) pass the address of a parameter list to the entry point YAPFEXIT. The structure YAPFX_pl_mdl from this parameter list is supplied in the header file YAPFX.H of the SYSLIB.TCP-IP-AP.050 library. The YAPFEXIT signature is as follows:
void YAPFEXIT (struct YAPFX_pl_mdl*)
Structure of YAPFX_pl_mdl
The YAPFX_pl_mdl structure is defined as follows:
/* Return codes *//* ENUM rc_s */#define YAPFXok 0 /* Ok */#define YAPFXbufTooShort 1 /* Buffer too short */#define YAPFXother 255 /* Other error */
/* Caller *//* ENUM caller_s */#define YAPFXclient 1 /* Client */#define YAPFXserver 2 /* Server */
/* Action *//* ENUM action_s */#define YAPFXrecv 1 /* Receive */#define YAPFXsend 2 /* Send */
/* Action modifier *//* ENUM actionm_s */#define YAPFXnone 0 /* None */#define YAPFXfirst 1 /* First */#define YAPFXlast 2 /* Last */
/* Parameter area */struct YAPFX_pl_mdl {
/* Input parameters */struct {unsigned long caller; /* Calling instance */unsigned short action; /* Action */unsigned short actionm; /* Action modifier */void *selector; /* Selector */char hostname[33]; /* Host name */char reserved1[7]; /* Reserved */unsigned long portNo; /* Port number */
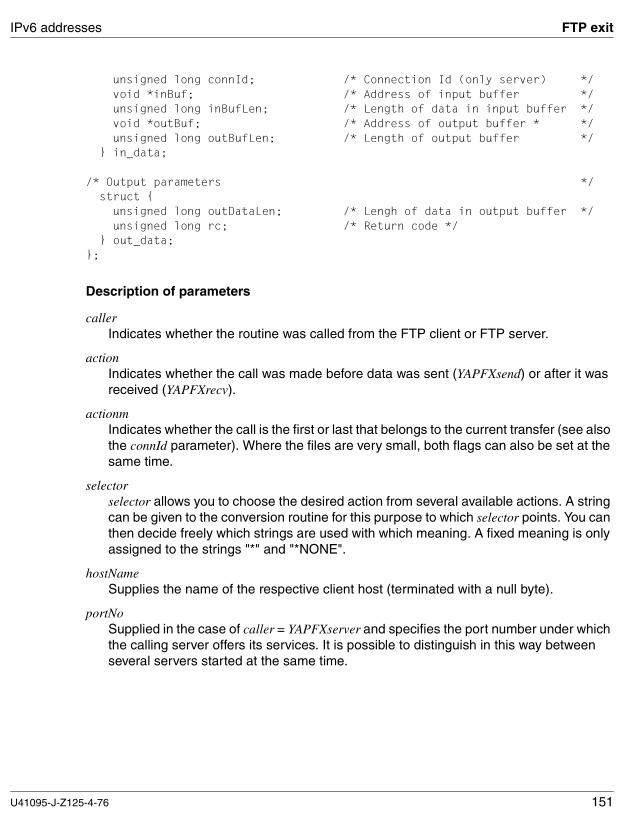
U41095-J-Z125-4-76 151
IPv6 addresses FTP exit
unsigned long connId; /* Connection Id (only server) */void *inBuf; /* Address of input buffer */unsigned long inBufLen; /* Length of data in input buffer */void *outBuf; /* Address of output buffer * */unsigned long outBufLen; /* Length of output buffer */
} in_data;
/* Output parameters */struct {unsigned long outDataLen; /* Lengh of data in output buffer */unsigned long rc; /* Return code */
} out_data;};
Description of parameters
caller Indicates whether the routine was called from the FTP client or FTP server.
action Indicates whether the call was made before data was sent (YAPFXsend) or after it was received (YAPFXrecv).
actionm Indicates whether the call is the first or last that belongs to the current transfer (see also the connId parameter). Where the files are very small, both flags can also be set at the same time.
selector selector allows you to choose the desired action from several available actions. A string can be given to the conversion routine for this purpose to which selector points. You can then decide freely which strings are used with which meaning. A fixed meaning is only assigned to the strings "*" and "*NONE".
hostNameSupplies the name of the respective client host (terminated with a null byte).
portNoSupplied in the case of caller = YAPFXserver and specifies the port number under which the calling server offers its services. It is possible to distinguish in this way between several servers started at the same time.

152 U41095-J-Z125-4-76
FTP exit IPv6 addresses
connId Where there are several active connections, this option allows the individual connections to be identified by the pair (portNo, connId). This is necessary, for example, if connection-specific status information is to be stored and then retrieved beyond the duration of a call. If only the first byte of a string containing two characters is supplied as the last byte in a call, for example, this byte must be buffered until it can be dealt with in the next call.
The flags in actionm determine how to use this type of buffered information:
– Status information from previous calls must be deleted with YAPFXfirst.
– All buffered data must be returned with YAPFXlast.
inBufContains the address of the buffer containing the data for conversion (input buffer).
inBufLenSpecifies the length (number of valid bytes) in the receive buffer.
outBufContains the address of the output buffer.
outBuflenSpecifies the length of the output buffer.
outDataLenBefore returning to the caller, the routine must indicate in outDataLen the number of valid bytes in the output buffer that thus have to be transferred.
rc The conversion routine uses rc to indicate whether the conversion was terminated successfully.

U41095-J-Z125-4-76 153
IPv6 addresses FTP exit
Writing user-defined FTP exits under POSIX
As the POSIX FTP is created by linking the LLMs FTP and FTPEXIT, you can also work with the FTP exits under POSIX. The interNet Services package contains the dummy module FTPEXIT, which only executes a return.
You write your own FTP exits as follows:
Ê Create the version of the FTPEXIT you require.
Ê Link this version to FTP from SYSLNK.TCP-IP-AP.050.
Ê Write the resultant LLM to the SINLIB.TCP-IP-AP.050 library under the name FTP.
Ê Then install POSIX-FTP (see the section “Installing and uninstalling FTP and TELNET clients in POSIX” on page 59).
Results and return codes for exit routines
If the output buffer is too small for the complete conversion, the exit routine must supply the return code YAPFXbufTooShort. The exit routine is called again in this case with the same data but a larger output buffer. This may happen several times until the output buffer is large enough or an internal limit on the part of the caller is exceeded.
In the case of all other errors, the exit routine must supply the return code YAPFXother. The caller then aborts the transfer and initiates a suitable error handling.
4.12.2.3 Enabling / disabling user-defined exit routines
Because user-defined exit routines are not selected by default, they have to be activated before they are used.
Enabling and disabling user-defined exit routines for the FTP server
User-defined exit routines for the FTP server can be activated either in the FTP server or FTP client.
Enabling user-defined exit routines for the FTP server in the FTP server
In order to activate the conversion routines in the FTP server, add the "-U" option to the /START-PROGRAM statement in the Enter file on the FTP server (SYSENT. TCP-IP-AP.050.FTPD) and then start the FTP server:
-U [receive: [<recv-selector>]!][send: [<send-selector>]]
The string <recv-selector> or <send-selector> is transferred in the selector parameter when the relevant conversion routine is called and may not exceed 32 characters.

154 U41095-J-Z125-4-76
FTP exit IPv6 addresses
Enabling user-defined exit routines for the FTP server in the FTP client
You can activate conversion routines for the FTP server from the FTP client by sending the server a site exit command from the client with an operand similar to the -U server option. The conversion routine is only called in this case with these parameters for transfers to this connection. If the FTP client from interNet Services Ï V2.0 is used, rexit ... can also be specified instead of quote site exit ....
You should note the following here:
● The site exit command has precedence over the -U option. In other words, even if the FTP server was started with the -U option, the specifications of a site exit command sent from the client to the server are valid.
● By sending a site exit command with the selector string "*" the general server setting is again set as valid in accordance with the -U option.
Disabling user-defined exit routines for the FTP server
The exit routine for the FTP server is disabled for the current connection by sending asite exit command with the selector string "*NONE".
Enabling / disabling user-defined exit routines for the FTP client
User-defined conversion routines are enabled and disabled for the FTP client with the exit command.
Enabling user-defined exit routines
exit [receive:[<recv-selector>]!] [send:[<send-selector>]]
A proper selector must be specified for both <recv-selector> and <send-selector>, which may contain at most 32 characters.
Disabling user-defined exit routines
exit receive:*NONE or send:*NONE or receive:*NONE!send:*NONE
You have to specify *NONE for both <recv-selector> and <send-selector>.

U41095-J-Z125-4-76 155
5 TELNET configuration and operationYou can configure TELNET using either the SDF command or the option file.
Please note the limitations on configuration and operation and the use of TLS/SSL when carrying out installation using FHS masks (page 46).
If you installed TELNET using the SDF command SET-FTP-TELNET-PARAMETERS, TELNET was configured during installation (see the chapter “Installing FTP and TELNET” on page 37). If you installed TELNET using FHS masks, you have to configure TELNET for operation.
This chapter covers the following topics related to the configuration and operation of TELNET servers:
● Using TLS/SSL to secure the TELNET server (see page 156)
● Configuration of TELNET via SDF command (see page 158) or option file (see page 168)
● Startup and shutdown of TELNET servers (see page 199)
● Saving the logging file of TELNET servers (see page 202)
● Displaying the current settings of the TELNET server (see page 202)
● Specification of commands using the console interface (see page 205)
● Using IPv6 addresses in TELNET (see page 207)
● Exits for TELNET clients and the TELNET server (see page 208)
i
i

156 U41095-J-Z125-4-76
TLS/SSL support on the TELNET server TELNET configuration and operation
5.1 TLS/SSL support on the TELNET server
TLS/SSL support on the TELNET server offers a wide range of setting options. You can make these settings as follows:
● With the aid of options which are stored in one or more option files and are interpreted when the TELNET server is started (see the section “Configuring TELNET using an option file” on page 168).
● With the aid of the installation command parameters SET-FTP-TELNET-PARAMETERS (see the section “Configuring TELNET using an option file” on page 168).
Parameterization of TLS/SSL support on the TELNET server
Below you will find an overview of the possible settings for TLS/SSL support on the TELNET server using the options. The individual options correspond to equivalent parameters in the SET-FTP-TELNET-PARAMETERS command.
The following options are available for setting parameters for TLS/SSL support on the TELNET server:
● START-TLS option (-Z tls-required, see page 177)
This option allows you to control TLS support on the TELNET server. A raft of additional options (-Z options) is provided here (see the table on page 157). Provisions for authen-tication are negotiated by SSL to free TELNET of this load.
● AUTHENTICATION option (-B, see page 197)
You use this option to negotiate the provisions for authentication. In BS2000/OSD the AUTHENTICATION option is currently only implemented for TLS/SSL.
You can control TLS support on the TELNET server using the AUTHENTICATION option implemented for TLS/SSL. To do this you use the same -Z options as in the START-TLS option (see the table on page 157).
● ENCRYPTION option (-H, page 198)
You use this option to negotiate the encryption method and the key used. In TELENET, currently only DES64 variants DES_CFB64 and DES_OFB64 are supported.
The START-TLS option and AUTHENTICATION option may not be enabled simultaneously. The following table lists the options with which you can control TLS/SSL support on the TELNET server in conjunction with the START-TLS / AUTHENTICATION option.
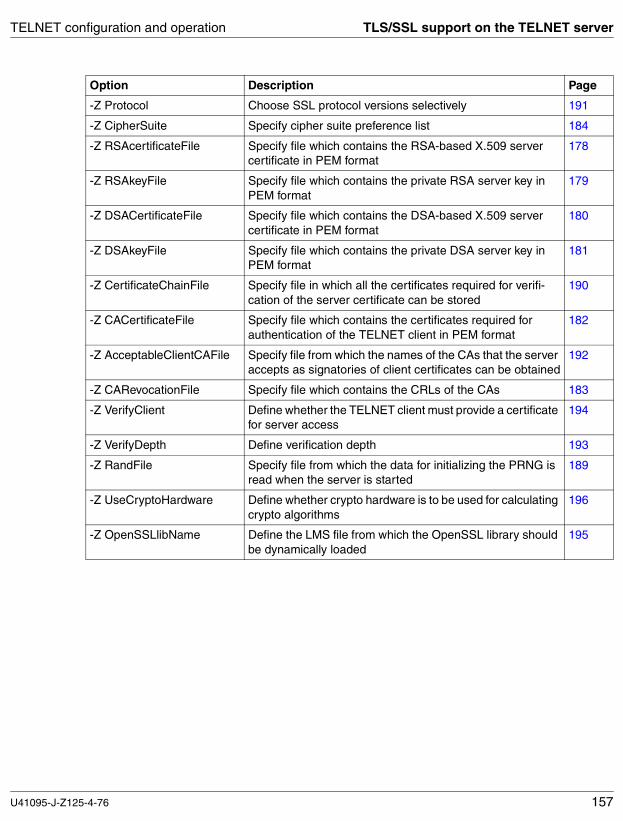
U41095-J-Z125-4-76 157
TELNET configuration and operation TLS/SSL support on the TELNET server
Option Description Page
-Z Protocol Choose SSL protocol versions selectively 191
-Z CipherSuite Specify cipher suite preference list 184
-Z RSAcertificateFile Specify file which contains the RSA-based X.509 server certificate in PEM format
178
-Z RSAkeyFile Specify file which contains the private RSA server key in PEM format
179
-Z DSACertificateFile Specify file which contains the DSA-based X.509 server certificate in PEM format
180
-Z DSAkeyFile Specify file which contains the private DSA server key in PEM format
181
-Z CertificateChainFile Specify file in which all the certificates required for verifi-cation of the server certificate can be stored
190
-Z CACertificateFile Specify file which contains the certificates required for authentication of the TELNET client in PEM format
182
-Z AcceptableClientCAFile Specify file from which the names of the CAs that the server accepts as signatories of client certificates can be obtained
192
-Z CARevocationFile Specify file which contains the CRLs of the CAs 183
-Z VerifyClient Define whether the TELNET client must provide a certificate for server access
194
-Z VerifyDepth Define verification depth 193
-Z RandFile Specify file from which the data for initializing the PRNG is read when the server is started
189
-Z UseCryptoHardware Define whether crypto hardware is to be used for calculating crypto algorithms
196
-Z OpenSSLlibName Define the LMS file from which the OpenSSL library should be dynamically loaded
195

158 U41095-J-Z125-4-76
SET-FTP-TELNET-PARAMETERS TELNET configuration and operation
5.2 Configuring TELNET using the SET-FTP-TELNET-PARAMETERS installation command
For the full command syntax and the description of the installation operands, see page 38.
SET-FTP-TELNET-PARAMETERS
(...)
, TELNET-SERVER-PROC= *NO / *CREATE(...)
*CREATE(...)
⏐ JOB-NAME= *STD / <name 1..5>
⏐ , JOB-CLASS= *STD / <name 1..8>
⏐ , CPU-TIME= *STD / <integer 1..32767>
⏐ , PRIORITY= *STD / <integer 0..255>
⏐ , DEBUG= *STD / <integer 0..9>
⏐ , TRACE= *STD / <integer 0..9>
⏐ , MAXIMUM-CONNECTIONS= *STD / <integer 1..900>
⏐ , STATION-ID= *STD / <integer 0..6>
⏐ , ASCII-TABLE= *STD / <text 1..8>
⏐ , EBCDIC-TABLE= *STD / <name 1..8>
⏐ , TLS-SUPPORT= *STD / *NO / *PARAMETERS(...)
⏐ *PARAMETERS (...)
⏐ ⏐ OPTION= *STD / *START-TLS / *AUTHENTICATION(...)
⏐ ⏐ *AUTHENTICATION(...)
⏐ ⏐ ⏐ DEBUG= *STD / *NO / *YES
⏐ ⏐ , PROTOCOL= *STD / <text 1..80>
⏐ ⏐ , CIPHER-SUITE = *STD / <text 1..80_with-lower-case>
⏐ ⏐ , RSA-CERTIFICATE-FILE = *STD / *NONE / <filename 1..54_without-generation-version>
⏐ ⏐ , RSA-KEY-FILE = *STD / *NONE / <filename 1..54_without-generation-version>
⏐ ⏐ , DSA-CERTIFICATE-FILE = *STD / *NONE / <filename 1..54_without-generation-version>
⏐ ⏐ , DSA-KEY-FILE = *STD / *NONE / <filename 1..54_without-generation-version>
⏐ ⏐ , CA-CERTIFICATE-FILE = *STD / *NONE / <filename 1..54_without-generation-version>
⏐ ⏐ , CLIENT-CA-FILE = *STD / *NONE / <filename 1..54_without-generation-version>
⏐ ⏐ , CERT-CHAIN--FILE = *STD / *NONE / <filename 1..54_without-generation-version>
⏐ ⏐ , CA-REVOCATION-FILE = *STD / *NONE / <filename 1..54_without-generation-version>
⏐ ⏐ , RANDOM-FILE = *STD / <filename 1..54_without-generation-version>
⏐ ⏐ , SSL-LIBRARY = *STD / *NONE / <filename 1..54_without-generation-version>
⏐ ⏐ , VERIFY-CLIENT= *STD / *NONE / *OPTIONAL / *REQUIRE
⏐ ⏐ , VERIFY-DEPTH= *STD / <1..32767>
⏐ ⏐ , USE-CRYPTO-HARDWARE= *STD / *NO / *YES
i

U41095-J-Z125-4-76 159
TELNET configuration and operation SET-FTP-TELNET-PARAMETERS
TELNET-SERVER-PROC=Parameters for TELNET server.
TELNET-SERVER-PROC=*NONo installation is to be performed for the TELNET server.
TELNET-SERVER-PROC=*CREATE(...)The TELNET server is to be configured. The Enter procedure for starting the TELNET server is created from the parameters entered.
JOB-NAME=This name is used as a prefix. To construct the terminal name of the current connection, the sequence number is appended to the JOB-NAME. See also the -A option on page 170.
JOB-NAME=*STDCorresponds to the entry TELSR or the value in the installation file.
JOB-NAME=<name 1..5> Job name used as a prefix.
JOB-CLASS= The job class in which the server process is to run. Make sure that Enter jobs with the parameters TIME=NTL and PRIORITY=(120,EXPRESS) may be started in this job class.
JOB-CLASS=*STDCorresponds to the standard job class on the system or the value in the installation file.
SET-FTP-TELNET-PARAMETERS
⏐ , ENCRYPTION= *STD / *NO / *YES(...)
⏐ *YES(...)
⏐ ⏐ DEBUG= = *STD / *NO / *YES
⏐ ⏐ , KEY= <x-text 1..16>
⏐ , SSL-LIBRARY = *STD / *NONE / <filename 1..54_without-generation-version>
⏐ , OPTION-FILE= *STD / <filename 1..54_without-generation-version>
⏐ , SELECTOR= *STD / <text 1..511>
⏐ , PORT-NUMBER= *STD / <integer 0..32767>
⏐ , SERVER-ENTER-FILE= *STD / <filename 1..54_without-generation-version>
⏐ , LOGGING-FILE= *STD / <filename 1..54_without-generation-version>
(...)

160 U41095-J-Z125-4-76
SET-FTP-TELNET-PARAMETERS TELNET configuration and operation
JOB-CLASS=<name 1..8>Name of the job class.
CPU-TIME=Maximum CPU time available for the server process.
CPU-TIME=*STDCorresponds to the entry NTL or the value in the installation file.
CPU-TIME=<integer 1..32767> Maximum CPU time available for the server process.
PRIORITY=Priority with which the server process is to run.
PRIORITY=*STDCorresponds to the entry 120 or the value in the installation file.
PRIORITY=<integer 0..255>Priority with which the server process is to run.
DEBUG=Trace at user level. See also the -D option on page 170.
DEBUG=*STDCorresponds to the entry 0 or the value in the installation file.
DEBUG=<integer 0..9>Debug level.
TRACE=Trace at TCP/IP (socket) interface. See also the -T option on page 173.
TRACE=*STDCorresponds to the entry 0 or the value in the installation file.
TRACE=<integer 0..9>Socket trace level.
MAXIMUM-CONNECTIONS=Maximum number of connections that the server is to operate. See also the -N option on page 171.
MAXIMUM-CONNECTIONS=*STDCorresponds to the entry 15 or the value in the installation file.
MAXIMUM-CONNECTIONS=<integer 1..900>Maximum number of connections that the server is to operate.

U41095-J-Z125-4-76 161
TELNET configuration and operation SET-FTP-TELNET-PARAMETERS
STATION-ID=Number of places with which the name of the remote computer or the job name of the TELNET server is to be taken into account in the terminal name. See also the -D option on page 170.
STATION-ID=*STDCorresponds to the entry 0 or the value in the installation file.
STATION-ID=<integer 0..6>Number of places with which the name of the remote computer or the job name of the TELNET server is to be taken into account in the terminal name.
ASCII-TABLE=Standard ASCII code table (ISO 88591). See also the -X option on page 174.
ASCII-TABLE=*STDCorresponds to the entry of 8 blanks or the value in the installation file.
ASCII-TABLE=<text 1..8>Standard ASCII code table.A non-empty value for ASCII-TABLE (specified as a command parameteror - if ASCII-TABLE=*STD - as a value in any specified installation file), is only effective if EBCDIC-TABLE (specified as a command parameter or - if EBCDIC-TABLE=*STD - as a value in any specified installation file) also does not contain an empty value.
EBCDIC-TABLE=Standard EBCDIC code table (EDF041). See also the -X option on page 174.
EBCDIC-TABLE=*STDCorresponds to the value of 8 blanks or the value in the installation file.
EBCDIC-TABLE=<name 1..8>Standard EBCDIC code table.A non-empty value for EBCDIC-TABLE (specified as a command parameter or, if EBCDIC-TABLE=*STD is set, as a value in any specified installation file), is only effective if ASCII-TABLE (specified as a command parameter or - if ASCII-TABLE=*STD - as a value in any specified installation file) also does not contain an empty value.
TLS-SUPPORT=Defines whether the connection is to be secured with TLS/SSL.
TLS-SUPPORT=*STDDefault: *NO.
TLS-SUPPORT=*NOThe TELNET server does not secure the connection with the aid of the TELNET option START-TLS.

162 U41095-J-Z125-4-76
SET-FTP-TELNET-PARAMETERS TELNET configuration and operation
TLS-SUPPORT=*PARAMETERS(...)The TELNET server secures the connection via TLS/SSL.
OPTION=TELNET option for implementing TLS/SSL. See also the -Z tls-required option on page 177.
OPTION=*STDDefault: START-TLS
OPTION=*START-TLSTLS/SSL is implemented using the TELNET option START-TLS.
OPTION=*AUTHENTICATION(...)TLS/SSL is implemented using the TELNET option AUTHENTICATION. See also the -B option on page 197.
DEBUG=Switch for the authentication trace.
DEBUG=*STDDefault: *NO
DEBUG=*NOThe authentication trace is not enabled.
DEBUG=*YESThe authentication trace is enabled.
PROTOCOL=See the -Z Protocol option on page 191.
PROTOCOL=*STDDefault: ALL-SSLv2
PROTOCOL=<text 1..80>Specification of the TLS/SSL protocol to be used.
CIPHER-SUITE=See the -Z CipherSuite option on page 184.
CIPHER-SUITE=*STDDefault: ALL:!EXP:!ADH
CIPHER-SUITE=<text 1..80_with-lower-case>Specification of the encryption algorithms to be used.
RSA-CERTIFICATE-FILE=See the -Z RSAcertificateFile option on page 178.
RSA-CERTIFICATE-FILE=*STDDefault: *NONE

U41095-J-Z125-4-76 163
TELNET configuration and operation SET-FTP-TELNET-PARAMETERS
RSA-CERTIFICATE-FILE=*NONENo RSA certificate file is specified.
RSA-CERTIFICATE-FILE=<filename 1..54_without-generation-version>Name of the RSA certificate file.
RSA-KEY-FILE=See the -Z RSAkeyFile option on page 179.
RSA-KEY-FILE=*STDDefault: *NONE
RSA-KEY-FILE=*NONENo RSA key file is specified.
RSA-KEY-FILE=<filename 1..54_without-generation-version>Name of the RSA key file.
DSA-CERTIFICATE-FILE=See the -Z DSAcertificateFile option on page 180.
DSA-CERTIFICATE-FILE=*STDDefault: *NONE
DSA-CERTIFICATE-FILE=*NONENo DSA certificate file is specified.
DSA-CERTIFICATE-FILE=<filename 1..54_without-generation-version>Name of the DSA certificate file.
DSA-KEY-FILE=See the -Z DSAkeyFile option on page 181.
DSA-KEY-FILE=*STDDefault: *NONE
DSA-KEY-FILE=*NONENo DSA key file is specified.
DSA-KEY-FILE=<filename 1..54_without-generation-version>Name of the DSA key file.
CA-CERTIFICATE-FILE=See the -Z CACertificateFile option on page 182.
CA-CERTIFICATE-FILE=*STDDefault: *NONE
CA-CERTIFICATE-FILE=*NONENo CA certificate file is specified.

164 U41095-J-Z125-4-76
SET-FTP-TELNET-PARAMETERS TELNET configuration and operation
CA-CERTIFICATE-FILE=<filename 1..54_without-generation-version>Name of the CA certificate file.
CLIENT-CA-FILE=See the -Z AcceptableClientCAFile option on page 192.
CLIENT-CA-FILE=*STDDefault: *NONE
CLIENT-CA-FILE=*NONENo file is specified.
CLIENT-CA-FILE=<filename 1..54_without-generation-version>Name of the file with the certificates of the accepted CAs.
CERT-CHAIN-FILE=See the -Z CertificateChainFile option on page 190.
CERT-CHAIN-FILE=*STDDefault: *NONE
CERT-CHAIN-FILE=*NONENo CA certificate chain file is specified.
CERT-CHAIN-FILE=<filename 1..54_without-generation-version>Name of the CA certificate chain file.
CA-REVOCATION-FILE=See the -Z CARevocationFile option on page 183.
CA-REVOCATION-FILE=*STDDefault: *NONE
CA-REVOCATION-FILE=*NONENo CA revocation file is specified.
CA-REVOCATION-FILE=<filename 1..54_without-generation-version>Name of the CA revocation file (CRL).
RANDOM-FILE=See the -Z RandFile option on page 189.
RANDOM-FILE=*STDDefault: SYSDAT.TCP-IP-AP.050.TELNETD.RAND
RANDOM-FILE=<filename 1..54_without-generation-version>Name of the file which contains the data for initializing the PRNG.
SSL-LIBRARY=See the -Z OpenSSLlibName option on page 195.

U41095-J-Z125-4-76 165
TELNET configuration and operation SET-FTP-TELNET-PARAMETERS
SSL-LIBRARY=*STDDefault: LMS library to which the IMON logical ID SYSLNK refers.
SSL-LIBRARY=*NONENo LMS library is specified.
SSL-LIBRARY=<filename 1..54_without-generation-version>Name of the LMS library which contains the OpenSSL dynamically loadable module.
VERIFY-CLIENT=See the -Z VerifyClient option on page 194.
VERIFY-CLIENT=*STDDefault: *NONE
VERIFY-CLIENT=*NONENo certificate is requested from the TELNET client.
VERIFY-CLIENT=*OPTIONALA certificate is requested from the TELNET client. However, if no certificate or only an invalid one is returned, the TELNET client is still granted access.
VERIFY-CLIENT=*REQUIREA certificate is requested from the TELNET client. However, if no certificate or only an invalid one is returned, the TELNET client is denied access.
VERIFY-DEPTH=See the -Z VerifyDepth option on page 193.
VERIFY-DEPTH=*STDDefault: 1
VERIFY-DEPTH=<integer 0..32767>Number of certificates between the client certificate and the certificate which is known to the TELNET server (including the latter).
USE-CRYPTO-HARDWARE=See the -Z UseCryptoHardware option on page 196.
USE-CRYPTO-HARDWARE=*STDDefault: *NO
USE-CRYPTO-HARDWARE=*NONo crypto hardware is used.
USE-CRYPTO-HARDWARE=*YESCrypto hardware is used.

166 U41095-J-Z125-4-76
SET-FTP-TELNET-PARAMETERS TELNET configuration and operation
ENCRYPTION=*STD / *NO / *YES(...)Defines whether the TELNET server implements encryption for the connection using the ENCRYPTION option. See also the -H option on page 198.
ENCRYPTION=*STDDefault: *NO.
ENCRYPTION=*NOThe TELNET server implements no encryption for connections by means of the ENCRYPTION option.
ENCRYPTION=*YES(...)The TELNET server implements (on principle) encryption for connections by means of the ENCRYPTION option.
ENCRYPTION=*YES(...) may only be specified if TLS-SUPPORT=*PAR(...) is not also specified.
DEBUG=Switch for the encryption trace.
DEBUG=*STDDefault: *NO
DEBUG=*NOEncryption trace not enabled.
DEBUG=*YESEncryption trace enabled.
KEY=<x-text 1..16>Key to be used for DES 64 encryption.The key must be specified without quotes and is interpreted as a hexadecimal string.Example: The key “TELNET” is E3C5D3D5C5E3 in hexadecimal notation and must be specified as follows: ... ENCRYPTION=*YES(KEY=E3C5D3D5C5E3)
SSL-LIBRARY=See the -Z OpenSSLlibName option on page 195.
SSL-LIBRARY=*STDDefault: LMS library to which the IMON logical ID SYSLNK refers.
SSL-LIBRARY=*NONENo LMS library is specified.
i

U41095-J-Z125-4-76 167
TELNET configuration and operation SET-FTP-TELNET-PARAMETERS
SSL-LIBRARY=<filename 1..54_without-generation-version>Name of the LMS library which contains the OpenSSL dynamically loadable module.
OPTION-FILE=File in which the options are stored.
OPTION-FILE=*STD Default: SYSDAT.TCP-IP-AP.050.TELNETD.OPT
OPTION-FILE= <filename 1..54_without-generation-version> Name of the option file.
SELECTOR=Selector for TELNET exit routines. See also the -E option on page 171.
SELECTOR=*STDDefault: No exits
SELECTOR=<text 1..511>Specifies the selector for the TELNET exit routines.
PORT-NUMBER=Port number under which the TELNET server is started. See also the -P option on page 172.
PORT-NUMBER=*STDDefault: 23
PORT-NUMBER=<integer 0..32767>Specifies the port number under which the TELNET server is started.
SERVER-ENTER-FILE=Name of the start file for the TELNET server.
SERVER-ENTER-FILE=*STDDefault: SYSENT.TCP-IP-AP.050.TELNETD
SERVER-ENTER-FILE=<filename 1..54_without-generation-version>Specifies the name of the start file for the TELNET server.
LOGGING-FILE=Name of the logging file for the TELNET server.
LOGGING-FILE=*STDDefault: SYSOUT.TCP-IP-AP.050.TELNETD
LOGGING-FILE=<filename 1..54_without-generation-version>Specifies the name of the logging file for the TELNET server.

168 U41095-J-Z125-4-76
Configuration of TELNET using the option file TELNET configuration and operation
5.3 Configuring TELNET using an option file
When the SET-FTP-TELNET-PARAMETERS command is executed (see page 38/page 158), an option file is generated in which the individual TELNET server parameters are stored as options. The default file name of the option file is:
SYSDAT.TCP-IP-AP.050.TELNETD.OPT
If a file of this name exists in the TELNET server’s execution ID, it is interpreted by the TELNET server’s start file (default file name: SYSENT.TCP-IP-AP.050.TELNETD) when the TELNET server is started and the TELNET server is configured accordingly.
You can thus make changes to the TELNET server parameters via the option file without needing to repeat installation using the SET-FTP-TELNET-PARAMETERS command.
If you want to use a file with a different name as the option file, specify the following option in the start file:
-M option-file-name
This file is then interpreted in place of any file namedSYSDAT.TCP-IP-AP.050.TELNETD.OPT which may exist.
The following priorities apply for the options:
5. Options specified in the start procedure
6. Options which
– are included in the option file specified via the -M option or,
– if no -M option was specified, which are included in the default option fileSYSDAT.TCP-IP-AP.050.TELNETD.OPT.
Option file and parameter line options
In the option file you can also specify the parameter line options supported in earlier versions. Mixed application of option file and options in the parameter line is also possible. If a particular option is specified both in the parameter line and in the option file, the option specified in the parameter line has priority.
U41095-J-Z125-4-76 169
TELNET configuration and operation Configuration of TELNET using the option file
Notation of the options in the option file
The various options must be entered in the option file according to the following rules:
● Any number of options can be contained in a line
● If an option’s arguments extend over more than one line, each line that is to be continued must be terminated with the continuation character “\”.
● A line beginning with the character “#” in column 1 is ignored when the file is read in.
● No distinction is made between upper and lower case in the option names.

170 U41095-J-Z125-4-76
-A, -D TELNET configuration and operation
5.3.1 Options for general configuration of the TELNET server
-A - Specify a name prefix
The -A option is used to specify a name prefix. This prefix is used to form a terminal name by appending a sequence number. The job started by the server for each client is assigned this prefix as the job name.
<text 1..8>Name prefix.Default: TELSR
-D - Debug level
The -D option is used to specify a debug level which defines whether or which diagnostic information regarding the TELNET server run should be written to the logging file.
<integer 0..2>Debug level. The value 0 disables logging. The higher the specified value, the more information is placed in the logging file.Default: 0
-A
<text 1..8>
-D
<integer 0..2>

U41095-J-Z125-4-76 171
TELNET configuration and operation -E, -N
-E - Specify exit routines
The -E option enables and disables user-defined exit routines of the TELNET server. The structure of the selector routines is described in the section “Exit routines” on page 209.
<selector-definition 1..511>Selector definition
-N - Specify the number of connections
The -N option is used to specify the number of connections which the TELNET server is to operate.
<integer 1..900>Number of connections which the server is to operate simultaneously. Default: 15
-E
<selector-definition 1..511>
-N
<integer 1..900>

172 U41095-J-Z125-4-76
-P, -S TELNET configuration and operation
-P - Specify port number
The -P option is used to specify the port number under which the server can be reached.
<integer 1..1023>Port number Default: 23
-S - Define terminal name
The -S option is used to specify the number of digits from the name of the remote computer or name prefix (see option -A) of the TELNET server which are included in the terminal name.
<integer 0..6>Number of digits.Default: 0
-P
<integer 1..1023>
-S
<integer 0..6>

U41095-J-Z125-4-76 173
TELNET configuration and operation -T, -V
-T - Specify socket trace level
The -T option is used to specify the socket trace level. The socket trace level defines whether or which diagnostic information of the TCP-IP (socket) system is to be written to the logging file.
<integer 0..9>Socket trace level. The value 0 disables logging. The higher the specified value, the more information is placed in the logging file.Default: 0
-V - Enable/disable verbose
The -V option is the short form of -D 1 and -T 1.
-T
<integer 0..9>
-V
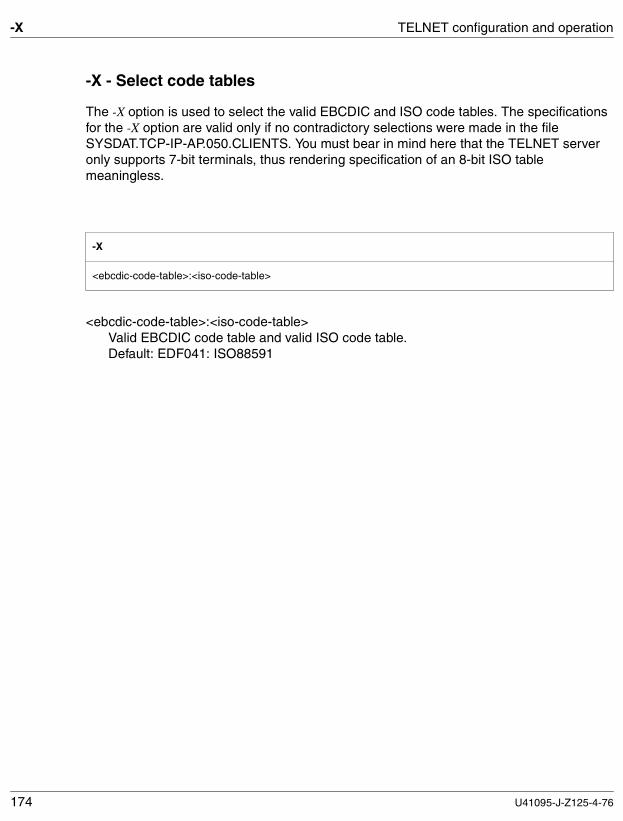
174 U41095-J-Z125-4-76
-X TELNET configuration and operation
-X - Select code tables
The -X option is used to select the valid EBCDIC and ISO code tables. The specifications for the -X option are valid only if no contradictory selections were made in the fileSYSDAT.TCP-IP-AP.050.CLIENTS. You must bear in mind here that the TELNET server only supports 7-bit terminals, thus rendering specification of an 8-bit ISO table meaningless.
<ebcdic-code-table>:<iso-code-table> Valid EBCDIC code table and valid ISO code table.Default: EDF041: ISO88591
-X
<ebcdic-code-table>:<iso-code-table>
U41095-J-Z125-4-76 175
TELNET configuration and operation Secure use of TELNET
5.3.2 Options for safe use of TELNET with the aid of authentication and encryption
There are three methods of guaranteeing secure operation of TELNET by means of authen-tication and encryption:
● START-TLS option
The START-TLS option was implemented exclusively for TLS/SSL. In BS2000/OSD it is supported by the server option -Z tls-required.
● “Telnet Authentication Option” (RFC 2941) for negotiating an authentication method
In BS2000/OSD only TLS/SSL is currently supported. The “Telnet Authentication Option” is selected using the option -B. The “Telnet Authentication Option” will possibly gain in importance in the future because it permits a very wide variety of authentication methods to be supported, including Kerberos. In the following, the “Telnet Authenti-cation Option” will be referred to as AUTHENTICATION option.
● “Telnet Data Encryption Option” (RFC 2946) for negotiating a symmetric encryption method and the associated key
● In BS2000/OSD only DES 64 (RFC 2952, RFC 2953) is currently supported. The “Telnet Data Encryption Option” is selected using the server option -H. In the following, the “Telnet Data Encryption Option” will be referred to as ENCRYPTION option.
START-TLS option (see page 176), AUTHENTICATION option (see page 197) and ENCRYPTION option (see page 198) are described in detail in the following sections.

176 U41095-J-Z125-4-76
-Z option TELNET configuration and operation
5.3.3 -Z option - Support of the START-TLS option
This option enables you to control TLS support on the TELNET client. Negotiation of the arrangements for authentication is handled by SSL in this case to relieve the load on TELNET.
You enter the options for using TLS support as follows:
-Z <option>
Time when the options or changes to the options should become effective
The -Z OpenSSLlibName option is only evaluated once during a TELNET session, namely when the OpenSSL library is loaded. All other options become effective after the connection to the TELNET client has been set up.
Description of the -Z options
The -Z options are described below.
The following must be observed here:
● With the exception of the -Z tls-required option, all the -Z options can also be used for the AUTHENTICATION option (see page 197) as this operates with TLS/SSL support.
● The -Z OpenSSLlibName option is also relevant for the ENCRYPTION option relevant, as only encryption routines from the OpenSSL library are used.
● Simultaneous specification of the ENCRYPTION option (-H, see page 198) and either the START-TLS option (-tls-required, see page 177) or the AUTHENTICATION option (-B, see page 197) results in an error when the TELNET server is started.
● Simultaneous specification of the START-TLS option (-Z tls-required) and the AUTHENTICATION option (-B) results in an error when the TELNET server is started.

U41095-J-Z125-4-76 177
TELNET configuration and operation -Z tls-required
-Z tls-required
The -Z tls-required option is used to enable and disable TLS security via the START-TLS option on the TELNET client.
yesSTART-TLS support is enabled.
noSTART-TLS support is disabled.
-Z tls-required specified without operands-Z tls-required = yes applies (START-TLS support is enabled).
-Z tls-required not specifiedSTART-TLS support is not enabled (default).
-Z tls-required
[ ={ yes | no } ]

178 U41095-J-Z125-4-76
-Z RSACertificateFile TELNET configuration and operation
-Z RSACertificateFile
The -Z RSACertificateFile option is used to specify a file which contains the RSA-based X.509 server certificate in PEM format. This file can also contain the private RSA server key. However, generally the certificate and key are stored in different files. In this case the key file is specified using the -Z RSAKeyFile option (see page 179).
<file-name 1..54>Name of the file which contains the RSA-based X.509 server certificate in PEM format.
*NONENo file is specified.*NONE is the default.
-Z RSACertificateFile
={<file-name 1..54> | *NONE}

U41095-J-Z125-4-76 179
TELNET configuration and operation -Z RSAKeyFile
-Z RSAKeyFile
The -Z RSAKeyFile option is used to specify a file which contains the private RSA server key in PEM format.
If both an X.509 client certificate and a private server key are contained in the same file (see the -Z RSACertificateFile option on page 178), the -Z RSAKeyFile option need not be specified.
As it should be possible to start up the TELNET server automatically in unattended operation, no passphrase may be entered for the private server key at server startup. You must therefore remove any existing encryption of the private key with a passphrase. In this event, ensure that unauthorized persons cannot access this key.
<file-name 1..54>Name of the file which contains the private RSA server key.
*NONENo separate file is used for the RSA server key.*NONE is the default.
-Z RSAKeyFile
={<file-name 1..54> | *NONE}

180 U41095-J-Z125-4-76
-Z DSACertificateFile TELNET configuration and operation
-Z DSACertificateFile
The -Z DSACertificateFile option is used to specify a file which contains the DSA-based X.509 server certificate in PEM format. This file can also contain the private DSA server key. However, generally the certificate and key are stored in different files. In this case the key file is specified using the -Z DSAKeyFile option (see page 181).
<file-name 1..54>Name of the file which contains the X.509 client certificate in PEM format.
*NONENo file is specified.*NONE is the default.
-Z DSACertificateFile
={<file-name 1..54> | *NONE}

U41095-J-Z125-4-76 181
TELNET configuration and operation -Z DSAKeyFile
-Z DSAKeyFile
The -Z DSAKeyFile option is used to specify a file which contains the private DSA server key in PEM format.
If both an X.509 client certificate and a private server key are contained in the same file (see the -Z DSACertificateFile option on page 180), the -Z DSAKeyFile option need not be specified.
As it should be possible to start up the TELNET server automatically in unattended operation, no passphrase may be entered for the private server key at server startup. You must therefore remove any existing encryption of the private key with a passphrase. In this event, ensure that unauthorized persons cannot access this key.
<file-name 1..54>Name of the file which contains the private DSA server key.
*NONENo separate file is used for the DSA server key.*NONE is the default.
-Z DSAKeyFile
={<file-name 1..54> | *NONE}
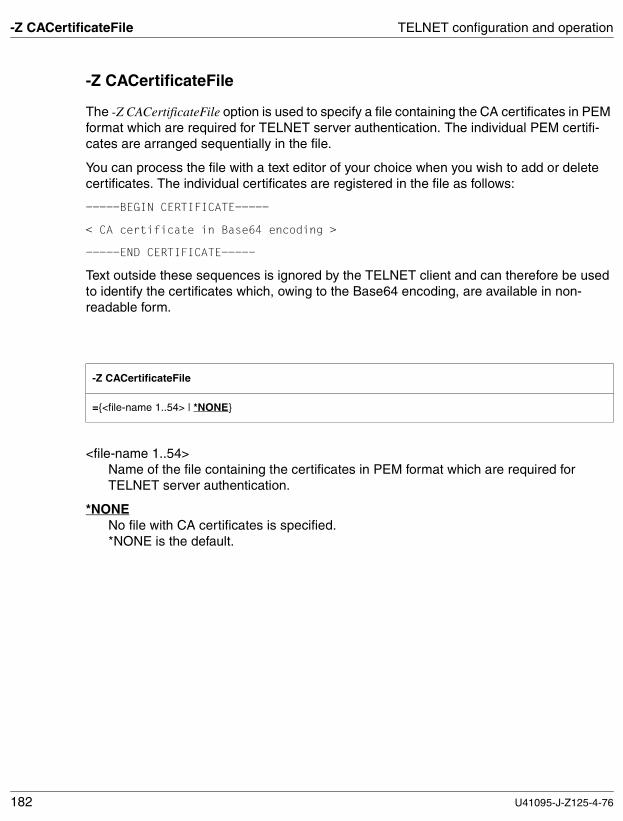
182 U41095-J-Z125-4-76
-Z CACertificateFile TELNET configuration and operation
-Z CACertificateFile
The -Z CACertificateFile option is used to specify a file containing the CA certificates in PEM format which are required for TELNET server authentication. The individual PEM certifi-cates are arranged sequentially in the file.
You can process the file with a text editor of your choice when you wish to add or delete certificates. The individual certificates are registered in the file as follows:
-----BEGIN CERTIFICATE-----
< CA certificate in Base64 encoding >
-----END CERTIFICATE-----
Text outside these sequences is ignored by the TELNET client and can therefore be used to identify the certificates which, owing to the Base64 encoding, are available in non-readable form.
<file-name 1..54>Name of the file containing the certificates in PEM format which are required for TELNET server authentication.
*NONENo file with CA certificates is specified.*NONE is the default.
-Z CACertificateFile
={<file-name 1..54> | *NONE}

U41095-J-Z125-4-76 183
TELNET configuration and operation -Z CARevocationFile
-Z CARevocationFile
The -Z CARevocationFile option is used to specify a file which contains the CRLs (Certificate Revocation Lists) of the Certificate Authorities (CAs). (Certificates issued by a Certificate Authority can be declared invalid by publication of a Certificate Revocation List (CRL).)
<file-name 1..54>Name of the file which contains the CRLs of the Certificate Authorities.
*NONENo file with CRLs is specified.*NONE is the default.
-Z CARevocationFile
={<file-name 1..54> | *NONE}

184 U41095-J-Z125-4-76
-Z CipherSuite TELNET configuration and operation
-Z CipherSuite
The -Z CipherSuite option is used to specify a cipher suite preference list. If this option is not specified, a default preference list is used.
<specification>Specification of a a cipher suite preference list (for details, see the description of the specification structure below).ALL: !EXP: !ADH is the default.
Description of the specification structure
The specification consists of one or more cipher mnemonics which are separated by a colon (:).
A cipher mnemonic can have the following forms:
● A cipher mnemonic can consist of a single cipher suite such as DES-CBC-SHA.
● A cipher mnemonic can represent:
– a list of cipher suites which contain a particular algorithm
– cipher suites of a particular type
For example, SHA1 represents all cipher suites which use the digest algorithm SHA1, and SSLv3 represents all SSL Version-3 algorithms.
● Lists of cipher suites can be combined to form a single cipher mnemonic with the aid of the “+” character. This is then interpreted as a logical AND operation. Thus SHA1+DES represents all cipher suite which contain the SHA1 and DES algorithms.
-Z CipherSuite
=<specification>

U41095-J-Z125-4-76 185
TELNET configuration and operation -Z CipherSuite
● Each cipher mnemonic can optionally be prefixed by one of the characters “!”, “-” or “+”:
– If the prefix is “!”, the relevant cipher suites are permanently deleted from the preference list. Subsequently these no longer appear in the preference list when they are specified explicitly.
– If the prefix is “-”, the relevant cipher suites are deleted from the preference list, but some or all of them can be added again using subsequent options.
– If the prefix is “+”, the relevant cipher suites are moved to the end of the preference list. This means that no cipher suites are added to the preference list, but only existing ones moved.
– If none of the three characters “!”, “-” or “+” is prefixed, the cipher mnemonic is inter-preted as a list of cipher suites which is appended to the current preference list. If this includes a cipher suite which is already contained in the current preference list, it is ignored. It is not moved to the end of the preference list.
● The cipher mnemonic “@STRENGTH” can be added at any position in order to sort the current preference list according to the length of the encryption key.
Permissible cipher mnemonics
The permissible cipher mnemonics are described below.
DEFAULTThe following cipher list is the default:
ALL:!ADH:RC4+RSA:+SSLv2:@STRENGTH
If it is used, this cipher mnemonic must be at the start of the specification.
ALLAll cipher suites with the exception of the eNULL ciphers. The latter must be enabled explicitly.
HIGHCipher suites with key lengths greater than 128 bits. As 3DES is interpreted with a length of168 bits, it belongs to this suite class.
MEDIUMCipher suites with a key length of 128 bits.

186 U41095-J-Z125-4-76
-Z CipherSuite TELNET configuration and operation
LOWCipher suites with key lengths of 64 or 56 bits, except Export cipher suites.
EXP, EXPORTExport encryption algorithms including 40- and 56-bit algorithms.
EXPORT4040-bit Export encryption algorithms.
EXPORT5656-bit Export encryption algorithms.
eNULL, NULL“NULL” encryption algorithms, in other words those without encryption. As these offer no encryption and thus present a security risk, they are by default disabled and, if required, must be specified explicitly.
aNULLCipher suites without authentication. This means at present the anonymous Diffie-Hellman algorithms. These algorithms are vulnerable to “man in the middle” attacks, and you are consequently advised not to use them.
kRSA, RSACipher suites with RSA key exchange.
kEDHCipher suites with ephemeral Diffie-Hellmann key negotiation.
aRSACipher suites with RSA authentication, in other words the certificates contain RSA keys.
aDSS, DSSCipher suites with DSS authentication, in other words the certificates contain DSS keys.
TLSv1, SSLv3, SSLv2TLSv1, SSLv3 and SSLv2 cipher suites. The TLSv1 suites and the SSLv3 suites are identical.
AESCipher suites with AES encryption (key length of128 and 256 bits).
DHCipher suites with Diffie-Hellman key exchange, including anonymous exchange.
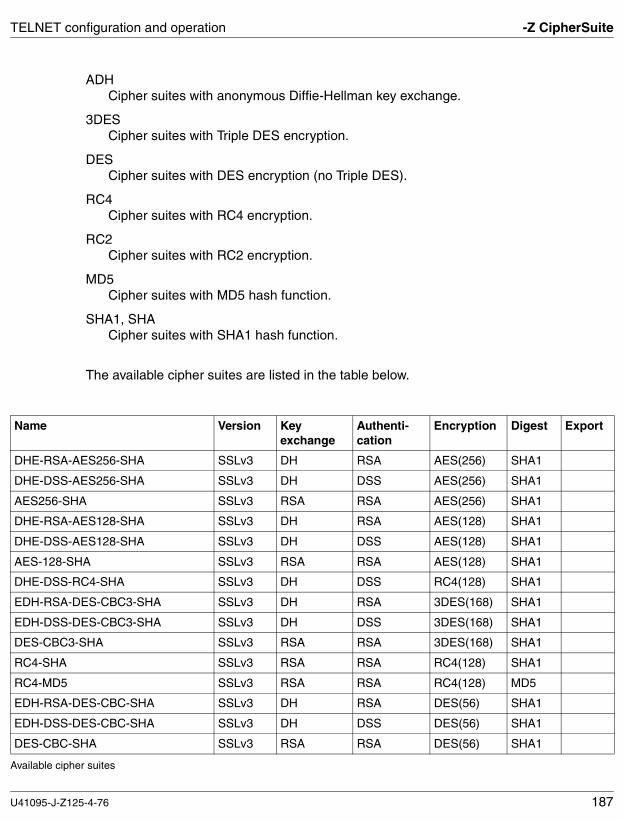
U41095-J-Z125-4-76 187
TELNET configuration and operation -Z CipherSuite
ADHCipher suites with anonymous Diffie-Hellman key exchange.
3DESCipher suites with Triple DES encryption.
DESCipher suites with DES encryption (no Triple DES).
RC4Cipher suites with RC4 encryption.
RC2Cipher suites with RC2 encryption.
MD5Cipher suites with MD5 hash function.
SHA1, SHACipher suites with SHA1 hash function.
The available cipher suites are listed in the table below.
Name Version Key exchange
Authenti-cation
Encryption Digest Export
DHE-RSA-AES256-SHA SSLv3 DH RSA AES(256) SHA1
DHE-DSS-AES256-SHA SSLv3 DH DSS AES(256) SHA1
AES256-SHA SSLv3 RSA RSA AES(256) SHA1
DHE-RSA-AES128-SHA SSLv3 DH RSA AES(128) SHA1
DHE-DSS-AES128-SHA SSLv3 DH DSS AES(128) SHA1
AES-128-SHA SSLv3 RSA RSA AES(128) SHA1
DHE-DSS-RC4-SHA SSLv3 DH DSS RC4(128) SHA1
EDH-RSA-DES-CBC3-SHA SSLv3 DH RSA 3DES(168) SHA1
EDH-DSS-DES-CBC3-SHA SSLv3 DH DSS 3DES(168) SHA1
DES-CBC3-SHA SSLv3 RSA RSA 3DES(168) SHA1
RC4-SHA SSLv3 RSA RSA RC4(128) SHA1
RC4-MD5 SSLv3 RSA RSA RC4(128) MD5
EDH-RSA-DES-CBC-SHA SSLv3 DH RSA DES(56) SHA1
EDH-DSS-DES-CBC-SHA SSLv3 DH DSS DES(56) SHA1
DES-CBC-SHA SSLv3 RSA RSA DES(56) SHA1
Available cipher suites

188 U41095-J-Z125-4-76
-Z CipherSuite TELNET configuration and operation
DES-CBC3-MD5 SSLv2 RSA RSA 3DES(168) MD5
RC2-CBC-MD5 SSLv2 RSA RSA RC2(128) MD5
RC4-MD5 SSLv2 RSA RSA RC4(128) MD5
RC4-64-MD5 SSLv2 RSA RSA RC4(64) MD5
DES-CBC-MD5 SSLv2 RSA RSA DES(56) MD5
EXP1024-DHE-DSS-RC4-SHA SSLv3 DH(1024) DSS RC4(56) SHA1 export
EXP1024-RC4-SHA SSLv3 RSA(1024) RSA RC4(56) SHA1 export
EXP1024-DHE-DSS-DES-CBC-SHA SSLv3 DH(1024) DSS DES(56) SHA1 export
EXP1024-DES-CBC-SHA SSLv3 RSA(1024) RSA DES(56) SHA1 export
EXP1024-RC2-CBC-MD5 SSLv3 RSA(1024) RSA RC2(56) MD5 export
EXP1024-RC4-MD5 SSLv3 RSA(1024) RSA RC4(56) MD5 export
EXP-EDH-RSA-DES-CBC-SHA SSLv3 DH(512) RSA DES(40) SHA1 export
EXP-EDH-DSS-DES-CBC-SHA SSLv3 DH(512) DSS DES(40) SHA1 export
EXP-DES-CBC-SHA SSLv3 RSA(512) RSA DES(40) SHA1 export
EXP-RC2-CBC-MD5 SSLv3 RSA(512) RSA RC2(40) MD5 export
EXP-RC4-MD5 SSLv3 RSA(512) RSA RC4(40) MD5 export
EXP-RC2-CBC-MD5 SSLv2 RSA(512) RSA RC2(40) MD5 export
EXP-RC4-MD5 SSLv2 RSA(512) RSA RC4(40) MD5 export
ADH-AES256-SHA SSLv3 DH none AES(256) SHA1
ADH-AES128-SHA SSLv3 DH none AES(128) SHA1
ADH-DES-CBC3-SHA SSLv3 DH none 3DES(168) SHA1
ADH-DES-CBC-SHA SSLv3 DH none DES(56) SHA1
ADH-RC4-MD5 SSLv3 DH none RC4(128) MD5
EXP-ADH-DES-CBC-SHA SSLv3 DH(512) none DES(40) SHA1 export
EXP-ADH-RC4-MD5 SSLv3 DH(512) none RC4(40) MD5 export
NULL-SHA SSLv3 RSA RSA none SHA1
NULL-MD5 SSLv3 RSA RSA none MD5
Name Version Key exchange
Authenti-cation
Encryption Digest Export
Available cipher suites

U41095-J-Z125-4-76 189
TELNET configuration and operation -Z RandFile
-Z RandFile
The -Z RandFile option is used to specify a file from which data is read for initializing the pseudo random numbers generator (PRNG) when the server is started. When the server is shut down, the relevant data from the PRNG is read to this file so that it can be used the next time the server is started.
If several TELNET servers are operated in parallel, a separate file must be defined for each server.
IMPORTANT!
This file may not be accessible to unauthorized people.
<file-name 1..54>Name of the file which contains the data for initializing the PRNG.Default: SYSDAT.TCP-IP-AP.050.TELNETD.RAND
-Z RandFile
=<file-name 1..54>
!

190 U41095-J-Z125-4-76
-Z CertificateChainFile TELNET configuration and operation
-Z CertificateChainFile
The -Z CertificateChainFile option is used to specify a file in which all certificates can be stored which are required for verification of the server certificate. The first certificate in this file is the server certificate. The remaining certificates must form an unbroken chain, starting with the certificate of the CA which issued the server certificate, through to the root certificate of a CA which can be verified directly by the FTP client. The certificates in the chain must be sorted in such a way that the root certificate is in last place.
The specified file is only required if the server certificate was issued by a CA that is not known to the TELNET clients and verification can thus not be performed by the TELNET clients without the certificate chain being sent. This mechanism requires that RSA and DSA certificates should not be used simultaneously for the server, as the file is used for both variants.
<file-name 1..54>Name of the file in which all certificates are stored which are required for verification of the server certificate.
*NONENo file is specified.*NONE is the default.
-Z CertificateChainFile
={<file-name 1..54> | *NONE}
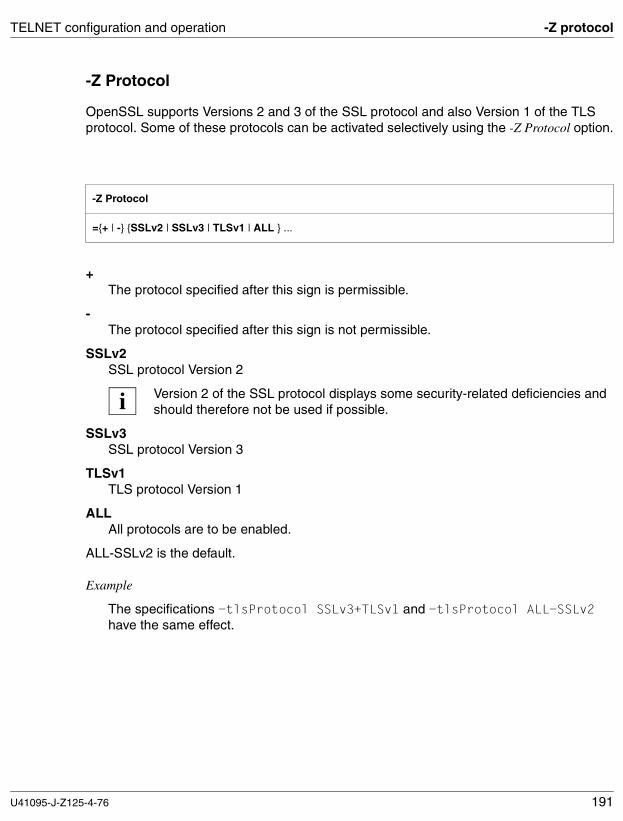
U41095-J-Z125-4-76 191
TELNET configuration and operation -Z protocol
-Z Protocol
OpenSSL supports Versions 2 and 3 of the SSL protocol and also Version 1 of the TLS protocol. Some of these protocols can be activated selectively using the -Z Protocol option.
+The protocol specified after this sign is permissible.
-The protocol specified after this sign is not permissible.
SSLv2SSL protocol Version 2
Version 2 of the SSL protocol displays some security-related deficiencies and should therefore not be used if possible.
SSLv3SSL protocol Version 3
TLSv1TLS protocol Version 1
ALLAll protocols are to be enabled.
ALL-SSLv2 is the default.
Example
The specifications -tlsProtocol SSLv3+TLSv1 and -tlsProtocol ALL-SSLv2 have the same effect.
-Z Protocol
={+ | -} {SSLv2 | SSLv3 | TLSv1 | ALL } ...
i

192 U41095-J-Z125-4-76
-Z AcceptableClientCAFile TELNET configuration and operation
-Z AcceptableClientCAFile
When client authentication is enabled, the server notifies the clients upon TLS connection setup of the names of the CAs which it accepts as signatories of client certificates. These name are taken from the certificates in the file specified by the-Z AcceptableClientCAFile option. The individual certificates in PEM format are arranged sequentially in this file.
You can process the file with a text editor of your choice when you wish to add or delete certificates. The individual certificates are registered in the file as follows:
-----BEGIN CERTIFICATE-----
< CA certificate in Base64 encoding >
-----END CERTIFICATE-----
Text outside these sequences is ignored by the TELNET server and can therefore be used to identify the certificates which, owing to the ASN.1/Base64 encoding, are available in non-readable form.
<file-name 1..54>Name of the file.
*NONENo file is specified.*NONE is the default.
-Z AcceptableClientCAFile
={<file-name 1..54> | *NONE}

U41095-J-Z125-4-76 193
TELNET configuration and operation -Z VerifyDepth
-Z VerifyDepth
The -Z VerifyDepth option is used to define the verification depth, in other words the maximum permissible number of certificates between the TELNET client certificate and the certificate which is known to the TELNET server.
Here you must note the following:
● If the value 1 (default) is specified as the maximum depth, the server certificate must have been signed directly by a CA (Certificate Authority) that the TELNET client knows for it to be accepted.
● If the maximum depth is exceeded, the connection is cleared, unless verification of the TELNET server certificate has been disabled with -Z VerifyClient=NONE (see page 194) or -Z VerifyClient=OPTIONAL.
● Specifying the depth as 0 is meaningless. In this case only self-signed certificates would be permissible.
<integer 0..32767>Maximum permissible number of certificates between the TELNET client certificate and the certificate which is known to the TELNET server.Default: 1
-Z VerifyDepth
=<integer 0..32767>

194 U41095-J-Z125-4-76
-Z VerifyClient TELNET configuration and operation
-Z VerifyClient
The -tlsVerifyClient option is used to define whether a TELNET client requires a certificate to access a server.
NONEThe TELNET server does not request a certificate from the TELNET client.NONE is the default.
OPTIONALThe TELNET server requests the TELNET client to send its certificate. If the client refuses to do this or supplies an invalid certificate, access is nevertheless allowed.
REQUIREThe TELNET client must transfer a valid certificate, otherwise access is refused.
-Z VerifyClient
={NONE | OPTIONAL | REQUIRE}

U41095-J-Z125-4-76 195
TELNET configuration and operation -Z OpenSSLlibName
-Z OpenSSLlibName
The -Z OpenSSLlibName option is used to define the LMS file from which the OpenSSL library should be dynamically loaded. The OpenSSL library is only dynamically loaded if at least one of the options -Z tls-required, -B on or -H on is specified.
It may be necessary to specify a name other than the default name if, for example, the OpenSSL library is also used by other products.
Dynamic loading of the OpenSSL library can be expedited with the aid of DAB using caches. If the OpenSSL library is used jointly by a number of products, the size of the DAB buffer used is reduced.
<openssl-libname>Name of the LMS file from which the OpenSSL library is to be dynamically loaded. Default: LMS file to which the IMON logical ID SYSLNK refers.
-Z OpenSSLlibName
=<openssl-libname>
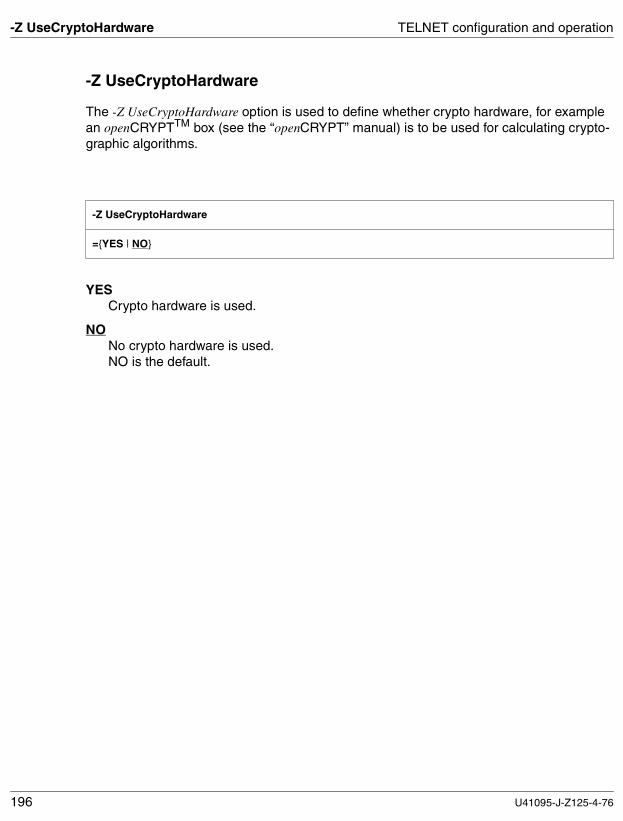
196 U41095-J-Z125-4-76
-Z UseCryptoHardware TELNET configuration and operation
-Z UseCryptoHardware
The -Z UseCryptoHardware option is used to define whether crypto hardware, for example an openCRYPTTM box (see the “openCRYPT” manual) is to be used for calculating crypto-graphic algorithms.
YESCrypto hardware is used.
NONo crypto hardware is used. NO is the default.
-Z UseCryptoHardware
={YES | NO}

U41095-J-Z125-4-76 197
TELNET configuration and operation Enable/disable AUTHENTICATION
5.3.4 -B option - Enable/disable the AUTHENTICATION option
The -B option allows you to enable or disable support of the AUTHENTICATION option with which an authentication method can be negotiated. In BS2000/OSD the AUTHENTICATION option is currently only implemented for TLS/SSL.
You can define the settings in the TELNET server which are required for SSL operation using the -Z options described for the START-TLS option (see the section “-Z option - Support of the START-TLS option” on page 176).
The options -Z tls required (START-TLS option, see page 177) and -B (AUTHENTICATION option) may not be specified simultaneously. If they are, an error message is issued:
Both START-TLS and AUTHENTICATION-Option not allowed
onThe AUTHENTICATION option is supported.
off The AUTHENTICATION option is not supported.
debugThe authentication trace is enabled.
-B
{on | off | debug}

198 U41095-J-Z125-4-76
Enable/disable ENCRYPTION TELNET configuration and operation
5.3.5 Option -H - Enable/disable the ENCRYPTION option
With the -H option you can enable and disable support of the ENCRYPTION option, which is used to negotiate the encryption method and the key used. Currently only variants DES_CFB64 and DES_OFB64 of DES64 are supported in TELNET. The -H option may not be specified at the same time as the option -Z tls-required (see page 177) or -B on (see page 197). If it is, the following error message is issued:
error: SSL and encryption opton
Only encryption routines from the OpenSSL library are used. If an OpenSSL library with a name different from the default file name (SYSLNK.TCP-IP-AP.050) is to be used, you can specify this using the -Z OpenSSLlibName option (see page 195).
onThe ENCRYPTION option is supported.
off The ENCRYPTION option is not supported.
debugThe encryption trace is enabled.
key={<c-string 1..8> | <x-string 1..16>}Encryption key for DES
– Note that no distinction is made between the key for encryption and the key for decryption. The TELNET client and TELNET server use the same key. In the case of the TELNET server this means that this key applies for all TELNET clients.
– When -H on is specified, the specification -H key=... is always required, otherwise the following error message is issued:
Error: Encryption on and no Encryption Key!
-H
{on | off | debug | key={<c-string 1..8> | <x-string 1..16>}
i

U41095-J-Z125-4-76 199
TELNET configuration and operation Starting up/shutting down the server
5.4 Starting up and shutting down the TELNET server
You can use the commands described below to start up the TELNET server.
These commands can also be entered at the operator console.
5.4.1 Starting up the TELNET server
The /START commands for the Enter jobs are as follows:
The /START commands are only permissible under IDs that have the NET-ADMIN privilege.
If you want to start FTP and TELNET simultaneously, use the START-TCP-IP-DEMON command.
5.4.2 Shutting down the TELNET server
The commands for shutting down the TELNET server which are described below are only valid for servers as of interNet Services V3.0A.
You shut down the TELNET server with the STOP-TELNET-DEMON command.
PORT-NUMBER=Specifies the port number of the TELNET server to be shut down.Default: The TELNET server with default port number 23 is shut down.
PORT-NUMBER=*STD-PORTHas the same effect as specifying no parameters.
PORT-NUMBER=*ANYAll active TELNET servers are shut down.
PORT-NUMBER=<integer 0..32767>A TELNET server with the specified port number is to be shut down.
/START-TCP-IP-DEMON Enter Job for TCP-IP-AP
/START-TELNET-DEMON Enter Job for the TELNET server
STOP-TELNET-DEMON
PORT-NUMBER=*STD-PORT/*ANY/<integer 0..32767>
i
i
i

200 U41095-J-Z125-4-76
Starting up/shutting down the server TELNET configuration and operation
5.4.3 Shutdown
Servers can still be shut down using the console command/INTR <tsn>,shutdown. <tsn> is the TSN of the relevant server task.
5.4.4 Notes and restrictions for starting up and shutting down servers
The following points must be borne in mind when you start up or shut down servers:
● The START-TELNET-DEMON command is only effective if start procedure SYSENT.TCP-IP-AP.050.TELNETD exists.
If the command is entered at the console it must also be shareable. This has no negative effect on security since from TCP-IP-AP V5.0 on all server options can be stored in a separate option file which does not need to be shareable (see the section “Configuring TELNET using an option file” on page 168).
● The VERSION parameter in the START commands also permits servers withTCP-IP-AP Versions < 5.0 to be started. However, as the servers only log on to the TCPIPAP subsystem after every start as of V5.0, only such servers can be shut down again using the STOP command.
● A maximum of 20 users can be connected to the TCPIPAP subsystem. No more users are permitted owing to the size of internal tables. In practice the maximum number of 20 is, however, sufficient. If the maximum number is exceeded, the server shuts down on startup and issues the following message:
"error: too many connections to Subsystem TCPIPAP"
● If the server was not started under TSOS it shuts down and issues the following message:
"error: no privilege to connect to Subsystem TCPIPAP"
This can only occur if you attempt to start the server by calling the start procedure explicitly instead of using the START-...-DEMON command, because this would be rejected under an ID other than TSOS.
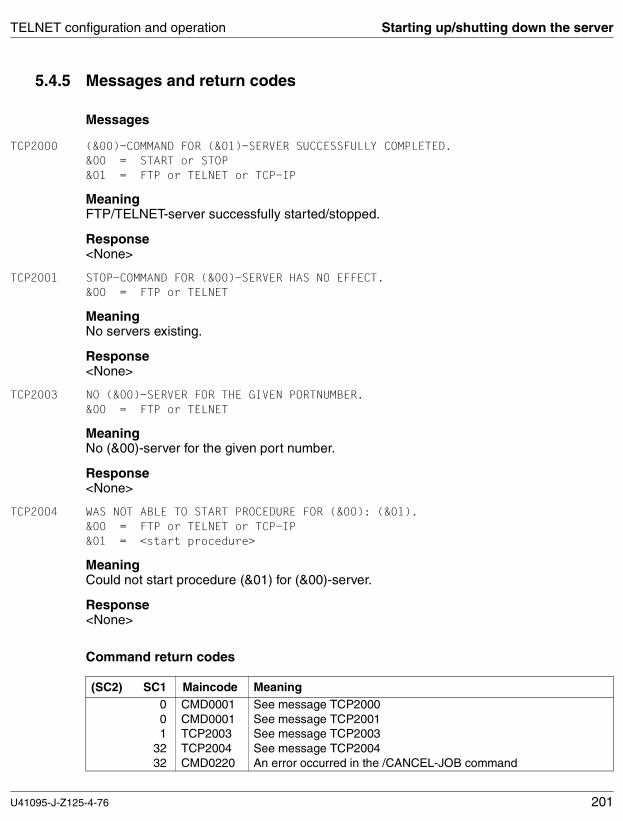
U41095-J-Z125-4-76 201
TELNET configuration and operation Starting up/shutting down the server
5.4.5 Messages and return codes
Messages
TCP2000 (&00)-COMMAND FOR (&01)-SERVER SUCCESSFULLY COMPLETED.&00 = START or STOP&01 = FTP or TELNET or TCP-IP
MeaningFTP/TELNET-server successfully started/stopped.
Response<None>
TCP2001 STOP-COMMAND FOR (&00)-SERVER HAS NO EFFECT.&00 = FTP or TELNET
MeaningNo servers existing.
Response<None>
TCP2003 NO (&00)-SERVER FOR THE GIVEN PORTNUMBER.&00 = FTP or TELNET
MeaningNo (&00)-server for the given port number.
Response<None>
TCP2004 WAS NOT ABLE TO START PROCEDURE FOR (&00): (&01).&00 = FTP or TELNET or TCP-IP&01 = <start procedure>
MeaningCould not start procedure (&01) for (&00)-server.
Response<None>
Command return codes
(SC2) SC1 Maincode Meaning0 CMD0001 See message TCP20000 CMD0001 See message TCP20011 TCP2003 See message TCP2003
32 TCP2004 See message TCP200432 CMD0220 An error occurred in the /CANCEL-JOB command

202 U41095-J-Z125-4-76
Logging file of TELNET servers TELNET configuration and operation
5.5 Logging file of TELNET servers
TELNET servers log their outputs in a logging file with the default file nameSYSOUT.TCP-IP-AP.050.TELNETD. The logging file always contains the difference entries for the current backup with the /INTR command RDPROT (see the section “RDPROT - Save logging file of TELNET servers” on page 207).
5.6 Displaying the current settings of TELNET servers
You can use the BS2000/OSD command SHOW-FTP-TELNET-STATUS to obtain infor-mation on the current settings of BS2000/OSD TELNET servers.
The following information is output:
● Settings made when the servers were generated
● Current information on the server task’s TSN and number of active connections
The servers place the data in auxiliary files with the following names:
SYSDAT.TCP-IP-AP.050.TELNETD.CONF.<port>
<port> specifies the port number of the relevant server.
These files are deleted when the server is shut down.

U41095-J-Z125-4-76 203
TELNET configuration and operation Settings of FTP and TELNET servers
SERVER=Name of the server whose data is to be output (FTP or TELNET).
SERVER=*TELNET(...)Output of a TELNET server’s configuration data.
PORT-NUMBER=Port number of the TELNET server whose configuration data is to be output.
PORT-NUMBER=*STD-PORTPort number 23. This is the default.
PORT-NUMBER=*ANYInformation on all TELNET servers currently active is output.
PORT-NUMBER=< integer 0..32767>Port number of the TELNET server whose configuration data is to be output.
INFORMATION=Type and scope of the information output.
INFORMATION= *STDOutput of a list of servers specified by PORT-NUMBER. This is the default.
INFORMATION= *ALLOutput of all information on all servers specified by PORT-NUMBER.
OUTPUT= Output medium to which the information is to be written.
OUTPUT=*SYSOUT Output is to SYSOUT. This is the default.
OUTPUT=*SYSLST Output is to SYSLST.
SHOW-FTP-TELNET-STATUS
SERVER= *FTP(...)/ *TELNET(...)
*FTP(...)
⏐ PORT-NUMBER= *STD-PORT / *ANY / <integer 0..32767>
*TELNET(...)
⏐ PORT-NUMBER=*STD-PORT / *ANY / <integer 0..32767>
, INFORMATION= *STD /*ALL
, OUTPUT=*SYSOUT/*SYSLST
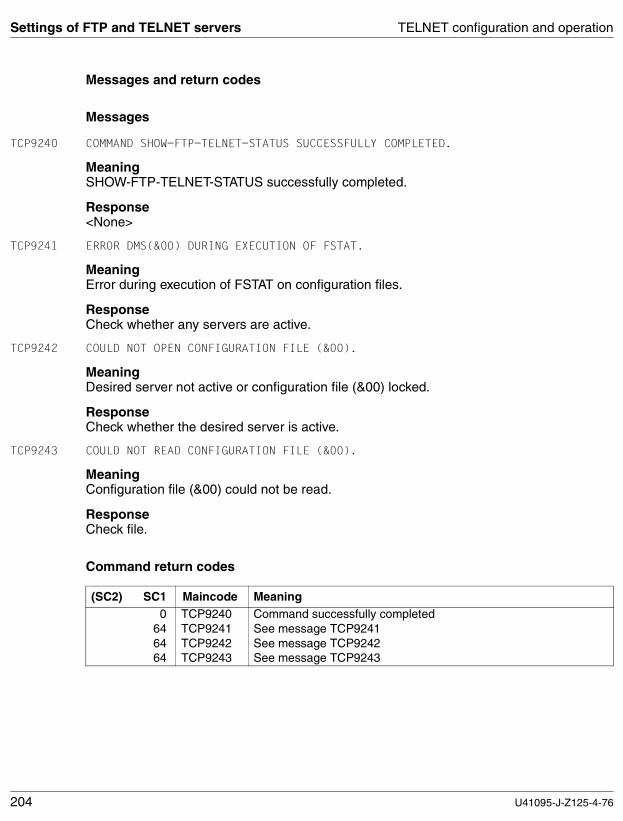
204 U41095-J-Z125-4-76
Settings of FTP and TELNET servers TELNET configuration and operation
Messages and return codes
Messages
TCP9240 COMMAND SHOW-FTP-TELNET-STATUS SUCCESSFULLY COMPLETED.
MeaningSHOW-FTP-TELNET-STATUS successfully completed.
Response<None>
TCP9241 ERROR DMS(&00) DURING EXECUTION OF FSTAT.
MeaningError during execution of FSTAT on configuration files.
ResponseCheck whether any servers are active.
TCP9242 COULD NOT OPEN CONFIGURATION FILE (&00).
MeaningDesired server not active or configuration file (&00) locked.
ResponseCheck whether the desired server is active.
TCP9243 COULD NOT READ CONFIGURATION FILE (&00).
MeaningConfiguration file (&00) could not be read.
ResponseCheck file.
Command return codes
(SC2) SC1 Maincode Meaning0 TCP9240 Command successfully completed
64 TCP9241 See message TCP924164 TCP9242 See message TCP924264 TCP9243 See message TCP9243

U41095-J-Z125-4-76 205
INTR interface Console interface
5.7 Console interface
Some commands can also be specified by the system operator via the console interface. These commands are introduced with the command /INTR. Commands issued with /INTR are used to
– control server traces, – exit the various server tasks, – save the logging files.
The following server commands are possible via the console interface:
The commands for starting up and shutting down the TELNET servers (see page 199) can also be entered via the console.
debug - Enable / disable trace to user level
<tsn>TSN of the server task for which the trace to the user level is to be activated.
debug <debug-value>The permitted values are from 0 to 9. Higher values result in the output of more information. A value of 0 means that the trace is disabled. This command is used by the system customer service for error diagnostics. A debug value > 2 is not meaningful.
Operation Brief description
debug Enable / disable trace to user level
trace Enable / disable trace to TCP/IP interface
shutdown Shut down service
RDPROT Save the TELNET server’s logging file
/INTR
<tsn> , debug <debug-value>
i

206 U41095-J-Z125-4-76
trace, shutdown INTR interface
trace - Enable / disable trace to TCP/IP interface
<tsn>TSN of the server task for which the trace to the TCP/IP interface is to be activated.
trace <trace-value>The permitted values are from 0 to 9. Higher values result in the output of more information. A value of 0 means that the trace is disabled. This command is used by the system customer service for error diagnostics.
shutdown - Shut down service
<tsn>TSN of the server task to be shut down.
/INTR
<tsn> , trace <trace-value>
/INTR
<tsn> , shutdown

U41095-J-Z125-4-76 207
INTR interface RDPROT
RDPROT - Save logging file of TELNET servers
The RDPROT command is used to save the logging file of a TELNET server under the name of the original logging file (default file name: SYSOUT.TCP-IP-AP.050.TELNETD), extended by a suffix specifying the date and time in the format <MMDD><HHMMSS>. This file always contains the difference entries for the previous backup. Make sure that you do not select a name that is too long for the logging file: RDPROT fails when the name exceeds the permissible length after the suffix is appended.
<tsn>TSN of the server task.
5.8 IPv6 addresses in TELNET
When setting up the control connection using the client command open you can also use an IPv6 address which you must specify in hexadecimal notation with a colon (:) (see the manual “interNet Services User Guide”).
/INTR
<tsn> , RDPROT
208 U41095-J-Z125-4-76
TELNET exits INTR interface
5.9 TELNET exits
The following exits exist for the TELNET client and the TELNET server:
● Exit before starting the interactive application (Open Exit)
● Exit before terminating the interactive application (Close Exit)
● Exit before sending data
● Exit after receiving data
The exits for starting and terminating the interactive application can only be set on the TELNET server.
5.9.1 DUMMY module
TELNET exits are handled in the reloaded EXITTEL.C module. EXITTEL.C is provided as a support and has just one entry point in YAPTEXIT. The only EXITTEL.C action is the return with the return value 0xff. This indicates that no user-defined exit routines have been defined as yet.
In order to define your own exits, create a module containing the entry point YAPTEXIT and replace the EXITTEL module in the SYSLNK.TCP-IP-AP.050 library (SRMLNK.TCP-IP-AP.050) with the module you have created.

U41095-J-Z125-4-76 209
INTR interface TELNET exits
5.9.2 Exit routines
For handling the various exits, the callers of the exit routine (TELNET client or TELNET server) pass the address of a parameter list to the entry point YAPTEXIT. The yaptx structure from this parameter list is supplied in SYSLIB.TCP-IP-AP.050 under the name yaptx.h.
Structure of yaptx
The yaptx structure is defined as follows:
struct yaptx {int caller; /* Aufrufer: S=Server, C=Client */
#define client 0x01 /* X’01’ Client */#define server 0x02 /* X’02’ Server */
int action /* main action code */#define telrecv 0x01 /* action = receive */#define telsend 0x02 /* action = send */#define telopen 0x03 /* action = open connection */#define telclos 0x04 /* action = close connection */
char *selector; /* Selector */int portno; /* Port-Nummer (Server-Port) */char hname[128+1]; /* Hostname von Server / Client */char reserved[3]; /* Reserved */int connid; /* identifies uniquely client-server */
/* connection. Only for Server */char *inbuf; /* Address of input buffer */int inbuflen; /* Length of input buffer */char *outbuf; /* Address of output buffer */int outbuflen; /* Length of output buffer */int outDatalen; /* Length of output data */
Description of parameters
The following parameters are transferred:
● Caller of exit routine (caller)
● Type of entry (action)
● Printable character string for identifying the exit routine (selector)
● Connection identifier (connid)
● Host name (hname)– of the addressed TELNET server (for TELNET clients)– of the calling TELNET server (for TELNET servers)

210 U41095-J-Z125-4-76
TELNET exits INTR interface
● Port number (portno)– of the addressed TELNET server (for TELNET clients)– of the addressed TELNET client (for TELNET servers)
● For send/receive exits: inbuf, inbuflen, outbuf, outbufLen, outDataLen outDataLen must be supplied by the exit itself.
callerSpecifies whether the exit routine was called by the TELNET client or TELNET server.
actionSpecifies the type of entry (receive, send, open connection, close connection)
selectorPrintable character string for selecting the required exit routine. The character string is terminated with \0.
portnoPort number of the server or client:
– On TELNET clients, portno specifies the port number of the addressed TELNET server.
– On TELNET servers, portno specifies the port number of the addressed TELNET client.
hname[128+1]Host name of server or client:
– On TELNET clients, hname specifies the host name of the addressed TELNET server.
– On TELNET servers, hname specifies the host name of the addressed TELNET client.
inBufContains the address of the buffer containing the data to be converted (input buffer). Only relevant for send/receive exits.
inBufLenSpecifies the length (number of valid bytes) of the input buffer. Only relevant for send/receive exits.
outBufContains the address of the output buffer. Only relevant for send/receive exits.
outBuflenSpecifies the length of the output buffer. Only relevant for send/receive exits.

U41095-J-Z125-4-76 211
INTR interface TELNET exits
outDataLenBefore returning to the caller, the routine must specify in outDataLen the number of valid bytes in the output buffer that must therefore be sent. Only relevant for send/receive exits.
connid Connection identifier. The Connection Identifier uniquely identifies the client/server connection in the case of a fixed TELNET server. If several servers are active, the pair (portno, connid) uniquely identifies the connection between client and server and thus the TELNET client (see also the connid parameter). This is important, for example, for code conversions if two bytes are mapped to one byte. The exit routine must buffer the first byte in this case for the conversion to be able to perform the conversion when the second byte is received. connid ensures the unique assignment of the buffer to the respective connection.
Results and return values of exit routines
Exit routines must always supply a return value. Every exit for which no user-defined exit routine exists, must return the value 0xff as a return value.
Results and return values for send and receive
Following orderly execution, outbuf contains the converted code and outDataLen the length of the converted code. Return value: 0.
If an exit determines that there is not enough memory for a code conversion, the return value -2 must be returned.
The only query with inbuf = 0 is whether or not a relevant exit was defined:
● If a relevant exit is defined, the return value must be 0.
● If no relevant exit is defined, the return value must be 0xff.
Results and return values for open and close
open
If the exit permits access to the server, the return value is 0, otherwise it must be -1.
close
close always returns the return value 0.

212 U41095-J-Z125-4-76
TELNET exits INTR interface
5.9.3 User-defined exits
For exit handling with your own procedures, you have to add the relevant code to the EXITTEL.C module.
If you define an exit for send or receive, you are also responsible for handling all special characters. In particular, you must ensure that
● a 0xff character is duplicated for sending,
● two successive 0xff characters are converted to a single 0xff for sending.
Activating user-defined server exits on the TELNET server
You can activate the code created in this way on the TELNET server with the -e option:
-e [open:<selector1>!][close:<selector2>!][receive:<selector3>!][send:<selector4>]
If you specify * for <selector>, the exit mechanism is started without the more precise speci-fication of <selector>.
Activating user-defined server exits on the TELNET client
You can activate server exits for send and receive on the TELNET client with the rexit (remote exit) command. This restricts the effect of rexit, however, to the connection of this special client to the server.
The rexit command has the following syntax:
rexit [receive:<selector1>][<send:<selector2>]
The following cases can be distinguished:
● Server options are specified:
If no rexit command was specified for a connection between the server and client, the setting of the -e server option applies.
If there are entries for an exit routine both in the rexit command and in the -e server options, the specifications of the rexit command apply. Subsequent specification of * for <selector1> or <selector2> in the rexit command causes a reset to the entry in the server option. A blank entry for <selector1> or <selector2> disables the exit.
● No server options are specified:
The specification of * for <selector> in the rexit command activates the exit routine. More precise differentiation of the handling type as enabled by the specification of <selector>, is not provided for in this case. A blank entry for <selector1> or <selector2> disables the exit.

U41095-J-Z125-4-76 213
INTR interface TELNET exits
Activating user-defined client exits on the TELNET client
User-defined exit routines for the client can be set on the client with the exit command:
exit [receive:<selector1>][<send:<selector2>]
If * is specified for <selector1> or <selector2>, the YAPTEXIT entry is selected but without the more precise specification of selector. If no entry is made for <selector>, no exit routine will be selected. A blank entry for <selector1> or <selector2> disables the exit.
Examples
1. Clients on the host host should not be given access to the TELNET server. This can be specified with the following user-defined module with the YAPTEXIT entry:
YAPTEXIT (struct yaptx *exparam){
switch (exparam->action) {case telopen:
if (strcmp(exparam->hname,"host") == 0)return(-1);
break;default;
break;}
}
This module must replace the EXITTEL module in the SYSLNK.TCP-IP-AP.050 library and be activated with the -e open:* option. The external reference YAPTEXIT is resolved from the user-defined module at runtime.
2. Two different user-defined open exits are defined for a TELNET server:
– If a client logs on from host1, exit1 should be selected.– If a client logs on from host2, exit2 should be selected.
YAPTEXIT (struct yaptx *exparam){
if ((exparam->action) == telopen)if (strcmp(exparam.hname,"host1")==0)
exit1(exparam)else
if ((strcmp(exparam.hname,"host2")==0)exit2(exparam);
}
The relevant option is: -e open;*

214 U41095-J-Z125-4-76
TELNET exits INTR interface
3. Two different code conversions should be defined for the data that are sent from the client to the server. For example, x‘0102’ should be converted therefore to x‘0a’ or x‘0a0b’. In the example below, the code conversion routines are called proc1 or proc2. The recognition strings are "proc1" or "proc2".
YAPTEXIT (struct yaptx *exparam){
if ((exparam->caller) == client) && (exparam->action == telsend))if (strcmp(exparam->selector,"proc1")==0) proc1(exparam);
elseif ((strcmp(exparam->selector,"proc2")==0)
proc2(exparam);}
The relevant commands for enabling this exit are:
exit send:proc1 or exit send:proc2
User-defined TELNET exits under POSIX
The POSIX TELNET is created by linking the LLMs TELPOSIX and EXITTEL. You can thus also work with the TELNET exits under POSIX.
The interNet Services package contains the dummy module EXITTEL, which only executes a return.
You write your own TELNET exits as follows:
Ê Create the version of the EXITTEL you require.
Ê Link this version to TELPOSIX from SYSLNK.TCP-IP-AP.050.
Ê Write the resultant LLM to SINLIB.TCP-IP-AP.050 under the name TELNET.
Ê Then install POSIX-TELNET (see the section “Installing and uninstalling FTP and TELNET clients in POSIX” on page 59).

U41095-J-Z125-4-76 215
6 Generating random numbersThis chapter describes:
● Generating random numbers in BS2000/OSD with PRNGD
● Generating random numbers in POSIX with the prngd server daemon

216 U41095-J-Z125-4-76
Entropy sources Generating random numbers in BS2000/OSD
6.1 Generating random numbers in BS2000/OSD with PRNGD
Almost all cryptographic methods require strong random numbers. If attackers can predict the numbers the random number generator will provide sufficiently well, they can find the keys that are used relatively easily.
To avoid every cryptographic application from having to implement procedures for producing random numbers, BS2000/OSD provides a central random number generator. The BS2000/OSD random number generator PRNGD (Pseudo Random Number Generator Daemon) is implemented as a pseudo random number generator. This prevents blocking and thus offers no openings for “Denial of Services (DoS)” attacks.
To improve access to data of the operating system kernel, the BS2000/OSD PRNGD is implemented as a TPR subsystem. This is a major advantage in comparison with appli-cation -specific random number generators that do not run in TPR. In addition, this also ensures that the PRNGD is better protected against access by potential attackers. The user interface is implemented via an SVC.
The entropy sources, configuration and user interface of the BS2000/OSD PRNGD are described below.
6.1.1 Entropy sources of the BS2000/OSD PRNGD
The entropy sources used by the BS2000/OSD PRNGD include:
● access times to specific, frequently used files
● outputs of commands relating to data that changes dynamically, such as SHOW-USER-STATUS with various parameters, or outputs of the SHOW-DAB-CACHING command if DAB is used on the system in automatic operation
You can define the files and commands to be used in a configuration file. To do this you specify for the commands what relative entropy content a particular output has so as to place more emphasis on commands with little explanatory (in other words unchanging) text and outputs that vary greatly. This permits adaptations to local conditions. In contrast, access times to files play no part in entropy accounting.
You can also specify the intervals at which the time stamps for the files are to be queried and the commands are to be executed. Outside the initialization phase, only one of the files is queried and one of the commands executed.
One further important entropy source is network traffic. Here the BS2000/OSD PRNGD accesses the network traffic data collected by BCAM (number of bytes and packets etc. sent and received on a connection). However, configuration for this is neither necessary nor possible.

U41095-J-Z125-4-76 217
Generating random numbers in BS2000/OSD Configuration
6.1.2 Configuration of the BS2000/OSD PRNGD
You configure the BS2000/OSD PRNGD with the aid of the options in a configuration file (the default name of which is SYSSSI.PRNGD.010 and can be changed using the IMON logical ID SYSSSI). This is interpreted when the subsystem is started. The various options must be entered in the option file according to the following rules:
● Each option must be in a separate line
● If an option’s arguments extend over more than one line, each line that is to be continued must be terminated with the continuation character “\”.
● A line beginning with the character “#” in column 1 is ignored when the file is read in.
● The option names are not case-sensitive.
The various options are described below.

218 U41095-J-Z125-4-76
Configuration: poolSize, minimalEntropy Generating random numbers in BS2000/OSD
poolSize
The poolSize option is used to specify the size (in bytes) of the entropy pool to be used.
<size>Size of the entropy pool to be used (in bytes). Default: 4096
Generally the default value is sufficient. Only in the event of (temporary) high require-ments for random numbers can it make sense from the security viewpoint to use higher numbers. If numbers lower than 1024 are specified, 1024 is used.
minimalEntropy
The minimalEntropy option is used to specify how high (in bytes) the entropy content of the entropy pool must be before access to the random number generator is permitted.
<value>Value for the entropy content of the entropy pool (in bytes) as of which access is permitted to the random number generator. Default: 256
Once this value has been exceeded random numbers are always supplied, even when this minimum value is not reached. Generally the default value is sufficient. If values below 256 are specified, 256 is used.
poolSize
<size>
minimalEntropy
<value>
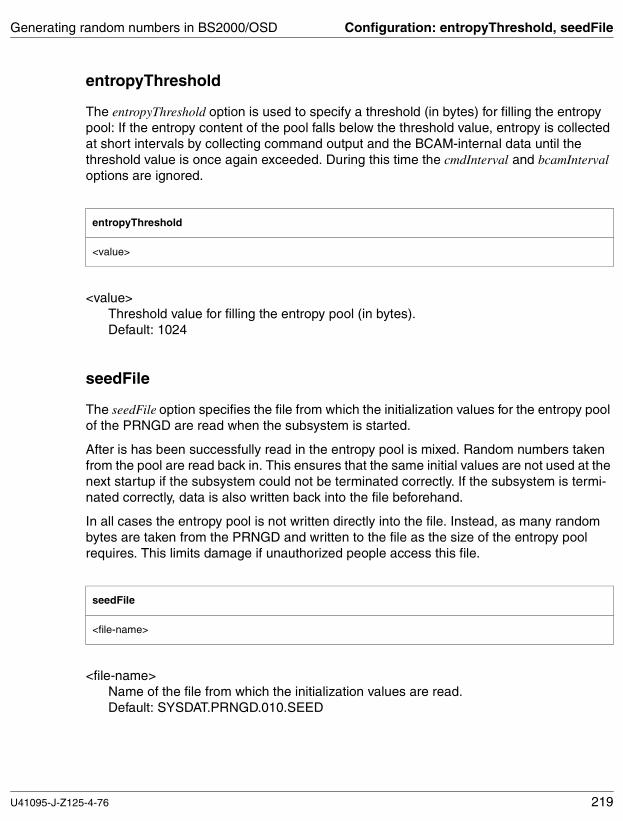
U41095-J-Z125-4-76 219
Generating random numbers in BS2000/OSD Configuration: entropyThreshold, seedFile
entropyThreshold
The entropyThreshold option is used to specify a threshold (in bytes) for filling the entropy pool: If the entropy content of the pool falls below the threshold value, entropy is collected at short intervals by collecting command output and the BCAM-internal data until the threshold value is once again exceeded. During this time the cmdInterval and bcamInterval options are ignored.
<value>Threshold value for filling the entropy pool (in bytes). Default: 1024
seedFile
The seedFile option specifies the file from which the initialization values for the entropy pool of the PRNGD are read when the subsystem is started.
After is has been successfully read in the entropy pool is mixed. Random numbers taken from the pool are read back in. This ensures that the same initial values are not used at the next startup if the subsystem could not be terminated correctly. If the subsystem is termi-nated correctly, data is also written back into the file beforehand.
In all cases the entropy pool is not written directly into the file. Instead, as many random bytes are taken from the PRNGD and written to the file as the size of the entropy pool requires. This limits damage if unauthorized people access this file.
<file-name>Name of the file from which the initialization values are read.Default: SYSDAT.PRNGD.010.SEED
entropyThreshold
<value>
seedFile
<file-name>

220 U41095-J-Z125-4-76
Configuration: file, fileInterval Generating random numbers in BS2000/OSD
file
The file option is used to specify files whose access times the PRNGD uses as an entropy source. You can specify this option as often as you wish. The files specified are entered in a list which is processed cyclically at intervals defined by the fileInterval option. Multiple specification of the same file is also possible. This can, for example, make sense in the case of files which are accessed much more frequently than the other specified files.
The entropy collected by this mechanism plays no part in entropy accounting.
<file-name>Name of the file whose access times are used as an entropy source.
fileInterval
The fileInterval option is used to specify the (minimum) time intervals at which a file is taken from a list defined with the file option and its last access time written to the entropy pool.
<time-interval>Time interval in seconds.
file
<file-name>
fileInterval
<time-interval>

U41095-J-Z125-4-76 221
Generating random numbers in BS2000/OSD Configuration: cmd
cmd
The cmd option is used to specify an SDF command whose SYSOUT outputs are to be used as an entropy source. You can specify this option as often as you wish. The commands specified here are entered in a list which is processed cyclically at intervals defined by the cmdInterval option.
Multiple specification of the same command is possible. This can, for example, make sense for commands whose SYSOUT output changes considerably more or more frequently than that of the other commands specified.
<sdf-command-name>Name of the SDF command whose SYSOUT outputs are to be used as the entropy source.
<entropy-rate>Estimated relative entropy content of the SYSOUT output of the command specified under <sdf-command-name>.
Example
In this example it is assumed that a line of a SYSOUT output of the SDF command SHOW-USER-STATUS INFORMATION=*PROGRAM is 40 bytes long and that there are 16 different, equally probable variants of each of these output lines. The latter means that a task executes one of 16 given programs with equal probability.
In this case each of these lines contains half a byte of entropy and the entropy rate is correspondingly 0.5/40 = 0.0125. In practice it is much more difficult to determine how many different outputs can occur. Furthermore, these outputs are rarely equally probable. However, specific, plausible assumptions regarding the number and probability of various variants of an output line (see above) can be made to estimate the entropy rate and, as required, to reduce this by a safety factor.
cmd
<sdf-command-name> <entropy-rate>

222 U41095-J-Z125-4-76
Configuration: cmdInterval, bcamInterval Generating random numbers in BS2000/OSD
cmdInterval
The cmdInterval option is used to specify the (minimum) time intervals at which a command is taken from the list defined with the cmd option and its SYSOUT output is added to the entropy pool.
<time-interval>Time interval in seconds.Default: 49
bcamInterval
The bcamInterval option is used to specify the (minimum) time intervals at which the BCAM-internal data is added to the entropy pool.
<time-interval>Time interval in seconds.Default: 49
cmdInterval
<time-interval>
bcamInterval
<time-interval>

U41095-J-Z125-4-76 223
Generating random numbers in BS2000/OSD Program interface GPRBYTE
6.1.3 GPRBYTE program interface of the BS2000/OSD PRNGD
The GPRBYTE program interface of the BS2000/OSD PRNGD is available for the languages C/C++ and ASSEMBLER.
GPRBYTE is the interface of the NLKRES96 routine in the GPRBYTE module of the DSSM subsystem PRNGD. The NLKRES96 routine supplies the pseudo random numbers for the calling program.
Compatibility
The PRNGD program interface is source- and object-compatible as of PRNGD Version 1.0.
Entry name(s) and SVC number(s)
SVC 16 (decimal)
Macro type
The following MF values are supported for macro generation (see the “Executive Macros” manual):
The ASSEMBLER macro and the C/C++ include file are in the LMS library SYSLIB.PRNGD.010.
ASSEMBLER MF = { C | D | E | L | M }

224 U41095-J-Z125-4-76
Program interface GPRBYTE Generating random numbers in BS2000/OSD
Macro syntax
The MF and PARAM operands are supported in accordance with the convention.
Operand description
DATAADR = <data-buffer-address>Pointer (char*) to the memory area to which the random numbers are to be written.
NUM_BYT = { <integer 1..255> | <number-of-bytes> }Number of random bytes which are to be written to the memory area. The number of random bytes can be specified as follows:
<integer 1..255>Integer between 1 and 255
<number-of-bytes>Variable of the data type integer
MODE = *NON_BLOCKINGOperating mode of the random number generator.Currently only the non-blocking mode is supported, in other words the random numbers are to be supplied by a generator which is not blocked by lack of entropy.
Operation Operands
<Marker> GPRBYTE DATAADR = <data-buffer-address>,NUM_BYT = <integer 1..255> / <number-of-bytes>[,MODE = *NON_BLOCKING]
i

U41095-J-Z125-4-76 225
Generating random numbers in BS2000/OSD Program interface GPRBYTE
Special language features
Return codes
Language Language-specific operand
ASSEMBLER [PREFIX = { G | <name> }][,MACID = { PRB | <name>}][,EQUATES = { YES | NO }]
C SVC-#: 16, UNIT = 430, FUNCTION = 1, VERSION = 1
Return code Identifier Meaning
Subcode Maincode
2 1
0 00 0000 successful, ASS: GPRBSUCC No error detected
0 20 0001 int_error, ASS: GPRBINTE Internal error
0 01 0002 parameter_error, ASS: GPRBPARE Parameter error
0 40 0003 buffer_invalid, ASS: GPRBBUFE Buffer too small or not allocated
0 40 0004 too_many_bytes, ASS: GPRBTOOM More than 255 bytes requested
0 80 0005 prngd_not_ready, ASS: GPRBNRDY Random number generator does not have enough entropy
0 80 0006 timeout, ASS: GPRBTOUT Random number generator temporarily unavailable

226 U41095-J-Z125-4-76
Program interface GPRBYTE Generating random numbers in BS2000/OSD
C programming example
#include <stdio.h>#include "FHDR.H"#include "GPRBYTE.H" main(int argc, char *argv[]){ char randomBytes[128]; struct GPRBYTE_pl_mdl param; enum {UNIT = 430, FUNCTION = 1, VERSION = 1, dataLen = 32}; FHDR_SET_RC_NIL(param.hdr); FHDR_MOD_IFID(param.hdr, UNIT, FUNCTION, VERSION); param.in_data.mode = GPRBYTEnon_blocking; param.in_data.buffer = &randomBytes; param.in_data.num_bytes = dataLen; GPRBYTEC(param); if (param.hdr.FHDR_RC_MAINCODE == GPRBYTEsuccessful) { int i; printf("GPRBYTEC called successfully\nData: "); for (i = 0; i < dataLen; i++) printf("%02X", randomBytes[i]); printf("\n"); } else printf("Error in call of GPRBYTEC: %08X\n", param.hdr.FHDR_RC_NBR);}

U41095-J-Z125-4-76 227
Generating random numbers in BS2000/OSD PRNGD messages
6.1.4 Messages
GPR0100 INTERNAL ERROR IN PRNGD-SUBSYSTEM-INITIALIZATION; ERROR CODE (&00)
MeaningSome operating resources aren't available. This resources are according to the error code:
0000 - No memory space for subsystem object available. 0001 - No memory space for PRNGD error trace available. 0002 - No memory space for PRNGD event trace available. 0003 - No memory space for task lock object available. 0004 - Task lock can't be created. 0005 - Server bourse can't be created. 0006 - No memory space for file object available. 0007 - No memory space for PRNG object available. 0008 - Error at reading configuration file. 0009 - Error at initialization of PRNG. 0010 - Error at accessing seed file. 0011 - Error at connection of holder task with SDF. 0012 - Error at notification of DSSM.
Response<None>
GPR0105 ERROR IN DSSM-PRNGD-INTERFACE; ERROR CODE (&00)
MeaningThe cause for this message is according to the error code:
0001 - A notification of DSSM failed. 0002 - Some internal error occurred during restart of PRNGD subsystem.
Response<None>
GPR0110 THE SUBSYSTEM PRNGD IS READY
MeaningThe subsystem PRNGD is as far initialized that it can fulfill requests for (pseudo) random numbers.
Response<None>

228 U41095-J-Z125-4-76
PRNGD messages Generating random numbers in BS2000/OSD
GPR0150 THE FOLLOWING SYSTEM DUMP OF TASK GPR1 SERVES AS DIAGNOSTIC AID
MeaningIf the reason for the occurred problem isn't already clear from the previous message, then take the dump please and send it to your support.
Response<None>

U41095-J-Z125-4-76 229
Random number generation in POSIX prngd server daemon
6.2 Random number generation in POSIX with theprngd server daemon
The server program prngd used in OSD/POSIX provides random numbers (entropy) via a standardized interface for programs which run in the POSIX subsystem. prngd uses the PRNGD subsystem in BS2000/OSD if this has been started. However, if necessary prngd can calculate entropies independently. As the prngd server daemon and the BS2000/OSD subsystem PRNGD come from a common code base, they also share many concepts (non-blocking random number calculation, similarly structured configuration file, writing back of the so-called “seed file” etc.).
The server program /opt/TCP-IP-SV/prngd/sbin/prngd is automatically started when POSIX is started and then runs as a background process (daemon) under the SYSROOT ID. At startup it reads in its configuration from the file /etc/prngd.conf.
Using the EGD protocol, the prngd server daemon is addressed via the UNIX socket /var/run/egd-pool. Further details on this can be found at http://www.aet.tu-cottbus.de/personen/jaenicke/postfix_tls/prngd.html. You can test the EGD interface and extract sample random numbers using the tool /opt/TCP-IP-SV/prngd/sbin/prngd-ctl.
Use of the prngd server daemon by the DNS server NAMED
The prngd server daemon is currently used by the DNS server NAMED (see page 242). In future, further interNet Services programs will also use the prngd interface for calculating random numbers.
Installing the prngd server daemon
Please read the Release Notice shipped with the product interNet Services in addition to the information in this section.
The different components of the interNet Services software package are installed as a POSIX program package by the POSIX installation program (see the manual “POSIX Basics for Users and System Administrators”). You will find more detailed information on the installation of the components in the section “Installation” on page 33.
For the installation and operation of the TCP-IP-SV component, the PLAM library SINLIB.TCP-IP-SV.030.PRNGD must be shareable. During installation of PRNGD, the installation path can be defined in the POSIX file system. The prngd server daemon is installed by default in the /opt/TCP-IP-SV/prngd directory.
After installation is completed, the daemon is started automatically and is available to other POSIX processes for generating random numbers.

230 U41095-J-Z125-4-76
prngd server daemon Random number generation in POSIX
Configuring the prngd server daemon
As the prngd server daemon normally gets its entropy from the BS2000/OSD subsystem PRNGD, no special configuration is required. Configuration file /etc/prngd.conf describes the BS2000/OSD commands which are used as a fallback for entropy calculation if the BS2000/OSD subsystem PRNGD is not available.
The configuration comprises three specifications per line for starting the POSIX program:
1. The first specification defines the command to be executed. This command is generally enclosed in double quotes.
2. The second specification defines the absolute path to the program (for example /sbin/sh).
3. The third specification provides an estimate for the quality of the entropy generated by the command (see 1.).
Example of the configuration file /etc/prngd.conf
"sh /opt/TCP-IP-SV/prngd/etc/prngd/bs2cmd.STATUS.LIST" /sbin/sh 0.2"sh /opt/TCP-IP-SV/prngd/etc/prngd/bs2cmd.STATUS.PROG" /sbin/sh 0.2#"df -lg" /usr/sbin/df 0.01#"ps -aAcdefjl" /sbin/ps 0.2
(See also the section “Generating random numbers in BS2000/OSD with PRNGD” on page 216).
Normally the BS2000/OSD subsystem PRNGD is available and the specifications in the /etc/prngd.conf file are not used.
Terminating the prngd server daemon
When the POSIX subsystem is terminated, so too is the prngd server daemon. Its status is saved to the seed file /etc/prngd-seed, from where the seed value is read at the next startup. However, you can also stop the daemon manually by calling the following stop scripts:
# /etc/init.d/TCP-IP-SV.prngd stop
Do not forget to start it again manually later:
# /etc/init.d/TCP-IP-SV.prngd start
Otherwise NAMED, for example, cannot obtain any random numbers.

U41095-J-Z125-4-76 231
7 DNSThis chapter is based on the “BIND9 Administrator Reference Manual” of the Internet Software Consortium. The copyright for this Administrator Guide is owned by the Internet Software Consortium. This description is restricted to the parts relevant to BS2000/OSD. At the relevant places in the manual, for example syntax descriptions, the “BIND9 Adminis-trator Reference Manual” of the Internet Software Consortium is referred to as the current versions are described only there. You will find the "BIND9 Administrator Reference Manual" of the Internet Software Consortium on your server in the directory/opt/TCP-IP-SV/dns-named/readme.
The DNS (Domain Name Service) is a TCP/IP protocol for the Application Layer that enables TCP/IP application programs to translate the symbolic computer names that are normally used there into their associated IP addresses. The network-wide assignment of computer names to IP addresses is implemented by the DNS with the aid of a distributed database that is made available to all those who need this information on the network. TCP/IP application programs access the DNS functionality via socket functions like gethostbyname() and gethostbyaddr() (see the manuals “SOCKETS(BS2000)” and “SOCKETS/XTI for POSIX”).
The definition of DNS which is currently valid is based on the RFCs (Request for Comments). These standards are defined by the Internet Engineering Task Force (IETF) and the Internet Engineering Steering Group (IESG). Comprehensive information on the RFCs is available on the IETF home page: http://www.ietf.org/rfc/
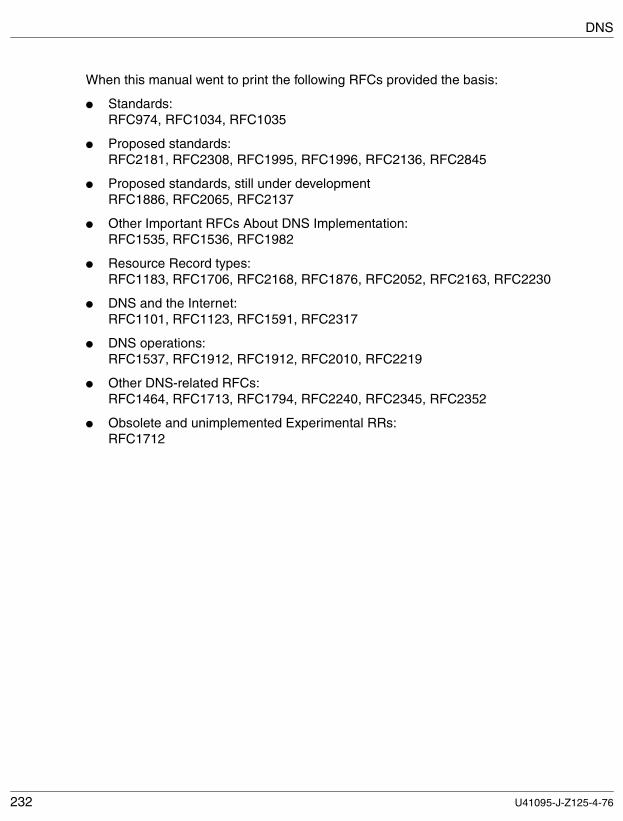
232 U41095-J-Z125-4-76
DNS
When this manual went to print the following RFCs provided the basis:
● Standards: RFC974, RFC1034, RFC1035
● Proposed standards: RFC2181, RFC2308, RFC1995, RFC1996, RFC2136, RFC2845
● Proposed standards, still under development RFC1886, RFC2065, RFC2137
● Other Important RFCs About DNS Implementation:RFC1535, RFC1536, RFC1982
● Resource Record types:RFC1183, RFC1706, RFC2168, RFC1876, RFC2052, RFC2163, RFC2230
● DNS and the Internet:RFC1101, RFC1123, RFC1591, RFC2317
● DNS operations:RFC1537, RFC1912, RFC1912, RFC2010, RFC2219
● Other DNS-related RFCs:RFC1464, RFC1713, RFC1794, RFC2240, RFC2345, RFC2352
● Obsolete and unimplemented Experimental RRs: RFC1712

U41095-J-Z125-4-76 233
DNS Concept of the DNS
7.1 Concept of the DNS
The Domain Name Service is a distributed, replicated database with servers (DNS servers) and clients (resolvers) in which data from many different DNS servers is maintained. The resolvers, by contrast, have no local database and must issue DNS requests to one or more DNS servers to receive the required information.
7.1.1 Development of the DNS
Applications use IP addresses to set up connections (TCP) and for the datagram traffic (UDP) to partner computers. IP addresses are, however, not very user-friendly, so a naming system was developed in the early days of the internet to enable important computers to be identified by name. Each computer in the TCP/IP network can be assigned one or more freely selectable name(s). The names are independent of the IP address(es) of the computer, but can be mapped to an IP address via functions of the Application Programming Interface (API).
The assignment between computer names and the IP addresses of the computers with which communication is desired is implemented via a host file:
● in UNIX: /etc/hosts
● in BS2000/OSD: BCAM host file
The host file contains a computer name and its associated IP address in each line.
In the early days of the internet, a central host file had to be administered manually by the Network Information Center (NIC) and copied to all computers on the internet at regular intervals. All new computers were entered into this host file by the network administrator of the NIC and were known to the other computers only after the file was redistributed via FTP.
Due to the fast growth of the internet, this procedure was soon rendered impractical, since the continuously expanding host files needed to be updated and redistributed too often. The use of database technology offered the best solution to this problem.

234 U41095-J-Z125-4-76
Concept of the DNS DNS
7.1.2 DNS name space
The DNS name space is structured hierarchically in the form of a tree and divided into different domain levels. It has a root called the root domain, which serves as the anchor for all search transactions within the DNS name space, and several subtrees, which may form independent administration units as so-called zones.
Structure of the DNS name space
Figure 1 illustrates the domain structure of the DNS name space.
Figure 1: Domain structure of the DNS name space
GOV ARPA DE others
others xyz univers siemens
venus earth mars
others telstar moon eurostar
star1 star2 star3
Individual computersand subdomains
Local administrationdomains
Second-level domains
Top-level domains
The root domains" "
FR NL

U41095-J-Z125-4-76 235
DNS Concept of the DNS
There are DNS servers at each level of the DNS name space. A DNS server is a computer that performs the following tasks:
● managing information on servers at the next lower name level, and
● mapping of symbolic names to addresses in cases where no subordinate DNS servers for those names exist
The domains of the DNS name space have the following features:
● Root domain
The root domain is at the very top of the DNS hierarchy and is managed by the NIC. In the root domain, the NIC maintains root domain DNS servers which, in turn, manage the information on the DNS servers of the next lower level.
● Top-level domains
The top-level domains are in the level below the root domain.
These are the top-level domains in the United States:
aero Air-transport industry
biz Businesses
com Commercial organizations
coop Cooperatives
edu Educational institutions
gov American government institutions
info Unrestricted use
int International organizations
mil American military institutions
museum Museums
name For registration by individuals
net Network organizations
org Non-commercial organizations
pro Accountants, lawyers, physicians, and other professionals
The top-level domains outside the USA are organized on a country basis. The ISO country codes are used as the names of the countries concerned, e.g. DE for Germany, FR for France, etc. When a new network is registered, the NIC assigns it to the appro-priate domain.
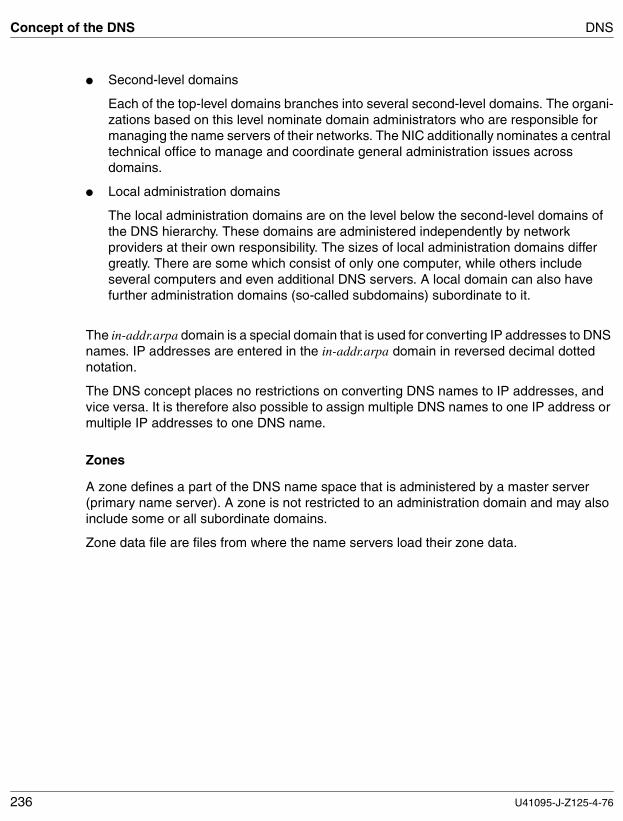
236 U41095-J-Z125-4-76
Concept of the DNS DNS
● Second-level domains
Each of the top-level domains branches into several second-level domains. The organi-zations based on this level nominate domain administrators who are responsible for managing the name servers of their networks. The NIC additionally nominates a central technical office to manage and coordinate general administration issues across domains.
● Local administration domains
The local administration domains are on the level below the second-level domains of the DNS hierarchy. These domains are administered independently by network providers at their own responsibility. The sizes of local administration domains differ greatly. There are some which consist of only one computer, while others include several computers and even additional DNS servers. A local domain can also have further administration domains (so-called subdomains) subordinate to it.
The in-addr.arpa domain is a special domain that is used for converting IP addresses to DNS names. IP addresses are entered in the in-addr.arpa domain in reversed decimal dotted notation.
The DNS concept places no restrictions on converting DNS names to IP addresses, and vice versa. It is therefore also possible to assign multiple DNS names to one IP address or multiple IP addresses to one DNS name.
Zones
A zone defines a part of the DNS name space that is administered by a master server (primary name server). A zone is not restricted to an administration domain and may also include some or all subordinate domains.
Zone data file are files from where the name servers load their zone data.
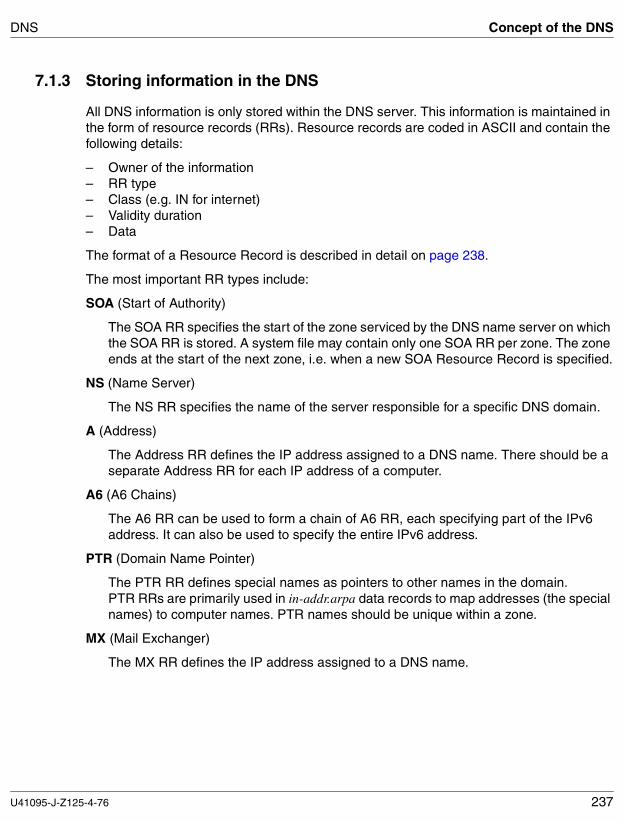
U41095-J-Z125-4-76 237
DNS Concept of the DNS
7.1.3 Storing information in the DNS
All DNS information is only stored within the DNS server. This information is maintained in the form of resource records (RRs). Resource records are coded in ASCII and contain the following details:
– Owner of the information– RR type– Class (e.g. IN for internet)– Validity duration– Data
The format of a Resource Record is described in detail on page 238.
The most important RR types include:
SOA (Start of Authority)
The SOA RR specifies the start of the zone serviced by the DNS name server on which the SOA RR is stored. A system file may contain only one SOA RR per zone. The zone ends at the start of the next zone, i.e. when a new SOA Resource Record is specified.
NS (Name Server)
The NS RR specifies the name of the server responsible for a specific DNS domain.
A (Address)
The Address RR defines the IP address assigned to a DNS name. There should be a separate Address RR for each IP address of a computer.
A6 (A6 Chains)
The A6 RR can be used to form a chain of A6 RR, each specifying part of the IPv6 address. It can also be used to specify the entire IPv6 address.
PTR (Domain Name Pointer)
The PTR RR defines special names as pointers to other names in the domain. PTR RRs are primarily used in in-addr.arpa data records to map addresses (the special names) to computer names. PTR names should be unique within a zone.
MX (Mail Exchanger)
The MX RR defines the IP address assigned to a DNS name.

238 U41095-J-Z125-4-76
Concept of the DNS DNS
CNAME (Canonical Name)
The CNAME RR can be used to assign an alternative name to a standard host name. The alternative name must not be specified in the name field of other Resource Records. Changes in the standard host name remain transparent to all application programs using the alternative name, i.e. the application programs need not be updated on changing the standard host name.
Information on further Resource Record types is available, for example, in RFC1035. Comprehensive information on the RFCs is available on the home page of the Internet Engineering Task Force (IETF): http://www.ietf.org
7.1.4 Format of a DNS message
The same format is used in the DNS for queries and responses (see figure 2).
Figure 2: Format of a DNS message
The individual sections of a DNS message have the following significance:
● The header has a fixed length and contains metadata on the DNS message, including, among other things, the identification, the type of message (query or response) and the length of the following variable sections.
Additional information
Header
Query section
Response section
Authority section

U41095-J-Z125-4-76 239
DNS Concept of the DNS
● The Query section specifies the information to be found.
● The Response section contains the found information in the form of a variable number of Resource Records.
● The Authority section contains RRs with the names of other name servers in case the name server contacted earlier could not return a response.
● The lowest section may include additional information in the form of RRs.
7.1.5 DNS resolver (overview)
The DNS resolver handles the requests for resolving DNS domain names into IP addresses which application programs direct to the DNS Name Server.
Access to the DNS resolver
Application programs gain access to the resolver via the socket functions linked to the appli-cation, such as the functions gethostbyname() and gethostbyaddr() which are used for IPv4, and the functions getaddrinfo(), getnameinfo(), getipnodebyaddr() and getipnodebyname() which are used for IPv4 and IPv6:
Normally the resolver functions are provided in a library which is supplied with the products “SOCKETS(BS2000)” and “SOCKETS/XTI for POSIX”. The resolver functions used there are described in the manuals "SOCKETS(BS2000)” and “SOCKETS/XTI for POSIX”.
In POSIX it is also possible to include the complete resolver functionality in the application via the library. In this case the resolver functions are described in the online documentation on DNS. To access the online documentation you must install the DNS development modules (see page 248).
gethostbyname() Supplies the associated IPv4 address for a host name.
gethostbyaddr() Supplies the associated host name for an IPv4 address.
getaddrinfo() Supplies information on host names, host addresses and service independently of the protocol.
getnameinfo() Supplies the name of the communications partner independently of the protocol.
getipnodebyaddr() Supplies information on host names independently of the protocol.
getipnodebyname() Supplies information on host addresses independently of the protocol.

240 U41095-J-Z125-4-76
Concept of the DNS DNS
Resolution of the requests directed to the DNS resolver
The requests directed to the DNS resolver can be resolved in various ways:
● Via the resolver provided with SOCKETS(BS2000) using the configuration file $TSOS.SYSDAT.SOCKETS.nnn.RESOLV in the BS2000/OSD file system. (nnn specifies the version.)
If you wish to use the DNS resolver functionality via SOCKETS(BS2000), the subsystem must be installed and running. Further information on this can be found in the “SOCKETS(BS2000)” manual.
● With the resolver daemon provided via interNet Services DNS using the configuration file /etc/resolv.conf in the POSIX file system.
If you wish to use the DNS resolver functionality via interNet Services DNS, the DNS resolver daemon must be installed and running. Further information on this can be found in the section “Installing and uninstalling the DNS resolver” on page 246.
● By linking the resolver library using the configuration file /etc/resolv.conf in the POSIX file system (only possible in POSIX).
Here you do not need to start either the SOCKETS(BS2000) subsystem or the DNS resolver daemon. The configuration file /etc/resolv.conf in the POSIX file system must, however, be configured correctly.
● By querying the BCAM tables.
Here you must bear in mind that host names are entered in the BCAM tables in upper case. To find the hosts entered in lower case you must create an alias in lower case.
Order of the queries when resolving the resolver requests
How or in what order the queries occur is determined by the program platform (BS2000/OSD or POSIX) and how the application is linked:
● Sockets application in BS2000/OSD:
– When you are using the pure IPv4 functions gethostbyname() and gethostbyaddr(), first the DNS resolver daemon is called by interNet Services DNS.
If a name or address cannot be determined by a DNS request, name or address conversion is attempted using the entries in the BCAM tables.
Only if this conversion attempt fails do the gethostbyname() and gethostbyaddr() functions return an error.

U41095-J-Z125-4-76 241
DNS Concept of the DNS
– When you are using the DNS resolver functions getaddrinfo(), getnameinfo(), getipnodebyaddr(), getipnodebyname(), first the DNS resolver is used via SOCKETS(BS2000).
If a name or address cannot be determined by a DNS request, name or address conversion is attempted using the entries in the BCAM tables.
Only if this conversion attempt fails do the getaddrinfo(), getnameinfo(), getipnodebyaddr(), getipnodebyname() functions return an error.
● Sockets application in POSIX (default):
– When you are using the pure IPv4 functions gethostbyname() and gethostbyaddr() in a Sockets application in POSIX, first name or address conversion is attempted using the entries in the BCAM tables.
If a name or address cannot be determined by a BCAM request, the DNS resolver daemon of interNet Services DNS is called.
Only if this conversion attempt fails do the gethostbyname() and gethostbyaddr() functions return an error.
– When you are using the DNS resolver functions getaddrinfo(), getnameinfo(), getipnodebyaddr(), getipnodebyname(), first the DNS resolver is used via SOCKETS.
If a name or address cannot be determined by a DNS request, name or address conversion is attempted using the entries in the BCAM tables.
Only if this conversion attempt also fails do the getaddrinfo(), getnameinfo(), getipnodebyaddr(), getipnodebyname() functions return an error.
● Sockets application in POSIX with linked resolver library of interNet Services DNS:
By including the resolver library of interNet Services DNS results in the file /etc/resolv.conf being accessed exclusively in the POSIX file system for all calls (IPv4 and IPv6) when the application runs.
A prerequisite for production of the application is that the DNS development modules are installed (see page 248).

242 U41095-J-Z125-4-76
Concept of the DNS DNS
When the application is linked, the following link sequence must be observed:
1. Resolver library of interNet Services DNS: /usr/lib/libbind.a
2. SOCKETS/XTI library: /usr/lib/libsocket.a
7.1.6 DNS name server NAMED (overview)
NAMED is the DNS name server in BS2000/OSD. NAMED enables both recursive and iterative queries as well as caching and can be optionally configured as:
– a master server,– a slave server,– a "caching-only" server,– a forwarding server.
Recursive and iterative queries
On receiving a query of another name server or the resolver, NAMED first tries to answer the query on the basis of its own database.
If this does not succeed, NAMED behaves as described below, depending on the configu-ration:
● recursive queries (default case)
In the case of a recursive query, the name server performs all activities required to answer that query. Here recursive means that the name server repeats the same basic procedure (sending queries to a remote name server and following links) until it receives the answer it is looking for.
The resolver sends a recursive query to a name server to obtain information on a particular domain name. The name server should then supply the requested data or return an error message reporting that
– the data of the requested type is not available or– the specified domain name does not exist.
With a recursive query the name server cannot simply refer the resolver to another name server but must itself contact the next name server it knows.
● iterative queriesThe name server rejects a query if it cannot be answered locally, i.e. with information from its own database. The source of the query must then use some other name server to get an answer for the query.

U41095-J-Z125-4-76 243
DNS Concept of the DNS
caching
NAMED stores all incoming information during the iterative process in a local cache, which extends the database and reduces the answering time. If too many queries are required, the cache can grow very large.
Master server and slave server
DNS name servers administer zones, if they are authoritative for the zone. As a rule, the DNS within a zone is not implemented on a single NAMED server, but on a group of such servers. To enable failover security, apart from the master server (primary server), at least one additional server should be set up as a slave server (secondary server), which manages a copy of the master server data. NAMED can be configured both as a master server and as a slave server.
Changes in the zone data are always made on the master server. The Master name server for a zone reads the zone data from a file on its host, the zone data file. The slave server, which always receives its data only from the master server, queries the master server periodically to check whether its own copy of the master server data needs to be updated. The transfer of master server data to the slave server is known as a zone transfer.
If desired, the master server can also be configured to actively notify all slave servers when the zone data is changed. These slave servers can then initiate the zone transfer. A slave server that only takes over NS Resource Records from the master server is known as a stub server.
During a zone transfer, the slave servers can save the transferred data to backup files. If the backup files are not available on starting up a slave server, the slave server in question requests the current data from the master server.
Zone data should be transferred regularly even if it has not been modified. This enables the data to be accessed even if the master server is not available.
A NAMED server may be used in different zones as a master and/or slave server.
Forwarding servers and forwarders
If NAMED is configured as a forwarding server, it forwards all queries that it cannot answer with its own database to special name servers (called "forwarders") for recursive processing. These forwarders then try to obtain the required answers in an iterative process. If the forwarders cannot return the final information, the forwarding server will try to independently answer the query again, depending on its configuration, or simply abort the process.

244 U41095-J-Z125-4-76
Concept of the DNS DNS
Forwarding-only mode
In this mode a name server that uses a forwarder does not inquire at other name servers if the forwarder supplies no result.
Caching-only servers
NAMED can also be configured as a "caching-only" server. A caching-only server does not maintain its own committed database, but requests information from other authorized name servers. This information is then saved in the cache of the caching-only server.
Views
The view statement enables a NAMED server to be configured in such a way that it handles queries differently depending on the sender address.
7.1.7 DNS security concepts
TSIG (Transaction SIGnatures) is a key-based security mechanism. It is suitable for securing communication between two servers. As an additional security measure TSIG uses shared secrets. TSIG is, for example, useful for the dynamic update.
The DNSSEC (DNS SECurity) extensions are also key-based. They use encryption with a public key.

U41095-J-Z125-4-76 245
DNS Concept of the DNS
7.1.8 Interaction of the security mechanisms of BCAM and DNS
If conflicts occur between the established security mechanisms and the new options of name or address conversion resulting from the use of DNS, the internal system security mechanisms always have priority.
BCAM offers two methods of allowing communication relationships between partners:
● Communication relationships are possible to any partners, even if they are not known to the BCAM transport system.
In this case, using the addresses determined by the DNS cannot cause conflicts with the BCAM transport system security mechanisms, since these are explicitly disabled.
● Communication relationships are only possible to partners known to the BCAM transport system.
In this case, the following situation could occur:
An application may receive the address of a partner system from the DNS, but may still be unable to set up a connection to it, since this partner system is not known to the BCAM transport system, and communication is not permitted for security reasons.
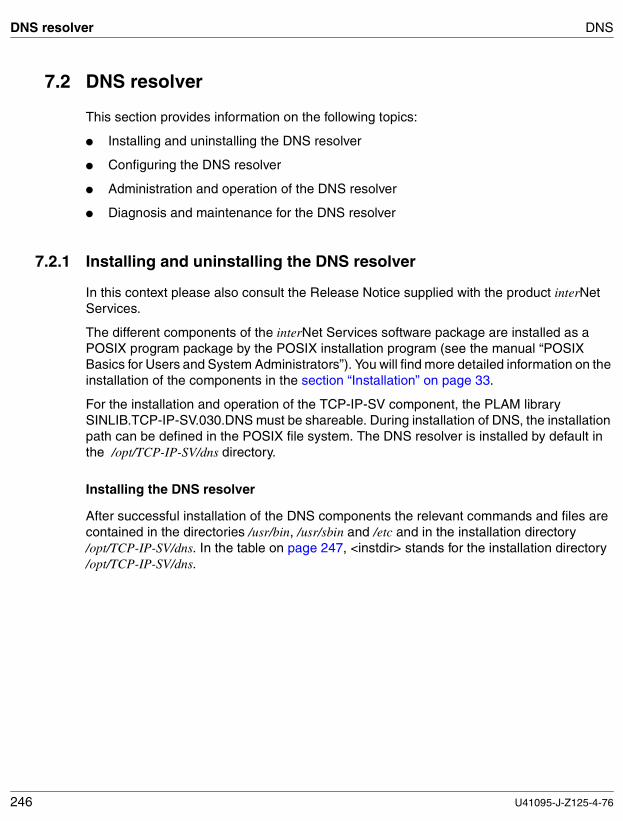
246 U41095-J-Z125-4-76
DNS resolver DNS
7.2 DNS resolver
This section provides information on the following topics:
● Installing and uninstalling the DNS resolver
● Configuring the DNS resolver
● Administration and operation of the DNS resolver
● Diagnosis and maintenance for the DNS resolver
7.2.1 Installing and uninstalling the DNS resolver
In this context please also consult the Release Notice supplied with the product interNet Services.
The different components of the interNet Services software package are installed as a POSIX program package by the POSIX installation program (see the manual “POSIX Basics for Users and System Administrators”). You will find more detailed information on the installation of the components in the section “Installation” on page 33.
For the installation and operation of the TCP-IP-SV component, the PLAM library SINLIB.TCP-IP-SV.030.DNS must be shareable. During installation of DNS, the installation path can be defined in the POSIX file system. The DNS resolver is installed by default in the /opt/TCP-IP-SV/dns directory.
Installing the DNS resolver
After successful installation of the DNS components the relevant commands and files are contained in the directories /usr/bin, /usr/sbin and /etc and in the installation directory /opt/TCP-IP-SV/dns. In the table on page 247, <instdir> stands for the installation directory /opt/TCP-IP-SV/dns.

U41095-J-Z125-4-76 247
DNS DNS resolver
After successful installation the other activities that are required are executed under the POSIX shell in an ID with POSIX root authorization. For this purpose the POSIX shell is started with the BS2000/OSD command START-POSIX.
If you want individual components of the overall package not to be activated, it is only necessary to deactivate the POSIX file attribute “executability” of the daemon. To make components available which have been installed but have not yet been used, the POSIX file attribute “executability” must be activated for the relevant daemons.
The relevant commands of the DNS resolver daemon are:
– activation command: chmod u+x in.dnsd – deactivation command: chmod u-x in.dnsd
After interNet Services has been installed, the configuration files specific to the DNS components must be adapted to individual requirements before interNet Services is started up.
Directory File Description
/etc/init.d/ dnsd Start/stop procedure
/etc/rc0.d/ K66dns Shutdown procedure for shutting down POSIX
/etc/rc2.d/ S70dns Start procedure for starting POSIX
/usr/bin/ dig Diagnostic tool for DNS
host Host names DNS lookup tool
nslookup Lookup tool for DNS
/usr/lib/ libbind.a Resolver library1)
/usr/sbin/ in.dnsd Symbolic link to /opt/TCP-IP-SV/dns/sbin/dnsd
startservices Procedure for starting the daemons after installation
startdns Start call for the DNS resolver daemon
stopdns Stop call for the DNS resolver daemon
restartdns Restart call for the DNS resolver daemon
<instdir>/etc/ install.TCP-IP-SV-DEV.030.DNS Installation script for the DNS development modules
<instdir>/etc/ remove.TCP-IP-SV-DEV.030.DNS Uninstallation script for the DNS devel-opment modules
<instdir>/readme/ * man pages for the DNS tools and for the resolver library1) in HTML and text format
1) Only available if the DNS development modules are installed (see page 248).
248 U41095-J-Z125-4-76
DNS resolver DNS
Uninstalling the DNS resolver
The uninstallation of the interNet Services components is carried out using the POSIX installation program under the TSOS ID in the same way as installation. During uninstalla-tion, the active DNS resolver daemon is searched for and terminated. The termination of daemons that are still active is logged in the /var/adm/messages message file. All files, links and procedures of the DNS resolver are then deleted.
During uninstallation, the /etc/resolv.conf configuration file in the /etc/tcpipsv directory is saved with the suffix _sav, provided no file with the same name already exists. In the event of reinstallation, the backup copy can be copied to the active directory /etc again. Ensure that the backup copy has the current status.
Installing/uninstalling DNS development modules
With the DNS development modules additional files are provided which are not required for operation of the DNS resolver daemon. These comprise the resolver library with the associated man pages which are needed if a Sockets application is to be produced in POSIX with a linked resolver library (see the table on page 247).
The DNS development modules are made available in the POSIX file system with the following shell script:
/opt/TCP-IP-SV/dns/etc/install.TCP-IP-SV-DEV.030.DNS
When the DNS development modules are no longer required, they can be removed from the POSIX file system using the following shell script:
/opt/TCP-IP-SV/dns/etc/remove.TCP-IP-SV-DEV.030.DNS

U41095-J-Z125-4-76 249
DNS DNS resolver
7.2.2 Configuring the DNS resolver
Operation of the DNS resolver daemon is controlled by the configuration file /etc/resolv.conf. The configuration file can contain several entries which specify the information relevant to the DNS resolver.
The following types of entry exist:
● nameserver entry
● domain entry
● search entry
● options entry
Each entry is contained in a separate line in the configuration file and begins with the keyword (nameserver, domain etc.) in column 1. The keyword is followed by the entry’s parameters, each separated by a blank. The last parameter may not be followed by a blank. The keywords of the /etc/resolv.conf entries are expected in lower case.
Lines in /etc/resolv.conf which begin with a semicolon (;) are interpreted as comment lines.

250 U41095-J-Z125-4-76
DNS resolver DNS
nameserver entry
nameserver ip_address
The nameserver entry is used to inform the DNS resolver daemon of the IP address of a DNS server. The /etc/resolv.conf configuration file may contain a maximum of three nameserver entries.
When the DNS resolver daemon processes a DNS request, the DNS server defined with the first nameserver entry is queried first. If the first DNS server does not reply, the DNS server defined with the second nameserver entry is queried, if such an entry exists. If the second server also does not reply, the process is repeated with the third name server, and so on. If the DNS server defined by the third nameserver also does not reply, you should repeat the DNS request with all DNS servers until the maximum number of retries (see the options entry on page 255, attempts parameter) is reached.

U41095-J-Z125-4-76 251
DNS DNS resolver
domain entry
domain domain
The domain entry defines a default domain for the requests of the DNS resolver daemon to the DNS name server(s).
The following must be observed here:
● A maximum of one domain entry can be valid in the configuration file /etc/resolv.conf. If the configuration file contains several domain entries but no search entries, the last domain entry applies.
● domain and search entries invalidate each other, so if there are several domain and search entries in the configuration file, the domain entry and search entry which apply are those which are not followed by a further domain or search entry.
The function of the domain entry depends on whether or not the DNS name specified in the DNS request contains a dot (.).
The following description applies for the default setting of the ndots parameter in the options entry (see page 255).
● Function of the domain entry if the DNS name contains a dot:
If the DNS server cannot reply successfully to a DNS request for a name name, the DNS resolver daemon sends another DNS request with name.domain to the DNS server. If this DNS request also fails, the DNS resolver daemon sends a further DNS request with the higher-level domain to the DNS server. This procedure can be continued up to a DNS request in which the appended domain is one level below the top level.

252 U41095-J-Z125-4-76
DNS resolver DNS
Example
The following example shows the requests generated by the DNS resolver daemon to a DNS server.
Entry in the configuration file /etc/resolv.conf:
domain mch.siemens.de
Name specified by the user:
my.host
Name generated by the DNS resolver daemon for requests to a DNS server:
1. my.host2. my.host.mch.siemens.de3. my.host.siemens.de
● Function of the domain entry if the specified DNS name does not include a dot:
If a DNS request for a name name.domain cannot be successfully answered by the DNS server, the DNS resolver daemon issues a new DNS request with name to the DNS server.
Example
The following example shows the requests to a DNS server generated by the DNS resolver daemon.
Entry in the configuration file /etc/resolv.conf:
domain mch.siemens.de
Name specified by the user:
myhost
Name generated by the DNS resolver daemon for requests to a DNS server:
1. myhost.mch.siemens.de 2. myhost.siemens.de 3. myhost

U41095-J-Z125-4-76 253
DNS DNS resolver
search entry
search domain1[ domain2[ .... [ domain6]]]
The search entry defines for the resolver daemon several domain names for the requests to the DNS name server(s).
The following must be observed here:
● A maximum of one search entry can be valid in the configuration file /etc/resolv.conf. If the configuration file contains several search entries but no domain entries, the last search entry applies.
● domain and search entries invalidate each other, so if there are several domain and search entries in the configuration file, the domain entry and search entry which apply are those which are not followed by a further domain or search entry.
The function of the search entry depends on whether or not the DNS name specified in the DNS request contains a dot (.).
● Function of the search entry if the specified DNS name includes a dot:
If a DNS request for a specific name cannot be successfully answered by the DNS server, the DNS resolver daemon issues a new DNS request with name.domain1 to the DNS server.
If even this DNS request cannot be successfully answered by the DNS server, the DNS resolver repeats the DNS request with the next domain name domainx (x = 2 - 6) defined in the search entry. This is repeated until either the DNS request is successfully answered by the DNS server or no further domain names are defined in the search entry.

254 U41095-J-Z125-4-76
DNS resolver DNS
Example
The following example shows the requests generated by the DNS resolver daemon to a DNS server:
Entry in the /etc/resolv.conf configuration file:
search mch.siemens.de siemens.de
Name specified by the user: my.host
Names generated by the DNS resolver daemon for requests to a DNS server:
1. my.host 2. my.host.mch.siemens.de 3. my.host.siemens.de
● Function of the search entry if the specified DNS name does not include a dot:
A DNS request with name.domain1 is initially issued to the DNS server. If this DNS request is not successfully answered by the DNS server, the DNS resolver daemon then repeats the request using the next domain name domainx (x = 2 to 6) defined in the search entry. This is repeated until either the DNS request is successfully answered by the DNS server or no further domain names are defined in the search entry.
If no DNS request has been successfully answered by the DNS server after all domain names defined in the search statement have been processed, a DNS request is issued with name.
Example
The following example shows the requests generated by the DNS resolver daemon to a DNS server.
Entry in the /etc/resolv.conf: configuration file:
search mch.siemens.de siemens.de
Name specified by the user:
myhost
Names generated by the DNS resolver daemon for requests to a DNS server:
1. myhost.mch.siemens.de2. myhost.siemens.de3. myhost

U41095-J-Z125-4-76 255
DNS DNS resolver
options entry
options option [option] ...
The options entry is used to define the behavior of a number of resolver routines by the values specified for option.
The following values can be specified for option:
debugThis activates the diagnostic mechanism of the DNS resolver daemon, and diagnostic messages are written to the /var/adm/messages file.
ndots:nSpecifies the lower threshold value for the number of dots (“.”) which a name transferred in a DNS request must contain for a first absolute (“as-is”) request to the DNS name server to be executed.The default is ndots:1. Thus if a name in a request to the DNS name server contains at least one dot, this name is first of all treated as an absolute name in a request before it is supplemented by domain names (see also the domain entry on page 251).
attempts:nSpecifies the maximum number of connection attempts which can be made to each DNS name server per DNS request. The specification attempts:0 has the same effect as the specification attempts:1.The default is attempts:4
timeout:nSpecifies the start timeout value for a retransmission in seconds. The previous timeout value is doubled with every attempt until the maximum number of connection attempts (see the attempts parameter) has been made. The specification timeout:0 has the same effect as the specification timeout:1.The default is timeout:5.When the default values for attempts and timeout are used, the overall timeout value for each DNS server is as follows:5+10+20+40=75 seconds.
256 U41095-J-Z125-4-76
DNS resolver DNS
rotateThe requests are sent in time slicing mode to the DNS name server generated with the aid of the nameserver entry. Thus instead of letting all clients send their first request to the first DNS server listed, the request volume is distributed evenly over all the listed DNS name servers.
no_tld_queryCauses the DNS resolver not to search for the name of the top level domain, in other words for a name which contains no dots (“.”). Using this option does not prevent the DNS resolver from applying the rules in accordance with a domain or search entry.

U41095-J-Z125-4-76 257
DNS DNS resolver
7.2.3 DNS resolver - administration and operation
This section provides information on the following topics:
● Starting up and shutting down the DNS resolver
● Modifying the configuration of the DNS resolver
7.2.3.1 Startup and shutdown of the DNS resolver
The DNS resolver is automatically started up when the POSIX subsystem is started and shut down when POSIX is shut down. After installation you can start the resolver daemon using the startservices procedure. The startservices procedure is only executed if no daemon of an interNet Services component is active. In addition, it is also possible to start, restart and shut down the daemon manually using the startdns, restartdns and stopdns commands which are described below.
Startup call for the DNS resolver
The startup call for the DNS resolver daemon is:
startdns
When a daemon startup call is issued, an implicit stop is executed for that daemon if the check determines that the daemon is already active. A new start is then executed in each such case. Startup occurs via the link, i.e. the link is tested for executability. No startup occurs if no execution rights for the link exist.
Restart call for the DNS resolver
There is also a restart call offered for the DNS resolver daemon. This call is needed whenever a modified configuration file is to be read in during a session.
The restart calls for the DNS resolver is:
restartdns
A check is made during the restart procedure run to determine if the daemon concerned has been started. If no active daemon is found, a normal new startup is executed.

258 U41095-J-Z125-4-76
DNS resolver DNS
Shutting down the DNS resolver
The following call is available in /usr/sbin to stop the DNS resolver daemon:
stopdns
The shutdown only applies until the POSIX subsystem is terminated. If an automatic restart is to be prevented when the POSIX subsystem is restarted, the link to the daemon must be made non-executable as described under the installation of the individual components on page 246 (chmod u-x Link).
Starting and stopping testing
The DNS resolver can be started with the following call even if the link is disabled:
/etc/rc2.d/S70dns dstart
The DNS resolver is stopped when testing stops as in normal operation with stopdns.
7.2.3.2 Modifying the DNS resolver configuration file
The DNS resolver daemon /etc/resolv.conf configuration file can be modified in the POSIX shell under $TSOS or $SYSROOT using EDT. The syntax of the entries must be stringently adhered to when editing the configuration file; otherwise, DNS queries may produce undesirable results.
Changes in the configuration file only take effect after a DNS resolver daemon new start or restart (see the startdns and restartdns commands on page 257).

U41095-J-Z125-4-76 259
DNS DNS resolver
7.2.4 DNS resolver - diagnosis and maintenance
This section describes logging functionality and diagnostic options for DNS.
7.2.4.1 DNS resolver - logging
The DNS resolver stores its logging information in the /var/adm/messages file. These entries have the following basic format:
Jan 22 15:44:58 LOG_NOTICE syslog[799]: dnsdamon: <message text>
The date and time output is followed by a keyword denoting the message classification. The DNS resolver daemon only uses the LOG_NOTICE keyword for its logging messages.
The classification is followed by the ID as a system message (syslog) with information on the relevant process ID (PID) [pid]. If no valid PID is available for the message output (e.g. the message issued by the daemon start procedure), an empty parenthesis expression is output. The name of the daemon (in this case dnsdamon) is output after the PID, enclosed in colons (:). The actual message text then follows.
No further logging messages are output after the stopdns command is entered, i.e. when the DNS resolver daemon terminates or is no longer running.
7.2.4.2 DNS resolver - diagnostic options
You activate the DNS debugging mechanism with the aid of the options entry (options debug, see page 255) in the configuration file /etc/resolv.conf. The diagnostic messages of the DNS resolver daemon are then logged in the /var/adm/messages file.
260 U41095-J-Z125-4-76
DNS name server NAMED DNS
7.3 DNS name server NAMED
This section provides information on the following topics:
● Installing and uninstalling NAMED
● Configuring NAMED
● Administration and operation of NAMED
● Diagnosis and maintenance of NAMED
7.3.1 Installing and uninstalling NAMED
In this context please also consult the Release Notice supplied with the product interNet Services. Installation of the interNet Services component PRNG is a prerequisite for the operation of NAMED.
The different components of the interNet Services software package are installed as a POSIX program package by the POSIX installation program (see the manual “POSIX Basics for Users and System Administrators”). You will find more detailed information on the installation of the components in the section “Installation” on page 33.
For the installation and operation of the TCP-IP-SV component, the PLAM library SINLIB.TCP-IP-SV.030.NAMED must be shareable. During installation of NAMED, the installation path can be defined in the POSIX file system. The default directory for instal-lation is /opt/TCP-IP-SV/dns-named.
Installing NAMED
After successful installation of the NAMED component, the relevant commands and files are contained in the directories /usr/sbin, /usr/bin and /etc and in the installation directory opt/TCP-IP-SV/dns-named. In the table on page 261, <instdir> stands for the installation directory /opt/TCP-IP-SV/dns-named.

U41095-J-Z125-4-76 261
DNS DNS name server NAMED
Directory File Description
/etc/ named.conf DNS configuration file of the name server
/etc/init.d/ dnssrv Start/stop procedure
/etc/rc0.d/ K64dnssrv Procedure for shutting down POSIX
/etc/rc2.d/ S72dnssrv Procedure for starting POSIX
/usr/bin/ nsupdate Dynamic update program
/usr/lib/ liblwres.alibisccfg.alibisccc.alibisc.alibdns.a
Additional DNS libraries not required for running NAMED 1)
/usr/sbin/ in.named Symbolic link to/opt/TCP-IP-SV/dns-named/sbin/named
startnamed Start call for the DNS name server daemon
stopnamed Stop call for the DNS name server daemon
named-checkconf Syntax check of a named.conf file
named-checkzone Syntax check of a zone file
rndc Remote name daemon control
rnd-confgen Generation of the remote name daemon control
dnssec-keygen Key generation
dnssec-makekeyset Generate a key set
dnssec-signkey Create key for signature
dnssec-signzone Assign zone
<instdir>/etc/ install.TCP-IP-SV-DEV.030.NAMED Installation script for the development modules
remove.TCP-IP-SV-DEV.030.NAMED Deinstallation script for the devel-opment modules
<instdir>/include/ * Include files1)
<instdir>/readme/ bind9arm.pdf Bind9 Administrator Reference Manual
* man pages in HTML and text format1) Only available if the NAMED development modules are installed (see page 263).
262 U41095-J-Z125-4-76
DNS name server NAMED DNS
After successful installation the other activities that are required are executed under the POSIX shell in an ID with POSIX root authorization. For this purpose the POSIX shell is started with the BS2000/OSD command START-POSIX.
If you want individual components of the overall package not to be activated, it is only necessary to deactivate the POSIX file attribute “executability” of the daemon. To make components available which have been installed but have not yet been used, the POSIX file attribute “executability” must be activated for the relevant daemons.
The relevant commands of the DNS resolver daemon are:
activation command: chmod u+x in.named
deactivation command: chmod u-x in.named
After interNet Services has been installed, the configuration and system files specific to the DNS components must be adapted to individual requirements before interNet Services is started up.
Uninstalling NAMED
The uninstallation of the interNet Services components is carried out using the POSIX installation program under the TSOS ID in the same way as installation.
Before you remove the NAMED components using the POSIX-INSTALLER, you should use the script <instdir>/etc/remove.TCP-IP-SV-DEV.030.NAMED to remove the development modules (if installed).
During uninstallation, the active DNS NAMED daemon is searched for and terminated. The termination of daemons that are still active is logged in the /var/adm/messages message file. All files, links and procedures of DNS NAMED are then deleted.
During uninstallation, the /etc/named.conf configuration file in the /etc/tcpipsv directory is saved with the suffix _sav, provided no file with the same name already exists. In the event of reinstallation, the backup copy can be copied to the active directory /etc again. Ensure that the backup copy has the current status.
i
U41095-J-Z125-4-76 263
DNS DNS name server NAMED
Installing/uninstalling NAMED development modules
With the NAMED development modules, additional files are provided which are not required for operation of the NAMED. These comprise Bind9 libraries which are used internally, plus the associated include files, which are provided by default with Bind9 but are only needed if application development is to be based on these Bind9 libraries (see the table on page 261).
The NAMED development modules are made available in the POSIX file system with the following shell script:
/opt/TCP-IP-SV/dns-named/etc/install.TCP-IP-SV-DEV.030.NAMED
When the NAMED development modules are no longer required, they can be removed from the POSIX file system using the following shell script:
/opt/TCP-IP-SV/dns-named/etc/remove.TCP-IP-SV-DEV.030.NAMED

264 U41095-J-Z125-4-76
DNS name server NAMED DNS
7.3.2 Configuring NAMED
This section provides information on the following topics:
– NAMED configuration file named.conf – NAMED and security– NAMED process models
7.3.2.1 NAMED configuration file named.conf
The operation of the DNS name server daemon is controlled by means of the configuration file /etc/named.conf. The syntax of the configuration file named.conf is described in the “BIND9 Administrator Reference Manual” of the Internet Software Consortium.
Example
Structure of a named.conf file
options {directory "/var/named";
};
logging {channel my_security_channel {file "my_security_file"; severity info; };category security { my_security_channel; default syslog; };category cname { null; };
};
zone "test1.mch.siemens.de" IN {type master;file "masterzone";
};
zone "test2.mch.siemens.de" IN {type slave;file "slavezone";masters { 155.90.80.1; };
};
zone "." in {type hint;file "named.cache";
};
zone "60.155.in-addr.arpa" IN {type master;file "arpafile";

U41095-J-Z125-4-76 265
DNS DNS name server NAMED
};
zone "0.0.127.in-addr.arpa" in {type master;file "loopback";
};
7.3.2.2 NAMED zone data files
Apart from general configuration settings, the file /etc/named.conf also contains information on the zones to be set up. The actual zone data is stored in local system files as Resource Records and read from these system files on starting the server daemon.
The syntax of the local zone data files is described in the “BIND9 Administrator Reference Manual” of the Internet Software Consortium.
All zone data files must be created in the SRR (Standard Resource Record) format, where each line of the file contains one Resource Record (RR).
Example
Structure of the masterzone file
test1.mch.siemens.de. IN SOA host1.test1.mch.siemens.de. postmaster (
1 ; serial
10800 ; Refresh after 3 hours
3600 ; Retry after 1 hour
604800 ; Expire after 1 week
86400) ; Minimum TTL of 1 day;; Name servers
;
test1.mch.siemens.de. IN NS host1.test1.mch.siemens.de.
IN NS host2.test1.mch.siemens.de.
;
; Addresses
;
host1 IN A 155.60.70.1
host2 IN A 155.60.70.2
host3 IN A 155.60.70.3

266 U41095-J-Z125-4-76
DNS name server NAMED DNS
loopback IN A 127.0.0.1
; Aliases
;
alias1 IN CNAME host1.test1.mch.siemens.de.
;
; Mail Exchanger
;
test1.mch.siemens.de. IN MX 0 host1.test1.mch.siemens.de.
test1.mch.siemens.de. IN MX 10 host3.test1.mch.siemens.de.
Example
Structure of the arpafile file
60.155.in_addr.arpa. IN SOA host1.test1.mch.siemens.de.postmaster (postmaster (
1 ; serial
10800 ; Refresh after 3 hours
3600 ; Retry after 1 hour
604800 ; Expire after 1 week
86400) ; Minimum TTL of 1 day
;
; Name servers
;
60.155.in_addr.arpa. IN NS host1.test1.mch.siemens.de.
IN NS host2.test1.mch.siemens.de.
;
; Addresses
;
1.70 IN PTR host1.test1.mch.siemens.de.
2.70 IN PTR host2.test1.mch.siemens.de.
3.70 IN PTR host3.test1.mch.siemens.de.

U41095-J-Z125-4-76 267
DNS DNS name server NAMED
Example
Structure of the loopback file
0.0.127.in_addr.arpa. IN SOA host1.test1.mch.siemens.de. postmaster (
10800 ; Refresh after 3 hours
3600 ; Retry after 1 hour
604800 ; Expire after 1 week
86400) ; Minimum TTL of 1 day
;
; Name servers
;
0.0.127.in_addr.arpa. IN NS host1.test1.mch.siemens.de.
;
; Addresses
;
1.0.0.127.in_addr.arpa. IN PTR localhost.

268 U41095-J-Z125-4-76
DNS name server NAMED DNS
7.3.2.3 NAMED and security
When NAMED is configured, the following options allow security aspects to be taken into account when data is accessed:
● The allow-query option of the options statement enables the authorization to send requests to the name server to be restricted to individual hosts.
● The allow-transfer option of the options statement enables the authorization to receive zone data from the name server to be restricted to individual hosts.
● The allow-update option of the zone statement enables the option of dynamic data update to be restricted to individual hosts on a zone-specific basis.
TSIG
A further security mechanism is provided by the Transaction SIGnatures (TSIG). These support server-to-server communication, including zone transfer, notify and recursive queries.
TSIG is key-based and is applied to communication between two DNS name servers. TSIG first generates a key (automatically or manually) which the two servers share. Transfer and use of the key is controlled by entries in the servers’ configuration files.
A detailed description of the function of TSIG is provided in the “BIND9 Administrator Reference Manual” of the Internet Software Consortium.
DNSSEC
DNS security (DNSSEC) extensions permit cryptographic authentication of the DNS infor-mation. They are defined in RFC 2535.
DNSSEC uses public keys for encryption. This enables zone administrators to sign the zone data digitally and authenticate themselves. Communication must be established between the administrators of the parent zone and/or the child zone in order to transfer the keys and signatures.
As soon as the zone keys for the child zone are generated a key set must be generated so that this can be transferred to the administrator of the parent zone. This allows the parent zone to show the security status of the child zone correctly.

U41095-J-Z125-4-76 269
DNS DNS name server NAMED
DNSSEC provides the following tools:
● dnssec-keygen for key generation
● dnssec-makekeyset for generating a key set from one or more keys
● dnssec-signkey for signing a child’s key set
● dnssec-signzone for signing a zone
A detailed description of the function of DNSSEC is provided in the “BIND9 Administrator Reference Manual” of the Internet Software Consortium.
Executing NAMED without root authorization
By default NAMED is executed with root authorization. To prevent an intruder gaining full access to the file system or being able to execute commands under the root ID in the event of any security problems with the software, it is also possible to run NAMED without root authorization. The dnssrv parameter USERID enables you to run NAMED under any user ID. We recommend that you specify the user ID with the lowest privilege for USERID.
The user ID defined in USERID must be assigned read and write permission for the working files for which the entries directory and pidfile were agreed in the configu-ration file named.conf.
i

270 U41095-J-Z125-4-76
DNS name server NAMED DNS
7.3.2.4 NAMED process models
NAMED uses two alternative process models:
● Standard process model
● Thread process model
Standard process model and thread process model
The hardware requirements for DNS were to date relatively simple. For DNS servers up to Bind8 it was thus sufficient if requests for relatively large zones were answered with just a daemon processor, provided adequate performance was ensured. In this standard process model a process is started when the service starts which replies to all requests sequentially.
This architecture was revised with Bind9 to ensure sufficient throughput was also guaranteed for
● extremely large zones (such as .com),
● the new, CPU-intensive security functions and
● IPv6 support.
In addition to the standard process model, Bind9 therefore also offers a process model based on threads, the thread process model. Threads enable individual tasks of an appli-cation to be subdivided into program segments that can be executed independently of each other. On multiprocessor systems these program segments can be processed in parallel. Bind9 uses the POSIX threads in accordance with the POSIX (Portable Operating Systems Interface) Standard for its multithreaded architecture.
Standard process model and thread process model in BS2000/OSD
In BS2000/OSD, too, the DNS server can utilize the standard process model and thread process model, which should be selected according to the current performance require-ments.
The standard process model is always sufficient for smaller zones and when little use is made of the security functions. This process model is the default in the event of a new instal-lation.
If the standard process model does not permit adequate throughput, the thread process model should be used. Every POSIX-THREADS application in BS2000/OSD is executed as a multitask Unix process, in other words in principle several (at least two) BS2000/OSD tasks run in parallel. The BS2000/OSD task under which a multithreaded application is started is referred to as the origin task of the application.

U41095-J-Z125-4-76 271
DNS DNS name server NAMED
The following types of task are also started in a thread application:
● Thread tasks in which the threads specified by the application run.
● Resource tasks implement the hidden server tasks which utilize BS2000/OSD or POSIX resources.
You can define the number of thread and resource tasks in the configuration. All of these tasks are connected to specific shared memory pools of the application which contain the jointly used application code and application data.
Prerequisites for using the thread process model in BS2000/OSD
The following measures must be implemented to permit the thread process model to be used:
● The product PTHREADS must be installed.
The product PTHREADS is part of BS2000-GA and contains most of the POSIX threads functionality in BS2000/OSD. The use of the POSIX threads functionality requires that, in addition to the product PTHREADS, the thread-safe variant of the product CRTE and the thread-safe variant of the Sockets library of the product POSIX-SOCKETS must also be used. In this context please also consult the Release Notice supplied with the product PTHREADS.
● The system support staff must ensure that the following is set for the tasks under which the thread application runs:
– Authorization to switch to task category TP must be granted.– Task deactivation must be prevented.
Defining the standard or thread process model as the process model for DNS
You define whether DNS is used with the standard or thread process model in the dnssrv procedure (see page 273).
Define standard process model for DNS
If you want to use the standard process model in DNS, assign the value 0 to the MAXTH parameter.
Define thread process model for DNS
If you want to use the thread process model in DNS, assign a value > 0 to the parameters MAXTH and MINTH. You thus define the maximum and minimum number of thread tasks.

272 U41095-J-Z125-4-76
DNS name server NAMED DNS
The optimum number of thread tasks depends on the following factors:
● Number of available CPUs
● Required load
● Total system load
The value recommended for MAXTH is the number of available CPUs. Because of the Bind9 implementation the MINTH parameter is not relevant and need not be specified in dnssrv. In addition, you can specify the number of resource tasks using the MINRT parameter. It is recommendable to provide a separate resource task for all heavily used network interfaces and ports and an additional task for disk accesses. When MINRT is assigned the value 0, the resources that are selected by default by the resource task are selected for the appli-cation’s origin task.
By default two resource tasks are predefined in dnssrv. This is generally enough for use in corporate networks.
The MAXRT parameter is of no significance in the current version of PTHREADS. In later versions it is planned to permit the number of resource tasks within the two threshold values MINRT and MAXRT to be adjusted automatically to the current load. To avoid problems in future updates of PTHREADS you should select the same value for MAXRT and MINRT.

U41095-J-Z125-4-76 273
DNS DNS name server NAMED
7.3.3 NAMED - administration and operation
Administration and operation of NAMED comprise the following tasks:
● Starting up and shutting down NAMED
● Modifying NAMED zone data
7.3.3.1 Starting up and shutting down NAMED
NAMED is automatically started up when the POSIX subsystem is started and shut down when POSIX is shut down. In addition, it is also possible to start and shut down the daemon manually using the startnamed and stopnamed commands which are described below.
Startup call for NAMED
The startup call for the NAMED daemon is:
startnamed
When a daemon startup call is issued, an implicit stop is executed for that daemon if the check determines that the daemon is already active. A new start is then always executed. Startup occurs via the link, in other words the link is tested for executability. No startup occurs if no execution rights for the link exist.
startnamed calls the dnssrv procedure internally.
IMPORTANT!
Do not call dnssrv directly!
You define the process model for NAMED using the following parameters in /etc/init.d/dnssrv (see page 270):
● MAXTH
● MINTH
● MAXRT
With the USERID parameter you define whether NAMED is to run without root authorization (see page 269).
!

274 U41095-J-Z125-4-76
DNS name server NAMED DNS
Shutting down NAMED
The following call is available in /usr/sbin to stop the NAMED daemon:
stopnamed
IMPORTANT!
The shutdown only applies until the POSIX subsystem is terminated. If an automatic restart is to be prevented when the POSIX subsystem is restarted, the link to the daemon must be made non-executable as described under the instal-lation of the individual components on page 260 (chmod u-x Link).
NAMED - starting and stopping testing
NAMED can be started with the following call even if the link is disabled:
/etc/rc2.d/S72dnssrv dstart
NAMED is stopped when testing stops as in normal operation with stopnamed.
7.3.3.2 Modifying the zone data files of NAMED
If desired, the configuration of the NAMED server can be changed outside the current server session by modifying the NAMED zone data files and starting NAMED again.
In addition, it is also possible to change the configuration via so-called dynamic updates. In this case, Resource Records can be dynamically added, deleted or modified during the current server session.This feature will play an important role in the future, especially in connection with DHCP.
Dynamic Update
Dynamic update is the term used for the ability under certain specified conditions to add, modify or delete records or RRsets in the master zone files. Dynamic update is fully described in RFC 2136.
Dynamic update is enabled on a zone-by-zone basis, by including an allow-update or update-policy clause in the zone statement.
Updating of secure zones (zones using DNSSEC) follows RFC 3007: SIG and NXT records affected by updates are automatically regenerated by the server using an online zone key. Update authorization is based on transaction signatures and an explicit server policy.
!
U41095-J-Z125-4-76 275
DNS DNS name server NAMED
The journal file
All changes made to a zone using dynamic update are stored in the zone’s journal file. This file is automatically created by the server when the first dynamic update takes place. The name of the journal file is formed by appending the extension .jnl to the name of the corre-sponding zone file. The journal file is in a binary format and should not be edited manually.
The server will also occasionally write (“dump”) the complete contents of the updated zone to its zone file. This is not done immediately after each dynamic update, because that would be too slow when a large zone is updated frequently. Instead, the dump is delayed by 15 minutes, allowing additional updates to take place.
When a server is restarted after a shutdown or crash, it will replay the journal file to incor-porate into the zone any updates that took place after the last zone dump.
Changes that result from incoming incremental zone transfers are also journaled in a similar way.
The zone files of dynamic zones cannot normally be edited by hand because they are not guaranteed to contain the most recent dynamic changes - those are only in the journal file. The only way to ensure that the zone file of a dynamic zone is up to date is to run rndc stop.
If you have to make changes to a dynamic zone manually, the following procedure will work:
Ê shut down the server using rndc stop ().
sending a signal or using rndc halt is not sufficient
Ê wait for the server to exit
Ê remove the journal file,
Ê edit the zone file,
Ê and restart the server.
IMPORTANT!
Removing the journal file is necessary because the manual edits will not be present in the journal, rendering it inconsistent with the contents of the zone file.
i
!

276 U41095-J-Z125-4-76
DNS name server NAMED DNS
7.3.4 NAMED - diagnosis and maintenance
This section describes logging functionality and diagnostic options for NAMED.
7.3.4.1 NAMED - logging
The DNS name server NAMED enters its logging information in the /var/adm/messages file. In the configuration file /etc/named.conf you can use the logging function to define the categories for which logging is to be performed, in other words on which channels the logging information is to be output.
By default, all messages with a severity from "Info" to "Critical" are stored via SYSLOG in the file /var/adm/messages. Messages of the categories "Packet" and "Eventlib" are excep-tions. These messages as well as all debug messages are stored in the file named.run in the startup directory of the NAMED daemon.
The following information is contained in the entries of the NAMED daemon in the logging file var/adm/messages:
– Date and system time– Keyword for classification, which corresponds to the message priority (severity)– Name of the NAMED daemon and process ID (PID)– Logging category– Actual meaning
Example
Jan 04 09:42:06 LOG_INFO named[1064]: load: master zone "test.mch.siemens.de" (IN) loaded (serial 36)
The following information is contained in the entries of the NAMED daemon in the named.run file:
– Date and system time– Logging category– Actual meaning
Example
30-Jan-2004 11:14:12.574 load: info: master zone "test.mch.siemens.de" (IN) loaded (serial 36)
Further information on logging is provided in the section “Configuring NAMED” on page 264.
U41095-J-Z125-4-76 277
DNS DNS name server NAMED
7.3.4.2 NAMED - diagnostic options
All activities of NAMED are logged in debug mode. You can enable this mode by setting the environment variable DEBUGNAMED or via the rndc tool. The volume of diagnostic infor-mation depends on the debug level. The higher the level, the more detailed the messages. You can transfer the level directly in the environment variable DEBUGNAMED or set it with the rndc tool. You can also disable debug mode with the rndc tool.
A further diagnostic option is provided by the database dump. You can use the rndc tool to have the data in the cache and the root data output to file. You can also enable query logging with the rndc tool.
The rndc tool is described in the “BIND9 Administrator Reference Manual” of the Internet Software Consortium.

278 U41095-J-Z125-4-76
DNS tools DNS
7.4 DNS tools
A number of tools are available for diagnostics, administration and monitoring of NAMED. These tools are listed below. You will find a description of them on your server under /opt/TCP-IP-SV/dns /readme or under /opt/TCP-IP-SV/dns-named/readme.
Diagnostic tools
● dig (domain information groper)
Command line tool for retrieving information on the domain name servers
● host
Command line tool for querying Internet host names
● nslookup
Command line tool for querying domain name servers on the Internet. nslookup will not be developed any further. In future the dig tool should be used instead.
Administration tools
● rndc (remote name daemon control)
Tool for monitoring name server operation
● rndc-confgen
Utility for generating the rndc.conf file
A detailed description of these tools is provided in the “BIND9 Administrator Reference Manual” of the Internet Software Consortium.

U41095-J-Z125-4-76 279
DNS DNS tools
7.4.1 Diagnostic tool dig - examples
A number of examples of how to work with the diagnostic tool dig is provided below.
Querying the address for a name (server address from resolv.conf)
# dig www.fujitsu-siemens.com
; <<>> DiG 9.2.3 <<>> www.fujitsu-siemens.com;; global options: printcmd;; Got answer:;; ->>HEADER<<- opcode: QUERY, status: NOERROR, id: 6862;; flags: qr rd ra; QUERY: 1, ANSWER: 1, AUTHORITY: 0, ADDITIONAL: 0
;; QUESTION SECTION:;www.fujitsu-siemens.com. IN A
;; ANSWER SECTION:www.fujitsu-siemens.com. 781 IN A 217.115.66.11
;; Query time: 49 msec;; SERVER: 123.123.123.123#53(123.123.123.123);; WHEN: Fri Nov 28 09:29:07 2003;; MSG SIZE rcvd: 57
Querying the name for an address (server address from resolv.conf)
# dig -x 217.115.66.11
; <<>> DiG 9.2.3 <<>> -x 217.115.66.11;; global options: printcmd;; Got answer:;; ->>HEADER<<- opcode: QUERY, status: NOERROR, id: 63202;; flags: qr rd ra; QUERY: 1, ANSWER: 1, AUTHORITY: 0, ADDITIONAL: 0
;; QUESTION SECTION:;11.66.115.217.in-addr.arpa. IN PTR
;; ANSWER SECTION:11.66.115.217.in-addr.arpa. 8600 IN PTR www.fujitsu-siemens.com.
;; Query time: 43 msec;; SERVER: 123.123.123.123#53(123.123.123.123);; WHEN: Fri Nov 28 09:42:42 2003;; MSG SIZE rcvd: 81

280 U41095-J-Z125-4-76
DNS tools DNS
Querying the name server of a DNS domain (server address from resolv.conf)
# dig fujitsu-siemens.com ns
; <<>> DiG 9.2.3 <<>> fujitsu-siemens.com ns;; global options: printcmd;; Got answer:;; ->>HEADER<<- opcode: QUERY, status: NOERROR, id: 37331;; flags: qr rd ra; QUERY: 1, ANSWER: 3, AUTHORITY: 0, ADDITIONAL: 3
;; QUESTION SECTION:;fujitsu-siemens.com. IN NS
;; ANSWER SECTION:fujitsu-siemens.com. 86330 IN NS ns1.fujitsu-siemens.com.fujitsu-siemens.com. 86330 IN NS ns.dfu.de.fujitsu-siemens.com. 86330 IN NS dns-gtld-1.ision.net.
;; ADDITIONAL SECTION:ns1.fujitsu-siemens.com. 86330 IN A 194.111.222.111ns.dfu.de. 47948 IN A 195.101.102.103dns-gtld-1.ision.net. 77872 IN A 195.123.123.123
;; Query time: 43 msec;; SERVER: 123.123.123.123#53(123.123.123.123);; WHEN: Fri Nov 28 09:31:08 2003;; MSG SIZE rcvd: 160

U41095-J-Z125-4-76 281
DNS DNS tools
Querying all entries for a name (server address from resolv.conf)
# dig www.fujitsu-siemens.com any
; <<>> DiG 9.2.3 <<>> www.fujitsu-siemens.com any;; global options: printcmd;; Got answer:;; ->>HEADER<<- opcode: QUERY, status: NOERROR, id: 54864;; flags: qr aa rd ra; QUERY: 1, ANSWER: 2, AUTHORITY: 3, ADDITIONAL: 5
;; QUESTION SECTION:;www.fujitsu-siemens.com. IN ANY
;; ANSWER SECTION:www.fujitsu-siemens.com. 900 IN A 217.115.66.11www.fujitsu-siemens.com. 86400 IN MX 10 mail.pdb.sbs.de.
;; AUTHORITY SECTION:fujitsu-siemens.com. 86400 IN NS ns1.fujitsu-siemens.com.fujitsu-siemens.com. 86400 IN NS ns.dfu.de.fujitsu-siemens.com. 86400 IN NS dns-gtld-1.ision.net.
;; ADDITIONAL SECTION:mail.pdb.sbs.de. 62876 IN A 192.100.200.101mail.pdb.sbs.de. 62876 IN A 192.100.200.102ns1.fujitsu-siemens.com. 86400 IN A 194.111.222.111ns.dfu.de. 47834 IN A 195.101.102.103dns-gtld-1.ision.net. 77941 IN A 195.123.123.123
;; Query time: 175 msec;; SERVER: 123.123.123.123#53(123.123.123.123);; WHEN: Fri Nov 28 09:29:59 2003;; MSG SIZE rcvd: 241
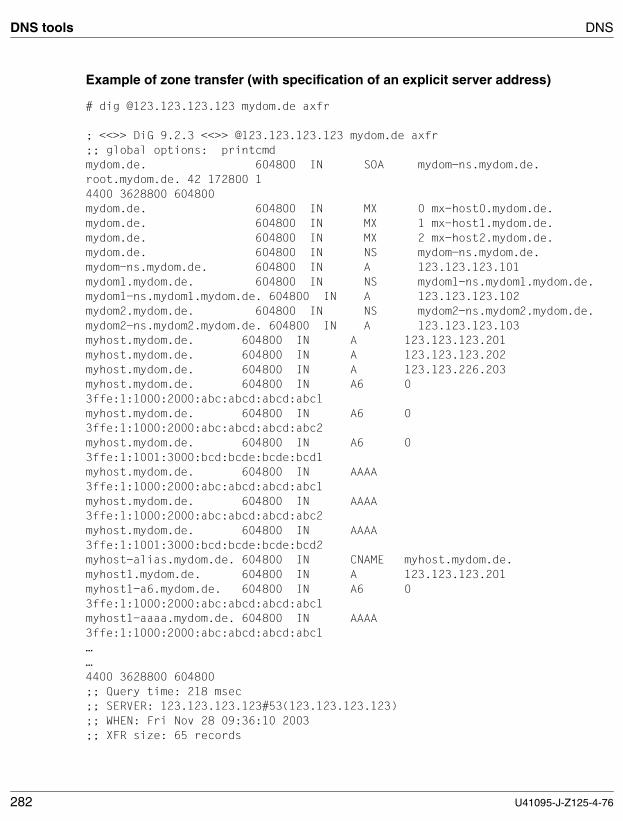
282 U41095-J-Z125-4-76
DNS tools DNS
Example of zone transfer (with specification of an explicit server address)
# dig @123.123.123.123 mydom.de axfr
; <<>> DiG 9.2.3 <<>> @123.123.123.123 mydom.de axfr;; global options: printcmdmydom.de. 604800 IN SOA mydom-ns.mydom.de. root.mydom.de. 42 172800 14400 3628800 604800mydom.de. 604800 IN MX 0 mx-host0.mydom.de.mydom.de. 604800 IN MX 1 mx-host1.mydom.de.mydom.de. 604800 IN MX 2 mx-host2.mydom.de.mydom.de. 604800 IN NS mydom-ns.mydom.de.mydom-ns.mydom.de. 604800 IN A 123.123.123.101mydom1.mydom.de. 604800 IN NS mydom1-ns.mydom1.mydom.de.mydom1-ns.mydom1.mydom.de. 604800 IN A 123.123.123.102mydom2.mydom.de. 604800 IN NS mydom2-ns.mydom2.mydom.de.mydom2-ns.mydom2.mydom.de. 604800 IN A 123.123.123.103myhost.mydom.de. 604800 IN A 123.123.123.201myhost.mydom.de. 604800 IN A 123.123.123.202myhost.mydom.de. 604800 IN A 123.123.226.203myhost.mydom.de. 604800 IN A6 0 3ffe:1:1000:2000:abc:abcd:abcd:abc1myhost.mydom.de. 604800 IN A6 0 3ffe:1:1000:2000:abc:abcd:abcd:abc2myhost.mydom.de. 604800 IN A6 0 3ffe:1:1001:3000:bcd:bcde:bcde:bcd1myhost.mydom.de. 604800 IN AAAA 3ffe:1:1000:2000:abc:abcd:abcd:abc1myhost.mydom.de. 604800 IN AAAA 3ffe:1:1000:2000:abc:abcd:abcd:abc2myhost.mydom.de. 604800 IN AAAA 3ffe:1:1001:3000:bcd:bcde:bcde:bcd2myhost-alias.mydom.de. 604800 IN CNAME myhost.mydom.de.myhost1.mydom.de. 604800 IN A 123.123.123.201myhost1-a6.mydom.de. 604800 IN A6 0 3ffe:1:1000:2000:abc:abcd:abcd:abc1myhost1-aaaa.mydom.de. 604800 IN AAAA 3ffe:1:1000:2000:abc:abcd:abcd:abc1……4400 3628800 604800;; Query time: 218 msec;; SERVER: 123.123.123.123#53(123.123.123.123);; WHEN: Fri Nov 28 09:36:10 2003;; XFR size: 65 records

U41095-J-Z125-4-76 283
8 NTPThe Network Time Protocol Version 3 is documented in RFC 1305. NTP is the improved successor to the TIME Protocol (RFC 868) and the ICMP Timestamp Option. Versions 1 and 2 are described in RFCs 1059 and 1119.
8.1 NTP concept
The Network Time Protocol is based on the client/server principle. It uses highly-developed methods to provide the time to systems on LANs and/or WANs with an accuracy within the millisecond range.
8.1.1 NTP functionality
NTP offers the following functionality:
● It allows a reference time (Universal Coordinated Time, UTC) to be distributed within a network, and
● also coordinates the clocks within networks of any size.
In order to feed the UTC time into the network, it is recommended that the network computer on which NTP is installed be equipped with a radio-controlled hardware clock which receives a time signal generated by an atomic clock. With its DCF77 time signal, the authoritative source for disseminating time in Germany is the Federal Institute for Physical Technology in Braunschweig (Physikalisch-Technische Bundesanstalt in Braunschweig).
A computer equipped in this way synchronizes its own system clock with the externalhardware clock, thus becoming the primary time server on the network. The precision of this time server is determined by the resolution of its own system clock.
Time servers have hierarchical relationships. A secondary time server receives its time via the network from a primary time server. The position of this time server in the hierarchy is identified by a number called the stratum. A primary time server has a stratum of 1, a secondary time server has a stratum of 2, etc. The higher the stratum, the further the time server is from the primary time source and the higher the probability that this time server is inaccurate.
284 U41095-J-Z125-4-76
NTP concept NTP
In simple terms, time is synchronized between the client and the server as follows:
1. The client sends an NTP message to the server as a datagram.
2. The server replaces the IP addresses and some of the message fields in the arriving datagram and sends it back.
3. The server sends the modified datagram back to the client.
The result of this process is four timestamps from which the following two measurements can then be calculated:
● the time the NTP message spent travelling through the network (delay)
● the time difference between the clocks of the two computers (offset)
Both measurements are approximated. The offset contains an average delay, i.e. NTP assumes that the arrival route and the return route of the NTP packets are the same length. Any deviations therefore cause errors in the calculation of the offset. In LANs, the round trip delay is only a fraction of the offset, so the offset calculation is very precise. However, this does not apply to WANs.
To minimize the effect of runtime fluctuations, the calculated offset and delay values are put through an additional filtering procedure. Of the last eight received NTP messages of a time server, the message with the lowest delay determines the current offset value. An additional measurement is also calculated from the same list - the dispersion. This is the weighted mean value of the offset deviations of the last eight NTP messages from the current offset value. The offset values with a low delay value are given a greater weight than those with large delay values. Dispersion is the measurement used to evaluate the quality of a time server.
A client/server configuration is entirely dependent on the availability of its components. In NTP, two major techniques are used to prevent any possible sources of failure:
● Redundancy:
Each time server or each client is in contact with at least three other time servers of the same or a higher stratum. If a computer’s current synchronization source fails, another time server automatically takes over.

U41095-J-Z125-4-76 285
NTP NTP concept
● Selection:
A selection mechanism is applied, in which the best time server of those available in the list is chosen as the current synchronization source.
The selection criterion are:
– stratum (the lower, the better)– delay (the smaller, the better)– dispersion (the smaller, the better)
(Time) servers and clients are differentiated according to who receives the correct time from whom. The client requests an NTP message with the already described timestamps from the server and uses this to synchronize its own clock if the server proves to be the best available. In the NTP protocol, the five different operating states in which a time server operates are defined in terms of "associations" between time servers.
Symmetrical associations (Peer to Peer) between time servers use the full range of functions of the NTP protocol. In particular, a peer host receives status information about the corresponding peer and is prepared, if necessary, to use it as a synchronization source. In client/server associations, by contrast, the roles are fixed. The server supplies the client with the precise time, but is never ready to synchronize with the client. Symmetrical associations are usually between time servers with low stratum values, whereas client/server associations are normally between time servers with high stratum values. Broadcast associations can be used in LANs in which a server provides several clients with NTP messages in the broadcast procedure.
Not every client requiring the time service should be synchronized directly with the stratum-1 server(s), as this would overload the server and prevent it from providing a precise time. It is better to distribute the time among a group of selected stratum-2 servers.
Association Host1 Host2
Peer to Peer Symmetrically active Symmetrically passive
Client to Server Client Server
Server Client
Broadcast Client Broadcast server
Broadcast server Client

286 U41095-J-Z125-4-76
NTP concept NTP
8.1.2 Implementing NTP in BS2000/OSD
BS2000/OSD (Version 2.0 or higher) uses the NTP functionality as a client. If interNet Services V1.0 is installed, BS2000/OSD can also be used as an NTP server.
The adjtime function, which is offered as a POSIX interface and as a privileged TPR interface, enables the system time in BS2000/OSD to be modified by a specific value.
The system time is available to the user via the following interfaces:
● GTIME (both in TU and in TPR)
● GDATE
● via the runtime routines of high-level languages
The time-of-day register (TODR) is not adapted as part of one of these synchronizations.
The actual adaptation of the system time is carried out asynchronously with the adjtime call in small steps. The change is made by accelerating or delaying the system clock for a certain time, depending on whether the correction value is positive or negative. The technique involved ensures that two consecutive calls for the current time still receive monotonous time values and not jumps in time.
The process of synchronizing the system time by an absolute value of n seconds lasts 4*n seconds. NTP performs its synchronization in BS2000/OSD every 64 seconds with the current offset value.
The time of the adjtime call is determined by the following factors:
● Current deviation between the time shown on the own system and the accurate NTP server time. If the deviation is small, the polling interval is increased, thus reducing the synchronization frequency.
● The set minpoll value, which specifies the minimum polling interval. The memory requirements of the adjtime call must be taken into account here.
● For each adjtime call, 8 KB of class-4 memory and KB of class-3 memory are required. The memory areas involved are occupied for 15 minutes each.
This results in the following requirement for class-4 memory:
Requirement = (900 / sync_interval) * 8 KB
where sync_interval specifies the interval (in seconds) between two synchronizationoperations initiated by NTP.

U41095-J-Z125-4-76 287
NTP NTP concept
When adjtime is called, it terminates any previous adjtime call that may be running. The functionality of adjtime can be requested by several privileged users in BS2000/OSD. An internal system of preferences establishes whose synchronization jobs are executed, and whose are not. The priority remains in effect throughout the existence of a higher-priority instance.
The following have priority over NTP:
– a TimeServer 3920 connected as a channel device and supplied by the TSDRIVER subsystem
– the radio clock or TimeServer 3920 connected to the SKP, SVP or VM2000 monitoring machine
– the synchronization of the hosts in a HIPLEX-XCS pool (OSD V3.0 or higher) performed by the XCS-TIME subsystem (subfunction of HIPLEX-MSCF)
The time server with the highest priority is preferred by BS2000/OSD; all other time servers are then ignored. It is also not possible to operate NTP and DCE at the same time. Since this is not checked by BS2000/OSD, the system administrator must make suitable organizational arrangements.
All NTP messages are logged in the default file /var/adm/messages, unless another log file has been defined.
NTP can remain in use even during seasonal time switchovers.
NTP programs
The table below contains an overview of the programs used for starting the NTP daemon and for controlling the NTP functionality:
Program Function Refer to
xntpd NTP daemon page 290
ntpq Querying NTP status page 303
ntpdate Setting date and time page 301
ntptrace Tracing NTP servers page 314
i
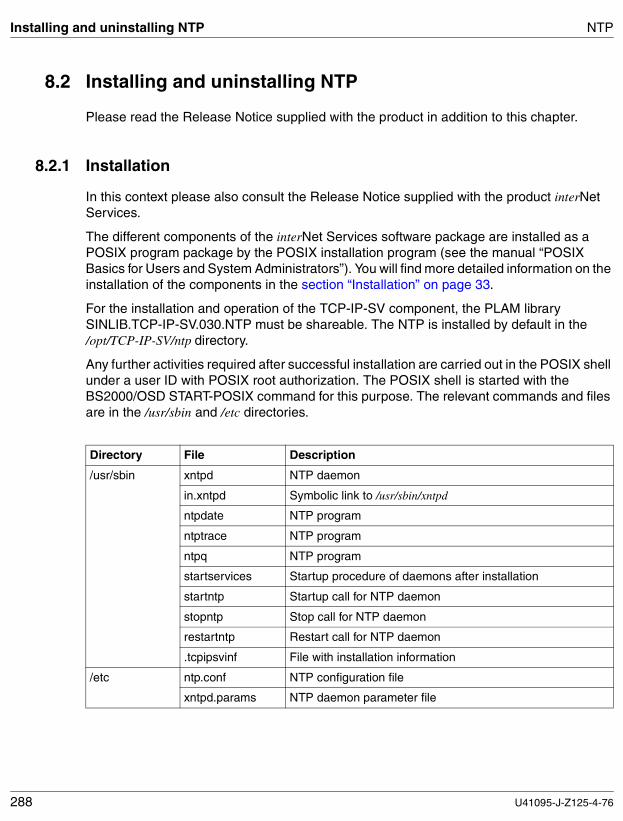
288 U41095-J-Z125-4-76
Installing and uninstalling NTP NTP
8.2 Installing and uninstalling NTP
Please read the Release Notice supplied with the product in addition to this chapter.
8.2.1 Installation
In this context please also consult the Release Notice supplied with the product interNet Services.
The different components of the interNet Services software package are installed as a POSIX program package by the POSIX installation program (see the manual “POSIX Basics for Users and System Administrators”). You will find more detailed information on the installation of the components in the section “Installation” on page 33.
For the installation and operation of the TCP-IP-SV component, the PLAM library SINLIB.TCP-IP-SV.030.NTP must be shareable. The NTP is installed by default in the /opt/TCP-IP-SV/ntp directory.
Any further activities required after successful installation are carried out in the POSIX shell under a user ID with POSIX root authorization. The POSIX shell is started with the BS2000/OSD START-POSIX command for this purpose. The relevant commands and files are in the /usr/sbin and /etc directories.
Directory File Description
/usr/sbin xntpd NTP daemon
in.xntpd Symbolic link to /usr/sbin/xntpd
ntpdate NTP program
ntptrace NTP program
ntpq NTP program
startservices Startup procedure of daemons after installation
startntp Startup call for NTP daemon
stopntp Stop call for NTP daemon
restartntp Restart call for NTP daemon
.tcpipsvinf File with installation information
/etc ntp.conf NTP configuration file
xntpd.params NTP daemon parameter file

U41095-J-Z125-4-76 289
NTP Installing and uninstalling NTP
If you do not want to activate NTP, you will only need to prevent the links to the NTP daemon ntpd from being executed. In order to enable an ntpd daemon that has been installed but not yet used, the links for the corresponding daemons must be activated in the POSIX shell with root authorization in the /usr/sbin directory.
After installing the interNet Services and before calling the general startup procedure, the NTP configuration file of the individual components must be customized to individual requirements (see page 292).
The general startup procedure starts the daemons that have links. This can be checked via the entries in the /var/adm/messages message file (only POSIX root has read access rights). If the POSIX subsystem is stopped and then restarted, the interNet Services daemons activated after installation are also started automatically.
8.2.2 Uninstallation
The uninstallation of the interNet Services components is carried out using the POSIX installation program under the TSOS ID in the same way as installation. During uninstal-lation, the active NTP daemon is searched for and terminated. The termination of daemons that are still active is logged in the /var/adm/messages message file. All files, links and proce-dures of the NTP are then deleted.
During uninstallation, the /etc/resolv.conf configuration file in the /etc/tcpipsv directory is saved with the suffix _sav, provided no file with the same name already exists. In the event of reinstallation, the backup copy can be copied to the active directory /etc again. Ensure that the backup copy has the current status.
Activation command: chmod u+x in.xntpd
Deactivation command: chmod u-x in.xntpd

290 U41095-J-Z125-4-76
Startup and shutdown of NTP NTP
8.3 Startup and shutdown of NTP
This section provides information on the following topics:
● Startup and shutdown of NTP
● NTP time synchronization (set date and time)
● Creating the configuration file of the NTP daemon
8.3.1 Starting and shutting down NTP
The selected components of interNet Services are started by the user with the startservices procedure under /usr/sbin after installation and selection. The startservices procedure is run only if no interNet Services daemon is active. The NTP daemons can, however, also be started separately. The relevant procedures are likewise installed in the /usr/sbin directory, as described on page 288.
Startup call for the NTP daemon
The name of the NTP daemon is xntpd. The startup call is: startntp
When the xntpd daemon startup call is issued, an implicit stop is executed for this daemon if the check determines that the daemon is already active. A new start is then executed in each case. The startup occurs via the link, i.e. the link is tested for executability. The link is not started if no execution authorization exists for it.
The individual options for the NTP daemon startup call are described in the section “Startup options of the NTP daemon xntpd” on page 299.
Restart call for the NTP daemon
There is also a restart call offered for the NTP daemon. This call is needed whenever a modified configuration file is to be read in during a session.
The restart call is: restartntp
A check is made during the restart procedure run to determine if the daemon concerned has been started. If no active daemon is found, a normal new startup is executed.

U41095-J-Z125-4-76 291
NTP Startup and shutdown of NTP
Shutting down NTP
The stopntp call is provided under/usr/sbin to stop the NTP daemon.
The shutdown applies only until the POSIX subsystem is terminated. If an automatic restart is to be prevented when the POSIX subsystem is restarted, the link to the daemon must be made non-executable (see also page 289, chmod u-x link).
8.3.2 NTP time synchronization
In BS2000/OSD, NTP time synchronization can either be performed continuously using the NTP daemon xntpd or in a single operation using the ntpdate program. How you set the date and time with the ntpdate program is described in the section “Setting the date and time via NTP with the ntpdate program” on page 301.
xntpd and ntpdate both use port number 123. Only one of the applications can therefore run at any given time. The startup options for xntpd must be defined in the /etc/xntp.params file.
The following two lines must be added to the /etc/services file if they are not already there:
ntp 123/udp # Network Time Protocolntp 123/tcp # Network Time Protocol
Addressing clocks
In OSD/POSIX only the system clock of the local computer can be configured as a clock. In principle, however, NTP also allows other clocks such as radio receivers for DCF77 signals to be configured.
Clocks are addressed analogously to partner hosts by using pseudo IP addresses, which are invalid as normal IP addresses. The following section describes how clocks are configured using the server and fudge configuration statements.
i

292 U41095-J-Z125-4-76
Startup and shutdown of NTP NTP
8.3.3 Creating the NTP daemon xntpd configuration file
The default name for the configuration file of the NTP daemon xntpd is /etc/ntp.conf. The format of the configuration file for xntpd is similar to that of other OSD/POSIX configuration files. Comments are introduced with the # character and continue to the end of the line. Blank lines are ignored.
Configuration statements consist of a keyword, followed by a list of arguments which are separated by spaces. No distinction is made between uppercase and lowercase letters for the keywords of the commands. A statement may not extend over multiple lines. The individual configuration statements are described below.
When xntpd is used as a broadcast client, no configuration file is required.
server statement
The server statement sets the local xntpd daemon to "client" mode for the specified server. In this mode, the local xntpd is synchronized by the remote NTP server, but not vice versa.
server host_addr[ version #][ prefer][ minpoll minpoll][ maxpoll maxpoll]
host_addr Host address in dotted notation, which specifies the server for which the local xntpd daemon is to be set to client mode.
Clocks are addressed analogously to partner hosts using pseudo IP addresses of the form 127.127.t.u, which are invalid as normal IP addresses. t identifies the type of clock, and u is type-specific. The local system clock is specified with the pseudo IP address 127.127.1.0 and is the only clock possible in BS2000/OSD.
version # Version number for outgoing NTP packets. Possible values for # are 1, 2 or 3.Default: version 3
prefer This option can be used to mark the host specified with host_addr as "preferred" and thus select it for synchronization over other candidates that have the same values.

U41095-J-Z125-4-76 293
NTP Startup and shutdown of NTP
minpollInteger that specifies the minimum polling interval for NTP messages as 2minpoll seconds.Default: 6 (64 sec)Values permitted in BS2000/OSD: ≥ 6 (64 sec)
maxpollInteger that specifies the maximum polling interval for NTP messages as 2minpoll seconds.Default: 10 (1024 sec)Values permitted in BS2000/OSD: up to 14 (approx. 4 hours, 30 minutes)
Example (client mode)
# ntp.conf##server 127.127.1.0 #own clockserver 132.23.4.121 prefer #time serverserver 139.25.113.36 #unix machineserver 139.25.109.118 #linux pc
restrict statement
The restrict statement enables access control.
restrict numeric_address [mask numeric_mask] [flag]
numeric_addressnumeric_address must be entered in "decimal dotted notation" and must specify the IP address of a network, a subnetwork or an individual host. If the mask clause is not specified, numeric_address refers to the IP address of a single host.
numeric_masknumeric_mask must be entered in "decimal dotted notation" and must specify a subnet mask. Default: 255.255.255.255

294 U41095-J-Z125-4-76
Startup and shutdown of NTP NTP
flagThe flag specification always implies a restriction on access rights. A restrict command without the flag entry thus allows unrestricted access rights.
flag can have the following values:
ignore Packets arriving from hosts specified in the restrict command are ignored. Neither queries nor time server polls are answered.
noserve All NTP packets with a mode not equal to 6 or 7 are ignored. Time service isrejected, but queries are allowed.
notrust The local xntpd daemon does not perform any synchronization due to NTP packets received from hosts specified in the restrict command.
Example
# ntp.conf # # server 127.127.1.0 #own clock server 132.23.4.121 prefer #time server server 139.25.24.12 #VM2 server 139.25.109.118 #linux pc # # access control: # by default, ignore all packets # restrict default ignore # # don't trust servers on local net # restrict 139.25.0.0 mask 255.255.0.0 notrust # # the above defined servers are unrestricted # restrict 127.127.1.0 #own clock restrict 132.23.4.121 #time server restrict 139.25.24.12 #VM2 restrict 139.25.109.118 #linux pc

U41095-J-Z125-4-76 295
NTP Startup and shutdown of NTP
fudge statement
Clocks can be configured via the server statement (see page 292). A further statement for configuring a clock is the fudge statement. The fudge statement must immediately follow the server statement that addresses the clock.
fudge 127.127.t.u[ stratum stratum]
t identifies the type of clock.
u is type-specific. The local system clock is specified with the pseudo IP address 127.127.1.0 and is the only clock possible in BS2000/OSD.
stratum Integer that specifies the number of stations via which the local xntpd daemon can obtain a high-precision timestamp from an external clock. stratum can be significant in the configuration of the local system clock. stratum servers of stratum 1 have direct access to external time signals. Servers which receive their timestamps from stratum-1 servers are stratum-2 servers, and so on.
The value of stratum is the major criterion used by xntpd to select one server from several as the client. The local system clock is also a "server" for xntpd. The default value for its stratum is 3. By specifying a lower or higher value for its stratum in the fudge statement, you can thus assign the local system clock a higher or lower preference than the other servers.
Example (server mode with own clock)
# ntp.conf##server 127.127.1.0 #own clockfudge 127.127.1.0 stratum 1

296 U41095-J-Z125-4-76
Startup and shutdown of NTP NTP
peer statement
The peer statement places the local xntpd in “symmetrically active” mode as opposed to the remote server. In this mode:
● the local server can be synchronized by the remote server, and
● the remote server can be synchronized by the local server.
This setting is meaningful in a network of servers in which, for example, either the local or the remote server may have the better time source, depending on the load.
peer host_addr[ version #][ prefer][ minpoll minpoll][ maxpoll maxpoll]
host_addr Host address in dotted notation, which specifies the server for which the local xntpd daemon is to be set to "symmetrically active" mode.
version # Version number for outgoing NTP packets. The possible values for # are 1, 2 or 3.Default: version 3
prefer This option can be used to mark the host specified with host_addr as "preferred" and thus select it for synchronization over other candidates that have the same values.
minpollInteger that specifies the minimum polling interval for NTP messages as 2minpoll seconds.Default: 6 (64 sec)Values permitted in BS2000/OSD: ≥ 6 (64 sec)
maxpollInteger that specifies the maximum polling interval for NTP messages as 2minpoll seconds.Default: 10 (1024 sec)Values permitted in BS2000/OSD: up to 14 (approx. 4 hours, 30 minutes)

U41095-J-Z125-4-76 297
NTP Startup and shutdown of NTP
broadcast statement
The broadcast statement places the local server xntpd in broadcast mode. In this mode, the local server periodically sends broadcast messages to clients with a specific address.
broadcast host_addr[ version #][ prefer][ minpoll minpoll][ maxpoll maxpoll]
host_addr Host address, in dotted notation, which specifies the clients to which the local xntpd daemon is to send broadcast messages periodically.
version # Version number for outgoing NTP packets. The possible values for # are 1, 2 or 3.Default: version 3
prefer This option can be used to mark the host specified with host_addr as "preferred" and thus select it for synchronization over other candidates that have the same values.
minpollInteger that specifies the minimum polling interval for NTP messages as 2minpoll seconds.Default: 6 (64 sec)Values permitted in BS2000/OSD: ≥ 6 (64 sec)
maxpollInteger that specifies the maximum polling interval for NTP messages as 2minpoll seconds.Default: 10 (1024 sec)Values permitted in BS2000/OSD: up to 14 (approx. 4 hours, 30 minutes)

298 U41095-J-Z125-4-76
Startup and shutdown of NTP NTP
broadcastclient statement
The broadcastclient statement instructs the local xntpd daemon to synchronize the local system time using incoming NTP broadcasts. In order to calculate the local system time, the message runtime with respect to the server is required. To measure this, a brief data exchange is initiated with the broadcast server when the first broadcast message is received.
broadcastclient
broadcastdelay statement
The xntpd daemon usually balances out message runtimes between a broadcast server and the client automatically by using a message protocol specially intended for this purpose. If this calibration fails, the xntpd uses a default value of 0.004 seconds. The broadcastdelay statement can be used to define some other value.
broadcastdelay delaytime
delaytime Specifies the value, in seconds, to offset the message runtime between the broadcast server and client.Default: 0.004

U41095-J-Z125-4-76 299
NTP Startup and shutdown of NTP
driftfile statement
The driftfile statement specifies the file containing the precision drift of the local oscillator. This value is used by the local xntpd daemon to calculate an adjustment for local frequency fluctuations.
driftfile filename
filename Specifies the file containing the precision drift of the local oscillator.
If the filename file or the driftfile statement does not exist, the drift is initially assumed to be 0. The local NTP daemon xntpd then calculates the drift and saves it as a floating-point value in multiples of 10-6 (parts per million, ppm). This saved value is used with a restart.
8.3.4 Startup options of the NTP daemon xntpd
xntpd is the NTP daemon process which manages the local time of an OSD/POSIX system, sometimes in conjunction with internet standard servers.
The NTP daemon xntpd should be started with startntp. The options described below can be entered in the /etc/xntpd.params file.
The configuration parameters for xntpd are read from a configuration file (default:/etc/ntp.conf) when the daemon is started. If xntpd is used only as a broadcast client,a configuration file is not needed. Internal variables and/or configuration parametersof xntpd can be displayed with the ntpq program.
The local xntpd can be configured to one of the following modes with respect to the remote hosts:
– Symmetrically active/passive– Client – Broadcast client
xntpd
[-bdg] [-c <conffile>] [-f <driftfile>] [-l <logfile>] [-p <pidfile>] [-r <broadcastdelay>]

300 U41095-J-Z125-4-76
Startup and shutdown of NTP NTP
A broadcast client automatically recognizes remote servers and calculates time corrections on the basis of the message runtimes between the server and the client. Broadcast clients can be completely configured by means of parameters in the command line.
Options
-bxntpd is a broadcast client, i.e. it receives NTP broadcasts and synchronizes the local time accordingly.
-dStarts xntpd in debugging mode. This option can be specified more than once for more extensive debugging messages. If the <logfile> option (see below) is not set, all debugging messages are written to the /var/adm/messages file.
-gSets xntpd to always correct the local system time on the basis of a received timestamp. Without this option, the local system time is corrected only if it differs from the received timestamp by no more than 1000 seconds.
-c <conffile>Refers to the name of the configuration file.Default: /etc/ntp.conf
-f <driftfile>Specifies the name of the drift file (see page 299).
-l <logfile>Specifies the name of the log file for syslog messages.
-p <pidfile>Specifies the file in which xntpd stores its process ID.
-r <broadcastdelay>xntpd usually balances out message runtimes between a broadcast server and the client automatically. If this calibration fails, the value specified (in seconds) as the broadcastdelay is used instead (see page 298).
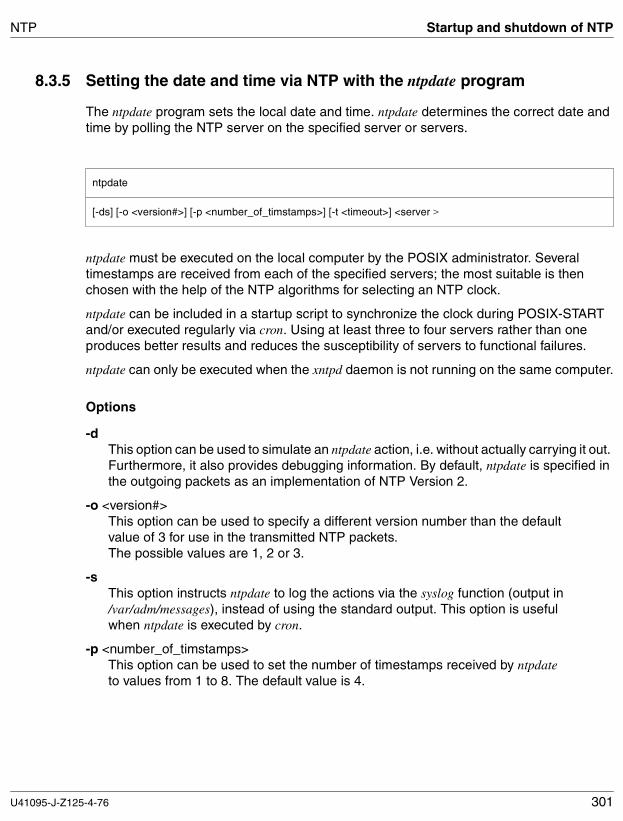
U41095-J-Z125-4-76 301
NTP Startup and shutdown of NTP
8.3.5 Setting the date and time via NTP with the ntpdate program
The ntpdate program sets the local date and time. ntpdate determines the correct date and time by polling the NTP server on the specified server or servers.
ntpdate must be executed on the local computer by the POSIX administrator. Several timestamps are received from each of the specified servers; the most suitable is then chosen with the help of the NTP algorithms for selecting an NTP clock.
ntpdate can be included in a startup script to synchronize the clock during POSIX-START and/or executed regularly via cron. Using at least three to four servers rather than one produces better results and reduces the susceptibility of servers to functional failures.
ntpdate can only be executed when the xntpd daemon is not running on the same computer.
Options
-dThis option can be used to simulate an ntpdate action, i.e. without actually carrying it out. Furthermore, it also provides debugging information. By default, ntpdate is specified in the outgoing packets as an implementation of NTP Version 2.
-o <version#>This option can be used to specify a different version number than the default value of 3 for use in the transmitted NTP packets.The possible values are 1, 2 or 3.
-sThis option instructs ntpdate to log the actions via the syslog function (output in /var/adm/messages), instead of using the standard output. This option is usefulwhen ntpdate is executed by cron.
-p <number_of_timstamps>This option can be used to set the number of timestamps received by ntpdate to values from 1 to 8. The default value is 4.
ntpdate
[-ds] [-o <version#>] [-p <number_of_timstamps>] [-t <timeout>] <server >

302 U41095-J-Z125-4-76
Startup and shutdown of NTP NTP
-t <timeout>This option can be used to specify the time to wait for an answer. The timeout isrounded up or down to a multiple of 0.2 seconds. The default value is 1 second.
<server>Specifies one or more computers from which the timestamp is to be requested.

U41095-J-Z125-4-76 303
NTP Administration and operation
8.4 Administration and operation
The administration and operation of NTP essentially involves querying the NTP status with the NTP program ntpq.
The NTP program ntpq can be used to query the current status of NTP servers via control messages. It can be optionally executed in interactive mode or controlled via command-line options. When executing ntpq interactively with commands, a distinction must be madebetween the internal commands of ntpq and the commands for control messages.
8.4.1 Querying the NTP status via command-line options
If one or more statements are specified on the command line, each of these statements is sent to the NTP servers running either on the host specified in the command line arguments or, by default, on the local host (localhost). If none of the statements is specified, ntpq attempts to read commands from the standard input and execute them on the NTP server that is running on the first host specified in the command line or, by default (if no other host is specified), on the local host.
ntpq uses special packets to communicate with the NTP server and can therefore also be used to query any compatible NTP servers on the network.
The command-line options are described below. If a command-line option other than-i or -n is specified, the queries involved are sent directly to the named hosts.Otherwise, ntpq tries to read commands from the standard input interactively.
ntpq
[-inp][-d][-c <command>] [<server>] [...]

304 U41095-J-Z125-4-76
Administration and operation NTP
Options
-iPlaces ntpq in interactive mode. Commands are read from the standard input.
-nOutputs all host addresses in dotted notation, instead of converting them to host names.
-pPrints a list of partners known to the server (NTP partner hosts and clocks) as well as an overview of their statuses. This is the equivalent of the interactive command peers.
-dActivates the output of debugging data.
-c <command>[ <host>] ... The following argument is interpreted as a command and added to the list of commands to be executed on the specified hosts. The -c option can be specified any number of times.
<server> Specifies the NTP server for which the current status is to be determined.
8.4.2 Querying the NTP status interactively with commands
The commands for interactive queries consist of a keyword, followed by 0 to 4 arguments. You only have to specify as many characters of the keyword as needed to uniquely identify the command. The output generated by a command is normally written to the standard output; however, you can optionally have the output of individual commands piped to the file filename by appending >filename to the command.
The following distinction must be made between commands:
● commands that are executed internally by the ntpq program itself (ntpq-internal commands).
● commands that cause NTP requests to be sent to an NTP server.

U41095-J-Z125-4-76 305
NTP Administration and operation
8.4.2.1 Querying the NTP status with internal commands of ntpq
The following commands are executed by the ntpq program itself.
Show information on command keywords
?[ keyword]
A “?” on its own outputs a list of all the command keywords known to ntpq. A “?” followed by a command keyword provides information on the function and syntax of the command.
Specify a time limit for answers to server queries
timeout milliseconds
The timeout command specifies a timeout for answers to server queries (in milliseconds). Since ntpq repeats each query on exceeding the timeout, the total waiting period is twice the length of the specified timeout.Default: 5000 milliseconds.
Specify host name for subsequent queries
host hostname
The host command specifies the host to which subsequent queries are to be sent. The hostname can be specified as either a computer name or a numerical address.

306 U41095-J-Z125-4-76
Administration and operation NTP
Show host names with ntpq output
hostnames yes | hostnames no
If hostname yes is specified, the host names are shown in the ntpq output. If hostname no is specified, numerical addresses are shown instead of the host names.
Default: hostname yes (unless changed with the -n switch in the command line).
Show unformatted answers of the remote server
raw
The answers of the remote server to the query commands are shown as received. The only formatting/interpretation carried out on the data is the conversion of non-ASCII data to a readable format.
Show formatted answers to query commands
cooked
The answers to the query commands are interpreted, and the values of the variables recognized by the server are converted to a user-friendly format. Variables that cannot be interpreted by ntpq are identified with a “?”.

U41095-J-Z125-4-76 307
NTP Administration and operation
Set version number
ntpversion 1 | ntpversion 2 | ntpversion 3
Sets the version number to be used by ntpq in NTP packets. Please note that mode 6 control messages (and, of course, the corresponding mode) do not exist in versions prior to NTPVersion 2.Default: ntpversion 3
Enable debugging function
debug more | debug less | debug no
Enables or disables the internal debugging function of the query command.
debug more Increments the debug level by 1, thus returning more diagnostic information.
debug less Reduces the debug level by 1, thus returning less diagnostic information.
debug no Turns off the debugging function.
Exits ntpq
quit
Exits the ntpq program.

308 U41095-J-Z125-4-76
Administration and operation NTP
8.4.2.2 Querying the NTP status with commands for control messages
Each partner that is known to a server has a 16-bit association identifier consisting of an integer. NTP control messages with partner variables must use this association identifier to identify which partner the values belong to.
By means of commands for control messages, one or more NTP messages are sent to the server, and the returned data is output in partially formatted form. Most of the commands output a single message and also expect a single answer. One exception is the peers command, which sends a preprogrammed sequence of messages.
Request and display association IDs and partner statuses
associations
The associations command requests a list of the association IDs and partner statuses for the partners of the queried server, and outputs this list in columns. The first column contains a sequential number for the associations (starting with 1); the second column contains the actual association ID returned by the server, and the third column contains the status word for the partner. These are followed by several columns with data that was decoded from the status word. The data returned by the associations command is buffered internally in ntpq.
Send request to read a status
pstatus assocID
The pstatus command sends a request to the server to read the status for the specified association ID (assocID). The returned names and values of the partner variables are output.

U41095-J-Z125-4-76 309
NTP Administration and operation
Request a list of the clock variables of the server
clockvar[ assocID]
- - - - - - - - - - - - - - - - - - - - - - - - - - - - - - - - - - - - - - - - - - - - - - - - - - - - - - - - - - - - - - - - - -
cv[ assocID]
The clockvar command, or cv for short, requests a list of the clock variables of the server. Servers on which a clock is configured react positively to this request. assocID specifies the association ID. If the association ID is not specified or is specified as “0”, the request for variables applies to the internal NTP system clock of the server. Otherwise, the association ID is interpreted as the partner association ID of a clock, and the related variables are displayed. If the variable list is not specified, the server returns a standard list of variables and values.
Request a list of the server’s peers, including additional information
peers
The peers command requests a list of the server’s partners, including an overview of the status of each partner. The information in the overview includes:
– the address of the remote partner, – the reference ID (0.0.0.0 if the reference ID is unknown), – the stratum of the remote partner, – the type of partner (local, unicast or broadcast), – an indication of when the last packet arrived, – the polling interval (in seconds), – the accessibility register (as an octal number), – the current message runtime, – the drift and variance of the partner (both in seconds).
The character in the left margin indicates the significance of this partner in the clock selection process.

310 U41095-J-Z125-4-76
Administration and operation NTP
The meanings of the codes are as follows:
sp deleted because of a high stratum and/or negative plausibility checks
xtime is invalid since the drift is too large
.selected from the end of the candidate list
- deleted from the cluster algorithms
+added to the final selection group
# selected for synchronization, but the synchronization distance exceeds the maximum
* selected for synchronization
o selected for synchronization; external clock
The host field may contain either a host name, an IP address or the name of a clock. If hostnames no (see also page 306) is specified, only IP addresses are displayed.

U41095-J-Z125-4-76 311
NTP Diagnosis and maintenance of NTP
8.5 Diagnosis and maintenance of NTP
The following sections provide you with information on the logging function and trace functionality of NTP.
8.5.1 Logging function
The NTP components store their logging information in the /var/adm/messages file.
The ntp entries of this logging file have the following basic format:
Apr 27 16:31:24 LOG_NOTICE syslog[]: xntpd: <message text>
The date and time is followed by a keyword that classifies the message.
The NTP daemon uses the following keywords:
LOG_INFO Information on the program: Copyright and Version, as well as program outputs with the DIAGNOSE ON option
LOG_NOTICE Information from administration procedures;details on the operating status of the daemon
LOG_DEBUG Program outputs with the DIAGNOSE ON option
LOG_ERR Error messages of the NTP daemon
The classification is followed by the ID as a system message (syslog) with information on the relevant process ID (PID). If no valid PID is available for the message output (e.g. for a message output during the daemon startup procedure), an empty parenthesis expression is displayed. The name of the daemon appears after the PID, enclosed within colons (:). The actual message text then follows.
Logging messages on entering the startdns command
(1) xntpd: ntp-daemon is starting with params > <(2) in.xntpd[1700]: xntpd version=3.4o (beta multicast); Tue Sep 5 08:18:42 MDT 1995 (1)(3) in.xntpd[1700]: COPYRIGHT (C) Siemens AG 1998 (4) in.xntpd[1700]: All rights reserved (5) in.xntpd[1700]: xntpd: version 2.0 Sourcekorrekturstand A00 started (6) in.xntpd[1700]: precision = 27 usec

312 U41095-J-Z125-4-76
Diagnosis and maintenance of NTP NTP
Meaning of the logging messages:
(1) Output of the startup procedure before the NTP daemon is started(2) Initialization messages on starting and restarting the NTP daemon(3) (4) Copyright message on starting the NTP daemon(5) Message of the NTP daemon on completing the initialization(6) Calculated precision.
Logging messages on entering the restartdns command
(1) signal SIGTERM send to ntp-daemon PID=94(2) ntp-daemon is starting with params > <(3) ......
Meaning of the logging messages:
(1) Output of the restart procedure before starting the NTP daemon(2) ...
Logging messages on entering the stopdns command
(1) signal SIGTERM send to ntp-daemon PID=121
Meaning of the logging messages:
(1) Output of the stop procedure before the NTP daemon is terminated.
Logging messages on entering the restartdns command when no NTP daemon is running
(1) no ntp-daemon available for restart(2) ntp-daemon is starting with params > <...
Meaning of the logging messages:
(1) Output of the restart procedure before the NTP daemon is started(2) ...
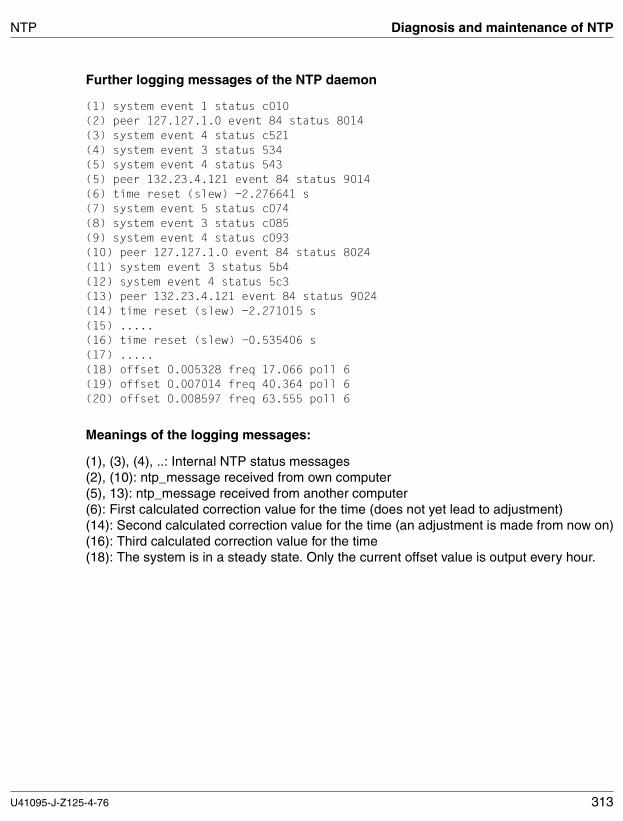
U41095-J-Z125-4-76 313
NTP Diagnosis and maintenance of NTP
Further logging messages of the NTP daemon
(1) system event 1 status c010(2) peer 127.127.1.0 event 84 status 8014(3) system event 4 status c521(4) system event 3 status 534(5) system event 4 status 543(5) peer 132.23.4.121 event 84 status 9014(6) time reset (slew) -2.276641 s(7) system event 5 status c074(8) system event 3 status c085(9) system event 4 status c093(10) peer 127.127.1.0 event 84 status 8024(11) system event 3 status 5b4(12) system event 4 status 5c3(13) peer 132.23.4.121 event 84 status 9024(14) time reset (slew) -2.271015 s(15) .....(16) time reset (slew) -0.535406 s(17) .....(18) offset 0.005328 freq 17.066 poll 6(19) offset 0.007014 freq 40.364 poll 6(20) offset 0.008597 freq 63.555 poll 6
Meanings of the logging messages:
(1), (3), (4), ..: Internal NTP status messages(2), (10): ntp_message received from own computer(5), 13): ntp_message received from another computer(6): First calculated correction value for the time (does not yet lead to adjustment)(14): Second calculated correction value for the time (an adjustment is made from now on)(16): Third calculated correction value for the time(18): The system is in a steady state. Only the current offset value is output every hour.

314 U41095-J-Z125-4-76
Diagnosis and maintenance of NTP NTP
8.5.2 Trace functionality of NTP
The trace functionality of NTP is provided by the ntptrace command.
8.5.2.1 ntptrace - Trace a chain of NTP servers back to the prevailing clock
ntptrace determines the clock to which a specific NTP server refers for its time and traces the chain of NTP servers back to the prevailing clock. If no arguments are specified, the command begins with localhost.
Example of an ntptrace output:
% ntptracelocalhost: stratum 4, offset 0.0019529, synch distance 0.144135server2.bozo.com: stratum 2, offset 0.0124263, synch distance 0.115784usndh.edu: stratum 1, offset 0.0019298, synch distance 0.020993, refid 'WWVB'
The fields (from left to right) in each line are: the host name, the host stratum, the time offset between this host and the local host (as calculated by ntptrace; this value is therefore not always 0 for localhost), the host’s synchronization distance and (only forservers of stratum 1) the ID of the external clock. All times are specified in seconds. (The synchronization distance is a measure of the message runtime to the partner.)
OPTIONS
-dActivates output of debugging data.
-nIP addresses are specified instead of the host names. This may be necessary if no name server is running.
-vReturns detailed information on the NTP servers.
-o <version#>Uses NTP packets of the specified version to communicate with the server.The default value for version# is 3.
ntptrace
[-dnv] [-o <version#>] [-r <retries>] [-t <timeout>] [<server>]

U41095-J-Z125-4-76 315
NTP Diagnosis and maintenance of NTP
-r <retries>Sets the number of retries for each host. Default: 5
-t <timeout>Sets the timeout for the response to a request. Default: 2
<server>Specifies the server from which the chain to the prevailing clock should be traced back.Default: localhost

316 U41095-J-Z125-4-76
Diagnosis and maintenance of NTP NTP
U41095-J-Z125-4-76 317
9 OpenSSHThis chapter is based on the manual pages (man pages) of OpenSSH and describes the OpenSSH server. The OpenSSH client is described in the interNet Services User Guide.
The description provided here has been shortened to contain only the parts relevant to BS2000/OSD. At certain places in the chapter, such as in the descriptions of options, the OpenSSH man pages are referred to as only these contain the description of the most up-to-date versions. You can find the OpenSSH man pages on the Internet at http://www.openssh.org/manual.html or, after you have installed the component OpenSSH on your server,
● under <installationpath>/readme/TCP-IP-SV.openssh/html/ as an HTML file,
● under <installationpath>/readme/TCP-IP-SV.openssh/pdf/ as a PDF file,
● under <installationpath>/readme/TCP-IP-SV.openssh/text/ as a text file.
The default installation path is: /opt/TCP-IP-SV/openssh
When the “OpenSSH man pages” are referred to in the course of this chapter, these sources are meant. The man pages supplied with the product should preferably be used as these man pages contain the BS2000-specific adaptations (changed path names, extended functionality, etc.).
SSH (Secure Shell) is a cryptographic protocol for performing the following tasks:
● Login on a remote computer
● Interactive / non-interactive command execution on a remote computer
● File transfer between different computers in a network
SSH designates not just the protocol itself but also concrete implementations.
Programs such as telnet, rlogin, rsh and rcp do cover the range of tasks mentioned, but they have considerable security gaps. Thus, for example, all the communication, including passwords, is generally transferred unencrypted.
i

318 U41095-J-Z125-4-76
Concept of OpenSSH OpenSSH
SSH guarantees cryptographically secure communication over insecure networks and offers comprehensive security through
● reliable, mutual authentication of the communication partners,
● integrity and confidentiality of the data exchanged.
One of the intentions in developing SSH was to replace the r utilities rlogin, rsh and rcp. SSH is available in the protocol versions SSH 1 and SSH 2.
OpenSSH is the free version of SSH (i.e. there is no license fee) which supports the SSH protocol versions 1.3, 1.5 and 2.0. The basis for porting OpenSSH to POSIX is provided by OpenSSH V3.8.
9.1 Concept of OpenSSH
OpenSSH is the secure alternative to the r utilities rlogin, rcp and rhs, and the programs telnet and ftp. In contrast to the aforementioned programs, OpenSSH encrypts all network traffic (including passwords) and thus prevents eavesdropping, connection hijacking, and other attacks at network level. Furthermore, OpenSSH supports a raft of tunneling variants and a wide range of authentication methods.
9.1.1 Component parts of the OpenSSH protocol suite
The OpenSSH protocol suite comprises the following programs and commands:
● On the server side: Server program sshd (see page 326)
● On the client side (see the interNet Services User Guide):
– Client program ssh or slogin: replaces rlogin and telnet.
– scp: replaces rcp.
– sftp: replaces ftp.
● Administration utilities (see the interNet Services User Guide):
– ssh-agent
– ssh-add
– ssh-keygen
– ssh-keyscan

U41095-J-Z125-4-76 319
OpenSSH Concept of OpenSSH
To permit secure communication of Windows systems with BS2000/OSD via SSH, the open source software PuTTY, for example, provides the functionality of the client side of OpenSSH.
9.1.2 Network security with OpenSSH
OpenSSH protects against the following threats to network security:
● IP spoofing
In the event of IP spoofing a remote computer sends packets with a counterfeited sender address. OpenSSH even provides protection against a spoofer in the local network who claims to be your router for outgoing messages.
● DNS spoofing
In the event of DNS spoofing an attacker falsifies the Resource Records (RR) in the DNS Name Server.
● Connection hijacking
● Eavesdropping
Unauthorized tapping into unencrypted passwords and other plaintext messages.
● Data corruption
OpenSSH protects against unauthorized reading and data corruption by encrypting the network traffic. OpenSSH prevents IP spoofing and DNS spoofing by authenticating the communication partners.
Thus an attacker who has obtained control over the network can only force the discon-nection of OpenSSH. However, the attacker cannot
● decrypt messages,
● intercept messages and read them in again,
● engage in connection hijacking.
i

320 U41095-J-Z125-4-76
Concept of OpenSSH OpenSSH
9.1.3 Features of OpenSSH
OpenSSH is characterized by the following features:
● Strong encryption
● Automatic and transparent encryption
● Strong authentication
● Interoperability
● Transmission of binary data and data compression
● Agent forwarding
● TCP forwarding
Strong encryption
OpenSSH supports the encryption algorithms 3DES, Blowfish, AES and Arcfour:
● 3DES is a tried and tested encryption algorithm for strong encryption.
● Blowfish is a high-speed block encryptor for users who require a particularly fast encryption method.
● AES is also a high-speed block encryptor. AES satisfies the US Federal Information Processing Standard (FIPS) Advanced Encryption Standard and was developed as a replacement for DES.
● Arcfour is a high-speed stream encryptor.
Automatic and transparent encryption
By default, encryption of all communication between the OpenSSH client and the OpenSSH server is performed automatically and transparently. A symmetrical encryption method is used for this purpose, for example Blowfish or 3DES.
Strong authentication
Authentication of the OpenSSH server to the OpenSSH client is based on the asymmetrical encryption algorithms RSA and DSA. Several methods are available for authenticating the OpenSSH client to the OpenSSH server (see page 330).

U41095-J-Z125-4-76 321
OpenSSH Concept of OpenSSH
Interoperability
OpenSSH Version 1 supports SSH 1.3 and SSH 1.5 and thus permits communication with most Unix and Windows operating systems and most of the other SSH implementations. OpenSSH Version 2 also supports SSH 2. Interoperability between the clients and servers of the two OpenSSH versions is guaranteed.
It is recommendable to work with SSH protocol Version 2 as SSH protocol Version 1 manifests security gaps and, for example, does not protect reliably against “man-in-the-middle” attacks. (You specify the protocol version in the /etc/ssh/sshd_config configuration file using the parameter protocol 2.)
Transmission of binary data and data compression
Transmission of binary data via the network is supported. Optional data compression before encryption enhances the performance when transmitting over low-speed network connec-tions.
Agent forwarding
In the case of agent forwarding the authentication agent (see the interNet Services User Guide) which runs on your local computer administers your authentication keys (RSA/DSA). OpenSSH can automatically forward the connection to the authentication agent via any network connection. The authentication keys then only need to be kept on your local computer, but not on any other computer in the network.
Port forwarding (TCP forwarding)
Port forwarding makes insecure TCP/IP connections secure by forwarding (tunnelling) TCP/IP connections to a remote computer using an encrypted protocol. Port forwarding implements mapping of a local port on the client computer onto a port on the remote computer.
i

322 U41095-J-Z125-4-76
Installing and uninstalling OpenSSH OpenSSH
9.2 Installing and uninstalling OpenSSH
In addition to this chapter, please also refer to the Release Notice supplied with the product.
9.2.1 Installing OpenSSH
In this context please also consult the Release Notice supplied with the product interNet Services.
The different components of the interNet Services software package are installed as a POSIX program package by the POSIX installation program (see the manual “POSIX Ba-sics for Users and System Administrators”).
For the installation and operation of the OpenSSH suite, the PLAM library SINLIB.TCP-IP-SV.030.openssh must be shareable.
/START-POSIX-INSTALLATION
Function: Install POSIX program packages (IMON support: Y)Product name: TCP-IP-SVPackage name: OPENSSH
If you install OpenSSH using the POSIX installation program, you will first be queried about the installation path <installationpath>. It is recommendable to use the default setting /opt/TCP-IP-SV/openssh. If you specify a different path name, the path /opt/TCP-IP-SV/openssh is created as the symbolic link to the path name specified by you when the post-installation script is executed.
The POSIX installation program then checks whether the /opt file system has sufficient memory and reads all files from the PLAM library into the POSIX file system.

U41095-J-Z125-4-76 323
OpenSSH Installing and uninstalling OpenSSH
Executing the post-installation script
After all files have been read in, a post-installation script is started automatically which handles the computer-specific setup of the OpenSSH components.
In detail, the post-installation script performs the following activities and logs their execution on the console:
1. The directories /etc/tcpipsv/openssh, /opt/SMAWPlus/etc and /usr/local/etc are searched for SSH host key files of an earlier installation of TCP-IP-SV:openssh. The first host key file (if one exists) of each directory is transferred to the /etc/ssh/ directory.
The following three pairs of host key files (private/public keys) are searched for:
● ssh_host_key and ssh_host_key.pub (RSA1)
● ssh_host_rsa_key and ssh_host_rsa_key.pub (RSA)
● ssh_host_dsa_key and ssh_host_dsa_key.pub (DSA)
2. The /etc/tcpipsv/openssh directory is searched for the ssh and sshd configuration files (ssh_config, sshd_config) of an earlier installation of TCP-IP-SV:openssh. If no configu-ration files can be found, the configuration file supplied with the product is copied.
3. The /var/run directory, if it does not exist, is generated as it is required for the PRNGD socket and the process ID file of the OpenSSH server sshd. This directory is contained by default in the newer Unix operating systems (but not yet in POSIX).
4. If for installation you specified an installation path other than the default installation path /opt/TCP-IP-SV/openssh, the default installation path will be changed in the startup scripts to the installation you have specified, and /opt/TCP-IP-SV/openssh will be set up as the symbolic link to this installation path.
5. If not all three host key files were found in step 1), these are now generated. The ssh-keygen utility (see the interNet Services User Guide) is called up to three times for this purpose (for RSA1, RSA, DSA) to generate a non-repeatable, random host key.
6. If no POSIX group with the group ID 22 exists, this is now generated and entered in the /etc/group file with the group name “sshd”.

324 U41095-J-Z125-4-76
Installing and uninstalling OpenSSH OpenSSH
7. If no user ID SYSSSHD exists as yet, the post-installation script now creates this. In addition, an address space limit of 32 MB is defined, and a POSIX user ID 22 and a POSIX group ID 22 assigned. For this purpose the post-installation script issues the following commands:
/ADD-USER USER-ID=SYSSSHD,ADDR-SP-LIM=32,-
/ ACC-ATT=*P(ACC=SYSACC,CPU-LIM=*MAX,POSIX=*YES),-
/ MAIL-ADDR='Privilege Separation user id for OpenSSH',-
/ LOGON-PASSWORD=${PASSWORD}
/SET-JOB-STEP
/MOD-USER USER-ID=SYSSSHD,ADDR-SP-LIM=32,-
/ ACC-ATT=*M(ACC=SYSACC,CPU-LIM=*MAX,POSIX=*YES),-
/ LOGON-PASSWORD=${PASSWORD}
/MOD-POS-USER-ATTR USER-ID=SYSSSHD,USER-N=22,GROUP-N=22,-
/ DIRECTORY='/var/empty',-
/ PROGRAM='/bin/false',-
/ COMM='Privilege Separation user id for OpenSSH'
8. In the startup file /etc/profile of the POSIX shell the PATH specification is extended to the <installationpath>/bin directory (and <installationpath>/sbin for the user with the user ID 0 (SYSROOT or TSOS)). If a C shell (csh or tcsh) is installed, an analogous procedure is followed using the icsh startup file (/etc/.login or /etc/csh.login).
9. If ADDRESS-SPACE-LIMIT < 32 MB is specified for SYSROOT, a warning is issued on the console.
10. If no POSIX-RLOGIN-DEFAULT is set for SYSROOT, a corresponding error message is issued on the console.
11. If no general read permission exists for the installation library (e.g. SINLIB.TCP-IP-SV.030.OPENSSH), a corresponding error message is issued on the console.
U41095-J-Z125-4-76 325
OpenSSH Installing and uninstalling OpenSSH
12. If no serious faults are detected, the general POSIX start script is now called for OpenSSH, and this script starts the sshd daemon under SYROOT. (To call the POSIX start script: /etc/init.d/TCP-IP-SV.openssh start)
The /etc/init.d/TCP-IP-SV.openssh start script automatically determines the maximum permissible values for JOB-CLASS, ACCOUNT, START and MAXIMUM CPU LIMIT for SYSROOT. Using these values the script starts an /ENTER job with the job name SSHLOGIN.
The sshd daemon logs important messages in the /var/adm/messages file via the syslog mechanism. In addition, problems which occur when the ENTER job is started are recorded in the /var/adm/opensshd_startup.log file.
In contrast to other installations in POSIX, a daemon is automatically started in the TCP-IP-SV:prngd and TCP-IP-SV:openssh packages. Thus the daemon need not be configured beforehand and then be started “manually”. Such daemons which are started automatically are always started under the SYSROOT ID in POSIX.
9.2.2 Uninstalling OpenSSH
When you begin uninstalling OpenSSH a pre-remove script is executed which saves the modified configuration data (host key files, modified configuration files) in the /etc/tcpipsv/openssh/ directory. Unmodified configuration files are not saved. From this directory the files mentioned are once more copied into the configuration directory /etc/ssh/ when installation takes place again.
If you do not wish to use the configuration data of the old installation as a basis when you reinstall OpenSSH at some future time, you must completely remove the content of the /etc/tcpipsv/openssh/ directory:# rm -fr /etc/tcpipsv/openssh
i
i

326 U41095-J-Z125-4-76
OpenSSH server daemon sshd OpenSSH
9.3 OpenSSH server daemon sshd
sshd (OpenSSH Daemon) is the daemon program for OpenSSH.
9.3.1 Configuring the OpenSSH server daemon sshd
sshd can be configured optionally
● with the aid of command line arguments which you specify when calling sshd (see page 327),
● with the aid of a configuration file.
The values specified as command line arguments have priority over the corresponding values in the configuration file.
Configuration file of sshd
By default sshd reads its configuration data from the /etc/ssh/sshd_config file. If you want to use a different configuration file, specify this with the parameter -f in the command line when you start sshd.
If a SIGHUP hangup signal is received, sshd reads the configuration file again and restarts. Here sshd is executed under the same name under which it was started, e.g. /opt/TCP-IP-SV/openssh/sbin/sshd.
In POSIX a restart will only be successful if no sshd session is currently active. (An active sshd session occupies the TCP/IP port and prevents the restart.)
Syntax of the configuration file
The configuration file of sshd must comply with the following syntax:
● In each line the file contains a pair comprising keyword and associated argument or associated argument list:
– For keywords no distinction is made between upper and lower case.
– Arguments are case-sensitive.
● Empty lines and lines beginning with “#” are interpreted as comments.
A detailed description of the configuration options is provided in the OpenSSH man pages.
i

U41095-J-Z125-4-76 327
OpenSSH OpenSSH server daemon sshd
9.3.2 Starting sshd
By default, sshd is started in POSIX by the startup script /etc/rc2.d/S97TCP-IP-SV.openssh. In this startup script the sshd call is issued with the parameter -f <config_file>. This specifies the configuration file from which the sshd configuration data is read. After startup, sshd waits at port 22 for connection requests from the OpenSSH client.
Alternatively you start sshd under SYSROOT with the following command:
sshd -words [-46Ddeiqt] [-b <bits>] [-f <config_file>] [-g <login_grace_time>] [-h <host_key_file>] [-k <key_gen_time>] [-o <option>] [-p <port>] [-u <len>]
A detailed description of the operands is provided in the OpenSSH man pages.
For each incoming connection request sshd generates a new child process. These sshd child processes implement key exchange, encryption, authentication, command execution and data exchange. The sshd implementation described here supports versions 1 and 2 of the OpenSSH protocol in parallel.
9.3.3 Internal procedure when setting up a connection between sshd and ssh
The procedure for setting up a connection between the OpenSSH Server sshd and the OpenSSH client ssh (see the interNet Services User Guide) differs depending on whether SSH protocol Version 1 or Version 2 is used.
Connection setup between sshd and ssh in SSH protocol Version 1
To enable sshd to receive connection requests from ssh, the following requirements must be met for sshd:
● A host key (RSA, generally 1024 bits) exists on the computer on which sshd is running (server computer). The host key is the public key in a pair of public / private keys and identifies the server. This requirement is already satisfied by installation in POSIX.
● In addition, when it starts, sshd generates a server key S (RSA, generally 768 bits) which is updated every hour and is never stored.
● SSH protocol Version 1 must be activated in the configuration file /etc/ssh/sshd_config (default: “Protocol 2,1”).

328 U41095-J-Z125-4-76
OpenSSH server daemon sshd OpenSSH
The following activities are performed for every ssh connection request:
1. sshd sends its two public RSA keys (host and server keys) to ssh.
2. ssh checks whether it knows sshd by comparing the RSA host key with the public keys in its own local database:
● If the RSA host key is contained in this database, the system continues with 3.).
● If the RSA host key is not contained in this database, ssh asks the user if he/she wishes to continue with connection setup.
Depending on the user’s response, ssh proceeds as follows:
– If the user responds with “no”, ssh aborts connection setup.
– If the user responds with “yes”, ssh “learns” the RSA host key by entering it in the database of keys which it knows. Afterward ssh continues with 3.).
3. ssh generates a 256-bit random number, encrypts this with both the host key and the public key of sshd and sends the result to sshd. Both sides use the encrypted random number as the session key with which all communication over the connection is encrypted with immediate effect.
4. Both sides use this random number as the session key for encrypting all communication in the current session. The rest of the session is encrypted using a conventional encryption algorithm. Currently Blowfish or 3DES (default) is used for this purpose.
5. ssh and sshd now conduct an authentication dialog in which ssh proves its identity and authorization to sshd (see the section “Authentication between OpenSSH client ssh and server sshd” on page 330).
sshd authenticates itself implicitly to ssh as it can only ascertain the session key generated and encrypted by ssh if it knows its private RSA/DSA keys.

U41095-J-Z125-4-76 329
OpenSSH OpenSSH server daemon sshd
Connection setup between sshd and ssh in SSH protocol Version 2
To enable sshd to receive connection requests from ssh, the following requirements must be met for sshd:
● A host key (RSA or DSA, generally 1024 bits) exists on the computer on which sshd is running (server computer). The host key is the public key in a pair of public / private keys and identifies the server. This requirement is already satisfied by installation in POSIX.
● Forward security is implemented by a Diffie-Hellman Key Agreement which results in a mutual session key.
● SSH protocol Version 2 must be activated in the configuration file /etc/ssh/sshd_config.
The following activities are performed for every ssh connection request:
1. sshd sends its host key and a list of the encryption algorithms it supports to ssh. The encryption methods that can be used at present are 128-bit AES, Blowfish, 3DES, CAST128, Arcfour, 192-bit AES and 256-bit AES.
2. ssh checks whether it knows sshd by comparing the RSA host key with the public keys in its own local database:
● If the RSA host key is contained in this database, the system continues with 3.).
● If the RSA host key is not contained in this database, the client proceeds as follows:
– DNS lookup for host keys only for RSA/DSA keys (not RSA1). If the configu-ration is suitable (VerifyHostKeyDNS Yes), ssh ascertains the RSA host key with the aid of a DNS request and a user query. If the query is answered with “no”, ssh aborts the connection. If the answer is “yes”, the client “learns” the RSA host key by entering it in the database of keys which it knows. Continue with 3.).
– Otherwise the connection is not set up.
3. ssh generates a 256-bit random number, encrypts this with both the host key and the public key of sshd, and sends the result to sshd together with details of the encryption method selected. Both sides use the encrypted random number as the session key with which all communication over the connection is encrypted with immediate effect.
Session integrity is guaranteed by a Message Authentication Code (MAC).
4. Both sides use this random number as the session key for encrypting all communication in the current session. The rest of the session is encrypted using a symmetrical encryption method. Currently 128-bit AES, Blowfish, 3DES, CAST128, Arcfour, 192-bit AES or 256-bit AES is used for this purpose. ssh selects the encryption algorithm from the list which it received from sshd together with the host key (see step 2).

330 U41095-J-Z125-4-76
OpenSSH server daemon sshd OpenSSH
5. The client and sshd now conduct an authentication dialog in which the client proves its identity and authorization to sshd.
Details on client authentication can be found in the section “Authentication between OpenSSH client ssh and server sshd” on page 330.
sshd authenticates itself implicitly to the client as it can only ascertain the session key generated and encrypted by the client if it knows its private RSA keys.
9.3.4 Authentication between OpenSSH client ssh and server sshd
Different methods are used for authenticating the OpenSSH client to the OpenSSH server depending on whether SSH protocol Version 1 or Version 2 is used.
Client authentication in the SSH protocol Version 1
SSH protocol Version1 supports the following methods for client authentication, it being possible to specifically admit or exclude some methods depending on the configuration:
1. rhosts authentication
2. rhosts RSA authentication
3. RSA-based authentication
4. Password authentication
The methods available in the actual configuration are used one after the other until a method has successfully provided authentication or until all methods have failed. The authentication methods are explained below.
1. rhosts authentication
rhosts authentication corresponds to authentication with the r utilities rlogin and rsh. Unlike the rlogin server, Sshd uses DNS host names rather than BCAM host names. The DNS host names are determined by reverse lookup from the IP address (see the section “BS2000/OSD-specific restrictions” on page 337).
CAUTION!
rhosts authentication is extremely insecure and should on all accounts be disabled by the administrator. In the default configuration of the OpenSSH server, rhosts authentication has consequently already been disabled.
!
U41095-J-Z125-4-76 331
OpenSSH OpenSSH server daemon sshd
Successful rhosts authentication merely requires a corresponding entry for the computer from which the user logs on in one of the following files:
● /etc/hosts.equiv or /etc/ssh/shosts.equiv
Syntactically both files have the same format and are searched in the specified order.
If an entry for the computer from which the user logs on exists in one of these files on the remote computer, and if the user names on both sides also match, the user may log on immediately.
● $HOME/.rhosts or $HOME/.shosts
Syntactically both files have the same format and are searched in the specified order.
If one of the two files exists in the $HOME directory of the user on the remote computer and if this file contains an entry with the name of the client server and the user name on this computer, the user may log on immediately.
2. rhosts authentication in conjunction with RSA-based authentication
With this method, rhosts authentication is complemented by an RSA-based authenti-cation of the client computer. The known keys of the client computer are stored in the files /etc/ssh/known_hosts and $HOME/.ssh/known_hosts of the OpenSSH server sshd.
rhosts authentication in conjunction with RSA-based authentication prevents IP and DNS spoofing.
3. RSA-based authentication
In the case of RSA-based authentication each user generates a pair of keys comprising the public and private keys for authorization purposes. The OpenSSH server knows the user’s public key if this key is stored in the server files /etc/ssh/known_hosts and $HOME/.ssh/known_hosts. Only the users themselves know their own private keys.
ssh handles the RSA authentication protocol automatically. The user generates the key pair by calling the OpenSSH basic tool ssh-keygen. RSA authentication can be performed most conveniently using the authentication agent ssh-agent. ssh-keygen and ssh-agent are described in the interNet Services User Guide.

332 U41095-J-Z125-4-76
OpenSSH server daemon sshd OpenSSH
4. Password authentication
If the other authentication methods fail, ssh requests a user password and sends this to the remote computer in encrypted form so that it can be checked.
If authentication is not successful with any of the above-mentioned methods, the OpenSSH client’s connection request is rejected.
SSH protocol Version 1 supports no mechanisms which ensure great integrity of the connection.
Client authentication in SSH protocol Version 2
SSH protocol Version 2 supports similar authentication methods to SSH protocol Version 1. When using the default value for the PreferredAuthentication option in the server configu-ration file sshd_config (see page 326), the OpenSSH client executes the following authenti-cation methods one after the other:
1. rhosts authentication
2. Public key authentication
3. Password authentication
The methods are applied one after the other until a method has successfully provided authentication or until all methods have failed.
Public key authentication is similar to RSA authentication and permits the use of RSA and DSA algorithms. The OpenSSH client signs the session ID with its private key ($HOME/.ssh/id_dsa or $HOME/.ssh/id_rsa) and sends the result to the OpenSSH server. The server checks whether the corresponding public key is contained in its $HOME/.ssh/authorized_keys file. If both keys exist and the signature is correct, the server accepts the connection.
SSH protocol Version 2 supports additional mechanisms which ensure confidenti-ality and integrity of the connection:
● Confidentiality is guaranteed by encrypting the data traffic using 3DES, Blowfish, CAST128 or Arcfour.
● Integrity is guaranteed by encrypting the data traffic using hmac-md5 or hmac-sha1.
i
i

U41095-J-Z125-4-76 333
OpenSSH OpenSSH server daemon sshd
Server authentication
The OpenSSH client ssh automatically maintains and checks a database which contains the host IDs of all computers with which ssh has ever had contact. Host keys are stored on a user-specific basis in the $HOME/.ssh/known_hosts file. ssh also checks the /etc/ssh/ssh_known_hosts file for known computers. Each new computer is automatically stored in the user-specific file after is has been confirmed by the user.
As soon as the host ID of a computer changes, ssh reports this and blocks the existing passwords. This prevents a Trojan Horse from being able to call the users’ passwords. This also permits “man-in-the-middle” attacks to be repelled which could otherwise bypass the encryption.
The StrictHostKeyChecking option in the configuration file ssh_config (see page 326) is used to suppress logons to computers whose host key is unknown or has been changed.A detailed description of the StrictHostKeyChecking options is provided in the OpenSSH man pages.
9.3.5 Login process
After a user has logged in successfully, sshd performs the following activities:
1. Depending on whether the user has logged in on a user terminal (tty), sshd proceeds as follows:
● If the user has logged in on a tty and has not entered a command, sshd outputs the time of the last login and the contents of the /etc/motd file. However, a prerequisite here is that the output was not suppressed by means of an option in the sshd config-uration file or by means of $HOME/.hushlogin.
● If the user has logged in on a tty, sshd logs the time of the login.
2. sshd checks whether the /etc/nologin file exists. If the file exists, sshd prints out its contents. If the user who logs in does not have root authorization, sshd terminates.
3. sshd switches to execution mode with normal user privileges.
4. sshd sets up a basic runtime environment.
5. sshd reads the $HOME/.ssh/environment file if this exists and users are permitted to set their environment variables. For information on this see the PermitUserEnvironment option in the sshd configuration file.
6. sshd switches to the user’s home directory.

334 U41095-J-Z125-4-76
OpenSSH server daemon sshd OpenSSH
7. If the client is operating in an X11 environment and transfers a valid $DISPLAY variable,
● the user-specific command $HOME/.ssh/rc is called, the X11 authentication param-eters being transferred via stdin, or
● the global xauth program is called. As no X11 environment is available for POSIX, this call fails.
8. sshd executes the user shell or the user command.
9.3.6 Files of the OpenSSH server daemon sshd
In addition to the configuration file sshd_config (see page 326), the OpenSSH daemon sshd uses further files, some of which are described below. A complete overview of all files used by sshd can be found in the OpenSSH man pages.
$HOME /.ssh/authorized_keys
This file contains a list of all user public keys,
– which are permitted for RSA authentication (see page 331) (SSH protocol Version 1).
– which are permitted for public key authentication (pubkey authentication, see page 332) (SSH protocol Version 2).
Using the AuthorizedKeyFile option in the sshd_config file (see page 326) you can specify another file to handle this function.
A detailed description of the syntax and options of the $HOME/.ssh/authorized_keys file is provided in the OpenSSH man pages.
/etc/ssh/ssh_known_hosts, $HOME/.ssh/known_hosts
These files contain a list of all host public keys of all known remote computers. The global file /etc/ssh/ssh_known_hosts should be provided by the administrator (optional). The user-specific files $HOME/.ssh/known_hosts are maintained automatically. Each time users log on to an unknown computer, their key is entered in a user-specific file.
A detailed description of the syntax and options of the /etc/ssh/ssh_known_hosts and $HOME/.ssh/known_hosts files is provided in the OpenSSH man pages.

U41095-J-Z125-4-76 335
OpenSSH OpenSSH server daemon sshd
/etc/ssh/ssh_host_key, /etc/ssh/ssh_host_dsa_key, /etc/ssh/ssh_host_rsa_key
These files contain the private sections of the host keys and may only be owned by users with root authorization. Only users with root authorization may read these files. The files may not be accessible to anyone else. Note that sshd cannot be started if these files are accessible for the group or for everyone.
/etc/ssh/ssh_host_key.pub, /etc/ssh/ssh_host_dsa_key.pub, /etc/ssh/ssh_host_rsa_key.pub
These files contain the public sections of the host keys and should be available for all to read, but it should only be possible for users with root authorization to overwrite them. The public sections of the host keys stored in the files should match the corresponding private sections of the host keys in the files /etc/ssh/ssh_host_key, /etc/ssh/ssh_host_dsa_key, /etc/ssh/ssh_host_rsa_key.
These files perform no major functions. They merely simplify application for the users by enabling users to copy their contents directly into the ssh_known_hosts files.
The files are generated automatically during installation using ssh-keygen (see the interNet Services User Guide).
/etc/ssh/moduli
This file contains Diffie-Hellman groups which are used for the “Diffie-Hellman Group Exchange”. The file format is described in moduli (5) in the OpenSSH man pages.
/var/empty
chroot directory which is used by sshd during privilege separation in the pre-authenti-cation phase. The directory should not contain any files and must be owned by a user with root authorization. The directory may not be owned by a group or a user without root authorization.
/var/run/sshd.pid
This file contains the process ID of the sshd which listens for connection requests at the port. If multiple sshd daemons are listening at various ports simultaneously, the file contains the ID of the last daemon started. The content of this file is not confidential and may be read by all.

336 U41095-J-Z125-4-76
OpenSSH server daemon sshd OpenSSH
$HOME/.ssh/authorized_keys
This file contains a list of the public keys (RSA or DSA) with which you can log into a user’s account. The file must be readable for a user with root authorization and should not be accessible for other users. The format of the file is described in the OpenSSH man pages. The user will transfer the contents of his/her files identity.pub, id_dsa.pub and/or id_rsa.pub to this file, as described for ssh-keygen (see the interNet Services User Guide).
/etc/ssh/ssh_known_hosts, $HOME/.ssh/known_hosts
These files are queried to check the host’s public key in the event of
– combined rhosts/RSA authentication (see page 331) with SSH protocol Version 2.
– public key authentication (see page 332) with SSH protocol Version 2.
The key is accepted only if it is listed in one of the aforementioned files. The client uses the same files to ensure that it is connected to the intended remote computer.
Only users with root authorization and the owner should have write permission for these files. /etc/ssh/ssh_known_hosts should be readable for all users. $HOME/.ssh/known_hosts can, but need not, be readable for all users.
/etc/nologin
If this file exists, sshd only permits users with root authorization to log in. The content of the file is shown to everyone who attempts to log in, the login attempts of users without root authorization being rejected. It should be possible for everyone to read the file.
/etc/hosts.allow, /etc/hosts.deny
This file defines access controls which are performed by TCP wrappers. Further infor-mation is available under hosts_access (5) in the OpenSSH man pages.

U41095-J-Z125-4-76 337
OpenSSH BS2000/OSD-specific restrictions
9.4 BS2000/OSD-specific restrictions
When working with OpenSSH in a BS2000/OSD environment, the special aspects described below must be borne in mind.
Use of a user’s own resolver library instead of the BCAM host name
To resolve host names, OPENSSH(BS2000) uses neither the BCAM host tables nor the resolver on the BS2000/OSD side which is configured in the $TSOS.SYSDAT.SOCKETS.nnnn.SOC6.RESOLV file, but the DNS resolver library of TCP-IP-SV:DNS(BS2000) (see the “DNS” chapter in the “interNet Services Administrator Guide”). As a result the sshd daemon is independent of the BCAM version used and behaves in the same way as applications such as TCP-IP-SV:DNS(BS2000) and APACHE(BS2000). Prerequisites here are that the /etc/resolv.conf file exists and contains the address of at least one valid DNS name server. The complete DNS name and the complete IPv4 or IPv6 address are also entered in the lastlog file so that the place where the remote login took place can be ascertained. Here the host name is used in the notation in which it was supplied by the name server, i.e. normally in lower case. This behavior is compatible with other Unix platforms, but differs from the behavior of the POSIX rlogin. The POSIX rlogin always uses BCAM names in upper case.
In the case of ssh connections or ssh-keyscan calls from POSIX, the behavior described also means that host names which are not entered in the DNS resolver library of TCP-IP-SV:DNS(BS2000) but are entered in the BCAM host table are invisible for ssh and ssh-keyscan and thus invalid.
In this case you must therefore
● specify the associated IP addresses or
● use a name entered in the DNS resolver library of TCP-IP-SV:DNS(BS2000) or
● enter the BCAM names “manually” in the /etc/hosts file.
Prompt when the password is empty
Normal Unix computers do not request a password if they use login or slogin to log into an ID without a password. However, the POSIX rlogin requests a password to be entered even for an ID without a password. This behavior does not result in increased security, though, because it is at the same time possible to issue an rsh command without a password for the same ID.
Here OpenSSH behaves like the other Unix systems and does not ask for a empty password. However, as a login to IDs without a password is, by default, blocked in OpenSSH, in this case you must set the PermitEmptyPasswords directive in the configuration file /etc/ssh/sshd_config to “yes”.

338 U41095-J-Z125-4-76
BS2000/OSD-specific restrictions OpenSSH
Upper/lower case in the user name
Unlike in Unix operating system, no distinction is made between upper and lower case in BS2000/OSD and OSD/POSIX. Thus in BS2000/OSD and OSD/POSIX the user “Username” can log on as “username”, “USERNAME” or “uSeRnAmE”. The name of the user who has logged on is recorded in the /var/adm/utmp file. You can use the who command to have the user name displayed.
Whereas rlogin enters the user name in upper case, OpenSSH specifies the user name in lower case (as is usual in Unix operating systems).
Restrictions when using POSIX device files
On account of a restriction in POSIX it is not simply possible to use stdin, stdout or stderr of an ssh call with one of the special POSIX device files. An exception here is /dev/null combined with stdin.
Example
The call
$ ssh remote_computer command >/dev/null
or
$ ssh remote_computer command </dev/zero
leads to the error messages
select: No such device
A way to bypass this is to use a Unix pipe, e.g.
$ cat /dev/zero | ssh remote_computer command
or
$ ssh remote_computer command | cat >/dev/null
Restrictions when using the BS2000/OSD dialog interface
You can only start the ssh client program in a remote login session, i.e. you must be logged onto POSIX by means of rlogin, ssh, or slogin.In $DIALOG or TELNET sessions you can only use ssh if stdin, stdout and stderr have been redirected to a file or a POSIX pipe, otherwise ssh will abort and issue the following message:
select: Invalid fileno

U41095-J-Z125-4-76 339
10 Mail servers in POSIXSending and receiving electronic mail (e-mail) are among the most important services on the Internet. Here the role of the post offices is taken over by the mail servers, which are also called Mail Transfer Agents (MTA). Mail servers handle transfer of e-mails over the network and ensure they are delivered to mailboxes.
Mail User Agents (MUAs) offer user-friendly interfaces for performing the following tasks:
● Writing and sending e-mails
● Accessing the mailboxes
● Presenting and processing the electronic mail received
Man pages
This chapter is in part based on the manual pages (man pages) for Postfix and IMAP/POP3. The man pages which provide further information are referred to at the appropriate places in the chapter, e.g. in the description of programs and parameters/options. You can find the most up-to-date man pages on the Internet at:
● www.postfix.org/ (Postfix)
● www.washington.edu/imap/ (IMAP/POP3)
In addition, the Postfix and IMAP/POP3 man pages will be available on your server after you have installed these components.
The Postfix man pages can be found on your server
● under <installation-path>/readme/ MAIL.postfix/html/ as HTML files,
● under <installation-path>/readme/ MAIL.postfix/pdf/ as PDF files,
● under <installation-path>/readme/ MAIL.postfix/text/ as text files.
(Standard installation path for Postfix: /opt/MAIL/postfix/)

340 U41095-J-Z125-4-76
Mail servers
The IMAP/POP3 man pages can be found on your server
● under <installation-path>/readme/ MAIL.imap/html/ as HTML files,
● under <installation-path>/readme/ MAIL.imap/text/ as text files.
(Standard installation path for IMAP/POP3: /opt/MAIL/imap/)
Where the Postfix or IMAP/POP3 man pages are referred to in the course of this chapter, these sources are meant. You should by preference use the man pages supplied with the product as these relate to the software version contained in the product.
i
U41095-J-Z125-4-76 341
Mail servers Overview
10.1 Overview
The electronic mail service on the Internet is based on the Simple Mail Transfer Protocol (SMTP), which is defined in RFC 821 and RFC 2821. Originally only pure text messages could be transferred, but today the MIME mechanism (Multipurpose Internet Mail Exten-sions, RFC 2045 through 2049) enables a wide range of formats, e.g. images, to be trans-mitted. Mail servers which handle the electronic mail service on the basis of the SMTP protocol are also called SMTP servers.
The SMTP server used by the interNet Services in BS2000/OSD is the product Postfix Version 2.1.5, which has been ported to BS2000/OSD and to which IPv6 and TLS function-ality has been added. This Open Source SMTP server created by Wietse Venema is characterized in particular by high performance, simple manageabilty, and a high degree of security. In addition, the partial compatibility of Postfix to the SendmailTM program contained in the interNet Value Edition guarantees simple migration from Sendmail to Postfix. Further details on this are provided in the section “Migration from Sendmail to Postfix” on page 371.
The following protocols are used by the Mail User Agents to access mailboxes on a remote server:
● Internet Mail Access Protocol (IMAP, RFC 2060 etc.)
● Post Office Protocol Version 3 (POP3, RFC 1939)
The IMAP and POP3 servers supplied with interNet Services are more up-to-date versions of the Open Source servers from the UW-IMAP Toolkit of the University of Washington contained in the interNet Value Edition delivery package. In contrast to these older versions, the IMAP and POP3 servers of the interNet Services delivery package support the IPv6 and TLS protocols (see page 355).
To permit e-mails to be sent from BS2000/OSD, the interNet Services delivery package contains a simple User Agent, the Mail Sender (see the interNetServices User Guide). To permit automatic processing of received e-mails, interNet Services contains a Mail Reader on an IMAP/POP3 basis. If POSIX-SH is installed, POSIX also contains a simple, local User Agent (Mailx) for sending and processing text messages in BS2000/OSD.

342 U41095-J-Z125-4-76
Functionality Mail servers
10.2 Functionality
An SMTP server or Mail Transfer Agent (MTA) is a mail server for transferring e-mails on the Internet using the Simple Mail Transfer Protocol (SMTP). Here the SMTP server can function as a mail relay or mail end system. A further major function provided by the SMTP server is the option of creating mailing lists and forwarding requests with the aid of aliases. Aliases permit the user part of a local receiver address to be replaced by one or more receiver addresses.
The SMTP server uses the Domain Name Service (DNS) to select a suitable route to an end system.
The SMTP server receives messages either from another SMTP server or from a Mail User Agent (MUA). On the basis of the message’s receiver address(es), the message is trans-ferred via a TCP/SMTP connection to another SMTP server and/or a local Mail Delivery Agent (MDA).
Here the local MDA, which stores the messages in special files (mailboxes), is particularly important. The MUA can be used to further process (read, forward, sort, save, reply to, delete) the messages contained in the local mailboxes. In addition, the MUA enables messages to be created and transferred to the local SMTP server for delivery. Some MUAs can also transfer messages to a remote SMTP server via a TCP/SMTP connection.
Figure 3: Client/server mail communication via SMTP, POP3 and IMAP
MailboxPOP3 server
IMAP server
Remote mail server
SMTP
POP3
IMAP
SMTP
SMTP
BS2000/OSDClient Internet server
UserAgent (MUA)
PC
POP3 Client
IMAP Client
User AgentMailx
Mail server
on
MSA
Mail Senderin
BS2000/OSD

U41095-J-Z125-4-76 343
Mail servers Functionality
The IMAP and POP3 mechanisms enable a client system, especially if it is not equipped with an SMTP server (MTA), to access the mailboxes of the SMTP server system. For this purpose, an IMAP and a POP3 server are installed on the SMTP server system. For example, clients (e.g. Outlook, Eudora and Mozilla/Thunderbird) which run on a remote system can then read and delete messages in the server system’s mailboxes.
In the case of remote User Agents you must ensure that an account number for accounting a POSIX Remote Login Session exists for the users (BS2000/OSD command /ADD-USER or /MODIFY-USER-ATTRIBUTES POSIX-RLOGIN-DEFAULT=*YES).
IMAP and POP3 differ in the following ways:
● With IMAP, the e-mails remain on the server, where they are also backed up.
● With POP3, the e-mails are by default downloaded to the client and stored there.
Format of the messages
The format of the messages is defined in RFC 822. Messages consist of the message header and the message text. The header and text are separated by precisely one blank line.
Both the message header and the message text consist of readable characters in ASCII format. The message header comprises multiple declarations which in principle are contained in one line, but to enable them to be read more easily can be distributed over several lines. The declarations consist of a name and a text part whose format is defined by the name. Depending on the name, but also on other declarations, a particular type of declaration can occur precisely once, not at all, at most once, or as often as required in a message header.
Most names are defined in RFC 822 or 2822. RFC 1522 defines some extensions. Names beginning with “X” are used for private extensions.
The MIME mechanism enables not only pure text but also binary data to be included in the message text. The MIME mechanism defines additional message header declarations and is described in the RFCs 2045 through 2049.

344 U41095-J-Z125-4-76
Installing and uninstalling the mail servers Mail servers
10.3 Installing and uninstalling the mail servers
This section describes installation and uninstallation of the SMPT server (Postfix server) and of the IMAP and POP3 servers. openNet Server V2.0 is required to install these mail servers.
By default, the mail servers are assigned the following port numbers:
10.3.1 Installing and uninstalling the Postfix server (SMTP server)
You install the Postfix server as a POSIX program package using the POSIX installation program (see the manual “POSIX Basics for Users and System Administrators”).
Installation requirements
To permit the installation and operation of the Postfix server, the PLAM librarySINLIB.MAIL.031.POSTFIX must be available and shareable. The POSIX subsystem must have been started.
The Postfix server requires correctly functioning DNS functionality to provide error-free operation. As the server is started automatically after installation has been completed, you should ensure that the DNS functionality is functioning correctly before beginning instal-lation. You do this through correct configuration of the /etc/resolv.conf file and the DNS servers referenced there (see the “interNet Services Administrator Guide”). If the DNS functionality is not functioning correctly, installation of the Postfix server can be delayed because of a DNS timeout, resulting in errored behavior of the Postfix server.
Port Protocol Explanation
25 tcp/udp SMTP Simple Mail Transfer Protocol
110 tcp/udp POP3 Post Office Protocol - Version 3
143 tcp/udp IMAP Internet Message Access Protocol
993 tcp/udp IMAPS IMAP via TLS/SSL
995 tcp/udp POP3S POP3 via TLS/SSL

U41095-J-Z125-4-76 345
Mail servers Installing and uninstalling the mail servers
Starting installation
Before Postfix is installed, the PRNGD should be installed in POSIX (see section “Random number generation in POSIX with the prngd server daemon” on page 229).
The Postfix server must run in privileged mode. You must therefore install the Postfix server using the POSIX installation command under the SYSROOT or TSOS ID (UID=0, GID=0):
Ê Start installation: /START-POSIX-INSTALLATION
Ê Select the following function: Install packages on POSIX
Ê Specify the following values in the screen which is then displayed:
You can modify the installation path displayed for the installation procedure. However, it is advisable to keep to the default /opt/MAIL/postfix.
If another version of the interNet Value Edition delivery package is installed, the POSIX installation program issues a corresponding error message.
Postfix installation is fundamentally also possible when interNet Value Edition is already installed. However, in this case you must ensure that no sendmail daemon is active which contends with the Postfix server with regard to port number assignment. Generally this concerns port number 25.
Ê Abort Postfix installation by pressing the K2 key if you want to uninstall interNet Value Edition before installing Postfix.
Ê Continue Postfix installation by pressing the send key if you do not want to uninstall interNet Value Edition beforehand.
The POSIX installation program then checks whether the /opt file system has sufficient memory space and reads all the files from the PLAM library into the POSIX file system or generates references to PLAM library members. After all files have been read in, the POSIX installation program automatically starts a post-installation script which handles computer-specific configuration of the Postfix server.
IMON support?: Y
name of product: MAIL
package of product: POSTFIX
i
i

346 U41095-J-Z125-4-76
Installing and uninstalling the mail servers Mail servers
Executing the post-installation script
The post-installation script performs the following steps:
1. First the post-installation script checks whether a POSTFIX user ID already exists.
If this is the case and the two conditions below are also satisfied, an error message is issued and execution of the post-installation script is aborted:
– POSIX User Number Î Default POSIX User Number
– POSIX Group Number Î Default POSIX Group Number
2. If the POSTFIX user ID does not yet exist, the post-installation script sets up this user ID with the following attributes:
– Random password– BS2000/OSD account: SYSACC– Address space limit: 32 MB
Under POSIX this ID is assigned the home directory /var/empty and the login shell /bin/false as a login option is neither required nor desirable for the POSTFIX ID.
3. The post-installation script sets up a POSIX group MAILDROP.
4. If the NOBODY user ID does not yet exist, the post-installation script sets up this user ID with the following attributes:
– Random password– BS2000/OSD account: SYSACC– Address space limit: 32 MB
Under POSIX this ID is assigned the home directory /var/empty and the login shell /bin/false as a login option is neither required nor desirable for the NOBODY ID.
5. In the startup file /etc/profile of the POSIX shell, the PATH specification for the user with the user number 0 (SYSROOT or TSOS) is extended by the directories <installation-path>/bin and <installation-path>/sbin. If a C shell (csh or tcsh) is installed, the post-installation script proceeds analogously with the csh startup file (/etc/.login or /etc/csh.login).
6. If the default job class for batch jobs of the SYSROOT ID has a JOB-CLASS-LIMIT < 20, a warning is issued.
7. If ADDRESS-SPACE-LIMIT < 32 MB applies for SYSROOT, a warning is issued.
8. If ADDRESS-SPACE-LIMIT < 32 MB applies for POSTFIX, a warning is issued.
9. If no POSIX-RLOGIN-DEFAULT is set for POSTFIX, a corresponding error message is output.

U41095-J-Z125-4-76 347
Mail servers Installing and uninstalling the mail servers
10. If SYSROOT has no read permission for the installation library(e.g. SINLIB.MAIL.031.POSTFIX), a corresponding error message is output.
11. The post-installation script attempts to determine the system’s domain name by inspecting the DNS Resolver configuration files /etc/resolv.conf and $TSOS.SYSDAT.SOCKETS.*.SOC6.RESOLV.
12. The post-installation script sets the following parameters in the Postfix configuration file /etc/postfix/main.cf by calling postconf -e: mailq_path, newaliases_path, daemon_directory, readme_directory, html_directory, command_directory, sendmail_path, manpage_directory, mail_owner, setgid_group, config_directory and queue_directory. If a domain was found in step 11, the mydomain parameter is also set.
13. The post-installation script calls Postfix’s own post-installation script /etc/postfix/post-install.
14. If initial installation of Postfix is concerned, i.e. no configuration backup directory /etc/postfix.sav for a previous Postfix installation exists, the post-installation script checks whether a /etc/mail/aliases or /etc/aliases file exists. If one of these files exists, the post-installation script copies the first file found to /etc/postfix/aliases and enters the following parameter definitions in the /etc/postfix/main.cf file:
alias_maps = hash:/etc/postfix/aliasesalias_database = hash:/etc/postfix/aliases
15. If no serious errors are detected, the post-installation script uses /etc/init.d/MAIL.postfix start to call the general POSIX start script for Postfix, and this starts the Postfix server under SYSROOT.
The /etc/init.d/MAIL.postfix script automatically determines the maximum values for JOB-CLASS, ACCOUNT, START and MAXIMUM CPU LIMIT which are permissible for SYSROOT. The script uses these values to start an enter job with the job name POSTFIX.
The Postfix server logs important messages in the /var/adm/messages file using the syslog mechanism. In addition, the Postfix server records problems which occur when the enter job starts in the var/adm/postfix_startup.log file.
Completing installation
After successful installation, perform the remaining activities which are required in the POSIX shell under the TSOS ID. To do this, start the POSIX shell under the TSOS ID using the BS2000/OSD command /START-POSIX-SHELL.

348 U41095-J-Z125-4-76
Installing and uninstalling the mail servers Mail servers
Files and directories used by the Postfix server
The table below lists the most important files and directories used by the Postfix server. If you use an installation path which differs from the standard Postfix installation path, the path names specified in the table must be adjusted accordingly.
Name Type Explanation
/opt/MAIL Directory
/opt/MAIL/postfix Directory Standard Postfix installation directory
/opt/MAIL/postfix/bin Directory Links to Sendmail compatibility program
/opt/MAIL/postfix/bin/mailq Link Outputs the mail queue
/opt/MAIL/postfix/bin/newaliases Link Updates the alias index file
/opt/MAIL/postfix/libexec/postfix Directory Daemon programs
/opt/MAIL/postfix/libexex/postfix/local Program Local Delivery Agent
/opt/MAIL/postfix/libexec/postfix/master Program Central administration program
/opt/MAIL/postfix/libexec/postfix/pickup Program Processes mail selected locally
/opt/MAIL/postfix/libexec/postfix/qmgr Program Queue management
/opt/MAIL/postfix/libexec/postfix/smtpd Program Receipt of mails using SMTP
/opt/MAIL/postfix/libexec/postfix/smtp Program Forwards mails using SMTP
/opt/MAIL/postfix/readme Directory Online documentation
/opt/MAIL/postfix/sbin Directory Management programs
/opt/MAIL/postfix/sbin/postalias Program Generates/inquires the alias index file
/opt/MAIL/postfix/sbin/postcat Program Outputs files in queues
/opt/MAIL/postfix/sbin/postconf Program Displays/modifies Postfix parameters
/opt/MAIL/postfix/sbin/postdrop Program Writes mails in the maildrop directory for delivery by Postfix
/opt/MAIL/postfix/sbin/postfix Program Starts/stops the Postfix system
/opt/MAIL/postfix/sbin/postmap Program Generates/inquires the index files
/opt/MAIL/postfix/sbin/postqueue Program Queue management by the system administrator
/opt/MAIL/postfix/sbin/postsuper Program Grants the system administrator super-user access to queues
/opt/MAIL/postfix/sbin/sendmail Program Sendmail compatibility program
/opt/MAIL/postfix/share Directory Online documentation in the form of man pages
/etc/postfix Directory Directory for Postfix configuration files
/etc/postfix/master.cf Text file Configuration for master daemon

U41095-J-Z125-4-76 349
Mail servers Installing and uninstalling the mail servers
Uninstalling the Postfix server (SMTP server)
Uninstall the Postfix server using the POSIX installation command under the SYSROOT or TSOS ID (UID=0, GID=0):
Ê Start uninstallation: /START-POSIX-INSTALLATION
Ê Select the following function: Delete packages from POSIX
Ê In the subsequent screen display mark the line containing the following values and activate your selection by pressing the send key:
Product Version Package... ... ...MAIL 031 POSTFIX/opt/MAIL/postfix
Ê Follow the further instructions issued by the tool.
If Postfix configuration files have been modified since the time installation took place, these files are saved in the /etc/postfix.sav directory. When POSIX is installed again later, the files in the backup directory /etc/postfix.sav are used instead of the standard configuration files supplied.
10.3.2 Installing and uninstalling the IMAP and POP3 servers
You install IMAP and POP3 servers as a POSIX program package using the POSIX instal-lation program (see the manual “POSIX Basics for Users and System Administrators”).
Installation requirements
To permit the installation and operation of IMAP and POP3 servers, the PLAM librarySINLIB.MAIL.031.IMAP must be available, shareable and read-only. The POSIX subsystem must have been started.
/etc/postfix/main.cf Text file Central Postfix configuration file
/var/spool/postfix Directory Directory for queues and lock files
/var/mail Directory Directory for mailboxes
/var/mail/USER Mailbox file Mailbox for the user USER
/etc/rc0.d/K17MAIL.postfix Link Link to start/stop script
/etc/rc2.d/S97MAIL.postfix Link Link to start/stop script
/etc/init.d/MAIL.postfix Script Start/stop script
Name Type Explanation
i

350 U41095-J-Z125-4-76
Installing and uninstalling the mail servers Mail servers
Starting installation
IMAP and POP3 servers must run in privileged mode. You must therefore install IMAP and POP3 servers using the POSIX installation command under the SYSROOT or TSOS ID (UID=0, GID=0):
Ê Start installation: /START-POSIX-INSTALLATION
Ê Select the following function: Install packages on POSIX
Ê Specify the following values in the screen which is then displayed:
You can modify the installation path displayed for the installation procedure. However, it is advisable to keep to the default /opt/MAIL/imap.
If another version of the interNet Value Edition delivery package is installed, the POSIX installation program issues a corresponding error message.
IMAP and POP3 installation is fundamentally also possible when interNet Value Edition is already installed. The IMAP and POP3 daemon programs are then replaced by the current versions.
Ê Abort IMAP/POP3 installation by pressing the K2 key if you want to uninstall interNet Value Edition before installing IMAP/POP3.
Ê Continue IMAP/POP3 installation by pressing the send key if you do not want to uninstall interNet Value Edition beforehand.
The POSIX installation program then checks whether the /opt file system has sufficient memory space and reads all the files from the PLAM library into the POSIX file system or generates references to PLAM library members.
Completing installation
After successful installation, perform the remaining activities which are required in the POSIX shell under the TSOS ID. To do this, start the POSIX shell under the TSOS ID using the BS2000/OSD command /START-POSIX-SHELL.
IMON support?: Y
name of product: MAIL
package of product: IMAP
i

U41095-J-Z125-4-76 351
Mail servers Installing and uninstalling the mail servers
Files and directories used by the IMAP and POP3 servers
The table below lists the most important files and directories used by the IMAP and POP3 servers. If you use an installation path which differs from the standard Postfix installation path, the path names specified in the table must be adjusted accordingly.
Name Type Explanation
/opt/MAIL Directory
/opt/MAIL/imap Directory Standard IMAP installation directory
/opt/MAIL/imap/readme Directory Online documentation
/opt/MAIL/imap/sbin Directory Daemon programs
/opt/MAIL/imap/sbin/imapd Program IMAP daemon
/opt/MAIL/imap/sbin/ipop3d Program POP3 daemon
/opt/MAIL/imap/share Directory Online documentation in the form of man pages
/usr/sbin/in.imapd Link Link to IMAP daemon
/usr/sbin/in.ipop3d Link Link to POP3 daemon
/etc/imap Directory Directory for IMAP/POP3 files(X.509 certificates, private keys)
/etc/imap/MAKE.CERT.sh Script Script for generating X.509 certificate requests and X.509 test certificates
/etc/imap/certs Directory Directory for X.509 certificates
/etc/imap/private Directory Directory for private keys
/etc/inet Directory Directory for configuration files(in particular inetd)
/etc/inet/services Text file Assignment of service names to port numbers
/etc/inet/inetd.conf Text file Configuration file for inetd
/var/mail Directory Directory for mailboxes
/var/mail/USER Mailbox file Mailbox for the user USER

352 U41095-J-Z125-4-76
Installing and uninstalling the mail servers Mail servers
Uninstalling the IMAP server and POP3 server
Uninstall the IMAP and POP3 servers using the POSIX installation command under the SYSROOT or TSOS ID (UID=0, GID=0):
Ê Start uninstallation: /START-POSIX-INSTALLATION
Ê Select the following function: Delete packages from POSIX
Ê In the subsequent screen display mark the line containing the following values and confirm your selection by pressing the send key:
Product Version Package=IMAP... ... ...MAIL 031 IMAP
Ê Follow the further instructions issued by the tool.

U41095-J-Z125-4-76 353
Mail servers Mail server: starting up
10.4 Starting up Mail servers
This section deals with the following topics:
● Starting up the Postfix server (SMTP server)
● Starting up the IMAP and POP3 servers
● Use of TLS/SSL-secured connections by Postfix, IMAP and POP3 servers
10.4.1 Starting up the Postfix server (SMTP server)
After the Postfix server has been installed you can adjust the configuration files /etc/postfix/master.cf and /etc/postfix/main.cf.
Generally the Postfix server is ready to operate even without any modification to the config-uration files as the installation program attempts to determine system-specific parameters, such as the system’s domain name, automatically via system calls and by inspecting the DNS Resolver’s configuration file /etc/resolv.conf and to save these parameters in the config-uration file main.cf. You should therefore store the system’s domain name (e.g. systemx.fujitsu-siemens.com) and any DNS aliases on the DNS server concerned before performing installation. To do this, you must configure the /etc/resolv.conf file accordingly (see the section “Configuring the DNS resolver” on page 249).
If it was possible to perform automatic Postfix configuration successfully, the Postfix server is started automatically after installation has been completed.
In the standard configuration the Postfix server operates merely as a mail end system, but not as a mail relay. If the Postfix server is also to be used as a mail relay, you must adapt the Postfix configuration file /etc/mail/postfix/main.cf accordingly. More detailed information on this can be found in the man pages on the Postfix server and in the documentation on the topic of Postfix which is referred to in “Related publications”.
Caution!
Proceed particularly carefully when you configure the Postfix server as a mail relay because a mail relay which can be accessed openly from the Internet very quickly attracts mail spammers. Among other things, this can result in your Internet access being blocked by the Internet service provider.
!

354 U41095-J-Z125-4-76
Mail server: starting up Mail servers
10.4.2 Starting up IMAP and POP3 servers
In contrast to the Postfix server, IMAP and POP3 servers do not run permanently as independent daemons but are started up for the associated connection by the inetd daemon at connection setup. There is thus one dedicated IMAP or POP3 daemon per IMAP and POP3 connection. In the event of heavy parallel use this can result in considerable demands on resources.
To permit the inetd daemon to start the individual IMAP and POP3 daemons, the inetd daemon must be configured appropriately. In the standard case the inetd daemon is configured automatically during IMAP installation.
If problems should occur when you are operating IMAP or POP3 servers, you should proceed in accordance with the description below to check whether the inetd daemon has been configured correctly:
Ê In the /etc/inet/services file check the entries which assign the service names to the port numbers of the IMAP and POP3 services.
The following entries are required:
pop-3 110/tcp # Post Office V3 pop-3s 995/tcp # SSL secured Post Office V3imap 143/tcp # IMAP imaps 993/tcp # SSL secured IMAP
Ê Ensure that a symbolic link exists from /etc/services to /etc/inet/services.
Ê In the inetd configuration file /etc/inet/inetd.conf check the entries for the individual service names.
The following entries are required:
pop-3 stream tcp nowait SYSROOT /usr/sbin/in.ipop3d in.ipop3d pop-3s stream tcp nowait SYSROOT /usr/sbin/in.ipop3d in.ipop3dimap stream tcp nowait SYSROOT /usr/sbin/in.imapd in.imapd imaps stream tcp nowait SYSROOT /usr/sbin/in.imapd in.imapd
Ê If you have modified the inetd configuration file /etc/inet/inetd.conf “manually”, you must inform the inetd daemon of the modification in the configuration file using the following command:
kill -HUP <process id of the inetd daemon>
IMAP and POP3 servers have no configuration file of their own. Furthermore, IMAP and POP3 servers only support the standard Mbox format for the user mailboxes, but not the Maildir format supported as an alternative by the Postfix server.
i

U41095-J-Z125-4-76 355
Mail servers Mail server: starting up
10.4.3 TLS/SSL protection of IMAP/POP3 and SMTP connections
On both the IMAP and POP3 servers and also on the Postfix server (SMTP server) the connections can be secured with the aid of TLS/SSL. This is particularly important for IMAP and POP3 connections as passwords would otherwise be transferred unencrypted.
X.509 certificates are used in conjunction with SSL. An X.509 certificate contains all the information needed to identify the server or client and also the certificate owner’s public key. Certificates are issued by a central authority, the Certificate Authority (CA), after the identity of the organization named in the certificate and of an authorized representative have been checked. To apply for an X.509 certificate from a CA you require a Certificate Signing Request (CSR) which you can generate with the /etc/imap/MAKE.CERT.sh script. Furthermore, this script generates a test certificate which you can use to perform tests of the TLS/SSL functionality in advance. As this test certificate is generated with the aid of a publicly known CA key and consequently offers no effective protection, it may not be used for productive operation.
Detailed information on the topic of TLS/SSL is provided in the interNet Services User Guide.
TLS/SSL protection of IMAP and POP3 connections
You store the test certificate and the private key at the appropriate positions for the IMAP server in the directory tree (/etc/imap/certs/in.imapd.pem and /etc/imap/private/in.imapd.pem). You store the certificate of the test CA under /etc/imap/certs/cacert.pem. Explicit configuration settings are not possible with the IMAP and POP3 servers. The CSR can be found under /etc/imap/imapd-csr.pem.
Note that the private key will later also be used together with the official certificate in productive operation. Consequently you must ensure that the private key is always protected against unauthorized access. During installation the access rights for the /etc/imap/private directory are thus restricted to the super user (SYSROOT, TSOS).
During installation, suitable links are automatically created for the POP2 server which refer to the aforementioned certificate and the private key for the IMAP server. This enables the private key and the certificate to be used both by the IMAP and the POP3 server.
As soon as you have received the certificate from an official CA you must store this under /etc/imap/certs/in.imapd.pem, thus overwriting the test certificate which you no longer require.
An excerpt from an /etc/imap/MAKE.CERT.sh run is shown on the next page. User inputs are highlighted with bold print.
i

356 U41095-J-Z125-4-76
Mail server: starting up Mail servers
# /etc/imap/MAKE.CERT.sh
1. Country Name (2 letter code) [DE]:
2. State or Province Name (full name) [Bavaria]: Bayern
3. Locality Name (eg, city) [Munich]: Muenchen
4. Organization Name (eg, company) [Manufacturer, Ltd]: Fujitsu Siemens Computers GmbH
5. Organizational Unit Name (eg, section) [Marketing]: Internet Services
6. Common Name (eg, FQDN) [www.manufacturer.com]: www.fujitsu-siemens.com
7. Email Address (eg, name@FQDN) [[email protected]]: [email protected]
8. Certificate Validity (days) [365]: 730
Certificate Version (1 or 3) [3]:
9. subjectAltName:dNSName (eg, FQDN) [www.fujitsu-siemens.com]:
Generating certificate, please wait...
Done
Subject: C=DE, ST=Bayern, L=Muenchen, O=Fujitsu Siemens Computers GmbH, OU=Internet Services, CN=www.fujitsu-siemens.com/[email protected]
The private key for IMAP has been created as /etc/imap/private/in.imapd.pem. The certifcate for IMAP has been created as /etc/imap/certs/in.imapd.pem. The used CA certificate has been saved as /etc/imap/certs/cacert.pem.
For using certificate and key also for POP3 we make appropriate links to the created files: Creating link /etc/imap/private/in.ipop3d.pem to file /etc/imap/private/in.imapd.pem. Creating link /etc/imap/certs/in.ipop3d.pem to file /etc/imap/certs/in.imapd.pem.
WARNING: Use this certificate only for testing, not for production! #

U41095-J-Z125-4-76 357
Mail servers Mail server: starting up
TLS/SSL protection of SMTP connections (Postfix)
SMTP connections can only be secured between two adjacent Mail servers (Mail Transfer Agents, MTAs) on the communication path. End-to-end security cannot be guaranteed with TLS/SSL. In particular, the e-mails are buffered on the MTAs in unencrypted format. TLS/SSL can, however, be used for implementing partially open mail relays. The group of users of a mail relay can be restricted to the authorized persons via TLS/SSL authenti-cation. Similarly, in cases where the e-mail is sent directly to the recipient, TLS/SSL enables mail encryption to be implemented which is transparent for e-mail senders and recipients.
If you use TLS/SSL in conjunction with Postfix, you must set the corresponding parameters in the Postfix configuration file /etc/postfix/main.cf. Here you must distinguish between use of TLS/SSL for incoming and outgoing connections:
● In the case of incoming connections the parameter names begin with the prefix “smtpd_”.
● In the case of outgoing connections the parameter names begin with the prefix “smtp_”.
Further information on the TLS/SSL parameters available is provided in the /etc/postfix/sample-tls.cf file.
Minimum configuration for TLS/SSL protection with incoming SMTP connections
The additional parameters for a minimum configuration for TLS/SSL protection of an incoming SMTP connection are shown below. The TLS/SSL configuration also uses the IMAP/POP3 certificate as the Postfix server certificate.
smtpd_tls_cert_file = /etc/imap/certs/in.imapd.pemsmtpd_tls_key_file = /etc/imap/private/in.imapd.pemsmtpd_use_tls = yes
Minimum configuration for TLS/SSL protection with outgoing SMTP connections
The additional parameters for a minimum configuration for TLS/SSL protection of an outgoing SMTP connection are shown below. The TLS/SSL configuration also uses the IMAP/POP3 certificate as the Postfix Client certificate.
smtp_tls_cert_file = /etc/imap/certs/in.imapd.pemsmtp_tls_key_file = /etc/imap/private/in.imapd.pemsmtp_tls_CAfile = /etc/imap/certs/trusted-certs.pemsmtp_use_tls = yes
The /etc/imap/certs/trusted-certs.pem file (the name is freely selectable) must contain certifi-cates of all CAs which are to be trusted. In test operation to a server whose server certif-icate was generated with the aid of the MAKE.CERT.sh script you must enter the contents of the /etc/imap/certs/cacert.pem file in the /etc/imap/certs/trusted-certs.pem file. After you switch over to productive operation you must replace this test CA certificate by the CA certificate of the CA which issued the productive server certificate.

358 U41095-J-Z125-4-76
Operating the Postfix server Mail servers
10.5 Operating the Postfix server
This section deals with the following topics:
● Postfix lookup tables
● Important programs for operating the Postfix mail server
10.5.1 Postfix lookup tables (index files)
Postfix uses a number of lookup tables to permit efficient searching for information on address substitution, access control, etc. In a lookup table for address substitution, for instance, the old address is the search criterion, while the new address is assigned to the search criterion as the search result. In a lookup table for access control, for example, all local e-mail recipients which Postfix accepts can be listed. Here it is only important for Postfix to know whether the search criterion exists. The search result as such is of no impor-tance.
The information provided via the lookup tables is initially entered in ordinary text files by the administrator of the Postfix mail server. However, for high-performance access to this infor-mation Postfix does not use the text files (source files) created by the administrator, but index files which the administrator generates from the source files with the aid of the postmap (see page 367) or postalias (see page 369) program.
postalias differs from postmap in the format required for postalias source files (alias files) which, owing to its compatibility with the Sendmail server, deviates slightly from the source file format of the other Postfix source files for lookup tables (see page 359).
Two different types of index files
The BS2000/OSD ported version of Postfix supports two different types of index files:
● hash files: Here the search is based on hash tables and algorithms.
● btree files: Here the search is based on Balanced-Tree (B-Tree) structures and algorithms.
Normally it is advisable to use the hash format. The use of btree files can make sense if performance problems occur with very large lookup tables in hash format. Storage of lookup tables in external databases or directories such as NIS, MySQL or LDAP which is fundamentally possible with Postfix is currently not supported by the BS2000/OSD ported version.

U41095-J-Z125-4-76 359
Mail servers Operating the Postfix server
General Postfix format for postmap source files
An entry (logical line) in a postmap source file has the following syntax:
Key White space Value
KeySearch criterion
White spaceWhite space consists of a sequence of blanks and/or tabulator characters. White space must contain at least one blank or tabulator character.
ValueInformation which is assigned to the search criterion.
In addition, the following rules apply for the format of a logical line:
● A logical line can extend over several text lines.
● A logical line starts with a text which is different from the white space.
● A line which begins with white space continues a logical line.
● Empty lines and lines which - possibly after a white space - begin with “#” are ignored by postmap.
Format for postalias source files (alias files)
With the aid of aliases the user part of a local receiver address can be replaced by one or more receiver addresses.
You can enter the following as receiver addresses:
● Local addresses
● Remote addresses
● Programs to which messages are transferred
● Files in which the messages are saved
The aliases are defined by entries in an alias file. The default file name of the alias file is /etc/postfix/aliases.

360 U41095-J-Z125-4-76
Operating the Postfix server Mail servers
An alias entry (alias definition) has the following syntax:
Name: Value1, Value2, Value3, ..., Valuen
NameUser part of a local receiver address. If the user part of a local receiver address contains special characters such as “@” or blanks, it must be enclosed in double quotes (""). The value of the user part of a local receiver address is always stored in lower case.
The alias file must always contain the entries for the local names “postmaster” and ”MAILER-DAEMON” (requirement of RFC 822).
Value1, Value2, Value3, ..., ValuenOne or more receiver addresses.
The following can be specified as Valuei, i = 1 ... n:
● Local name (e.g. sysroot)
● Remote address (e.g. [email protected])
● /File
In this case the message is by default appended to the end of the File file. The allow_mail_to_ files parameter in the Postfix configuration file main.cf enables you to suppress this behavior.
● |Program
In this case the message is by default transferred via a pipe to a program call Program. The allow_mail_to_commands parameter in the main.cf file enables you to suppress this behavior. If the program call contains special characters (in particular blanks), you must enclose it in double quotes ("").
● :include:File
File is a text file which allows you to define mailing lists, for example. The e-mails are sent to the recipients listed in these mailing lists. Blanks and lines which begin with “#” are ignored. All other lines in File have the same syntax as the right-hand sides of alias entries, i.e. Value1, Valuet2, ..., Valuen.
With :include:File, entries to be appended to files (|File) or to be transferred to program calls via a pipe (|Program) are ignored unless otherwise specified. The main.cf parameters allow_mail_to_ files and allow_mail_to_commands enable you to activate the appending of entries to files or the transfer of entries to program calls as the default option.
i

U41095-J-Z125-4-76 361
Mail servers Operating the Postfix server
● owner-aliasname: owner_mail_address
You use this entry to define an owner or administrator for the mailing list aliasname who has the mail address owner_mail_address. In the event of an error (undeliverable e-mail) the notification is then sent to owner_mail_address and not to the sender of the mail since the owner / administrator of the mailing list can generally react to delivery problems better than the sender of the mail.
If, for example, a mailing list with the name “dbadmin” is defined, the following entry defines the mail address (here: “owner-mail-address”) of the mailing list’s owner:
owner-dbadmin: owner-mail-address
If at the end of alias conversion it is determined that the message is to be delivered to a local user, Postfix checks whether this user’s home directory contains a .forward file. If this is the case, a further stage of alias conversion is performed in which the .forward file is inter-preted according to the same rules as an alias file.
Example
An example of an alias file is shown below.
# Alias file# Forward error messages to postmaster and append them# to logging file /var/adm/mailerrMAILER-DAEMON: postmaster, /var/adm/mailerr# Forward postmaster to system administrator IDpostmaster: sysroot# Forward messages addressed to system administrator# to real personsysroot: mueller# Program for automatic mail answeringauto-test: |"/home/rwk/auto-test -i 3"# Mailing listdbadmin: :include:/home/admin/db-adminsowner-dbadmin: postmaster
This owner-dbadmin alias means that errors, e.g. undeliverable mails to dbadmin, are not sent to the orignial sender but to postmaster.
Content of /home/admin/db-admins:
[email protected]@[email protected]/home/admin/db-admins.maillog

362 U41095-J-Z125-4-76
Operating the Postfix server Mail servers
10.5.2 Programs for operating the Postfix mail server
The most important programs for operating the Postfix mail server are described below. The description covers the main parameters and options for these programs. A complete list of all the programs available for operating the mail services and their parameters/options is provided in the man pages for Postfix.
postfix - Starting and stopping the Postfix server
You use the postfix program to start and stop the Postfix mail server. In addition, after the configuration files /etc/postfix/master.cf and /etc/postfix/main.cf have been modified you can use postfix to read these files in again. You do not need to stop the Postfix mail server explicitly to do this.
On account of special POSIX features you should not call the postfix program directly, but use the encapsulation script /etc/init.d/MAIL.postfix for the postfix call. Before Postfix starts, this script regenerates, among other things, all the index files defined in the configuration file main.cf, thus preventing a divergence of source and index files.
startStarts the Postfix mail server.
stopStops the Postfix mail server.
reloadReads the (modified) configuration files in again.
[/opt/MAIL/postfix/sbin/]postfix
{ start | stop | reload }
/etc/init.d/MAIL.postfix
{ start | stop | reload }

U41095-J-Z125-4-76 363
Mail servers Operating the Postfix server
postconf - Displaying and modifying Postfix configuration parameters
The postconf program enables you to modify the values of the Postfix configuration param-eters or have them displayed on the screen. This applies both for parameters which are set specifically in the configuration file /etc/postfix/main.cf and for those preset by default.
No parameter specifiedShows all currently valid parameter values.
-dShows all default parameter values.
-nShows all currently valid parameter values which differ from the associated default value.
-eSets Postfix configuration parameters.The -e option makes sense above all for automatic setting of parameters via a shell script. Otherwise you can also process the configuration file /etc/postfix/main.cf with any editor (e.g. EDT).
postconf
[ -d] [-n ] [-e ]

364 U41095-J-Z125-4-76
Operating the Postfix server Mail servers
postqueue (mailq) - Processing mail queues (as a normal user)
With normal user authorization, the postqueue program enables you to execute operations on the mail queues which are organized as files in various subdirectories.
Each e-mail which the Postfix server receives for local delivery or forwarding is initially buffered in subdirectories of /var/spool/postfix, e.g. /var/spool/postfix/incoming or /var/spool/postfix/active.
The e-mails placed in the mail queues are handled as follows:
● As soon as an e-mail has been successfully delivered or forwarded, it is removed from the mail queues.
● If an e-mail cannot initially be forwarded or delivered, e.g. because the mail server cannot be reached, it is once more placed in a mail queue. Another attempt to deliver it is only made after a wait time.
The mailq program is supported only because of its compatibility with the Sendmail mail server and provides the same functionality as postqueue -p.
As users with normal user authorization do not have the sbin directory in their path, they must specify the complete path name.
-pLists the contents of the mail queues in a presentation which is familiar from the Sendmail program mailq.
-fCauses the Postfix server to make an attempt (possibly a repeated attempt) to deliver all e-mails in the mail queues. This is, for example, useful after connection problems have been remedied which have temporarily prevented the forwarding of e-mails. Instead of waiting for the wait time for a renewed delivery attempt to elapse you can thus initiate the immediate delivery of all waiting messages.
-s <site>Causes the immediate delivery of all e-mails intended for <site> which are contained in the mail queues.
[/opt/MAIL/postfix/sbin/]postqueue
{ -p | -f | -s <site>}
i

U41095-J-Z125-4-76 365
Mail servers Operating the Postfix server
postsuper - Processing mail queues (with SYSROOT authorization)
The postsuper program enables you to execute operations on the mail queues for which SYSROOT authorization is required.
-pDeletes old temporary files which are left over after a system or software crash.
-sChecks and repairs the structure of the mail queues. You are urgently recommended to perform this operation before each Postfix startup.
-d <queue-id>In the mail queue(s) specified by <directory> ..., deletes an e-mail with the queue ID <queue-id>. If you specify the value ALL for <queue-id>, all e-mails in the specified mail queue(s) are deleted. Default value for <directory> ... : hold, incoming, active, deferred
-h <queue-id>In the mail queue(s) specified by <directory> ..., places an e-mail with the queue ID <queue-id> in the hold status. This e-mail will then initially not be delivered or forwarded. If you specify the value ALL for <queue-id>, all e-mails in the specified mail queue(s) are placed in the hold status.Default value for <directory> ... : incoming, active, deferred
-H <queue-id>In the mail queue(s) specified by <directory> ..., terminates the hold status for an e-mail with the queue ID <queue-id>. If you specify the value ALL for <queue-id>, the hold status is terminated for all e-mails in the specified mail queue(s).Default value for <directory> ... : hold
<directory> ...Specifies one or more mail queue directories.
postsuper
[-p] [-s] [-d <queue-id>] [-h <queue-id>] [-H <queue-id>] [<directory> ...]

366 U41095-J-Z125-4-76
Operating the Postfix server Mail servers
postcat - Displaying the contents of messages in the mail queues
The postcat program enables the administrator to have the contents of individual messages (e-mails in the mail queues) displayed in a readable format.
-vActivates detailed logging for debugging purposes.
-qIn this case you only need to specify the queue ID of the e-mail to be displayed as <file>. postcat then automatically determines the complete path name, i.e. the mail queue which contains <file>.
-c <config_dir>The Postfix configuration file main.cf is located in the <config_dir> directory instead of the standard configuration directory.
<file> ...Name(s) of the file(s)/e-mails whose contents are to be displayed:
– If you specify the -q option you need only specify the queue ID(s) of the message(s) to be output.
– If you do not specify the -q option, you must specify the complete path name(s) of the message(s).
Example
An e-mail with the queue ID 457106EA05 is contained in the deferred queue /var/spool/postfix/deferred/4/. A file with the name /var/spool/postfix/deferred/4/457106EA05 thus exists.
You can have the contents of the e-mail 457106EA05 displayed as follows:
● postcat /var/spool/postfix/deferred/4/457106EA05
Here you must specify the complete path name as the argument.
● postcat -q 457106EA05
With the -q option it is sufficient if you specify the queue ID of the e-mail to be displayed.
[/opt/MAIL/postfix/sbin/]postcat
[-vq] [-c <config_dir>] [<file> ... ]

U41095-J-Z125-4-76 367
Mail servers Operating the Postfix server
postmap - Generating and processing index files (Postfix format)
Postfix uses index files (lookup tables, see page 358). The postmap program offers the following functionality for processing lookup tables:
● Generating index files from text files
● Displaying entries for a specific key value (index search)
● Adding entries to an index file
● Removing entries from an index file
The BS2000/OSD ported version of Postfix supports the hash and btree formats for index files.
-q <key> Searches the entry for the key value <key> and outputs the first assigned value.
-d <key>Deletes the entry with the key value <key>.
-i Reads entries from the standard input and inserts these in the index file <path-name>.db.
hash: | btree:Specifies the type of index file to be generated (hash or btree).
<path-name>Name of the file for which the associated index file <path-name>.db is to be generated.
postmap
[ -q <key>] [-d <key>] [-i ] [hash:|btree:]<path-name> ...
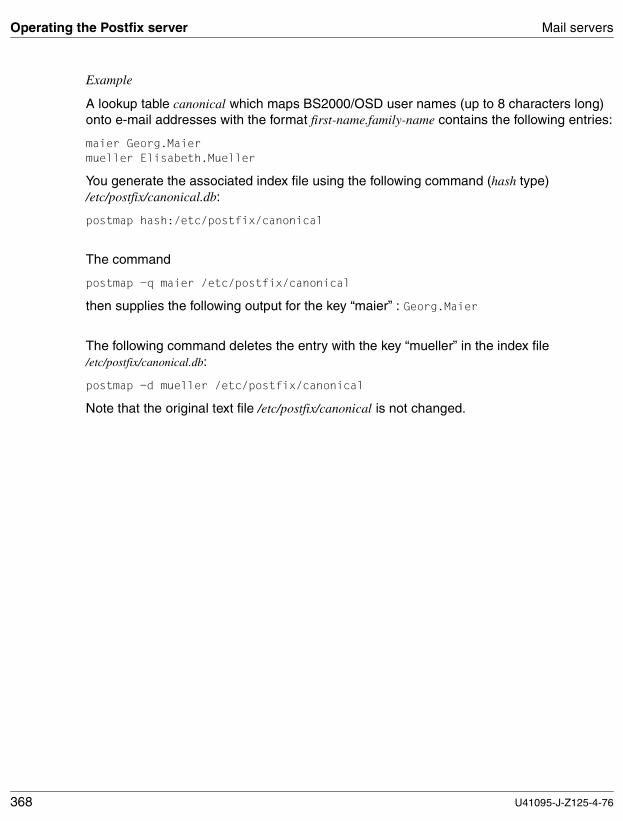
368 U41095-J-Z125-4-76
Operating the Postfix server Mail servers
Example
A lookup table canonical which maps BS2000/OSD user names (up to 8 characters long) onto e-mail addresses with the format first-name.family-name contains the following entries:
maier Georg.Maiermueller Elisabeth.Mueller
You generate the associated index file using the following command (hash type) /etc/postfix/canonical.db:
postmap hash:/etc/postfix/canonical
The command
postmap -q maier /etc/postfix/canonical
then supplies the following output for the key “maier” : Georg.Maier
The following command deletes the entry with the key “mueller” in the index file /etc/postfix/canonical.db:
postmap -d mueller /etc/postfix/canonical
Note that the original text file /etc/postfix/canonical is not changed.

U41095-J-Z125-4-76 369
Mail servers Operating the Postfix server
postalias - Generating and processing index files (alias format)
The postalias program differs from the postmap program only in the format of the input files (see page 359).
postalias offers the following functionality for processing lookup tables:
● Generating index files from text files
● Displaying entries for a specific key value (index search)
● Adding entries to an index file
● Removing entries from an index file
The BS2000/OSD ported version of postalias supports the hash and btree formats for index files.
-q <key> Searches the entry for the key value <key> and outputs the first assigned value.
-d <key>Deletes the entry with the key value <key>.
-i Reads entries from the standard input and inserts these in the index file <path-name>.db.
hash: | btree:Specifies the type of index file to be generated (hash or btree).
<path-name>Name of the file for which the associated index file <path-name>.db is to be generated.
postalias
[ -q <key>] [-d <key>] [-i <key>] [hash:|btree:]<path-name> ...

370 U41095-J-Z125-4-76
Operating the Postfix server Mail servers
Example
This example is based on the alias file from the example on page 361.
You generate the associated index file (hash type) with the following command /etc/postfix/aliases.db:
postalias hash:/etc/postfix/aliases
The command
postalias -q postmaster /etc/postfix/aliases
then supplies the following output for the key “postmaster”: sysroot
The following command deletes the entry with the key “sysroot” in the index file //etc/postfix/aliases.db:
postalias -d sysroot /etc/postfix/aliases
Note that the original text file /etc/postfix/aliases is not changed.
newaliases - Generating index files (alias format)
The newaliases program generates the associated index files for all files named in the config-uration parameter alias_database. The alias_database parameter is defined in the configu-ration file main.cf.
The newaliases program is supported for reasons of compatibility with the Sendmail mail server.
Example
The alias_database parameter is. for example, set as follows in the configuration file main.cf:
alias_database = hash:/etc/postfix/aliases
In this case you generate the index file /etc/postfix/aliases.db through the program call newaliases.

U41095-J-Z125-4-76 371
Mail servers Migration from Sendmail to Postfix
10.6 Migration from Sendmail to Postfix
Migration from Sendmail to Postfix requires relatively little effort as the Postfix mail server uses the Sendmail alias file format and the compatibility programs sendmail, mailq and newaliases are also available.
Two alternative procedures are available for migrating from the Sendmail server to the Postfix mail server:
● Installing the Postfix mail server only after the Sendmail server has been uninstalled.
● Installing the Postfix mail server in parallel to the existing Sendmail server installation.
Installing the Postfix mail server after uninstalling the Sendmail server
If you uninstall the Sendmail server before you install the Postfix mail server, you must ensure that the e-mails contained in the Sendmail server’s mail queue (default: /var/mqueue) are delivered before Sendmail is uninstalled. This is required because Postfix uses a queue system which is not compatible with the Sendmail queue system.
Proceed as follows:
Ê Stop the sendmail daemon.
Ê Use the following command to start a Sendmail run to empty the Sendmail mail queue:
/usr/sbin/sendmail -q
Ê If e-mails are still left in the Sendmail mail queue: As required, make further attempts to deliver the remaining e-mails or delete them.
Ê Start installation of the Postfix mail server (see page 345).

372 U41095-J-Z125-4-76
Migration from Sendmail to Postfix Mail servers
Installing the Postfix mail server in parallel to the existing Sendmail server installation
If clearing of the Sendmail mail queue is delayed, for example because mail servers have failed temporarily, it is advisable to initially leave the Sendmail installation as it is and to install a Postfix mail server in parallel.
Proceed as follows:
Ê Start installation of the Postfix mail server (see page 345).
If the Postfix installation routine finds an installed Sendmail, it issues a warning.
Ê Press the send key.
By doing so you ignore the warning and Postfix installation is continued.
The Postfix installation routine saves the sendmail program of the Sendmail server under the path /usr/sbin/sendmail.renamed.by.MAIL:postfix and replaces it by the Postfix variant.
If the Postfix installation routine finds an /etc/mail/aliases or /etc/aliases file (e.g. from an earlier Sendmail installation), it copies this file into the Postfix configuration directory. When installation has been completed the script call /etc/init.d/MAIL.postfix start is used to call the newaliases program automatically in order to generate the associated index file.
Ê Use the following command to start a Sendmail run to empty the Sendmail mail queue:
/usr/sbin/sendmail.renamed.by.MAIL:postfix -q
Before Postfix installation the /usr/sbin/mailq and /usr/sbin/newaliases calls were links on the Sendmail server to the Sendmail program. However, after successful Postfix installation the Postfix variant of the Sendmail program is started with these calls.
If after Postfix has been installed you still wish to use the Sendmail variants of the mailq and newaliases programs which operate on Sendmail files and queues, call the Sendmail program as follows with the suitable options selected:
● /usr/sbin/sendmail.renamed.by.MAIL:postfix -bi for the newaliases functionality
● /usr/sbin/sendmail.renamed.by.MAIL:postfix -bp for the mailq functionality
Postfix offers compatible support for the user-specific alias mechanism which is based on the .forward file contained in the home directory of the user concerned. As a result, no modifications to these files are required when migrating from Sendmail to Postfix.

U41095-J-Z125-4-76 373
11 Mail senders in BS2000/OSD
11.1 Installing and uninstalling mail senders
After the installation of the product files, a further installation step is required:
The address of the mail server (i.e. its DNS name or IP or IPv6 address) must be set using the mailServer option in the configuration file for the mail sender backend (see the section “mailServer” on page 379).
If there are problems, you should set the logLevel option in the configuration file in order to store diagnostic information in the logging file specified by means of logFile (see the sections “logFile” on page 376 and “logLevel” on page 377).
11.2 Option files
11.2.1 SYSSSI
The SYSSSI file specifies different parameters that are used by parts of the mail sender. The default name of the option file is:
$.SYSSSI.MAIL.031.MAILCLNT
Alternatively, it has the same name under the corresponding installation ID.
You can change the file name using the IMON logical ID SYSSSI.MAILCLNT.

374 U41095-J-Z125-4-76
Option files Mail senders in BS2000/OSD
Notation of the options in the option file
The various options must be entered in the option file in compliance with the following rules:
● Each option must be entered in a separate line.
● If the arguments of an option extend over several lines, each line to be continued must be concluded with a backslash (\), indicating that the line is to be continued.
● A line that begins with the number sign (#) in column 1 is ignored when the file is read in.
● No distinction is drawn between uppercase and lowercase for the option names.
● Unless otherwise specified, no distinction is drawn between uppercase and lowercase for the option values.
The available options are listed below:
defaultOptionFileName
The file name specified in the defaultOptionFileName option is used when the SEND-MAIL command is called with the default value *STD in the USER-OPTION-FILE operand.
<filename 1..54>Name of the file to be called by the SEND-MAIL command.Default: SYSDAT.MAIL.031.USER.OPT
defaultOptionFileName
<filename 1..54>

U41095-J-Z125-4-76 375
Mail senders in BS2000/OSD Option files
backendConfigurationFileName
The backendConfigurationFileName option specifies the name of the configuration file for the mail sender backend (see the section “Configuration file for the mail sender backend” on page 376).
<filename 1..54>Name of the configuration file.Default: $.SYSDAT.MAIL.031.SERVICE.OPT
backendConfigurationFileName
<filename 1..54>

376 U41095-J-Z125-4-76
Option files Mail senders in BS2000/OSD
11.2.2 Configuration file for the mail sender backend
The mail server backend is a TU task and:
● Receives an e-mail order from ASTI.
● Generates from this order a correctly formatted e-mail in accordance with MIME and S/MIME.
● Sends this e-mail to a mail server over an SMTP connection that may be secured by means of TLS/SSL.
The configuration options required for this are stored in a configuration file. The default file name is specified in the backendConfigurationFileName option in the SYSSSI file (see the section “SYSSSI” on page 373). This can be overwritten using the commands START-MAIL-SERVICE and MODIFY-MAIL-SERVICE-PARAMETERS.
The available options are listed below:
logFile
The logFile option specifies the name of the logging file in which the diagnostic messages are stored. The logLevel option (see below) specifies which messages are to be written in the file.
<filename 1..54>Name of the logging file.Default: $.SYSDAT.MAIL.031.LOG
logFile
<filename 1..54>

U41095-J-Z125-4-76 377
Mail senders in BS2000/OSD Option files
logLevel
The logLevel option specifies the priority of the diagnostic messages to be logged.
<selector>Specifies the functional set of messages to which the log level applies. The following values are possible:
<level>Specifies that all messages are to be logged with at least the specified priority. The possible values, in descending order of priority, are:
ALERTCRITICALERRORWARNINGNOTICEINFODEBUGNONE, which suppresses the logging of all messages
The logLevel option can be used more than once.
logLevel
<selector> <level>
ASTI Messages relating to order handling in ASTI
SMTP Messages relating to e-mail transfer to the SMTP server
TLS Messages relating to the TLS/SSL protection of the connection to the SMTP server
SMIME Messages relating to the S/MIME signing and/or encryption of e-mails
OTHER All other messages
ALL All messages

378 U41095-J-Z125-4-76
Option files Mail senders in BS2000/OSD
Example
logLevel ALL WARNINGlogLevel SMTP CRITICAL
This specifies that all messages with the priority WARNING are to be logged. The exception are SMTP messages, which are only to be logged when their priority is CRITICAL or higher.
Default: ALL CRITICAL
logMailContent
The logMailContent option specifies whether, for example, in ASTI logging at the highest level (“logLevel ASTI DEBUG”), the contents of e-mails (subject lines, e-mails and attach-ments) are to be logged as well. The logging of e-mail contents greatly increases the size of the logging files and causes data protection problems. It should therefore only be enabled when absolutely necessary and when precautions are taken to prevent the contents of e-mails from falling into the hands of people not authorized to read them.
NO The contents of e-mails are not logged. This is the default.
YES The contents of e-mails are logged when the logging level is sufficiently high.
logMailContent
NO / YES

U41095-J-Z125-4-76 379
Mail senders in BS2000/OSD Option files
mailServer
The mailServer option specifies the mail server to which the e-mail is to be forwarded.
<DNS-name | IP-address | IPv6-address>DNS name, IP address or IPv6 address of the mail server to which the e-mail is to be forwarded.
mailServerPort
The mail server is generally addressed via port 25. The mailServerPort may specify a different port for the mail server.
<port-number>Port number of the mail server.Default: 25
mailServer
<DNS-name | IP-address | IPv6-address>
mailServerPort
<port-number>

380 U41095-J-Z125-4-76
Option files Mail senders in BS2000/OSD
mailLogLevel
The mailLogLevel option specifies which data is to be logged.
0No logging (default).
1Simple logging. In this case, the following data is logged:
– Time– ASTI order ID– Sender addresses (“From”), both envelope and header– Recipient addresses (“To”), both envelope and header– Copy recipient addresses (“Cc”) (header)– Success status of the transfer to the SMTP server, including the OK message of the
mail server. Depending on the mail server software, this message may contain part of the message ID.
2Advanced logging.In addition to the data logged in simple logging, the subject header is logged. Since the subject header generally contains contents of the e-mail, data protection aspects have to be considered.
mailLogLevel
0 | 1 | 2

U41095-J-Z125-4-76 381
Mail senders in BS2000/OSD Option files
mailLogFile
The mailLogLevel option specifies the name of the e-mail logging file. Every e-mail send order sent to the service is entered in this file. The information written to the file depends on the mailLogLevel option (see page 380).
<filename 1..54>Name of the e-mail logging file.Default: $.SYSDAT.MAIL.031.MAILLOG
tempFilePrefix
Temporary files are used for signing or encryption with S/MIME. The names of these temporary files consist of a prefix and different suffixes. The prefix is specified in the tempFilePrefix option.
This option allows you to stored the files on a pubset and/or under a user ID other than the default pubset or TSOS ID. To this end, a CAT ID or user ID must be specified in the prefix.
<prefix>Prefix for the name of the temporary files.Default: #SYSDAT.MAIL.SMIME-TMP
mailLogFile
<filename 1..54>
tempFilePrefix
<prefix>

382 U41095-J-Z125-4-76
Option files Mail senders in BS2000/OSD
tlsSecureConnection
The tlsSecureConnection option specifies whether the SMTP connection to the SMTP server is to be secured with TLS.
NONEThe SMTP connection is never secured (default).
OPTIONALThe SMTP connection is secured if the SMTP server supports it. If not, an unsecured connection is used.
REQUIREThe SMTP connection is closed if the SMTP server does not support security.
tlsSecureConnection
NONE | OPTIONAL | REQUIRE

U41095-J-Z125-4-76 383
Mail senders in BS2000/OSD Option files
tlsProtocol
OpenSSL supports versions 2 and 3 of the SSL protocol and version 1 of the TLS protocol. You can use the tlsProtocol option to select which of these protocols are to be enabled.
+The protocol specified following this is permissible.
-The protocol specified following this is not permissible.
If neither “+” nor “-” is specified, the effect is the same as when “+” is specified.
Example
tlsProtocol SSLv3 TLSv1 and -tlsProtocol ALL -SSLv2 have the same effect.
SSLv2Version 2 of the SSL protocol
SSLv3Version 3 of the SSL protocol
TLSv1Version 1 of the TLS protocol
ALLAll protocols are to be enabled.
Default: ALL -SSLv2
tlsProtocol
[+ | -] {SSLv2 | SSLv3 | TLSv1 | ALL } ...
i

384 U41095-J-Z125-4-76
Option files Mail senders in BS2000/OSD
tlsCipherSuite
You can use the tlsCipherSuite option to specify a list of preferred encryption methods. If this option is not specified, a default list of preferences is used.
<specification>Specification in a list of preferred encryption methods (for more information, see the description of the structure of a specification below).Default: ALL: !EXP: !ADH
Description of the structure of a specification
The specification consists of one or more cipher mnemonics separated by a colon (:).
A cipher mnemonic can assume the following forms:
● A cipher mnemonic can consist of a single encryption suite (e.g. DES-CBC-SHA).
● A cipher mnemonic can represent:
– A list of encryption suites that contain a particular algorithm
– Encryption suites of a particular type
For example, SHA1 represents all encryption suites that use the SHA1 digest algorithm, and SSLv3 represents all SSL version 3 algorithms.
● Lists of encryption suites can be combined to form a single cipher mnemonic using the plus sign (+). This is then interpreted as a logical AND operation. SHA1+DES thus represents all encryption suites that contain the SHA1 and DES algorithms.
tlsCipherSuite
<specification>

U41095-J-Z125-4-76 385
Mail senders in BS2000/OSD Option files
● You can precede each cipher mnemonic with an exclamation mark (!), a minus sign (-) or a plus sign (+):
– If you precede it with an exclamation mark (!), the encryption suites are permanently removed from the list of preferred methods and do not reappear in it even if they are explicitly specified.
– If you precede it with a minus sign (-), the encryption suites are removed from the list of preferred methods, but some or all of them can be added again using subse-quent options.
– If you precede it with a plus sign (+), the encryption suites are moved to the end of the list of preferred methods. No encryption suites are added to the list.
– If none of these three characters precedes the cipher mnemonic, it is interpreted as a list of encryption suites to be appended to the current list of preferred methods. If this includes an encryption suite that is already contained in the current list of preferred methods, it is ignored and not moved to the end of the list.
● The cipher mnemonic “@STRENGTH” can be inserted at any point to sort the current list of preferred methods by the strength of the encryption algorithms (i.e. by the length of the encryption key, above all).
Permissible cipher mnemonics
The permissible cipher mnemonics are described below.
ALLAll encryption suites with the exception of the eNULL ciphers. These must be activated explicitly.
HIGHEncryption suites with key lengths greater than 128 bits. Since 3DES is evaluated with a length of 168 bits (instead of 112 bits, as evaluated by some cryptologists), it belongs to this suite class.
MEDIUMEncryption suites with a key length of 128 bits.
LOWEncryption suites with a key length of 64 or 56 bits. Export encryption suites are an exception.
EXP, EXPORTExport encryption algorithms including 40- and 56-bit algorithms.
EXPORT4040-bit export encryption algorithms.

386 U41095-J-Z125-4-76
Option files Mail senders in BS2000/OSD
EXPORT5656-bit export encryption algorithms.
eNULL, NULL“NULL” encryption algorithms (i.e. algorithms without encryption). Since these do not offer encryption and are therefore a security risk, they are disabled by default and have to be explicitly specified, if required.
aNULLEncryption suites without authentication. These are currently the anonymous Diffie-Hellman algorithms. These algorithms are vulnerable to “man in the middle” attacks, so it is not advisable to use them.
kRSA, RSAEncryption suites with RSA key exchange.
kEDHEncryption suites with a short-lived (ephemeral) Diffie-Hellman key agreement.
aRSAEncryption suites with RSA authentication (i.e. the certificates contain RSA keys).
aDSS, DSSEncryption suites with DSS authentication (i.e. the certificates contain DSS keys).
TLSv1, SSLv3, SSLv2TLS v1, SSL v3 or SSL v2 encryption suites. The TLSv1 and SSLv3 suites are identical.
DHEncryption suites with Diffie-Hellman key exchange, including anonymous exchange.
ADHEncryption suites with anonymous Diffie-Hellman key exchange.
AESEncryption suites with AES encryption (128- and 256-bit key length).
3DESEncryption suites with Triple DES encryption.
DESEncryption suites with DES encryption (not Triple DES).
RC4Encryption suites with RC4 encryption.
RC2Encryption suites with RC2 encryption.
MD5Encryption suites with MD5 hash function.

U41095-J-Z125-4-76 387
Mail senders in BS2000/OSD Option files
SHA1, SHAEncryption suites with SHA1 hash function.
The table below shows the available encryption suites.
Name Version Key exchange
Authenti-cation
Encryption Digest Export
DHE-RSA-AES256-SHA SSLv3 DH RSA AES(256) SHA1
DHE-DSS-AES256-SHA SSLv3 DH DSS AES(256) SHA1
AES256-SHA SSLv3 RSA RSA AES(256) SHA1
DHE-RSA-AES128-SHA SSLv3 DH RSA AES(128) SHA1
DHE-DSS-AES128-SHA SSLv3 DH DSS AES(128) SHA1
AES-128-SHA SSLv3 RSA RSA AES(128) SHA1
DHE-DSS-RC4-SHA SSLv3 DH DSS RC4(128) SHA1
EDH-RSA-DES-CBC3-SHA SSLv3 DH RSA 3DES(168) SHA1
EDH-DSS-DES-CBC3-SHA SSLv3 DH DSS 3DES(168) SHA1
DES-CBC3-SHA SSLv3 RSA RSA 3DES(168) SHA1
RC4-SHA SSLv3 RSA RSA RC4(128) SHA1
RC4-MD5 SSLv3 RSA RSA RC4(128) MD5
EDH-RSA-DES-CBC-SHA SSLv3 DH RSA DES(56) SHA1
EDH-DSS-DES-CBC-SHA SSLv3 DH DSS DES(56) SHA1
DES-CBC-SHA SSLv3 RSA RSA DES(56) SHA1
DES-CBC3-MD5 SSLv2 RSA RSA 3DES(168) MD5
RC2-CBC-MD5 SSLv2 RSA RSA RC2(128) MD5
RC4-MD5 SSLv2 RSA RSA RC4(128) MD5
RC4-64-MD5 SSLv2 RSA RSA RC4(64) MD5
DES-CBC-MD5 SSLv2 RSA RSA DES(56) MD5
EXP1024-DHE-DSS-RC4-SHA SSLv3 DH(1024) DSS RC4(56) SHA1 export
EXP1024-RC4-SHA SSLv3 RSA(1024) RSA RC4(56) SHA1 export
EXP1024-DHE-DSS-DES-CBC-SHA SSLv3 DH(1024) DSS DES(56) SHA1 export
EXP1024-DES-CBC-SHA SSLv3 RSA(1024) RSA DES(56) SHA1 export
EXP1024-RC2-CBC-MD5 SSLv3 RSA(1024) RSA RC2(56) MD5 export
EXP1024-RC4-MD5 SSLv3 RSA(1024) RSA RC4(56) MD5 export
EXP-EDH-RSA-DES-CBC-SHA SSLv3 DH(512) RSA DES(40) SHA1 export
Available encryption suites

388 U41095-J-Z125-4-76
Option files Mail senders in BS2000/OSD
EXP-EDH-DSS-DES-CBC-SHA SSLv3 DH(512) DSS DES(40) SHA1 Export
EXP-DES-CBC-SHA SSLv3 RSA(512) RSA DES(40) SHA1 Export
EXP-RC2-CBC-MD5 SSLv3 RSA(512) RSA RC2(40) MD5 Export
EXP-RC4-MD5 SSLv3 RSA(512) RSA RC4(40) MD5 Export
EXP-RC2-CBC-MD5 SSLv2 RSA(512) RSA RC2(40) MD5 Export
EXP-RC4-MD5 SSLv2 RSA(512) RSA RC4(40) MD5 Export
ADH-AES256-SHA SSLv3 DH None AES(256) SHA1
ADH-AES128-SHA SSLv3 DH None AES(128) SHA1
ADH-DES-CBC3-SHA SSLv3 DH None 3DES(168) SHA1
ADH-DES-CBC-SHA SSLv3 DH None DES(56) SHA1
ADH-RC4-MD5 SSLv3 DH None RC4(128) MD5
EXP-ADH-DES-CBC-SHA SSLv3 DH(512) None DES(40) SHA1 Export
EXP-ADH-RC4-MD5 SSLv3 DH(512) None RC4(40) MD5 Export
NULL-SHA SSLv3 RSA RSA None SHA1
NULL-MD5 SSLv3 RSA RSA None MD5
Name Version Key exchange
Authenti-cation
Encryption Digest Export
Available encryption suites

U41095-J-Z125-4-76 389
Mail senders in BS2000/OSD Option files
tlsCertificateFile
The tlsCertificateFile option allows you to specify a file that contains the X.509 client certif-icate in PEM format. This file can also contain the private client key. Generally, however, the certificate and key are stored in separate files. In this case, the key file is specified using the tlsKeyFile option (see below).
<filename 1..54>Name of the file that contains the X.509 client certificate in PEM format.
*NONENo file with certificates is used (default).
tlsKeyFile
The tlsKeyFile option allows you to specify a file that contains the private client key in PEM format.
If both the certificate and private key are contained in the same file (see the tlsCertificateFile option above), the tlsKeyFile option does not have to be specified.
The client key cannot be secured with a passphrase because it is not possible to enter a passphrase at startup of the service task.
<filename 1..54>Name of the file that contains the private client key.Default: file name specified by means of tlsCertificateFile
*NONEA separate file is not used for the client key.
tlsCertificateFile
<filename 1..54> | *NONE
tlsKeyFile
<filename 1..54> | *NONE

390 U41095-J-Z125-4-76
Option files Mail senders in BS2000/OSD
tlsCACertificateFile
The tlsCACertificateFile option allows you to specify a file that contains in PEM format the CA certificates that are required for authentication on the server. The individual PEM certif-icates are arranged sequentially in the file.
To add or delete certificates, you can edit the file in a text editor. The certificates are entered in the file as follows:
-----BEGIN CERTIFICATE-----
< CA certificate in Base64 coding >
-----END CERTIFICATE-----
Any text outside these sequences is ignored and can therefore be used to identify the certif-icates that are not available in readable form because of ASN.1/Base64 coding.
<filename 1..54>Name of the file that contains the certificates in PEM format that are required for authen-tication on the server.
*NONENo file is specified (default).
tlsCACertificateFile
<filename 1..54> | *NONE

U41095-J-Z125-4-76 391
Mail senders in BS2000/OSD Option files
tlsCARevocationFile
The tlsCARevocationFile option allows you to specify a file that contains the CRLs (certificate revocation lists) of the certificate authorities (CA). Certificates issued by a certificate authority can be declared invalid by the publication of a certificate revocation list (CRL).
<filename 1..54>Name of the file that contains the CRLs of the certificate authorities.
*NONENo file with CRLs is specified (default).
tlsVerifyServer
The tlsVerifyServer option allows you to specify whether a server certificate has to be verified.
YESThe certificate must be verified (default).
NOThe certificate does not have to be verified. In this case, there is a danger that an attacker (“man in the middle”) will be able to tap the data transfer on the connection between the mail sender backend and mail server unnoticed.
tlsCARevocationFile
<filename 1..54> | *NONE
tlsVerifyServer
YES | NO

392 U41095-J-Z125-4-76
Option files Mail senders in BS2000/OSD
tlsVerifyDepth
The tlsVerifyDepth option allows you to specify the verification depth (i.e. the maximum permissible number of certificates between the server certificate and the certificate known to the service task).
● The default for the maximum depth is 1. In this case, if it is to be accepted, the server certificate must have been issued directly by a certificate authority (CA) known to the service task.
● If the maximum depth is exceeded, the connection is aborted provided the verification of the server certificate is not disabled by means of tlsVerifyServer (see page 391).
● It makes no sense to specify a depth of 0. In this case, only self-signed certificates would be permissible.
<depth>Number of maximum permissible certificates between the server certificate and the certificate known to the service task.Default: 1
tlsUseCryptoHardware
The tlsUseCryptoHardware option allows you to specify whether crypto hardware such as an openCRYPTTM box (see the openCRYPT manual) is to be used to calculate cryptographic algorithms.
NOCrypto hardware is not used (default).
YES Crypto hardware is used.
tlsVerifyDepth
<depth>
tlsUseCryptoHardware
NO | YES

U41095-J-Z125-4-76 393
Mail senders in BS2000/OSD Mail service commands
11.3 Mail service commands
START-MAIL-SERVICE
The START-MAIL-SERVICE command starts the ASTI service task that processes the SMTP dialog with the mail server.
Domain SYSTEM-MANAGEMENT
Privileges TSOS
Operand description
ORDER-LIMIT = 255 / <integer 1..32000>This operand specifies how many orders can be active at any one time.
CONFIGURATION-FILE = *STD / <filename 1..54 without-gen>Specifies the file that contains the configuration options for the service task. You will find the contents of the file in the section “Configuration file for the mail sender backend” on page 376.
CONFIGURATION-FILE = *STDThe file name specified for the backendConfigurationFileName option in the SYSSSI file is used for the querying of the configuration options (see the section “SYSSSI” on page 373).
CONFIGURATION-FILE = <filename 1..54 without-gen>Specifies the file that contains the configuration options.
START-MAIL-SERVICE
ORDER-LIMIT = 255 / <integer 1..32000>
,CONFIGURATION-FILE = *STD / <filename 1..54 without-gen>

394 U41095-J-Z125-4-76
Mail service commands Mail senders in BS2000/OSD
Return codes
(SC2) SC1 Maincode Meaning
0 CMD0001 No error
1 CMD0202 Syntax error
64 CMD0216 The user has no authorization for the command
64 YML0120 The ASTI subsystem is not available
64 YML0130 The configuration cannot be read or does not exist
64 YML0132 ASTI reports an error
64 YML0134 The ASTI service is already running
64 YML0136 The program for the mail sender backend cannot be found
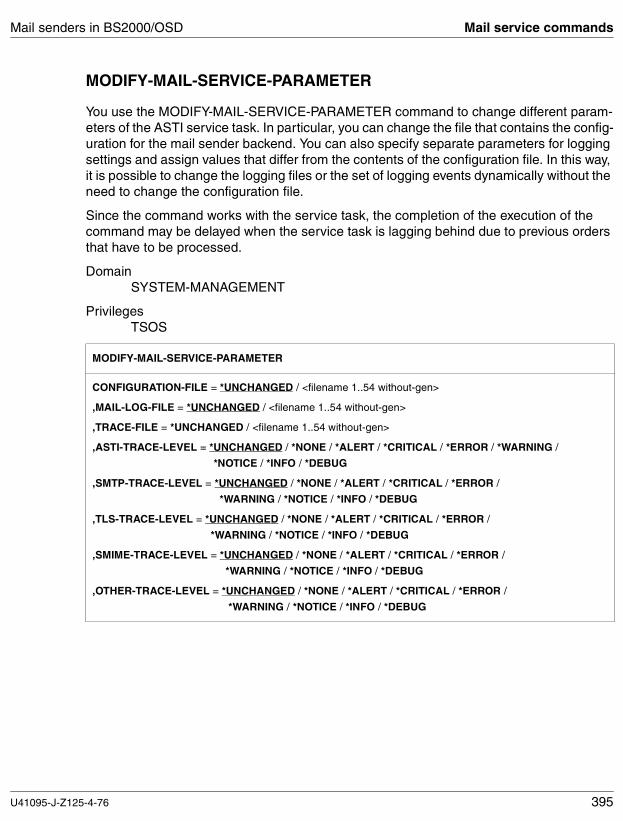
U41095-J-Z125-4-76 395
Mail senders in BS2000/OSD Mail service commands
MODIFY-MAIL-SERVICE-PARAMETER
You use the MODIFY-MAIL-SERVICE-PARAMETER command to change different param-eters of the ASTI service task. In particular, you can change the file that contains the config-uration for the mail sender backend. You can also specify separate parameters for logging settings and assign values that differ from the contents of the configuration file. In this way, it is possible to change the logging files or the set of logging events dynamically without the need to change the configuration file.
Since the command works with the service task, the completion of the execution of the command may be delayed when the service task is lagging behind due to previous orders that have to be processed.
Domain SYSTEM-MANAGEMENT
Privileges TSOS
MODIFY-MAIL-SERVICE-PARAMETER
CONFIGURATION-FILE = *UNCHANGED / <filename 1..54 without-gen>
,MAIL-LOG-FILE = *UNCHANGED / <filename 1..54 without-gen>
,TRACE-FILE = *UNCHANGED / <filename 1..54 without-gen>
,ASTI-TRACE-LEVEL = *UNCHANGED / *NONE / *ALERT / *CRITICAL / *ERROR / *WARNING /
*NOTICE / *INFO / *DEBUG
,SMTP-TRACE-LEVEL = *UNCHANGED / *NONE / *ALERT / *CRITICAL / *ERROR /
*WARNING / *NOTICE / *INFO / *DEBUG
,TLS-TRACE-LEVEL = *UNCHANGED / *NONE / *ALERT / *CRITICAL / *ERROR /
*WARNING / *NOTICE / *INFO / *DEBUG
,SMIME-TRACE-LEVEL = *UNCHANGED / *NONE / *ALERT / *CRITICAL / *ERROR /
*WARNING / *NOTICE / *INFO / *DEBUG
,OTHER-TRACE-LEVEL = *UNCHANGED / *NONE / *ALERT / *CRITICAL / *ERROR /
*WARNING / *NOTICE / *INFO / *DEBUG

396 U41095-J-Z125-4-76
Mail service commands Mail senders in BS2000/OSD
Operand description
CONFIGURATION-FILE = *UNCHANGED / <filename 1..54 without-gen>Specifies the file that contains the configuration options for the service task. You will find the contents of the file in the section “Configuration file for the mail sender backend” on page 376.
CONFIGURATION-FILE = *UNCHANGEDThe name of the configuration file remains unchanged.
CONFIGURATION-FILE = <filename 1..54 without-gen>Specifies the file that contains the configuration options for the service task. If the name of the configuration currently being used is specified, this file is read in again and any changes made to the file become effective.
MAIL-LOG-FILE = *UNCHANGED / <filename 1..54 without-gen>Specifies the name of the file in which the mail send result is to be logged (see the mailLogFile option on page 381). It is not possible to access the file when the mail service is running. To open the file, the assignment must therefore be made (temporarily) to another file.
MAIL-LOG-FILE = *UNCHANGEDThe name of the mail logging file remains unchanged.
MAIL-LOG-FILE = <filename 1..54 without-gen>Specifies the name of the file in which the mail send result is to be logged.
TRACE-FILE = *UNCHANGED / <filename 1..54 without-gen>Specifies the name of the file in which diagnostic messages are to be logged (see the logFile option on page 376). It is not possible to access the file when the mail service is running. To open the file, the assignment must therefore be made (temporarily) to another file.
TRACE-FILE = *UNCHANGEDThe name of the logging file remains unchanged.
TRACE-FILE = <filename 1..54 without-gen>Specifies the name of the file in which diagnostic messages are to be logged.
ASTI-TRACE-LEVEL = *UNCHANGED / *NONE / *ALERT / *CRITICAL / *ERROR / *WARNING / *NOTICE / *INFO / *DEBUGSpecifies the filter level for the logging of diagnostic messages relating to ASTI actions (see the logLevel option on page 377).
SMTP-TRACE-LEVEL = *UNCHANGED / *NONE / *ALERT / *CRITICAL / *ERROR / *WARNING / *NOTICE / *INFO / *DEBUGSpecifies the filter level for the logging of diagnostic messages relating to the SMTP protocol (see the logLevel option on page 377).

U41095-J-Z125-4-76 397
Mail senders in BS2000/OSD Mail service commands
TLS-TRACE-LEVEL = *UNCHANGED / *NONE / *ALERT / *CRITICAL / *ERROR / *WARNING / *NOTICE / *INFO / *DEBUGSpecifies the filter level for the logging of diagnostic messages relating to the TLS protocol (see the logLevel option on page 377).
SMIME-TRACE-LEVEL = *UNCHANGED / *NONE / *ALERT / *CRITICAL / *ERROR / *WARNING / *NOTICE / *INFO / *DEBUGSpecifies the filter level for the logging of diagnostic messages relating to S/MIME actions (see the logLevel option on page 377).
OTHER-TRACE-LEVEL = *UNCHANGED / *NONE / *ALERT / *CRITICAL / *ERROR / *WARNING / *NOTICE / *INFO / *DEBUGSpecifies the filter level for the logging of diagnostic messages relating to other actions (see the logLevel option on page 377).
Return codes
(SC2) SC1 Maincode Meaning
0 CMD0001 No error
1 CMD0202 Syntax error
64 CMD0216 The user has no authorization for the command
32 CMD0220 Internal error
64 YML0120 The ASTI subsystem is not available
64 YML0130 The configuration file cannot be read or does not exist
64 YML0131 Error accessing file
64 YML0140 The mail service is not running
64 YML0148 The maximum order limit has been reached
32 YML0176 Unexpected ASTI error

398 U41095-J-Z125-4-76
Mail service commands Mail senders in BS2000/OSD
SHOW-MAIL-SERVICE-PARAMETER
The SHOW-MAIL-SERVICE-PARAMETER command outputs the current settings of the mail service parameters.
In some cases (when a MODIFY-MAIL-SERVICE-PARAMETER command has not been issued beforehand), the command works together with the service task. The completion of the execution of the command may therefore be delayed when the service task is lagging behind due to previous orders that have to be processed.
Domain SYSTEM-MANAGEMENT
Privileges TSOS
Example
/SHOW-MAIL-SERVICE-PARAMETER% Configuration file: :DEFL:$TSOSDEFL.SYSDAT.MAIL.031.SERVICE.OPT% Mail log file: $.SYSDAT.MAIL.031.MAILLOG% Trace file: $.SYSDAT.MAIL.031.LOG% Trace level% ASTI: *ERROR% SMTP: *DEBUG% TLS: *ERROR% SMIME: *INFO% OTHER: *ERROR
SHOW-MAIL-SERVICE-PARAMETER

U41095-J-Z125-4-76 399
Mail senders in BS2000/OSD Mail service commands
Return codes
(SC2) SC1 Maincode Meaning
0 CMD0001 No error
1 CMD0202 Syntax error
64 CMD0216 The user has no authorization for the command
32 CMD0220 Internal error
64 YML0120 The ASTI subsystem is not available
64 YML0140 The mail service is not running
128 YML0148 The maximum order limit has been reached
32 YML0176 Unexpected ASTI error
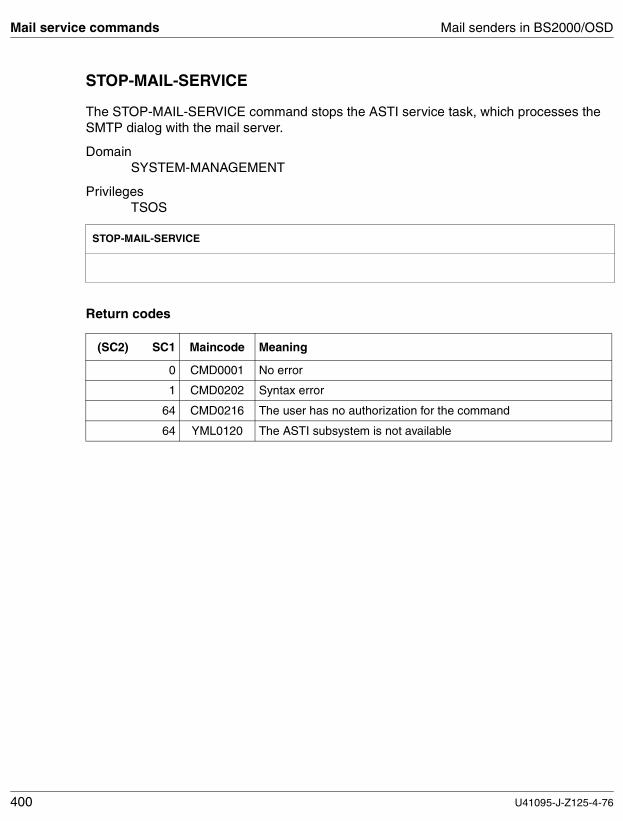
400 U41095-J-Z125-4-76
Mail service commands Mail senders in BS2000/OSD
STOP-MAIL-SERVICE
The STOP-MAIL-SERVICE command stops the ASTI service task, which processes the SMTP dialog with the mail server.
Domain SYSTEM-MANAGEMENT
Privileges TSOS
Return codes
STOP-MAIL-SERVICE
(SC2) SC1 Maincode Meaning
0 CMD0001 No error
1 CMD0202 Syntax error
64 CMD0216 The user has no authorization for the command
64 YML0120 The ASTI subsystem is not available

U41095-J-Z125-4-76 401
Mail senders in BS2000/OSD Messages
11.4 Messages
YML0100 INTERNAL ERROR IN MAILCLNT-SUBSYSTEM-INITIALIZATION; ERROR CODE '(&&00)'
MeaningSome operating resources aren't available. This resources areaccording to the error code:0000 - No memory space for subsystem object available.0001 - No memory space for MAILCLNT error trace available.0002 - No memory space for MAILCLNT event trace available.0005 - Server bourse can't be created.0008 - Error at reading configuration file.0011 - Error at connection of holder task with SDF.0012 - Error at notification of DSSM.
Response<None>
YML0105 ERROR IN DSSM-MAILCLNT-INTERFACE; ERROR CODE '(&&00)'
MeaningThe cause for this message is according to the error code:0001 - A notification of DSSM failed.0002 - Some internal error occured during restart of MAILCLNT subsystem.
Response<None>
YML0110 THE FOLLOWING SYSTEM DUMP OF TASK YML1 SERVES AS DIAGNOSTIC AID
MeaningIf the reason for the occured problem isn''t already clear from the previousmessage, then take the dump please and send it to your support.
Response<None>
YML0120 SUBSYSTEM ASTI IS NOT AVAILABLE
MeaningThe ASTI subsystem must be available for command execution.
ResponseInform your system administrator.

402 U41095-J-Z125-4-76
Messages Mail senders in BS2000/OSD
YML0130 CONFIGURATION FILE '(&&00)' UNREADABLE OR DOESN'T EXIST
MeaningThe specified configuration file is unreadable or does not exist.
ResponseSpecify the name of a readable file.
YML0131 Error accessing the file '(&00)
MeaningThe specified file cannot be accessed.
ResponseSpecify the valid name of an accessible file.
YML0132 STARTING MAIL SERVICE FAILED. ASTI RC: '(&&00)'
MeaningThe start of the ASTI service MAILCLNT failed with the displayed ASTI return code.
Response<None>
YML0134 THE MAIL SERVICE IS ALREADY RUNNING
MeaningThe ASTI service MAILCLNT is already running.
Response<None>
YML0136 IMON COULD NOT FIND LOAD LIBRARY
MeaningIMON could not find the load library with the program for the ASTI service.
ResponseCheck the product installation.
YML0138 MAIL SERVICE IS NOT RUNNING
MeaningThe mail service is not active and can therefore not be stopped.
Response<None>
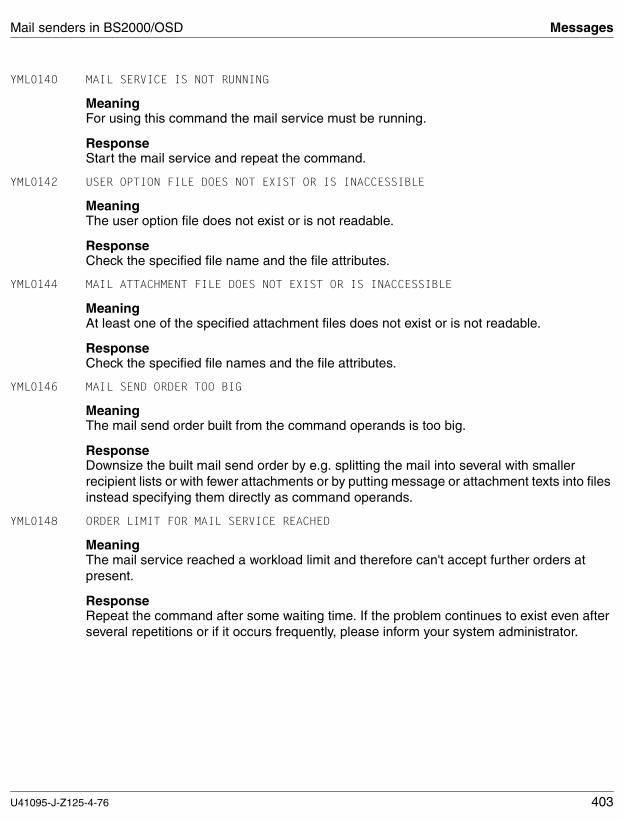
U41095-J-Z125-4-76 403
Mail senders in BS2000/OSD Messages
YML0140 MAIL SERVICE IS NOT RUNNING
MeaningFor using this command the mail service must be running.
ResponseStart the mail service and repeat the command.
YML0142 USER OPTION FILE DOES NOT EXIST OR IS INACCESSIBLE
MeaningThe user option file does not exist or is not readable.
ResponseCheck the specified file name and the file attributes.
YML0144 MAIL ATTACHMENT FILE DOES NOT EXIST OR IS INACCESSIBLE
MeaningAt least one of the specified attachment files does not exist or is not readable.
ResponseCheck the specified file names and the file attributes.
YML0146 MAIL SEND ORDER TOO BIG
MeaningThe mail send order built from the command operands is too big.
ResponseDownsize the built mail send order by e.g. splitting the mail into several with smaller recipient lists or with fewer attachments or by putting message or attachment texts into files instead specifying them directly as command operands.
YML0148 ORDER LIMIT FOR MAIL SERVICE REACHED
MeaningThe mail service reached a workload limit and therefore can't accept further orders at present.
ResponseRepeat the command after some waiting time. If the problem continues to exist even after several repetitions or if it occurs frequently, please inform your system administrator.

404 U41095-J-Z125-4-76
Messages Mail senders in BS2000/OSD
YML0160 MAIL SEND ORDER SUBMITTED WITH ORDER ID '(&&00)'
MeaningThe mail send order is submitted to ASTI with the specified order id.
Response<None>
YML0170 MAIL SEND ORDER CARRIED OUT; MAIL SERVER RESULT: '(&&00)'
MeaningThe mail send order is submitted to an SMTP mail server.
Response<None>
YML0171 MAIL SEND ORDER FAILED; MAIL SERVER RESULT: ''(&&00)'
MeaningThe submission of the mail send order to an SMTP mail server failed.
ResponseInform your system administrator.
YML0172 MAIL SERVICE NOT ACTIVE
MeaningThe ASTI mail service is not started.
ResponseInform your system administrator.
YML0174 NO SENDER ADDRESS SPECIFIED
MeaningNeither per FROM operand nor per user option file a sender address has been specified.
ResponseSpecify a sender address.
YML0176 UNEXPECTED ASTI ERROR; ASTI RC: '(&00)'
MeaningThe call of the ASTI subsystem failed with an unexpected error code.
ResponseInform your system administrator.

U41095-J-Z125-4-76 405
Mail senders in BS2000/OSD Messages
YML0203 INVALID OR NON-EXISTENT S/MIME FILE
MeaningA key, certificate or crl file specified in the command or in an option file is non-existent or contains invalid data.
Response<None>
YML0210 THE ORDER COULD NOT BE FOUND
MeaningThe specified order could not be found.
ResponseCheck the order ID.
YML0211 NO ORDER FOUND
MeaningNo order found with specified selection conditions.
ResponseCheck the selection conditions.
YML0212 YOU ARE NOT ALLOWED TO ACCESS THIS ORDER
MeaningThe specified order is owned by another user.
ResponseCheck the order ID.
YML0214 COMMAND CAN'T BE EXECUTED BECAUSE OF RESOURCE SATURATION
MeaningSome resources needed for command execution are not available at the moment.
ResponseWait some time and repeat the command.
YML0215 NO RESULT REQUESTED AT ORDER SUBMISSION
MeaningNo result can be delivered because at order submission no result return has been requested.
Response<None>

406 U41095-J-Z125-4-76
Messages Mail senders in BS2000/OSD
YML0216 NO ACCESS TO ORDER, BECAUSE SUBMITTED BY FOREIGN TASK
MeaningThe order can't be accessed as long the order submitting task is still active.
ResponseChange to the order submitting task or wait for the completion of this task.
YML0218 ORDER IS NOT A MAIL SEND ORDER
MeaningThe order is not a mail send order but an order used for internal purposes.
Response<None>
YML0220 YOU ARE NOT ALLOWED TO DELETE THIS ORDER
MeaningYou are not allowed to delete this order, because it is submitted by an other user.
Response<None>
YML0221 YOU ARE NOT AUTHORIZED TO DELETE THE ORDERS OF OTHER USERS
MeaningYou do not have the required privileges to delete the orders of other users.
Response<None>
YML0222 ORDER IS STILL NOT COMPLETED
MeaningThe order is just in processing so still no result is available.
ResponseWait some time and repeat then the command.

U41095-J-Z125-4-76 407
Related publications
Ordering manuals
The manuals are available as online manuals, see http://manuals.fujitsu-siemens.com, or in printed form which must be paid and ordered separately at http://FSC-manualshop.com.
openNet Server (BS2000/OSD)BCAM User Guide
interNet Services (BS2000/OSD)User Guide
openNet Server (BS2000/OSD)IPv6 Introduction and Conversion Guide, Stage 1User Guide
openNet Server (BS2000/OSD)IPSec V1.0 User Guide
openCRYPT (BS2000/OSD) Security with CryptographyUser Guide
openNet Server, interNet Services (BS2000/OSD)SNMP Management for openNet Server and interNet ServicesUser Guide
SOCKETS(BS2000) V2.2SOCKETS for BS2000/OSDUser Guide

408 U41095-J-Z125-4-76
Related publications
POSIX (BS2000/OSD)SOCKETS/XTI for POSIXUser Guide
CMX (BS2000)Communication Method in BS2000 User Guide
SNMP Management V5.0SNMP Management for BS2000/OSDUser Guide
SNMP Management V6.0SNMP Management for BS2000/OSDUser Guide
C Library Functions (BS2000/OSD)for POSIX ApplicationsReference Manual
XHCS(BS2000/OSD)8-Bit Code Processing in BS2000/OSDUser Guide
BS2000User Commands (ISP Format)User Guide
BS2000/OSD-BC Commands, Volumes 1 - 5User Guide
BS2000/OSD-BC Commands, Volume 6, Output in S Variables and SDF-P-BASYSUser Guide
BS2000/OSD-BCExecutive Macros User Guide

U41095-J-Z125-4-76 409
Related publications
IMON (BS2000/OSD)Installation MonitorUser Guide
BS2000/OSD-BCIntroductory Guide to Systems SupportUser Guide
Additional publications
SSL and TLSDesigning and Building Secure Systemsby Eric RescorlaISBN 0-201-61598-3
ContentsDetailed description of SSL and TLS and of the application environment
Secrets & LiesDigital Security in a Networked Worldby Bruce SchneierISBN 0-471-25311-1
ContentsOverview of IT security
PostfixThe Definitive Guideby Kyle D. DentISBN 0-596-00212-2
ContentsRelatively compact and up-to-date introduction to configuring and using the Postfix mail server.
http://www.oreilly.de/catalog/postfix/index.html

410 U41095-J-Z125-4-76
Related publications
Postfixby Richard BlumISBN 0-672-32114-9
ContentsDetailed description of how to configure and use the Postfix mail server. The May 2001 edition is no longer quite up-to-date, and there may be slight differences as far as BS2000/OSD porting concerned. In addition, the focus is somewhat Linux-oriented. Nevertheless, the level of detail makes it a noteworthy book.
The Book of PostfixState-of-the-Art Message Transportby Ralf Hildebrandt and Patrick KoetterISBN 1-59327-001-1
ContentsExtensive treatment of the issues of mail transport constraints and mail filtering. Of the books listed here, this one contains the most detailed description of TLS use. Theory-oriented chapters are complemented by detailed practical examples (generally on the basis of Linux systems).
http://www.postfix-book.com/index.html
RFCs
Comprehensive information on the Requests for Comments (RFCs) is available on the Internet Engineering Task Force’s (IETF) home page:
www.ietf.org

U41095-J-Z125-4-76 411
Index
$HOME/.rhosts 331$HOME/.shosts 331$HOME/.ssh/authorized_keys 336$HOME/.ssh/known_hosts 334, 336/etc/hosts 233/etc/hosts.allow 336/etc/hosts.deny 336/etc/hosts/equiv 331/etc/imap 351/etc/imap/certs 351/etc/imap/MAKE.CERT.sh 351/etc/imap/private 351/etc/inet 351/etc/inet/inetd.conf 351/etc/inet/services 351/etc/init.d/MAIL.postfix 349/etc/named.conf
DNS configuration file 261examples 264
/etc/nologin 336/etc/ntp.conf 292/etc/postfix 348/etc/postfix/main.cf 349/etc/postfix/master.cf 348/etc/rc0.d/K17MAIL.postfix 349/etc/rc2.d/S97MAIL.postfix 349/etc/ssh/moduli 335/etc/ssh/shosts.equiv 331/etc/ssh/ssh_host_dsa_key 335/etc/ssh/ssh_host_dsa_key.pub 335/etc/ssh/ssh_host_key 335/etc/ssh/ssh_host_key.pub 335/etc/ssh/ssh_host_rsa_key 335/etc/ssh/ssh_host_rsa_key.pub 335/etc/ssh/ssh_known_hosts 334, 336
/etc/ssh/sshd_config 326/etc/xntp.params 291, 299/opt/MAIL 348, 351/opt/MAIL/imap 351/opt/MAIL/imap/readme 351/opt/MAIL/imap/sbin 351/opt/MAIL/imap/sbin/imapd 351/opt/MAIL/imap/sbin/ipop3d 351/opt/MAIL/imap/share 351/opt/MAIL/postfix 348/opt/MAIL/postfix/bin 348/opt/MAIL/postfix/bin/mailq 348/opt/MAIL/postfix/bin/newaliases 348/opt/MAIL/postfix/libexec/postfix 348/opt/MAIL/postfix/libexec/postfix/master 348/opt/MAIL/postfix/libexec/postfix/pickup 348/opt/MAIL/postfix/libexec/postfix/qmgr 348/opt/MAIL/postfix/libexec/postfix/smtp 348/opt/MAIL/postfix/libexec/postfix/smtpd 348/opt/MAIL/postfix/libexex/postfix/local 348/opt/MAIL/postfix/readme 348/opt/MAIL/postfix/sbin 348/opt/MAIL/postfix/sbin/postalias 348/opt/MAIL/postfix/sbin/postcat 348/opt/MAIL/postfix/sbin/postconf 348/opt/MAIL/postfix/sbin/postdrop 348/opt/MAIL/postfix/sbin/postfix 348/opt/MAIL/postfix/sbin/postmap 348/opt/MAIL/postfix/sbin/postqueue 348/opt/MAIL/postfix/sbin/postsuper 348/opt/MAIL/postfix/sbin/sendmail 348/opt/MAIL/postfix/share 348/usr/sbin/in.imapd 351/usr/sbin/in.ipop3d 351

412 U41095-J-Z125-4-76
Index
/usr/sbin/xntpdNTP daemon 288
/var/adm/messagesmessage file 35, 248, 262, 289
/var/empty 335/var/mail 349, 351/var/mail/USER 349, 351/var/run/sshd.pid 335/var/spool/postfix 349
A-A 82, 170A (Address) 237A6 (A6 chains) 237access control 52accounting in FTP 125-acctActive 93acctActive 134-acctFile 93acctFile 134activate
DNS 247, 262NTP 289
activate debugging functionNTP 307
active mode 137addressing 292
clock 291, 292, 295adjtime call
NTP 286administration
NAMED 273administration and operation (DNS and
security) 274administration domains
local 236agent forwarding (OpenSSH) 321alias 24alias file 359
example 361alias file, see also postmap source filealias format 369, 370aliases, function 342-allowTsosLogin 94
alphanum-name (data type) 25-appPrefix 82arpafile 266association
NTP 285ASSOCIATIONS command
NTP 308authentication
between ssh and sshd 330client authentication 330, 332password authentication 332public key authentication 332rhosts authentication 330, 331, 332RSA-based authentication 331server authentication 333
AUTHENTICATION option 175, 197
B-B 83, 197backendConfigurationFileName 375Balanced-Tree (B-Tree), see btreeBCAM host file
DNS 233bcamInterval 222BROADCASTCLIENT statement
NTP 298BROADCASTDELAY statement
NTP 298BS2000/OSD-PRNGD
see PRNGD (BS2000/OSD)btree file 358
C-C 84caching 243cat-id (data type) 25-childEnterJob 85-childJobClass 86-childName 84client (DNS) 233client authentication 330, 332clock
addressing 291, 295

U41095-J-Z125-4-76 413
Index
CLOCKVAR/CV commandNTP 309
cmd 221cmdInterval 222CNAME (Canonical Name) 238code tables
selecting 174command-line options
NTP 303command-rest (data type) 25composed-name (data type) 25concept
DNS 233configuration
BS2000/OSD-PRNGD 217DNS resolver 249FTP 65NTP daemon 299OpenSSH 326TELNET 155
configuration file/etc/ntp.conf (NTP) 299/etc/ssh/sshd_config 326create for NTP 292mail sender 376
configuration file (DNS)syntax 258
configuration parametersNTP 292
configuringFTP via option file 81TELNET via option file 168
connection setup between sshd and ssh 327, 329
control connection 136secure 114
-convSelector 90COOKED command
NTP 306creating
DNS configuration file 249c-string (data type) 25
D-D 84, 170daemon
NTP xntpd 288data connection 136
secure 115data type
alphanum-name 25cat-id 25command-rest 25composed-name 25c-string 25date 25device 25filename 26fixed 25integer 27name 27partial-name 28posix-filename 28posix-pathname 28product-version 29structured-name 29text 29time 29vsn 29x-string 30x-text 30
data types in SDF 25date
set with NTP 301date (data type) 25DCAM application name 53, 56deactivate
DNS 247, 262NTP 289
debug 132, 205DEBUG command
NTP 307debug level
specifying 170-debugLevel 84defaultOptionFileName 374

414 U41095-J-Z125-4-76
Index
delayNTP 284
device (data type) 25diagnosis 259
DNS resolver 259NAMED 276, 277NTP 311
dig (DNS) 278examples 279
directoriesIMAP/POP3 server 351
-disableSiteExecCommand 96-disableSizeCommand 97dispersion (NTP) 284displaying current settings
of FTP and TELNET servers 129, 202DNS
/etc/hosts 233activate 247, 262administration tools rndc, rndc-confgen 278BCAM host file 233concept 233configuration file named.conf 261deactivate 247, 262diagnostic tools dig/, host/, nslookup 278diagnostic tools, dig (examples) 279domain level 235domain structure 234explanation 231functionality 233logging messages 311message format 238modify configuration file 258name server 242NAMED 242NAMED start (startnamed) 273NAMED stop (stopnamed) 274restart resolver (restartdns) 257root domains 235start resolver (startdns) 257startup calls 257stop daemon (stopdns) 36stop resolver (stopdns) 258storing information 237
tools 278Transaction SIGnatures 268zone 236
DNS (resource records) 237DNS client 233DNS development modules
installing/uninstalling 248DNS name server, see NAMEDDNS name space 234DNS resolver 233, 239
configuring 249diagnosis and maintenance 259DOMAIN entry 251installing 246modify configuration 258NAMESERVER entry 250OPTIONS entry 255SEARCH entry 253starting and stopping testing 258starting/stopping diagnosis 258uninstalling 248
DNS SECurity (DNSSEC) 244, 268DNS server
see also DNS-NAMED 235see also NAMED
DNS-NAMED 242stop daemon (stopnamed) 36
DNSSEC 244, 268DNSSEC (DNS SECurity) 244dnssrv 273domain
in-addr.arpa 236DOMAIN entry
DNS resolver 251domain level (DNS) 235domain structure (DNS) 234DRIFTFILE statement
NTP 299-DSSidLength 89DUMMY module (TELNET exit) 208dummy routine (FTP exit) 149

U41095-J-Z125-4-76 415
Index
E-E 85, 171ENCRYPTION option 175, 198ENTER job 49entropy sources (BS2000/OSD-PRNGD) 216entropyThreshold 219event
FTP exit 141example
FTP exit 145NTP configuration file 293
executability of the daemonsPOSIX file attribute 247, 262
exitTELNET 208
exit mechanismsfor FTP 140for FTP server 149
exit routinespecifying (TELNET) 171
exit routinesTELNET 209
EXITTEL.C 208explanation
DNS 231
F-F 85file 220fileInterval 220filename (data type) 26fixed (data type) 25format
DNS message 238of a message (SMTP) 343
forwarder (server)DNS 243
forwarding server 243-FTAClevel 83-FTACuserId 86FTP
accounting 125configuration and operation 65configuring via option file 81
installing/uninstalling in POSIX 59IPv6 addresses 136TLS/SSL support 66
FTP exit 140dummy routine 149dummy routine, user-defined 150events 141example 145security check 140
FTP exit routineresult 153return code 153user-defined 153
FTP server 139displaying current settings 129, 202exit mechanisms 149logging file 129, 202passive mode 137proxy mechanism 138shutdown 120, 122, 200start 119, 199TLS/SSL support 66
FTP server options-acctActive 93-acctFile 93-allowTsosLogin 94-appPrefix (-A) 82-childEnterJob (-F) 85-childJobClass (J) 86-childName (-C) 84-convSelector (-U) 90-debugLevel (-D) 84-disableSiteExecCommand 96-disableSizeCommand 97-DSSidLength (-S) 89-FTAClevel (-B) 83-FTACuserId (-K) 86-initialChildCmds (-Z) 92-logonExtension (-L) 87-maxConn (-N) 87-OpenSSLlibName 118-portNumber (-P) 88-serverInfoFile (-E) 85-socketTraceLevel (-T) 89

416 U41095-J-Z125-4-76
Index
FTP server options (cont.)-systemExit (-X) 91-timeout (-O) 88-tlsAcceptableClientCAFile 110-tlsCAcertificateFile 109-tlsCArevocationFile 111-tlsCertificateChainFile 108-tlsCipherSuite 99-tlsDSAcertificateFile 106-tlsRandFile 116-tlsRSAcertificateFile 104-tlsRSAkeyFile 105, 107-tlsSecureControlConnection 114-tlsSecureDataConnection 115-tlsUseCryptoHardware 117-tlsVerifyClient 112, 194-tlsVerifyDepth 113-verbose (-V) 90
FTP subagent 139FTP subevent
FTPBYE 141FTPCMD 142FTPCMDE 143FTPLOG 141
FTPBYE (FTP subevent) 141FTPCMD (FTP subevent) 142FTPCMDE (FTP subevent) 143FTPLOG (FTP subevent) 141FUDGE statement
NTP 295function 343
aliases 342functionality
DNS 233IMAP 343NTP 283POP3 343Sendmail 342
Ggenerating random numbers 215
in BS2000/OSD with PRNGD 216in POSIX with prngd server daemon 229
GPRBYTE 223
H-H 198hash file 358header (message header) 343heterogeneous networks 138hierarchy
time server 287host (DNS) 278HOST command
NTP 305host file (DNS) 233HOSTNAMES command
NTP 306
IIMAP 343
TLS/SSL protection 355IMAP server
directories 351files 351installing 349port number 344starting up 354uninstalling 352
implementationNTP 286
in-addr.arpadomain 236
index file 358alias format 369, 370generating 367, 369, 370Postfix format 367processing 367, 369
index filestypes 358
initial operationinterNet Services 35
-initialChildCmds 92input file, see source file 359installation
DNS development modules 248DNS resolver 246LDAP 322mail sender 373

U41095-J-Z125-4-76 417
Index
installation (cont.)NAMED 260NAMED development modules 263NTP 288OpenSSH 322TCP-IP-SV 33, 229, 246, 260, 288, 322TELNET 53with IMON 49
installation file 49, 51installation program 46, 47
notational conventions 47installing
FTP/TELNET in POSIX 59IMAP server 349mail server 344OpenSSH 322POP3 server 349SMTP server 344
integer (data type) 27interNet Services
initial operation 35stop calls 36, 258, 274uninstall 35uninstallation 248, 262, 289uninstalling 289
INTR interface 132, 205acctActive 134acctFile 134debug 132, 205RDPROT 135, 207shutdown 133, 206trace 133, 206
IPv6 addressesin FTP 136in TELNET 207
iterative queryDNS 242
J-J 86
K-K 86
L-L 87LDAP 339
installation 322licensing regulations 15local administration domains 236logFile 376logging
DNS resolver 259NAMED 276NTP 311
logging file of FTP and TELNETservers 129, 202logging function
DNS resolver 259logging messages
DNS 311login process (sshd) 333logLevel 377-logonExtension 87loopback 267
MMail Delivery Agent (MDA) 342mail queue 364
displaying messages 366processing 364, 365
mail sender 373configuration file 376installation 373MODIFY-MAIL-SERVICE-PARAMETER 395option file 373service commands 393SHOW-MAIL-SERVICE-PARAMETER 398START-MAIL-SERVICE 393STOP-MAIL-SERVICE 400
mail sender optionsdefaultOptionFileName 374logFile 376logLevel 377mailLogLevel 380, 381mailServer 379mailServerPort 379tempFilePrefix 381tlsCACertificateFile 390

418 U41095-J-Z125-4-76
Index
mail sender options (cont.)tlsCARevocationFile 391tlsCertificateFile 389tlsCipherSuite 384tlsKeyFile 389tlsProtocol 383tlsSecureConnection 382tlsUseCryptoHardware 392tlsVerifyDepth 392tlsVerifyServer 391
mail senders in BS2000/OSD 373mail server 342
installing 344uninstalling 344
mail server optionsbackendConfigurationFileName 375
mail server, see also SMTP serverMail Transfer Agent (MTA) 339Mail Transfer Agent, see also SMTP serverMail User Agent (MUA) 339mailbox 342mailLogLevel 380, 381mailServer 379mailServerPort 379maintenance
DNS resolver 259NAMED 276NTP 311
masksdescription 47
master server 243-maxConn 87MDA 342message file
/var/adm/messages 35, 248, 262, 289message header 343message text 343message, format (SMTP) 343migration from Sendmail to Postfix 371MIME mechanism 341, 343minimalEntropy 218
modifyconfiguration of the DNS resolvers 258DNS configuration file 258zone data files of NAMED 274
MODIFY-MAIL-SERVICE-PARAMETER 395MTA (Mail Transfer Agent) 339MUA, see Mail User AgentMultipurpose Internet Mail Extensions, see MIMEMX (Mail Exchanger) 237
N-N 87, 171name (data type) 27name prefix
specifying 170name server (DNS) 242
see also NAMEDname space (DNS) 234NAMED 260, 276
administering 273configuration file 264diagnosis 277diagnosis and maintenance 276diagnostic options 277executing without root authorization 269installing 260logging 276modify zone data files 274process models 270security 268shutting down 274start 273starting and stopping testing 274starting/stopping diagnosis 274startup call 273uninstalling 262zone data files 265
NAMED development modulesinstalling/uninstalling 263
NAMED see also name serverNAMED see DNS NAMEDnamed.conf 264

U41095-J-Z125-4-76 419
Index
NAMESERVER entryDNS resolver 250
network security with OpenSSH 319Network Time Protocol, see NTPnetworks, heterogeneous 138newaliases 370notational conventions
installation program 47NS (Name Server) 237nslookup (DNS) 278NTP
/etc/ntp.conf 299activate 289activate debugging function 307addressing 291, 292, 295adjtime call 286association 285ASSOCIATIONS command 308BROADCASTCLIENT statement 298BROADCASTDELAY statement 298CLOCKVAR/CV command 309configuration parameters 292COOKED command 306deactivate 289DEBUG command 307delay 284diagnosis 311dispersion 284DRIFTFILE statement 299FUDGE statement 295functionality 283HOST command 305HOSTNAMES command 306implementation 286installation 288logging 311maintenance 311ntpdate 301NTPTRACE command 314NTPVERSION command 307offset 284PEER statement 296PEERS command 309primary time server 283
program 287query ntpq status 303query status 304RAW command 306RESTRICT statement 293sample configuration file 293secondary time server 283SERVER statement 292set date/time 301shutdown 290start daemon (startntp) 290startup 290startup call 290startup options 299stop daemon (stopntp) 36stratum 283time server 283TIMEOUT command 305trace (ntptrace) 314trace functionality 314xntp 291xntp.params 299xntpdate 291
NTP daemonoptions 299startup options 299xntpd 288
NTP time synchronization 291NTPD
set date 301set time 301
ntpdateNTP 291NTP program 301
ntpqquery NTP status 303
ntptraceNTP trace 314
NTPTRACE commandNTP 314
NTPVERSION commandNTP 307

420 U41095-J-Z125-4-76
Index
O-O 88offset
NTP 284OpenSSH 317
BS2000/OSD-specific restrictions 337component parts 318concept 318configuring 326features 320network security 319server daemon sshd 326uninstalling 325
OpenSSH server daemonfiles 334
OpenSSH server daemon see also sshdoperation
FTP 65Postfix server 358TELNET 155
option fileFTP 81mail sender 373SYSSSI 373TELNET 168
optionsparameter lines 81
OPTIONS entry, DNS resolver 255options see also FTP server options, TELNET
server options, TLS/SSL options 81
P-P 88, 172parameter line options 81partial-filename (data type) 28passive mode 137password authentication 332PEER statement
NTP 296PEERS command
NTP 309PLAM library
SINLIB.MAIL.030.POSTFIX 344, 349poolSize 218
POP3 serverdirectories 351files 351function 343installing 349port number 344starting up 354TLS/SSL protection 355uninstalling 352
port forwarding (OpenSSH) 321port number
IMAP server 344POP3 server 344SMTP server 344specifying 172
-portNumber 88POSIX
terminate subsystem 36, 258, 274, 291POSIX file attribute
executability 247, 262posix-filename (data type) 28posix-pathname (data type) 28postalias 369
source file 359postcat 366postconf 363Postfix
format for source files 359migration from Sendmail 371TLS/SSL protection 357
postfix 362Postfix server
displaying and modifying configuration parameters 363
lookup tables 358operation 358post-installation script 346starting and stopping 362starting up 353uninstalling 344, 349
Postfix server, see also SMTP serverpost-installation script (OpenSSH) 323post-installation script (Postfix server) 346

U41095-J-Z125-4-76 421
Index
postmap 367source file 359source file, see also alias file
postqueue (mailq) 364postsuper 365primary time server
NTP 283PRNGD (BS2000/OSD)
bcamInterval 222cmd 221cmdInterval 222configuration 217entropy source 216entropyThreshold 219file 220fileInterval 220messages 227minimalEntropy 218poolSize 218program interface GPRBYTE 223seedFile 219
process models (NAMED) 270product ID 49product-version (data type) 29program
NTP 287program interface GPRBYTE 223proxy mechanism 138PTR (Domain Name Pointer) 237public key authentication 332PuTTY 319
Qquery
NTP status 303, 304recursive (DNS) 242
query, iterativeDNS 242
RRAW command
NTP 306RDPROT 135, 207
recursive queryDNS 242
regulations, licensing 15resolver
DNS 233, 239resource records (DNS) 237restart call
DNS resolver (restartdns) 257TCP-IP-SV 35
RESTRICT statementNTP 293
resultFTP exit routine 153
return codeFTP exit routine 153
RFCs 231rhosts authentication 330, 331, 332rndc-confgen (DNS) 278rnds (DNS) 278root domains 235RSA-based authentication 331
S-S 89, 172SEARCH entry
DNS resolver 253secondary time server
NTP 283second-level domains 236secure
control connection 114data connection 115
Secure Shell, see OpenSSHsecurity (NAMED) 268security check
FTP exit 140seedFile 219Sendmail
functionality 342migration to Postfix 371
422 U41095-J-Z125-4-76
Index
serverforwarder (DNS) 243forwarding 243master 243primary, see master server 243secondary, see slave server 243slave 243
server (DNS) 233server authentication 333SERVER statement
NTP 292-serverInfoFile 85set time
NTPD 301SET-FTP-TELNET-PARAMETERS
TELNET 158SHOW-MAIL-SERVICE-PARAMETER 398shutdown 133, 206
FTP server 120, 122, 200interNet Services 36NTP 290TELNET server 122, 199, 200
shutting downnamed 274
Simple Mail Transfer Protocol (SMTP) 341SINLIB.MAIL.030.POSTFIX
PLAM library 344, 349slave server 243SMTP
Simple Mail Transfer Protocol 341TLS/SSL protection 357
SMTP serverinstalling 344port number 344post-installation script 346uninstalling 344, 349
SMTP server, see also Postfix serverSNMP subagent for FTP 139SOA (Start Of Authority) 237socket trace level
specifying 173-socketTraceLevel 89software requirements 19
source filefor postalias 359for postmap 359postalias format 359Postfix format 359
sshconnection setup with sshd 327, 329
SSH, see OpenSSHsshd
connection setup with ssh 327, 329files 334login process 333starting 327
sshd (OpenSSH server daemon) 326sshd, see also OpenSSH server daemon 326standard port number
IMAP server 344POP3 server 344SMTP server 344
standard process model (NAMED) 270start
DNS resolver (startdns) 257FTP server 119, 199NAMED 273NTP daemon (startntp) 290TELNET server 119, 199
startingPostfix server 362
starting/stopping diagnosisDNS resolver 258NAMED 274
START-MAIL-SERVICE 393START-TLS option 175startup
IMAP server 354NTP 290POP3 server 354Postfix server 353SMTP server 353
startup callDNS 257NAMED 273NTP 290

U41095-J-Z125-4-76 423
Index
startup optionsNTP 299xntpd 291
statementsDNS configuration file 250
station identification 53, 56stop
DNS daemon (stopdns) 36DNS resolver (stopdns) 258DNS-NAMED (stopnamed) 274DNS-NAMED daemon (stopnamed) 36NTP daemon (stopntp) 36
stop callsinterNet Services 36, 258, 274TCP-IP-SV 291
stop NTP daemon (stopntp) 291STOP-MAIL-SERVICE 400stopping
Postfix server 362storing information (DNS) 237stratum
NTP 283structured-name (data type) 29subagent for FTP 139subevent, see FTP subeventsubsystem
terminate POSIX 36, 258, 274, 291suffixes for data types 31syntax
DNS configuration file 258SYSSSI 373system clock 283system message language 47-systemExit 91
T-T 89, 173TCP forwarding (OpenSSH) 321TCP-IP-SV 19
installing 33, 229, 246, 260, 288, 322restart calls 35software requirements 19stop calls 291
TELNETconfiguration and operation 155configuring via option file 168configuring via SET-FTP-TELNET-
PARAMATERS 158exit routine 209installing/uninstalling in POSIX 59IPv6 addresses 207TLS/SSL support 156
Telnet authentication option 175Telnet data encryption option 175TELNET exit 208
DUMMY module 208EXITTEL.C 208user-defined 212YAPTEXIT 208
TELNET serverdisplaying current settings 129, 202logging file 129, 202shutdown 122, 199, 200start 119, 199TLS/SSL support 156
TELNET server options-A 170AUTHENTICATION option 175-B 197-D 170-E 171ENCRYPTION option 175-H 198-N 171-P 172-S 172START-TLS option 175-T 173Telnet authentication option 175Telnet encryption option 175-tlsCertificateChainFile 190-V 173-X 174-Z AcceptableClientCAFile 192-Z CACertificateFile 182-Z CARevocationFile 183-Z CipherSuite 184

424 U41095-J-Z125-4-76
Index
TELNET server options (cont.)-Z DSACertificateFile 180-Z DSAKeyFile 181-Z OpenSSLlibname 195-Z Protocol 191-Z RandFile 189-Z RSACertificateFile 178-Z RSAKeyFile 179-Z tls-required 177-Z UseCryptoHardware 196-Z VerifyDepth 193
TELSR 54tempFilePrefix 381terminal name 54
defining 172terminate
POSIX subsystem 36, 258, 274, 291test start (DNS resolver) 258test stop (DNS resolver) 258text (data type) 29text of a message 343thread process model (NAMED) 270time
set with NTP 301time (data type) 29TIME protocol 283time server
hierarchy 287NTP 283primary (NTP) 283secondary (NTP) 283
time synchronizationhierarchy 287NTP 284
-timeout 88TIMEOUT command
NTP 305TLS/SSL options
START-TLS option 175-tlsAcceptableClientCAFile 110-tlsCAcertificateFile 109-tlsCArevocationFile 111-tlsCertificateChainFile 108-tlsCipherSuite 99
-tlsDSAcertificateFile 106-tlsOpenSSLlibName 118-tlsProtocol 98-tlsRandFile 116-tlsRSAcertificateFile 104-tlsRSAkeyFile 105, 107-tlsSecureControlConnection 114-tlsSecureDataConnection 115-tlsUseCryptoHardware 117-tlsVerifyClient 112, 194-tlsVerifyDepth 113-Z CACertificateFile 182-Z CARevocationFile 183-Z CertificateChainFile 190-Z CipherSuite 184-Z DSACertificateFile 180-Z DSAKeyFile 181-Z OpernSSLlibname 195-Z Protocol 191-Z RandFile 189-Z RSACertificateFile 178-Z RSAKeyFile 179-Z tls-required 177-Z UseCryptoHardware 196-Z VerifyDepth 193
TLS/SSL protectionIMAP/POP3 355Postfix 357
TLS/SSL supporton the FTP server 66on the TELNET server 156
-tlsAcceptableClientCAFile 110tlsCACertificateFile 390-tlsCAcertificateFile 109tlsCARevocationFile 391-tlsCArevocationFile 111-tlsCertificateChainFile 108tlsCertificateFile 389-tlsCipherSuite 99tlsCipherSuite 384-tlsDSAcertificateFile 106tlsKeyFile 389-tlsOpenSSLlibname 118-tlsProtocol 98

U41095-J-Z125-4-76 425
Index
tlsProtocol 383-tlsRandFile 116-tlsRSAcertificateFile 104-tlsRSAkeyFile 105, 107tlsSecureConnection 382-tlsSecureControlConnection 114-tlsSecureDataConnection 115-tlsUseCryptoHardware 117tlsUseCryptoHardware 392-tlsVerifyClient 112, 194-tlsVerifyDepth 113tlsVerifyDepth 392tlsVerifyServer 391tools (DNS) 278top-level domains 235trace 133, 206trace functionality
NTP 314TRACE outputs 53, 56Transaction SIGnatures 244Transaction SIGnatures (TSIG) 268Transaction SIGnatures, DNS 268TSIG 268TSIG (Transaction SIGnatures) 244TSN 132, 133, 205, 206
U-U 90uninstallation
interNet Services 248, 262, 289uninstalling
DNS development modules 248DNS resolver 248FTP/TELNET in POSIX 59IMAP server 352interNet Services 35, 289mail server 344NAMED 262
development modules 263OpenSSH 325POP3 server 352Postfix server 344, 349SMTP server 344
Universal Coordinated Time (UTC) 283
user-definedFTP exit routine 150, 153TELNET exit 212
V-V 90, 173Verbose
enabling/disabling 173-verbose 90vsn (data type) 29
X-X 91, 174xntp.params
NTP 299xntpd
NTP 291NTP daemon 288options 299startup options 291, 299
x-string (data type) 30x-text (data type) 30
YYAPTEXIT 208
Z-Z 92-Z AcceptableClientCAFile 192-Z CACertificateFile 182-Z CARevocationFile 183-Z CertificateChainFile 190-Z CipherSuite 184-Z DSACertificateFile 180-Z OpenSSLlibname 195-Z Protocol 191-Z RandFile 189-Z RSACertificateFile 178-Z RSAKeyFile 179, 181-Z tls-required 177-Z UseCryptoHardware 196-Z VerifyDepth 193zone (DNS) 236zone data files 265

426 U41095-J-Z125-4-76
Index

Comments on interNet Services V3.2AAdministrator Guide
U41095-J-Z125-4-76
Fujitsu Siemens Computers GmbHUser Documentation81730 MünchenGermany
Fax: (++49) 700 / 372 00000
e-mail: [email protected]://manuals.fujitsu-siemens.com
CommentsSuggestionsCorrections
✁
Submitted by


Information on this document On April 1, 2009, Fujitsu became the sole owner of Fujitsu Siemens Compu-ters. This new subsidiary of Fujitsu has been renamed Fujitsu Technology So-lutions.
This document from the document archive refers to a product version which was released a considerable time ago or which is no longer marketed.
Please note that all company references and copyrights in this document have been legally transferred to Fujitsu Technology Solutions.
Contact and support addresses will now be offered by Fujitsu Technology So-lutions and have the format …@ts.fujitsu.com.
The Internet pages of Fujitsu Technology Solutions are available at http://ts.fujitsu.com/... and the user documentation at http://manuals.ts.fujitsu.com.
Copyright Fujitsu Technology Solutions, 2009
Hinweise zum vorliegenden Dokument Zum 1. April 2009 ist Fujitsu Siemens Computers in den alleinigen Besitz von Fujitsu übergegangen. Diese neue Tochtergesellschaft von Fujitsu trägt seit-dem den Namen Fujitsu Technology Solutions.
Das vorliegende Dokument aus dem Dokumentenarchiv bezieht sich auf eine bereits vor längerer Zeit freigegebene oder nicht mehr im Vertrieb befindliche Produktversion.
Bitte beachten Sie, dass alle Firmenbezüge und Copyrights im vorliegenden Dokument rechtlich auf Fujitsu Technology Solutions übergegangen sind.
Kontakt- und Supportadressen werden nun von Fujitsu Technology Solutions angeboten und haben die Form …@ts.fujitsu.com.
Die Internetseiten von Fujitsu Technology Solutions finden Sie unter http://de.ts.fujitsu.com/..., und unter http://manuals.ts.fujitsu.com finden Sie die Benutzerdokumentation.
Copyright Fujitsu Technology Solutions, 2009


