Intro to Excel 2007 Department of Technology Enhanced Learning Last Modified: 9/07 Information Technology Systems Division, UNCW
2
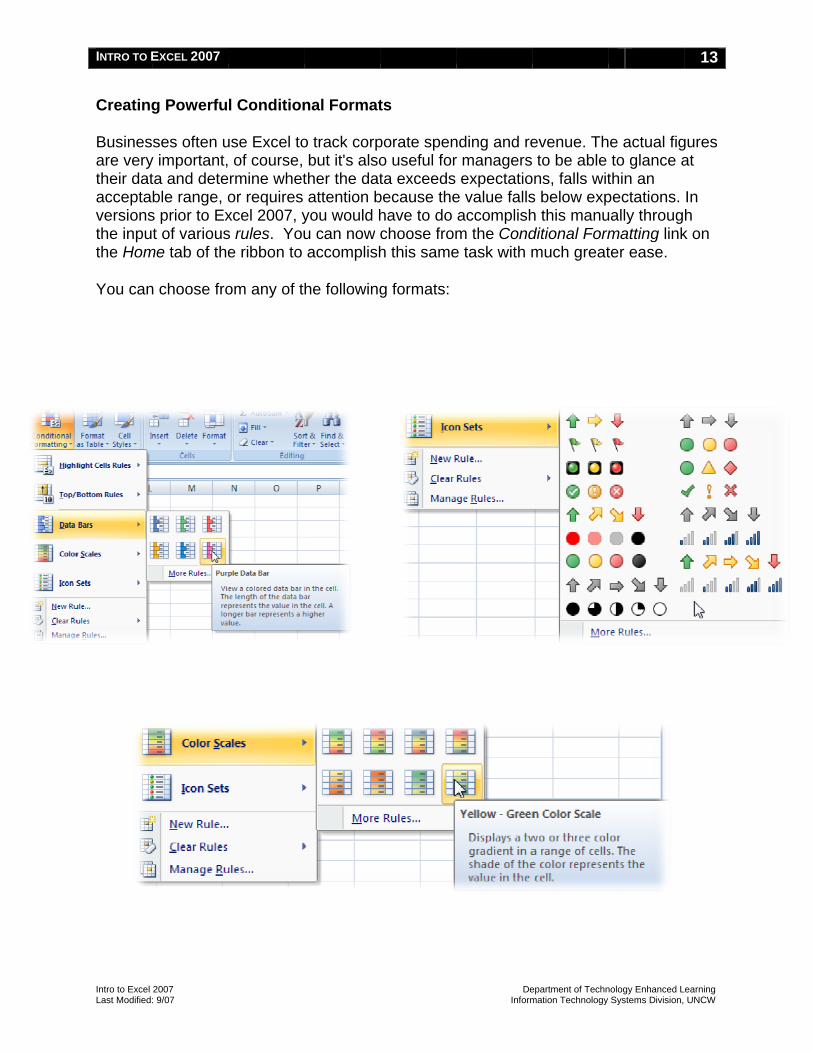
What’s New in Excel 2007
One of the first things you'll notice about Excel 2007 is that the user interface has changed quite a bit. Earlier versions of Excel housed the program's more than 1,000 commands in a series of menus, toolbars, task panes, and dialog boxes. And, as it turns out, there were some functions that didn't appear by default on any of the menus or toolbars. In Excel 2007, there is only one place to look for the tools you need to use it: the user interface Ribbon at the top of the program window. The Excel 2007 product team took the dozens of menus and toolbars and reorganized their contents onto the Ribbon tabs and galleries. If you've used Excel before, you'll need to spend only a little bit of time working with the new user interface to bring yourself back up to your usual proficiency. If you're new to Excel, you'll have a much easier time learning to use the program than you would have had with the previous user interface.
Excel 2003 Excel 2007
Becoming Familiar with the New User Interface
After you enter your data into a worksheet, you can change the data appearance, summarize it, or sort it by using the commands on the user interface Ribbon. Unlike in previous versions of Excel, which made you hunt through a complex toolbar and menu system to find the commands you wanted, you can find everything you need at the top of the Excel 2007 program window.
INTRO TO EXCEL 2007
Intro to Excel 2007 Department of Technology Enhanced Learning Last Modified: 9/07 Information Technology Systems Division, UNCW
3
The Excel 2007 user interface divides its commands into seven tabs: Home, Insert, Page Layout, Formulas, Data, Review, and View. The Home tab appears when you start Excel 2007.
The Home tab contains a series of groups: Clipboard, Font, Alignment, Number, Styles, Cells, and Editing. Each group, in turn, hosts a series of controls that enable you to perform tasks related to that group (formatting fonts, setting cell alignment, creating number formats, and so on). Clicking a control with a drop-down arrow displays a menu that contains further options; if an option has an ellipsis (...) after the item name, clicking the item displays a dialog box. If a group has a dialog box associated with it, such as the Number group shown in the preceding graphic, you can display that dialog box by clicking the Dialog Box Launcher at the lower-right corner of the group. (The Dialog Box Launcher looks like a small box with an arrow pointing down and to the right.)
Managing Larger Data Collections
Many Excel users take advantage of the program's data summary and calculation capabilities to process large data collections. In Excel 2003 and earlier versions, you were limited to 65,536 rows and 256 columns of data in a worksheet. You could always spread larger data collections across multiple worksheets, but it took a lot of effort to make everything work correctly. You don't have that problem in Excel 2007. The Microsoft Excel 2007 product team expanded worksheets to include 16,384 columns and 1,048,576 rows of data, which should be sufficient for most of the projects you want to do in Excel 2007.
Excel 2007 also comes with more powerful and flexible techniques you can use to process your worksheet data. In Excel 2003, you could assign up to three conditional formats (rules that govern how Excel displays a value) to a cell. In Excel 2007, the only limit on the number of conditional formats you can create is your computer's memory.
The table on the next page summarizes the expanded data storage and other capabilities found in Excel 2007.
INTRO TO EXCEL 2007
Intro to Excel 2007 Department of Technology Enhanced Learning Last Modified: 9/07 Information Technology Systems Division, UNCW
4
Limit Excel 2003 Excel 2007Columns in a worksheet 256 16,384
Rows in a worksheet 65,536 1,048,576
Number of different colors allowed in a workbook
56 4.3 billion
Number of conditional format conditions applied to a cell
3 Limited by available memory
Number of sorting levels of a range or table 3 64
Number of items displayed in an AutoFilter list 1,024 32,768
Total number of characters displayed in a cell 1,024 32,768
Total number of characters per cell that Excel can print
1,024 32,768
Total number of unique cell styles in a workbook
4,000 65,536
Maximum length of a formula, in characters 1,024 8,192
Number of nested levels allowed in a formula 7 64
Maximum number of arguments in a formula 30 255
Number of characters that can be stored and displayed in a cell with a text format
255 32,768
Number of columns allowed in a PivotTable 255 16,384
Number of fields displayed in the PivotTable Field List task pane
255 16,384
Using the New Microsoft Office File Format
Starting with the 1997 release, all Microsoft Office programs have used a binary file format that computers (but not humans) can read. Excel 2007, Microsoft Office Word 2007, and Microsoft Office PowerPoint® 2007 have a new and improved file format that, in addition to being somewhat more readable, creates much smaller files than the older binary format.
The new Microsoft Office Open XML Formats combine the XML and the Zip file compression format to create robust files that (on average) are about half the size of similar Excel 2003 files. You can open and save Excel 2003 files in Excel 2007, of
INTRO TO EXCEL 2007
Intro to Excel 2007 Department of Technology Enhanced Learning Last Modified: 9/07 Information Technology Systems Division, UNCW
5
course. If you want to open Excel 2007 files in Excel 2000, Excel 2002, or Excel 2003, you can install the Microsoft Office Compatibility Pack for Office Word 2007, Excel 2007, and Office PowerPoint 2007 file formats from the following website:
http://www.uncw.edu/msvista
Besides smaller file sizes, the 2007 Microsoft Office system file formats offer several other advantages:
• Improved interoperability. Because the new file formats use XML as their base, it is much easier for organizations to share and exchange data between the Microsoft Office system programs and other applications. The older binary file format was difficult to read and wasn't standards-based.
• Improved automation. The Excel 2007 file format is based on open standards, which means that any program written to process data based on those standards will work with Excel 2007. In other words, you don't need to write special routines or use another program in the Microsoft Office system to handle your Excel 2007 data programmatically.
• Compartmentalizing information. The new Microsoft Office system file format separates document data, macro code, and header information into separate containers, which Excel 2007 then combines into the file you see when you open your workbook. Separating macro code (automated program instructions) from your worksheet data improves security by identifying that a workbook contains a macro and enables you to prevent Excel 2007 from executing code that could harm your computer or steal valuable personal or business information.
INTRO TO EXCEL 2007
Intro to Excel 2007 Department of Technology Enhanced Learning Last Modified: 9/07 Information Technology Systems Division, UNCW
6
Creating Workbooks
Every time you want to gather and store data that isn't closely related to any of your other existing data, you should create a new workbook. The default workbook in Excel 2007 has three worksheets, although you can add more worksheets or delete existing worksheets if you want. Creating a new workbook is a straightforward process - you just click the Microsoft Office Button, click New, and identify the type of workbook you want to create.
When you start Excel 2007, the program displays a new, blank workbook; you can begin to enter data in the worksheet's cells or open an existing workbook. After you make any desired changes to a workbook, you should save the workbook to avoid losing your work.
When you save a file, you overwrite the previous copy of the file. If you have made changes that you want to save, but you want to keep a copy of the file as it was previously, you can use the Save As command to specify a name for the new file.
You also can use the controls in the Save As dialog box to specify a different format for the new file and a different location in which to save the new version of the file. For example, Steve Perry, the Director of Operations and Systems Administration, might want to save an Excel file that tracks expenses as an Excel 2003 file if he needs to share the file with another department that uses Excel 2003.
INTRO TO EXCEL 2007
Intro to Excel 2007 Department of Technology Enhanced Learning Last Modified: 9/07 Information Technology Systems Division, UNCW
7
Modifying Workbooks
Most of the time, you create a workbook to record information about a particular business activity, such as the number of assets that a department handles or the average cost of the last pieces of equipment they ordered. Each worksheet within that workbook should thus represent a subdivision of that activity. To display a particular worksheet, just click the worksheet's tab on the tab bar (just below the grid of cells).
When you create a worksheet, Excel 2007 assigns it a generic name such as Sheet4, Sheet5, or Sheet6. After you decide what type of data you want to store on a worksheet, you should change the default worksheet names to something more descriptive. For example, you could change the name of Sheet1 in the asset tracking workbook to Furniture. When you want to change a worksheet's name, double-click the worksheet's tab on the tab bar to highlight the worksheet name, type the new name, and press.
Another way to work with more than one workbook is to copy a worksheet from another workbook to the current workbook. One circumstance in which you might consider copying worksheets to the current workbook is if you have a list of your current employees in another workbook. You can copy worksheets from another workbook by right-clicking the tab of the sheet you want to copy and, from the shortcut menu that appears, clicking Move or Copy to display the Move or Copy dialog box.
INTRO TO EXCEL 2007
Intro to Excel 2007 Department of Technology Enhanced Learning Last Modified: 9/07 Information Technology Systems Division, UNCW
8
After the worksheets are in the target workbook, you can change their order to make the data easier to locate within the workbook. To change a worksheet's location in the workbook, you drag its sheet tab to the desired location on the tab bar. If you want a worksheet to stand out in a workbook, you can right-click its sheet tab and use the menu that appears to change the tab's color. At the other end of the spectrum, you can hide the active worksheet by right-clicking the worksheet's tab on the tab bar and clicking Hide on the context menu that appears. When you want Excel 2007 to redisplay the worksheet, right-click any visible sheet tab and click Unhide. In the Unhide dialog box, click the sheet you want to display and click OK.
If you determine that you no longer need a particular worksheet, such as one you created to store some figures temporarily, you can delete the worksheet quickly. To do so, right-click its sheet tab and then click Delete.
Zooming In on a Worksheet
One way to make Excel 2007 easier to work with is to change the program's zoom level. Just as you can "zoom in" with a camera to increase the size of an object in the camera's viewer, you can use the Excel 2007 zoom setting to change the size of objects within the Excel 2007 program window.
Clicking the Zoom In control increases the size of items in the program window by 10 percent, whereas clicking the Zoom Out control decreases the size of items in the program window by 10 percent. If you want more fine-grained control of your zoom level, you can use the slider control to select a specific zoom level.
INTRO TO EXCEL 2007
Intro to Excel 2007 Department of Technology Enhanced Learning Last Modified: 9/07 Information Technology Systems Division, UNCW
9
Arranging Multiple Workbook Windows
As you work with Excel 2007, you will probably need to have more than one workbook open at a time. For example, you could open a workbook that contains customer contact information and copy it into another workbook to be used as the source data for a mass mailing you create in Word 2007. When you have multiple workbooks open simultaneously, you can switch between them by clicking the user interface's View tab and then, in the Window group, clicking the Switch Windows button and clicking the name of the workbook you want to view.
You can arrange your workbooks within the Excel 2007 window so that most of the active workbook is shown, but the others are easily accessible by clicking the View tab and then, in the Window group, clicking the Arrange All button. Then, in the Arrange Windows dialog box, select the Cascade option.
Many Excel 2007 workbooks contain formulas on one worksheet that derive their value from data on another worksheet, which means you need to change between two worksheets every time you want to see how modifying your data changes the formula's result. However, you can display two copies of the same workbook, displaying the worksheet that contains the data in the original window and displaying the worksheet with the formula in the new window. When you change the data in the original copy of the workbook, Excel 2007 updates the formula result in a new window. To display two copies of the same workbook, open the desired workbook and then, on the View tab's Window group, click New Window. Excel 2007 will open a second copy of the workbook. If the original workbook's name was DepartmentalAssets, Excel 2007 displays the name DepartmentalAssets:1 on the original workbook's title bar and DepartmentalAssets:2 on the second workbook's title bar.
INTRO TO EXCEL 2007
Intro to Excel 2007 Department of Technology Enhanced Learning Last Modified: 9/07 Information Technology Systems Division, UNCW
10
Entering and Revising Data
After you create a workbook, you can begin entering data. The simplest way to enter data is to click a cell and type a value, which is a method that works very well when you're entering a few pieces of data, but it is less than ideal when you're entering long sequences or series of values. For example, Bill Vereen, the Director of Network & Communications, might want to create a worksheet listing the monthly program savings that large departments can enjoy if they sign exclusive delivery contracts with Network & Communications. To record those numbers, he would need to create a worksheet with the following layout.
Entering the sequence January, February, March, and so on repeatedly can be handled by copying and pasting the first occurrence of the sequence, but there's an easier way to do it: use AutoFill. With AutoFill, you enter the first element in a recognized series, grab the fill handle at the lower-right corner of the cell, and drag the fill handle until the series extends far enough to accommodate your data. A similar tool, FillSeries, enables you to enter two values in a series and use the fill handle to extend the series in your worksheet. For example, if you want to create a series starting at 2 and increasing by 2, you can put 2 in the first cell and 4 in the second cell, select both cells, and then use the fill handle to extend the series to your desired end value.
INTRO TO EXCEL 2007
Intro to Excel 2007 Department of Technology Enhanced Learning Last Modified: 9/07 Information Technology Systems Division, UNCW
11
You do have some control over how Excel 2007 extends the values in a series when you drag the fill handle. For example, if you drag the fill handle up (or to the left), Excel 2007 extends the series to include previous values. If you type January in a cell and then drag that cell's fill handle up (or to the left), Excel 2007 places December in the first cell, November in the second cell, and so on.
Another way to control how Excel 2007 extends a data series is by holding down the CTRL key while you drag the fill handle. For example, if you select a cell that contains the value January and then drag the fill handle down, Excel 2007 extends the series by placing February in the next cell, March in the cell after that, and so on. If you hold down the CTRL key, however, Excel 2007 repeats the value January in each cell you add to the series.
Formatting Cells
Excel 2007 spreadsheets can hold and process lots of data, but when you manage numerous spreadsheets it can be hard to remember from a worksheet's title exactly what data is kept in that worksheet. Data labels give you and your colleagues information about data in a worksheet, but it's important to format the labels so that they stand out visually. To make your data labels or any other data stand out, you can change the format of the cells in which the data is stored.
Most of the tools you need to change a cell's format can be found on the user interface's Home tab. You can apply the formatting represented on a button by selecting the cells you want to apply the style to and then clicking the appropriate button. If you want to set your data labels apart by making them appear bold, click the Bold button. If you have already made a cell's contents bold, selecting the cell and clicking the Bold button will remove the formatting.
Items in the Home tab's Font group that give you choices, such as the Font Color control, have a down arrow at the right edge of the control. Clicking the down arrow displays a list of options accessible for that control, such as the fonts available on your system or the colors you can assign to a cell.
INTRO TO EXCEL 2007
Intro to Excel 2007 Department of Technology Enhanced Learning Last Modified: 9/07 Information Technology Systems Division, UNCW
12
Another way you can make a cell stand apart from its neighbors is to add a border around the cell. To place a border around one or more cells, select the cells and then choose the border type you want by clicking the down arrow in the Font group's Border control and selecting the type of border to apply. To display the full range of border types and styles, open the Border control's drop-down list and then click More Borders. The Border tab of the Format Cells dialog box contains the full range of tools you can use to define your cells' borders.
INTRO TO E
Intro to Excel Last Modified:
Creating
Businesare verytheir datacceptaversionsthe inputhe Hom
You can
EXCEL 2007
2007 : 9/07
g Powerfu
ses often uy important,ta and deteble range, o
s prior to Ext of various
me tab of the
n choose fro
l Condition
use Excel to of course,
ermine whetor requires xcel 2007, ys rules. Youe ribbon to
om any of t
nal Format
o track corpbut it's also
ther the datattention b
you would hu can now accomplish
he following
ts
porate speno useful forta exceeds
because thehave to do choose fromh this same
g formats:
De Inform
nding and rer managersexpectatio
e value fallsaccomplishm the Conde task with m
epartment of Technmation Technology
evenue. Th to be able
ons, falls wits below exph this manuditional Formmuch great
nology Enhanced LSystems Division,
e actual figto glance a
thin an pectations. ually througmatting linkter ease.
earning UNCW
13
gures at
In h k on
INTRO TO EXCEL 2007
Intro to Excel 2007 Department of Technology Enhanced Learning Last Modified: 9/07 Information Technology Systems Division, UNCW
14
Formulas Spreadsheets do more than keep your numbers in neat rows and columns. With spreadsheets you can enter formulas—from simple to complex—to manipulate those numbers. You can create your own formulas or you can use built-in Functions. All formulas and functions begin with the equal sign. The same symbols you used in simple math work in Excel:
• + to add • - to subtract • * to multiply • / to divide • ( ) Use parentheses to organize the operations - all calculations within
parentheses are completed first. To add the four cells shown below, you could enter “=d4+d5+d6+d7” or you could use “=sum(d4:d7)” Note: The sum function is a lot easier to use when adding large quantities of cells.
Common Functions:
Function Description
SUM Finds the sum of the numbers in the specified cells
AVERAGE Finds the average of the numbers in the specified cells
COUNT Finds the number of entries in the specified cells
MAX Finds the largest value in the specified cells
MIN Finds the smallest value in the specified cells
INTRO TO E
Intro to Excel Last Modified:
Creatin
To creatInsert ta2007 dis
When yodefault lscreens
If Excel which Explots dataxis cona Cost ccreates contains2007 ch
EXCEL 2007
2007 : 9/07
ng Charts
te a chart, sab, in the Chsplay the av
ou click youayout and chot shows
2007 doesxcel 2007 pta incorrect
ntains numecolumn, Exca sequentia
s one columart engine
s
select the dharts groupvailable cha
ur desired ccolor schema column c
n't plot youplots a datatly is when erical data. cel 2007 ploal series to
mn of text vaplots the da
data you wap, click the tart subtypes
chart subtypme defined chart and th
r data the wa column. Tthe columnFor exampots both of provide va
alues and aata correctl
ant to summtype of chas.
pe, Excel 2in your wor
he data use
way you waThe most con you want tple, if your dthose colum
alues for theanother coluy.
De Inform
marize visuart you want
007 createrkbook's thed to create
ant, you canommon situto provide vdata list conmns in the e horizontalumn of num
epartment of Technmation Technology
ally and thet to create t
s the chart eme. The fit.
n change thation in whvalues for tntains a Yeabody of thel axis. If youmerical valu
nology Enhanced LSystems Division,
en, on the to have Exc
using the following
he axis on ich Excel 2
the horizontar column a
e chart and ur data set ues, the Exc
earning UNCW
15
cel
2007 tal and
cel
INTRO TO E
Intro to Excel Last Modified:
You canthe horizand thenSource D
To remoadd the button to
In the AxAxis LabincludingClick OK
EXCEL 2007
2007 : 9/07
n change wzontal axis n, on the DeData dialog
ove a columcolumn to to display th
xis Labels dbel Range fg the columK again to c
hich data it(also knowesign tab, i
g box.
mn from an the Horizon
he Axis Lab
dialog box, field, select
mn header, close the Se
applies to wn as the x-
n the Data
axis, selectntal (Categoels dialog b
click the Ct the cells toif any), clicelect Data S
the verticalaxis). To mgroup, click
t the columory) Axis Labox.
Contract Diao provide thk the ExpanSource dial
De Inform
l axis (also make that ch
k Select Da
n's name aabels pane
alog button he values fond Dialog blog box and
epartment of Technmation Technology
known as thange, seleata to displa
and then clic, click that p
at the rightor the horizbutton, and d revise you
nology Enhanced LSystems Division,
the y-axis) ect the charay the Sele
ck Removepane's Edit
edge of thontal axis (then click O
ur chart.
earning UNCW
16
and rt ct
e. To t
e (not OK.
INTRO TO E
Intro to Excel Last Modified:
After youchart to workshe
To resizedges. Hdirectionnarroweenable ychange drag the
Just as ymove a want to Design cMove Ch
To movethe new creates that shesheet.
To moveaccompmove th
EXCEL 2007
2007 : 9/07
u create yodominate it
eet.
ze a chart, sHandles in n. Dragginger or wider, you to makethe chart's
e corner han
you can cochart withinmove the ccontextual thart dialog
e the chart sheet's naa chart sheet, but whe
e the chart anying fielde chart.
our chart, yots workshee
select the cthe middle
g a handle owhereas dre the chart height andndle chang
ntrol a charn a workshechart to a netab, in the Lbox.
to a new chme in the a
eet, which cen Excel 20
to an existid down arro
ou can chanet or take o
hart and thof the edge
on the left oragging theshorter or t width at thes the char
rt's size, yoeet, drag thew worksheLocation gr
hart sheet, accompanycontains on007 creates
ng worksheow, and the
nge its sizeon a role as
en drag ones enable yor right edgee handles otaller. Drag
he same timrt's size pro
ou can also he chart to teet, click throup, click M
select the Ning field. Sely your chathe new ch
eet, select ten click the
De Inform
e to reflect ws another in
e of the hayou to resize enables yn the chart'ging a corn
me; holding oportionally
control its the desired e chart and
Move Chart
New sheet electing the
art. You canhart sheet,
the Object worksheet
epartment of Technmation Technology
whether youformative e
ndles on the the chart you to make's upper an
ner handle edown the S.
location. Tolocation. If
d then, on tt to display
option butte New sheen still resizethe chart ta
In option buto which yo
nology Enhanced LSystems Division,
u want the element on
he chart's in one
e the chart nd lower edgenables yoShift key as
o f you he the
on and typeet option e the chart oakes up the
utton, click ou want to
earning UNCW
17
the
ges u to
s you
e
on e full
the
INTRO TO EXCEL 2007
Intro to Excel 2007 Department of Technology Enhanced Learning Last Modified: 9/07 Information Technology Systems Division, UNCW
18
Adding Headers and Footers to Printed Pages
Changing how your data appears in the body of your worksheets can make your information much easier to understand, but it doesn't communicate when the worksheet was last opened or to whom it belongs. You could always add that information to the top of every printed page, but you would need to change the current date every time you opened the document. And if you wanted the same information to appear at the top of every printed page, any changes to the body of your worksheets could mean that you would need to edit your workbook so that the information appeared in the proper place.
If you want to ensure that the same information appears at the top or bottom of every printed page, you can do so by using headers or footers. (A header is a section that appears at the top of every printed page; a footer is a section that appears at the bottom of every printed page.) To create a header or footer in Excel 2007, you display the Insert tab and then, in the Text group, click Header & Footer to display the Header & Footer Tools Design contextual tab.
When you display your workbook's headers and footers, Excel 2007 displays the workbook in Page Layout view, which is new in Excel 2007. The Excel 2007 product team's goal in creating Page Layout view was to show you exactly how your workbook will look when printed while still enabling you to edit your file, a capability not provided by Print Preview.
Excel 2007 divides its headers and footers into left, middle, and right sections. When you move your mouse pointer over an editable header or footer section, Excel 2007 highlights the section to indicate that clicking the left mouse button will open that header or footer section for editing.
When you click a header or footer section, Excel 2007 adds the Design contextual tab to the ribbon. The Design contextual tab holds a number of standard headers and footers, such as page numbers by themselves or followed by the name of the workbook. To add an Auto Header to your workbook, display the Design contextual tab and then, in the Auto Header & Footer group, click Auto Header and then click the Auto Header you want to apply.
INTRO TO EXCEL 2007
Intro to Excel 2007 Department of Technology Enhanced Learning Last Modified: 9/07 Information Technology Systems Division, UNCW
19
Questions or Problems?
Contact the Technology Assistance Center (TAC) Location: Hoggard Hall, room 126 Phone: 962-HELP (4357) E-mail: [email protected]. Normal hours of operation: Monday – Thursday, 7:30am-11pm; Friday, 7:30am-5:30pm; Sunday, 12pm-11pm