29


Introduction ............................................................................................................................................................... 1
Prerequisites .............................................................................................................................................................. 1
How Single Sign-on Works ........................................................................................................................................ 2
SSO Process Flow ..................................................................................................................................................2
How to Enable SSO in Satmetrix NPX (SAML2.0 SP Inititated Flow) ........................................................................ 3
Generate your Certificate ......................................................................................................................................3
Add a trust party to your ADFS ..............................................................................................................................3
Obtain Your Remote ADFS Login URL ...................................................................................................................3
Upload your ADFS Certificate and Remote Login URL to NPX .............................................................................3
Troubleshooting ........................................................................................................................................................ 5
Check list ................................................................................................................................................................5
Error Report ...........................................................................................................................................................5
Common Errors ......................................................................................................................................................6
Standard attributes in the SAML response from the IdP .....................................................................................8
APPENDIX ................................................................................................................................................................... 9
How to Export a Certificate from Your ADFS Server .............................................................................................9
Adding Satmetrix as a Trust Party to your ADFS ................................................................................................ 12
Single Sign-On (SSO) enables your users to securely access Satmetrix NPX without being prompted to enter
their Satmetrix log-in credentials.
Implementing Single Sign-On requires you or one of your administrators to have knowledge and experience
working with ADFS. If you do not have ADFS knowledge, consider enabling the Stay Signed In feature instead.
Stay Signed In enables users to save their log-in information in their browser cookie for up to 30 days and can
be configured within the application by any administrator.
To enable the Stay Signed In feature:
1. From the left navigation, go to Admin > Advanced Admin.
2. Choose System Settings.
3. On the left of the System Settings page under Company profile, click Security Settings.
4. Under Password policy, switch Enable ‘Stay Signed In’ to Yes. You can also set how many days your
users will stay signed in without being prompted to log in again. The default is 30 days.
Your enterprise must have the following prerequisites for enabling Single Sign-On (SSO).
A functional ADFS environment that is capable of federating with Internet applications. This
federation service acts as an identity provider (IdP). Federation can be accomplished by an in-house
or third party provider.
For additional help on setting up ADFS, read this article: Implementing Your ADFS Design Plan.
If your federation service uses something other than ADFS 2.0, it should support the SAML2-SP
initiated flow. (Satmetrix NPX SSO is tested well and certified with ADFS 2.0).
An (IdP) remote login URL.
An exported public certificate [Base-64 encoded X.509 (.CER) ]. Key size 2048. Please see Generating
your Certificate from ADFS in the Appendix.
A valid user account with Satmetrix NPX.
A valid user account in your Enterprise Application (IdP).
A username or e-mail address that matches between these two accounts.
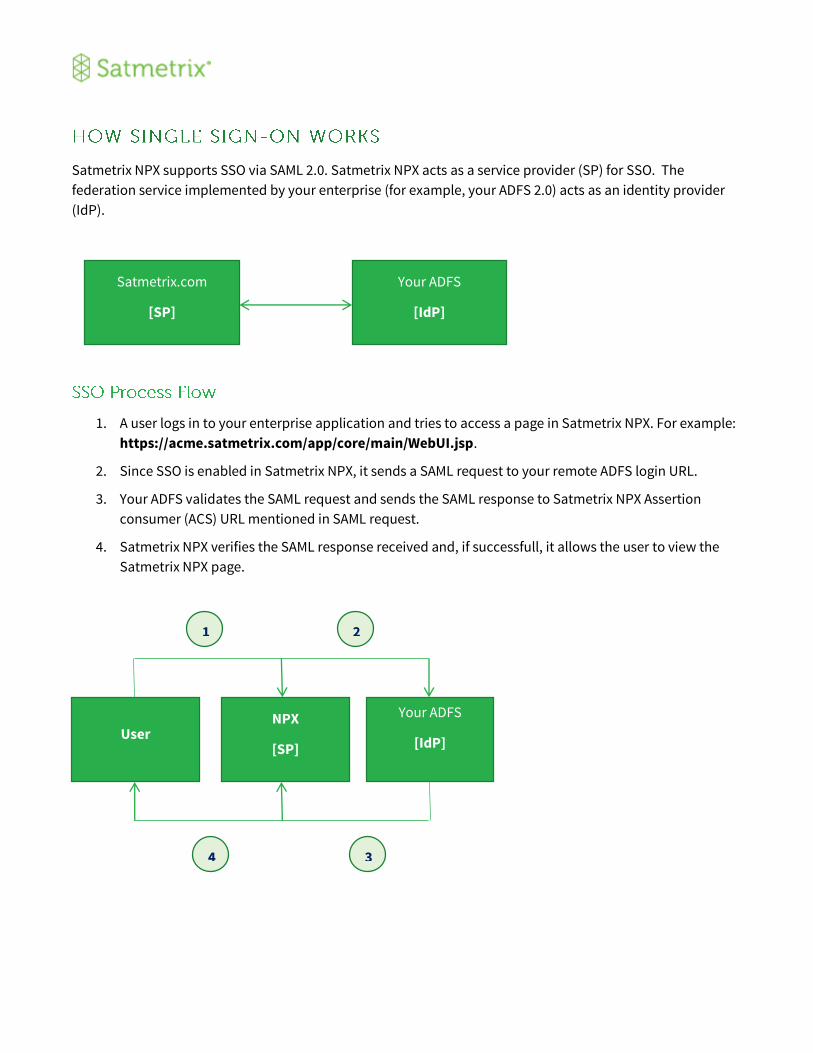
Satmetrix NPX supports SSO via SAML 2.0. Satmetrix NPX acts as a service provider (SP) for SSO. The
federation service implemented by your enterprise (for example, your ADFS 2.0) acts as an identity provider
(IdP).
1. A user logs in to your enterprise application and tries to access a page in Satmetrix NPX. For example:
https://acme.satmetrix.com/app/core/main/WebUI.jsp.
2. Since SSO is enabled in Satmetrix NPX, it sends a SAML request to your remote ADFS login URL.
3. Your ADFS validates the SAML request and sends the SAML response to Satmetrix NPX Assertion
consumer (ACS) URL mentioned in SAML request.
4. Satmetrix NPX verifies the SAML response received and, if successfull, it allows the user to view the
Satmetrix NPX page.
User NPX
[SP]
Your ADFS
[IdP]
1 2
3 4
Satmetrix.com
[SP]
Your ADFS
[IdP]

The process requires a few general steps:
1. Generate a certificate from your ADFS server.
2. Add a trust party to your ADFS.
3. Obtain your remote login URL for ADFS.
4. Upload your Certificate and remote ADFS login URL to NPX.
Please see Generating Your Certificate from ADFS in the Appendix of this document. You will need a
functioning ADFS environment.
Please see Adding Satmetrix as a Trust Party to your ADFS in the Appendix of this document. You will need a
functioning ADFS environment.
Contact your IT ADFS admin for your remote ADFS login URL if you do not have it. This URL is used to send the
SAML request and authenticate the user at IdP end.
1. Log into your Satmetrix app with a user that has the Enterprise Admin role or the appropriate
permissions.

2. Go to Admin > Advanced Admin. Choose Single Sign-On.
3. In the Single Sign-On Configuration page, click the Enable Single Sign-On checkbox.
4. Click Browse and upload your exported certificate. To learn more about generating your certificate,
see our guide Generating Certificate from ADFS in the Appendix.
5. Enter your remote ADFS login URL.
6. Click Save.
SSO is now enabled.

If your SSO login has failed, there are a number of things you can do to resolve the errors.
Check the following list to make ensure everything has been taken care of.
1. SSO has been enabled in Satmetrix NPX.
2. A valid ADFS certificate has been uploaded to Satmetrix NPX.
3. You have entered a valid application login URL:
https://<yourenterprisename>.satmetrix.com/app/core/service/authLogin
4. Configured valid ADFS login URL.
5. Make sure the user is accessing the Satmetrix NPX page from the proper URL.
https://<enterprisename>.satmetrix.com/app/core/main/WebUI.jsp
You can download an error log from the Error Report tab. From the left navigation, go to Admin > Advanced
Admin, then choose Single Sign-On. Click the Error Report tab.

Check the list below for some common errors.
SAML Single Sign-on is not enabled for this domain
Please ensure that the SAML Single Sign-on to Satmetrix is enabled for your domain.
SAML Response Signature is invalid. The certificate used to sign the SAML Response doesn't match with
the uploaded certificate
Please ensure that IdP is sending the correct and valid certificate (for example, signed and uploaded
certificates match or the certificate is not expired).
Not able to find the uploaded IdP Certificate in Satmetrix
Please verify that you had already uploaded the IdP Certificate successfully in Satmetrix.
IdP Certificate uploaded in Satmetrix is invalid
Please verify that the IdP Certificate uploaded in Satmetrix is a valid one.
Relay state URL is not found along with the SAML Response
Please ensure that the Relay state parameter, received by the IdP along with the SAML request, is passed back
with the SAML Response to Satmetrix.
SAML Response 'NotBefore' condition failed, Response received time on the Satmetrix Server was before the
'NotBefore' time set in SAML Response
Please ensure that the time settings are accurate in your IdP. Also to avoid any IdP/Satmetrix clock sync issue,
please keep few minutes buffer for both the 'NotBefore'/'NotOnOrAfter' threshold.
SAML Response 'NotOnOrAfter' condition failed, Response received time on Satmetrix Server was after the
'NotOnOrAfter' time set in SAML Response
Please ensure that the time settings are accurate in your ADFS. Also to avoid any IdP/Satmetrix clock sync
issue, please keep few minutes buffer for both the 'NotBefore'/'NotOnOrAfter' threshold.
Signature is not found in the SAML Response
Please ensure that your SAML Response/Assertion is signed.
Subject value is not found in the SAML Response
Please ensure that your SAML Response contains the Subject element.
NameID value is not found in the SAML Response
Please ensure that your SAML Response contains the NameID element.
Assertion is not found in the SAML Response
Please ensure that your SAML Response contains the Assertion element.
Issuer is not found in the SAML Response
Please ensure that your SAML Response contains the Issuer element.
The user is not available in Satmetrix
Please ensure that the user set in SAML Response is a valid user in Satmetrix.


Use attributes below as a reference for validating your SAML XML response. Checking these attributes is not
necessary in most the cases unless you have customized these attributes on the ADFS side.
Key Mandatory Description
RelayState Y It should be the absolute URL which the user is trying to access in Satmetrix NPX.
Issuer Y It should be the same name as that of the issuer of the certificate uploaded in Satmetrix NPX.
NameId or email
Y One parameter value should be available in the SAML response:
‘NameId’ is the username of the IdP’s currently logged-in user, which should exist in Satmetrix NPX.
‘email’ email address of the Satmetrix NPX User.
NotBefore and NotOnOrAfter
Y SAML condition ‘NotBefore’ and ‘NotOnOrAfter’
Sign the SAML Response using the certificate whose public part is uploaded in Satmetrix
NPX.

1
Launch the ADFS Management app on your ADFS server.
2

In the directory on the left of the app, click ADFS > Service > Certificates.
3 Double-click on the token-signing certificate labeled "Primary". This will bring up the certificate panel.
4
In the Details tab, click Copy to File.
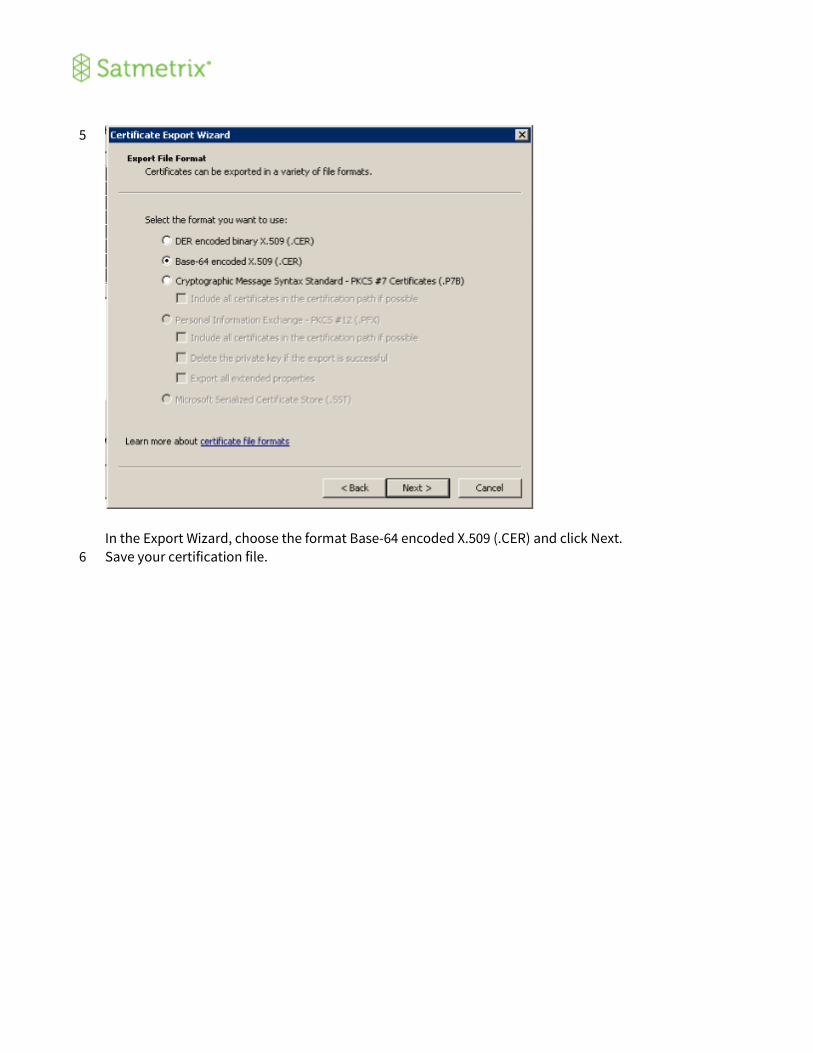
5
In the Export Wizard, choose the format Base-64 encoded X.509 (.CER) and click Next.
6 Save your certification file.
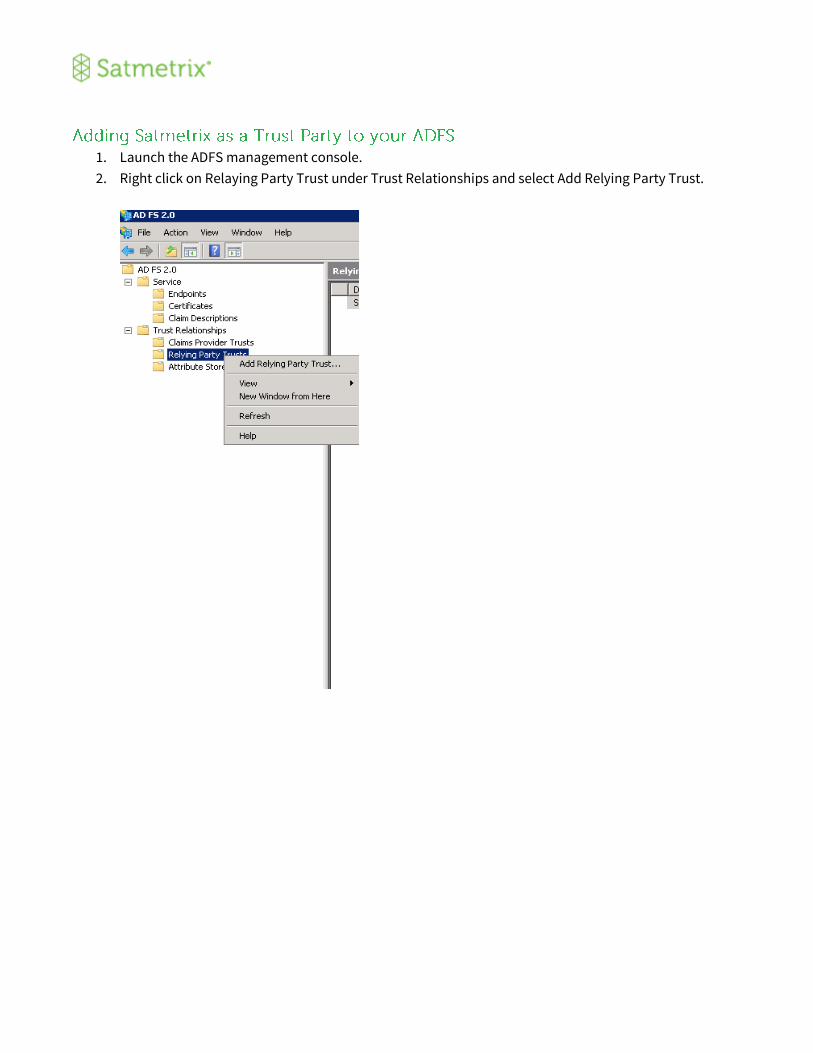
1. Launch the ADFS management console.
2. Right click on Relaying Party Trust under Trust Relationships and select Add Relying Party Trust.

3. On the next page, click Start.

4. Select Enter data about the relying party manually.
5. Click Next.

6. Enter Satmetrix SSO as the display name.
7. Click Next.
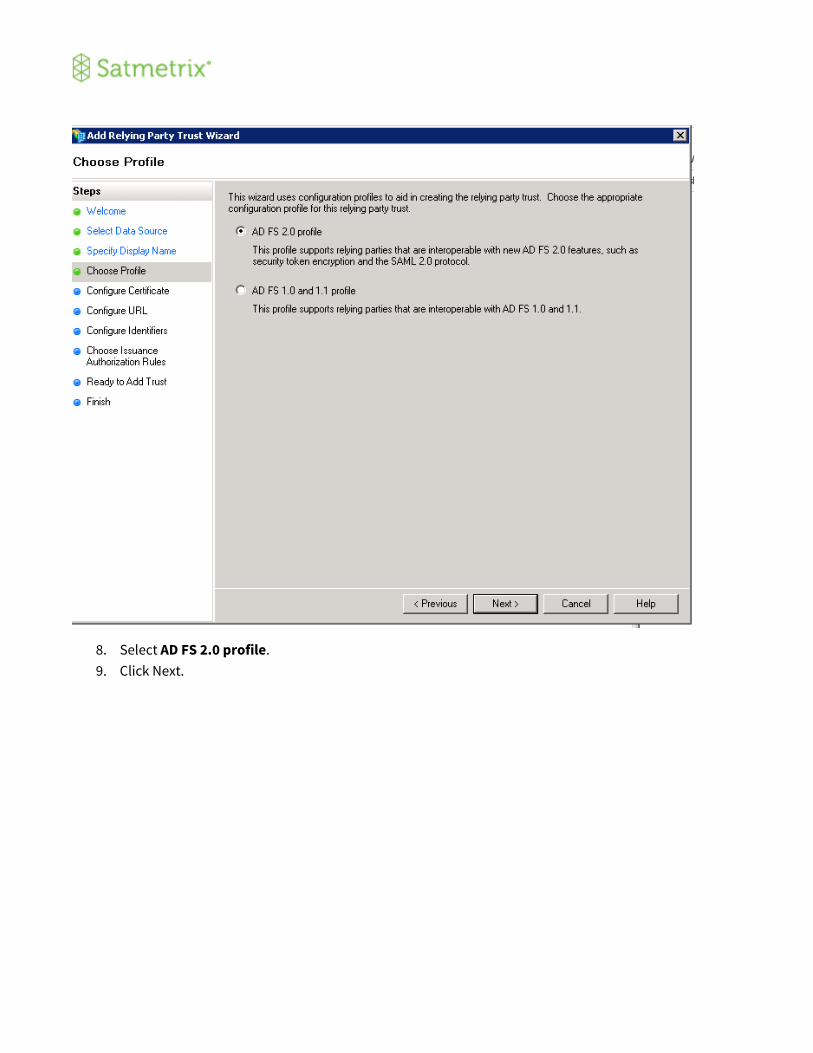
8. Select AD FS 2.0 profile.
9. Click Next.
10. Click Next.

11. Select Enable support for SAML 2.0 WebSSO protocol.
12. Under Relying party SAML 2.0 SSO service URL, enter in your Satmetrix application login URL. That is
the following URL, but with your enterprise name:
https://<YOUR ENTERPRISE NAME> .satmetrix.com/app/core/service/authLogin
For example, if your enterprise is named Acme, your login URL will be:
https://acme.satmetrix.com/app/core/service/authLogin
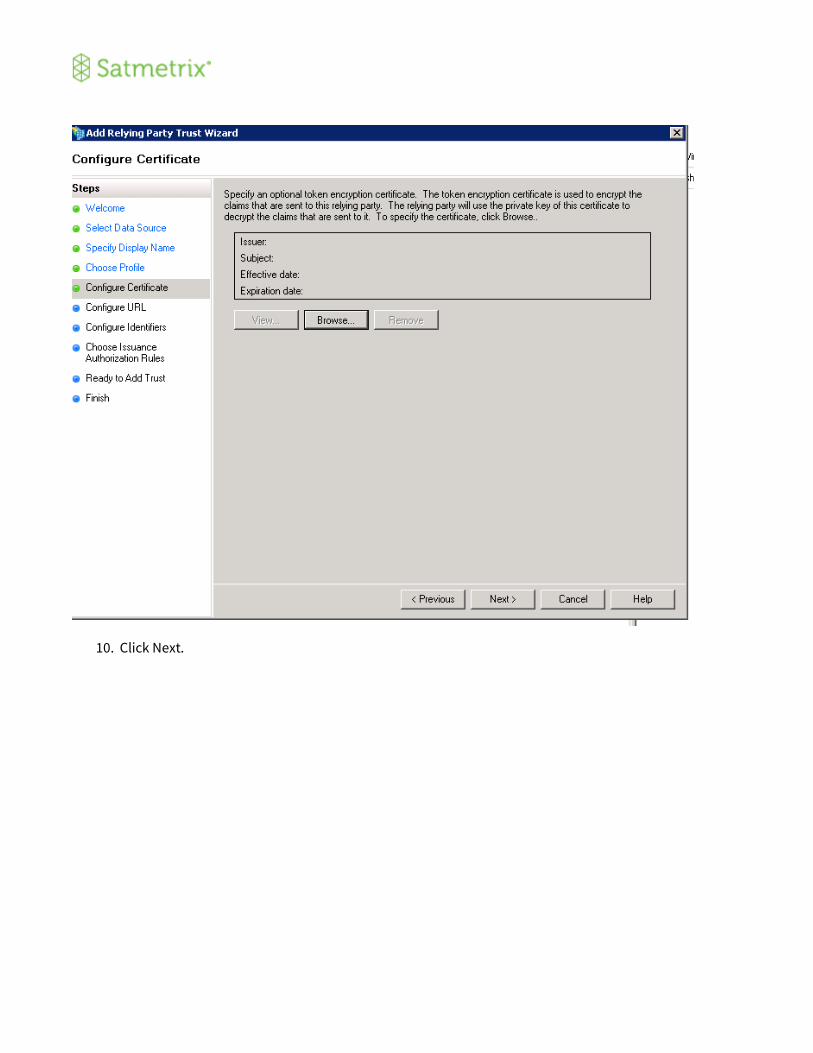
13. Click Next.

14. Under Relying party trust identifier, enter “SATMETRIX” exactly as it appears here. This is case-
sensitive.
15. Click Add.
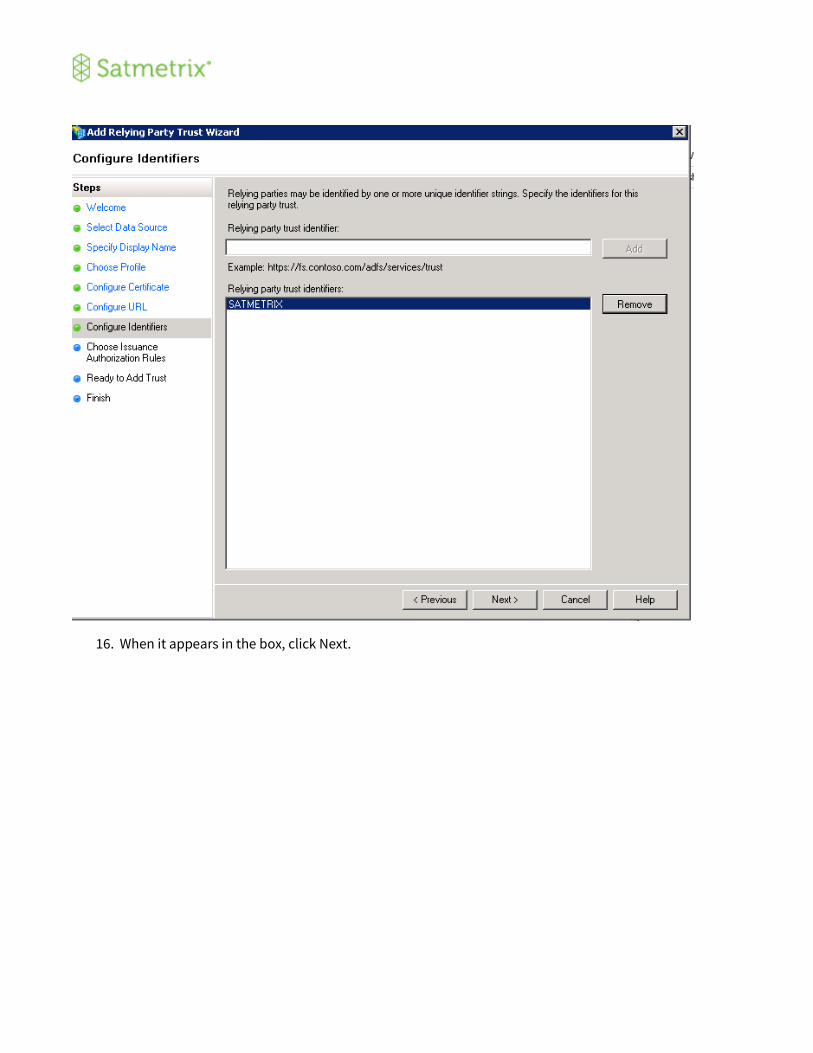
16. When it appears in the box, click Next.
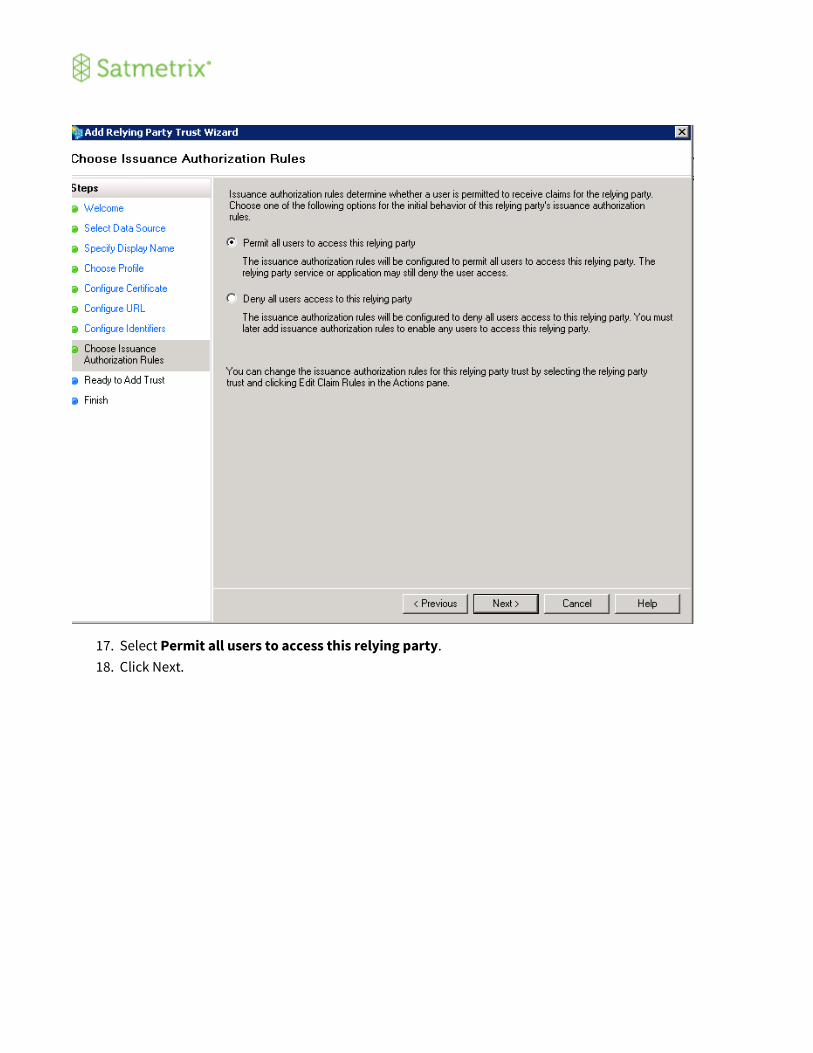
17. Select Permit all users to access this relying party.
18. Click Next.
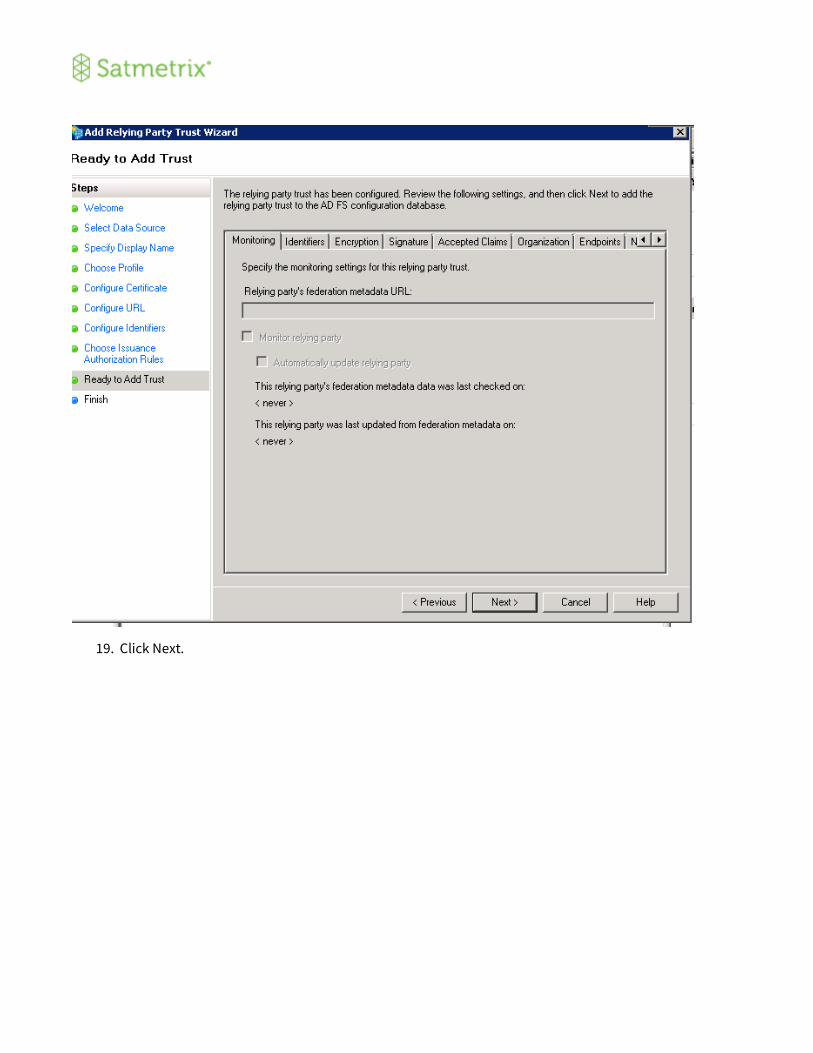
19. Click Next.
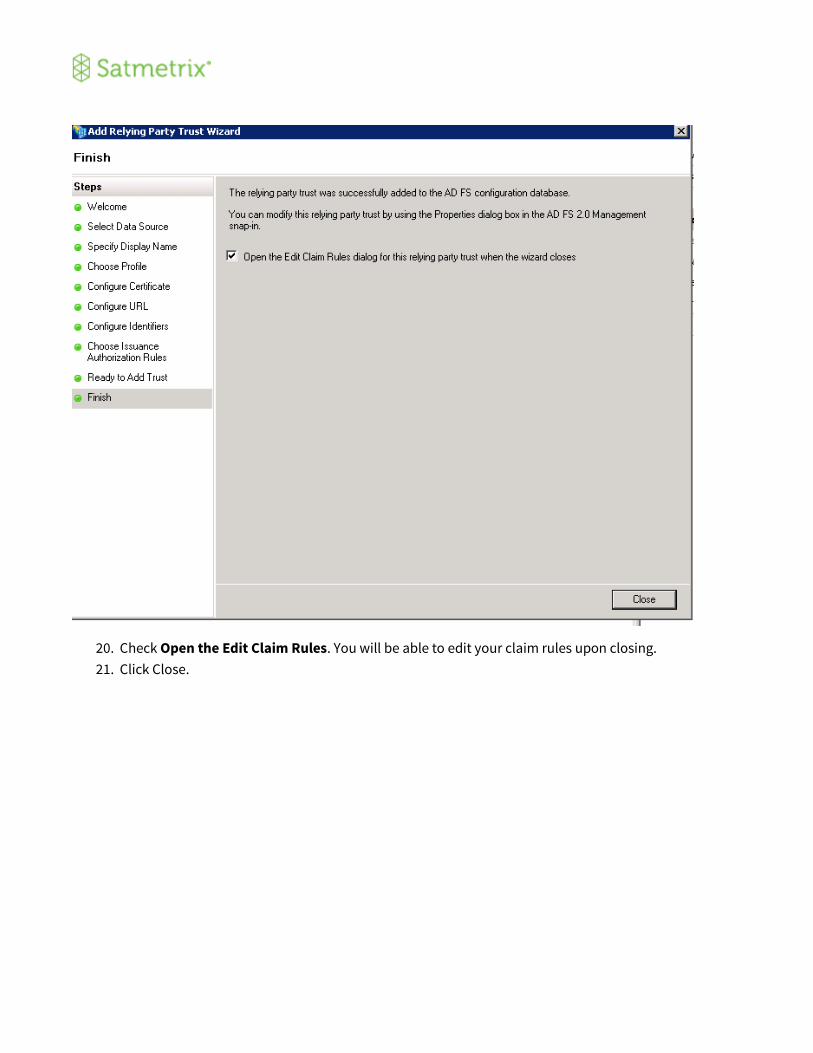
20. Check Open the Edit Claim Rules. You will be able to edit your claim rules upon closing.
21. Click Close.
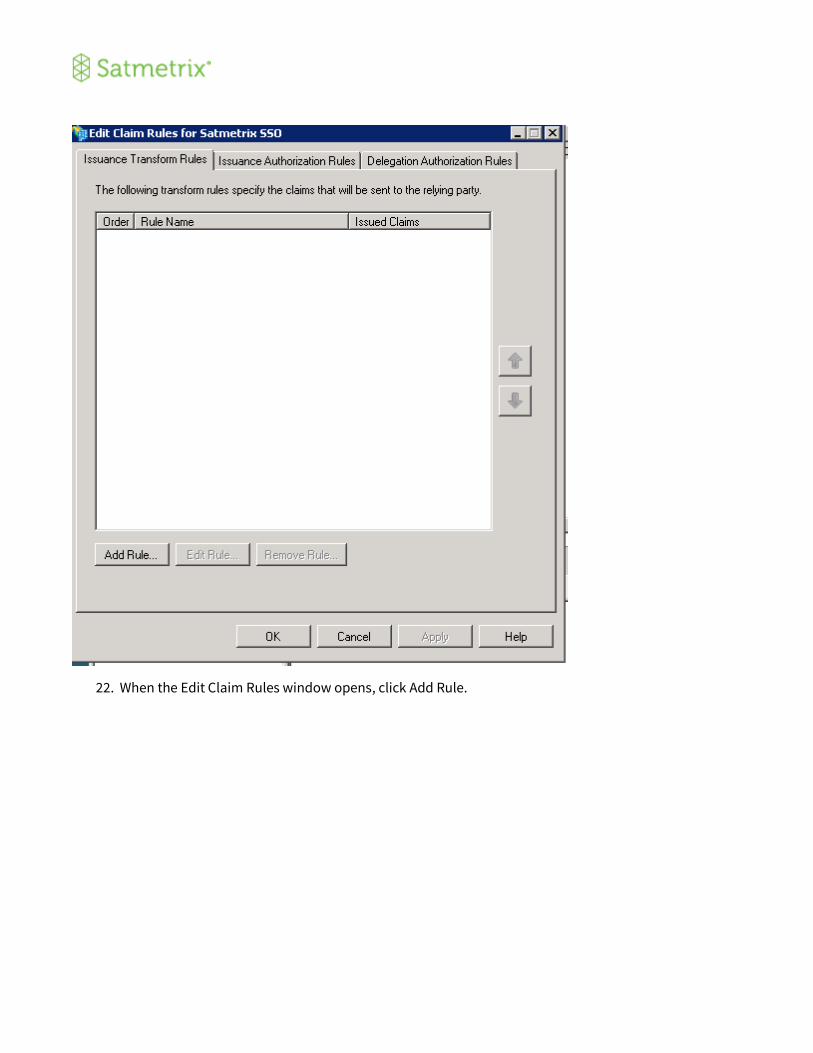
22. When the Edit Claim Rules window opens, click Add Rule.

23. Select Send LDAP Attributes as Claims from the Claim rule templates dropdown menu.
24. Click Next.

25. Enter “Email to Name” as the Claim rule name.
26. Select Active Directory from the Attribute store dropdown menu.
27. Under Mapping of LDAP attribute, choose E-Mail-Addresses as the LDAP Attribute and Name ID as the
Outgoing Claim Type.
28. Click Finish.

29. Click OK.
You have now added Satmetrix as a trust party to your ADFS.


