Page 1
INTRODUCTION
The Owners Manual for your new Airstream trailer is designed to respond to the
most frequent inquiries regarding the operation, function and care of the many
systems that make modern trailering a joy.
Airstream realizes our customers possess varying degrees of expertise in the
area of repairing and maintaining the appliances in their trailer. For this reason,
the service and trouble-shooting information found in this manual is directed
toward those with average mechanical skills.
We also realize you may be more familiar in one area than you are in another.
Only you know your capabilities and limitations. We want you to use this
manual, and hope you will find the information contained in it useful, however,
should you ever feel you may be “getting in over your head” please see your
dealer to have the repairs made.
A brief explanation of the operation of the appliances such as refrigerator,
furnace, water heater and others are explained in this manual. However, you
will also find the manufacturer’s information supplied in a packet included
with this manual more detailed.
All information, illustrations and specifications contained in this manual are based
on the latest product information available at the time of publication approval. If
and when new materials and production techniques are developed which can
Page 2
2013 SPORTINTRODUCTION
improve the quality of its product, or material substitutions are necessary due
to availability, Airstream reserves the right to make such changes.
We have provided many important safety messages in this manual. Always
read and obey all safety messages.
Warning indicates a potentially hazardous situation that, if not
avoided, could result in death or serious injury.
CaUTiOn indicates a potentially hazardous situation that, if not
avoided, could result in minor or moderate injury.
nOTiCE: used without the safety alert symbol indicates a situation that could
result in property damage if not avoided.
NOTE: Important information regarding the maintenance of your recreational
vehicle.
(Optional)
This denotes items that may be an option on all or particular models. Additionally, some optional items can only be included during the manufacturing phase and cannot be added.
The inclusion of optional items does not imply or suggest the availability,
application suitability, or inclusion for any specific unit.
Important Safety Precautions
You’ll find many safety recommendations on this page and throughout this
manual. The recommendations on the next two pages are the ones we
consider to be the most important. They are covered in depth in later sections
of this manual.
Do Not Allow Passengers to Ride in the Trailer During Travel
The transport of people puts their lives at risk and may be illegal. The trailer
does not have seat belts, therefore, it is not designed to carry passengers.
Reducing Fishtailing or Sway (See page B-12)
Sway or fishtailing is the sideways action of a trailer caused by external forces.
Excessive sway of your travel trailer can lead to the rollover of the trailer and
tow vehicle resulting in serious injury or death. Be sure to follow the instructions
in this manual.
Page 3
INTRODUCTION
Mold (See page C-9)
There are mold and mold spores throughout the indoor and outdoor environment.
There is no practical way to eliminate all mold and mold spores in the indoor
environment; the way to control indoor mold growth is to control moisture.
Towing and Weight Distribution (See section B, pages 1-11)
Weight distribution is an important factor when loading your travel trailer. A
recreational vehicle with the cargo distributed properly will result in efficient,
trouble-free towing. Be sure to follow the instructions in this manual.
Formaldehyde (Next Page)
Formaldehyde is an important chemical used widely by industry to manufacture
building materials and numerous household products. It is also a by-product
of combustion and certain other natural processes. Thus, it may be present
inside the trailer with some individuals being sensitive to it. Ventilation of the
unit normally reduces the exposure to a comfortable level.
Lug Nut Torquing (See page D-14)
Being sure wheel mounting nuts (lug nuts) on trailer wheels are tight and
properly torqued is an important responsibility that trailer owners and users
need to be familiar with and practice. Inadequate and/or inappropriate wheel
nut torque (tightness) is a major reason that lug nuts loosen in service. Loose
lug nuts can rapidly lead to a wheel separation with potentially serious safety
consequences. Overtightening can be just as serious and cause failure of the
lug nut or bolt stud. Be sure to follow the instructions in this manual.
See torque pattern on page D-14 for tightening sequence and follow torque
specifications on page I-2.
Appliances and Equipment (See page H-1)
The appliances (stove, refrigerator, etc.) and equipment (hot water heater,
furnace, etc.) typically operate on LP gas. LP gas is flammable and is contained
under high pressure. Improper use may result in a fire and/or explosion. Be
sure to follow all instructions and warnings in this manual as well as the specific
owners’ manuals of the appliances and equipment.
Tire Safety (See page D-8 AND READ TIRE SAFETY ADDENDUM)
Properly maintained tires improve the steering, stopping, traction, and load-
carrying capability of your vehicle. Under inflated tires and overloaded
vehicles are a major cause of tire failure. Be sure to read the Tire Safety Manual
Page 4
2013 SPORTINTRODUCTION
Addendum included with your owner’s packet.
Chemical Sensitivity; Ventilation
Chemical Sensitivity
After you first purchase your new recreational vehicle and sometimes after it
has been closed up for an extended period of time you may notice a strong
odor and chemical sensitivity. This is not a defect in your recreational vehicle.
Like your home, there are many different products used in the construction of
recreational vehicles such as carpet, linoleum, plywood, insulation, upholstery,
etc. Formaldehyde is also the by-product of combustion and numerous
household products, such as some paints, coatings and cosmetics. However,
recreational vehicles are much smaller than your home and therefore the
exchange of air inside a recreational vehicle is significantly less than a home.
These products, when new or when exposed to elevated temperatures and/
or humidity, may “off-gas” different chemicals, including formaldehyde. This
off-gassing, in combination with the minimal air exchange, may cause you to
experience irritation of the eyes, nose, and throat and sometimes headache,
nausea, and a variety of asthma-like symptoms. Elderly persons and young
children, as well as anyone with a history of asthma, allergies, or lung problems,
may be more susceptible to the effects of off-gassing.
Formaldehyde
Most of the attention regarding chemical off-gassing surrounds formaldehyde.
Formaldehyde is a naturally occurring substance and is an important chemical
used widely by industry to manufacture building materials and numerous
household products. It is also a by-product of combustion and certain
other natural processes. Thus, it may be present inside the trailer with some
individuals being sensitive to it. Ventilation of the unit normally reduces the
exposure to a comfortable level.
Trace levels of formaldehyde are released from smoking, cooking, use of
soaps and detergents such as carpet shampoos, cosmetics, and many other
household products. Some people are very sensitive to formaldehyde while
others may not have any reaction to the same levels of formaldehyde. Amounts
released decrease over time.
Your Airstream trailer was manufactured using low formaldehyde emitting (LFE)
wood products, which is the typical usage in the recreation vehicle industry.
Formaldehyde has an important role in the adhesives used to bind wood
products used in recreation vehicles. The wood products in your trailer are
designed to emit formaldehyde at or lower than industry guidelines and should
not produce symptoms in most individuals.
Page 5
INTRODUCTION
While LFE wood products typically do not emit formaldehyde at a level that
would cause symptoms in most individuals, it is possible, though not likely, for
that to occur when the trailer is not properly ventilated. Ventilation is an essential
requirement for trailer use, for many reasons. Any effects of formaldehyde
can be greatly reduced by actions such as opening windows, opening roof
vents, running the air conditioner, or some combination thereof. In addition,
the emission of formaldehyde by these products naturally decreases rapidly
over time.
Airstream strongly suggests that you take measures to properly ventilate your
trailer on a regular basis.
Ventilation
To reduce or lessen exposure to chemicals from off-gassing it is of utmost
importance that you ventilate your recreational vehicle. Ventilation should
occur frequently after purchase and at times when the temperatures and
humidity are elevated. Remember off-gassing is accelerated by heat and
humidity. Open windows, exhaust vents, and doors. Operate ceiling and/or
other fans, roof air conditioners, and furnaces and use a fan to force stale air
out and bring fresh air in. Decreasing the flow of air by sealing the recreational
vehicle increases the formaldehyde level in the indoor air. Please also follow the
recommendations contained in Chapter 2 regarding tips to avoid condensation
problems. Many of the recommendations contained in Chapter 2 will assist in
avoiding exposure to chemicals that off-gas. If you have any questions with
respect to proper ventilation of your trailer, please do not hesitate to contact
your dealer or Airstream.
Do Not Smoke
Finally, we recommend that you do not smoke inside your recreational vehicle.
In addition to causing damage to your recreational vehicle, tobacco smoke
releases formaldehyde and other toxic chemicals.
Medical Advice
If you have any questions regarding the health effects of formaldehyde, please
consult your doctor or local health department.
Warranty Exclusion
Chemical gassing is not a “Defect” in your recreational vehicle and is not
covered by the Limited Warranty. Please follow the recommendations in this
manual to address this concern.
Page 6
TABLE OF CONTENTS
A - 1
A. WARRANTY AND SERVICE
Warranty
Warranty Explanation
Service
Reporting Safety Defects
Maintenance Schedule
Maintenance Parts & Supplies
B. TOWING
Tow Vehicles
Brakes
Loading
Weighing
Hitching Up
Towing Tips
Pre-Travel Check List
C. CAMPING
Camping Safety
Overnight Stop
Extended Stay
Leveling & Stabilizing
Hook Ups
Winter Traveling
Condensation/Mold
D. EXTERIOR
Cleaning
Main Door/Windows
Chassis
Tires
Axle and Running Gear
Electric Brakes
E. INTERIOR FURNISHINGS
AND ACCESSORIES
Fabric Care
Features & Fixtures
Storage Areas
Smoke Alarm
Gas Detector , LP
Fire Extinguisher
Gas Detector , CO
F. PLUMBING
LP (Liquid Petroleum) Gas
Water
Winterizing
Drain and Waste
Toilet
Faucet
G. ELECTRICAL
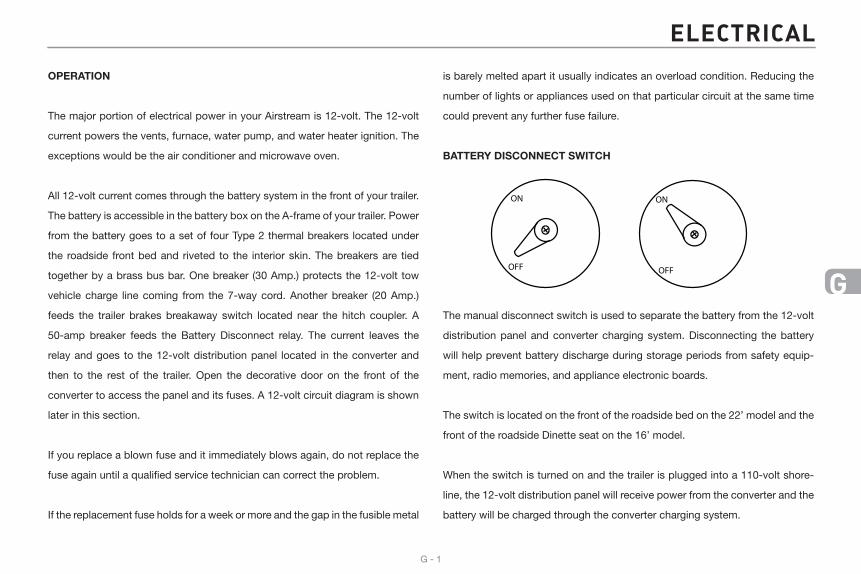
Battery Disconnect
Battery
Converter
Distribution Panel
TV Antenna/Booster
Satellite Pre-wire
Solar Panel Pre-wire
110-Volt System & Components
F. APPLIANCES
Air Conditioner
Furnace
Cooktop
Microwave
Refrigerator
Water Heater
High Volume Fan
Monitor Panel
I. SPECIFICATIONS
Page 7
AA
A - 1
WARRANTy AND SERvICE
AIRSTREAM LIMITED WARRANTY
WARRANTY COVERAGE
Airstream Inc. (“Airstream”) warrants that it will repair or replace defects in
material or workmanship in any components of a new Airstream trailer pur-
chased from an authorized Airstream dealer in the United States or Canada for
a period of twenty-four (24) months from the date the trailer is first delivered
to the original retail purchaser. In order to obtain coverage under this Limited
Warranty, you must notify an authorized Airstream dealership or Airstream of
the warrantable defect no later than ten (10) days following expiration of this
Limited Warranty. Airstream’s obligation to repair or replace defective materials
or workmanship is the sole obligation of Airstream under this Limited Warranty.
Airstream reserves the right to use new or remanufactured parts of similar qual-
ity to complete any warranty work.
LIMITATION OF IMPLIED WARRANTIES
IMPLIED WARRANTIES ARISING UNDER APPLICABLE LAW, IF
ANY, INCLUDING BUT NOT LIMITED TO IMPLIED WARRANTIES OF
MERCHANTABILITY OR FITNESS FOR A PARTICULAR PURPOSE,
ARE HEREBY LIMITED IN DURATION TO THE TERM OF THIS LIMITED
WARRANTY. ALL OTHER WARRANTIES, EXPRESS OR IMPLIED, ARE
HEREBY DISCLAIMED BY AIRSTREAM. SOME STATES DO NOT ALLOW
LIMITATIONS ON HOW LONG AN IMPLIED WARRANTY LASTS, SO THE
ABOVE LIMITATIONS MAY NOT APPLY TO YOU.
WHAT IS NOT COVERED BY THIS LIMITED WARRANTY
This Limited Warranty does not provide coverage for any of the following:
1. Tires, batteries, stereo, television, range/stove, furnace, refrigerator, water
heater, microwave, generator, slide-out mechanisms, and other materials,
parts and components warranted by persons or entities other than Airstream.
Please refer to the warranties of component manufacturers for terms and
conditions of coverage;
2. Any part or component of the trailer that was not manufactured or installed
by Airstream;
3. Normal deterioration due to wear or exposure, including but not limited to
rust, corrosion, oxidation, and cosmetic blemishes;
4. Normal maintenance and service items, including but not limited to light
bulbs, fuses, lubricants, sealants and seals, slideout adjustments, door
adjustments, and awning tension;
5. After-market equipment or accessories installed on the trailer after completion
of manufacture by Airstream, or any defects or damage caused by such
items;
6. Trailers not purchased through an authorized dealer of Airstream trailers,
and trailers purchased directly or indirectly through auction, salvage,
repossession, or other non-customary sale means;
7. Defects or damage caused by, in whole or in part, or in any way related to:
Page 8
A
A - 2
WARRANTy AND SERvICE
A - 3
a. Accidents, misuse (including off-road use), or negligence.
b. Failure to comply with the instructions set forth in any owner’s manual
provided with the trailer.
c. Alteration or modification of the trailer except such alterations or
modifications approved in writing by Airstream.
d. Acts of God or other environmental conditions, such as lightning, hail, salt,
or other chemicals in the atmosphere.
e. De-icing agents or other chemicals applied to the trailer.
f. Failure to properly maintain or service the trailer, including but not limited
to the maintenance of lubricants, sealants, and seals.
g. Condensation and the results of condensation including water damage
and the growth of mold or mildew. Mold and mildew are natural
growths given certain environmental conditions and are not covered by the
terms of this Limited Warranty.
h. Use of the trailer other than for temporary recreation purposes, including
but not limited to use of the trailer for residential, disaster relief, commercial,
or rental purposes.
i. The addition of weight to the trailer that causes the trailer’s total weight to
exceed applicable trailer weight ratings, or addition of weight
causing improper distribution of the weight of the trailer.
j. Selection, use, and operation of any hitch assembly.
k. Failure to seek and obtain repairs in a timely manner.
l. Failure to use reasonable efforts to mitigate damage caused by defects.
m. Failure to properly ventilate the trailer.
n. Improper electric power supply or improper vehicle hookup to other
facilities.
o. Acts or omissions of any person or entity other than Airstream.
DISCLAIMER OF INCIDENTAL AND CONSEQUENTIAL DAMAGES
Airstream hereby disclaims any and all incidental and consequential damages
arising out of or relating to the trailer, including expenses such as transpor-
tation to and from vehicle dealerships and Airstream repair facilities, loss of
time, loss of pay, loss of use, inconvenience, commercial loss (including lost
profits), towing charges, bus fares, vehicle rental, service call charges, gasoline
expenses, incidental charges such as telephone calls and facsimile transmis-
sions, and expenses for lodging. This disclaimer is independent of any failure
of the essential purpose of any warranties provided with a trailer, and shall
survive any determination that a warranty failed of its essential purpose. Some
states do not allow the exclusion or limitation of incidental or consequential
damages, so the above limitation or exclusion may not apply to you.
OBTAINING WARRANTY SERVICE
In order to obtain warranty service under this Limited Warranty, the owner must
do all of the following:
1. Owner and dealer representative must complete and return the Customer
Performance Checkout within 10 days from delivery of the trailer;
Page 9
AA
A - 2 A - 3
WARRANTy AND SERvICE
2. Notify Airstream or one of its authorized, independent dealers, of any
claimed defect within the warranty period or 10 days thereafter;
3. Provide notification of a defect within 10 days of discovery of that defect;
4. Promptly return the trailer to an authorized Airstream dealer or Airstream
for repairs.
If you believe a defect covered by this Limited Warranty still exists after an at-
tempted repair by an authorized Airstream dealer, you must contact Airstream
at the following address, specifying:
1. The complete serial number of the trailer;
2. The date of original purchase and the date of original delivery;
3. The name of the selling dealer; and
4. The nature of the problem and the steps or service which have been
performed.
AIRSTREAM, INC.
419 West Pike Street
P.O. Box 629
Jackson Center, Ohio 45334-0629
Attention: Owner Relations Department
Airstream may direct you to an authorized Airstream dealer, or may request
that you bring your trailer to the Airstream factory in Jackson Center, Ohio for
repairs.
Airstream does not control the scheduling of repairs at its authorized Airstream
dealers, and repairs at the Airstream factory may not be immediately available.
Therefore, you may encounter delays in scheduling repairs and/or completion
of repairs. All costs associated with transporting the trailer for any warranty
service shall be the sole responsibility of the owner.
DEALER REPRESENTATIONS EXCLUDED
The entire Limited Warranty provided by Airstream is set forth herein. Airstream
will not be responsible for any additional representations or warranties made by
any person or entity other than Airstream, and Airstream’s obligations are solely
as set forth in the terms and conditions of this Limited Warranty.
WARRANTY TRANSFER
This Limited Warranty is transferable to subsequent owners for the remaining
duration of the warranty period, upon approval from Airstream. Transfer of this
Limited Warranty will only be approved by Airstream upon all of the following:
1. Airstream’s receipt of a completed transfer application form;
2. The payment of a $250.00 processing fee to Airstream; and
3. The completion of an inspection of the condition of the trailer, at the
Page 10
A
A - 4
WARRANTy AND SERvICE
A - 5
owner’s expense, by an authorized Airstream dealer in accordance w i t h
Airstream’s required procedure and Airstream’s receipt of a written report as
to the results of such inspection.
Transfer application forms are available from your dealer or Airstream’s Service
Administration Department.
CHANGES IN DESIGN
Airstream reserves the right to make changes in design and improvements
upon its products from time-to-time, without imposing upon itself any obliga-
tion to install additional features in your trailer.
STATUTE OF LIMITATIONS
No action may be brought against Airstream for breach of this Limited Warranty,
any applicable implied warranty, or for any other claim arising out of or relating
to an Airstream trailer, more than thirty (30) days after: (1) expiration of the
twenty-four (24) month Limited Warranty period; or (2) expiration of the ten (10)
day notice period that follows expiration of the Limited Warranty period, if such
notice is given.
THIS WARRANTY GIVES YOU SPECIFIC LEGAL RIGHTS, AND YOU MAY
ALSO HAVE OTHER RIGHTS WHICH VARY FROM STATE TO STATE.
AIRSTREAM, INC.
419 West Pike Street
P.O. Box 629
Jackson Center, OH 45334-0629
Tele: 937-596-6111
Fax: 937-596-6539
EXPLANATION OF AIRSTREAM LIMITED WARRANTY
The Airstream Limited Warranty is detailed on a Warranty Card. It is filled out
by the dealer and presented to the owner during delivery of a new unit. The
Limited Warranty must be presented to a dealer to obtain warranty service. It
should be kept in the trailer during the warranty period.
EXCLUSIONS:
Normal Wear
Items such as tires, curtains, upholstery, floor coverings, window, door and vent
seals will show wear or may even wear out within the one year warranty period
depending upon the amount of usage, weather, and atmospheric conditions.
Page 11
AA
A - 4 A - 5
WARRANTy AND SERvICE
Accident
We strongly urge our dealers and customers to inspect the trailer upon receipt of
delivery for any damage caused by accident while being delivered to the dealer,
or while it is on the dealer’s lot. Damage of this nature becomes the dealer or
customer’s responsibility upon acceptance of delivery, unless Airstream is noti-
fied and the person making the delivery verifies the damage. Glass breakage,
whether obviously struck or mysterious, is always accidental and covered by
most insurance policies.
Abuse
Lack of customer care and/or improper maintenance will result in early failure
for which Airstream cannot be held responsible.
Exposure
Not unlike a car, the steel parts of a trailer can and will rust if subjected to pro-
longed exposure to moisture, salt air, or corrosive air-borne pollutants without
repainting. Aluminum oxidizes when unprotected under similar conditions, and
refinery chemicals of a sulfurous nature are harmful to finishes if not washed
off periodically. Extremely hot or direct sunlight will deteriorate rubber and fade
curtains and upholstery. Conditions of this nature, although they may be normal
for the area, are beyond Airstream’s control and become the responsibility of
the owner.
It is the responsibility of the owner to take such preventative measures as are
necessary to maintain the exterior caulking and sealer of your unit. It is the
responsibility of the owner to use reasonable, prudent care to prevent foresee-
able secondary damage from rain, plumbing leaks, and the natural accumula-
tion of moisture in your unit, such as a delaminated floor; stained upholstery,
carpeting, or drapes; mold formation and growth; furniture damage, etc. Mold
is a natural growth given certain environmental conditions and is not covered
by the terms of the Limited Warranty.
Overload
Damage due to loading, either beyond capacity or to cause improper towing
because of improper balance, is beyond Airstream’s responsibility. The
Airstream trailer is engineered to properly handle the gross vehicle load rating
on the certification label. Load distribution has a definite effect upon the
towing characteristics and attitudes of the trailer. Level hitch installations are
a necessity, and very important on a tandem axle trailer. There are limits to the
amount of load that can be safely transported depending upon speed and road
conditions, and reasonable cause to believe these factors have been exceeded
could void the Airstream warranty. For additional information on the loading of
Page 12
A
A - 6
WARRANTy AND SERvICE
A - 7
your trailer, consult your Owner’s Manual or gross vehicle weight rating plate.
The axle is manufactured to a tolerance of 1-degree camber and 1/8” toe-in.
These tolerances will only change if the trailer is subjected to abuse, such as
dropping off a sharp berm, striking a curb, or hitting a deep hole in the road.
Such damage could be considered as resulting from an accident which risks
are not covered under the warranty. Abnormal tire wear and/or wheel alignment
resulting from such damage is not covered under the terms of the warranty.
Chemical Gassing
Chemical gassing is not a “Defect” in your recreational vehicle and is not
covered by the Limited Warranty. Please follow the recommendations in this
manual to address this concern.
SERVICE:
Before leaving the factory, each and every vital part of the trailer is tested for
performance. Each test is signed and certified by an inspector. After the trailer
arrives on your dealer’s lot all of these vital parts and systems are again tested.
When you take delivery of your new trailer you will receive a complete check
out.
At that time a specified list of performance checks on your trailer equipment will
be conducted and any deficiencies you have experienced since taking delivery
will be corrected.
Please contact your dealer if you need service. Major service under your
Airstream Limited Warranty is available through our nationwide network of
Airstream Dealer Service Centers. An up-to-date list of Dealer Service Centers
will be sent with an Owner’s Survey shortly after your trailer is delivered. WWW.
Airstream.com web site also has a dealer locator on it. This list is current as of
the date of this publication.
Occasionally dealerships change, or new dealers are added who may not
appear on this list. For this reason, it is suggested that you contact your local
dealer from time to time and bring your list up to date. He can also provide
you with additional copies if you need them. ALL CENTERS OPERATE ON AN
APPOINTMENT BASIS FOR THE UTMOST EFFICIENCY.
When you require service from the Airstream Factory Service Center, or a
Certified Dealer Service Center, please contact the service manager for an
appointment, and kindly inform him if you are unable to keep the appointment
date or wish to change it. Service may be arranged at the Factory Service
Center by contacting the Service Coordinator at: Airstream Factory Service
Center, P.O. Box 629, 419 W. Pike Street, Jackson Center, Ohio 45334-0629
Page 13
AA
A - 6 A - 7
WARRANTy AND SERvICE
Phone: 937-596-6111
REPORTING SAFETY DEFECTS
If you believe that your vehicle has a defect which could cause a crash or could
cause injury or death, you should immediately inform the National Highway
Traffic Safety Administration (NHTSA) in addition to notifying Airstream Inc..
If NHTSA receives similar complaints, it may open an investigation, and if it
finds that a safety defect exists in a group of vehicles, it may order a recall and
remedy campaign. However, NTHSA cannot become involved in individual
problems between you, your dealer, or Airstream Inc.
To contact NHTSA, you may either call the Vehicle Safety Hotline toll-free at
1-888-327-4236 (TTY: 1-800-424-9153); go to http://www.safercar.gov; or
write to: Administrator, NHTSA, 1200 New Jersey Avenue, S.E., Washington,
DC 20590.
You can also obtain other information about motor vehicle safety from http://
www.safercar.gov.
MAINTENANCE SCHEDULE
Warning: FAILURE TO MAINTAIN YOUR COACH CAN CAUSE
PRE-MATURE AND UNEXPECTED PARTS BREAKAGE AND/OR ERRATIC
OPERATION THAT MAY BE HAZARDOUS.
Note: See appliance manufacturer’s literature for further information.
EVERY 1,000 MILES OR 60 DAYS
Escape Window Check operation of latches and upper hinge.
*Battery Check water level , lead acid only
Smoke Alarm Test and replace battery as required
Tires Check tire pressure (See Specifications),
Spare Tire Carrier Check tire is secure.
Hitch Check for loose bolts or unusual wear.
GFI Circuit Breaker Test and record.
Page 14
A
A - 8
WARRANTy AND SERvICE
A - 9
EVERY 5,000 MILES OR 90 DAYS
Exterior Door Locks Lubricate with dry graphite.
Exterior Hinges Lubricate with light household oil.
LPG Regulator Check bottom vent for obstructions.
Main Door Striker Pocket Coat with paraffin.
Wheel Lug Nuts See Specification Section in this
manual for wheel torque ratings.
Break Away Switch Pull pin and lubricate with household
oil . Replace pin immediately.
7-Way Plug Spray with contact cleaner.
Hitch Ball Latch Lubricate with non-detergent motor
oil.
Hitch Ball Lubricate with hitch ball lube or wheel
bearing grease.
Main Door Step Lubricate moving parts and check.
* As a battery ages and becomes less efficient, or in very hot weather, the water
level should be checked at more frequent levels.
EVERY 10, 000 MILES OR 6 MONTHS
Brakes Inspect, adjust, or replace as necessary.
Wheel Bearings Clean and repack.
Tires Inspect and rotate.
Spare Tire Carrier Lubricate moving parts, check tire is secure.
Seals, Windows, & Door Clean with mild detergent and coat with
“Slipicone”.
TV Antenna Lubricate all moving parts with silicone
lubricant.
Exterior Wax.
Escape Window Lubricate latches with WD-40 or light
household oil.
Page 15
AA
A - 8 A - 9
WARRANTy AND SERvICE
EVERY YEAR
Battery Clean, neutralize, and coat terminals with
petroleum jelly.
A-Frame Wire brush and paint frame at front and rear.
Step Clean and lubricate, check for wear at
outriggers.
LP Bottles Have purged by LP supplier.
Seams Check and reseal exterior seams, windows,
lights, and vents as needed.
Hitch Coupler and Ball Check for wear or damage. Assure all parts
operate freely. Replace any component if worn
or damaged.
SUGGESTED MAINTENANCE PARTS AND LUBRICANTS
BULBS, EXTERIOR
LED Step light, Clearance Light Sealed, replace light
LED Stop/Turn/Tail, license plate L15-0073
Convenience Light (Dump Valve) Sealed, replace light
Exterior Compartment Light (Incandescent) #1141
BULBS, INTERIOR
Ceiling, Closet Light (Incandescent) #1141
DangEr: Always replace the light bulb on an interior or exte-
rior light fixture with the correct bulb for that light. Failure to heed this
warning could cause fire, property damage, personal injury, or death.
Page 16
A
A - 10
WARRANTy AND SERvICE
B - 1
MISCELLANEOUS
Water Hose Gaskets
Wheel Bearing Grease
Extra Hair Pin Clips for Hitch
Grease Seals
Dry Graphite
WD-40 or Equivalent Aerosol Lubricant
Oil Can with 30 Weight Non-Detergent Oil
Silicone Lubricant
Light Household Type Oil
Spray Contact Cleaner
Hitch Ball Lube (May use wheel bearing grease.)
Exterior Sealer
DATE DEALER SERvICE PERFORMED
MAINTENANCE RECORD
Page 17
A - 10
TOWINg
B - 1
B
TOW VEHICLE EQUIPMENT
If you plan to buy a new vehicle to tow your trailer we suggest that you include
in your purchase the towing options offered by most tow vehicle manufacturers.
These include such things as a heavy-duty alternator and radiator, heavy-duty
springs (See Note:) and shock absorbers, transmission cooler, heavy-duty fan
and flasher unit and others, depending upon the make of the vehicle.
Transmissions may be manual or automatic, but an automatic transmission
may prolong your tow vehicle’s life and generally does a better job of control-
ling engine loads than the average driver using a manual shift.
Having adequate power is very important when considering the purchase of
a new vehicle or the trailer towing capability of your present one. American
manufacturers realize more than 30% of the vehicles they sell will be used for
towing some type of trailer. The dealers are provided with guidelines to use
when helping a customer decide on a tow vehicle. The guidelines are not just
determined by the power output of the engine. The gear ratio of the differential
is also a very important part of the guideline.
Inspect the tow vehicle’s hitch regularly for loose bolts or nuts, cracked welds,
loose ball mounts, worn parts, etc.
New trailerists often carry more food and other supplies than really needed.
Remember that every item you take along is one more thing to stow and adds
weight to the total load you must pull. Consolidate items in shelves, lockers,
and in the refrigerator. It is better to have one full and one empty locker, than
two half empty ones. Special care must be taken not to overload the front and
rear ends of the trailer.
NOTE: Be realistic when ordering heavy duty springs. Only springs heavy enough to support your loaded vehicle (not including trailer) are necessary. Too harsh of spring rate will only shorten the life of the tow vehicle and trailer, and will make your journeys less enjoyable.
7-way Plug Diagram
Black, 12V
Blank
Brown, Right Turn
Blue, Brake 12V, White
Left Turn, Red
Clearance Lights,Green
Page 18
TOWINg
B - 2
B
B - 3
Warning: Too stiff of springs can hinder the action of the
weight equalizing hitch and prevent the transfer of weight to the front of
the vehicle.
Warning: Always shut off the LP gas at the bottles when fuel-
ing a tow vehicle.
ELECTRIC BRAKES
Trailers with Dexter Nev-R-Adjust brakes. Please follow all maintenance proce-
dure in the Dexter users manual provided in the owner’s packet.
The brakes are operated by 12 volt current from your tow vehicle and MUST BE
HOOKED UP SO THAT YOU HAVE AN INTEGRAL SYSTEM WITH YOUR TOW
VEHICLE BRAKES. To prevent problems and insure satisfactory braking action,
install an electronic brake controller in line with the brakes in your tow vehicle.
An electronic controller installed in your tow vehicle will synchronize the trailer
brakes with your tow vehicle brakes. It is designed to apply the trailer brakes
with your tow vehicle brakes.
Your brake controller should be adjusted to provide for a slight lead of the trailer
brakes over the tow vehicle brakes. Follow the directions provided with your
controller and keep the information for future reference. Don’t be afraid to ask
questions! If you don’t understand the directions, have the installer explain the
procedures.
Due to normal brake lining wear, the brakes and the controller setting should
be checked and readjusted every six months or 10,000 miles whichever comes
first.
Note: Brake lining adjustment should be periodically checked (fully) to be sure trailer brakes are in the same adjustment as the tow vehicles.
Properly set adjustments will provide for safe comfortable stops. They will also
help assure optimum brake and tire life for both the tow vehicle and the trailer.
In THE EVENT OF AN ACCIDENTAL SEPARATION of the tow vehicle and the
trailer, the BREAK-AWAY SWITCH will set and lock the trailer brakes for a
sufficient length of time to stop the trailer. The switch is activated when the
wire attached to it and to the tow vehicle pulls out the small pin in the front
of the unit. THIS PIN SHOULD BE PULLED OUT, LUBRICATED WITH LIGHT
HOUSEHOLD OIL, AND REPLACED EVERY 90 DAYS.
To prevent corrosion within the breakaway switch, pull the switch’s pin straight
Page 19
B - 2
TOWINg
B - 3
B
forward and spray the inside of the switch through the hole with an electric con-
tact cleaner (such as Spra- Kleen) and reinsert pin. A drop of light household oil
on the groove near the base of the pin will allow the pin to operate freely. WHEN
THE TRAILER IS CONNECTED TO THE TOW VEHICLE, THE BREAKAWAY
SWITCH LOOP SHOULD BE ATTACHED TO THE PERMANENT FRAME OF
YOUR HITCH. When disconnecting the trailer from the tow vehicle remove the
wire loop from the frame.
NOTICE: DO NOT REMOVE THE PIN FROM THE SWITCH ANY LONGER
THAN NEEDED FOR THE OIL APPLICATION BECAUSE THIS WILL APPLY THE
TRAILER BRAKES. EXTENDED PIN REMOVAL WILL RUN DOWN BATTERY
AND COULD CAUSE DAMAGE TO THE BRAKES ELECTRICAL SYSTEM
Warning: Do not use breakaway switch for parking brake.
More information on the brakes and controller is located in the Exterior section
of this manual.
LOADING
When you tow a trailer, you are subject to new and different challenges on
the highway than you may have previously encountered. Towing a trailer is
no small responsibility and should be undertaken with great care and an eye
toward safety first. An accident with a tow vehicle and trailer can have much
greater consequences than carelessness with a small car. Like an airline pilot
who is responsible for expensive equipment and many lives, you should take
your responsibilities as a tow vehicle driver very seriously and learn all you can
about doing the job safely and well. Balancing the load and preparing the trailer
and tow vehicle are critical to safe handling.
One of the most critical aspects of safely operating a trailer is knowing the
weights involved and where they are placed. The first thing to determine is
how much is being towed and confirming that it is within the capacities of the
equipment being used. Determining WHERE that load is placed is critical to the
way your rig will handle on the road.
Do not try to guess what your recreational vehicle weighs loaded. Load your RV
including water, propane, etc and take it to a public scales. Weigh each axle of
your vehicle. Refer to your axle weight and tire limits to see if your within a safe
range. Total all axle weights and make sure you are below the GVWR. If you are
not overloaded make sure your load is balanced. Do not load too much on one
side. A balanced load is much easier to tow or drive. Also, front to back balance
is also important. Step back and look at your recreational vehicle. Make sure
that there is not too much weight on the hitch or on the rear of the RV. Be sure
to secure all items. Loose items can cause damage and be a safety issue if not
properly secured.
Page 20
TOWINg
B - 4
B
B - 5
The Cargo Carrying capacity tag shown below is installed on every trailer and
can be found on the inside of the screen door on your vehicle.
Airstream weighs the vehicle as finished to arrive at the Vehicle Weight.
That number is subtracted from the Gross Vehicle Weight Rating (GVWR)
of the trailer and listed under THE WEIGHT OF CARGO SHOULD NEVER
EXCEED on the tag. The total weight of any and all cargo, including dealer
modifications or additions, water, and propane should never exceed the
number listed.
When loading the vehicle it is important to keep the Gross Vehicle Weight
Rating, Gross Axle Weight Ratings, Tire Weight Ratings (listed on the vehicle
Tire Information Placard), and Cargo in mind. These ratings should never be
exceeded. Your safety depends on not overloading the trailer, the trailer axles,
and tires. See the specification section for rating list.
When loading heavy objects such as tools, skillets, irons, and boxes of canned
goods, etc., keep them as low as possible - preferably on the floor. Try to hold
additional weight behind the axle to a minimum.
See Specification section in this manual for definitions and weights pertaining
to this label.
WEIGHING YOUR TRAILER
The diagram on the next page shows how to weigh the trailer on scales.
The allowable personal cargo must be distributed in your trailer in such a
manner that the Gross Axle Weight Rating is not exceeded.
To determine this, it is necessary to load all of your allowable personal cargo
and variable weights. Then hitch the trailer to the tow vehicle with load equal-
izing hitch properly adjusted as shown on the following pages.
Place the trailer on a scale with both axles only on the scale (see illustration).
If the weight on the axles exceeds the axle system Gross Axle Weight Rating
(GAWR), then some of the personal cargo must be redistributed forward in
order to place some of this weight on the tongue.
The tongue weight should be in between 10% - 15% of the trailer’s total weight,
and must not exceed the tow vehicle’s or the hitch’s maximum weight rating.
To determine tongue load, unhitch tow vehicle and place the tongue hitch post
RECREATIONAL VEHICLE TRAILER CARGO CARRYING CAPACITYVIN #################
THE WEIGHT OF CARGO SHOULD NEVER EXCEEDXXX kg or XXX lbs
CAUTIONA full load of water equals XXX kg or XXX lbs of cargo @ 1 kg/L (8.3 lb/gal)
Page 21
B - 4
TOWINg
B - 5
B
on a scale. The trailer must be properly loaded as determined above, with your
allowable personal cargo and variable weights.
Hitch Weight
To use a scale that has a lower weight limit than your tongue load, such as a
bathroom scale, to check the tongue weight use the following method (see
illustration).
Level the trailer front to back and side to side. Place a piece of wood of ap-
proximately the same thickness as the bathroom scales on the ground in line
with the trailer hitch jack as shown. It should be so spaced that a short piece
of pipe or other round piece will lay exactly one foot from the centerline of the
jack extension.
Place the scales so that another round piece can be exactly two feet from the
centerline of the jack extension in the other direction. Place a 4 x 4 on the two
round pieces and screw the jack extension down on the top of the 4 x 4 until
the tongue of the trailer is supported by it. Multiply the scale reading by three.
This will be the tongue weight of your trailer. If you exceed the capacity of the
bathroom scales, increase the two-foot dimension to three or four more feet,
but always multiply the scale reading by the total number of feet between the
wood and scales.
nOTE: Be sure trailer is level when you read scales. 1. 2. 3.
2 FT. 1 Ft.
PipePipe
Bathroom Scale Wood Support
Page 22
TOWINg
B - 6
B
B - 7
HITCHING UP
Hitching up your trailer is something that will become almost second nature
with practice. The following section includes proper hitch load distribution.
Proper training on connecting your trailer to a tow vehicle is essential for safety.
When coupling the trailer to the towing vehicle, always ensure the two vehicles
are properly coupled, including the safety chains and breakaway switch cable,
in accordance with the tow vehicle manufacturer’s instructions, the hitch
manufacturer’s instructions, and this manuals instructions. All coupling devices
and procedures must conform to State and Federal regulations. Please see
your dealer or other qualified personnel for instruction on the proper hitching
of your trailer.
Equalizing Hitch Load Distribution
When a trailer is hitched up properly to a tow vehicle with a load equalizing
hitch, approximately 1/3 of the trailer’s tongue weight will be on the trailer’s
axles and 2/3 will be transferred to the tow vehicle, 1/3 of this weight transfer
will be carried by the front wheels and 1/3 by the rear wheels of the tow vehicle
(See diagram), Thus, the tire load of each wheel on the tow vehicle will be
increased by 1/6 of the trailer’s tongue weight. The tire air pressure of the tow
vehicle should be increased to compensate for this additional weight. Refer to
the vehicle’s owner’s manual for this information.
Percentage of Tongue Load
distributed to car and/or trailer wheels
Page 23
B - 6
TOWINg
B - 7
B
Warning: The tongue weight should he approximately 10%
of the trailer’s total weight, but MUST NOT EXCEED 1,000 lbs. And, under
no condition should it exceed the hitch rating. Your hitch installer should
provide your hitch rating information.
Sway Control Device
Although Airstream has not intruded into the hitch manufacturers field of
expertise and performed formal testing, we find the vast majority of Airstream
owner’s purchases sway-control devices. When passed by large trucks or
when exposed to sudden crosswinds the trailer will be “pushed” and this action
will be felt in the tow vehicle. It’s our understanding the sway control devices
will reduce the amount of movement and make towing more comfortable and
add some safety. Follow the directions of the sway control manufacturer when
having it installed and using it.
Page 24
TOWINg
B - 8
B
B - 9
TOWING TIPS
We want every owner to be a safe and courteous driver. A few hours of towing
practice in a large empty supermarket lot will make pulling your trailer over the
road much easier. Line out two corners for left and right turns. You may also use
these corners to practice backing and parking.
After thoroughly inspecting your hitch, brakes, and tires you should be ready to
tow. Check traffic, signal that you are about to pull away, and start slowly. Look
often in your mirrors, and observe the action of the trailer, then carefully move
into the proper lane of traffic. Remember that the trailer wheels will not follow
the path of the tow vehicle wheels; therefore, WIDER TURNS ARE NECESSARY
WHEN TURNING TO THE LEFT OR TO THE RIGHT.
The BRAKE CONTROLLER is activated when you apply the brakes of the tow
vehicle. Your tow vehicle brakes will automatically apply the trailer brakes first
when properly adjusted. This will help keep your tow vehicle and trailer in a
straight line and make you stop as if you were driving the tow vehicle alone.
If swaying or swerving should occur, briefly operating the controller separate
from the vehicle brakes may help correct the situation. Practice this maneuver
on a clear highway or deserted parking lot. Don’t wait for an emergency then
grope for the controller.
When trailering you might encounter a temporary cooling system overload
during severe conditions, such as hot days when pulling on a long grade, when
slowing down after higher speed driving, or driving long idle periods in traffic
jams. If the hot indicator light comes on, or the temperature gauge indicates
overheating and you have your air conditioner turned on, turn it off. Pull over
in a safe place and put on your emergency brake. Don’t turn off the engine.
Increase the engine idle speed. Lift the engine hood and check for fluid leaks
at the radiator overflow outlet. Check to see that all drive belts are intact and
the radiator fan is turning. If you have a problem have it fixed at the next op-
portunity. If there is no problem the light should go off or temperature should
come down within one minute. Proceed on the highway a little slower. Ten
minutes later resume normal driving.
DangEr: Never open a radiator cap when the tow vehicle is
hot. Check the coolant level when the vehicle is cool.
When going downhill in dry weather, down shift so that engine compression
will slow the whole rig down. Take dips and depressions in the road slowly
and do not resume normal driving speeds until you are sure that the trailer
wheels are clear of the dip.
Warning: On slippery pavement do not use engine drag to
help slow down as this may cause the rear wheels of the tow vehicle to
Page 25
B - 8
TOWINg
B - 9
B
skid. On icy pavement drive slowly and if you feel the tow vehicle skidding
gently apply the trailer brakes only. This will bring the tow vehicle and
trailer back into a single line. Chains do not help trailer wheels.
When driving in mud and sand let the momentum carry the rig through. Apply
power gently and use as little as possible. Stay in the tracks of the vehicle
ahead and keep the tow vehicle in the highest possible gear. If you get stuck it
is best to tow out the entire rig together without unhitching.
Despite the best hitch you will notice that whenever a large bus or truck
overtakes your rig the displaced air first pushes the trailer rear slightly to the
right and then affects the front. It may be necessary to steer very slightly, mo-
mentarily, toward the bus or truck to help compensate for the sway induced by
the passing-vehicle. Do not apply the tow vehicle brakes, as this can tend to
exaggerate the situation. You may find, however, that briefly applying the trailer
brakes with your manual control will help eliminate sway.
DangEr: CHOCK THE TRAILER WHEELS when stopping on a
hill or slope. Leaving your tow vehicle in gear is not enough for standstill
safety. Do not use trailer brakes as parking brakes.
On a two-lane road cars will be lining up behind you because you travel at a
lower speed. It is both courteous and sensible to signal, pull onto the shoulder,
and let them pass. Your trailer is designed to be towed easily at any legal speed,
so if you are not careful you may be inclined to forget it is there.
Passing
ON FREEWAYS OR EXPRESSWAYS try to pick the lane you want and stay in
it. Always maintain plenty of space between you and the car ahead, at least the
length of the tow vehicle plus trailer for every ten miles per hour. Remember
that in order to pass another vehicle you will need longer to accelerate. You
must also allow for the length of the trailer when returning to the right hand
lane.
Page 26
TOWINg
B - 10
B
B - 11
Tracking
OBSERVE THAT THE TRACKS MADE BY THE TRAILER WHEELS ARE
DISTINCTLY DIFFERENT FROM THOSE MADE BY THE TOW VEHICLE.
Studying this will make it easier for you to correct mistakes. Truck or trailer type
fender or door grip rear view mirrors are a must for maximum visibility and in
most states the law requires them.
Backing Up
In BACKING UP the important thing to remember is to DO EVERYTHING
SLOWLY and to correct immediately if you see the trailer turning the wrong
way. Concentrate on the rear of the trailer. With your tow vehicle and trailer in
a straight line back up slowly and turn the bottom of the steering wheel in the
direction you want the trailer to go. Watch out the window or in the mirror until
the rear of the trailer is pointing in the desired direction. Your tow vehicle will be
following the trailer in an arc. Straighten the tow vehicle and trailer by turning
the steering wheel more sharply, and then when they are in line, straighten the
steering wheel.
ALWAYS TRY TO BACK TO YOUR LEFT BECAUSE THE VISIBILITY IS MUCH
BETTER. (See Illustration) When you don’t make it on the first try it is usually
much easier to pull forward to your original position and start over.
If your spouse or traveling companion normally directs you when backing they
should position themselves forward of the tow vehicle so the driver can easily
see them. Their directions should always indicate to the driver the direction
the rear of the trailer should go. A little practice in a parking lot with the person
giving directions can save a lot of frustration when backing into a campsite.
Page 27
B - 10
TOWINg
B - 11
B
Page 28
TOWINg
B - 12
B
B - 13
Controlling Sway or Fishtailing
Sway or fishtailing is the sideways action of a trailer caused by external forces. It
is common for travel trailers to sway in response to strong winds or crosswinds,
or when passed by or passing a semi-tractor and trailer, or driving downhill.
Warning: Excessive sway or fishtailing of your travel trailer
can lead to the rollover of the trailer and tow vehicle. Serious injury or
death can occur. It is important that you read and understand the informa-
tion in this section.
Sway or fishtailing of your recreation vehicle can be controlled and is primarily
impacted by four factors:
Equipment•
Tongue weight•
Driving•
Corrective measures•
Equipment – When hitched together, the trailer and the tow vehicle must be
level. The tires of both the trailer and tow vehicle should be in good condition
and inflated to the pressure recommended as noted on the exterior of the trailer
and in the owner’s manuals of the trailer and tow vehicle.
Your trailer brakes should work in synchronization with your tow vehicle brakes.
Never use your tow vehicle or trailer brakes alone to stop the combined load.
Your brake controller must be set up according to the manufacturer’s speci-
fications to ensure proper synchronization between the tow vehicle and the
trailer. Additionally, you may have to make small adjustments occasionally to
accommodate changing loads and driving conditions.
Also, we recommend a friction sway damper or hitch with built-in sway control
be provided for your unit. Please consult your dealer regarding this equipment,
as the RV manufacturer does not provide sway control devices.
Tongue weight – The tongue weight should be between 10% to 15% of the
total travel trailer weight. See page B-5 of this manual regarding the proper
weight distribution of your recreation vehicle.
Driving – This is the most important component. The tendency for the vehicle
to sway increases with speed therefore, obey all speed limits and reduce speed
during inclement weather or windy conditions.
Corrective measures – If sway occurs the following techniques should be
used:
1. Slow down immediately, remove your foot from the accelerator. Avoid using
Page 29
B - 12
TOWINg
B - 13
B
the tow vehicle brakes unless there is a danger of collision. Reduce speed
gradually whenever possible. If you can do so safely, use the brake hand con-
troller (independent of the tow vehicle brakes) to gently and progressively apply
the trailer brakes. This will help to keep the vehicles aligned. Practice using the
brake hand controller on a deserted parking lot. Don’t wait until an emergency
occurs before using it. Location of the brake hand controller is important and
should be made easily accessible.
2. Steer as little as possible while maintaining control of the vehicle. Because
of natural reaction lag time, quick steering movements to counter trailer sway
will actually cause increased sway and loss of control. Keep both hands on the
wheel. Hold the wheel as straight as possible until stability is regained.
3. Do not jam on the brakes or attempt to press on the accelerator to speed
your way out of the fishtailing. Both actions make the situation worse and
could cause severe injury or death.
4. Once the swaying is under control, stop as soon as possible. Check tire
pressures, cargo weight distribution and look for any signs of mechanical
failure. Travel at reduced speeds that permit full control until the problem can
be identified and corrected.
Page 30
C - 1
TOWINg
B - 14
B
NOTES
Page 31
C - 1
C
B - 14
CAMPINg
SUGGESTED PRE-TRAVEL CHECK LIST
Interior
1. Turn off water pump switch.
2. Check battery water level.
3. Close windows and vents.
4, Lock all interior cabinet doors.
5. Latch refrigerator door. (Seal containers first.)
6. Hold down or stack securely all loose, hard, and sharp objects.
7. Latch doors.
8. Drain toilet bowl.
9. Turn off interior lights.
10. Set table in sleeping position with cushion on top.
11. Pull up or retract step.
12. Lower blinds.
13 . Secure and lock main door.
Exterior
1. Disconnect and stow the electrical shoreline cord, the sewer hookup hose
(flush out and store in hose carrier), water hookup hose, and TV cable.
2. Turn off gas at LP tanks.
3. Retract stabilizing jacks.
4. Check Hitch: It must be properly attached.
5. Check safety chains and breakaway switch cable.
6. Fully retract jack. Remove and stow jack stand or wood block.
7. Check clearance and stoplights.
8. Check lug nuts for correct torque.
9. Check tires for correct pressure.
10. Check that TV antenna is properly stowed.
11. Adjust tow vehicle mirrors.
12. Pull forward some 50 ft., test brakes, and check site for forgotten objects
and cleanliness.
Home
1. Leave house key with your neighbors.
2, Valuables and important papers should be stored in a safe place.
3, Newspaper and other deliveries should be discontinued.
4, Ask the Post Office to hold your mail for you.
5. Arrange with the telephone company for discontinued or “vacation service”
6. Arrange care for your pets.
7. Your lawn, garden, and houseplants should be cared for.
8. Lock all windows and doors securely. Keep shades open and install light
timers for a lived in look.
Page 32
C - 2
C
C - 3
CAMPINg
9. Cover all food to keep out mice and insects. Discard food that may spoil.
10. Eliminate all fire hazards. Place matches in a tin box or glass jar.
11. Store oil, gasoline and other flammables properly.
12. Destroy all newspapers, magazines and oily rags.
13. Notify police.
Trailer Equipment and Accessories
1. Water hose, 5/8 inch high pressure, tasteless, odorless, non-toxic, (2-25 ft.
sections).
2. “Y” connection for water hose.
3. The sewer hose with clamp.
4. Drain cap with hose drain.
5. Holding tank cleaner and deodorizer.
6. Power cord adapter, 30 ampere capacity.
7. 50 ft. electric cord, 12-3 wire, 30 ampere capacity.
8. 25 ft. electric cord, 10-3, 30 ampere capacity.
9. Woodblocks for leveling.
10. Wheel chocks.
11. Hydraulic jack, safety jack stands.
12. Cross type lug wrench and a torque wrench.
13. Quality tire gauge.
14. Emergency road warning triangle.
Personal
1. Tow vehicle insurance to cover you and your family fully.
2. Avoid carrying large amounts of cash. Use Travelers Checks and credit
cards.
3. Confirm reservations.
4. Have sunglasses, sun block, and insect repellent for everyone.
5. Pack camera and film.
6. Make a checklist of clothing and toilet articles for everyone.
7. Carry Atlas or maps.
8. Medicine, pertinent medical history, alert bracelets.
Motoring Essentials
1. Display the tow vehicle and trailer registration properly.
2. Carry drivers license.
3. In Canada you’ll need a non-residence liability insurance card and your birth
certificate, soon a passport will be required.
4. In Mexico you must have special auto insurance and passport.
5. Carry an extra set of the ignition and truck keys in a separate pocket, or in
your wallet.
6. Keep an operating flashlight with fresh batteries in the glove compartment.
7. Pack the tow vehicle so that you can reach the tools and spare tire without
Page 33
C - 2 C - 3
C
CAMPINg
completely unpacking.
8. Keep sharp or hard articles securely packed wherever they may be.
9. Do not packed things in the passenger seating area. You need the
maximum space for comfort.
10. Wear easy wash, drip-dry traveling clothes.
11. Do not make your vacation trips a mileage marathon. Stop and relax
frequently.
12. Carry a first-aid kit.
13. Carry your pets dish, food, leash, and health and registration papers.
SAFETY
As always, safety should be one of your top priorities. Make sure you, and
everyone traveling with you, can operate the main door and exit window rapidly
without light. Contemplate other means of escape in case the designated exits
are blocked.
The escape window(s) are identified by their red release handles. Lift up both
latches to release the escape window. Push out on the glass and it will swing
clear.
Warning: The window operation should be checked each trip
and the latches lubricated with WD-40 or equivalent every six months.
Warning: At each campsite make sure you have not parked in
such a manner as to block the operation of the escape window by being
too close to trees, fences or other impediments. Scenic views are one
reason for traveling, but don’t park so the beautiful lake or steep cliff is just
outside your escape window.
Warning: Read the directions carefully on the fire extin-
guisher. If there is any doubt on the operation, you and your family should
practice, then replace or recharge the extinguisher. You will find your local
fire department will be happy to assist you and answer any questions.
WarningS:
Don’t smoke in bed.•
Keep matches and lighters out of reach of small children! •
Don’t clean with flammable material! •
Keep flammable material away from open flame!•
We have all heard these warnings many times, but they are still among the
leading causes of fires.
Other safety information on the LPG system of your trailer is located in the
plumbing section of this manual.
Page 34
C - 4
C
C - 5
CAMPINg
OVERNIGHT STOP
Airstream owners have parked virtually every placing imaginable from filling
stations to farmlands. In time you’ll develop a knack for spying wonderful little
roadside locations by turning off the main highway and exploring.
There are many modern parks including State, County and Federal parks with
good facilities where you might obtain hookups of electrical, water, and sewer
connections. Directories are published which described in detail these parks
and tell what is available in the way of services and hookups.
On overnight or weekend trips chances are you will not use up the capacity
of the sewage holding tank, deplete the water supply, or rundown the battery
which supplies the 12 volt current.
On a longer trip, when you have stayed where sewer connections and utility
hookups were not available, it will be necessary for you to stop from time to
time to dispose of the waste in the holding tank and replenish the water supply.
Many gas stations (chain and individually owned) have installed sanitary
dumping stations for just this purpose. Booklets are available which lists these
dumping stations.
When stopping for the night, your Airstream is built to be safely parked in any
spot that is relatively level and where the ground his firm. Your facilities are with
you. You are self-contained. Unless the tow vehicle is needed for transporta-
tion, it is not necessary to unhitch.
Try to pick as level a parking spot as possible. Stabilizing jacks or blocks
probably won’t be required for an overnight stay. However, if you put the jack
pad on the hitch jack and run the hitch jack down to take the weight off the tow
vehicle’s springs it will provide some stability. If you must parked on a slope,
PARK FACING DOWNHILL. It is easier to level the trailer this way.
All you need to do to enjoy the self-contained luxury of your Airstream is to turn
on the LP gas and light any appliances with pilots.
Before moving on, check your campsite both for cleanliness and also to be
sure you haven’t left anything behind. Turn off the gas supply and make sure
everything is properly stowed. Use your PRE-TRAVEL CHECK LIST and you
are ready for more travel adventure.
Page 35
C - 4 C - 5
C
CAMPINg
EXTENDED STAY
Making a long trip in your Airstream is not very different from making a week-
end excursion. Since everything you need is right at hand, you are at home
wherever you go. When packing for an extended trip, take everything you
need, but only what you need.
When you plan to stay in the same place for several days, weeks or months,
you will want your trailer to be as level and steady as possible. Check the
attitude with a small spirit level set on the inside work counter or the trailer hitch
“A-Frame”. (See Diagram) If a correction is necessary then YOU MUST LEVEL
FROM SIDE TO SIDE FIRST This can he done easily by backing the trailer up
one or more 2” x 6” boards. (See Diagram) We do not recommend placing tires
in a hole for leveling.
LEVEL FROM FRONT TO REAR by disconnecting the hitch from the tow
vehicle, putting the jack pad under the hitch jack and adjusting the jack up
or down until you are level. Block or chock the wheels to keep the trailer from
rolling. Use STABILIZING JACKS at all four corners as shown in the diagram to
eliminate the natural spring action of the axles.
NOTICE: STABILIZING JACKS should only be used to stabilize trailer.
Warning: Whenever the trailer must be lifted with a jack, as
when changing a tire or leveling on very rough terrain, ALWAYS PLACE
THE LIFTING JACK UNDER THE MAIN FRAME RAIL. A label is provided to
indicate the proper position for the jack. NEVER USE STABILIZING JACKS
TO LIFT THE TRAILER.
2. Level front to rear1. Level side to side
H-Hydralic Jack PositionS-Stabilizing Jack Position
SS
SS
S SH
HH
H-Hydralic Jack PositionS-Stabilizing Jack Position
SS
SS
S SH
HH
Page 36
C - 6
C
C - 7
CAMPINg
CITY WATER HOOK-UP
Simply connect hose to potable source, open the valve,
and you have pressurized faucets, toilet and water heater.
Open faucets to purge trapped air from the water system.
Allow the water heater to fill before lighting.
WASTE WATER SYSTEM
The main parts of the waste water system are the toilet, dual holding tanks, and
tank dump valves. The system is designed to provide complete self-contained
toilet facilities, while on the road or parked, without being connected to a
sewage line. It may also be used in the stationary position while connected to
a sewage hose.
Keep the dump valves closed with either method and empty the tanks when
they are nearly full, black water tank first and then gray water tank. The idea is
to send a large volume of water through the tanks and hose at the same time
to float solids away. Dumping the gray water last will help rinse the valves and
hose.
After the sewage tank has been emptied, close the gate valves and put ap-
proximately five gallons of water in the sewage holding tank. This will help
prevent solids from building up in the sewage holding tank. The addition of a
deodorizing agent like Aqua-Kem will help prevent odors.
Should you ever have a build-up of solids, close the valves fill the tanks about
3/4 full with fresh water, drive a distance to agitate the solids, and drain the
tanks.
NOTICE: THINGS NOT TO PUT INTO TOILET OR DRAINS
1. Facial tissues (they do not dissolve like toilet paper).
2. Detergents or bleach. Use a sewage tank deodorizer, available from dealer.
3. Automotive antifreeze, ammonia, alcohols, or acetone.
4. Table scraps or other solids that may clog the drains.
SHORELINE POWER SUPPLY
The Power Cord hook-up is on the side of the trailer. The
cord may be stored in the rear exterior compartment. The
power cord is plugged into the trailer receptacle and the
City Power Service.
Many campgrounds provide less than 30 amp service. It is possible to blow
their fuse or circuit breaker. If this happens, reduce the load and replace reset
City
Water Inlet
Page 37
C - 6 C - 7
C
CAMPINg
the breaker.
CABLE/SATELLITE TV
Located on the side of your trailer is a gray coax inlet box. Lifting the cover
reveals the receptacle to connect Cable or Satellite TV coax line to your trailer.
WINTER TRAVELING
Traveling in sub-freezing temperatures will require certain precautions to pro-
tect the plumbing system and your personal belongings from being damaged
by freezing.
Whenever possible the heat should be kept on at a constant temperature. It is
easier for the furnace to keep a constant room temperature than for the trailer
temperature to be allowed to drop to 50 degrees Fahrenheit then attempt to
raise it to room temperature.
The furnace on the Sport model is ducted to provide heat to the below floor
water tanks to prevent freezing.
nOTiCE: Drain and winterize all models if the water systems are not
being used during winter traveling. See winterizing section in this manual
for instructions.
Some states do not allow LPG to be turned on while moving. While traveling in
these states you must use your common sense. How cold is it? How long will it
be before you can turn the heat back on? Is the temperature dropping or rising?
Remember, when towing at 50 MPH the wind chill factor will cause the interior
of the trailer to cool much faster than a trailer that is parked.
When parked in sub-freezing temperatures make sure you keep a full supply
of LP gas and plug into a 110 volt power source whenever possible. A fully
charged battery will not last more than 8 to 10 hours if the furnace is running
almost constantly and 110-volt power is not available.
Leave cabinet doors, wardrobes and bed doors partially open to allow warm
air to circulate around plumbing lines and fixtures. Insulate and/or wrap your
exterior water lines with heat tape.
EFFECTS OF PROLONGED OCCUPANCY
Your trailer was designed primarily for recreational use and short-term occu-
pancy. If you expect to occupy the trailer for an extended period, be prepared
to deal with condensation and the humid conditions that may be encountered.
The relatively small volume and tight compact construction of modern recre-
Page 38
C - 8
C
C - 9
CAMPINg
ation vehicles mean that the normal living activities of even a few occupants
will lead to rapid moisture saturation of the air contained in the trailer and the
appearance of visible moisture, especially in cold weather.
Just as moisture collects on the outside of a glass of cold water during humid
weather, moisture can condense on the inside surfaces of the trailer during
cold weather when relative humidity of the interior air is high. This condition is
increased because the insulated walls of a recreation vehicle are much thinner
than house walls. Estimates indicate that a family of four can vaporize up to three
gallons of water daily through breathing, cooking, bathing, and washing. Unless
the water vapor is carried outside by ventilation, or condensed by a dehumidifier,
it will condense on the inside of the windows and walls as moisture, or in cold
weather as frost or ice. It may also condense out of sight within the walls or the
ceiling where it will manifest itself as warped or stained panels.
Appearance of these conditions may indicate a serious problem. When you
recognize the signs of excessive moisture and condensation in the trailer,
action should be taken to minimize their effects.
TIPS TO CONTROLLING CONDENSATION
NOTICE: To avoid condensation problems, try to follow these tips to help
alleviate excess moisture.
Allow excess moisture to escape to the outside when bathing, washing dishes,
hair drying, laundering, and using appliances and non-vented gas burners.
Keep the bathroom door closed and the vent or window open when bathing
and for a period of time after you have finished.
Do not hang wet clothes in the trailer to dry.
In hot weather, start the air conditioner early as it removes excess humidity
from the air while lowering the temperature.
Keep the temperature as reasonably cool during cold weather as possible.
The warmer the vehicle, the more cold exterior temperatures and warm interior
temperatures will collide on wall surfaces, thus creating condensation.
Use a fan to keep air circulating inside the vehicle so condensation and mildew
cannot form in dead air spaces. Allow air to circulate inside closets and cabi-
nets (leave doors partially open). Please keep in mind that a closed cabinet
full of stored goods prevents circulation and allows the exterior temperature to
cause condensation.
The natural tendency would be to close the vehicle tightly during cold weather.
Page 39
C - 8 C - 9
C
CAMPINg
This will actually compound the problem. Simply put, you need to remove
some of the warm air, and allow some cool outside air to get inside the vehicle,
so the furnace will not recycle the humid interior air.
NOTICE: Your trailer is not designed, nor intended, for permanent housing.
Use of this product for long term or permanent occupancy may lead to prema-
ture deterioration of structure, interior finishes, fabrics, carpeting, and drapes.
Damage or deterioration due to long-term occupancy may not be considered
normal, and may under the terms of the warranty constitute misuse, abuse, or
neglect, and may therefore reduce the warranty protection.
ABOUT MOLDS
What are molds?
Molds are microscopic organisms that naturally occur in virtually every environ-
ment, indoors and out. Outdoors, mold growth is important in the decomposi-
tion of plants. Indoors, mold growth is unfavorable. Left unchecked, molds
break down natural materials, such as wood products and fabrics. Knowing
the potential risks is important for any type of homeowner to protect their
investment.
What factors contribute to mold growth?
For mold growth to occur, temperatures, indoor or outdoors, must be between
40 degrees and 100 degrees Fahrenheit and also have a source of moisture,
such as humidity, standing water, damp materials, etc. Indoors, the most rapid
growth occurs with warm and humid conditions.
How can mold growth be inhibited?
By controlling relative humidity, the growth of mold and mildew can be inhibited.
In warm climates, use of the air conditioner will reduce the relative humidity.
Vents are located in the bathing and cooking areas and constant use is advised
during food preparation and bathing, even during colder weather. Additionally,
opening a window during these activities will assist in ventilation. In extremely
humid conditions, the use of a dehumidifier can be helpful. If using a dehumidi-
fier, please read and follow all manufacturer instructions and recommendations
to the use and cleaning of the dehumidifier.
Frequent use of your RV or cleaning regularly is an important preventive
measure. Further, any spills should be wiped up quickly and dried as soon
as possible. Avoid leaving damp items lying about. On safe surfaces, use
mold or mildew killing cleaning products. Check sealants regularly, and reseal
when necessary to avoid water leaks. Proper preventive maintenance to the
Page 40
C - 10
C
CAMPINg
D - 1
RV and its accessories, as described both in this manual and in accompanying
literature, will provide the best protection to the RV.
For more information of controlling moisture in the RV, please read “Tips to
Controlling Condensation” located in this manual.
Page 41
C - 10
ExTERIOR
D - 1
D
CLEANING
Exterior Skin
As a general rule of thumb we recommend the trailer be washed about every
four weeks and waxed in the spring and fall. In coastal and industrial areas
cleaning and waxing should be done on a more frequent schedule. When trav-
eling through winter weather all road treatment chemicals should be removed
immediately.
nOTiCE: ABRASIVE POLISHES OR CLEANING SOLVENTS SUCH AS
AUTOMATIC DISHWASHER OR ACID ETCH CLEANERS ARE TOO STRONG
AND SHOULD NEVER BE USED. RINSE ALL GRIT FROM SURFACE PRIOR
TO WASHING. Use soft rags or wash mitts always moving lengthwise
with the trailer. NEVER rub hard on the coating. Even the softest rag will
damage the coating if excessive pressure is applied.
ALWAYS CLEAN YOUR TRAILER IN THE SHADE OR ON A CLOUDY DAY WHEN
THE ALUMINUM SKIN IS COOL. Oil, grease, dust and dirt may be removed by
washing with any mild non-abrasive soap or detergent. Cleaning should be
followed by a thorough clean water rinse. Drying the unit with a chamois or a
soft cloth may prevent spots and streaks. WHEN WASHING OR POLISHING
YOUR TRAILER, ALWAYS WIPE “WITH” THE GRAIN OF THE METAL.
After cleaning and drying, a good grade of nonabrasive automotive paste or
liquid wax will increase the life of the finish, especially in coastal areas where
the finish is exposed to salt air or in polluted industrial areas. It will also protect
the shell from minor scratches and make subsequent cleaning easier.
It is important to remove sap, gum, resin, asphalt, etc. as soon as possible after
they appear by washing and waxing. Sunlight and time will bake-harden these
materials making them almost impossible to remove without heavy buffing and
heavy buffing can damage the exterior skin and its coating. If asphalt remains
on the trailer after washing, use a small amount of kerosene on a rag and wipe
the spots individually, being careful not to scratch the finish.
If a substance is found on the coating that cannot be removed by normal wash-
ing procedures, Airstream recommends using DX 330 Acryli-Clean made by
PPG Industries. Follow all directions and warnings on the product container.
Acryli-Clean should be used by trained personnel only, using the proper equip-
ment under controlled conditions. Use the Acryli-Clean as sparingly as possible
to remove glue, tar, and other similar substance.
To keep your trailer looking new, paint the “A’ frame, LPG tanks, and rear
frame periodically.
It is recommended that the caulking and sealant used in external seams and
Page 42
ExTERIOR
D - 2
D
D - 3
joints such as end shell segments and around window frames, light bezels,
beltline and rub rail molding, etc. be checked regularly. If this material has dried
out and become cracked or checked, or if a portion has fallen out, it should
be replaced with fresh material to prevent possible rain leaks. Caulking and
sealing material is available from your Airstream dealer.
Aluminum Wheels
The aluminum wheels and axle end cover come clear-coated. They keep their
good looks simply by washing with soap and water. Do not use abrasive clean-
ers or polishes on coated aluminum wheels.
Exterior Shower
This shower consists of a shower hose, shower head, and water valve inside of
a lockable exterior door. Water is supplied by the pump or city water hookup.
Main Door
The main door of the trailer is manufactured with a built in keyed dead bolt and
door lock. The door lock in engaged from the inside by a lever and the dead
bolt is engaged by a turning the knob.
A main door hold back is mounted on the side sheet. The hold back secures
the door to the side of the trailer. When opening the door, push it gently into the
spring operated slide. To release the door, slide the hold back bolt back.
A little grease in the striker pockets and slight amount of household oil in the
lock mechanisms will keep the locks operating smoothly.
Don’t forget to lubricate the hinge pins periodically with household oil also. Use
sparingly and remove any excess from exterior akin immediately.
NOTICE: When towing, the door lock and dead bolt must be secured. If
it is not locked, the constant vibration of travel may cause the door to
open with possible damage.
Screen Door
The screen door secures to the main door by means of a slide bolt type latch.
It can be operated independently by releasing the slide bolt and swinging the
screen door away from the main door.
Step
To operate the step, lift up on the front of the step and pull straight out until step
Page 43
D - 2
ExTERIOR
D - 3
D
swings down and locks into place.
CaUTiOn: Once the steps are lowered, press down on them to
make sure they are secure.
NOTICE: Never travel with step lowered or extended.
Exterior Windows
Lifting two red vertical latches up past vertical opens the escape windows of
your trailer. This releases the sash from the window frame and allows it to be
swung clear of the trailer.
Turning the large operating knob counter clockwise opens the standard win-
dows.
Clean your trailer windows the same way you clean the windows in your home.
Clean the seals with a damp cloth or mild detergent every three to six months,
taking care not to use strong solvents, as they will damage the seals. A coat
of natural silicone lubricant applied after the seal has dried will keep it flexible.
Spread the lubricant evenly with a brush or finger, working it into the surface.
This is a good practice for all rubber seals in your trailer. For replacement of a
damaged window contact an Airstream Service Center.
Window Solar Stoneguard
Stone guards may be provided for added protection on the front panoramic
windows. To open the guard, unhook the two rubber T-handles on the bottom
of the guard, raise the stoneguard to the desired height, and tighten the thumb
screws on each support arm. Be sure to lower and fasten the guard when high
winds may be approaching and before travel.
Wrap Protectors
Certain areas of the front end of the trailer are coated with a clear applied
surface protectorate. This coating will protect the exterior skin coating from
minor scrapes and scratches.
Awnings
Complete instructions have been provided with your awning. You should
make sure your traveling companions are familiar with the operation of the
awning. If a sudden wind should come up, or if high wind and storms are
forecast, the awning should be retracted and stowed.
Page 44
ExTERIOR
D - 4
D
D - 5
Chassis
Hitch Ball Height
The RECOMMENDED HITCH BALL HEIGHT for the Airstream Sport is listed
in the specification section of this manual. If you plan long trips with the trailer
heavily loaded you should check your trailer, after loading, to determine the
optimum height. To check, park the trailer on a level surface and crank the front
jack up or down until the measurement from the frame to the ground is the
same front and rear. Measure from the ground to the upper surface of the hitch
ball coupler. Add one inch to this figure when setting the ball height on the tow
vehicle to allow for the suspension settling under the added weight.
Coupler Operating Instructions
1. To open - slide latch forward and pull up to open
coupler before inserting ball.
2. Place coupler on ball of same diameter as coupler and
of same or greater capacity.
3. When ball is completely nested in socket, push top of
latch handle rearward until handle snaps into closed
position. (Figure 2)
4. Extend jack to ground and lift tow vehicle/trailer combination 2-4” to insure
coupler is securely attached to tow ball. Retract jack before towing.
5. Insert padlock through hole in handle for theft prevention.
Warning: ALWAYS OPEN LATCH HANDLE BEFORE INSERTING
BALL INTO COUPLER.
AXLE AND RUNNING GEAR ASSEMBLY
Each RUBBER TORSION axle is aligned during manufacturing, and double-
checked on a random basis. Alignment after delivery is the customer’s respon-
sibility.
Hitting chuck holes or rough railroad tracks while going straight will only cause
misalignment after the tire has been struck many repetitive times. Of course, a
deep enough hole can affect the alignment immediately.
The worse culprit is a curb because they are normally struck at an angle.
Surprisingly rear axles are occasionally damaged when people are attempting
to park beside a curb and are backing up their trailer.
To Open
Open PositionFigure 1
To Close
Closed PositionFigure 2
Page 45
D - 4
ExTERIOR
D - 5
D
As you look under your trailer is it normal for the axle to be bent up in the
middle. This bend is how the camber is obtained.
Toe-in is built into the axle by very slight bends in the axle tube on each end.
If tire wear ever indicate misalignment check with your dealer for the nearest
location having the proper equipment.
nOTiCE: Never allow heat to he applied to the axle tube since the rubber
providing the spring torsion action will he severely damaged.
Rubber torsion Axle Alignment Specifications
Toe-In each side 1/16” Tolerance 1/16” + or -
Camber each side ¾ degrees positive Tolerance ¾ degrees + or –
Wheel Bearing Maintenance
1. Jack trailer at marked jack location pad behind axle on mainframe,
2. Remove hubcap or spindle cover, wheel and tire.
3. Remove cotter pin.
4. Remove dust cap.
5. Remove spindle nut and washer.
6. Remove bearings and hub.
7. Lay down hub with inside grease seal down. Knock out inner bearing and
grease seal using wood or plastic dowel and hammer.
8. Clean all parts thoroughly with kerosene.
9. Check all bearings and races for chips or roughness of any kind. Any dam-
aged component must be replaced.
10. Pack bearing with a good grease (No 2 grade-265 ASTM penetration or
equivalent).
11. Install inner bearing.
12. Install new grease seal in hub or rotor using wooden or rawhide mallet.
13. Install hub and drum on spindle.
14. Install outer bearing.
15. Install washer and spindle nut.
16. While rotating the wheel, tighten the spindle nut with a 12” wrench until
there is a slight tension. Then back off one notch and install cotter pin. There
should now be from .001” to .010” end play in hub. If not, back off one
Page 46
ExTERIOR
D - 6
D
D - 7
notch.
17. Check the lug nuts at 10, 25 miles and recheck at 50 miles of travel. See
Specification Section in this manual for wheel torque ratings.
When packing bearings by hand, place a glob of grease in the palm of one
hand and push the large end of the bearing down into the grease (see illustra-
tion). Keep turning the bearing around and forcing it down through the grease
until the grease is extruded up through the opposite end. Wipe the extra grease
in your hand around the outside of the bearing. It’s not necessary to fill the hub
and dust cap with grease.
Page 47
D - 6
ExTERIOR
D - 7
D
ELECTRIC BRAKES
A CONTROLLER installed in your tow vehicle will synchronize the trailer brakes
with your tow vehicle brakes. It is designed to apply the trailer brakes whenever
the tow vehicle brakes are applied.
TYPICAL ELECTRONIC CONTROLLER
ELECTRONIC CONTROLLERS are inertially activated. The controller senses
deceleration and generates an output, which reflects the inertia sensed. When
you are stationary, the controller does not apply the brakes unless the manual
slide bar is activated.
NOTE: Study all material provided with your particular brake control. If you
don’t understand the information, have the installer explain the information to
you or call the manufacturer of the controller.
In THE EVENT OF AN ACCIDENTAL SEPARATION of the tow vehicle and trailer,
the BREAKAWAY SWITCH will set and lock the trailer brakes for a sufficient
length of time to stop the trailer. The switch is activated when the wire attached
to it and to the tow vehicle pulls out the small pin in the front of the unit. THIS PIN
SHOULD BE PULLED OUT, LUBRICATED WITH LIGHT HOUSEHOLD OIL AND
REPLACED EVERY 90 DAYS.
To prevent corrosion within the breakaway switch, pull the switch’s pin straight
forward and spray the inside of the switch through the hole with an electric
contact cleaner (such as Spra-Kleen) and reinsert the pin. A drop of light
household oil on the groove near the base of the pin will allow the pin to oper-
ate freely. WHEN THE TRAILER IS CONNECTED TO THE TOW VEHICLE, THE
BREAKAWAY SWITCH LOOP SHOULD BE ATTACHED TO THE PERMANENT
FRAME OF YOUR HITCH. When disconnecting trailer from tow vehicle remove
wire loop from the frame. DO NOT REMOVE PIN FROM SWITCH BECAUSE
THIS WILL APPLY THE TRAILER BRAKES.
Warning: Do not use breakaway switch for parking brake.
HOW TO USE YOUR ELECTRIC BRAKES PROPERLY
Your trailer brakes are designed to work in synchronization with your tow
vehicle brakes. Never use your tow vehicle or trailer brakes alone to stop the
combined load.
Your trailer and tow vehicle will seldom have the right amperage flow to the
brake magnets to give you comfortable, safe braking unless you make proper
brake system adjustments. Changing trailer load and driving conditions as well
as uneven alternator and battery output can mean unstable current flow to your
Page 48
ExTERIOR
D - 8
D
D - 9
brake magnets. It is therefore imperative that you maintain and adjust your
brakes as set forth in this manual, use a properly modulated brake controller,
and perform the synchronization procedure noted below
In addition to the synchronization adjustment detailed below, electric brake
controllers provide a modulation function that varies the current to the electric
brakes with the pressure on the brake pedal. It is important that your brake
controller provide approximately 2 volts to the braking system when the brake
pedal is first depressed and gradually increase the voltage to 12 volts as brake
pedal pressure is increased. If the controller “jumps” immediately to a high
voltage output, even during a gradual stop, then the electric brakes will always
be fully energized and will result in harsh brakes and potential brake lockup.
Proper synchronization of tow vehicle to trailer braking can only be accom-
plished by road testing. Brake “lockup, grabbiness, or harshness” is quite often
lack of synchronization between the tow vehicle and the trailer being towed,
too high of a threshold voltage (over 2 volts), or under adjusted brakes.
Warning: The braking system should be checked and ser-
viced by qualified, certified technicians only. Failure to do so could result
in loss of control of your vehicle or the trailer causing damage to property,
injury, and/or death.
TIRES
A Tire Safety Manual is provided with each owners packet. Please read and
become familiar with this information before using your trailer.
Your trailer is equipped at the factory with name brand trailer tires. Airstream
dealers cannot make warranty adjustments to tires unless they sell that particu-
lar brand. A tire dealer who handles that brand must do this. If you ever have
tire problems check the local telephone directory for the nearest tire dealer.
To get the maximum performance from your tires check the air pressure often,
but only when the tires are cool. Never bleed out air immediately after driving.
Recommended tire pressures vary with tire type and size. For pressures refer to
the SPECIFICATION TABLE.
Be especially cautious in crossing holes or dips in the road. Under these cir-
cumstances it is good practice to set your rear view mirrors so that you can
observe your tires at all time.
All tire and wheel assemblies are balanced at the factory. Be sure to rebalance
the tire and wheel assemblies each time a tire is changed.
Try to park out of the sun whenever possible when in warm climates. In desert
regions use tire covers to prevent ultra-violet deterioration to tires.
Page 49
D - 8
ExTERIOR
D - 9
D
To CHANGE A TIRE with a jack see the label affixed to the underbelly to the rear
of the wheels. This label, says JACK with an arrow and points to a plate riveted
to the mainframe rail where the jack head must be placed. Trailer must be
immobilized with wheel chocks and blocking before raising trailer with a jack.
Be especially cautious in crossing holes or dips in the road. Under these cir-
cumstances it is good practice to set your rear view mirrors so that you can
observe your tires at all time.
Warning: The maximum speed rating on the tires installed
on your trailer is 65 MPH. DO NOT EXCEED THIS RATING. Failure to heed
this warning could cause catastrophic tire failure resulting in property
damage, personal injury and/or death.
Warning: Never attempt to change any tire without securely
chocking remaining wheels. Never position yourself in a manner where a
raised trailer can come down on you if it should become dislodged from
a jack.
Warning: When removing aluminum-forged wheels from
spindle, it is very important to mark them to assure the wheel is placed in
the same position of the drum when reinstalling. If the aluminum-forged
wheel is to be mounted on a different drum it is important to sand all loose
corrosion from the mating surfaces.
Load and Inflation Information for Your Tires
Maintaining proper tire inflation pressure is essential for both tire safety and
performance.
Proper Tire Inflation
The level of air in your tires affects your vehicle’s overall performance. Not
even the highest quality tire will perform well if it’s not inflated properly. The
correct pressure varies from vehicle to vehicle and depends in part upon driver
preference. Each vehicle has a maximum inflation pressure, usually found
on a metal tag riveted to the outside of the vehicle as well as on the original
equipment tires.
Correct tire inflation is a key component in tire care. The recommended inflation
pressures for your tires are indicated on the certification label or in your owner’s
H-Hydralic Jack PositionS-Stabilizing Jack Position
SS
SS
S SH
HH
Page 50
ExTERIOR
D - 10
D
D - 11
manual. Since RVs can be loaded with many different configurations, the load
on each tire will vary. For this reason, air pressure should be checked based
on the load on each individual tire. Cold Inflation Pressure should be adjusted
to handle the maximum tire load, and all tires on the axle should carry the
same inflation pressure. COLD TIRE INFLATION PRESSURE is the tire pressure
checked in the morning before you drive more than a few miles or before rising
ambient temperatures or the sun’s radiant heat affects it. Check your tires’ air
pressures at least once a month, before each trip and each morning you drive
during a trip. Tire pressure should be checked cold, as tire pressure ratings
have been designed with typical running heat/pressure build-up in mind. Make
sure the valves and caps are free of dirt and moisture.
Under Inflation
Under inflation brings a higher risk of damage due to road hazards, reduces
casing durability, causes a loss in fuel economy, and uneven or irregular tire
wear. Severe under inflation brings about an increased risk of tread separation,
handling difficulties, and possibly tires failure, caused by overheating.
IMPORTANT: Lowering tire pressure in the search for a smoother ride is not
only dangerous, it’s relatively ineffective, as the difference in the ride quality
is not significant. When minimum inflation pressure requirements are not
met, tire durability and optimum operating conditions are compromised. Tire
inflation pressure should always meet the guidelines for vehicle weight.
It may be necessary to inflate your tires at a truck stop or truck service •
center in order to achieve adequate air pressure for your coach’s
needs
Only permanent air seal metal valve caps should be used.•
Be safe - if a tire has been run 20% under inflated, it must be •
dismounted and inspected by a trained professional. It should not be
aired up without a full inspection or without using a safety cage. Use
a calibrated gauge. If your tire is rated for higher inflation pressures, a
special gauge will be required designed for larger tires.
Don’t bleed air from warm tires to reduce pressure buildup •
Don’t inflate tires to cold PSI rating beyond rim specifications •
HOW OVERLOADING AFFECTS YOUR TIRES
Tire pressure is what enables your RV tire to support loads. Overloading your
tires can have serious consequences for passengers and your RV. Too much
weight can cause stress on your RV’s suspension system, brake failure, shock
absorber damage, handling and steering problems, irregular tire wear and
possible tire failure. Excessive loads or under inflation can lead to an excessive
amount of heat and tire failure. If you discover that your tires cannot handle the
load, lighten the weight of the load on your tires. Tire pressure should never be
reduced below the vehicle manufacturer’s recommended levels to support load
conditions in order to improve the ride quality of a vehicle. The difference in ride
Page 51
D - 10
ExTERIOR
D - 11
D
quality is not significant. When inflation pressure requirements are not met, tire
durability and optimum operation can be affected.
WEIGHING YOUR TRAVEL TRAILER OR TOWED VEHICLE
Since a trailer or towed vehicle adds to the load on your RV’s tires, it is crucial to
properly weigh towed vehicles. A travel trailer should first be weighed with the
tongue, while detached from the pulling vehicle. The actual weight of the trailer
must be less than or equal to the GVWR for safe operation, otherwise contents
must be removed until the weight is within maximum GVWR limitations. The
weight of the complete, attached trailer, excluding the towing vehicle, must
also be taken. Each wheel should be weighed while still attached to the towing
vehicle, and the individual wheel positions on the towing vehicle should be
weighed and checked for overload as well.
If you determine that the loading of your vehicle’s tires are uneven, the actual
weight of the trailer on each tire must be less than or equal to its maximum
load capacity for safe operation, otherwise contents must be removed until the
weight is within maximum load limitations.
TIRE CARE
Tires are a very precisely engineered product designed for specific applications
and use. The tire functions as the sole contact between the vehicle and the
road. Therefore, it must provide several different functions in order for your
tow and recreational vehicle to handle properly. Most important are traction
while moving, grip when steering or stopping, and a comfortable ride for you
and your passengers. The Tires on your recreational vehicle are designed for
highway use and must be properly maintained in order to maximize tire life, as
well to provide a safe mode of transportation. Always keep your tires clean and
properly inflated.
Correct tire inflation is a key component in tire care. The recommended inflation
pressures for your tires are indicated on the certification label and in your
owner’s manual. Since RVs can be loaded with many different configurations,
the load on each tire will vary. For this reason, air pressure should be checked
based on the load on each individual tire. Cold Inflation Pressure should be
adjusted to handle the maximum tire load, and all tires on the axle should carry
the same inflation pressure. COLD TIRE INFLATION PRESSURE is the tire
pressure checked in the morning before you drive more than a few miles or
before rising ambient temperatures or the sun’s radiant heat affects it.
Page 52
ExTERIOR
D - 12
D
D - 13
Tips on Tire Care
Any tire, no matter how well constructed, may fail in use as a result of punctures,
impact damage, improper inflation or other conditions resulting from use. Tire
failures may create a risk of property damage or personal injury. To reduce the
risk of tire failure tire manufacturers strongly recommend the following:
1. Check the pressure in your tires, including your spare, at least monthly when
the tires are cool (after the vehicle has stopped three hours and then driven
less than one mile.) Do not reduce pressure when tires are hot. Use a quality
tire gauge to check pressure and maintain it at the recommended level.
2. Never overload your tires. The maximum load carrying capability of your tires
is molded on the sidewall of the tire.
3. Check your tires frequently for scrapes, bulges, separations, cuts or snags
resulting from use. See your tire dealer immediately if any such condition
is discovered.
4. Never operate your vehicle in excess of lawful speeds or the maximum
speeds justified by driving conditions, or in excess of speeds recommended
for the tire you are using.
5. Make every effort to avoid running over objects that may damage the tire
through impact or cutting, such as chuckholes, glass, metal, etc.
6. Never drive on smooth tires. Tires should be removed when 2/32nds inch of
tread depth remains. In most states it is illegal to drive with less than 2/32nds
inch remaining tread depth.
Proper Inspection and Storage of Tires
Before taking your RV on a trip or when removing from an extended storage
period, make it a practice to inspect the overall condition of your tires. Check
for any type of condition or damage that might result in failure. A thorough
check should include both inside and outside sidewalls, tread area and the
condition of hardware such as valve stems, valve caps, and wheels. The tread
should be checked for any unusual wear, cracking, penetrations and/or cuts.
An uneven wear pattern can indicate misalignment or worn suspension parts.
Since many RVs are used seasonally and sometimes stored for extended
times, it is possible that tires will take many years to wear out. Tires, as any
rubber product, will age over time. If tires show cracking in the sidewall or tread
surfaces that are more than 2/32nds deep, they should be replaced before
your next trip or vacation. Store your RV in a cool dry area away from major
heat sources and extreme cold. An enclosed area is best with no exposure to
electromagnetic sources such as generators or transformers. If you must keep
your RV outside, cover your tires from direct sunlight. Take your RV to your Tire
dealer for service to check or correct any of these conditions.
Page 53
D - 12
ExTERIOR
D - 13
D
Replacing Your Tires
It is possible to replace your tires with a different size in some instances to
increase your load capacity with a different inflation pressure. If there is a reason
to replace your tires with a different size, make sure the following checks are
made before the purchase:
Does the replacement tire have the load capacity that is needed for my •
RV and will it fit properly inside the wheel well?
Will the overall diameter difference affect the speedometer or antilock •
braking system?
Is the increase in air pressure compatible with the maximum rated •
pressure stamped on the rim?
Is there enough dual spacing offset for the rear wheel positions? •
Tires used on most RVs are driven at or near maximum loads during hot
weather and then are left idle for months. In normal use oils in the tire come to
the surface during flexing and protect the rubber from ultraviolet light. But when
left idle, natural aging may cause the rubber to crack prematurely, especially in
the sidewall area.
Any tire on an RV that is over five years old should be inspected by a competent
tire professional for cracking and replaced, even if it has no apparent tread
wear. This is because a tire on a car or truck might last 80,000 to 120,000 miles
before it needs to be replaced, but an RV tire that only travels 5,000 miles per
year will not approach that mileage for 20 years. It will need to be replaced
much before that.
The first step is choosing a tire adequate for the load. The load rating printed
on the sidewall will show the maximum load that can be carried at a defined
pressure. As the inflation pressure drops, the load that can be carried is less. As
speed increases, the amount of load that can be carried also drops. The load
rating is also affected by how the tire is used, as a single or as a dual.
An ST225/75R15 tire is a special trailer tire with a section width of 225 mm, a
height to width ratio of 75%, radial construction with a diameter of 15 inches.
As the width to height ratio becomes smaller, the tire has a lower profile.
A Goodyear ST215/75 R14 tire inflated to 50 PSI has load capacity of 1850
Lbs.
A Goodyear ST225/75 R15 tire inflated to 65 PSI has load capacity of 2540
Lbs
Warning: Do not mismatch wheels and tires.
Page 54
ExTERIOR
D - 14
D
D - 15
Axle systems are installed with hubs and drums that are compatible with
many wheels used in the recreational vehicle industry that have matching
bolt patterns. If the original manufacturer installed equipment is in need of
replacement, the wheel manufacturer should be contacted for proof of com-
patibility prior to replacement and use.
Customers replacing original equipment that has not been tested for compat-
ibility must ensure the replacements are compatible to the hub and drum as-
sembly installed. Such elements of compatibility include, but are not limited
to:
Diameter of the hub-mounting surface.•
Stud length and diameter.•
Location and number of studs.•
Center hold diameter for the wheel.•
Wheel mounting offset from the rim center.•
Rated capacity of the wheel.•
Wheel fastener torque.•
Wheel nut size and shape.•
Impact of any added wheel accessories (such as decorative center caps) •
that could affect proper seating of the wheel to the hub surface.
Lug Nut Torquing
Proper wheel nut torque is very important to safe and dependable towing of
your vehicle. The wheel and axle systems used in travel trailers wheels are
similar, yet different, in many ways to those used on cars and trucks. These
differences are important and require special attention to wheel nut torque
both while the trailer is new and throughout the trailer’s life.
Trailer wheels must carry much higher loads per wheel than passenger car or
truck wheels. Each wheel may carry 1000 pounds and higher. Furthermore,
wheels on tandem axle trailers do not steer, and are subjected to very high
side load stress whenever the trailer makes a tight turn. When you go around
corners, especially slow, tight ones, the wheels on your trailer are subject to
these strong side loads. This tends to flex the wheel and gradually loosen the
wheel nuts. Although the materials and manufacturing methods are maxi-
mized for this kind of service, these extra loads can cause stress, which can
result in flexing and loosening of wheel nuts.
1
2
3
45
6
5
4
3
2 1
Page 55
D - 14
ExTERIOR
D - 15
D
Before each trip and any time a wheel is replaced, be sure to tighten the
wheel nuts, following the sequence shown in lug pattern below. Set the
torque specification as seen in the Specification Section of this manual. If the
wheel was replaced, tighten wheel nuts at start and at 10, 25, and 50 miles.
Warning: Use a torque wrench to tighten lug nuts. Tighten-
ing by hand or with an impact wrench is not recommended. Do not over
torque.
If you notice wheel wobbling or hear a rattling sound coming from a wheel,
especially at low speeds, a wheel lug nut may have come loose. This problem
is usually caused by improper tightening or by faulty or damaged lug bolt
threads. If you have a reason to believe a lug nut has come loose, safely stop
the vehicle at the side of the road as soon as possible. Put up warning devices.
Check the tightness of all the lug nuts. Tighten all lug nuts to the specified
torque, using a torque wrench. If lug stud threads are damaged or faulty, get
professional service help.
Warning: WHEEL SEPARATION CAN OCCUR
1. On first trip, tighten wheel nuts at start and at 10, 25, and 50
miles.
2. Thereafter, check wheel nuts:
Before each trip.
Following winter storage, check before beginning a trip.
Following excessive braking, inspect wheel nuts
Warning: Do not over torque wheels as this could damage
the lug nuts and/or lug bolts causing wheel separation.
TIRE ROTATION
(10,000-mile intervals)
SPARE TIRE
The spare tire for Airstreams is stored under the front of the trailer. The front
handle of the tire carrier is a one-inch tube protruding out from under the front
A-frame on the curbside. It is secured by a bracket and bolt along the inside
of the A frame rail. Removing the bolts allows the front on the tire carrier to be
lowered and the spare tire removed.
DangEr: The spare tire carrier is designed to carry an
undamaged tire and rim assembly of the type and size specified
for the trailer. Never place a severely damaged wheel assembly
with a damaged partial tire, or a rim only in the carrier.
Radial Tires
Page 56
ExTERIOR
D - 16
D
D - 17
Exterior Liquid Propane Gas (LPG) Port
An Exterior LPG Port quick connect may be installed on the hitch A-frame of
your trailer.
A LPG supply line, male quick connect coupler, 3/8” flare fitting, and one pound
LPG bottle coupler is shipped with the trailer in the loose parts box. These parts
can used to connect a lantern or other appliance that uses a one pound LPG
bottle supply to the exterior port.
To assemble the loose parts install the male quick connect coupler to one end
of the supply hose. Then add the flare fitting to the other end of the supply hose
and then install the one pound bottle coupler to the flare fitting. This assembly
can be installed into the appliance in place of the one pound LPG bottle.
Page 57
D - 16
ExTERIOR
D - 17
D
Warning: Only professional technicians trained and certified
in LPG system installations and repairs should perform repairs or modifi-
cations to you LP system and/or LP appliances. The entire assembly de-
scribed in this section must be leak checked and inspected after assembly
is complete by a Certified LP gas technician before use. Failure to follow
this warning could cause property damage, personal injury, and/or death.
Quick Connect Instructions
Slide the Quick Connect Valve Sleeve back and insert the appliance supply
gas line male coupler into the Quick Connect Valve female coupler. Release the
sleeve to capture the male coupler and gently pull on appliance supply line to
check that it is properly captured.
Turn the shut off lever to the on position to supply gas to the appliance.
To remove the appliance supply line:
Turn the gas lever to the off position to unlock the male coupler and slide the
sleeve back to release the appliance supply line. For safety the LP Port Valve
has a shut off lever that locks the male coupler in place when the gas is turned
on. The gas is on when the lever is turned so it is inline with the valve. The
drawing below shows the shutoff lever in the off position.
Warning: Each time you use the Exterior LP Port check it for
wear and/or damage. If any damage or wear is found DO NOT USE the
Port until it has been checked by a qualified technician. Failure to follow
this warning could cause property damage, personal injury, and/or death.
Page 58
ExTERIOR
D - 18
D
E - 1
NOTES
Page 59
D - 18
INTERIOR
E - 1
E
The interior of all Airstream trailers has been designed for comfort, convenience,
durability and appearance. How you use it and how you take care of it naturally
depends on you. However, if you learn to operate the interior components
and take care of them and the trailer properly, this knowledge will add to your
pleasure as well as the long life of your trailer.
Upholstery-Cleaning Code S
All materials should be professionally dry cleaned to remove any overall soiled
condition. Spot clean, using a mild water free solvent or dry cleaning product.
DO NOT SATURATE THE FABRIC. Carefully follow instructions on such prod-
uct. Clean only in a well-ventilated room. Avoid any product containing carbon
tetrachloride, which is highly toxic. Pretest small area before proceeding. Use
professional furniture cleaner when an overall soiled condition is reached.
nOTiCE: Never remove cushion covers for separate dry cleaning or
washing. Any tumble cleaning method can destroy the backing, shrink or
otherwise damage upholstery fabric.
Warning: Keep your furniture and family safe from fires
caused by careless smoking. Do not smoke when drowsy. Remove im-
mediately any flowing ash or a lighted cigarette, which falls on furniture.
Smoldering smoking material can cause upholstered furniture fires.
Interior Skin
The interior skin on your trailer is covered with an upholstery that can be
cleaned with a vacuum cleaner. For stubborn spots, spot clean, using the foam
only from water based cleaning agent such as mild detergent or non-solvent
upholstery shampoo product.
Apply foam with a soft brush in a circular motion. Vacuum when dry. Pretest
small area before proceeding. Use professional furniture cleaner when an
overall soiled condition is reached. The manufacturer of the fabric designed
the above code.
The aluminum interior skin in the bathroom and galley area should follow the
same cleaning instructions detailed in the Exterior Section of this manual for
the exterior skin.
Counter Tops
The counter areas around the sinks are of a high-pressure laminate and can be
cleaned with soap and water, or you can use a common solvent on tough spots.
Be sure no abrasive cleaner is used, as there is the possibility it could scratch
Page 60
INTERIOR
E - 2
E
E - 3
the surface. A protective pad should always be placed under hot utensils.
Sinks
Cleaning can be accomplished using mild liquid detergent designed for stain-
less steel with a soft cloth.
Shower Stall
To clean your fiberglass shower stall unit use warm water and one of the stron-
ger liquid detergents. Do not use abrasive cleaners, they may scratch and dull
the surface of your unit. Stubborn stains can be removed with solvents such as
turpentine, paint thinner or acetone. Restore dulled areas by rubbing with an
automotive type liquid cleaner then put the soft slow back into your unit with
a light application of liquid wax. NOTE: The 23’ Front Bed model has small
access door cut into the front shower exterior wall to access and service the
shower valve plumbing.
Retractable Clothesline
A retractable clothes line and line hook is installed for your conveinence in the
shower stall of the unit.
Dinette Seats/Pedestal Table, 22’ Front Bed Model
The table is of a high-pressure laminate and can be cleaned with soap and
water, or you can use a common solvent on tough spots. Be sure no abrasive
cleaner is used, as there is the possibility it could scratch the surface. A protec-
tive pad should always be placed under hot utensils. The dinette is made into
a bed by lifting the table off the pedestal and removing the pedestals from the
floor. Place the table onto the seat bottom with the rubber bumpers. The table
has rubber bumpers on its bottom that rests on the seat bottom. Arrange the
seat and backrest cushions over the table and seats to complete the conver-
sion. Always remove cushions before lowering table into bed position.
Monitor Panel
The monitor panel allows you to check the amount of fluid in your fresh water
tank, black tank, and the gray tank. It is located in the bathroom. The LP
gas and battery status are also shown. See more about its operation in the
Appliance section of this manual.
Page 61
E - 2
INTERIOR
E - 3
E
Exhaust Fans/Vents
The trailers are equipped with vent fan in the
shower area and a non-powered vent. Units
may have an optional high volume ceiling
fan. The high volume ceiling fan instructions
are located in the appliance section of this
manual.
The round ventilator in the shower is opened by pushing straight up on the
crossbar handle. The round switch can then be turned to engage the fan
motor.
The non powered vent can be opened and closed by a crank mechanism.
Telephone Shower Head
The telephone shower head is designed to give maximum flexibility in usage,
and provides for water saving techniques when using your trailer on self-
containment. It can be held in the hand and moved about the body. Normally
the best water conservation procedure is to wet the entire body and then turn
the water off. Apply soap, lather thoroughly, and then rinse the soap off. The
telephone shower head is also used to fill the tub for taking a bath. When you
have finished using the shower be sure to shut the water off at the faucet.
Linoleum
Mop and clean with linoleum floor cleaner.
Bath Area Switches
Two switches for appliances are located on the bathroom wall. One is for the
water pump on the monitor panel.
Once the water pump switch is turned on the pump will run until the water
pressure reaches about 35 psi. At this point an internal pressure switch will
shut it off. When a faucet is opened the water pressure will drop and the
pump will start to run again.
NOTICE: The Sureflo water pump should be turned off when using city water
or when the trailer is left unattended.
The second switch, with a red indicator, is for lighting the water heater. The
water heater is on when the red light is on. A light switch is also integrated into
the same panel as the water heater switch.
Handle
Button (on/off )
ToOpen
Page 62
INTERIOR
E - 4
E
E - 5
Lighting
Each light fixture has a sliding switch located in on the fixture. Gently squeezing
in the middle and pulling the lens away from the light fixture will remove the lens
from the light. During cold weather it is a good idea to leave the light on a few
minutes prior to removing the lens. Cold plastic can break easily. A gentle twist
on the cooled bulb will release it from its socket when they burn out..
Wall switches just inside the door control ceiling, step, and patio lights. The
individual ceiling lights must be on for the wall switch to work.
Storage
The galley cabinets should have the heaviest items on the bottom and lighter
items overhead. After loading you should have the skillets and can goods on
the floor or bottom shelf, and the cereals and crackers in the overhead roof
locker. Use the unbreakable type plates and saucers, and consider storing your
dish towels around them. Better yet, use paper plates. Who wants to wash
dishes when on a trip or vacation?
Clothes hung in wardrobes should be kept on hangers that snap over the
clothes rods to keep them from “jumping” off on rough roads. Evening dresses
should be kept in the plastic bags like dry cleaning businesses use. No matter
how hard you try, if you travel a long dusty section of road the dust will work
its way into the trailer and soil clothes. Try to avoid large bulky coats. Layers of
lighter clothing will usually keep you warmer, are more versatile and easier to
store. There are several areas in the trailer to store your belongings. Remember
to distribute the load as outlined in the Loading section of this manual.
Remember, heavy items should be stored low and toward the front, lighter
items in the overhead cabinets. Please read the loading section of this manual
for more information on the safe storage of items.
Warning: Keep flammable material away from the furnace.
SMOKE ALARM
A smoke detector is provided with your trailer. A manual pertaining to the
detector is included in the paper work given to you at the dealership. Please
read and follow all care, maintenance, and safety information contained in the
smoke alarm manual.
The smoke alarm will “beep” once a minute for at least 30 days when the bat-
tery is weak. The battery must immediately be replaced with a fresh one.
Warning: Alarm battery is shipped deactivated. Check your
alarm for proper battery installation. To activate battery, new Airstream
Page 63
E - 4
INTERIOR
E - 5
E
owner must install included battery to proper orientation.
Warning: Smoke Alarms have a Limited Life. The unit should
be replaced immediately if it is not operating properly. You should always
replace a Smoke Alarm after 10 years from the date of purchase. Write the
purchase date on the space provided on the back of unit.
SERVICE: If service is required or you have not received an smoke alarm users
manual please contact the Consumer Affairs Division at 800.323.9005
LP GAS DETECTOR
THIS ALARM HAS A SEVEN YEAR LIFE, SEE END OF LIFE NOTIFICATION
IN LP DETECTOR MANUAL. PLEASE READ ENTIRE DETECTOR MANUAL
BEFORE OPERATING UNIT.
In the kitchen area of your unit is the LP gas detector. LP gas is a mixture
of gases produced and sold commercially as a fuel for heating and cooking
appliances. LP gas is highly flammable and, as a result, can be explosive if
ignited under certain circumstances. LP gas is heavier than air and, if confined
in a closed space, will accumulate close to the floor. The LP gas detector is
designed to alarm at less than 25% of the legal explosive limit. It will provide
a visual and audible alarm by sounding an alarm every 5 seconds and lighting
the red LED.
Your LP gas detector is wired directly to your vehicle battery and incorporates a
1-amp in-line fuse. It has no internal battery back up. In Normal Stand By Mode
the LED indicator will be green.
LOW VOLTAGE
The operating voltage for the detector is 12 VDC. The actual voltage supplied
to the detector in a recreational vehicle may drop below the minimum 8 VDC.
The detector is designed to provide the user with a LOW VOLTAGE WARNING
before reaching that level and to provide additional distinct, clear warnings and
alarms after the 8 VDC level is reached. However, if available power supplied to
the unit is below the operating voltage of 8 VDC the detector will not detect gas
or provide you protection against dangerous levels of LP Gas.
DangEr: Activation of this detector indicates the presence of
LP gas, which can cause an explosion and/or fire causing death or serious
injury. This normally indicates a leak in the LP gas installation or a LP gas
appliance. Extinguish all open flames, open your windows and door and
evacuate the unit immediately. Do not activate any electrical switch. Turn
off the LP at your gas bottle(s). DO NOT RE-ENTER YOUR UNIT UNTIL A
QUALIFIED REPAIR TECHNICIAN HAS CORRECTED THE PROBLEM AND
Page 64
INTERIOR
E - 6
E
E - 7
CERTIFIED THE SYSTEM AS SAFE.
DangEr: It is not recommended that the detector be
disconnected from the battery during periods of storage. There is a
small heater on the sensor of the device, which “burns” away impurities
in the air during periods of normal use. During periods when power is
interrupted, impurities can build up on the sensor. When power is returned
to the detector the detector alarm may activate until the impurities are
“burned” off. This could take a number of hours, during which time the
alarm will be constantly “on”.
DETECTOR TEST
The Test/Rest button is used to verify proper alarm function. Executing the test
function sounds the alarm and lights up the red LED. The test will sound the
alarm twice, with 4 “beeps” in one second followed by 5 seconds of silence. By
pressing the button you can verify that the alarm sounds and the LED functions
properly.
DangEr Have a qualified technician check your LP Gas system
annually or if you have any signs of leaks or malfunctions.
FIRE EXTINGUISHER
The fire extinguisher just inside your forward door should have the charge
checked on a regular basis. Make sure your family, especially the cook, knows
how to release the extinguisher storage bracket, and how to properly operate
the extinguisher. Check with your local fire department for professional advice
on its operation and use if you find the directions on the extinguisher unclear.
We’re sure they will be happy to assist you and your family.
SAFETY:
Many things can be construed as safety related, but the most important
is your common sense. If you are careless with matches, cigarettes, flam-
mable material or any other hazardous material, we are sure you realize
your potential for accidents is greatly increased.
Page 65
E - 6
INTERIOR
E - 7
E
CARBON MONOXIDE ALARM
CAREFULLY READ AND UNDERSTAND THE CONTENTS OF THHE ALARM
INSTRUCTION MANUAL BEFORE USING THE ALARM.
STORE THE MANUAL IN A SAFE PLACE FOR FUTURE REFERENCE. PAY
PARTICULAR ATTENTION TO THE SAFETY WARNINGS. PASS THE MANUAL
ONTO ANY SUBSEQUENT USERS OF THE ALARM
If you have not received the Owner’s manual for the Carbon Monoxide Alarm
please contact Airstream factory Customer Service or Quantum Group Inc. at
1.800.432.5599
Warning: Failure to replace this product by the “REPLACE BY
DATE” printed on the alarm cover may result in death by Carbon Monoxide
poisoning. Replace By Date is six (6) years from the date of manufacture.
DANGER: Activation of your CO alarm’s audible horn indicates
the presence of carbon monoxide (CO) which can KILL YOU.
Warning: Alarm battery is shipped deactivated. Check your
alarm for proper battery installation.
Warning: THIS PRODUCT IS INTENDED FOR USE IN
ORDINARY INDOOR LOCATIONS OF FAMILY LIVING UNITS. IT IS NOT
DESIGNED TO MEASURE COMPLIANCE WITH OCCUPATIONAL SAFETY
AND HEALTH ADMINISTRATION (OSHA) COMMERCIAL OR INDUSTRIAL
STANDARDS. INDIVIDUALS WHO ARE AT SPECIAL RISK FROM CARBON
MONOXIDE EXPOSURE BY REASON OF AGE, PREGNANCY OR MEDICAL
CONDITION MAY CONSIDER USING WARNING DEVICES WHICH
PROVIDE AUDIBLE AND VISUAL SIGNALS FOR CARBON MONOXIDE
CONCENTRATION UNDER 30 PPM. IF IN DOUBT CONSULT YOUR
MEDICAL PRACTITIONER.
THIS CARBON MONOXIDE ALARM IS NOT
1. Designed to detect smoke, fire or any gas other than carbon monoxide.
2. To be seen as a substitute for the proper servicing of fuel-burning appli-
ances.
3. To be used on an intermittent basis, or as a portable alarm for spillage of
combustion products from fuel-burning appliances.
Warning: This carbon monoxide alarm is designed for indoor
use only. Do not expose to rain or moisture. Do not knock or drop the alarm.
Do not open or tamper with the alarm as this could cause malfunction.
Page 66
INTERIOR
E - 8
E
E - 9
The alarm will not protect against the risk of carbon monoxide poisoning
when the batteries are dead or missing. The alarm will only indicate the
presence of carbon monoxide gas at the sensor. Carbon monoxide gas
may be present in other areas.
IMPORTANT
1. Carbon monoxide is produced by the incomplete combustion of fuels such
as wood, charcoal, coal, heating oil, paraffin, gasoline, natural gas, propane,
butane, etc.
2. Ideally, it is recommended that a carbon monoxide alarm should be installed
in or near every room that has a fuel burning appliance such as any room
heaters, water heaters, cookers, grills, etc.
3. Ensure that the alarm horn can be heard by all those who are intended to
hear it. Seek medical help if it is suspected that a user of the RV is suffering
from carbon monoxide poisoning.
4. If the alarm sounds, make sure to investigate the problem. Ignoring the alarm
may result in sickness, injury or death. (CO may be present even if nothing is
seen or smelled by the user).
5. Room spaces should be well ventilated when household cleaning supplies
are used as these may cause a false alarm.
6. Alarm should be tested once per week.
WHAT IS CARBON MONOXIDE
Carbon monoxide (CO) is a highly poisonous gas which is released when fuels
are burnt. It is invisible, has no smell and is therefore very difficult to detect
with the human senses. Under normal conditions, in a room where fuel burning
appliances are well maintained and correctly ventilated, the amount of carbon
monoxide released into the room by appliances is not dangerous.
These fuels include: Wood, coal, charcoal, oil, natural gas, gasoline, kerosene,
and propane. Common appliances are often sources of CO. If they are not
properly maintained, are improperly ventilated, or malfunction, CO levels can
rise quickly. CO is a real danger in “Air-tight” RVs with added insulation, sealed
windows, and other weatherproofing can “trap” CO inside.
The following conditions can result in potentially dangerous CO situations.
1. Excessive spillage or reverse venting of fuel burning appliances caused by
outdoor conditions, such as:
A. Wind direction and/or velocity: including high gusts of wind.
Heavy air in the vent pipes (cold/humid air with extended periods
between cycles).
B. Negative pressure differential resulting from sue of exhaust fans.
C. Simultaneous operation of several fuel burning appliances
competing
Page 67
E - 8
INTERIOR
E - 9
E
for limited internal air.
D. Vent pipe connections vibrating loose from clothes dryers,
furnaces or water heaters.
E. Obstructions in or unconventional vent pipe designs which can
amplify the above situations.
2. Extended use of un-vented fuel burning devices.
3. Temperature increase that can trap exhaust gases near the ground.
SYMPTOMS OF CARBON MONOXIDE POISONING.
The following symptoms are related to CO POISONING and should be dis-
cussed with users of the RV.
Mild Exposure - Slight headache, nausea, vomiting, fatigue,
(“flu-like” symptoms),
Medium Exposure - Throbbing headache, drowsiness, confusion, fast heart
rate.
Extreme Exposure - Convulsions, unconsciousness, heart and lung failure,
Exposure to carbon monoxide can cause brain damage, death.
DangEr: Many causes of reported CARBON MONOXIDE
POISONING indicate that while victims are aware that they are not well,
they become so disoriented that they are unable to save themselves by
either exiting the building or calling for assistance. Also young children
and pets may be the first to be affected.
Warning: Test units used in RVs after the vehicle has been
in storage, before each trip and once a week while in use. Failure to test
units used in RV’s as described may remove your protection.
Page 68
F - 1
INTERIOR
E - 10
E
NOTES
Page 69
F - 1E - 10
PLUMBINg
F
LIQUID PETROLEUM GAS (LPG)
FILL VALVE
Your trailer is equipped with LP tank fill valves called “RV Type I Acme” con-
nection. The large, green, nylon swivel nut is a right hand thread and is
designed for hand operation only. It and the bottle shut off valves can be
accessed by twisting the two cover lids on top of the cover or sliding the
complete cover off the tanks.
The valve features an internal spring-loaded module that will not allow gas to
flow from the cylinder until a positive seal has been made at the connection. The
valve outlet has 1-5/16” Acme threads on the outlet exterior and female POL,
left-handed threads on its interior. This feature allows for connection of the new
wrenchless, right-handed, Acme RV connection and still accommodates the
standard left-handed POL fittings used for filling propane cylinders.
The mating, green swivel nut and brass nipple also incorporates new features:
the green nylon nut swivels on a black bushing that is heat sensitive. Between
240 degrees F. and 300 degrees F. the bushing will yield (melt) allowing the
spring-loaded module in the valve to push the brass nipple back (approximately
1/4”) closing the module and stopping the flow of gas from the cylinder. Inside
the brass nipple is a flow-limiting device designed to sense excessive gas flow.
If an excessive flow is sensed, the flow-limiting device shuts the flow down to
a maximum of 10 SCFH (Standard Cubic Feet per Hour) or less. This is also
referred to as the by-pass flow.
By-pass flow is extremely important in the proper operation of this connection.
The flow-limiting device may activate if the cylinder valve is opened quickly.
When all appliances are off, the by-pass flow allows the pressure downstream
from the flow-limiting device to equalize. When pressure is equalized, the flow-
limiting device will supply normal flow to the system. Equalization occurs in
approximately 5 seconds and in most cases goes completely unnoticed. If,
however, an appliance is left on or there is a leak or open flow in the system,
the by-pass pressure will not be able to equalize and allow the flow-limiting
device to re-open. Symptoms of this condition would be appliances that light
but have lower than normal flame or starve out from lack of gas, a substantial
reduction in the flame when another appliance is operating, or pilots that are
difficult to light. If this should happen, the following steps should eliminate the
condition:
1. Close LP cylinder valve.
2. Extinguish all flames and smoking materials
3. Be sure all gas appliances, including their pilot lights, are off.
4. Open LP cylinder valve slowly. DO NOT SNAP OPEN.
5. Wait at least 15 seconds before lighting appliances.
Page 70
F - 2 F - 3
PLUMBINg
F
6. If operational difficulties continue, there may be a leak in the system.
Immediately close the LP cylinder valve and have the system inspected by
a qualified RV service technician.
Again, make sure all appliances are off before opening propane cylinder
valves.
Exception: when reconnecting a full cylinder to an auto changeover regu-
lator it is not necessary to shut off the appliances or close the valve of the
cylinder already in service.
DangEr: LEAKING LP GAS MAY IGNITE CAUSING A FIRE OR
EXPLOSION WHICH COULD RESULT IN SERIOUS BODILY INJURY,
PROPERTY DAMAGE, AND/OR DEATH.
How long a full tank of gas will last is dependent on usage. In cold weather,
when you are using the furnace, large amounts of hot water, and are doing
extensive cooking, you will naturally use more than you will in warm weather
when you may do limited cooking. On the average, with normal cooking and
other appliance use you can probably count on two to three weeks of service
from each tank.
AUTOMATIC GAS REGULATOR
All models are equipped with a two stage automatic change over gas regulator
that offers the convenience of automatic changeover from empty to full gas
cylinders. Both tanks are connected to this regulator.
Make sure there is propane in both tanks before you start. Rotate the black
lever on the top front side of the regulator toward the cylinder you want to use
first. This will be the “service” cylinder and the other will be the “Reserve” cylin-
der. Slowly open both cylinders valves. Open both cylinder valves completely,
then close about 1/4 turn. This will allow you to easily check to see if valves
are open or closed. The indicator on top of the regulator will turn bright green.
The indicator will stay bright green as long as there is fuel coming from the
service cylinder. When the service cylinder empties, the regulator will draw fuel
automatically from the reserve cylinder providing an uninterrupted fuel flow to
the system. When it switches over, the indicator will change from green to red.
This red color indicates the service cylinder is empty and needs to be filled.
Warning: LP gas regulators must always be installed with
the diaphragm vent facing downward. Regulators that are not in com-
partments have been equipped with a protective cover. Make sure that
regulator vent faces downward and that cover is kept in place to minimize
Page 71
F - 2 F - 3
PLUMBINg
F
vent blockage, which could result in excessive gas pressure causing fire
or explosion.
DangEr: The LPG bottles are securely mounted on the front
“A” frame of your trailer. If these bottles must be removed for service or
replacement it is important that they be reinstalled correctly in order to
prevent any possibility of them falling off or becoming dislodged during
travel.
LPG BOTTLES
The following step-by-step procedure gives you the proper method of remov-
ing and installing these bottles:
1. Remove the bottle cover and turn the knob on your automatic regulator so
the arrow points to the tank opposite the one to be removed. Shut off the gas
valve on the bottle to be removed.
2. Disconnect the rubber gas line at the bottle to be removed. (The green plastic
fitting is a right hand thread and no tools should be used.)
3. Turn the large clamping T-handle counterclockwise until the hold down
bracket is loose enough to remove the bottle. DO NOT REMOVE OR
LOOSEN THE CENTER HOLD DOWN ROD. It is fastened to the A-frame by
two hex head nuts. Periodically check the rod for tightness.
To Install
1. Place the bottle in position on the “A” frame and bottle cross member so that
it rests on the upper collar of both bottles with the collar rims engaged in the
grooves on the underside of the bracket. If your trailer is equipped with a gas
bottle cover it should be positioned over the bottles next. Make sure the hold
down rod projects up through the hole in the shroud center bracket.
2. Replace the T-handle and tighten down until the bottles are held firmly in
place.
3. Turn on gas shut off valves and test all fittings with a soap suds or detergent
solution and watch for bubbles.
If you have allowed both tanks to run out, air may have gotten into the lines. In
this event, the air must be forced out through the lines by gas pressure before
you will be able to light the pilots. Hold a match to the pilot of the appliance
closest to the tanks until it lights and stays lit. Then move to the next closest,
etc.
Warning: Your LP tanks must be filled as directed by the tank
manufacturer. Instructions are located on a decal near the fill valve. The
decal must not be defaced.
Warning: Your LP tanks must be, and can only be, placed
Page 72
F - 4 F - 5
PLUMBINg
F
in the proper position when remounting on the front of the trailer. In any
other position the base of the tank will not fit into the recess.
Warning: Use only the gas bottles furnished with your trailer. If
replacement is required it must be a bottle of the same size and design.
Warning: The vent at the bottom of the regulator must be kept
free of any obstructions and must be pointed downward. A good habit is
to check the vent each time a bottle is removed for filling. It is especially
important to check the vent if the trailer has not been used regularly.
NOTICE: Twice a year, or after a long storage period, we suggest you take your
unit in for a checkup and cleaning of the gas operated appliances.
BASIC RULES FOR SAFETY
DangEr: Do not store LP containers within a vehicle. LP
containers are equipped with safety devices that vent gas should the
pressure become excessive.
DangEr: Do not use cooking appliances for comfort heating.
Cooking appliances need fresh air for safe operation. Before operation
open an overhead vent or turn on an exhaust fan and open a window.
A warning label has been located in the cooking area to remind you to
provide an adequate supply of fresh air for combustion. Unlike homes,
the amount of oxygen supply is limited due to the size of the recreational
vehicle; and, proper ventilation when using the cooking appliances will
avoid dangers of asphyxiation. It is especially important that cooking ap-
pliances not be used for comfort heating as the danger of asphyxiation is
greater when the appliance is used for long periods of time.
DangEr: Portable fuel burning equipment, including wood
and charcoal grills and stoves, shall not be used inside the recreational
vehicle. The use of this equipment inside the recreational vehicle may
cause fires or asphyxiation.
Warning: A warning label has been located near the LP gas
container. This label reads: DO NOT FILL CONTAINER (S) TO MORE THAN
80 PERCENT OF CAPACITY. Overfilling the LP gas container can result in
uncontrolled gas flow, which can cause fire or explosion. A properly filled
container will contain approximately 80 percent of its volume as liquid LP
gas.
Warning: Do not bring or store LP gas containers, gasoline
or other flammable liquids inside the vehicle because a fire or explosion
may result.
Page 73
F - 4 F - 5
PLUMBINg
F
DangEr: IF YOU SMELL GAS:
1. Extinguish any open flames, pilot lights and all smoking materials.
2. Do not touch electrical switches.
3. Shut off the gas supply at the tank valve(s) or gas supply connection
4. Open doors and other ventilating openings.
5. Leave the area until odor clears.
6. Have the gas system checked and leakage source corrected before
using again.
WATER SYSTEM-SELF CONTAINED
Fill the water tank by opening the exterior access door and remove screw cap.
A garden hose can now be inserted. It’s a good idea to let the water run through
the hose for a short time to flush it out. Experienced RVers usually fill their tanks
with “home” water to avoid strange water that may be distasteful to them.
The amount of water in the tank may be checked on the Monitor Panel, or you
may fill the tank until water overflows out of the fill.
Open the hot side of the galley or lavatory faucet and turn on the water pump
switch located on the monitor panel. For some time the open faucet will only
sputter. This is because the water heater is being filled and air is being pushed
out through the lines. Once the water heater is full a steady stream of water will
come from the faucet. Now open a cold faucet. It will sputter for a short time,
but will soon expel a steady stream. All other faucets can now be opened until
all air is expelled. Once the system is filled with water and the faucets closed,
the water pump will shut off. When a faucet is opened the pump will come back
on automatically. If the faucet is just barely open it is normal for the pump to
cycle on and off rapidly.
SANITIZING
Potable water systems require periodic maintenance to deliver a consistent flow
of fresh water. Depending on use and the environment the system is subject to,
sanitizing is recommended prior to storing and before using the water system
after a period of storage. Systems with new components, or ones that have
been subjected to contamination, should also be disinfected as follows:
1. Use one of the following methods to determine the amount of common
household bleach needed to sanitize the tank.
A) Multiply “gallons of tank capacity” by 0.13; the result is the ounces of •
bleach needed to sanitize the tank.
B) Multiply “Liters of tank capacity” by 1.0; the result is the milliliters of •
bleach needed to sanitize the tank.
2. Mix into solution the proper amount of bleach within a container of water.
Page 74
F - 6 F - 7
PLUMBINg
F
3. Pour the solution (water/bleach) into the tank and fill the tank with potable
water.
4. Open all faucets (Hot & Cold) allowing the water to run until the distinct odor
of chlorine is detected.
5. The standard solution must have four (4) hours of contact time to disinfect
completely. If you double the solution, this concentration allows for contact
time of one (1) hour.
6. When the contact time is completed, drain the tank. Refill with potable water
and purge the plumbing of all sanitizing solution.
NOTE: The sanitizing procedure outlined above is in conformance with the approved procedures of RVIA ANSI Al19.2 and the U.S. Public Health Service.
WATER PUMP AND FILTER
The 16 ft. pump and filter is located under the roadside dinette seat. Lift cush-
ion to reveal access panel.
The 22 ft. model has the water pump located under the wardrobe. Access is
gained by removing the felt covered lower wardrobe shelf.
To clean the strainer screen, first remove the inlet connection from the pump
side of the strainer. This will allow the intake side of the strainer to be rotated
about 1/8 turn counterclockwise and be removed. The screen part of the
strainer will now be accessible for cleaning.
To reassemble, rotate the inlet side of the strainer until stops are felt. The “O”
ring performs the sealing. Be gentle, the strainer must be reinstalled completely
so it is sealed to allow the pump to prime but too much pressure will only break
the strainer.
CITY WATER HOOK-UP
The city water hook-up is located on the side of the trailer.
Use a high-pressure hose of at least ½” diameter. It should be
one that is tasteless, odorless and non-toxic designed for RV
use. The city water inlet is a standard garden hose thread. We
suggest you carry two lengths of hose. This way you have the ability to reach
hookups further away than normal, plus you have a spare hose should one fail
or become damaged unexpectedly.
After hooking up the hose and turning on the city water valve provided in the
park, slowly open a faucet. There will be a lot of spurts and sputtering until all
the air is expelled from the trailer system. If the water heater is empty it will take
some time before all the air is expelled and you get a steady flow of water at
the faucet. Once a steady flow is achieved at one faucet the others should be
opened long enough to expel the air in the lines going to them.
City
Water Inlet
Page 75
F - 6 F - 7
PLUMBINg
F
Your plumbing system has a built in pressure regulator to protect your lines and
faucets from extremely high pressures on some city water systems.
NOTICE: Turn the Sureflo water pump off when hooked to city water. A check
valve inside the pump protects water flowing back to the fresh water tank. See
optional pump directions below.
DRAIN VALVES
The 16 ft model has two drain valves that are located under the roadside dinette
seat. Remove the cushions to access a removable panel in the lounge top.
The 22 ft. Front Bed valves are located under the bed on the roadside. Access
is provided by an access door cut in the seat bottom and bed top. Two other
low point drain valves are located under the wardrobe. Access is gained by
removing the felt covered lower wardrobe shelf.
The drain valves allow the hot and cold fresh water lines to drain for winterizing
and sanitizing purposes. Open all faucets, use the hitch jack to tilt the trailer up
and down and let gravity do the work.
To Empty Fresh Water Tank
Fresh water can be drained using two different procedures.
The freshwater tank drain valve on all units except for the 16 ft. is located
under the trailer on freshwater tank pan. This “box” or tank pan supports the
water tank. A white plastic petcock is located on the side of the pan for draining
the water tank. All faucets should be opened before attempting to drain the
tank by opening the petcock. The 16 ft. fresh water tank drain valve is located
under the roadside dinette beside the water tank.
Pumping the water out with the self-contained water pump can also empty the
fresh water tank. Simply turn on the pump switch until the water will no longer
come out of the faucets.
NOTICE: Do not let the pump run dry for extended periods of time as this could
damage the pump.
Water Heater Draining
All models have a drain plug or petcock on the water heater. Access is from the
exterior. The plug or valve is usually located in the lower left corner, viewed as
you face the exterior of the water heater.
Page 76
F - 8 F - 9
PLUMBINg
F
WINTERIZING AND STORAGE
When storing your trailer for short or long periods use the same precautions
as you would in your own home in regard to perishables, ventilation and rain
protection. In addition, for prolonged storage periods flush out all the drain
lines and the holding tanks. Also drain the entire water system including the
water heater and the water storage tank. Instructions for draining the water
system are explained in the following paragraphs on winterizing.
THE MAIN CONSIDERATION IN WINTERIZING IS TO GUARD AGAINST
FREEZING DAMAGE TO THE FRESH WATER SYSTEM LINES, TANK, AND
PUMP; THE WASTE DRAIN SYSTEM INCLUDING THE P-TRAPS AND TANKS,
THE WATER HEATER AND THE BATTERY.
To completely winterize your trailer follow this procedure.
1. Level the trailer from side to side and front to rear. Open all faucets.
2. Turn the water pump switch to the ON position to expel water from the fresh
water storage tank or open the tank drain valve. (See “To Empty Fresh Water
Tank” on previous page)
3. Open all fresh water line low point drain valves (See drain valves on previ-
ous page), the drain plug or valve on water heater, and the exterior shower
faucet. Remove and drain exterior shower hose.
4. While the water is draining from the system, open and flush the toilet-flushing
valve. Depress hand spray lever on toilet (if so equipped) while holding the
spray head down inside the bowl. Depress hand spray thumb button on the
telephone shower head while holding down inside the tub and drain all water
from the flexible hose. Unscrew the heads on both spray units and store.
5. Turn the pump switch OFF after all water has been removed from the storage
tank.
6. Remove outlet water line from the water pump.
7. Disconnect the water pump inlet connection and turn the pump on until all
the water is expelled. This water, about 1/2 cup, can be caught in a towel
or rag.
8. Lower the front of the trailer as far as the jack will allow until water ceases
to drain, then crank the jack up as high as it will go and let any remaining
water drain out.
9. After the water has stopped running from the drain lines, apply at least 60
lbs, of air pressure at the city water inlet. An air to city water adapter is
available from your dealer’s RV accessory store. Be sure the toilet valve and
all drain valves and faucets are open and pump outlet hose is disconnected.
This can be accomplished at a service station and will force any remaining
water from the water heater and remove any water which may be trapped
in low areas.
10. Pour a cup of *approved non-toxic RV antifreeze into the sinks and tub
drains to prevent P-trap freeze-up.
Page 77
F - 8 F - 9
PLUMBINg
F
*Approved and listed by a recognized testing authority such as UL (Underwriter
Lab).
nOTiCE: Remove all RV anti-freeze spillage from all drain and faucet parts
after winterizing. Failure to do so could result in damage to the plumbing
fixture’s finish.
11. Be sure to open the waste holding tank drain valves and drain and flush
the tanks thoroughly (THIS IS VERY IMPORTANT AS THE SEWAGE IN THE
TANKS, IF FROZEN, COULD SERIOUSLY DAMAGE THE TANKS.)
12 Remove the cartridge of the water purifier and leave the purifier valve in the
open position. (If so equipped.)
13. Remove the battery from your trailer and store in a cool dry place where
there is no danger of freezing. It is very important for optimum life of a battery
to check it periodically and to keep it fully charged.
14. Remove any items (food, cosmetics, etc.) from trailer interior that might be
damaged by freezing - or might damage the trailer if containers break.
For additional winterizing protection add a non-toxic antifreeze (approved for
drinking water system) to the water lines using the following procedure.
1. Reconnect all lines except the hose to the pump inlet port. Close all drain
valves.
2. Turn water heater by-pass valve to by-pass position. To by-pass the water
heater for winterizing, close valves A and C and open valve B (See illustra-
tion).
3. Attach a length of hose to the pump inlet port. This piece of hose should
be long enough for the free end to be inserted into and reach the bottom
of the antifreeze container.
4. Dilute the antifreeze solution in accordance with the manufacturer’s instruc-
tions
5. Open all water faucets.
6. Insert hose length into the antifreeze container, turn the pump switch on,
and run the water pump until the antifreeze solution fills all water lines. Flush
toilet. Work hand shower spray while holding down in tub.
7. Shut off the pump and close all faucets.
8. Disconnect the hose length from pump inlet fitting and reconnect water
system inlet line.
Page 78
F - 10 F - 11
PLUMBINg
F
Water Heater Bypass
For Normal Operation
Turn water heater by-pass valves to normal flow position. Open valves A and
C, close valve B .
For Winterizing
Turn valves to By-Pass position. Close valves A and C, open valve B.
By-Pass Valve Location:
16 Ft. is under the roadside wardrobe hinged bottom shelf.
22 Ft. Front Bed model is accessed through a door under the mattress on the
roadside bed or through its storage door.
DRAIN AND WASTE SYSTEM
Your trailer has a drain and waste system that includes waste-holding tanks
made from molded plastic, free from corrosion problems, with trouble-free
dump valves.
The MAIN (BLACK) HOLDING TANK enables you to use the toilet for several
days away from disposal facilities.
The wastewater from the sink, shower, bath and lavatory drains into the
AUXILIARY (GRAY) HOLDING TANK. Each tank has its own dump valve, how-
ever, both tanks drain through a common outlet. Therefore, you need to make
only one sewer hose connection when hooking up to a dump station.
NOTE: The 16’ model has a Black/Gray Combination tank. All waste water and
black water drains to this tank.
Almost all campgrounds will have dumping facilities. Park directories such as
Woodalls and Rand McNally also list dumping stations.
To empty one or both tanks attach the sewer hose by pressing the bayonet
HOT WATER LINE
COLD WATER LINE
BYPASSLINE
WATERHEATER TOP
A
BC Cold
Water Inlet
HotWater Outlet
Page 79
F - 10 F - 11
PLUMBINg
F
fitting onto the dump valve outlet and rotate clockwise until it feels solid and
secure. Attach the outlet end of the hose to the sewage outlet; making sure that
the hose is placed so it will drain completely.
Pull the main dump valve handle as far as it will go and wait until the tank is
drained. Close the dump valve and partially refill the tank with clean water and
repeat until clean. The main holding tank must be flushed out until all paper and
waste material is removed. Should solids accumulate, close the dump valve;
fill the tank about half full with water, then tow the trailer for a few miles. The
turbulence and surging of the water will usually dissolve the solids into suspen-
sion so the tank can be drained.
Now pull the auxiliary tank valve handle to drain the gray tank. When dumping,
the main holding tank should be dumped first; then the auxiliary holding tank.
This will help to rinse out the sewer line with auxiliary holding tank water.
Replace the bayonet ring cap prior to traveling.
nOTiCE: Never put wet strength paper towels or tissues in your holding
tank since they won’t dissolve and can “catch” in the mechanism of the
dump valve. Colored toilet tissue is slower to dissolve than white. Most
RV accessory stores offer tissue designed for RVs that will completely
dissolve.
Deodorizers
There are many deodorizers on the market in tablet, liquid and powder form.
These not only combat odor, but also stimulate the bacteria that works to dis-
solve the solids in your tank.
Monitor Panel
Check your monitor panel frequently. When the BLACK WATER HOLDING
TANK is completely full, sewage cannot be emptied from the toilet bowl. If the
GRAY WATER HOLDING TANK is overfilled, drain water will “backup” into the
tub and cause an unpleasant cleaning job. Never drain the tanks at any place
other than an approved dumping station.
When Parked and Connected to Sewer Outlet
When you are in a park and connected to a sewer outlet keep the main hold-
ing tank dump valve closed, and empty the tank every few days or whenever
it becomes almost full. ONLY BY SENDING A LARGE VOLUME OF LIQUID
THROUGH THE MAIN HOLDING TANK AT A TIME AND THEN FLUSHING
THE TANK WILL TOILET PAPER AND OTHER SOLIDS COMPLETELY WASH
AWAY.
Page 80
F - 12 F - 13
PLUMBINg
F
This practice will avoid the accumulation of solids in the main holding tank,
which could lead to an unpleasant cleaning job. Should solids accumulate,
close the dump valve; fill the tank about half full with water, then tow the trailer
for a few miles. The turbulence and surging of the water will usually dissolve
the solids into suspension so the tank can be drained. Keep the auxiliary tank
valve open when connected to a sewer outlet.
Draining the tanks as described will protect them from freezing during stor-
age. When traveling in sub-freezing temperatures add a winterizing solution
designed for RV use to both waste water tanks. Follow the directions on the
anti-freeze container on the amount needed to protect tank in it is full. Tank
capacities are found in the Specification section of this manual.
Drain Systems Cleaning
The only cleaning agents that can be used without causing harm to the system
are household ammonia and tri-sodium phosphate in small quantities. Do
not use any product that contains any portion of petroleum distillates. This
attacks the rubber seals of your toilet and dump valve. Also, do not use any
dish detergent or abrasive cleaners. All products should be marked approved
for ABS drainage systems.
Black Tank Flush
The main holding tank must be flushed out until all paper and waste material
is removed. The trailer has a water hose connector on the side of the trailer
marked “Black Tank Flush”. To use, hook up a water hose and turn on full force.
Within the tank a spray head with a multiple holed line will spray the interior
surface of the tank. The black tank dump valve should be closed for the first
couple of minutes, and then opened to let the water out in a rush. Repeat as
needed. Replace the dump valve cap prior to traveling.
A vacuum breaker and check valve is located above the exterior connection to
prevent backup of water into the water hose.
Page 81
F - 12 F - 13
PLUMBINg
F
TOILET
Manufacturer:
Thetford Corporation
7101 Jackson Road
Ann Arbor, MI 48103
313-769-6000
The RV toilet in your Airstream is a design that has been used for many years.
There are two pedals. The large pedal opens and closes the slide mechanism,
and the smaller pedal opens and closes a water valve.
In normal use, when you are hooked up to city water, both pedals are de-
pressed together. This dumps the sewage and fresh water and flushes down
the side of the bowl. Water will continue to run into the bowl for a short time
after the pedals are released.
When you wish to conserve water hold the hand-spray head over the bowl and
hold down the thumb-operated lever. Now when you depress the pedal all the
water is routed through the hand-spray.
NOTICE: When you dump the bowl of the toilet make sure all paper and
solids have cleared the slide mechanism before you allow it to close. Failure
to do so can cause the groove for the slide to become jammed and the slide
will no longer close completely.
If the problem should occur a small nail or bent clothes hanger can be used to
“pick” the material out of the groove.
Please see the toilet owner’s/user manual for warranty and user tips, and
maintenance.
Page 82
F - 14 F - 15
PLUMBINg
F
LAVATORY FAUCET
Elkay
Model 97155BR
Vendor
ITC Inc.
230 East Lakewood Blvd.
Holland, MI 49424
Tel. 616-396-1355
CARE AND MAINTENANCE
All that is needed to clean your faucet and sink is a soft damp cloth. Elkay does
not recommend the use of scour pads, cleansers or chemicals. The abrasive
nature of these substances could damage the faucet’s finish. A non-abrasive
car wax will help to protect the finish.
Page 83
F - 14 F - 15
PLUMBINg
F
GALLEY SINK/FAUCET
Manufacture
SMEV
WWW.SMEV.COM
To use: Open lid and rotate faucet to upright position. Open hot or cold faucet
as needed.
Clean Acrylic lid with warm soapy water, no abrasive. For the stainless steel
sink each sink comes with a packet of SMINOX stainless steel polish/cleaner
which is included with your owner’s case. This would be the preferred cleaner
for sink appliances per SMEV, however any stainless steel (non-abrasive)
cleaner would be fine.
Notice: Do not use any abrasive cleaners or cloths on surfaces.
Page 84
F - 16
PLUMBINg
F
G - 1
NOTES
Page 85
F - 16
ELECTRICAL
G - 1
G
OPERATION
The major portion of electrical power in your Airstream is 12-volt. The 12-volt
current powers the vents, furnace, water pump, and water heater ignition. The
exceptions would be the air conditioner and microwave oven.
All 12-volt current comes through the battery system in the front of your trailer.
The battery is accessible in the battery box on the A-frame of your trailer. Power
from the battery goes to a set of four Type 2 thermal breakers located under
the roadside front bed and riveted to the interior skin. The breakers are tied
together by a brass bus bar. One breaker (30 Amp.) protects the 12-volt tow
vehicle charge line coming from the 7-way cord. Another breaker (20 Amp.)
feeds the trailer brakes breakaway switch located near the hitch coupler. A
50-amp breaker feeds the Battery Disconnect relay. The current leaves the
relay and goes to the 12-volt distribution panel located in the converter and
then to the rest of the trailer. Open the decorative door on the front of the
converter to access the panel and its fuses. A 12-volt circuit diagram is shown
later in this section.
If you replace a blown fuse and it immediately blows again, do not replace the
fuse again until a qualified service technician can correct the problem.
If the replacement fuse holds for a week or more and the gap in the fusible metal
is barely melted apart it usually indicates an overload condition. Reducing the
number of lights or appliances used on that particular circuit at the same time
could prevent any further fuse failure.
BATTERY DISCONNECT SWITCH
The manual disconnect switch is used to separate the battery from the 12-volt
distribution panel and converter charging system. Disconnecting the battery
will help prevent battery discharge during storage periods from safety equip-
ment, radio memories, and appliance electronic boards.
The switch is located on the front of the roadside bed on the 22’ model and the
front of the roadside Dinette seat on the 16’ model.
When the switch is turned on and the trailer is plugged into a 110-volt shore-
line, the 12-volt distribution panel will receive power from the converter and the
battery will be charged through the converter charging system.
OFF
ON
OFF
ON
Page 86
ELECTRICAL
G - 2
G
G - 3
When the switch is turned off and the trailer is plugged into a 110-volt shoreline,
the 12-volt distribution panel will still receive power from the converter, but the
battery is disconnected from the system. The battery will not be drained with
the switch in the off position. The converter will not charge the battery with the
switch in this position.
The charge in the 12-volt battery is replenished when towing from the tow
vehicle alternator through the 7-way cord. This charge will go to the battery no
matter which position the Battery Disconnect Switch is in.
NOTICE: The refrigerator needs 12 volt power to operate when switched to
gas. When dry camping with 110 volt power inaccessible, turning the discon-
nect switch off will shut down the refrigerator’s electronic board and it will not
cool food.
BATTERY (Lead Acid)
nOTiCE: A normal battery can discharge by itself in 30 to 40 days when
not in use, therefore, IT IS NECESSARY TO PERIODICALLY CHECK THE
BATTERY AND CHARGE IT AS IS NECESSARY.
We suggest checking the battery at least every two weeks in freezing weather.
The temperature at which a battery will freeze depends on the condition of its
charge. As an example: a fully charged battery with a specific gravity of 1.265
will not freeze until the electrolyte temperature drops to - 71.3 degrees F, while
a discharged battery will freeze at +19 degrees F. The following table shows
the freezing points of battery at various specific gravity readings, temperature
corrected 80 degrees F.
1.265 -71.3 F
1.250 -62 F
1.200 -16 F
1.100 +5 F
1.150 +19 F
Do not add water to a battery in freezing temperatures unless the vehicle will be
put to use at once, otherwise the added water may freeze. Neglect is expensive.
Care costs little. Check your battery regularly.
MAINTAIN A CLEAN BATTERY TOP AND CHECK TERMINALS AND CABLES
FOR TIGHTNESS AND CLEANLINESS. A dirty battery will dissipate its charge
through surface contamination. Clean battery top with a damp cloth and dry
thoroughly.
The terminals should be tight and free of corrosion. To clean terminals, neutral-
Page 87
G - 2
ELECTRICAL
G - 3
G
ize with a solution of baking soda, rinse in clear water, and dry.
Note: Care must be used to make sure soda is not allowed to enter battery
cells.
To insure maximum battery capacity on the charge and the discharge, the bat-
tery terminals and the inside portion of the cable connector should be scraped
or brushed until both of these surfaces are shiny bright. The cable connectors
should then be reconnected to the battery and tightened. The complete as-
sembly, battery post and cable connector should be coated with heavy body
mineral grease, petroleum grease or petroleum jell.
NOTICE: RECONNECT THE BATTERY CABLES TO THE CORRECT
BATTERY POSTS. The black cable should be connected to the negative
(-) post and the red cable to the (+) post. The polarity of your tow vehicle
must also be negative (-) ground since it must always match the trailer.
Most tow vehicles are negative grounded, but always check your vehicle
owner’s manual to be sure.
ADD WATER TO CELLS AS NECESSARY. Check the electrolyte level at least
once a month. When you are traveling steadily and for an extended period of
time, or if you are in climates above 90 degrees F, check the electrolyte level
about every two weeks.
DangEr: When checking or filling the electrolyte level in the
batteries, do not allow battery electrolyte to contact skin, eyes, fabric, or
painted surfaces. The electrolyte is a sulfuric acid solution, which could
cause serious personal injury or damage to the trailer. Wear complete
splash proof goggles and clothing protection when working with batter-
ies. Avoid touching your eyes while working near batteries.
nOTiCE: Do not fill battery above the split ring in filler opening. DO NOT
MEASURE SPECIFIC GRAVITY IMMEDIATELY after adding water. The
water must mix with the electrolyte by charging or by driving a few miles.
DangEr: The gases generated within a storage battery cell
may be ignited by an open flame or spark in the vicinity of the battery.
Do not use a match or flame to provide light for checking the level of the
water.
During the winter the battery should be removed from the trailer and stored in
a cool, dry place, where there is no danger of freezing. It should be kept full of
water, cleaned and charged monthly. A battery that is allowed to completely
lose its charge will never regain its original power or a full charge.
Page 88
ELECTRICAL
G - 4
G
G - 5
For battery service or replacement, go to any service station or dealer who sells
and services the make battery installed in your trailer.
When being towed, the 12-volt battery in your trailer is receiving a constant
charge from the tow vehicle’s generator or alternator through the seven-way
connector.
Your tow vehicle’s voltage regulator controls the charge rate. It is important to
keep the seven-way connector clean. One method is to use “Spra-Kleen”.
Whenever possible use the automatic built in charge of the converter system
for charging. The charging circuit automatically controls the current, reducing it
as the battery increases in charge.
At service stations make certain they give your battery a slow charge because
quick charges will drastically shorten the life of the battery, as will allowing
repeated complete discharges.
POWER CENTER
Converter, 12-Volt Distribution, 110 Volt Distribution
Model WF-8955ANPB
Manufacturer:
World Friendship Company
Distributor:
CHENG USA Inc. Elkhart
28255 Charlotte Avenue, Building 2
Elkhart Indiana 46517
Phone: (574) 294-8997
Fax: (574) 294-8698
The converter/charging system is the interior low voltage electrical system that
enables you to use the interior lights, powered vents, pumps, and 12-volt ap-
pliances whether operating on self-contained battery power or 120-volt city
power. The 12-volt light bulbs give off the same light as regular household
bulbs, so that when operating on self-contained battery power, everything
works normally except the 110-volt convenience outlets and 110-volt appli-
ances. The converter system is designed to maintain constant output voltages
regardless of the variances that occur in city power systems.
Page 89
G - 4
ELECTRICAL
G - 5
G
12V POWER CIRCUITS
The current in the converter system is 12 volts direct current (12VDC) negative
grounded.
Power sources that supply 12VDC current to the system are as follows:
A. Main charge line from tow vehicle •
B. Trailer Battery •
C. Converter •
The power sources above are all electrically connected to the 12-volt distribu-
tion fuse panel that distributes current to interior branch circuits. The circuits
provide power to operate all 12-volt DC lights and systems.
The power converter is a solid-state electronic power supply and is mainte-
nance free. It is so self-sufficient and quiet that you will probably not know
it is working except for the fact that your battery is always charged, and your
12-volt systems always works. If any 12-volt system fails to operate, first
check your recreational vehicles 12-volt distribution fuse panel located behind
the decorative front door of the converter and inspect all fuses. If a fuse is
opened or blown replace it with the same size fuse (never install a larger use).
If the fuse opens again, have an electrician or certified RV technician locate
the circuit trouble. Replace blown fuses with same type fuses of the proper
amperage only.
If the power converter is not working, first confirm the RV supply or shoreline
cord is plugged into a live circuit. Then check all the 120-volt breakers in your
converter 110 volt distribution panel to make sure they are on. If the breaker is
tripped, follow the instructions to reset the breakers. If the breaker trips again,
consult an electrician or certified RV technician.
CONVERTER OPERATION
The electronic power converter is designed to supply the nominal 12-volt
filtered D.C. power for all 12 volt operated devices encountered in RV service.
Although the converter is an excellent battery charger, the converter does not
require a battery to be connected to it for proper operation.
nOTiCE: When installing a battery (s) always observe polarity. Connecting a
battery reverse polarity will blow the power converter main fuses located on the
12 volt D.C. distribution fuse block.
120 VOLT AC PANEL BOARD
The AC panel board section of the converter is located behind the converter’s
decorative door. This panel contains the 120 Vac branch circuit breakers for
Page 90
ELECTRICAL
G - 6
G
G - 7
your RV. One of the breakers controls the 120 volt power to the 12 volt con-
verter section located in the converter. This breaker may also control another
branch circuit. Check the label for what each branch circuit breaker controls.
The 120 volt circuits may be turned “on” my putting their breaker handle up to
the on position or “off” by flipping the handle down to the off position. To reset
the tripped breaker move handle to off then on.
Fuses and Breakers
Breakers
The WF-8955AN ULTRA Distribution Panel w/55 Amp Power Converter was
designed to use a 30 AMP main breaker with branch circuits (Cutler-Hammer
and SIEMENS are recommended breakers). Double breakers may be used for
the branch circuits. Should a breaker become faulty replace with the same type
breaker as provided by the GEM. Use only approved circuit breakers and 12V
fuses. IMPORTANT: When replacing circuit breakers replace with the same type
and rating as the original.
AC Breaker Manufacturer:
1. Main Circuit Breaker-Listed, rated 120Vac, maximum 30 A Culter-Hammer:
Type BR and C. T&B: Type TB. Siemens/ITE: Type: QP. Square D: Type: HOM
2. Branch Circuit Breaker-Listed, rated 120Vac, maximum 20 A Culter Hammer:
Type BR and C, or BRD BD and A. T &B: Type: TBBD or TB. ITE/Siemens: Type
QT or QP. Square D: Type HOM or HOMT
12 VDC Fuses
Each 12 VDC circuit in the WFCO Distribution panel was designed for a maxi-
mum of a 20 amp automotive style fuse. Should one need to be replaced, be
sure to replace it with the same type and amp rating as originally supplied by
the Airstream. Replacing it with either a higher or lower amp fuse could result
in the panel not functioning properly.
Each 12VDC circuit of the WFCO Distribution panel is provided with a LED
indicator light. Should the fuse “blow” or an open be caused the LED will light
up indicating which circuit is open and which fuse needs to be replaced.
REVERSE Polarity Fuses. The WF-8955AN is equipped with reverse polarity
fuses, Should these fuses “blow” either during the manufacturing process or
while connecting the battery replace with the same type and rating fuse as
originally provided with the equipment.
Page 91
G - 6
ELECTRICAL
G - 7
G
The WF-8955 AN Series is not weather resistant nor designed for installation in
wet locations. The WF-8955AN Series must be protected from direct contact
with water.
Automatic Microcontroller Operation
The WFCO series of 3-stage switch mode power converter are fully automatic.
The converter senses which mode it needs to be in by checking the condition
of the battery. The three modes include:
Absorption Mode: During this mode the converter output is at 13.6 VDC range.
This is the mode that the converter will function at normally. This mode provides
the 12 VDC and the current required by the trailer.
Bulk Mode: When the converter senses that the battery voltage is less than
13.2 VDC the converter will automatically go into the Bulk Mode.
Float Mode: If the RV is not being used for a period of time and the shore power
has been left plugged in, the converter will automatically go into float mode.
The converter senses if there has been any demand. If there is no activity for a
period the converter will automatically go into float mode. When the converter
senses a demand by turning on lights, the converter automatically goes into
bulk mode and returns to absorption mode.
Page 92
ELECTRICAL
G - 8
G
G - 9
Circuit Diagram
20
20
20
20
20
30 Amp Main Circ. 1
Cir. 2
Cir. 3Cir. 4
Cir. 5
Cir. 1
Cir. 2
Cir. 3
110-Volt12-Volt
Cir. 4
20
20
20
Cir. 6Cir. 7Cir. 8
Page 93
G - 8
ELECTRICAL
G - 9
G
12-Volt, 22’ Models
Circuit 1.
Not Used
Circuit 2., Yellow, 20
Amp
Step Light
Living Area Ceiling
Lights
Circuit 3. Pink, 20
Amp.
Oven Light
Galley Roof Locker
Light
Circuit 4. Brown, 20
Amp
TV Jack/Booster
Circuit 5. Blue, 20
Amp.
Ceiling Fan
Monitor Panel
Water Pump
Water Heater
Bath Light
Closet Light
Circuit 6. Red, 20
Amp.
Sewer Light
Furnace
Refrigerator/Light/Fan
Circuit 7. Black, 20
Amp.
CS Front Compartment
Light
Circuit 8. 20 Amp.
Radio
Dinette Light
12 DC Outlet
12-Volt, 16’ Model
Circuit 1, Purple, 15
AMP.
Compartment Light,
Bedroom locker & ceil-
ing lights, Dump valve
light, Closet light
Circuit 2, Yellow, 15
Amp.
Living Area Ceiling Lts.
Step Light, Dinette
Locker Lts, Bath Fan
Bath/Shwr Ceiling Lt.
Circuit 3. Pink, 20 Amp
Galley Locker Lt.,
Furnace, Refer Fan,
Refer Lt., Living Area
Ceiling Fan
Circuit 4, Brown, 15
Amp.
Bedroom & Dinette TV
Jack, Antenna Booster
110-Volt, 22’ Model
Circuit 1
Air Conditioner
Circuit 2
Dinette Receptacle
Dinette Night Stand
Receptacle
Circuit 3
Microwave Oven
Circuit 4 (GFIC)
Refrigerator Receptacle
Galley Receptacle
Main Area TV
Receptacle
Bath Receptacle
Outside Receptacle
110-Volt, 16’ Model
Circuit 1
Air Conditioner
Circuit 2
Convertor Receptacle
Bedroom Receptacle
Dinette Receptacle
Circuit 3
Microwave Oven
Circuit 4 (GFIC)
Galley Receptacle
Refrigerator Receptacle
Outside Receptacle
Page 94
ELECTRICAL
G - 10
G
G - 11
REVERSE POLARITY
If there is power to the converter but no power to the entire 12 Volt system,
then check the reverse polarity fuses on the front panel of the WF-8935 power
converter. First visually inspect the fuses for any breaks then if none are seen
use a continuity tester and check for continuity across the fuses.
If fuse(s) are blown this means the RV Battery was accidentally connected in
reverse either at the battery or at the converter. Connect properly then replace
the fuse(s).
IMPORTANT: These fuses protect the converter from damage in the event an
RV Battery is accidentally connected in reverse. A reverse battery connection
even for a second is the only thing that will blow these fuses.
ATV FUSE
Page 95
G - 10
ELECTRICAL
G - 11
G
TV ANTENNA
Manufacturer:
Winegard Company
3000 Kirkwood Street
Burlington, Iowa 52601
Phone: 800-843-4741
Raising Antenna to Operating Position
Turn elevating crank in “UP” direction until some
resistance to turning is noted. Antenna is now in
operating position. Check to make sure switch on
front TV jack is on.
Rotating Antenna
Make sure antenna is in “UP” position. Pull down
on directional handle with both hands until it disen-
gages ceiling plate and rotate for best picture and
sound on television set.
Lowering Antenna to Travel Position
Raising Antenna
Rotating Antenna
Lowering Antenna
Rotate antenna until pointer on directional handle aligns with pointer on ceiling
plate.
nOTiCE: Antenna must be in “down” position while traveling to prevent
damage.
Turn elevating crank in the “Down” direction until resistance is noted. Antenna
is now locked in travel position.
Checking Operation:
1. Tune TV receiver to nearest station and rotate antenna for best picture and
sound.
2. Turn off switch on booster power supply. Picture on TV receiver should be
considerably degraded with the power off.
DO’S
1. Do check parking location for obstructions before raising antenna.
2. Do carefully raise, lower and rotate - if difficult, check for cause.
3. Do rotate slowly when selecting station and check fine-tuning on TV set
to make sure it is properly adjusted.
4. Do lower antenna before moving vehicle.
Page 96
ELECTRICAL
G - 12
G
G - 13
DON’TS
1. Don’t force elevating crank up or down. Check for cause of trouble.
2. Don’t rotate directional handle hard against stops.
3. Don’t travel with lift in up position.
4. Don’t leave lift part way up or down.
5. Don’t apply sealing compound or paint over top of base plate or anywhere
on lift.
Lubrication
To lubricate the elevating gear apply a liberal amount of silicone spray lubricant
to the elevating gear with the lift in the down position, then run the lift up and
down a few times to distribute lubricant over gears.
Lubricating Rotating Gear Housing
In the event that rotating the antenna becomes difficult, lubricating the bear-
ing surface between the rotating gear housing and the base plate can restore
normal operation. Any spray type silicone lubricant may be used.
Elevate antenna and remove setscrew from rotating gear housing as shown.
Spray lubricant into hole and around edges of gear housing. Rotate gear hous-
ing until lubricant coats bearing surfaces and antenna rotates freely.
TV Booster/12 Volt Outlet
The TV booster amplifies the signal from the TV
antenna. Pushing the small button activates and
deactivates the booster. A green light comes on
when the booster is activated. For viewing while
hooked up to an exterior cable or satellite TV
source, turn the booster off.
NOTE: The TV Booster must be on to receive antenna signals and off for cable or satellite TV operation.
Please review the antenna and booster manuals include in your owner’s
packet before operating the system.
LUBRICATE HERE
SPRAY AROUND EDGES REMOVE SET SCREW
TV Outlet w/Booster & 12 Outlet
12 VOutlet
BoosterSwitch
TV CableHook Up
Light
Page 97
G - 12
ELECTRICAL
G - 13
G
Solar Panel Per-Wire
The Sport is pre-wired for a roof mounted solar panel. One green and one
yellow wire are ran in the ceiling from just forward of the high volume roof vent
to the DC buss bar located under the roadside front lounge. The wires are
coiled at the buss bar and in the roof at these locations.
Page 98
ELECTRICAL
G - 14
G
G - 15
110-VOLT ELECTRICAL SYSTEM
Shoreline Power Supply
The Power Cord hook-up is on the side of the trailer
and powers the 12 volt converter, 110 volt appliances,
and receptacles. The cord may be stored in the rear
exterior compartment. The power cord is plugged into
the trailer receptacle and the City Power Service.
Many campgrounds provide less than 30 amp service. It is possible to blow
their fuse or circuit breaker. If this happens, reduce the load and replace the
fuse or reset the breaker.
Avoid extension cords and adapters whenever possible. If an extension cord
must be used it should be as short and heavy as possible to provide the most
current to the air conditioner.
The Airstream converter system enables you to use the lights and appliances
whether operating on self-contained battery power or hooked up to 110-volt
city power. The 12-volt light bulbs give off the same light as regular household
bulbs, so that when operating on self-contained battery power, everything
works normally except the 110-volt convenience outlets and 110-volt appli-
ances.
Exterior outlets for 110 volts are located conveniently in your trailer.
NOTICE: When operating with city power make very certain that the service is
110 volt and not 220 volt.
The converter system is a transformer designed to maintain constant output
voltages regardless of the variances that occur in city power systems. The
design eliminates the need for complex electronic sensing systems to charge
the battery, minimizing the possibility of failures and greatly increasing its
overall reliability.
Warning: When the three-pronged plug can be used there
will be no problems with proper polarity or grounding.
In some older parks and other locations where three pronged outlets are not
available, certain precautions to insure proper grounding and polarity must be
taken. These precautions are listed below:
1. Attach the three-pronged plug to a two-pronged adapter. The third conduc-
tor line of this adapter has a short wire lead, which must be grounded.
Page 99
G - 14
ELECTRICAL
G - 15
G
2. For proper grounding connect the short ground lead to a grounded outlet
box or to a cold water pipe. When no water pipe is available drive a metal
rod two feet into the ground and attach the ground lug to it, thus providing
the unit with proper grounding.
To operate self-contained, simply disconnect the power supply cable.
When your trailer shoreline is hooked up to 110 volt AC, the converter system
automatically charges the trailer battery with the battery disconnect switch in
the “use” (on) position and, if the 7-way cord is hooked up, your tow vehicle
battery as well. The speed and degree of charge depends on how much power
is used for lights and appliances, as only the surplus goes to charging the
battery. If you are making an extended stay, then you should keep your trailer
hooked up to a 110 volt current if it is available.
While you are connected to the 110-volt receptacle the wiring is protected by
circuit breakers in the breaker panel. The circuit breaker panel for the 110-volt
system is located in the converter. Open the brown decorative converter door
under the bed. In the event of a failure of a 110-volt circuit, first check your
trailer circuit breakers and the breaker for the outlet your trailer shoreline
cord is plugged into. If a breaker continues to trip after you have reset it
several times, your circuit may be overloaded with appliances or there may be
a short in the circuit. Try lessening the load on the circuit. Perhaps an electric
griddle, hair dryer, or an electric heater can be turned off. If that does not solve
the problem consult an Airstream Service Center.
All wiring, components, and wiring methods conform to federal and state
requirements.
Page 100
ELECTRICAL
G - 16
G
G - 17
GROUND FAULT CIRCUIT INTERRUPTER (GFCI)
Many states require trailers which are sold in their state, and which have exterior
110 volt receptacles, to have a ground fault circuit interrupter.
Trailers manufactured for sale in these states have type THQL 15 amp GFCI
breakers installed on the general circuit, since the exterior breaker is on this
circuit. The breaker replaced the standard TQL-15 amp breaker.
When properly installed, the GFCI circuit breaker provides reliable overload and
short circuit protection PLUS protection from Ground Faults that might result
from contact with a “HOT”’ load wire and ground.
IMPORTANT NOTE: The GFCI circuit breaker will NOT reduce shock hazard if
contact is made between a “HOT” load wire and a neutral wire or 2 “HOT” load
wires.
Each GFCI circuit breaker is calibrated to trip with a ground current of 5 mil-
liamperes or more. Since most persons can feel as little as 2 milliamperes, a
distinct shock may be felt if the need for protection exists. However, the shock
should be of such short duration that the effects would be reduced to less than
the normally dangerous level. However, persons with acute heart problems or
other conditions that can make a person particularly susceptible to electric
shock may still be seriously injured.
While the GFCI circuit breaker affords a high degree of protection, there is no
substitute for the knowledge that electricity can be dangerous when carelessly
handled or used without reasonable caution.
Warning: The GFCI circuit breaker provides protection only
to the circuit to which it is connected. It does NOT provide protection to
any other circuit.
ON
TRIP
OFF
PUSH
TOTEST
Difference incurrent when groundfault exists
Positive Buss Bar
NeutralBuss Bar
Black-Hot LeadWhite-Neutral to load
Page 101
G - 16
ELECTRICAL
G - 17
G
OCCUPANT:
GFCI s are proven lifesavers, however, consumers need to take a few minutes
each month to do this simple test. By taking action, you can help protect your
family from the risk of electric shock. Perform the next two tests on the GFCI
Breaker and receptacle each month and record the date in the chart on the
following page.
GFCI Breaker
1. With handle B in “ON” position, press PUSH TO TEST
button A.
2. Handle B should move to TRIP position, indicating that
GFCI breaker has opened the circuit.
3. To restore power move handle B to “OFF” and the to
“ON
Important: If handle B does not move to TRIP position when test button is
pressed, the GFCI breaker protection is not complete. If this happens, replace
GFCI breaker.
GFCI Receptacle
To properly test GFCI receptacles in your home:
Push the “Reset” button located on the GFCI receptacle, first
to assure normal GFCI operation.
Plug a night light (with an “ON/OFF” switch) or other product
(such as a lamp) into the GFCI receptacle and turn the product
“ON.”
Push the “Test” button located on the GFCI receptacle. The night light or other
product should go “OFF.”
Push the “Reset” button, again. The light or other product should go “ON”
again.
If the light or other product remains “ON” when the “Test” button is pushed, the
GFCI is not working properly or has been incorrectly installed (miss wired). If
your GFCI is not working properly, call a qualified, certified electrician who can
assess the situation, rewire the GFCI if necessary or replace the device.
A
B Push To Test
Page 102
ELECTRICAL
G - 18
G
H - 1
JAN FEB MAR APR MAY JUN JUL AUG SEP OCT NOV DEC
2012
2013
2014
2015
2016
2017
Page 103
G - 18
APPLIANCES
H - 1
H
All appliances are delivered to Airstream Inc. with an Owner’s Manual and
warranty notice. These materials are included in the delivery case supplied
by your dealer. The manuals may contain warnings, cautions, and operating
instruction that should be read and followed before operating the appliances.
The information contained in the appliances manuals supersedes any
information contained in the Airstream Trailer Owner’s Manual on appliances.
If you believe contradictory information on appliances is contained in this
manual, please contact the Airstream Customer Service Department at 937-
596-6111 or write:
Airstream Factory Service Center
P.O. Box 629
419 W. Pike Street
Jackson Center, Ohio 45334-0629
937-596-6111
If any appliance manuals have not been provided with your trailer, contact your
dealer, the respective appliance manufacturer or Airstream Customer Service.
A manual will be provided to you.
Maintenance: Follow the instructions and warnings noted in the appliances
and equipment owner’s manuals as well as the ones listed below:
Annual maintenance should be conducted on propane gas appliances •
and equipment by an authorized dealer or repair facility.
Insects can build nests in the burners of various appliances and •
equipment. The burner and burner orifice of the propane gas appliances
and equipment should be cleaned out by an authorized dealer or repair
facility anytime circumstances or conditions warrant., but no less than on
an annual basis.
Warning: Most LP gas appliances used in recreational vehicles
are vented to the outside of the vehicle. When parked close to a gasoline
pump, it is possible that gasoline fumes could enter this type of appliance
and ignite the burner flame, CAUSING A FIRE OR AN EXPLOSION.
Page 104
APPLIANCES
H - 2
H
H - 3
AIR CONDITIONER
Manufacturer:
Carrier Tranport/Air Conditioning
50 Grumbacher Road
York, PA 17402
Phone: 800-673-2431
Note: Review the air conditioning literature supplied in your Owner’s Packet before proceeding,
The roof air conditioner used on Airstream trailers is one of the most popular on
the market today. In your Owner’s Packet is a set of literature covering all oper-
ating and maintenance instructions. If the literature is misplaced please contact
the air conditioner manufacturer or your Airstream dealer for replacement.
The voltage to the air conditioner is critical. We commonly refer to 110 or
120 volts, but a check with a voltmeter may find voltage much lower. Your air
conditioner will probably not function if the current drops below 105 volts. Low
voltage is usually associated with older or poorly maintained trailer parks, but
many people have found their homes, built only twenty or thirty years ago, may
not be capable of operating the air conditioner on some receptacles, Parking
your trailer so the power cord can be plugged into a receptacle close to the
fuse or circuit breaker box can alleviate the problem. Avoid extension cords and
adapters whenever possible. If an extension cord must be used it should be as
short and heavy as possible to provide the most current to the air conditioner.
If high temperatures are expected, make an effort to park in a shaded area.
Starting the air conditioner early in the morning also helps. It is much easier
to hold a comfortable temperature than it is to lower the temperature after the
interior of the trailer is already hot.
Page 105
H - 2
APPLIANCES
H - 3
H
FURNACE
Manufacturer:
Atwood Mobile Products
1874 South Pioneer Road
Salt Lake City, UT 841041
Phone: 801-972-4621
The manufacturer of the furnace in your trailer has been well known in the
RV industry for many years. The furnace burns LP gas, and is powered by
12 volt current from the battery or power converter when plugged into city
power. Operating instructions are located in your Owners Packet. If they should
become misplaced new literature can be ordered direct from the manufacturer
or your Airstream dealer. The manufacturer also offers a detailed service guide
for your furnace.
Warning: Carefully read all the manufacturer’s instructions
prior to operating. NEVER store flammable material next to the furnace.
NOTICE: If warranty service is required use only a service location recom-mended by the furnace manufacturer or your Airstream dealer.
COOK TOP
Manufacturer:
SMEV
People using gas cook tops in their home will find little difference in the opera-
tion of the cook top in the trailer. Other customers, used to electric ranges
may be a little apprehensive at first; but will quickly gain confidence. The basic
operation of the gas cook top have been the same for many years, but please
be sure to read all the directions furnished by the manufacturer and located in
the Owner’ s Packet. Excellent service and parts manuals are available from
the manufacturer.
Clean Acrylic lid water, no abrasives. For the stainless steel sink each sink
comes with a packet of SMINOX stainless steel polish/cleaner which is included
with your owner’s case. This would be the preferred cleaner for sink appliances
per SMEV, however any stainless steel (non-abrasive) cleaner would be fine.
Warning: The operation manual for the cook top is included
in your owner’s packet. If this has not been provided with your trailer,
contact you dealer or Airstream Customer Service before operating appli-
ance. The manual contains specialized warnings and cautions that should
be reviewed prior to operating the appliance.
Page 106
APPLIANCES
H - 4
H
H - 5
MICROWAVE OVENS
Tappen Microwave
Distributor:
Intercon Marketing
1540 Nothgate Blvd.
Sarasota, FL 34234
941-355-4488
Email: [email protected]
NOTICE: Only federally certified technicians are permitted to service microwave
ovens. For this reason the only service instructions contained in this manual are
for removal of the complete oven. If you have a microwave problem please
contact the appropriate manufacturer.
REFRIGERATOR
Manufacturer:
Dometic Sales Corporation 2320
Industrial Parkway P.O. Box 490
Elkhart, Indiana 46514
Phone: 1-800-544-4881
Review all refrigerator literature supplied in your Owner’s Packet or stored in
the refrigerator prior to operating.
In absorption refrigerant system ammonia is liquefied in the finned condenser
coil at the top rear of the refrigerator. The liquid ammonia then flows into the
evaporator (inside the freezer section) and is exposed to a circulating flow of
hydrogen gas, which causes the ammonia to evaporate, creating a cold condi-
tion in the freezer.
The tubing in the evaporator section is specifically sloped to provide a con-
tinuous movement of liquid ammonia, flowing downward by gravity, through
this section. If the refrigerator is operated out-of-level when the vehicle is not
moving, liquid ammonia will accumulate in portions of the evaporator tubing.
This will slow the circulation of hydrogen and ammonia gas, or in severe cases,
completely block it, resulting in a loss of cooling.
Page 107
H - 4
APPLIANCES
H - 5
H
Any time the vehicle is parked for several hours with the refrigerator operating
the vehicle should be leveled to prevent this loss of cooling. The vehicle needs
to be leveled only so it is comfortable to live in (no noticeable sloping of floor
or walls).
When the vehicle is moving the leveling is not critical, as the rolling and pitching
movement of the vehicle will pass to either side of level, keeping the liquid
ammonia from accumulating in the evaporator tubing.
OPERATION
The refrigerator requires 12-volt current to operate whether running on LP or
110 volt modes. The 12-volt is used to power the circuit board that directs
the refrigerator functions. When running in a mode such as LP, it means the
heat source, by far the largest power requirement; to evaporate the ammonia
is being provided by an LP Gas burner.
Sport Models are equipped with a fan inside the exterior refrigerator compart-
ment. This fan pulls ambient temperature air across the condensation coils on
the backside of the refrigerator to aid in the cooling. The fan is thermostatically
controlled.
WATER HEATER
Manufacturer
Atwood Mobile Products
6320 Kelly Willis Road
Greenbriar, TN 37073
801.972.4621
Notice: Review the water heater literature supplied in your Owner’s Packet before proceeding,
Warning: Hydrogen gas can be produced in a hot water
system served by this heater that has not been used for a long period of
time (generally two weeks or more). Hydrogen gas is extremely flammable.
To reduce the risk of injury under these conditions, it is recommended that
the hot water faucet he opened for several minutes at the kitchen sink
before using any electrical appliance connected to the hot water system.
If hydrogen is present there will probably be an unusual sound such as air
escaping through the pipe as the water begins to flow. There should be no
smoking or open flame near the faucet at the time it is open.
Page 108
APPLIANCES
H - 6
H
H - 7
Electronic Ignitio.
The switch used to light your electronic ignition water heater is located in the
bathroom above the lavatory top. When the switch is turned on, the red light
will come on indicating the “try” mode is in effect. Normally the burner will
ignite in just a few seconds, and the light will go out. If your LP system hasn’t
been used for some time, the system may go into safety lockout (about 20
seconds) before the air is all expelled from the lines. Turning the switch off for
30 seconds, then back on, reinstates the “try” mode.
SAFETY
If your water system is full and cold and the water heater is ignited the system
can see pressures as high as 120 psi before the relief valve starts to open.
Since the water system normally operates in the 40-psi range the water ex-
panding does put unusual stress on the system. This normally does not cause
any problems, but the stress is easily alleviated. As the water is heating just
open any faucet and run as little as a cup of water. Just removing this small
amount of water reduces the pressure build up significantly.
For fun, watch the sequence of events your family goes through when you park
the trailer and ignite the water heater. More than likely someone will run water
and relieve the pressure without even realizing it.
HIGH VOLUME ROOF VENT
Manufacturer:
Surflo Corporation
The High-volume roof vent system is designed to quickly exhaust stale, hot
air and draw in fresh air. It’s great to use when the outside temperature really
doesn’t call for air conditioning, but heat has built up in your coach.
OPERATING INSTRUCTIONS:
1) Open dome cranking knob. •
2) Turn fan knob to desired performance level. •
3) Open a window or door for airflow. •
4) Source of airflow is determined by the window(s) or door(s) opened. •
For best results, close all roof vents and open 1 (one) window the great-
est distance from your ceiling fan,
CLEANING INSTRUCTIONS:
1) Turn fan motor Off. •
2) Remove screws around perimeter of screen insert only. •
3) Remove screen clean screen with soap & water solution and rein-•
stall.
Page 109
H - 6
APPLIANCES
H - 7
H
MONITOR PANEL
Micropulse Systems Monitor
CATCON PRODUCTS INC.
817-921-2188
[email protected]
[email protected]
The MicroPulse System makes use of a single solid-state sensor per tank. The
MicroPulse sensor measures the static (head) pressure at the bottom of the tank
and transmits this information to the MicroPulse System Monitor. Knowing this
pressure value, after a one-time calibration has been performed, the MicroPulse
System will calculate and accurately display the tank level in 1/8 increment.
A single sensor is installed on the sidewall of each tank, near the bottom, via a
3/4” female NPT spin-in thread. The sensor is solid state, there are no moving
parts to wear or maintain. Because the principle of operation does not involve
any electrical current flow through the tanks contents (conducted or induced),
the nature of the fluid in the tank is unimportant.
The monitor system has been calibrated at the factory and should never need
another calibration. If you feel the system is not operating correctly, please
contact CATCON Products or a local Airstream dealer. The following instruc-
tions are provided for qualified service technicians.
MONITOR WIRE CONNECTIONS
Red 12VDC, Battery Only
Black Ground, Battery Only
Purple Water pump, 15A, 12VDC
White LPG Sensor, 90 ohm
Fresh Fresh Tank Sensor
Gray 1 Gray 1 Sensor
Gray 2 Gray 2 Sensor
Black Black Sensor
Page 110
APPLIANCES
H - 8
H
I - 1
MICROPULSE SYSTEMS MONITOR OPERATION INSTRUCTIONS
This example shows the monitor reporting the following:
Fresh Water = 7/8 to Full
Gray Water 1 = Empty to 5/8
Gray Water 2 = 3/4
Black Water = Empty to 5/8
Battery = 3/8 to Full.
On the diagram the Letters R=Red, Y=Yellow, G=Green, Blank=no LED lit.
NORMAL OPERATION
The MicroPulse Monitor will display the condition of each system at all times.
The tri-color LED beside the system will indicate the condition of the system
using the following color code.
Fresh Water & Battery are as follows:
Green LED = 3/8 to Full
Yellow LED = 1/4
Red LED = 1/8 to Empty
Gray Water & Black Water are as follows:
Green LED = Empty to 5/8
Yellow LED = 3/4
Red LED = 7/8 to Full
TO OBTAIN EXACT READING
To obtain an exact reading of all systems press and release the status button
one time. The monitor will flash the LED beside the system it is about to report.
It will than display the exact condition of that system by lighting the bar graph
from Empty to Full. The monitor will display the exact condition of each system
and then return to normal operation mode.
To obtain an exact reading of an individual system press and release the status
button until the LED beside the system that you want the condition of is lit.
Release the status button and the monitor will display the exact condition of
that system by lighting the bar graph from Empty.
NOTE: The steel LP tanks on the Sport Models does not have a level sensor.
The monitor system does not read LP Gas levels.
Monitor Display
Fresh WaterGray Water 1Gray Water 2Black WaterBattery
RG
GGY
Page 111
H - 8
SPECIFICATIONS
I - 1
I
Note: All weights listed in the Specification Chart are checked and updated
throughout the model year. Your production trailer may vary from weights
listed.
For precise cargo capacity read the Cargo Carrying Capacity tag on the inside
of the screen door. The “WEIGHT OF CARGO SHOULD NEVER EXCEED”
numbers shown on the Cargo Carrying Capacity tag on the inside of the screen
door in your vehicle is the maximum weight of cargo you can load and carry in
your specific trailer as built with its options.
Two tags are located on the front roadside of your trailer. The Tire & Loading
information tag lists the Size and Cold Inflation Pressure of the tires on your
vehicle, the weight of your trailer as manufactured, and the Gross Vehicular
Weight Rating. The Vehicle Manufacturing Tag lists the Size of tires and wheel
rims, Maximum Cold Inflation pressures, the Vehicle identification Number
(VIN), and Gross Axle ratings (GAWR).
The UBW and NCC weights listed in the Specification Table are for the base
unit with no options and fluids.
Gross Vehicular Weight Rating (GVWR): is the maximum permissible weight
of this trailer when fully loaded. It includes all weight at the trailer axle (s) and
tongue or pin.
Unit Base Weight (UBW): is the dry weight of the base unit without options.
Net Carrying Capacity (NCC): is equal to GVWR minus UBW
Gross Axle Weight Rating (GAWR): is the value specified as the load carrying
capacity of a single axle system, as measured at the tire-ground interfaces.
Tire Size with Maximum Inflation Pressure, Cold
ST 215-75 R14 - 50 psi
ST 225-75 R15 - 65 psi
PSI = Pounds Per Square inch.
Page 112
SPECIFICATIONS
I - 2
I
Note: All weights listed in the Specification Chart are checked and updated
throughout the model year. Your production trailer may vary from weights
listed.
Wheel Torque Ratings:
Aluminum Wheels 110 ft. lbs.
Steel Wheels 100 ft. lbs
*Measuring Hitch Ball Height
The proper height will vary according to the weight you carry and the tires you
use. However, checking the height on your trailer is relatively easy:
1. With trailer on fairly level ground measure from ground to bottom of frame,
front and rear.
2. Adjust front jack until measurements are equal.
3. Now measure from ground to the inside top of ball coupler. This figure is the
hitch height. The hitch ball is then usually set ½” to 1” higher, according to
the spring rate of your tow vehicle, to allow for it to settle when the trailer is
hitched up.
SPECIFICATIONS 16’ 22’ FB
Length-Exterior 16’ 4” 21’ 8”
Width-Exterior 8’ 7’ 3.25”
Width-Interior 7’ 7” 6’ 11.75”
Height-Ext. w/o AC 8’ 8” 8’ 3.5”
Height-Ext. w/ A/C 9’ 4” 8’ 11”
Height-Int. w/o AC 6’ 7” 6’ 5.625”
Height-Int. w/ A/C 6’ 4.5” 6’ 3”
*Hitch Ball Height 18” 17.25”
Hitch Wt. (Dry, no options)
442 367
GVWR (lbs.) 3500 4500
UBW (lbs.) 2850 3634
NCC (lbs.) 640 866
Fresh Water (Gal) 23 20
Gray Water (Gal) 21 Combo
24
Black Water (Gal.) 18
Page 113
I - 2
INDEx
J
Accessories ....................................................... C-2
Air Conditioner .................................................. H-2
Antenna TV ...................................................... G-11
Appliances ......................................................... H-1
Axles .................................................................. D-4
Awning ............................................................... D-3
Backing ............................................................B-10
Battery ............................................................... G-2
Battery Disconnect Switch ................................ G-1
Bath Exhaust ......................................................E-3
Bathroom Switches ............................................E-3
Bearing .............................................................. D-5
Beds ...................................................................E-2
Black Tank ........................................................F-10
Black Tank Flush ..............................................F-12
Bottles, LP ..........................................................F-3
Brake Controller .........................................B-2, D-7
Brakes ........................................................B-2, D-7
Break-Away Switch ....................................B-2, D-7
Bulbs ..................................................................A-9
Camping ............................................................ C-1
Carbon Monoxide Alarm ....................................E-7
Capacities ............................................................ I-2
Cargo ........................................................B-3, D-10
Caution ................................................. Introduction
Chassis .............................................................. D-4
Check List ......................................................... C-1
Circuit Diagram .................................................. G-8
City Water Hook-Up ...................................C-6, F-6
Cleaning ............................................................ D-1
Circuit Breakers ...............................G-1, G-5, G-15
Condensation .................................................... C-8
Converter ................................................. G-4, G-14
Connector
7-Way ........................................... B-1, G-1, G-4
110 volt ....................................................... G-14
Cooktop ............................................................. H-3
Counter top ........................................................E-1
Coupler .............................................................. D-4
Control Panel ..............................................E-2, H-7
Dimensions .......................................................... I-2
Doors:
Main .............................................................. D-2
Screen .......................................................... D-2
Drain Valves ........................................................F-7
Drain System ....................................................F-10
Dump Valves .....................................................F-10
Electrical ............................................................ G-1
12 Volt Fuse .....................................G-5, G-6, G-9
110-volt ......................................................... G-14
Circuit Breakers .............................G-1, G-8, G-16
Diagrams
Cable TV .............................................. G-12, G-13
Satellite Pre-Wire ........................................... G-13
Solar Panel Pre-Wire ..................................... G-14
Fuse/Brakers ................................................. G-6
Page 114
INDEx
J
Emergency Escape Window ...................... C-3, D-3
Exhaust Fans ..............................................E-2, H-6
Extended Stay ................................................... C-5
Exterior Maintenance ........................................ D-1
Factory Service...................................................A-5
Fans ............................................................E-2, H-6
Faucets .............................................................F-14
Fire Extinguisher .................................................E-6
Flat Tire .............................................................. D-9
Furnace ............................................................. H-3
Fuses ......................................................... G-5, G-9
Gas, LP ....................................................... E-5, F-1
Grey Tank (Aux) ..........................................F-10, I-2
Ground Fault Interrupter .................................. G-16
Grounding ........................................................ G-15
GVWR ....................................................B-4, I-1, I-2
GAWR ....................................................B-4, I-1, I-1
High Volume Fan ........................................E-2, H-6
Hitch .................................................... B-1, B-6, I-2
Hitching Up ........................................................B-6
Hitch operation .................................................. D-4
Holding Tanks ............................................F-10, 1-2
Hitch Ball Height .......................................... D-4, I-2
Humidity ............................................................ C-9
Interior ................................................................E-1
Jacks ................................................................. C-5
Leveling ............................................................. C-5
Lights ..................................................................E-3
Loading .......................................................B-3, D-9
Lounge ...............................................................E-2
LP Gas Exterior Port ........................................ D-16
LP Gas ................................................................F-1
LP Gas Detector .................................................E-5
LP Fill Valve ........................................................F-1
Maintenance Parts .............................................A-9
Maintenance Record ........................................A-10
Maintenance Schedule .......................................A-7
Microwave ......................................................... H-4
Mold Prevention ....................INTRODUCTION, C-9
Monitor Panel ................................... E-2, F-11, H-7
Overnight Stop .................................................. C-4
Parking .............................................................. C-4
Passing ...............................................................B-9
Plumbing ............................................................F-1
Power Cord ............................................. C-6, G-14
Refrigerator ........................................................ H-4
Regulator, LP ......................................................F-2
Roof Vents .................................................E-3, H-6
Rotation, Tire ................................................... D-15
Safety ........ SEE ALL WARNINGS AND CAUTIONS
Sanitizing ............................................................F-5
Satellite Hookup .............................................. G-13
Screens ............................................................. D-2
Service ................................................................A-5
Seven Way Connector ............................... B-1, G-1
Sewer Hose ......................................................F-11
Shower .......................................................D-2, E-2
Sink .....................................................................E-2
Smoke Alarm ......................................................E-4
Page 115
INDEx
J
Solar Panel ...................................................... G-13
Spare Tire Carrier ............................................ D-15
Specifications ...................................................... I-1
Stabilizing .......................................................... C-5
Step ................................................................... D-2
Storage ...............................................................E-4
Table ...................................................................E-2
Tires ............................................................. D-8, I-1
Tire Changing .................................................... D-9
Tongue Latch ..................................................... D-4
Tongue Weight ....................................................B-5
Toilet .................................................................F-13
Towing ................................................................B-1
Tow Vehicle .........................................................B-1
TV Hookup ............................................... C-7, G-12
TV Antenna ...................................................... G-11
Upholstery ..........................................................E-1
Valves, Drain .......................................................F-7
Vents ...........................................................E-2, H-6
Warning ................................................ Introduction
Warranty .............................................................A-1
Washing ............................................................. D-1
Waste System ..................................................F-10
Water System .....................................................F-5
Heater ............................................. E-3, F-16, H-5
Filter ..................................................................F-6
Tank .................................................... F-5, F-7, I-2
Pump ........................................................ E-3, F-6
Drainage .........................................................F-10
Strainer .............................................................F-6
Waxing ............................................................... D-1
Weight ............................................... B-3, D-10, I-2
Weight Distribution .............................................B-3
Wheel
Torque ............................................................ D-14
Alignment ........................................................ D-5
Bearing ............................................................ D-5
Windows ............................................................ D-3
Winter Traveling ................................................. C-7
Winterizing ..........................................................F-8
Wrap Protectors ................................................ D-3
Airstream Sport Travel Trailer Owners Manual
©AIRSTREAM INC. 2012