CHAPTER 1-1 Cisco Cloud Network Automation Provisioner Tenant Portal Guide, Release 2.1, Part: CCAMCP-CNAP-Tenant2-2.1 1 Introduction The Cisco Cloud Architecture for Microsoft Cloud Platform (CCA for MCP) solution delivers IaaS, PaaS, and SaaS with integrated management software. The data center infrastructure is built with Cisco Application Centric Infrastructure (ACI) for the Data Center Fabric and Cisco UCS-based compute, Cisco Adaptive Security Appliance (ASA) firewall for security, and Cisco Aggregation Services Routers (Cisco ASR 9000 and Cisco ASR1000) data center edge routers. Additionally, Cisco virtualized network functions such as Cisco Cloud Services Router 1000V (CSR 1000V) are used to implement tenant services. Microsoft Hyper-V Hypervisor is used as the virtualizing layer for compute to run tenant workloads. The Management Stack is based on Microsoft Windows Azure Pack (WAP), which allows service providers to create plans and tenant administrators to subscribe to those plans. CCA for MCP enables service providers to offer network management services on top of a Cisco network infrastructure through Microsoft WAP. A Microsoft WAP administrator can use the Cisco Cloud Network Automation Provisioner (CNAP) for MCP Admin Portal to configure, manage, and administer Cisco Data Center Network resources. Cisco CNAP provides the capability to create tenant containers with sophisticated network services such as tenant edge routing, multiple security zones, firewalling, NAT, MPLS VPN access, and Server Load Balancing. The administrator uses the portal to define and set up the available plans that will be visible in the Tenant Portal and that can be consumed by tenants. Tenants consume resources by using the Tenant Portal to subscribe to an available plan. This allows service providers to offer differentiated plans that provide more value to tenants and generate more revenue for service providers, with the convenience of automation to deploy sophisticated containers for tenants. For more information, see: http://www.cisco.com/go/cloud. Tasks You Can Perform in the Tenant Portal You can use the Tenant Portal to: • Subscribe to plans • Create containers for subscriptions In a multi-CSR container plan, multiple “subcontainers” are logically stitched together by Cisco CNAP to form one “super container”. A multi-CSR container plan lets you scale out your network performance through the provisioning of additional Cisco CSR 1000V routers, allocate Cisco CSR 1000Vs and the associated workload subnets to specific applications, and allocate Cisco CSR 1000Vs according to departments or work groups within your organization. • View and modify information about containers, including:
The Cisco Cloud Architecture for Microsoft Cloud Platform (CCA for MCP) solution delivers IaaS, PaaS, and SaaS with integrated management software. The data center infrastructure is built with Cisco Application Centric Infrastructure (ACI) for the Data Center Fabric and Cisco UCS-based compute, Cisco Adaptive Security Appliance (ASA) firewall for security, and Cisco Aggregation Services Routers (Cisco ASR 9000 and Cisco ASR1000) data center edge routers. Additionally, Cisco virtualized network functions such as Cisco Cloud Services Router 1000V (CSR 1000V) are used to implement tenant services.
Microsoft Hyper-V Hypervisor is used as the virtualizing layer for compute to run tenant workloads. The Management Stack is based on Microsoft Windows Azure Pack (WAP), which allows service providers to create plans and tenant administrators to subscribe to those plans.
CCA for MCP enables service providers to offer network management services on top of a Cisco network infrastructure through Microsoft WAP. A Microsoft WAP administrator can use the Cisco Cloud Network Automation Provisioner (CNAP) for MCP Admin Portal to configure, manage, and administer Cisco Data Center Network resources. Cisco CNAP provides the capability to create tenant containers with sophisticated network services such as tenant edge routing, multiple security zones, firewalling, NAT, MPLS VPN access, and Server Load Balancing. The administrator uses the portal to define and set up the available plans that will be visible in the Tenant Portal and that can be consumed by tenants. Tenants consume resources by using the Tenant Portal to subscribe to an available plan. This allows service providers to offer differentiated plans that provide more value to tenants and generate more revenue for service providers, with the convenience of automation to deploy sophisticated containers for tenants.
For more information, see: http://www.cisco.com/go/cloud.
Tasks You Can Perform in the Tenant PortalYou can use the Tenant Portal to:
• Subscribe to plans
• Create containers for subscriptions
In a multi-CSR container plan, multiple “subcontainers” are logically stitched together by Cisco CNAP to form one “super container”. A multi-CSR container plan lets you scale out your network performance through the provisioning of additional Cisco CSR 1000V routers, allocate Cisco CSR 1000Vs and the associated workload subnets to specific applications, and allocate Cisco CSR 1000Vs according to departments or work groups within your organization.
• View and modify information about containers, including:
Chapter 1 Introduction Accessing the Tenant Portal
– View summary information about a container.
– Delete a container.
– View gateway information about a container, including remove a WAN gateway.
– View and modify firewall information about a container, including add and modify a policy map for a service policy, modify and remove a class map instance, and modify and remove an access group (you can also add a rule to an Access Control List [ACL]).
– View and modify tier information about a container, including add a tier, change a tier (and update a segment), remove a tier, and remove a segment.
– Map public IP addresses to private DMZ IP addresses
Understanding the Interrelationship of Tasks Performed in the Tenant Portal and by the Cloud Provider
Certain tasks performed in the Tenant Portal and by the cloud provider are interdependent in that tasks must be completed by one user before other tasks can be accomplished by the other user. For example:
• Base container plans must be created by the cloud provider before you can use the Tenant Portal to subscribe to them and create containers.
• In the Tenant Portal, after you subscribe to a plan and create a container, then the cloud provider can confirm that the newly-created tenant container is Active and configure the following for it:
– WAN Gateway—When you are creating a container for a plan to which you have subscribed, you see a screen indicating whether the plan includes entitlement for a WAN Gateway (e.g., MPLS VPN). If it does, you see a message to contact your cloud provider. Once your container is active, the cloud provider can then configure the WAN Gateway.
– Firewall—When you are creating a container for a plan to which you have subscribed, you specify the number of Workload Tiers for the container. Cisco CNAP will automatically set up a perimeter around each of the zones in the container, however the Tenant Firewall tab will not display any information until the WAN Gateway has been provisioned by the cloud provider. The firewall is automatically created with a base configuration during container creation. When the WAN gateway is created, another firewall zone is created for the WAN edge. You can configure a firewall in the Tenant Portal, however it can only be configured after you have created a container and the cloud provider has created a WAN Gateway.
Accessing the Tenant PortalYou access the Tenant Portal from the WAP Tenant Site.
To access the Tenant Portal:
Step 1 Access WAP.
For information on accessing WAP, see the WAP documentation.
Step 2 You see the WAP Tenant Portal login scree, shown in the following screen.
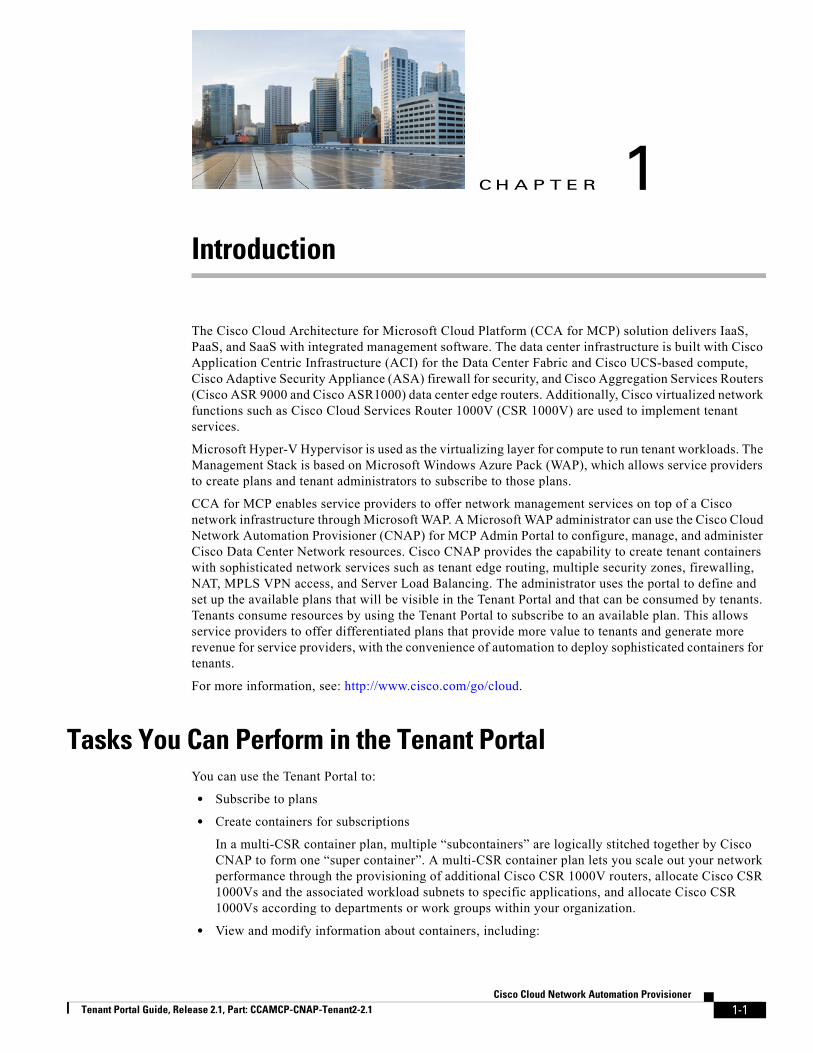
Step 1 On the main Tenant Portal screen, at the bottom, click + New in the lower left corner, click My Account, then click Add Subscription, as shown in the following screen.
Note You use Cisco CNAP to create network containers. After you create a container, use the VM cloud resource provider (RP) to allocate VMs to the tiers in a container. Standalone mode will always work and should generally be used unless your SP gives you other instructions. VM roles mode will only work if your SP is using addresses from a static IP address pool. Contact your SP to determine which mode you should use.
To create a container:
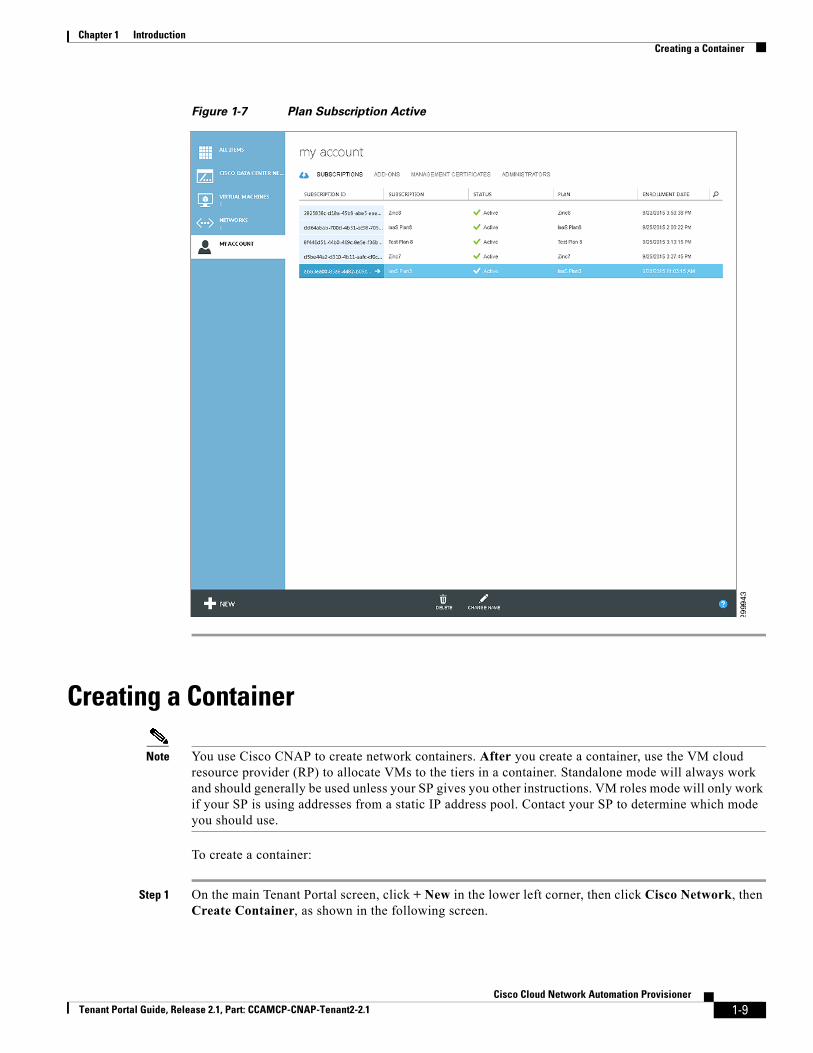
Step 1 On the main Tenant Portal screen, click + New in the lower left corner, then click Cisco Network, then Create Container, as shown in the following screen.
Step 2 Some values are prepopulated based on what your cloud provider has defined. Complete the fields to create a network container:
• Subscription:
– Subscription:—Select the subscription for which you want to create a container.
– Admin:—Preselected and cannot be changed.
– Regions:—Select the Region with which the container will be associated.
• Container Details:
– Name:—Enter a name for the container or use the prepopulated name.
– Type:—Zinc Container is supported in the current release.
– Bring Your Own IP Space (BYoIP)—BYoIP allows you to assign your own preferred address space (subnet) to each of the Workload Tiers within your conjoined container. To prevent conflicts, you must assign a unique, non-overlapping subnet to each of the Workload Tiers during container creation. This allows your Enterprise users access to the Workload Virtual Machines and Load Balancers (if applicable) as part of your Enterprise Network.
Note When Multi-CSR is checked, BYoIP is required but the Bring Your Own IP Space checkbox is not selected. When Multi-CSR is not selected, BYoIP is not supported.
– Multi CSR—If this is checked, then you can scale out your network performance through the provisioning of additional Cisco CSR 1000V routers, allocate Cisco CSR 1000Vs and the associated workload subnets to specific applications, and allocate Cisco CSR 1000Vs according to departments or work groups within your organization.
– Container Group—Container groups are optional descriptors you can add at container creation. In the event that master containers are being used (multiCSR), using the same container group for multiple containers keeps them in the same master container. If multiple master containers are not required, the field can be ignored.
• WAN Access (VPN):
– MPLS, Site-to-Site, and Internet are supported in the current release. Remote Access is not supported.
• Tiers:
– Workload:—Number of tiers.
– Workload SLB—Preselected based on plan.
– DMZ:—DMZ tier for external (Internet) access.
– DMZ SLB—DMZ server load balancer.
When you are finished, at the bottom of the screen, click the right arrow ().
You see the following screen if the plan is entitled to an MPLS VPN and Internet Access. If the plan is only entitled to an MPLS VPN, you do not see the message about Internet Access.
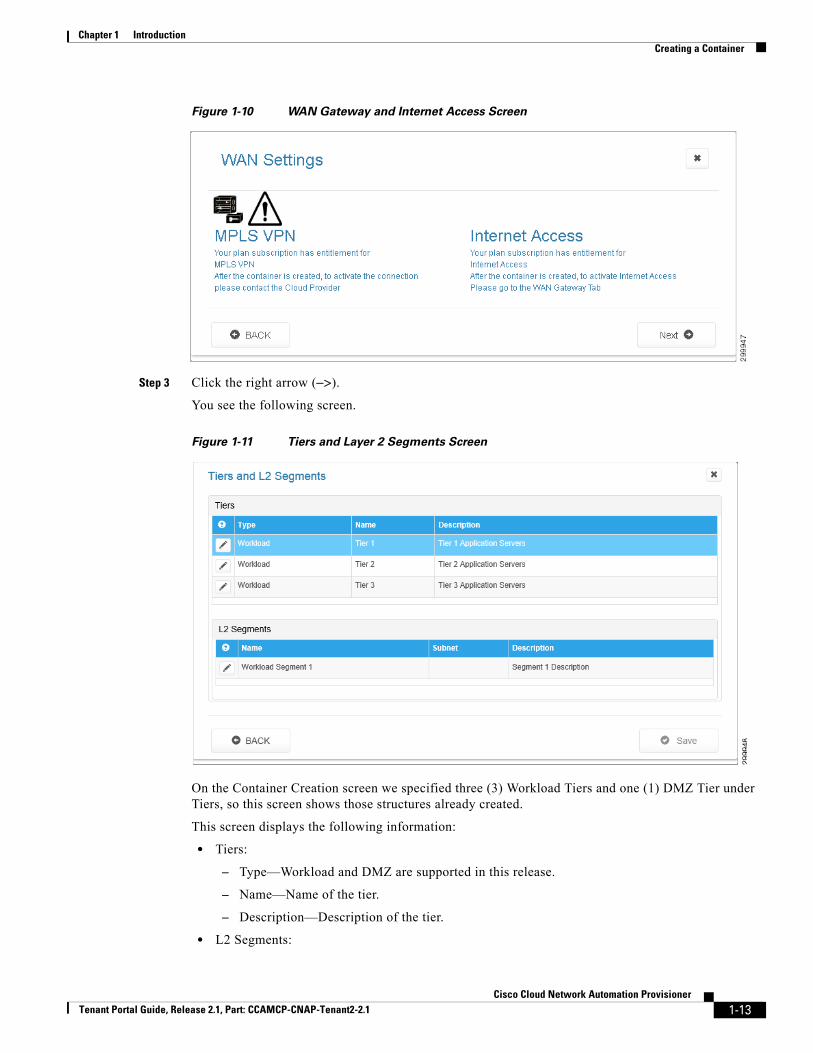
Figure 1-10 WAN Gateway and Internet Access Screen
Step 3 Click the right arrow ().
You see the following screen.
Figure 1-11 Tiers and Layer 2 Segments Screen
On the Container Creation screen we specified three (3) Workload Tiers and one (1) DMZ Tier under Tiers, so this screen shows those structures already created.
This screen displays the following information:
• Tiers:
– Type—Workload and DMZ are supported in this release.
– Subnet—Subnet the segment is in. The next step details the procedure for entering subnet information for a multi-CSR container.
– Description—Description of the segment.
Step 4 In a multi-CSR container, for each Tier, you need to enter the subnet information for the Tier segment. Click the Tier you want to update to highlight it, then click the pencil icon next to the corresponding segment under L2 Segments.
You see the following screen.
Figure 1-12 Change Segment Screen
Step 5 Enter the subnet information for the segment. You can use /24 to /29 masks for workload tier subnet IP addresses. When you are finished, click Update.
You return to the previous screen.
Step 6 Select each remaining Tier in turn and enter the subnet information for its segment. When you are finished, click Save.
Note In a multi-CSR container, you must select each region in turn from the drop-down menu on the Container Creation Screen shown in Figure 1-9 and update the subnet information for the tier segments in that region following the procedure above.
Step 7 When you are finished, click the check mark.
Step 8 Click Cisco Network.
The container you created should be available in the Containers: pull-down menu at the top of the screen, as shown in the following screen.