1 Dear SHARP customer Contents Thank you for your purchase of the SHARP LCD colour TV product. To ensure safety and many years of trouble-free operation of your product, please read the Important Safety Precautions carefully before using this product. OPERATION MANUAL Introduction Dear SHARP customer ................................................................................................................. 1 Contents......................................................................................................................................... 1 Precautions for daily use .............................................................................................................. 3 Important safety precautions....................................................................................................... 4 Trademarks.................................................................................................................................... 5 Accessories ................................................................................................................................... 6 Preparation Attaching the stand unit ............................................................................................................... 7 Handling and precautions with the wall-mounted TV ............................................................... 8 Part names..................................................................................................................................... 8 TV (Front) ......................................................................................................................... 8 TV (Rear) .......................................................................................................................... 9 Remote control unit ....................................................................................................... 10 The operation button ..................................................................................................... 11 Remote control pairing .................................................................................................. 11 Before turning on the power ...................................................................................................... 12 Connecting external devices ..................................................................................................... 13 Using digital audio output .......................................................................................................... 14 Inserting a SD/SDHC memory card (commercially available) ................................................ 14 Connecting a USB memory device............................................................................................ 14 Connecting to the Network ........................................................................................................ 14 Inserting the batteries ................................................................................................................ 15 Cautions regarding the remote control unit ................................................................... 15 Turning the TV on/off .................................................................................................................. 16 Running the TV for the first time .................................................................................... 16 Turning off the TV .......................................................................................................... 16 User Guide ................................................................................................................................... 16 Watching TV Watching TV................................................................................................................................ 17 MENU-MPX ................................................................................................................... 17 MENU-Audio Language ................................................................................................. 17 MENU-Subtitle Language .............................................................................................. 17 MENU-Back ................................................................................................................... 17 MENU-Info ..................................................................................................................... 17 MENU-EPG .................................................................................................................... 17 MENU-Program List ...................................................................................................... 17 MENU-Program Edit ...................................................................................................... 18 MENU-HDMI Select ....................................................................................................... 18 MENU-Settings .............................................................................................................. 18 General ......................................................................................................................................... 18 Skin Setting.................................................................................................................... 18 Booting state ................................................................................................................. 18 Language ....................................................................................................................... 18 Default input method ..................................................................................................... 18 Mouse ............................................................................................................................ 18 Quick start ..................................................................................................................... 18 No signal power off........................................................................................................ 18 Sleep timer ..................................................................................................................... 18
Transcript
1
Dear SHARP customer
Contents
Thank you for your purchase of the SHARP LCD colour TV product. To ensure safety and many years of trouble-free operation of your product, please read the Important Safety Precautions carefully before using this product.
OPERATION MANUAL
Introduction
Dear SHARP customer ................................................................................................................. 1Contents ......................................................................................................................................... 1Precautions for daily use .............................................................................................................. 3Important safety precautions ....................................................................................................... 4Trademarks .................................................................................................................................... 5Accessories ................................................................................................................................... 6
Preparation
Attaching the stand unit ............................................................................................................... 7Handling and precautions with the wall-mounted TV ............................................................... 8Part names ..................................................................................................................................... 8
TV (Front) ......................................................................................................................... 8TV (Rear) .......................................................................................................................... 9Remote control unit ....................................................................................................... 10The operation button ..................................................................................................... 11Remote control pairing .................................................................................................. 11
Before turning on the power ...................................................................................................... 12Connecting external devices ..................................................................................................... 13Using digital audio output .......................................................................................................... 14Inserting a SD/SDHC memory card (commercially available) ................................................ 14Connecting a USB memory device ............................................................................................ 14Connecting to the Network ........................................................................................................ 14Inserting the batteries ................................................................................................................ 15
Cautions regarding the remote control unit ................................................................... 15Turning the TV on/off .................................................................................................................. 16
Running the TV for the first time .................................................................................... 16Turning off the TV .......................................................................................................... 16
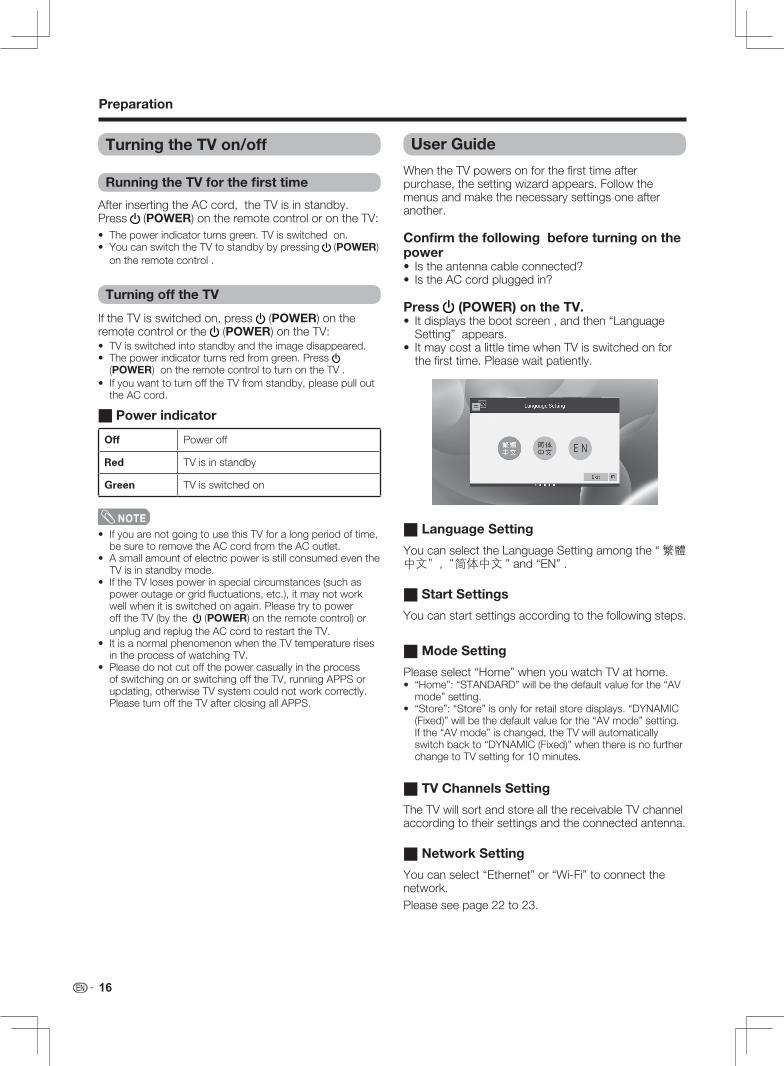
User Guide ................................................................................................................................... 16
Watching TV
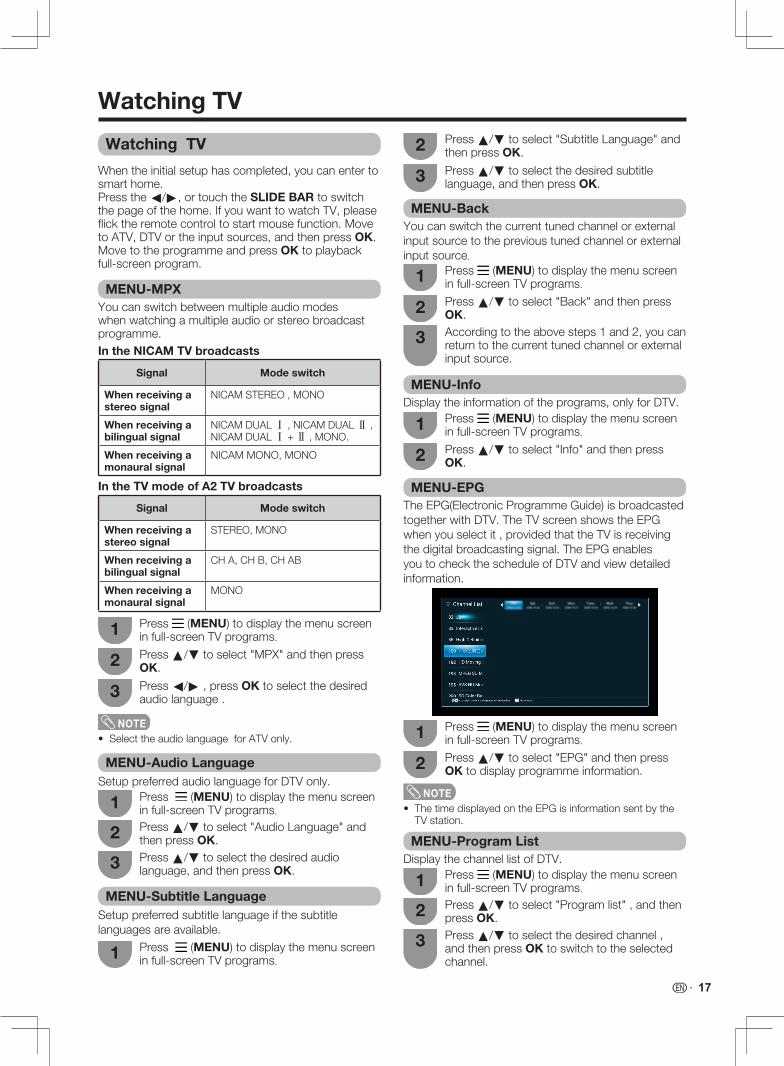
Watching TV ................................................................................................................................ 17MENU-MPX ................................................................................................................... 17MENU-Audio Language ................................................................................................. 17MENU-Subtitle Language .............................................................................................. 17MENU-Back ................................................................................................................... 17MENU-Info ..................................................................................................................... 17MENU-EPG .................................................................................................................... 17MENU-Program List ...................................................................................................... 17MENU-Program Edit ...................................................................................................... 18MENU-HDMI Select ....................................................................................................... 18MENU-Settings .............................................................................................................. 18
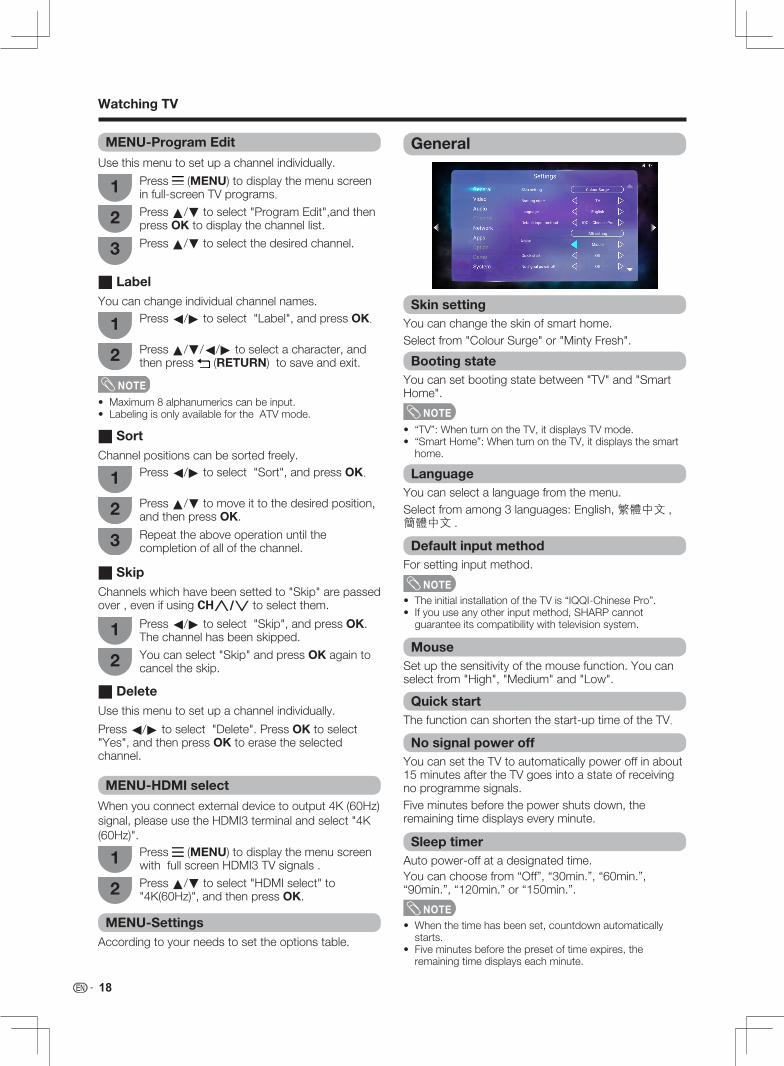
General ......................................................................................................................................... 18Skin Setting .................................................................................................................... 18Booting state ................................................................................................................. 18Language ....................................................................................................................... 18Default input method ..................................................................................................... 18Mouse ............................................................................................................................ 18Quick start ..................................................................................................................... 18No signal power off ........................................................................................................ 18Sleep timer ..................................................................................................................... 18
Smart home ................................................................................................................................. 24TV ...................................................................................................................................................24APP.................................................................................................................................................24
Text input.......................................................................................................................................24Browser..........................................................................................................................................24
Other useful features
Connecting a USB memory device ............................................................................................ 25Playing back files on a USB memory device..............................................................................25Buttons for USB media operation ............................................................................................. 26List of file formats compatible with USB mode.........................................................................27
Observe the following itemsMaintenance of the cabinet• When cleaning the cabinet, use a soft cloth (made of cotton, floss, etc.) to clean gently. Do not use a dry or damp rag mixed with chemicals, as this could cause the ingredients of the cabinet body to deteriorate or crack.• Becarefulnottouseanabrasiveclothforcleaningorcleanwithexcessiveforce,asthiscouldscratchthesurfaceofthecabinet.• Ifthecabinetisgreatlysoiled,cleanwithasoftcloth(madeofcotton,floss,etc.)soakedwithasmallamountofdilutedneutral
detergent and wrung out, and then clean with a soft dry cloth.• Becausethecabinetismadeofplastic,solventssuchasbenzene,alcoholorthinnercouldcauseittodeteriorate,ormakeitscoatingcomeoff.Thereforedonotusesuchsolventstocleanthecabinet.
• Becauseplasticizerisincludedintheplastics,deteriorationorthecoatingpeelingoffcouldoccurwhenthecabinetcomesintocontactwithsomesubstances.Thereforekeepitawayfromvolatilesubstancessuchasinsecticide.Inaddition,donotletitcomeinto contact with objects made of rubber, resin, etc. for a long time.
Maintenance of the LCD panel• BeforecleaningtheLCDpanel,besuretoturnofftheTVsetandunplugthepowercordfromtheoutlet.• WhencleaningtheLCDpanel,useadryandsoftcloth(madeofcotton,floss,etc.)tocleanthesurfaceoftheLCDpanelgently.ForprotectingtheLCDpanel,donotcleanwithadirtycloth,detergent,oradryordampragmixedwithchemicals,asthiscouldcausepeeling of the panel surface.
• Waterandmoisture—Donotusetheproduct near water, such as bathtub, washbasin, kitchen sink, laundry tub, swimming pool and in a wet basement.
• Donotplacevasesoranyotherwater-filledcontainers on this product. Do not place the productunderairconditioner,humidifierand so on. The water may spill onto the productcausingfireorelectricshock.
• Stand—Donotplacetheproductonan unstable cart, stand, tripod or table. Doing so can cause the product to fall, resulting in serious personal injuries as well as damage to the product. Use only a cart, stand, tripod, bracket or table recommended by the manufacturer or sold with the product. When mounting the product on a wall, be sure to follow the manufacturer’s instructions. Use only the mounting hardware recommended by the manufacturer.
• Whenrelocatingtheproductplacedonacart,itmustbemovedwithutmostcare.Suddenstops,excessiveforceandunevenfloor surface can cause the product to fall from the cart.
• Ventilation—Theventsandotheropeningsinthecabinetaredesignedforventilation.Donotcoverorblocktheseventsandopeningssinceinsufficientventilationcancauseoverheatingand/orshortenthelifeof the product. Do not place the product on a bed, sofa, rug or other similar surface, sincetheycanblockventilationopenings.Thisproductisnotdesignedforbuilt-ininstallation; do not place the product in an enclosed place such as a bookcase or rack,unlessproperventilationisprovidedor the manufacturer’s instructions are followed.
• TheLCDpanelusedinthisproductismadeof glass. Therefore, it can break when the product is struck forcefully or with a sharp object.IftheLCDpanelisbroken,becarefulnot to be injured by broken glass.
• Heatsources—Keeptheproductawayfrom heat sources such as radiators, heaters,stovesandotherheat-generatingproducts(includingamplifiers)
• Topreventfire,neverplaceanytypeofcandle or naked flames on the top or near theTVset.
• Donotplaceheavyobjectsonthisproduct or stand on it. Doing so could cause injury if the product overturns.Takespecialcarenearchildren and pets.
TheLCDpanelisaveryhightechnologyproductwith8,294,400pixels,givingyoufinepicturedetails.Duetotheverylargenumberofpixels,occasionallyafewnon-activepixelsmayappearonthescreenasafixedpoint of blue, green or red.Thisiswithinproductspecificationsanddoesnotconstitute a fault.
• Donotdisplayastillpictureforalongtime,asthiscouldcausean afterimage to remain.
• Incasetheproductisdroppedandthecabinet is damaged, be sure to turn off the power of the product, and unplug thepowercord.Ifyoucontinuetousetheproduct,itmaycausefireorelectricshock.
• Donotopentherearcoverofthecabinetto reconstruct the circuits. There exists high voltagewithinthecabinetanditmaycauseelectricshockandinjury.Ifmaintenanceisrequired, contact your dealer.
• UnplugthepowercordbeforeyoumovetheTVset.Ifnotunpluggedbeforehand,the power cord may become damaged and cause electric shock.
• Cleaning—UnplugtheACcordfromtheACoutletbeforecleaningtheproduct.Use a damp cloth to clean the product. Do not use alcohol cleaners, spray cleaners or chemical cloth when cleaning because these types of materials may damage the product.
5
Trademarks
• The terms HDMI and HDMI High-Definition Multimedia Interface, and the HDMI Logo are trademarks or registeredtrademarks of HDMI Licensing LLC in the United States and other countries.
• Theoperationmanualhasbeencollatedandcheckedstrictly.Duetofactorssuchassoftwareupgrading,SHARPcannotguarantee that the actual operation keeps pace with the manual description.
accessible via this device belong to and may be proprietary to third parties. Therefore, any use of such third partycontent and services must be in accordance with any authorization or terms of use provided by such content or service provider. SHARP shall not be liable to you or any third party for your failure to abide by such authorization or terms of use.Unlessotherwisespecificallyauthorizedbytheapplicablecontentorserviceprovider,allthirdpartycontentandservicesprovidedare forpersonalandnon-commercialuse;youmaynotmodify,copy,distribute, transmit,display,perform,reproduce,upload,publish,license,createderivativeworksfrom,transferorsellinanymannerormediumanycontent or services available via this device.
• SHARPisnotresponsible,norliable,forcustomerservice-relatedissuesrelatedtothethirdpartycontentorservices.Any questions, comments or service-related inquiries relating to the third party content or service should be madedirectly to the applicable content or service provider.
• All third party content or services accessible via this device is provided to you on an “as-is” and “as available”basisandSHARPanditsaffiliatesmakenowarrantyorrepresentationofanykindtoyou,eitherexpressor implied,including,withoutlimitation,anywarrantiesofmerchantability,non-infringement,fitnessforaparticularpurposeoranywarrantiesofsuitability,availability,accuracy,completeness,security,title,usefulness,lackofnegligenceorerror-freeor uninterrupted operation or use of the content or services provided to you or that the content or services will meet your requirementsorexpectations.
• SHARP isnotanagentofandassumesno responsibility for theactsoromissionsof thirdpartycontentorserviceproviders,noranyaspectofthecontentorservicerelatedtosuchthirdpartyproviders.
• InnoeventwillSHARPand/oritsaffiliatesbeliabletoyouoranythirdpartyforanydirect,indirect,special,incidental,punitive,consequentialorotherdamages,whetherthetheoryofliabilityisbasedoncontract,tort,negligence,breachofwarranty,strictliabilityorotherwiseandwhetherornotSHARPand/oritsaffiliateshavebeenadvisedofthepossibilityof such damages.
• MPEG Layer-3 audio coding technology licensed from Fraunhofer IIS and Thomson.
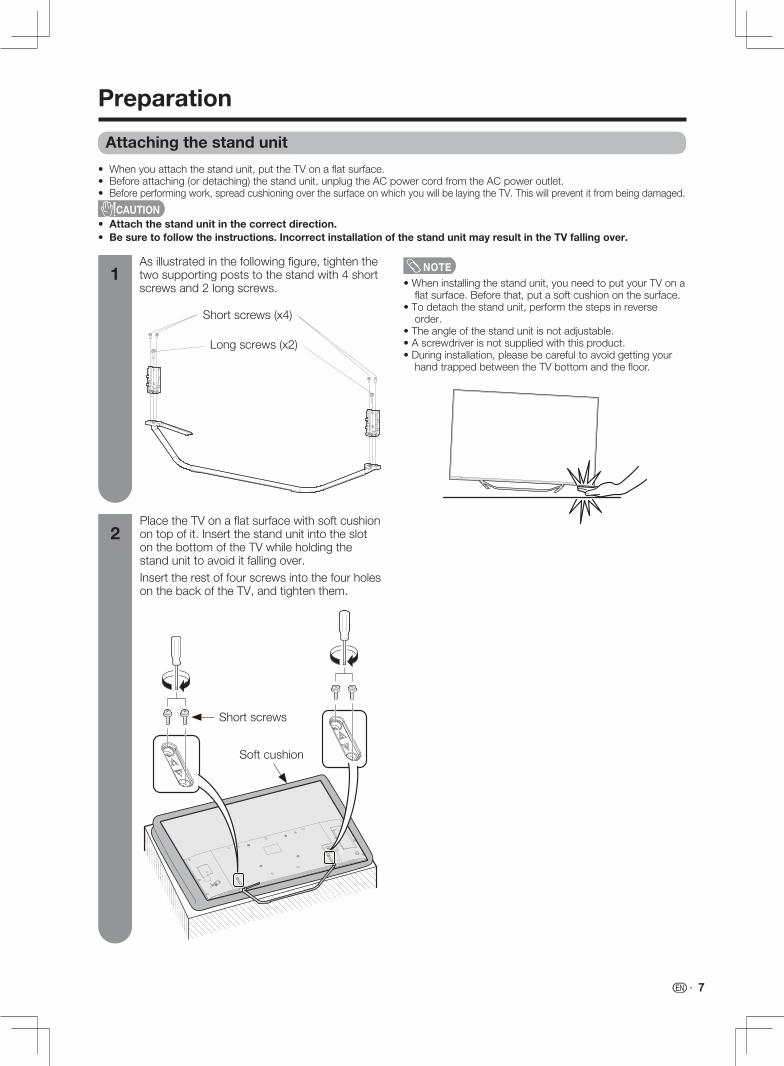
CAUTION • Attach the stand unit in the correct direction.• Be sure to follow the instructions. Incorrect installation of the stand unit may result in the TV falling over.
Attaching the stand unit
NOTE •Wheninstallingthestandunit,youneedtoputyourTVonaflatsurface.Beforethat,putasoft cushion on the surface.
PlacetheTVonaflatsurfacewithsoftcushionontopofit.InsertthestandunitintotheslotonthebottomoftheTVwhileholdingthestandunittoavoiditfallingover.InserttherestoffourscrewsintothefourholesonthebackoftheTV, and tighten them.
Asillustratedinthefollowingfigure, tighten the two supporting posts to the stand with 4 short screws and 2 long screws.
• This TV should be mounted on a wall only with a wall mount bracket recommended by SHARP. The use of other wall mount brackets may result in an unstable installation and may cause serious injuries.
• Installing the TV requires special skills that should only be performed by qualified service personnel. Customers should not attempt to do the work themselves. SHARP bears no responsibility for improper mounting or mounting that results in accident or injury.
Using a SHARP recommended bracket to mount the TV• YoucanaskaqualifiedserviceprofessionalaboutusingaSHARPrecommendedbrackettomounttheTVtothewall.• Carefullyreadtheinstructionsthatcomewiththebracketbeforebeginningwork.
Preparation
Power indicator
9
Preparation
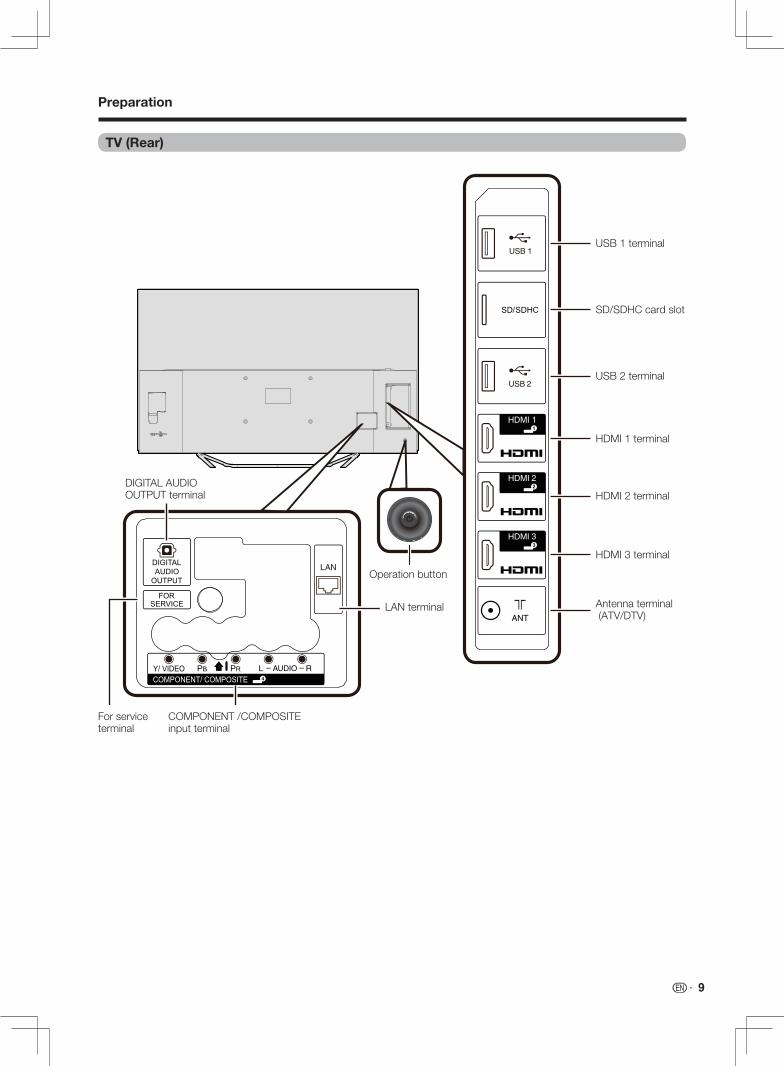
TV (Rear)
Antenna terminal(ATV/DTV)
HDMI1terminal
USB2terminal
USB1terminal
SD/SDHCcardslot
COMPONENT/COMPOSITEinput terminal
LANterminal
HDMI2terminal
HDMI3terminal
DIGITALAUDIOOUTPUT terminal
Forserviceterminal
Operation button
10
Preparation
Remote control unit
1 (POWER (Standby/On)) Toswitchthepoweronandoff.(Seepage16.)2 (HOME) Display the smart home. 3 SLIDE BAR Touch the slide bar to switch the page of the
home. 4 a/b/c/d (Cursor) Selectadesireditemonthesettingscreen.5 OK Executeacommand.6 VOLk/l Setthevolume.7 INDICATOR The indicator of the remote control. 8 (MENU) Display the menu list.9 (RETURN) Returntothepreviousmenuscreen.10 CHr/s TVinputmode:Selectthechannel.11 (BROWSER) Startbrowser.
11
8
10
7
9
1
5
6
2
4
3
NOTE •Ifpressthe ( POWER )oftheTV,pleasepressany
button on the remote control (except the power button) to wake up the remote control.
The indicator of the remote control
Indicator Performance Instructions state Description
BlueRapid flash Remind Startthepairing.
For3seconds Remind PairingisOK.
Red
Slow flash for 3seconds Warning Lowbattery,theremotecontrolcanstillbeused.
w The mouse function of the remote controlWiththebuilt-ingyroscopesensor,setuptheTVthrough motion sensing of the remote control . Withthemousefunction,youcanmovethecursorof the screen to selected item and press OK to enter when browsering the smart home.
YoucanalsosetuptheTVthroughtheoperationbuttonattheTVback.(Thepositionoftheoperationbutton, please see page 9)
Theremotecontrolunithasbeenpre-pairedwiththeTVsetinfactorysoyoucanusetheremotecontrolunitdirectly.Iftheremotecontrolfailstooperateora new remote control unit is used, please follow the following steps to pair the remote control unit and the TV.•Whentheremotecontrolisindormancy,flicktheremote
control to restart it.
The operation button
Remote control pairing
Action Description
Short press TurnontheTV.
Left/Right Setthevolumereduction/add.
Up/Down Setthechannelup/down.
Long press Display the menu( Pair , Power off )when theTVisswitchedon.
Press the " "buttonontheTVforafewseconds, "Pairing "and "Power off" menu will be displayed.
1
Point the remote control unit towards the bottomleftcornerofTV(within20cm),press"OK" and " " at the same time until red and blue lights stop flashing alternately .
Press "OK" on the remote control unit to completetheBluetoothpairing.
Notes on installing the TV• AvoiddirectsunlightandplacetheTVinawell-ventilatedlocation.• PlacetheTVinalevellocation.• DonotturnonthepoweroftheTVbeforeconnectingtheACcord.• IfthereareanyprotectiveplasticsheetsontheTVcabinet,pleasetakethemoffbeforeconnecting.
Connecting the antenna cableTo enjoy a clearer picture, use an outdoor antenna. The following is a brief explanation of the types of connections that are used for coaxial cable.
YoucanconnectmanytypesofexternalequipmenttoyourTV,likeaVCR,DigitalTVSetTopBox(STB),gameconsole,camcorder,DVDplayerandPC.Toviewexternalsourceimages,press (HOME) to the smart home interface,touchtheslidebartoswitchtotheTV,selecttheinputsourceandthenpressOK.
w When using component cable* (commercially available)
w When using AV cable* (commercially available)
w When using HDMI cable (commercially available)
Digital TV STB/VCR/Game console/Camcorder/DVD Player/PC
Digital TV STB/VCR/Game console/Camcorder/DVD Player
Digital TV STB/VCR/Game console/Camcorder/DVD Player
leakage in old batteries.• Removebatteriesassoonastheyhavewornout.Chemicalsthatleakfrombatteriescancausearash.Ifyoufindany
chemical leakage, wipe thoroughly with a cloth.• Thebatteriessuppliedwiththisproductmayhaveashorterlifeexpectancyduetostorageconditions.• Ifyouwillnotbeusingtheremotecontrolunitforanextendedperiodoftime,removethebatteriesfromit.• Batteriesshallnotbeexposedtoexcessiveheatsuchassunshine,fireorthelike.
1 Openthebatterycover.
Place batteries with their terminals corresponding to the (e) and (f) indications in the battery compartment.
Closethebatterycoverfromtoptobottom.
Figure1:Holdthefrontpartoftheremote control with one hand, pull the handle tope with another hand.
an area with high humidity.• Donotinstallorplacetheremotecontrolunitunderdirectsunlight.
The heat may cause deformation of the unit.•Mousefunctionandotheroperationswillconsumetheelectricpowerspeedily.Soifyoudomoresuchoperations,youmightneedtoreplacethe battery regularly.
• IftheTVlosespowerinspecialcircumstances(suchaspower outage or grid fluctuations, etc.), it may not work well when it is switched on again. Please try to power offtheTV(bythe (POWER) on the remote control) or unplugandreplugtheACcordtorestarttheTV.
When the initial setup has completed, you can enter to smart home.Press the c/d, or touch the SLIDE BAR to switch thepageofthehome.IfyouwanttowatchTV,pleaseflicktheremotecontroltostartmousefunction.MovetoATV,DTVortheinputsources,andthenpressOK. MovetotheprogrammeandpressOK to playback full-screenprogram.
Watching TV
Signal Mode switch
When receiving a stereo signal
NICAMSTEREO,MONO
When receiving a bilingual signal
NICAMDUALⅠ ,NICAMDUALⅡ , NICAMDUALⅠ + Ⅱ ,MONO.
When receiving a monaural signal
NICAMMONO,MONO
You can switch between multiple audio modes when watching a multiple audio or stereo broadcast programme.In the NICAM TV broadcasts
SetuppreferredaudiolanguageforDTVonly.
In the TV mode of A2 TV broadcasts
Signal Mode switch
When receiving a stereo signal
STEREO,MONO
When receiving a bilingual signal
CHA,CHB,CHAB
When receiving a monaural signal
MONO
MENU-MPX
MENU-Audio Language
Press (MENU) to display the menu screen infull-screenTVprograms.
Press (MENU) to display the menu screen infull-screenTVprograms.
Press (MENU) to display the menu screen infull-screenTVprograms.
1
1
1
Press c/d , press OK to select the desired audio language .
Press a/b to select the desired subtitle language, and then press OK.
Press a/b to select the desired audio language, and then press OK.
3
3
3
2
2
2
Press a/b to select "MPX" and then press OK.
Press a/btoselect"SubtitleLanguage"andthen press OK.
Youcanselectdifferentpicturesizesthataccountforthe kind of each picture.
You can adjust the picture to your preference.
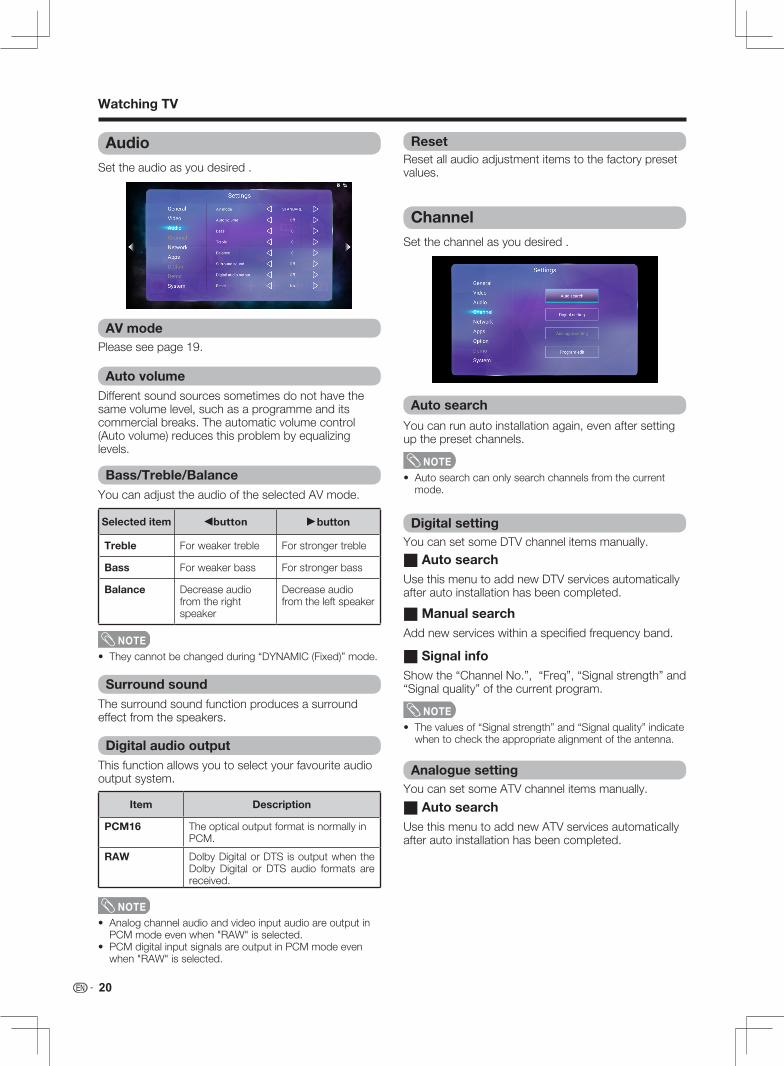
Setthevideoasyoudesired.
Selected item Description
Normal For4:3standardpictures.Asidebarappearson each side.
Zoom 14:9 For14:9letterboxpictures.Athinsidebarappears on each side, and you may also see bars on the top and bottom with some programmes.
Panorama Inthismodethepictureisprogressivelystretched toward each side of the screen.
Full For16:9squeezepictures.
Cinema 16:9 For16:9letterboxpictures.Barsmayappearon the top and bottom with some programmes.
Cinema 14:9 For14:9letterboxpictures.Barsmayappearon the top and bottom with some programmes.
Dot by Dot Display an image with the same number of pixelsonthescreen(onlywhenreceiving2160psignal).
Underscan Display with an underscan image only when receivinga720p/1080i/1080psignal.DisplaywiththeHigh-Definitionimageadjustedoptimally.Noisemayappearontheedgeofthescreen with some programmes.
Alliance®)• AwirelessLANconnectionandperformancecannotbeguaranteedforallresidentialenvironments.Inthefollowingcases,thewirelessLANsignalmaybepoorordrop,ortheconnection speed may become slower.– Whenusedinbuildingsmadewithconcrete,reinforced
steel,ormetal.– When placed near objects that obstruct the signal.–Whenusedwithotherwirelessdevicesthatemitthe
same frequency.– Whenusedinthevicinityofmicrowaveovensandotherdevicesthatemitamagneticfield,electrostaticcharge,orelectromagnetic interference.
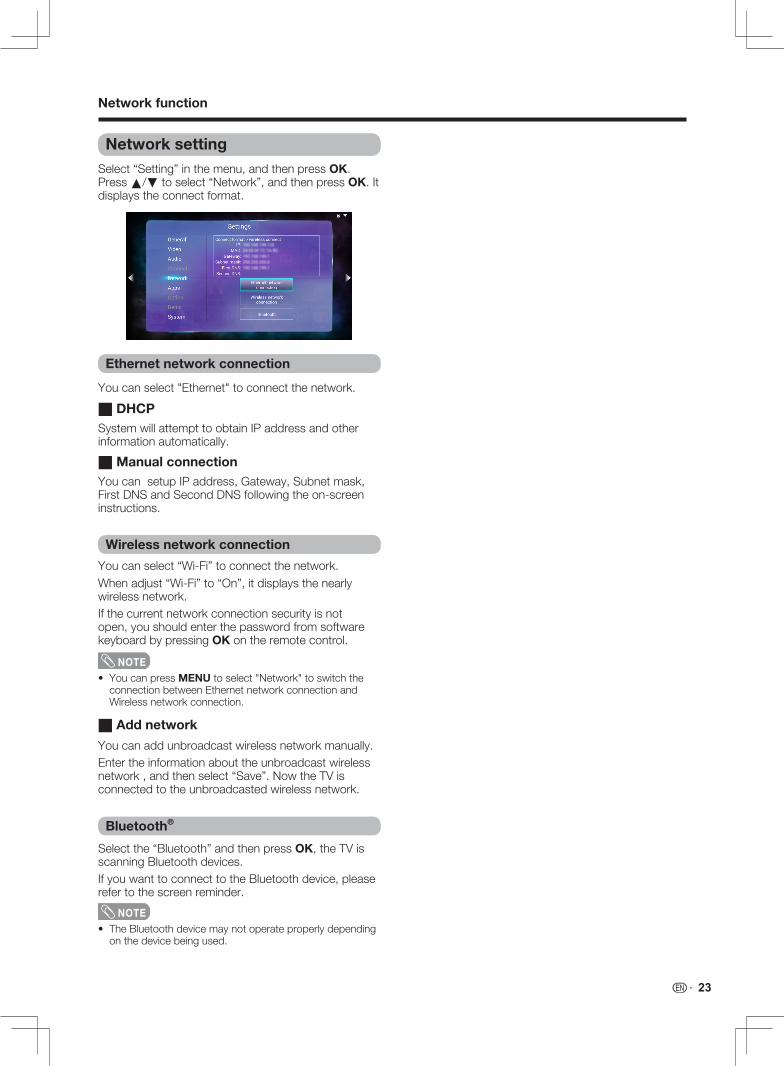
You can add unbroadcast wireless network manually.Entertheinformationabouttheunbroadcastwirelessnetwork,andthenselect“Save”.NowtheTVisconnected to the unbroadcasted wireless network.
Selectthe“Bluetooth”andthenpressOK,theTVisscanningBluetoothdevices.IfyouwanttoconnecttotheBluetoothdevice,pleaserefer to the screen reminder.
Whenadjust“Wi-Fi”to“On”,itdisplaysthenearlywireless network.Ifthecurrentnetworkconnectionsecurityisnotopen, you should enter the password from software keyboard by pressing OK on the remote control.
InAPPscreen,youcanexperiencethesuppliedapplicationsprovidedwiththeTV,alsoyoucandownload more apps from the app store.
Selectaninputsource(ATV,DTV,HDMI1,HDMI2,HDMI3,COMPONENT,AV),andthenpressOK on the remote control.
Select“Settings”andpressOK in the APP screen.
Press a/b to select "Apps", and then press OK. Press a/b to select the items you want, and then press OK.
1
2
APP
Smart home
TV
w Install applications from unknown sources
w My Apps
w Default installation location
Fromhere,youcansetupwhetherapplicationsareallowed to install from unknown sources.
Itwilldisplayapplicationslistthathavebeeninstalled.Operationssuchas“Forcestop”,“Uninstall”,“Clearcache”or“MovetoSDcard/Movetointernal”canbeused to an application.
Itprovidesvirtualkeyboardinputmode.Intheprocess,youcanchoosecharacterbymovingcursor,andpressOK to complete character input. At the same time, you canchangetheinputmodefromvirtualkeyboard.
ThevirtualkeyboardappearswhenyoupressOK to input text.
InAppscreen,select"Browser"andpressOK, or press (BROWSER) on the remote control to start browsing internet.
CAUTION • Do not use the USB extension cable, otherwise it may
cause the TV does not work properly.• Please insert the USB device after the TV is powered
on properly.
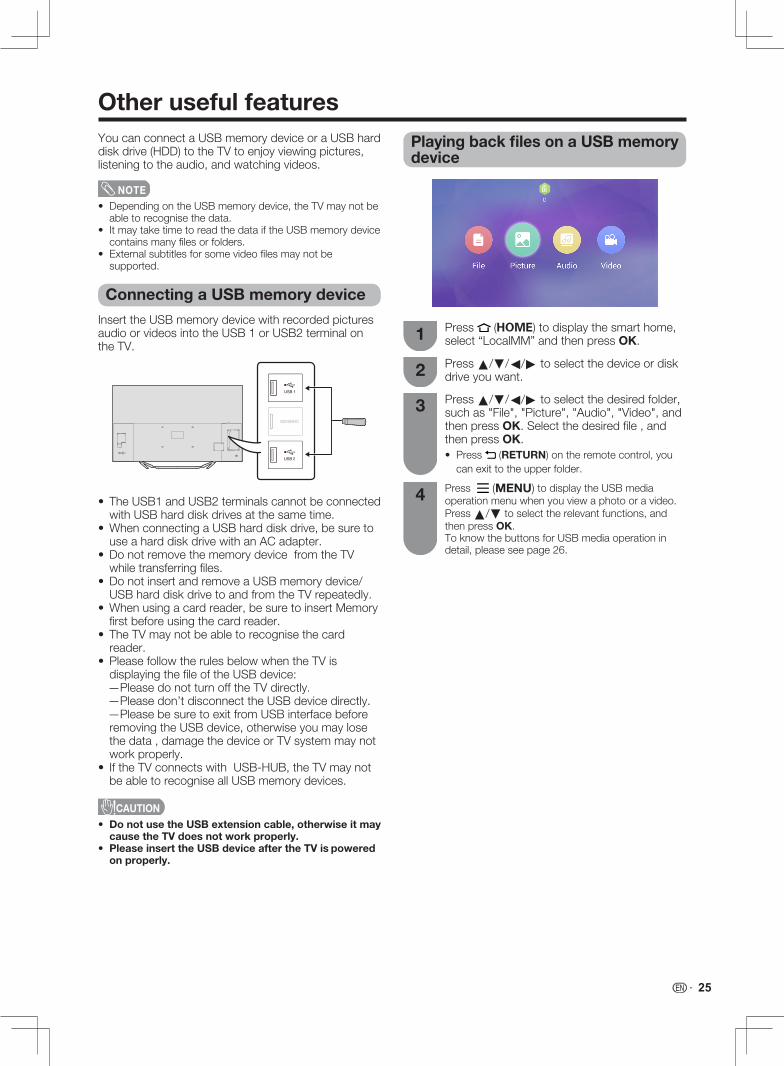
Press (HOME) to display the smart home, select“LocalMM”andthenpressOK. 1
Press a/b/c/d to select the desired folder, suchas"File","Picture","Audio","Video",andthen press OK.Selectthedesiredfile,andthen press OK.• Press (RETURN) on the remote control, you
can exit to the upper folder.
Press (MENU)todisplaytheUSBmediaoperationmenuwhenyouviewaphotooravideo.Press a/btoselecttherelevantfunctions,andthen press OK. ToknowthebuttonsforUSBmediaoperationindetail,pleaseseepage26.
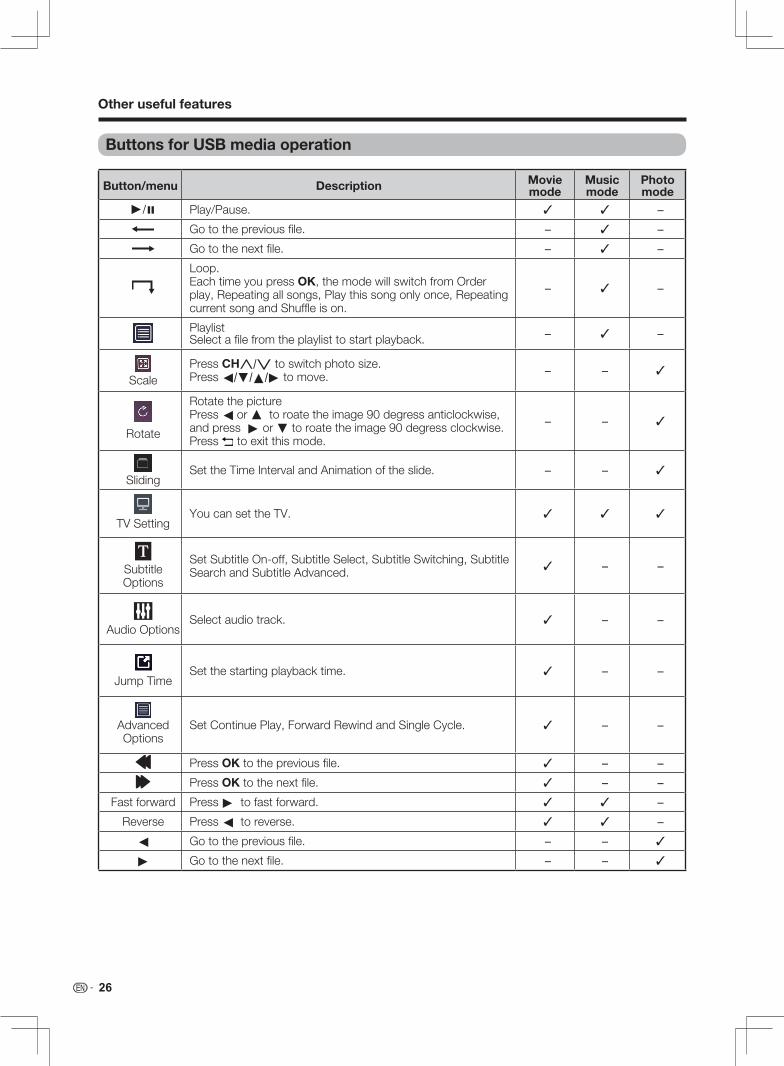
Rotate the picturePress c or a to roate the image 90 degress anticlockwise, and press d or b to roate the image 90 degress clockwise.Press to exit this mode.
PCMAC3WMA,WMA ProMP3AAC,supportMPEG2AAC(AAC-LC)&MPEG4AAC-LCHE-AAC,supportMPEG4HE-AACv2MPEGAudio,supportMPEG1Layer1/2Dolby Digital PlusDolby Digital DTS
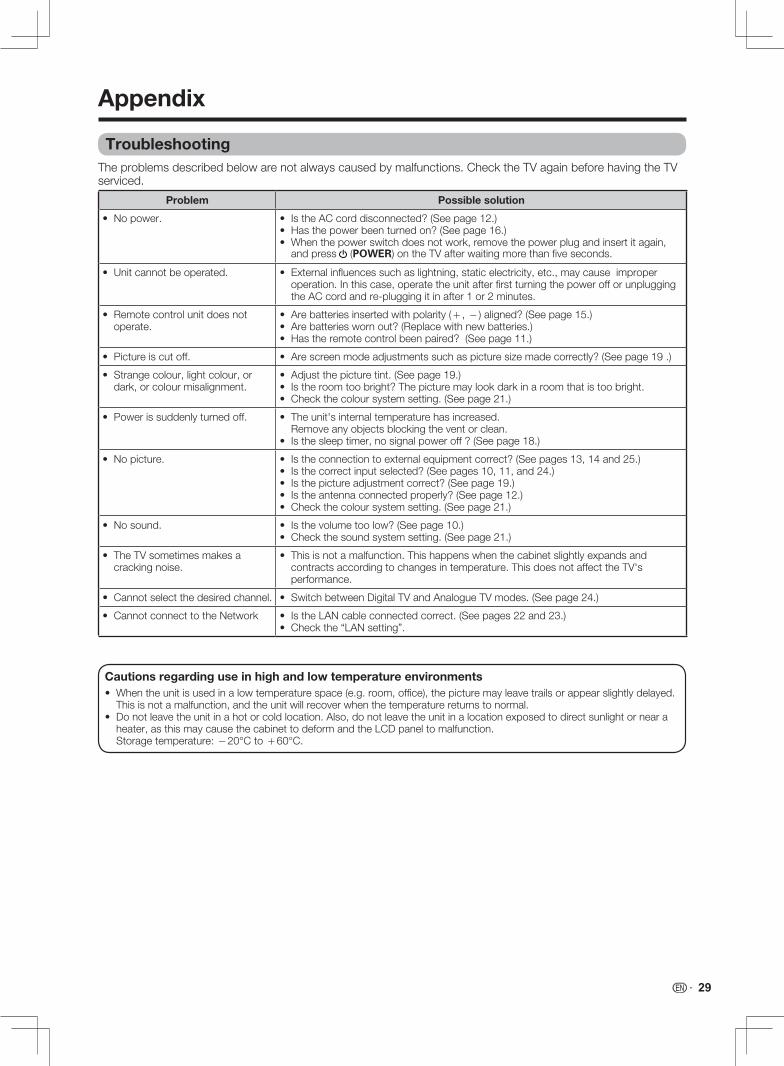
Cautions regarding use in high and low temperature environments• Whentheunitisusedinalowtemperaturespace(e.g.room,office),thepicturemayleavetrailsorappearslightlydelayed.Thisisnotamalfunction,andtheunitwillrecoverwhenthetemperaturereturnstonormal.